

Petsafe Passport PPA00-13795, Passport PPA00-13796 Installation And Operating Manual

Installation and Operating Guide
Please read this entire guide before installation.
Model Numbers: PPA00-13795 and PPA00-13796
2 Customer Care Center 1-800-732-2677
Important Safety Information
Explanation of Attention Words and Symbols used in this guide
This is the safety alert symbol. It is used to alert you to potential personal injury hazards.
Obey all safety messages that follow this symbol to avoid possible injury or death.
WARNING indicates a hazardous situation which, if not avoided, could result in
death or serious injury.
CAUTION, used with the safety alert symbol, indicates a hazardous situation
which, if not avoided, could result in minor or moderate injury.
CAUTION, used without the safety alert symbol, indicates a hazardous situation which, if not avoided
could result in harm to your pet.
NOTICE is used to address practices not related to personal injury.
• When children are present in the home, it is important to consider the pet door during child proofing
activities. The pet door may be misused by a child resulting in the child accessing potential hazards that
may be on the other side of the pet door. Purchasers/Homeowners with swimming pools should ensure
that the pet door is monitored at all times and that the swimming pool has adequate barriers to entry. If a
new hazard is created inside or outside of your home, which may be accessed through the pet door, Radio
Systems
®
Corporation recommends that you properly guard access to the hazard or remove the pet door.
The closing panel or lock, if applicable, is provided for aesthetic and energy efficiency purposes and is not
intended as a security device. Radio Systems
®
Corporation will not be liable for unintended use, and the
purchaser of this product accepts full responsibility for oversight of the opening it creates.
• Power Tools. Risk of severe injury; follow all safety instructions for your power tools. Be sure to always wear
your safety goggles and other proper safety equipment.
• Ensure the power adapter is used only on a standard 120 Volt AC circuit outlet.
• Do not unplug by pulling on cord. To unplug, grasp the power adapter plug housing, not the cord.
• Inspect the power cord before and periodically during use. Discontinue use if damage or deterioration
occur, such as blistering, cracking, chewing or deformation. Continued use may result in injury or property
damage.
• To avoid tripping, always position the power cord out of the path of foot traffic.
• The user, prior to installation, must become familiar with all building codes that may affect the installation of
the pet door and determine, along with a licensed contractor, its suitability in a given installation. This pet
door is not a fire door. It is important for the owner and contractor to consider any risks that may be present
inside or outside of the pet door, any risks that may be created by subsequent changes to your property
and, how they may relate to the existence and use, including misuse of the pet door.
• If cutting metal surface, be aware of sharp edges to prevent injury.
• During pet training while pet door is in Open Mode, make sure to GENTLY lower flap onto pet’s back. Also
avoid possible injury by making sure your pet is entirely through the pet door opening, including paws and
tail, before completely releasing flap.
• Do not allow your pet to chew on the power cord.

www.petsafe.net 3
• Read this entire guide prior to cutting or modifying an opening in your door or wall. Do not proceed with
cut-out or installation until your Passport
™
is assembled, powered up, programmed for your pet and all steps
under “Prepare, Setup and Test” have been completed.
• Keep these instructions with important papers; be sure to transfer these instructions to the new owner of the
property.
• Unauthorized changes or modifications may void the user’s authority to operate this equipment, and void
the warranty.
• We do not accept any responsibility for openings that are cut or modified in doors or walls or any damage
caused to doors or walls in forming or modification of such openings, including any costs associated with
the repair or replacement.
• The unit only operates properly while outside temperatures are greater than -5°F (-20.5° C) and less than
131° F (55° C). If operating from the optional rechargeable lithium-ion battery, the battery and battery
compartment cannot be exposed to temperatures below 32° F (0° C).
• Do not install in a location where the Passport
™
interior frame, including the LCD screen and battery
compartment, and the power adapter are exposed to damp or wet conditions or to water or outside
elements, such as rain or snow.
• Only use designated power adapter with the product.
• Do not use power adapter in temperatures below 32° F (0° C) or above 104° F (40° C). Power adapter
for inside use only.
• If homeowner’s door or other application is not level, the pet door must be installed level to swing properly.
• When applying the cutting template, there should be a minimum of 3” between the bottom and sides of the
door and the outer edge of the template to maintain the structural integrity of the door.
• Make sure there is nothing underneath the door where you will be drilling holes or cutting out the opening.
• Use a manual screwdriver to tighten screws. Do not over-tighten. Over-tightening can strip the screws or
warp the pet door frame.

4 Customer Care Center 1-800-732-2677
Thank you for choosing the PetSafe® brand. You and your pet deserve a companionship that includes memorable moments and a shared
understanding together. Our products and training tools promote a lifestyle of protection, teaching, and love—essentials that influence memories for
a lifetime. If you have any questions about our products or training your pet, please visit our website at www.petsafe.net or contact our Customer
Care Center at 1-800-732-2677.
PRODUCT WARRANTY
To get the most protection out of your warranty, please register your product within 30 days at www.petsafe.net. By registering and keeping
your receipt, you will enjoy the product’s full warranty, and should you ever need to call the Customer Care Center, we will be able to help you
faster. Most importantly, PetSafe
®
will never give or sell your valuable information to anyone. Complete warranty information is available online at
www.petsafe.net.
Table of Contents
GETTING STARTED
.................................................................................................................................................................................................................................6
Components ..................................................................................................................................................................................................................................................................6
How the Passport Pet Access Smart System
™
Works .................................................................................................................................................................................................6
Passport Key™ ................................................................................................................................................................................................................................................................6
Features, Controls and Indicators ...............................................................................................................................................................................................................................7
Key Definitions ..............................................................................................................................................................................................................................................................7
Icon Definitions .............................................................................................................................................................................................................................................................9
Connecting Passport™ to Computer .............................................................................................................................................................................................................................9
Wireless Connection .................................................................................................................................................................................................................................................10
Battery Operation ......................................................................................................................................................................................................................................................10
Prepare, Setup and Test
...............................................................................................................................................................................................................................10
Install Clock Battery and Power Adapter .......................................................................................................................................................................................................10
Understanding Motion Sensors ...................................................................................................................................................................................................................... 11
Check for Radio-Frequency Interference ....................................................................................................................................................................................................... 11
Select Installation Location .............................................................................................................................................................................................................................. 11
Initial User Setup .............................................................................................................................................................................................................................................. 11
Program Pet ......................................................................................................................................................................................................................................................12
Test Passport Key
™
............................................................................................................................................................................................................................................13
Understanding Read-Range ............................................................................................................................................................................................................................13
Prepare Passport Key
™
......................................................................................................................................................................................................................................13
INSTALLATION
.........................................................................................................................................................................................................................................14
Checklist Before Installation ......................................................................................................................................................................................................................................14
Professional Installation Help ....................................................................................................................................................................................................................................14
Tools Needed .............................................................................................................................................................................................................................................................14
Installation in a Non-Glass Door ....................................................................................................................................................................................................................14
Train Pet .......................................................................................................................................................................................................................................................................17
Installation in a Wall ...........................................................................................................................................................................................................................................18
PROGRAMMING PASSPORT
™
...............................................................................................................................................................................................18
Main Menu ..............................................................................................................................................................................................................................................................18

www.petsafe.net 5
Door Settings ......................................................................................................................................................................................................................................................... 18
Door Operational Modes ................................................................................................................................................................................................................................19
Lock Keypad ......................................................................................................................................................................................................................................................19
Volume Control .................................................................................................................................................................................................................................................19
Date and Time ...................................................................................................................................................................................................................................................19
Low Battery Mode ........................................................................................................................................................................................................................................... 20
Language .......................................................................................................................................................................................................................................................... 20
Pet Settings ............................................................................................................................................................................................................................................................ 20
Master Access .................................................................................................................................................................................................................................................. 20
Master Access Modes ....................................................................................................................................................................................................................................... 21
Timer Mode (Master Access) ..........................................................................................................................................................................................................................21
Re-latch Time (Master Access) ........................................................................................................................................................................................................................ 22
In-Tone & Out-Tone (Master Access) .............................................................................................................................................................................................................. 22
Add Pet .............................................................................................................................................................................................................................................................. 23
Individual Pet Settings .............................................................................................................................................................................................................................. 23
Pet Access Mode (Individual Pet) ................................................................................................................................................................................................................... 24
Timer Mode (Individual Pet) ........................................................................................................................................................................................................................... 24
Re-latch Time (Individual Pet) .......................................................................................................................................................................................................................... 25
In-Tone and Out-Tone (Individual Pet) ............................................................................................................................................................................................................ 25
Rename Pet ....................................................................................................................................................................................................................................................... 26
Relearn Pet ........................................................................................................................................................................................................................................................ 26
Remove Pet ....................................................................................................................................................................................................................................................... 26
Pet Tracking ................................................................................................................................................................................................................................................................ 26
Indicator Light .............................................................................................................................................................................................................................................................27
Firmware Updates ......................................................................................................................................................................................................................................................27
ASSISTANCE
................................................................................................................................................................................................................................................27
About ..........................................................................................................................................................................................................................................................................27
Serial Number ............................................................................................................................................................................................................................................................27
Troubleshooting ......................................................................................................................................................................................................................................................... 28
Reset Button ............................................................................................................................................................................................................................................................... 29
Replacement Parts and Accessories ........................................................................................................................................................................................................................ 29
Customer Care International .................................................................................................................................................................................................................................... 29
TERMS & HANDLING
...................................................................................................................................................................................................................... 30
Terms of Use and Limitation of Liability .................................................................................................................................................................................................................... 30
Perchlorate Battery .................................................................................................................................................................................................................................................... 30
Important Recycling Advice ...................................................................................................................................................................................................................................... 30
Battery Disposal ......................................................................................................................................................................................................................................................... 30
Compliance ............................................................................................................................................................................................................................................................... 30
Warranty .....................................................................................................................................................................................................................................................................31

6 Customer Care Center 1-800-732-2677
GETTING STARTED
GETTING STARTED
Components
How the Passport Pet Access Smart System
™
Works
Using radio frequency identification (RFID) technology, the Passport Pet Access Smart System™ reads the Passport Key™ worn on your pet’s collar.
When your pet approaches the Passport
™
, the system reads the unique ID of your pet’s Passport Key™ and if that number is programmed, the pet door
will unlock allowing your pet to enter or exit. If a pet or animal is not programmed to the system, the pet door will remain locked. This allows access
to only your programmed pet(s) while helping keep out other pets, wild animals, pests and strays. Offering advanced selective entry and exit by
pet, multiple access options (such as in-only access and out-only access) and the option to only allow access at specific times of day, the Passport
™
gives you complete control of each pet’s access. You can set access by pet or easily set the same access setting for all pets with the Master Access
option. Pet Tracking shows your pet’s current location and the last 4 times your pet used the pet door, allowing you to monitor your pet’s access.
Programming is easy using the LCD screen and 5-Star Navigation or by connecting to your computer with included USB cable. A wireless connection
allows for remote programming from any smart device, providing ultimate convenience for today’s busy pet owners (requires Passport
™
Wireless
Card, sold separately). The Passport
™
is programmable for up to 20 pets.
Passport Key
™
Worn on your pet’s collar, the Passport Key™ uses Radio Frequency Identification (RFID) technology by using a unique code to signal the Passport™
to operate as programmed for your pet. The Passport Key
™
does not require a battery to operate. One Passport Key™ is included which is NOT
pre-programmed to operate with your Passport
™
. Follow all steps under “Prepare, Setup and Test”, including “Test Passport Key™”page 13, before
starting installation. The Passport Pet Access Smart System
™
can be programmed for up to 20 pets. Additional Passport Key™ accessories are sold
separately (see “Replacement Parts and Accessories” page 29).
Installaton and
Operating Guide
Interior Frame
with Flap
3-V Lithium Battery
for door Clock
(CR2032)
Exterior Frame
USB Cable
Power Adapter
Passport Key
™
Key Ring
2 pcs.
Finishing Plugs
11 pcs.
3
15
/16" (100mm)
Screws 6 pcs.
3
7
/16" (88mm)
Screws 6 pcs.
Cutting Template
C
e
n
t
e
r
L
i
n
e
Cut
ti
ng Templ
ate
NOTI
CE:
W
hen
appl
yi
ng
cut
t
i
ng
t
empl
at
e
t
her
e
s
houl
d
b
e
a
mi
ni
mum
of
3
”
b
et
wee
n
t
he
bot
t
om
a
nd
s
i
d
es
of
t
h
e
do
or
and
t
he
ou
t
er
ed
ge
of
t
he
t
empl
a
t
e
t
o
mai
nt
ai
n
t
he
st
r
uct
ur
a
l
i
n
t
egr
i
t
y
of
t
h
e
d
oor
.
Ra
d
i
o
Sy
s
t
e
ms
®
Co
r
p
o
r
a
t
i
o
n
•
1
0
4
2
7
P
e
t
S
a
f
e
Wa
y
,
K
n
o
x
v
i
l
le
,
T
N
3
7
9
3
2
1
-
8
0
0
-
7
3
2
-
2
6
7
7
•
www
.
p
e
t
s
a
f
e
.
n
e
t
•
©2
0
1
3
R
a
d
io
S
y
s
t
e
ms
®
C
o
r
p
o
r
a
t
i
o
n
4
0
8
-
0
8
2
C
e
n
t
e
r
L
i
n
e
Medium
17
1
/
16
” (43.
4 cm) H
S
h
o
u
l
d
e
r
H
e
i
g
h
t
S
h
o
u
l
d
e
r
H
e
i
g
h
t
•
Hammer
•
J
igs
aw
*
•
Phi
l
l
ips
Sc
r
ewd
r
i
ver
•
Sl
ot
t
ed
Sc
r
ewdr
i
ver
•
Dr
i
l
l
•
½”
Dr
i
l
l
Bi
t
•
L
ev
el
•
T
ap
e
M
e
as
u
r
e
•
Mas
k
i
n
g
o
r
Pai
nt
er
's
T
ap
e
•
Duct
T
ape
•
St
r
i
ng
•
Pen
c
i
l
•
Saf
et
y
E
qui
pment
Opt
i
onal
:
•
Caul
k
*
Wi
t
h
a
p
p
r
o
p
r
i
a
t
e
b
l
a
d
e
t
y
p
e
a
n
d
le
n
g
t
h
;
e
x
a
mp
l
e
,
a
me
t
a
l
d
o
o
r
w
o
u
l
d
r
e
q
u
i
r
e
a
b
l
a
d
e
f
o
r
me
t
a
l.
T
ools N
e
ede
d
Medium
13
1
/
8
”
(
33.
4
c
m
)
W
C
e
n
t
e
r
L
i
n
e
Cut
ti
ng Templ
ate
NOTI
CE:
W
hen
appl
yi
ng
cut
t
i
ng
t
empl
at
e
t
her
e
s
houl
d
b
e
a
mi
ni
mum
of
3
”
b
et
wee
n
t
he
bot
t
om
a
nd
s
i
d
es
of
t
h
e
do
or
and
t
he
ou
t
er
ed
ge
of
t
he
t
empl
a
t
e
t
o
mai
nt
ai
n
t
he
st
r
uct
ur
a
l
i
n
t
egr
i
t
y
of
t
h
e
d
oor
.
Ra
d
i
o
Sy
s
t
e
ms
®
Co
r
p
o
r
a
t
i
o
n
•
1
0
4
2
7
P
e
t
S
a
f
e
Wa
y
,
K
n
o
x
v
i
l
le
,
T
N
3
7
9
3
2
1
-
8
0
0
-
7
3
2
-
2
6
7
7
•
www
.
p
e
t
s
a
f
e
.
n
e
t
•
©2
0
1
3
R
a
d
io
S
y
s
t
e
ms
®
C
o
r
p
o
r
a
t
i
o
n
4
0
8
-
0
8
2
C
e
n
t
e
r
L
i
n
e
Medium
17
1
/
16
” (43.
4 cm) H
S
h
o
u
l
d
e
r
H
e
i
g
h
t
S
h
o
u
l
d
e
r
H
e
i
g
h
t
•
Hammer
•
J
igs
aw
*
•
Phi
l
l
ips
Sc
r
ewd
r
i
ver
•
Sl
ot
t
ed
Sc
r
ewdr
i
ver
•
Dr
i
l
l
•
½”
Dr
i
l
l
Bi
t
•
L
ev
el
•
T
ap
e
M
e
as
u
r
e
•
Mas
k
i
n
g
o
r
Pai
nt
er
's
T
ap
e
•
Duct
T
ape
•
St
r
i
ng
•
Pen
c
i
l
•
Saf
et
y
E
qui
pment
Opt
i
onal
:
•
Caul
k
*
Wi
t
h
a
p
p
r
o
p
r
i
a
t
e
b
l
a
d
e
t
y
p
e
a
n
d
le
n
g
t
h
;
e
x
a
mp
l
e
,
a
me
t
a
l
d
o
o
r
w
o
u
l
d
r
e
q
u
i
r
e
a
b
l
a
d
e
f
o
r
me
t
a
l.
T
ools N
e
ede
d
Medium
13
1
/
8
”
(
33.
4
c
m
)
W
www.petsafe.net 7
GETTING STARTED
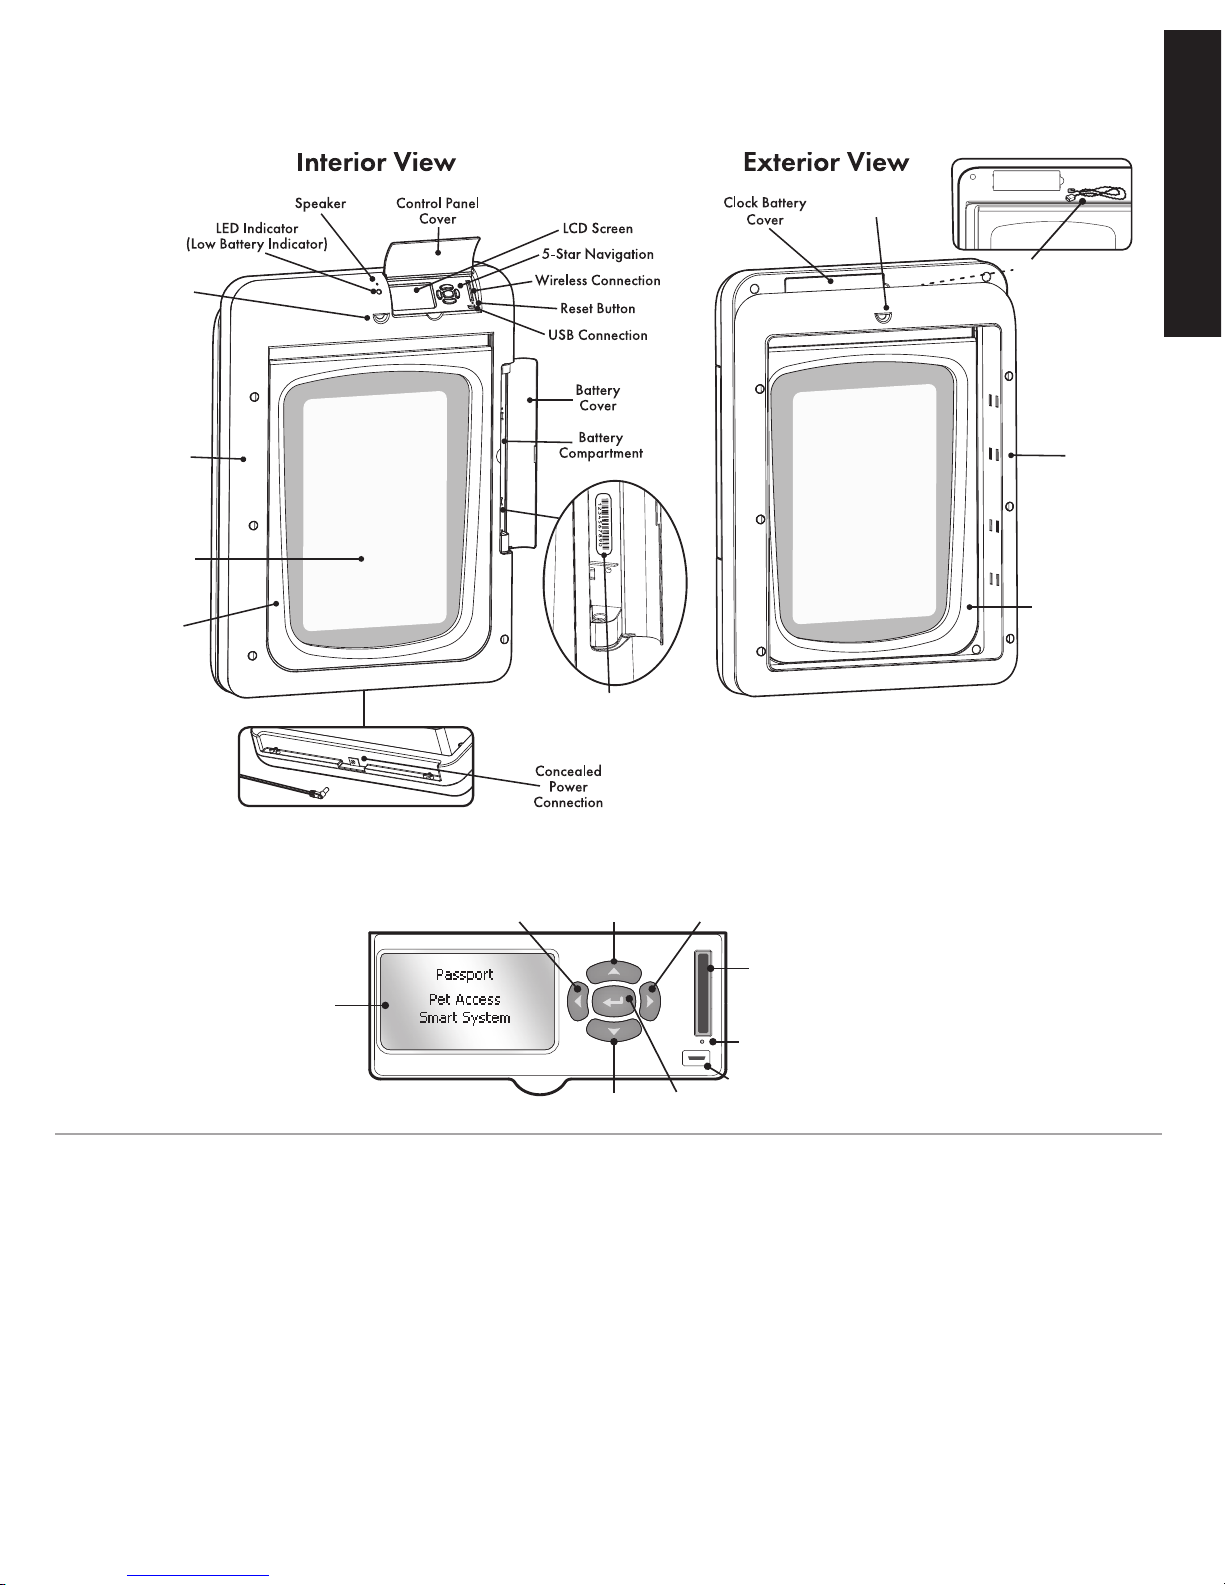
Features, Controls and Indicators
Interior
Motion Sensor
Exterior
Motion Sensor
Interior
Frame
Exterior
Frame
Interior
Locking U-Flap
Exterior
Locking U-Flap
Main Flap
Serial Number inside
battery compartment
Motion Sensor
Wire
Control Panel
Key Def initions
• 5-Star Navigation – Group of five buttons with up arrow key, down arrow key, left arrow/back key, right arrow key, and enter/select key
used to navigate the Passport
™
menu system for easy programming. Located in control panel on interior frame.
• Antenna - The antenna is located inside main flap and receives radio signals from Passport Key
™
. The Passport Key™ must be located within a
certain distance of antenna in order for the unique code to be read.
• Battery Compartment – The battery compartment is located on interior frame and holds the optional Passport
™
Rechargeable Battery
(sold separately).
• Battery Cover – Covers and protects optional rechargeable lithium-ion battery and battery compartment.
• Blind Zones – Areas where motion sensors cannot detect your pet and the Passport
™
will not read your pet’s Passport Key™.
• Clock Battery – The 3-V lithium coin cell battery (size CR2032) which keeps the clock’s time during any power loss.
• Clock Battery Cover – Covers and protects 3-V lithium coin cell clock battery and Passport
™
electronics circuit board.
• Control Panel – Area at top of interior frame where LCD screen, 5-Star Navigation, wireless connection, USB connection and reset button
are located.
L
CD Screen
USB Connection
Enter/Select
Arrow Key
Down
Arrow Key
Left Arrow/
Back KeyUpArrow Key
Right
Arrow Key
Reset Button
Wireless
Connection

8 Customer Care Center 1-800-732-2677
GETTING STARTED
• Control Panel Cover – Door that covers and protects control panel.
• Concealed Power Connection – For connecting the Passport
™
to the power adapter.
• Cut-out Size – Size of opening cut in homeowner’s door for proper fit and pet door installation.
• Exterior Frame – Size of pet door frame on the outside of the home.
• Flap Opening Size – Size of usable flap space for pet to enter and exit through the pet door.
• In-Only Access – Pet access setting which only allows pets with a programmed Passport Key
™
to enter but not exit. Door operational mode must
be set to Smart Mode for In-Only Access to work.
• In/Out Access – Pet access setting which only allows pets with a programmed Passport
™
to enter and exit the Passport™. Door operational
mode must be set to Smart Mode for In/Out Access to work.
• In-Tone – Optional, audible alert that sounds when pet wearing a programmed Passport Key
™
enters. Door operational mode must be set to
Smart Mode for In-Tone to work. Default factory setting is off with 10 sound options available.
• Interior Frame – Pet door frame on the inside of home. Frame with main flap and control panel.
• LCD Screen – Liquid crystal display screen to visually display text and images to easily program the Passport
™
. Located in the control panel on
the interior frame.
• LED/Light Indicator – Light on interior frame which blinks green once every 6 seconds when Passport
™
power source (power adapter or
rechargeable battery) is in good operating status. Blinks a red light twice every 6 seconds when powered by the rechargeable battery and the
battery is low (Low Battery Mode). If Passport
™
has an error alert (ATTENTION screen), the LED will blink red once every 6 seconds.
• Lock Keypad – Allows 5-Star Navigation buttons to be disabled by setting a 4 digit PIN number.
• Locked Mode – Pet door operational mode where Passport
™
flap is locked and does not allow entry or exit for any pet, including programmed
pets wearing a Passport Key
™
.
• Locking U-Flap – The “U” shaped flaps on the interior and exterior frames which lock in multiple points along the bottom and sides for added
strength and improved weather resistance.
• Low Battery Mode – When powered by the optional Passport
™
Rechargeable Battery, allows the Passport™ door flap to be set to a specified
open or locked position when the battery charge runs low and shuts down. Also allows an optional audible alert to notify you when the battery is
low. The default factory setting is off for the beep and locked for the flap if the battery shuts down. An alert (ATTENTION screen) will appear on
the LCD screen and LED will blink red twice every 6 seconds when the Passport
™
enters Low Battery Mode.
• Main Flap – The center, plastic flap with UV sun protection which covers the pet door flap opening.
• Master Access – Pet access setting which easily allows same access mode and settings to be set for all pets with a programmed Passport Key
™
without the need to individually program by pet. This is the default factory pet access setting for each pet.
• Motion Sensing Zones – Areas where motion sensors detect motion and trigger the reader, which reads your pet’s Passport Key
™
, to turn on.
• Motion Sensor – Detects movement from pet (or other moving objects) and triggers the Passport
™
to power up so it can read the Passport Key™.
A motion sensor is located on both the interior frame and exterior frame.
• Motion Sensor Wire – Connects the exterior Motion Sensor to the Passport
™
electronics board.
• Open Mode – Pet door operational mode where Passport
™
flap is unlocked and allows entry and exit for all pets, including unprogrammed
pets or pets without a Passport Key
™
. The Passport™ will function like a traditional pet door in this mode.
• Out-Only Access – Pet access setting which only allows pets with a programmed Passport Key
™
to exit but not enter. Door operational mode
must be set to Smart Mode for Out-Only Access to work.
• Out-Tone – Optional, audible alert that sounds when pet wearing a programmed Passport Key
™
exits. Door operational mode must be set to
Smart Mode for Out-Tone to work. Default factory setting is off with 10 sound options available.
• Outer Frame Size – Overall pet door dimensions.
• Passport Key
™
– A Passport Key™ is a passive transmitter that sends a unique code to the Passport Pet Access Smart System™.
• Passport Pet Access Smart System
™
– The Passport™ is an intelligent receiver using an internal antenna to pick up a unique Passport Key™
code for selective pet access.
• Passport
™
Rechargeable Battery – Optional, rechargeable lithium-ion battery specially designed to work with the Passport™ to allow full
operation in place of the power adapter or as a power back-up option in case of power loss (sold separately).
• Radio-Frequency Interference – Radio-frequency interference is due to radio-frequency signals from other household appliances or
common electronic products that negatively affect the ability of the Passport
™
to receive a signal from a Passport Key™. Radio-frequency
interference or “noise” can come from a variety of sources. Interference can be minimal, constant or ever changing based on usage and
closeness of other electronic household items during operation of the Passport
™
. It is recommended that household appliances and common
electronic products be placed at least two feet (61 cm) away from the location of the Passport
™
.
• Radio-Frequency Technology – The use of a radio-frequency signal that can be transmitted without wires.
• Re-latch Time – Amount of time it takes the pet door to re-lock after Passport Key
™
is no longer in read range or detected. Default factory
setting is 2 seconds but can be adjusted from 1 second to 60 seconds.
• Read Range – Distance between Passport Key
™
and the Passport Pet Access Smart System™ when it first detects the key and triggers the flap to
unlock or operate as programmed for pet.
www.petsafe.net 9
GETTING STARTED
• Replacement Flap Size – Overall size of main flap when removed from pet door.
• Reset Button – Pin-sized button located in the control panel which reboots the Passport
™
.
• Smart Mode – Pet door operational mode where Passport
™
flap is electronically locked and will function as specifically programmed for pets
wearing a programmed Passport Key
™
. The default factory setting for door operational mode.
• Speaker – Produces sound and used to alert when In-Tone or Out-Tone has been set, or when battery alert or error has been detected.
• Serial Number – Unique identification number assigned to each Passport
™
during manufacturing. The serial number is located on a label
inside battery compartment or on Passport
™
About screen.
• Timer Mode – Allows the different pet access settings to be set at specific times of day for all pets with a programmed Passport Key
™
through
Master Access or can be programmed by pet. Four time slots available with a minimum of 2 programmed times required. Door operational mode
must be set to Smart Mode for Timer Mode to work.
• USB Connection – Connection for a mini-USB cable to connect Passport
™
to a computer for programming or to download door firmware
updates (USB cable included).
• Volume – Turns speaker on or off. Default factory setting is on.
• Wireless Connection – Connection for Passport Wireless Card
™
(sold separately) which is used to connect to your existing wireless router to
remotely program and operate the Passport
™
from a computer, smartphone or other smart device.
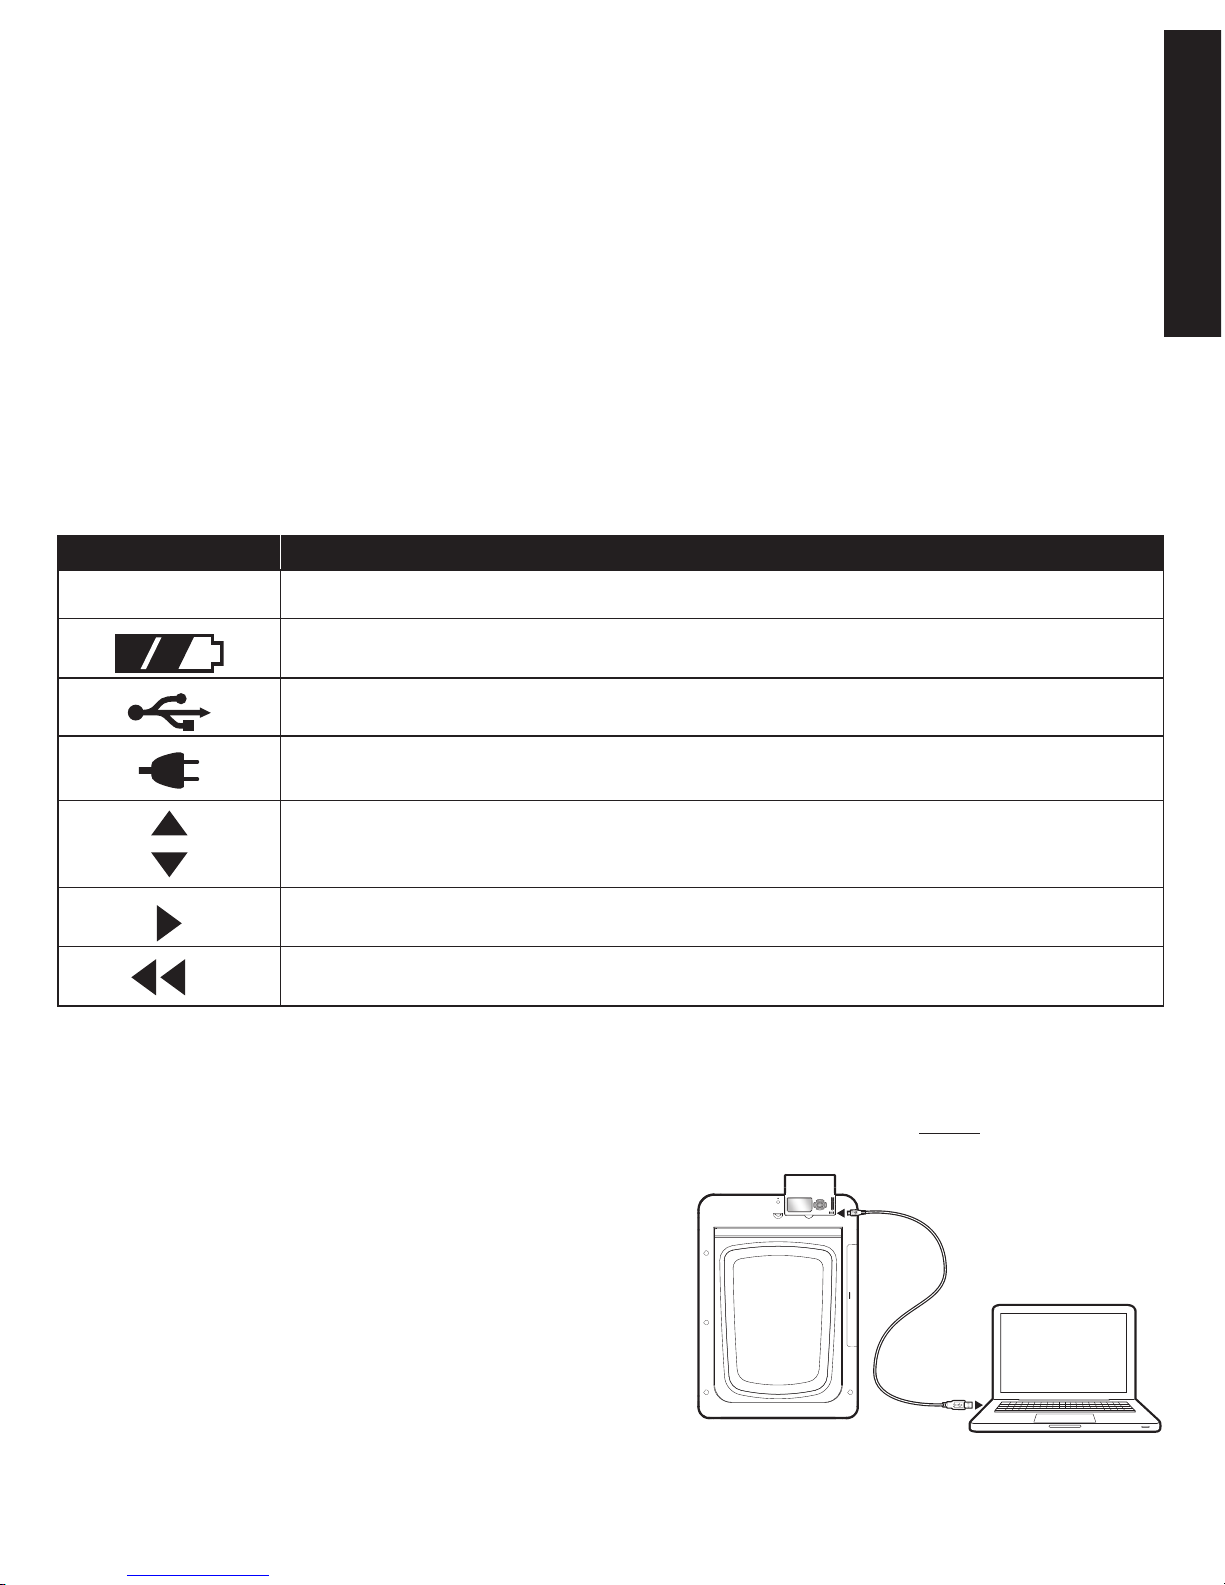
Icon Def initions
Connecting Passport
™
To Computer
With the Passport™ Computer Application, you have the option to connect your Passport™ to your computer to complete the “Initial User Setup” steps
page 11 and to program the pet door instead of using the Passport
™
control panel. Again, the Computer Application is optional but NOT required
to operate your Passport
™
. Connecting Passport™ to your computer also allows you to check for and install computer application software and door
firmware updates.
To use Passport™ with your computer, you need:
•Internetconnectionforyourcomputer
•PCorMacwithaUSB2.0portandoneofthefollowingoperatingsystems:
- Windows
®
XP, Windows
®
Vista, Windows
®
7 or 8
- Mac OS 10.5 or newer
•Minimum1GHzprocessor
•Minimum1GBRam
•30MBharddrivespace
Connecting to your computer: Use the included USB cable to connect the Passport
™
to the USB port on your computer.
ICON FUNCTION
05:30
TIME INDICATOR Displays the current set time. Can be set to 12 hour or 24 hour format.
BATTERY INDICATOR Displays when the optional Passport™ Rechargeable Battery is in use with its
charge status.
USB CONNECTION Indicates a mini-USB cable is connected to the pet door.
POWER ADAPTER Indicates the power adapter is connected to the pet door.
UP / DOWN INDICATORS Indicates menu choices available above or below. Use the up and down
arrow keys on 5-Star Navigation to view additional menu items not shown on screen.
MORE / SELECT INDICATOR Indicates more information or options available. Use right arrow key on
5-Star Navigation to view additional information or options. Can sometimes be used to select an option.
BACK INDICATOR Indicates lower menu level. Press the back or left arrow key on 5-Star Navigation to
return to previous screen.
10 Customer Care Center 1-800-732-2677
GETTING STARTED
Downloading Software:
Open your browser and visit http://petsafe.rscconnect.com. Click the
register button and complete registration steps. Your Passport
™
serial
number is required for registration (see “Serial Number” page 27). Select
Passport
™
Door from “Add Product” drop down box and click “Add”
button. Next, click “Download Software” link to download Passport
™
Computer Application software. To complete “Initial User Setup” steps
using Computer Application, follow Door Setup Wizard. After the
Passport
™
Computer Application software has been downloaded, use it to
easily program your Passport
™
and customize your pet’s access.
Wireless Connection
A Wireless Connection, which connects to the Passport™ Wireless Card (sold separately, see “Replacement Parts and Accessories” page 29), is
located on the Passport
™
control panel above the USB connection. The Passport™ Wireless Card works with your home’s wireless router and is
required for remote, wireless operation from your computer, tablet or smartphone. See the “Passport
™
Wireless Card Operating Guide” for more
information.
Battery Operation
An optional, rechargeable lithium-ion battery is available to use with the Passport™ (sold separately, see “Replacement Parts and Accessories” page
29). The Passport
™
Rechargeable Battery can be used for full operation of the Passport™ or as a battery back-up option in case of a power loss. See
the “Passport
™
Rechargeable Battery Operating Guide” on how to install and use the rechargeable battery.
PREPARE, SETUP AND TEST
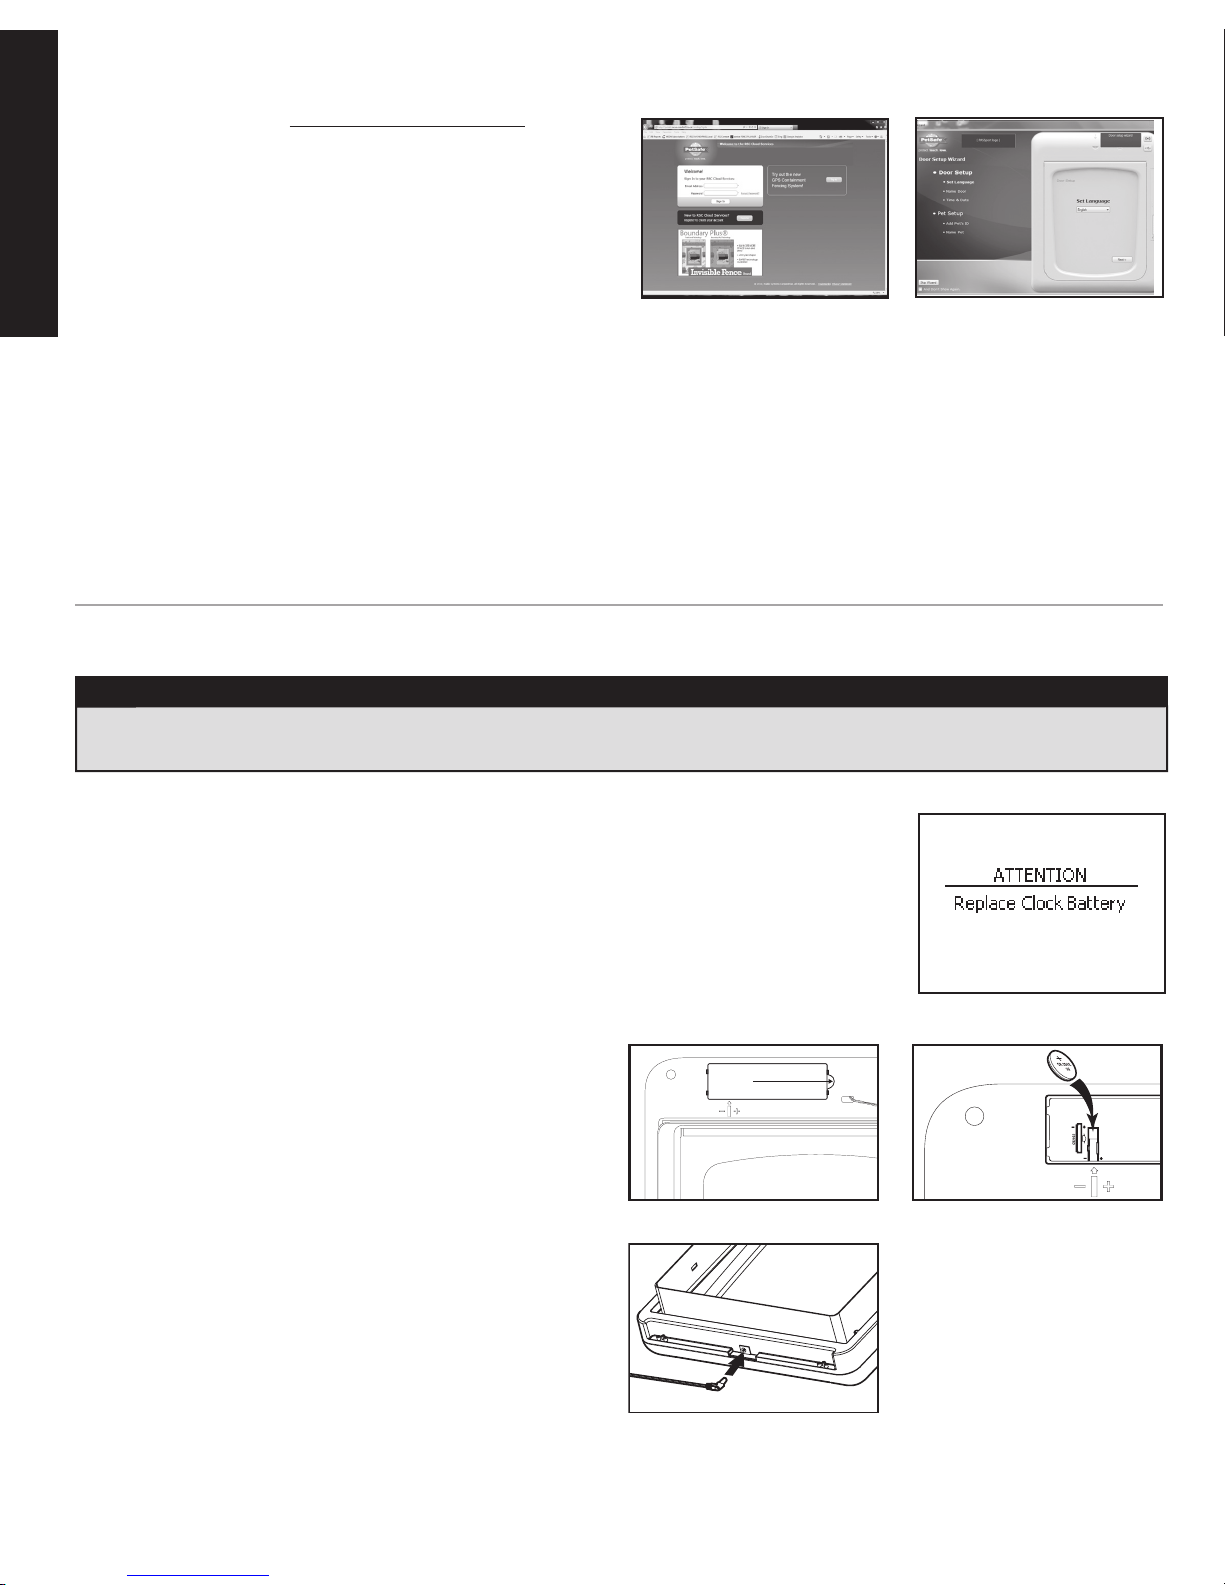
Install Clock Battery And Power Adapter
The Passport™ is shipped with the clock battery not installed. This is to prevent loss of battery life before purchase
and use. The 3-V lithium coin cell battery (size CR2032) will need to be installed before proceeding with setup,
testing and installation. The battery is required to keep the clock’s time during any power loss. Typical battery life
is about 1 year with normal use and operating power from power adapter or optional rechargeable lithium-ion
battery (sold separately). With no operating power, the expected battery life is about 10 weeks. If you will not
be using the Passport
™
or have no operating power for an extended period of time, it is recommended to remove
the clock battery to prevent loss of battery life. When clock battery needs replaced, if battery has not been
installed, or if installed incorrectly, you will receive an alert on the LCD screen.
To install clock battery: Remove clock battery cover from back of
interior frame. Battery slot is located on left side of circuit board. Insert
battery with positive (+) side facing the right side of the battery slot.
Make sure battery is fully inserted. Reinsert battery cover and push to
snap into place.
To install power adapter: The Passport Pet Access Smart System
™
is
supplied with a low-voltage AC adapter for power. Insert power
adapter into concealed power connection located underneath bottom of
interior frame.
An optional rechargeable lithium-ion battery is available to use with the
Passport
™
(sold separately, see “Replacement Parts and Accessories”
page 29
). If using the Passport™ Rechargeable Battery instead of adapter
for power source, insert it into battery compartment on right side of interior
frame (see “Passport
™
Rechargeable Battery Operating Guide” on how to
install the rechargeable battery).
NOTICE
Read this entire guide prior to cutting or modifying an opening in your door or wall. Do not proceed with cut-out or installation until your
Passport™ is assembled, powered up, programmed for your pet and all steps under “Prepare, Setup and Test” have been completed.
Pull and lift
here
 Loading...