

Petsafe Passport MPA19-13800, Passport MPA19-13801 Installation Manual

installation guide
Model Numbers
MPA19-13800
MPA19-13801
PLEASE READ THIS ENTIRE GUIDE BEFORE BEGINNING
Wall Entry Kit

2 Customer Care Center 1-800-732-2677
Important Safety Information
Explanation of Attention Words and Symbols used in this guide
This is the safety alert symbol. It is used to alert you to potential personal injury hazards.
Obey all safety messages that follow this symbol to avoid possible injury or death.
WARNING indicates a hazardous situation which, if not avoided, could
result in death or serious injury.
CAUTION, used with the safety alert symbol, indicates a hazardous
situation which, if not avoided, could result in minor or moderate injury.
CAUTION, used without the safety alert symbol, indicates a hazardous
situation which, if not avoided, could result in harm to your pet.
NOTICE is used to address practices not related to personal injury.
:
When children are present in the home, it is important to consider the
pet door during child proong activities. The pet door may be misused
by a child resulting in the child accessing potential hazards that may
be on the other side of the pet door. Purchasers/Homeowners with
swimming pools should ensure that the pet door is monitored at all
times and that the swimming pool has adequate barriers to entry. If
a new hazard is created inside or outside of your home, which may
be accessed through the pet door, Radio Systems
®
Corporation
recommends that you properly guard access to the hazard or remove
the pet door. The closing panel or lock, if applicable, is provided
for aesthetic and energy efciency purposes and is not intended
as a security device. Radio Systems
®
Corporation will not be liable
for unintended use, and the purchaser of this product accepts full
responsibility for oversight of the opening it creates.
:
Power Tools. Risk of severe injury; follow all safety instructions for your
power tools. Be sure to always wear your safety goggles and other
proper safety equipment.
:
Ensure the power adapter is used only on a standard 120 Volt AC
circuit outlet.
:
Do not unplug by pulling on cord. To unplug, grasp the power adapter
plug housing, not the cord.
:
Inspect the power cord before and periodically during use. Discontinue
use if damage or deterioration occur, such as blistering, cracking,
chewing or deformation. Continued use may result in injury or property
damage.
:
To avoid tripping, always position the power cord out of the path of
foot trafc.
:
The user, prior to installation, must become familiar with all building
codes that may affect the installation of the pet door and determine,
along with a licensed contractor, its suitability in a given installation.
This pet door is not a re door. It is important for the owner and
contractor to consider any risks that may be present inside or outside
of the pet door, any risks that may be created by subsequent changes
to your property and, how they may relate to the existence and use,
including misuse of the pet door.
:
If cutting metal surface, be aware of sharp edges to prevent injury.

www.petsafe.net 3
:
During pet training while pet door is in Open Mode, make sure
to GENTLY lower ap onto pet’s back. Also avoid possible injury
by making sure your pet is entirely through the pet door opening,
including paws and tail, before completely releasing ap.
:
Do not allow your pet to chew on the power cord.
:
Read this entire guide prior to cutting or modifying an opening in your
door or wall. Do not proceed with cut-out or installation until your
Passport
™
is assembled, powered up, programmed for your pet and all
steps under “Prepare, Setup and Test” have been completed.
:
Keep these instructions with important papers; be sure to transfer
these instructions to the new owner of the property.
:
Unauthorized changes or modications may void the user’s authority
to operate this equipment, and void the warranty.
:
We do not accept any responsibility for openings that are cut or
modied in doors or walls or any damage caused to doors or walls
in forming or modication of such openings, including any costs
associated with the repair or replacement.
:
The unit only operates properly while outside temperatures are greater
than -5°F (-20.5° C) and less than 131° F (55° C). If operating from
the optional rechargeable lithium-ion battery, the battery and battery
compartment cannot be exposed to temperatures below 32° F (0° C).
:
Do not install in a location where the Passport™ interior frame,
including the LCD screen and battery compartment, and the power
adapter are exposed to damp or wet conditions or to water or outside
elements, such as rain or snow.
:
Only use designated power adapter with the product.
:
Do not use power adapter in temperatures below 32° F (0° C) or above
104° F (40° C). Power adapter for inside use only.
:
If homeowner’s door or other application is not level, the pet door must
be installed level to swing properly.
:
When applying the cutting template, there should be a minimum of 3”
between the bottom and sides of the door and the outer edge of the
template to maintain the structural integrity of the door.
:
Make sure there is nothing underneath the door where you will be
drilling holes or cutting out the opening.
:
Use a manual screwdriver to tighten screws. Do not over-tighten. Overtightening can strip the screws or warp the pet door frame.

4 Customer Care Center 1-800-732-2677
Thank you for choosing the PetSafe® brand. You and your pet deserve a companionship
that includes memorable moments and a shared understanding together. Our products
and training tools enhance the relationship between pets and their owners. If you have
any questions about our products or training your pet, please visit our website at www.
petsafe.net or contact our Customer Care Center at 1-800-732-2677.
To get the most protection out of your warranty, please register your product within 30
days at www.petsafe.net. By registering and keeping your receipt, you will enjoy the
product’s full warranty and should you ever need to call the Customer Care Center, we
will be able to help you faster. Most importantly, PetSafe
®
will never give or sell your
valuable information to anyone. Complete warranty information is available online at
www.petsafe.net.
Table of Contents
Components .......................................................................................................... 5
Tools Needed ........................................................................................................ 5
Other Items You May Need ................................................................................... 5
Installation ............................................................................................................. 6
Installation in a Wall ............................................................................................7
Determine Pet Door Location ............................................................................. 7
Prepare Wall ....................................................................................................... 7
Assemble Tunnels .............................................................................................. 8
Cut Pet Door Opening ........................................................................................ 9
Install Pet Door ................................................................................................. 11
Train Pet ........................................................................................................... 16
Customer Care International ............................................................................... 17
Terms of Use and Limitation of Liability .............................................................. 17
Warranty ..............................................................................................................17
www.petsafe.net 5
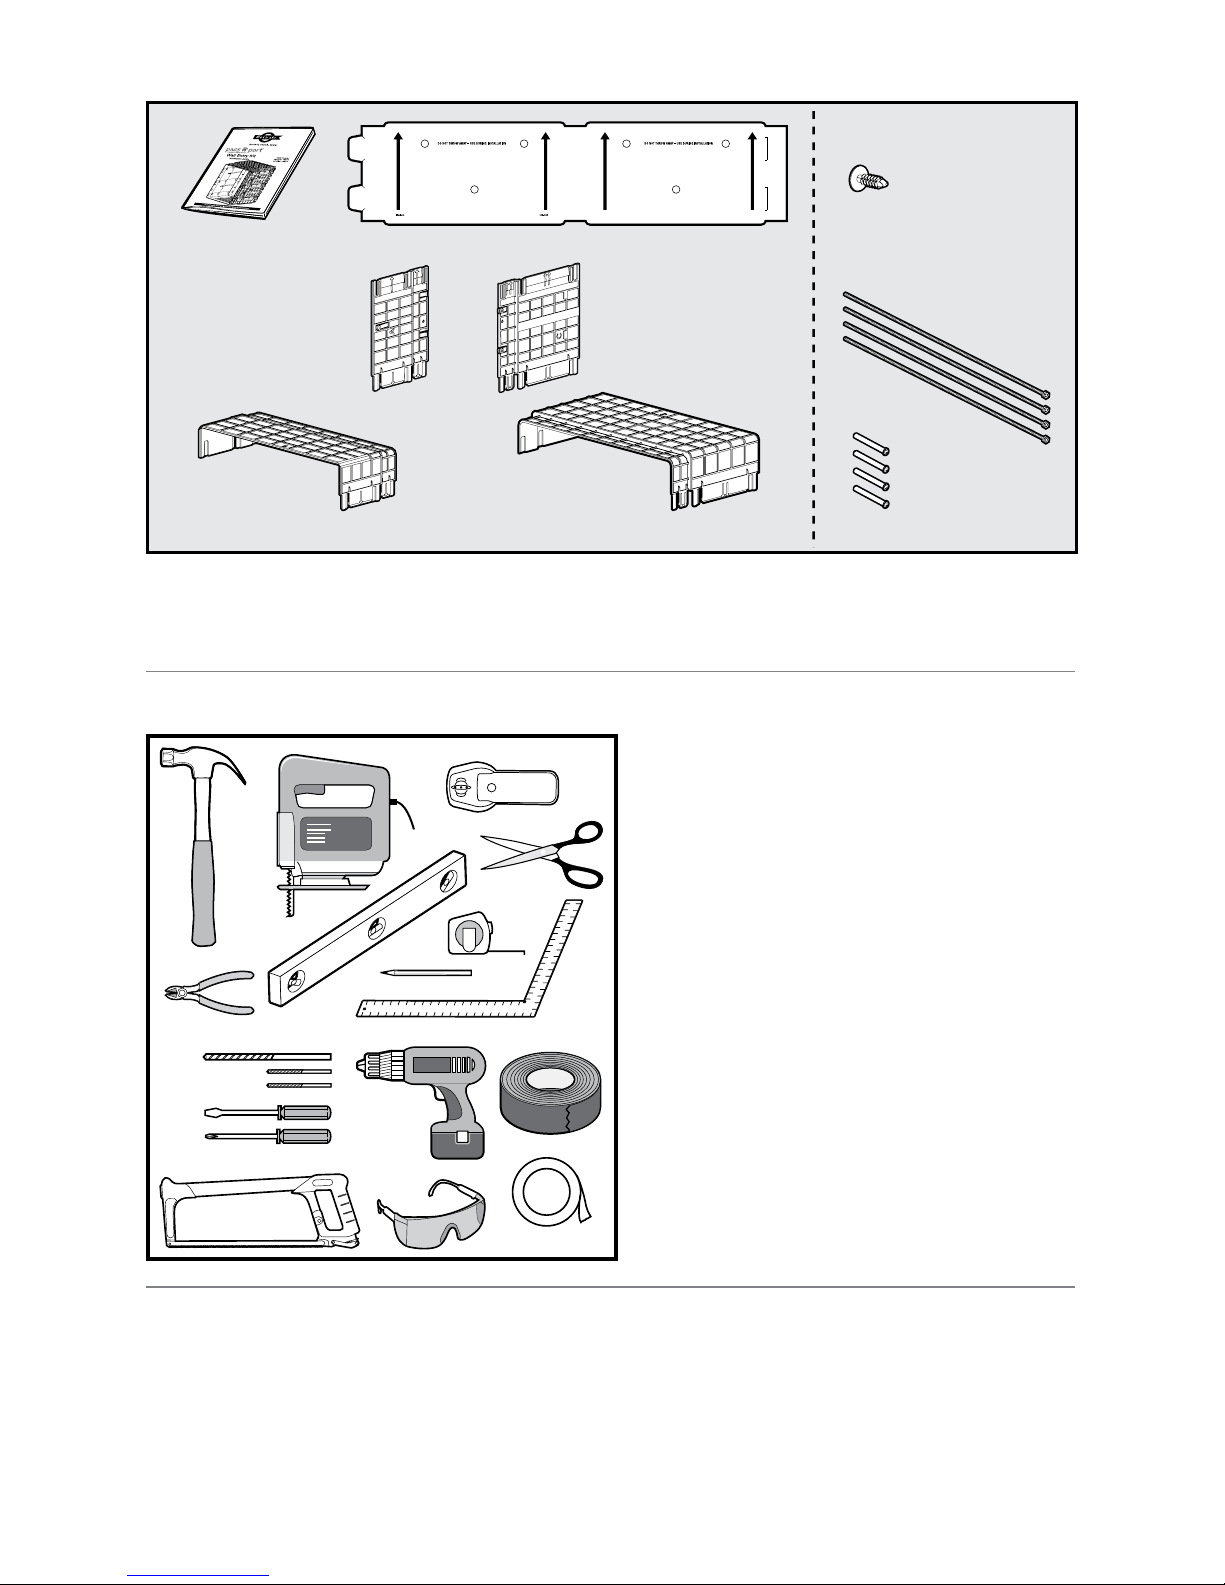
Components
Installaton and
Operating Guide
Tunnel Fastners
(Small+ Qty 4,
Medium Qty 8)
Screw Binder
Post(Qty 4)
Installation Screw Rods
with Nut (Qty 4)
Center Locator Template
A Interior Tunnnel Sides
(Small Qty 2,
*Medium Qty 4)
C Exterior Tunnnel Sides
(Small Qty 2,
*Medium Qty 4)
B Interior Tunnnel
Top & Bottom
D Exterior Tunnnel
Top & Bottom
*Parts may be preassembled.
Note: The Passport Wall Entry Kit can be used for wall or applications 3
3
⁄4” to 12” thick.
Applications thicker than 12” require a second Wall Entry Kit (sold separately).
Tools Needed
:
Framing Square
:
Hacksaw
:
Jigsaw or other appropriate cutting
device to cut through wall
:
Drill
:
1⁄2”, 3⁄16”, 7⁄32” Drill Bits
:
Phillips Screwdriver
:
Slotted Screwdriver
:
Tape Measure
:
Masking Tape
:
Duct Tape
:
Pencil
:
Level
:
Scissors
:
Stud Finder
:
Side-cutting Pliers
:
Safety Equipment
Optional:
:
Dry Wall Saw
:
Caulk
Other Items You May Need
Passport Pet Access Smart System™ (sold separately)
Passport Pet Access Smart System
™
Cutting Template
Passport Pet Access Smart System
™
Installation and Operating Guide

6 Customer Care Center 1-800-732-2677
Installation
Checklist Before Installation
Before installing the Passport Pet Access Smart System™, it is important to consider the following:
Clock battery is installed.
If using the power adapter, you have located a power outlet in planned location on inside of
home where power adapter can plug in. If not, you have a power cord extension to reach the
outlet or are using the optional Passport
™
Rechargeable Battery instead (sold separately) as
the power source.
Planned location has been checked for possible radio-frequency interference by ensuring all
common household appliances and electronic devices are at least 2 feet away (60 cm).
Power adapter and motion sensor wire have been disconnected or if using optional
Passport
™
Rechargeable Battery, it has been removed.
“Initial User Setup” steps to set the language, time and date have been completed.
Each pet to use the Passport
™
has a Passport Key™ and is successfully programmed to the
pet door.
Each Passport Key
™
has been tested in the installation location on both interior and exterior
side and the Passport
™
can read each key.
If installing in a door, will any components of the Passport Pet Access Smart System
™
be
obstructed by the door opening and closing?
If installing in a wall, are there any objects (such as doors, shrubs, heat pump, etc.) that could
obstruct the Passport
™
once installed?
If installing in a wall, have you checked for electrical and plumbing xtures in the wall where
you plan to install the Passport
™
?
You have read the entire Passport Pet Access Smart System™ Installation and Operating Guide.
All steps under “Prepare, Setup and Test” in the Passport™ Installation and Operating Guide
have been followed and completed.
Want Professional Installation Help?
Invisible Fence® Brand installers (where available) may come to your home and install your
new PetSafe
®
Pet Door for an additional cost. Contact the Invisible Fence® Brand Customer
Care Center at 1-877-866-DOGS (3647) or visit the website at www.invisiblefence.com for
more information.
 Loading...