

Petsafe 300 Series Quick Start Manual
Quick Start Guide
Pika-aloitusopas
Snabbstartsguide
Hurtigveiledning
Lynvejledning
Manual-Locking Cat Flap
Kattlucka med manuell låsning
Manuaalisesti lukittava kissanluukku
Katteluke med manuell lås
Manuel kattelem med lås
Please read this entire guide before beginning.
Lue tämä opas kokonaan ennen kuin aloitat.
Läs hela handboken innan du använder apparaten.
Les hele bruksanvisningen før du starter.
Læs hele denne vejledning før brug.
300
Series
Series
Serien
Series
Serien
The PetSafe™ Manual-Locking Cat Flap is suitable to fit most doors or partitions
although additional materials and competent DIY skills may be required. This cat
flap is designed to adapt easily to cut-out sizes for Staywell™ 200, 300, 400, 500,
ENFINO
900 and Petporte smart flap™ series cat flaps. Some simple DIY skills are required
and minor adjustments to the cut-out or additional accessories might be needed.
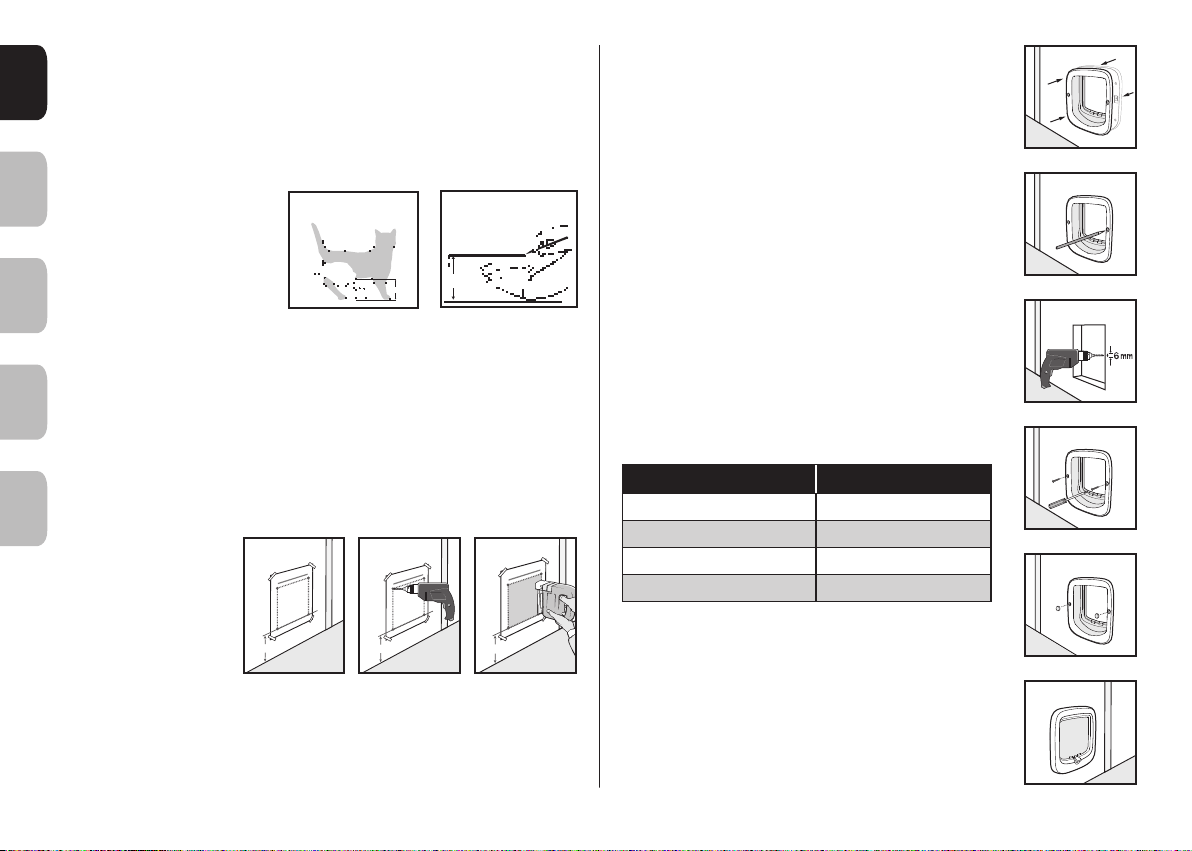
Installation – Measurement and Marking
Measure the belly height of
your cat. This is usually
100 mm –150 mm (Fig. A).
Mark this measurement on the
outside of your door and draw a
straight horizontal line
SV
168 mm long (Fig. B).
Please keep in mind that this horizontal line will eventually be the bottom of the hole
you will cut in your door. The frame of the cat flap will be 25 mm lower. If necessar y,
this line may have to be raised slightly to account for some door designs.
Fig. A
Fig. B
(x)
(x)
Installation – Doors
1. Attach the supplied Cutting Template to the outside of your door in the correct
position, ensuring that it is the right way up and level (Fig. C).
2. Drill four (4) corner holes with a 12 mm diameter drill bit as marked on the
Cutting Template through the door (Fig. D). Please ensure that the drill remains
straight and level.
DA
3. Using a jig or
key-hole saw, cut
along the dashed
line as indicated
on the Cutting
Template. (Fig. E).
Fig. C
(X)
Fig. D
(X)
Fig. E
(X)
4. Temporarily place both frames into the cut-out (Fig. F).
5. Level the cat flap until it is in the proper position. On the
outside, use a pencil to mark screw holes through the
holes on the exterior frame (Fig. G).
6. Remove the cat flap and drill the screw holes with a
6 mm drill (Fig. H).
7. Clean the area from any dust, dirt or debris.
8. Place the interior frame (with attached tunnel) into
the hole from the inside. Align the exterior frame to
the outside of the door. Four (4) different lengths of
screws have been provided with this cat flap. Select the
appropriate length. Using a manual screw driver, screw
the exterior frame through the holes in your door to the
interior frame (Fig. I).
9. When the installation of the cat flap is completed,
place the two (2) blanking plugs over the screws on the
exterior frame (Fig. J).
10. The cat flap is ready to use (Fig. K).
Screw Selection Guide
Cut-Out Thickness Screw Length
12 mm – 21 mm 40 mm screw
22 mm – 31 mm 50 mm screw
32 mm – 41 mm 60 mm screw
42 mm – 51 mm 70 mm screw
Fig. F
Fig. G
Fig. H
Fig. I
Fig. J
Fig. K
2
petsafe.com
Installation – Glass Doors or Windows
A mounting adaptor and wall extension tunnels are available to complete
the installation of the cat flap into glass doors or windows. Please visit
www.petsafe.com to learn more about glass installation and to purchase
these accessories.
Working with glass is a skilled job and should be carried
out by a professional glazier. It is not possible to cut holes in toughened glass or
double glazed units except at the time of manufacture. Please consult a glazier.
Installation – Walls
Installation of the cat flap into a wall will require an Installation Adaptor (sold
separately) to ensure performance. Extension Tunnels may also need to be
purchased to ensure that the flap extends completely through the wall. Once this
has been purchased, follow the instructions below.
1. Attach the supplied Cutting Template to the inside of your wall in the correct
position ensuring that it is the right way up and level (Fig. C).
2. Drill four (4) corner holes with a 12 mm diameter drill bit as marked on the
Cutting Template through the wall. Ensure that the drill remains straight
and level.
3. Using the appropriate tool for your home construction, such as a jig saw, cut
along the appropriate line as indicated on the Cutting Template. (Fig. E).
4. From the exterior of the home, finish cutting the hole through the wall using the
four corner holes drilled through the wall as a guide.
5. Clean the area of any dust, dirt or debris.
6. Slide one installation adaptor plate over the tunnel on the interior frame
and attach it to the back of the frame using the two (2) pan headed
screws (included).
7. From the interior of the home, position the interior assembly on the wall and
mark the four (4) screw holes on the installation adaptor plate attached to the
cat flap. Remove the assembly.
8. Using the proper hardware for your wall construction (not included), drill the
appropriate size holes for your hardware and attach the interior frame with
installation adaptor to the wall.
Optional: Add tunnel extensions (sold separately) to extend the tunnels through
your wall.
9. Attach the two (2) included metal clips into the rectangular recesses on the
remaining adaptor plate with the flat side of the clip flush with the outer face of
the plate.
10. Set the exterior frame on top of the remaining adaptor plate and attach using
the two (2) 16 mm flat head screws (included).
11. From the exterior of the home, place the exterior frame with installation adaptor
attached onto the tunnel of the interior frame and mark the four (4) screw holes
on the installation adaptor plate. Remove the exterior frame.
12. Using the proper hardware for your wall construction (not included), drill
the appropriate size holes for your hardware, and attach the exterior frame
assembly to the wall.
13. Insert the eight (8) blanking plugs into the exterior and interior installation
adaptor plates and the two (2) blanking plugs into the exterior frame.
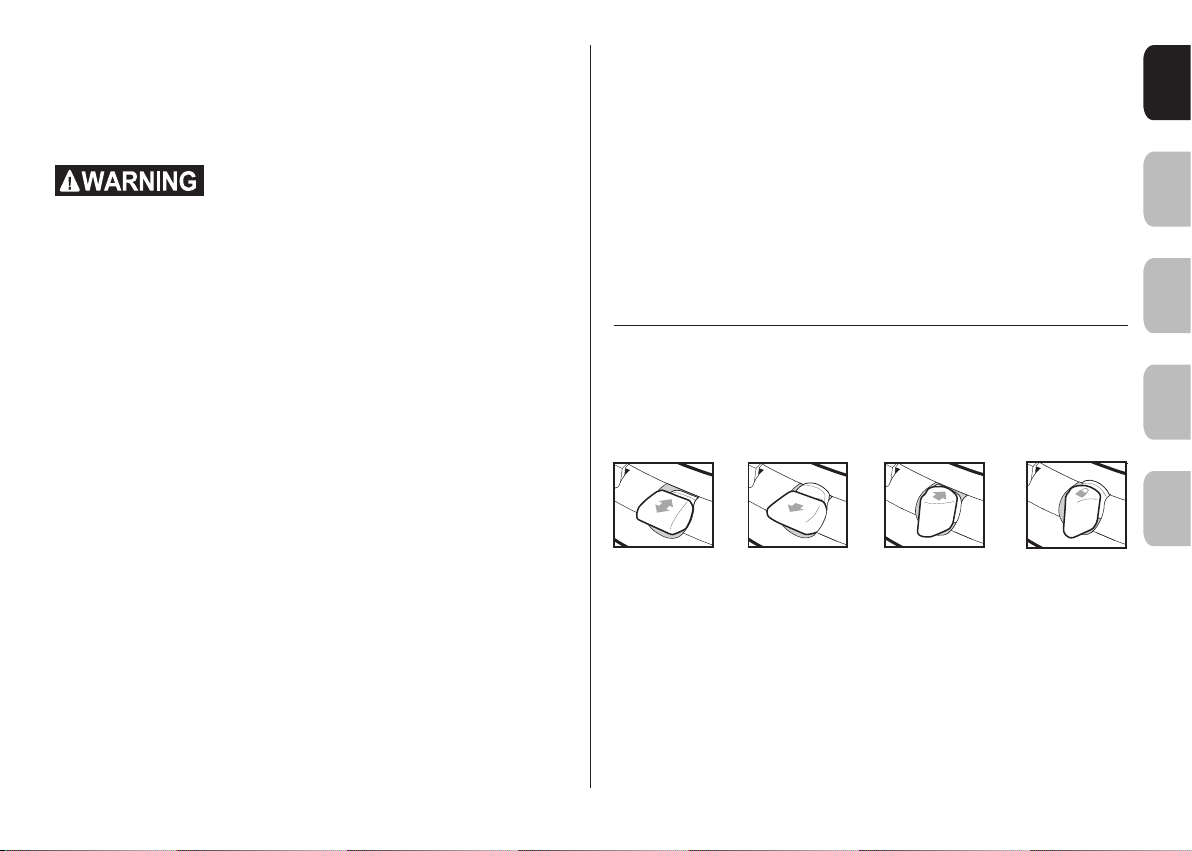
4-Way Manual Lock
The 4-Way Manual lock allows you to control your cat’s access in and out of your
home in either direction. Until your pet is thoroughly familiar with using the cat flap,
it is a good idea to only use the 4-Way Manual lock in the In or Out position only
(Fig. L).
In or Out
Fig. L
Out onlyIn only
Fully locked
Additional Information
For extended information on your PetSafe® Manual-Locking Cat Flap including glass
and wall installation, helpful training tips, and available accessories, please visit
www.petsafe.com.
EN
FI
NO
DASV
3Accessories available online
Manuaalisesti lukittava PetSafe™-kissanluukku sopii useimpiin oviin ja tilanjakajiin,
vaikkakin lisämateriaaleja ja riittäviä TEE SE ITSE -taitoja saatetaan tarvita. Tämä
kissanluukku on suunniteltu siten, että se mukautuu helposti Staywell™ 200, 300,
ENFINO
400, 500 ja 900 -kissanluukkujen sekä Petporte smart flap™ -sarjan kissanluukkujen
asennusaukkojen kokoihin. Leikkaaminen vaatii yksinkertaisia TEE SE ITSE -taitoja ja
mahdollisesti pieniä säätöjä ja lisätarvikkeita.
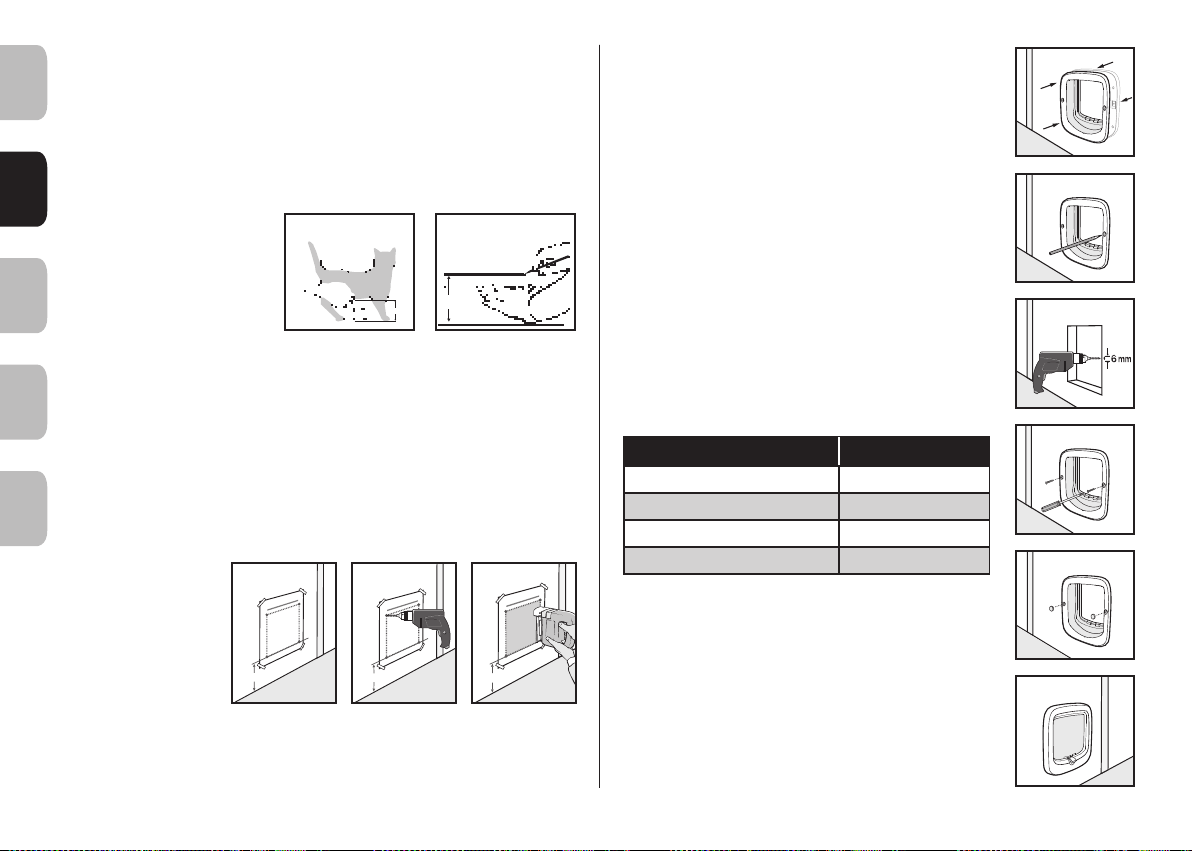
Asennus – Mittaaminen ja merkitseminen
Mittaa kissasi vatsakorkeus. Se on
yleensä 100–150 mm (Kuva A)
Merkitse tämä mittaus oven
ulkopuolelle ja piirrä vaakasuora
168 mm pitkä viiva (Kuva B).
SV
Muista, että oveen leikkaamasi
aukon alareuna tulee lopulta
tämän vaakasuoran viivan kohdalle. Kissanluukun kehys on sitä 25 mm
matalammalla. Tarvittaessa tätä viivaa on nostettava hieman ylöspäin joidenkin
ovimallien kohdalla.
.
Kuva A
Kuva B
(x)
(x)
Asennus – Ovet
1. Kiinnitä mukana tullut leikkausmalli oven ulkopuolelle oikeaan asentoon niin,
että oikea puoli osoittaa ylöspäin ja se on vaakasuorassa (Kuva C).
2. Poraa neljä kulmareikää oven läpi käyttämällä 12 mm:n poran terää
leikkausmallin merkintöjen mukaisesti (Kuva D). Varmista, että poran terä pysyy
DA
suorana ja vaakasuorassa.
3. Sahaa kuviosahan
tai pistosahan avulla
leikkausmallissa
näytettyä katkoviivaa
pitkin. (Kuva E).
Kuva C
Kuva D
Kuva E
4. Aseta molemmat kehykset hetkeksi leikattuun aukkoon
(Kuva F).
5. Asettele kissanluukku sopivaan asentoon. Merkitse
ulkopuolelle lyijykynällä ruuvinreiät ulkokehyksen reikien
läpi (Kuva G).
6. Poista kissanluukku ja poraa ruuvinreiät 6 mm:n poran
terällä (Kuva H).
7. Puhdista alue pölystä, liasta tai roskista.
8. Aseta sisäkehys (johon on kiinnitetty tunneli) aukkoon
sisäpuolelta. Kohdista ulkokehys oven ulkopuolelle.
Kissanluukun mukana on toimitettu neljä (4) pituisia
ruuveja. Valitse pituudeltaan sopivat. Ruuvaa ulkokehys
käsikäyttöisen ruuvimeisselin avulla ovessa olevien
reikien läpi sisäkehykseen (Kuva I).
9. Kun kissanluukun asennus on valmis, aseta kaksi
sulkutulppaa ulkokehyksen ruuvien päälle (Kuva J).
10. Kissanluukku on käyttövalmis (Kuva K).
Ruuvien valintaopas
Asennusaukon paksuus Ruuvin pituus
12 – 21 mm 40 mm:n ruuvi
22 – 31 mm 50 mm:n ruuvi
32 – 41 mm 60 mm:n ruuvi
42 – 51 mm 70 mm:n ruuvi
Kuva F
Kuva G
Kuva H
Kuva I
Kuva J
(X)
(X)
(X)
4 petsafe.com
Kuva K
 Loading...