

Page 1
Microchip Cat Flap
Chatière avec puce électronique
Microchip kattenluik
Puerta con microchip
Porta per gatti con microchip
Mikrochip Katzenklappe
Please read this entire guide before beginning as additional accessories may be required.
Veuillez lire ce manuel en entier avant de commencer car des accessoires supplémentaires
peuvent être nécessaires.
Gelieve deze gids volledig door te lezen voordat u begint aangezien eventuele extra
accessoires nodig zijn.
Lea toda la guía antes de empezar ya que podrían ser necesarios accesorios adicionales.
Leggere attentamente la guida all’uso prima di utilizzare la porta poiché potrebbero essere
necessari accessori aggiuntivi.
Bitte lesen Sie die ganze Gebrauchsanleitung aufmerksam durch, ehe Sie beginnen,
da möglicherweise weiteres Zubehör erforderlich ist.
Quick Start Guide
Guide de démarrage rapide
Beknopte handleiding
Guía de inicio rápido
Guida rapida
Schnellstartanleitung
100
Series
Série
Serie
Serie
Serie
Serie
Page 2
2
petsafe.com
ENFRES
NL
IT
DE
The user, prior to installation, must become familiar with all building codes that may
affect the installation of the pet door and determine, along with a licensed contractor,
its suitabilit y in a given installation. This pet door is not a fire door. It is important for the
owner and contractor to consider any risks that may be present inside or outside of the
pet door, and any risks that may be created by subsequent changes to your property and
how they may relate to the existence and use, including misuse of the pet door.
• If cutting a metal surface, be aware of sharp edges to prevent injury.
• Working with glass is a skilled job and should be carried out by a professional
glazier. It is not possible to cut holes in toughened glass or double glazed units
except at the time of manufacture. Please consult a glazier.
• Keep these instructions with important papers; be sure to transfer these instructions to
the new owner of the propert y.
• Please read these instructions fully prior to forming or modifying
an opening in your selected door or wall. We strongly recommend
that your microchip cat flap is programmed for your cat and a check
made that it works with the microchip in your cat first.
• This unit only operates properly when outside temperatures are greater than -25° C
(-13° F) and less than 55° C (131° F).
• PetSafe
®
pet doors are suitable for most doors, walls or partitions although
additional materials may be required. This product is designed for the convenience
of you and your pet. It is not possible to fully guarantee the exclusion of all other
animals in all circumstances. Radio Systems Corporation will not accept liability for
any damage or inconvenience caused by unwanted animals who may gain access
to your home.
IMPORTANT SAFETY INFORMATION
Explanation of Attention Words and Symbols used in this guide
This is the safety alert symbol. It is used to alert you
to potential personal injury hazards. Obey all safety
messages that follow this symbol to avoid possible
injury or death.
WARNING indicates a hazardous situation which,
if not avoided, could result in death or serious injury.
CAUTION, used with the safety alert symbol,
indicates a hazardous situation which, if not avoided,
could result in minor or moderate injury.
NOTICE is used to address practices not related to
personal injury.
When children are present in the home, it is important to consider the pet door during
child proofing activities, the pet door may be misused by a child resulting in the child
accessing potential hazards that may be on the other side of the pet door. Purchasers/
Homeowners with swimming pools should ensure that the pet door is monitored at all
times and that the swimming pool has adequate barriers to entry. If a new hazard is
created inside or outside of your home, which may be accessed through the pet door,
Radio Systems Corporation recommends that you properly guard access to the hazard
or remove the pet door. The closing panel or lock, if applicable, is provided for aesthetic
and energy efficiency purposes and is not intended as a security device. Radio Systems
Corporation will not be liable for unintended use and the purchaser of this product
accepts full responsibility for oversight of the opening it creates.
• In keeping with accepted standards of parental care, children should be supervised
at all times.
• Power Tools. Risk of severe injury; follow all safety instructions for your power tools.
• Be sure to always wear your safety goggles.
Hereinafter Radio Systems Corporation, Radio Systems PetSafe Europe Ltd.,
Radio Systems Australia Pty Ltd. and any other affiliate or Brand of Radio
Systems Corporation may be referred to collectively as “We” or “Us”.
Page 3
3
DEITNL
ES
FR
EN
Accessories available online
Thank you for choosing the PetSafe® Brand. You and your pet deserve a
companionship that includes memorable moments and a shared understanding
together. Our products and training tools enhance the relationship between
pets and their owners. If you have any questions about our products
or training your pet, please visit our website at www.petsafe.com
or contact our Customer Care Centre. For a listing of Customer Care
Centre telephone numbers, visit our website at www.petsafe.com.
Programming Cats into the PetSafe®
Microchip Cat Flap
Your PetSafe® Microchip Cat Flap is designed to work with most 15-digit
microchips (FDX-B) used for pets. Before you begin setup or installation of the
cat flap, please ensure your cat has the correct type of microchip.
To begin operation, the cat flap must learn the unique microchip Identification
Number (ID) of your cat. Please follow the steps below to begin the setup of
your cat flap:
1. The cat flap will be factory pre-set in the locked position. Ensure the
manual lock is set to the In and Out position (See Fig. H on page 7).
2. Remove the battery cover, set aside the provided hardware pack, and
install 4 high quality alkaline AA batteries (LR6). The green LED light will
flash three (3) times which indicates that the cat flap is in Automatic Mode.
3. To enter Learn Mode, press and hold the button in the battery
compartment until the red LED light appears (about 5 seconds). You will
have 60 seconds to position the cat’s head in the tunnel to learn the
microchip ID. Once the cat flap has learned the microchip ID, it will unlatch
and the red LED will turn off. The cat flap will stay in Automatic Mode and
will re-latch after 3 seconds.
4. After successfully learning the cat’s microchip ID, you will be ready to
install the cat flap into your door.
Note: To learn more than one cat, please follow the same steps starting with
step No. 3. The microchip cat flap can store up to 40 microchipped cats.
Replace the battery cover when the process is complete for all cats.
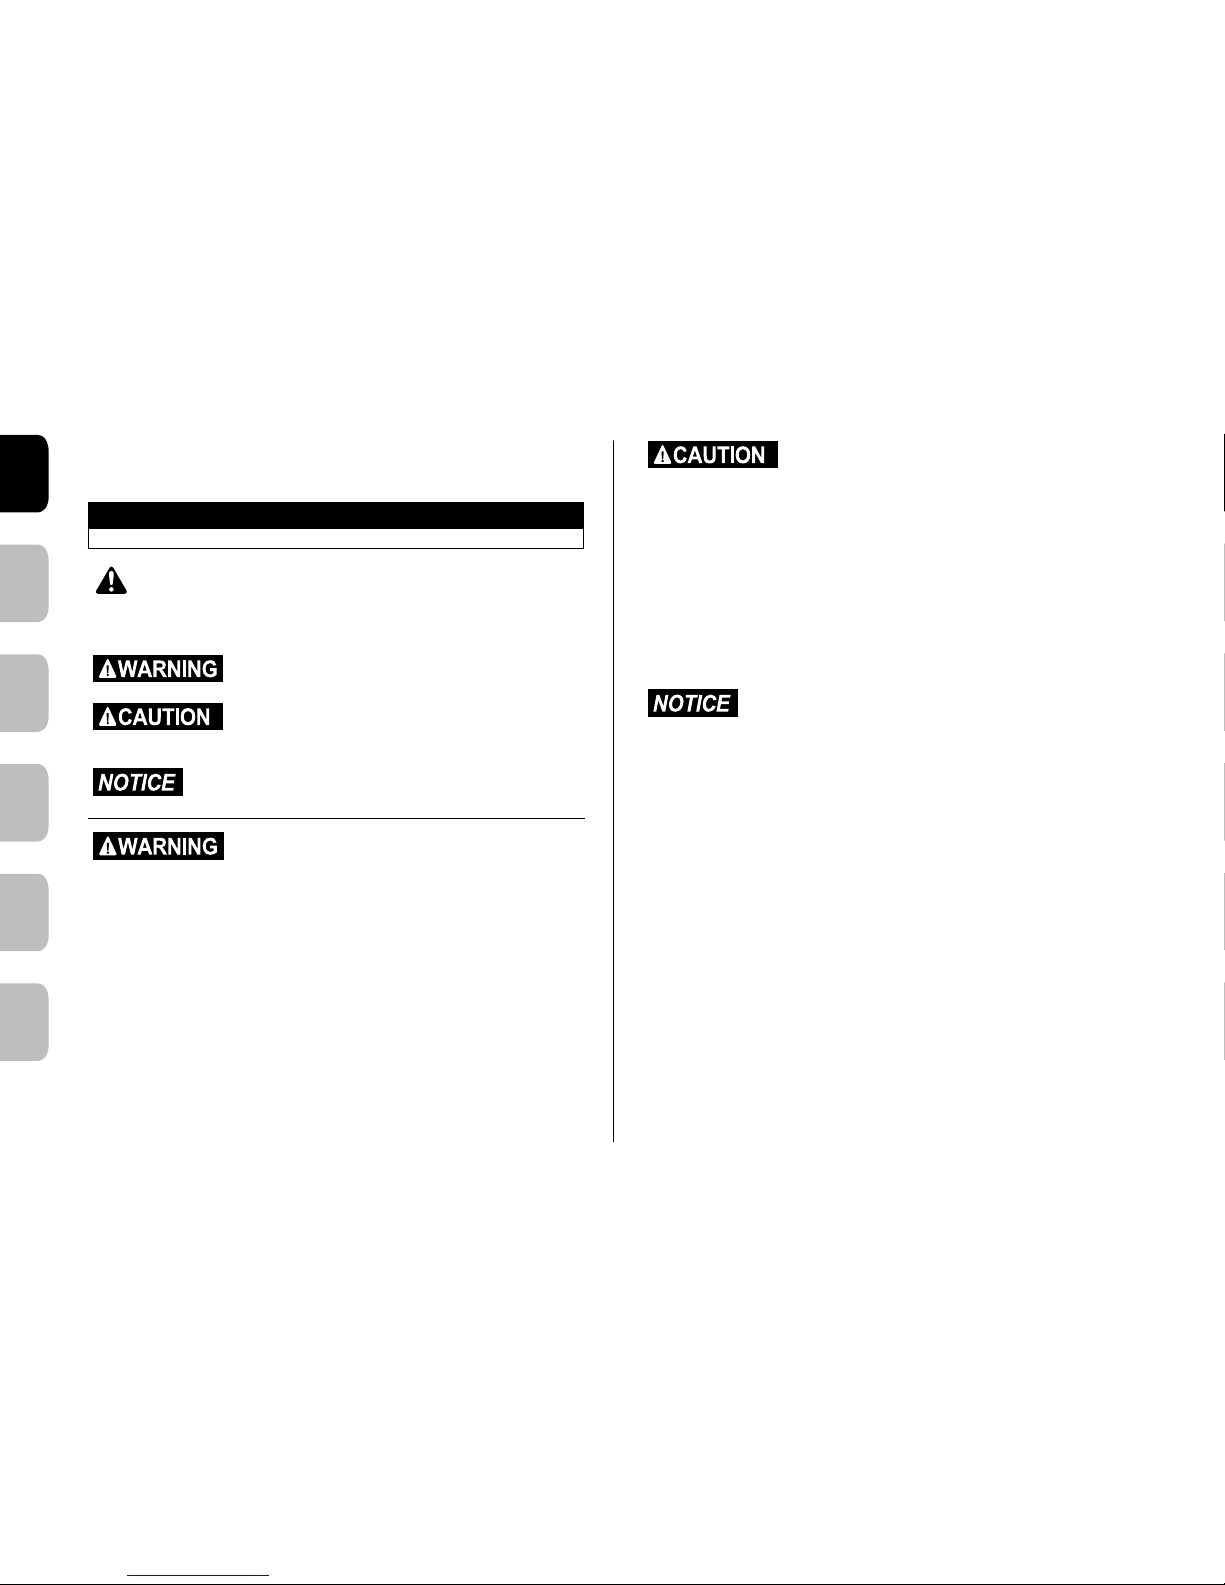
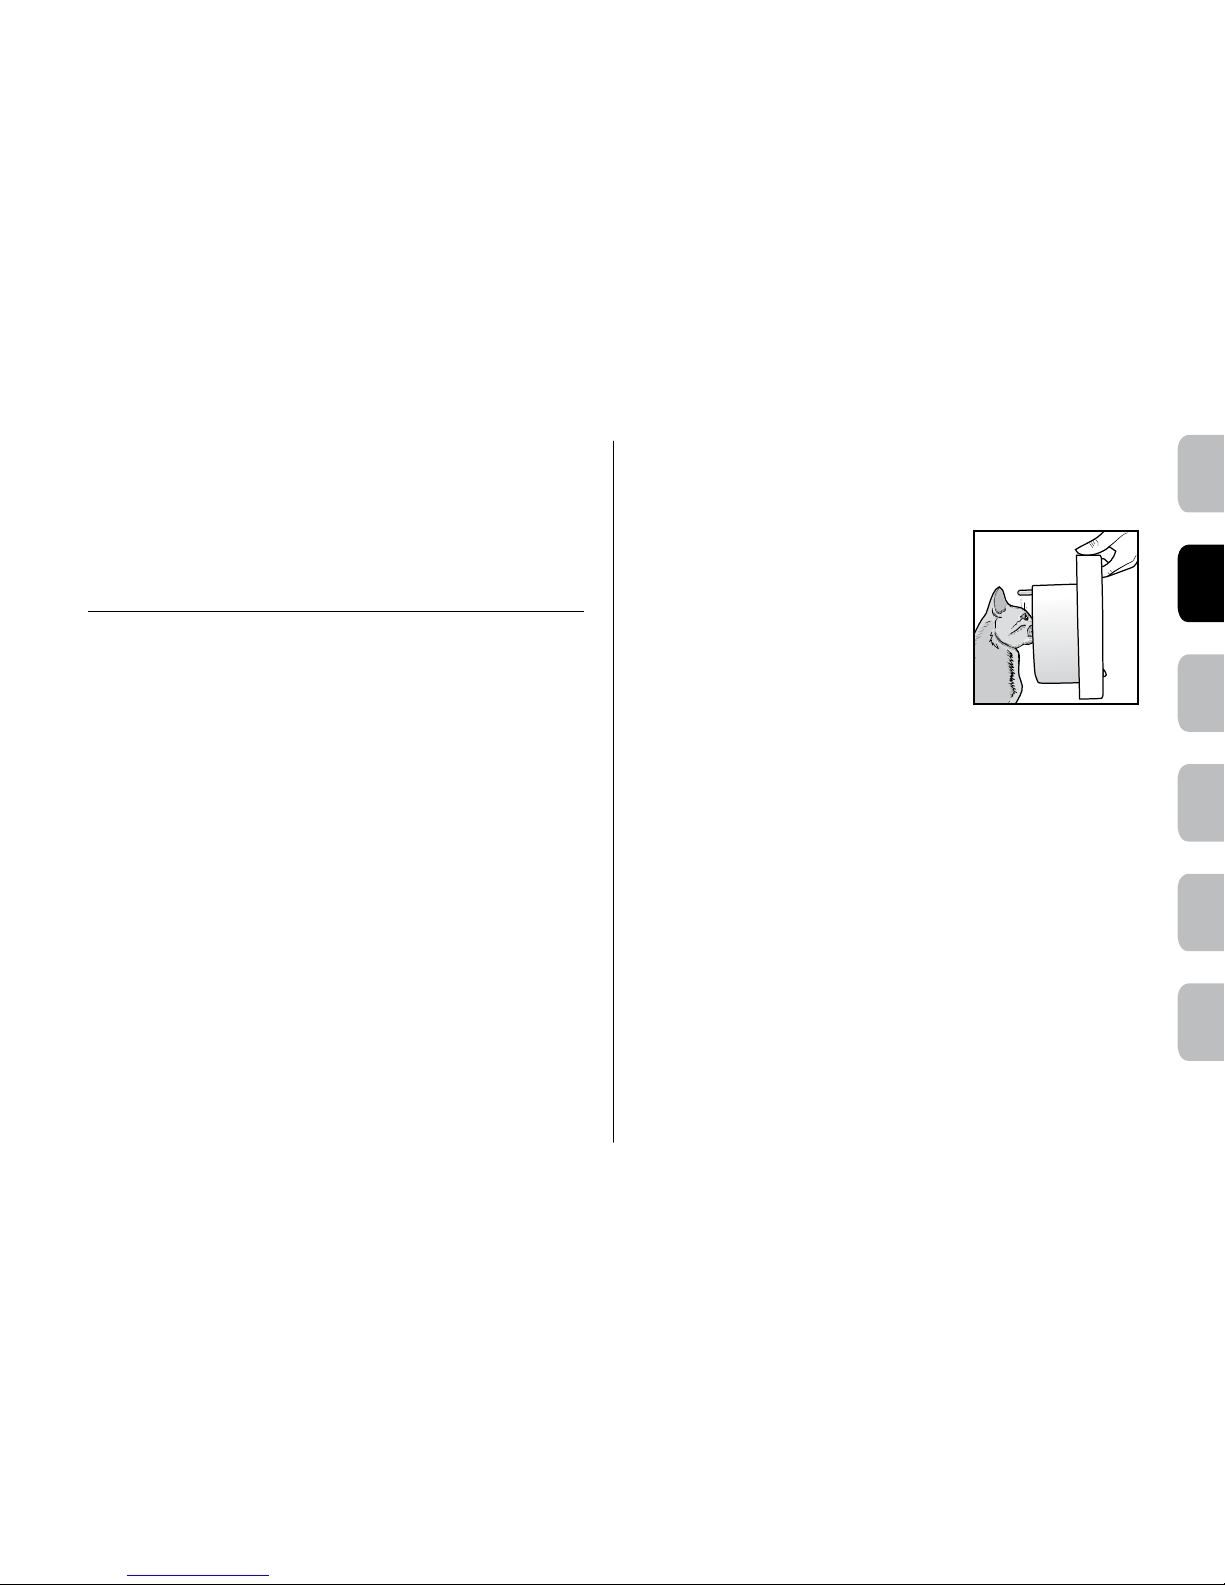
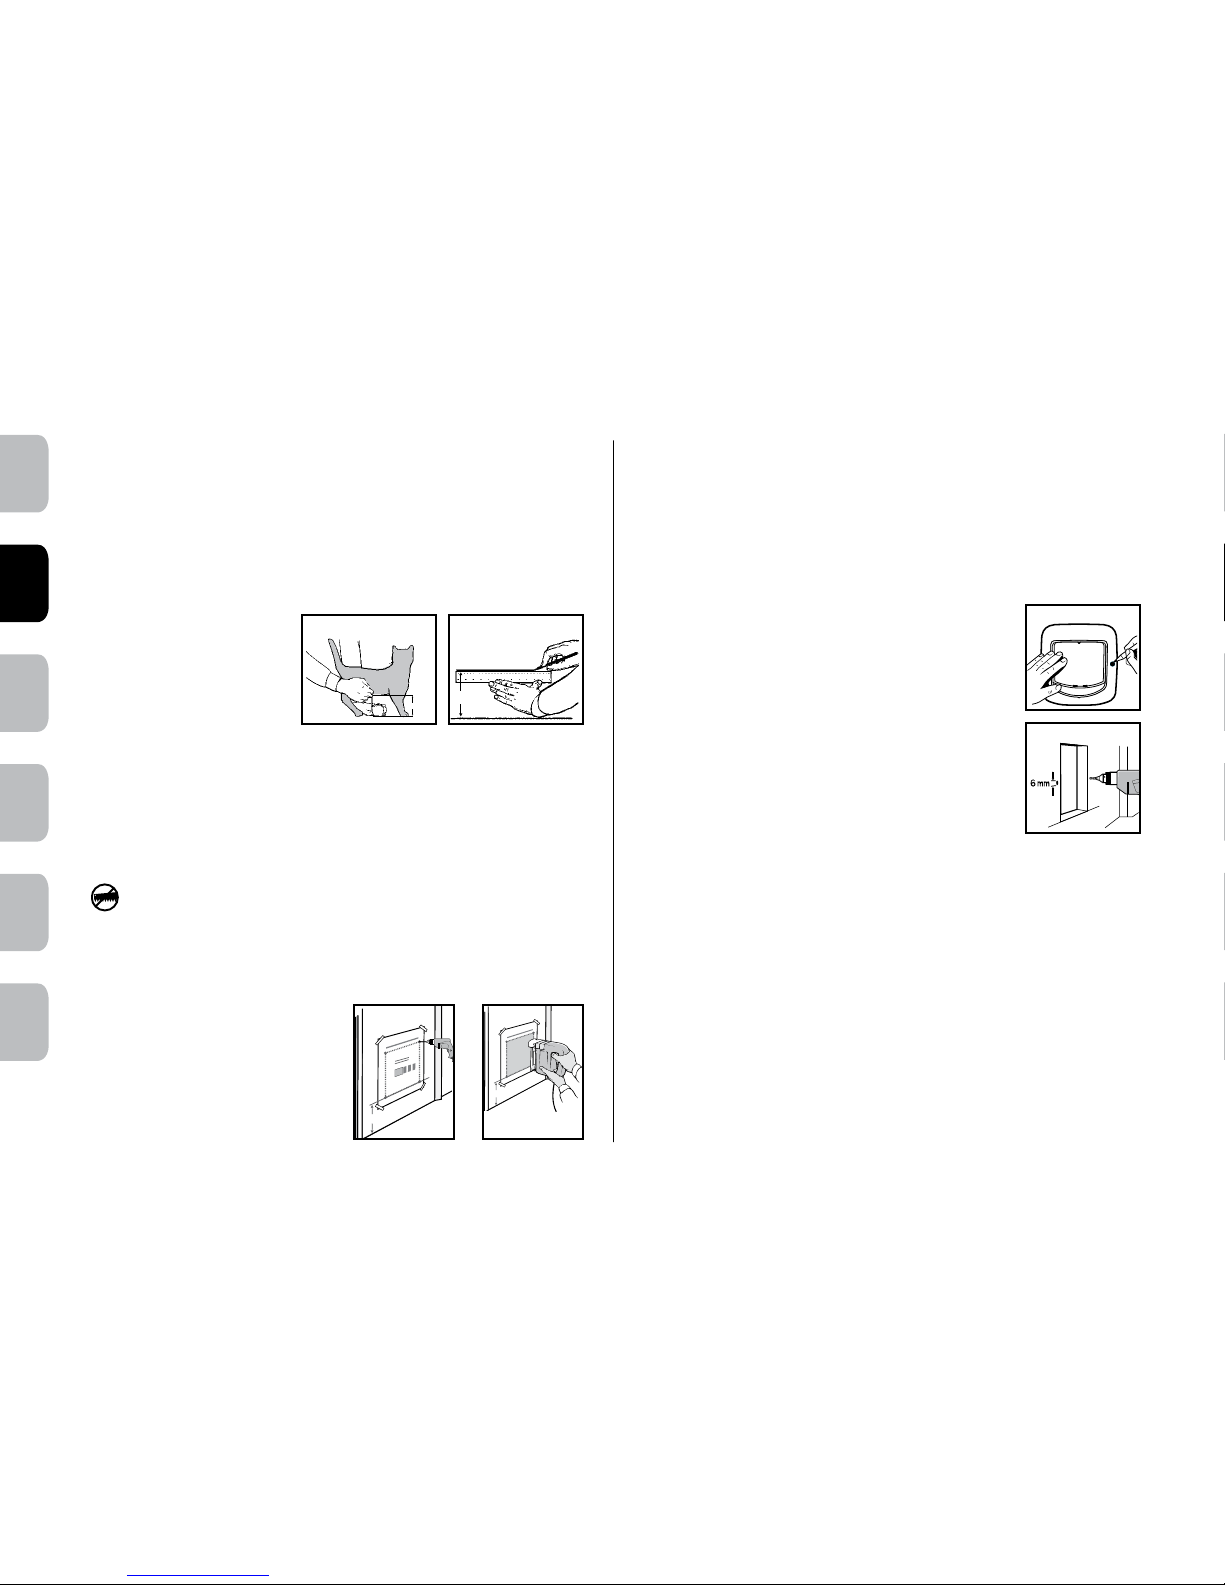
Helpful Tip: Program your cat’s
microchip ID before installation to
prevent having to hold your cat in the
cat flap once it is installed. If you are
having trouble programming your cat’s
microchip ID, please ensure that their
head is extended into the tunnel with the
microchip cat flap oriented as shown.
You should hear the cat flap unlatch once
it has learned your cat’s microchip ID.
Note: If your cat’s head touches the clear flap prior to
unlatching, then the microchip is not located for best use of
this product. Please contact PetSafe
®
Customer Service for
additional options for operation.
Page 4
4
petsafe.com
ENFRES
NL
IT
DE
2. Drill four corner holes with a 12 mm (½”) diameter drill bit as marked on
the Cutting Template through the door. Ensure that the drill remains straight
and level.
3. Using a jig or key-hole saw, cut along the appropriate line as indicated
on the Cutting Template. (Fig. D).
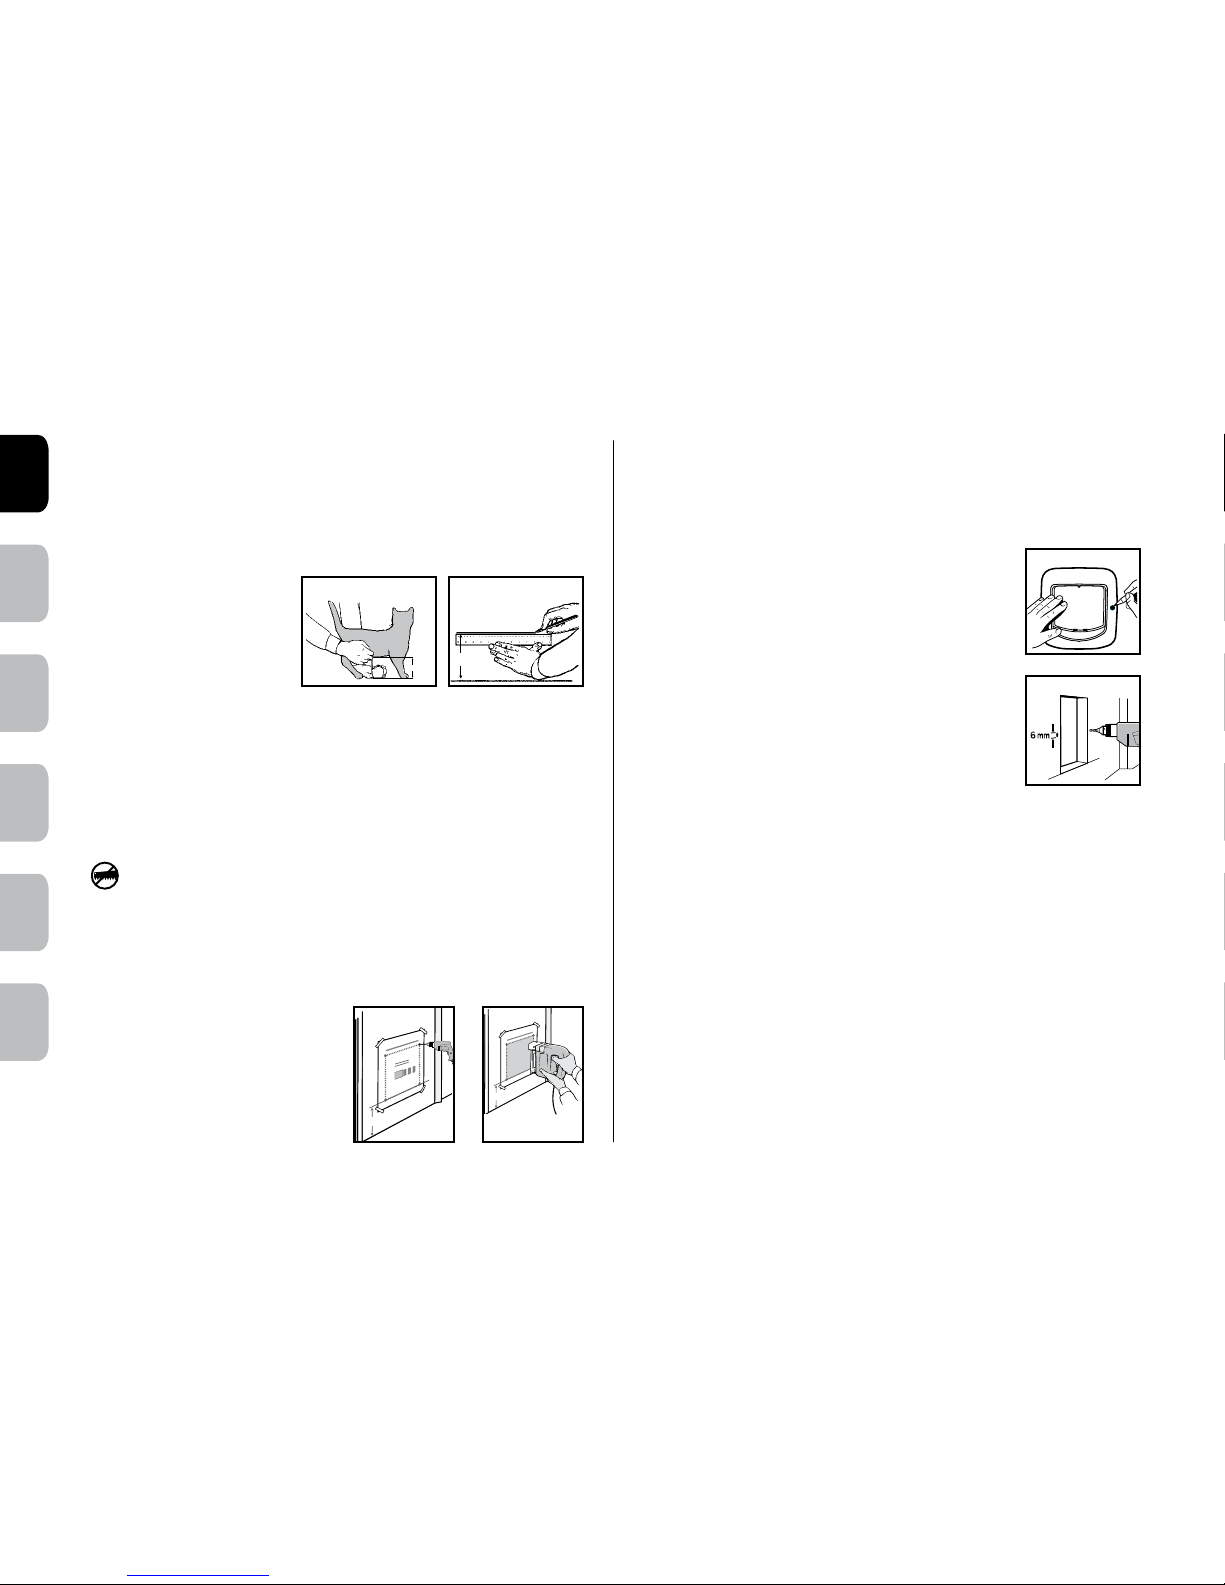
4. Temporarily place the interior frame into the cutout. Level
the cat flap until it is in the proper position in the center
of the cutout. On the outside install the exterior frame.
Use a pencil to mark screw holes through the mounting
holes on the exterior frame (Fig. E).
5. Remove the interior and exterior frame and drill the
screw holes with a 6mm (¼”) drill bit (Fig. F). Ensure
that the drill remains straight and level.
6. Clean the area from any dust, dirt or debris.
7. From the interior of the home, insert the cat flap interior
frame into the opening.
8. From the exterior of the home, place the exterior frame
onto the interior frame.
9. Making sure to center the cat flap in the hole. Three (3) different lengths
of screws have been provided with this cat flap. Select the appropriate
length. Using a manual screw driver, screw the exterior frame to the
interior frame.
10. Insert the two blanking plugs over the screws on the exterior frame.
11. Remove the batteries from the cat flap and wait for 30 seconds. Re-install
the batteries and battery cover. The cat flap is ready to use.
Fig. E
Fig. F
The PetSafe® Microchip Cat Flap is suitable to fit most doors or partitions although
additional materials and competent DIY skills may be required. This cat flap is
designed to adapt easily to cut-out sizes for Staywell® 200, 300, 400, 500, 900
and Petporte smartflap™ series cat flaps. Some simple DIY skills are required and
minor adjustments to the cut-out or additional accessories might be needed.
Installation – Measurement and Marking
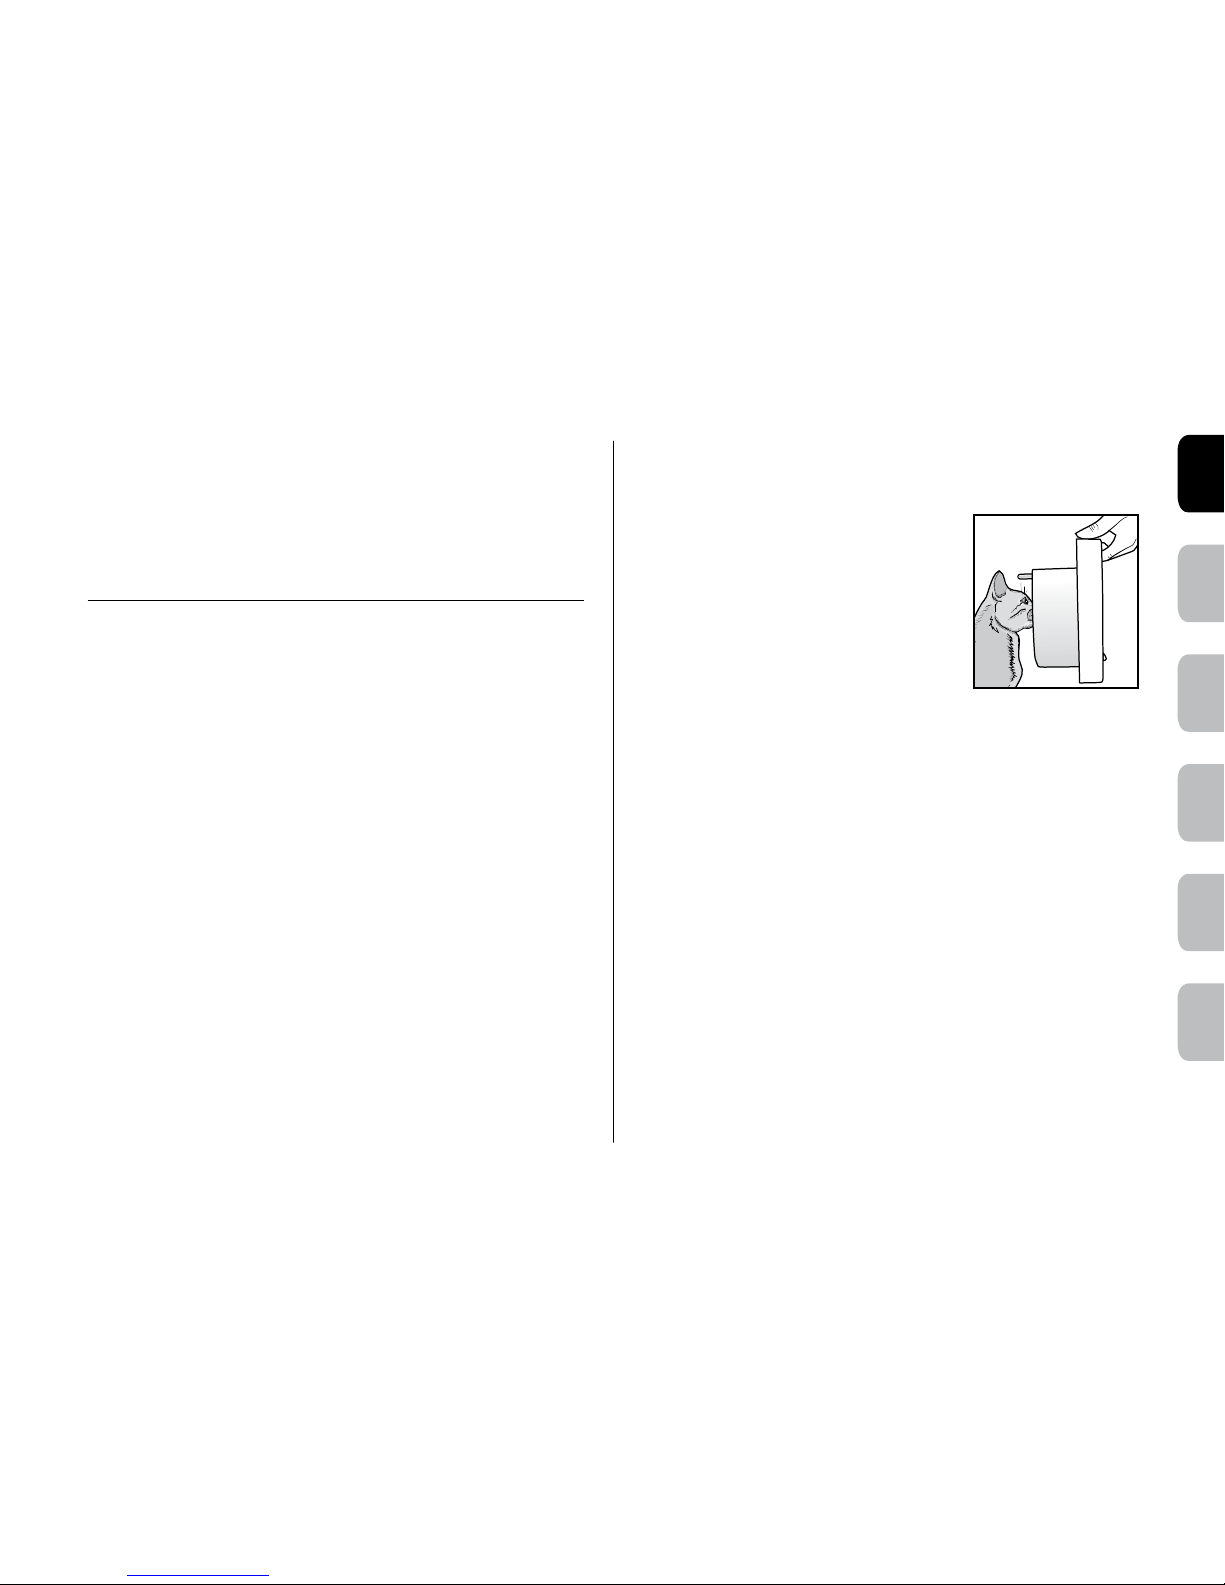
Measure the belly height
of your cat. This is usually
100 mm (3 ¹₅⁄₁₆”) –150 mm
(5 ¹₅⁄₁₆”) (Fig. A).
Mark this measurement on the
outside of your door and draw
a straight horizontal line 168 mm (6
₅
⁄₈”) long, preferably in the center of the
door (Fig. B).
Please keep in mind that this horizontal line will eventually be the bottom of the
hole you will cut in your door. The frame of the cat flap will be 25 mm lower. If
an installation adaptor is used, then the frame will be lower.
Note: This line may have to be raised slightly to allow for at least 50 mm (2”)
from the bottom of the door.
Important: Do not cut the tunnel. Key components are contained
within the tunnel and any alteration to the tunnel will affect functionality.
Installation – Wooden, PVC, or uPVC
Doors without Metal
Before beginning, please check if your door has a metal core. If a metal core
or metal plate is found, follow the
Installation – Metal or Metal Core
Doors instructions.
1. Attach the supplied Cutting Template
to the outside of your door in the
correct position ensuring that it is the
right way up and level (Fig. C).
(x)
Fig. A
(x)
Fig. B
(X)
Fig. C
(X)
Fig. D
Page 5

5
DEITNL
ES
FR
EN
Accessories available online
Installation – Metal or Metal Core Doors
Installation of the cat flap into a door containing metal will require an Installation
Adaptor (sold separately) to ensure proper performance. Once this has been
purchased, follow the instructions below.
1. Attach the supplied Cutting Template to the outside of your door in the
correct position ensuring that it is the right way up and level (Fig. C).
2. Drill four corner holes with a 12 mm (½”) diameter drill bit as marked on
the Cutting Template through the door. Ensure that the drill remains straight
and level.
3. Using a jig or key-hole saw, cut along the appropriate line as indicated
on the Cutting Template. (Fig. D).
4. Clean the area of any dust, dirt or debris.
5. Slide one installation adaptor plate over the tunnel on the interior frame of
the cat flap.
6. From the interior of the home, insert the cat flap interior frame with
installation adaptor into the opening.
7. From the exterior of the home, place the remaining installation adaptor
plate onto the interior frame tunnel followed by the exterior frame of the
cat flap.
8. Making sure to center the cat flap in the hole. Three (3) different lengths
of screws have been provided with this cat flap. Select the appropriate
length. Using a manual screw driver, screw the exterior frame to the
interior frame.
9. Insert the 8 blanking plugs into the exterior and interior installation
adaptor plates and 2 blanking plugs into the exterior frame.
10. Remove the batteries from the cat flap and wait for 30 seconds. Re-install
the batteries and battery cover. The cat flap is ready to use.
Optional: For additional support use screws that are less than half the
thickness of your door to attach the installation adaptors to the door.
Installation – Walls
Installation of the cat flap into a wall will require an Installation Adaptor (sold
separately) to ensure performance. Extension Tunnels may also need to be
purchased to ensure that the flap extends completely through the wall. Once
this has been purchased, follow the instructions below.
Important: Check for electrical and plumbing that could be in
the wall where you wish to place the pet door.
1. Attach the supplied Cutting Template to the inside of your wall in the correct
position ensuring that it is the right way up and level (Fig. C)
Note: Depending on the presence of metal, there are two (2) options on the
cutting template. Please use the appropriate line for your wall construction.
2. Drill four corner holes with a 12 mm (½”) diameter drill bit as marked on the
Cutting Template through the wall. Ensure that the drill remains straight and level.
3. Using the appropriate tool for your home construction, such as a jig saw, cut
along the appropriate line as indicated on the Cutting Template. (Fig. D).
4. From the exterior of the home, finish cutting the hole through the wall using
the four corner holes drilled through the wall as a guide.
5. Clean the area of any dust, dirt or debris.
6. Slide one installation adaptor plate over the tunnel on the interior frame
and attach it to the back of the frame using the two (2) pan headed
screws (included).
7. From the interior of the home, position the interior assembly on the wall
and mark the four (4) screw holes on the installation adaptor plate
attached to the cat flap. Remove the assembly.
8. Using the proper hardware for your wall construction (not included), drill
the appropriate size holes for your hardware and attach the interior frame
with installation adaptor to the wall.
Optional: Add tunnel extensions (sold separately) to extend the tunnels
through your wall.
9. Attach the two (2) included metal clips into the rectangular recesses on
the remaining adaptor plate with the flat side of the clip flush with the outer
face of the plate.
Page 6
6
petsafe.com
ENFRES
NL
IT
DE
10. Set the exterior frame on top of the remaining adaptor plate and attach
using the two (2) 16mm ( ₅⁄₈”) flat head screws (included).
11. From the exterior of the home, place the exterior frame with installation
adaptor attached onto the tunnel of the interior frame and mark the four (4)
screw holes on the installation adaptor plate. Remove the exterior frame.
12. Using the proper hardware for your wall construction (not included), drill
the appropriate size holes for your hardware, and attach the exterior
frame assembly to the wall.
13. Insert the 8 blanking plugs into the exterior and interior installation
adaptor plates and 2 blanking plugs into the exterior frame.
14. Remove the batteries from the cat flap and wait for 30 seconds. Re-install
the batteries and battery cover. The cat flap is ready to use.
Installation – Single-Glazed Glass
The PetSafe® Microchip Cat Flap is designed for installation into single-glazed
glass and requires a circular hole with a diameter of 215 mm (8 ₇⁄₁₆”). Your
glazier will need to cut a circular hole of diameter 215 mm (8 ₇⁄₁₆”) as per the
cutting template. Once a glazier has cut the hole in your glass door or window
please follow the instructions below for installation.
1. From the interior of the home, insert the cat flap interior frame into the opening.
2. From the exterior of the home, place the exterior frame onto the tunnel of the
interior frame.
3. Make sure to center the cat flap in the hole. Three (3) different lengths
of screws have been provided with this cat flap. Select the appropriate
length. Using a manual screw driver, screw the exterior frame to the
interior frame.
4. Insert the two blanking plugs over the screws on the exterior frame.
5. Remove the batteries from the cat flap and wait for 30 seconds. Re-install
the batteries and battery cover. The cat flap is ready to use.
Working with glass is a skilled job and should be carried
out by a professional glazier. It is not possible to cut holes in toughened glass or
double glazed units except at the time of manufacture. Please consult a glazier.
Installation – Double-Glazed Glass
The PetSafe® Microchip Cat Flap is designed for installation into double
glazed glass and requires a circular hole with a diameter of 260 mm (10 ¼”)
and an Installation Adaptor (sold separately.) If possible, have your glazier
use non-metal materials when sealing the glass to prevent the cat flap’s read
range from being reduced. Once your glazier has installed the new glass
panel with a 260 mm hole, please follow the instructions below for installation.
1. Slide one installation adaptor plate over the tunnel on the interior frame of
the cat flap.
2. From the interior of the home, insert the cat flap interior frame with
installation adaptor into the opening.
3. From the exterior of the home, place the remaining installation adaptor
plate onto the tunnel of the interior frame followed by the exterior frame of
the cat flap.
4. Make sure to center the installation adaptor in the hole. Three (3) different
lengths of screws have been provided with this cat flap. Select the
appropriate length. Using a manual screw driver, screw the exterior frame
to the interior frame.
5. Insert the eight (8) blanking plugs into the exterior and interior installation
plates and two (2) into the exterior frame.
6. Remove the batteries from the cat flap and wait for 30 seconds. Re-install
the batteries and battery cover. The cat flap is ready to use.
Working with glass is a skilled job and should be carried
out by a professional glazier. It is not possible to cut holes in toughened glass or
double glazed units except at the time of manufacture. Please consult a glazier.
Page 7
7
DEITNL
ES
FR
EN
Accessories available online
Basic Operation - Guide
FUNCTION BUTTON
ACTIVATION
LED I NDICATOR ACTION
Manual
Mode
Press & Release Red - Solid for 5
seconds
Latch w ill unlock. Use 4-Way Lock
options for pet access.
Automatic
Mode
Press & Release Green - Solid for 5
seconds
Latch w ill lock and will only
be activated by re ading a
“programmed” microchip ID.
Learn Mode Press & Hold for
5 Secon ds until
LED is ac tivated
Red – Solid for up to
60 seconds
Cat flap w ill exit Lear n Mode
once microchip ID is programmed.
Latch will unlock after successful
programming. Repeat for
additional cats.
Motion
Sensor
N/A Green - Solid for th e
length of activation
Motion is detected outsi de and the
cat flap i s looking for a microchip
to read.
Low Bat tery N/A Red - Flas hes every
10 seconds
Replace batteries soon.
Batteries
Replaced
N/A Green – 3 quick
flashes
Cat flap w ill enter Automatic
mode.
Factory Reset Press & Hold 15
Seconds until
LED is ac tivated
Red - 5 quic k flashes Cat fl ap will enter b ack into
Autom atic Mode and b e locked.
All programmed microchip I Ds will
be erased from the m emory.
Error N/A Red – Cont inuous
quick flashing
Remove b atteries , wait 30 secon ds
then replace batteries. If Red light
continues, contact the Customer
Care Centre. Latch will attempt to
unloc k for cat flap to be used in
Manual Mode.
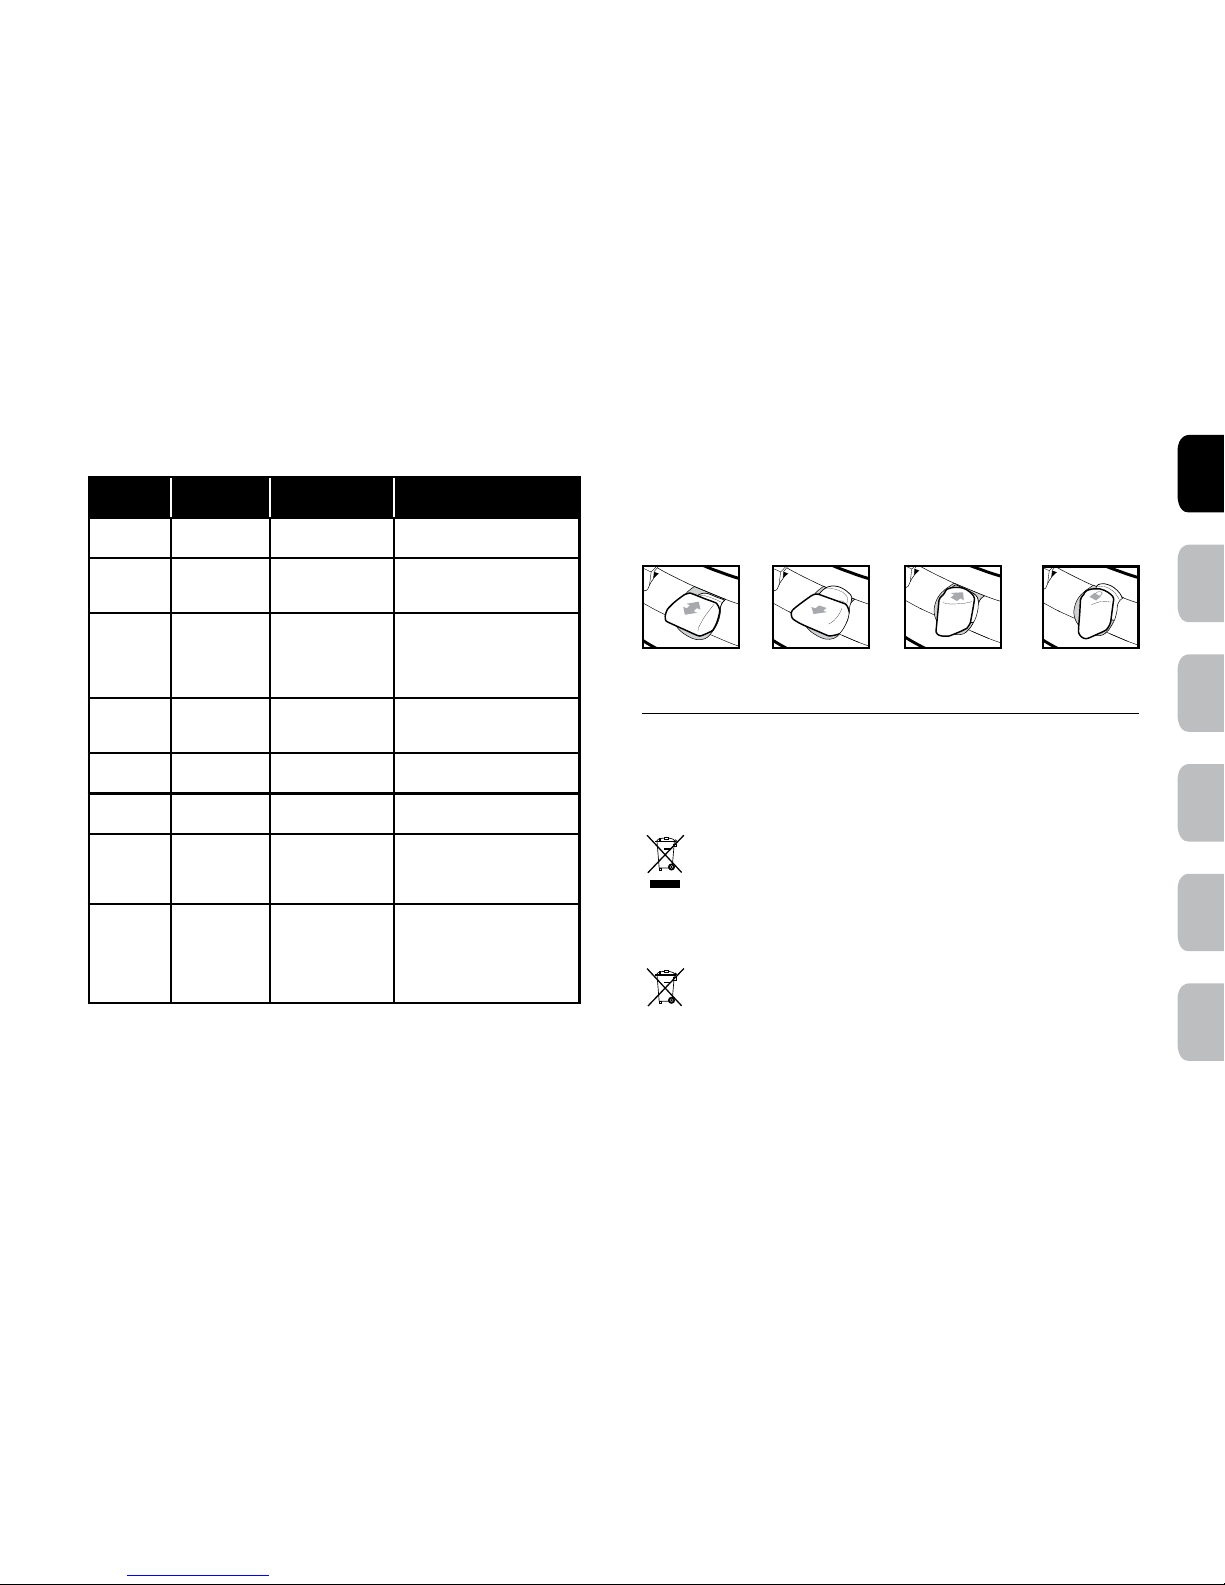
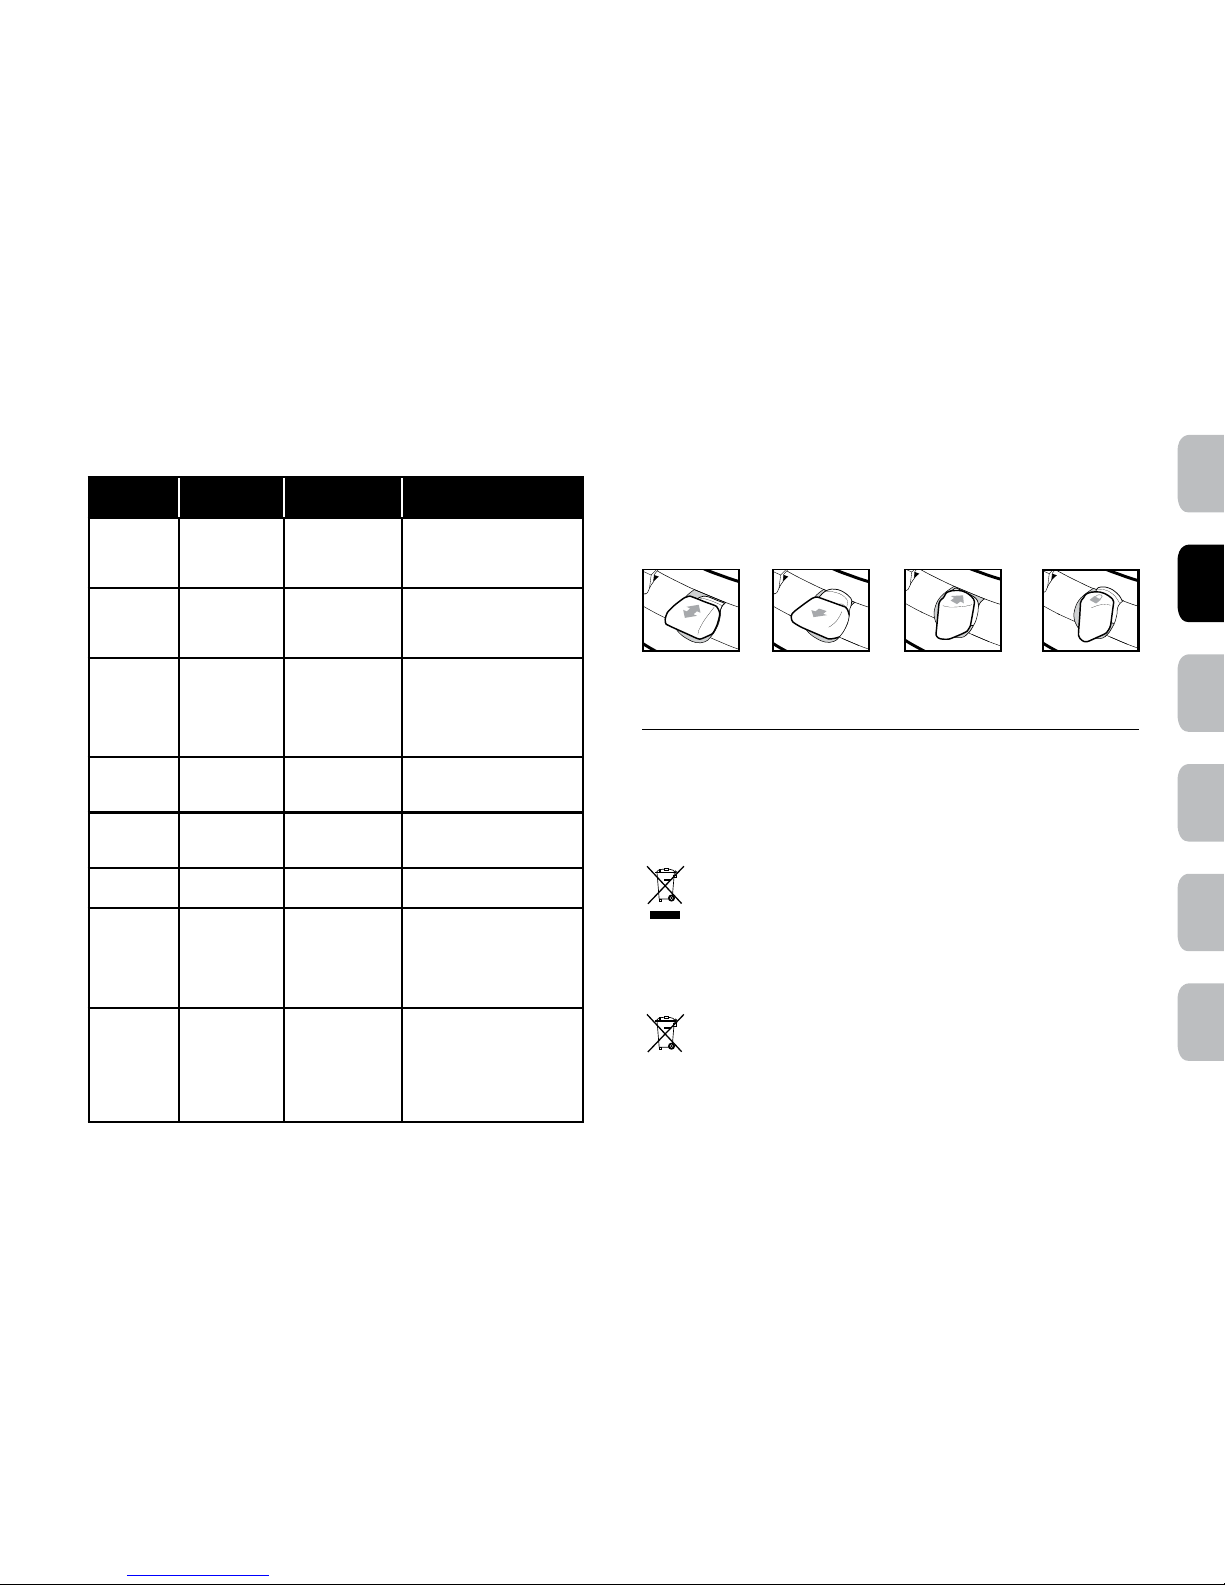
4-Way Manual Lock
The 4-Way Manual lock allows you to control your cat’s access in and out of
your home in either direction. Until your pet is thoroughly familiar with using the
cat flap, it is a good idea to anly use the 4-Way Manual lock in the In or Out
position only (Fig. H).
Fully lockedIn or Out Out onlyIn only
Fig. H
Additional Information
For extended information on your PetSafe® Microchip Cat Flap including glass
and wall installation, helpful training tips, and available accessories, please
visit www.petsafe.com to download the full product Installation Guide.
Important Recycling Advice
Please respect the Waste Electrical and Electrical Equipment regulations in your country. This equipment
must be recycled. If you no lo nger require t his equipment, do not place it in the n ormal munic ipal waste
syste m. Please ret urn it to where i t was purchase d in order that i t can be placed i n our recycli ng system. If
this is n ot possible, please contact PetSafe® Customer Care Centre for further information.
Battery Disposal
Separate colle ction of spe nt batteries is requi red in many regio ns; check the regulations in your a rea
before d iscarding s pent batte ries. At the end of the product life, please contact o ne of our Custo mer Care
Centres to receiv e instruct ions on proper d isposal of t he batter y. Please do not d ispose of th e battery i n
household or municipal waste.
Page 8

8
petsafe.com
ENFRES
NL
IT
DE
Compliance
Radio Systems Corporation declares under its own responsibility, that the following product is in compliance
with t he essenti al requiremen ts under art icle 3 of the RE D (2014/53/EU) and the RoHS Direc tive
(2011/65/EU). Unauthorise d changes or modifications to th e equipment t hat are not app roved by Radio
Systems Corporation may violate EU RED regulations, c ould void the u ser’s authori ty to operat e the
equip ment, and wil l void the warra nty.
Hereby, Ra dio Systems Co rporation , declares th at this PPA19-16145 prod uct is in compl iance with the
esse ntial require ments and other releva nt provision s. The Decla ration of Conformit y can be found at :
http://www.petsafe.net/customercare/eu_docs.php.
IC: Canada
This de vice compli es with Industry Canada lice nse-exem pt RSS standard(s). Operat ion is subjec t to the
following two c onditions : (1) this devic e may not cause i nterferen ce, and (2) this device must a ccept any
interference, including interference that may cause undesired operation of the device.
FCC: USA
This de vice compli es with par t 15 of the FCC Rules. Ope ration is subject to the following two con ditions: (1)
This de vice may not ca use harmfu l interference, and (2) th is device must accept any interference received,
including interference that may cause undesired operation.
NOTE: This e quipment ha s been tested and found to comply with the limits for a Cl ass B digital d evice,
pursu ant to part 15 of the F CC Rules. The se limits are designed t o provide reas onable prote ction agai nst
harmful interference in a residential installation. This equipment generates, uses, and can radiate radio
frequency energy and, if not installed and used in accordance with the instructions, may cause harmful
inter ference to rad io communic ations. However, there i s no guarantee t hat interf erence will not occur in a
specific insta llation. I f interfere nce does occu r to radio or tele vision reception, wh ich can be dete rmined by
turni ng the equipment off a nd on, the user i s encouraged to try to co rrect the int erference b y one or more of
the following measures:
• Reorient or relocate the receiving antenna.
• Increase the separation between the equipment and the receiver.
• Connec t the equipment to an out let on a circuit different from that to which the receive r is
connected.
• Consul t customer care, the deal er, or an experienced radio/TV tec hnician for help.
CAUTI ON: Modific ation or changes to thi s equipment n ot expressl y approved by Rad io Systems
Corpo ration may vo id the user’s aut hority to o perate the equipment .
Australia
This de vice compli es with the ap plicable EMC requireme nts specifi ed by the ACMA
(Australian Communications and Media Authority).
Warranty
Three Year Non-Transferable Limited Warranty
This Product has the benefi t of a limited manufacturer’s warran ty. Complete details o f the warrant y
appli cable to this Product and its terms can be found a t www.petsafe.com and/or are available by
contacting your local Customer Care Centre.
Europe – Radio Systems PetSa fe Europe Ltd., 2nd Floor, Elg ee Building, Market Square, Dundalk,
Co. Louth, A91 YR9X Ireland
USA/Canada – Radio Systems Corpo ration, 10427 PetS afe Way, Knoxvi lle, TN 37932 USA
Australia/New Zealand – In compliance with the Australian Consumer Law, Warranties Against
Defec ts, effec tive January 1, 2012, warranty d etails of this Product are as follows : Radio System s Australia
Pty L td. (hereina fter referred to as “Radio Systems”) warrants t o the original retail pu rchaser, and no t any
other p urchaser or s ubsequent owner, that i ts Product, when subje ct to normal and proper residential use,
will be free from de fects in mat erial or work manship for a p eriod of three (3) years from t he purchase d ate.
An “original retai l consumer pu rchaser” is a pe rson or entity who or iginally pu rchases the Product, or a
gift recipien t of a new Product t hat is unopened and in it s original packaging . When serv iced by Radio
Systems Customer Serv ice, Radio Syst ems covers lab our and part s for the first three years of ownersh ip;
afte r the first thre e years, a ser vice or upgra de charge will apply rel ative to replacement o f the Product
with new or refurbished it ems at Radio Sys tems’ sole dis cretion.
The limited warranty is non-transferable and shall automatically terminate if the original retail consumer
purcha ser resells the Radio Systems Produ ct or transfers the property on w hich the Radio Systems
Produc t is installed. This Limited Warranty excl udes accidental damage due to dog chews; lightning
damag e; or neglect, alteration, and misuse. Consumers wh o purchase products outside of Australia,
New Zealand, or fro m an unauthor ised dealer w ill need to return the Prod uct to the original pla ce of
purchase for any warranty issues.
Pleas e note that Radio Systems does not provide refu nds, replacements, o r upgrades for c hange of
mind, or for any other reason outside of these Warranty ter ms.
Claims Procedure: Any claim made unde r this Warrant y should be mad e directly to Ra dio Systems
Australia Pty Ltd. Cust omer Care Cent re at:
Radio Systems Aus tralia Pty L td.
PO Box 34 42, Australia Fair, QLD 4215, Australia
Australia Residents: 1800 786 608
New Zealand Resid ents: 0800 543 054
Email: aus-info@petsafe.net
To file a claim, a proof of p urchase must b e provided. Without a pro of of purchase, Radio Syst ems will
not repair or repla ce faulty co mponents. Radio Systems requests the Consumer to contact the Radio
Systems Customer Care Cent re to obtain a Warra nty Return number, prior to sendi ng the Product .
Failure to do so may delay in the repair or replacement of the Pro duct.
If the Product is de emed to be faulty within 30 days f rom date of original purc hase, Radio Systems will
organi se for a replace ment to be sent in advance of returni ng the fault y Product. A Post B ag will be
inclu ded with the replacement Produc t for the return of the faulty Product. The Product must be returned
Page 9

9
DEITNL
ES
FR
EN
Accessories available online
within 7 days of receiving t he replacement. If the Product is d eemed to be faulty after 30 days from
the date of original purchase, the consumer will be required to retur n the Product to Radio Systems
at the co nsumer’s own expense. Radio Systems will tes t and replace the fault y unit or its components
and return to the consumer free of charge, provide d the Product is w ithin its said warrant y period. This
warran ty is in addit ion to other rights and remedies available to you under the law. Radio Systems
goods c ome with guarantees th at cannot be exc luded under t he Australia Consume r Law. You are
entit led to a replacement or ref und for a major failure and for compensation for any other reasonably
foreseeable loss or damage. You are also entitled to have the goods repaired or replaced if the goods
fail to be of accept able qualit y and the failure does not amount to a major fail ure.
Shoul d you have any que ries or require a ny further i nformation, please contact o ur Customer Ca re
Centre on 1800 786 608 (Australia) or 080 0 543 054 (New Ze aland).
Terms of Use and Limitation of Liability
1. Terms of Use
Use of this Product i s subject to your acceptance without modification of the ter ms, conditi ons
and notices contained herein. Use of this Product implies acceptance of all such terms, conditions
and notices. If you do not wis h to accept these terms, conditions, and notices, please return the
Product, unused, in its orig inal packaging and at your own cost and risk to the relevant Customer
Care Centre together with p roof of purchas e for a full refund.
2. Proper Use
If you are unsure whether this Product is appropriate for your pet, please consult your vete rinarian
or certified tra iner prior to use. Proper use includes, wit hout limitation, revi ewing the ent ire
manual and any specific safety information statements.
3. No Unlawful o r Prohibit ed Use
This Product is des igned for use w ith pets only. Using this Product in a way that is not intend ed
could result in violation o f Federal, State or local l aws.
4. Limitation of Liability
In no even t shall Radio Systems Cor poration or any of its ass ociated com panies be lia ble for
(i) any indirect, pun itive, incidental, special or consequ ential dama ge and/or (ii) any loss or
damages whats oever arisin g out of or connected wit h the misuse of t his Product. T he Purchaser
assum es all risks and liabili ty from the us e of this Product to the fullest extent permissible by law.
5. Modification of Terms and Conditions
Radio Systems Corporatio n reserves the right to change the terms, co nditions an d notices
govern ing this Product from tim e to time. If suc h changes have been notified to you p rior to your
use of this Product, they shall be bindi ng on you as if inco rporated herein.
Page 10
10
petsafe.com
ENFRES
NL
IT
DE
• En conformité avec les standard reconnus de soins parentaux, les enfants doivent
toujours être sous surveillance.
• Outils électriques. Risque de blessures graves, suivez toutes les consignes de
sécurité fournies avec vos outils électriques.
• Portez toujours vos lunettes protectrices.
Avant l’installation, l’utilisateur doit se familiariser avec les réglementations de
construction susceptibles d’affecter l’installation de la chatière/porte et déterminer,
avec l’aide d’un entrepreneur agréé, son caractère approprié dans une installation
donnée. Cette chatière/porte n’est pas une porte coupe-feu. Il est important pour le
propriétaire et l’entrepreneur de prendre en compte tous les risques éventuels à l’intérieur
ou à l’extérieur de la porte pour animaux, ainsi que tous les risques consécutifs aux
modifications ultérieures de votre propriété, et l’impact que celles-ci peuvent avoir sur
l’existence, l’utilisation, et même le mauvais usage, de la porte pour animaux.
• Si vous découpez une surface métallique, faites attention aux rebords tranchants
afin d’éviter toute blessure.
• Le travail du verre est une activité qui nécessite des compétences et devrait être
menée par un vitrier professionnel. Il n’est pas possible de découper des trous dans
du verre trempé ou du double-vitrage, à moins de le faire lors de la fabrication.
Veuillez consulter un vitrier.
• Gardez ces instructions avec les documents importants ; veillez à les transférer au
nouveau propriétaire de votre maison, le cas échéant.
• Merci de lire ces instructions intégralement avant de percer ou
modifier une ouverture dans la porte ou le mur de votre choix.
Il est fortement recommandé de commencer par programmer la
chatière à puce électronique pour votre chat et d’effectuer un test
de fonctionnement avec la micropuce de votre chat.
• Cet appareil ne peut fonctionner correctement qu’à condition d’être exposé à des
températures extérieures supérieures à -25 °C (-13 °F) et inférieures à 55 °C (131 °F).
• Les portes pour animaux PetSafe® sont adaptées à la plupart des types de porte, de
mur ou de cloison, mais du matériel supplémentaire peut s’avérer nécessaire. Ce produit
est conçu pour votre confort et celui de votre animal. Il n’est pas possible de garantir
en totalité l’exclusion de tous les autres animaux en toutes circonstances. Radio Systems
Corporation n’assumera pas la responsabilité des dégâts ou des dérangements causés
par un animal indésirable qui se serait introduit dans votre maison.
CONSIGNES DE SÉCURITÉ IMPORTANTES
Description des termes et symboles utilisés dans ce manuel
Ce symbole est une alerte de sécurité. Il est utilisé pour vous
alerter des risques de blessures. Veuillez respecter tous les
messages de sécurité qui suivent ce symbole pour éviter tout
risque de blessure ou de décès.
AVERTISSEMENT indique une situation
dangereuse qui, si elle n’est pas évitée,
risque d’entraîner la mort ou des blessures
graves.
ATTENTION, utilisé avec un symbole d’alerte de
sécurité, indique une situation dangereuse qui, si
elle n’est pas évitée, pourrait entraîner des blessures
légères à modérées.
AVIS indique les pratiques qui ne risquent pas
d’entraîner des blessures corporelles.
Lorsqu’il y a des enfants dans la maison, il est important de prendre en compte la porte
pour animaux lorsqu’il est question d’installer des dispositifs de sécurité pour les enfants ;
la porte pour animaux peut être utilisée de manière inappropriée par un enfant, qui
sera alors exposé à des risques potentiels de l’autre côté de la porte pour animaux.
Les acheteurs/propriétaires qui ont une piscine doivent s’assurer que la chatière/porte
est sur veillée en permanence et que la piscine est entourée de barrières adéquates. Si
vous effectuez une installation qui pourrait créer un nouveau danger à l’extérieur ou à
l’intérieur de votre maison et que la porte pour animaux entraine une exposition à ce
danger, Radio Systems Corporation vous recommande de protéger correctement l’accès
à ce danger potentiel ou de retirer la porte pour animaux. Le panneau de fermeture
ou le verrou, le cas échéant, est fourni à des fins esthétiques et d’économie d’énergie ;
il ne s’agit pas de dispositifs de sécurité. Radio Systems Corporation décline toute
responsabilité en cas d’utilisation incorrecte du produit et la responsabilité de surveiller
l’ouverture créée par ce dispositif revient entièrement à l’acheteur.
Ci-après, « Nous » peut renvoyer collectivement à Radio Systems Corporation,
Radio Systems PetSafe Europe Ltd., Radio Systems Australia Pty Ltd., ainsi qu’à
toute autre filiale ou marque de Radio Systems Corporation.
Page 11
11
Accessoires disponibles en ligne
DEITNL
ES
FR
EN
Merci d’avoir choisi la marque PetSafe®. Votre relation avec votre animal se
doit de comporter des moments mémorables et une compréhension mutuelle.
Nos produits et nos outils de dressage permettent aux animaux et à leurs
propriétaires d’avoir de meilleures relations. Si vous avez des questions sur
nos produits ou sur le dressage de votre animal, veuillez contacter
notre service clientèle ou visiter notre site Web, www.petsafe.com.
Pour obtenir la liste des numéros de téléphone du service clientèle,
consultez notre site Web à l’adresse www.petsafe.com.
Enregistrer des chats dans la chatière
PetSafe® à puce électronique
Votre chatière PetSafe® à puce électronique est prévue pour fonctionner avec
la majorité des micropuces à 15 chiffres (FDX-B) utilisées pour les animaux.
Avant de commencer le paramétrage ou l’installation de la chatière, merci de
vérifier que votre chat porte bien le bon type de micropuce.
Pour commencer à fonctionner, la chatière doit apprendre le numéro
d’identification unique (ID) de la micropuce de votre chat. Merci de suivre les
instructions ci-dessous pour commencer le paramétrage de votre chatière :
1. La chatière est préréglée en usine en position verrouillée. Vérifiez que le
système de verrouillage manuel est configuré en position Entrée ou Sortie
(voir Fig. H pa ge 11).
2. Retirez le cache des piles, mettez le paquet fourni de côté et installez
4 piles alcalines AA (LR6) de bonne qualité. La LED verte va clignoter
trois (3) fois, indiquant que la chatière est en mode automatique.
3. Pour passer en mode apprentissage, maintenez enfoncé le bouton situé
dans le compartiment des piles jusqu’à ce que la LED rouge s’allume
(environ 5 secondes). Vous aurez 60 secondes pour introduire la tête du
chat dans le tunnel afin d’enregistrer l’ID de la micropuce. Une fois que
la chatière a enregistré l’ID de la micropuce, elle se débloque et la LED
rouge s’éteint. La chatière reste en mode automatique et se referme au
bout de 3 secondes.
4. Après avoir enregistré l’ID de la micropuce du chat, vous serez en mesure
d’installer la chatière sur votre porte.
Remarque : pour enregistrer plus d’un chat, suivez les mêmes étapes à partir
de l’étape n° 3. La chatière à puce électronique peut enregistrer jusqu’à
40 chats équipés d’une micropuce. Replacez le cache des piles lorsque le
processus est terminé pour tous les chats.
Astuce : enregistrez l’ID de la micropuce
de votre chat avant d’installer la
chatière pour éviter d’avoir à maintenir
votre chat dans la chatière après
l’installation. Si vous avez des difficultés
à enregistrer l’ID de la micropuce de
votre chat, vérifiez que sa tête est
en extension dans le tunnel et que la
chatière à puce électronique est orientée
telle qu’illustrée. Vous devriez entendre
la chatière se déverrouiller lorsqu’elle a
enregistré l’ID de la micropuce de votre chat.
Remarque : si la tête de votre chat touche le rabat transparent
avant le déverrouillage, alors la position de la micropuce
n’est pas idéale pour l’utilisation de ce produit. Veuillez
contacter le service clientèle de PetSafe
®
pour plus d’options
de fonctionnement.
Page 12
12
petsafe.com
ENFRES
NL
IT
DE
1. Fixez le gabarit de découpe fourni à l’extérieur de votre porte dans la
position adéquate en vérifiant qu’il est dans le bon sens et bien horizontal
(Fig. C).
2. Percez la porte dans les quatre coins avec un foret de 12 mm (½”) comme
indiqué sur le gabarit de découpe. Assurez-vous que le foret reste bien
droit et horizontal.
3. Découpez le long de la ligne appropriée à l’aide d’une scie sauteuse ou
d’une scie à guichet, comme indiqué sur le gabarit de découpe. (Fig. D).
4. Placez provisoirement le cadre intérieur dans
l’ouverture. Mettez la chatière à niveau jusqu’à ce
qu’elle soit dans la bonne position au centre de
l’ouverture. À l’extérieur, installez le cadre extérieur.
Utilisez un crayon à papier pour marquer les orifices
des vis à travers les trous de montage du cadre
extérieur (Fig. E).
5. Retirez les cadres intérieur et extérieur et percez les
orifices des vis avec un foret de 6 mm (¼”) (Fig. F).
Assurez-vous que le foret reste bien droit et horizontal.
6. Débarrassez la zone de toute poussière, salissure
ou débris.
7. Depuis l’intérieur de la maison, insérez le cadre
intérieur de la chatière dans l’ouverture.
8. Depuis l’extérieur de la maison, placez le cadre extérieur de la chatière
dans le cadre intérieur.
9. Assurez-vous de bien centrer la chatière dans l’ouverture. Des vis de trois
(3) longueurs différentes sont fournies avec cette chatière. Sélectionnez
la longueur appropriée. À l’aide d’un tournevis manuel, visser le cadre
extérieur sur le cadre intérieur.
10. Insérez les deux bouchons de finition sur les vis du cadre extérieur.
11. Retirez les piles de la chatière et attendez 30 secondes. Insérez de
nouveau les piles et le cache des piles. La chatière est prête à l’emploi.
Fig. E
Fig. F
La chatière à puce électronique PetSafe
®
est prévue pour s’adapter à la
plupart des portes ou cloisons même si des matériaux supplémentaires et des
talents de bricoleurs peuvent être nécessaires. Cette chatière est conçue pour
s’adapter facilement aux tailles de coupe des chatières Staywell® 200, 300,
400, 500 et 900 et des chatières de la série Petporte smartflap™. Quelques
talents de bricoleur de base sont nécessaires et il peut s’avérer nécessaire
d’ajuster légèrement l’ouverture ou d’ajouter des accessoires supplémentaires.
Installation – Mesures et marquage
Mesurez la hauteur du ventre
de votre chat. Celle-ci est
généralement comprise entre
100 mm (3 ¹₅⁄₁₆”) et 150 mm
(5 ¹₅⁄₁₆”) (Fig. A).
Marquez cette hauteur du côté
extérieur de votre porte et tracez une ligne horizontale de 168 mm (6
₅
⁄₈”) de
long, de préférence au milieu de votre porte (Fig. B).
Gardez à l’esprit que cette ligne horizontale correspondra au bas du trou que
vous découperez dans votre porte. Le cadre de la chatière sera 25 mm plus bas.
Si vous utilisez un adaptateur pour l’installation, alors le cadre sera plus bas.
Remarque : vous devrez peut-être surélever légèrement cette ligne pour laisser
au minimum 50 mm (2”) entre celle-ci et le bas de la porte.
Important : ne découpez pas le tunnel. Des composants importants
sont intégrés dans le tunnel et toute altération du tunnel affecterait le
fonctionnement de la chatière.
Installation – Portes en bois, en PVC ou
uPVC sans métal
Avant de commencer, vérifiez si votre
porte dispose d’un renfort métallique.
Si vous découvrez une armature ou une
plaque métallique, suivez les instructions
de la section Installation – Portes en
métal ou à renfort métallique.
(x)
Fig. A
(x)
Fig. B
(X)
Fig. C
(X)
Fig. D
Page 13

13
Accessoires disponibles en ligne
DEITNL
ES
FR
EN
Installation – Portes en métal ou à renfort
métallique
Pour installer cette chatière sur une porte contenant du métal, il vous faudra
utiliser un adaptateur d’installation (vendu séparément) pour garantir son bon
fonctionnement. Une fois cet achat effectué, suivez les instructions ci-dessous.
1. Fixez le gabarit de découpe fourni à l’extérieur de votre porte dans la
position adéquate en vérifiant qu’il est dans le bon sens et bien horizontal
(Fig. C).
2. Percez la porte dans les quatre coins avec un foret de 12 mm (½”) comme
indiqué sur le gabarit de découpe. Assurez-vous que le foret reste bien
droit et horizontal.
3. Découpez le long de la ligne appropriée à l’aide d’une scie sauteuse ou
d’une scie à guichet, comme indiqué sur le gabarit de découpe. (Fig. D).
4. Débarrassez la zone de toute poussière, salissure ou débris.
5. Glissez l’une des plaques de l’adaptateur d’installation sur le tunnel, sur le
cadre intérieur de la chatière.
6. Depuis l’intérieur de la maison, insérez le cadre intérieur de la chatière
muni de l’adaptateur d’installation dans l’ouverture.
7. Depuis l’extérieur de la maison, placez la deuxième plaque de
l’adaptateur d’installation sur le tunnel du cadre intérieur, puis placez le
cadre extérieur de la chatière.
8. Assurez-vous de bien centrer la chatière dans l’ouverture. Des vis de trois
(3) longueurs différentes sont fournies avec cette chatière. Sélectionnez
la longueur appropriée. À l’aide d’un tournevis manuel, visser le cadre
extérieur sur le cadre intérieur.
9. Insérez les huit bouchons de finition sur les plaques intérieure et
extérieure de l’adaptateur d’installation, puis 2 bouchons de finition sur
le cadre extérieur.
10. Retirez les piles de la chatière et attendez 30 secondes. Insérez de
nouveau les piles et le cache des piles. La chatière est prête à l’emploi.
Facultatif : pour un meilleur maintien lorsque vous montez l’adaptateur
d’installation sur votre porte, utilisez des vis dont la longueur est inférieure à la
moitié de l’épaisseur de la porte.
.
Installation – Murs
Pour installer cette chatière sur un mur, il vous faudra utiliser un adaptateur
d’installation (vendu séparément) pour garantir son fonctionnement. Il vous
faudra peut-être également acheter des extensions de tunnel pour que la
chatière traverse entièrement le mur. Une fois cet achat effectué, suivez les
instructions ci-dessous.
Important : vérifiez l’absence de câbles électriques ou
d’accessoires de plomberie dans le mur à l’endroit où vous
désirez installer la porte pour animaux.
1. Fixez le gabarit de découpe fourni à l’intérieur de votre mur dans la position
adéquate en vérifiant qu’il est dans le bon sens et bien horizontal (Fig. C).
Remarque : en fonction de l’absence ou de la présence de métal, deux
(2) options sont disponibles sur le gabarit de découpe. Utilisez la ligne
adaptée à votre type de mur.
2. Percez le mur dans les quatre coins avec un foret de 12 mm (½”) comme indiqué
sur le gabarit de découpe. Assurez-vous que le foret reste bien droit et horizontal.
3. À l’aide d’un outil adapté à la structure de votre maison, une scie sauteuse
par exemple, découpez le long de la ligne appropriée comme indiqué sur
le gabarit de découpe. (Fig. D).
4. Depuis l’extérieur de la maison, finissez de découper l’ouverture dans
le mur en vous guidant grâce aux quatre trous percés précédemment
dans le mur.
5. Débarrassez la zone de toute poussière, salissure ou débris.
6. Glissez l’une des plaques de l’adaptateur d’installation sur le tunnel, sur
le cadre intérieur, et attachez-le au dos du cadre grâce aux deux (2) vis à
tête cylindrique (fournies).
7. Depuis l’intérieur de la maison, placez l’ensemble intérieur sur le mur et
faites une marque à l’emplacement des quatre (4) trous de vis sur la plaque
de l’adaptateur d’installation attachée à la chatière. Retirez l’ensemble.
8. À l’aide d’un outil adapté à la structure de votre mur (non inclus), percez
des trous de taille appropriée et montez le cadre intérieur muni de
l’adaptateur d’installation au mur.
Facultatif : ajoutez des extensions de tunnel (vendues séparément) pour
prolonger le tunnel et le faire traverser le mur.
Page 14
14
petsafe.com
ENFRES
NL
IT
DE
9. Placez les deux (2) clips métalliques inclus dans les niches rectangulaires
situées sur la deuxième plaque de l’adaptateur d’installation, la face plate
du clip étant au ras de la face extérieure de la plaque.
10. Placez le cadre extérieur sur la deuxième plaque de l’adaptateur et
attachez-les à l’aide des deux (2) vis de 16 mm (₅⁄₈”) à tête plate (incluses).
11. Depuis l’extérieur de la maison, placez le cadre extérieur, l’adaptateur
d’installation étant attaché au tunnel du cadre intérieur, et faites une marque
à l’emplacement des quatre (4) trous de vis sur la plaque de l’adaptateur
d’installation. Retirez le cadre extérieur.
12. À l’aide d’un outil adapté à la structure de votre mur (non inclus), percez des
trous de taille appropriée et montez l’ensemble du cadre extérieur au mur.
13. Insérez les huit bouchons de finition sur les plaques intérieure et
extérieure de l’adaptateur d’installation, puis 2 bouchons de finition sur
le cadre extérieur.
14. Retirez les piles de la chatière et attendez 30 secondes. Insérez de
nouveau les piles et le cache des piles. La chatière est prête à l’emploi.
Installation – Vitre à simple vitrage
La chatière PetSafe® à puce électronique est conçue pour pouvoir être
installée sur une vitre à simple vitrage ; elle nécessite un trou circulaire d’un
diamètre de 215 mm (8 ₇⁄₁₆”). Votre vitrier devra découper un trou circulaire
d’un diamètre de 215 mm (8 ₇⁄₁₆”) en respectant le gabarit de découpe.
Lorsque le vitrier aura découpé le trou dans votre porte vitrée ou fenêtre,
suivez les instructions ci-dessous pour compléter l’installation.
1. Depuis l’intérieur de la maison, insérez le cadre intérieur de la chatière
dans l’ouverture.
2. Depuis l’extérieur de la maison, placez le cadre extérieur sur le tunnel du
cadre intérieur.
3. Assurez-vous de bien centrer la chatière dans l’ouverture. Des vis de trois
(3) longueurs différentes sont fournies avec cette chatière. Sélectionnez
la longueur appropriée. À l’aide d’un tournevis manuel, visser le cadre
extérieur sur le cadre intérieur.
4. Insérez les deux bouchons de finition sur les vis du cadre extérieur.
5. Retirez les piles de la chatière et attendez 30 secondes. Insérez de
nouveau les piles et le cache des piles. La chatière est prête à l’emploi.
Le travail du verre est une activité qui nécessite des
compétences et devrait être menée par un vitrier professionnel. Il n’est pas
possible de découper des trous dans du verre trempé ou du double vitrage, à
moins de le faire lors de la fabrication. Veuillez consulter un vitrier.
Installation – Vitre à double vitrage
La chatière PetSafe® à puce électronique est conçue pour pouvoir être
installée sur une vitre à double vitrage ; elle nécessite un trou circulaire d’un
diamètre de 260 mm (10 ¼”) de diamètre et un adaptateur d’installation
(vendu séparément). Si possible, demandez à votre vitrier d’utiliser des
matériaux non métalliques lorsqu’il scellera le verre, afin d’éviter de réduire la
portée de lecture de la chatière. Lorsque votre vitrier aura installé le nouveau
panneau de verre doté d’un trou de 260 mm, suivez les instructions ci-dessous
pour compléter l’installation.
1. Glissez l’une des plaques de l’adaptateur d’installation sur le tunnel, sur le
cadre intérieur de la chatière.
2. Depuis l’intérieur de la maison, insérez le cadre intérieur de la chatière
muni de l’adaptateur d’installation dans l’ouverture.
3. Depuis l’extérieur de la maison, placez la deuxième plaque de
l’adaptateur d’installation sur le tunnel du cadre intérieur, puis placez le
cadre extérieur de la chatière.
4. Assurez-vous de bien centrer l’adaptateur d’installation dans l’ouverture.
Des vis de trois (3) longueurs différentes sont fournies avec cette chatière.
Sélectionnez la longueur appropriée. À l’aide d’un tournevis manuel,
visser le cadre extérieur sur le cadre intérieur.
5. Insérez les huit bouchons de finition sur les plaques intérieure et extérieure
de l’adaptateur d’installation, puis deux (2) sur le cadre extérieur.
6. Retirez les piles de la chatière et attendez 30 secondes. Insérez de
nouveau les piles et le cache des piles. La chatière est prête à l’emploi.
Le travail du verre est une activité qui nécessite des
compétences et devrait être menée par un vitrier professionnel. Il n’est pas
possible de découper des trous dans du verre trempé ou du double vitrage, à
moins de le faire lors de la fabrication. Veuillez consulter un vitrier.
Page 15
15
Accessoires disponibles en ligne
DEITNL
ES
FR
EN
Utilisation de base - Guide
FONCTION BOUTON
D’ACTIVATION
VOYANT LED ACTION
Mode manuel Appuyez et
relâchez
Rouge - fixe pendan t
5 secondes
Le loqu et s’ouvrira. Utilisez
le système de verrouillag e à
4 posit ions pour l’accès des
animaux.
Mode
automatique
Appuyez et
relâchez
Vert - fixe pendant
5 secondes
Le loqu et va se verrouiller et
sera réactivé uniquemen t par la
lecture de l’ID d ’une micropuce
enregist rée.
Mode
Apprentissage
Appuyez et
maintenez
enfoncé pendant
5 secondes
jusqu’ à ce que la
LED soit activée
Rouge - fixe pendan t
60 secondes
La chat ière va quitter le mode
apprentissage une fois que l’ID
de la mic ropuce sera enregistré.
Le loqu et va se déverrouiller après
un enregistrement réussi. Répétez
l’opération pour d’autres chats.
Détecteur de
mouvement
S/O Vert - fixe pendant l a
durée d’activation
Un mouvement est détecté à
l’extérieur et la chatière cherche
une micropuce à lire.
Piles faibles S/O Rouge - clignote
toutes les
10 secondes
Remplacez les piles.
Piles
remplacées
S/O Vert - 3
clignotements brefs
La chat ière va passer en mode
automatique.
Réinitialisation
des paramètres
d’us ine
Appuyez et
maintenez
enfoncé pendant
15 secondes
jusqu’ à ce que la
LED soit activée
Rouge - 5
clignotements brefs
La chat ière va repass er en
mode au tomatique e t être
verrouillée. Toutes les micropuces
enregistrées seront effacées de
la mémo ire.
Erreur S/O Rouge : clignotement
rapide continu
Retirez les piles, attend ez
30 secondes et rep lacez les
piles . Si la lumière rouge persiste,
contactez le service clientèle.
Le loqu et essayera de se
déverrouiller pour une utilisation
de la cha tière en mode manuel.
Verrouillage manuel à 4 positions
Le système de verrouillage manuel à 4 positions vous permet de contrôler
l’accès du chat à votre maison dans toutes les directions. Il est recommandé
d’utiliser le système de verrouillage à 4 positions en position Entrée ou Sortie
uniquement tant que votre animal n’est pas encore familiarisé avec l’utilisation
de la chatière (Fig. H).
VerrouilléeEntrée ou
sortie
Sortie
uniquement
Entrée
uniquement
Fig. H
Informations complémentaires
Pour plus d’informations sur votre chatière PetSafe® à puce électronique, y
compris sur son installation sur des murs ou du verre, des astuces de dressage
utiles et les accessoires disponibles, rendez-vous sur le site www.petsafe.com
pour télécharger le guide d’installation complet du produit.
Remarque importante concernant le recyclage
Veuillez respecter les réglementations concernant les déchets électriques et les déchets de matériel
électrique en v igueur dans v otre pays. Ce t appareil do it être recycl é. Si vous n’avez plus b esoin de cet
appareil, ne le jetez pas dans un systèm e de déchets municipa l courant. Veuil lez le rappor ter là où vous
l’avez acheté pour qu’il soit recyclé. Si cela n’est pas possible, veuillez contacter le service clientèle
PetSa fe® pour de plus amples informations.
Élimination des batteries usagées
La coll ecte sélec tive des piles usagée s est exigée dans de nomb reux pays ; rens eignez-vous sur les
réglementati ons locales e n vigueur ava nt de jeter les p iles usagées. Lorsq ue ce produit aura attei nt la fin
de sa vie utile, veuillez contacter le service clientèle afin d’obtenir des directives relatives à l’élimination
adéqu ate des piles. N’él iminez pas les p iles avec les d échets mén agers ni dans un e déchetterie muni cipale.
Page 16

16
petsafe.com
ENFRES
NL
IT
DE
Conformité
Radio Sy stems Corpo ration décl are sous sa resp onsabilité propre que le produit s uivant est co nforme
aux exi gences ess entielles s tipulées à l’article 3 d e la RED (2014/53/EU) et de la directive Ro HS
(2011/65/EU). Les changemen ts ou les modification s non autoris ées sur l’appa reil qui ne sont p as
approuvées par Radio Systems Corporation peuvent violer les règlementations RED, et sont susceptibles
d’entraîner la révo cation de l’autorisat ion d’utilis ation de l’app areil et annulent la garantie.
Par la prés ente, Radio Systems Cor poration dé clare que ce pro duit PPA19-16145 est conforme au x
exigences fondamentales et autres provisions applicables. La déclaration de conformité est disponible à
l’adresse http://www.petsafe.net/customercare/eu_docs.php.
IC : Can ada
Ce disp ositif est conforme a ux normes RSS non soumis es à licence d’Indust ry Canada . Son fonctionnemen t
est soumis aux deux condit ions suivan tes : (1) ce dispo sitif ne doit causer au cune interf érence et (2) il doit
accepter toute interférence, y compris celles qui pourraient perturber son fonctionnement.
FCC : Ét ats-Uni s
Ce disp ositif est conforme à l a section 15 des rè gles de la FCC (Co mmission américai ne des
commu nications). S on fonctionnement e st soumis aux d eux conditi ons suivant es : (1) ce dispos itif ne
doit causer aucune interférence et (2) il doit accepter toute interférence, y compris celles qui pourraient
perturber son fonctionnement.
REMARQUE : cet équipement a été testé et déclaré conforme aux limites définies pour les appareils
numér iques de Clas se B, confor mément à la Partie 15 de la Régle mentation FCC. Ces li mites sont conçues
afin de fournir un e protection raisonna ble contre toute inter férence dan s le cadre d’un environneme nt
résidentiel. Cet appareil génère, utilise et peut émettre des radiofréquences et, s’il n’est pas installé et
utilisé conformément aux instructions, peut provoquer des interférences nuisibles pour les communications
radio. Cependant, il n’y a aucune garantie d’absence d’interférence dans une installation donnée. Si
des interférences surviennent par rapport à la réception radio ou télévision, que l’on peut déterminer en
éteignant et en rallumant l’appareil, l’utilisateur est encouragé à essayer de corriger l’interférence par l’une
ou plus ieurs des mesures suiva ntes :
• Réorientez ou déplacez l’antenne de réception.
• Augmentez la distance entre l’équipement et le récepteur.
• Connectez l’appareil à une prise située sur un circuit différent de celui du récepteur.
• Consultez le service clientèle, le détaillant ou un technicien en radio/télé expérimenté pour
obtenir de l’aide.
ATTENTION : toute modification ou tout changement apporté(e) à cet équipement, non expressément
approuvé(e) au préalable par Radio Systems Corporation, risque d’invalider l’autorisation de l’utilisateur
à l’utiliser.
Garantie
Trois ans de garantie limitée non trans férable
Ce produit bénéficie d’une garantie limitée du fabricant. L’ensemble des informations concernant
la garantie appl icable à ce prod uit ainsi que ses conditions peu vent être consultées sur le site
www.petsafe.com et/ou vous êt re communiquées si vous contactez votre ser vice clientèle loca l.
Europe – Radio Systems PetSafe Europe Ltd., 2nd Floor, Elgee Building, Market Square, Dundalk,
Co. Louth, A91 YR9X Ireland
USA/Canada – Radio Systems Corpo ration, 10427 PetS afe Way, Knoxvi lle, TN 37932 USA
Conditions d’utilisation et limitation de responsabilité
1. Conditions d’utilisation
L’utilisation de ce Produit est sujett e à votre acceptation sans modifications d e l’intégralité des
conditions générales et consignes d’utilisation stipulées dans le présent document. L’utilisation
de ce Produit revient à en accepter les ter mes, condit ions et consignes d’utilisation. Si vous
n’acceptez pas ces conditions générales et consignes d’utilisation, veuillez renvoyer ce Produit
inuti lisé dans son emballage d’origine, à vos frais e t risques, au s ervice clientèle approprié et
avec une preuve d’achat, afin d’obtenir un re mboursement complet.
2. Utilisation adéquate
Si vous n’ êtes pas sûr(e) que ce Produi t est adapté à votre animal, veuillez consulter votre
vétérinaire ou un dresseur certifié avant emploi. Une utilisation appropriée implique, entre autres,
la consultation de l’intégralité du manuel et de toute s les déclarations relatives au x informations
de sécurité spécifiques.
3. Utilisation illégale ou interdite
Ce Produit est conçu pour être u tilisé exclu sivement avec des anim aux de compag nie. L’usage de
ce Produit dans un bu t autre que celu i prévu pourrait entraîner des inf ractions aux lois fédérales,
local es ou de l’État.
4. Limitation de responsabilité
Radio Systems Cor poration et ses sociétés affiliées ne pe uvent en aucun cas être tenues
responsables (i) des dommages directs, indirects, punitifs, accidentels, spéciaux ou secondaires,
(ii) des pertes ou dommages consécu tifs ou associés à l’utilisation inappropriée de c e Produit.
L’acheteu r assume tous les risques et responsabilités en rapport avec l ’utilisation de ce Produit,
dans la p leine mesure p révue par la loi.
5. Modification des conditions générales
Radio Systems Cor poration se ré serve le droi t de modifier les termes, les cond itions et
les consignes d’utilisation appl icables à ce Produit. Si de telles modificat ions vous ont
été communiqué es avant que vous n’utilisiez ce produit, elles seront consi dérées comme
juridiquement contraignantes et faisant partie du présent document.
Page 17

17
Accessoires beschikbaar online
DEITNL
ES
FR
EN
• In lijn met geaccepteerde normen voor ouderlijke zorg dienen kinderen te allen tijde
onder toezicht te staan.
• Elektrisch gereedschap. Risico op ernstig letsel; volg alle veiligheidsinstructies voor
uw elektrische gereedschap.
• Draag altijd een veiligheidsbril.
De gebruiker moet zich voorafgaand aan de installatie alle bouwcodes eigen maken
die van invloed kunnen zijn op de installatie van het huisdierluik en, samen met een
bevoegde aannemer, bepalen of het product geschikt is voor de specifieke situatie. Dit
huisdierluik is geen branddeur. Het is belangrijk dat de eigenaar en aannemer rekening
houden met alle mogelijk risico’s, binnen en buiten en ook met risico’s als gevolg van
wijzigingen aan uw woning en hoe deze zich verhouden tot de aanwezigheid en het
gebruik, inclusief het misbruik, van het huisdierluik.
• Let bij het snijden van een metalen oppervlak op scherpe randen, om letsel
te voorkomen.
• Werken met glas is gespecialiseerd werk en moet worden uitgevoerd door een
professionele glaszetter. Het is niet mogelijk om gaten te maken in verstevigd glas of
dubbel glas, behalve ten tijde van de productie. Raadpleeg een glaszetter.
• Bewaar deze instructies bij belangrijke papieren en geef deze instructies aan de
nieuwe eigenaar van de woning.
• Lees deze instructies helemaal door voordat u een opening maakt
of aanpast in de deur of wand die u daarvoor hebt geselecteerd.
Wij raden u ten zeerste aan eerst het microchipkattenluik te
programmeren voor uw kat en te controleren of het luik werkt in
combinatie met de microchip van uw kat.
• Deze eenheid werkt alleen goed bij buitentemperaturen die hoger zijn dan -25° C
(-13° F) en lager zijn dan 55° C (131° F).
• PetSafe®-huisdierluiken zijn geschikt voor de meeste deuren, wanden en afscheidingen,
maar soms kan er extra materiaal nodig zijn. Dit product is ontwikkeld voor uw gemak
en dat van uw huisdier. Het is niet mogelijk volledig te garanderen dat alle andere
dieren onder alle omstandigheden buitengesloten blijven. Radio Systems Corporation
aanvaardt geen aansprakelijkheid bij schade, verlies of ongemak veroorzaakt door
ongewenste dieren die uw huis binnengekomen kunnen zijn.
BELANGRIJKE VEILIGHEIDSINFORMATIE
Uitleg van legenda in deze gids
Dit is het symbool voor een veiligheidswaarschuwing.
Het wordt gebruikt om u te wijzen op mogelijke risico’s
van persoonlijk letsel. Volg alle veiligheidsberichten
op die volgen op dit symbool om mogelijk letsel of
overlijden te voorkomen.
WAARSCHUWING geeft een risicovolle
situatie aan die, wanneer deze niet
vermeden wordt, kan leiden tot overlijden
of ernstig letsel.
VOORZICHTIG in combinatie met het symbool
voor veiligheidsalarm, geeft een risicovolle
situatie aan die, wanneer deze niet vermeden
wordt, kan leiden tot licht of matig letsel.
OPMERKING wordt gebruikt om te wijzen
op zaken die niet gerelateerd zijn aan
persoonlijk letsel.
Wanneer er kinderen in huis zijn is het belangrijk om rekening te houden met het
huisdierluik bij het kindveilig maken van het huis. Het huisdierluik kan door een kind
misbruikt worden, waardoor het kind aan de andere kant van het huisdierluik gevaar
kan lopen. Kopers/huiseigenaren met zwembaden moeten ervoor zorgen dat het
huisdierluik te allen tijde in de gaten wordt gehouden en dat het zwembad voldoende
is afgeschermd. Als er een nieuw risico ontstaat in of buiten uw huis, dat via het
huisdierluik toegankelijk is, dan raadt Radio Systems Corporation aan om de toegang
tot het risico goed af te schermen, of het huisdierluik te verwijderen. Het sluitingspaneel
of slot, indien van toepassing, wordt geleverd voor esthetische en energie-efficiënte
doeleinden en is niet bedoeld als beveiligingsinstrument. Radio Systems Corporation is
niet verantwoordelijk voor onbedoeld gebruik en de koper van dit product accepteert de
volledige verantwoordelijkheid voor toezicht op de gecreëerde opening.
Hierna kunnen Radio Systems Corporation, Radio Systems PetSafe Europe Ltd.,
Radio Systems Australia Pty Ltd. en andere aangesloten ondernemingen of merken
van Radio Systems Corporation gezamenlijk “Wij” of “Ons” worden genoemd.
Page 18

18
petsafe.com
ENFRES
NL
IT
DE
Dank u dat u voor het merk PetSafe® hebt gekozen. U en uw huisdier verdienen
een vriendschap die gedenkwaardige momenten en een gedeeld begrip
bevat. Onze producten en trainingsmiddelen versterken de relatie tussen
huisdieren en hun baasjes. Als u vragen heeft over onze producten of het
trainen van uw huisdier, bezoek dan onze website www.petsafe.com
of neem contact op met de klantenservice. Voor een lijst van
telefoonnummers van de klantenservice bezoekt u onze website
www.petsafe.com.
Katten in het PetSafe®-microchipkattenluik
programmeren
Uw PetSafe®-microchipkattenluik is bestemd voor gebruik in combinatie
met de meeste 15-cijferige microchips (FDX-B) die worden gebruikt voor
huisdieren. Controleer of uw kat het correcte type microchip heeft voordat u
het kattenluik gaat instellen of installeren.
Om het kattenluik te kunnen gebruiken, moet het luik het unieke
identificatienummer (de ID) van de microchip van uw kat kennen. Volg
onderstaande stappen voor het instellen van uw kattenluik:
1. Het kattenluik wordt vooraf op de gesloten positie ingesteld in de fabriek.
Zorg ervoor dat de handmatig sluiting is ingesteld op de In- en Uit-positie
(Zie afb. H op pagina 22).
2. Verwijder het batterijdeksel, leg het meegeleverde hardwarepakket opzij
en plaats 4 AA-alkalinebatterijen van hoge kwaliteit (LR6). Het groene
LED-lampje knippert drie (3) keer waarmee wordt aangeduid dat het
kattenluik in de automatische modus staat.
3. Houd de knop in het batterijvak ingedrukt tot het rode LED-lampje gaat
branden (ongeveer 5 seconden) om de inleesmodus te activeren. U hebt
nu 60 seconden de tijd om de kop van uw kat in de doorgang van het luik
te houden, zodat de unieke ID van de microchip kan worden ingelezen.
Als de ID van de microchip door het kattenluik is ingelezen, wordt het luik
ontgrendeld en gaat het rode LED-lampje uit. Het kattenluik blijft in de
automatische modus staan en wordt na 3 seconden opnieuw vergrendeld.
4. Nadat het inlezen van de microchip-ID van uw kat is gelukt, kunt u het
kattenluik in de deur installeren.
Opmerking: als u de microchip van meerdere katten wilt inlezen, volgt u
dezelfde procedure vanaf stap 3. Er kunnen maximaal 40 microchips van
katten worden opgeslagen in het microchipkattenluik. Plaats de batterijdeksel
terug wanneer het proces voor alle katten is voltooid.
Nuttige tip voor het gebruik:
programmeer de microchip-ID van
uw kat voordat u het kattenluik
installeert, om te voorkomen dat u uw
kat in de doorgang van het kattenluik
moet houden nadat dit geplaatst is.
Als u problemen ondervindt bij het
programmeren van de microchip-ID van
uw kat, zorg er dan voor dat u de kop
van de kat goed in de doorgang van
het kattenluik houdt in de richting zoals
getoond. Als de microchip-ID van uw kat is ingelezen, kunt u
horen dat het kattenluik wordt ontgrendeld.
Opmerking: als de kop van uw kat de doorzichtige flap raakt
voor het ontgrendelen, dan is de microchip niet op de optimale
manier geplaatst voor het gebruik van dit product. Neem
contact op met de klantenservice van PetSafe
®
voor extra
bedieningsopties.
Page 19

19
Accessoires beschikbaar online
DEITNL
ES
FR
EN
2. Gebruik een drilboor met een diameter van 12 mm (½”) en boor vier
hoekgaten door de deur, zoals aangegeven op de sjabloon voor
uitsnijden. Zorg ervoor dat u de boor hierbij recht houdt.
3. Zaag met een decoupeerzaag of schrobzaag langs de bijbehorende lijn,
zoals is aangegeven op het sjabloon voor uitsnijden. (afb. D).
4. Plaats het binnenframe tijdelijk in de uitsparing. Houd
het kattenluik zodanig dat dit zich in de juiste positie
bevindt, in het midden van de uitsparing. Installeer het
buitenframe aan de buitenkant. Teken de schroefgaten
af met een potlood, door de montagegaten in het
buitenframe heen (afb. E).
5. Verwijder het binnen- en buitenframe en boor de
schroefgaten met een drilboor met een diameter van
6mm (¼”) (afb. F). Zorg ervoor dat u de boor hierbij
recht houdt.
6. Ontdoe de ruimte van stof, vuil of resten.
7. Plaats vanuit binnen het binnenframe van het kattenluik
in de opening.
8. Plaats vanuit buiten het buitenframe op het binnenframe.
9. Zorg ervoor dat het kattenluik in het midden van het gat geplaatst wordt.
Met dit kattenluik worden schroeven in drie (3) verschillende lengtes
meegeleverd. Kies de juiste lengte. Schroef het buitenframe met behulp
van een handschroevendraaier vast aan het binnenframe.
10. Plaats de twee afdichtdopjes over de schroeven op het buitenframe.
11. Verwijder de batterijen uit het kattenluik en wacht 30 seconden. Plaats de
batterijen en de batterijklep terug. Het kattenluik is klaar voor gebruik.
Afb. E
Afb. F
De PetSafe®-microchipkattenluiken zijn geschikt voor plaatsing in de meeste deuren,
wanden of afscheidingen, hoewel hulpmaterialen en voldoende doe-het-zelfvaardigheden nodig kunnen zijn. Dit kattenluik is ontworpen om eenvoudig te worden
aangepast aan de sjabloonformaten voor Staywell® 200, 300, 400, 500, 900 en
Petporte smartflap™-kattenluiken. Er zijn enkele eenvoudige doe-het-zelfvaardigheden
nodig en mogelijk moeten er kleine aanpassingen worden aangebracht aan de
uitsparing in de deur of moeten er extra accessoires worden gebruikt.
Installatie – Meten en aftekenen
Meet de buikhoogte van uw kat.
Dit is meestal 100 mm (3 ¹₅⁄₁₆”)
–150 mm (5 ¹₅⁄₁₆”) (afb. A).
Markeer deze hoogte aan de
buitenkant van uw deur en teken
een rechte, horizontale lijn van
168 mm (6 ₅⁄₈”) lang, bij voorkeur op het midden van de deur (afb. B).
Houd er rekening mee dat deze horizontale lijn uiteindelijk de onderkant van het
gat wordt dat u in uw deur gaat zagen. Het frame van het kattenluik komt 25 mm
lager te zitten. Indien de installatie-adapter gebruikt wordt zal het frame lager zijn.
Opmerking: deze lijn moet een beetje omhoog gehaald worden om op zijn
minst 50 mm (2”) ruimte vanaf de onderkant van de deur te hebben.
Belangrijk: zaag niet in de tunnel. De tunnel bevat belangrijke onderdelen
en elke aanpassing van de tunnel zal de functionaliteit nadelig beïnvloeden.
Installatie – Deuren van hout, pvc of
PVC-U zonder metaal
Controleer voordat u begint of uw deur een metalen kern heeft. Indien
u een metalen kern of metalen plaat tegenkomt, volg dan de Installatie Gebruiksaanwijzing voor metalen
deuren of deuren met een metalen kern.
1. Zet het meegeleverde sjabloon
voor uitsnijden in de correcte positie
vast op de buitenzijde van uw deur
en zorg dat het met de juiste zijde
omhoog is geplaatst en dat het
waterpas is (afb. C).
(x)
Afb. A
(x)
Afb. B
(X)
Afb. C
(X)
Afb. D
Page 20

20
petsafe.com
ENFRES
NL
IT
DE
Installatie – Metalen deuren of deuren met
een metalen kern
Het installeren van het kattenluik in een deur die metaal bevat vereist een
installatie-adapter (apart verkocht) om een goede prestatie te garanderen. Volg
onderstaande gebruiksaanwijzingen wanneer u dit hebt aangeschaft.
1. Zet het meegeleverde sjabloon voor uitsnijden in de correcte positie vast
op de buitenzijde van uw deur en zorg dat het met de juiste zijde omhoog
is geplaatst en dat het waterpas is (afb. C).
2. Gebruik een drilboor met een diameter van 12 mm (½”) en boor vier
hoekgaten door de deur, zoals aangegeven op de sjabloon voor
uitsnijden. Zorg ervoor dat u de boor hierbij recht houdt.
3. Zaag met een decoupeerzaag of schrobzaag langs de bijbehorende lijn,
zoals is aangegeven op het sjabloon voor uitsnijden. (afb. D).
4. Ontdoe de ruimte van stof, vuil of resten.
5. Schuif een installatie-adapterplaat over de tunnel van het binnenframe
van het kattenluik.
6. Plaats vanuit binnen het binnenframe van het kattenluik met de installatieadapter in de opening.
7. Plaats vanuit buiten de overgebleven installatie-adapterplaat op het
binnenframe van de tunnel en daarna het buitenframe van het kattenluik.
8. Zorg ervoor dat het kattenluik in het midden van het gat geplaatst wordt.
Met dit kattenluik worden schroeven in drie (3) verschillende lengtes
meegeleverd. Kies de juiste lengte. Schroef het buitenframe met behulp
van een handschroevendraaier vast aan het binnenframe.
9. Plaats 8 afdichtdopjes op de buiten- en binneninstallatie-adapterplaten
en 2 afdichtdopjes op het buitenframe.
10. Verwijder de batterijen uit het kattenluik en wacht 30 seconden. Plaats de
batterijen en de batterijklep terug. Het kattenluik is klaar voor gebruik.
Optioneel: voor extra ondersteuning gebruikt u schroeven die minder dan
de helft van de dikte van uw deur zijn om de installatie-adapters op uw deur
vast te zetten.
.
Installatie – Muren
Het installeren van het kattenluik in een muur vereist een installatie-adapter
(apart verkocht) om te werken. U moet eventueel ook verlengtunnels
aanschaffen om ervoor te zorgen dat het luik helemaal door de muur gaat.
Volg onderstaande gebruiksaanwijzingen wanneer u dit hebt aangeschaft.
Belangrijk: controleer of er zich elektrische en sanitaire leidingen
bevinden in de muur waar u het huisdierluik wilt installeren.
1. Zet het meegeleverde sjabloon voor uitsnijden in de correcte positie vast op
de binnenzijde van uw muur en zorg dat het met de juiste zijde omhoog is
geplaatst en dat het waterpas is (afb. C).
Opmerking: afhankelijk of er metaal aanwezig is of niet, zijn er twee (2) opties
op het sjabloon voor uitsnijden. Gebruik de lijn die past bij uw muurconstructie.
2. Gebruik een drilboor met een diameter van 12 mm (½”) en boor vier hoekgaten
in de muur, zoals aangegeven op de sjabloon voor uitsnijden. Zorg ervoor dat
u de boor hierbij recht houdt.
3. Gebruik het juiste gereedschap voor uw constructie, zoals een
decoupeerzaag, en zaag langs de juiste lijn zoals aangegeven op het
sjabloon voor uitsnijden. (afb. D).
4. Zaag vanuit buiten het gat door de muur verder, gebruik makend van de
vier hoekgaten die door de muur geboord zijn als geleiding.
5. Ontdoe de ruimte van stof, vuil of resten.
6. Schuif de installatie-adapterplaat over de tunnel van het binnenframe en
bevestig het aan de achterkant van het frame met de twee (2) schroeven
met een platte kop (inbegrepen).
7. Plaats vanuit binnen de binnenmontage op de muur en teken vier (4)
schroefgaten uit op de installatie-adapterplaat bevestigd aan het
kattenluik. Verwijder de montage.
8. Gebruik gereedschap passend bij uw muurconstructie (niet inbegrepen)
en boor gaten van de juiste maat voor uw schroeven en bevestig het
binnenframe met installatie-adapter op de muur.
Optioneel: voeg extra tunnelverlengstukken toe (apart verkocht) om de
tunnel te verlengen door uw muur heen.
9. Bevestig de twee (2) bijgevoegde metalen klemmen op de rechthoekige
uitsparingen op de overgebleven adapterplaat met de platte kant van de
klem gelijk met de buitenkant van de plaat.
Page 21

21
Accessoires beschikbaar online
DEITNL
ES
FR
EN
10. Plaats het buitenframe bovenop de overgebleven adapterplaat en
bevestig met de twee (2) 16 mm ( ₅⁄₈”) schroeven met een platte kop
(inbegrepen).
11. Plaats vanuit buiten de buitenmontage met installatie-adapter op de tunnel
van het binnenframe en teken vier (4) schroefgaten uit op de installatieadapterplaat. Verwijder het buitenframe.
12. Gebruik gereedschap passend bij uw muurconstructie (niet inbegrepen)
en boor gaten van de juiste maat voor uw schroeven en bevestig het
buitenframe op de muur.
13. Plaats 8 afdichtdopjes op de buiten- en binneninstallatie-adapterplaten
en 2 afdichtdopjes op het buitenframe.
14. Verwijder de batterijen uit het kattenluik en wacht 30 seconden. Plaats de
batterijen en de batterijklep terug. Het kattenluik is klaar voor gebruik.
Installatie - Enkel glas
Het PetSafe®-microchipkattenluik is ontworpen voor installatie in enkel glas
en vereist een rond gat met een diameter van 215 mm (8 ₇⁄₁₆”). Uw glaszetter
snijdt met behulp van de sjabloon voor uitsnijden een rond gat met een
diameter van 215 mm (8 ₇⁄₁₆”) in het glas. Nadat het gat in uw raam of deur
van glas is aangebracht door een glaszetter, volgt u voor de installatie
onderstaande gebruiksaanwijzingen.
1. Plaats vanuit binnen het binnenframe van het kattenluik in de opening.
2. Plaats vanuit buiten het buitenframe op de tunnel van het binnenframe.
3. Zorg ervoor dat het kattenluik in het midden van het gat geplaatst wordt.
Met dit kattenluik worden schroeven in drie (3) verschillende lengtes
meegeleverd. Kies de juiste lengte. Schroef het buitenframe met behulp
van een handschroevendraaier vast aan het binnenframe.
4. Plaats de twee afdichtdopjes over de schroeven op het buitenframe.
5. Verwijder de batterijen uit het kattenluik en wacht 30 seconden. Plaats de
batterijen en de batterijklep terug. Het kattenluik is klaar voor gebruik.
Werken met glas is gespecialiseerd werk en moet
worden uitgevoerd door een professionele glaszetter. Het is niet mogelijk om
gaten te maken in verstevigd glas of dubbel glas, behalve ten tijde van de
productie. Raadpleeg een glaszetter.
Installatie - Dubbel glas
Het PetSafe®-microchipkattenluik is ontworpen voor installatie in dubbel
glas en vereist een rond gat met een diameter van 260 mm (10 ¼”) en een
installatie-adapter (apart verkocht). Laat, indien mogelijk, een glaszetter nietmetaal materiaal gebruiken bij het sealen van het glas om te voorkomen dat
het leesbereik van het kattenluik vermindert. Nadat uw glaszetter een nieuw
glazen paneel met een gat met een diameter van 260 mm heeft geplaatst,
volgt u voor de installatie onderstaande gebruiksaanwijzingen.
1. Schuif een installatie-adapterplaat over de tunnel van het binnenframe
van het kattenluik.
2. Plaats vanuit binnen het binnenframe van het kattenluik met de installatieadapter in de opening.
3. Plaats vanuit buiten de overgebleven installatie-adapterplaat op de tunnel
van het binnenframe en daarna het buitenframe van het kattenluik.
4. Zorg ervoor dat de installatie-adapter in het midden van het gat geplaatst
wordt. Met dit kattenluik worden schroeven in drie (3) verschillende
lengtes meegeleverd. Kies de juiste lengte. Schroef het buitenframe met
behulp van een handschroevendraaier vast aan het binnenframe.
5. Plaats acht (8) afdichtdopjes op de buiten- en binneninstallatieplaten en
twee (2) afdichtdopjes op het buitenframe.
6. Verwijder de batterijen uit het kattenluik en wacht 30 seconden. Plaats de
batterijen en de batterijklep terug. Het kattenluik is klaar voor gebruik.
Werken met glas is gespecialiseerd werk en moet
worden uitgevoerd door een professionele glaszetter. Het is niet mogelijk om
gaten te maken in verstevigd glas of dubbel glas, behalve ten tijde van de
productie. Raadpleeg een glaszetter.
Page 22

22
petsafe.com
ENFRES
NL
IT
DE
Basisgebruiksaanwijzing
FUNCTIE KNOPACTI-
VERING
LEDLA MPJE ACTIE
Handmatige
modus
Indrukken en
loslaten
Rood - Continue
gedurende
5 seconden
Vergrendeling wordt ontgrendeld.
Gebruik de opti es voor
4-standenvergrendeling voor
toegang voor huisdieren.
Automatische
modus
Indrukken en
loslaten
Groen - Continue
gedurende
5 seconden
Vergrendeling wordt vergrendeld
en wordt alleen geactiveerd
door he t inlezen van een
“geprogrammeerde” microchip-ID.
Inleesmodus Gedurende
5 seconden
ingedrukt
houde n totdat
het ledlampje
wordt
geactiveerd
Rood – Continu
gedurende
60 seconden
Kattenluik verlaat de inleesmodus
zodra microchip -ID is
geprogrammeerd. Vergrendeling
wordt ontgrendeld na een
succesvolle programmering.
Herhaal voor ex tra katten.
Bewegingssensor N.v.t. Groen - Continu
voor de duur van
de activering
Er wordt buiten beweging
waargenomen en het kattenluik
contro leert of er een microchip is
die kan worden ingelezen.
Batterij bijna Leeg N.v.t. Rood - Kn ippert
om de
10 seconden
De batterijen moeten binnenkort
worden vervangen.
Batterijen
vervangen
N.v.t. Groen – Knipper t
snel 3 keer
Kattenluik gaat naar Automatische
modus.
Fabrieksinstellingen herstellen
Gedurende
15 seconden
ingedrukt
houde n
totdat het
ledlampje wordt
geactiveerd
Rood - Knippert
snel 5 keer
Kattenluik gaat terug naar
Autom atische modus en
wordt vergrendeld. Alle
geprogrammeerde microchipID’s worde n uit het geheugen
verwijderd.
FUNCTIE KNOPACTI-
VERING
LEDLA MPJE ACTIE
Error N.v.t. Rood –
aanhoudend snel
knipperen
Verwijder de batterijen, wacht
30 seconden en pl aats dan de
batterijen terug. Neem contact
op met de k lantenser vice als het
rode lampje blijft brand en. De
vergrendeling zal proberen te
ontgre ndelen zodat het kattenluik
kan worden gebruikt in de
Handmatige modus.
Handmatige 4-standenvergrendeling
Met de 4-standenvergrendeling kunt u de toegang van uw kat naar
binnen en naar buiten in beide richtingen regelen. Tot uw huisdier
vertrouw is met het gebruik van het kattenluik, is het een goed idee om het
4-standenvergrendeling uitsluitend te gebruiken in de In- en uitpositie (afb. H).
Volledig
afgesloten
In of uit Alleen uitAlleen in
Afb. H
Extra informatie
Bezoek www.petsafe.com voor uitgebreide informatie over uw PetSafe®microchipkattenluik, inclusief installatie in glas en muren, nuttige tips voor
het gebruik en beschikbare accessoires of om de montagehandleiding te
downloaden.
Page 23

23
Accessoires beschikbaar online
DEITNL
ES
FR
EN
Belangrijk advies voor recycling
Voor het veilig verwijderen van kattenluiken dient u de lokale regels betreffende het veilig verwijderen
van elektrisch afval en elektrische apparaten in acht te nemen. Dit apparaat dient gerecycled te worden.
Indie n u dit apparaa t niet langer n odig hebt, werp het dan ni et weg bij het gewone huisvuil. Bre ng het
apparaat terug n aar de plaat s van aankoop, zo dat het kan worde n opgenome n in ons recycli ngsysteem.
Als dit n iet mogelij k is, neem dan co ntact op met d e klantense rvice van PetSafe® voor meer informatie.
Wegwerpen van batterijen
Gescheiden inzameling van gebruikte batterijen is in veel landen verplicht; controleer de plaatselijke
voorschriften voorda t u gebruikte batter ijen weggoo it. Aan het ein de van de gebruiksduu r verzoeken
wij u con tact op te nem en met een van onze klante nservices voor een g ebruiksaa nwijzing vo or gepaste
wegwerpen van de batterij. Wij verzoeken u om de batterij niet bij het huishoudelijk of gemeentelijke
afval te plaatsen.
Conformiteit
Radio Systems Corporation verklaart onder zijn eigen verantwoordelijkheid dat het volgende product
voldo et aan de esse ntiële verei sten onder ar tikel 3 van de RE D (2014/53/EU) en de RoH S Richtlijn
(2011/65/EU). Ongeoorloofde wijzigingen of aanpassingen aan de apparatuur, welke niet zijn
geacc ordeerd door d e Radio System s Corporati on, kunnen lei den tot inbreu k op de EU richtl ijnen, tot het
verbo d op het gebrui k van dit syste em en tot het nie tig verklaren van de gara ntie.
Hierbij verklaart Radio Systems Corporation dat dit PPA19-16145 product voldoet aan de
essentiële eisen en andere relevante bepalingen. U vindt de conformiteitsverklaring op:
http://ww w.petsafe.com/customercare/eu_docs.php.
Garantie
Drie jaar niet-overdraagbare beperkte garantie
Dit product heeft het voordeel van ee n beperkte fabrieks garantie. Volledige details van de garantie
van toepassing op dit product en de gebruiksvoorwaarden vindt u op ww w.petsafe.com en/of zijn
beschikbaar door contact op te nemen met uw lokale klantenser vice.
Europa – Radio Sys tems PetSafe Europe Ltd., 2nd Floor, Elg ee Building, Market Square, Dund alk,
Co. Louth, A91 YR9X Ireland
Gebruiksvoorwaarden en beperking van aansprakelijkheid
1. Gebruiksvoorwaarden
Dit product wordt u aangeboden onder voorwaarde van uw toezegging, zonder wijziging,
van de algemene voorwaarden en kennisgevingen die hierin staan. Gebruik van dit Product
impliceert aanvaarding al dergelijke algemene voorwaarden en kennisgevingen. Indien u deze
algemene voorwaarden en kennisgevingen niet wenst te aanvaarden, verzoeken wij u het
Product ongebruikt, in de oorspronkelijke verpakking en voor eigen kosten terug te sturen naar de
betreffende klanten service, samen met het aankoopbewijs, voor volledige restitutie.
2. Correct gebruik
Als u er ni et zeker van bent of dit produ ct geschikt is voor uw huisdier, gelieve dan vó ór gebruik
contact op te nemen met uw dierenarts of een gediplomeerde trainer. Correct gebruik omvat, zonder
beperkingen, het doornemen van de volledige handleiding en alle specifieke veiligheidsinformatie.
3. Geen onwettelijk of verboden gebruik
Dit product is all een ontworpen voor gebruik me t huisdieren. Gebruik van dit Product op een
wijze waarvoo r het niet bedoeld is, kan de schending van nat ionale of plaatselijke wetten of de
wetten van een staat tot gevolg hebben.
4. Beperking van aansprakelijkheid
Onder geen enkel e omstandigheid zal Rad io Systems Cor poration of een van de gel ieerde
bedrijven aansprakelijk zijn voor (i) indirecte, strafrechtelijke, incidentele, speciale of
vervolgschade en/of (ii) voor verlies of schade, ongeacht de aard erva n, die voort vloeit uit of
verband houdt met het oneigenlijk g ebruik van dit Product. De koper aanvaardt, in de breedste
zin zoals toegestaan door de wet, alle risico’s en aansprakelijkheden aan die samenhangen met
het geb ruik van dit Product.
5. Aanpassing van de algemene voorwaarden
Radio Systems Cor poration behoudt zich het recht voor om de algemene voorwaarden
en kennisgevingen waaronder dit Product wordt aangeboden, te wijzigen. Indien u werd
geïnformeerd over zulke wi jzigingen voorafgaand aan het g ebruik van dit Product zullen deze
wijzigingen bindend zijn.
Page 24

24
petsafe.com
ENFRES
NL
IT
DE
• Para cumplir las normas aceptadas de control parental, debe supervisar a los niños
en todo momento.
• Herramientas eléctricas. Peligro de lesión grave; siga todas las instrucciones de
seguridad para sus herramientas eléctricas.
• Asegúrese de utilizar siempre sus gafas de protección.
El usuario, antes de la instalación, debe familiarizarse con todos los códigos del
edificio que puedan afectar a la instalación de la puerta para mascotas y determinar,
junto con un instalador profesional su idoneidad en una instalación dada. Esta puerta
para mascotas no es una puerta para incendios. Es importante que el propietario y el
instalador consideren los riesgos que puedan estar presentes dentro o fuera de la puerta
para mascotas, así como los riesgos que puedan crearse por los subsiguientes cambios
en su propiedad y los relacionados con su existencia y uso, incluida la mala utilización
de la puerta para mascotas.
• Si está cortando una superficie de metal, tenga cuidado con los bordes afilados
para evitar lesiones.
• El trabajo con cristal requiere habilidad y debe ser llevado a cabo por un cristalero
profesional. No es posible practicar agujeros en vidrio templado ni en doble
acristalamiento, excepto en el momento de fabricación. Consulte a un cristalero.
• Conserve estas instrucciones con sus documentos importantes, asegúrese de
transferir estas instrucciones al nuevo propietario de la vivienda.
• Lea todas las instrucciones antes de crear o modificar una apertura
en la puerta o pared seleccionada. Recomendamos encarecidamente
que programe su puerta con microchip para su gato y compruebe
que funcione primero con el microchip de su gato.
• Esta unidad solo funciona correctamente siempre que la temperatura exterior
supere los -25 °C (-13 °F) y sea inferior a 55 °C (131 °F).
• Las puertas para mascotas PetSafe
®
son adecuadas para la mayoría de puertas,
paredes o tabiques, si bien puede requerir materiales adicionales. Este producto
está diseñado para su comodidad y la de su mascota. No se puede garantizar
totalmente la exclusión del resto de animales en todas las circunstancias.
Radio Systems Corporation no aceptará responsabilidades por daños o
inconvenientes causados por animales no deseados que puedan conseguir
acceder a su hogar.
INFORMACIÓN DE SEGURIDAD IMPORTANTE
Explicación de las palabras de atención y símbolos utilizados en esta guía
Este es el símbolo de alerta de seguridad. Se utiliza para
alertarlo sobre riesgos de lesiones personales potenciales.
Siga todos los mensajes de seguridad que aparecen a
continuación de este símbolo para evitar posibles daños o
la muerte.
ADVERTENCIA indica una situación
peligrosa que, de no evitarse, podría provocar
lesiones poco importantes o moderadas.
ATENCIÓN, utilizada con el símbolo de alerta de
seguridad, indica una situación peligrosa que, de no
evitarse, podría provocar lesiones poco importantes
o moderadas.
AVISO se utiliza para referirse a prácticas no
relacionadas con las lesiones personales.
Cuando haya niños en el hogar, es importante considerar la puerta para mascotas al
adoptar las medidas de protección para niños; los niños pueden utilizar la puerta para
mascotas de forma indebida y exponerse a los riesgos que podrían existir del otro lado de
esta puerta. Los compradores o propietarios de vivienda con piscinas deben garantizar
que la puerta para mascotas esté controlada en todo momento y que la piscina tenga
barreras de entrada adecuadas. Si surge un nuevo peligro dentro o fuera de su hogar,
al que puede acceder por la puerta para mascotas, Radio Systems Corporation, le
recomienda que proteja de forma adecuada el acceso al peligro o retire la puerta para
mascotas. La placa de cierre o bloqueo, si procede, se suministra por estética y eficacia
energética y no está concebida como dispositivo de seguridad. Radio Systems Corporation
no se hará responsable del uso no previsto, y el comprador de este producto acepta toda
la responsabilidad relativa a la vigilancia de la abertura que crea.
De ahora en adelante podemos hacer referencia a Radio Systems Corporation,
Radio Systems PetSafe Europe Ltd., Radio Systems Australia Pty Ltd., y cualquier
otra filial o marca de Radio Systems Corporation colectivamente como
“Nosotros” o “A nosotros”.
Page 25

25
Accesorios disponibles en línea
DEITNL
ES
FR
EN
Gracias por elegir la marca PetSafe®. Usted y su mascota se merecen disfrutar
de una relación repleta de momentos memorables y de comprensión mutua.
Nuestros productos y herramientas de adiestramiento mejoran la relación entre
las mascotas y sus propietarios. Si tiene alguna pregunta sobre nuestros
productos o sobre el adiestramiento de su mascota, visite nuestro
sitio web www.petsafe.com o póngase en contacto con nuestro
Centro de atención al cliente. Para obtener un listado de los números
de teléfono del Centro de atención al cliente, visite nuestro sitio web
www.petsafe.com.
Programar gatos en la puerta con
microchip PetSafe
®
La puerta con microchip PetSafe® está diseñada para que funcione con
la mayoría de microchips de 15 dígitos (FDX-B) utilizados para mascotas.
Antes de empezar la configuración o instalación de la puerta para gatos,
asegúrese de que su gato tiene el tipo correcto de microchip.
Para empezar a funcionar, la puerta para gatos debe conocer el número de
identificación (ID) único del microchip del gato. Siga los pasos a continuación
para empezar la instalación de su puerta para gatos:
1. La puerta para gatos estará preconfigurada de fábrica en posición de
bloqueo. Asegúrese de que el bloqueo manual este ajustado en posición
Dentro y Fuera (Ver fig. H en la página 29).
2. Retire la tapa de las baterías, reserve el paquete de tornillería que se
incluye e instale las 4 baterías alcalinas AA (LR6). El indicador luminoso
LED verde parpadeará tres (3) veces, lo que indica que la puerta para
gatos está en el modo automático.
3. Para entrar en el modo de Aprendizaje, mantenga pulsado el botón
hasta que el indicador luminoso LED rojo se encienda (alrededor de
5 segundos). Tendrá 60 segundos para colocar la cabeza del gato en el
túnel para reconocer el microchip ID. Una vez que la puerta para gatos
haya reconocido el ID del microchip, se desbloqueará y el indicador
luminoso LED rojo se apagará. La puerta para gatos permanecerá en el
modo Automático y se volverá a cerrar al cabo de 3 segundos.
4. Tras el reconocimiento correcto del ID del microchip del gato, podrá
instalar la puerta para gatos en su puerta.
Nota: para reconocer a más de un gato, siga los mismos pasos desde el paso
n.° 3. La puerta para gatos con microchip puede guardar hasta 40 gatos con
microchip. Vuelva a colocar la tapa de las baterías cuando haya terminado el
proceso para todos los gatos.
Consejo útil: programe el ID único
del microchip de su gato antes de
la instalación para evitar tener que
sostener al gato en la puerta para gatos
una vez instalada. Si tiene problemas
para programar el ID del microchip de su
gato, asegúrese de que la cabeza esté
extendida en el túnel con la puerta para
gatos con microchip orientada como
se muestra. Debe oír como la puerta
para gatos se desbloquea cuando haya
reconocido el ID del microchip de su gato.
Nota: si la cabeza de su gato toca el hueco de la puerta antes
de desbloquearse, entonces el microchip no está colocado
para aprovechar el producto al máximo. Si desea opciones de
funcionamiento adicional, póngase en contacto con el servicio
al cliente de PetSafe
®
.
Page 26

26
petsafe.com
ENFRES
NL
IT
DE
2. Perfore en la puerta los cuatro orificios con una broca de un diámetro
de 12 mm (½”) tal como está marcado en la plantilla para el corte.
Asegúrese de que la broca permanece recta y nivelada.
3. Utilice una plantilla o una sierra para cerraduras para cortar a lo largo de
la línea de puntos, como se indica en la plantilla de corte. (fig. D).
4. Coloque temporalmente el marco interior en el corte.
Nivele la puerta para gatos hasta que esté en el centro
del corte. En el exterior instale el marco exterior. Use un
lápiz para marcar los orificios de los tornillos a través
del marco exterior (fig. E).
5. Retire el marco interior y exterior, y taladre los agujeros
con una broca de 6 mm (¼”) (fig. F). Asegúrese de
que la broca permanece recta y nivelada.
6. Limpie la zona de polvo, suciedad o restos.
7. Desde el interior de la casa, introduzca el marco
interior de la puerta para gatos en la abertura.
8. Desde el exterior de la casa, coloque el marco
exterior sobre el marco interior.
9. Asegurarse de centrar la puerta para gatos en el agujero. Se suministran
con esta puerta para gatos tres (3) longitudes distintas de tornillos. Elija la
longitud más adecuada. Con un destornillador manual, atornille el marco
exterior al marco interior.
10. Introduzca los dos taponadores sobre los tornillos en el marco exterior.
11. Retire las baterías de la puerta para gatos y espere 30 segundos. Vuelva
a colocar las baterías y la tapa de las baterías. Ya puede utilizar la
puerta para gatos.
Fig. E
Fig. F
La puerta para gatos con microchip PetSafe
®
es adecuada para ajustarse a la
mayoría de puertas o tabiques, si bien puede requerir materiales adicionales
y habilidades profesionales de bricolaje. Esta puerta para gatos está
diseñada para adaptarse fácilmente a tamaños de abertura para las series
de puertas para gatos Staywell
®
de 200, 300, 400, 500, 900 y Petporte
smartflap
™
. Son necesarias ciertas dotes de bricolaje y quizá requiera
pequeños ajustes al recorte o accesorios adicionales.
Instalación – Medición y marcado
Mida la altura de su gato en la
barriga. Suele ser de 100 mm
(3 ¹
₅
⁄₁₆”) –150 mm (5 ¹₅⁄₁₆”)
(fig. A).
Marque esta medición en el
exterior de su puerta y trace una
línea horizontal de 168 mm de
longitud (6
₅
⁄₈”), de preferencia en el centro de la puerta (fig. B).
Tenga en cuenta que posteriormente esta línea horizontal será la parte inferior
del orificio que practicará en su puerta. El marco de la puerta para gato será
de 25 mm o inferior. Si se utiliza un adaptador de instalación, el marco será
más bajo.
Nota: esta línea puede subirse ligeramente para dejar al menos 50 mm (2”)
desde la parte inferior de la puerta.
Importante: no corte el túnel. Hay componentes importantes en el
túnel y cualquier alteración en él afectará a su funcionalidad.
Instalación – Puertas de madera, PVC o
uPVC sin metal
Antes de empezar, compruebe si su puerta tiene metal interior. Si se encuentra
un núcleo o placa de metal, siga las
instrucciones Instalación - Puertas o
núcleos de metal.
1. Acople la plantilla de corte suministrada
a la parte exterior de la puerta en la
posición correcta, de modo que esté
con la orientación superior adecuada y
nivelada (fig. C).
(x)
Fig. A
(x)
Fig. B
(X)
Fig. C
(X)
Fig. D
Page 27

27
Accesorios disponibles en línea
DEITNL
ES
FR
EN
Instalación – Puertas metálicas y con
núcleo de metal
Para la instalación de la puerta para gatos en una puerta que tenga metal
será necesario un adaptador de instalación (se venden por separado) para
asegurase un rendimiento adecuado. Una vez comprado, siga las instrucciones
a continuación.
1. Acople la plantilla de corte suministrada a la parte exterior de la puerta
en la posición correcta, de modo que esté con la orientación superior
adecuada y nivelada (fig. C).
2. Perfore en la puerta los cuatro orificios con una broca de un diámetro
de 12 mm (½”) tal como está marcado en la plantilla para el corte.
Asegúrese de que la broca permanece recta y nivelada.
3. Utilice una plantilla o una sierra para cerraduras para cortar a lo largo de
la línea de puntos, como se indica en la plantilla de corte. (fig. D).
4. Limpie la zona de polvo, suciedad o restos.
5. Deslice una placa del adaptador de instalación sobre el túnel en el lado
interior del marco de la puerta para gatos.
6. Desde el interior de la casa, introduzca el marco interior de la puerta
para gatos en la abertura.
7. Desde el exterior de la casa, coloque la placa del adaptador de
instalación restante sobre el túnel del marco interior seguido del marco
exterior de la puerta para gatos.
8. Asegurarse de centrar la puerta para gatos en el agujero. Se suministran
con esta puerta para gatos tres (3) longitudes distintas de tornillos. Elija la
longitud más adecuada. Con un destornillador manual, atornille el marco
exterior al marco interior.
9. Introduzca los 8 taponadores en las placas del adaptador de instalación
exterior e interior y los 2 taponadores del marco exterior.
10. Retire las baterías de la puerta para gatos y espere 30 segundos. Vuelva
a colocar las baterías y la tapa de las baterías. Ya puede utilizar la
puerta para gatos.
Opcional: si desea apoyo adicional, use tornillos que tengan menos de la
mitad del grosor de su puerta para acoplar los adaptadores de instalación a
la puerta.
Instalación - Paredes
Para la instalación de la puerta para gatos en una pared será necesario
un adaptador de instalación (se venden por separado) para asegurase un
rendimiento adecuado. Podría ser necesario comprar túneles de extensión
para asegurarse de que la puerta se extiende completamente a través de la
pared. Una vez comprado, siga las instrucciones a continuación.
Importante: compruebe las instalaciones eléctricas o
sanitarias que pueda haber en la pared donde desee colocar
la puerta para mascotas.
1. Acople la plantilla de corte suministrada a la parte interior de la pared
en la posición correcta, de modo que esté con la orientación superior
adecuada y nivelada (fig. C)
.
Nota: según la presencia de metal, hay dos (2) opciones de plantilla de
corte. Utilice la línea adecuada al tipo de construcción de su pared.
2. Perfore en la puerta los cuatro orificios con una broca de un diámetro de
12 mm (½”) tal como está marcado en la plantilla para el corte. Asegúrese de
que la broca permanece recta y nivelada.
3. Con la herramienta adecuada para la construcción de su casa, como por
ejemplo una sierra caladora, corte a lo largo de la línea apropiada tal
como indique la plantilla para el corte. (fig. D).
4. Desde el exterior de la casa, termine de cortar el agujero a través de la
pared mediante agujeros en las cuatro esquinas perforados a través de
la pared como guía.
5. Limpie la zona de polvo, suciedad o restos.
6. Deslice una placa adaptadora de instalación en el túnel en el marco
interior y acóplela a la parte posterior del marco usando los dos tornillos
de cabeza plana (incluidos).
7. Desde el interior de la casa, coloque el conjunto interior en la pared
y marque los cuatro (4) tornillos en la placa del adaptador de la
instalación acoplados a la puerta para gatos. Retire el conjunto.
8. Con la tornillería adecuada al tipo de construcción (no se incluyen),
taladre agujeros del tamaño adecuado a su tornillería y acople el marco
interior con el adaptador de la instalación a la pared.
Opcional: agregue extensiones de túnel (se vende por separado) para
extender los túneles a través de la pared.
Page 28

28
petsafe.com
ENFRES
NL
IT
DE
9. Acople dos (2) clips de metal incluidos en las muescas rectangulares en
la placa del adaptador restante con el lado plano del clip a ras con la
cara exterior de la placa.
10. Coloque el marco exterior sobre la placa del adaptador restante y
acople los dos (2) tornillos de cabeza plana de 16 mm ( ₅⁄₈”) (incluidos).
11. Desde el exterior de la casa, coloque el marco exterior con el adaptador de
instalación acoplado al túnel del marco interior y marque los cuatro (4) tornillos
en la placa del adaptador de la instalación. Retire el marco exterior.
12. Con la tornillería adecuada al tipo de construcción de la pared (no se
incluyen), taladre agujeros del tamaño adecuado a su tornillería y acople
el marco exterior con el adaptador de la instalación a la pared.
13. Introduzca los 8 taponadores en las placas del adaptador de instalación
exterior e interior y los 2 taponadores del marco exterior.
14. Retire las baterías de la puerta para gatos y espere 30 segundos. Vuelva
a colocar las baterías y la tapa de las baterías. Ya puede utilizar la
puerta para gatos.
Instalación – Cristal simple
La puerta para gatos PetSafe® Microchip está diseñada para su instalación
en un cristal simple y es necesario un agujero circular con un diámetro de
215 mm (8 ₇⁄₁₆”). Es necesario que su cristalero corte un agujero circular de
215 mm (8 ₇⁄₁₆”) según la plantilla para el corte. Una vez que el cristalero ha
hecho el agujero en su puerta de cristal o en su ventana, siga las instrucciones
a continuación para la instalación.
1. Desde el interior de la casa, introduzca el marco interior de la puerta para
gatos en la abertura.
2. Desde el exterior de la casa, coloque el marco exterior sobre el marco interior.
3. Asegurarse de centrar la puerta para gatos en el agujero. Se suministran
con esta puerta para gatos tres (3) longitudes distintas de tornillos. Elija la
longitud más adecuada. Con un destornillador manual, atornille el marco
exterior al marco interior.
4. Introduzca los dos taponadores sobre los tornillos en el marco exterior.
5. Retire las baterías de la puerta para gatos y espere 30 segundos. Vuelva
a colocar las baterías y la tapa de las baterías. Ya puede utilizar la
puerta para gatos.
El trabajo con cristal requiere habilidad y debe ser
llevado a cabo por un cristalero profesional. No es posible practicar agujeros
en vidrio templado ni en doble acristalamiento, excepto en el momento de
fabricación. Consulte a un cristalero.
Instalación – Cristal doble
La puerta para gatos con microchip PetSafe® Microchip está diseñada para
su instalación en un cristal doble y es necesario un agujero circular de 260 mm
(10 ¼”) y un adaptador de instalación (se vende por separado.) A ser posible,
pida a su cristalero que no use materiales metálicos para sellar el cristal y
evitar así que se reduzca el rango de lectura de la puerta para gatos. Una vez
que el cristalero haya instalado el nuevo panel de cristal con un agujero de
260 mm, siga las instrucciones a continuación para la instalación.
1. Deslice una placa del adaptador de instalación sobre el túnel en el lado
interior del marco de la puerta para gatos.
2. Desde el interior de la casa, introduzca el marco interior de la puerta
para gatos en la abertura.
3. Desde el exterior de la casa, coloque la placa del adaptador de
instalación restante sobre el túnel del marco interior seguido del marco
exterior de la puerta para gatos.
4. Asegúrese de centrar el adaptador de instalación en el agujero. Se
suministran con esta puerta para gatos tres (3) longitudes distintas de
tornillos. Elija la longitud más adecuada. Con un destornillador manual,
atornille el marco exterior al marco interior.
5. Introduzca los ocho (8) taponadores en las placas del adaptador de
instalación exterior e interior y los dos (2) taponadores del marco exterior.
6. Retire las baterías de la puerta para gatos y espere 30 segundos. Vuelva
a colocar las baterías y la tapa de las baterías. Ya puede utilizar la
puerta para gatos.
El trabajo con cristal requiere habilidad y debe ser
llevado a cabo por un cristalero profesional. No es posible practicar agujeros
en vidrio templado ni en doble acristalamiento, excepto en el momento de
fabricación. Consulte a un cristalero.
Page 29

29
Accesorios disponibles en línea
DEITNL
ES
FR
EN
Funcionamiento básico - Guía
FUNCIÓN ACTIVACIÓN
DE BOTÓN
INDI CADOR LED ACCIÓN
Modo
manual
Presionar y soltar Rojo - Continuo
durante 5 segundos
El cierre se desbl oqueará. Use
las opc iones de las 4 posiciones
de cier re para el acceso de la
mascota.
Modo
automático
Presionar y soltar Verde - Con tinuo
durante 5 segundos
El cierre se bloqueará y solo s e
activará con la lectura de un ID de
microchip “programado”.
Modo
Aprender
Presio ne y
suelte durante
5 segundos
hasta q ue se
active el LED.
Rojo - Continuo hasta
60 segundos
La puer ta para gatos saldrá
del mod o Aprender una vez
programado el ID del microchip.
El cierre se bloqueará tras la
programación correcta. Repita el
proceso para otros gatos.
Detec tor de
movimientos
N/A Verde - Con tinuo
mientras dure la
activación
Se detecta movimiento exterior
y la puer ta para gatos está
buscando un microchip para leer.
Batería con
poca carga
N/A Rojo - Parp adeos
cada 10 segundos
Sustituya pronto las baterías.
Baterías
sustituidas
N/A Verde – 3 par padeos
rápidos
La puer ta para gatos entrará en el
modo automático.
Restablecer
los valores
de fábrica
Presio ne y
suelte durante
15 segundos
hasta q ue se
active el LED.
Rojo - 5 par padeos
rápidos
La puer ta para gatos entrará de
nuevo en e l modo automá tico y se
cerrará. Todos los ID de microchip
programados se el iminarán de la
memoria.
Error N/A Roja - Parp adeo
rápido continuo
Extraiga las baterías, espere
30 segundos y vuelva a
colocarlas. S i continúa la luz roja,
pónga se en contacto con el centro
de aten ción al cliente. El cierre
intentará desbloquearse para
utili zar la puerta p ara gatos en el
modo manual.
4 posiciones de cierre manual
Las 4 posiciones de cierre manual le permiten controlar la entrada y salida
de su gato de la casa en cualquier dirección. Hasta que su mascota se haya
familiarizado con el uso de la puerta para gatos, es buena idea utilizar las
4 posiciones de cierre manual solo en la posición “Entrada o Salida” (fig. H).
Totalmente
bloqueada
Dentro o fuera Sólo fueraSólo dentro
Fig. H
Información adicional
Para obtener información adicional sobre la puerta para gatos con Microchip
PetSafe®, incluida la instalación en cristal y en la pared, consejos útiles
de adiestramiento y accesorios disponibles, visite www.petsafe.com para
descargar el Manual de instalación completo del producto.
Aviso importante sobre el reciclaje
Respete las normas de eliminación de los residuos eléctricos y de los equipos eléctricos de su país. Este
equip o debe recicl arse. Si no nec esita más est e equipo, no lo t ire a la basura convencional. Devu élvalo
a la tien da donde lo co mpró para que pueda inclu irse en nuest ro sistema de re ciclado. Si e sto no es
posib le, póngase e n contacto co n el Centro de at ención al cli ente de PetSafe® para más información.
Eliminación de las baterías
En much as regiones se requiere qu e las baterías gastad as se recojan p or separado; c ompruebe l as
norma s de su zona ante s de deshacer se de las baterías gast adas. Al final de la vida útil del producto,
pónga se en contac to con uno de nuestros Cent ros de Atenci ón al Cliente p ara recibir ins truccion es sobre
la elim inación cor recta de la bat ería. No tire l a batería en l a basura doméstica o mun icipal.
Page 30

30
petsafe.com
ENFRES
NL
IT
DE
Conformidad
Radio Systems Corporation declara, bajo su responsabilidad, que el producto siguiente cumple
los requ isitos esen ciales del ar tículo 3 de la d irectiva RE D (2014/53/EU) y de la di rectiva RoHS
(2011/65/EU). Los cam bios o modific aciones no au torizados q ue se hagan a este equipo, s in que
Radio Sy stems Corpo ration los ap ruebe previamente, pu eden infri ngir las norm ativas RED de la UE,
podrían anular la autoridad del usuario para hacer funcionar el equipo y anular la garantía.
Por la pres ente, Radio Systems Cor poration, d eclara que este producto PPA19-16145 cumpl e con los
requisitos esenciales y otras disposiciones relevantes. La declaración de conformidad se puede encontrar
en http://www.petsafe.net/customercare/eu_docs.php.
Garantía
Garantía limitada no transferible de tres años
El fabricante de e ste producto ofrece una garantía limitada. Puede encontrar los detalles de la
garant ía aplicabl e a este producto, así como sus términos de uso, en www.petsafe.com y tambi én
estarán disponibles poniéndose en contacto con el Centro de atención al cliente local.
Europa – Radio Sys tems PetSafe Europe Ltd., 2nd Floor, Elg ee Building, Market Square, Dund alk,
Co. Louth, A91 YR9X Ireland
Términos de uso y limitación de responsabilidad
1. Términos de uso
El uso de este producto está sujeto a su aceptació n sin modificación de los término s, las
condiciones y los avisos a quí incluidos. El uso de e ste producto implica l a aceptación de dichos
términos, condiciones y avisos. Si no desea aceptar estos términos, condiciones y avisos,
devuelva el producto sin utilizar, en su paquete original, a portes pagados y asumiendo el
riesg o del envío al Centro de atención al cliente pertinente junto co n la prueba de compra para
obtener una devolución.
2. Uso correcto
Si no est á seguro de si este producto es apropiado para su mascota, consult e con su veterinario
o con un adiestrad or certificado antes de usarlo. El uso correcto incluye, sin limitación, la revis ión
de este manual de funcionamiento y de cualquier declaración de seguridad específica.
3. No se debe hacer n ingún uso il egal o prohi bido
Este pro ducto se ha diseñado para utilizarse solo con mascotas. El uso de este producto de un a
forma que no sea la prevista podría provocar la inf racción de leyes federales, estatales o lo cales.
4. Limitación de responsabilidad
En ningún caso, Radio Systems Corporation o cual quiera de sus em presas asociadas será
responsable de (i) ningún daño indirecto, punitivo, accidental, especial o consecuencial y
(ii) ning una pérdida o daño que resu lte o esté relacionado con el uso indebido de e ste producto.
El comprador asume todos los riesgos y responsabilida des del uso de es te producto hasta el
límite máximo p ermitido po r la ley.
5. Modificación de las condiciones generales
Radio Systems Corporation se reserva el derecho a cambiar periódicamente las condiciones
generales y los av isos bajo los que se ofrec e este producto. Si dichos cambios le han sido
notificados antes de usar este produ cto, serán vin culantes para usted del mismo mod o que si
estuvieran incluidos en este documento.
Page 31

31
Accessori disponibili in online
DEITNL
ES
FR
EN
• Strumenti a motore. Rischio di gravi lesioni; seguire le istruzioni di sicurezza per
l’uso degli utensili elettrici.
• Ricordarsi di indossare sempre gli occhiali protettivi.
Prima dell’installazione, l’utente deve informarsi adeguatamente su tutte le norme
edilizie che potrebbero interessare l’installazione della porta per animali domestici
e determinarne, insieme ad una persona incaricata qualificata, l’idoneità per una
data installazione. Questa porta per animali domestici non è una porta antincendio. È
importante che il proprietario e il consulente considerino qualsiasi rischio che si possa
presentare all’interno o all’esterno della porta per animali domestici, qualsiasi rischio
che possa derivare dalla modifica dell’immobile e in che modo possa interferire con
l’esistenza, l’uso, incluso l’uso scorretto, della porta per animali domestici.
• Se si taglia una superficie di metallo, fare attenzione ai bordi taglienti per
evitare lesioni.
• Lavorare con il vetro richiede esperienza, pertanto si consiglia di affidare il lavoro
a un vetraio professionista. Non è possibile ritagliare fori nel vetro temperato o
nelle unità con doppio vetro tranne che al momento in cui sono prodotti. Si prega di
rivolgersi a un vetraio.
• Conservare queste istruzioni con i documenti importanti; accertarsi di trasmettere
queste istruzioni ai nuovi proprietari.
• Leggere completamente le istruzioni prima di creare o modificare
un’apertura nella porta o la parete selezionata. Consigliamo
vivamente di programmare la porta per gatti con microchip per
un gatto specifico e controllare prima di tutto che funzioni con il
suo microchip.
• L’unità funziona correttamente in presenza di temperature esterne comprese tra
-25 °C (-13 °F) e 55 °C (131 °F).
• Le porte per animali domestici PetSafe
®
sono adatte per quasi tutte le porte, pareti
o pareti divisorie anche se possono essere richiesti materiali supplementari. Questo
prodotto è studiato per la comodità del proprietario e dell’animale. Non è possibile
garantire completamente l’esclusione di tutti gli altri animali in qualsiasi circostanza.
Radio Systems Corporation non accetta alcuna responsabilità per danni o
incomodi causati da animali esterni che possano avere accesso all’abitazione.
IMPORTANTI INFORMAZIONI DI SICUREZZA
Spiegazione dei termini e dei simboli di attenzione utilizzati in questa guida
È il simbolo di allerta sicurezza. Si usa per
avvisare di ogni possibile rischio di infortunio
alle persone. Osservare tutti i messaggi di
sicurezza segnalati da questo simbolo per
evitare possibili infortuni o la morte.
AVVERTENZA indica una situazione
pericolosa che, se non evitata, potrebbe
causare morte o gravi lesioni.
ATTENZIONE, utilizzato con il simbolo di
allarme per la sicurezza, indica una situazione
di rischio che, se non evitata, potrebbe
provocare lesioni leggere o moderate.
AVVISO è utilizzato per indicare procedure
senza rischio di lesioni personali.
In presenza di bambini piccoli presso l’abitazione, non dimenticare che i minori
potrebbero utilizzare in modo improprio la porta per animali domestici durante le loro
attività esplorative, accedendo inavvertitamente ai potenziali pericoli presenti oltre
la porta stessa. Gli acquirenti/proprietari di case con piscina devono costantemente
sorvegliare la porta e assicurarsi che la piscina sia dotata di barriere protettive d’accesso.
Qualora all’esterno o all’interno della casa si determinassero nuove situazioni di rischio
e la porta per animali domestici permettesse di accedervi, Radio Systems Corporation
consiglia di adottare misure per proteggere adeguatamente la porta o di rimuoverla. Il
pannello di chiusura o il blocco, se previsti, vengono forniti a scopi estetici o di risparmio
energetico e non intendono essere un dispositivo di sicurezza. Radio Systems Corporation
declina ogni responsabilità per qualsiasi uso non previsto e l’acquirente del prodotto si
assume la responsabilità di sorvegliare l’apertura che esso crea.
• In conformità agli standard riconosciuti di genitorialità, i bambini devono essere
sempre sorvegliati.
Di seguito Radio Systems Corporation, Radio Systems PetSafe Europe Ltd.,
Radio Systems Australia Pty Ltd. e qualunque altra affiliata o marchio di
Radio Systems Corporation possono essere indicati collettivamente con “Noi”.
Page 32

32
petsafe.com
ENFRES
NL
IT
DE
Grazie per aver scelto il marchio PetSafe®. Voi e il vostro gatto meritate
un’amicizia fatta di momenti indimenticabili e di comprensione reciproca.
I nostri prodotti e strumenti di addestramento permettono di migliorare il
rapporto tra gli animali domestici e i loro proprietari. Per qualsiasi domanda
sui nostri prodotti o sull’addestramento dell’animale, visitare il nostro
sito all’indirizzo www.petsafe.com o rivolgersi al Centro assistenza
clienti. Per un elenco dei numeri di telefono dei Centri assistenza
clienti, visitare il nostro sito web www.petsafe.com.
Programmazione del tipo di gatto per la
porta per gatti con microchip PetSafe
®
La porta per gatti con microchip PetSafe® è progettata per funzionare con
la maggioranza dei microchip a 15 cifre (FDX-B) utilizzati per gli animali
domestici. Prima di iniziare la configurazione o l’installazione della porta per
gatti, accertarsi che il gatto sia munito del corretto tipo di microchip.
Per prima cosa è necessario impostare il numero di identificazione (ID)
univoco del microchip del gatto. Seguire la procedura indicata di seguito per
iniziare la configurazione della porta per gatti:
1. La porta per gatti sarà preimpostata in fabbrica in posizione di blocco.
Assicurarsi che il dispositivo di blocco sia impostato su interno e esterno
(Vedere la Fig. H a pagina 36).
2. Rimuovere il coperchio del vano batterie, mettere da parte il gruppo
hardware e installare 4 batterie alcaline AA di ottima qualità (LR6). La
spia LED verde lampeggerà tre (3) volte, per indicare che la porta per
gatti è impostata in modalità automatica (Automatic).
3. Per attivare la modalità di apprendimento (Learn), premere e mantenere
premuto il pulsante del comparto batterie finché non si accende la
spia LED rossa (per circa 5 secondi). Da questo momento si hanno a
disposizione 60 secondi per introdurre la testa del gatto nel tunnel e
consentire il riconoscimento dell’ID del microchip. Terminata la procedura
di rinoscimento, la porta per gatti si sblocca e la spia LED rossa si
spegne. La porta per gatti rimarrà in modalità automatica (Automatic) e si
ribloccherà dopo 3 secondi.
4. Terminata la procedura di apprendimento dell’ID del microchip del gatto
è possibile installare la porta per gatti nella porta scelta.
Nota: se i gatti sono più di uno, seguire per ognuno la stessa procedura
iniziando dal passaggio n° 3. La porta per gatti con microchip è in grado di
memorizzare fino a 40 gatti muniti di microchip. Terminate le procedure per
tutti i gatti, chiudere il coperchio del vano batterie.
Consigli utili per l’uso: programmare
l’ID del microchip del gatto prima
dell’installazione, per non essere
costretti a trattenere l’animale
all’interno della porta per gatti una
volta installata. In caso di problemi con
la programmazione dell’ID del microchip
del gatto, verificare che l’animale abbia
la testa completamente all’interno del
tunnel e che il microchip della porta
per gatti sia orientato nella direzione
indicata. Quando l’apprendimento dell’ID del microchip del
gatto è avvenuto, la porta per gatti si sblocca.
Nota: se la testa del gatto tocca la porta per gatti trasparente
prima che si sblocchi, allora il microchip non è posizionato
in modo da consentire l’utilizzo ottimale del prodotto. Per
ulteriori opzioni di funzionamento, si prega di rivolgersi al
Servizio assistenza clientidi PetSafe
®
.
Page 33

33
Accessori disponibili in online
DEITNL
ES
FR
EN
2. Con il trapano e una punta da 12 mm (½ poll.) di diametro eseguire sulla
porta di casa quattro fori agli angoli come indicato sulla sagoma per il
taglio. Mantenere la punta diritta, non inclinata.
3. Con un seghetto da traforo o un seghetto alternativo tagliare lungo la
linea tratteggiata della sagoma per il taglio. (Fig. D).
4. Posizionare provvisoriamente la struttura interna della
porta per gatti nel foro della porta/parete. Allineare la
porta per gatti fino a raggiungere la posizione corretta
al centro dell’intaglio. Sull’esterno, installare la struttura
esterna. Con una matita, contrassegnare la posizione
dei fori per le viti attraverso i fori di montaggio della
struttura esterna (Fig. E).
5. Rimuovere la struttura interna e quella esterna ed
eseguire il fori per le viti con una punta da trapano da
6 mm (¼ poll.) (Fig. F). Mantenere la punta diritta,
non inclinata.
6. Pulire l’area da eventuali tracce di polvere, sporcizia
o residui.
7. Dall’interno dell’abitazione, inserire la struttura interna della porta per
gatti nell’apertura.
8. Dall’esterno dell’abitazione, posizionare la struttura esterna sulla
struttura interna.
9. Verificare di aver centrato la porta per gatti rispetto al foro. La porta
per gatti viene fornita con viti di montaggio di tre (3) diverse lunghezze.
Selezionare la lunghezza appropriata. Con un cacciavite manuale,
avvitare la struttura esterna a quella interna.
10. Inserire i due tappi di chiusura sulle viti del lato esterno della struttura.
11. Rimuovere le batterie dalla porta per gatti e attendere 30 secondi. Reinstallare le batterie e il coperchio del vano batterie. La porta per gatti è
ora pronta per l’uso.
Fig. E
Fig. F
La porta per gatti con microchip PetSafe
®
è adatta a qualunque porta, parete
o parete divisoria, anche se a volte l’installazione può richiedere l’utilizzo di
materiali supplementari e qualche competenza di bricolage. Questa porta
per gatti è progettata per adattarsi facilmente alle dimensioni dell’intaglio
ricavato per le porte per gatti della serie Staywell® 200, 300, 400, 500,
900 e Petporte smartflap™. Sono necessarie conoscenze di base di bricolage
e minimi adattamenti della forma dell’intaglio o accessori supplementari.
Installazione – Misura e marcatura
Misurare l’altezza da terra della
pancia del gatto: di regola è di
100 mm (3 ¹
₅
⁄₁₆ poll.) –150 mm
(5 ¹
₅
⁄₁₆ poll.) (Fig. A).
Segnare la misura rilevata
sull’esterno della porta e
tracciare una linea retta orizzontale di lunghezza pari a 168 mm (6
₅
⁄₈ poll.),
preferibilmente passante per il centro della porta (Fig. B).
La linea rappresenterà la parte inferiore del foro che verrà ritagliato nella
porta. La struttura della porta per gatti sarà 25 mm più bassa. Se si utilizza un
adattatore d’installazione, il telaio sarà più basso.
Nota: la linea dovrà quindi essere leggermente rialzata di almeno 50 mm
(2 poll.) dalla base della porta.
Importante: non tagliare il tunnel. Il tunnel contiene componenti
chiave, pertanto, se viene modificato, potrebbe non essere più garantita la
corretta funzionalità del sistema.
Installazione – Porte in legno, PVC, o uPVC
senza metallo
Prima di iniziare, controllare se la porta ha un’anima metallica. In caso affermativo,
seguire le istruzioni per l’installazione su
porte metalliche o con anima metallica.
1. Fissare nella posizione corretta la
sagoma per il taglio sull’esterno
della porta accertandosi che sia nel
verso giusto e a livello (Fig. C).
(x)
Fig. A
(x)
Fig. B
(X)
Fig. C
(X)
Fig. D
Page 34

34
petsafe.com
ENFRES
NL
IT
DE
Installazione – Porte metalliche o con
anima metallica
L’installazione della porta per gatti in una porta contenente metallo richiede
l’utilizzo di un adattatore per l’installazione (veduto separatamente) per
garantire prestazioni adeguate. Dopo l’acquisto, seguire le istruzioni riportate
di seguito.
1. Fissare la sagoma per il taglio all’esterno della porta nella posizione
corretta, accertandosi che sia nel verso giusto e a livello (Fig. C).
2. Con il trapano e una punta da 12 mm (½ poll.) di diametro eseguire sulla
porta quattro fori agli angoli come indicato sulla sagoma per il taglio.
Mantenere la punta diritta, non inclinata.
3. Con un seghetto da traforo o un seghetto alternativo tagliare lungo la
linea appropriata della sagoma per il taglio. (Fig. D).
4. Pulire l’area da eventuali tracce di polvere, sporcizia o residui.
5. Fare scorrere la piastra dell’adattatore d’installazione lungo tunnel sulla
struttura interna della porta per gatti.
6. Dall’interno dell’abitazione, inserire nell’apertura la struttura interna della
porta per gatti con l’adattatore d’installazione.
7. Dall’esterno dell’abitazione, posizionare la seconda piastra
dell’adattatore d’installazione nel tunnel della struttura interna seguita
dalla struttura esterna della porta per gatti.
8. Verificare di aver centrato la porta per gatti rispetto al foro. La porta
per gatti viene fornita con viti di montaggio di tre (3) diverse lunghezze.
Selezionare la lunghezza appropriata. Con un cacciavite manuale,
avvitare la struttura esterna a quella interna.
9. Inserire gli 8 tappi di chiusura sulle placche degli adattatori d’installazione
esterno ed interno e i 2 tappi di chiusura sulla struttura esterna.
10. Rimuovere le batterie dalla porta per gatti e attendere 30 secondi. Re-
installare le batterie e il coperchio del vano batterie. La porta per gatti è
ora pronta per l’uso.
Facoltativo: per ulteriore supporto, per fissare gli adattatori
d’installazione alla porta, utilizzare viti di lunghezza inferiore alla metà
dello spessore della porta.
Installazione – Pareti
L’installazione della porta per gatti in una parete richiede l’utilizzo di
un adattatore per l’installazione (veduto separatamente) per garantire
prestazioni adeguate. È inoltre possibile acquistare delle prolunghe del tunnel
che permettono l’estensione della porta attraverso l’intero spessore della
parete. Dopo l’acquisto, seguire le istruzioni riportate di seguito.
Importante: verificare preventivamente che nella parete non
vi siano fili elettrici o tubazioni in corrispondenza dell’area
prevista per l’installazione della porta per animali domestici.
1. Fissare la sagoma per il taglio fornita all’interno della porta nella posizione
corretta, accertandosi che sia nel verso giusto e a livello (Fig. C).
Nota: se è presente metallo, le opzioni di taglio della sagoma per il
taglio sono due (2). Utilizzare la linea appropriata al tipo di parete di cui
si dispone.
2. Con il trapano e una punta da 12 mm (½ poll.) di diametro eseguire nella
parete quattro fori agli angoli come indicato sulla sagoma per il taglio.
Mantenere la punta diritta, non inclinata.
3. Con l’utensile più adatto al tipo di costruzione dell’abitazione, quale ad es.,
un seghetto da traforo, tagliare lungo la linea appropriata come indicato
sulla sagoma per il taglio. (Fig. D).
4. Dall’esterno dell’abitazione, finire di tagliare il foro nella parete utilizzando
i quattro fori agli angoli preforati attraverso la parete come guida.
5. Pulire l’area da eventuali tracce di polvere, sporcizia o residui.
6. Fare scorrere una piastra dell’adattatore d’installazione lungo il tunnel
sulla struttura interna e fissarla sul retro del telaio con le due (2) viti a
calotta (incluse).
7. Dall’interno dell’abitazione, applicare il gruppo interno alla parete
e segnare la posizione dei quattro (4) fori per le viti sulla placca
dell’adattatore d’installazione fissata alla porta per gatti. Rimuovere
il gruppo.
8. Selezionare la bulloneria adatta al tipo di parete (non inclusa) ed
eseguire i rispettivi fori di dimensione appropriata, quindi fissare alla
parete la struttura interna con l’adattatore d’installazione.
Facoltativo: aggiungere tunnel di estensione (venduti separatamente) per
prolungare i tunnel attraverso la parete.
Page 35

35
Accessori disponibili in online
DEITNL
ES
FR
EN
9. Fissare i due (2) fermagli metallici inclusi nelle sedi rettangolari della
piastra dell’adattatore rimanente con il lato piatto del fermaglio a livello
della superficie esterna della piastra.
10. Posizionare la struttura esterna sopra la piastra di adattamento rimanente
e fissare con le due (2) viti a testa piatta da 16 mm (
₅
⁄₈ poll.) (incluse).
11. Dall’esterno dell’abitazione, applicare la struttura esterna collegata
all’adattatore d’installazione al tunnel della struttura interna e segnare
la posizione dei quattro (4) fori per le viti sulla placca dell’adattatore
d’installazione. Rimuovere la struttura esterna.
12. Selezionare la bulloneria adatta al tipo di parete (non inclusa) ed
eseguire i rispettivi fori di dimensione appropriata, quindi fissare la
struttura esterna alla parete.
13. Inserire gli 8 tappi di chiusura sulle placche degli adattatori d’installazione
esterno ed interno e i 2 tappi di chiusura sulla struttura esterna.
14. Rimuovere le batterie dalla porta per gatti e attendere 30 secondi. Reinstallare le batterie e il coperchio del vano batterie. La porta per gatti è
ora pronta per l’uso.
Installazione – su vetro singolo
La porta per gatti con microchip PetSafe® è indicata per l’installazione anche
su vetri singoli dove è necessario praticare un foro circolare di diametro pari
a 215 mm (8 ₇⁄₁₆ poll.). Il vetraio dovrà tagliare un foro circolare del diametro
di 215 mm (8 ₇⁄₁₆ poll.) secondo la sagoma di taglio. Una volta che il vetraio
ha realizzato il foro nella porta di vetro o nella finestra seguire le istruzioni di
seguito per l’installazione.
1. Dall’interno dell’abitazione, inserire la struttura interna della porta per gatti
nell’apertura.
2. Dall’esterno dell’abitazione, posizionare la struttura esterna sul tunnel della
struttura interna.
3. Verificare di aver centrato la porta per gatti nel foro. La porta per
gatti viene fornita con viti di montaggio di tre (3) diverse lunghezze.
Selezionare la lunghezza appropriata. Con un cacciavite manuale,
avvitare la struttura esterna a quella interna.
4. Inserire i due tappi di chiusura sulle viti del lato esterno della struttura.
5. Rimuovere le batterie dalla porta per gatti e attendere 30 secondi. Reinstallare le batterie e il coperchio del vano batterie. La porta per gatti è
ora pronta per l’uso.
Lavorare con il vetro richiede esperienza, pertanto
si consiglia di affidare il lavoro a un vetraio professionista. Non è possibile
ritagliare fori nel vetro temperato o nelle unità con doppio vetro tranne che al
momento in cui sono prodotti. Si prega di rivolgersi a un vetraio.
Installazione – Porte/finestre con doppio
vetro
La porta per gatti con microchip PetSafe® è indicata per l’installazione su
doppio vetro ove è necessario ritagliare un foro circolare di diametro pari a
260 mm (10 ¼ poll.) e richiede l’uso di un adattatore d’installazione (venduto
separatamente). Se possibile, richiedere al vetraio l’utilizzo di materiali non
metallici per la sigillazione del vetro onde impedire la riduzione della portata di
lettura della porta per gatti. Quando il vetraio avrà installato il nuovo pannello
di vetro con il foro di 260 mm, seguire le istruzioni di seguito per l’installazione.
1. Far scorrere una piastra di adattamento sul tunnel dal lato interno della
struttura della porta per gatti.
2. Dall’interno dell’abitazione, inserire nell’apertura la struttura interna della
porta per gatti con l’adattatore d’installazione.
3. Dall’esterno dell’abitazione, posizionare la seconda piastra
dell’adattatore d’installazione nel tunnel della struttura interna seguita
dalla struttura esterna della porta per gatti.
4. Assicurarsi di centrare l’adattatore d’installazione nel foro. La porta per
gatti viene fornita con viti di montaggio di tre (3) diverse lunghezze.
Selezionare la lunghezza appropriata. Con un cacciavite manuale,
avvitare la struttura esterna a quella interna.
5. Inserire gli otto (8) tappi di chiusura sulle placche d’installazione esterna
ed interna e i 2 tappi di chiusura sulla struttura esterna.
6. Rimuovere le batterie dalla porta per gatti e attendere 30 secondi. Reinstallare le batterie e il coperchio del vano batterie. La porta per gatti è
ora pronta per l’uso.
Lavorare con il vetro richiede esperienza, pertanto
si consiglia di affidare il lavoro a un vetraio professionista. Non è possibile
ritagliare fori nel vetro temperato o nelle unità con doppio vetro tranne che al
momento in cui sono prodotti. Si prega di rivolgersi a un vetraio.
Page 36

36
petsafe.com
ENFRES
NL
IT
DE
Guida al funzionamento di base
FUNZIONE PULSANTE DI
ATTIVAZIONE
SPIA LE D AZIONE
Modalità
manuale
Premere e
rilasciare
Rossa continua p er
5 secondi
La porta si sblocca. Utilizzare
le opzio ni a 4 modalità di
bloccaggio per l’accesso
dell’animale domestico.
Modalità
automatica
Premere e
rilasciare
Verde continua per
5 secondi
La porta si blocca e sarà attivata
esclu sivamente dalla let tura dell’ID
di un microchip programmato.
Modalità
apprendimento
Mantenere
premuto per
5 secondi finché
il LED non si
attiva
Rossa continua p er
60 secondi
La modalità di apprendimento
della p orta per gat ti si
interromperà subito dopo la
programmazione dell’ID del
microc hip. La porta si sbloccherà
al termine della programmazione.
Ripetere la procedura per gli
eventuali altri gatti.
Sensore di
movimento
n.a. Verde fissa per
tutta la durata
dell’attivazione
Viene r ilevato il movimento
ester no e la porta pe r gatti cerca i l
microc hip da leggere.
Batteria
scarica
n.a. Rossa lampeggiante
ogni 10 secondi
Sostituire le batteri e al più presto.
Batterie
sostituite
n.a. Verde lampeggiante
velocemente 3 volte
La porta per gat ti entra in mod alità
automatica.
Reset delle
impostazioni
predefinite
Mantenere
premuto per
15 secondi
finché i l LED non
si att iva
Rossa lampeggiante
velocemente 5 volte
La porta per gat ti entrerà
in moda lità automatica e si
blocc herà. Gli ID di tutti i
microchip programmati saranno
cancellati dalla memoria.
Errore n.a. Rosso –
Lampeggiamento
rapido continuo
Estrarre le batterie, at tendere
30 secondi e sost ituirle. Se la spia
rossa resta accesa, contattare il
Centro assistenza clienti. Verrà
tentato lo sbloccaggio d ella porta
per gatti per co nsentirne l ’uso in
modalità manuale.
4 modalità di bloccaggio manuale
L’opzione a 4 modalità di bloccaggio manuale permette di controllare
l’entrata e l’uscita del gatto in entrambe le direzioni. Si consiglia di utilizzare
l’opzione a 4 modalità di bloccaggio manuale soltanto nella posizione di
Ingresso o Uscita finché il gatto non abbia acquisito completa dimestichezza
con l’uso della porta per gatti (Fig. H).
Chiusura totaleIngresso o
uscita
Solo uscitaSolo ingresso
Fig. H
Ulteriori informazioni
Per ulteriori informazioni sulla porta per gatti con microchip PetSafe®, quali ad
esempio la procedura di installazione su vetro o a parete, utili suggerimenti
per l’addestramento e tutti gli accessori disponibili, scaricare il manuale di
installazione completo dal sito www.petsafe.com.
Avviso importante per il riciclaggio
Si preg a di rispett are le norme pe r lo smaltimento dell e apparecchi ature elet triche ed elettroni che
(RAEE) del paes e di residenza. Questo apparecchio deve es sere riciclato. Se no n fosse più nec essario,
non imm etterlo ne l normale sistema di sm altimento dei rifiuti urbani . Riportar lo al negozio do ve è stato
acqui stato perché s ia inserito nel nostro s istema di riciclagg io. Se ciò non fo sse possib ile, contat tare il
Centro assistenza clienti PetSafe® per ulteriori informazioni.
Eliminazione delle batterie
In molt i Paesi è obbli gatorio racc ogliere sep aratamente l e batterie esauste; c ontrollare l e norme in vigore
nella p ropria zona pr ima di gettare le batterie esa uste. Al term ine della vi ta utile del pro dotto, contattare
uno dei nostri Centri assistenza clienti per ricevere istruzioni sul corretto smaltimento della batteria. Non
smaltire la batteria insieme ai normali rifiuti domestici o urbani.
Page 37

37
Accessori disponibili in online
DEITNL
ES
FR
EN
Conformità
Radio Systems Corporation dichiara sotto la propria responsabilità che i prodotti seguenti sono conformi
ai requi siti essen ziali riportati ne ll’articol o 3 della diret tiva RED (2014/53/UE) e nella diret tiva RoHS
(2011/65/UE). Modi fiche o variazioni non a utorizzate da Radio Sy stems Corpo ration poss ono violare i
regolamenti RE D dell’UE, in validare l’aut orizzazi one all’uso del disposi tivo e rendere nulla la garanzia.
Radio Sy stems Corpo ration dich iara che quest o prodotto PPA19-16145 è confo rme ai requisi ti
essenziali e ad altre disposizioni rilevanti. La Dichiarazione di conformità è disponibile all’indirizzo:
http://ww w.petsafe.net/customercare/eu_docs.php.
Garanzia
Tre anni di garanzia limitata non trasferibile
Questo prodot to è fornito completo di una garanzia limita ta del produt tore. Informazioni es aurienti
sulla g aranzia di que sto prodott o e le sue condizioni sono disponi bili sul sito Web w ww.petsafe.com
e/o possono essere richieste contattando il Centro assistenza clienti di zona.
Europa – Radio Sys tems PetSafe Europe Ltd., 2nd Floor, Elg ee Building, Market Square, Dund alk,
Co. Louth, A91 YR9X Ireland
Limitazione di responsabilità e condizioni di utilizzo
1. Termini di utilizzo
L’utiliz zo di questo prodotto è soggetto all’accet tazione se nza modifich e dei termini,
delle condizioni generali e degli a vvisi qui co ntenuti. L’utilizzo di qu esto prodot to implica
l’accet tazione della totalità di tali t ermini, condizioni g enerali e avvisi. Se non si desidera
accet tare tali termini, condizioni g enerali e avvisi, per u n totale rimborso si prega di restituire il
prodotto, inut ilizzato, nella sua co nfezione originale, a s pese e rischio del cliente, al Centro di
assistenza clienti appropriato, insieme alla prova di acquisto.
2. Uso corretto
Se si nutrono dubb i in merito all ’idoneità d el prodotto p er il proprio animale domestico, prima
dell’us o, consultare il veterinario di fid ucia o un addes tratore certificato. Il corret to utilizzo
compre nde, a titolo esemplificativo ma non esaustivo la lettura dell’intero manuale e di ogni
specifico messaggio di sicurezza pertinente.
3. Viet ato l’uso illegale o non co nsentito
Il prodotto è stato proget tato per essere utilizzato unicamente per animali domes tici. L’utiliz zo di
questo prodotto in modo di verso da quello previsto potrebbe configu rare la violazione di leggi
federali, statali o locali.
4. Limitazione di responsabilità
In nessun caso Radio Systems Corporation, o una delle sue affiliate, potrà e ssere ritenuta
responsabile di (i) qualsiasi danno indiretto, punitivo, accidentale, speciale o consequenziale
e/o (ii) qualsiasi perdita o danno der ivante o ricollegabile all’uso i mproprio di qu esto prodot to.
L’acquirente si assu me tutti i rischi e le responsabi lità derivanti dall’uso di questo prodot to nella
misura m assima cons entita dall a legge.
5. Modifica delle condizioni generali
Radio Systems Corporation si riserva il diritto di modificare periodicamente i termini, le condizioni
generali e gli av visi che regolano il prodotto. Se tali modifiche sono state no tificate all’acquirente
prima d ell’utiliz zo del prodotto, sono da considerarsi vinc olanti come s e fossero inco rporate nel
presente documento.
Page 38

38
petsafe.com
ENFRES
NL
IT
DE
• Elektrowerkzeuge. Risiko einer ernsthaften Verletzung; befolgen Sie alle
Sicherheitsanweisungen für Ihre Elektrowerkzeuge.
• Setzen Sie immer unbedingt Ihre Schutzbrille auf.
Der Benutzer muss sich vor der Installation mit allen Bauvorschriften vertraut machen,
die die Installation der Haustiertür beeinflussen können, und zusammen mit einem
qualifizierten Fachbetrieb feststellen, ob sie für eine gegebene Installation geeignet
ist. Diese Haustiertür ist keine Brandschutztür. Es ist wichtig, dass der Eigentümer und
der Fachbetrieb mögliche Risiken berücksichtigen, die innerhalb oder außerhalb der
Haustiertür vorhanden sein können, sowie Risiken, die durch spätere Änderungen an
der Immobilie entstehen können, und wie sich diese Risiken auf die Existenz und die
Nutzung - auch den Missbrauch - der Haustiertür auswirken können.
• Achten Sie beim Schneiden von Metalloberflächen auf scharfe Kanten, um
Verletzungen zu vermeiden.
• Die Arbeit mit Glas erfordert qualifizierte Arbeitstechniken und sollte von einem
professionellen Glaser durchgeführt werden. In verstärktes Glas oder Doppelglas
lassen sich keine Öffnungen schneiden, außer bei der Herstellung selbst. Bitte
wenden Sie sich an einen Glaser.
• Bewahren Sie diese Gebrauchsanweisung bei wichtigen Papieren auf; achten Sie
darauf, dass Sie die Gebrauchsanweisung einem neuen Besitzer der Immobilie
aushändigen.
• Lesen Sie die vorliegende Anleitung vollständig durch, bevor Sie
eine Öffnung in die vorgesehene Tür oder Wand schneiden oder
diese ändern. Wir empfehlen dringend, dass Ihre MikrochipKatzenklappe zuerst für Ihre Katze programmiert und überprüft
wird, ob sie mit dem Mikrochip Ihrer Katze funktioniert.
• Die Einheit funktioniert nur ordnungsgemäß bei Außentemperaturen über -25 °C
(-13 °F) und unter 55 °C (131 °F).
• Haustiertüren von PetSafe
®
eignen sich für die meisten Türen, Wände oder
Raumteiler, wobei eventuell zusätzliche Materialien erforderlich sein können. Dieses
Produkt wurde für Ihre und die Bequemlichkeit Ihres Haustiers entworfen. Es ist
jedoch nicht möglich, den Ausschluss aller anderen Tiere unter allen Umständen zu
garantieren. Radio Systems Corporation übernimmt keinerlei Haftung für Schäden
oder Unannehmlichkeiten, die durch ungewolltes Eindringen von Tieren in Ihr Haus
verursacht werden.
WICHTIGE SICHERHEITSINFORMATIONEN
Erklärung der in dieser Anleitung verwendeten Warnhinweise und Symbole
Das ist das Sicherheitswarnsymbol. Es wird verwendet,
um Sie auf mögliche persönliche Verletzungsgefahren
hinzuweisen. Befolgen Sie alle Sicherheitsmeldungen
nach diesem Symbol, um mögliche Verletzungen oder
Todesfälle zu vermeiden.
WARNUNG weist auf eine gefährliche Situation
hin, die bei Nichtvermeidung zum Tod oder schweren
Verletzungen führen kann.
VORSICHT, weist in Verbindung mit dem
Sicherheitswarn symbol auf eine Gefahrensituation
hin, die, sofern sie nicht vermieden wird, zu einer
geringfügigen oder moderaten Verletzung führen
könnte.
HINWEIS kennzeichnet Anwendungen, die nicht im
Zusammenhang mit Körperverletzung stehen.
Wenn Kinder im Haushalt sind, ist es wichtig, die Haustiertür für Kinder unzugänglich zu
machen, um zu verhindern, dass ein Kind auf die andere Seite der Haustiertür gelangen
kann, falls dort potentielle Gefahren für das Kind bestehen. Käufer/Hausbesitzer mit
einem Swimmingpool haben sicherzustellen, dass die Haustiertür stets überwacht wird
und dass der Pool über ausreichende Zugangsbarrieren verfügt. Wenn eine neue Gefahr
innerhalb oder außerhalb Ihres Haushalts entsteht, zu der die Haustiertür einen Zugang
bietet, empfiehlt Radio Systems Corporation, dass Sie den Zugang zu der Gefahr
hinreichend überwachen oder die Haustiertür entfernen. Die Verschlussplatte bzw.
ggf. das Schloss dient ästhetischen Zwecken sowie der Energieeffizienz und ist nicht
als Sicherheitseinrichtung vorgesehen. Radio Systems Corporation haftet nicht für eine
nicht bestimmungsgemäße Verwendung und der Käufer dieses Produkts trägt die volle
Verantwortung für die Aufsicht über die geschaffene Öffnung.
• Im Einklang mit den anerkannten Standards der elterlichen Aufsicht sollten Kinder
jederzeit überwacht werden.
Im Folgenden bezieht sich „wir“ oder „uns“ auf Radio Systems Corporation,
Radio Systems PetSafe Europe Ltd., Radio Systems Australia Pty Ltd. und jegliche
anderen Tochtergesellschaften oder Marken von Radio Systems Corporation.
Page 39

39
Zubehör Online verfügbar
DEITNL
ES
FR
EN
Vielen Dank für den Kauf der Marke PetSafe®. Sie und Ihr Haustier verdienen
eine Freundschaft, die unvergessliche Momente und ein gegenseitiges
Verstehen umfasst. Unsere Produkte und Trainingsgeräte verbessern die
Beziehung zwischen Haustieren und ihren Besitzern. Bei Fragen zu
unseren Produkten oder zum Training Ihres Haustiers besuchen Sie
bitte unsere Website auf www.petsafe.net oder wenden Sie sich
an unsere Kundenbetreuung. Eine Liste der Telefonnummern der
Kundenbetreuung finden Sie auf unserer Website www.petsafe.com.
Einprogrammieren von Katzen in die
PetSafe® Mikrochip-Katzenklappe
Ihre PetSafe® Mikrochip-Katzenklappe wurde dazu entworfen, mit den
am häufigsten für Haustiere verwendeten 15-stelligen Mikrochips (FDX-B)
zu funktionieren. Bevor Sie mit den Einstellungen oder der Installation der
Katzenklappe beginnen, stellen Sie bitte sicher, dass Ihre Katze die richtige
Art von Mikrochip hat.
Für den Betriebsbeginn muss die Katzenklappe die eindeutige
Identifikationsnummer (ID) des Mikrochips Ihrer Katze kennenlernen. Bitte
befolgen Sie die unten stehenden Schritte zum Einrichten Ihrer Katzenklappe:
1. Die Katzenklappe ist werkseitig in der verriegelten Position voreingestellt.
Vergewissern Sie sich, dass die manuelle Verriegelung auf die Position
„hinein“ und „hinaus“ eingestellt ist. (Siehe Abb. H auf Seite 43).
2. Entfernen Sie die Abdeckung des Batteriefachs, legen Sie die
mitgelieferte Werkzeugpackung bereit und installieren Sie 4 AA-AlkaliBatterien (LR6) guter Qualität. Die grüne LED Leuchte blinkt drei (3) mal,
was bedeutet, dass sich die Katzenklappe im Automatikmodus befindet.
3. Um den Lernmodus aufzurufen, halten Sie die Taste im Batteriefach
gedrückt, bis die rote LED-Leuchte aufleuchtet (etwa 5 Sekunden
lang). Sie haben 60 Sekunden Zeit, um den Kopf der Katze im Tunnel
zu positionieren, damit die Mikrochip-ID erlernt wird. Sobald die
Katzenklappe die Mikrochip-ID erlernt hat, wird sie entsperrt und die rote
LED Leuchte erlischt. Die Katzenklappe bleibt im Automatikmodus und wird
nach 3 Sekunden wieder verriegelt.
4. Nachdem die Mikrochip-ID der Katze erfolgreich erlernt wurde, können
Sie die Katzenklappe in Ihre Tür einsetzen.
Hinweis: Wenn mehr als eine Katze erlernt werden soll, befolgen Sie bitte die
gleichen Schritte, beginnend mit Schritt Nr. 3. Die Mikrochip-Katzenklappe kann
bis zu 40 Katzen mit Mikrochip speichern. Wenn der Vorgang für alle Katzen
abgeschlossen ist, setzen Sie die Abdeckung des Batteriefachs wieder ein.
Tipp: Programmieren Sie die MikrochipID Ihrer Katze vor der Installation,
um zu verhindern, dass Sie Ihre Katze
in der Katzenklappe halten müssen,
nachdem sie installiert wurde. Wenn Sie
Schwierigkeiten haben, die MikrochipID Ihrer Katze zu programmieren,
stellen Sie bitte sicher, dass deren Kopf
sich in den Tunnel erstreckt, wobei die
Katzenklappe wie gezeigt ausgerichtet
wird. Sie sollten hören, dass sich die
Katzenklappe entriegelt, sobald sie die Mikrochip-ID Ihrer
Katze erlernt hat.
Hinweis: Wenn der Kopf Ihrer Katze die durchsichtige Klappe
vor dem Entriegeln berührt, dann ist die Lage des Mikrochips
nicht für eine optimale Nutzung dieses Produkts geeignet.
Bitte wenden Sie sich an die Kundenbetreuung von PetSafe
®
,
um weitere Optionen für den Betrieb zu erfahren.
Page 40

40
petsafe.com
ENFRES
NL
IT
DE
1. Befestigen Sie die mitgelieferte Schneidschablone an der Außenseite
Ihrer Tür in der korrekten Position und stellen dabei sicher, dass die richtige
Richtung nach oben weist und sie genau im Wasser (horizontal) ist
(Abb. C).
2. Bohren Sie vier Ecklöcher, wie auf der Schneideschablone markiert ist, mit
einem Bohrer mit 12 mm (½”) Durchmesser durch die Tür. Stellen Sie bitte
sicher, dass der Bohrer gerade und waagrecht bleibt.
3. Schneiden Sie mit einer Spann- oder Schlüssellochsäge entlang der
gestrichelten Linie auf der Schneideschablone. (Abb. D).
4. Stecken Sie den Innenrahmen der Katzenklappe
vorübergehend in den Wandausschnitt. Richten Sie die
Katzenklappe aus, bis sie in der richtigen Position in der
Mitte des Ausschnitts ist. Installieren Sie außen den
Außenrahmen. Verwenden Sie einen Bleistift, um die
Schraubenlöcher durch die Löcher am Außenrahmen zu
markieren (Abb. E).
5. Entfernen Sie den Innen- und Außenrahmen und bohren
Sie die Schraubenlöcher mit einem 6 mm (¼”) Bohrer.
(Abb. F). Stellen Sie bitte sicher, dass der Bohrer
gerade und waagrecht bleibt.
6. Befreien Sie den Bereich von Staub, Schmutz oder
Rückständen.
7. Stecken Sie den Innenrahmen der Katzenklappe von innen in die Öffnung.
8. Setzen Sie den Außenrahmen von außen auf den Innenrahmen.
9. Stellen Sie dabei sicher, dass die Katzenklappe im Loch zentriert
ist. Mit dieser Katzenklappe wurden drei (3) verschiedene Längen
von Schrauben geliefert. Wählen Sie die entsprechende Länge aus.
Schrauben Sie den Außenrahmen mithilfe eines Handschraubenziehers in
den Innenrahmen.
10. Die beiden Verschlussstopfen über die Schrauben am Außenrahmen
einstecken.
11. Nehmen Sie die Batterien aus der Katzenklappe und warten Sie
30 Sekunden. Setzen Sie die Batterien und die Batterieabdeckung
wieder ein. Die Katzenklappe ist betriebsbereit.
Abb. E
Abb. F
Die PetSafe® Mikrochip-Katzenklappe passt in die meisten Türen oder
Raumteiler, wobei jedoch eventuell zusätzliche Materialien und handwerkliches
Geschick erforderlich sein können. Diese Katzenklappe ist so konzipiert, dass
sie sich leicht an Ausschnittgrößen für Katzenklappen der Staywell® 200, 300,
400, 500, 900 und Petporte smartflap™ Serien anpassen lässt. Es sind einige
einfache handwerkliche Fähigkeiten erforderlich und es können geringfügige
Anpassungen an der Aussparung oder zusätzliches Zubehör erforderlich sein.
Installation – Messung und Markierung
Messen Sie die Bauchhöhe Ihrer
Katze. Diese ist normalerweise
100 mm (3 ¹₅⁄₁₆”) –150 mm
(5 ¹₅⁄₁₆”) (Abb. A).
Markieren Sie diesen Messwert
an der Außenseite Ihrer Tür oder
Wand und zeichnen Sie eine gerade horizontale Linie, die 168 mm (6
₅
⁄₈”)
lang ist, vorzugsweise in der Mitte der Tür (Abb. B).
Denken Sie bitte daran, dass diese horizontale Linie letztendlich die
Unterseite der Öffnung sein wird, die Sie in Ihre Tür machen. Der Rahmen
der Katzenklappe wird 25 mm niedriger liegen. Bei Verwendung eines
Installationsadapters liegt der Rahmen niedriger.
Hinweis: Diese Linie muss eventuell leicht angehoben werden, um mindestens
50 mm (2”) Abstand von der Unterkante der Tür zu ermöglichen.
Wichtig: Den Tunnel nicht schneiden. Im Tunnel befinden sich wichtige
Komponenten und jede Änderung des Tunnels beeinträchtigt die
Funktionalität.
Installation – Holz-, PVC- oder uPVC-Türen
ohne Metall
Bevor Sie beginnen, überprüfen Sie bitte,
ob Ihre Tür einen Metallkern hat. Wenn
ein Metallkern oder eine Metallplatte
vorhanden ist, befolgen Sie die
Anweisungen für Installation von Metalloder Metallkerntüren.
(x)
Abb. A
(x)
Abb. B
(X)
Abb. C
(X)
Abb. D
Page 41

41
Zubehör Online verfügbar
DEITNL
ES
FR
EN
Installation – Metalltüren oder Türen mit
Metallkern
Der Einbau der Katzenklappe in eine Tür, die Metall enthält, erfordert einen
Installationsadapter (separat erhältlich), um eine einwandfreie Funktion zu
gewährleisten. Folgen Sie nach dem Kauf den untenstehenden Anweisungen.
1. Befestigen Sie die mitgelieferte Schneideschablone an der Außenseite
Ihrer Tür in der korrekten Position und stellen dabei sicher, dass die richtige
Richtung nach oben weist und sie genau waagerecht ist (Abb. C).
2. Bohren Sie vier Ecklöcher, wie auf der Schneideschablone markiert ist, mit
einem Bohrer mit 12 mm (½”) Durchmesser durch die Tür. Stellen Sie bitte
sicher, dass der Bohrer gerade und waagrecht bleibt.
3. Schneiden Sie mit einer Spann- oder Schlüssellochsäge entlang der
gestrichelten Linie auf der Schneideschablone. (Abb. D).
4. Befreien Sie den Bereich von Staub, Schmutz oder Rückständen.
5. Schieben Sie eine Installationsadapterplatte über den Tunnel an der
Innenseite des Rahmens der Katzenklappe.
6. Stecken Sie den Innenrahmen der Katzenklappe mit dem
Installationsadapter von innen in die Öffnung.
7. Setzen Sie von außen die verbleibende Installationsadapterplatte auf den
inneren Rahmentunnel, gefolgt vom äußeren Rahmen der Katzenklappe.
8. Stellen Sie dabei sicher, dass die Katzenklappe im Loch zentriert
ist. Mit dieser Katzenklappe wurden drei (3) verschiedene Längen
von Schrauben geliefert. Wählen Sie die entsprechende Länge aus.
Schrauben Sie den Außenrahmen mithilfe eines Handschraubenziehers in
den Innenrahmen.
9. Stecken Sie die 8 Verschlussstopfen in die Außen- und
Inneninstallationsadapterplatten und 2 Verschlussstopfen in den
Außenrahmen.
10. Nehmen Sie die Batterien aus der Katzenklappe und warten Sie
30 Sekunden. Setzen Sie die Batterien und die Batterieabdeckung
wieder ein. Die Katzenklappe ist betriebsbereit.
Optional: Für zusätzliche Unterstützung verwenden Sie Schrauben,
die weniger als die Hälfte der Dicke Ihrer Tür betragen, um die
Installationsadapter an der Tür zu befestigen.
Installation – Wände
Der Einbau der Katzenklappe in eine Wand erfordert einen
Installationsadapter (separat erhältlich), um eine einwandfreie Funktion zu
gewährleisten. Möglicherweise müssen auch Verlängerungstunnel erworben
werden, um sicherzustellen, dass die Klappe vollständig durch die Wand
verläuft. Folgen Sie nach dem Kauf den untenstehenden Anweisungen.
Wichtig: Achten Sie auf elektrische Leitungen und Rohre, die
sich in dem Wandbereich befinden könnten, in dem Sie die
Haustiertür installieren möchten.
1. Befestigen Sie die mitgelieferte Schneideschablone an der Innennseite Ihrer
Wand in der korrekten Position und stellen dabei sicher, dass die richtige
Richtung nach oben weist und sie genau waagerecht ist (Abb. C).
Hinweis: Je nachdem, ob Metall vorhanden ist, gibt es zwei (2) Optionen
auf der Schneideschablone. Bitte verwenden Sie die entsprechende Linie
für Ihre Wandkonstruktion.
2. Bohren Sie vier Ecklöcher, wie auf der Schneideschablone markiert ist, mit
einem Bohrer mit 12 mm
(½”)
Durchmesser durch die Wand. Stellen Sie bitte
sicher, dass der Bohrer gerade und waagrecht bleibt.
3. Schneiden Sie mit dem für die Bauweise Ihres Hauses geeigneten
Werkzeug, wie z. B. einer Stichsäge, entlang der entsprechenden Linie, wie
auf der Schnittschablone angegeben. (Abb. D).
4. Schneiden Sie von außen das Loch durch die Wand, indem Sie die vier
Ecklöcher, die durch die Wand gebohrt wurden, als Führung verwenden.
5. Befreien Sie den Bereich von Staub, Schmutz oder Rückständen.
6. Schieben Sie eine Montageadapterplatte über den Tunnel am
Innenrahmen und befestigen sie mit den beiden (2) Linsenschrauben (im
Lieferumfang enthalten) an der Rückseite des Rahmens.
7. Positionieren den Aufbau von innen an der Wand und markieren Sie
die vier (4) Schraubenlöcher auf der an der Katzenklappe befestigten
Installationsadapterplatte. Entfernen Sie den Aufbau.
8. Bohren Sie mit dem für Ihre Wandkonstruktion geeigneten Werkzeug (nicht
im Lieferumfang enthalten) die entsprechenden Löcher für Ihre Beschläge
und befestigen Sie den Innenrahmen mit Installationsadapter an der Wand.
Optional: Fügen Sie Tunnelverlängerungen (separat erhältlich) hinzu, um die
Tunnel durch Ihre Wand zu verlängern.
Page 42

42
petsafe.com
ENFRES
NL
IT
DE
9. Befestigen Sie die beiden (2) mitgelieferten Metallklammern in den
rechteckigen Aussparungen der verbleibenden Adapterplatte, wobei die
flache Seite des Klammer bündig auf der Außenseite der Platte aufliegt.
10. Setzen Sie den Außenrahmen auf die verbleibende Adapterplatte und
befestigen Sie ihn mit den beiden (2) 16 mm (
₅
⁄₈”) Flachkopfschrauben
(im Lieferumfang enthalten).
11. Setzen Sie den Außenrahmen mit Installationsadapter von außen auf den
Tunnel des Innenrahmens und markieren Sie die vier (4) Schraubenlöcher
auf der Installationsadapterplatte. Entfernen Sie den Außenrahmen.
12. Bohren Sie mit dem für Ihre Wandkonstruktion geeigneten Werkzeug (nicht
im Lieferumfang enthalten) die Löcher passender Grüße für Ihre Beschläge
und befestigen Sie den Außenrahmen mit Installationsadapter an der Wand.
13. Stecken Sie die 8 Verschlussstopfen in die Außen- und
Inneninstallationsadapterplatten und 2 Verschlussstopfen in den
Außenrahmen.
14. Nehmen Sie die Batterien aus der Katzenklappe und warten Sie
30 Sekunden. Setzen Sie die Batterien und die Batterieabdeckung
wieder ein. Die Katzenklappe ist betriebsbereit.
Installation – Einfachverglasung
The PetSafe® Microchip Katzenklappe ist für die Installation in
Einfachverglasung ausgelegt und erfordert ein kreisförmiges Loch mit einem
Durchmesser von 215 mm (8 ₇⁄₁₆”). Der Glaser muss ein rundes Loch mit
einem Durchmesser von 215 mm (8 ₇⁄₁₆”) gemäß der Schneideschablone
schneiden. Nachdem der Glaser das Loch in die Glastür oder das Glasfenster
geschnitten hat, befolgen Sie einfach die unten stehende Installationsanleitung.
1. Stecken Sie den Innenrahmen der Katzenklappe von innen in die Öffnung.
2. Setzen Sie den Außenrahmen von außen auf den Tunnel des Innenrahmens.
3. Stellen Sie sicher, dass die Katzenklappe im Loch zentriert ist. Mit dieser
Katzenklappe wurden drei (3) verschiedene Längen von Schrauben
geliefert. Wählen Sie die entsprechende Länge aus. Schrauben Sie den
Außenrahmen mithilfe eines Handschraubenziehers in den Innenrahmen.
4. Die beiden Verschlussstopfen über die Schrauben am Außenrahmen ein
stecken.
5. Nehmen Sie die Batterien aus der Katzenklappe und warten Sie
30 Sekunden. Setzen Sie die Batterien und die Batterieabdeckung
wieder ein. Die Katzenklappe ist betriebsbereit.
Die Arbeit mit Glas erfordert qualifizierte Arbeitstechniken
und sollte von einem professionellen Glaser durchgeführt werden. In
Sicherheitsglas oder Doppelglas lassen sich keine Öffnungen schneiden, außer
bei der Herstellung selbst. Bitte wenden Sie sich an einen Glaser.
Installation – Doppelverglasung
Die PetSafe® Microchip Katzenklappe ist für den Einbau in Doppelverglasung
konzipiert und erfordert ein kreisrundes Loch mit einem Durchmesser von
260 mm (10 ¼”) und einen Installationsadapter (separat erhältlich). Wenn
möglich, sollte Ihr Glaser beim Versiegeln des Glases nichtmetallische
Materialien verwenden, um zu verhindern, dass die Lesereichweite der
Katzenklappe reduziert wird. Nachdem der Glaser das Loch mit 260 mm
(10 ¼”) Durchmesser in die Glastür oder die Glasscheibe geschnitten hat,
befolgen Sie einfach die unten stehende Installationsanleitung.
1. Schieben Sie eine Adapterplatte über den Tunnel an der Innenseite des
Rahmens der Katzenplatte.
2. Stecken Sie den Innenrahmen der Katzenklappe mit dem
Installationsadapter von innen in die Öffnung.
3. Setzen Sie von außen die restliche Installationsadapterplatte auf den
inneren Rahmentunnel, gefolgt vom äußeren Rahmen der Katzenklappe.
4. Stellen Sie sicher, dass der Montageadapter im Loch zentriert ist.
Mit dieser Katzenklappe wurden drei (3) verschiedene Längen von
Schrauben geliefert. Wählen Sie die entsprechende Länge aus.
Schrauben Sie den Außenrahmen mithilfe eines Handschraubenziehers in
den Innenrahmen.
5. Stecken Sie die 8 Verschlussstopfen in die Außen- und
Inneninstallationsplatten und 2 Verschlussstopfen in den Außenrahmen.
6. Nehmen Sie die Batterien aus der Katzenklappe und warten Sie
30 Sekunden. Setzen Sie die Batterien und die Batterieabdeckung
wieder ein. Die Katzenklappe ist betriebsbereit.
Die Arbeit mit Glas erfordert qualifizierte Arbeitstechniken
und sollte von einem professionellen Glaser durchgeführt werden. In
Sicherheitsglas oder Doppelglas lassen sich keine Öffnungen schneiden, außer
bei der Herstellung selbst. Wenden Sie sich bitte an einen Glaser.
Page 43

43
Zubehör Online verfügbar
DEITNL
ES
FR
EN
Grundbetrieb - Anleitung
FUNKTION KNOPFAK-
TIVIERUNG
LED-LEUCHTE AKTION
Manueller Modus Drücken u nd
Loslassen
Rot - Leuchtet
durchgehend
5 Sekunden lang
Die Klappe wird entsperrt.
Verwenden Sie 4 Verschlussoptionen
für den Zugang von Haustieren.
Automatikmodus Drücken und
Loslassen
Grün - Le uchtet
durchgehend
5 Sekunden lang
Die Klappe wird gesperr t
und nur durch das Lesen einer
„programmierten“ Mikrochip-ID
aktiviert.
Lernmodus 5 Sekunden
lang ge drückt
halte n, bis die
LED akt iviert ist
Rot - Leuchtet
durchgehend bis
zu 60 Se kunden
lang
Die Katzenklap pe wird den
Lernmodus verlassen, sobald die
Mikrochip-ID programmiert wurde.
Die Klappe wird nach erfo lgreicher
Programmierung entsperrt.
Für weit ere Katzen Vorgang
wiederholen.
Bewegungssensor Entf. Grün - Le uchtet
durchgehend,
solange
Aktivierung anhält.
Draußen wird eine Bewegung
erkannt und die Katzenklappe
sucht nach einem Mikrochip, um
ihn zu le sen.
Niedriger
Batteriestand
Entf. Rot - B linkt alle
10 Sekunden
Batterien bald austauschen.
Batterien
ausgetauscht
Entf. Grün – 3-mal iges
schnelles Blinken
Die Katzenklap pe wechselt in den
Automatikmodus.
Werkseitiges
Rückset zen
15 Sekunde n
lang ge drückt
halte n, bis die
LED akt iviert ist
Rot - 5-m aliges
schnelles Blinken
Katzen klappe geht zurück in
den Aut omatikmodus und wird
gesperrt. Alle programmierten
Mikrochip-IDs werden a us dem
Speicher gelöscht.
Fehler Entf. Rot – Durchgehend
schnell blinkend
Batterien entfernen, 30 Sekunden
warten und dann Batterien
erset zen. Wenden Sie s ich an
die Kundenbetreuung, wenn die
rote Leuchte weiterhin leuchtet.
Die Klappe wird versuchen zu
entsperren, damit die Katzenklappe
im manuellen Modus verwe ndet
werden kann.
4 manuelle Verschlussoptionen
Die 4-fache manuelle Verschlussoption ermöglicht es Ihnen, den Zugang Ihrer
Katze in Ihr Haus hinein und aus Ihrem Haus heraus in beide Richtungen zu
kontrollieren. Bis Ihr Haustier gründlich mit der Benutzung der Katzenklappe
vertraut ist, ist es eine gute Idee, nur die manuellen Verschlussoptionen in der
„Hinein- oder Hinaus“-Position des 4-fach-Verschlusses zu benutzen (Abb. H).
Vollständig
verschlossen
Herein oder
heraus
Nur herausNur hinein
Abb. H
Weitere Informationen
Weitere Informationen über Ihre PetSafe® Microchip Katzenklappe inklusive
Glas- und Wandinstallation, hilfreiche Trainingstipps und verfügbares Zubehör
finden Sie unter www.petsafe.com, wo Sie die komplette Montageanleitung
des Produkts herunterladen können.
Wichtige Recyclinghinweise
Bitte halten Sie sich an die Entsorgungsvorschriften für elektrische Geräte Ihres Landes. Dieses Gerät
muss recycelt we rden. Wenn Sie ei n Gerät nicht mehr benöt igen, entso rgen Sie es nic ht im städtis chen
Hausm üll. Bitte g eben Sie es da hin zurück, wo Sie es geka uft haben, d amit es unserem Recycl ingsystem
zugef ührt werden kann. Ist dies nicht m öglich, set zen Sie sich bi tte mit der PetS afe®-Kundenbetreuung in
Verbindung, um weitere Informationen zu erhalten.
Batterieentsorgung
In vielen Regionen ist die separate Sammlung von verbrauchten Batterien erforderlich; prüfen Sie die
Bestimmungen in Ihrer Gegend, bevor Sie verbrauchte Batterien wegwerfen. Am Ende des Produktlebens
kontaktieren Sie bitte unsere Kundenbetreuung, um Anweisungen zur richtigen Entsorgung des Geräts zu
erhalten. Entsorgen Sie die Batterie bitte nicht im Hausmüll oder der kommunalen Müllentsorgung.
Page 44

44
petsafe.com
ENFRES
NL
IT
DE
Konformität
Radio Systems Corporation erklärt in eigener Verantwortung, dass das folgende Produkt den wesentlichen
Anforderungen unter Artikel 3 der RED- (2014/53/EU) und der RoHS-Richtlinie (2011/65/EU) entspricht.
Unbefugte Änderungen an diesem Gerät, die nicht von Radio Systems Corporation genehmigt sind,
können einen Verstoß gegen die RED-Richtlinien der EU darstellen, die Befugnis für den Betrieb des Geräts
aufheben und führen zum Erlöschen der Garantie.
Hiermit erklärt Radio Systems Corporation, dass dieses PPA19-16145-Produkt den wesentlichen
Anforderungen und anderen relevanten Bestimmungen entspricht. Die Konformitätserklärung steht Ihnen hier
zur Verfügung: http://www.petsafe.com/customercare/eu_docs.php.
Garantie
Dreijährige nicht übertragbare beschränkte Garantie
Dieses Produkt besitzt eine eingeschränkte Herstellergarantie. Alle Einzelheiten zu der für dieses
Produkt geltenden Garantie und ihren Bestimmungen erhalten Sie auf www.petsafe.com und/oder bei
Ihrer Kundenbetreuung vor Ort.
Europa – Radio Sys tems PetSafe Europe Ltd., 2nd Floor, Elg ee Building, Market Square, Dund alk,
Co. Louth, A91 YR9X Ireland
Nutzungsbedingungen und Haftungsbeschränkung
1. Nutzungsbedingungen
Dieses Produkt wird Ihnen unter der Bedingung angeboten, dass Sie es ohne eine Modifizierung
der darin enthaltenen allgemeinen Geschäftsbedingungen annehmen. Der Gebrauch dieses
Produkts setzt das Einverständnis mit sämtlichen allgemeinen Geschäftsbedingungen voraus.
Wenn Sie diese allgemeinen Geschäftsbedingungen nicht akzeptieren wollen, geben Sie
das Produkt bitte unbenutzt in seiner Originalverpackung und auf Ihre Kosten und Ihr Risiko an
die entsprechende Kundenbetreuung zusammen mit dem Kaufnachweis für eine vollständige
Kostenrückerstattung zurück.
2. Richtige Verwendung
Wenn Sie nicht sicher sind, ob dieses Produkt für Ihr Haustier angemessen ist, konsultieren
Sie bitte vor der Verwendung Ihren Tierarzt oder zertifizierten Trainer. Eine ordnungsgemäße
Verwendung umfasst unter anderem das Lesen der gesamten Anleitung und aller spezifischen
Sicherheitsinformationen.
3. Keine widerrechtliche oder verbotene Verwendung
Dieses Produkt ist ausschließlich zur Verwendung mit Haustieren konstruiert. Eine Verwendung
dieses Produkts auf eine nicht vorgesehene Art und Weise könnte eine Verletzung von Bundes-,
staatlichen oder lokalen Gesetzen zur Folge haben.
4. Haftungsbeschränkung
Radio Systems Corporation und alle damit verbundenen Unternehmen sind unter keinen
Umständen haftbar zu machen für (i) jegliche indirekten Schäden, Schadensersatzverpflichtungen,
zufälligen Schäden, besonderen Schäden oder Folgeschäden und/oder (ii) jegliche Verluste
oder Schäden jedweder Art, die aus dem Missbrauch dieses Produkts entstehen oder damit
verbunden sind. Der Käufer übernimmt alle Risiken und Haftungsverpflichtungen aus der
Verwendung dieses Produkts im vollsten im Rahmen des Gesetzes zulässigen Umfang.
5. Modifikation der allgemeinen Geschäftsbedingungen
Radio Systems Corporation behält sich das Recht vor, die allgeminene Geschäftsnedingungen
unter denen dieses Produk t angeboten w ird, von Zeit zu Zei t zu ändern. Wenn Sie über solche
Änderungen vor der Verwendung dieses Produkt informiert wurden, sind diese für Sie bindend als
wären sie hierin eingeschlossen.
Page 45

45
Zubehör Online verfügbar
DEITNL
ES
FR
EN
Page 46

46
petsafe.com
Page 47

47
Accessories available online
Page 48

petsafe.com
L400-2125-19/4
©2017 Radio Systems Corporation
Radio Systems Corporation
10427 PetSafe Way
Knoxville, TN 37932 USA
+1 (865) 777-5404
Radio Systems PetSafe Europe Ltd.
2nd Floor, Elgee Building, Market Square
Dundalk, Co. Louth, A91 YR9X Ireland
+353 (0) 76 892 0427
All PetSafe® pet doors are suitable for any door, wall or partition although additional materials may be required. This product is designed for the convenience of you and your pet. It is not possible to fully guarantee the exclusion of all
other animals in all circumstances. Radio Systems
Corporation will not accept liability for any damage or inconvenience caused by unwanted animals who may gain access to your home. In keeping with accepted standards of parental
care, children should be supervised at all times.
Les chatières PetSafe
®
s’adaptent à toutes les portes, à tous les murs et à toutes les cloisons, bien que du matériel supplémentaire se révèlera peut-être nécessaire. Ce produit a été conçu pour votre confort et pour celui de votre animal.
Il n’est pas possible de garantir en totalité l’exclusion de tous les autres animaux en toutes circonstances. Radio Systems
Corporation n’assumera pas la responsabilité des dégâts ou des dérangements causés par un animal indésirable
qui se serait introduit dans votre maison. Conformément aux normes admises en termes de devoir parental, les enfants doivent être surveillés à tout moment.
Alle PetSafe
®
huisdierenluiken zijn geschikt voor alle deuren, wanden of scheidingsmuren hoewel aanvullende materialen voor de montage nodig kunnen zijn. Dit product is ontworpen met als uitgangspunt uw gebruikersgemak en
het gemak van uw huisdier. Het is niet mogelijk volledig te garanderen dat alle andere dieren onder alle omstandigheden buitengesloten blijven. Radio Systems
Corporation aanvaardt geen aansprakelijkheid voor schade, verlies of
ongemak veroorzaakt door ongewenste dieren die uw huis binnengekomen kunnen zijn. Conform geldige normen voor ouderlijke zorg moet er geschikt toezicht van kleine kinderen te alle tijden worden toegepast.
Alle PetSafe
®
-Haustiertüren eignen sich für jede Türe, Wand oder Abtrennung; eventuell können jedoch zusätzliche Materialien erforderlich sein. Dieses Produkt wurde für Ihren Nutzen und den Ihres Haustieres entwickelt. Es ist jedoch nicht
möglich, den Ausschluss aller anderen Tiere unter allen Umständen zu garantieren. Radio Systems
Corporation übernimmt keinerlei Haftung für Schäden oder Unannehmlichkeiten, die durch ungewolltes Eindringen von Tieren in Ihr Haus
verursacht werden. Gemäß den anerkannten Normen der elterlichen Aufsicht sollten Kinder jederzeit beaufsichtigt werden.
Tutte le porticine PetSafe
®
per animali domestici si possono montare su quasiasi porta, muro o divisorio, anche se potrebbero essere necessari materiali ulteriori. Questo prodotto è studiato per la convenienza vostra e del vostro
animale. Non è possibile garantire completamente l’esclusione di tutti gli altri animali in qualsiasi circostanza. Radio Systems
Corporation non accetta alcuna responsabilità per danni o incomodi causati da animali esterni che possano
avere accesso alla vostra abitazione. In conformità agli standard riconosciuti di genitorialità, i bambini devono essere tenuti sotto controllo in ogni momento.
Todas la puertas para mascota de PetSafe
®
se pueden instalar en todo tipo de puerta, pared o tabique, aunque a lo mejor se necesiten materiales adicionales además de aptitudes para el bricolaje. Este producto se ha diseñado para
su comodidad y la comodidad de su mascota. Es imposible garantizar totalmente que, en todo caso, no entren animales no deseados por la gatera. Radio Systems
Corporation no aceptará responsabilidad alguna por daños o por
molestias causados por animales no deseados que entren en su casa por la puerta para mascota. De acuerdo con los estándares generalmente aceptados, se requiere la supervisión de un adulto si hay niños alrededor.
Edition
Édition
Editie
Edición
Edizione
Edition
3
RD
 Loading...