

Page 1
Page 2

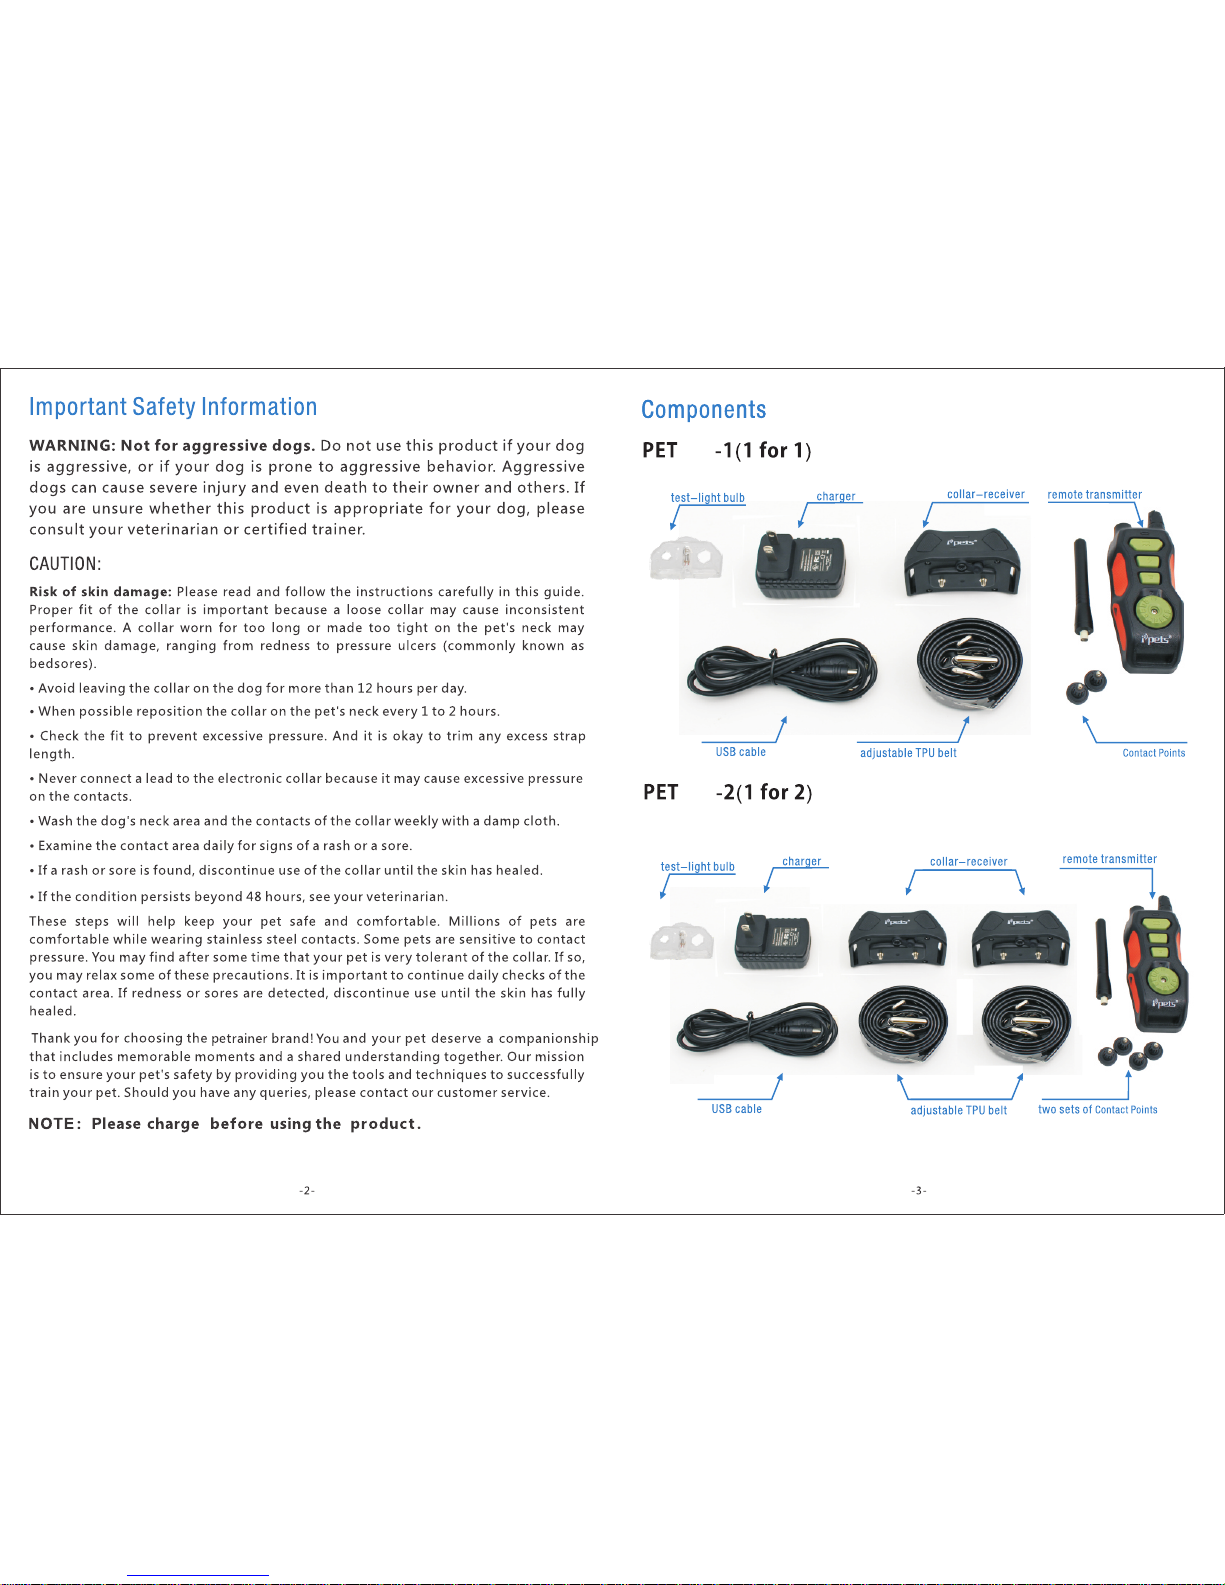
Important Satety Information
Icomponents
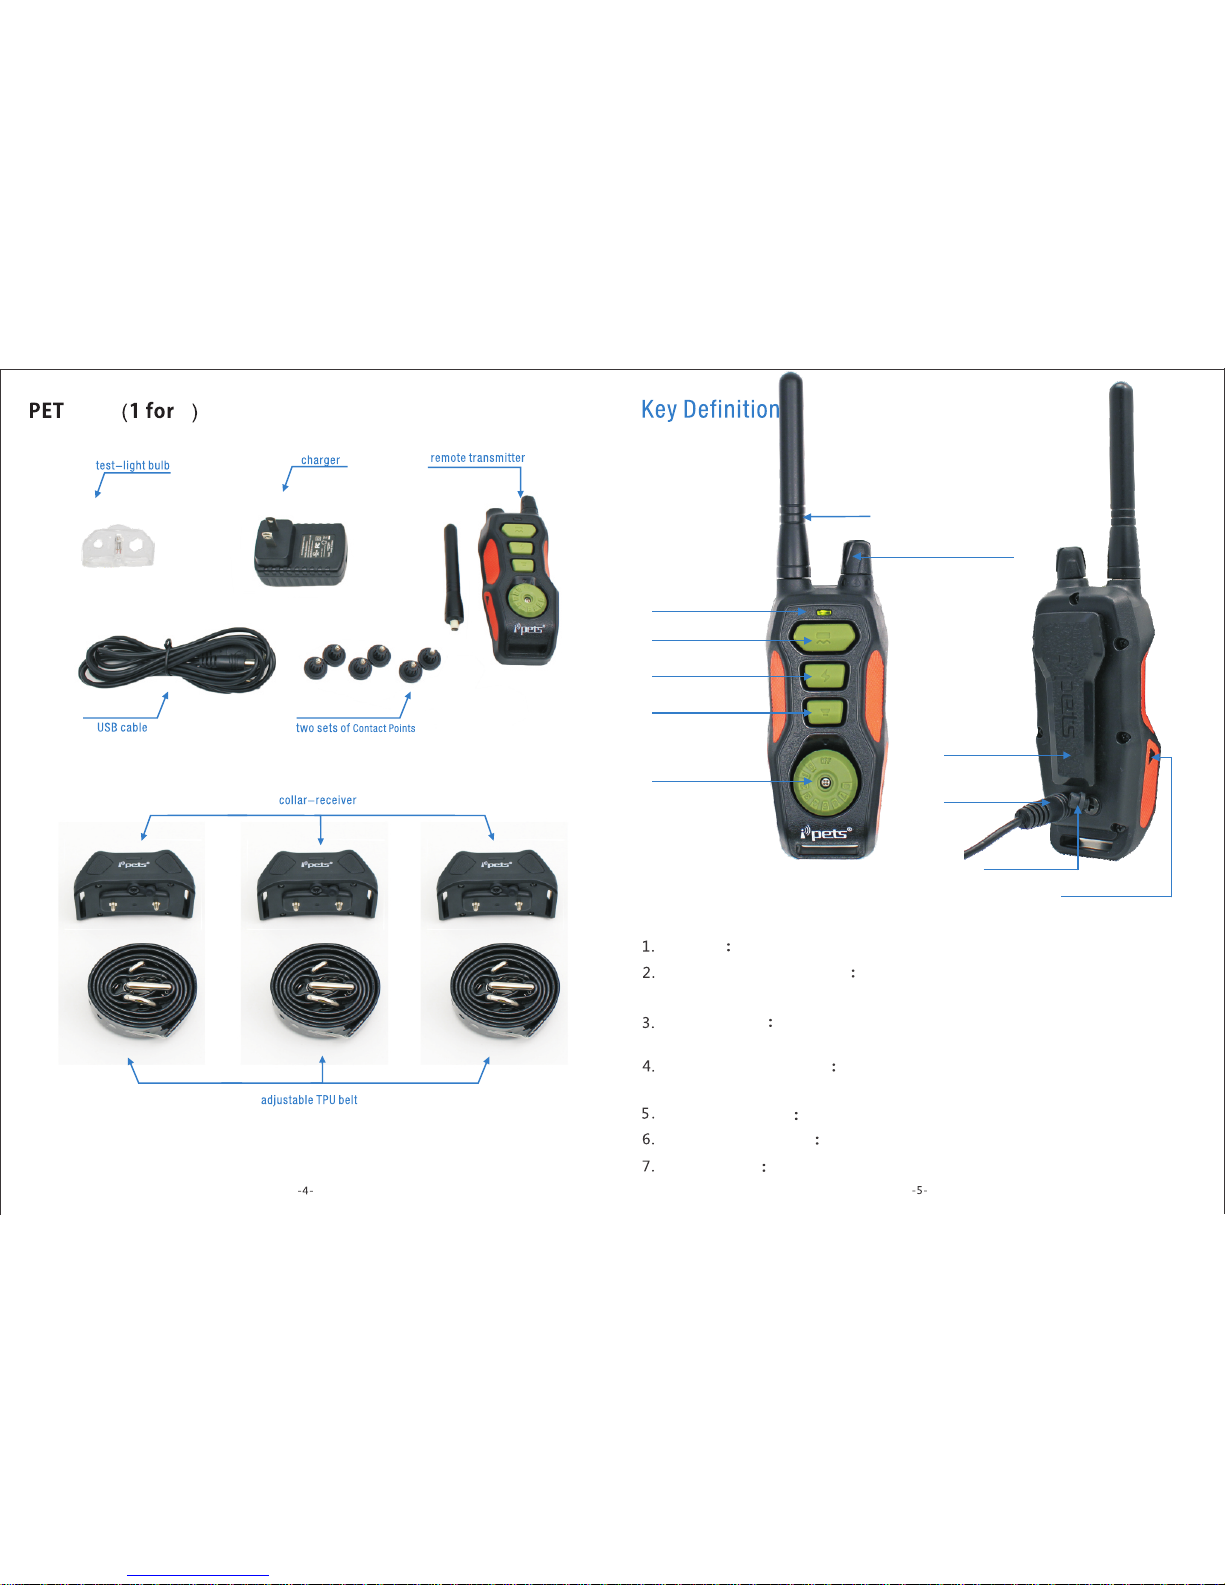
Key Definitions
Features
How the Dog Training System Works
Operating Guide
Step1 P re pare th e Re mote Tra ns mitte r an d Recei ve r Colla r
Step2 P ai ring Co ll ar Rece iv er to Tran sm itter
Step3 Tes t th e Traini ng S ystem F un ction s
Step4 F it t he coll ar -rece iv er
Step5 R e- threa d th e colla r( as diag ra m)
Frequently Asked Questions
Froubleshooting
General Training Tips
Addendum and Upgrading Notes
2
3
5
7
8
8
8
11
10
12
13
14
15
15
17
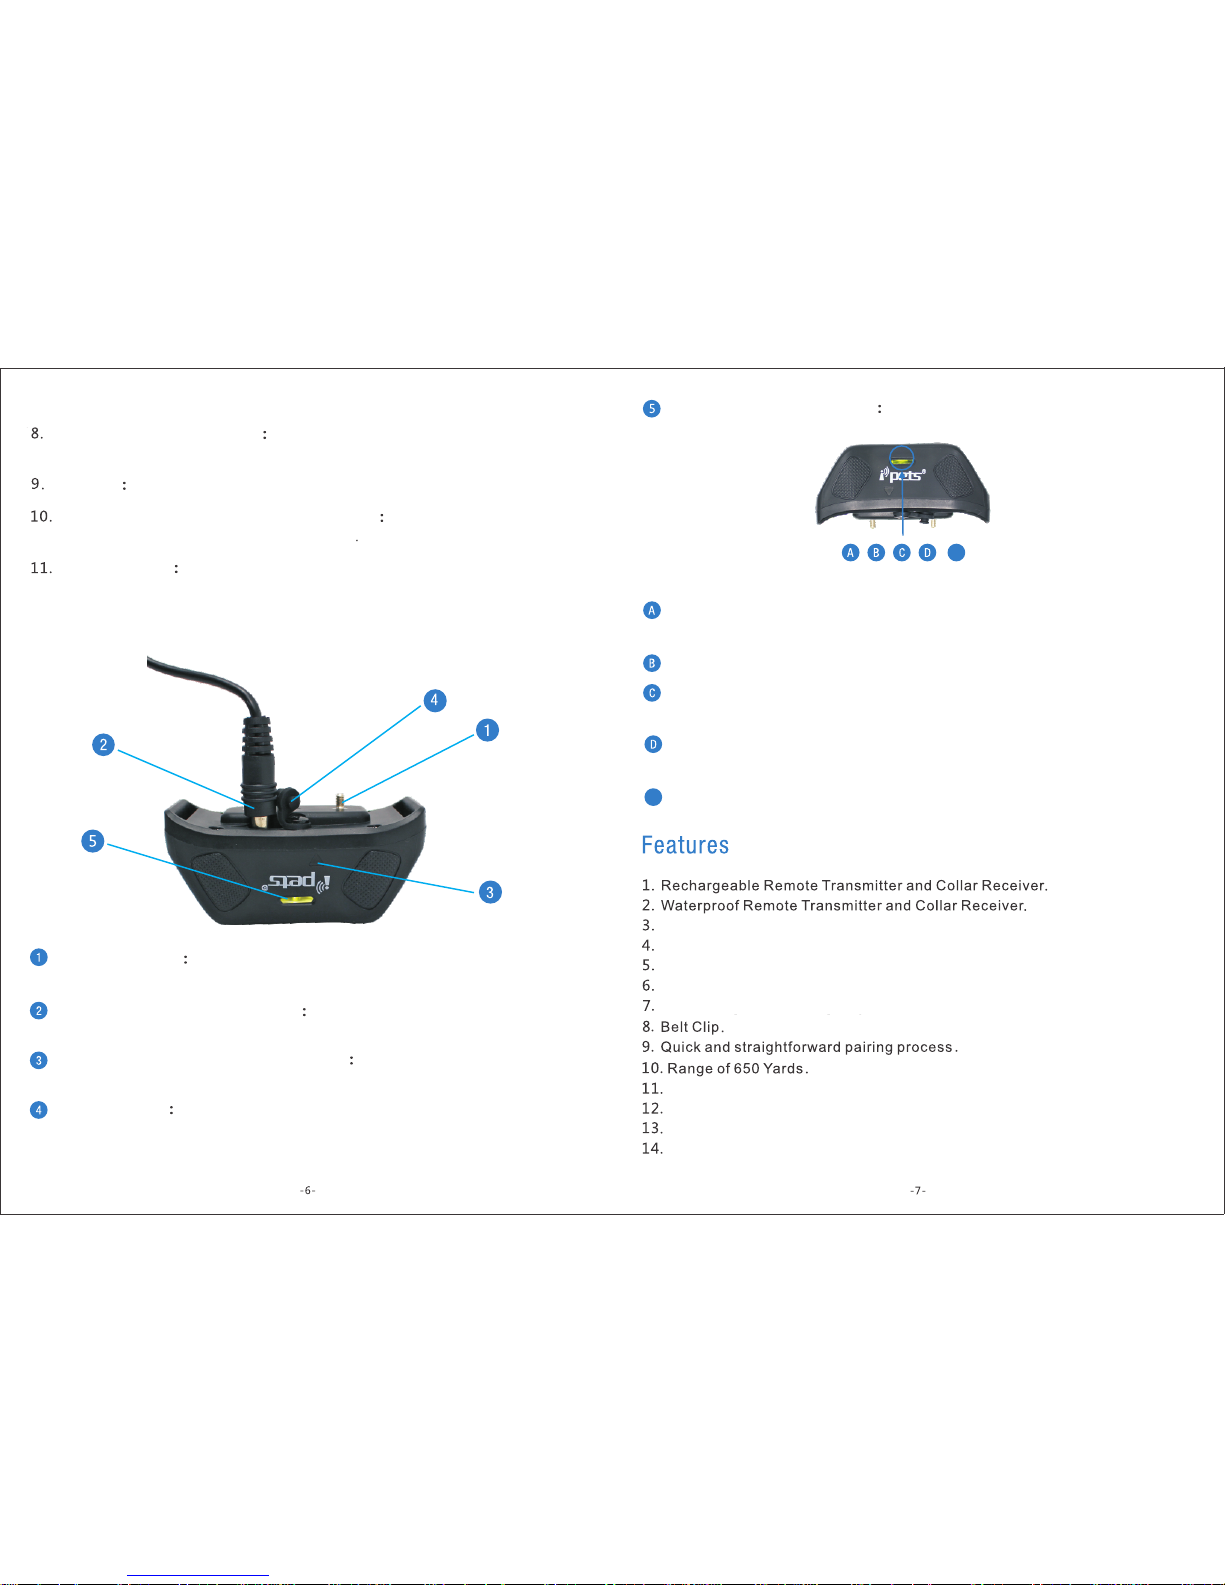
Collar Receiver
6
Page 3
618
618
Page 4
618-3
3
Tra ns mi ts s ig na l fr om R em ot e Tra ns mi tt er t o th e Co ll ar R ec ei ve r.
Transmitte r Indicator Light
When pressing stimulation buttons the Transmitter
Indicator Light flashes green and solid red when charg in g th e ba tt er y.
Rotate the dial to adjust the level of stimulation from 0 – 8. In
addition, powers on and off the Remote Transmitter.
Rotate the dial to select a receiver. Up to three receivers
Delivers vibration stimulation to the selected receiver.
Re mote Transmitter
Inte nsity Dia l
Rece iver Sele ctor Dial
pair to the Remote Transmitter.
Vibrat io n Butto n
Stat ic Shock Bu tton
Deliver static shock stimulation to the selected receiver.
Tone Butt on
Sends a tone signal to the selected receiver, which then emits
Ind icato r Light
Vib ratio n Butto n
Rec eiver Select or Dial
Pairing Re cepta cle
Cha rging J ack
Bel t Clip
Ant enna
Rub ber Cover
Sta tic Sho ck Butt on
Tone Bu tton
Intensity Dial
Antenna
Page 5
a tone.
Transmitter Charging Jack
Charges the battery of the Remote Transmitter
when connected to a power source.
Belt C lip
Allows for the possibility of hands free training.
Remo te Transmi tter Pair ing Recep tacle
Pairs the Remote Transmitter
to the Collar Receiver(s) or powers off the Collar Receiver when properly aligned.
Rubb er Cover
Protects the internal components of the Remote Transmitter
from dust and water. Always remember to replace after charging is comp le te .
Cont act Point s
Contact points cover the metal screws, and through them
static shock stimulation is delivered.
Co lla r Rec eiv er
Coll ar Receiv er Chargi ng Jack
Char ges the battery of the Co llar Recei ver
when connected to a power source.
Coll ar Receiv er Pairin g Recepta cle
Pairs the Collar Receiver to the
Remote Transmitter or powers off the Collar Receiver.
Rubb er Cover
Protects the internal components of the Collar Receiver from
dust and water. Always remember to replace after chargin g is c om pl et e.
Rece iver Indi cator Lig ht
Stimulation Buttons pressed on the Remote Transmitter will cause a gr ee n
light to appear on the Collar Receiver.
Initiating the pairing process of the Remote Transmitter and Re ce iv er C ol la r wi ll
produce a solid green light.
8 intensity levels of Vibration.
8 intensity levels of Static Shock.
Easy to use, adjustable Intensity Dial.
Tro ub le f re e Re ce iv er S el ec to r Di al .
Simple, ergonomic design layout.
When the Collar Receiver is charging the light will be a solid r ed ; it s wi tc he s
to green when fully charged.
In standby status, the Receiver Indicator Light will flash green perio di ca ll y.
E
Powering off the Collar Receiver will give off a re d li gh t.
E
Capable of simultaneous control of three dogs (extra receive rs a re p ur ch as ab le ).
Adjustable, thick TPU strap to accommodate any size of dog.
Conserves power when not in use to extend battery life.
3 modes: Tone, Vi br at io n an d St at ic S ho ck .
Page 6
Ipets products are reliable, effective, and comfortable for large or small dogs. The
system assists in controlling your dog without a leash in a range up to 650 yards away!
Instantly send a signal from the Remote Transmitter, which activates your dog’s Collar
Re ce iv er. T he d og w ill recei ve a n an noying bu t sa fe , ha rmless st im ul at io n. With
correct, consist ent use of this prod uct, the dog will associate his misbehavior with
your corrections, and soon enough, you will have a well-trained dog. This particular model
features adjustable levels of stimulation and multiple types of stimulation, enabling the
user to tweak accordingly to the dog’s temperament, removing the risk of over
stimulation or incorrect usage of stimul at io n.
Power Saving
R T
and Receiver Collar
R T and Receiver Collar
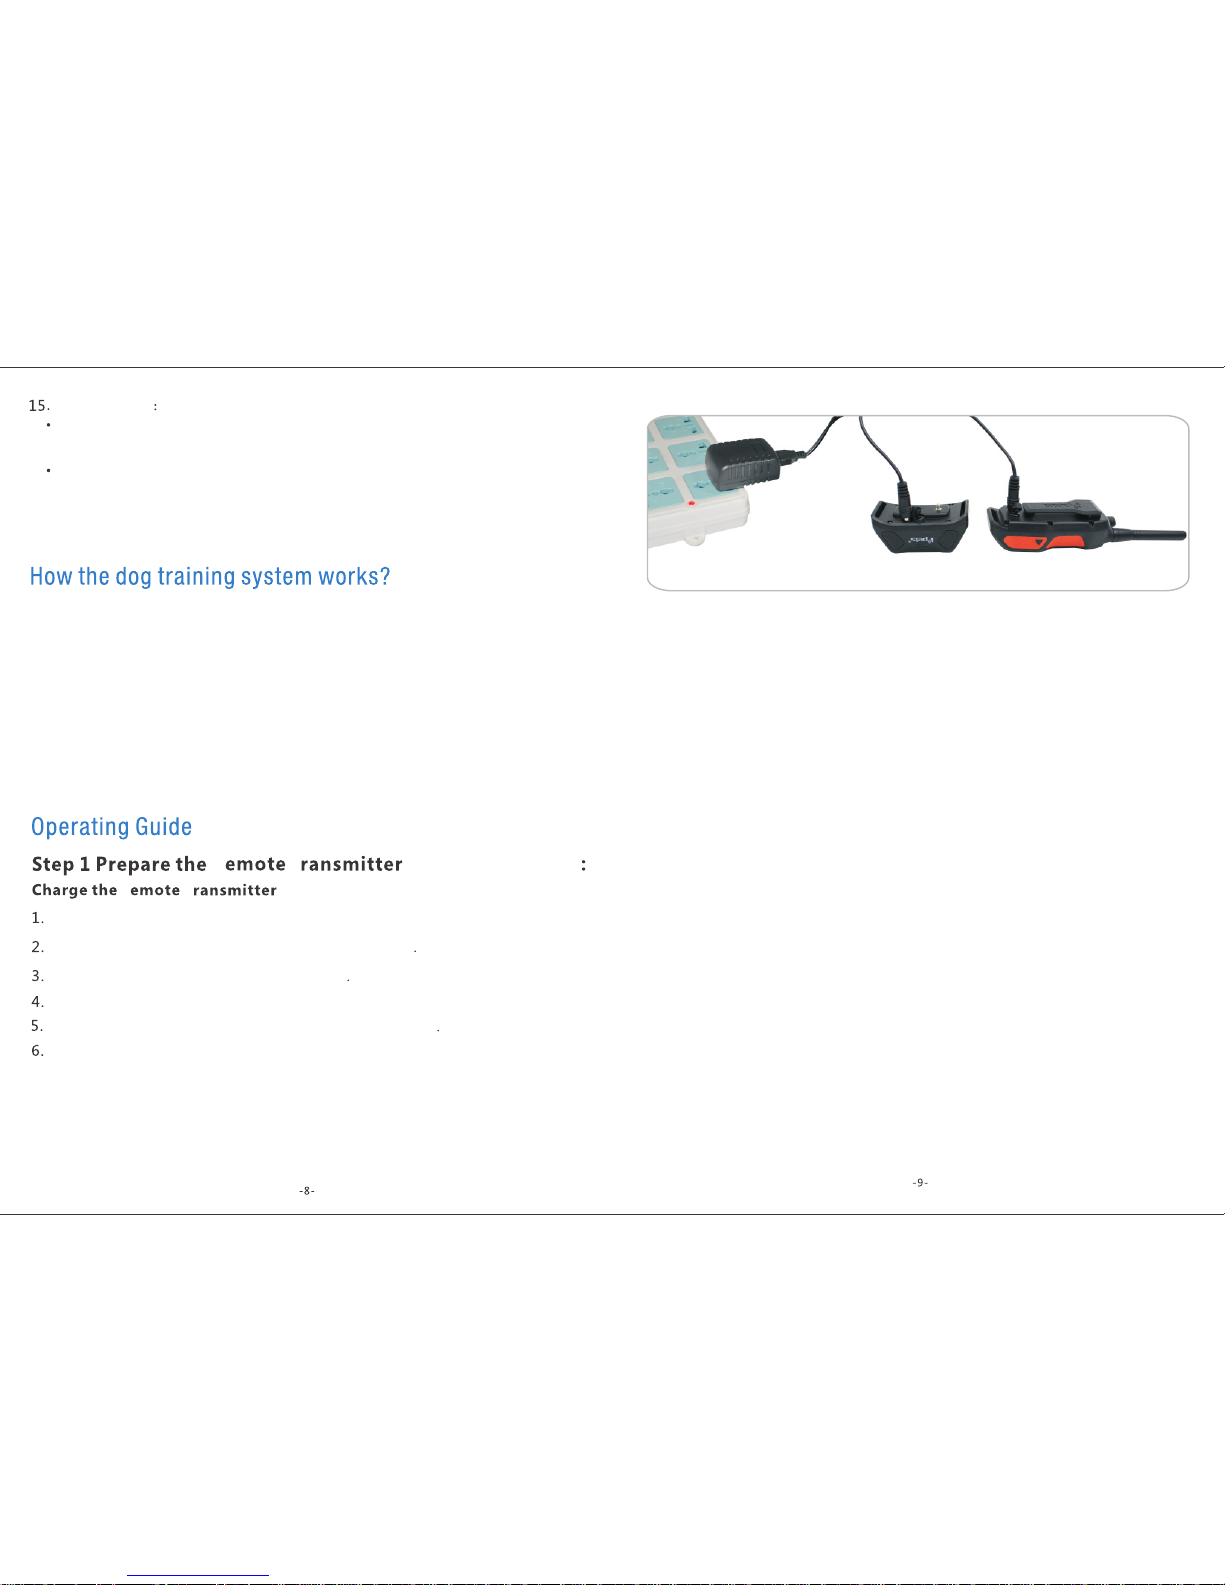
A solid red light will appear on the ransmitter Indicator Lig ht , in di ca ti ng
Insert the charging connector into the Charging Jack
Uncover the Transmitter Charging Jack by lifting the Rubber Cover.
Plug the charger into a standard wall outlet
charging is
The collar-receiver,if left unused for 5 minutes,will enter i nt o “D EE P SLEEP”
status,yet it can be activated by any movement.
The remote transmitter,if left unused for 2 minutes,will enter into“STANDBY”
status;if unused for 5 minutes,it will enter into“DEEP SLEEP”STATUS.To activate
the transmitter in separate cases,you can simply press any button (excep t the
LED LIGHT button) and the“ON/OFF”button(for 1 sec)separately.
Note : Before fi rst use, ch arge the Re mote Trans mitter un til compl etion
of the c harging p rocess.
Replace the Rubber Cover to protect the Transmitter Charging Jack.
Once charging is complete, the solid red light will turn to a solid gree n li gh t.
To p ow er on th e Re mo te Transmitter ro ta te the I nt en si ty Dial so it ’s no longer
selecting “ of f. ” If do ne correctly, th e Transmitter In di ca to r Li gh t will be flashing
green.
Powering on and off the Remote Transmitter
NB:T he indica tor light o f collar- receive r will flas h red if it n ee ds rech ar ging.
To power off the Remote Transmitter rotate the Intensity Dial to select “off ,” t he
Tra ns mi tt er I nd ic at or l ig ht w il l ce as e fl as hi ng .
Powe ring on and o ff the Coll ar Receiv er
To power on the Remote Collar Receiver, align the Remote Tra ns mi tt er P ai ri ng
Receptacle with the corresponding Collar Recei ve r Pa ir in g Re ce pt ac le , on ce
the Receiver Indicator Light is green separate the two Pairing R ec ep ta cl es . The
Collar Receiver is now on.
To power off the Remote Collar Receiver, realign the Remote Transmitter
Pairing Receptacle Transmitter with the correspondi ng C ol la r Re ce iv er P ai ri ng
Receptacle, once the Receiver Indicator Light goes red sep ar at e th e tw o Pa ir in g
Receptacles. The Collar Receiver is now off .
Page 7
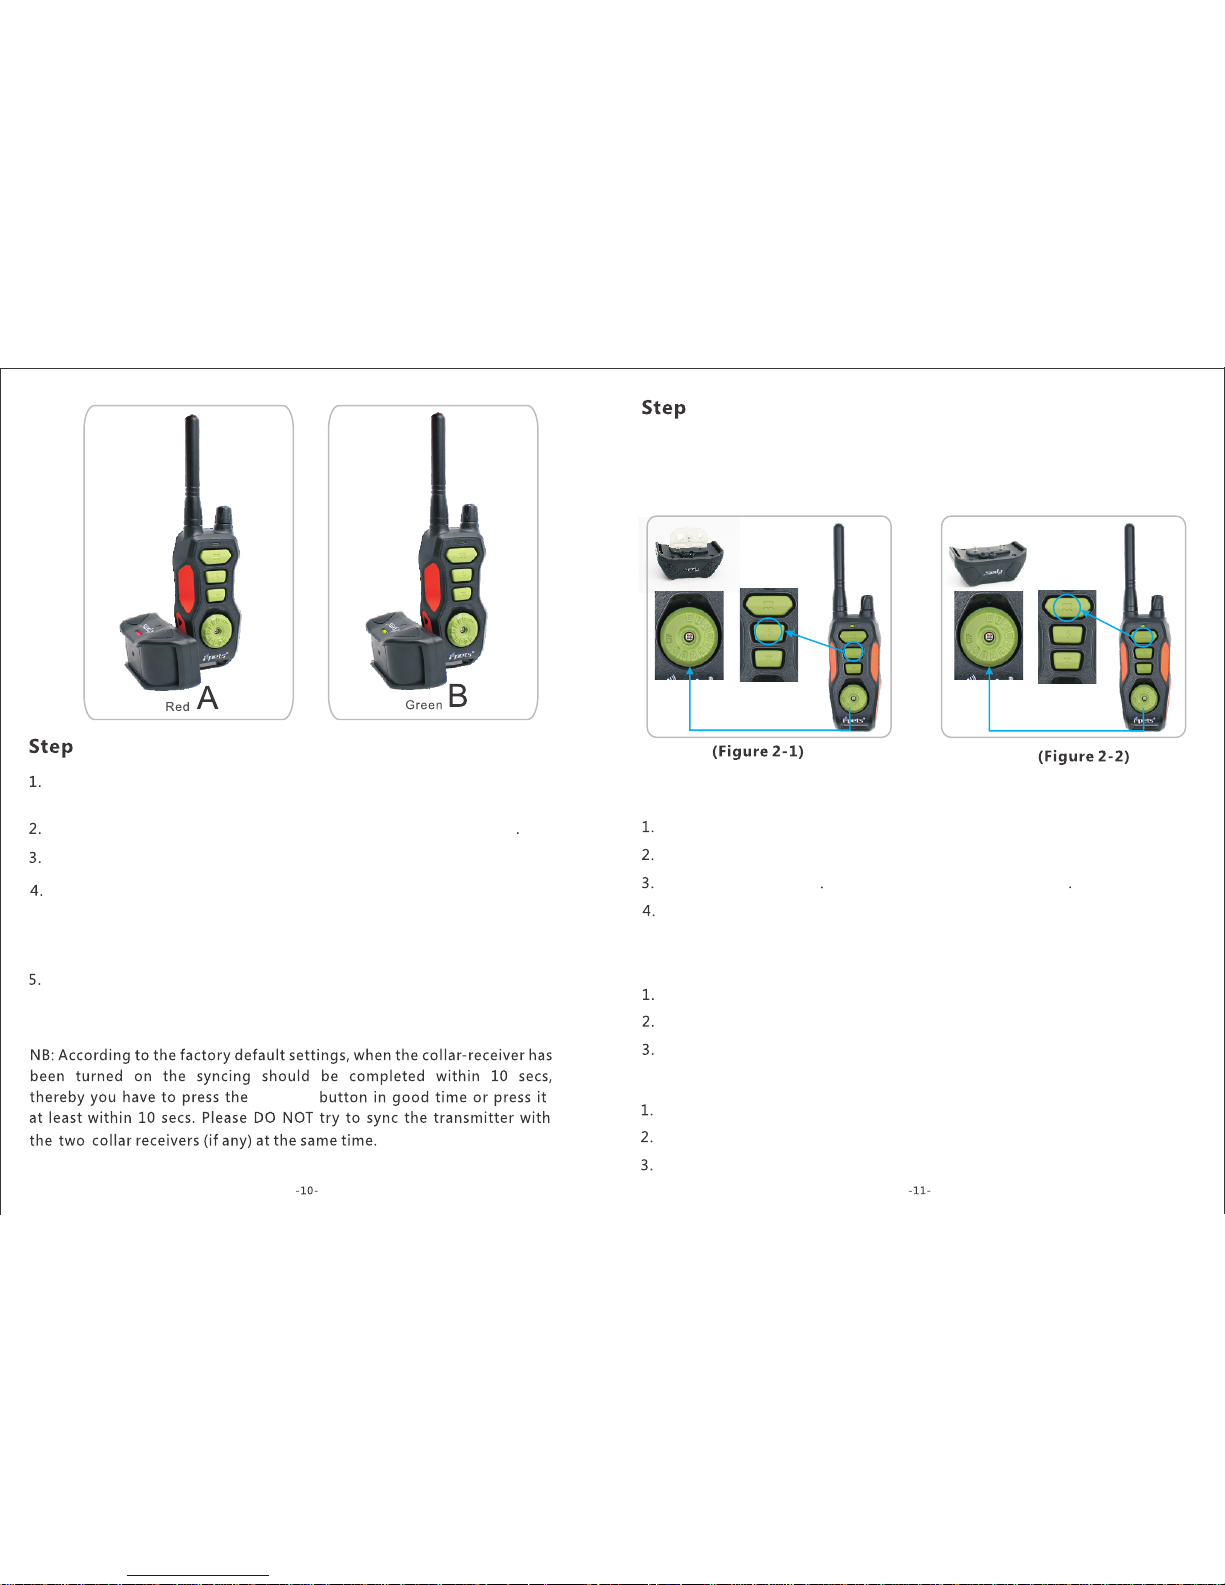
Pairing Collar Receiver to Transmitter
2
Rotate the Intensity Dial so it’s no longer selecting “off, ” th e Re mo te Tr an sm it te r
will now .
Rotate the Receiver Selector Dial to 1, indicating the first receive r fo r pa ir in g.
Ensure the Collar Receiver is off.
Align and the Remote Transmitter Pairing Receptacle with the co rr es po nd in g
Collar Receiver Pairing Receptacle, hold until the Rec ei ve r In di ca to r Li gh t is a
steady green, once the steady green light begins to flash, press any of the
stimulation buttons. Pairing is now complete.
If needing to pair a second or third Collar Receiver, repeat these step s bu t ro ta te
the Receiver Selector Dial to 2 or 3, depending on what Receiv er C ol la r yo u’ re
pairing.
Vibration
The testing methods will help determine whether the traini ng s ys te m is f un ct io ni ng
3
Test the Training System Functions
as intended. Please ensure that the pairing process is compl et e be fo re a tt em pt in g
to test the functionality.
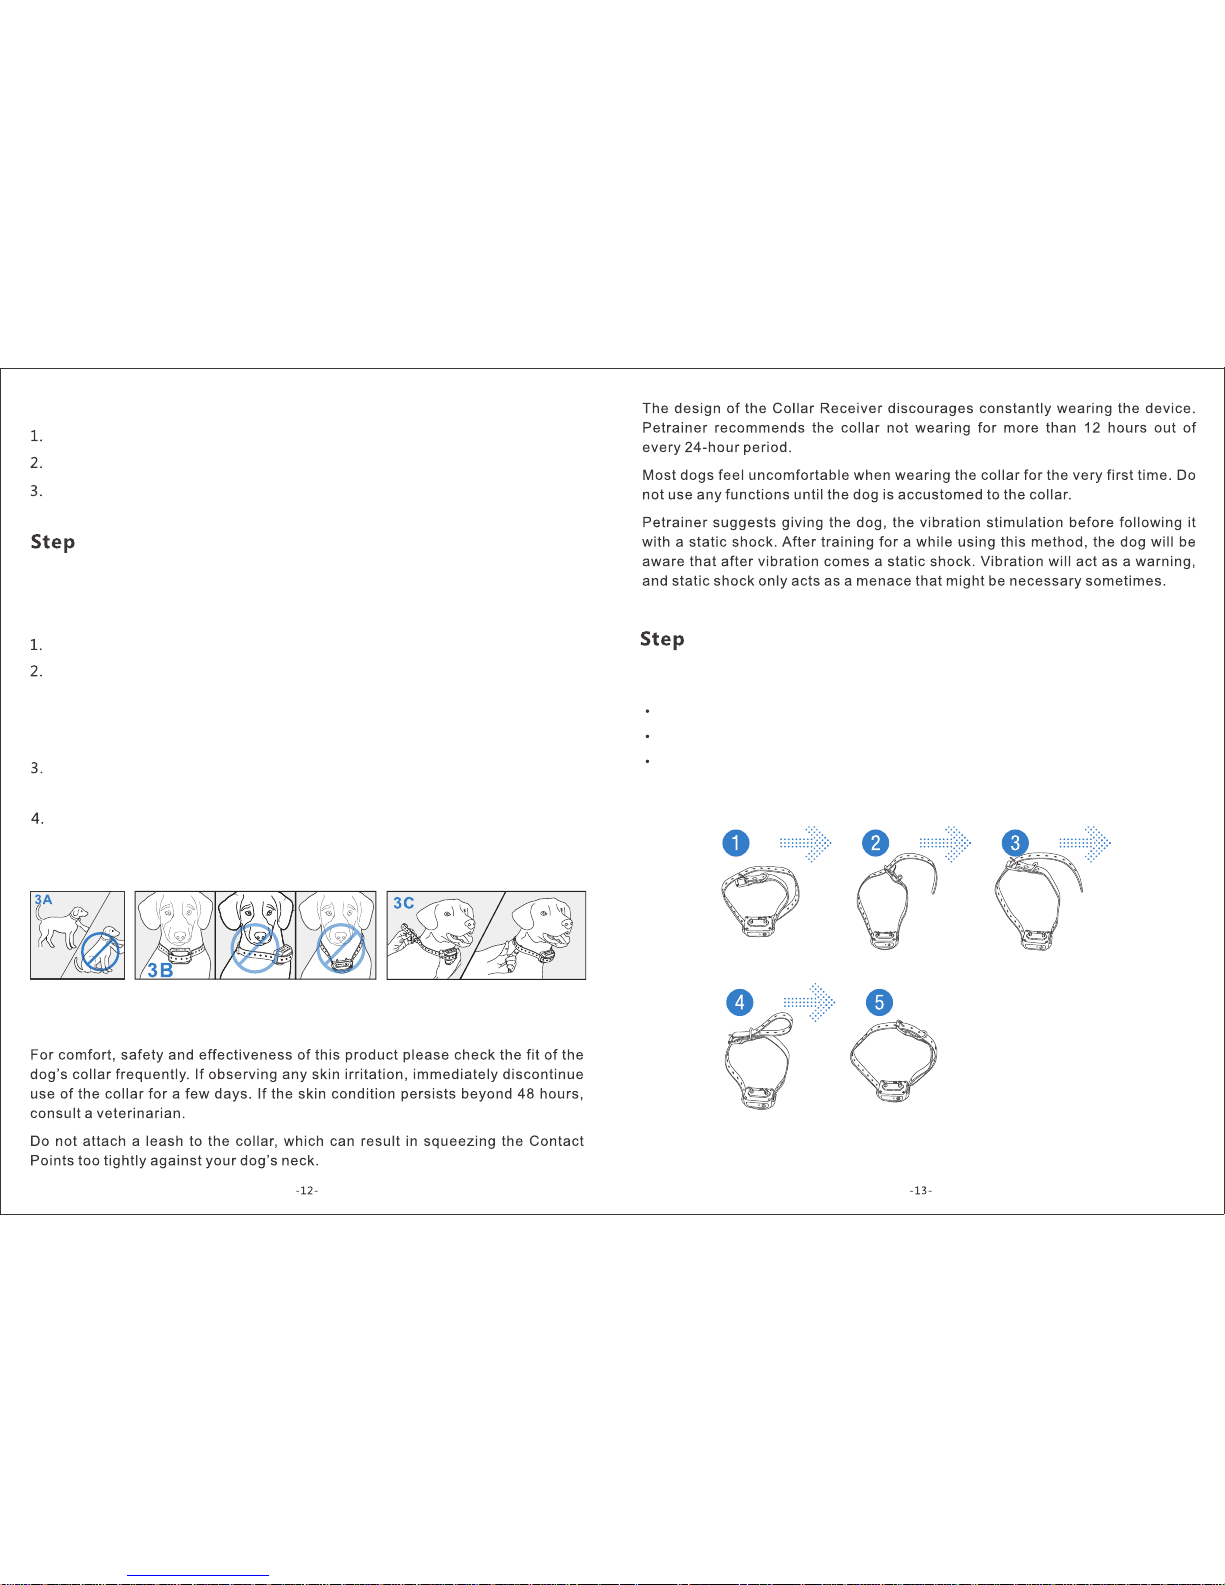
Put the test bulb over the Contact Points of the Collar Receiver.
Testing t he S tatic S ho ck Func ti on
Press the Vibration Button and the Collar Receiver will respond appropriately.
Power on the Remote Transmitter, and adjust the Intensity Dial off 8.
Select the correct Collar Receiver with the Receiver Selecto r Di al .
Testing t he Vib ration Fu nction
Select the correct Collar Receiver with the Receiver Selecto r Di al .
static shock function is operating correctly.
Power on the Remote Transmitter and adjust the Intensity Dial off 8.
Press the Static Shock Button and the test bulb will flash orange, indicating th e
Press the Tone Button, the Collar Receiver will emit a tone.
To power on the Remote Transmitter move the Intensity Dial from the “off” position.
Select the correct Collar Receiver with the Receiver Selector Di al .
Testing t he Tone F unction
Page 8
Press the Tone Button, the Collar Receiver will emit a tone.
To power on the Remote Transmitter move the Intensity Dial from the “off” position.
Select the correct Collar Receiver with the Receiver Selec to r Di al .
Testing t he Tone F unction
4
Fit the Collar Receiver
Important: The proper fit and placement of the Collar Receiver is essential for
effective training. The c on ta ct p oi nt s mu st h av e di re ct c on ta ct w it h th e do g’ s
skin.
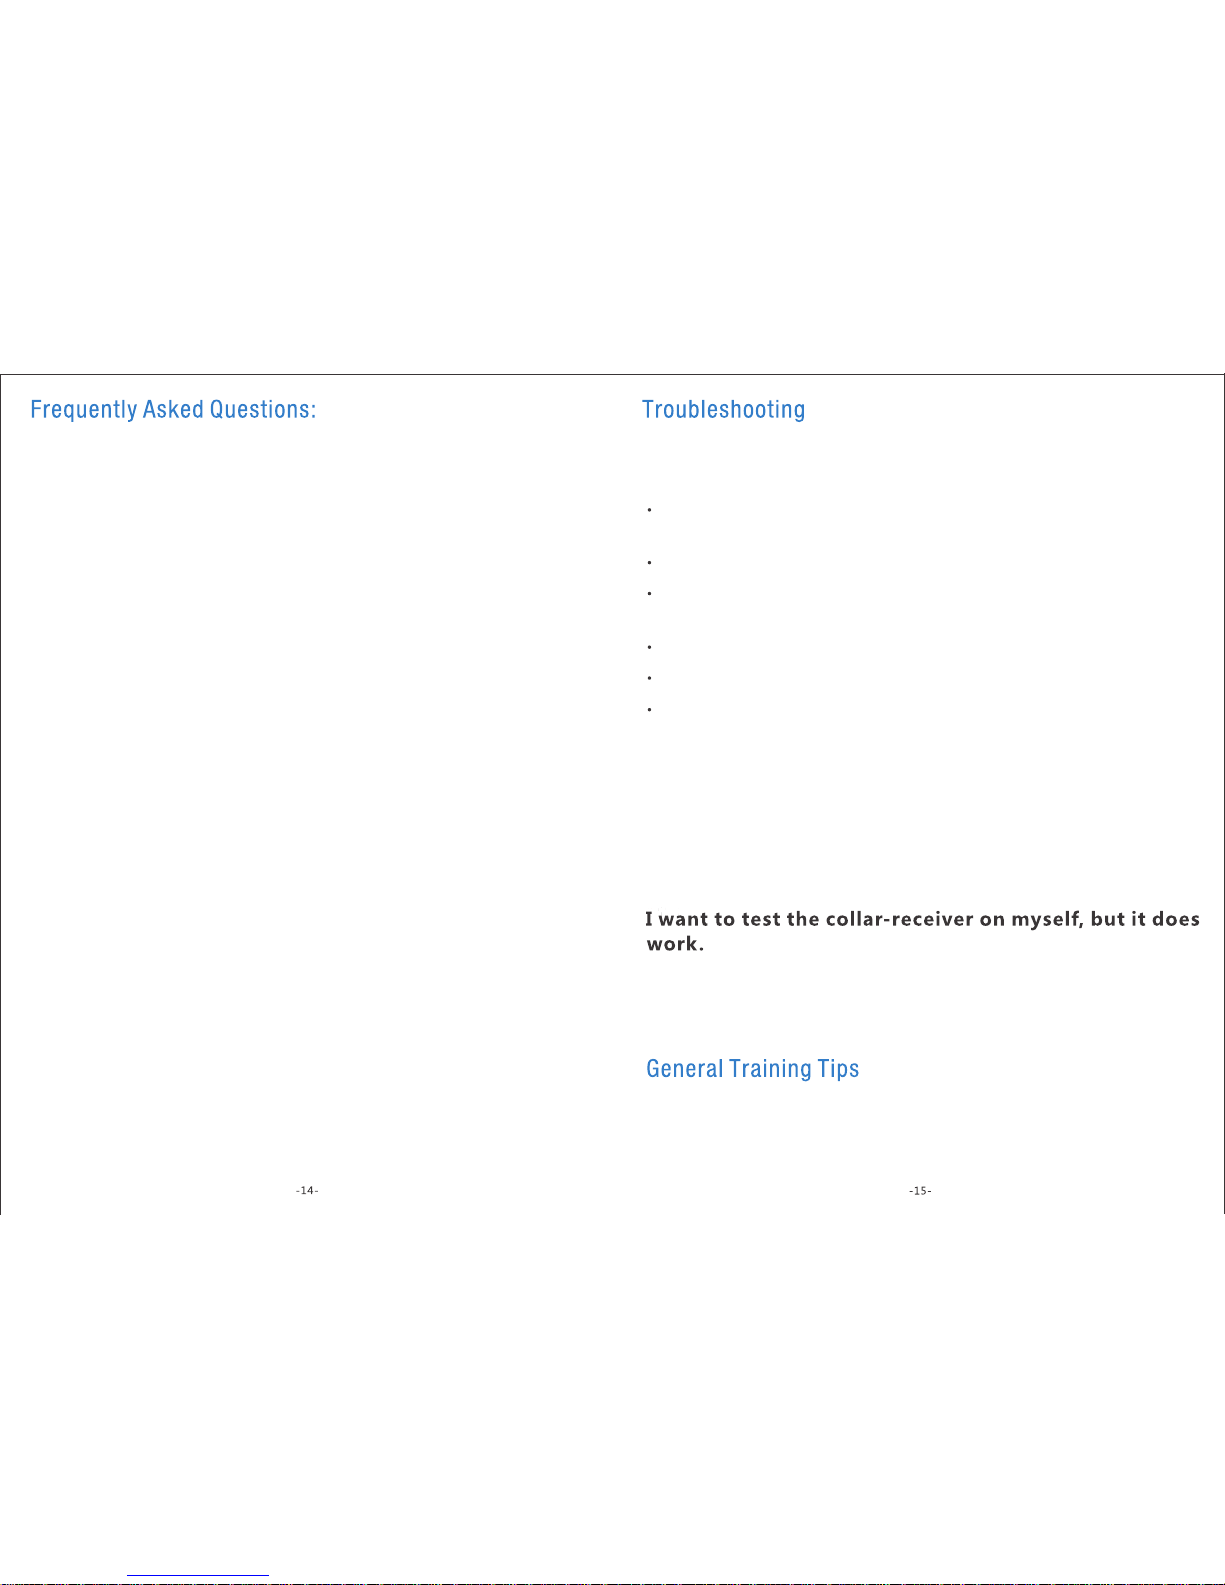
To fit the Collar Receiver, attach the Collar Strap to the Receiver.
With the dog standing in front of you, place the Collar Receiver aro un d th e do g’s
neck, so the receiver box and Contact Points are on the underside of you r do g’s
neck, making direct contact with the dog’s skin. If direct contact is not possible,
shaving some fur away, ensuring good contact is recommended.
Fasten the collar strap. The fit should be snug, but not taut. A finger should be able
to be placed beneath the collar strap when around the do g’s neck.
Allow the dog to wear the Collar Receiver for several minutes an d ch ec k th e st ra p
again. The dog will soon become more familiar with the Collar Receiver, so it is
crucial to ensure the fit comfortable and flattering.
CAUTION: RISK OF SKIN DAMAGE
5
Re-thread the collar
Regu lar Maint enance
Ensure Contact Points are not too tighton a weekly basis.
Rinse the Contact Points with alcohol on a weekly basis.
Check the dog’s neck for irritation and wash the dog’s ne ck o n a we ek ly b as is .
Page 9
Is the Collar Receiver waterproof?
Yes, b ut a lw ay s en su re t ha t th e Ru bb er C ov er s ea ls t he C ha rg in g Ja ck
Can I replace the Collar receiver with another kind of colla r?
No.
Can I attach a leash to the Collar Receiver?
No, this can resu lt in pul li ng the Cont ac t Points t oo tightly a ga in st the d og 's
neck. At ta ch a leash t o a s ep ar at e, no nm et al li c collar or a harness. En su re the
extra collar does not put pressure on the Contact Points.
How long can I leave the Collar Receiver on my dog?
The des ig n of th e collar di sc ou ra ge s constant we ar in g. We recommend no t
having the dog wea r the collar for more th an 12 hours out of eve ry 24 -h ou r
period.
Is the training system suitable for all dogs?
The collar Is adjustable from le ng th 5 .9 ”( 15 cm ) to 1 9. 6” (5 0c m) , if t he d og 's n ec k
circumference is smal le r th an 5.9”, you w il l be forced to r et hr ea d th e co ll ar, if
the d og 's ne ck circumference is la rg er th an 22”, this c ol la r m ay not be su it ab le
for the dog. This collar is not suitable for dogs under 15lbs.
How old does the dog have to be before using the system?
Your dog sh ou ld have lea rn ed basic ob ed ie nc e commands su ch as, “s it ” or
“stay.” Th e Co ll ar R ec ei ve r mi gh t be t oo l ar ge f or d og s un de r 15 lb s.
Once my d og com pl et es tra in in g and is b ee n o be yi ng my comm an ds , will he
have to wear the collar?
Probably not, but you may try to reinforce training with the collar.
Can I use the Ipets rechargeable training collar with more than on e do g?
Yes, y ou j us t ne ed t o pu rc ha se a no th er C ol la r Re ce iv er f or t he s ys te m.
My dog i s not respo nding aft er the trai ning syst em instal led
succ essfull y.
Charge th e Remote Tra ns mi tt er and Coll ar Receiver fo r 6 hour s, separately
before first use.
Ensure if the Remote Transmitter and Collar Receiver power is on.
Check the intensity l ev el s of vibr at io n an d st at ic s ho ck , ma ki ng sure it is not
set to 0.
Ensure the Collar Receiver has sufficient power to operate.
Check the collar to ensure it fits snugly against your dog's neck.
If t es te d for a ll of t he above an d the d og is s ti ll not re sp on di ng , please tr y re-
pairing the Remote Transmitter and Receiver Collar.
The Re mote Trans mitter do es not work .
Check the battery status of the Remote Transmitter.
Press an d hold th e Right S id e B ut to n for a few se co nd s to po we r on th e Remote
Tra ns mi tt er.
When tes ti ng the C ol la r Receiver with your hands, plea se touch t he t wo
electrodes simultaneously, as touching one electrode will not work.
The following tips on how to get the best out of your Petrainer
Training Coll ar.
Page 10
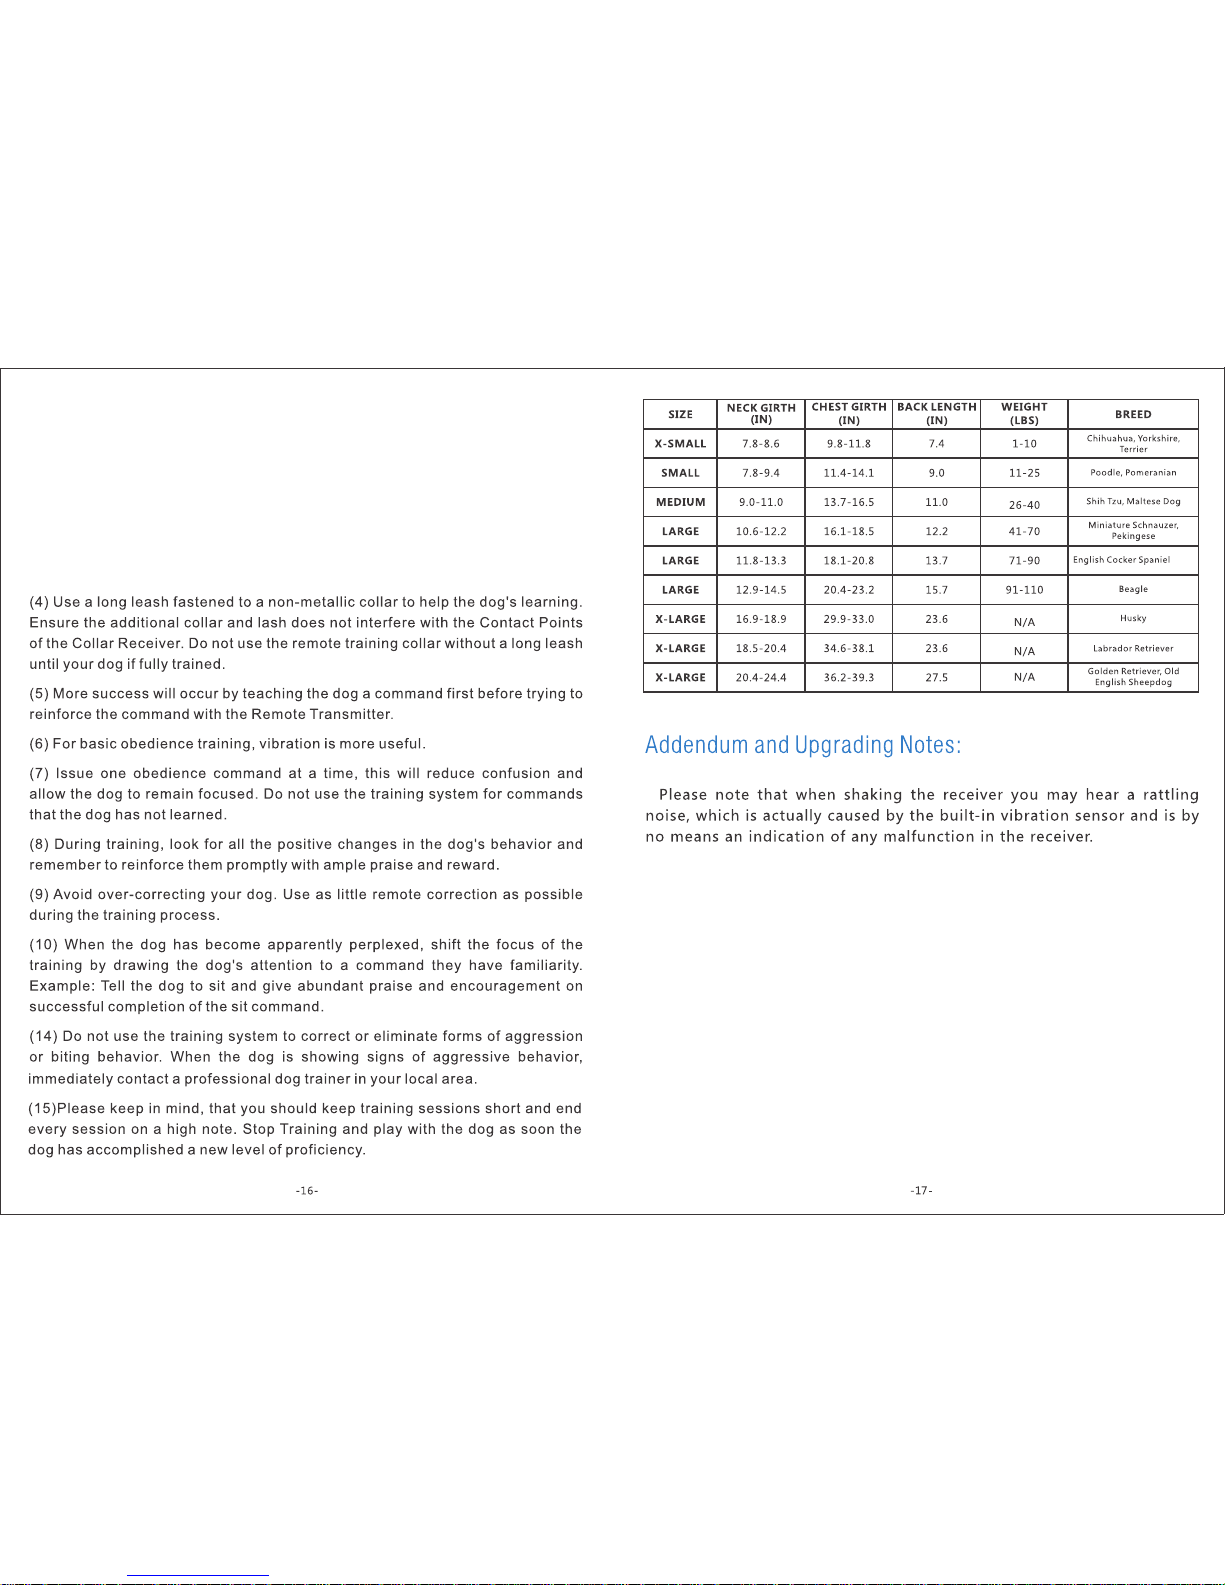
(1) M ak e training se ss io ns short an d po si ti ve (b etween 1 0- 15 minutes lo ng for
each session.) This will enab le th e dog to kee p its att en ti on fo cu se d on the
trainer.
(2) Train one dog at a time.
(3) Du ri ng the first i ni ti al trai ni ng sessions, keep th e do g in a fa mi li ar outdoor
environment. Training in ne w l oc at io ns may cause the dog to become
distracted, ca us in g you t o re in fo rc e commands wi th the Col la r Re ce iv er more
than necessary.
 Loading...