

Page 1
Page 2
Important Satety Information
Icomponents
Key Definitions
Features
How the Dog Training System Works
Operating Guide
Step1 P re pare th e Re mote Tra ns mitte r an d Recei ve r Colla r
Step2 P ai ring Co ll ar Rece iv er to Tran sm itter
Step3 Tes t th e Traini ng S ystem F un ction s
Step4 F it t he coll ar -rece iv er
Step5 R e- threa d th e colla r( as diag ra m)
Frequently Asked Questions
Froubleshooting
General Training Tips
Addendum and Upgrading Notes
2
3
4
6
7
7
7
10
9
11
12
13
14
15
16
Page 3
617
617
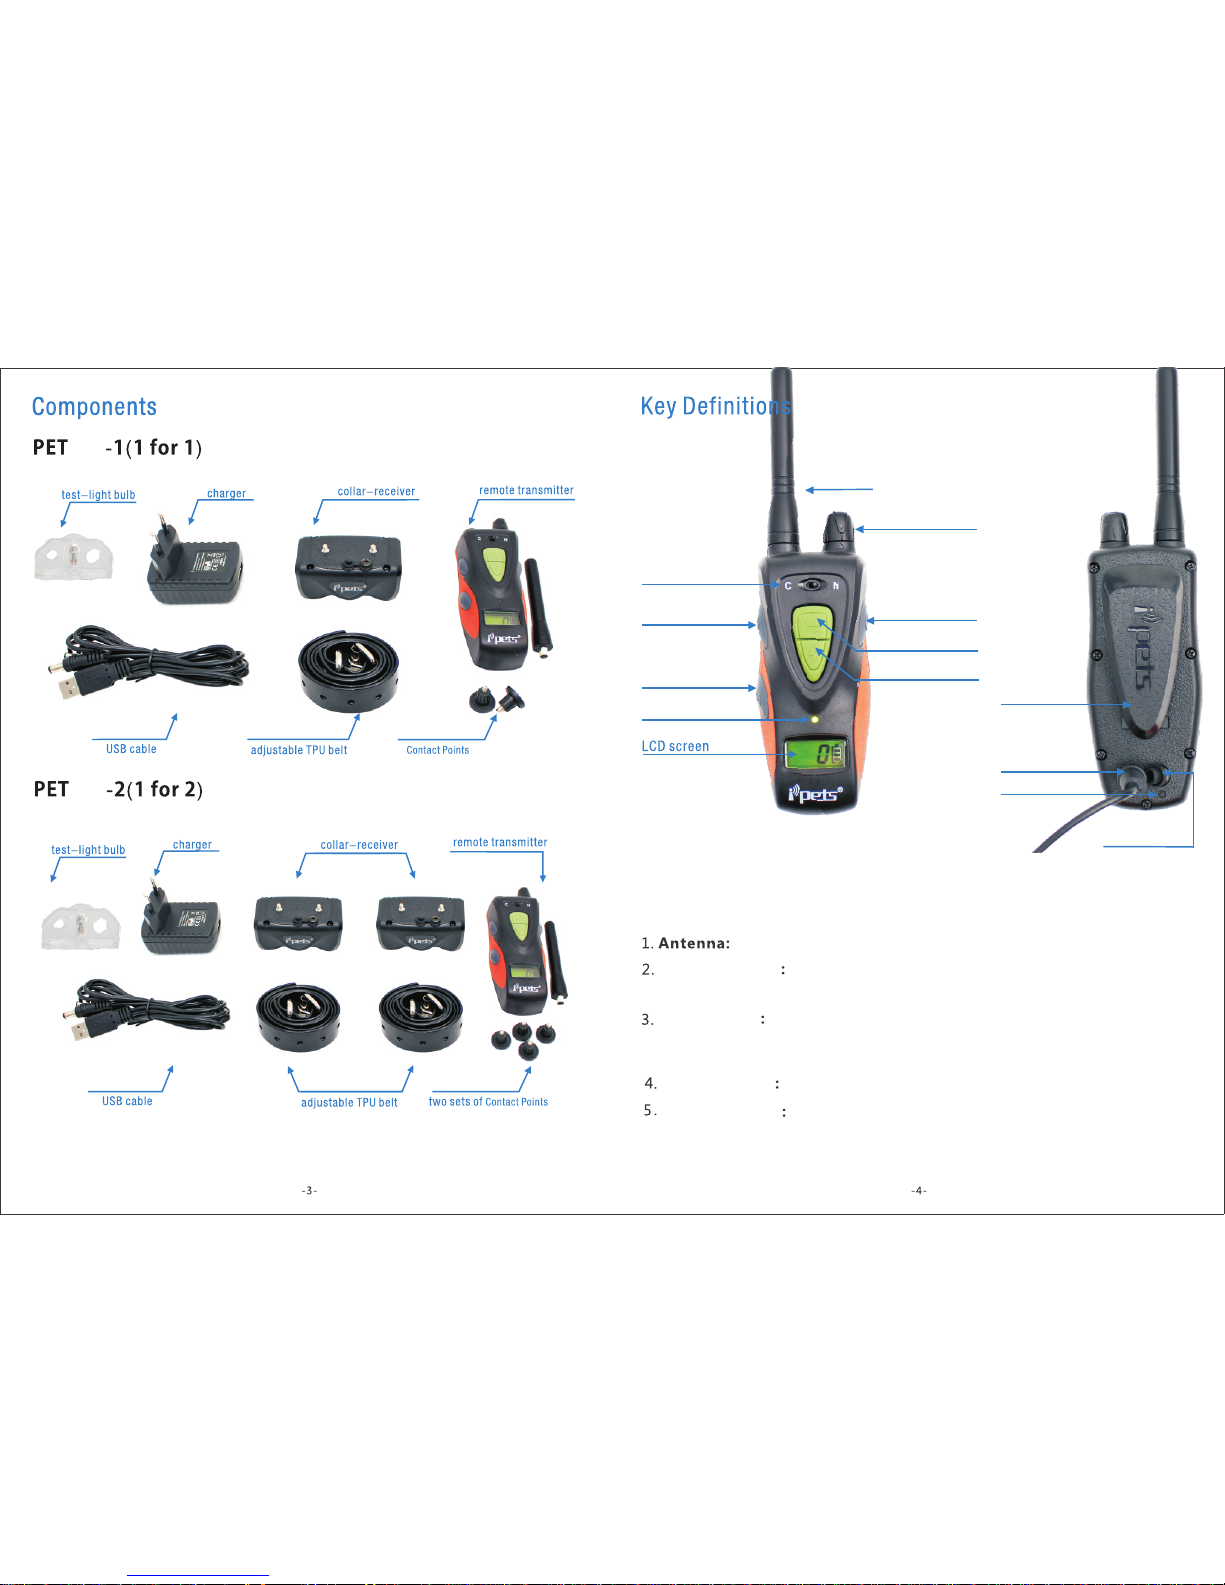
Tra ns mi ts s ig na l fr om R em ot e Tra ns mi tt er t o th e Co ll ar R ec ei ve r
Indi cator Lig ht
Flashes green or solid green when any of the stimulation
buttons are pressed and solid red when charging the battery or n o po we r.
LCD Sc reen
Indicates the intensity level of stimulation currently selecte d
and battery life. When pressing stimulation buttons, the LCD scree n wi ll n ot if y is
which receiver receiving stimulation.
Inte nsity Dia l
Rotate the dial to adjust the level of stimulation from 0 to 100.
Toggle Sw it ch
Toggle switch swaps between continuous and momentary
mode. If the toggle switch is to the left, all stimulation buttons are now continuou s
and if to the right, all stimulation buttons are now momentary.
Toggl e Switc h
Vib ratio n Butto n 2
Sta tic But ton 2
Ind icato r Light
Int ensit y Dial
Powe r Butto n
Vib ratio n Butto n 1
Sta tic But ton 1
Pairing Sy mbol
Cha rging J ack
Bel t Clip
Ant enna
Rub ber Cover
Page 4
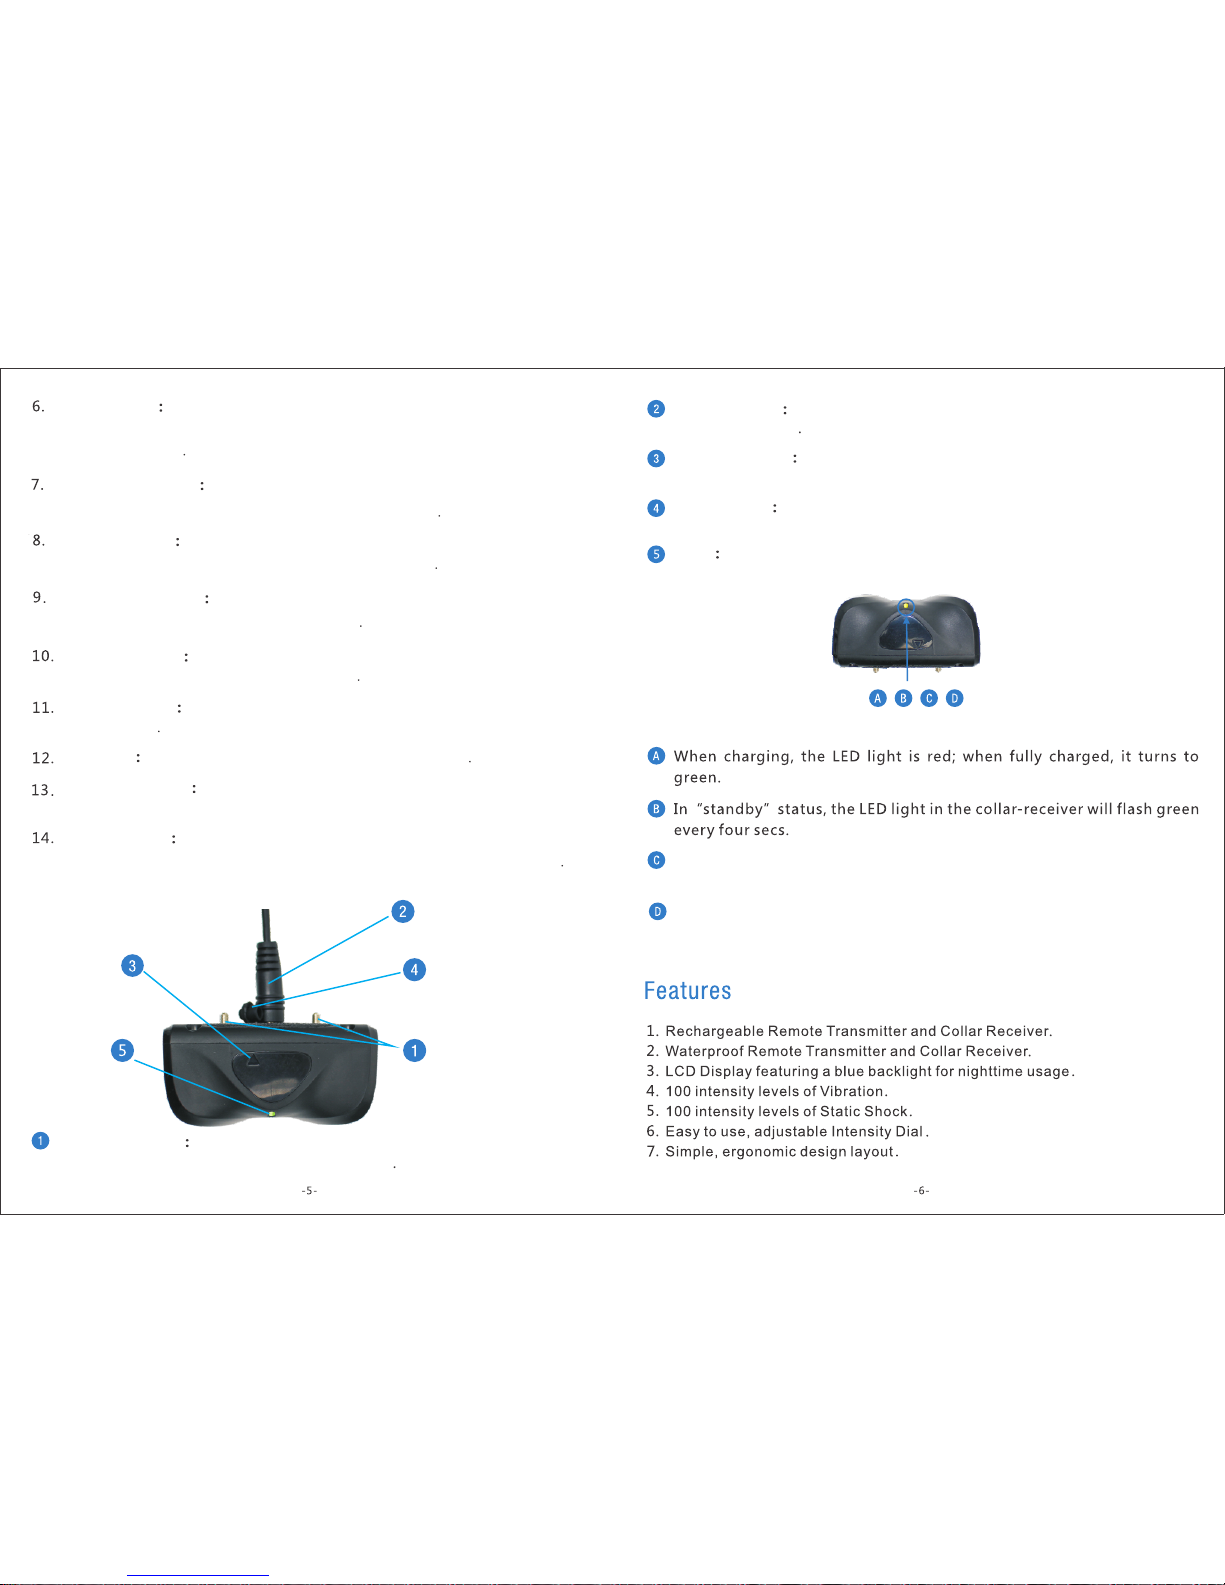
Powe r Button
Powers the Remote Transmitter on and off and has another function
that enables a mode that will vibrate the Remote Transmitter when pre ss in g
stimulation buttons
Vibrat io n Butto n 1
Delivers continuous or momentary vibration to the first
receiver, depending on the position of the Toggle Switch
Stat ic Button 1
Delivers continuous or momentary static shock to the first
receiver, depending on the position of the Toggle Switch
Vibrat io n Butto n 2
Delivers continuous or momentary vibration to the second
receiver, depending on the position of the Toggle Switch.
Stat ic Button 2
Delivers continuous or momentary static shock to the second
receiver, depending on the position of the Toggle Switch.
Char ging Jack
Charges the battery of the Remote Tra ns mi tt er w he n co nn ec te d
to a power source
Belt C lip
Allows for the possibility of hands free training
Pair ing Symbo l
Pairs the Remote Transmitter to the Collar Receiver(s) or
powers off the Collar Receiver when properly aligned.
Rubb er Cover
Protects the internal components of the Remote Transmitter
from dust and water. Always remember to replace after charging is comp le te
Cont act Point s
Contact points cover the metal screws, and through them
vibration or static shock stimulation is delivered
Charging Jack
Charges the battery of the Collar Receiver when connected
to a power source
Pairing Symbol
Pairs the Collar Receiver to the Remote Tra ns mi tt er o r
powers off the Collar Receiver.
Rubber Cover
Protects the internal components of the Collar Receiver from
dust and water. Always remember to replace after charging is com pl et e.
Light
Stimulation Buttons pressed on the Remote Transmitter will cause a gr ee n
light to appear on the Collar Receiver.
Pairing the Remote Transmitter and Collar Receive r wi ll p ro du ce a s ol id green
light.
Page 5
Ipets products are reliable, effective, and comfortable for large or small dogs.
The system assists in controlling your dog without a leash in a range up to 650
yards away! Instantly send a signal from the Remote Transmitter, which activat es
your dog's Collar Receiver. The dog will receive an annoying but safe, harmless
stimulation. With correct, consistent use of this product, the dog will associat e
his misbehavior with your corrections, and soon enough, you wi ll h av e a we ll -t ra in ed
dog. This particular model features adjustable levels of stimulation, enabling the
user to tweak accordingly to the dog's temperament, removing the ris k of o ve r
stimulation.
Power Saving
R T
and Receiver C oll ar
R T and Receiver Collar
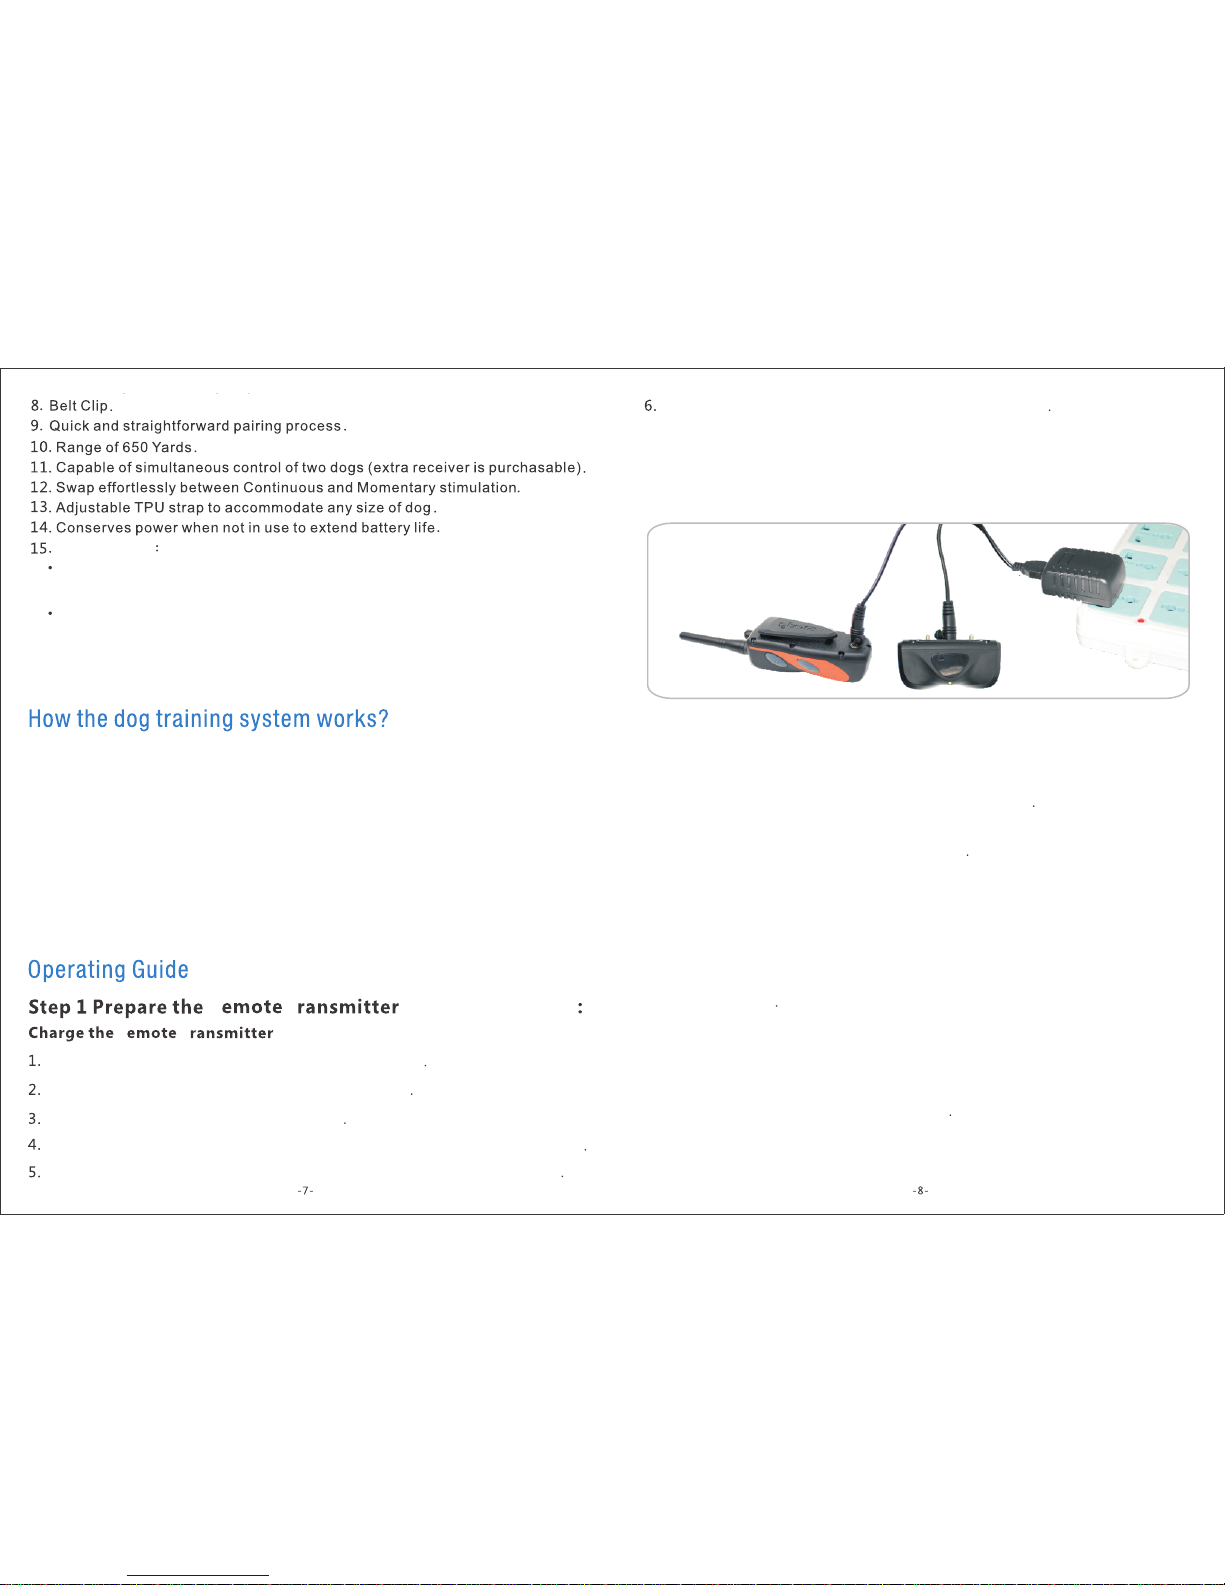
A solid red light will appear on the Indicator Light, indic at in g
Insert the charging connector into the Charging Jack
Uncover the Charging Jack by lifting the Rubber Cover
Plug the charger into a standard wall outlet
Once charging is complete, the solid red light will turn to a solid gree n li gh t
charging is occurring
The collar-receiver,if left unused for 5 minutes,will enter i nt o “D EE P SLEEP”
status,yet it can be activated by any movement.
The remote transmitter,if left unused for 2 minutes,will enter into”STANDBY”
status;if unused for 5 minutes,it will enter into”DEEP SLEEP”STATUS.To activate
the transmitter in separate cases,you can simply press any button (excep t th e
LED LIGHT button) and the”MODE”button(for 1 sec)separately.
Note : Before fi rst use, ch arge the Re mote Trans mitter an d receive r
Coll ar until co mpletio n.
Powering on and off the Remote Transmitter
Press and hold the Power Button for several seconds, the LCD display w il l
and the Transmitter Indicator Light will turn to solid green
appear
To power off the Remote Transmitter, press and hold the Right Side Button for a
few seconds,and Indicator Light will turn to red
Powe ring on and o ff the Coll ar Receiv er
To po we r o n the R em ot e C ol la r Receiver, al ig n t he Remote Tr an sm it te r P ai ri ng
Symbol with the corresponding Collar Receiver Pairing Symbol, once the
Receiver I nd ic at or Ligh t is gree n separate the tw o Pa ir in g Sy mb ol . Th e Co ll ar
Receiver is now on
To po we r o ff the Remote C ol la r Receiver, r ea li gn the Remote Tran sm it te r
Pairing Symbol Tra ns mi tt er wit h the corresponding C ollar R ec ei ve r P ai ri ng
Symbol, once t he Rec ei ve r Indi ca to r Ligh t goes red separate the two Pairing
Receptacles. The Collar Receiver is now off
NB:T he indica tor light o f collar- receive r will flas h red if it nee ds rech ar ging.
Replace the Rubber Cover to protect the Charging Jack
Page 6
Press and hold the Power Button for a few seconds to power on the Remote
Pairing Collar Receiver to Transmitter
Transmitter
Rotate the Intensity Dial to 0
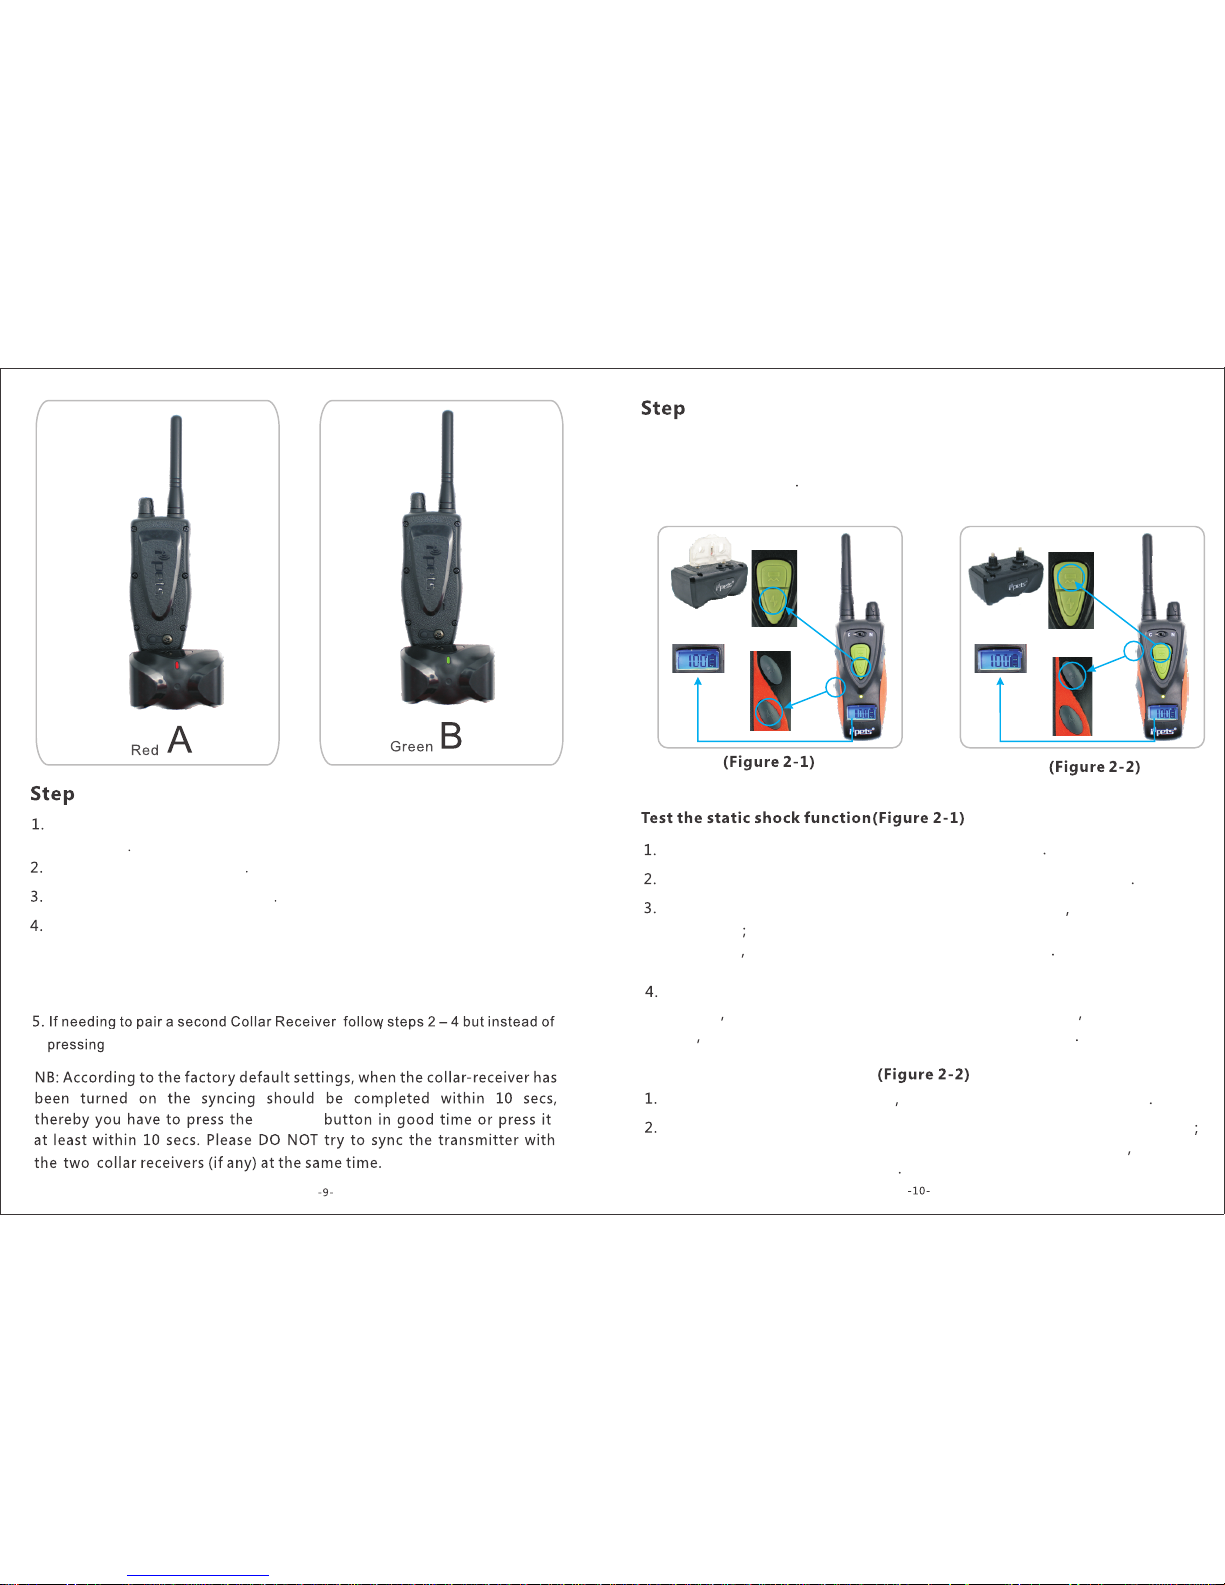
Ensure the Collar Receiver is off
Align and the Remote Transmitter Pairing Symbol with the correspo nd in g
Collar Receiver Pairing Symbol, hold until the Recei ve r In di ca to r Li gh t is a
steady green, once the steady green light begins to flash, press the Vibration
Button 1 immediately. Pairing is now complete.
the Vibration Button 2 immediately.
Vibration
2
Put the test light over the Screws of the Collar Receiver
Tur n on t he R em ot e Tra ns mi tt er a nd a dj us t th e In te ns it y Di al o ff 100
There is an option for continuous stimulation or momentary if desiring
continuous push the Toggle Switch to the left position and if desiring
Toggle Switch to the right position
After deciding the type of stimulation, press either Static Button or 1 or Static
Button 2 depending on which receiver is undergoing t he t es t th e te st b ul b wi ll
flash indicating the Static Shock function is operating correctly
Power on the Remote Transmitter and adjust the Intensity Dial off 100
There is an option for continuous stimulation or momentary, if desiring continuous
push the Toggle Switch to the left position and if desiring momentary move the
Toggle Switch to the right position
Testing th e Vi br at io n Fu nc ti on s
momentary move the
Test the Training System Functions
The testing methods will help determine whether the training s ys te m is f un ct io ni ng
as intended. Please ensure that the pairing process is complet e be fo re a tt em pt in g
to test the functionality
3
Page 7
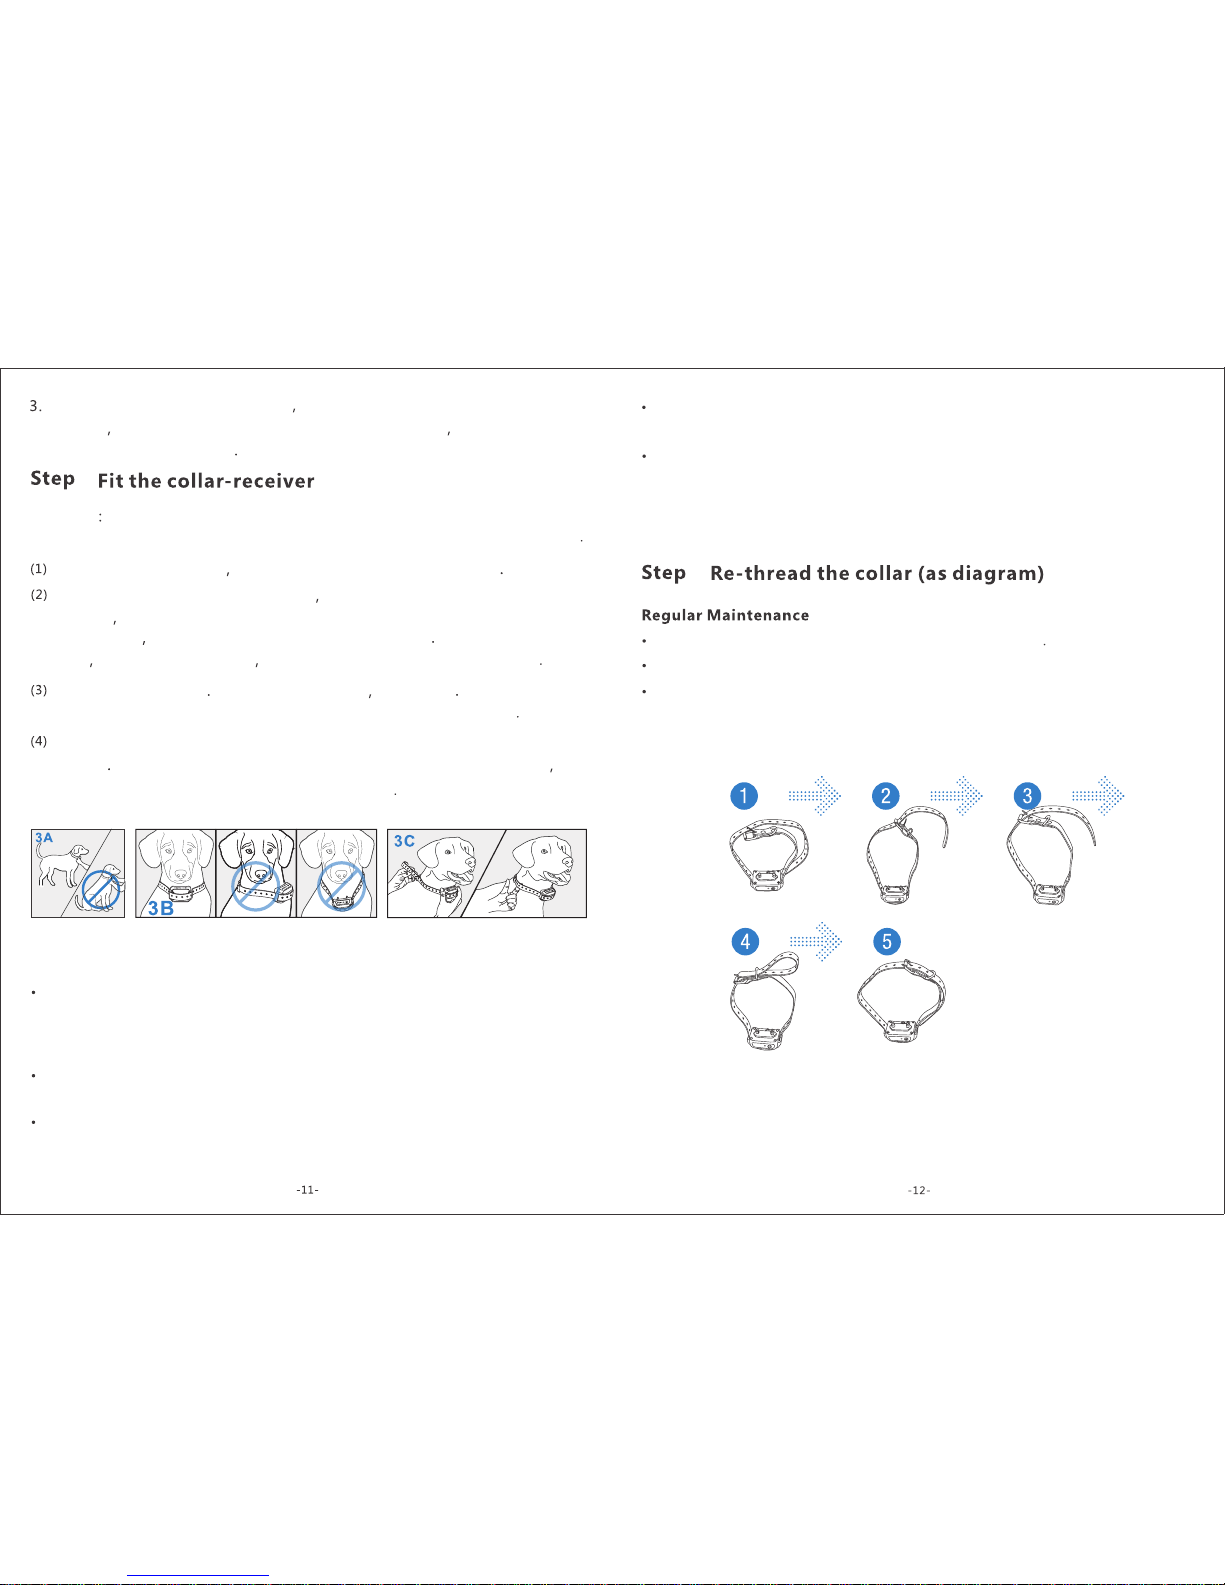
Important The proper fit and placement of the Collar Receiver is essential for
yo ur d og 's neck m ak in g direc t co nt act wit h th e dog's s ki n If d irect c on ta ct is n ot
possible shaving some fur away ensuring good contact is reco mm en de d
Fasten the collar strap The fit should be snug but not taut A fin ge r sh ou ld b e
able to be placed beneath the collar strap when around the d og 's n ec k
Allow the dog to wear the Collar Receiver for several minute s an d ch ec k th e
strap again The dog will soon become more familiar with the Collar Receiver so it
is crucial to ensure the fit comfortable and flattering
To fit the Collar Receiver attach the Collar Strap to the Receiver
Wi t h the do g s tan d in g i n f r on t o f y ou pla ce the Co lla r R ece i ver a r oun d t he
do g 's nec k s o t he re c eiv e r b ox an d C o nta ct Poi n ts ar e o n t h e u nd e rsi d e o f
effective training. The c on ta ct p oi nt s mu st h av e di re ct c on ta ct w it h th e do g' s
skin
CAUT ION: RISK O F SKIN DAMA GE
For comfort, sa fe ty and effectiveness of t hi s product p le as e ch ec k the f it o f the
dog's col la r f re qu en tl y. If observing an y s ki n i rr it at io n, im me di at el y d is co nt inue
use o f the c ol la r for a few da ys . If th e s ki n co nd it io n p er si st s beyond 48 hours,
consult a veterinarian.
Do n ot at ta ch a le as h to th e c ol la r, which c an result i n s qu ee zi ng the Co nt ac t
Points too tightly against your dog's neck.
T he de si gn of th e C ol la r R ec ei ve r discourages constantly wearing the device.
Petrainer recommends the collar not wearing for more than 12 hours out of
every 24-hour period.
After deciding the type of stimulation press either Vibration Button 1 or Vibration
Butt on 2 dependin g on which receiver is undergoing the test the Collar Receiver
Collar Receiver will vibrate
4
Petrainer suggests giving th e d og , t he vi br at io n s ti mu la ti on be fo re fo ll ow in g it
with a st at ic shock. After tr ai ni ng for a wh il e using this me th od , the dog w il l be
aware t ha t a ft er vi br at io n comes a st at ic sh oc k. Vi br at io n w il l a ct as a wa rn in g,
and static shock only acts as a menace that might be necessary sometimes.
Ensure Contact Points are not too tighton a weekly basis
Rinse the Contact Points with alcohol on a weekly basis.
Check the dog's neck for irritation and wash the dog's neck on a weekl y ba si s.
Most dogs f ee l un co mf or ta bl e wh en wear in g th e co ll ar for the very first time.
Do not use any functions until the dog is accustomed to the collar.
5
Step5 R e- threa d th e colla r( as diag ra m)
Page 8
Is the Collar Receiver waterproof?
Yes, b ut a lw ay s en su re t ha t th e Ru bb er C ov er s ea ls t he C ha rg in g Ja ck
Can I replace the Collar receiver with another kind of colla r?
No.
Can I attach a leash to the Collar Receiver?
No, this can resu lt in pul li ng the Cont ac t Points t oo tightly a ga in st the d og 's
neck. At ta ch a leash t o a s ep ar at e, no nm et al li c collar or a harness. En su re the
extra collar does not put pressure on the Contact Points.
How long can I leave the Collar Receiver on my dog?
The des ig n of th e collar di sc ou ra ge s constant we ar in g. We recommend no t
having the dog wea r the collar for more th an 12 hours out of eve ry 24 -h ou r
period.
Is the training system suitable for all dogs?
The collar Is adjustable from le ng th 5 .9 ”( 15 cm ) to 1 9. 6” (5 0c m) , if t he d og 's n ec k
circumference is smal le r th an 5.9”, you w il l be forced to r et hr ea d th e co ll ar, if
the d og 's ne ck circumference is la rg er th an 22”, this c ol la r m ay not be su it ab le
for the dog. This collar is not suitable for dogs under 15lbs.
How old does the dog have to be before using the system?
Your dog sh ou ld have lea rn ed basic ob ed ie nc e commands su ch as, “s it ” or
“stay.” Th e Co ll ar R ec ei ve r mi gh t be t oo l ar ge f or d og s un de r 15 lb s.
Once my d og com pl et es tra in in g and is b ee n o be yi ng my comm an ds , will he
have to wear the collar?
Probably not, but you may try to reinforce training with the collar.
Can I use the Ipets rechargeable training collar with more than on e do g?
Yes, y ou j us t ne ed t o pu rc ha se a no th er C ol la r Re ce iv er f or t he s ys te m.
My dog i s not respo nding aft er the trai ning syst em instal led
succ essfull y.
Charge th e Remote Tra ns mi tt er and Coll ar Receiver fo r 2 hour s, separately
before first use.
Ensure if the Remote Transmitter and Collar Receiver power is on.
Check the intensity l ev el s of vibr at io n an d st at ic s ho ck , ma ki ng sure it is not
set to 0.
Ensure the Collar Receiver has sufficient power to operate.
Check the collar to ensure it fits snugly against your dog's neck.
If t es te d for a ll of t he above an d the d og is s ti ll not re sp on di ng , please tr y re-
pairing the Remote Transmitter and Receiver Collar.
The Re mote Trans mitter do es not work .
Check the battery status of the Remote Transmitter.
Press and hol d t he Pow er But to n for a f ew sec on ds to powe r on the Remote
Tra ns mi tt er.
Page 9
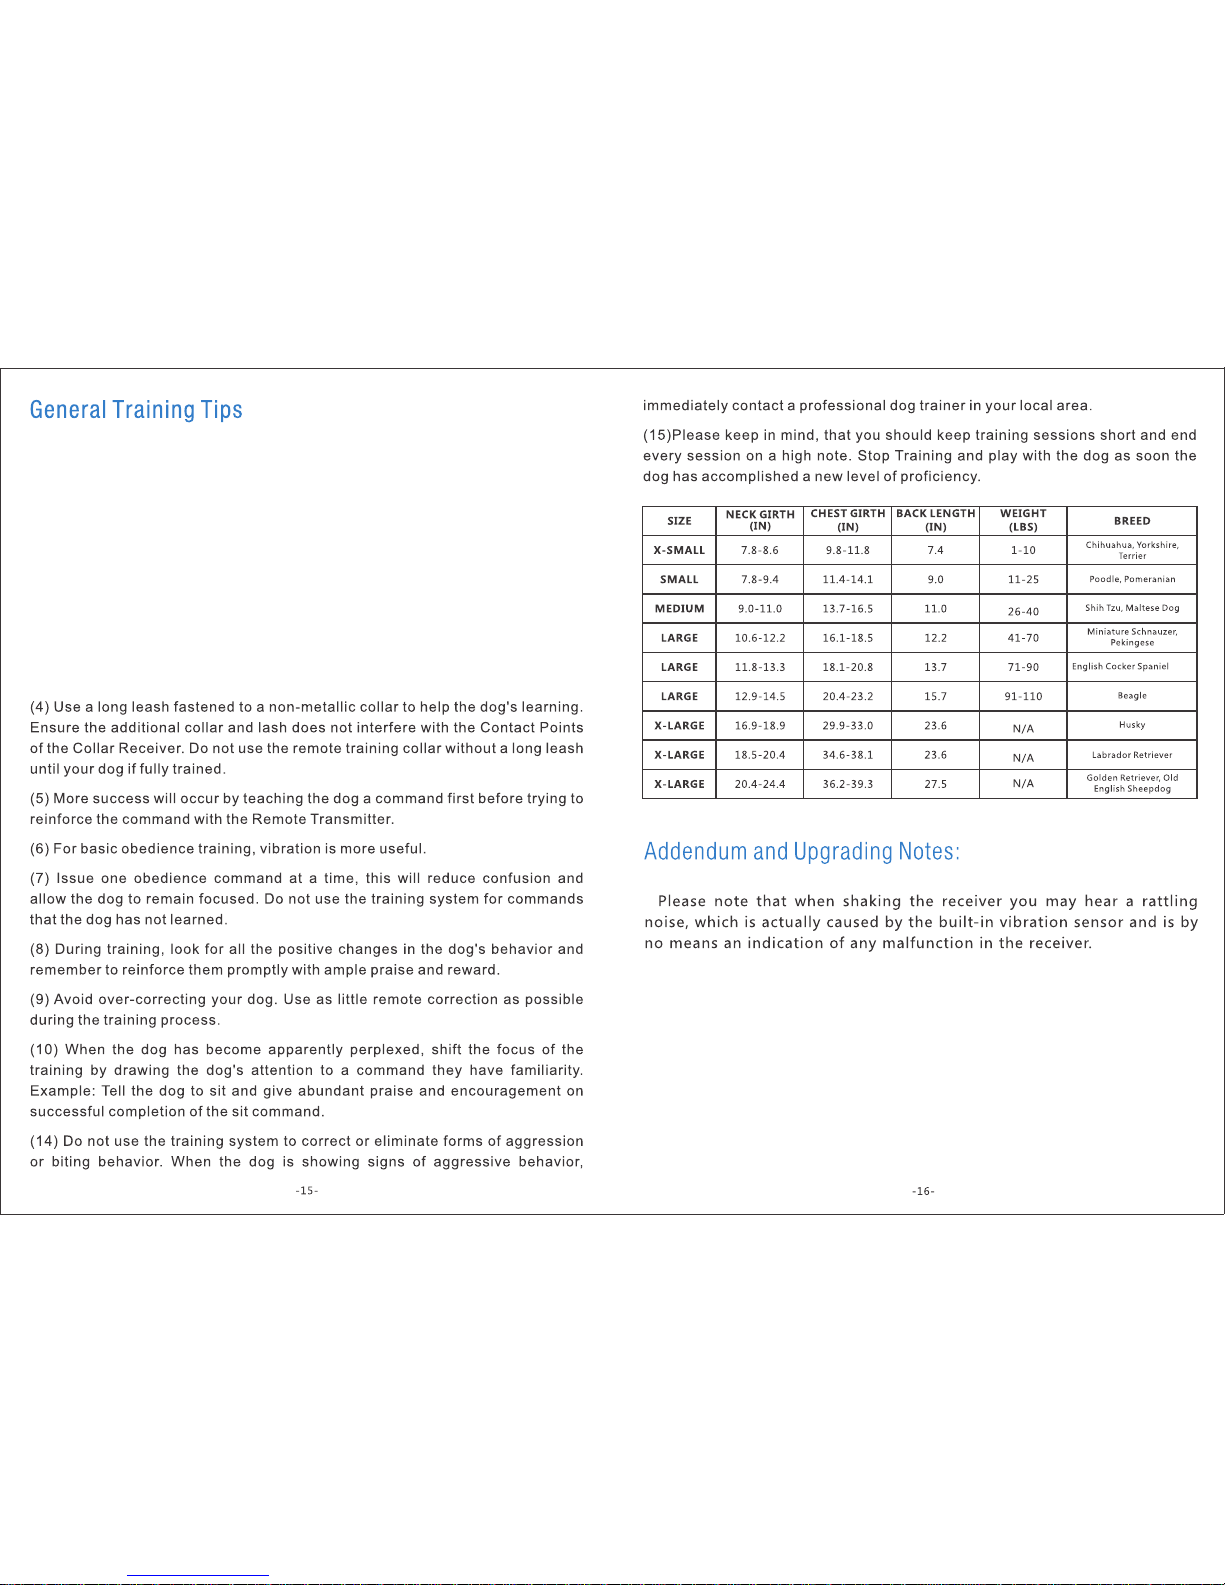
The following tips on how to get the best out of your Petrainer
Training Coll ar.
(1) M ak e training se ss io ns short an d po si ti ve (b etween 1 0- 15 minutes lo ng for
each session.) This will enab le th e dog to kee p its att en ti on fo cu se d on the
trainer.
(2) Train one dog at a time.
(3) Du ri ng the first i ni ti al trai ni ng sessions, keep th e do g in a fa mi li ar outdoor
environment. Tra in in g in new l oc at io ns may cause t he dog to be co me
distracted, ca us in g you t o re in fo rc e commands wi th the Col la r Re ce iv er more
than necessary.
 Loading...