

Page 1

Cast Iron Products
EN
Dutch Oven ft1 - ft18 / ft1-t - ft18-t
Fire Skillet fp20 - fp40 / fp20h - fp40h
Cast Iron Poultry Roaster cf30
Loaf Pan with Lid k4 / k8
Ring Cake Pan with Tarte Case Lid gf1
Cast-iron Trivet gr
Cast-iron Stack Grate gr-s / gr-s30
Waffle Iron wf-iron
Sandwich Iron sw-iron
Burger Iron bg-iron
User Manual
Page 2

EN
User manual for the Petromax Cast Iron Products
Thank you for choosing a Petromax cast iron product! With your new cast iron product you can cook
your meals on an open fire or in your kitchen at home while enjoying the unique properties of highquality cast iron. We are convinced that you will be delighted with the great features the Petromax cast
iron product has to offer and we hope that every dish will be a culinary delight.
Important instructions
Before using your cast iron product for the first time, read the following information carefully.
Keep this document for future reference.
Product description
You can use the Petromax cast iron produc t on a gas stove, in an oven, as well as outdoors on a campfire
or a suitable grill. The cast iron, which optimally transfers and stores heat, can be used immediately
and is easy to care for thanks to the pre-seasoned surface.
Safety instructions
•
Caution! The Petromax cast iron and it s parts (lid, handle, pan handle) get very hot. Children should
never be allowed near the Petromax cast iron produc t. Always wear heat-resistant gloves, use a cloth
or the lid lifter when you touch the cast iron product.
• Do not pour cold liquids (such as water) onto the hot cast iron product, it can be damaged.
• Never use dish soap to clean the cast iron product (except when re-seasoning).
• You must not let the cast iron product fall, cast iron is brittle and can break.
• Do not use any cast iron product in the microwave.
Before first use
Thoroughly clean cast iron product with hot water before using it for the first time, and dry it entirely.
Thanks to the pre -seasoned surface the sturdy Petromax cast iron product is ready to use, after rinsing
it. You do not need to season it first. The first few times you use it, do not cook any acidic foods, they
can destroy the patina, the protective layer of the cast iron product.
2
Page 3

Cleaning, maintenance and storage
As long as you care for your cast iron product, it will last for generations. For that purpose you should
follow some important basic rules:
• Let the cast iron product cool down completely before cleaning it with warm water. Never use dish
soap to clean the cast iron product. It can damage or even destroy the patina.
• Use a commercially available dishwashing brush or a sponge (not a metal scrub pad) to clean the
cast iron product. We recommend the Petromax Chain Mail Cleaner for cast and wrought iron to
remove cooking remains without damaging the patina.
• Never put the cast iron product in the dishwasher!
•
Do not clean the cast iron product with cold water when it is hot! It could damage the cast iron product.
• Never store the cast iron product when it is wet and untreated. It will rust.
• Always dry thoroughly after cleaning and grease lightly in order to seal the surface of your cast iron
product. Use a neutral oil or vegetable fat. Avoid using olive oil, it cannot reach very high temperatures when fried.
• Always store the cast iron product in a dry place. Never pack when it is wet and untreated.
Seasoning
The patina (the protective layer of the cast iron product) must be renewed when it is affected. It can
happen that your cast iron product starts to rust here and there. In that case, proceed as follows:
EN
• Remove the rust with a wire brush. Clean the cast iron product with warm water, dish soap, and a
dishwashing brush. Then dry it thoroughly.
• Coat the whole cast iron product and the lid (inner and outer surfaces) with a neutral oil, or lard. Do
not use any olive oil or others with a lower smoke point, they burn out too quickly.
• Then place the cast iron product in a preheated oven at a temperature of approx. 350 °F for 1 to 2
hours and then switch the oven off. Open the oven door halfway and let the cast iron product cool
down completely. Caution! Burning the layer of oil or lard can produce smoke. We recommend
seasoning outside, e.g. on an open fire or a grill.
• Grease all the parts again once they have cooled down. Your cast iron product is now seasoned.
3
Page 4

EN
How to use the Dutch Oven
Cooking, frying, baking
You can use the Dutch Oven in your kitchen oven as well as on a campfire or with a suitable barbecue
grill. The various heat sources such as barbecue briquettes, charcoal, or campfire embers do not
necessarily reach the same temperature.
On a campfire
When used on a campfire, you have several options: Each type of wood creates different embers and
burns at a different rate. When you place the Dutch Oven next to the fire, you can cook many dishes
with the heat that emanates from the fire. It is essential to turn the Dutch Oven regularly, so that it is
evenly heated on all sides.
With briquettes
High-qualit y briquettes are easy to use and reliable. They have mostly a similar size and they can store
heat for a long time. It is the easiest way for you to regulate the heat for your Dutch Oven. The amount
of briquettes that you need under the Dutch Oven and on the lid also depends on the cooking method.
Here is a rule of thumb for all Dutch Oven sizes:
• for simmering soups and stew: 1/3 of the briquettes on the lid and 2/3 under the Dutch Oven
• for baking bread and cakes: 2/3 of the briquettes on the lid and 1/3 under the Dutch Oven.
This table of fers you information on the amount of briquet tes needed depending on which Dutch Oven
you use. In this table you will find the amount of briquettes and how you should distribute them on
and under the Dutch Oven in order for your Dutch Oven to reach a certain temperature.
ft1 / ft1-t 325-360° F 400 -450° F
total (Top / Bottom) 5 (3 / 2) 8 (5 / 3)
ft3 / ft3-t 325-360° F 400 -450° F
total (Top / Bottom) 8 (5 / 3) 14 (9 / 5)
ft4.5 / ft4.5-t 325-360° F 400 -450° F
total (Top / Bottom) 15 (9 / 6) 21 (14 / 7)
ft6 / ft6-t 325-360° F 400 -450° F
total (Top / Bottom) 24 (14 / 10) 30 (20 / 10)
ft9 / ft9-t 325-360° F 400 -450° F
total (Top / Bottom) 24 (15 / 9) 30 (21 / 9)
4
Page 5

ft12 / f t12-t 325-360° F 400 -450° F
total (Top / Bottom) 28 (17 / 11) 38 (25 / 13)
ft18 / f t18-t 325-360° F 400-450° F
total (Top / Bottom) 32 (19 / 13) 42 (28 / 14)
The table indicates how many briquettes you need for baking. By switching the numbers from the top
and the numbers from the bottom, you will know how many briquettes are necessary for simmering
soups and stew. By the way: for braising and frying, simply divide the amount of briquettes by 2. Put
the first half of the briquettes on the lid and the other half under the Dutch Oven. Please keep in mind
that these numbers are only a guideline and can vary according to the type of briquettes you use, the
ambient air temperature and the weather. As a basic rule, it is better start with fewer briquettes and
add some more if necessary. To ensure an even heat, turn the lid every 10 to 20 minutes. After about
50 - 60 minutes replace the briquettes with new ones.
Dutch Oven Models
Petromax provides Dutch Oven in various sizes. Choose the one that suits your needs best.
EN
Model Base
Capacity
(max.)
ft1 / ft1-t 1 Qt. 0.26 Qt. 2.6“ 6.6 lb 6“ 4.7“
ft3 / ft3-t 1.7 Q t. 0.4 Qt. 2.6“ 11.4 l b 8“ 6.3“
ft4.5 / ft4.5-t 3.7 Qt. 1 Qt. 3.4“ 17.6 l b 10“ 8.7“
ft6 / ft6-t 5.8 Qt. 1.6 Q t. 3.8“ 22.9 lb 12“ (8 Qt.) 9.9“
ft9 / ft9-t 7.9 Qt . 1.6 Qt. 5.2“ 25.6 lb 12“ (10 Qt.) 9.4“
ft12 / f t12-t 11. 4 Q t. 2.1 Qt. 5.4“ 33 lb 14“ 11.5“
ft18 / f t18-t 17 Qt. 2.8 Qt. 6.3“ 39.5 lb 16“ 13“
The weights provided refer to the models with feet. The models without feet are lighter.
Detailed infor mation on weight and dimensions of your Dutch Oven size is provide d on the packaging box.
All Dutch Oven are available in two models: Either with feet at the bottom or with a plane bottom
surface without feet.
Lid
Capacity
(max.)
Base
Depth
Weight
(approx.)
Upper edge
Diameter
Diameter Bottom
inner / outer
(approx.)
5
Page 6

How to use the Fire Skillet
The Petromax Fire Skillet made of high-quality cast iron is indispensable for your meals over the open
fire or in the kitchen at home for they are extremely durable. Once you have tried them, you will never
want to do without the fire skillets and their numerous advantages anymore.
Petromax provides t wo models of the Fire Skillet in five sizes. Thus you can always choose the one that
suits you and your needs.
The best material: Cast iron
The high-quality cast iron with its outstanding heat distribution can be used immediately and is easy
to clean thanks to the pre-seasoned sur face. The durable and sturdy skillet has a natural anti-adhesive
effect that you will improve at each use, for a protective layer forms.
On all types of cooking areas
You can use the fire skillet not only on an electric cooker, over a gas flame or in the oven, for it also
proves its worth on cooking areas outdoors, on a campfire or a suitable barbecue.
Fire Skillet Models
Fire Skillet Models with one handle
Model Capacity
(max.)
fp20-t 1 Qt. 1.8“ 4 lb 8“ 5.9“
fp25-t 1.7 Q t. 1.8“ 5.5 lb 10“ 7.9 “
fp30-t 2.6 Qt. 1.8“ 7.7 lb 12“ 9.8“
fp35-t 3.7 Qt. 1.8“ 9.7 lb 14“ 11. 8“
fp40-t 5 Qt. 1.8“ 12 lb 16“ 13. 8“
6
Depth Weight Diameter
Upper edge
Diameter Bottom
inner / outer
(approx.)
Page 7
Fire Skillet Models with two handles
EN
Model Capacity
(max.)
fp20h-t 1 Qt. 1.8“ 3.5 lb 8“ 5.9“
fp25h-t 1.7 Qt. 1. 8“ 5 lb 10“ 7.9 “
fp30h-t 2.6 Qt. 1.8“ 7.3 lb 12“ 9.8“
fp35h-t 3.7 Qt. 1.8“ 8.8 lb 14“ 11.8 “
fp40h-t 5 Qt. 1.8“ 11. 5 lb 16“ 13. 8“
Depth Weight Diameter
Upper edge
Diameter Bottom
inner / outer
(approx.)
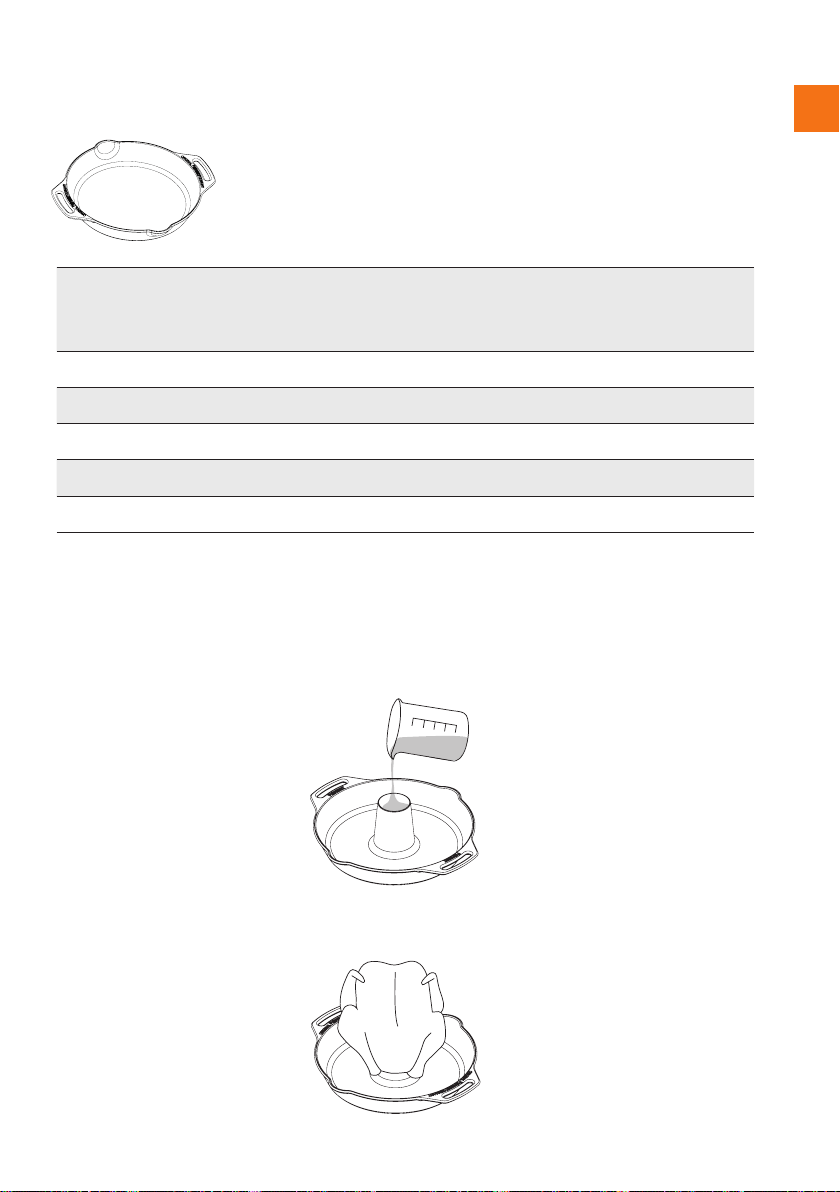
How to use the Poultry Roaster CF30
1. Prepare the poultry however you like, e.g. seasoning or marinating.
2. Fill the well of the poultry holder with herbs, spices, and liquid such as stock, beer, wine. Caution!
Do not fill the well with high-proof alcohol, it evaporates quickly and catches fire.
3. Place the poultry on the poultry holder. Make sure it cannot move. Vegetables, stock, or sauce can
also be added to the drip pan around the poultry depending on what you like or the recipe.
7
Page 8

EN
4. Put the Poultry Roaster in your oven or on your grill. Keep a minimum distance of 0.8 in to the bbq
lid or to the heating coils of the oven. Cook in the preheated oven at approx. 400 °F for 50 to 65
minutes according to the size of the poultry.
5. Grill your poultry until it is crispy, or follow the instructions of the recipe.
How to use the Loaf Pan with Lid K4 / K8
The Loaf Pans with Lid k4 / k8 can be used as roasters, ovenproof dishes for casseroles, and loaf pans
for baking bread or cake. The lid of the bigger Loaf Pan k8 comes with feet, so that you can use it as a
pan when upturned. Its ridges make it a brillant steak and grill pan.
How to use the Ring Cake Pan with Tart Case Lid
The mold serves for baking ring cakes (Ø 9.1 in) and is suitable for the oven as well as for the open fire.
The multifunctional lid has feet to stand on and serves for baking tart cakes when upturned (Ø 8.7 in).
Please follow the safety instructions and instructions for cleaning, maintenance, and storage.
How to use the Cast-Iron Trivet gr
The trivet made of solid cast iron manages first-class heat distribution – exactly what is needed for
baking in the Dutch Oven. For the trivet stands on three knobs, you succee d in braising, simmering and
baking with the cast-iron trivet in the Dutch Ovens ft4.5 ft6, ft9 and ft12 without burning anything.
You can use it right away thanks to the so-called seasoned finish without needing to season it first.
How to use the Cast-Iron Stack Grate gr-s
The stack grate made of solid cast iron manages a f irst-class heat distribution – exac tly what you need
for baking, braising and steaming at several levels in the Dutch Oven. Your meat, vegetables and cakes
are a success and do not burn, for the device stands on three 1.69-inch -long feet that manage the ideal
distance from the bottom of the pot. Moreover, the stack grate fits par ticularly well in the Dutch ovens
ft4.5 and in all bigger pots. You can use this grate immediately thanks to its seasoned finish and you
don't have to season it before first use.
How to use the Cast-Iron Stack Grate gr-s30
The large Stack Grate made of cast iron not only expands the Petromax portfolio but also provides for
a great open air cooking experience: The large Stack Grate made of cast iron for the Dutch Oven from
size ft12 allows you to prepare the dish, without coming in contact with the stock. Thanks to its ideal
material properties of cast iron and the three feet, the large stack grate can be used to grill directly in
the ember or to smoke in the Dutch Oven.
The cleverly placed indentions on the top provide for safe stacking with grates of the same size or the
small Stack Grate gr-s.
8
Page 9

How to use the Waffle Iron wf-iron
The waffle iron enlarges your outdoor cuisine with another great dessert: fill with waffle dough, turn
once if necessary, and the delicious pastry is already ready to be eaten.
The wooden handles fit comfortably in the hand, and the long rod ensures enough distance from the
source of heat. The cast iron can be used immediately, for it is provided with what is called a seasoned
finish. For cleaning, you simply separate the cast-iron halves thanks to the hinge. By the way, when
cleaning, you enjoy the amazing properties of cast iron, for it has a natural anti-adhesive effect.
With its baking surface, the waf fle iron is suitable for two waf fles of 3.5 x 4.3 in. The prac tical locking hook
keeps the waffle molds together, so that the dough does not flow out. Once the iron has been heated,
the stored residual heat c an be used for baking gently. The dough will be baked evenly and turns brown.
How to use the Sandwich Iron sw-iron
The sandwich iron is perfectly suitable for delicious toasts, bagels or dumplings. Whether as a snack at
the campfire or as a great addition to your BBQ menu: sandwiches will now be toasted in the cast-iron
molds in the embers of the campfire or on the barbecue. The toasted bread is crusty and the stuffing
deliciously juicy, for the toast pans of the sandwich iron store heat perfectly.
The pans, which can be separated thanks to a hinge, are ideal for toasts 4.3 x 4.3 in. But other treats
will be a success as well, for a practical locking hook keeps the toast pans together, so that nothing falls
down. From sweet to savory, much can be tried out in the sandwich iron, for even the stored residual
heat can be used for baking gently.
How to use the Burger Iron bg-iron
EN
Make perfec t burgers with the Petromax Burger Iron with its round molds, each with a diameter of 4.7
in. The ridged surface will give them the typical grilling pattern. The heat-storing material properties
of the cast iron mold allow you to sear the burger patties in the fire and then cook them to perfection
through the residual heat. Thanks to the flat, flush wood handles and the locking hook, you can close
and hold the burger iron safely into the embers. For cleaning, simply separate both halves at the hinge
and to easily remove roast residues in the grilling structure, we recommend to you the Petromax
Scraper with ridges for cast iron.
Warranty
Under proper use, a warranty period of two years will apply to your Petromax cast iron product from
the date of purchase. If you cannot properly use your Petromax cast iron product due to a defect in
material or workmanship, you are entitled to a warranty repair. Contact your dealer for that purpose.
Service
If you have questions or if you need additional information, please let us know. You can contact our
customer service via e-mail at: services@petromax.com.
9
Page 10

EN
Petromax offers many more products suitable for your Cast Iron Product
Chain Mail Cleaner for Cast and Wrought Iron
(available in two sizes)
Cast Iron Trivet Cast Iron Stack Grate
Care and Seasoning Conditioner
10
Page 11

More products online: www.petromax.com
Aramid Pro 300 Gloves Professional Lid Lifter
EN
Petromax Cooking Tripod Dutch Oven Table fe90
11
Page 12

Petromax Inc.
2500 Wilcrest
Suite 300
Houston 77042
USA
+1832 38 4 4074
info@petromax.de
www.petromax.de
Copyright © Petromax GmbH. All rights reserved.
Petromax and the dragon brand are registered trademarks. The content of this user manual must not
be replicated in any way, edited, copied or distributed by any means without permission.
 Loading...