

Petrainer PET998N User Manual
Fit the R eceiver Collar with your dogs:
Impor tant: The pr oper fi t and pla cem ent of yo ur coll ar is import ant for
eff ective tr aining. The contact po ints must have direct contact with yo ur
pet's skin on the underside of th e dog's neck.
To assure a p rop er fit, plea se fo llow these s tep s:
1. Have y our p et standin g com fortably ( 3A) .
Ce nt re the Co nt ac t Po in ts underneath your pe t' s ne ck , touching
2.
th e skin (3 B) .
3.
Th e Collar sh ou ld f it snugly, yet l oo se e no ug h to al lo w on e finger
to fit be tw ee n th e strap and y ou r pe t' s neck (3C).
Al lo w yo ur p et to wear the collar for severa l minu te s th en rec he ck
4.
the fit. Check the fit again as your pet becomes more comfortable with
the Collar. If your p et' s nec k is less than 12” around, you will ne ed to
threa d the p art of the col lar w hich inclu des t he antenna t hro ugh the
buckl e. It w ill be a tight f it.
3A
3B
3C
PET998N Quick Start
Instructions – Get Training Immediately
Key Definition
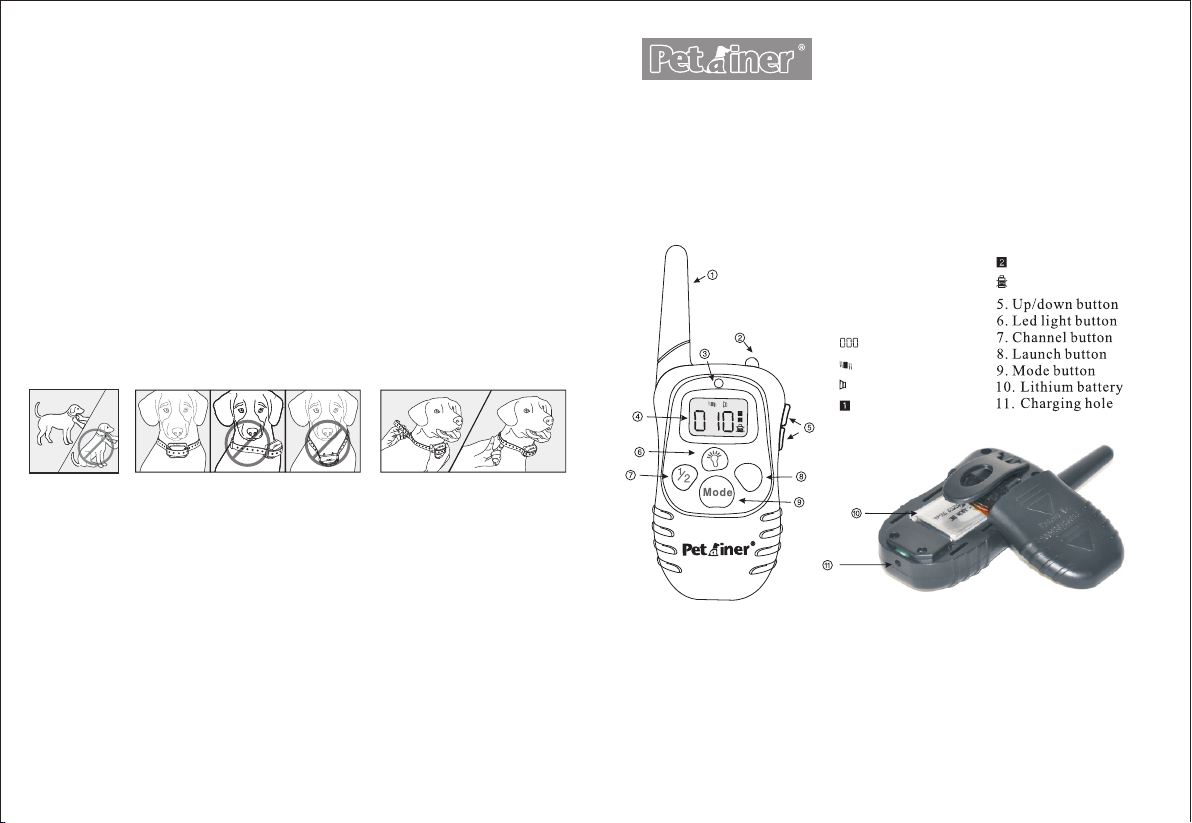
1. Antenn a
2. Led lig ht
3. LED Ind ica tor
4. LCD Scr een
1-10 lev el
Vibrati on mode
Beep mod e
Channe l 1
Channe l 2
Low Ba ttery Indicator
Y
LIMITED 90 DAYS WARRANTY
Petra ine r warrants t his p roduct to be f ree o f defects in p art s, materia ls
and wor kma nship for a pe rio d of 90 days, fr om da te of purcha se.
Sho uld an y repa irs or servicing under this warranty be required, contact
Cus tomer Service by phone or email for instructions on how to pack and
ship th e pro duct to Petr ain er.
Features
Petrainer CUSTOMER SERVICE
Teleph one: 1-86 6- 877-7 94 9
se rvi ce@ip ets -mall .co m
Em ail:
Ho urs: We ek days 9:00 AM- 5: 00 P M ES T
Th is w arran ty g ives you spec ific lega l ri ghts and yo u ma y al so have
ot her right s wh ich vary from s tate to state .
4 1
Remote transmit ter has a range up to 200 Met ers (218 yards / 65 0ft)
1.
wi th 2 traini ng mode s: vibrat ion and b eep.
2.1 0 level s of v ibrat ion.
3.2 l evels o f be ep.
4. Rech argea ble rem ote trans mitte r.
Rechargeable and waterproof receiver, your dog can swim underwater.
5.
If there is no movemen t for 5 m in. , the c oll ar will enter sleep mode to
Convenient, ea sy- to-read Blue Backlight LC D screen that shows the
10.Main b ody of the transm itter & receive r mad e of ABS materi al.
11. The system c an be u sed for 1 or 2 Rec eiv er Collars ( opt ional).
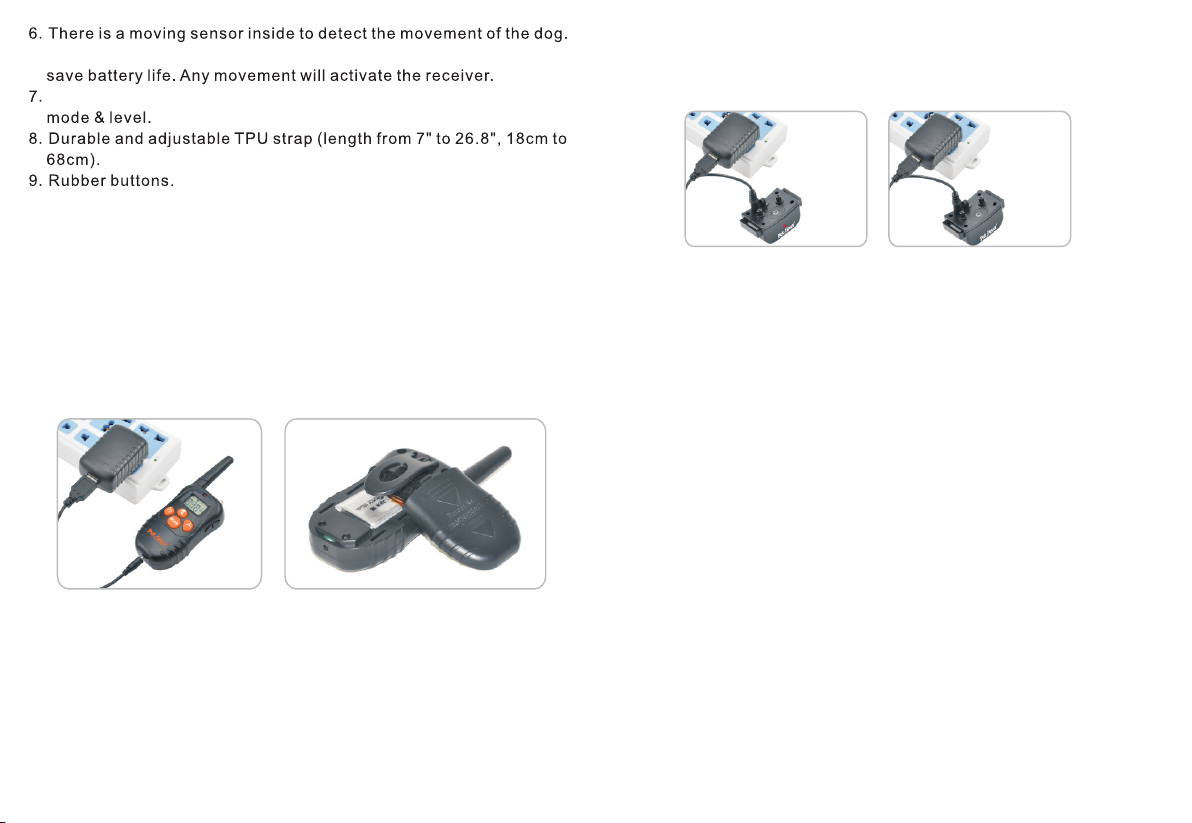
Charg e the Remote Tra nsmitter:
Insert the charging connector into the charging hole on the transmitter.
1.
2. Plug t he ch arger into a s tan dard wall ou tle t.
3. A red ligh t will appear on th e Tran smitter.
Charge the Transmitte r for around 2 hours when cha rging for the fi rst
4.
time.
5. The red lig ht wi ll disappe ar af ter the transmi tter is fully cha rged.
Charg e the Receiver Colla r:
To tu rn o n the Receiver Collar, p re ss t he o n/ of f bu tt on , a be ep will
1.
sound ; the r ed LED light w ill t urn on and fla sh ev ery 2 second s.
Open the rubber cover on the receiver, and insert the charging connector
2.
into th e cha rging hole .
3. Plug t he ch arger into a s tan dard wall ou tle t.
4. The red LED w ill a ppear (A).
5. Char ge th e Receiver C oll ar for aroun d1 ho ur when char gin g for the
2
first t ime .
6. When t he un it is fully ch arg ed, the red LE D lig ht will disa ppe ar (B).
7. Put th e rub ber cover ba ck in to place to ke ep ch arging jac k cle an.
A B
Pair together Remo te Transmitt er an d Receiver Collar:
1. Po wer on the Remote Transmitte r by pressi ng the Mode Button.
2. Se lect channel 1 or 2 by pressin g the ½ bu tton.
3. Po wer on the Receiver collar by pressing the on/off button.
4. Pr ess and hol d the on/off butt on for 3 seconds, a beep wil l sound and
the LED light will begin to flash .
5.
Pr es s Y butto n on the Rem ot e Tra ns mitter imme di ately(w it hin 5
seconds).
6. A second beep will so und from the Receive r Collar, indicatin g pairing
is successful.
7. Fo r a 2nd Re ceiver Collar Pairing , repeat steps 2 to 5, please be sure
to choose a differen t channel f rom the first pairing sequenc e.
Test the fu nction:
Test Vibrati on Fu nction
1. Pre ss Mod e butt on on the Remote Tra nsmitter, s witch to Vibration
mode , and make sure that the stimulation level is not s et t o 0, y ou
can press UP/DOW N butt on on the right side to a dj ust.
2.
Pr es s Y button, Receiver Co ll ar w il l vibrate, th at m ea ns Vib ra ti on
Func ti on w or ks .
Test Beep F unc tion
1. Pres s Mo de button o n Remote Transmitte r, switch to Beep M od e.
2. Pres s Y bu tt on , Recei ve r Co llar wi ll b eep, th at m ea ns Be ep M od e
works .
3
 Loading...