

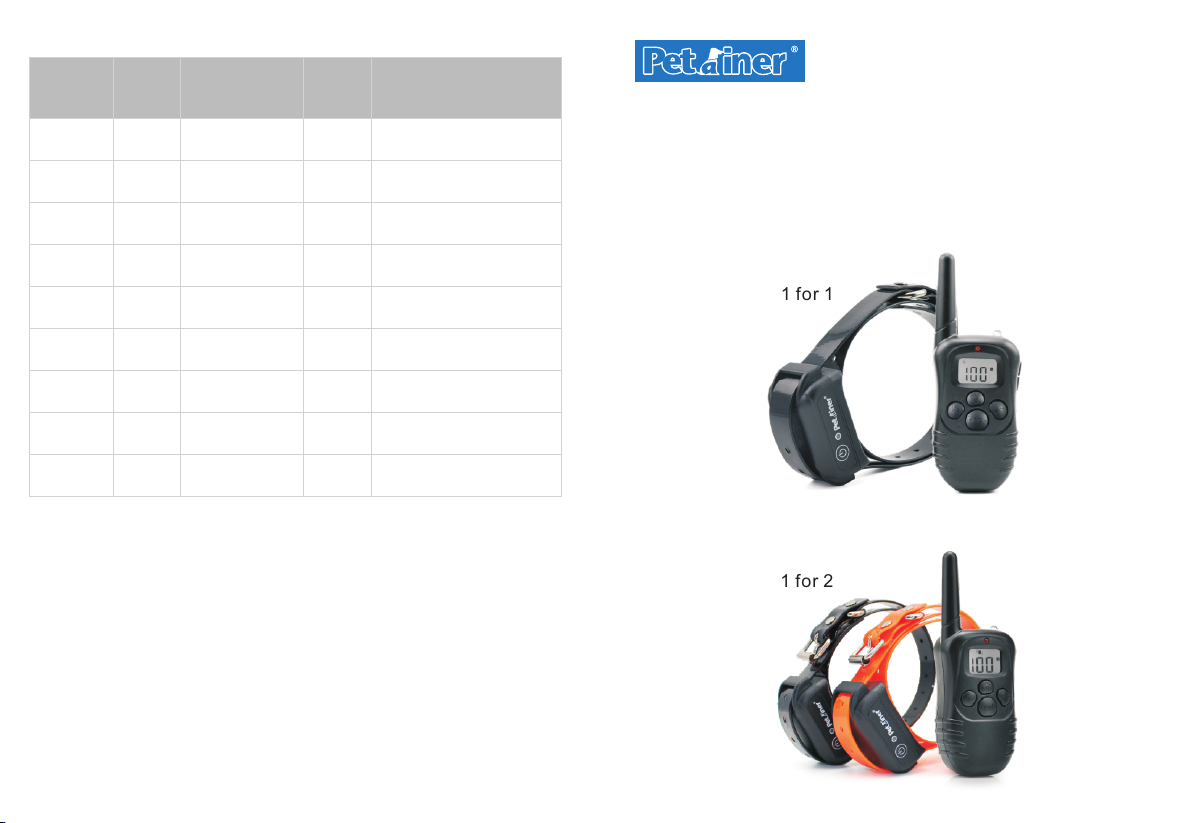
Common size of different dogs
Size
Mini
Small
Medium
Large
Large
Large
Neck
(cm)
20-22
20-24
23-28
27-31
30-34
33-37
Chest
Measu rement
(cm)
25-30
29-36
35-42
41-47
46-53
52-59
Back
Lengt h
(cm)
19
23
28
31
35
40
Type
Chihuahua, Yorkshire
Temier
Chihuahua, Yorkshire
Temier, Poodle, Pomeranian
Maltese Dog, Shih Tzu
Miniature Schnauzer,
Pekingese
Schnauzer, English Cocker
Spaniel
Beagle
V20 16070 5 EN
Rechargeable and Waterproof LCD Remote Pet
Training System Operating Guide
Please read this entire guide before beginning
Model Num ber:
IS-PET9 98DB 1 for 1
IS-PET9 98DBB 1 for 1
Huge
43-48
47-52
52-62
76-84
88-97
92-100
Husky
60
65
Labrador Retriever
Golden Retriever, Old
70
English Sheepdog
LIMITED 90 DAYS WARRANTY
Pet ra in er w ar ran ts th is pr od uc t to be f ree o f d ef ect s in pa rts , mat er ia ls a nd
wor km an ship f or a p er io d o f 9 0 da ys, fr om d at e o f p ur ch ase .
Sh ou ld a ny repairs or s er vi ci ng u nd er th is w ar ra nt y be required, co nt ac t
Cu st om er Service by p ho ne or e ma il f or instructions o n ho w to pa ck a nd ship
th e product t o Pe tr ai ne r.
Petainer CUSTOMER SERVICE
Telephone: 1-866-87 7-7 949 ( US& CA onl y)
Email: service@ip ets -ma ll. com
Hours: Week day s 9:0 0 AM- 5:00 PM EST
Thi s w arr an ty g iv es yo u sp ec if ic l eg al ri gh ts an d yo u ma y al so h av e o th er
rig hts wh ic h var y f ro m st at e t o s ta te .
20
Model Num ber:
IS-PET9 98DB 1 for 2
IS-PET9 98DBB 1 for 2
Important Safety Information
WARNING
No t fo r us e wi th agg re ss iv e do gs . Do not u se t hi s pr od uc t if your do g is
ag gr es si ve , o r i f your do g i s prone t o a gg re ss iv e b eh av io r. Ag gr es si ve do gs
ca n c au se s ev er e i nj ur y an d e ve n death t o their o wn er and ot he rs . If yo u are
un su re wh et he r th is product is a pp ro pr ia te fo r yo ur dog, p le as e co ns ul t y ou r
ve te ri na ri an or c er ti fi ed trainer.
CAUTION
Ri sk of Ski n dama ge. Pl eas e r ead an d f oll ow the in str uctions in t his manual.
Pr ope r fit o f the c oll ar is i mpo rtant. A colla r wo rn for too lo ng o r made too tight
on th e p et' s n eck may cause skin dam age . R ang ing from re dne ss to pre ssure
ul cer s, this c ond iti on is com mon ly know n as be dsores. Th ese c oll ars can c aus e
pr ess ure n ecros is if u sed inc orr ectly a nd is o ften mi sid ent ified a s bur ns.
Avo id le avi ng th e col lar o n the d og for more than 12 hours per day.
When possible repos iti on th e col lar o n the p et’s neck ever y 1 to 2 ho urs .
Check the fit to preven t exc ess ive p res sur e; fo llow the instructions in th is
manual.
Never connect a lead to t he el ect ron ic co lla r; it w ill cause excessive press ure
on the contacts.
When using a separate collar for a lead, don’t put pressure on the electronic collar.
Wash the dog’s neck area and the contacts of the collar weekly with a damp cloth.
Examine the contact a rea d ail y for s ign s of a ra sh or a s ore.
If a ras h or sore is found , disco ntin ue use of the collar unti l the ski n has healed.
If the condition pers ist s bey ond 4 8 hou rs, s ee yo ur veterinarian.
Th ese st eps will h elp ke ep y our pe t sa fe and com fo rta bl e. M il lio ns of p ets are
co mfort able whil e th ey w ear stain less stee l co ntact s. S ome pets ar e se ns iti ve
to c on tac t pr essur e. You may fin d af ter som e ti me that y ou r pet is very t ol erant
of the co lla r. I f so , you m ay r el ax s ome of the se pre ca uti on s. I t is im porta nt to
co ntinu e daily c he cks o f th e con ta ct ar ea . If re dn ess or so res are f ound,
di scont in ue use un ti l the ski n ha s fu lly hea le d.
Th an k yo u fo r ch oosin g Pe tr ainer Rec ha rg eable and Wat erpro of L CD R em ote
Pe t Tr ai ning Sy st em . O ur m is sion is to e ns ur e you r pe t’ s saf et y by pr ov id in g
you the tools and techn iqu es to s ucc ess ful ly tr ain your pet.
2 3
Table of Contents
Comp ments
How the Petrainer Rechargeable and Waterproof Training Collar Works
Features
Key D efin itio n
Operating Guide
Prepare the Remote Transmitter
Prepare the Receiver Collar
Pai ring the Remo te Transmitter and R eceiver Collar
To Test Petrainer Rechargeable and Waterproof Training Collar
Fit the Receiver Collar
Re-Thread the Collar
Freq uently Asked Ques tions
Troubleshooting
General Training Tip s
Common size of differ ent d ogs
LIMITED 90 DAYS WARRANTY
Petrainer CUSTOME R SERVICE
Warning
Pleas e charge bef ore using the pro duct!
If p ut ti ng the transmit te r an d re ceiver coll ar i n st or age for a long
t ime, p lea se c har ge both f ully b efo re leav in g the m i dle a n d
con ti nue c har gi ng on ce ev ery mo nt h.
10
12
14
15
17
18
20
20
20
4
5
5
6
8
8
9
9
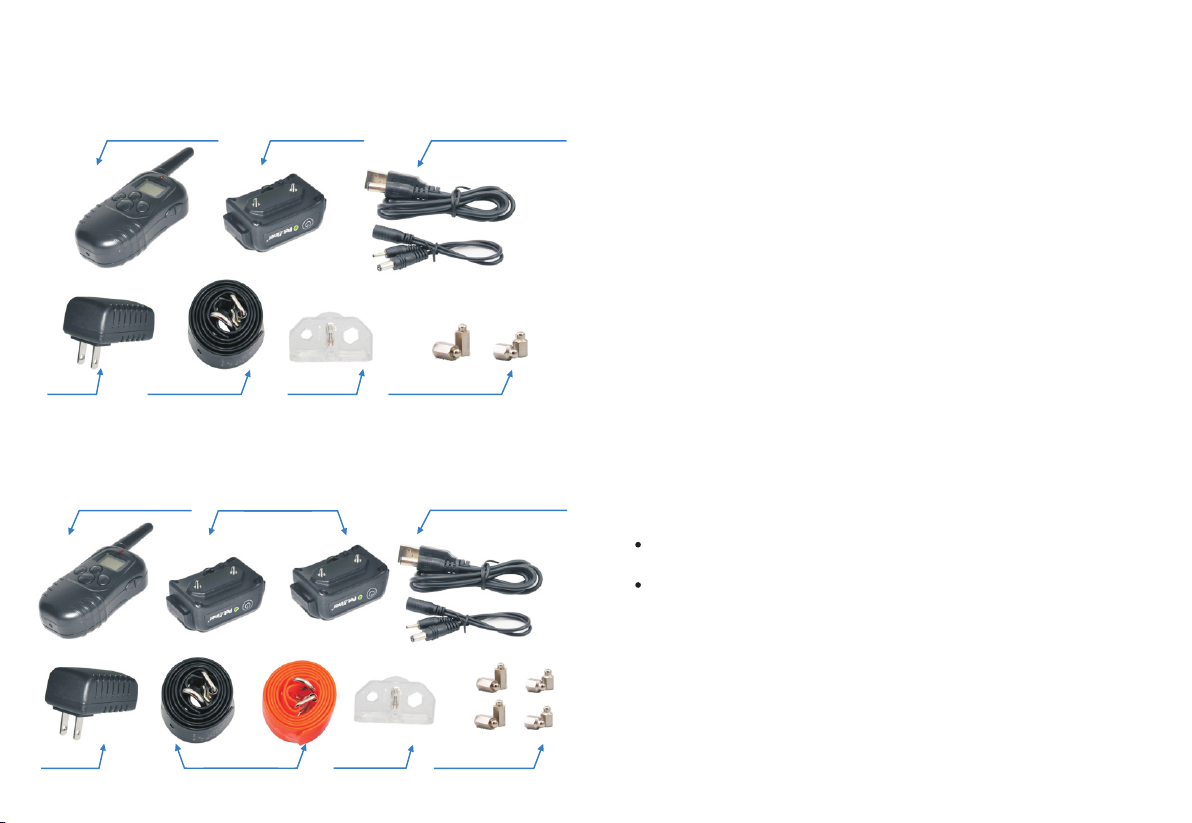
Components
IS-PET998DB 1 for 1
Remote Tr ansm itt er
Charge r
IS-PET998DB 1 for 2
Remote Tr ansm itt er
Adjust able T PU Bel t
Receiv er Col lar
Testi ng Bu lb
Receiv er Col lar
USB Cabl e and
Resemb ling s pli tter c able
2 sets Con tact P oin ts
USB Cabl e and
Resemb ling s pli tter c able
How the Petrainer Rechargeable and Waterproof LCD
Remote Pet Training System Works
Pe tra iner Re charg eab le and Water pro of L CD Re mote Pe t Tra ini ng Syst em has
be en proven s af e, c om fo rt ab le , a nd e ff ec ti ve f or all pe ts o ve r 8 p ou nd s. T hi s
sy st em a ss is ts y ou i n co nt ro lling your pet withou t a l eash in a ra ng e up t o 32 8
ya rd s (3 00m). A t th e pu sh o f a bu tt on, the Remot e Transmi tt er s ends a s ignal ,
act iv ati ng th e R ec eiv er Co lla r. U sin g t he Re mo te Tr ai ner c on si st en tl y a nd
cor re ct ly, ma ny m is beh av io rst ha t y ou r pet e xhi bi ts wi ll be c orre ct ed or a ny
basic obedience com man ds ca n be ta ugh t.
Im por tan t: T he R emo te Tr ai ner h as a ra ng e u p to 32 8 yar ds . Depen di ng on
th e way y ou hold t he Re mote Tra nsm itt er, the ra nge m ay vary. Hold t he Re mote
Tr an sm itter in a horizon ta l position aw ay f ro m yo ur body t o ac hi ev e op ti mu m
ra nge. Ter ra in , weath er, ve ge ta ti on , t ra ns mi ss io n fr om o th er ra di o dev ic es ,
and other factors wil l aff ect t he range of your Remote Traine r.
Features
1. Rechargeable Rem ote Tr ans mit ter a nd Re cei ver collar.
2. Wa ter pro of Receiver Collar, allowi ng yo ur pe t to sw im in w ate r.
3. 100 levels of vibrat ion .
4. 100 levels of static s hoc k (op tio nal ).
5. Alter stimulation l eve ls by p res sin g the U p & dow n buttons.
6. Tone b utt on ac tiv ate s a ton e on th e receiver collar.
7. Power save:
Th e receiv er collar w ill go i nt o deep sleep if t he re i s no op er at ion fo r 4
minutes and any dog mov eme nt wi ll ac tiv ate t he re ceiver.
Th e tra nsmitter w ill g o into STA NDB Y MOD E if ther e is no o perat ion a fter 20
se con ds and go i nto dee psl eep aft er 2 minu tes , pr ess a ny b utt on exce pt th e
LE D l ig ht b ut to n to ac ti va te t he transmitter fr om S tandby mo de a nd pr es s
th e Mod e bu tt on f or 5 se co nd s to aw ak en t he transmitter fr om d ee p s le ep
mo de.
8. Th e sys tem c an be u sed f or 1 or 2 R ece iver Collars.
9. Two p air s of me tal prongs (sh ort /lo ng) t o be suitable fo r dog s wit h differe nt fu r
lengths.
Charge r
4 5
Adjust able T PU Bel t
Testing Bu lb
4 sets Con tact P oin ts

Key Definition
1. Antenna
2. Led light
3. LED Indicator
4. LCD Screen
1-100 level
Static shock mode
Vib rat ion m ode
Beep mode
Light mode
Channel 1
Channel 2
Low Batter y Indicator
p/down button
5. U
6. Led light button
7. Channel button
8. Launch button
9. Mode button
10. Lithium battery
11. Ch arg ing h ole
5. Up/down button: Se lec ts in ten sit y lev el fo r Vibr ati on an d Sta tic S hoc k.
6. Led li gh t bu tt on : Wh en p re ss in g the L ED l ig ht b ut to n, t he LED li gh t on t he
transmit te r will be o n.
7. Channel button: Pressing this button will swap between the first and second
receiver.
8. La un ch b ut ton Se nd s t he si gn al fr om tr an smit te r t o rec ei ve r, r esul ti ng in
s ti mu lati on , b ee p o r lig ht , dep en din g on yo ur mo de se le cti on .
9. Mode bu tto n: Press this bu tto n to switch b etw een modes. The re are 4 mode s:
Static , Vibration, B eep a nd light mo de.
10. Lithium Battery : 3.7 V 240 m AhL iP.
11. Cha rg ing hole: I ns ert charg in g co nnect or i nto charg in g ho le to charg e th e
Transmitter.
collar
Y
Rubber Cover: Seal
charging hole to keep
from dust.
On/ Off/Encode B utt on:
turn on/off t he Re cei ver
Collar and hold it to ent er
1. An ten na: Tr ans mit s the s ign al from the Transmitter to the R ece ive r Col lar.
2. Led light: This ligh t wil l be on w hen p res sin g the L ED light button.
3. Indication light : Thi s lig ht wi ll fl ash w hen t he “Y” button is pressed . The
will be activate when c har gin g as we ll.
4. LCD display:
Static mode: W ith this mo de sel ected, pr essing th e “Y” bu tton will c ause the
receiv er to em it shock.
Vib rat ion m ode : Wit h thi s mod e selected, pressing the “Y ” but ton w ill c aus e
the receiver to vibra te.
Beep mode: With this mo de se lec ted , pre ssi ng th e “Y” button will cause the
receiver to emit a beep s oun d.
Li ght mod e: W ith thi s mode se le cte d, p ressi ng the “Y ” bu tton wi ll c aus e th e
LED li ght on the receiver to flash green once every second. Its primary purpose
is to help locate your pe t.
Channel 1: Indicate s the s ele cti on of t he fi rst c ollar receiver.
Channel 2: Indicate s the s ele cti on of t he se con d collar receiver.
6 7
light
encoding status.
A. When charging the batt ery, the red LED lig ht
sh ows up and changes t o gre en LE D aft er fu lly
charged.
B. In LED Light mode, press the lau nch button, the
gre en LED i n the R ece ive r Col lar w ill f lash every
one second.
C. Wh en S tand by, the R ec ei ve r Co lla r w il l f las h g re en LE D light e ve ry four
se conds.
D. Af ter tu rn o n t he Re ce iv er C ol lar, p re ss and hol d th e O n/ Of f/E n co de
b ut to n f or 5 seco nd s to enter encod in g pe ri od T he g re en L ED l ig ht w il l ke ep
fl as hi ng f or 1 0 se co nd s to ind ic at e th e en co di ng t im e.
Charging holes: Cha rge
for Receiver Collar.
Contact Points: Del ive r
the safe static corre cti on.
A B C D

Operating Guide
Step
Prepare the Remote Transmitter:
Charge the Remote Tran smi tte r
1. Connect the charge r con nec tor t o the c har gin g jack.
2. Plug the charger int o a sta nda rd ou tle t.
1
3. Th e red l igh t on th e Tran smi tte r will be on.
4. Ch arge the Tran smitter for 2 hours or until th e ligh t indi cates chargin g
is complete.
5. After fully charged , the r ed le d wil l tur n off automatical ly.
Low battery indi cato r: the symbol will sh ow up on th e right side of
scr een when rechargi ng is necessary.
How to use the Remote Tran smi tte r
1. To turn on/o ff the Trans mitter, ho ld the Mode b utt on for 5 seco nds.
2. Se t to the d iffer en t m od es by pr es si ng t he Mo de Bu tto n- Th e L CD
images wi ll c ha ng e fr om .
3. P res s up/Do wn bu ttons o n right h and s ide of th e transmit ter t o se t
Vibra tio n or S tat ic Shock lev el.
4. P re ss t he ½ b utton t o sw ap b etwee n ch annel 1 or 2, depen ding on
wh ic h re cei ve r yo u wish to sel ec t.
5. The Re mot e Transmitt er wi ll go int o STAN DBY M ODE i f no oper ati on
fo r 20 se conds a nd wi ll TU RN OFF if n o ope rat ion for 2 m inu tes.
6. In STANDBY MODE, press any button (except LED light button) to wak e
up the transmitter. When the trans mitter is powered off, hold the Mode
button on the Transmitter for 5secconds to TURN ON.
LCD
Step
Prepare the Receiver Collar:
Charg e the Receiv er Collar
1. To TURN ON the Receiver Collar, press the on/off button, a beep
and the green LED will turn on and begin to flash every 4 seconds.
2
2. Open the rubber cover and insert the charger connector into the
hole.
3. Plug the charger int o a sta nda rd ou tle t.
4. Th e red L ED wi ll be o n. (A )
5. Charg e the Recei ver Colla r for 2 hours o r until the l ight indi cat es
chargi ng is compl ete.
6. Afte r the uni t is fully charg ed, the red LED light wil l turn to a gr een LED
light automatically. (B)
7. Put the rubber cover b ack i n pla ce.
8. If the battery nee ds rechar ging, the r eceiver c oll ar will bee p for 20
second s.
Note: P lea se ch eck whether the b att ery needs re cha rging be for e you
use the de vice. W hen you tur n on the rec eiv er, i f th ere are bee ps f or
20 seconds, you need to r ech arg e the r ece ive r col lar before using the
unit.
A B
will sound,
charging
Step
Pairing the Remot e Transmitter and Receiver
Collar:
1. Po wer on t he Rec eiver Col lar by p ress ing the ON/OFF button , a beep
wil l soun d.
3
2. Pr ess an d hold t he ON/ OFF button for 5 seconds until a beep sound s,
8 9
and t he ind icat ing light will begin to flash quick ly.

3. Pre ss the Y button on the Remote Transmitt er once th e Receiver Collar
beep s and flashes qui ckly.
When the Remote Transm itt er an d Col lar R ece ive r are paired
successfully, the Co lla r Rec eiver will beep again, and th e ind ica tin g
light will stop flash ing q uic kly.
4. If needing to pair a sec ond C oll ar Re cei ver, f oll ow the same steps but
first press 1/2 butto n to di ffe rent channel.
Note: Pairing has to be finis hed wit hin 10 seconds after the 1st beep from
th e Recei ver C ollar. M eanin g, you ha ve to pre ss the Y butto n wit hi n 10
seconds of the 1st beep f or pa iri ng to b e com ple ted .
To Test Petrainer Rechargeable and Waterproof
Step
LCD Remote Pet Training System:
Th e st at ic im pu ls e re le as ed by th e Re cei ve r Col la r can no t be se en
with na ked e ye . Yo u ca n te st th e St imu la ti on wi th th is m ethod:
4
Test S tat ic Sh ock F unc tio n
Take ou t the te st bulb fro m the
package and place its metal wire
ag ain st t he Rece ive r Co llar’ s
Contac t Poin ts.
Press Mode button on the Remote
Tr an smitter, sw it ch t o Sh oc k
Mo de, confi rm u sin g th e LC D
dis pla y t hat th e s ti mu la ti on
level is not at 0 , you c an pr ess
th e UP/D OW N button on t he
ri gh t si de to a dj ust.
Press Y button, tes t bul b wil l flash, that me ans S hoc k function works.
Note: If w anting to t est t he shock fu nction on y our self, ple ase e nsure
your finger or hand is across both contact points to ensure the connection
is co mplete. Other wise, user will feel no stimu lation.
Important: If the tr ansmitter is in sleep mod e (the LCD display is turned
off) you must press the “Y” but ton once to wake up the uni t, then press
th e “Y” but ton aga in to sen d th e sig na l fro m th e remot e to the co llar
receiver. This applies to a ll funct ions.
Test V ibr ati on Function
P res s M ode b utt on on t h e
Re mote Tra nsmitte r, switc h
to Vibrate mode, confirm using
t h e L CD d i s p l a y tha t t h e
st imula ti on l evel is not at 0,
y o u c an pr es s U P/D OWN
b utt on o n t h e r ig ht si de t o
ad ju st.
Pre ssY button, Re mote Co llar
will vibrate, that means Vibration
Function wo rks .
Test B eep F unc tio n
Press Mode bu tton of Remote
Trans mi tter, s witch to Be ep
Mo de .
Press Y button, Receiver Collar
wil l b ee p, th at me ans Be ep
Mode works.
Test L ED Li ght F unc tio n
Pr es s LE D ligh t Button , LED
li gh t wi ll t urn on, means LED
l igh t b u t to n w or ks .
Note:
I: If L CD of Re mot e Trans mitter do es not d isplay, there is proba bly two
reason s:
10 11

Step
5
1. Ligh t Standby : In order to sav e power, the Remote Tra nsmitter
will go in to St andby Mod e if th ere is no ope rat ion after 2 0 sec onds,
press any bu tto n exce pt LED Light Button to act iva te Rem oter
Transmi tte r, LCD will di spl ay.
2. D ee p Sl eep: In order to save p ow er, t he R em ote Tra nsmit te r wi ll
go int o De ep S leep Mo de i f th ere is n o opera ti on afte r 2 mi nu tes,
h ol d t he M o de b utt on for 5 s ec on d s t o a ct iv at e t he R e mo te
Tra nsm itt er, LCD wi ll di spl ay.
II: T he re ce iv er co ll ar wi ll g o int o d ee p sle ep if no op er at io n f or 4
mi nu tes. And an y mo vemen t by t he d og will a ct ivate t he r eceiv er.
If th e Receive r Coll ar has n o response when y ou pre ss the Y butto n, and
the Indi cation li ght of the Re ceiver Co lla r is not o n either, yo u can shake
Re cei ver C ollar o r for ce th e dog to mo ve, a nd the indic ati on light of th e
Re ce iv er C ol la r wi ll s ho w gree n, which means the Re ce iver C ol lar is
activate and will work.
II I: When testing, ch oose a ny m od e ex ce pt LED light. W he n yo u
u nd er V ib ration o r St at ic S ho ck mode, Intensity Le vel ca nn ot b e
at a st im ul at io n le ve l of 0, p re ss U P/ DO WN t o ad ju st .
ar e
Fit The Receiver Co llar with your dogs:
Im porta nt : The pro per fit and p la cemen t of y our colla r is i mport ant for
ef fe ct iv e training. The C on ta ct P oi nt s m us t ha ve direct c on ta ct w it h
yo ur pe t’s s kin o n th e und ers ide of th e dog ’s ne ck.
WARNING
To assure a proper fit, ple ase f oll ow th ese s tep s:
1. Have your pet standi ng co mfo rta bly ( 3A) .
2. Centre the Contact P oin ts un der nea th yo ur
pet’s ne ck, t ouc hin g the s kin ( 3B). If your pet
has a long or thick coat, p lea se us e lon ger
Contact Points, we en clo sed 2 s ets C ont act
Points, short ones an d lon ger o nes .
CA UTION : he re a re 1 00 leve ls f or
Vibr ation and Stimu latio n. The strong
Sti mulatio n can pe netrate the hai r of
the pet and fabric within 6mm thick. Do
not shave the pet’s neck as this may
increase the risk of skin irritation.
3. The Collar should fit snugly, yet loose
enough to allow one finger to fit between
the strap and your pet’s neck.(3C)
4. Al low your pe t to wear the c ollar for s everal mi nutes the n rech eck
fit. Ch eck the f it a gain as y our pet beco mes more com fortabl e with th e
Collar.
CAUTION: Risk of skin d ama ge.
Th e Re ce iv er Co ll ar is not d es ig ne d t o be wo rn co nstantly. W e
re co mmend t he C ol la r n ot b e wor n fo r more th an 1 2 h ou rs o ut of
ev er y 2 4- ho ur p er io d.
Mo st p ets fee l un comfo rt abl e at f ir st w ear in g the colla r. Do n’t use
an y fu nctio ns u nti l th e pe t ha s gotte n us ed t o the col la r.
We s ug ge st you gi ve t he d og Vib ra ti on b ef or e starting the St at ic
Sh ock. After a t im e of trai ni ng, the d og w ill lea rn t hat Sta tic Sho ck
Sti mu lat io n w il l co me af ter V ibr at ion . In th is w ay, the v ibra ti on
alo n e c an ef f ec ti ve ly cu rb the im p ro pe r d ee ds of th e p e t. Th e
Sti mul at io n o nl y ac ts a s a m en ac e t ha t m igh t b e u nn ec es sa ry
mo st of t he t im e.
3B
3C
3A
the
12 13

Step
Re-Thread the Col lar (as diagram)
6
Regular Mainten ance
Check Contact Point s for t igh tne ss we ekl y.
Clean Contact Point s wit h alc oho l wee kly.
Note: remove the battery and discharge Regular the Bark Automatic
Control Coll ar befor e touchi ng the Contact Poin ts.
Check your dog’s n eck f or ir rit ation and wash neck weekly.
Frequently Asked Questions
Ho w ol d does my pet h av e to b e befor e us ing Pet ra iner Re ch argea ble and
Water proof LCD R em ote Pet Trai ning Syst em?
You r pet sho ul d be a ble to reco gn ize bas ic o bedie nc e comma nd s such as “Si t”
or “ St ay.” Pet ra iner Re ch argea ble and Wat erp ro of L CD Remo te P et Tr ainin g
Sy stem may be too l ar ge f or pets u nd er 8 p ounds .
On ce my p et is t ra in ed a nd has be en o beying my c om ma nd s, wi ll m y pet
ha ve to c on ti nu e to we ar t he Re ce iv er C ol la r?
Pr ob ab ly n ot . You m ay n eed to r ei nforce trai ni ng w it h th e Re ce iv e Co ll ar f rom
ti me t o ti me .
Can I use Petrai ner Recha rge able and Wat erproof L CD Remote P et Trainin g
System w ith more th an one p et?
Yes, t he re is 2 se ri es wi th our Pe tr ainer Re ch arg eable an d Wa terpro of L CD
Rem o te Pe t T ra in in g Sys tem , o ne kin d i s 1 V 1 ( 1 Tr an sm it te r to 1 R ece ive
Co ll ar ) T T-P T0 5;the oth er o ne k in d is 1 V2 ( 1 Transmi tt er t o 2 Re ce iv e Co llar)
TT-PT06.
Will I get exac tly 3 28 ya rds o f ran ge wi th th e Remote Trainer?
Th e ef fe ct iv e r an ge of t he Re mo te Tra in er m ea ns th e st rai ght-li ne d istanc e
between Remote Tr ans mit ter a nd Re cei ver C ollar without obstac les i n bet wee n.
Ra ng e may v ar y ac co rd in g to te rr ai n, w ea th er, ve ge ta ti on , ba tt er y ca pa bi li ty
as well as transmissi on fr om ot her r adi o dev ice s.
How long can I conti nuo usl y del ive r vib rat ion or Static Shock to my pet ?
Th e ma xi mu m amo un t of ti me you ca n p re ss t he Vib ra ti on or S ta ti c S ho ck to
yo ur p et co nt in uo usl y is 10 s econ ds . Af te r t hi s, th e Re mot e Tr an sm it ter wi ll
time-out, and the Vib rat ion o r Sta tic S hoc k mus t be re lea sed a nd pr ess ed ag ain .
14
Is the Receiver Colla r wat erp roo f?
Yes, y our p et ca n swim in the water.
15

What do I do If my pet’s neck becomes red and i rri tat ed?
Di sc on ti nu e us e of the Petrainer Recharg ea bl e an d Wa te rp ro of L CD R em ot e
Pe t Train in g Sy st em f or a f ew d ay s. I f th e co nd ition persi st s be yo nd 4 8 ho urs,
you r v et er in ar ia n. O nce t he s kin r etu rn s to no rm al, m on it or yo ur pe t’s sk in
condition closely.
Can I attach a leash to the R ece ive r Col lar ?
NO . Th is c an r es ul t in p ul li ng t he C on ta ct P oi nts too ti ghtly again st y ou r pe t’ s
ne ck . Us e a sepa ra te c ol la r pl ac ed a bo ve t he R ec eiver Colla r.
How wi ll I know when to charge the batteries?
For Re mot e Tra ns mi tt er : t he sy mb ol wi ll s ho w u p o n t he ri gh t s id e of LC D
scr ee n. Fo r R ec eiv er Co ll ar: w ill he r a bee p for 2 0 se co nds, i ndic at ing t he
dev ic e n ee ds to be ch ar ge d.
How long is your lithium battery lifetime?
Our L ith iu m b at tery c an c har ge 40 0 tim es fo r r em ote C ont ro l a nd Re ce iv er
Col la r.
How long can I leave Rece ive r Col lar o n myd og?
The Collar is not designed to be worn cons tant ly. We reco mmen d the Collar no t be
wor n for more than 12 hour ou t of ever y 24-hour period.
How long should my t rai nin g ses sio ns be f or my p et?
Tra ining s essio ns shou ld be kep t pos itive a nd shor t, it is be tter fo r about 1 0-15
mi nut es l ong e ach ses sion.
Wh at ki nd of dog s are y our Petrai ner R echargea ble a nd Wa ter proof LCD
Re mot e Pet Tr ai nin g Sys tem sui tab le for?
Th e co ll ar i s ad ju st ab le fr om l ength 5 .9 ”( 15cm) t o 1 9. 6” (5 0c m) ,if y ou r pet ’s
ne ck i s sm al ler th an 5 .9” , yo u ha ve to r ethre ad i t, if y ou r pe t’ s ne ck is l ar ger
th an 2 2” , pl eas e d on ’t bu y it : a nd t hi s C ol la r i s no t s ui ta bl e for t he do gs l ess
th an 8 p ou nd s ei th er.
16 17
Troubleshooting
My p et do es not re spo nd afte r cor rect in sta llation Pe tra iner Re cha rgeable
an d Waterp roo f Traini ng Co llar.
You n eed to ch ar ge the Re mo te Tr ans mi tte r an d Re cei ve r Colla r fo r 2 ho urs
in divid ually f ir st.
You ne ed t o t ur n on th e R em ot e Tran sm itte r B y hol di ng th e mo de bu tto n
for 5 se con ds .
Check the levels of vib rat ion o r sta tic s hoc k.
Make sure the Receive r has e nou gh po wer t o ope rat e.
Restart the Receive r col lar b y pre ssi ng th e on/ off butto n.
Tes t 4 fu nc ti ons (B eep, L ight, Vib ra ti on a nd S ho ck ) fi rs t be fo re u si ng. See
pa rt “ Tes t” o f Op er ation Guide .
Int en si ty le ve l h as to be m or e t ha n “ 0” whe n p ai ri ng . Te st la un ch fo r
vib ra ti on an d St a ti c S ho ck F un ct io n.
Th e Rec eiver C oll ar will g o into de ep sl eep if no o perat ion f or 5 m inu tes and
an y dog moveme nt will a cti vate th e dev ice.
Make sure the Contact P oin ts ar e pla ced s nug ly ag ainst your pet's skin.
Trim your pet 's f ur w he re the Cont ac t Po ints touc h th e ne ck o r sw it ch to
lo ng er C ontac t Po in ts.
If none of the above works, you can try repairing between the Remote Transmitter
an d Rec eiver C ollar. ( See par t “Pa iring ” of Op erati on Guid e)
Remote Transmitter d oes n ot wo rk.
You ne ed to c har ge th e Rem ote Tr ans mit ter f or 2 ho urs w hen y ou ge t pro duc t
for the first time.
Che ck i f t he Re mo te Tra nsmi tt er is o n l ow ba tt er y s ta tu s, t he sy mb ol wi ll
sho w up on t he r ig ht si de of t he L CD sc re en .
You n ee d to h ol d th e Mo de b ut ton on t he R emote T ransmit te r fo r 5 se co nd s
to pow er i t th e de vi ce o n.
Rem ot e Tr ans mi tt er aut om at ic all y g oes in to st an db y m od e i f n o a cti on
is det ec te d wit hin 2 0 se co nd s, at th is t im e the re wi ll b e no LC D d isp la y.
Pre ss an y bu tto n t o r e- ac ti vat e t he Re mot e Tr an sm it te r.
R emo te Tr a ns mi tt er wil l a ut om at ic al l y g o es i nto dee p s lee p s ta tu s i f
no ac ti on is de te cte d w it hin 2 mi nu te s. At t his ti me , t her e w il l b e n o LCD
d isp la y. Yo u h a ve t o p r ess “Mo de ” b utt on for 5 s ec on ds un ti l t h e L C D
di sp la y re ap pe ar s.
th e

My Re cei ver Co lla r work s great for s ome ti me, but it do es not work anymo re
aft er I charged the device.
Fi rs t, chec k if cha rg ing is succ es sful, w he n yo u ar e charg in g, r ed L ED ligh t
wi ll b e on , af ter ful ly c ha rged, the r ed l ed l ig ht will tur n of f au tom at icall y.
Th e Receiver Co ll ar i s damaged a nd i t doesn't w or k af te r being k no ck ed
do wn .
You ha ve to t urn o n Receiver Collar again aft er yo u'r e fin ish ed ch arg ing .
We tu rne d on th e rec eiv er co lla r and it starts to beep for 20 s eco nds .
Re ceive r Co llar wi ll b ee p for 20 seco nd s in l ow batt ery statu s un less it get s
charge d. Charge it for 2 hours and th e other fun ctions wi ll wo rk after chargi ng
is f in ished .
Ou r Rec eiv er Coll ar is d esign ed to n ot be kno cke d down, plea se do n't kno ck
do wn th e device, to a voi d break ing s tructure a nd ci rcuits.
I want to test Receiver C oll ar my sel f, bu t it do es not work.
If y ou te st Receive r Col lar b y your ha nd or l eg, ple ase t ouc h the 2 ele ctr ode s
at t he sa me time, onl y tou ching one el ect rod e will no t wor k.
General Training Tips
Th e follo wing ar e ti ps o n how to ge t th e be st out of y ou r Petra iner Re mo te
Pe t Tra ining C ollar :
(1 ) Ma ke the tr ai ning se ss ion s sh ort and pos it ive (be tween 10- 15 m inu te s long
fo r ea ch time ), w hich wi ll e nable y ou r dog to keep i ts a ttent io n focus ed o n you.
(2) Train one dog at a time.
( 3) D u ri ng i nit ia l t rai ni ng s es si on s, k eep you r d o g i n a f ami li ar out do or
en vir onmen t e. g. an e nc losed a re a o f th e g ar de n and a wa y f ro m ot her d og s/
an im al s an d pe op le. Tra ining in n ew l oc ation s ma y caus e yo ur d og to beco me
dis tr act ed ca us ing y ou t o r ei nfo rc e y ou r c om mand s w it h t he re mo te co llar receiver more often c oll ar- rec eiv er mo re th an accordingly.
(4 ) Us e a l on g le as h fa st ened t o a no n- me ta ll ic c ol lar to h el p hi s/ he r le ar ni ng.
En su re t he a dd it io na l co llar a nd l ea sh d oe s no t in te rf ere wi th t he s ki n co nt act
of t he meta l pr obe s on t he coll ar- re cei ver. Do not us e th e rem ot e tra in ing c ol lar
without a long leash un til y our d og is f ull y tra ine d.
18 19
(5) Yo u w il l ha ve mo re su cce ss by te ac hin g the d og a co mm and f irs t b ef or e
try in g t o r ei nf orce t o co mma nd wi th th e r em ote t rai ne r.
(6) Fo r b as ic obe di en ce tr ain in g, V IB RATI ON an d AU DI O m od es a re m or e
use fu l.
(7 ) Iss ue an o bed ien ce command at a tim e, wh ich w ill f ocus your dog's a tte nti on
an d re du ce c on fu sion. Do n ot u se t he r em ote co llar to co rrect comma nd s th at
have not already been c ove red .
(8 ) Du rin g tr ainin g, l ook for all t he p ositi ve c hange s in y our dog's b eh avi or a nd
re membe r to r einfo rc e them pr om ptly wi th a mple pr ai se and rewa rd.
(9 ) Avo id o ver-c orrec ti ng y our dog . Us e as f ew r em ote cor re ction s as p os sible
du ri ng the trai ning proc es s.
(1 0) Wh en y our d og h as be co me appare nt ly p er plexed, s hi ft th e fo cu s o f th e
tr ai ni ng se ss io n by drawing hi s/ he r attention t o a c om ma nd t he y are f am il ia r
wi th , e .g . si t. Give y ou r do g pra is e an d encouragement g al or e on su cc es sf ul
com pl et io n o f t he co m ma nd. R ep ea t t his s ev er al tim es be for e r et ur ni ng to
tr ain ing wit h remote cor recti ons .
(11) If y ou k now a pa rt ic ul ar mi sbe ha vio r you r d og do es , t he n re inv en t t hi s
si tu at io n du ri ng a trainin g sessio n. Yo u will have f ar m or e su cc es s if you de al
with one misbehavio r at a ti me in a c ont rol led s itu ation.
( 12 ) B e c on s is te nt ; g iv e y our dog a t o ne , v ibr at io n o r s ta ti c- st i mul at i on
c o rre c tio n f or e a c h m is beh avi or. Whe n r ei n for cin g a c omma nd w i t h a
c or re c ti on . It i s c rit ic al t ha t y ou d o s o w i th ou t e mo t io n t he n i mm ed i at el y
praise and reward you r dog f or ma rki ng th e rig ht de cision.
(1 3) When y ou r do g se em s to re ac t in a timid an d fr ig ht en ed f as hi on t o either
th e to ne, vibra tion or stati c-sti mu latio n, p artic ul arly in ear ly t ra ining s es sions ,
do n ot b e fl ab berga st ed. Shi ft t he f oc us of the train in g sessi on b y dr aw ing his /
he r a tt en ti on t o a c om ma nd t he y a re f am il ia r with. E . G. si t an d give yo ur d og
abundant pr ais e and e nco uragement on s ucc ess ful c ompletion of t he co mma nd.
(1 4) D o no t u se P et rai ner R em ot e P et T ra in in g Col la r to co rr ec t or el im in ate
for m o f ag gr ess ion or bi t in g be ha vio r. Wh e n y ou r do g is sho win g s i gn s of
aggressive behavi or th en co nta ct a pr ofe ssi onal dog trainer in your vici nit y.
(1 5) P lease be re mi nded that y ou s ho uld kee p tr ai nin g se ss ions sh or t an d end
ev er y sess io n on a hi gh not e. Stop t ra ining an d pl ay w it h your do g as s oo n as
he /s he has acco mplis he d a ne w le vel of prof ic iency.
If ne ed in g mor e tr ai nin g t ip s, plea se v is it us a t o r
fa ceboo k. co m/ ip et small
fo r p le nt y of re so ur ces.
ww w. ip et s- ma ll.co m ww w.
 Loading...