

3. Test static shock function:
1) Attach the light to the metal probes.
2) Select to Stat ic Mode by pressing “Mode ” bu tton .
3) Select stati c leve l to 1 -1 00 by pres sing UP/DOWN butt on .
4) Pres s “Y” b utto n, t he LED will flash o n.
Tips
1. The life ti me o f the batt er ie s va ry a ccordi ng a s how often yo u use the
pro du ct. Therefore you should o ften c he ck t he batteri es b y watching the
indicator l ight i n the re ceiver and the indi cator sign on th e LCD sc reen o f th e
tra ns mi tter.
2. The va lid distan ce of re mote c on trol mea ns t he straight- li ne d ista nc e
betwe en the tra nsmitt er a nd the rec eiver without obstacles in between. I f
there a re i nterference signals or s ig na l scre ening around, the actua l remo te
con trol d istance may vary.
3. This product is for pet trai ni ng. Only by training, t he p et c an u nd erstand
the inten ti on of its owner. Good effect can o nl y be a chieved afte r a period of
tra in in g.
4. Training se ss io ns should be kep t positive and short, a bo ut 10-15 minutes
long each time .
5. Pres ently, this p roduct i s th e most e ffective and safe st too l for training
pet. Fo ll owing the correct operat ional instruction s, y ou can effe ctively trai n
the pet and bring it n o ha rm .
About Petrainer
The Pet rainer, is o ur b rand , ha s ou r own re search & d ev el opment and
pro du ction depar tm en t. A p rofessional ma nu fact urer a nd s up plier fo r pet
tra in in g equipment, our team is th e fi rst class, o ur p ro du ct s are wi th high
quality. Provi di ng a better se rvice to custo mer all over the world, we are
willing to accept OEM / OD M orde rs and fast pro cessing.
Thank you for s upporting Petrai ne r.
Freq uence : 433. 82 5MHz
Tran smitte r: 2 x 4LR4 4/6V
Rece iver: 2 x AA A/1.5 V
NOT E: P le as e ta ke out the batter ies if you don't use it for a long time .
R&TTE
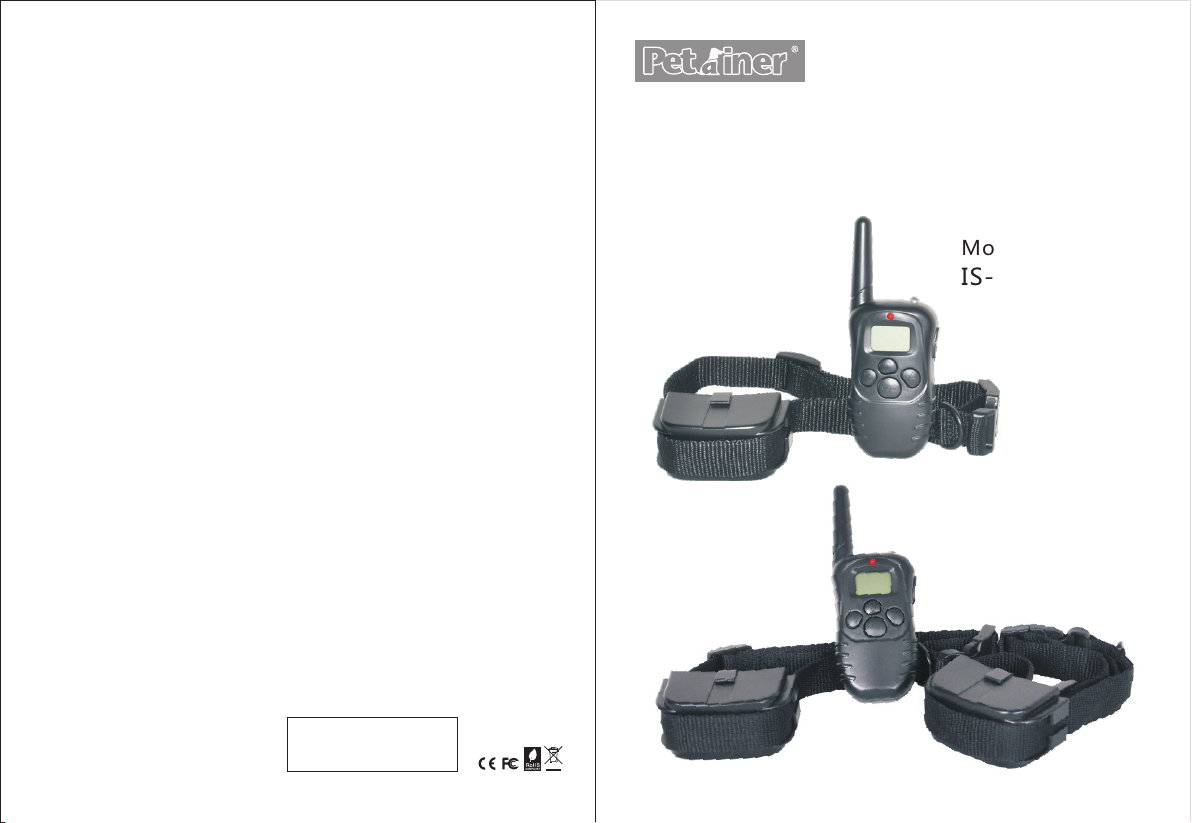
300M Remote Dog Training Collar
with 0-100lvs static and vibration modes
Please re ad this entire guide before using
Model Number :
IS-PET998D-1
Model Number :
IS-PET998D-2
MAIN FEATURES
1. Ea sy-to-us e, e rgon om ic t rans mi tter.
2. Rheostat d ia l that allows fo r gradua l in crea se s in s ti mulation intensity
with no jumps between 0- 10 0 le ve ls .
3. 4 trai ni ng modes: stat ic shock/ vibration/ beep/ li ght.
4. The Pe traine r El em ent 99 8D has a 300 meters range.
5. Two-dog model al lo ws t he t rainer to control two different dogs from one
tra ns mi tter.
6. Fe at ured p ower s aving de si gn w ith automatic stan dby and memor y
function.
7. No ext er nal ante nn a on the collar receiver.
8. Re du ced re ce iver /col la r is i deal for s ma ll/medium s ize dogs.
9. Transmitter and receiver are powered b y re pl ac eable batt er ie s.
Channel 2: sel ec t to e ncod e be tw ee n tran sm itter an d 2n d rece iv er col la r.
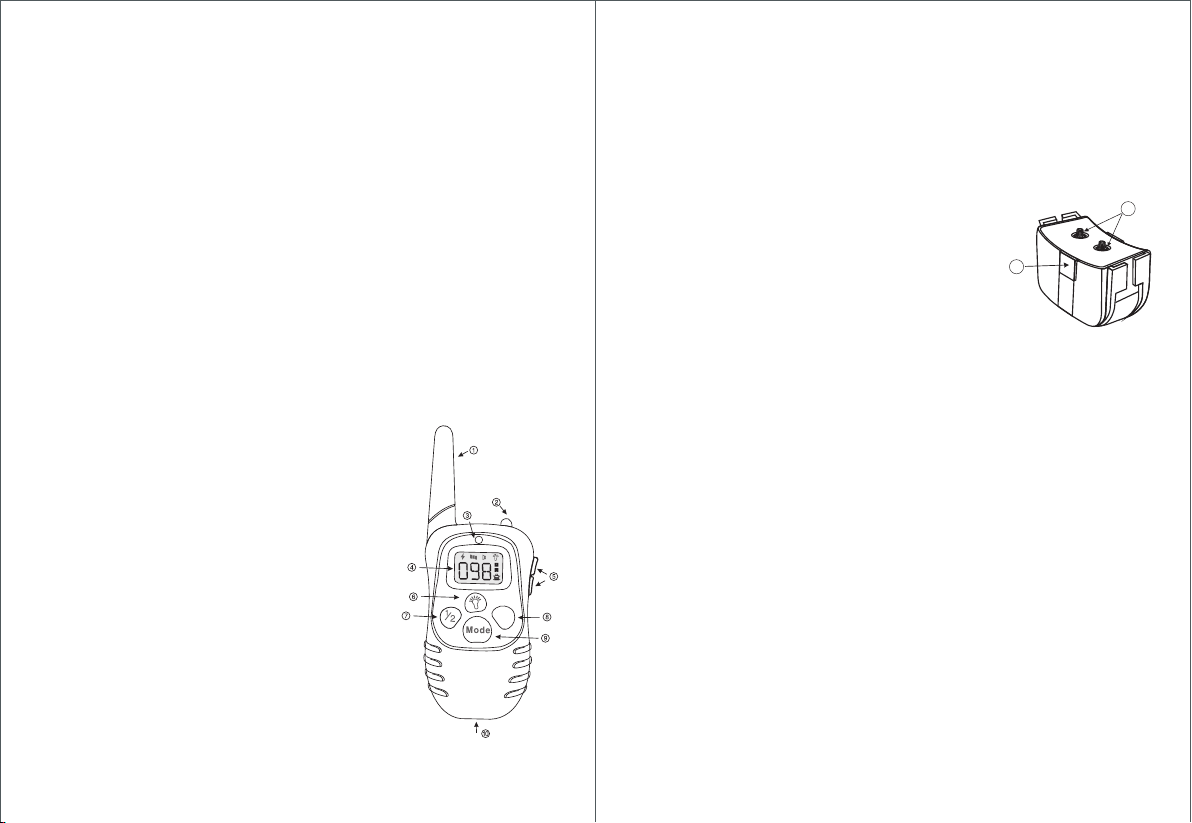
5. Up/down button: Intensity level button for V ib ration a nd S tatic Sh oc k.
6. Led light button: when pressing the L ED l ig ht b utto n, t he l ed light in the
Transmitter will be on.
7. Channel button: press this bu tton, can select to en co de b et we en
tra ns mi tter a nd o ne r ec ei ve r co ll ar, or between tra ns mitt er a nd 2 nd rec eive r
col lar.
8. Launch button: after you finish mode se le ct ing, press this b utton for
con fi rmation.
9. Mode button: include 4 mo de s as S tati c Mo de,
Vibrati on M ode, Beep Mode an d li gh t Mo de.
10. Cover: Put 2* 4LR4 4/ 6V b atteries i n.
11.Co ntac t Points: de li ve r th e sa fe stat ic c or re ct io n.
12. Cover: Put 2 * AAA 1.5 V batteries in.
12
11
DESCRIPTION
1. Ante nn a: tra ns mi t the signal to Receiver Collar.
2. Led light: this lig ht wil l be o n when pre ssing LED lig ht button.
3. LED Indicator: this light wil l fl as h when
tra ns mi tter works, or w he n ch argi ng, this light
will be on.
4. LC D Scre en:
Sta ti c mo de: under this mo de , pres s Y bu tton ,
Rec ei ve r wi ll shock; press Up/down b utton, can
adjust Stat ic l ev el f ro m 0 to 100 .
Vibrati on m od e: under this mod e, p re ss Y
butto n, Rec ei ve r wi ll v ibrate; press Up/d ow n
butto n, c an a djust Vibrat io n le ve l from 0 to 100.
Beep mode: und er t hi s mode, press Y button, the
rec ei ve r co ll ar can g et a b ee p sound.
Light mode: under th is m od e, pre ss Y butto n, the
gre en L ED light in the receiver will fla sh e very
one second, it is convenient to l et y ou k now
where y ou r pe t is .
Channel 1: sel ec t to e ncod e be tw ee n tran sm itter an d on e rece iv er col la r.
Y
HOW TO USE
1.Connect transmitter and receiver:
1) Put 2 * 4LR44/6 V ba tteries into the transmitte r.
2) Pres s “1/2” button to choose chan ne l for connec ti on , choose chan ne l 1 for
the first recei ver.
3) Put 2 * AAA 1.5V batteries into the re ceiver.
4) After a beep from the receiver, press “ Y” butto n on the tra ns mitt er
within 10 second s.
5) The collar receiver will beep i f co nn ec te d su ccessfully.
6) Pres s “1/2” button to encode, choose to chann el 2 for the s ec on d co ll ar by
the same procedure.
Important Notice:
1. The tran smitte r wi ll go into S tand by M od e if there's no operat ion afte r 20
seconds and turn o ff after 20 mi nu te s; Th e re ce iver w ill go i nt o Stan db y
Mode if unused for 4 minutes. Any movement will activate the re ceiver.
2.“ ½” button to choose chan ne l for conn ec ti on. In Channel 1, can o nl y train
the first recei ver, in ch an nel 2 trai n the second receiver.
3. In working mode, if you want to re co nnect the receiver, simply reset the
bat teri es i n th e re ce iv er, th ere is a b eep sound to indicate that it's ready to
encode.
 Loading...