

www.ipets-mall.com

Table of Contents
Compone nt s. ....... .. ....... .. .. ....... .. ....... .. .. ..... .. .. ....... .. .. ..... .. .. ....... .. .. ..... .. .. .... 3
How the D og Train in g Syste m Works ..... .. ..... ....... ..... .. ..... ..... .. ..... .. ..... ..... .. .... 4
Featu res.. .. ..... ..... .. ..... ..... ..... .. ..... ..... ..... .. ..... ..... .. ..... ..... ..... .. ..... ..... .. ..... ..... 4
Key Defin it ions. .. ..... .. .. ..... .. ..... .. ....... .. ..... .. ....... .. ..... .. ..... .. ....... .. ..... .. ....... .. . 5
Remote Tra ns mi tter.... .. .. ....... .. ....... .. .. ....... .. ....... .. .. ..... .. .. ....... .. .. ..... .. .. . 5
Collar re ce iver.... .. ..... .. .. ..... .. ....... .. ....... .. ..... .. .. ..... .. ....... .. ....... .. ..... .. .. .. 6
Operati ng G uide. .. ....... .. ..... .. ..... .. .. ..... .. ..... .. ....... .. ..... .. ....... .. ..... .. ....... .. ..... . 7
St ep 1 Prepar e th e re mo te t ransmit te r.. ....... .. .. .. ....... .. .. ....... .. .. .. ....... .. .. .. 7
Step 2 Pr ep are the col lar-rec ei ver... .. ..... .. ..... .. ....... ....... .. ..... .. ..... .. ..... .. . 8
Step3 S yn c th e remot e tr ansmitt er w ith the c ol lar-rec ei ver... .. ....... .. ..... .. .. 9
Step 4 Test t he t raining s ys te m.... .. .. ..... .. .. ..... .. .. ..... .. .. ..... .. .. ..... .. .. ..... .. 1 0
St ep 5 Fit the coll ar -r eceiver. .. .. .. ....... .. .. ....... .. .. ....... .. .. .. ....... .. .. ....... .. . 12
Step6 Re- th re ad t he collar. .. .. ....... .. ....... .. .. ....... .. .. ..... .. .. ....... .. .. ....... .. . 13
Frequen tl y Asked Ques ti ons.... .. ....... .. ..... .. .. ..... .. ....... .. ....... .. ....... .. ..... .. .. ... 14
Tro ub leshoot in g...... .. .. ..... .. .. ....... .. ....... .. .. ..... .. .. ....... .. ....... .. .. ..... .. .. ..... .. .. . 16
General Tr ai ning Tip s. ....... .. ..... .. ....... .. ..... .. ....... .. ..... .. ....... .. ..... .. ....... .. ..... . 17
Addendu m an d Upgra di ng Notes: .. ..... .. ....... .. ..... .. ....... .. ..... .. ....... .. ..... .. ...... 19
LIMITED 9 0 DAYS WARRAN TY.. ..... .. ....... .. ..... .. ....... .. ..... .. .. ..... .. ....... .. ..... .. 1 9
Petaine r CU STOME R SE RVICE.. .. ....... .. .. ....... .. ....... .. .. ....... .. ....... .. .. ..... .. .. .19
-1-
Important Safety Information
WAR NING: NOT FOR AG GR ES SI VE D OG S. D o not use t hi s pr od uc t if your d og
is ag gressive , or if your dog is pron e to ag gre ssive behavio r, agg res sive dogs can
ca us e se ve re i njury and e ve n de at h to their owne r an d ot he rs . If you ar e un su re
wheth er this p roduc t is ap pr opr ia te fo r your do g, plea se cons ult you r veter inari an
or cert if ie d train er.
CAUTION:
Risk of skin dama ge: Pl eas e read and fol low the instructio ns carefu lly in this guide ,
pro per fit of the collars i s important be cau se a loo se collar may ca use inconsisten t
pe rf orm an ce . A col lar w or n for t oo lo ng o r mad e to o tig ht o n t he p et's ne ck ma y
ca us e sk in d am ag e, r an gi ng f ro m re dn es s to press ur e ulcers (commonly known
as b ed so re s).These collars can cause pressu re n ec ro si s if u se d in co rr ec tl y an d
is ofte n mi si denti fi ed as bur ns .
Avo id l eaving th e co llar on t he d og for more t ha n 12 hour s pe r day.
When po ss ib le repo si tion th e co llar on the p et 's neck e ve ry 1 to 2 hours .
Check the f it t o preve nt e xcess iv e pressur e, a nd it is ok ay t o trim any ex ce ss
strap l en gt h.
Never con ne ct a lead t o th e elect ro nic colla r be cause i t ma y cause exc es sive
press ur e on t he cont ac ts.
Wash the d og's neck ar ea and conta cts of th e col lar wee kly with a dam p clo th.
Exami ne t he c ontac t ar ea dail y fo r signs of a ra sh o r a sore.
If a ras h or sore is found, disc ontinue use of the col lar until the skin has healed.
If the co nd it ion per si sts bey on d 48 hours, s ee y our vet er inarian .
These steps will help your pet safe and comfo rtable. Millions of pets are com fortable
whil e wearing stainless steel contacts. So me pets are sensitive to conta ct pres sure .
You may f in d af te r so me t im e that your p et i s ve ry t ol er an t of the co ll ar. I f so you
ma y re la x some of t he se p re ca ut io ns , it is i mp or ta nt t o continue da il y ch ec ks o f
th e co ntact area. If redn es s or s or es a re d et ec te d, d iscontinue us e un ti l th e sk in
has ful ly h ea led.
Thank you for choosing the Petrainer brand! You and your pet deserve a companionship
th at in clu de s m em o ra ble m ome nt s a nd a sh are d und er sta nd i ng t o ge the r. O ur
mi ss io n is t o en su re y ou r pe t' s sa fe ty b y providin g you the tools and t ec hn iques
to s uc ce ss fully t ra in y ou r pet. Sh ou ld y ou have a ny q ue ri es , please co nt ac t ou r
custo me r se rvice .
NOTE: P le as e charg e be fore us in g the produ ct .
-2-
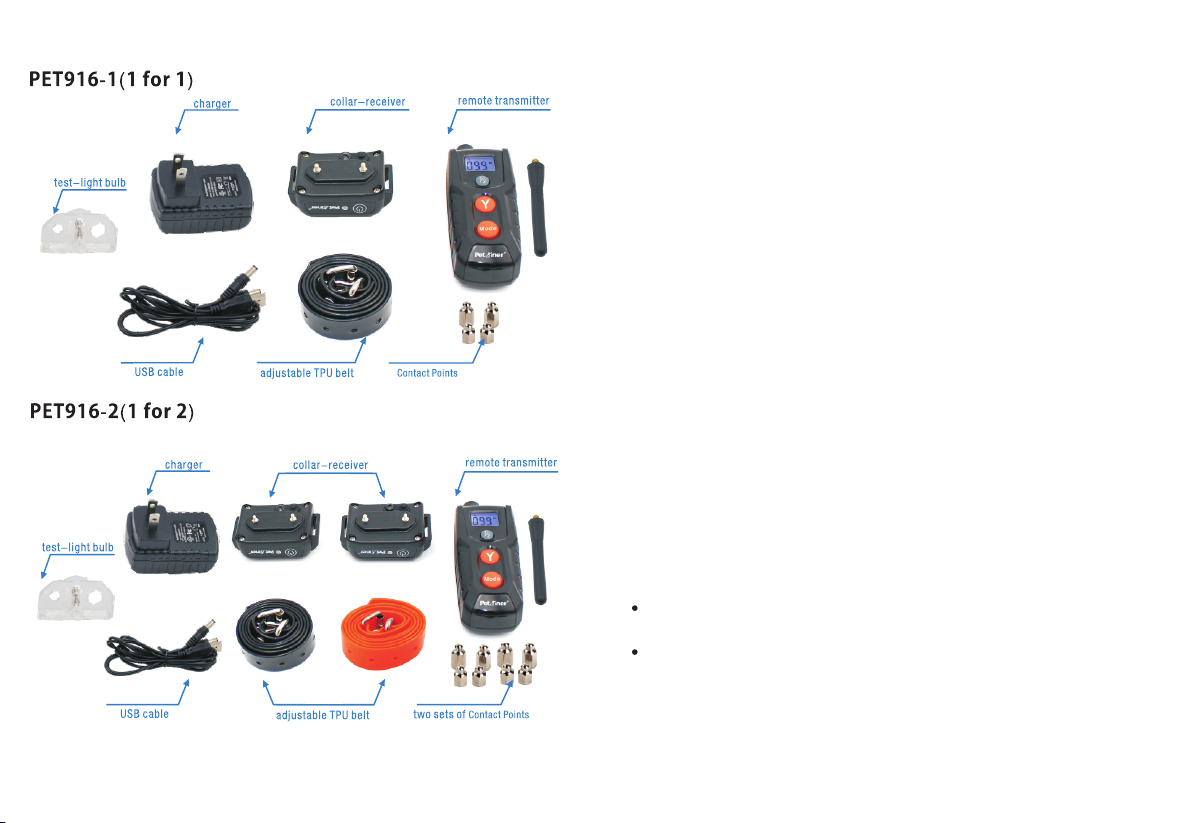
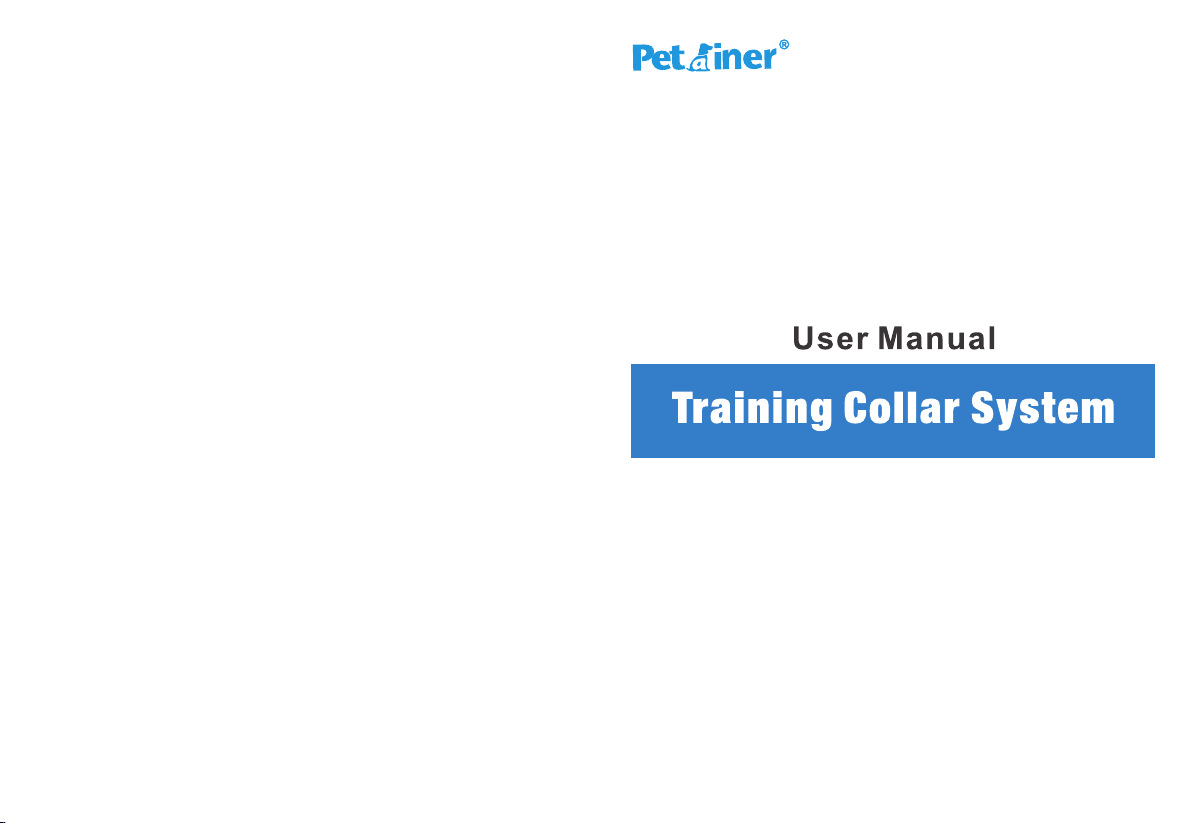
Components
How the dog training system works?
Th is sy st em ha s bee n pr ove n saf e, c omf or ta ble , and e ff ec tiv e fo r a ll pe ts o ver
15Ibs , it a ss ists yo u in c ontro ll ing your pe t wi thout a l ea sh in a range u p to 3 00m,
At th e push of a but ton , the remote transmitter sends a sign al, acti vat ing the collar
-rece iver. Using t he remo te tr ainer c onsis tentl y and c orrec tly, most mis beh avior s
that your pe t exh ibits can be corr ected or any b asi c obedi enc e comma nds t aught .
It c an al so b e u se d de ter s uc h unw an te d beh av io rs as j um pin g up , dig gi ng and
ch as ing . Wh ile t he st im ul ati on i s s ta rt lin g it is h ar mle ss t o y ou r pet . El ect ro ni c
tra ini ng de vic es requi re interaction and training fr om th e owner to ac hieve de sir ed
resul ts .
Important: Th e syst em has a ra nge up to 300m. Depending on the way you ho ld the
rem ote transmitter, the range ma y vary. Hold th e remote trans mit ter i n a hori zon tal
position away from your body to achieve optimum range. Terrain, weather, vegetation,
tr an sm is si on f rom other r ad io d ev ic es , and o th er f ac to rs w il l affe ct the ra ng e of
your re mo te t ransm it ter.
Features
1.Rechar ge able re mo te tran sm itter and c ol lar-r ec eiver.
2.T he r em ot e transmitter a nd c ol la r- re ce iv er are wa te rp ro of a nd c an withstand
li gh t ra in showers, y et w e ad vi se against su bm er gi ng i t into water, ma in ly f or
th e sa ke of exten di ng i ts l if e span.
3.LCD disp la y with bl ue b ackli gh t sc reen fo r ni ght usi ng .
4.Four m od es ( stati c/ vibra ti on/beep /l ight) a t yo ur dispos al .
5.100 inte ns ity lev el s of vibr at ions
6.100 inte ns ity lev el s of stat ic s hocks
7.Inte ns it y level s ca n be adju st ed by pushi ng U P/DOW N bu tton.
8.Power sa vi ng:
The c oll ar-recei ver, if left unused for 5 minutes, will e nte r int o “SL EEP ” sta tus,
yet a ny mo vem ent from the do g can a cti vate the receiver ag ain .
The r emote transmi tte r, if le ft un used for 2 minutes, will en ter i nto “ STANDBY ”
st a tu s ; i f u nu s ed fo r 5 m i nut es, it w i ll en t er in t o “DE E P SL E EP” s t at u s. To
ac ti va te th e tr an smitter i n se parat e ca se s, yo u ca n simpl y pr es s any b ut to n
(except th e LED lig ht button ) and th e “MODE” button (fo r 1 secon d ) separ atel y.
9. Th e tr aining sy st em can be u se d for 1 or 2 coll ar -rece iv ers.
-3-
-4-

Key Definitions
Remo te Transmitt er
Ant enna
LCD s creen
LED i ndica tor
Y but ton
Mod e butto n
1. An tenna: Tra ns mits si gn al to the c ol la r-rec ei ver
2. LCD Sc re en :
Stat ic Mode: Under this mode, when “Y” button is pressed , the collar-receiver
will sh ock; static levels can be adjusted from 0 to 100 by pressing the UP/DOWN
butt on.
Vi bra ti o n Mod e: Un der t his m o de , w he n “ Y” bu t to n i s pre sse d, th e c ol lar rec eiv er wi ll vi bra te; vibr ation le vels can b e adj ust ed fr om 0 to 10 0 by pr ess ing
the UP/ DO WN b utton .
Beep Mode: U nde r this mode, w hen “ Y” button is p res sed, th e col lar-r ece iver
will give a warni ng beep.
Up/ Down bu tton
Cha nnel bu tton
Cha rging h ole
-5-
Lig ht Mo de: Under this mode, whe n “Y” butt on is pressed th e gre en LE D light
the r ece ive r wil l flash every on e sec , ren der ing i t convenient to locate your p et:
(es p. in the dark).
½ bu tt on in di ca tes c ha nn el 1 or 2 o n the t ra ns mitte r, se lect on e ch annel f or
us e wi th on e co llar- re ce iv er.
3. L ED I ndicator: I t wi ll flash wh en “ Y” b ut ton is pr es se d an d serve s as b at te ry
ch ar gi ng indica to r
4. Y But ton : It in dic ate s the L AUN CH bu tto n, wh ich will send t he co rre ction signal
to the collar -re cei ver.
5. M ode Butto n: I t in di cates audio , vi br ation and sta ti c- sh ock corre ct io n mo des
on t he LCD-di sp la y sc reen.
6. Up /Do wn bu tto n: Pr e ss th e U p/ D ow n b utt ons o n t he ri g ht ha nd si d e of th e
tr an sm itter t o se t th e lev el o f co rrectio n yo u wi sh to a dm in is te r. ( WAR NING:
ALWAYS BE GI N WI TH A LO W- LE VE L SE TT IN G IN T HE INITIA L TRA NI NING
STA GE S) .
7. Channel But ton: When t he CHANNE L butt on “1/2” is pressed, y ou can sync the
collar-receiv er and the transmitter vi a diff ere nt channel.
8. Char gi ng Hole: fo r re mote tr an smitter c ha rging .
Coll ar receiver :
Cha rging H ole
Rubber Cov er
ON /OF F/ En cod e Bu tto n
Met al Prob es
1. Meta l Pr ob es: Del iv er vibr at ion and sta ti c stimu li .
2. ON/OFF/Encode Button: Turn on/off the collar -receiver; hold it for a few se conds
to encode the receiver.
3. R ub ber C ov er : Afte r co mp letio n of c hargi ng p le ase p ut t he cove r in p lace to
sa fe guard t he i ntern al u ni t fro m du st and wa te r.
-6-

4. Char gi ng H ole: fo r co llar- re ceiver ch ar ging.
When ch ar gi ng, the L ED l ight is r ed ; when full y ch arged , it t urns to gre en .
Un de r “l ig ht ” mo de , pr es s th e “l au nc h” m od e, a nd t he L ED l ig ht i n the collarre ce iv er w il l fl as h gr ee n ev er y on e se c.
In “ standby” stat us , th e LE D li gh t in t he c ollar-rec ei ve r wi ll f la sh g reen every
fo ur seconds.
After t urnin g on th e recei ver, pre ss and ho ld th e ON/OF F/ENC OD E but ton for
five se conds t o enc od e it.
Operating Guide
Prep are the remot e transmi tter:
Charg e th e re mote tr an smitt er
1. Conn ec t th e charg er c onnec to r to the char gi ng hole .
2. Plug t he c ha rger in to a s tanda rd o utlet.
3. T he re d li ght i n the t ra nsm it te r wil l be on , indic at in g t ha t cha rg in g i s
ta kin g pl ace .
4. Charge the tra nsmitter at lea st 2 hou rs for first char ge or until in dication
that charging is comp let e.
5. When c ha rg ing is co mp lete, t he r ed light wi ll t urn off a utomati ca lly.
6. Low Ba tt er y Indic at or “ ” sign al s the need fo r re charg in g.
-7-
How to use the remote transmitter
1.To turn on /o ff the tr an smitt er, p ress any bu tt on on the t ra nsmitte r.
2. Pres s th e MO DE butt on t o toggl e am ong 4 diffe rent mo de s
3. P re ss UP/D OW N bu tt on s on th e li gh t hand si de o f the t ra ns mi tt er to
ad ju st the in te ns it y level o f vi br ation o r st at ic shock.
4. “1 /2” but ton i ndica tes e ither chan nel 1 or cha nnel 2 on the tr ans mitte r.
Sel ect one chan nel for use with on e col lar-r ece iver.
5. T he remo te t ransm it te r wil l go into S TAN DBY MOD E if no o pe ra tion
fo r 2 m in ut es an d wi ll tu rn o ff if n o op era ti on f or 5 mi nutes .
6. In STAN DB Y MODE, p re ss any butt on t o wake it up. W he n tu rned off,
pres s and ho ld the MODE button for 1 second to turn on th e tran smitter.
Prep are the Colla r-recei ver:
Charg e th e co llar- re ceive r
1. Conn ec t th e charg er c onnec to r to the char gi ng jack .
2. Plug t he c ha rger in to a s tanda rd o utlet.
3. Th e re d LED light i n th e colla r- receive r wi ll turn o n. ( A)
4. C harge t he coll ar -r eceiv er f or at l ea st 2 ho ur s for t he firs t ch arge or
un til i nd ic ation t ha t cha rg in g is co mp lete.
5. After t he rece iv er h as be en f ully ch ar ged, th e re d l ig ht L ED li gh t will
tu rn off au to ma tical ly. ( B)
6. W he n c ha rg in g is fi ni sh ed , p ut t he rubb er c ov er in p la ce to k ee p th e
in te rnal un it f rom d us t an d w at er.
NB : Th e co ll ar -r ec ei ve r wi ll k ee p for 20 seconds if i t ne ed s re ch ar gi ng .
-8-

Sync t ransmitte r with coll ar-receiv er:
1. P ow er o n th e re mo te t ra ns mi tt er b y pr es si ng a ny b ut to n on t he
tr an sm it te r.
2 Select ch an nel 1 or 2..
3
. Power o r th e Re ceive r Co llar by p re ss the ON/O FF b utton o n co llar, a
beep wi ll s ou nd.
4 Pre ss O N/OFF b ut ton a fr esh a nd h old i t for 5 s econd s, a nd th en the
.
LE D l ig ht will s ta rt to f lash.
.
5 Now yo u can he ar the firs t beep from t he collar-re cei ver and the n press
the “Y ” button (of the transmitter ) immediately
.
6 You w il l he ar t he second b ee p fr om the re ce iv er, w hich si gn if ie s th at
th e tr ansmitter a nd t he r eceiver h av e be en s ynced.
7 To sync the tra nsmitter and the second receiver, repeat step 2 through 6..
8 Please be s ur e to choo se t he othe r ch annel..
NB : Ac co rd ing t o th e fa ct ory def au lt s et ti ng s, when t he c ol la r-recei ve r
has bee n tu rn ed on the s yn cing sh ou ld b e compl et ed with in 1 0 seconds ,
th ereby you h av e to p re ss t he “ Y” b utton in good t im e or p re ss i t at l east
wi th in 10 s eco nd s. Pl ea se DO N OT t ry to s ync t he tran sm itter w ith t he
two col la r- recei ve rs (if an y) a t the same ti me .
Test the trai ning syst em
The fo llowing testing method s will help you ascertai n whet her this traini ng
system functions swimm ingly. Please make sure th at you have connec ted
the tr ansmitter and collar-r eceiver befor e test ing.
-9-
Test the static shock function (Figure 2-1)
Pu t t he te s t- lig ht on th e c on t ac t p oin ts of th e c ol lar -re cei ve r. T ur n o n
the r emote tran smi tter, switc h to SH OCK m ode a nd pr ess the UP/D OWN
butto n to a dj ust the i nt ensit y le vel.
Pr e ss “Y ” b u tto n a nd th e b u lb wi l l f la sh, si g ni f yi ng tha t t h e SHO C K
fu n cti on wor ks. Pl eas e m a ke su r e the SH O CK le v el is ab o ve 0 whe n
te s tin g t he fun cti on.
No te: I f w an tin g t o tes t the s hoc k fun ct i on o n y our se lf, p lea se en sur e
you r finger or hand is acros s both cont act point s to ens ure the con nection
is comp le te . Other wi se, use r wi ll feel no st im ulati on .
Test the vibration functions (Figure 2-2)
Turn o n the r em ot e t ra ns mitte r, swi tc h to VI BR ATI ON mo de a nd pr es s
th e UP/ DO WM b utt on t o a dj us t the v ib ratio n le vel .
Press “ Y” b ut ton and t he c ollar -r eceiver w il l vibra ti on, signi fy ing the
VIBRAT ION funct io n works . Pl ease make s ur e the vib ra tion leve l is w ell
above 0 whe n te st the fu nc tion.
Test the beep function (Figure 2-3)
Tur n on the remo te t ransm it ter, swi tc h to B EEP mod e.
Pr ess “Y” bu t ton , t h e c oll a r-r e cei v er wil l b e ep, si g nif y ing th e B E EP
fu ncti o n w ork s .
Impor tant: I f the tra ns mitte r is in sle ep mode ( the LCD d ispla y is turn ed
off), you must press the “Y” button once to wake u p th e un it , th en p re ss
-10-

the “Y” b ut to n again t o se nd the si gn al from the r em ote to th e co llar
recei ve r. This ap pl ies to al l fu nctions .
Test the LED light function (Figure 2-4)
Tur n on the remo te t ransm it ter, swi tc h to L ED LIGH T mode.
Press “ Y” bu tton, t he coll ar-re ceive r wil l flash , signi fying t he LE D LIGHT
funct ion wor ks.
NB:
1 The s cr een of the re mo te tran sm itter doe s no t displ ay w hen:.
1 It is in STA NDBY mo de : to save p ow er, the tr an sm itter w il l go into
.
STAN DB Y mode if t he re's no o pe ration in 2 m in utes; y ou c an pres s
any but to n ex cept fo r th e LED LIG HT button t o ac tivat e it a nd then
its scr ee n wi ll disp la y.
2 It is in DEEP SLEEP mode : to sav e power, the transmitt er will go into .
DEEP SL EEP mode if there's no operatio n in 5 minutes; you can ho ld
an d pr es s the MODE bu tt on f or 1 s ec ond to ac ti va te i t an d th en its
scree n wi ll d ispla y.
2. Th e co llar-re ce iver wi ll g o into DEEP S LEEP mo de if the re i s no
op er ation for 5 minutes. Any movem en t wi ll a ct iv at e it . If t he r ec eiver
has n o respo nse the n you p ress “Y ” but ton and i ts in dicat or ligh t is no t
on e it he r, then you ca n sh ak e it o r let your do g mo ve t o ac ti vate it. (I f
you sha ke t he r eceiv er, y ou'll h ea r a rattlin g no ise cau se d by the buil t
-in vib ra ti on sens or w hich in di cates tha t it i s in work in g status) .
-11-
Fit th e collar-re ceiver
Imp ort ant : The pr ope r fit and pla cem ent of the co lla r-r ece ive r is essential
for effect ive traini ng. The meta l conta ct pr obes mu st have dire ct cont act
with your do g's sk in as follow s:
(1 ) To fit t h e col la r -r ece iv e r you w ill n e ed to a tta ch th e c ol l ar -st ra p t o
th e r ec eiv er bo x. En su re yo u hav e sel ec ted t he ap pr opr ia te le ngt h
met al pro bes f o r you r d og (i . e. lo n g- l en g th pr obe s f or lo n g- h ai r ed
do gs an d sh or t-len gt h for s ho rt -h air ed d og s). ( 3A )
(2) Wi th you r dog standi ng in front of yo u, pla ce the colla r-recei ver ar ound
it s ne ck s o th e re ce iv er b ox a nd p robes are on the underside of your
dog's n ec k, maki ng dire ct c ontac t wi th the sk in. You may n ee d to trim
the fur t o en sure good c on tact. ( 3B )
(3) should Fasten the collar-st rap. The fit sho uld be su ng, but not taut. You
be able to place one finger benea th th e col lar -strap around you r dog 's
neck. (3C)
(4 ) Al lo w y ou r d og to w ear t he co ll ar- re cei ve r f or se ve ral m inu te s a nd
th en c he ck t he strap again. As y ou r do g be co me s mo re familiar with
th e collar- re ce iv er you shou ld e ns ur e the fit is comf y an d fl at tering.
CAUT ION: RISK OF SK IN DAMAGE
For com fo rt, safet y an d eff ec tiven es s of this p ro duct plea se s ee to it
that you che ck the fit of your pet's collar frequen tly. If any skin irrita tion
is ob se rve d, di sc ont in u e th e u se of t h e co l la r f or a fe w day s. If t he
conditi on p ersis ts b eyond 4 8 ho urs, see yo ur v eteri na rian.
Do not atta ch a l eash to the c ol lar, which c an r esult in sq ue ezing the
metal pro be s too tight ly against y ou r pet's nec k.
The collar-receiver is not designed to be worn constantly. We recommend
th e co llar no t be worn f or m or e tha n 12 h ours ou t of e very 24 -h ou rs
period.
Mos t pets feel uncom for table whe n wearing the collar for the very first
ti me. Don't use any f un ct io ns b ef ore the pet has gotte n ac cu st om ed
to the co ll ar.
-12-

We su ggest y ou give t he dog VI BRATION bef ore sta rting t he STATIC
SH OCK . A ft er a t i me of tra ini n g, the do g w i ll lea r n t ha t s h ock wi l l
co me a ft er vibratio n. I n th is way, the vi br at io n al on e can e ffective ly
cu r b the m i sb e ha v io rs of yo u r dog . The STAT IC SH O CK on ly act s
as a mena ce t ha t might b e un neces sa ry someti me s.
Frequently Asked Questions:
How old doe s a pe t have to b e be fore us in g the syste m?
Your pet shou ld be ab le to le arn basic obed ien ce commands su ch as “s it” or “sta y”.
The collar-rece ive r maybe too large for dog under 15Ibs.
Re-t hread the col lar (as dia gram)
Regular Maintenance
Check the m et al prob es f or tigh tn ess on a week ly b asis.
Rinse the m et al prob es w ith alc oh ol o n a weekl y ba sis. (N B: P lease
turn of f the colla r- recei ve r before to uc hing th e me tal probe s. )
Check you r do g's nec k fo r irrit at ion and was h it o n a weekl y ba sis.
Once my pet is trained and has been obeying my commands, will he have to continue
to wear the collar?
Proba bl y no t. But yo u ma y try to re in force tra in ing wit h th e collar.
Can I use t he P et raine r re charg ea ble train in g colla r wi th more tha n on e pet?
Yes, y ou just nee d to a dd anot he r collar to t he s ystem .
How long ca n I co ntinu ou sly del iv er v ibrat io n or stat ic s hock to my pe t?
Ten seconds. Afte r ten seconds , the transmitter will time out an d should be started
aga in.
Is the co ll ar -rece iv er wate rp roof?
Yes, yet yo u ha ve t o ensure th at i ts c ha rg in g hole is s ea le d by the rubber c ov er.
Can I use t he s ys tem on ag gr essiv e pe ts?
No. Ple as e do n ot use th is s ystem t o co rrect or el im inate a ny f orm of aggr es sion
or biti ng b eh avior. I n th e event y ou r dog is show in g signs o f ag gressiv e be havio r
then co nt ac t a profe ss ional d og t rainer in y ou r vicin it y.
Will I ge t ex ac tly 300 m of r ange wi th t he Petrai ne r recha rg eable tra in ing col la r?
Th e ra ng e yo u get w it h th is s ys te m will va ry a cc or di ng t o terrain, ve ge ta ti on , as
well as tr ansmissio n from other radio device s. To get the maximum amount of ran ge,
please re fe r to “how t he s ystem w or ks” secti on o f this gu id e.
What do I d o if m y pe t's nec k be comes r ed a nd irrita te d?
Di sc ont in ue us e of the co llar un ti l t he s kin h as he al ed . If th e con di ti on pe rs ist s
be yo nd 48 h our s, s ee yo ur v ete ri na ria n.
-13-
Can I rep la ce t he coll ar -rece iv er with ano th er kind o f co llar?
No.
-14-

Can I att ac h a le ash to th e co llar- re ceiver?
No. This can r esult i n pulli ng the me tal pro bes too t ightl y again st your d og's ne ck.
At ta ch a l ea sh t o a se pa ra te , no nm et al li c co ll ar o r a ha rn es s, e ns ur in g th e ex tr a
collar do es n ot put pr es sure on t he m etal prob es .
How will I kn ow w hen to ch ar ge the sy st em?
Fo r t he r emo te tr an sm itt er : t he sy mb ol wi ll sh ow u p o n the L CD sc re en; f or th e
recei ve r: i f you hea r a be ep for 20 s ec onds when i t is a lread y on , you will ne ed t o
charg e th e re ceive r.
Wha t's the life-span of the lithium ba tte rie s of the remote tr ans mit ter and the coll ar
-re cei ver ?
They ca n be c ha rged ov er 4 00 time s
How long ca n I le ave col la r-rec ei ve r on my dog ?
As the co ll ar i s not des ig ned to be w or n constan tl y, we re co mmend the c ol lar not
be worn for m or e than 12 h ou rs out of e ve ry 24-hou r pe riod.
How shoul d I ar range t ra ining s es sions for m y pe t?
Make th e train ing ses sions s hort an d pos it ive, be tween 1 0-15 mi nut es l ong , ea ch
time. This e nable y our dog t o keep it s att en tio n fo cus ed o n you .
Troubleshooting
My pet is not respond ing afte r the Petrainer pet training system has
bee n instal led succ essfully.
You nee d t o c h ar ge t he rem o te tr ans mit ter and th e c o ll ar- rec eiv er f or 2H
se par ate ly b efo r e i ni tia l us e.
Che ck to see if the re mot e transmi tte r and the coll ar- receiver have been turned
on.
Check the i nt ensit y le vels of v ib ration an d st atic sh oc k.
Make su re t he c ollar -r eceiv er h as suff ic ient po we r to operat e.
Resta rt t he c ollar -r eceiv er b y pressin g th e ON/OF F bu tton.
Please test the 4 functi ons (i.e. BEEP. LIGHT. VIBRATION AND STATIC SHOCK)
before initial use. See the “test the trainin g system” part of this guide for testing
methods.
Check whe th er the co ll ar-re ce iver has en te red int o th e DEEP SL EE P mod e.
Check if th e co llar fi ts s nugly w it h your pet' s ne ck.
Che ck th e thi ckness of your pet's fur and use appropr iat e len gth metal probes.
If ne ces sary, ple ase t rim y our p et' s nec k hai r so th at th e met al pr obes come in
dir ect contact with your pet's sk in.
If all of t he a bo ve have b ee n addre ss ed and your p et s till gi ve s no respon se .
Please tr y to r e-con ne ct the re mo te transm it ter and t he c ollar-r ec eiver.
What ki nd o f do gs is Pet ra iner re ch argeabl e tr ainin g co llar suit ab le for?
The collar i s adj ustab le fr om leng th 5. 9 “(15cm) to 1 9.6 ” (50cm ), if y our pet's ne ck
ci r cum fer enc e i s s mal ler th an 5.9 ”, you ha ve to re thr e ad it , i f y our pe t's ne ck
circu mf er ence is l ar ger tha n 22 ”, this col la r may not b e su itable fo r yo ur pet. T his
collar is N OT suit ab le for do gs u nder 15Ib s.
-15-
The remote transmitter does not work.
Check if th e re mote tr an smitt er i s in low batt er y statu s. I f the icon “ ” sh ow s
up, bat te ry e xhaus ti on is imm in ent.
You ha ve to press a nd h old the M OD E button on t he t ransm it ter to tu rn i t on.
Check if the transmit ter has entered into th e STANDB Y or DEEP SLEEP st atus.
My collar-receiver works great for some time, yet it does not work
after charging.
Fir st, check if the receiver has been charg ed co rre ctly. Che ck th e “pr epa re th e
col lar-rece ive r” pa rt of t he gu ide for th e cor rect charging meth od.
Check if th e re ceive r ha s been tu rn ed on.
-16-

I want to test the collar-receiver on myself, but it does not work.
When te sting t he rece iver on y our h an ds, p le ase t ouch th e 2 elect rodes a t the
same ti me as tou ching o ne si ng le el ec tro de w ill n ot work .
General Training Tips
The following are tips on how to get the best out of your Petrainer
Remote Pet Training Collar:
(1 ) Make th e train in g sessi on s sh ort a nd p osi ti ve ( bet we en 1 0-1 5 mi nu tes l on g
fo r each ti me ), wh ic h will en ab le yo ur d og to k ee p its a tt en tio n fo cu sed o n yo u.
(2) Trai n on e do g at a time .
(3) Durin g init ial tr aining se ssions, keep yo ur dog in a familiar outdo or env iro nment
e.g. an encl osed area of the garden and away from other dogs/an imals and people.
Tra in in g in n ew location s ma y ca us e yo ur dog to becom e di st ra ct ed causin g yo u
to rein fo rc e your co mm ands wi th t he remote c ol lar-r ec eiver mor e of ten col la rrecei ve r mo re than a cc ordin gl y.
(4 ) U se a lo n g le a sh fa st e ne d t o a n on -me ta l li c c ol lar t o h elp h is/ he r l ear ni ng.
En sure the addi ti on al c ollar and leash d oe s no t in te rfere with th e sk in c on ta ct o f
th e m eta l p ro b es on t h e col lar -re cei ver. Do n o t u se th e r em o te tr ain in g c o ll ar
witho ut a l on g leash u nt il your d og i s fu lly tra in ed.
(5) You will hav e more su ccess b y teach ing the d og a comm and fir st befo re tryi ng
to rein force t o comma nd with t he re mo te tr ai ner.
(6) For basi c obe dienc e tra ining , VIB RATI ON an d AUDIO modes a re mo re us eful.
(7 ) Issue an obedie nc e co mm an d at a t im e, which will f oc us y ou r do g' s at tention
an d reduce confus io n. D o no t us e th e re mote collar t o co rr ec t co mm ands that
ha ve not alread y be en c ov er ed .
(8 ) Durin g tr ain in g, l ook f or all th e posit iv e cha ng es i n y ou r dog's b eh avior a nd
re me mber to r ein fo rc e the m pr omptl y wi th am pl e pra is e an d r ew ar d.
(9 ) Avoi d ov er- co rr ect in g you r do g. Us e as fe w remot e co rre ct io ns as p oss ib le
du ri ng th e tra in in g p ro ce ss.
(10) Wh en your do g has become apparently perplexed, shift the focus of the training
sessi on by drawin g his/h er atte ntion t o a com mand th ey are fa milia r wit h, e.g. s it.
Give yo ur dog pr aise an d encou ra gemen t galor e on succ essfu l co mplet ion of th e
comma nd . Re peat th is s evera l ti mes befor e re turni ng t o trainin g wi th remo te
corre ct io ns
-17-
(11) If you know a particu lar mi sbeh avior your dog does, then reinv ent this situati on
du r in g a tr ain ing se ssi on. Yo u w ill h a ve fa r m ore su cce ss if yo u d e al wi th one
misbe ha vi or at a tim e in a c ontro ll ed situat io n.
(12) Be cons isten t; give y our d og a tone , vib ratio n or stat ic-st imu latio n corre ction
for eac h misbe havio r. When re in forci ng a comm and wit h a corre ction . It is cri tical
th at y ou d o so w it ho ut e motion then immediate ly p ra is e an d re wa rd y ou r do g fo r
marki ng th e right d ecisi on
(1 3)When your dog seem s to r ea ct i n a ti mi d an d fr ig ht ened fashion to eithe r th e
tone, v ibrat ion or st atic- st imula tion, p artic ularl y in earl y train in g sessi ons, do n ot
be flabbergasted. Shi ft the focus of the train ing session by drawi ng his/her at tent ion
to a c om ma nd t he y ar e fa mi li ar w it h. E .G . si t and give your dog abundant praise
and encou ra gemen t on s ucces sf ul comple ti on of the c om mand.
(14)Do not use P et ra iner Remo te P et Tr ai ning Coll ar t o co rr ect or elim in at e form
of a gg re ss io n or biting b eh av io r. Wh en your dog i s sh ow in g si gns of ag gr es si ve
behavio r th en c on tact a prof es si onal dog trai ne r in y our vicin it y
(15)Please be reminded th at you should keep trai ning sessions short and end every
ses sio n on a hig h note. Sto p tra ining and play with your do g as soon as he/she has
accomplished a new level of proficiency.
If needing more training tips, please visit us at www.ipets-mall.com or www.facebook.
com/ipetsmall for plenty of resources.
-18-

Addendum and Upgrading Notes:
1. Pl eas e not e tha t whe n sha king the receiver you may hear a ra ttling noise, which
is ac tua lly caused by the bu ilt-in vibrat ion s ens or an d is by no means an indicat ion
of an y mal fun ction in the re ceiver
2. The range of “u p to 3 00 m” s pe ci fi ed i n th e us er m an ua l de no te s th e ma xi mu m
val id va lue t hat can be possibly achieved in id eal cond itions. Acco rdi ng to m ult ipl e
hands -on fie ld expe rimen ts, thi s Petra iner tr ainin g syste m has an effec tive ra nge
up to 150 -1 80 ,
LIMITED 90 DAYS WARRANTY
Petrainer warr ants this pro duct to be free of defect s in parts, mate rials and
wor kmanship for a pe riod of 90 day s, from date of purchase.
Sho uld any rep air s or ser vic ing under this warranty be required, co nta ct Customer
Ser vic e by phone or email for i nst ruc tio ns o n how to pack and ship th e pr odu ct t o
Pet rai ner.
Petrainer CUSTOMER SERVICE
Telephone : 1- 866-8 77 -7949
Email : ww w.i pets- ma ll.co m
Hours: Weekday s 9: 00 AM- 5:0 0 PM E ST
Th is w ar ra nt y gives you s pe ci fi c le ga l ri gh ts and yo u ma y al so h av e other r ig ht s
wh ic h va ry f ro m state t o st at e.
-19-
 Loading...