

Page 1
FISH MATE 2000 / 3000 / 4000
®
Pond Pump · Instructions
www.pet-mate.com +44 (0)1932 700 001
IMPORTANT SAFETY
INSTRUCTIONS
WARNING - To guard
against injury or death,
basic safety precautions
should be observed,
including the following:
READ AND FOLLOW
ALL SAFETY
INSTRUCTIONS
• Register your purchase on-line
at www.pet-mate.com/uk (see
guarantee below).
• All electrical work must be carried
out by a competent electrician.
• Check that the voltage label on the
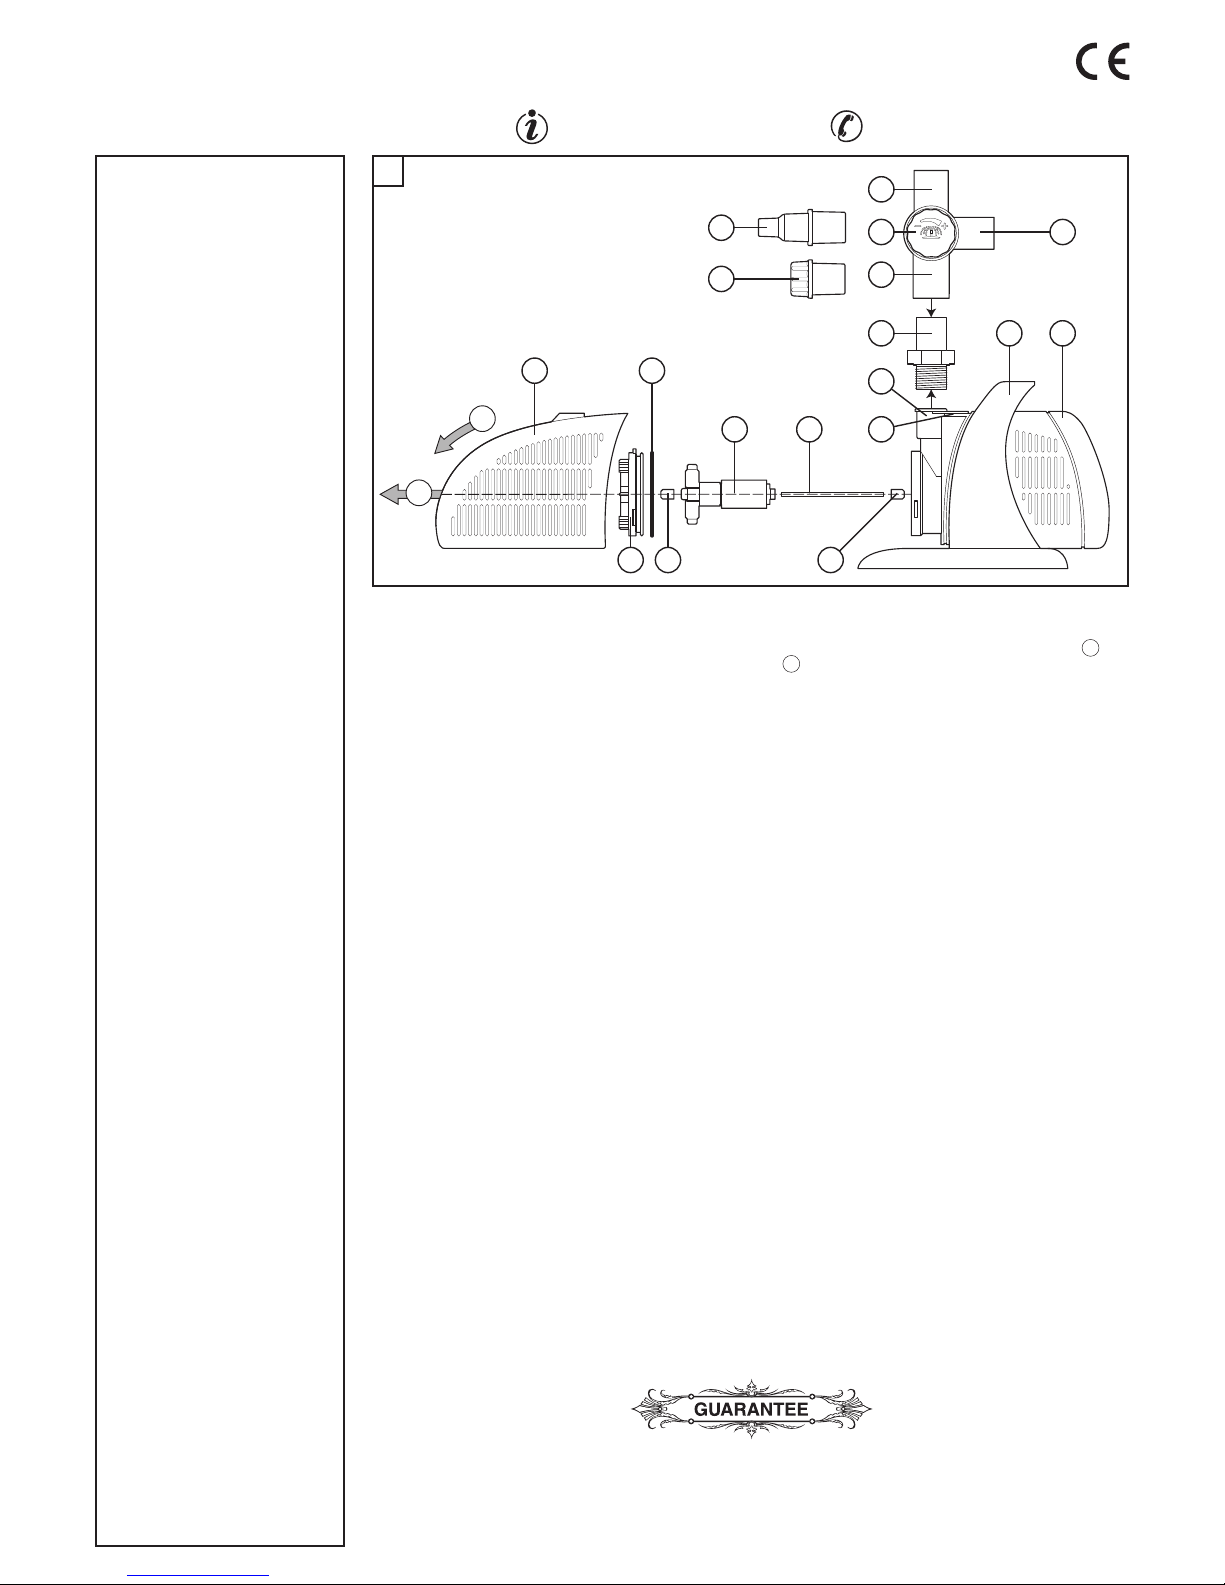
motor (H) (see Fig. 1) conforms
with your supply voltage.
• The pump MUST be wired into an
R.C.D./G.F.I. circuit breaker
(maximum 30mA) and a 3 AMP
(maximum) fuse. Ensure breaker is
regularly tested in accordance with
manufacturers instructions.
• Connection to the power supply
should be made through a suitable
dry weatherproofed 3 pin plug or
double pole switched enclosure
with minimum 3mm (1/8") contact
separation in all poles. If product is
hard wired to electrical supply this
must comply fully with the wiring
regulations of the national and local
electricity authority. The pump must
be protected by a 3 AMP
(maximum) fuse.
• This appliance must be earthed. It
is essential that all connections are
securely made using the following
code:
Brown - Live
Blue - Neutral
Green/Yellow - Earth
• Do not carry or pull the pump using
the supply cord.
• Disconnect electrical supply from
all appliances in the pond including
pumps and filters before contact
with the pond water or pump.
• Closely supervise children when
near to pond or pond equipment.
• Use pump only for ponds - do not
use pump in connection with
swimming pools, showers, etc.
• Use conduit approved by your
electricity authority to protect
supply cord where damage from
gardening equipment, children and
animals may occur.
• Discard pump if motor (H) shows
visual defects (e.g. cracks or
swelling).
• The supply cord of this appliance
cannot be replaced; if the cord is
damaged the appliance should be
discarded.
• Do not allow the pump to run dry.
• Do not operate the pump in
freezing conditions. Remove,
disassemble and dry pump if there
is a risk of pump being frozen.
• This pump is provided with a
thermal cut-out switch that
temporarily switches off the pump
in case of overheating. The pump
may restart when it has cooled.
SAVE THESE
INSTRUCTIONS
1. PUMP INSTALLATION
For convenience the pump should be positioned within reach
from the side of the pond on a solid platform (e.g. paving
slabs) approximately 250mm (10") below the pond surface.
The pump should be at least 200mm (8") below water level
to avoid problems of freezing and low water levels in summer
and no more than 1000mm (40") deep.
Only use pump if completely immersed in water.
A. Waterfall/Filter Only
For use with a pond filter you will often get improved results
with the pump sited at the opposite end of the pond to the
filter return.
The pump may be connected to a waterfall or filter using
12mm (1/2"), 19mm (3/4") or 25mm (1") bore hose. Fit
suitable outlet adapter (K) and flow valve (L) into pump outlet
(J). Insert adapter (P) if required and connect hose to
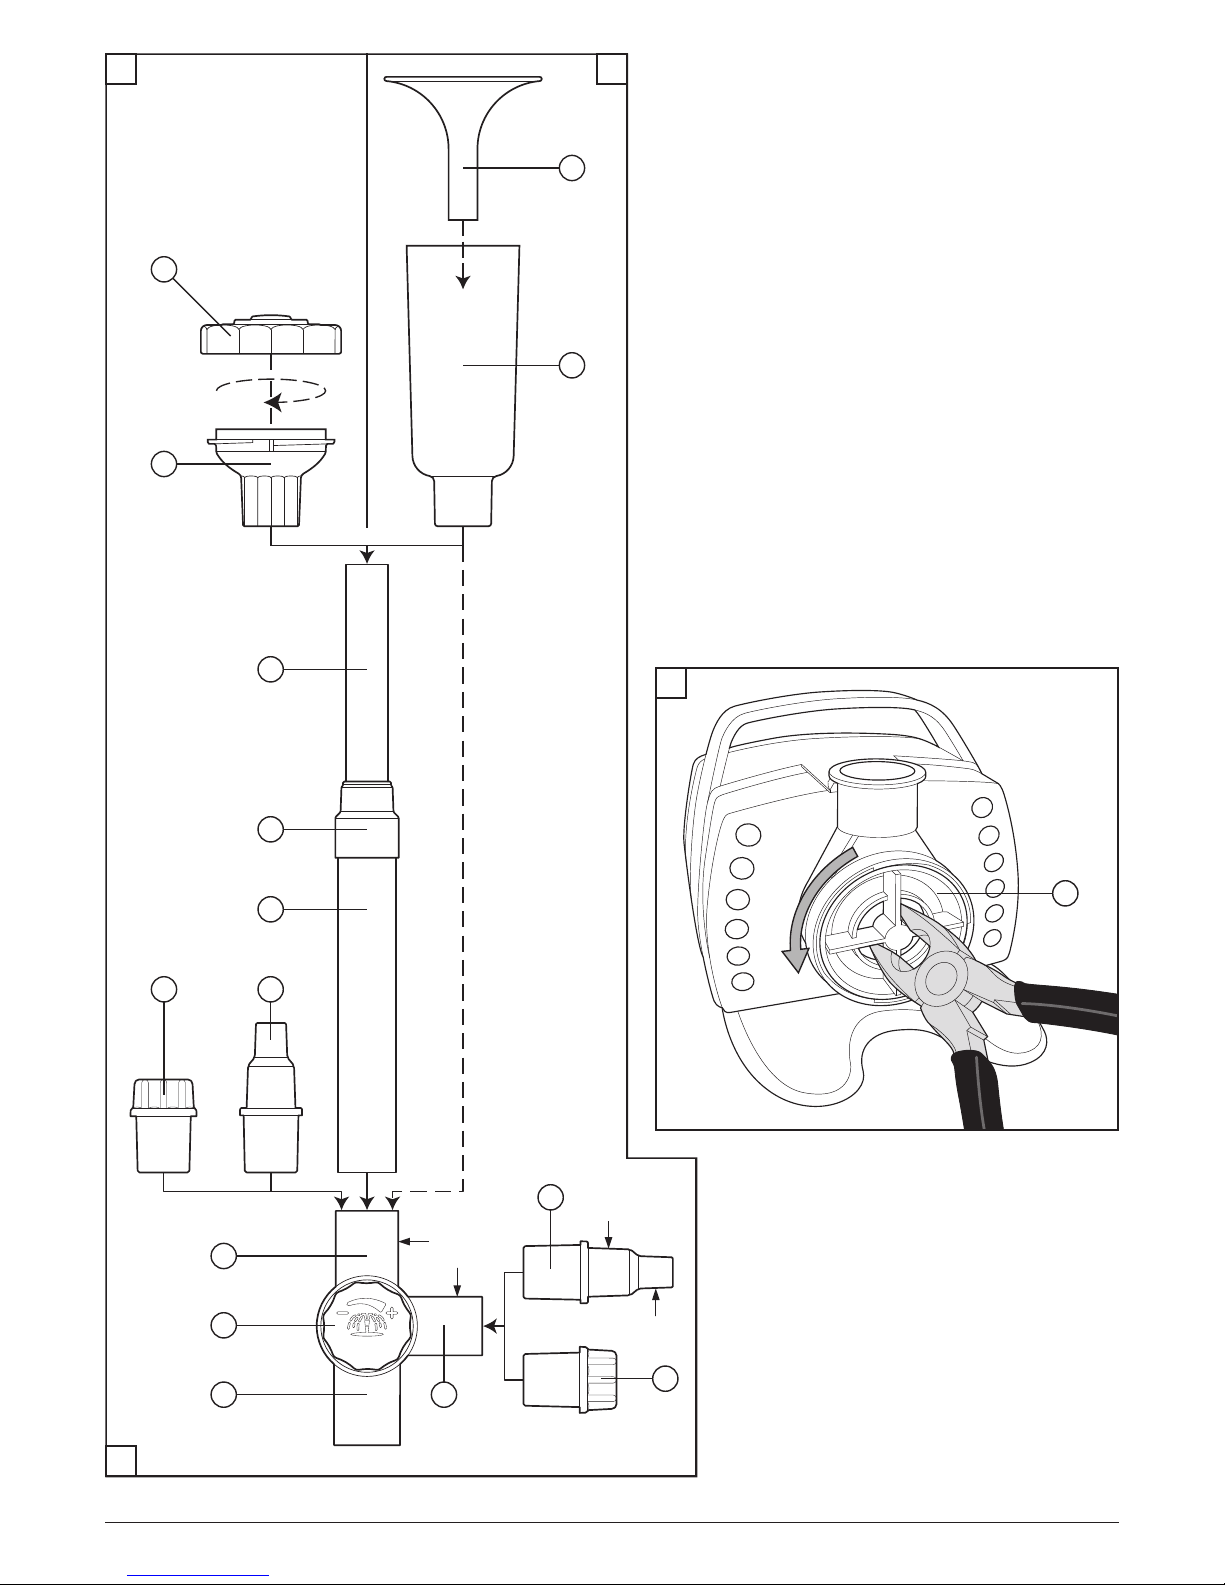
required outlet (see Fig 2c). Insert plug (Q) in unused outlet
and adjust flow using the flow control knob (M).
B. Fountain (and Waterfall/Filter)
Insert fountain components as shown in Fig. 2a (conventional
fountain) / 2b (bell fountain). If required tubes (R) and (T) may
be shortened with a hacksaw. Also fountain (W) may be fitted
directly to flow valve (N). For plume fountain do not fit any
parts to tube (T). If required, connect waterfall/filter with hose
to outlet (O) or (P). Alternatively, use blanking plug (Q). The
Fountain heads (V) may be unscrewed anticlockwise for
cleaning. Adjust fountain height/width using the flow control
(M) turning clockwise for increased height. If using the bell
fountain you will also need to manually adjust the gap
between parts (W) and (X) for the required effect. (Try
starting with approximately 1mm (1/16”) gap.)
2. MAINTENANCE / FAULT FINDING - IMPORTANT SAFETY
INSTRUCTIONS
• Disconnect electrical supply from pump before
removing from pond or contacting pond water.
• Do not carry or pull the pump by the cable.
A. ROUTINE MAINTENANCE OR WHEN FLOW FROM YOUR
PUMP IS NOTICEABLY REDUCED OR FOUNTAIN
DISPLAY HAS DETERIORATED:
i) Remove strainer cover (A) as shown by arrows 1 and
2 in Fig. 1. Clean strainer covers (A) and (H) using a stiff
brush.
ii) Check and remove any obstruction to inlet on impeller
cover (B).
iii) Remove and clean fountain head in water with a brush.
iv) Reassemble, taking care to align cut out in top of cover (A)
with grooves (I).
IMPORTANT
If flow is still poor check:
• Flow control (M) is correctly set.
• No blockage or kinks in outlet hose.
B. ONCE A YEAR OR IF FLOW IS STOPPED (CHECK
POWER SUPPLY FIRST!):
Completely disassemble pump to the component parts
shown in Fig. 1 as follows:
i) Disconnect all items fitted to pump outlet (J).
ii) Remove strainer cover (A) as shown in Fig. 1.
iii) Remove impeller cover (B) by rotating anticlockwise. If
required, pliers can be used as shown in Fig. 3.
iv) Carefully pull out pump impeller assembly (E) then (F).
v) After cleaning of all components:
• Check cable and pump body (G) for any damage or
deterioration and discard pump if suspected faulty.
• Check for wear of impeller (E) on shaft (F) and condition of
seal (C), rubber bushes (D1) and (D2). Replace with new
parts using the appropriate FISH MATE service kit as
required.
Carefully reassemble as follows:
vi) Locate shaft (F) into rubber bush (D2) inside pump body (G).
vii) Carefully and slowly slide impeller assembly (E) on to shaft
(F) to avoid damage from the powerful magnet.
viii)Lubricate rubber bush (D1) by immersing in water and then
push halfway on to the end of shaft (F). Align impeller cover
(B) before pushing on fully and rotating clockwise into
position.
ix) Refit front cover (A) taking care to align cut out with
grooves (I).
IMPORTANT - READ BEFORE USE
Pet Mate Ltd. guarantees your product for a period of 3 years from the date of purchase, subject to the registration of your purchase
details on our website www.pet-mate.com/ukwithin 14 days of purchase. (If you do not have access to a computer, please send details
of your purchase with copy of receipt along with your name and address.) In the event of a fault developing contact Pet Mate customer
services for a returns authorisation number. The guarantee is limited to any defect arising due to faulty materials or manufacture. Any
defective item will be repaired or replaced free of charge at the manufacturer’s discretion, provided that the defect has not been caused
by neglect, misuse or normal wear and tear. The guarantee excludes moving parts and claims arising from frost, accidental damage or
loss of fish. Your statutory rights are not affected.
1
A C
B
E F
J
K
I
L
M O
N
G H
Q
P
D1
D2
1
2
Downloaded from www.watergardeningdirect.com
Page 2
44703/0214
© PET MATE Ltd · Lyon Road · Hersham · Surrey · KT12 3PU · England N.America only: Ani Mate · 104A Longview · Drive · Conroe · Texas · 77301
2a 2b
2c
L
M
O
N
Q
P
P
R
S
T
Q
U
W
X
V
25mm
(1”)
19mm
(
3
/4”)
12mm
(
1
/2”)
3
B
Downloaded from www.watergardeningdirect.com
 Loading...