

Page 1
30512-0312 instructions.qxd 9/3/12 14:42 Page 1
®
CAT MATE Elite
CAT FLAP · KATZENKLAPPE · CHATIÈRE · GATERA · KATTENDEUR
Ref: 305N · 306 · 307 · 355 · 356
IMPORTANT - READ BEFORE USE
FITTING INSTRUCTIONS
WICHTIG - BITTE VOR VERWENDUNG LESEN
D
EINBAUANLEITUNG
F
IMPORTANT - À LIRE AVANT USAGE
INSTRUCTIONS DE MONTAGE
E
IMPORTANTE - LEA ANTES DE USAR
INSTRUCCIONES DE INSTALACIÓN
ENGLISHDEUTSCHFRANÇAISESPAÑOLNEDERLANDS
© PET MATE Ltd · Lyon Road · Hersham · Surrey · KT12 3PU · England
N.America only:
Ani Mate · 104A Longview Drive · Conroe · Texas 77301
www.pet-mate.com
30512/0312
NL
BELANGRIJK! DIT EERST LEZEN VOOR GEBRUIK
MONTAGE INSTRUCTIES
www.pet-mate.com
+44 (0)1932 700 001
N America (936) 760 4333
Page 2
30512-0312 instructions.qxd 9/3/12 14:42 Page 3
1 2
150mm
(6”)
5 6
9 10
3mm
1
(
/8”)
3 4
t
7
11 12
8
ENGLISHDEUTSCHFRANÇAISESPAÑOL
A
NEDERLANDS
2
3
Page 3
30512-0312 instructions.qxd 9/3/12 14:42 Page 5
IMPORTANT:
ENGLISH
• BEFORE INSTALLATION, PROGRAM CAT FLAP AS DESCRIBED IN
OPERATION INSTRUCTIONS
• DO NOT CUT TUNNEL OF CAT FLAPS.
1. Wood / Plastic / Metal Door Panels
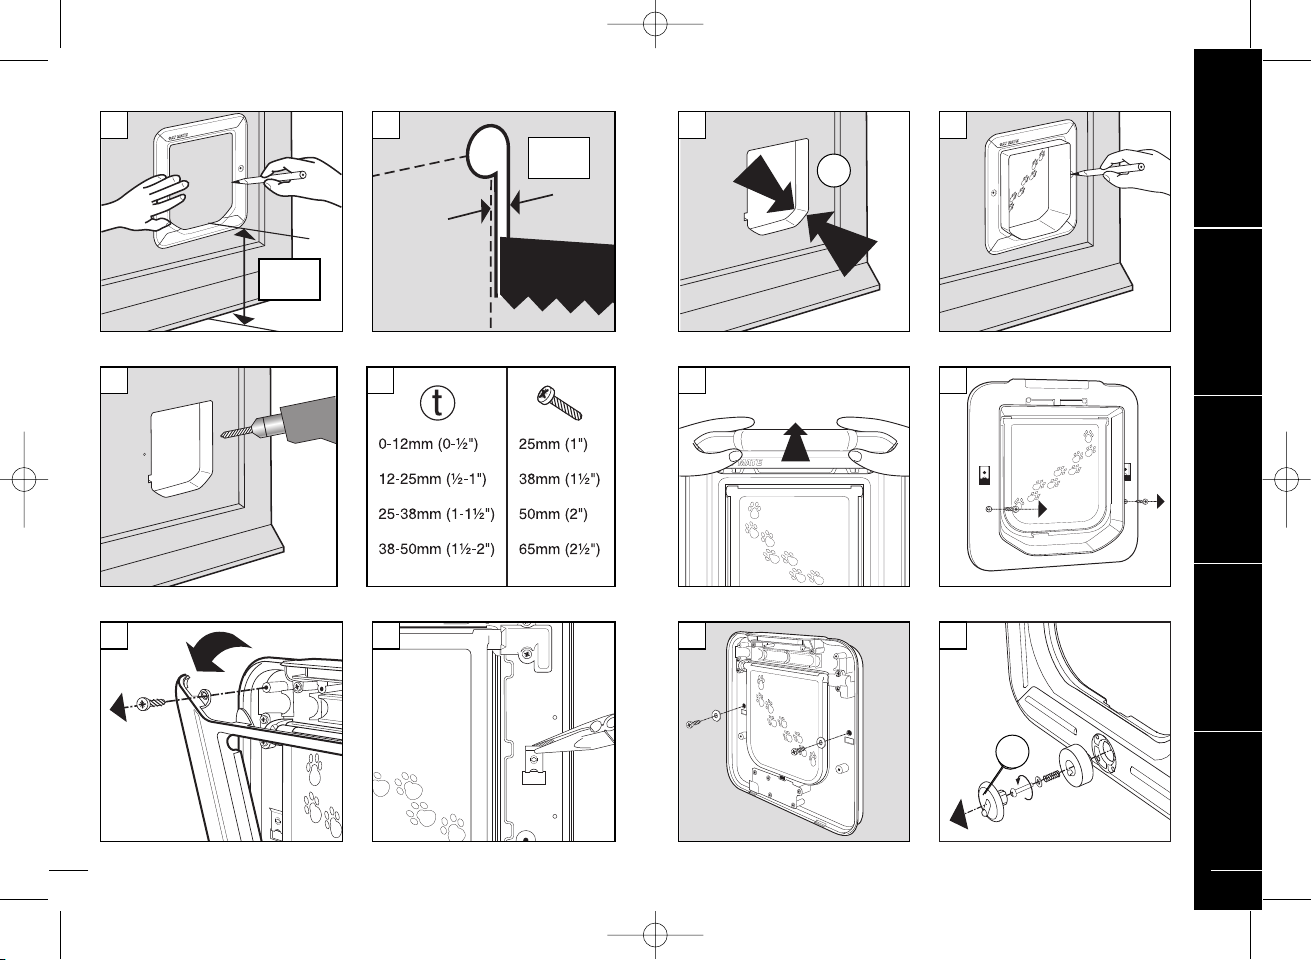
1.1 Place exterior frame in desired position on door and draw around
the aperture. We recommend the bottom of the aperture is
approximately 150mm (6") above ground level. (Fig.1). If you
must fit higher consider providing a step to help your cat enter.
1.2 Use an electric jigsaw to cut 3mm (1/8") OUTSIDE of drawn line.
(Fig. 2). Be careful to cut hole square to the door, particularly with
thicker doors. Ensure interior frame is free fitting in hole.
1.3 Determine thickness of door panel, (t). (Fig. 3).
1.4 Holding the interior frame and the exterior frame in position, mark
the 2 screw holes. (Fig. 4).
1.5 Remove the frames and drill screw clearance holes in panel to
6mm (1/4") diameter. (Fig. 5).
1.6 Position interior frame on inside of door and screw exterior frame
to it by using appropriate screws for panel thickness, (t), as shown
in Fig. 6. If necessary, cut supplied screws to length. Finally fit two
screw caps.
1.7 For metal panels you must remove batteries for a minimum of 2
minutes after installation. This will enable the cat flap to retune
itself to its new location for maximum performance.
2. Glass Panels 0-50mm (0-2") Thick
2.1 We recommend that you ask a glazier to cut a hole of 229mm (9")
diameter in the position required and then install the cat flap as
detailed below. Alternatively, you may prefer to replace the glass
panel with a clear plastic panel and install as instructions 1.1 to
1.6.
Note: It is not possible to cut a hole in double glazed or
toughened glass. You will need a new panel with the hole
already cut from your glazier.
2.2 Determine thickness of door panel, (t). (Fig. 3).
4
2.3 The black foam seal is not suitable for fitting to glass and should
be removed. If desired, the exterior frame may be sealed to the
glass panel using silicone sealant.
2.4 Position interior frame on inside of door, screw exterior frame to
it by using appropriate screws for panel thickness, (t), as shown in
Fig. 6. If necessary, cut supplied screws to length. Finally fit two
screw caps.
3. Wall Fitting
If you are installing your cat flap in a wall, you will need to purchase
Elite wall liners. You will need 1 wall liner for every 50mm (2") of wall
thickness over 50mm (2") or 100mm (4”) for
355/356)
3.1 Create a rectangular hole in your wall 205mm (8") high by
3.2 Remove interior frame battery cover by pushing up as shown, (Fig.
3.3 Remove interior frame cover by unscrewing 2 screws in rear of
3.4 Carefully remove 2 screw clips with pliers. (Fig. 10).
3.5 Fit interior frame assembled with requisite number of wall liners to
3.6 Refit interior frame cover with 2 screws under battery cover,
3.7 Fit exterior frame using 2 off 25mm (1") screws supplied and
cat flaps.
180mm (7") wide.
4 Way Locking Cat Flap (Ref. 307) only: Remove the 4-way
7).
knob as shown in Fig. 12 using a thin screwdriver to lever off cover
(A) as shown.
interior frame (Fig. 8).
it will be impossible to refit them).
under the battery cover and remove the interior frame by pivoting
down (Fig. 9).
interior wall securing in position with 2 suitable screws as shown
in Fig. 11.
under the head of the screws).
be glued in place, although a firm push fit will usually suffice.
taking great care not to trap electrical wires. (Refit the 4-way knob
for
the battery cover.
finally, fit 2 screw caps.
(Note: you will need to fit a washer (not supplied)
4 Way Locking Cat Flap using a hand screwdriver.) Replace
(Note: these screws may be discarded as
If required, the wall liners may
‘Chip & Disc’ (Ref.
Next remove the 2 screws
ENGLISH
5
Page 4

FCC STATEMENT
This device complies with Part 15 of the FCC Rules. Operation is
subject to the following two conditions:
(1) This device may not cause harmful interference.
(2) This device must accept any interference received, including
interference that may cause undesired operation.
Changes or modifications not expressly approved by the party
responsible for compliance could void the user's authority to operate the
equipment.
 Loading...