

Page 1
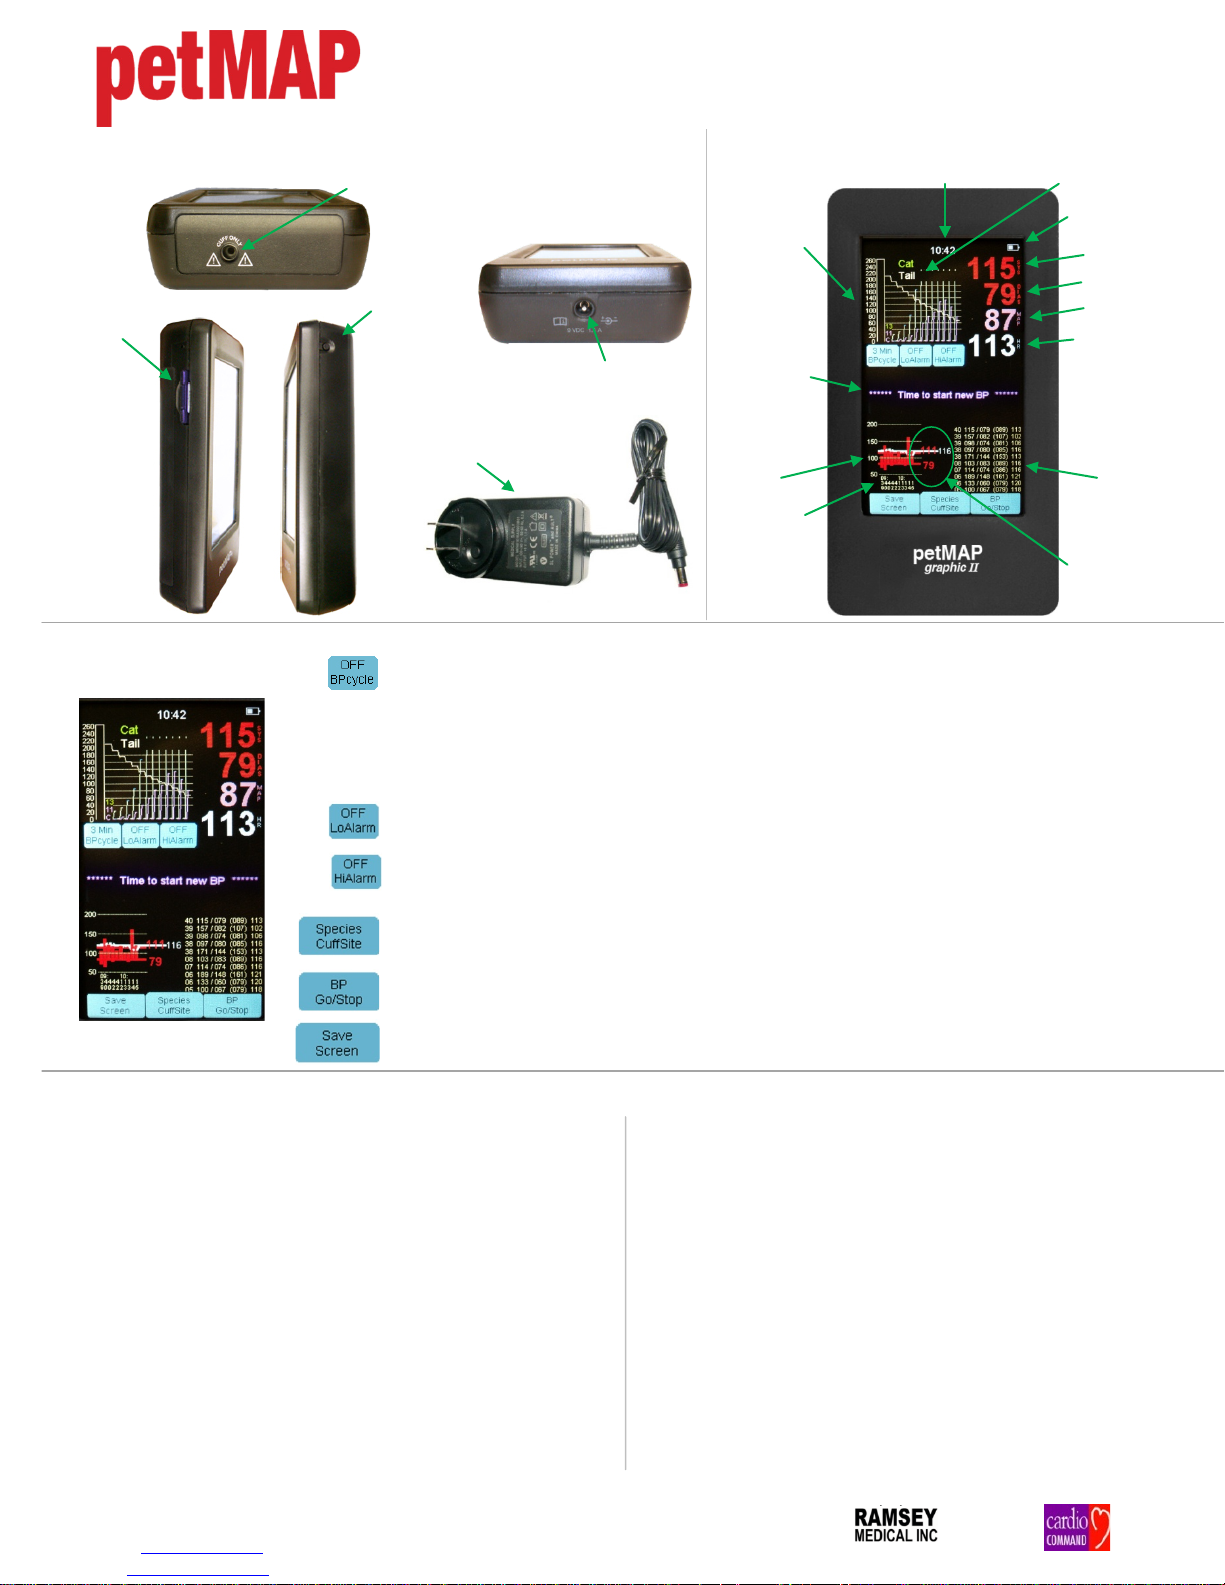
4. Measuring BP with BPcycle OFF.
Slot
ON/OFF
Blood Pressure Measurement & Related Commands
AC/DC Connection
graphic
II
Developed by:
Cuff Connection
Systolic BP
Diastolic BP
Measurement
Time of Da y
Battery Status/AC
Species, Cuff site Setting
button to turn the cycle mode OFF.
MAP
Quick Reference Instructions
CONTROLS & CONNECTIONS OPERATING DISPLAY
SD Card
Cuff
Pressur e
BPcycle
Alert
Power Indicator
Heart Rate
AC/DC
Adapter
BP Trend
(Optional)
Time of Da y
History
Nominal Session
Values (NSV)
USER SELECTIONS
Press and release to s et the BP measurement frequency which, when set, the unit will sound a short “beep” and
display a screen message reminding the user that it is time t o take another BP measurement. T he available BPcycle
options are STAT (BP cycles rapidly for three minutes then reverts automatically to a 2 min cycle time), 1 Mi n, 2 Mi n,
3 Min, 4 Min, 5 Min, 10 Min, 15 Mi n, 20 Min, 25 Min and 30 Min. Once the desired remi nder frequency is selected,
the user must press the BP G o/Stop button to begin the measurement – subsequent measurement reminders will be
displayed at the selecte d interval, but BP determinations are not started automatically. Press and hold the B P cycl e
Press and release t o set the low limit alarm for systolic pressure. The available settings are 60, 80, 100, 120, 140,
160 and OFF. Press and hold to turn the alarm OFF.
Press and release to set the high limit alarm for systolic pressure. The available settings are 150, 175, 200, 225,
250 and OFF. Press and hold to turn the alarm OFF.
Press and release t o set the species and cuff site which is displayed at the top. The s even available settings are DOG
(ForeArm, HindFoot and Tail), CAT (ForeArm, HindFoot and Tail) and Optimize…None. The non-optimized mode should
be used on any species other than dog or cat or when comparing petMAP to Doppler or other oscillometric BP devices.
Press and release t o initiate a new reading, or t o stop a BP readi ng that is i n progress.
If an SD card is in use, press to capture an image of the screen in a file on the SD card. Similarly, the unit will prompt the
user at power OFF for the same f eature. (See Op erator’s Manual)
DIRECTIONS FOR USE
(abbreviated*)
1. Power the petMAP graphic II (gII).
Press and release the ON/OFF button on the right side of the unit to
power the device on (See CONTROLS & CONNECTIONS section above).
2. Apply a cuff.
a. Select the proper size cuff based on measurement site, animal’s
size and cuff index markings. Apply the cuff snuggly, but not too
tight. If necessary, attach the cuff to the proper extension hose
provided. Attach cuff or cuff extension securely to the top of the
unit (See CONTROLS & CONNECTIONS section above).
3. Set Up the petMAP gII.
a. Press the Species/Cuff Site button repeatedly to change the
different settings. Stop when you arrive at the appropriate setting
(See USER SELECTIONS section above).
b. If desired, set LoAlarm and HiAlarm (See USER SELECTION section
above).
*More detailed information is available in the Operator’s Manual. A copy of the manual is available for
download at
www.petmap.c om. To c ontact Customer Service, call 813-289-5555; toll free 800-231-6370.
To start a reading, touch the BP Go/Stop button. A trend of BP
readings, along with the NSV (after at least two readings), will
appear on the bottom left of the screen and a tabular history of the
last 10 readings taken will be displayed on the bottom right of the
screen. NOTE: The data display format can change to a longer trend
by touching the BP trend.
5. Measuring BP with BPcycle ON.
BP cycle times can be set by touching the BPcycle button repeatedly
until you arrive at the desired time interval for BP reminders. Press
BP Go/Stop to initiate readings. A short “beep” will sound and a
message will appear on the screen when it’s time to take a new
measurement. All BP measurements are initiated by pressing BP
Go/Stop button.
Manufactured,
Distributed &
Serviced by:
R400247-A
140606
 Loading...