

Page 1
1
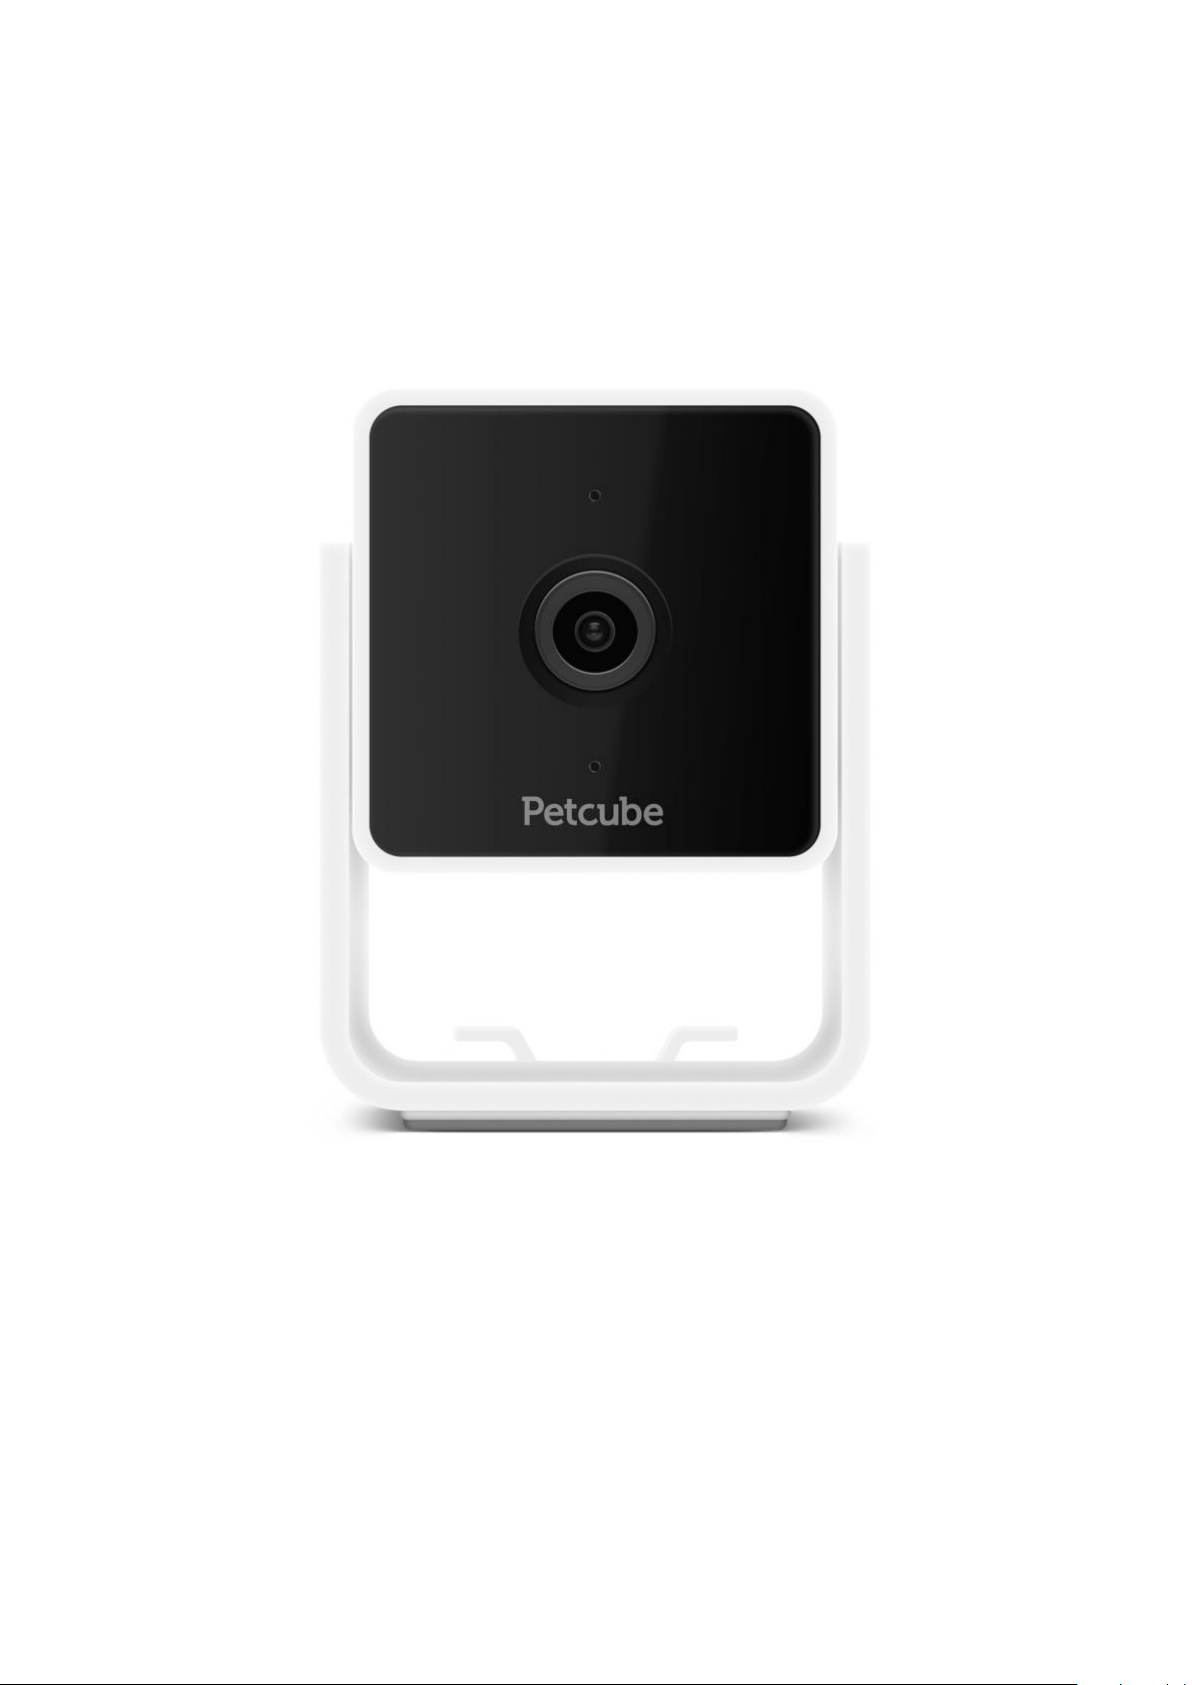
MEET YOUR
Petcube Cam
Page 2

PETCUBE CAM SPECS
1
Petcube Cam features:
• 110º wide angle view;
• 1080p HD video;
• 2-way audio;
• Night vision;
• 4x digital zoom;
• Sound and motion alerts.
AND SYSTEM REQUIREMENTS
2
Petcube Cam requires:
• Wi-Fi 802.11b/g/n, 2.4 Ghz, password protected;
• iOS 11 and higher or Android 7.1.2 and higher;
• Min 2 Mbps Upload speed on the Petcube (4 Mbps recommended);
• Min 2 Mbps Download speed on the mobile device (4 Mbps recommended).
Page 3

SAFETY
2
To avoid injuries or causing harm, read all safety information and operating instructions
prior to using Petcube.
• Don’t drop, hit, shake, or tumble your Petcube Cam;
• Don’t stain, scratch, or otherwise damage the front panel;
• Petcube is not to be used by minors unless under the direct supervision of an adult;
• Don’t expose to liquid, moisture, dust, excessive heat, or naked flame;
• Don’t leave in direct sunlight;
AND HANDLING
3
• Prevent the power cord from being walked on or pinched.
Page 4
GETTING
3
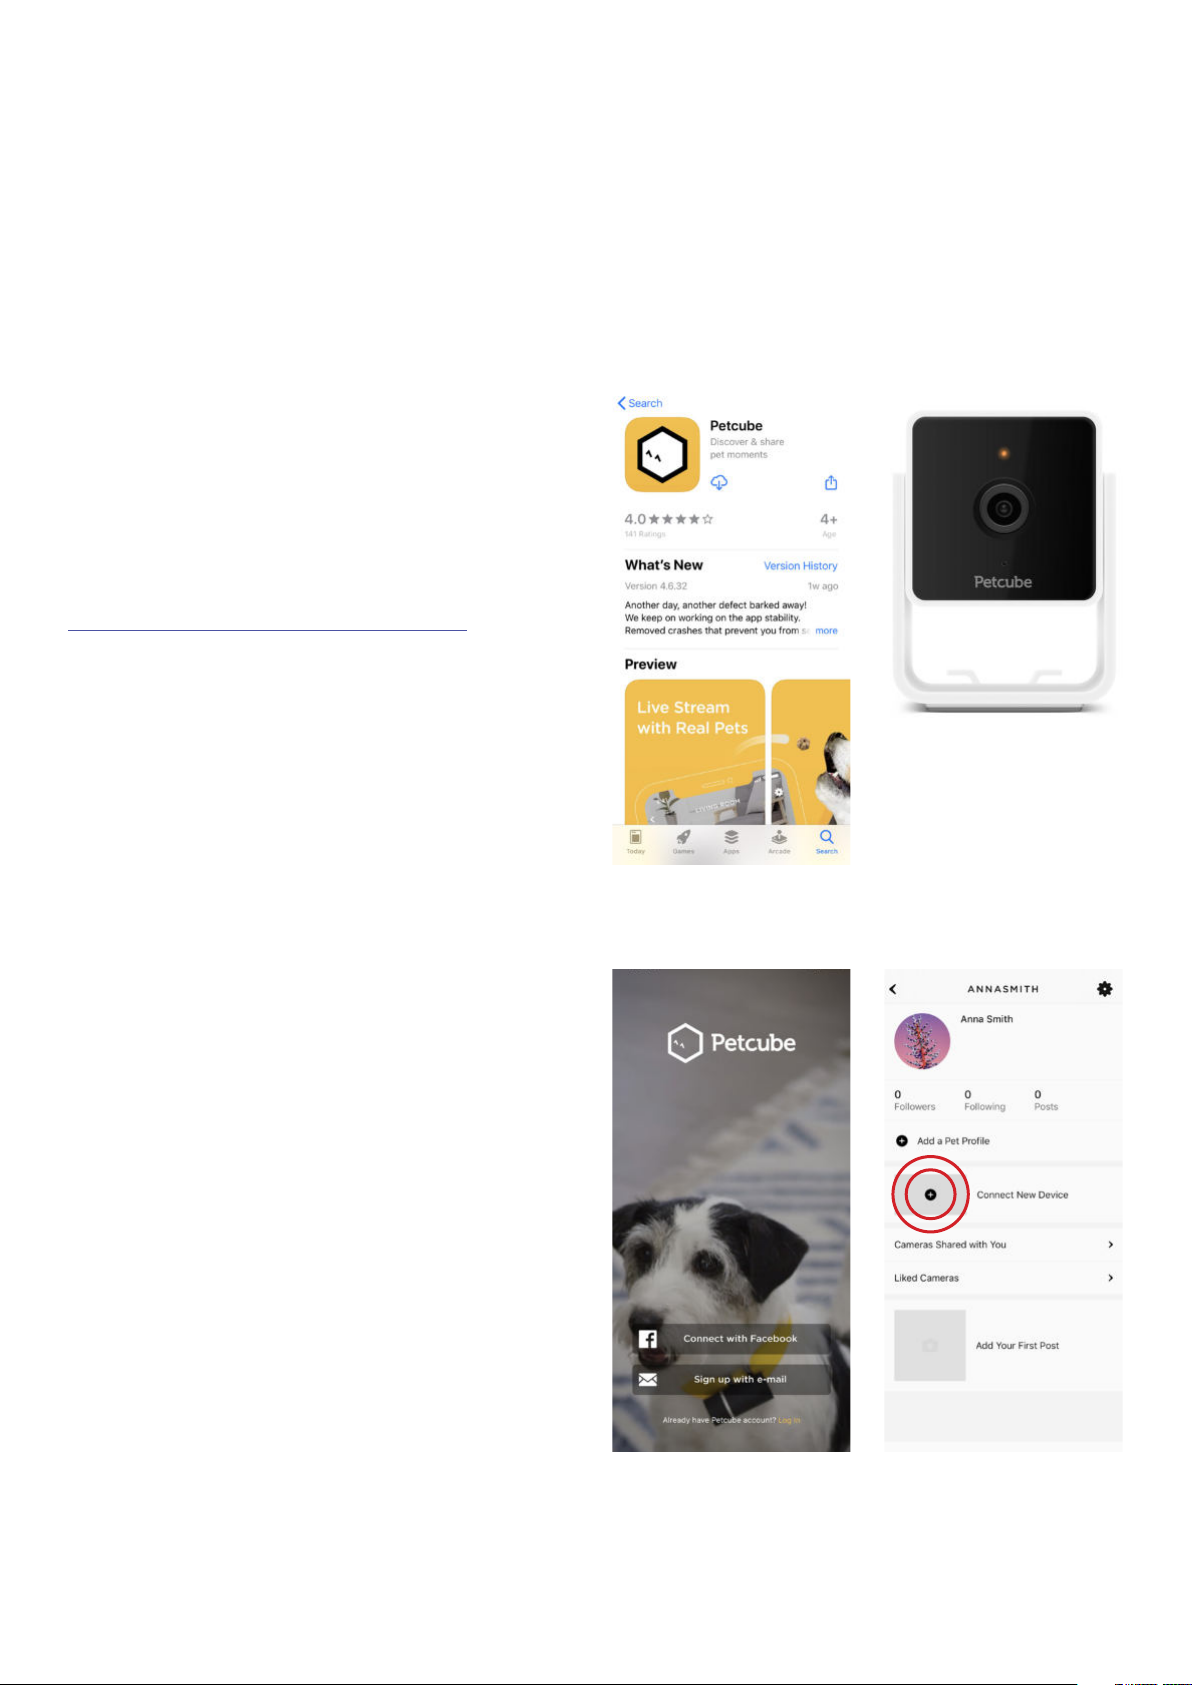
1. Setting up your Petcube Cam on iOS device
Step 1. To set up your Petcube,
download Petcube application (fig 3.1.1)
to your iOS device. The Petcube app
requires iOS 11 or greater and can
be downloaded in the App Store
or at the link below:
www.petcu.be/ios-app-download
STARTED
4
Step 2. Connect your Petcube
to a power source and wait up
to a minute until the LED light starts
blinking yellow or blue (fig 3.1.2).
Step 3. Open the Petcube app on your
iOS device, log in or sign up for
a Petcube account using your email
or Facebook account (fig 3.1.3).
Step 4. Select ‘Connect your device’
(fig 3.1.4) and pick Petcube Cam from
the list of options (fig 3.1.5). In case the
option to ‘connect your device’ is not
showing, tap on your profile icon
at the very top and hit ‘connect new
device’ in the center.
Fig. 3.1.2
Fig. 3.1.1
During the setup, Petcube Cam will
automatically detect the Wi-Fi network
your phone is currently connected to,
so it’s a good idea to make sure you’re
connected to the same network you
want to hook up the camera to, and
have the Wi-Fi password handy
as you’ll be asked to enter it shortly.
Fig. 3.1.3 Fig. 3.1.4
Page 5
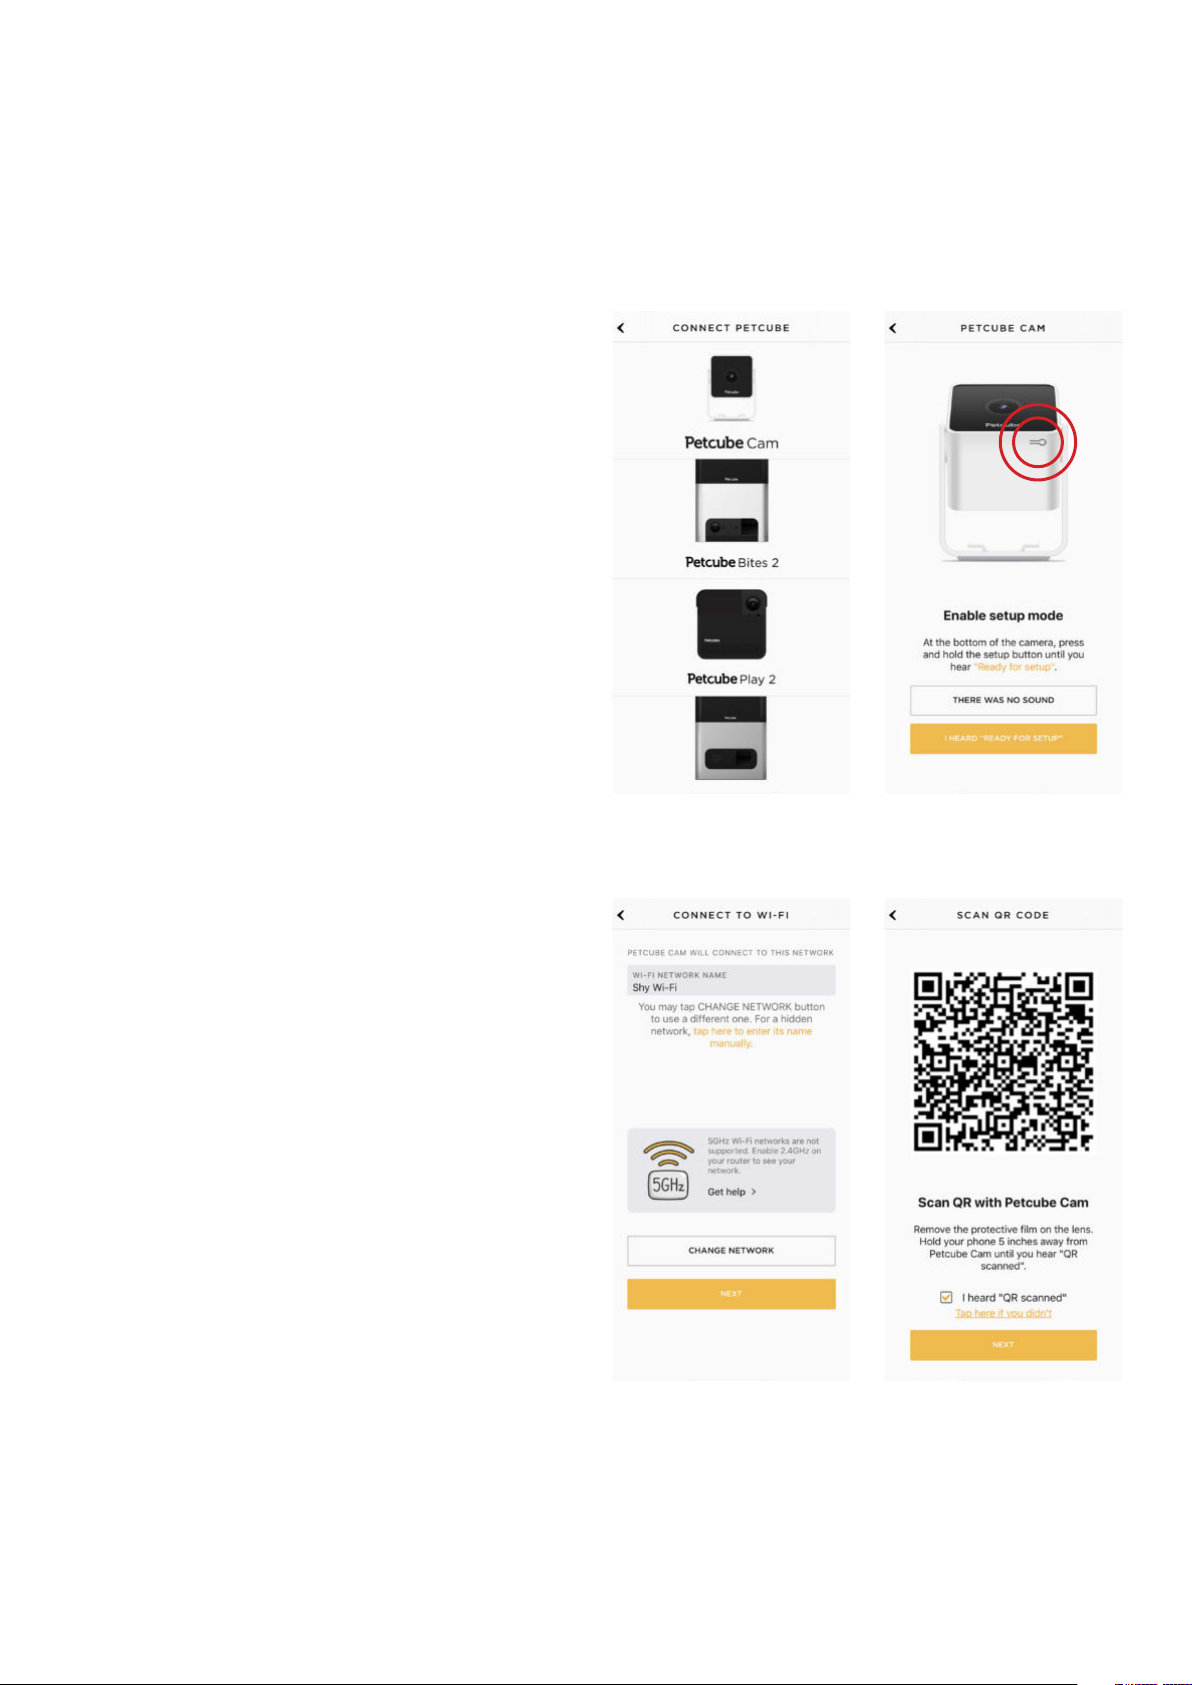
Step 5. As long as the LED light
is flashing on your camera, you’re ready
to enable the setup mode. To do that,
press setup button at the bottom of the
camera until you hear a short jingle and
a message saying “Ready to Connect”,
and tap “I heard “Ready to Connect”
on the screen.’ (fig 3.1.6).
Step 6. At the top, you’ll see the
5
network that you’ll be connecting
the camera to, so tap “Next”
to continue the setup and enter your
Wi-Fi password or “Change network”
if you wish to connect it to a different
network (figure 3.1.7).
Keep in mind that only 2.4 Ghz wifi
networks are supported by Petcube
Cam. Please make sure you are
connecting to 2.4 Ghz wifi network
Step 7. A QR code will be generated
on your phone screen. Hold your
camera at the 5-inch distance with the
lens facing the QR code until you hear
a message saying “QR code scanned”,
Fig. 3.1.5
Fig. 3.1.6
check the box, tap “Next” (figure 3.1.8).
Step 8. Your Petcube device is almost
set! Please wait until it connects
(figs 3.1.9 & 3.1.10) and the light on the
back turns blue.
Step 9. Once the LED light on your
Petcube changes to solid blue
Fig. 3.1.7
Fig. 3.1.8
Page 6
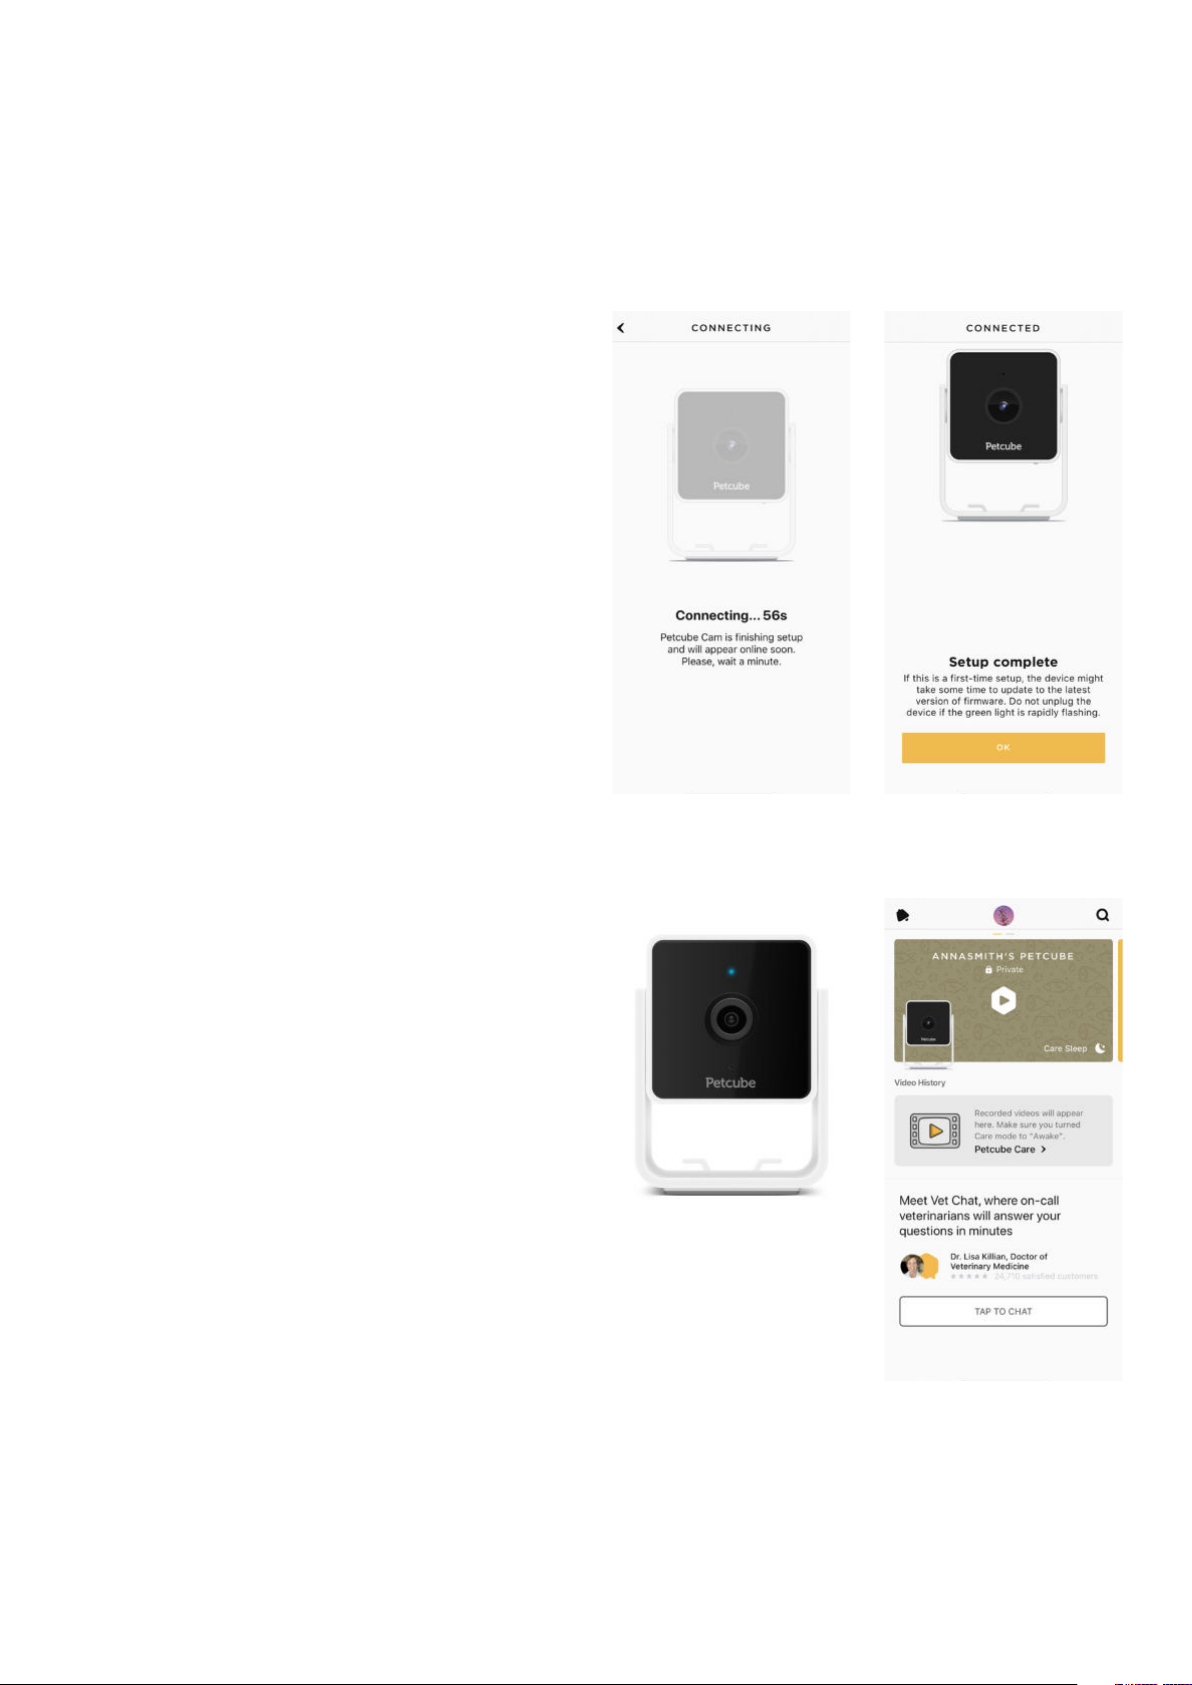
(fig 3.1.11), you are ready to play with
your Petcube (fig 3.1.12).
Reminder: It is likely that your Petcube
will need a firmware update right after
it is connected. The firmware update
will be downloaded to your camera
within 24 hours.
6
Fig. 3.1.9
Fig. 3.1.11
Fig. 3.1.10
Fig. 3.1.12
Page 7
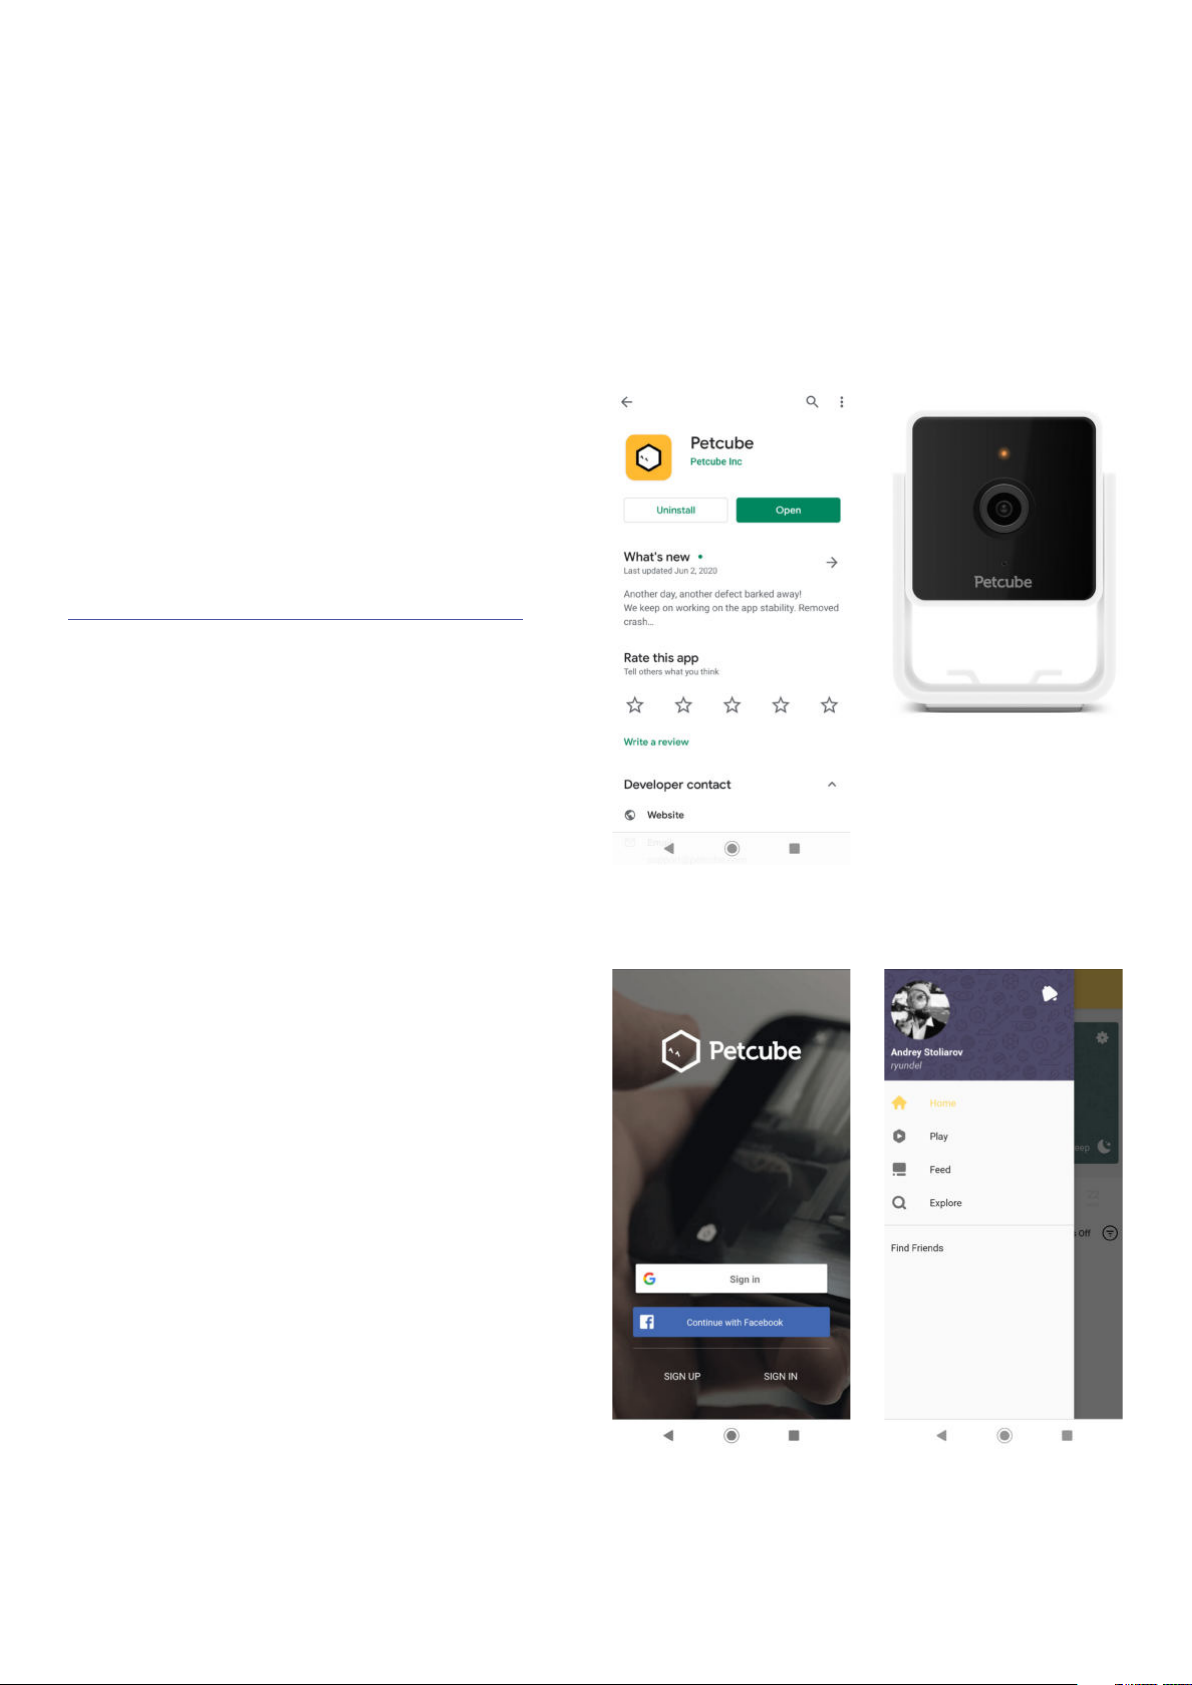
2. Setting up your Petcube Cam on Android device
Step 1. To set up your Petcube,
download the Petcube app to your
Android device (fig 3.2.1). The Petcube
app requires Android 7.1.2 or greater
and can be downloaded in the Google
Play Store or at the link below:
www.petcu.be/android-app-download
7
Step 2. Connect your Petcube
to a power source and wait up
to a minute until the LED light starts
pulsing yellow or blue (fig 3.2.2).
Step 3. Open Petcube app on your
Android device, log in or sign up for
a Petcube account using your email
or Facebook account (fig 3.2.3).
Step 4. Go to the ‘Home’ menu in the
top left corner of the app (fig 3.2.4),
select ‘Add Camera’ (fig 3.2.5), and pick
Petcube Сam from the list of options
(fig 3.2.6). During the setup, Petcube
Cam will automatically detect the
Wi-Fi network your phone is currently
Fig. 3.2.2
Fig. 3.2.1
connected to, so it’s a good idea
to make sure you’re connected to the
same network you want to hook up
the camera to, and have the Wi-Fi
password handy as you’ll be asked
to enter it shortly.
Step 5. As long as the LED light
is flashing on your camera, you’re ready
Fig. 3.2.3
Fig. 3.2.4
Page 8
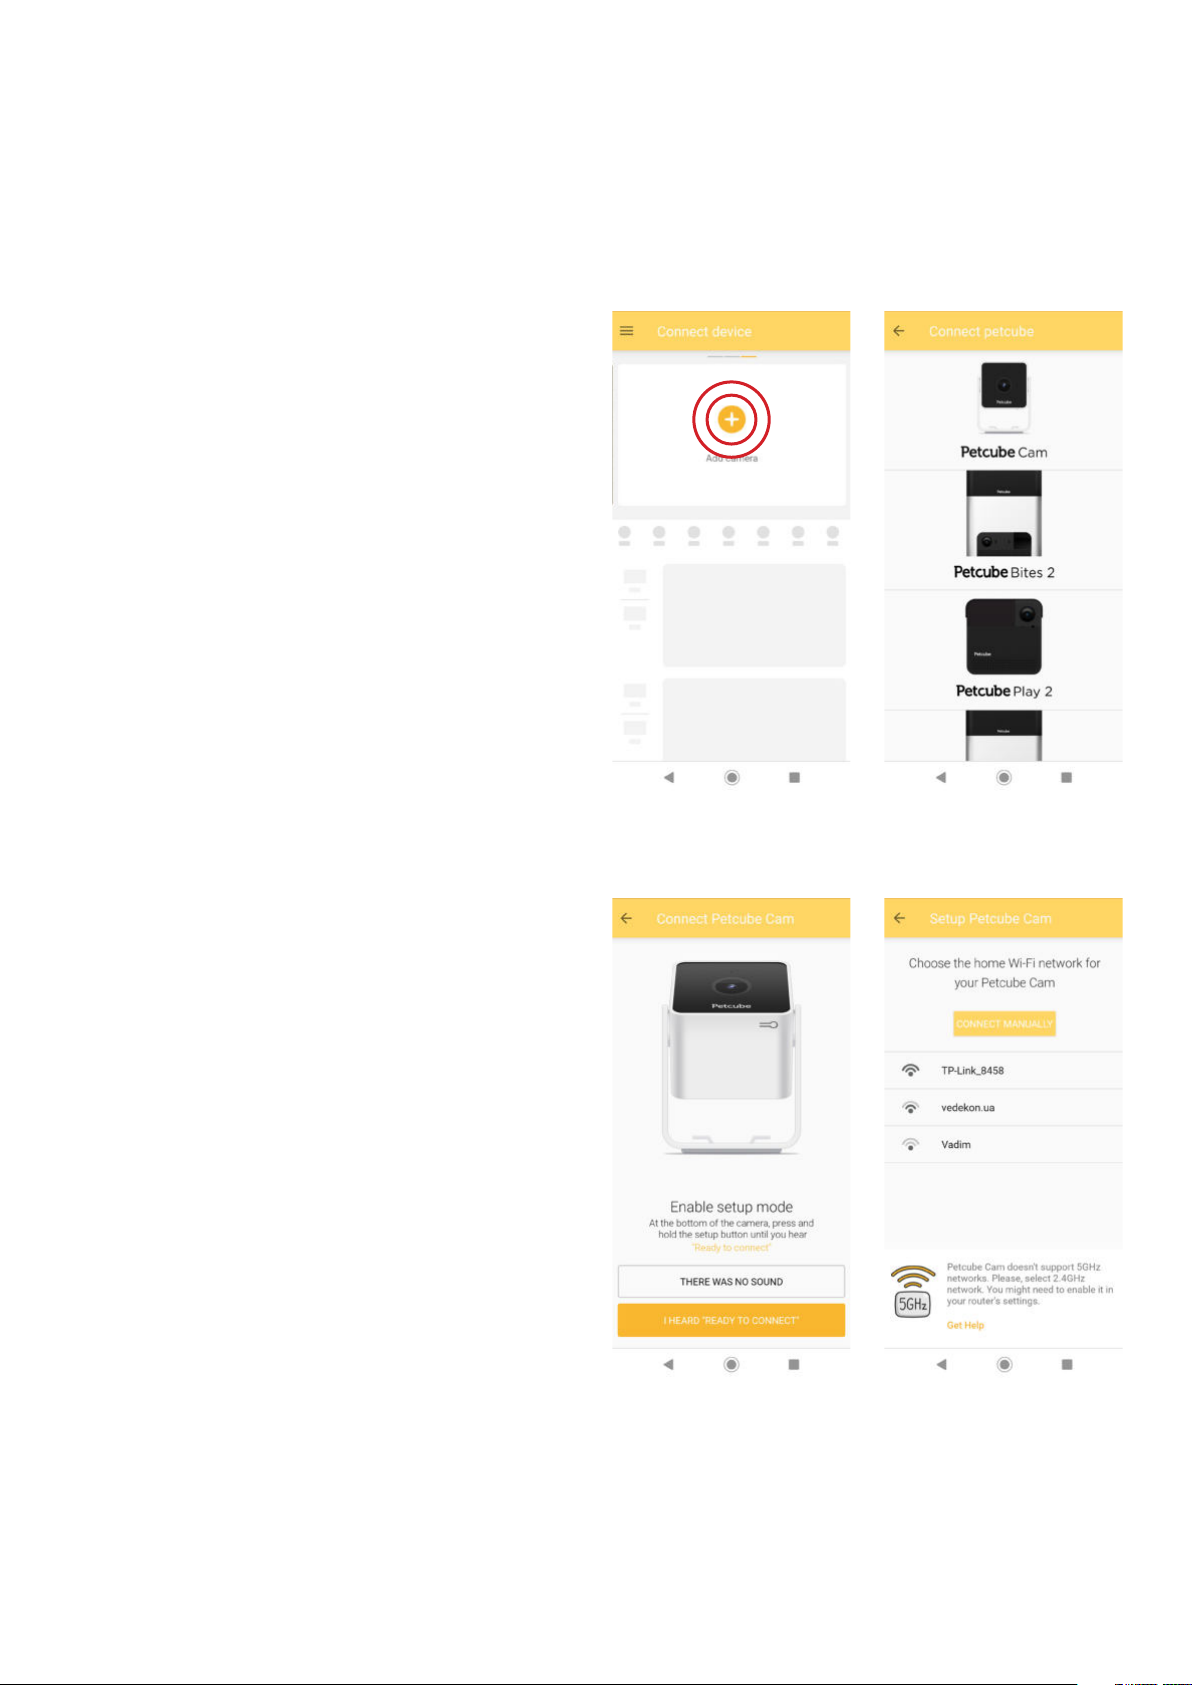
to enable the setup mode. To do that,
press the start button at the bottom
of the camera until you hear a short
jingle and a message saying “Ready
to Connect”, and tap “I heard “Ready
to Connect” on the screen.’ (fig 3.2.7).
Step 6. Choose Wifi network to
connect your Petcube Cam to and enter
wifi password. Keep in mind that only
8
2.4 Ghz wifi networks are supported
by Petcube Cam. Please make sure you
are connecting to 2.4 Ghz wifi network
(figs 3.28 & 3.2.9).
Step 7. A QR code will be generated
on your phone screen. Hold your
camera at the 5-inch distance with the
lens facing the QR code until you hear
a message saying “QR code scanned”,
check the box, tap “Next”.
Step 8. Your Petcube device is almost
set! Please wait until it connects and
the light on the back turns blue
(figs 3.2.12 & 3.2.13).
Fig. 3.2.5
Fig. 3.2.6
Step 9. Once the LED light on your
Petcube changes to solid blue, you are
ready to play with your Petcube
(figs 3.2.14).
Reminder: It is likely that your Petcube
will need a firmware update right after
it is connected. The firmware update
will be downloaded to your camera
within 24 hours.
Fig. 3.2.7
Fig. 3.2.8
Page 9
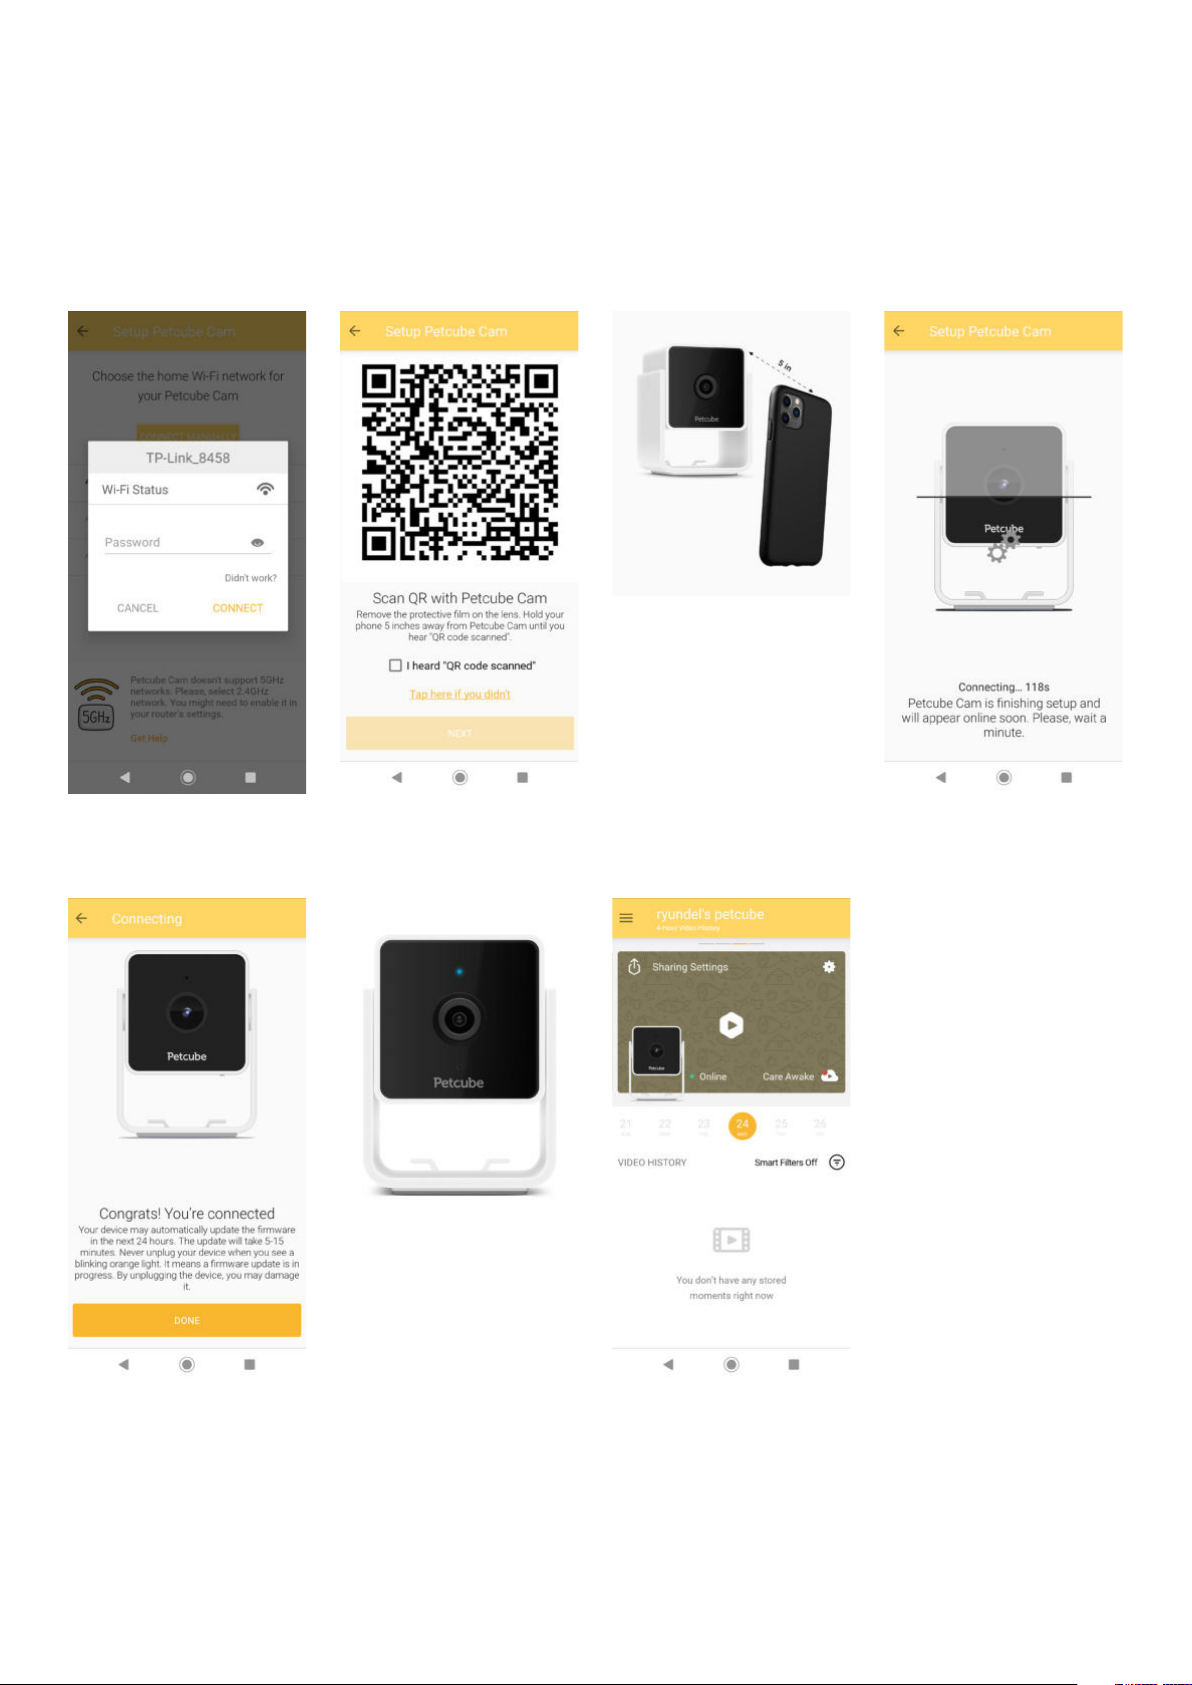
Fig. 3.2.11
9
Fig. 3.2.9
Fig. 3.2.10 Fig. 3.2.12
Fig. 3.2.14
Fig. 3.2.13 Fig. 3.2.15
Page 10
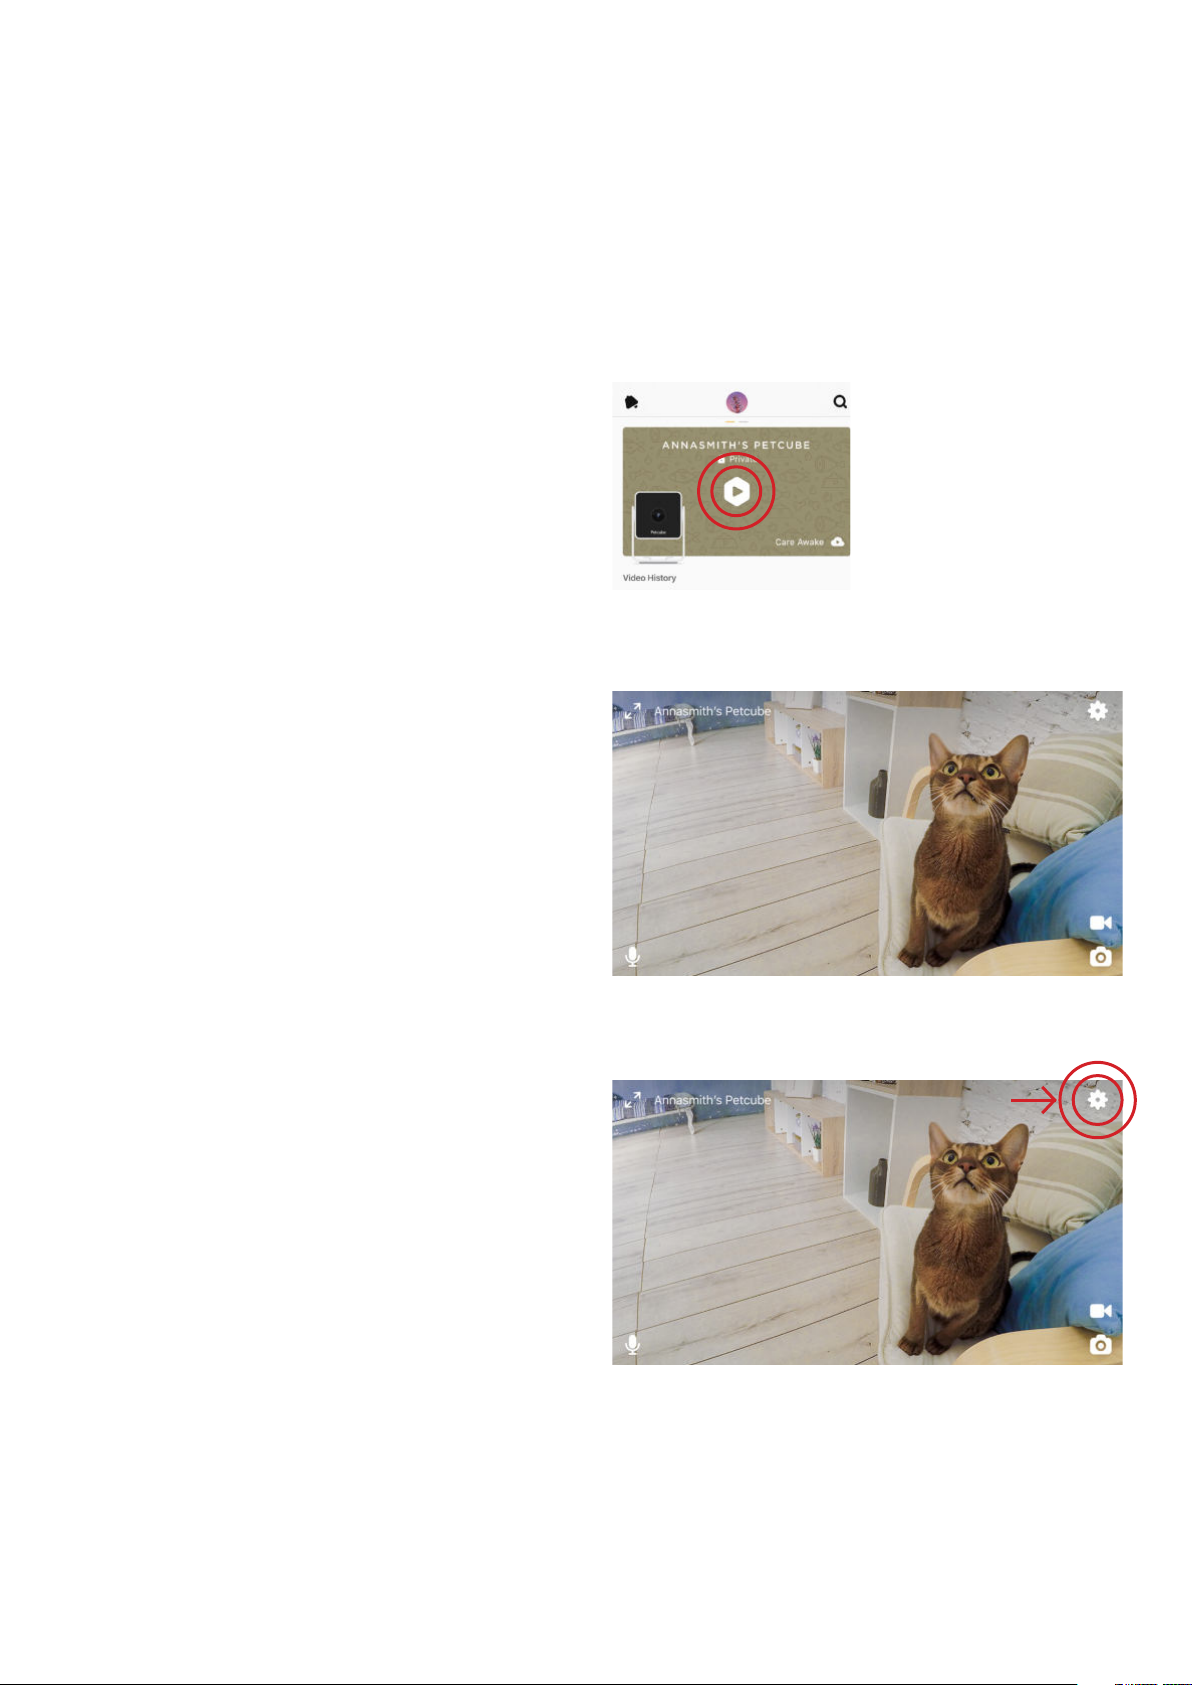
3. Playing with your Petcube
When you successfully registered your
Petcube and the LED light on the back
glows blue, go to the camera profile
in your iOS app or to the ‘Home’ tab
in your Android app and press the ‘Play’
icon at the top (fig 3.3.1).
Petcube Cam Live Stream Controls (fig
10
Fig. 3.3.1
3.3.2):
1 — Game Settings Menu;
2 — Take a photo to be saved on your
device;
3 — Start video to be saved on your
device;
4 — Tap to talk to your pet;
5 — Switch to portrait mode (iOS only).
To enable/disable audio and
nightvision, select the ‘Settings’ wheel
in the top right corner of the screen
(fig 3.3.3) during the game in the
landscape mode.
1
5
2
4
Fig. 3.3.2
3
*Settings Menu (fig 3.3.4):
1 — Turn on sound to listen in;
2 — Turn Night Vision On / Off / Auto.
To exit the live stream in iOS app
(fig 3.3.5), first exit the landscape mode
first by pressing the 2 arrows icon
Fig. 3.3.3
Page 11
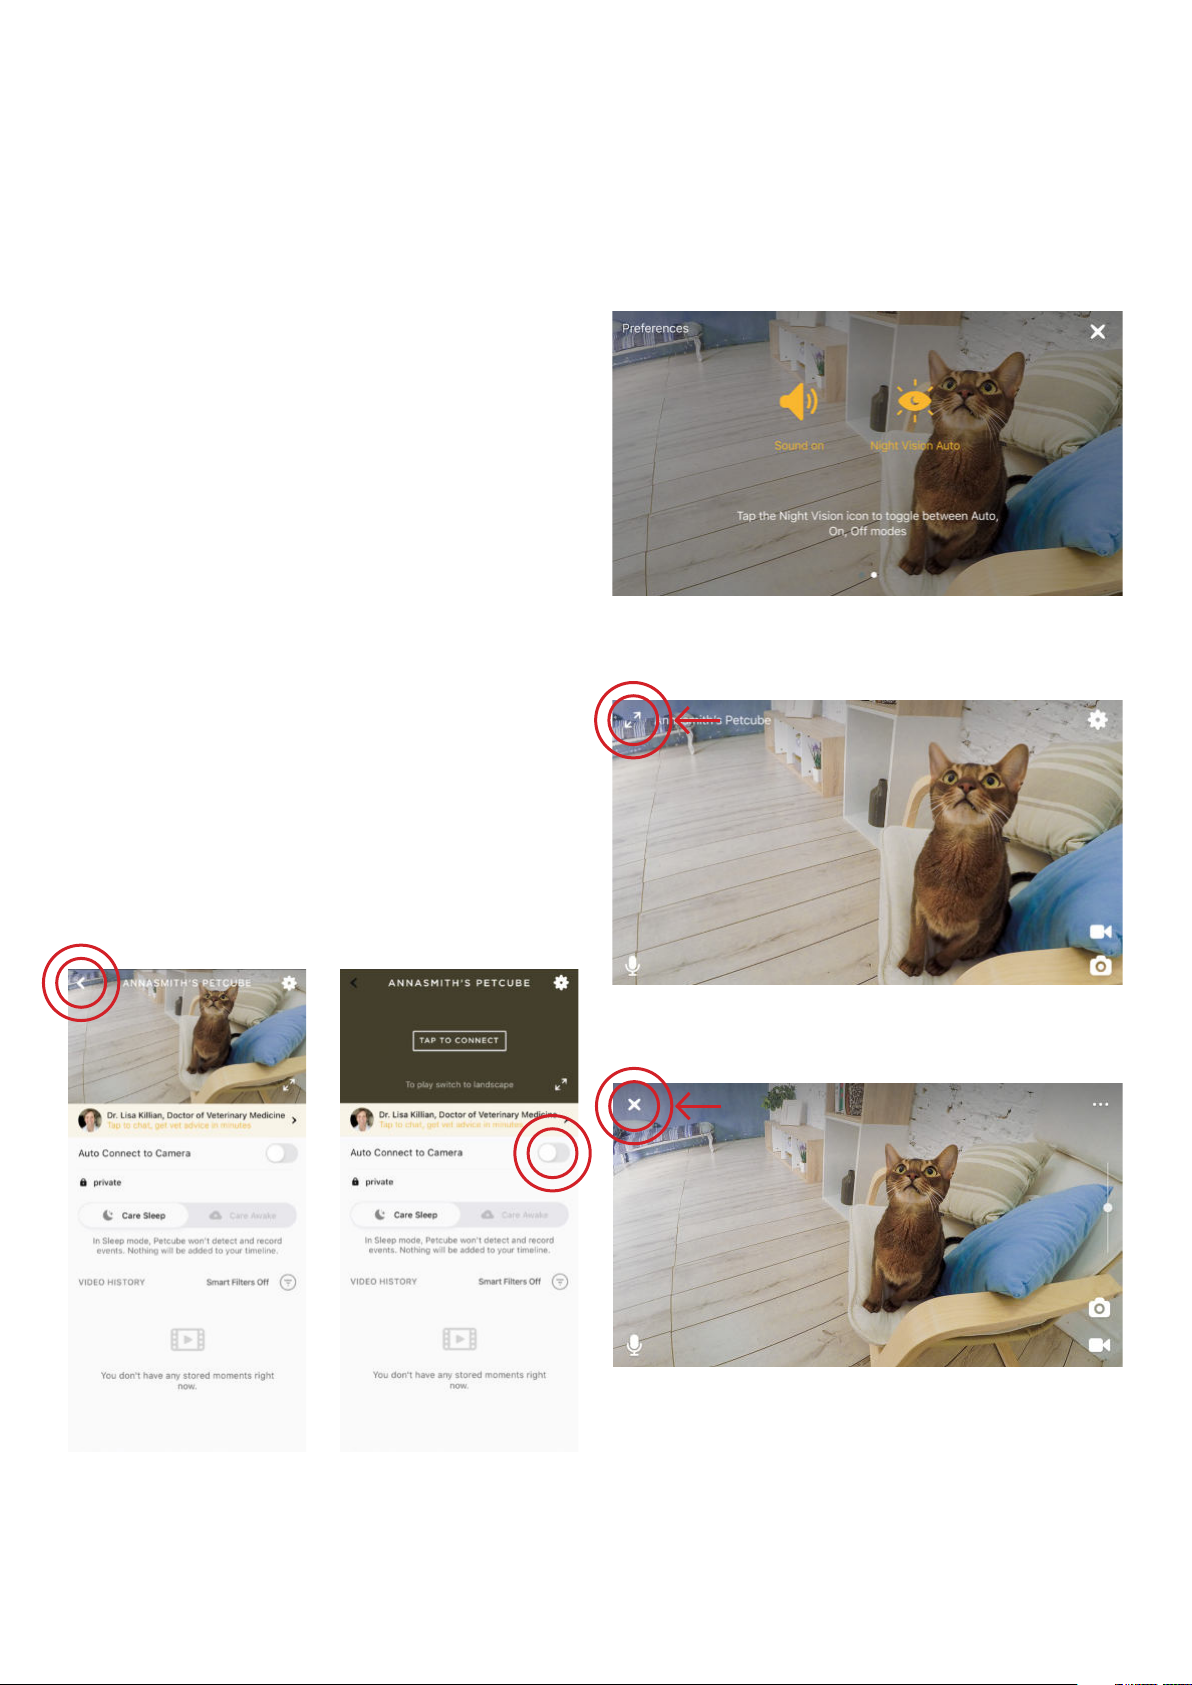
in the upper left corner. To return back
to the Petcube feed, tap the camera
video while in portrait mode and press
the ‘back’ icon in the upper left corner
11
(fig 3.3.6).
To return back to the Petcube feed
in Android app, press the ‘X’ icon
in the upper left corner (fig 3.3.7).
If you’re using an iOS app, you will
automatically connect to your camera
when you tap on it. To disable it, switch
the ‘Auto connect to Camera’ option
off on the camera profile (fig 3.3.8).
1
Fig. 3.3.4
Fig. 3.3.5
2
Fig. 3.3.6 Fig. 3.3.8
Fig. 3.3.7
Page 12
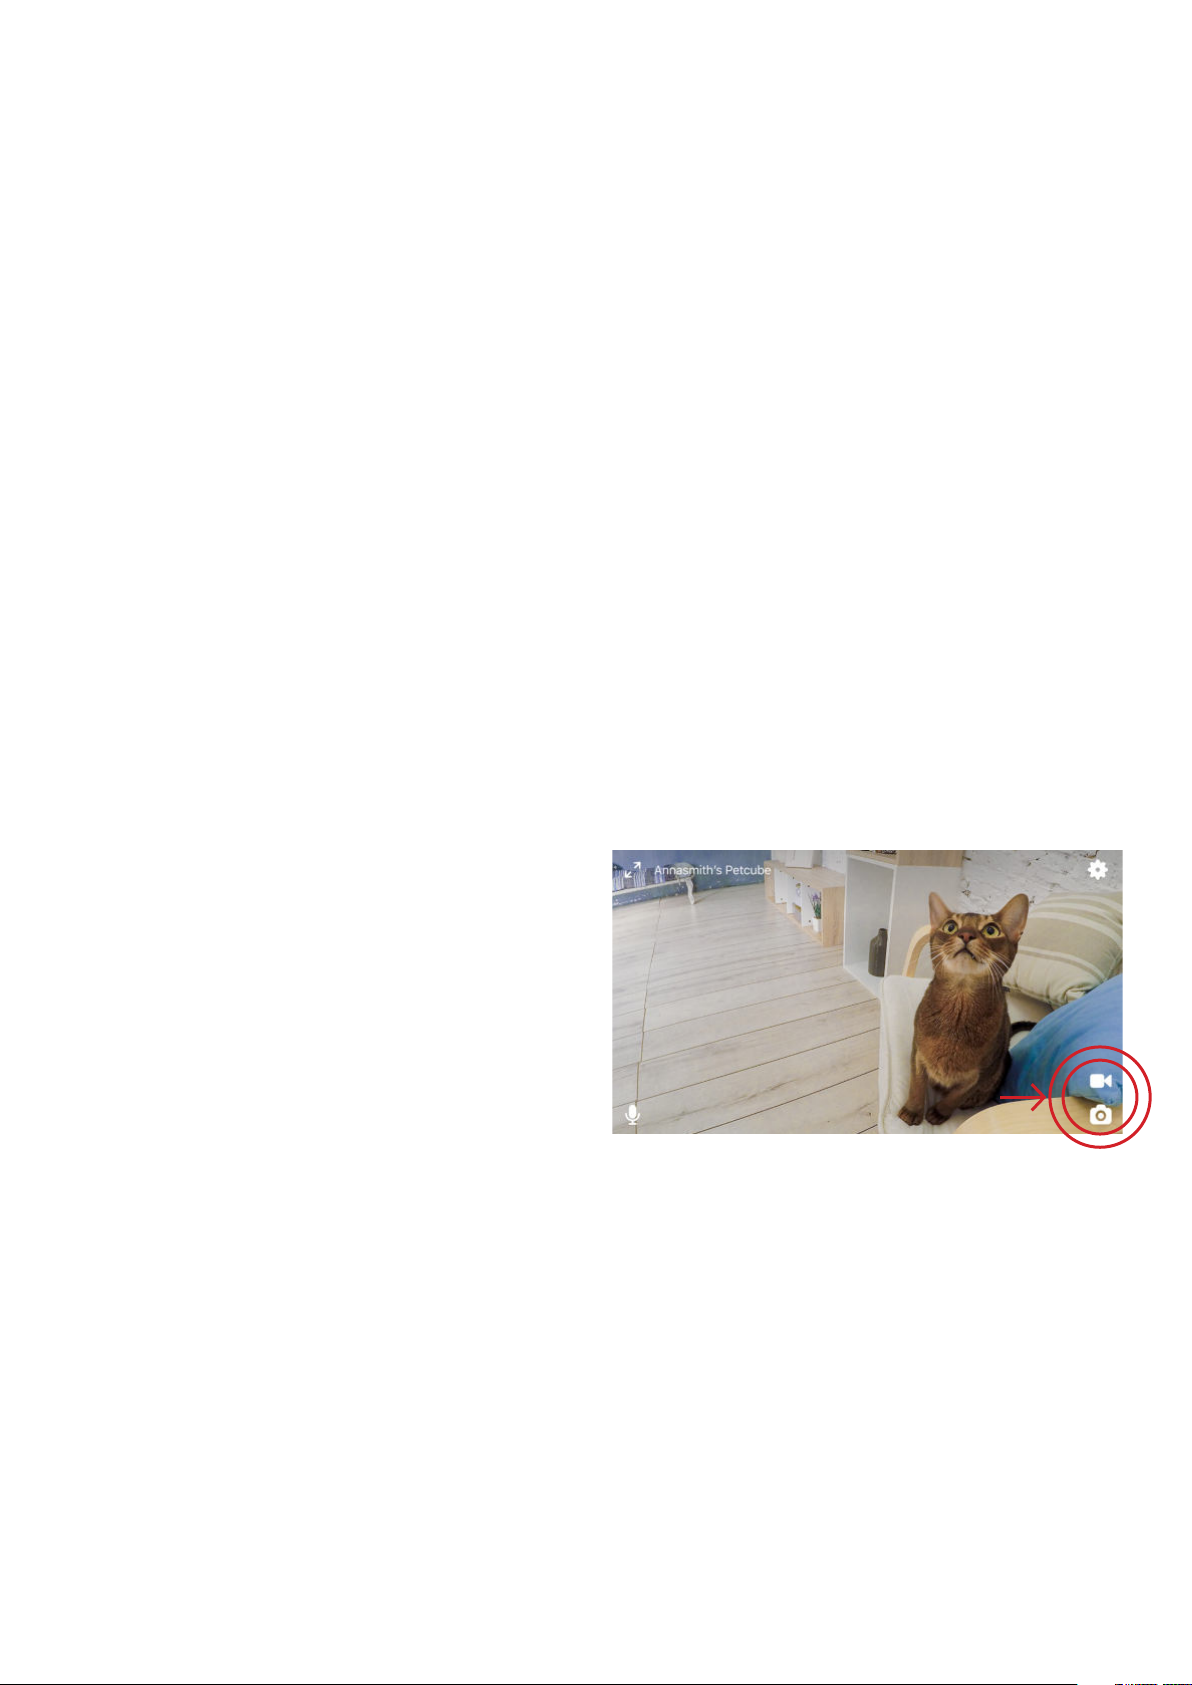
4. Where to place your Petcube Cam
Consider placing Petcube in a location that allows for maximum coverage through
the camera’s 160° wide angle lens. It’s always a good idea to point the Petcube
in the direction where your pets tend to spend most of their time.
If you want to place Petcube on a table or shelf, we recommend you set it up at least
3 feet above the floor. Petcube has a non-slip rubber bottom, which provides a secure
grip on flat surfaces. The camera should be placed closer to the edge of the surface
for better viewing angle.
12
5. Taking screenshots and recording video
In order to take a snapshot of the live
stream from your Petcube, you need
to tap the Photo Camera icon on the
bottom left while in play mode
(fig 3.5.1). You’ll get two options: ‘Share’
and ‘Done’. When selecting ‘Done,’
the screenshot will be automatically
saved to your phone’s storage.
By selecting ‘Share,’ you will have the
option of sharing it via Facebook,
Instagram or Twitter.
To start recording a live stream, tap
the Video Camera icon at the bottom
Fig. 3.5.1
right while in play mode. To stop
recording, tap the ‘Stop’ icon and
the video will automatically be saved
to your phone’s storage. Sound
recording is currently unavailable
in clips grabbed during live stream.
Page 13
6. Using Zoom feature
Petcube app now comes with the
4x digital zoom feature. Just connect
to your Petcube in the app, pinch-tozoom in the image during the game,
and pan around to see the whole scene.
7. Using Night Vision
13
Fig. 3.7.1
Petcube comes with the infrared sensor
capable of streaming clear black and
white video in pitch dark. When
the sensor detects a low level
of ambient light, your Petcube Cam will
automatically activate the Night Vision
mode.
Petcube app also allows you to turn
night vision on and off during a live
stream:
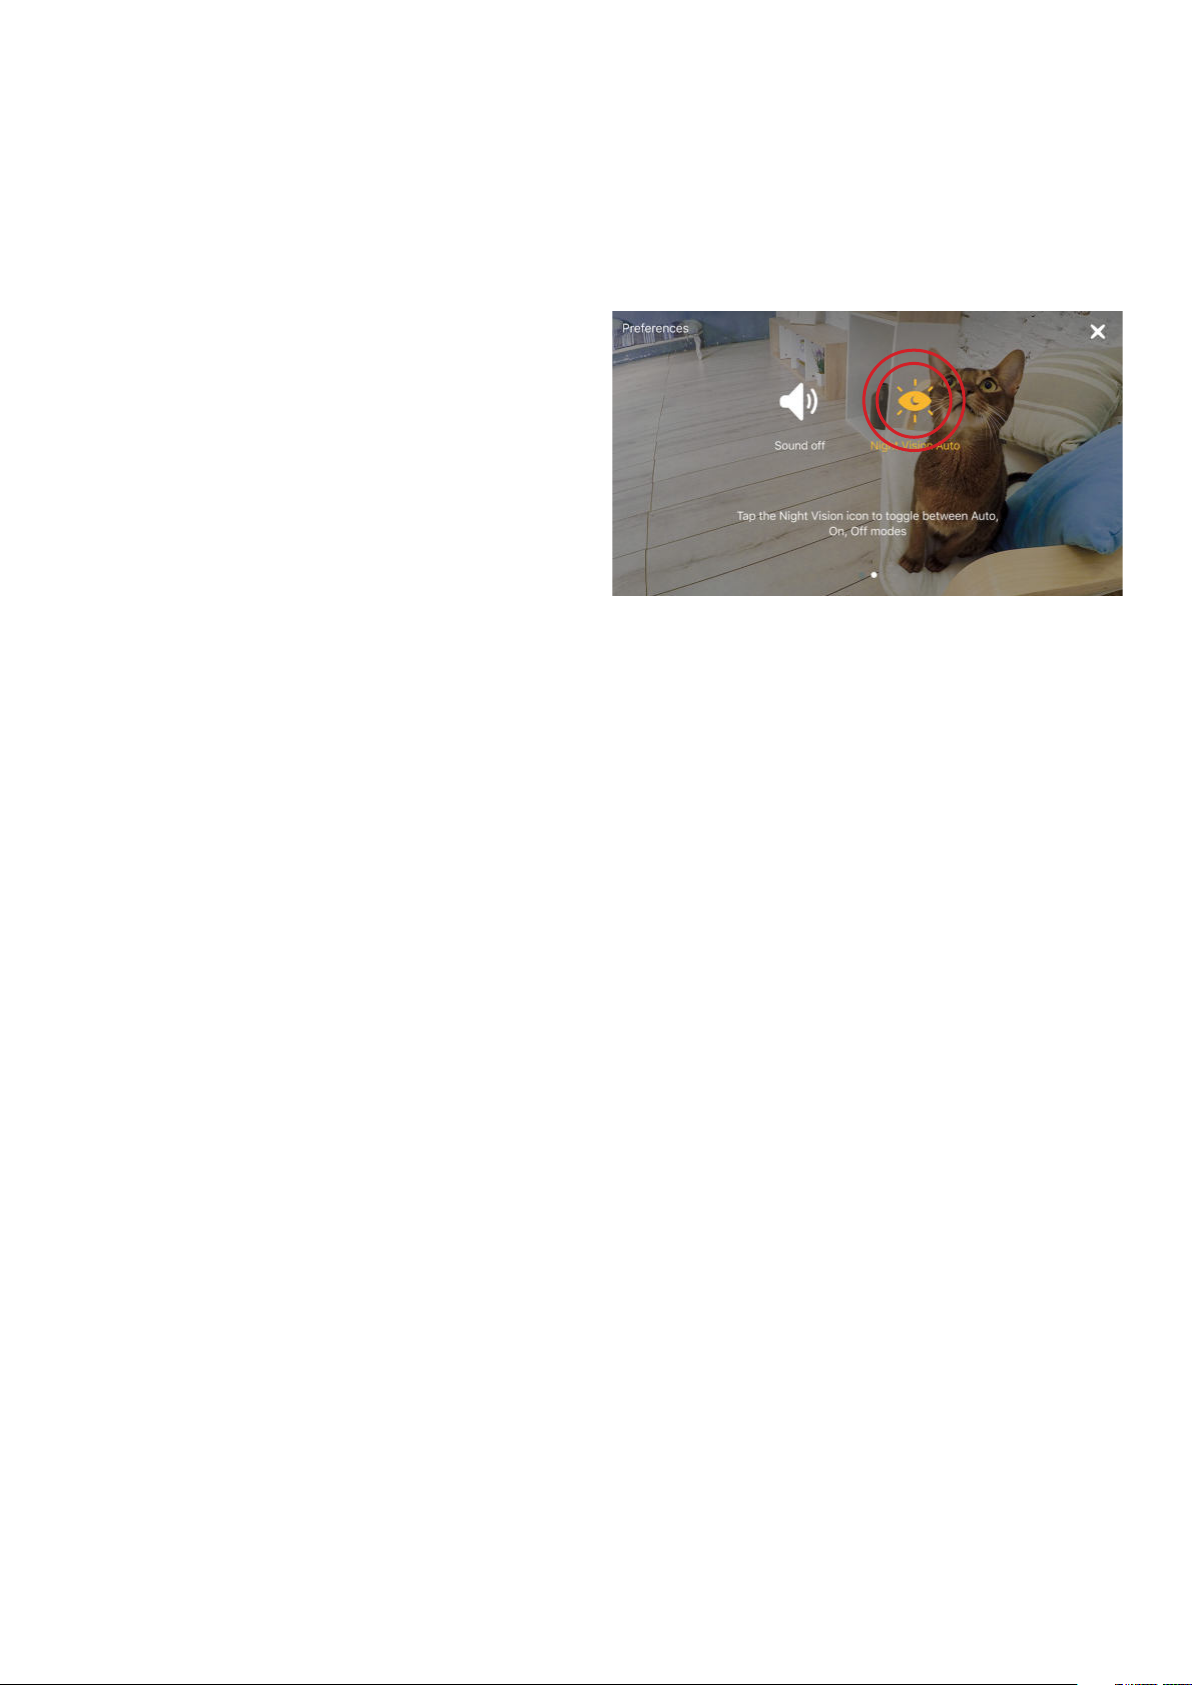
1. While in the live stream, tap the
‘Settings’ wheel in the upper right
corner;
2. Then to enable night vision, tap
on ‘Night Vision Off’ and to disable,
tap on ‘Night Vision on’ (fig 3.7.1);
3. You can also set the auto mode
if you select ‘Night Vision Auto’, that
way the sensor will automatically
detect low levels of ambient
light and will enable night vision
automatically;
Page 14
8. Using Two-way Audio or Push-To-Talk
Petcube comes with 2 ways of audio
interaction: default simultaneous
2-way audio and optional ‘push-to-talk’
feature that works much like a walkietalkie.
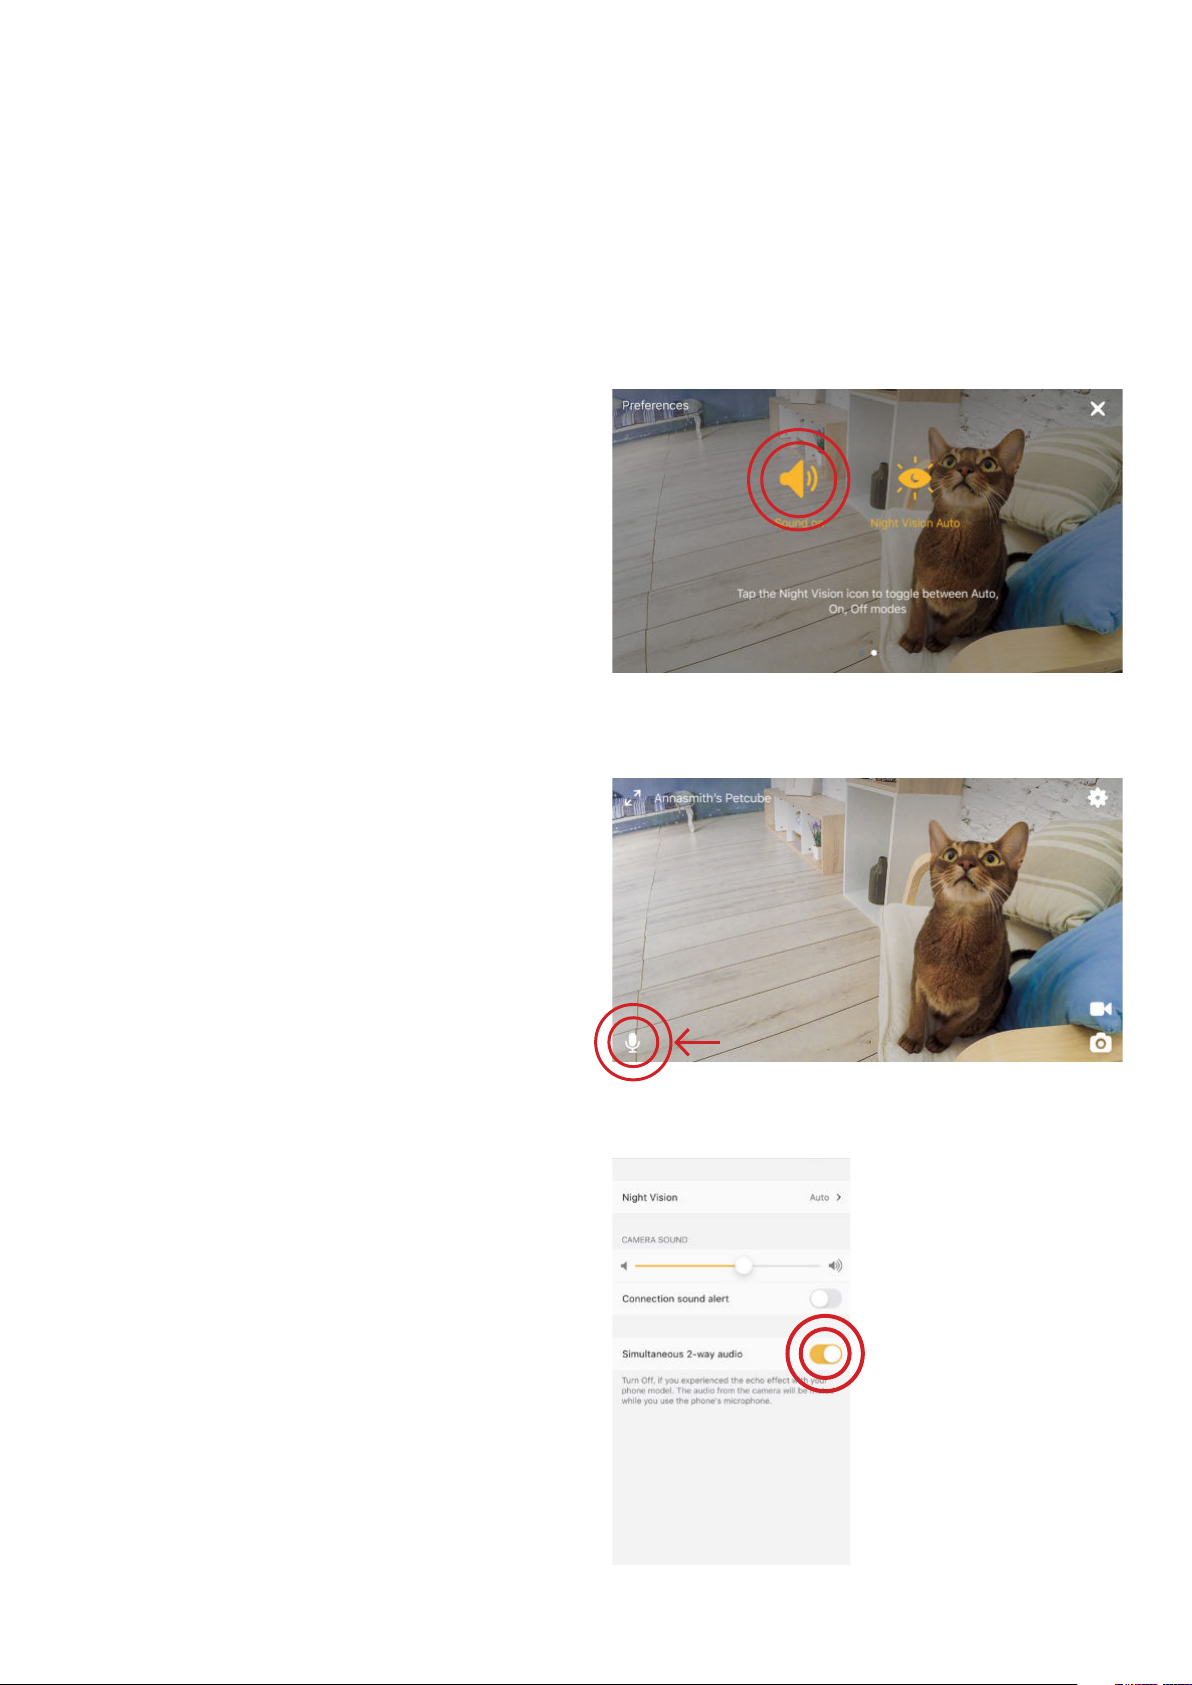
To start talking and listening, first, make
sure the sound is activated in Settings
at the top right (fig 3.8.1), then simply
tap the mic icon in the bottom left
14
Fig. 3.8.1
corner (fig 3.8.2).
To switch to push-to-talk audio:
1. Open the Petcube app;
2. Go to the camera profile, tap the
‘Settings’ wheel in the upper right
corner if you use Android or tap the
‘Play’ icon if you use iOS;
3. Tap the ‘Settings’ wheel in the upper
right corner;
4. Select ‘Video & Audio’ and disable
the ‘Simultaneous 2-way audio’
(fig 3.8.3).
Fig. 3.8.2
Fig. 3.8.3
Page 15
9. Volume control
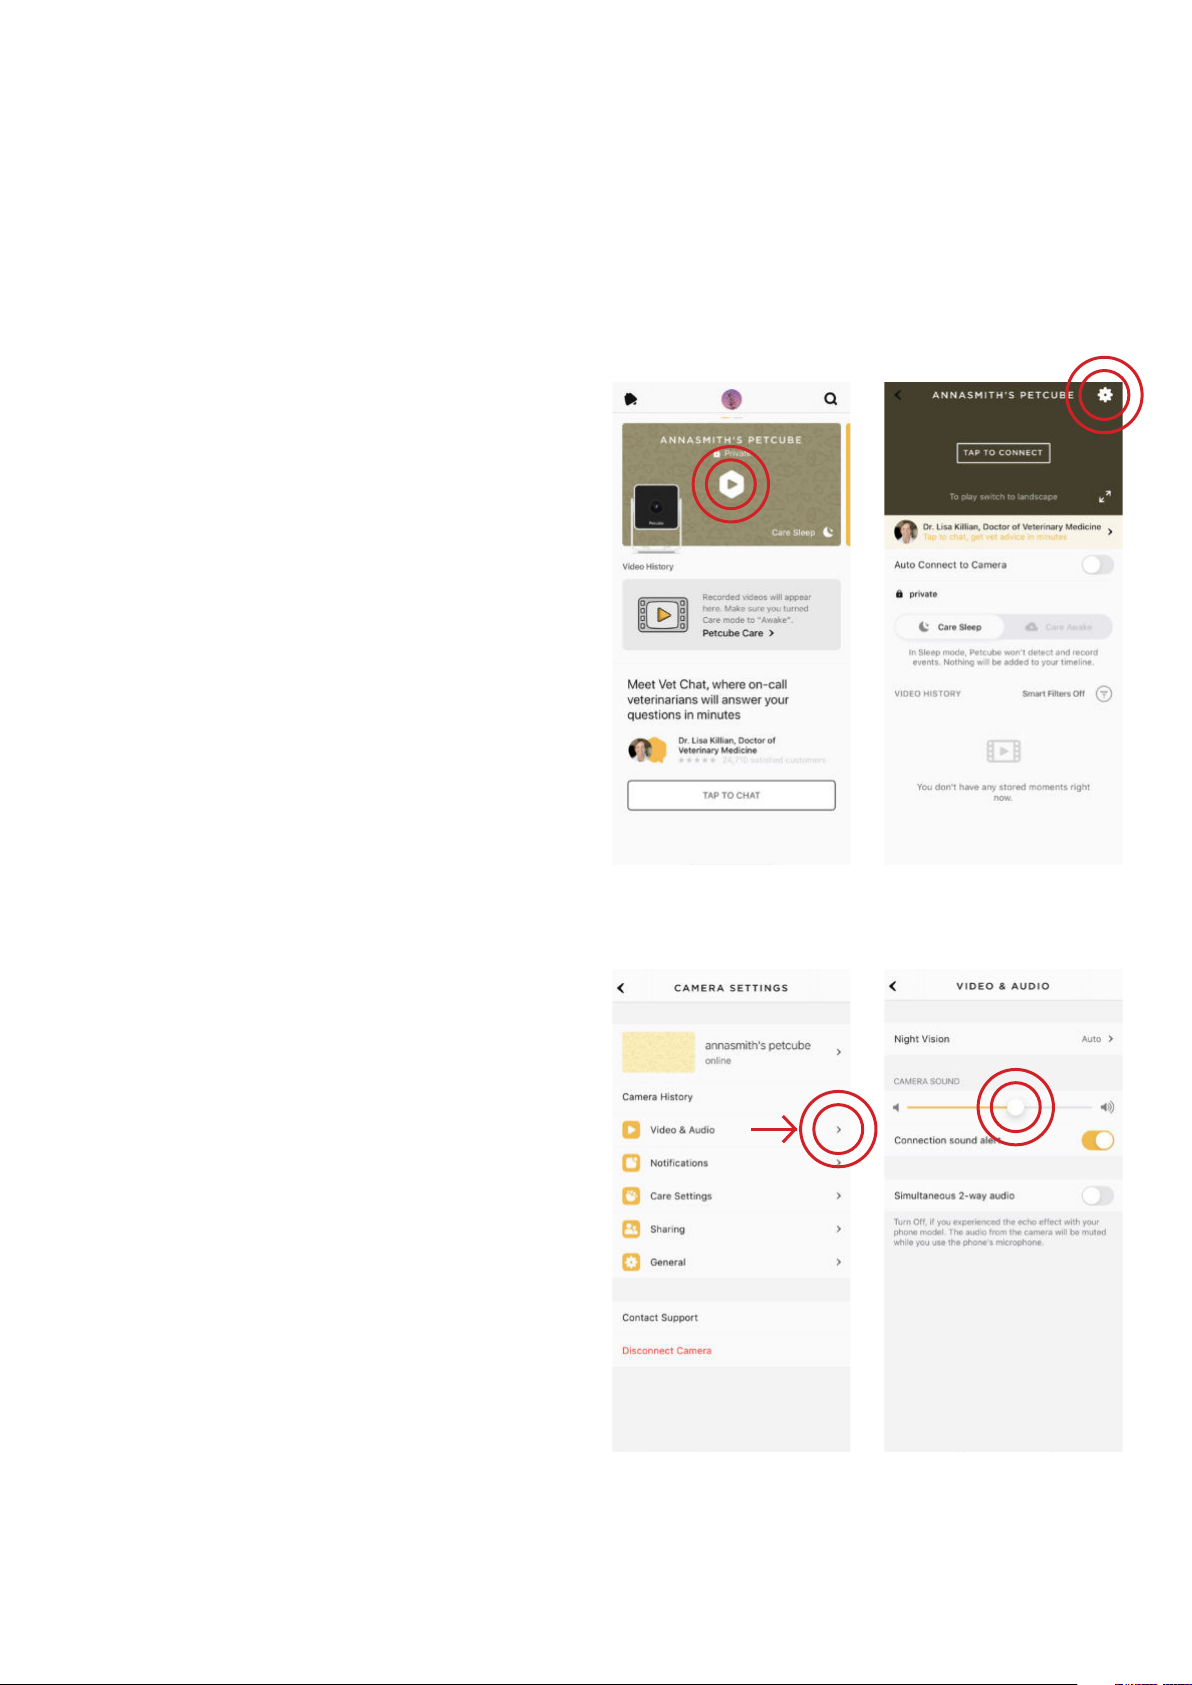
To configure the volume level on your
Petcube:
1. Open the Petcube app;
2. do not click play, click on camera
background;
3. Tap the ‘Settings’ wheel in the upper
right corner if you use Android
or tap the ‘Play’ icon if you use iOS
15
(fig 3.9.2);
4. Go to Video & Audio settings menu
(fig 3.9.3);
5. Adjust the volume level under
‘Camera Sound’ (fig 3.9.4).
Keep in mind that in order to be able to
change the settings on your Petcube,
it needs to be in online standby mode
(steady white light).
Fig. 3.9.1
Fig. 3.9.2
Fig. 3.9.3
Fig. 3.9.4
Page 16
10. Sound alert at the start of a call
To attract your pet’s attention and
be aware of when someone connects
to your Petcube in accordance with
your sharing settings, at the start
of every call your Petcube will play
a sound alert.
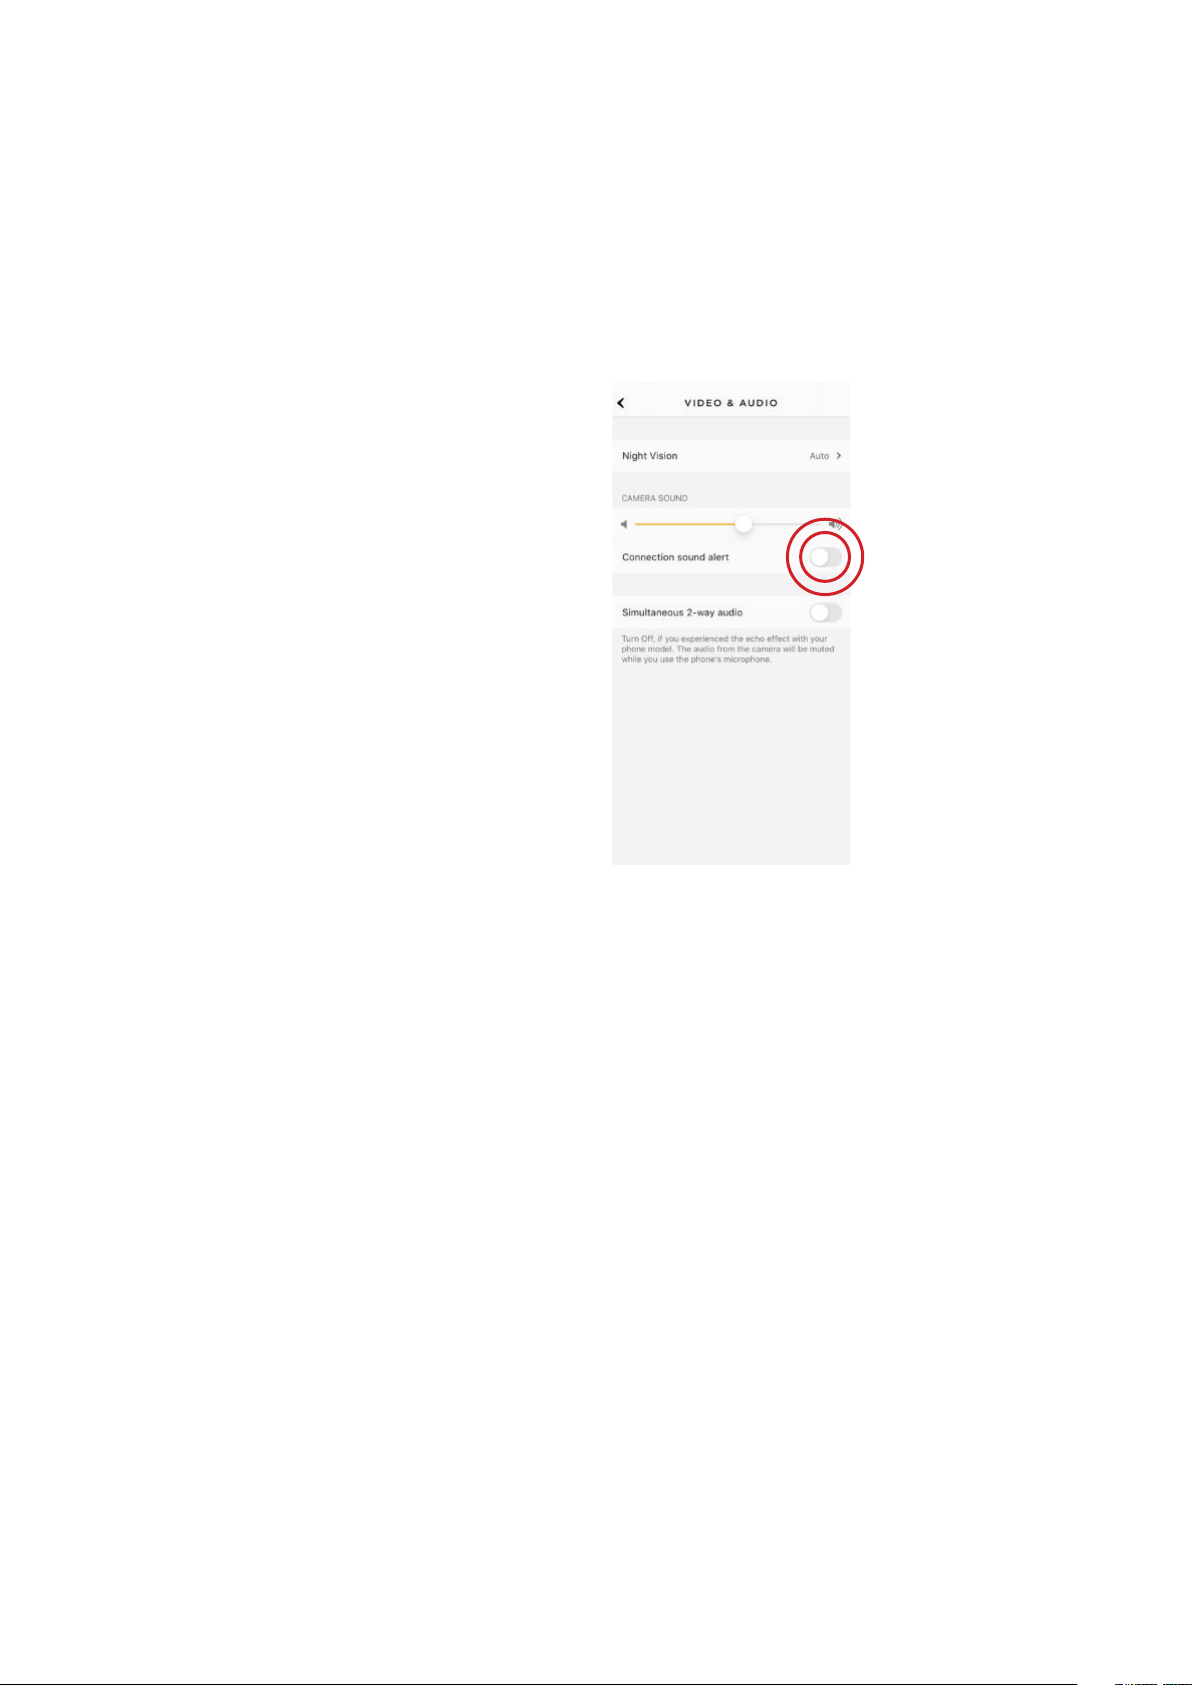
To disable the sound alert:
16
1. Open the Petcube app;
2. Go to the camera profile, tap the
‘Settings’ wheel in the upper right
corner if you use Android or tap the
‘Play’ icon if you use iOS;
3. Tap the ‘Settings’ wheel in the upper
right corner;
4. Go to Video & Audio settings;
5. Switch the ‘Connection sound alert’
off (fig 3.10.1).
Fig. 3.10.1
Page 17
11. Connecting to Petcube at the app launch / skip social feed
Some camera owners find it more
convenient if they can connect to their
camera immediately upon the app
start or at least skip the social feed,
enter camera profile and Petcube Care
timeline once they launch the app.
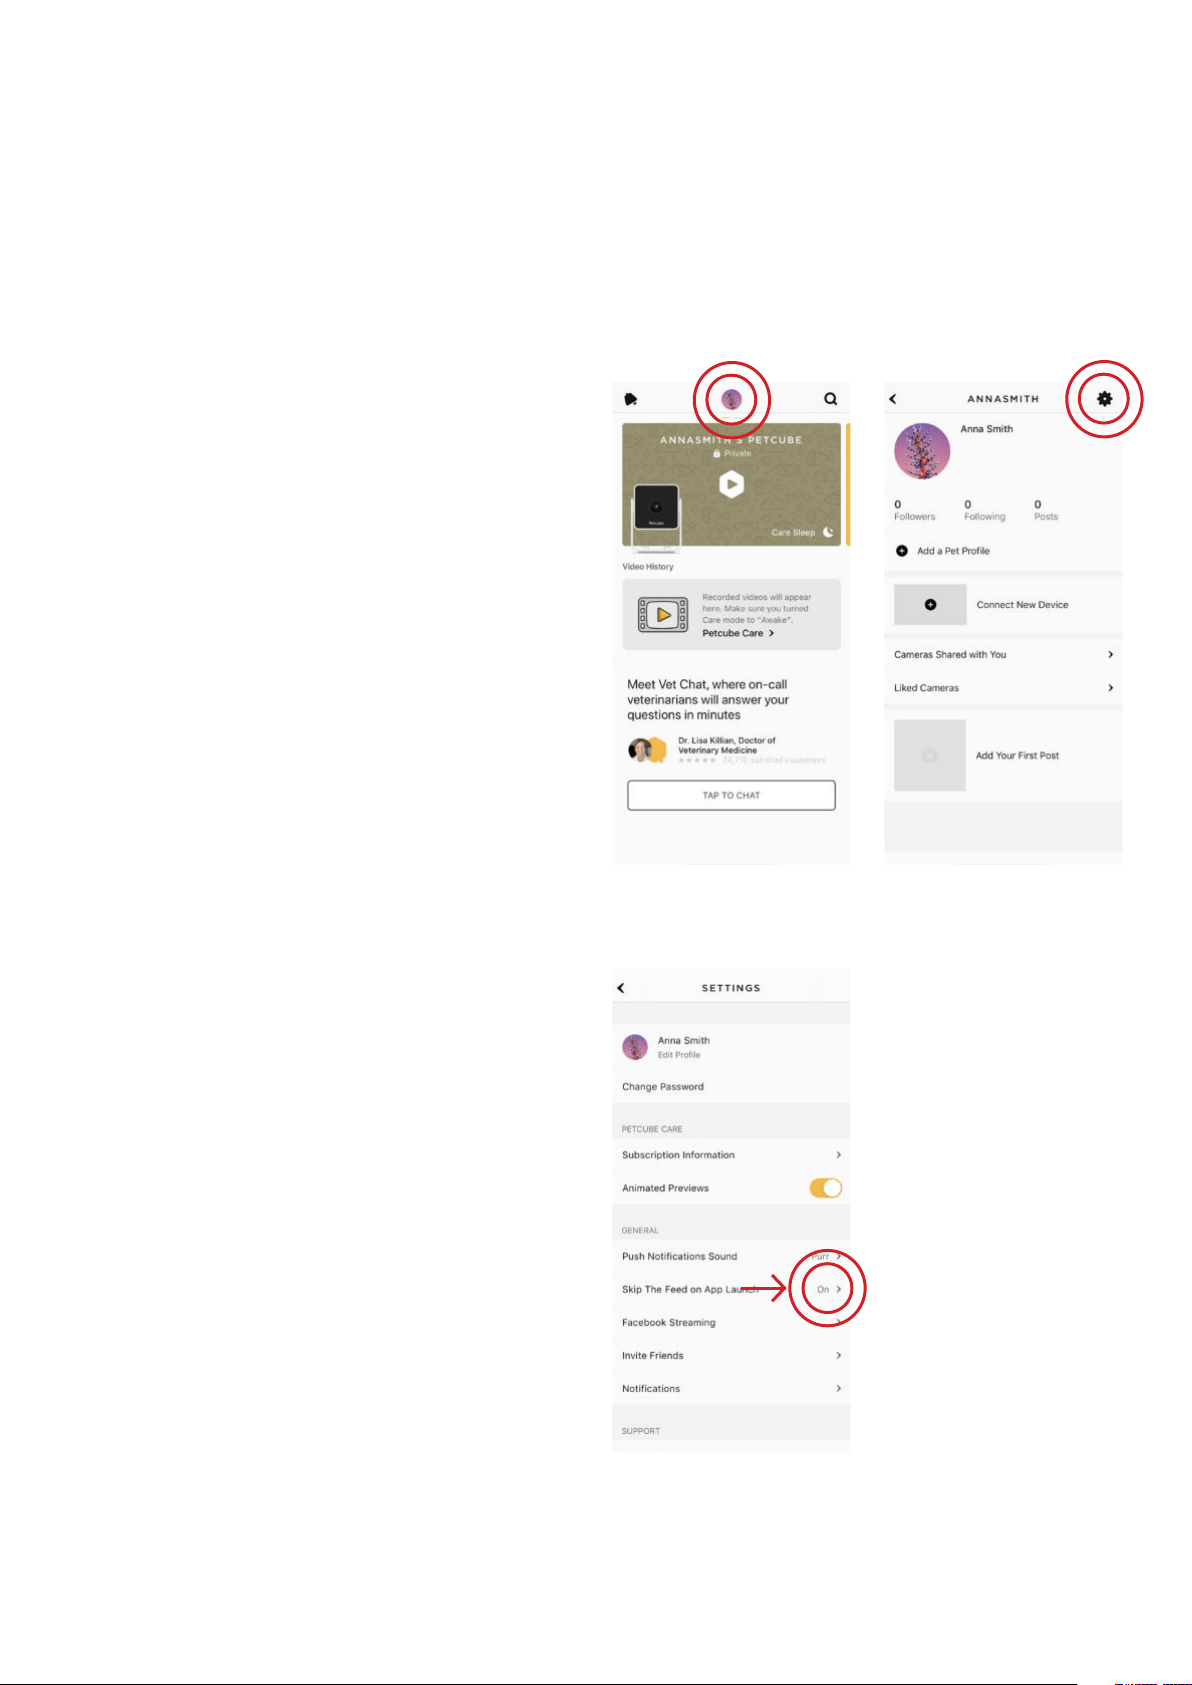
To configure the app start follow these
easy steps:
17
1. Tap on your profile icon at the very
top of your Petcube app (fig 3.11.1);
2. Tap on the Settings icon in the top
right corner of the screen (fig 3.11.2);
Look for ‘Skip The Feed on App
Launch’ and make sure this option
is enabled (fig 3.11.3).
Now, if you restart the app completely,
it will instantly take you to your camera
profile.
If you wish to skip the social feed but
would rather not connect to the camera
immediately on the app launch, simply
Fig. 3.11.1 Fig. 3.11.2
disable the option to ‘Auto connect
to Camera’ on the camera profile page.
Fig. 3.11.3
Page 18
12. Sharing access to your Petcube
By default, only you can access your
Petcube video stream, but you can
share access to your Petcube with your
family, friends and anyone who installs
the Petcube app on their smartphone.
Family members will have almost full
control of your camera, being able
to connect to your Petcube anytime,
18
change camera and sharing settings
and access recorded videos on Petcube
Care timeline.
Friend sharing allows you to configure
friend sharing access at specifically
scheduled times and days as well
as configure permission access for the
laser and 2-way audio controls.
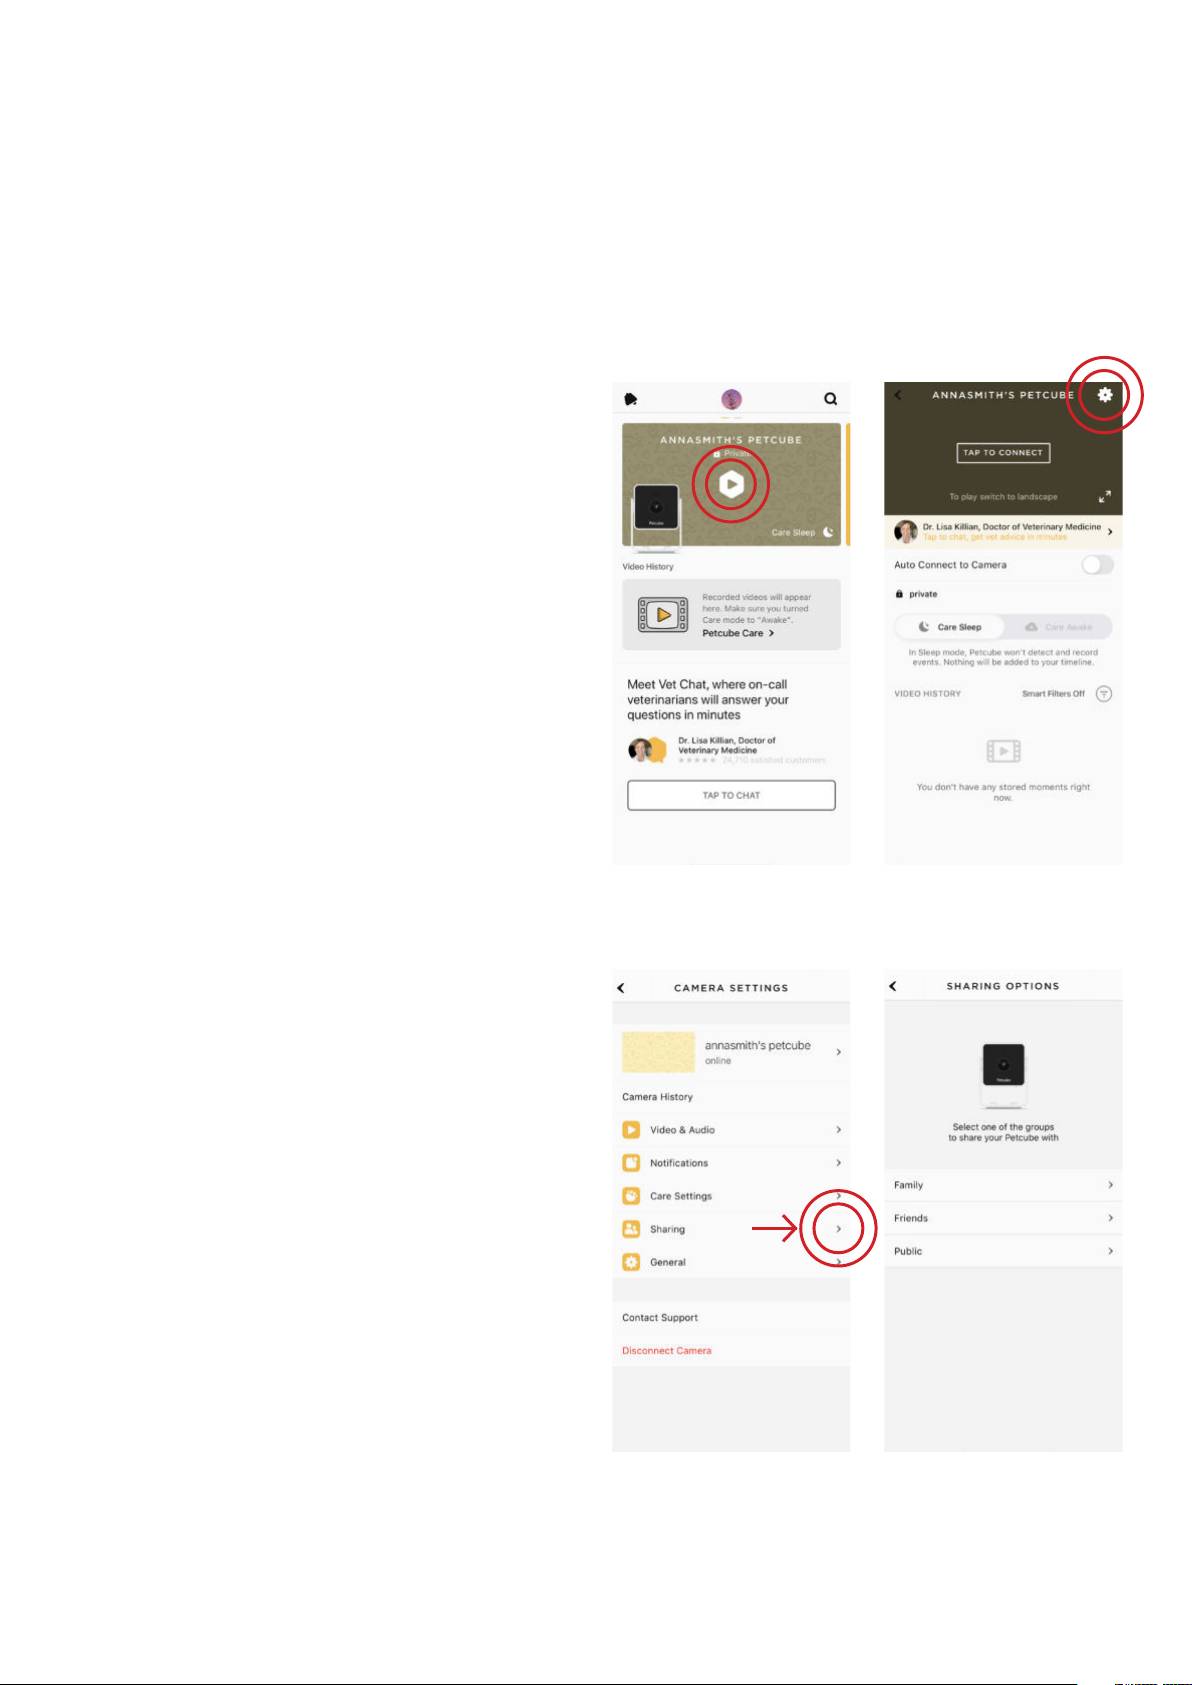
To share access to family members
or friends:
1. Open the Petcube app;
2. Go to the camera profile (fig 3.12.1);
3. Tap the ‘Settings’ wheel in the upper
right corner if you use Android
Fig. 3.12.1
Fig. 3.12.2
or tap the ‘Play’ icon if you use iOS
(fig 3.12.2);
4. Tap ‘Sharing’ (fig 3.12.3), select the
preferable sharing option and add
the new user to either ‘Family’
or ‘Friend’ list (fig 3.12.4).
To delete a user from your ‘Family’
or ‘Friends’ list: To delete a user from
Fig. 3.12.3
Fig. 3.12.4
Page 19
your ‘Family’ or ‘Friends’ list:
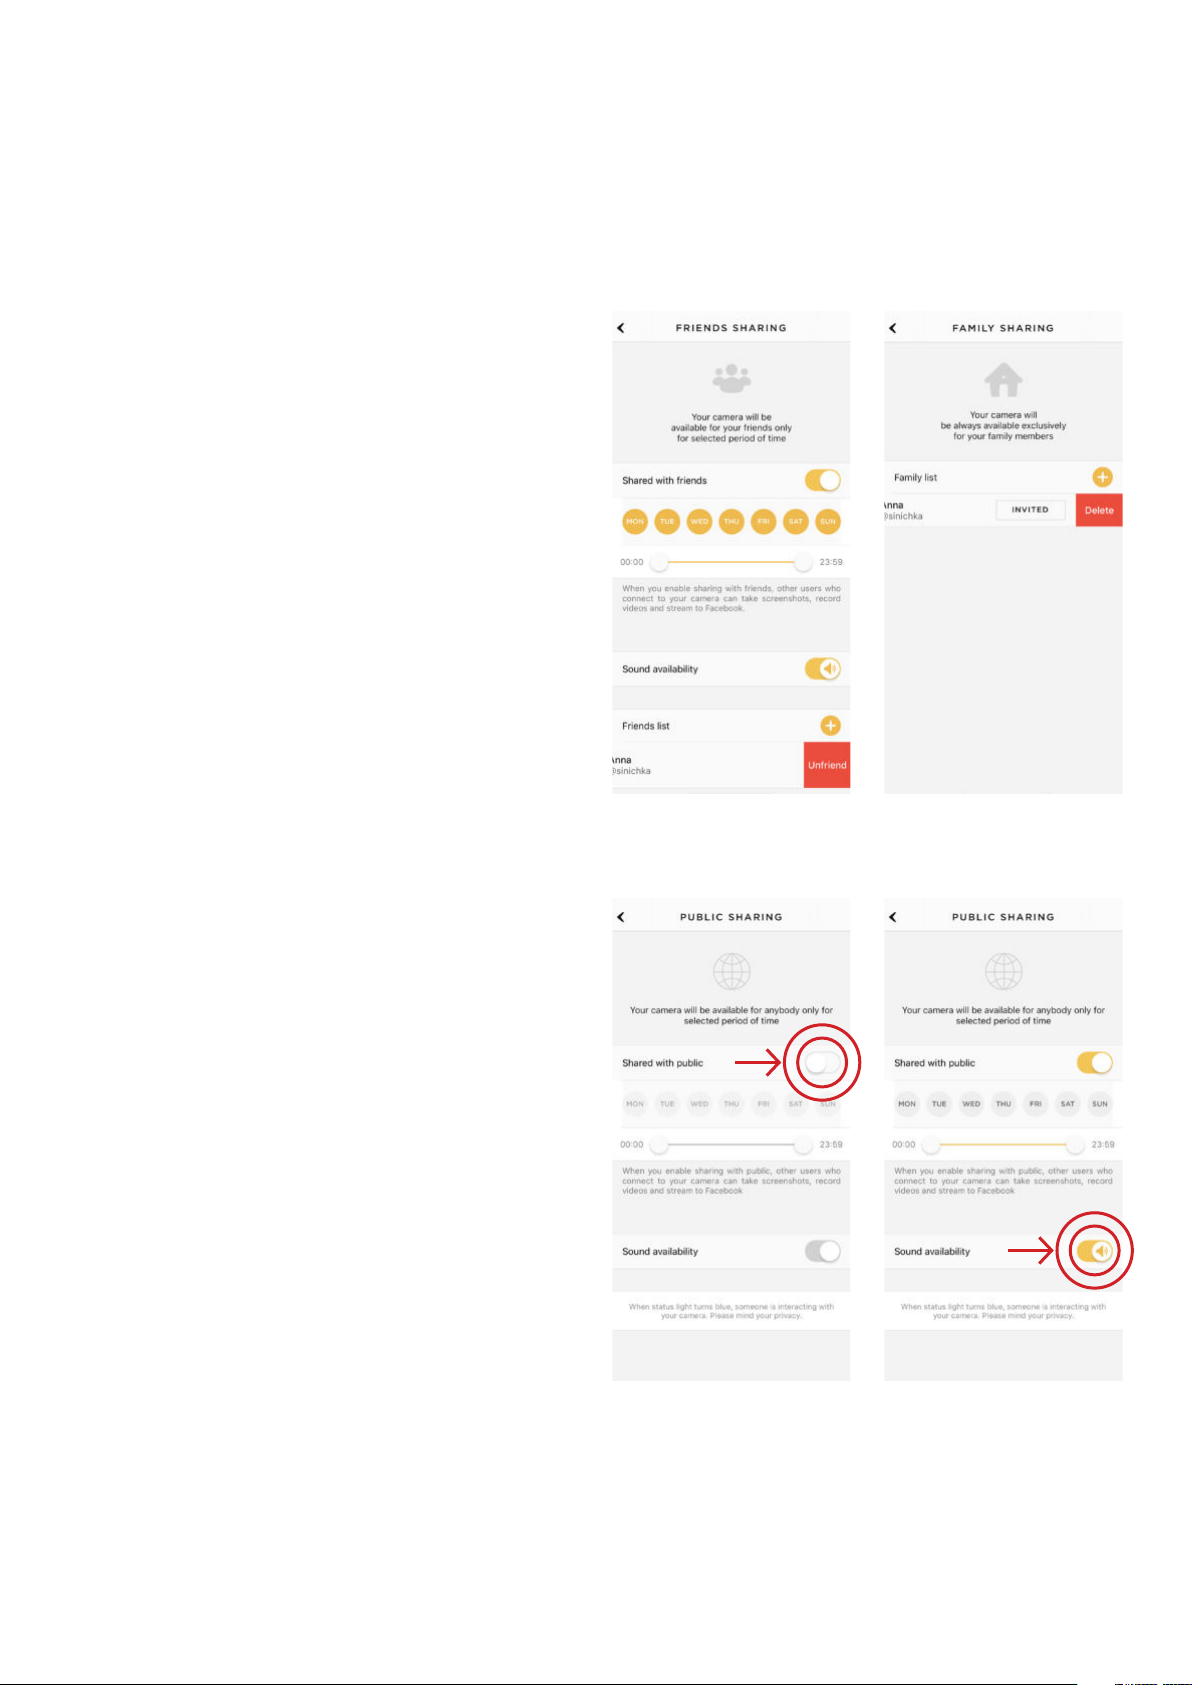
1. Go to ‘Sharing’ settings again;
2. Find their username and swipe it left
to ‘Delete’ or ‘Unfriend’
(figs 3.12.5 & 3.12.6).
You can also share your Petcube with
any Petcube app user by choosing the
‘Public’ sharing option where you can
allow laser access, sound controls
19
and schedule sharing time according
to your needs (fig 3.12.7 & 3.12.8).
Fig. 3.12.5
Fig. 3.12.6
Fig. 3.12.7
Fig. 3.12.8
Page 20
13. Using motion and sound detection
If you are not using Petcube Care
cloud-based video storage service,
the Petcube app can send push
notifications to your smartphone
whenever motion or sound is detected
on your Petcube. To enable push
notifications:
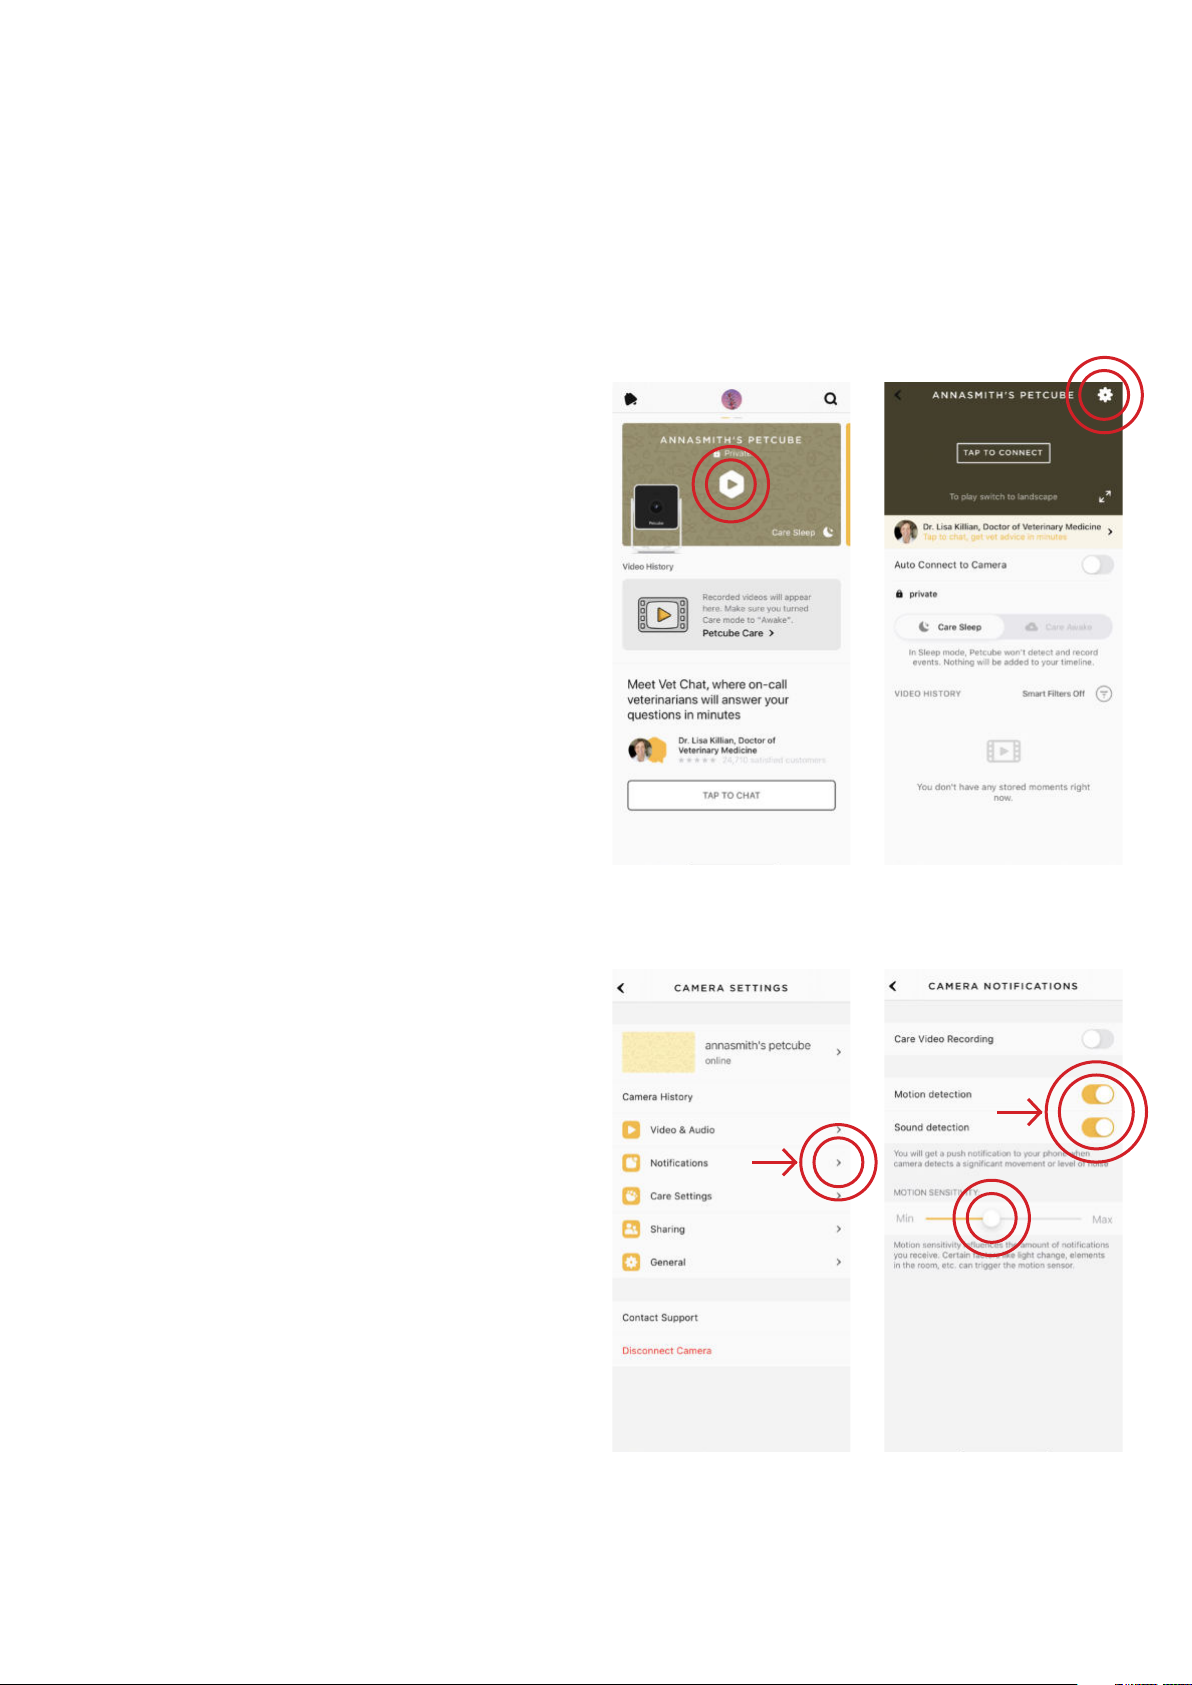
1. Open the Petcube app;
20
2. Go to the camera profile, tap the
‘Settings’ wheel in the upper right
corner if you use Android or tap the
‘Play’ icon if you use iOS (fig 3.13.1),
then tap ‘Settings’ in the upper right
corner (fig 3.13.2);
3. Select ‘Notifications’ (fig 3.13.3);
4. Turn ‘Motion Detection’ and ‘Sound
Detection’ options ON (fig 3.13.4).
You can also adjust the sensitivity
of the motion and sound detection
sensors by moving the slider.
Keep in mind that in order to be able
to change the settings on your
Petcube, it needs to be in online
Fig. 3.13.1
Fig. 3.13.2
standby mode (steady blue light).
If you are using Petcube Care cloud
history service, the Petcube app will
record videos triggered by motion and
sound detection and you can configure
push notifications to be sent as soon
as new video recordings are available.
Fig. 3.13.3
Fig. 3.13.4
Page 21
14. Setting up multiple Petcube Cams to one account
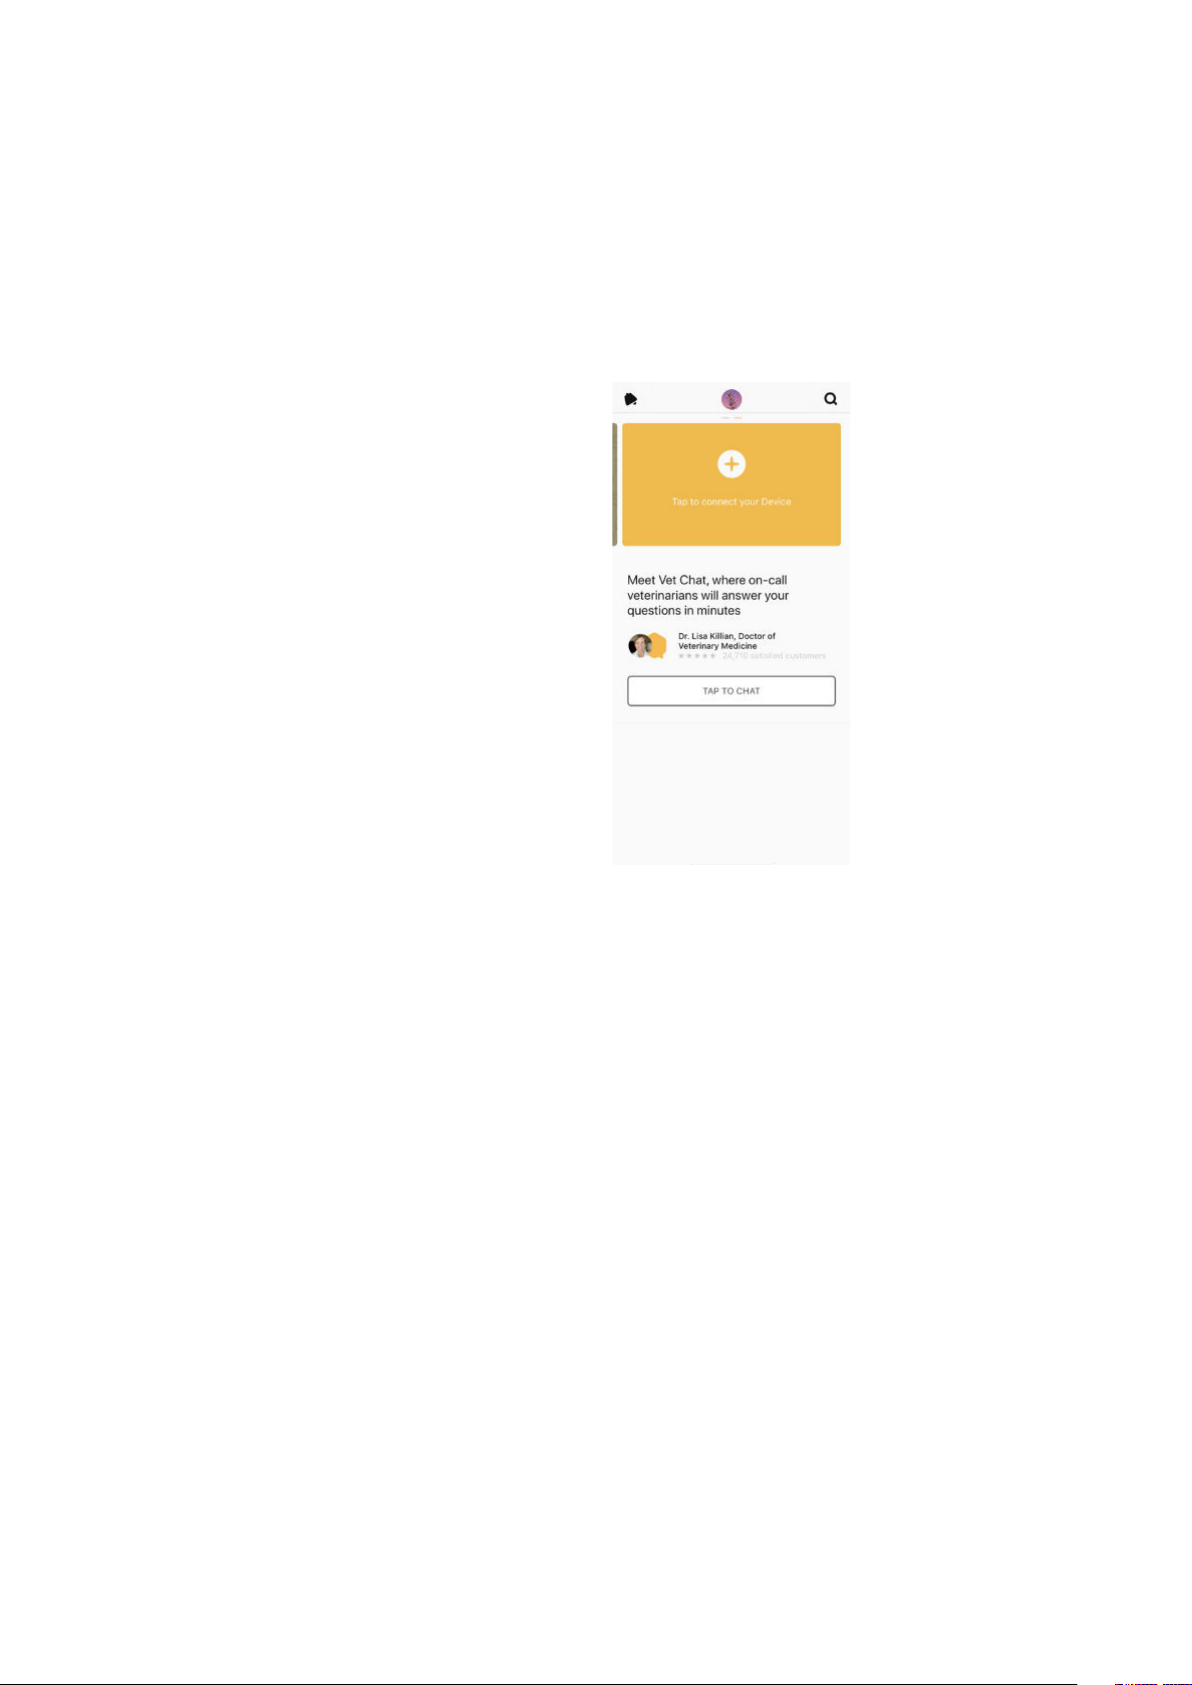
To register multiple cameras in a single
account:
1. Launch the Petcube app;
2. Swipe left at the top of the ‘Home’
tab;
3. Press ‘Tap to connect your device’
icon (fig 3.14.1);
21
4. Select your Petcube in the list and
follow the instructions.
Repeat this process to register
additional devices.
Fig. 3.14.1
15. Registering Petcube to a different account
Be aware that a Petcube can only be registered to one user. You cannot register it under
multiple accounts, but you can share access to it with other users using various sharing
options.
If you need to register a Petcube to a different account, simply delete the camera from
the account it is currently registered to:
1. Open the Petcube app;
2. Go to the camera profile, tap the ‘Settings’ wheel in the upper right corner if you use
Android or tap the ‘Play’ icon if you use iOS;
3. Tap the ‘Settings’ wheel in the upper right corner and tap ‘Disconnect camera’.
Page 22
16. Deleting the Petcube device
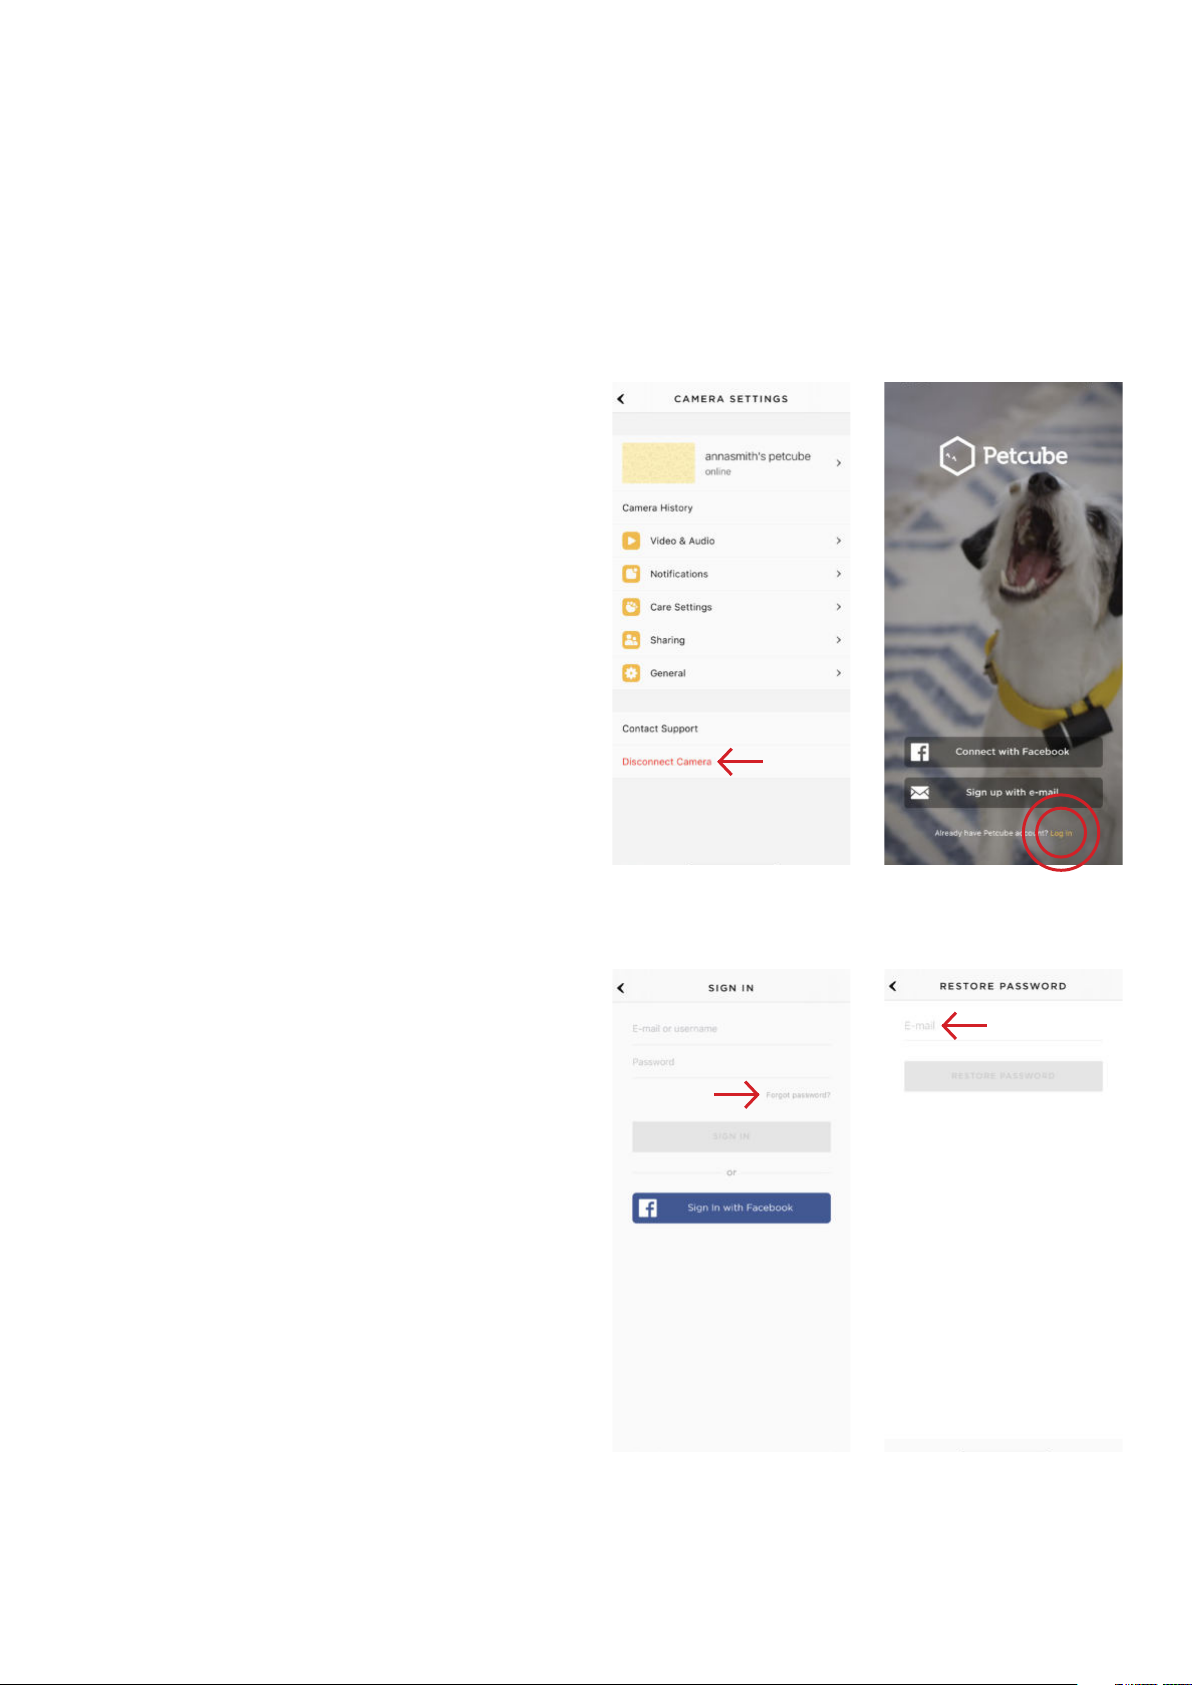
To delete the Petcube from your
account:
1. Open the Petcube app;
2. Go to the camera profile, tap the
‘Settings’ wheel in the upper right
corner if you use Android or tap the
‘Play’ icon if you use iOS;
3. Tap the ‘Settings’ wheel in the upper
22
right corner and tap ‘Disconnect
camera’ (fig 3.16.1);
4. Confirm by choosing ‘Delete’.
17. Resetting user account password
If you forgot your password:
1. Open the Petcube app on your
mobile device;
2. Tap ‘Log In’ at the bottom of the
screen (fig 3.17.1);
3. Tap ‘Forgot password’ (fig 3.17.2);
Fig. 3.16.1
Fig. 3.17.1
4. Enter your Petcube account email
address;
5. Hit ‘Restore Password’ at the
bottom. (fig 3.17.3);
6. Check your email and follow the
instructions to reset your password.
Fig. 3.17.2
Fig. 3.17.3
Page 23
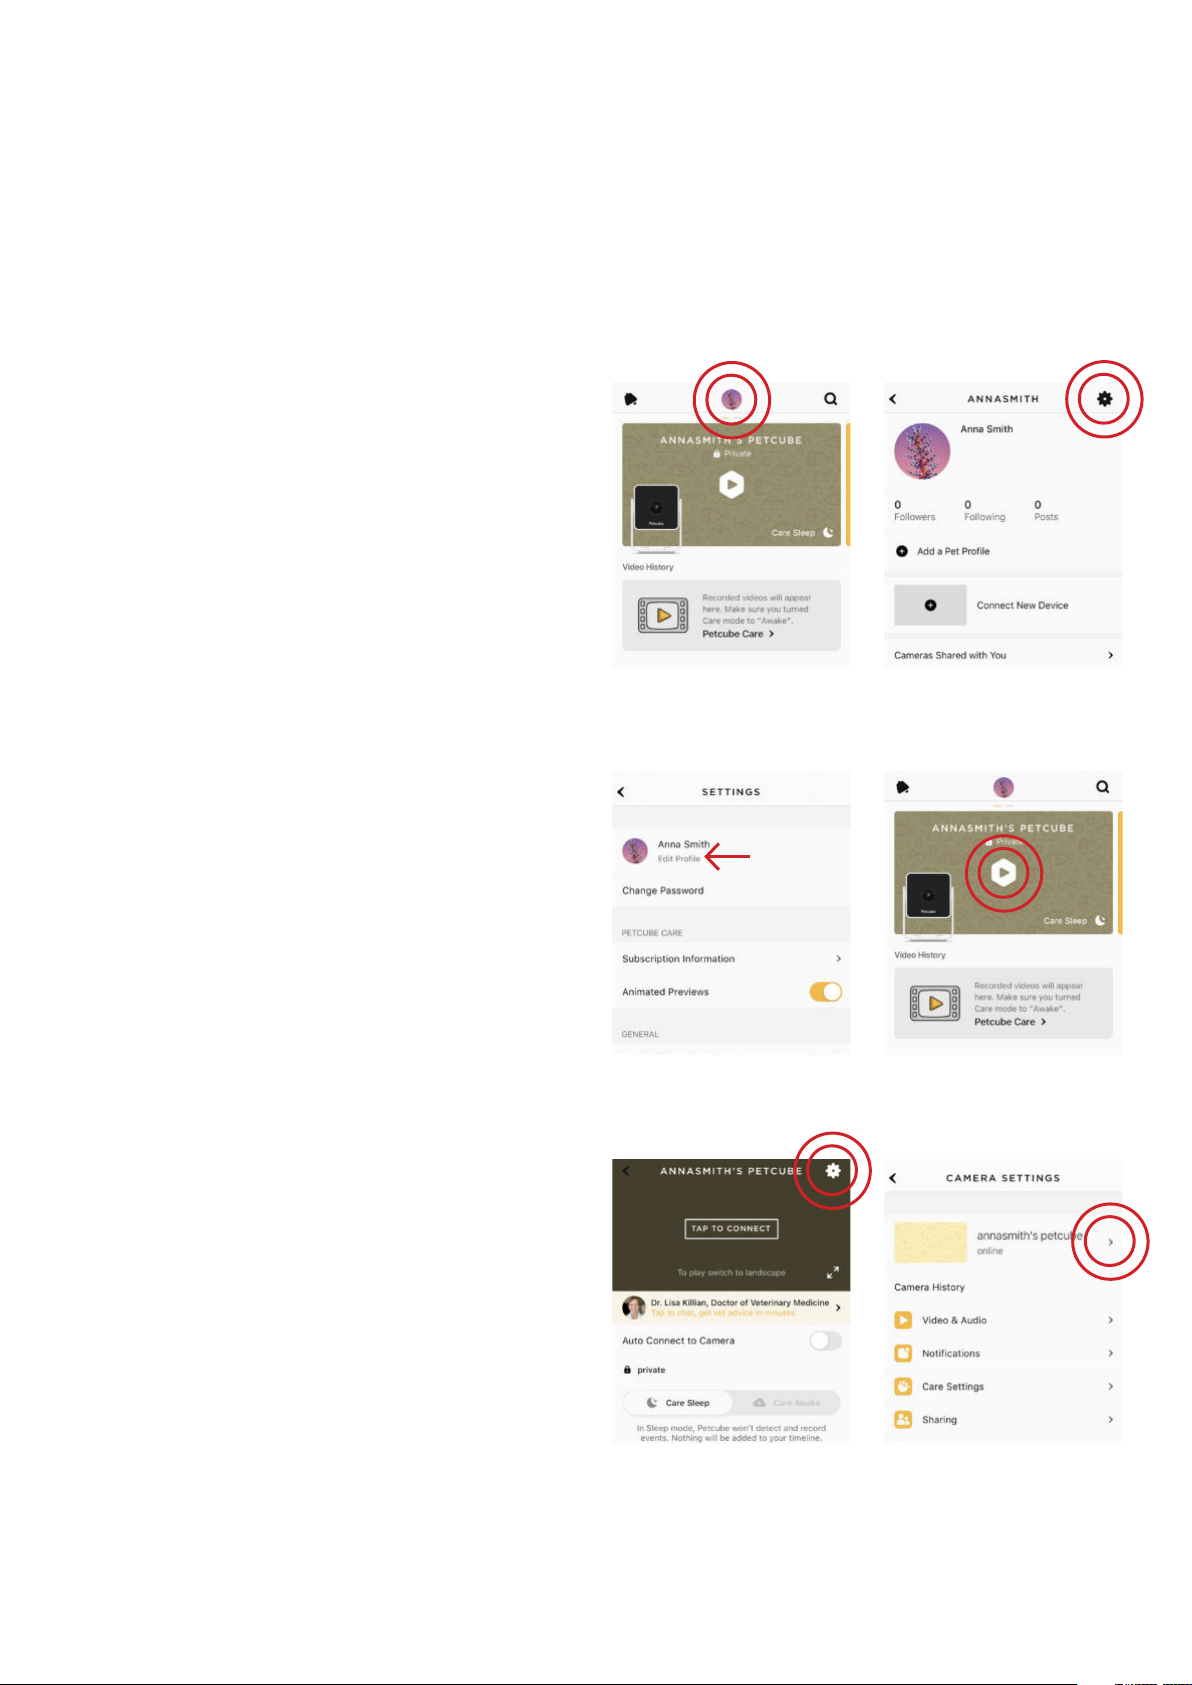
18. Changing your account name, username, password or camera name
To change your account details such
as your name, username or password:
1. Open the Petcube app;
2. Go to the user profile by tapping
your user icon (fig 3.18.1);
3. Tap the ‘Settings’ wheel in the upper
right corner (fig 3.18.2);
23
4. Hit ‘Edit profile” (fig 3.18.3) and tap
the values you want to change.
To change your Petcube Cam name
or change the camera background:
1. Open camera profile (fig 3.18.4);
2. Tap the ‘Settings’ wheel in the upper
right corner (fig 3.18.5);
3. Hit the arrow next to your Petcube
name and status (fig 3.18.6) and
change the necessary values.
Fig. 3.18.1
Fig. 3.18.3
Fig. 3.18.2
Fig. 3.18.4
Fig. 3.18.5
Fig. 3.18.6
Page 24
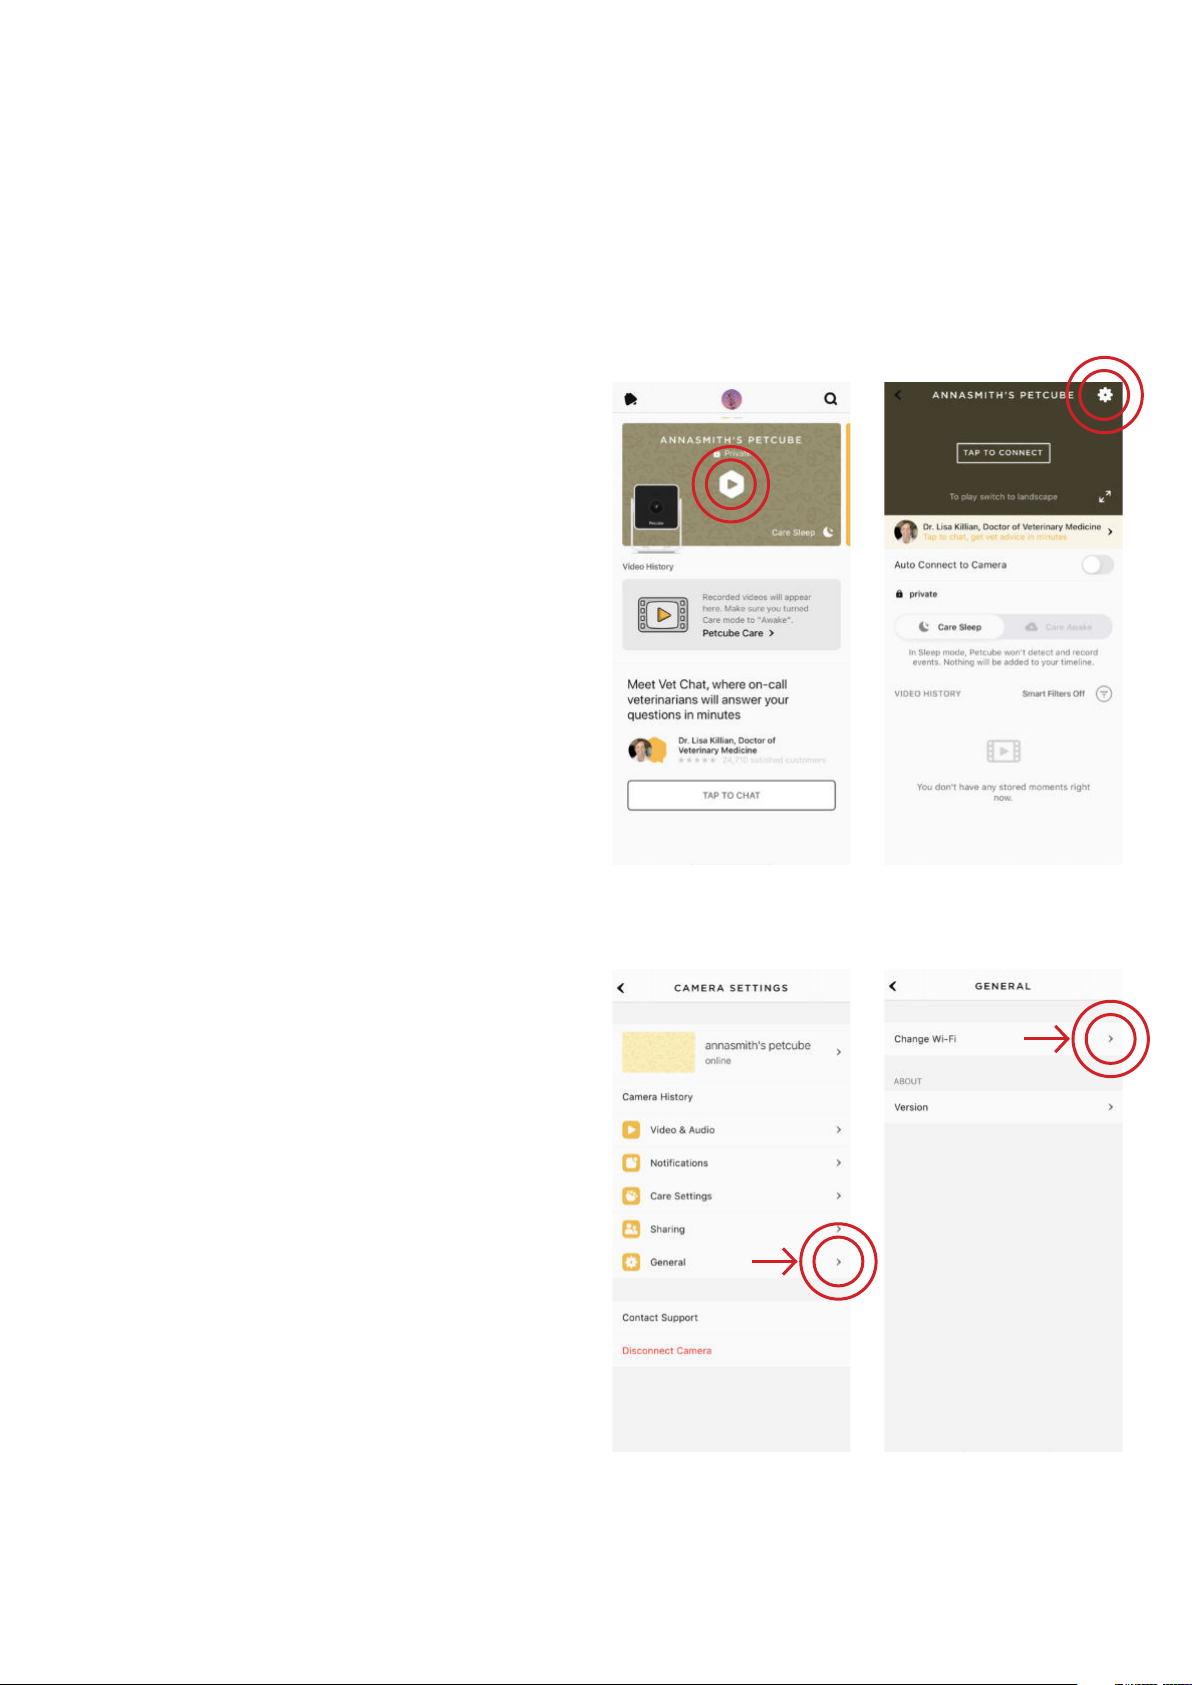
19. Moving your Petcube to a different location or changing Wi-Fi settings
As long as the Petcube is within range
of your wireless network, you can
reposition it according to your needs.
However, if you’re trying to use it
in a different Wi-Fi environment
or want to connect the camera
to a different wireless network, you
need to change the Wi-Fi settings
24
in the Petcube app.
To do that:
1. Open the Petcube app;
2. Go to the camera profile, tap the
‘Settings’ wheel in the upper right
corner if you use Android or tap the
‘Play’ icon if you use iOS (fig 3.19.1);
3. Tap the ‘Settings’ wheel in the upper
right corner (fig 3.19.2);
4. Select ‘General’ (fig 3.19.3);
5. Tap ‘Change Wi-Fi’ (fig 3.19.4);
6. Power up your Petcube, wait
1 minute until it starts up;
Fig. 3.19.1
Fig. 3.19.2
7. Click setup button at the bottom
of the device and follow the steps
on your screen.
Fig. 3.19.3
Fig. 3.19.4
Page 25
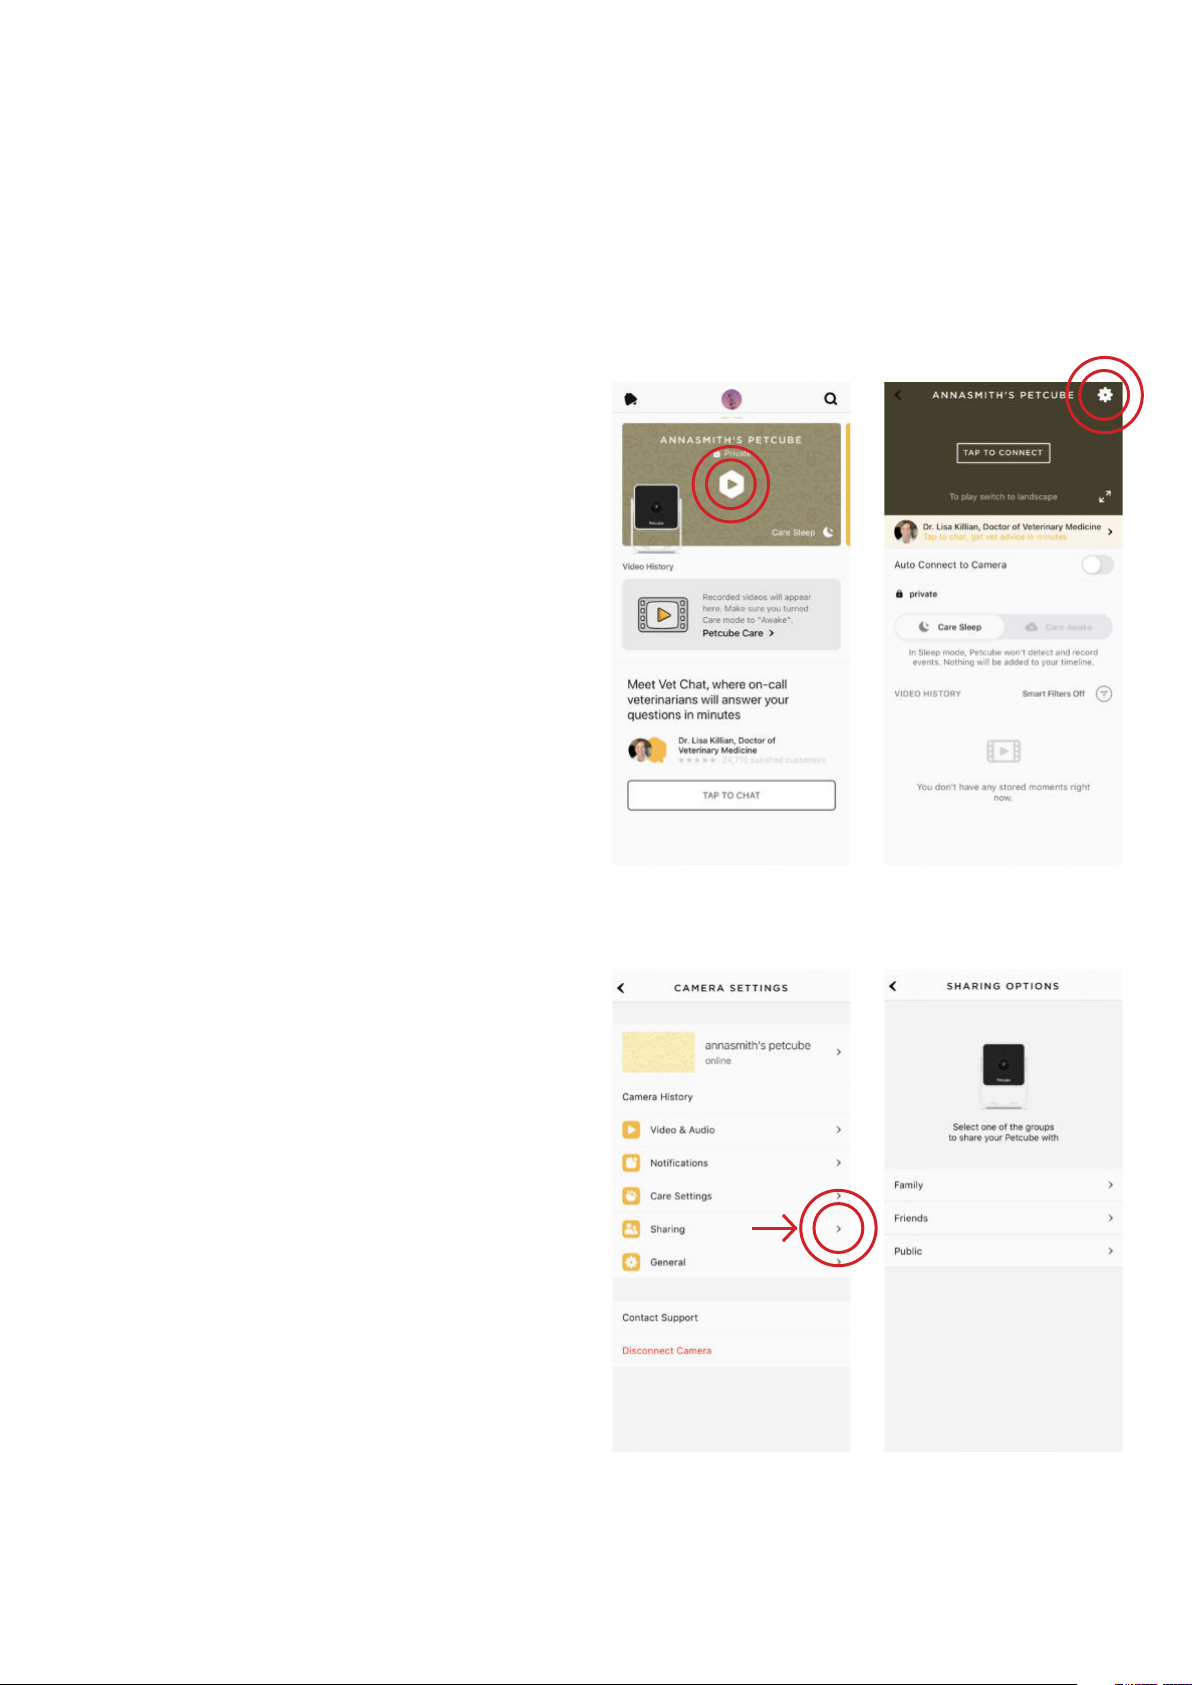
20. Turning your Petcube off remotely / Disable sharing
Currently, there is no option to turn
off the camera remotely from the
Petcube app. But if you’re sharing
access to your Petcube, you can easily
disable it in the ‘Settings’ menu.
To disable sharing:
1. Open the Petcube app;
25
2. Go to the camera profile, tap the
‘Settings’ wheel in the upper right
corner if you use Android or tap the
‘Play’ icon if you use iOS (fig 3.20.1);
3. Tap the ‘Settings’ wheel in the upper
right corner (fig 3.20.2);
4. Select ‘Sharing’ (fig 3.20.3) and tap
the specific sharing settings you
want to disable (fig 3.20.4).
Fig. 3.20.1
Fig. 3.20.2
Fig. 3.20.3
Fig. 3.20.4
Page 26
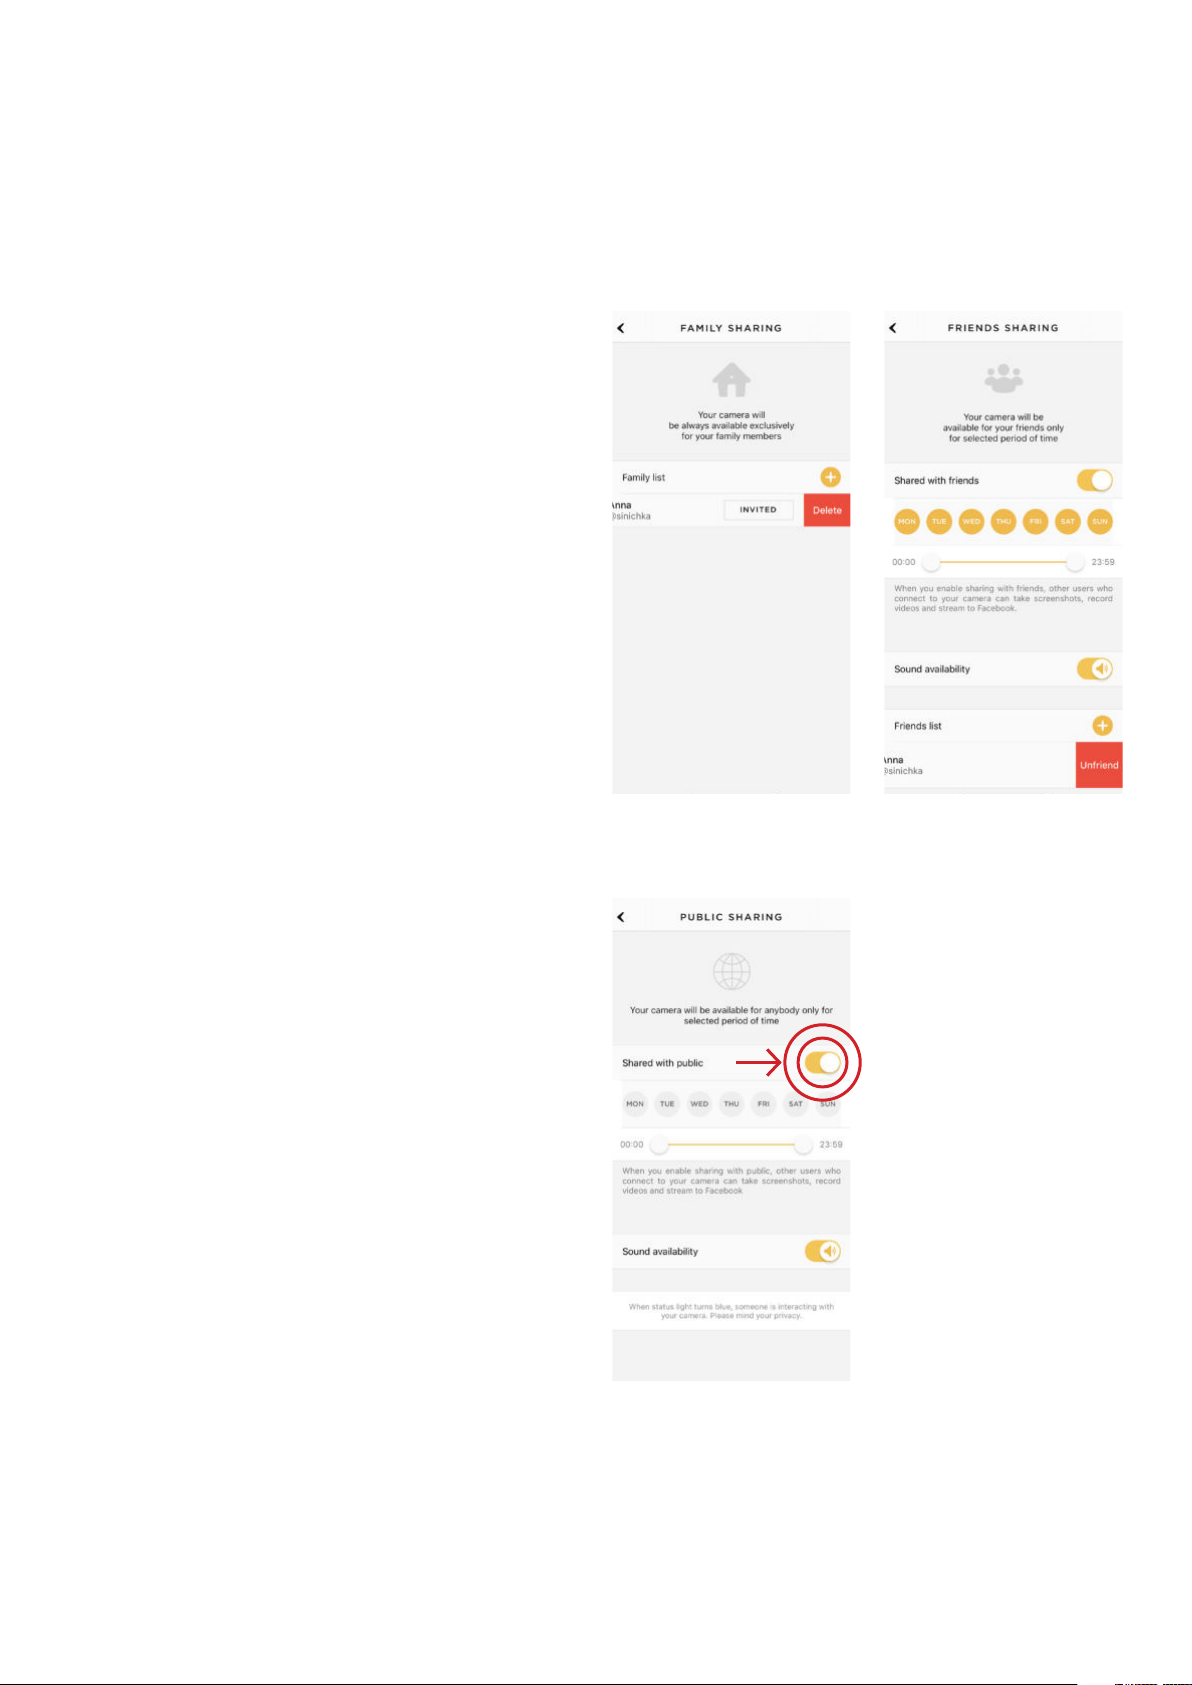
To disable family sharing, select ‘Family’
sharing in the list and swipe left the
username of the family account
to ‘Delete’ them (fig 3.20.5).
To disable friend sharing, select ‘Friend’
and simply switch the ‘Shared with
friends’ option off or if you wish
to disable sharing only for the specific
user, swipe their username left
26
to ‘Unfriend’ them (fig 3.20.6).
To stop public sharing, just switch the
sharing toggle off (fig 3.20.7).
Fig. 3.20.6Fig. 3.20.5
Fig. 3.20.7
Page 27

PETCUBE CARE™
4
1. What is Petcube Care
Petcube Care is an optional subscription service that adds features to a Petcube Cam
and gives owners additional peace of mind when it comes to their pets and their
property.
Depending on the subscription plan, Petcube Care provides Petcube users with access
to extended cloud-based video history for 3 or 90 days, longer 30-second video clips,
10 or unlimited video downloads, smart alerts, a 2-year device warranty, and Premium
Support.
27
Petcube Care also unlocks exclusive offers from our 30+ top partner brands, worth
hundreds of dollars in savings, including on pet medical insurance, pet sitting and
walking, vet consultations, audio-visual entertainment for pets, and pet products.
2. How much does Petcube Care cost
Petcube Care offers two different subscription plans, Optimal and Premium, to fit the
needs of pet owners of all stripes. Choose a monthly or annual rate:
Optimal plan (3-Day Video History)
• Monthly: $5.99 a month;
• Annual: $47.88 a year (save $24).
Premium plan (90-Day Video History)
• Monthly: $14.99 a month;
• Annual: $99.00 a year (save $80).
For more information on the plans, check out the Petcube Care subscription options
on petcube.com/care/
Page 28

3. How does Petcube Care work
Petcube Care watches after your pets and home when everyone is away, capturing
action videos, triggered by sound or motion. 30-second clips are saved securely in the
cloud and are accessible in the interactive timeline in the Petcube app to review and
download for 3 or 90 days (depending on the subscription plan). The 3-second look
back lets you see what event set off the recording.
Using powerful AI technology, Care understands what pets are doing, registering
important events like cat, dog or human movements, barks or meows, and sends you
28
real-time smart alerts about potentially dangerous events.
Without Care, Petcube users only have access to the live video streaming and general
sound and motion notifications.
4. How to activate Petcube Care
To start using Petcube Care, you need to have a Petcube Cam and a Petcube Care
subscription. New Petcube Cam owners receive a free 14-day trial with 3 days
of video history and access to smart alerts that offer audio recognition of barking
and meowing, and the ability to tell the difference between pets and people.
To subscribe:
1. Go to
2. Sign in with your Petcube account or go to the Petcube Care product page and
petcube.com;
select the most suitable subscription option for you. You will also be able
to subscribe from the ‘Home’ page in the Petcube app on both iOS and Android
devices.
If you are not a Petcube Cam owner yet but wish to buy one, you will also be able
to subscribe to Petcube Care when you make your purchase.
Page 29

5. How to Turn Off Petcube Care Video History
Petcube Care’s video history feature is turned on by default.
To deactivate it:
1. Open Petcube app;
2. Go to the camera profile in Home menu if you use Android or tap the ‘Play’ icon
if you use iOS;
3. Move the slider to ‘Sleep’ mode in the lower right corner of the Petcube Cam
controls.
29
In Sleep mode, Petcube Care is disabled. It will not detect and record events. Nothing
will be added to your video history timeline. You will still have access to recorded videos
if any were taken when Care was active and your subscription plan allows.
Use Awake mode, when you are not around and want Petcube Care to be active. You
will get noise & motion notifications. These moments will be stored on your timeline.
If you turned on Sleep mode, but later purchased a Petcube Care subscription, Awake
mode will be turned on automatically and your video timeline will begin to populate.
6. What is the Petcube Care free trial and how it works
A free 14-day Petcube Care trial of the Premium plan is included when you purchase a
Petcube Cam. You can enroll in the trial after you have activated your Petcube Cam. We
ask for a payment method to ensure you don’t have any interruption
in service after the trial ends. You will not be charged if you do not continue our service.
If you purchase a Petcube Care subscription at the same time as you buy a camera, your
subscription will start automatically when you activate the camera.
If you do not wish to use the free trial of Petcube Care, you can choose to skip it after
you have activated your Petcube Cam.
Page 30

30
You can view your subscription settings at any time in the Petcube app. Go to ‘Home’
tab, select ‘Settings’ in the upper right corner and look for ‘Manage Subscription’ under
Care settings.
For more information, check out the Petcube Care subscription options on petcube.com
7. Petcube Care modes explained
There are two modes in Petcube Care: Awake and Sleep. To change between the
settings, open Petcube app, go to the camera profile in Home menu if you use Android
or tap the ‘Play’ icon if you use iOS, move the slider to ‘Sleep’ or ‘Awake’ mode.
• Use Awake mode when you are not around and want Petcube Care to be active. You
will get noise & motion notifications. These moments will be stored on your timeline;
• Sleep mode disables Petcube Care. It will not detect and record events. Nothing will
be added to your timeline.
Keep in mind that your Petcube Cam needs to be online to record the videos.
If you wish Petcube Care to record videos but don’t wish to receive notifications
about recorded events, you can easily switch Petcube Care notifications in the camera
settings.
To do so:
1. Open Petcube app;
2. Go to the camera profile, tap the ‘Settings’ wheel in the upper right corner if you use
Android or tap the ‘Play’ icon if you use iOS;
3. Tap the ‘Settings’ in the upper right corner;
4. Select ‘Notifications’;
5. Disable ‘Care Video Recorded’ notifications.
If you don’t wish to use Petcube Care video recording service but would like to receive
motion and sound detection notifications, go to ‘Notifications’ settings again and turn
‘Motion Detection’ and ‘Sound Detection’ options on.
Page 31

8. How to view your video history in Petcube Care
It’s very easy to access your video history with Petcube Care! Launch the Petcube app
on your phone. Today’s videos will populate automatically on your home screen. You
can scroll down to get earlier videos.
Tap on the date to move back or forward in time.
Tap on the ‘...’ next to each video to get options to Delete, Share, or Save the video.
31
You can also access your video history if you log into your Petcube account on
petcube.com in the upper right corner.
The website doesn’t offer live streaming or alerts, but you can scroll through, filter,
and play back the recorded Care videos.
Remember, Petcube Care records videos to the timeline automatically by default. If you
would like to deactivate this feature, review these instructions in the article ‘How to Turn
Off Petcube Care Video History’.
If your Petcube Care is currently set to Sleep mode, you will need to change it to Awake
mode in order for videos to be recorded to your timeline. To do this:
1. Open Petcube app;
2. Go to the camera profile in Home menu if you use Android or tap the ‘Play’ icon
if you use iOS;
3. Move the slider to ‘Awake’ mode.
9. How to save a video recording to your phone’s internal storage
While you will be able to view video history for the past 4 hours (free subscription),
1, 3 or 10 days, depending on your subscription plan from the cloud via Petcube Care,
you will always be able to store video recordings to your phone’s internal storage. Just
pick the necessary video clip, press the three dots ‘…’ located on the left hand side
of the video and select ‘Save’.
Page 32

32
10. Video recording length
Currently, video recording length can be no longer than 30 secs. So, for instance,
if there’s a motion that lasts for 2 minutes 15 seconds, the app will cut it into 5 scenes.
However, in the free 4-hour history plan, video recording length is limited to 10 seconds.
11. How can I use Petcube Care on multiple Petcube devices
At the moment, separate Petcube Care subscriptions are required for each Petcube
Cam. Without a subscription, each Petcube Cam includes a limited free 4-hour video
history snapshot.
To purchase additional subscriptions:
1. Go to
2. Sign in with your Petcube account or go to the Petcube Care product page and
select the most suitable subscription option for you.
You will also be able to upgrade your subscription for each additional camera from
the Petcube app by going to the ‘Home’ screen of the camera.
12. How to add or update your payment information for Petcube Care
If you need to add or update your payment information for Petcube Care service:
1. Log into your Petcube account at petcube.com by clicking on the Home icon
petcube.com;
in the upper right corner;
2. Once logged in, go to ‘Billing’ tab to update your information.
13. How do I cancel Petcube Care subscription
In order to cancel your Petcube Care subscription:
1. Open Petcube app;
2. Go to camera profile on which you wish to cancel the subscription;
Page 33

3. Tap the ‘Settings’ wheel in the upper right corner;
4. Select Care Settings;
5. Click on the current subscription at the top;
6. Hit Cancel subscription at the very bottom of the page;
Alternatively, you can go to petcube.com, select the Home icon in the upper right
corner, go to Petcube Care tab, select your subscription and hit Cancel Subscription.
33
Page 34

PETCUBE SMART ALERTS
34
5
1. What are Smart Alerts & How do they work?
Smart alerts bring AI-powered recognition technology to the pet space. Your Petcube
Cam will be able to give you better intel on what’s happening at home when you’re
away, with audio detection of dog barks and cat meows, and visual detection of cats,
dogs and people. Get push notifications on your phone when something is detected and
setup automatic video recording so you can later replay what happened.
2. How well does it work?
Smart alerts improve the accuracy of your notifications, giving you less false positives.
The feature is powered by artificial intelligence algorithms that learn and improve over
time - this means that it will actually get smarter and smarter.
3. Can I use smart alerts?
Petcube launched smart alerts in November 2018 for subscribers to select Petcube Care
tiers. To find out if smart alerts are available for your subscription plan or to start a new
subscription, please view the Petcube Care page.
4. Can I choose which smart alerts I receive?
Yes! Smart alerts are triggered by four new types of events that your Petcube Cam can
recognize:
• Dogs barking;
• Cats meowing;
• Pets in view of the camera;
• People in view of the camera.
You’re in full control of which notifications you get - choose one or get them all —
it’s up to you.
Page 35

5. How can I get smart alerts for my pets?
If you don’t have a Petcube Cam yet:
1. Get a Petcube pet camera! :)
2. Download the Petcube App for your phone or tablet from the App Store or Google
Play Store;
3. Sign up for history subscription to Petcube Care;
35
4. Enable Smart Alerts in the Petcube App under Camera Notifications.
If you already have a Petcube Cam, but don’t have Petcube Care:
1. Sign up for a video history subscription to Petcube Care;
2. Enable Smart Alerts in the Petcube App under Camera Notifications.
If you have a Petcube Cam and Petcube Care:
Easy! Enable Smart Alerts in the Petcube App under Camera Notifications.
Page 36
TROUBLESHOOTING
36
6
1. LED light doesn’t light up
If the LED light on your Petcube Cam is off while the camera is plugged into the power
source, try unplugging it and plugging it back in. Make sure that you are using the
original power adapter that came with your Petcube and that the power cord
is undamaged. If you no longer have the original power adapter, make sure to only use
the ones that provide 5V/2A power.
2. Petcube blinks blue/yellow and doesn’t turn blinking blue
It might be that Petcube Cam is located
out of reach of wifi assigned, or wifi
is not being broadcasted, or there is not
internet available. Make sure it is in wifi
range and internet is available.
When you plug in your Petcube before
starting the registration process, it
should glow solid yellow for a minute.
Wait up to 1 minute until it starts
blinking blue/yellow.
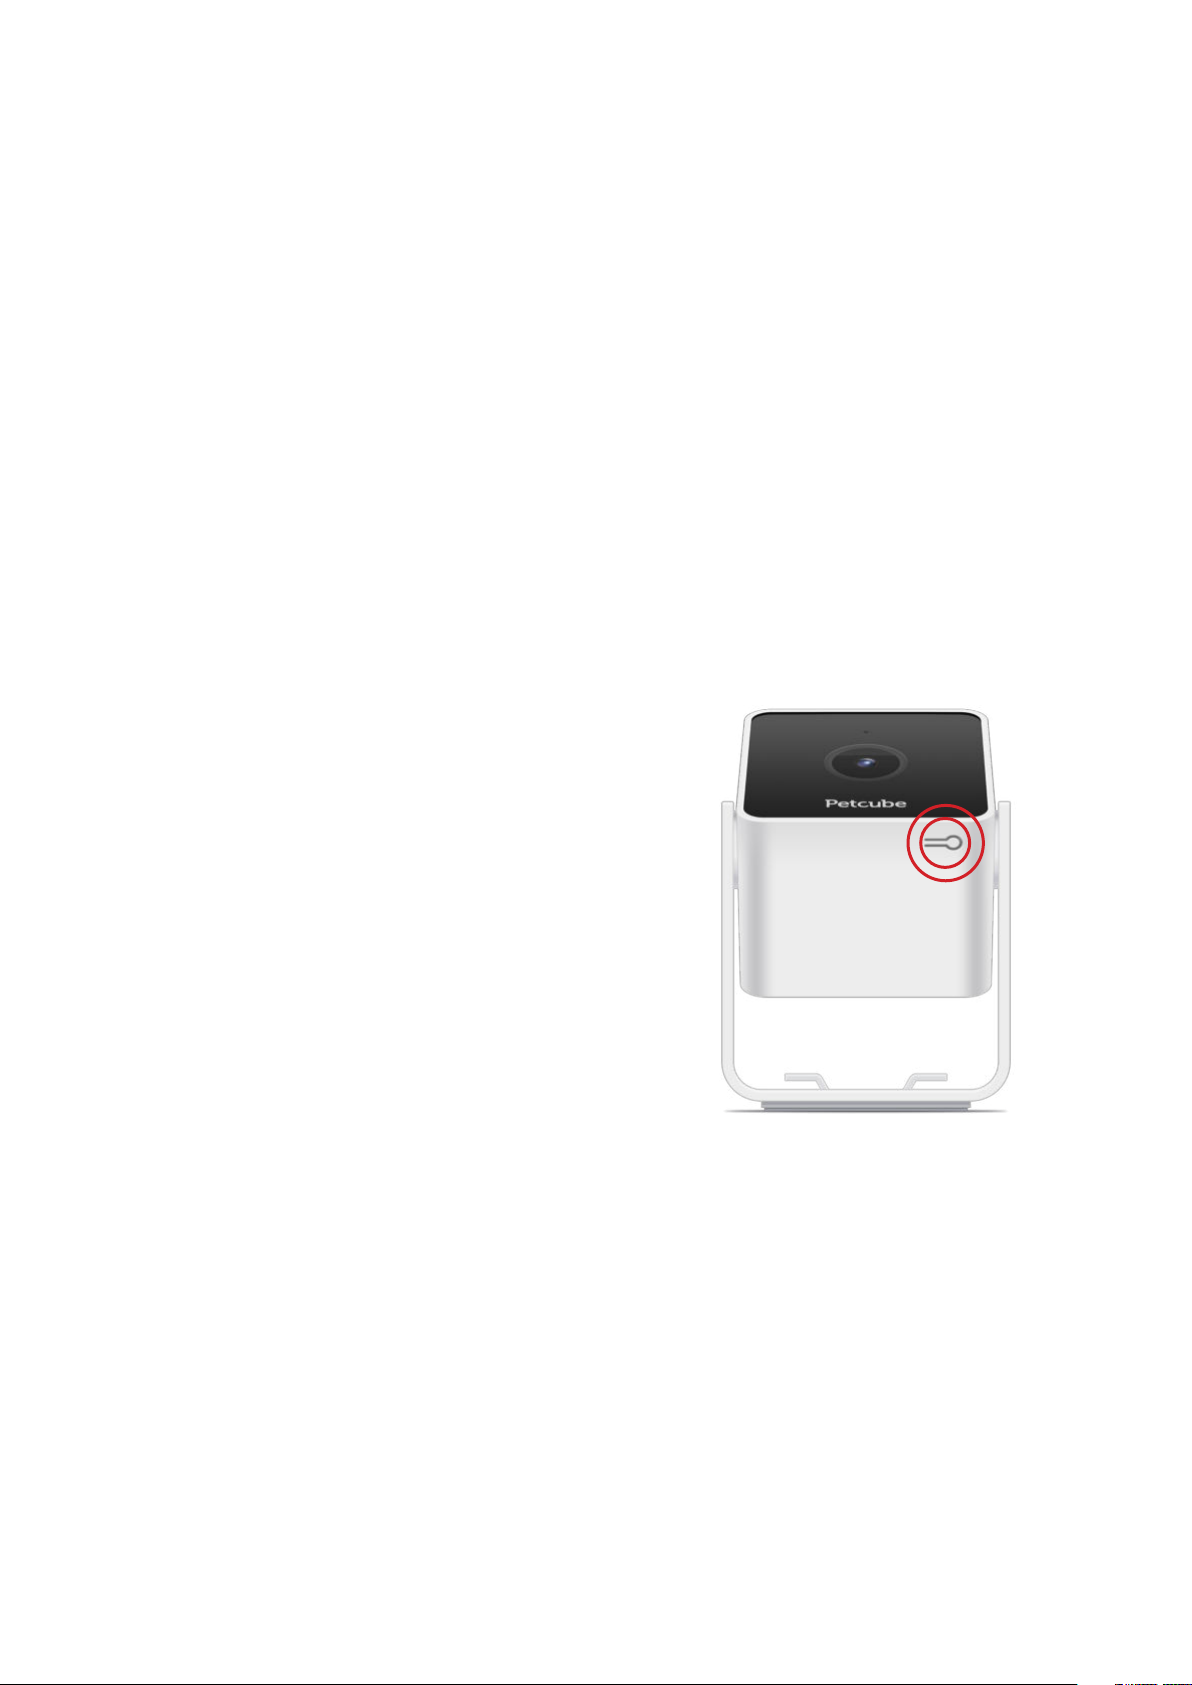
1. Find setup button on the bottom
of your Petcube Cam, hold it down
for 1 second until you hear “Ready
to connect” (
2. Open Petcube app, go to the ‘Home’
tab, select ‘connect your device’,
Fig. 6.2.1);
Fig. 6.2.1
pick your Petcube from the list
of options and follow the steps
on the screen.
Page 37
3. Incorrect Wi-Fi password
If Petcube app is showing the ‘Incorrect
Wi-Fi password’ error message after
the setup, here are a few possible
reasons behind that:
1. Case sensitivity: check the entered
password for uppercase
or lowercase characters. Keep in
mind that ‘Password’ and ‘password’
37
would be two different passwords
because the “P” is uppercase in the
first example and lowercase in the
second example;
2. Password length: check the entered
password length and keep in mind
that normally the password length
is 8+ characters long;
3. Keyboard language: check the
onscreen keyboard language and
make sure you enter password in the
correct keyboard layout.
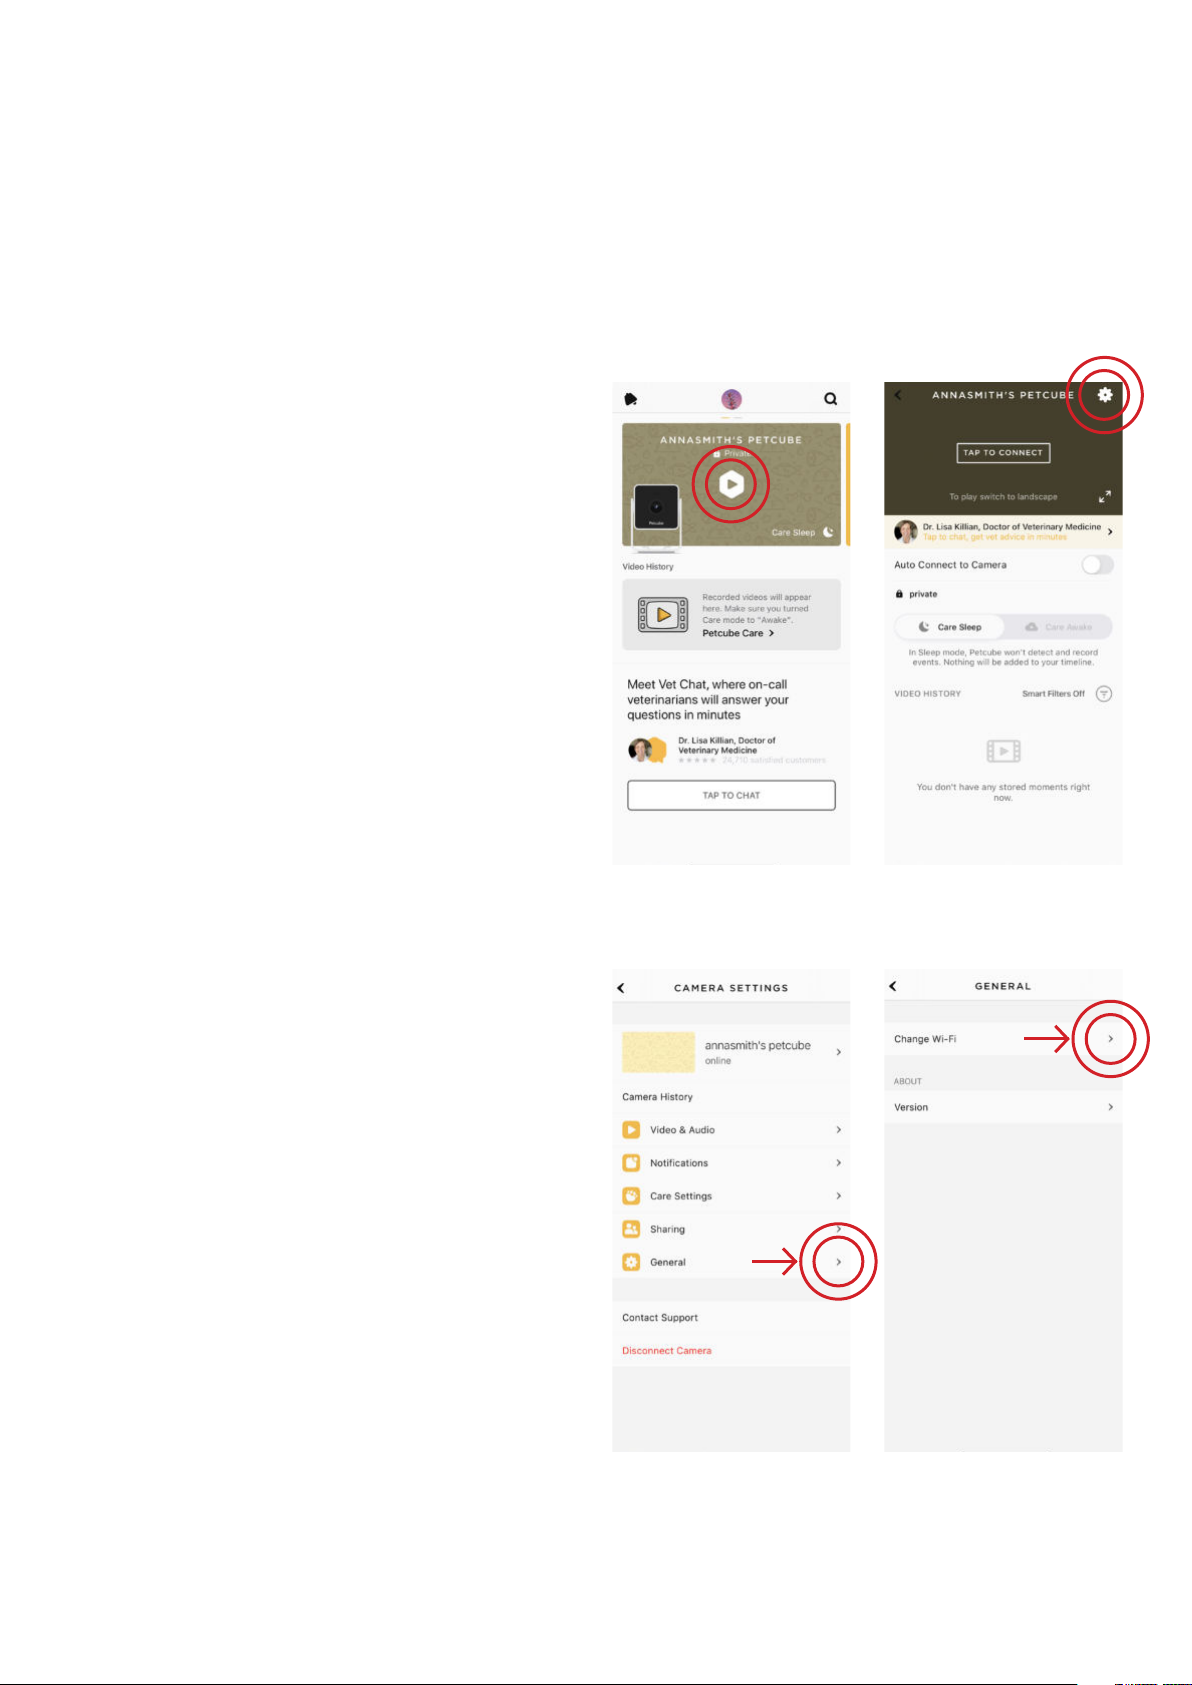
To reset the Wi-Fi password:
1. Open the Petcube app;
Fig. 6.3.1
Fig. 6.3.2
2. Go to the camera profile, tap the
‘Settings’ wheel in the upper right
corner if you use Android or tap the
‘Play’ icon if you use iOS (fig 6.3.1);
3. Tap the ‘Settings’ wheel in the upper
right corner (fig 6.3.2);
4. Select ‘General’ (fig 6.3.3);
5. Tap ‘Change Wi-Fi’ (fig 6.3.4);
Fig. 6.3.3
Fig. 6.3.4
Page 38

6. Power up your Petcube, wait 1 minute until it starts up;
7. Find setup button on the bottom of your Petcube Cam (fig 6.2.1), hold it down
for 1 seconds until you hear “Ready to connect”;
8. Open Petcube app, go to the ‘Home’ tab, select ‘connect your device’, pick your
Petcube from the list of options and follow the steps on the screen.
In case none of the above tips help, contact Petcube Customer Care Team at petcube.
com/support/.
38
4. The LED is pulsing yellow/blue and doesn’t turn blue after setup
This problem may occur if you have entered an incorrect password for your home Wi-Fi
network during registration. To change it:
1. Open the Petcube app;
2. Go to the camera profile;
3. Tap the ‘Settings’ wheel in the upper right corner;
4. Go to General and choose ‘Change Wi-Fi’;
5. Follow the on-screen instructions.
If that doesn’t help, below are a few other possible reasons this could be happening:
1. Your Petcube requires a manual firmware update. Please contact Petcube Customer
Care Team for assistance at petcube.com/support/;
2. You are using either a FIOS or Xfinity router or your router might be set up
to transmit in WEP encryption mode, which is not supported by Petcube due
to security reasons. Petcube works with newer WPA/WPA2 encryption technology
that aims to provide stronger wireless data encryption than WEP. We recommend
changing security encryption to WPA/WPA2, which won’t require you to reconnect
the devices back to the network or change your password. To access your router
settings, you may either call your ISP or look at the bottom of your router, it usually
has the login and password for the router settings, or contact Petcube Customer
Care Team for assistance;
Page 39

3. Your router may have some security settings such as a firewall or MAC address
filtering that don’t allow Petcube to connect to the Internet. Call your ISP or Petcube
Customer Care Team for assistance;
4. You have a WPS pin on your router, which works like a secondary Wi-Fi password
that is not supported by Petcube due to security reasons as it is considered
to be a vulnerability on the network. You may call your ISP or Petcube Customer Care
team to resolve this.
If you still need assistance with your Petcube, please reach out to Petcube Customer
Care Team at petcube.com/support/.
39
5. Petcube can’t register on your Wi-Fi network
You may see this message when there Petcube cannot receive the IP address
automatically using DHCP. Normally, the router should assign the IP address to your
Petcube automatically but if this didn’t happen, you can enter your router settings and
assign the IP address to your Petcube manually. You can also contact your ISP
or Petcube Customer Care team for help.
6. Petcube can’t establish the cloud connection / No Internet connection
If you get this error message, firstly, make sure you have Internet access on your
Wi-Fi by trying to open a few websites on a few devices. If you have Internet access
but Petcube still can’t be connected, try to reset the device by following these easy
steps:
1. First, if you have previously set up your Petcube, open the Petcube app, go to ‘Home’
tab, then select ‘Settings’ and choose ‘Disconnect Camera’;
2. Power up your Petcube, wait 1 minute until it starts up;
3. Find setup button on the bottom of your Petcube Cam (fig 6.2.1), hold it down
for 1 seconds until you hear “Ready to connect”;
4. Open Petcube app, go to the ‘Home’ tab, select ‘connect your device’, pick your
Petcube from the list of options and follow the steps on the screen.
Page 40

40
If you have a firewall on your Wi-Fi network or you have a block on some ports, below
is the list of ports that need to be open for Petcube:
1. 34.194.225.22:3335/tcp
2. 35.212.7.21:443/tcp
3. 35.207.1.22:443/tcp
4. cube_ext_ip:7000-7100/udp (optionally, NAT)
7. Oh bummer setup error
If during the setup you’re getting an ‘Oh Bummer’ error message, turn your Petcube
off and back on, wait up to 1 minute until it boots up and starts blinking and start the
setup process over again.
8. No sound comes out of my Petcube
For the two-way audio to work, Petcube requires access to the microphone on your
mobile device. To grant access to it, open the ‘Settings’ menu on your phone OS, then
go to ‘Privacy’ and then ‘Microphone,’ and make sure you have allowed the Petcube app
to use your phone’s mic.
9. Poor video quality or poor network conditions
Like with most video streaming services and products, video quality is affected
by router performance and/or your Internet connection. This can be improved if you
place Petcube closer to your home Wi-Fi router or by arranging it in a way so there
aren’t any obstacles between it and your router (i.e. walls, floors, radio interference etc.).
Petcube also requires at least 2 Mbps Internet connection upload and download speed
(4 Mbps is recommended). If your Internet connection speed is less than 2 Mbps, we
recommend upgrading for the best experience and highest video quality. To check your
Internet speed, we recommend performing online speed test. If you are not getting the
full speed you subscribed for, contact your Internet Service Provider.
Page 41

10. I can’t connect to my Petcube / Petcube is offline in the app
If you cannot connect to your Petcube from your mobile phone, try the following:
- Make sure that the LED light on the front of your Petcube is steady blue. If the LED
light on the front of your Petcube isn’t steady white, see ‘LED light notifications’
to determine the issue. In most cases rebooting the Petcube by unplugging and
plugging it back in should help but if you’re facing this issue too often, below are a few
ideas why it could be happening:
1. Your Petcube needs a firmware update. To get the most recent firmware update,
41
contact our support team at [email protected];
2. Sometimes the issue may be caused by restrictions of the Wi-Fi network your phone
is connected to, especially if it’s a public or office Wi-Fi. Try to temporarily disable
Wi-Fi on your phone and connect to your Petcube while using mobile data or or try
connecting to other Public Petcube Cam in the feed to make sure it’s not
a network restriction issue;
3. This issue may occur if you’re using a non-original or a less powerful A/C adapter.
Please make sure to use only 5V / 2A power adapters;
4. You are using a mesh network or your 5Ghz and 2.4Ghz channels have the same
SSID. It has been observed on multiple occasions that sometimes Petcube cannot
maintain a reliable connection on a mesh network or different network channels
(5Ghz and 2.4Ghz) with the same network name (SSID). It is recommended
to change any of the two channels names to avoid connection issues;
5. It’s possible that Petcube doesn’t have strong Wi-Fi connection. Keep in mind that
some connection issues may be caused by poor Wi-Fi signal, which can depend
on the router range, distance to the router and obstacles between Petcube and
router, such as walls or radio frequency interferences. Here are a few examples how
electronic appliances or bearing walls can impact your Wi-Fi signal.
Page 42
42
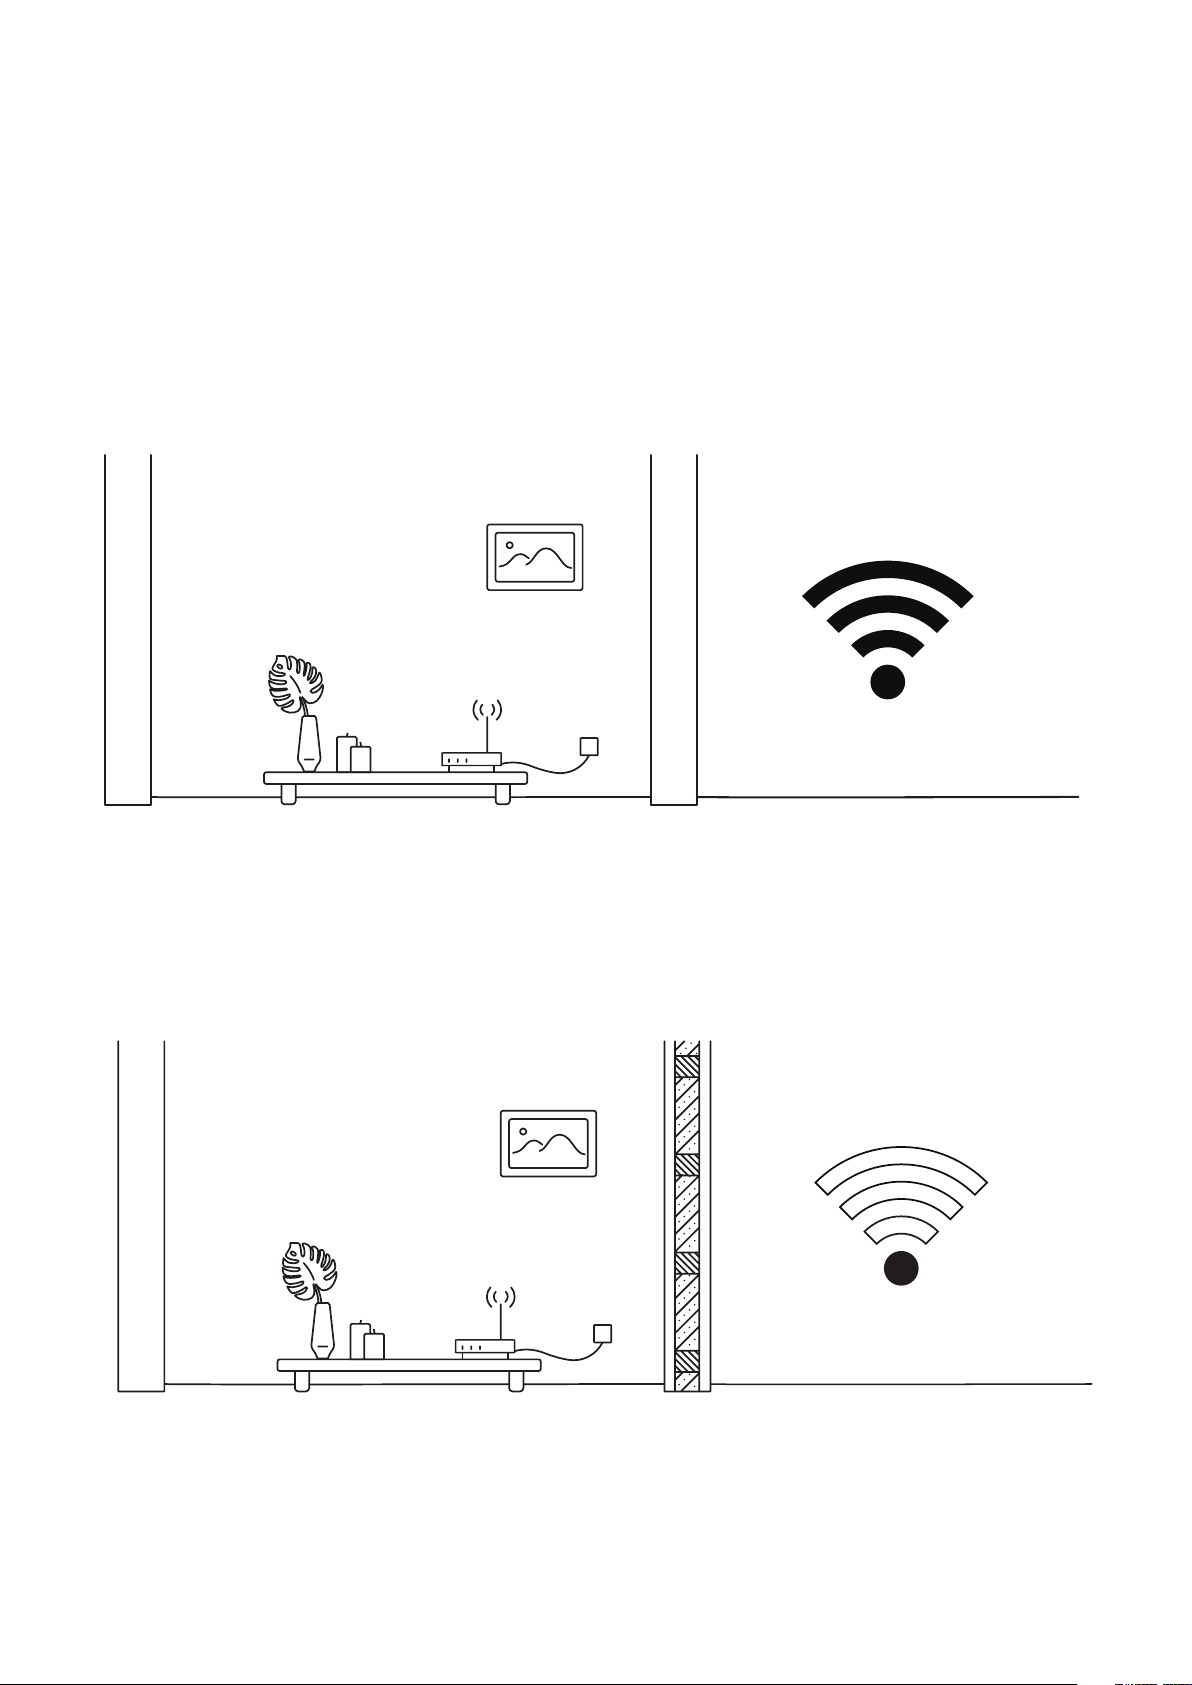
Example 1 (fig 6.10.1) shows no electronic or radio devices and no bearing walls between
two rooms so the signal in the other room is very good.
Fig. 6.10.1
Example 2 (fig 6.10.2) shows a bearing wall between two rooms which causes poor
Wi-Fi signal in the other room.
Fig. 6.10.2
Page 43
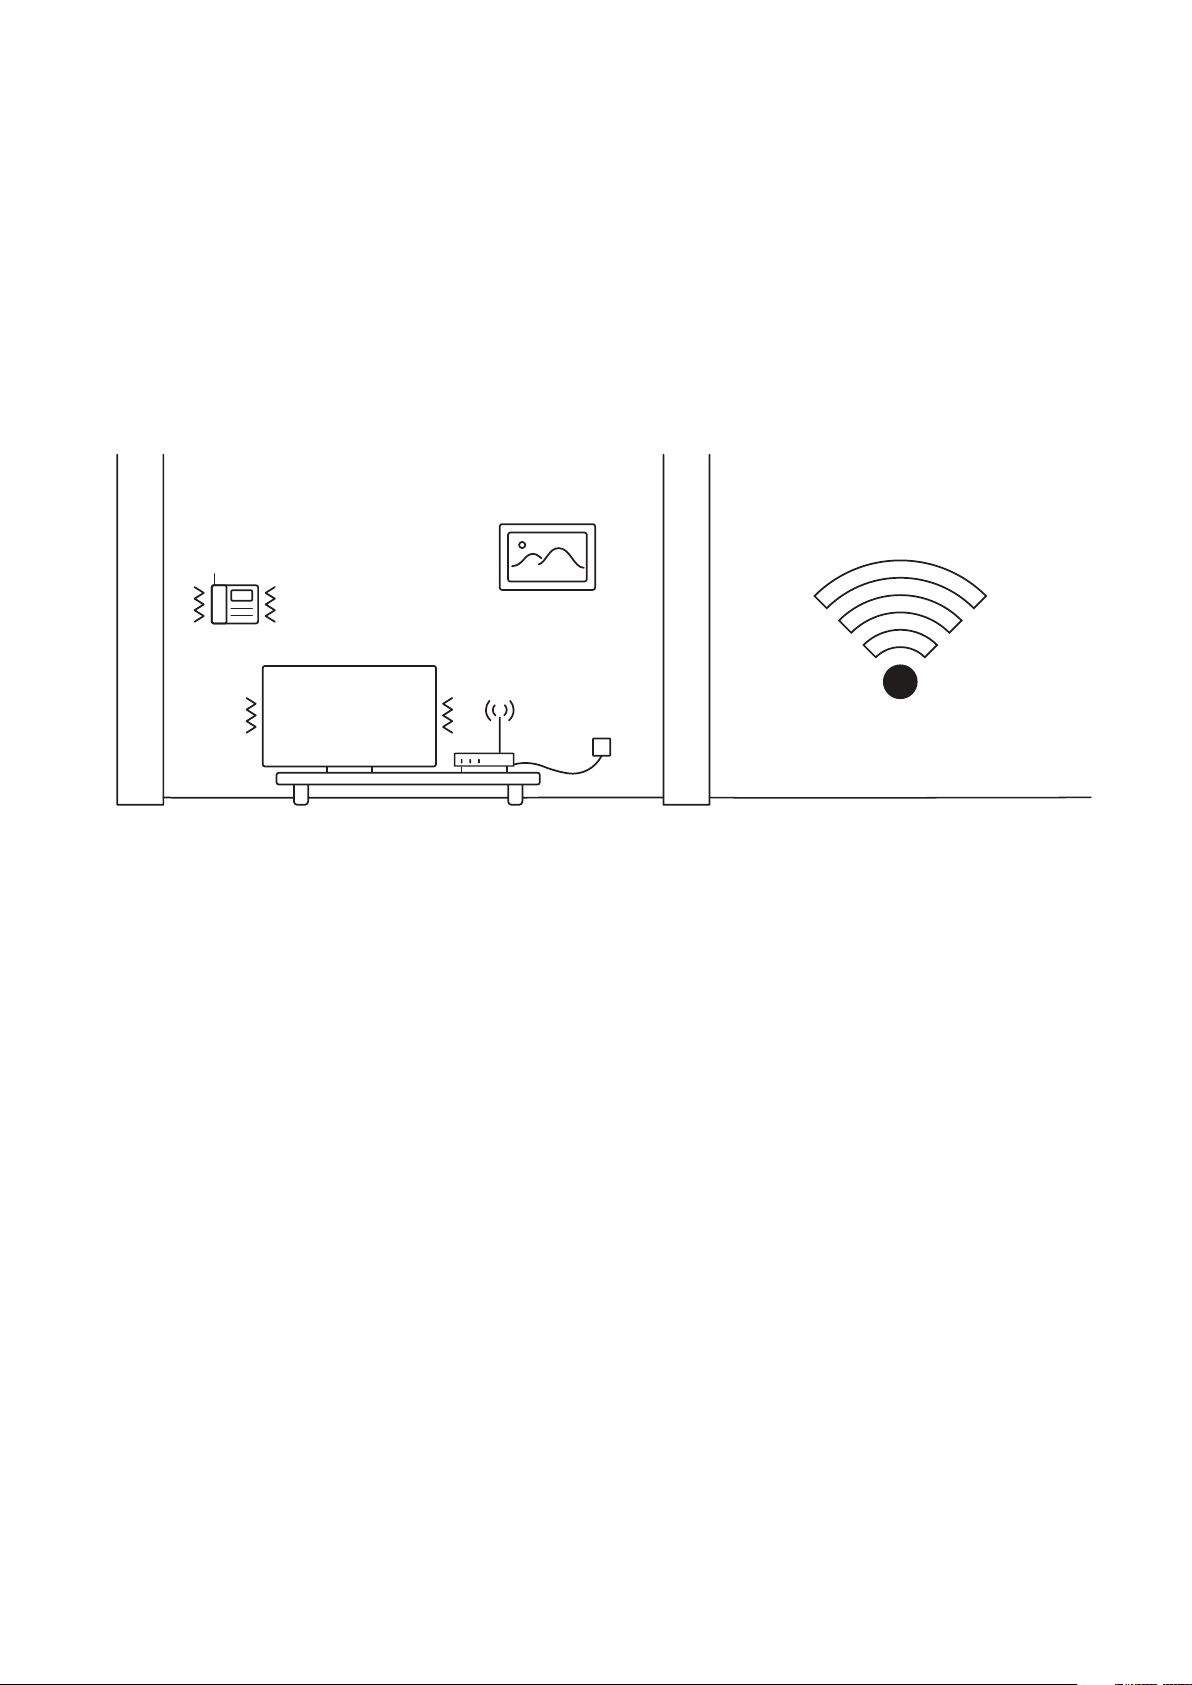
Example 3 (fig 6.10.3) shows interference caused by radio (phone) or electronic
appliances (TV). Poor Wi-Fi signal can be also impacted by microwaves, refrigerators,
cordless phones, baby monitors etc.
43
Fig. 6.10.3
11. Petcube is Disconnected in the app
If your Petcube Cam status shows as ‘Disconnected’ in the Petcube app, it usually means
that your phone is not connected to the Internet at the moment or the network you are
connected to has certain restrictions. Try to switch to any other Wi-Fi network
or connect to your camera using cellular data (LTE, 3G).
12. Petcube goes offline / turns off
This issue may occur if you’re using a non-original or a less powerful A/C adapter. Please
make sure to use only 5V / 2A power adapters.
If you’re using the original adapter, but the problem persists, contact Petcube Customer
Care Team to determine the problem.
Page 44

13. How to perform a manual firmware update on your Petcube
In order to perform the manual update of your Petcube, please reach out to Petcube
Customer Care Team at petcube.com/support/.
14. Stuck on software update screen
If your Petcube is stuck on the software update screen for more than 4 hours and
doesn’t switch to blue LED mode (online) it may indicate that the device needs
to be updated manually. In this case, contact Petcube Customer Care Team noting
44
the LED color on the Petcube and your username in the Petcube application.
15. How to find Petcube’s MAC address
If your router uses MAC filtering, you need to temporarily disable it to find the MAC
address of your own Petcube. This can be viewed in the list of connected devices in your
router settings. Once you have its MAC address, you can safely add your Petcube
as an exception and turn filtering back on.
You can also contact Petcube Customer Care Team to get help finding the MAC address
of your Petcube by performing a camera test.
Page 45
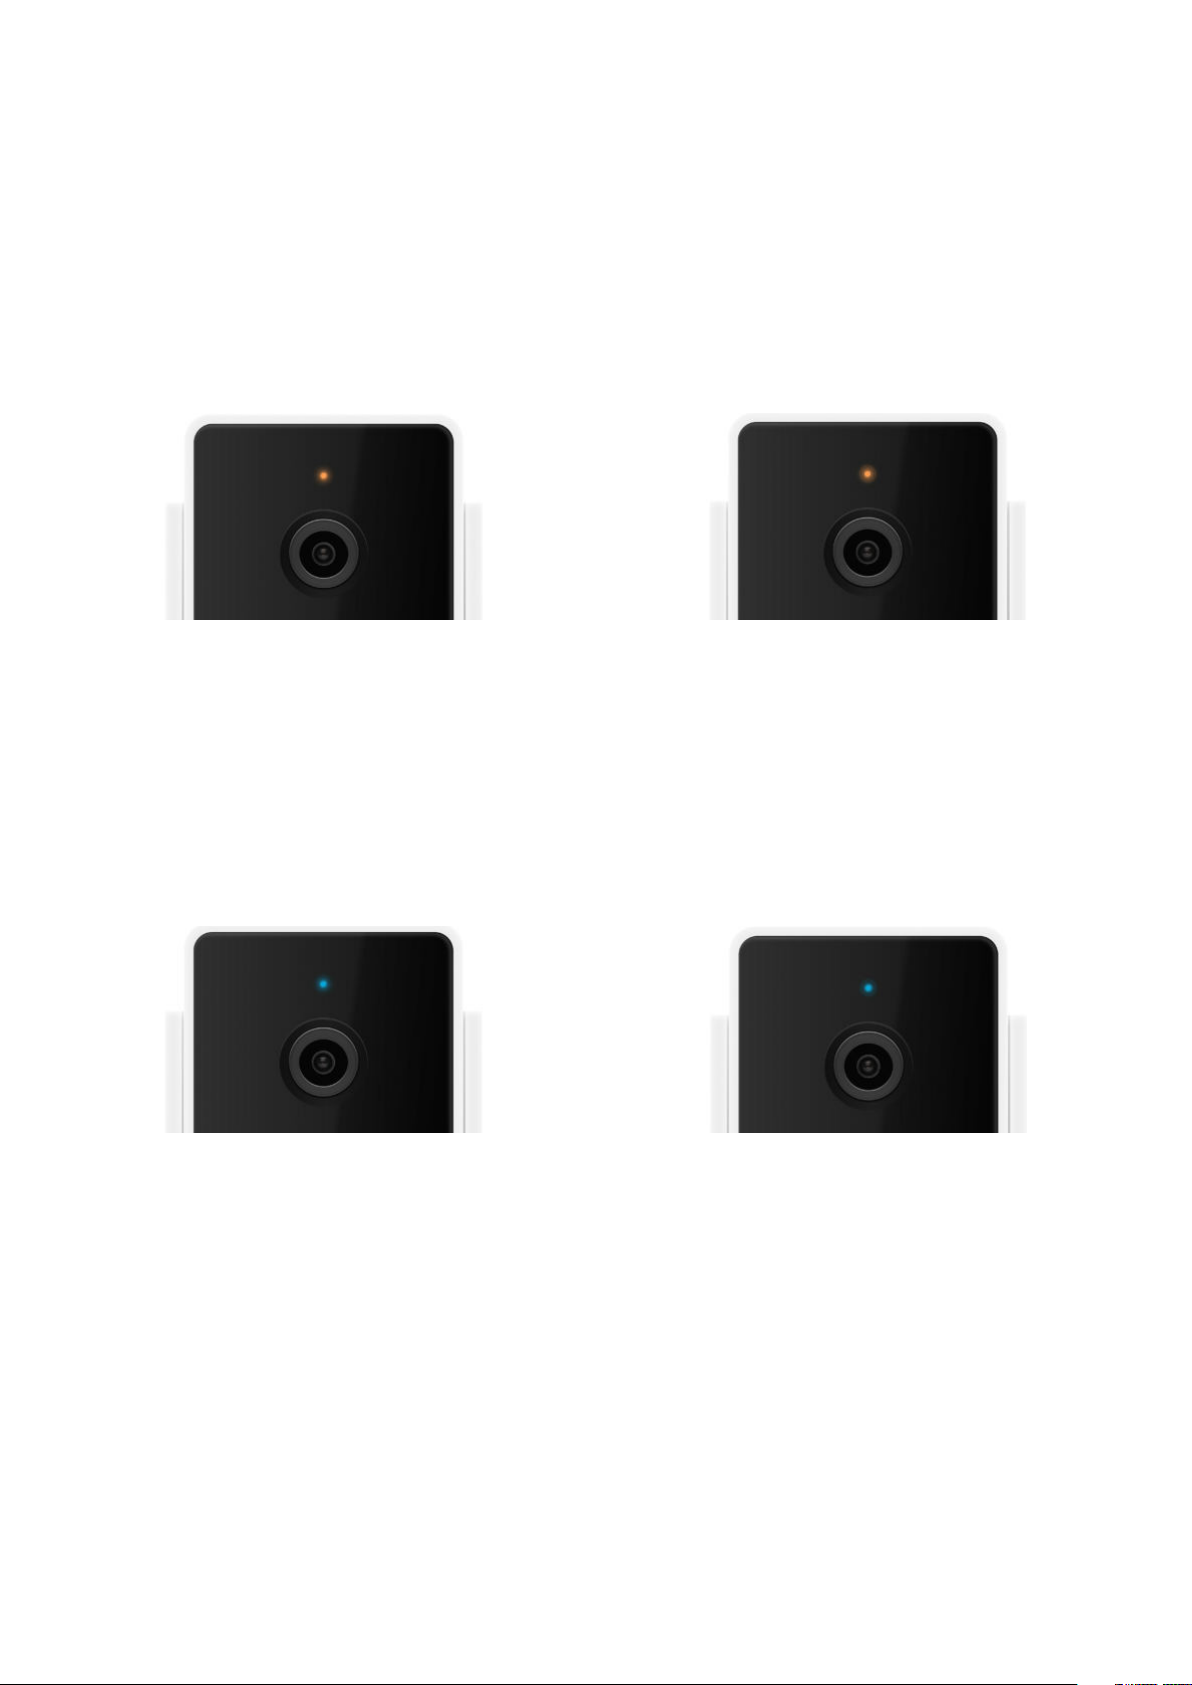
LED LIGHT NOTIFICATIONS
7
The LED light on the back of your Petcube tells you about its status.
45
Fig. 7.1
Steady Yellow
If you just powered your Petcube up, it
will show this color while it boots up for
up to 30 seconds.
Fig. 7.3
Steady Blue
Fig. 7.2
Fast Pulsing Yellow
Setup mode.
Fig. 7.4
Pulsed Blue Once
Online, standby mode.
Petcube Care™ is active, saving video
to your timeline.
Page 46
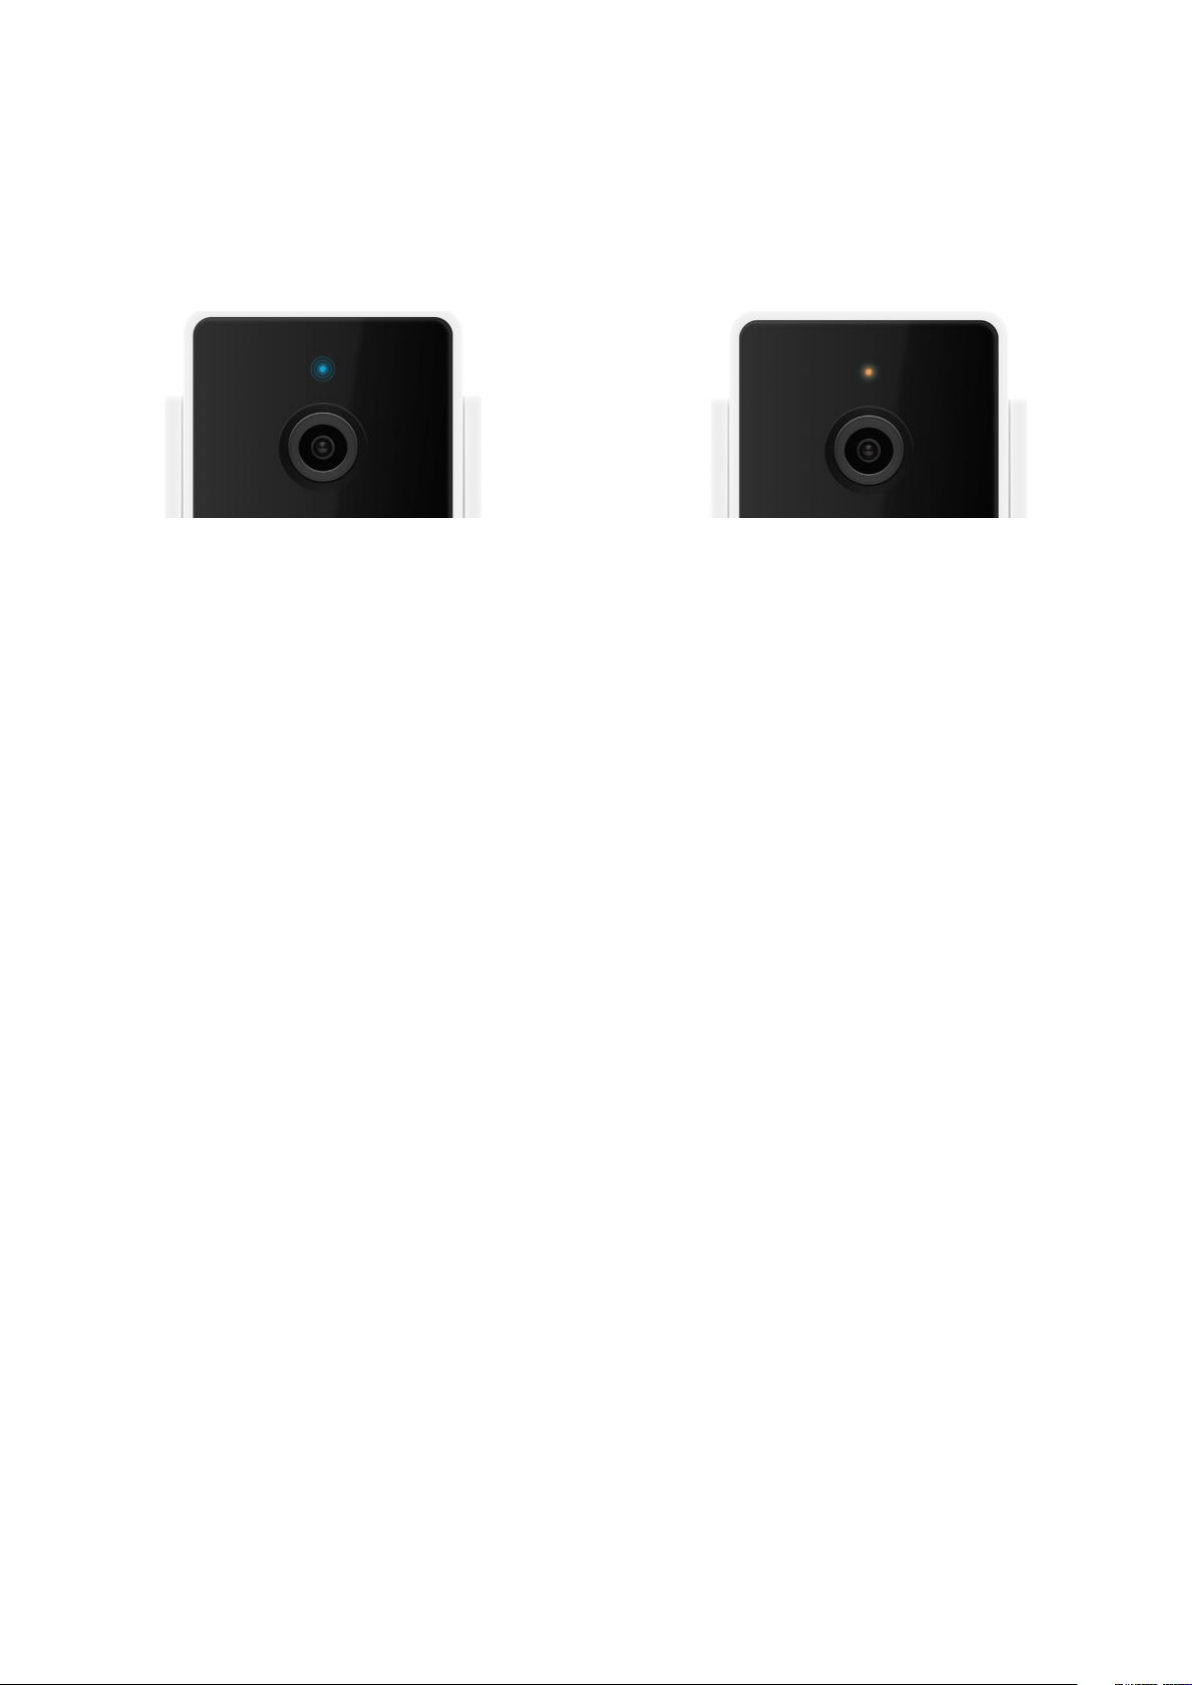
Fig. 7.5 Fig. 7.6
46
Slowly Pulsing Blue
Play mode. Be aware, mind your
privacy! Petcube is streaming live video
at the moment.
Pulsing Yellow/Blue
Your Petcube cannot connect to your
Wi-Fi network because of an incorrect
password, no wifi in range,
or no internet connection.
 Loading...