

Page 1

Pessl Instruments GmbH
Werksweg 107, 8160 Weiz, Austria
+43 317 255 21
Thank you for choosing an iMETOS for monitoring soil moisture data,
agrometeorological variables and other environmental conditions.
The iMETOS ECO D3 has been designed to work in harsh conditions
and in all climate zones. It can monitor data with a wide variety of
sensor sets. Like all products of the iMETOS family, it measures, logs
and sends data to the FieldClimate cloud. Users have free access to
data through web and mobile applications. Additional services (like
plant disease models and hyper localized weather forecasts) are
available upon license fee payment. Web API is available for interface
with other custom applications.
iMETOS ECO D3 systems will be mainly used for:
• Soil moisture monitoring.
• Hydrology and ood warning applications.
• Frost warning via SMS.
• Meteorological monitoring.
• Weather forecast corrected with local measurements.
• Plant disease models (depending on the conguration of the equipment).
• Eco-physiological monitoring.
• Environmental monitoring.
iMETOS ECO D3
USER MANUAL
Version 1.0, 05-2018
Page 2
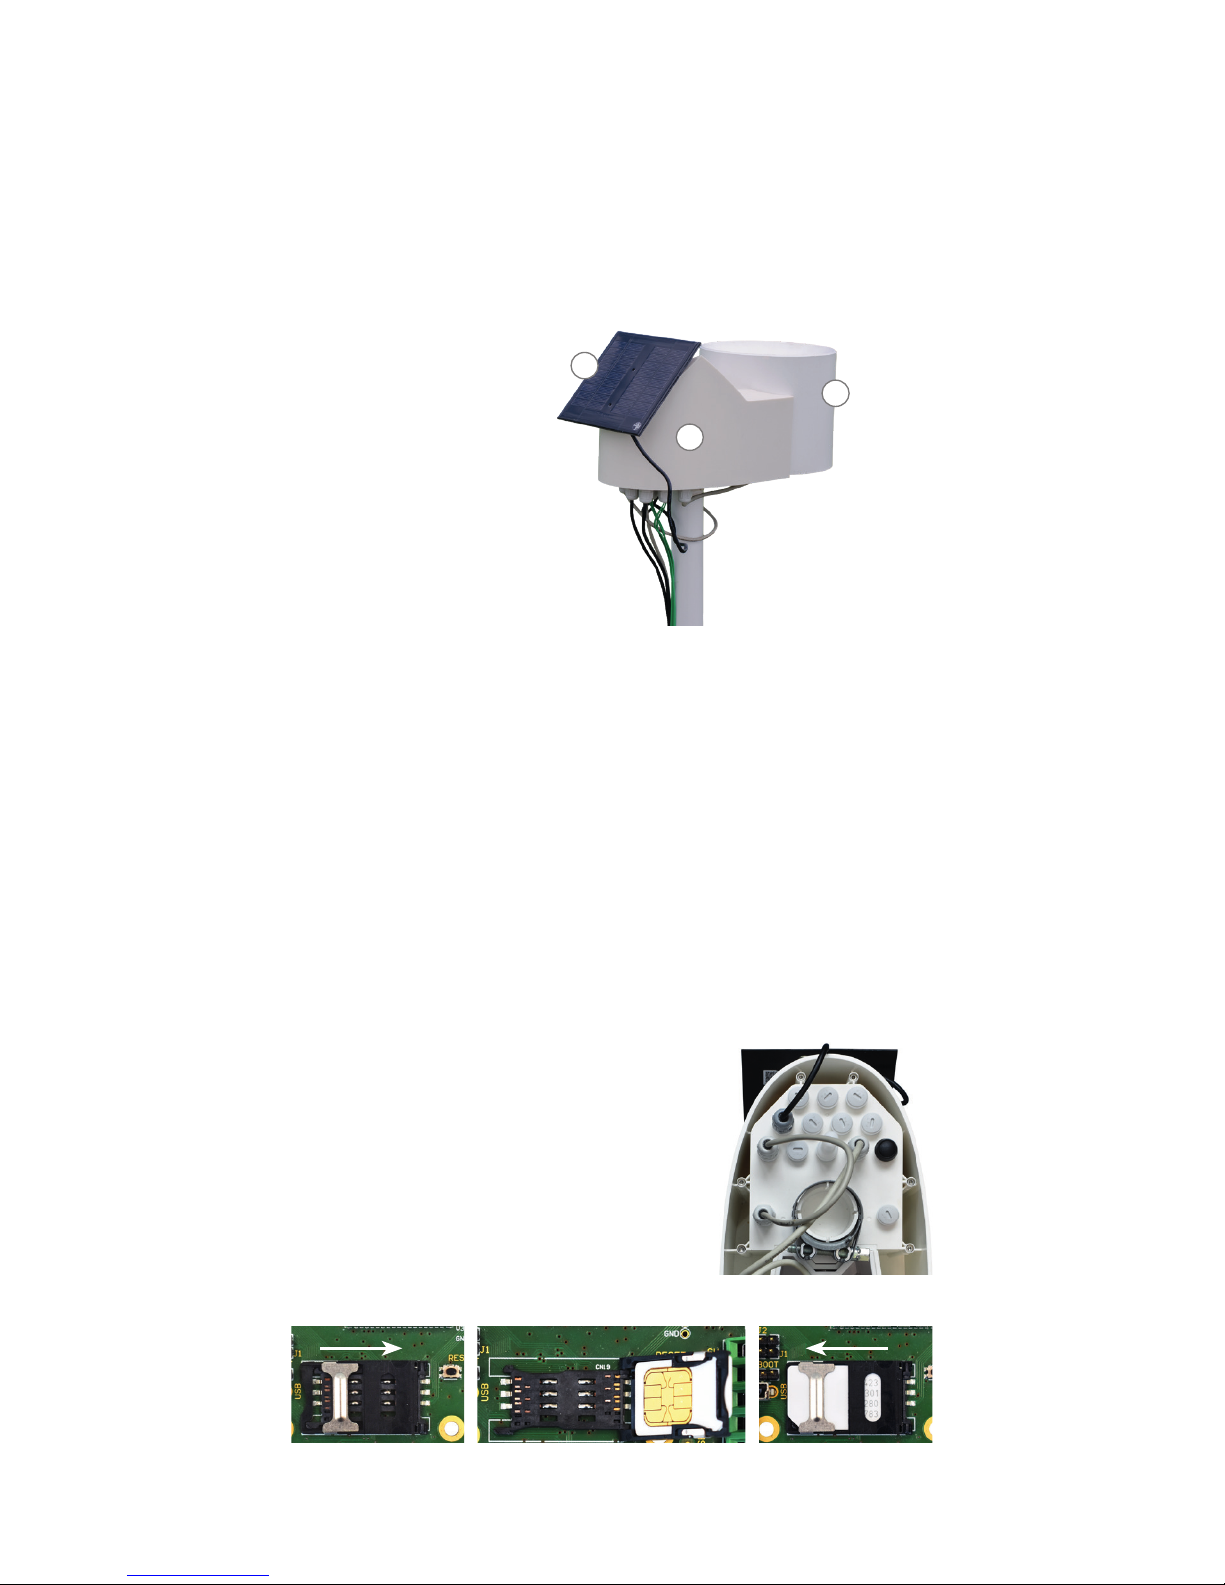
YOUR iMETOS ECO D3
The iMETOS ECO D3 BASE consists of a white plastic case containing the
electronics, the battery and the internal or external antenna. It can be
customized with a wide variety of sensors for soil moisture, water level,
temperature, salinity and more. Taped to the solar panel you will nd a
sticker with a unique serial number and the keys that enable the access
to the FieldClimate platform.
Other variations are described on the list below. Each of them is expandable with more sensors.
MAIN VARIATIONS
• iMETOS ECO D3 CLIMA: Air Temperature sensor and Rain Gauge. This
basic conguration enables the use of the imeteopro.com platform.
• iMETOS ECO D3 FROST: Wet and Dry Bulb Temperature sensor.
• iMETOS ECO D3 SM-1/2/3/4/5: Air Temperature sensor, Rain Gauge
(iMETOS ECO D3 SM-1/2) and soil moisture interfaces (Watermark,
Decagon or Sentek). Please note that soil moisture sensors are not
included in the package.
• iMETOS ECO D3 DISEASE MONITOR: Air Temperature and Humidity
sensor, Rain Gauge and Leaf Wetness sensor.
• iMETOS ECO D3 TANK MONITOR: Water Level sensor.
START-UP THE iMETOS ECO D3
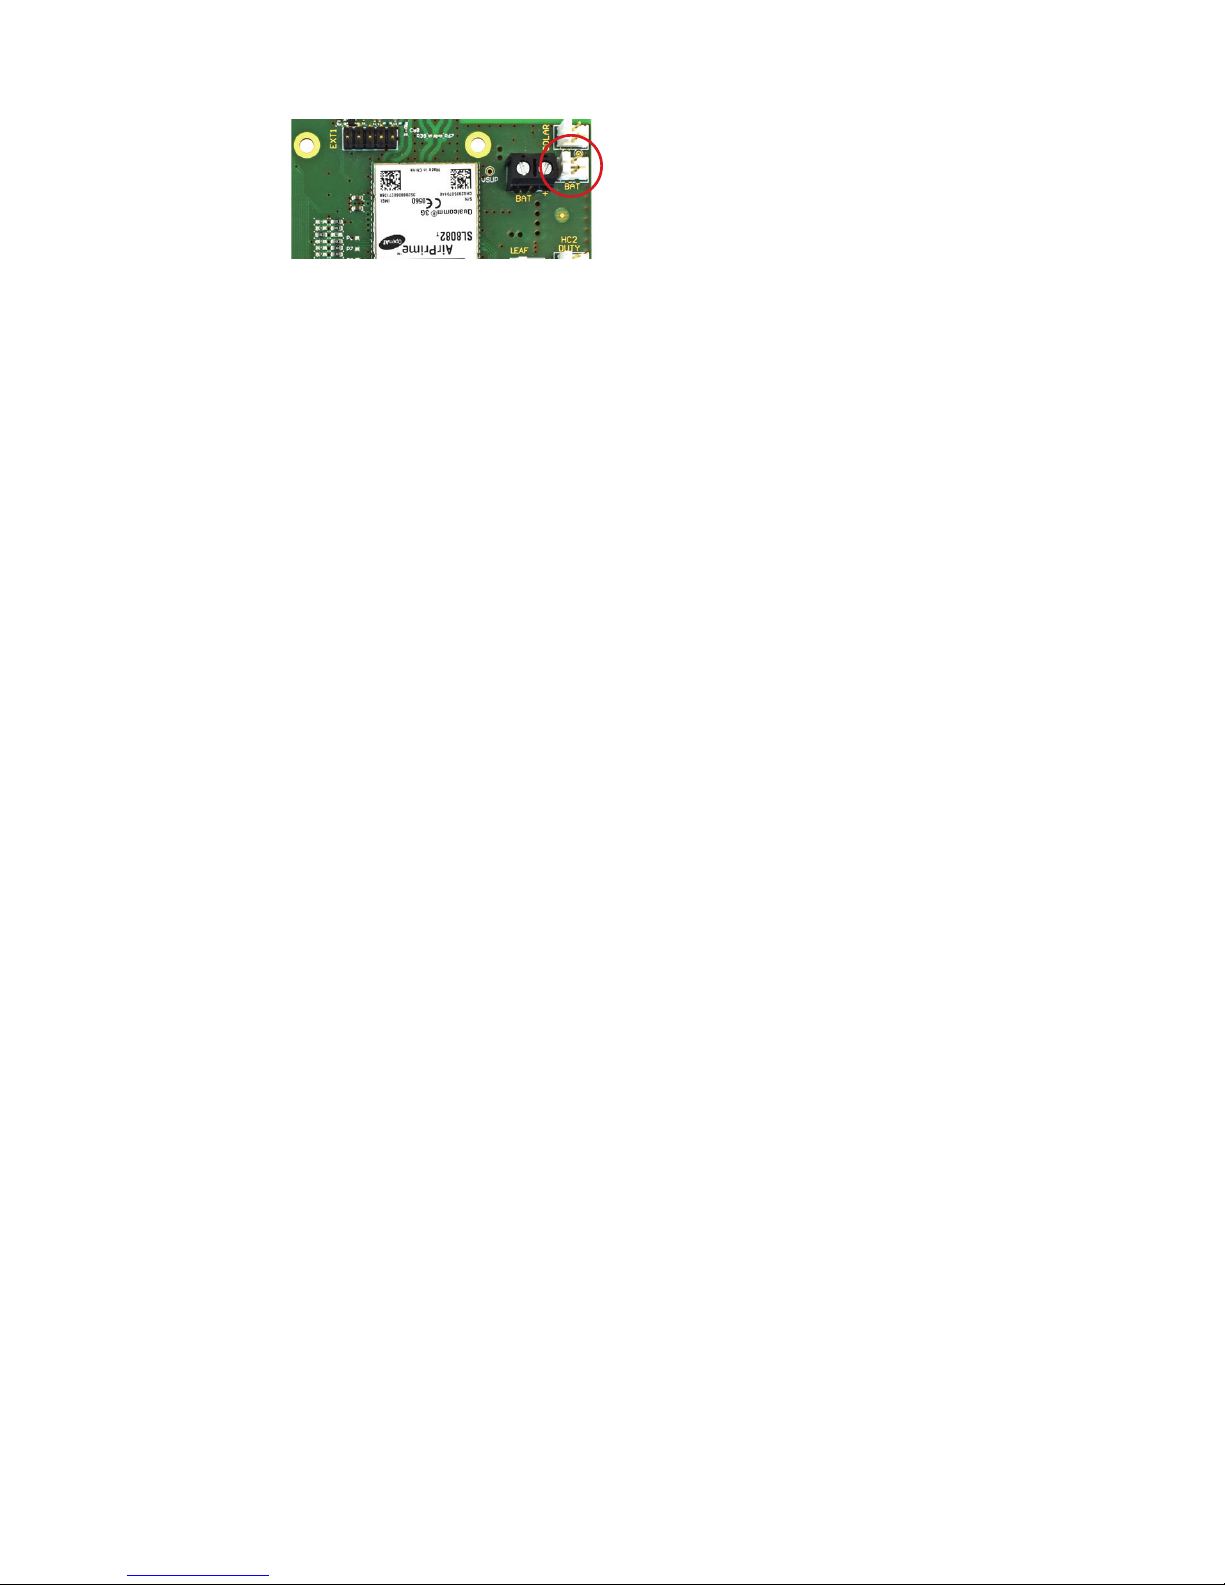
1. Open the housing by unscrewing the 6
screws on the bottom.
2. Loose the nut from the cable gland.
3. Pull out the case cover, letting the battery
cable loop pass through the gland.
4. In GPRS, UTMS, LTE (i.e. G2, G3, G4) net-
works a SIM card from a provider is needed. To insert a SIM card:
On picture:
iMETOS ECO D3
1. Solar panel; 2. Body containing a datalogger, a modem and a battery; 3. Rain gauge.
1
2
3
4.3 Lock the holder
by sliding the metal lock.
4.1 Slide the metal
part of the SIM card
holder to unlock it.
4.2 Place the SIM card into the
holder so the gold contacts on
the SIM face down on the board.
Unlock Lock
Page 3
Your device is now up and running. The three LEDs on the motherboard
will turn on for an instant indication that the station has reset. After
this, the connection with FieldClimate will start and the LEDs will give
you information about the communication process (for more details see
Blinking code section on metos.at/home/imetos-eco-series/#blinking-code).
In case you need further support, please contact [email protected].
iMETOS ECO D3 is a durable and exible datalogger for all climatic
conditions, but if you want to store it (e.g. during the winter) in a warehouse, disconnect the battery to avoid discharge.
INSTALLING YOUR iMETOS
The iMETOS has to be mounted on the pole: at the bottom of the unit
there is a plastic ring with a metal clamp on it. Make sure that the pole
is as vertical as possible. Check the bubble level on the rain gauge to
ensure the right installation verticality of the pole.
Mount the solar panel on the main plastic case. In the northern hemisphere, it should face south while in the southern hemisphere it should
point towards north.
Rain gauge is integrated in the plastic case, as depicted in the iMETOS
ECO D3 gure on the previous page.
iMETOS ECO D3 for soil moisture monitoring comes with a set of soil
moisture sensors connected to the main unit or to an extension box
on the serial bus connection. All soil moisture sensors need a specific interface and can be connected to the main control unit through
the cable chain. The soil moisture and temperature sensors have to be
properly installed in the ground. Depth of placement depends on the
application and varies with the rooting depth of turf or plant material.
To install fork-like sensors, excavate a trench to the depth required and insert
the entire sensing portion of the sensor horizontally into the undisturbed soil
face. Let the cable go down rst and then take it up to the top. This prevents
water from following the cable in the ground and wetting the sensor.
Soak Watermark sensors in water before installation.
To install soil moisture prole probes, drill a hole with an auger and insert
the probe carefully in the tapered soil opening, until the top of the probe is
levelled with the soil surface. To ensure high quality of measurements, all
soil moisture sensors should have a good contact with the soil around them.
In iMETOS ECO D3 FROST the Wet and Dry Bulb Temperature sensor should be
mounted at 50 cm above the ground or at the height of the lowest owers/fruits.
6. Close the cover to its nal position.
Note: Check that the PIN request for the SIM is disabled and that you
have data transfer service enabled.
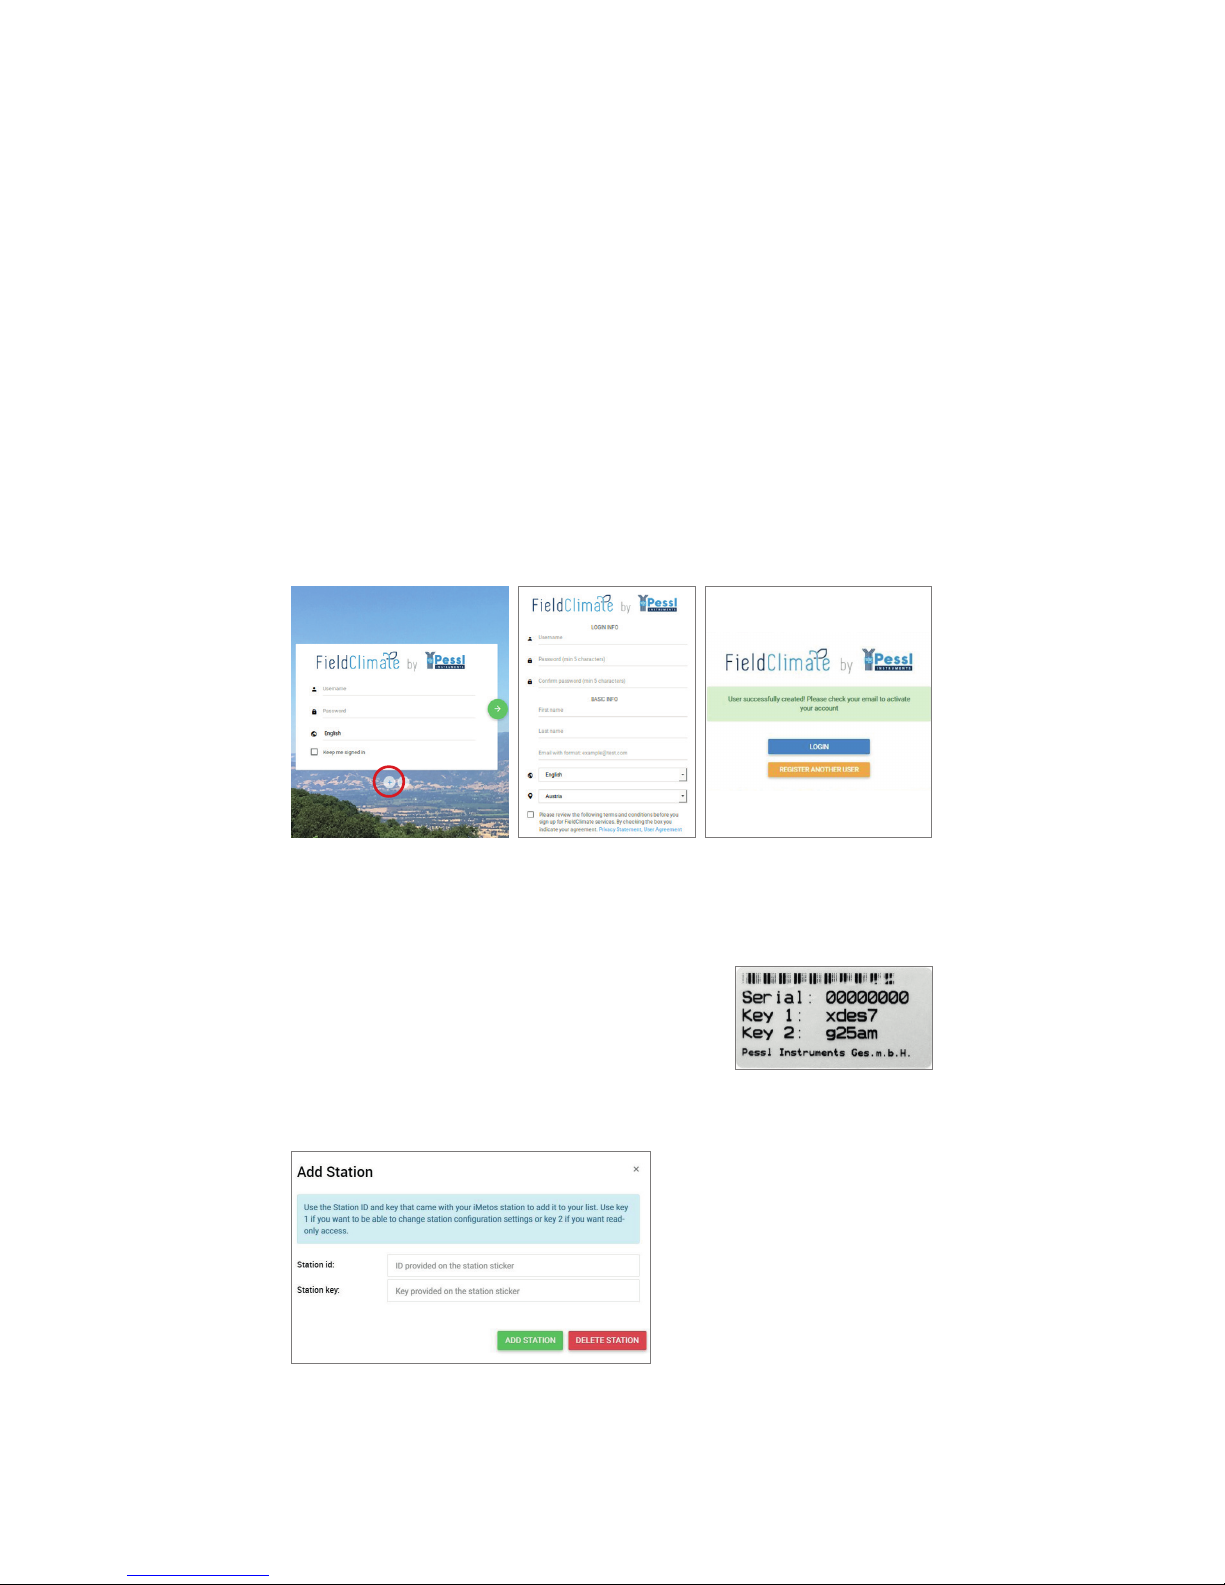
5. Plug the battery cable into
the BAT connector on the PCB
(red circle).
Page 4
The leaf wetness sensor can be tied to a branch of the plant slightly
inclined with the lter paper looking up. Mount it in a position that
allows the sensor to pick up early rain and to stay wet in the shade.
Note: 6 sensors can be connected directly to the iMETOS board; there is also
one PI bus chain input and 2 extension connectors on the top of the mother
board – the system can handle up to 400 sensors. The central extension can
support up to two cable chains, 2 soil moisture prole probes or the SDI12
interface. The extension on the left side supports the I2C interface, which can
be connected with barometric pressure and lightning sensors. For detailed
info about the installation of sensors refer to metos.at/home/imetos-eco-series.
USE YOUR iMETOS
To start using services we provide, you need to register on the FieldClimate platform, which gives you the access to the data in graphs or tables.
FieldClimate also provides a powerful decision support system for growing your crops (plant protection, irrigation, sowing, harvesting, fertilizing).
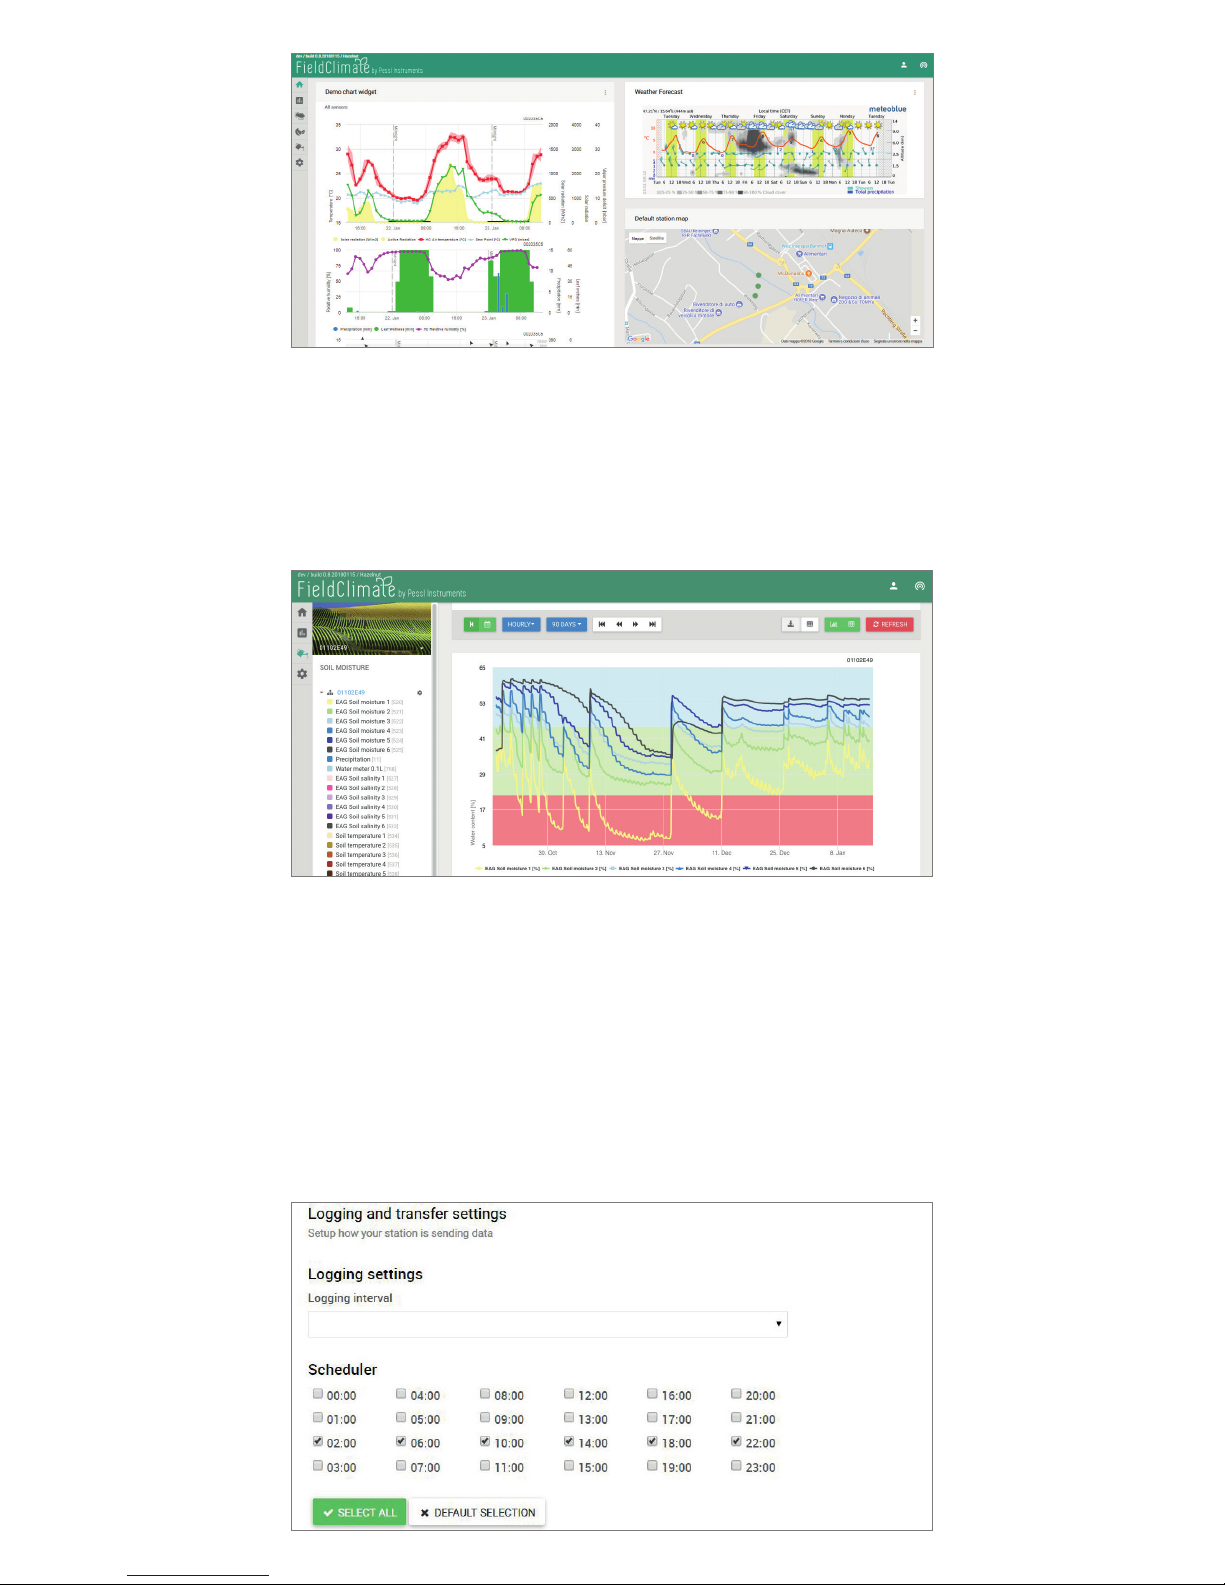
REGISTER AS A NEW USER ON ng.FieldClimate.com
ADD YOUR iMETOS DEVICE TO YOUR ACCOUNT
Now you can login to ng.FieldClimate.com. To add
your iMETOS device, click on the icon in the top
right corner User Menu > Add/Remove station. It
will ask you for the Station Serial number (SN) and the station key. Now the
silver sticker (in the gure) which came with your iMETOS has to be used.
Key 1 gives you full (admin) ac
-
cess and enables you to change
all the settings and set up the
iMETOS (e.g. data transfer in
-
terval, SMS warning, etc.). With
Key 2 the user is not allowed to
change the station parameters,
but can access all the data.
THE iMETOS DASHBOARD, STATION DATA AND SETTINGS
In the new Dashboard with a widgeted structure, the user can manage
quick access to the services of the highest interest. On the top right
corner, Station List allows you to choose among all the iMETOS devices
and select a single one.
1. Go to ng.eldclimate.com/
login and click the button
“+”.
2. Insert your personal
data & e-mail.
3. Check your e-mail and click
on the link to activate the user
account you created.
Page 5
On the left side, Station data page displays the data measured by your
iMETOS. Data can be viewed in detailed graphs and tables. You can
access the structured menu, which allows you to dene time series-resolution and export data in a chart/table.
In the Soil Moisture page you will nd all your sensors connected to
your iMETOS displayed in charts and tables. You can set the budget lines
in the chart indicating different moisture conditions (see gure below).
With the activation of licenses for highly precise localized weather fore-
cast and plant disease models, ou can access all data of these additional
services. If you have active yearly weather forecast license, you will also be
able to use the iMETEO PRO package (dashboard.imeteopro.com/login), by
logging in with your Fieldclimate username and password. To activate the
licences please contact your local distributor or [email protected].
On Station settings page you can congure your iMETOS.
Station settings > Conguration: Under Time zone and location, you need to
provide precise information, as weather forecast and other services depend
on it. Under Logging and transfer settings, you can dene how your iMETOS
Page 6

device logs and sends data. Please note that the iMETOS is delivered with
the default factory settings (as in the gure on the previous page). More
options are available by clicking the “Advanced options” button.
Station settings > Sensors and nodes: You can dene a custom name for
your station and nodes connected to it. For convenient viewing of data,
you can also rename each sensor and customize its color in the graph.
Station settings > Warnings: You can add phone numbers and set thresholds for each sensor, at which the warning SMS should be sent.
For further inquiries visit docs.metos.at/FieldClimate.
MAINTAINING THE iMETOS
The weather station should be checked periodically to ensure that
sensors are in optimal condition. Regular maintenance is necessary for
awless operation and durability.
At the beginning of the new season, check that the station is working
correctly; data must be transmitted at the set interval to FieldClimate.
Keep the solar panel and sensors clean and ensure correct rainfall
measurements by making sure the rain gauge is levelled (check the
bubble indicator), and not obstructed by leaves, insects or debris. Check
if leaf wetness sensor has the appropriate lter paper intact and positioned correctly (it should be replaced once, preferably twice a year).
Frost risk: Make sure that the water bottle of wet bulb temperature
sensor is at least 80% full.
When the solar panel of the iMETOS is exposed to the sun and gets
enough sunlight it should constantly recharge the battery of the system. The lifespan of the battery is expected to be 5 to 6 years with
sufcient recharging from the solar panel. Deep discharge shortens its
lifetime. The iMETOS will prevent this from happening and protect the
battery by limiting the data transfer to the safe level of charge. In doing
so, data is not lost and battery recovers faster.
UPDATING YOUR iMETOS
Every time the iMETOS ECO D3 connects to FieldClimate, it checks for
the latest rmware version. If it nds a newer version, it automatically
downloads it and updates itself. iMETOS ECO D3 can also be updated
manually via the USB connection.
For full user manual please visit:
metos.at/home/imetos-eco-series
Visit metos.at/home/terms-of-use/ to view
legal information for Pessl Instruments
products and services.
 Loading...