

Page 1
INSTALLATION INSTRUCTIONSINSTALLATION INSTRUCTIONSINSTALLATION INSTRUCTIONSINSTALLATION INSTRUCTIONS
**Inst**Inst**Inst**Inst allation recommendation:allation recommendation:allation recommendation:allation recommendation:
JBA recommends in most cases that the vehicle be taken to a reputable exhaust shop.JBA recommends in most cases that the vehicle be taken to a reputable exhaust shop.JBA recommends in most cases that the vehicle be taken to a reputable exhaust shop.JBA recommends in most cases that the vehicle be taken to a reputable exhaust shop.
PartPartPartPart s Lists Lists Lists List
A.A.A.A. Head pipeHead pipeHead pipeHead pipe 1111
B.B.B.B. MufMufMufMuffler 24"fler 24"fler 24"fler 24" 1111
96-97 Chevy S-10 pickup96-97 Chevy S-10 pickup96-97 Chevy S-10 pickup96-97 Chevy S-10 pickup
C.C.C.C. TTTTail pipeail pipeail pipeail pipe 1111
96-97 GMC S-15 pickup96-97 GMC S-15 pickup96-97 GMC S-15 pickup96-97 GMC S-15 pickup
D.D.D.D. TTTTurn outurn outurn outurn out 1111
E.E.E.E. Front mufFront mufFront mufFront muffler clamp/hanger 3"fler clamp/hanger 3"fler clamp/hanger 3"fler clamp/hanger 3" 1111
Ext. Cab/SExt. Cab/SExt. Cab/SExt. Cab/Sttttd. Bedd. Bedd. Bedd. Bed
FFFF.... Rear mufRear mufRear mufRear muffler clamp/hanger 3"fler clamp/hanger 3"fler clamp/hanger 3"fler clamp/hanger 3" 1111
GGGG.... TTTTurn out clamp 3"urn out clamp 3"urn out clamp 3"urn out clamp 3" 1111
V6-4.3LV6-4.3LV6-4.3LV6-4.3L
EFE
FFF
EE
GGGG
AAAA
TTTTOOLS RECOMMENDED:OOLS RECOMMENDED:OOLS RECOMMENDED:OOLS RECOMMENDED:
reciprocating saw or hack sawreciprocating saw or hack sawreciprocating saw or hack sawreciprocating saw or hack saw
prybarprybarprybarprybar
rubber malletrubber malletrubber malletrubber mallet
ratchetratchetratchetratchet
15mm deep socket15mm deep socket15mm deep socket15mm deep socket
9/16 box wrench and deep socket9/16 box wrench and deep socket9/16 box wrench and deep socket9/16 box wrench and deep socket
ppppair of channel lock pliersair of channel lock pliersair of channel lock pliersair of channel lock pliers
anti-seizeanti-seizeanti-seizeanti-seize
DDDD
spray lubricant or penetrating oilspray lubricant or penetrating oilspray lubricant or penetrating oilspray lubricant or penetrating oil
impimpimpimpact wrenchact wrenchact wrenchact wrench
CCCC
TTTTOOOO STSTSTST ARTARTARTART ::::
BBBB
2. Disconnect negative battery cable and2. Disconnect negative battery cable and2. Disconnect negative battery cable and2. Disconnect negative battery cable and
allow vehicle exhaust to cool.allow vehicle exhaust to cool.allow vehicle exhaust to cool.allow vehicle exhaust to cool.
1. Remove and inventory new JBA1. Remove and inventory new JBA1. Remove and inventory new JBA1. Remove and inventory new JBA
exhaust.exhaust.exhaust.exhaust.
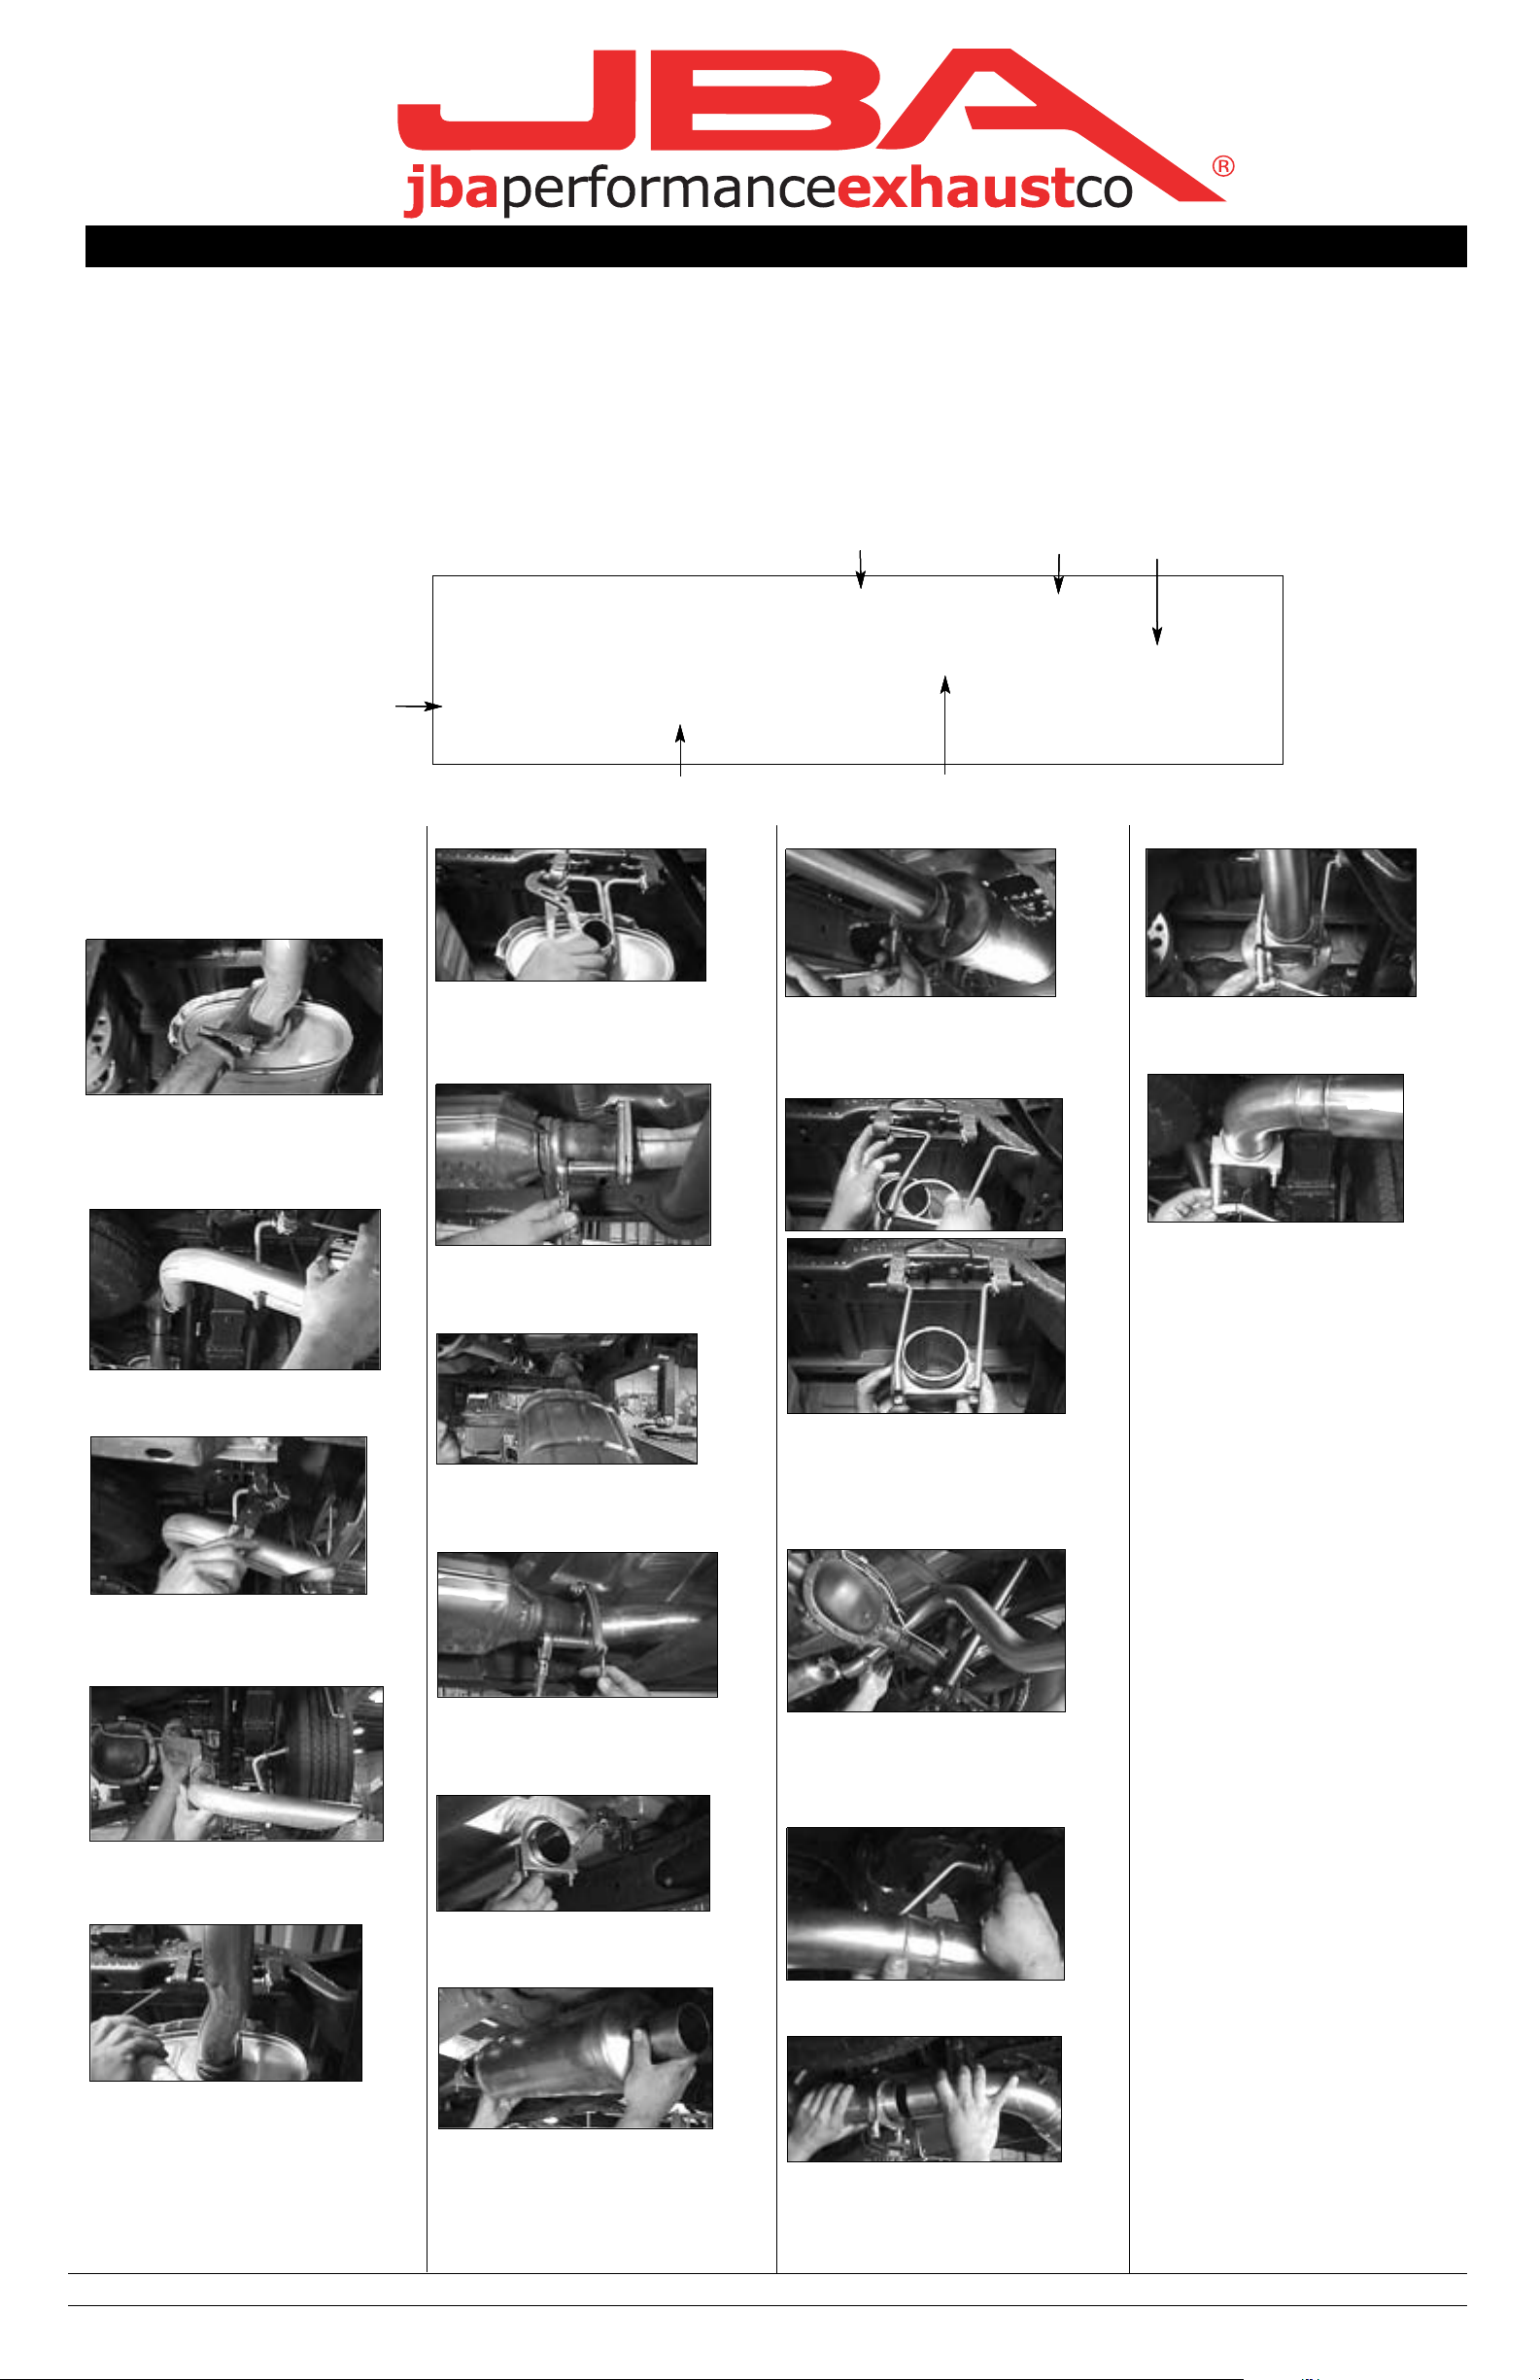
3. With vehicle raised and properly3. With vehicle raised and properly3. With vehicle raised and properly3. With vehicle raised and properly
supported, using a reciprocating sawsupported, using a reciprocating sawsupported, using a reciprocating sawsupported, using a reciprocating saw
or hacksawor hacksawor hacksawor hacksaw, cut the t, cut the t, cut the t, cut the tail pipe approxi-ail pipe approxi-ail pipe approxi-ail pipe approxi-
mately 3" behind rear mufmately 3" behind rear mufmately 3" behind rear mufmately 3" behind rear muffler hangerfler hangerfler hangerfler hanger....
8. With muf8. With muf8. With muf8. With muffler properly supported,fler properly supported,fler properly supported,fler properly supported,
using a pusing a pusing a pusing a pair of channel lock pliers,air of channel lock pliers,air of channel lock pliers,air of channel lock pliers,
remove front and rear mufremove front and rear mufremove front and rear mufremove front and rear muffler hangerfler hangerfler hangerfler hanger
rods from bottom hole of grommetrods from bottom hole of grommetrods from bottom hole of grommetrods from bottom hole of grommets.s.s.s.
14. With muf14. With muf14. With muf14. With muffler (B) in place, arrangefler (B) in place, arrangefler (B) in place, arrangefler (B) in place, arrange
clamp/hanger (E) on slip fit joint about aclamp/hanger (E) on slip fit joint about aclamp/hanger (E) on slip fit joint about aclamp/hanger (E) on slip fit joint about a
1/4î from end of muf1/4î from end of muf1/4î from end of muf1/4î from end of muffler and tighten clampfler and tighten clampfler and tighten clampfler and tighten clamp
completely with 9/16" deep socket.completely with 9/16" deep socket.completely with 9/16" deep socket.completely with 9/16" deep socket.
19. Check all pipes for proper clearance19. Check all pipes for proper clearance19. Check all pipes for proper clearance19. Check all pipes for proper clearance
and tighten clamp/hanger (F).and tighten clamp/hanger (F).and tighten clamp/hanger (F).and tighten clamp/hanger (F).
NOTE:NOTE:NOTE:NOTE: use anti seize on threads.use anti seize on threads.use anti seize on threads.use anti seize on threads.
4. S4. S4. S4. Spray lubricant on rear tpray lubricant on rear tpray lubricant on rear tpray lubricant on rear tail pipeail pipeail pipeail pipe
hanger rubber grommet.hanger rubber grommet.hanger rubber grommet.hanger rubber grommet.
10. Using care not to damage gasket on10. Using care not to damage gasket on10. Using care not to damage gasket on10. Using care not to damage gasket on
flange, remove the mufflange, remove the mufflange, remove the mufflange, remove the muffler assemblyfler assemblyfler assemblyfler assembly
pulling out towards the rear of the vehicle.pulling out towards the rear of the vehicle.pulling out towards the rear of the vehicle.pulling out towards the rear of the vehicle.
....
9. Remove the three nut9. Remove the three nut9. Remove the three nut9. Remove the three nuts on the threes on the threes on the threes on the three
bolt flange using a 15mm socket.bolt flange using a 15mm socket.bolt flange using a 15mm socket.bolt flange using a 15mm socket. YYYYouououou
may want to use some penetrating oil.may want to use some penetrating oil.may want to use some penetrating oil.may want to use some penetrating oil.
15. Inst15. Inst15. Inst15. Install rear mufall rear mufall rear mufall rear muffler clamp/hanger (F)fler clamp/hanger (F)fler clamp/hanger (F)fler clamp/hanger (F)
into both rubber grommetinto both rubber grommetinto both rubber grommetinto both rubber grommets, noting thats, noting thats, noting thats, noting that
hanger rod with 2 bends goes towards thehanger rod with 2 bends goes towards thehanger rod with 2 bends goes towards thehanger rod with 2 bends goes towards the
driverdriverdriverdriver íííís side of vehicle. Slip clamp/hangers side of vehicle. Slip clamp/hangers side of vehicle. Slip clamp/hangers side of vehicle. Slip clamp/hanger
(F) over muf(F) over muf(F) over muf(F) over muffler (B) slip fit joint. Do notfler (B) slip fit joint. Do notfler (B) slip fit joint. Do notfler (B) slip fit joint. Do not
tighten at this time.tighten at this time.tighten at this time.tighten at this time.
20. Check turn out (D) position and20. Check turn out (D) position and20. Check turn out (D) position and20. Check turn out (D) position and
tighten clamp (G) completelytighten clamp (G) completelytighten clamp (G) completelytighten clamp (G) completely....
21.21.21.21. AfAfAfAfter instter instter instter installation, it is recommendedallation, it is recommendedallation, it is recommendedallation, it is recommended
that all clampthat all clampthat all clampthat all clamps be retightened and joints be retightened and joints be retightened and joints be retightened and jointssss
ttttack welded in three spotack welded in three spotack welded in three spotack welded in three spots.s.s.s.
22. Using a sof22. Using a sof22. Using a sof22. Using a soft cloth, remove all printt cloth, remove all printt cloth, remove all printt cloth, remove all printssss
from turnout tip (D).from turnout tip (D).from turnout tip (D).from turnout tip (D).
23. Lower vehicle and reatt23. Lower vehicle and reatt23. Lower vehicle and reatt23. Lower vehicle and reattach the negativeach the negativeach the negativeach the negat
battery cable.battery cable.battery cable.battery cable.
NOTES:NOTES:NOTES:NOTES:
1) It may be necessary to loosen and1) It may be necessary to loosen and1) It may be necessary to loosen and1) It may be necessary to loosen and
realign the sprealign the sprealign the sprealign the spare tire for proper clear-are tire for proper clear-are tire for proper clear-are tire for proper clear-
ive
5. Using a p5. Using a p5. Using a p5. Using a pair of channel lock pliers,air of channel lock pliers,air of channel lock pliers,air of channel lock pliers,
remove hanger rod from bottom hole ofremove hanger rod from bottom hole ofremove hanger rod from bottom hole ofremove hanger rod from bottom hole of
grommet.grommet.grommet.grommet.
11111. Inst1. Inst1. Inst1. Install head pipeall head pipeall head pipeall head pipe (A) with three bolt(A) with three bolt(A) with three bolt(A) with three bolt
flange and tighten with 15mm socket.flange and tighten with 15mm socket.flange and tighten with 15mm socket.flange and tighten with 15mm socket.
NOTE:NOTE:NOTE:NOTE: we recommend using anti seizewe recommend using anti seizewe recommend using anti seizewe recommend using anti seize
on threads.on threads.on threads.on threads.
16. Inst16. Inst16. Inst16. Install short end of tall short end of tall short end of tall short end of tail pipe (C) fromail pipe (C) fromail pipe (C) fromail pipe (C) from
rear into slip joint on mufrear into slip joint on mufrear into slip joint on mufrear into slip joint on muffler (B).fler (B).fler (B).fler (B). TTTTail pipeail pipeail pipeail pipe
should slip into mufshould slip into mufshould slip into mufshould slip into muffler approx. 2".fler approx. 2".fler approx. 2".fler approx. 2".
NOTE:NOTE:NOTE:NOTE: you may have to tyou may have to tyou may have to tyou may have to tap tap tap tap tail pipe intoail pipe intoail pipe intoail pipe into
ance.ance.ance.ance.
2)2)2)2) All exhaust systems will expAll exhaust systems will expAll exhaust systems will expAll exhaust systems will expand aboutand aboutand aboutand about
1î rearward when exhaust temperature1î rearward when exhaust temperature1î rearward when exhaust temperature1î rearward when exhaust temperature
ststststart to rise.art to rise.art to rise.art to rise.
3) Use3) Use3) Use3) Use Anti-seize on threads of clampAnti-seize on threads of clampAnti-seize on threads of clampAnti-seize on threads of clamps.s.s.s.
6. Remove t6. Remove t6. Remove t6. Remove tail pipe assembly from rearail pipe assembly from rearail pipe assembly from rearail pipe assembly from rear
of vehicle.of vehicle.of vehicle.of vehicle.
12. Inst12. Inst12. Inst12. Install clamp/hanger (E) into rubberall clamp/hanger (E) into rubberall clamp/hanger (E) into rubberall clamp/hanger (E) into rubber
grommet and slide clamp over headgrommet and slide clamp over headgrommet and slide clamp over headgrommet and slide clamp over head
pipe (A).pipe (A).pipe (A).pipe (A).
17. Inst17. Inst17. Inst17. Install turn out hanger into bottomall turn out hanger into bottomall turn out hanger into bottomall turn out hanger into bottom
hole of rubber grommet.hole of rubber grommet.hole of rubber grommet.hole of rubber grommet.
mufmufmufmuffler with a rubber mallet.fler with a rubber mallet.fler with a rubber mallet.fler with a rubber mallet.
7. S7. S7. S7. Spray lubricant on front and rearpray lubricant on front and rearpray lubricant on front and rearpray lubricant on front and rear
mufmufmufmuffler hanger grommetfler hanger grommetfler hanger grommetfler hanger grommets.s.s.s.
13. With the JBA logo to the rear of13. With the JBA logo to the rear of13. With the JBA logo to the rear of13. With the JBA logo to the rear of
vehicle, slip mufvehicle, slip mufvehicle, slip mufvehicle, slip muffler (B) on head pipefler (B) on head pipefler (B) on head pipefler (B) on head pipe
approximately 2".approximately 2".approximately 2".approximately 2". NOTE:NOTE:NOTE:NOTE: you may haveyou may haveyou may haveyou may have
to tto tto tto tap it in with a rubber mallet.ap it in with a rubber mallet.ap it in with a rubber mallet.ap it in with a rubber mallet.
18. Inst18. Inst18. Inst18. Install 3" clamp (G) over rear of tall 3" clamp (G) over rear of tall 3" clamp (G) over rear of tall 3" clamp (G) over rear of tailailailail
pipe (C). Slip turnout (D) over tpipe (C). Slip turnout (D) over tpipe (C). Slip turnout (D) over tpipe (C). Slip turnout (D) over tail pipe.ail pipe.ail pipe.ail pipe.
Position 3" clamp (G) over slip joint turnPosition 3" clamp (G) over slip joint turnPosition 3" clamp (G) over slip joint turnPosition 3" clamp (G) over slip joint turn
out (D) and hand tighten.out (D) and hand tighten.out (D) and hand tighten.out (D) and hand tighten. NOTE:NOTE:NOTE:NOTE: use antiuse antiuse antiuse anti
seize on threads.seize on threads.seize on threads.seize on threads.
17099170991709917099
WWWWeeee recommend taking the truck to a muffler shop and having all slip connections tack welded.recommend taking the truck to a muffler shop and having all slip connections tack welded.recommend taking the truck to a muffler shop and having all slip connections tack welded.recommend taking the truck to a muffler shop and having all slip connections tack welded.
6-21-026-21-026-21-026-21-02
40-3019
 Loading...