

Page 1
PERSONAL TELECOM,INC.
www.perstel.com
PMANWHF00041
Owner's Manual
Page 2
To prevent injury and/or damage, take the following precautions:
1 Make sure you keep the antenna away from the mains or high voltage electricity source .
2 Make sure you keep the Power switch at OFF position when replacing batteries.
3 Make sure the batteries are NOT reversed.
4 If the unit becomes very hot, turn off the power immediately and consult your adapt™‚ dealer.
5 Do not drop the unit on the ground or subject to strong shock.
6 Do not attempt to dismantle the unit.
7 Keep the unit away from water or damp environments.
8 Keep away from direct sunlight or excessive heat or humidity.
9 Remove the batteries when you do not use the product for a long time.
10 Do not clean the unit with chemicals such as benzene and alcohol.
SAFETY PRECAUTIONS WHAT IS DAB ?
The DAB system is a new digital format, which can provide crystal-clear, near CD-quality audio
and good reception even when moving in cars or trains.
A DAB broadcast consists of a high speed data stream on a radio channel called an Ensemble.
An Ensemble is made up of several service components, which can be individual radio stations
or data services. Each service, or station can carry other useful information in addition to the
audio signal, such as the name of the station, news headlines or program information.
This is displayed on your DR201 when the station is selected.
A key feature of DAB radio is that stations can be added when additional channels are required
for a particular time and events. For example, an extra secondary station or secondary service
could be added for the commentary on a sports event. At the end of the event, the listener is
automatically returned to the primary service or station.
Page 3
CONTENTSCONTENTS
4
5
1. PREPARATION
1 What is in the Box? 7
2 Controls Diagram 8
3 Keys and Buttons 9
4 LCD Display 10
5 Preparation to Use 11
2. GETTING STARTED
1 Power ON/OFF 13
2 Antenna Setting 13
3 Volume Control 14
3. DAB OPERATION
1 Ensemble Tuning 15
2 Service Component Selection 19
3 Displaying Other Service Information 19
4. DR201 SETTING
1 DR201 Other Modes and Settings 21
2 Adjustment of Display 24
3 Button Hold 26
5. FM OPERATION
1
Switching to FM Radio Mode 27
2
Frequency Tuning 27
6. MUSIC PLAYER OPERATION
1
Mode Switching 30
2
Operation 30
3
Music Player Setting 32
7.
REMOVABLE DISC OPERATION
1
Connecting the DR201 to a PC 35
2
Before File Upload/Download 36
3 Operation 41
8. BATTERY AND MAINS OPERATION
1
Battery Operation 48
2
Mains Operation 48
Page 4
1. PREPARATIONCONTENTS
6
7
APPENDICES
Appendix 1 Menu Tree - DAB Block 49
Appendix 2 Menu Tree - FM Radio Block 50
Appendix 3 Menu Tree - Music Play Block 51
Appendix 4 Ensemble Information Example 52
Appendix 5 Regional Frequency Table 53
1
BAND-III (Europe) 53
2
L-BAND (Europe) 54
3
L-BAND (Canada) 54
Appendix 6 Troubleshooting 55
Appendix 7 Specifications 57
Appendix 8 Information on Digital Radio Services in the United Kingdom 58
WARRANTY
1
About Warranty Service 64
2
Product Information 65
3
Warranty Exclusion 65
4
Warranty Statement 65
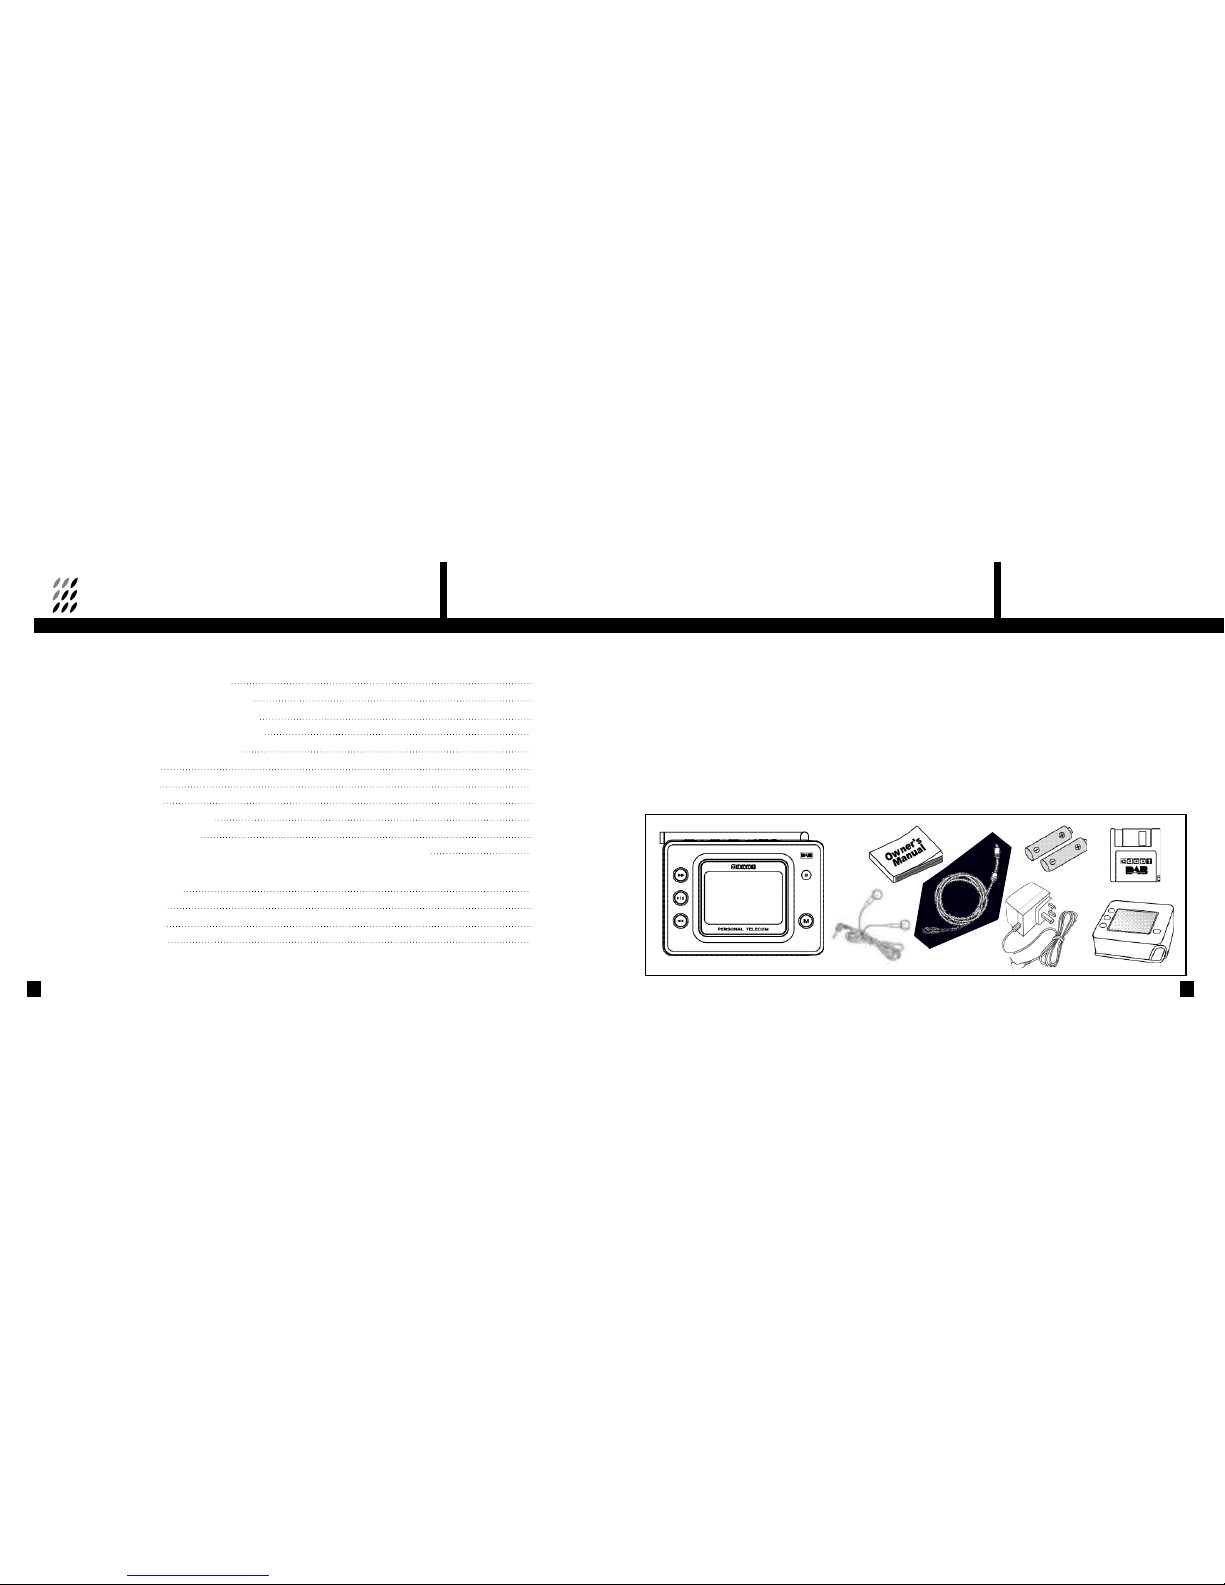
1 What is in the Box?
·DR201 DAB Digital Radio Receiver
·Stereo Earphone
·Owner’s Manual
·2 AA Alkaline Batteries
·Installation Diskette
·USB Cable
·Carrying Case
·Adaptor
Page 5
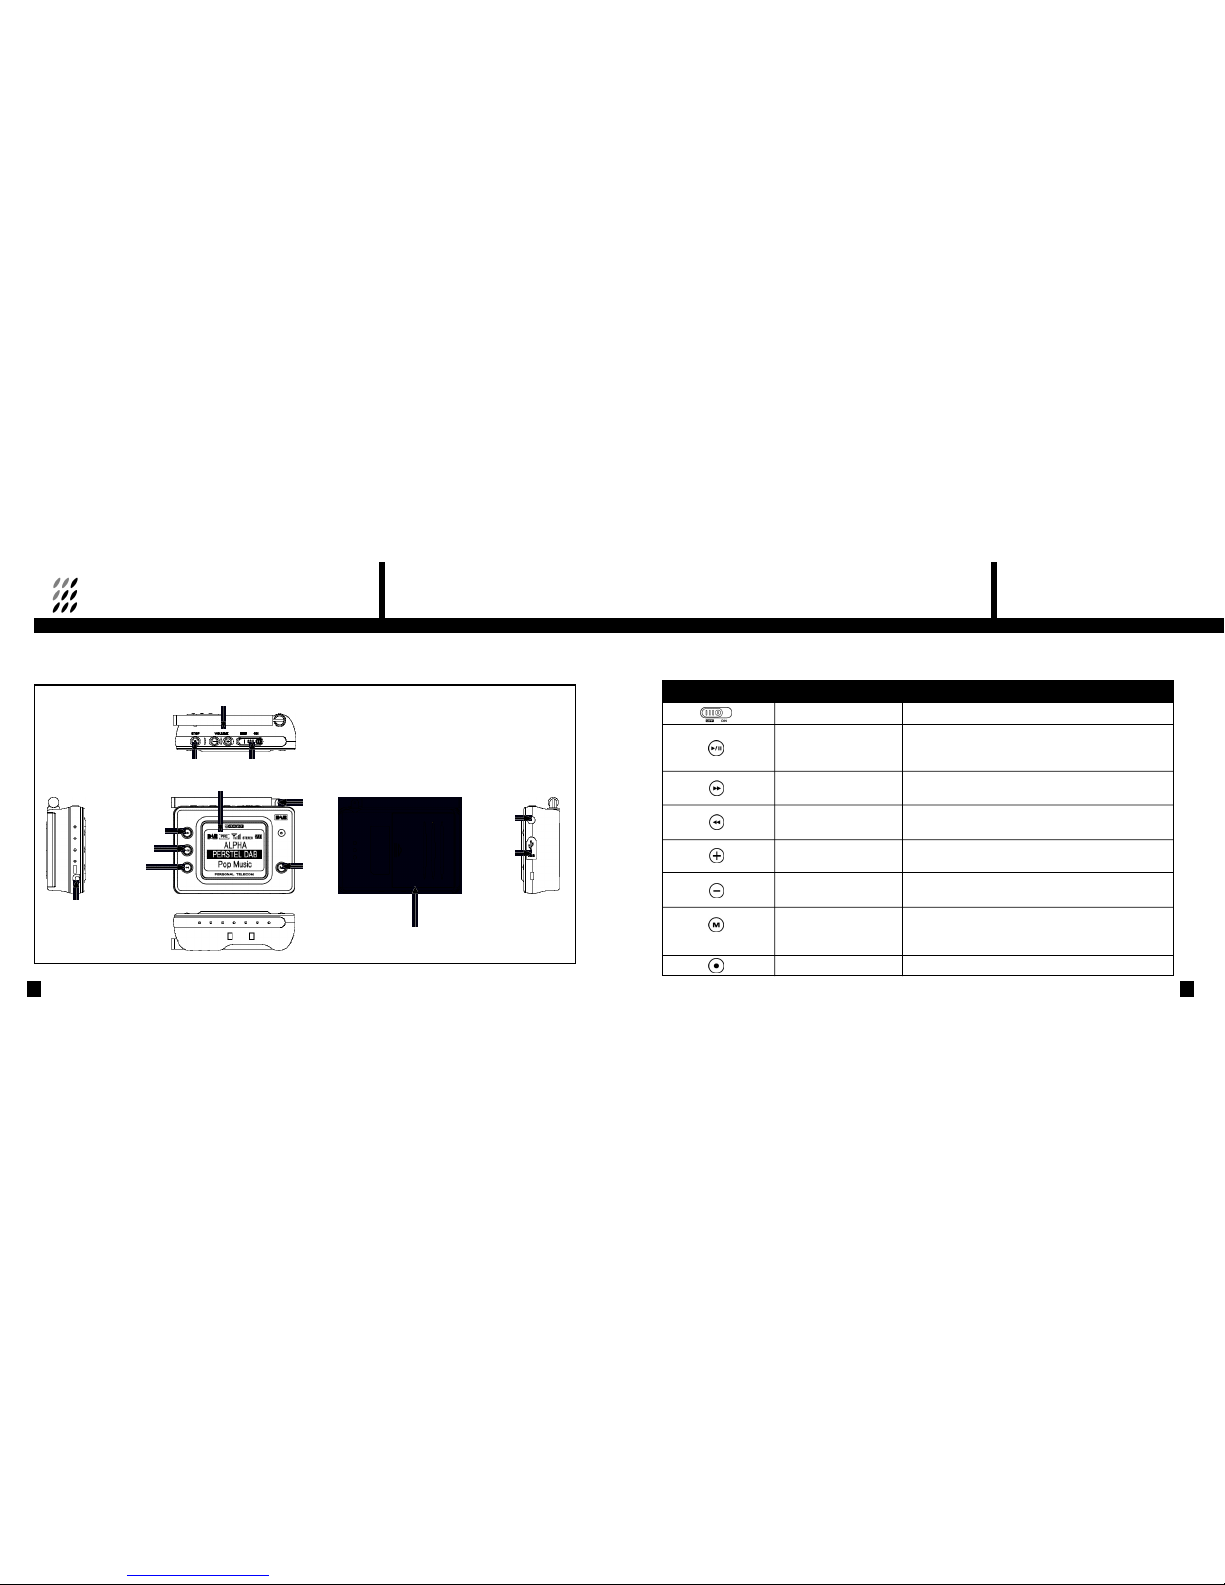
Power ON/OFF Slide to turn on / off
Push to Play/Pause songs at Music Player Mode
P l a y / P a u s e / C o n f i r m Push to confirm selection in [MENU] mode
Push to select highlighted line in DAB mode
F o r w a r d/U p
Push to search next CHANNEL or Up MENU item
Push and hold for auto forward search
B a c k w a r d/D o w n
Push to search previous CHANNEL or Down MENU item
Push and hold for auto backward search
Volume up
Push to increase volume
Push and hold for continuous control
Volume down
Push to decrease volume
Push and hold for continuous control
M e n u Press to enter the [MENU]
Press to exit the [MENU]
Press to exit to the upper [MENU] during Menu Selection
S t o p Press to stop Music Play at Music Player Mode.
1. PREPARATION
9
1. PREPARATION
8
2 Controls Diagram
Keys & Buttons N a m e F u n c t i o n a l i t y
3 Keys and Buttons
Volume
LCD Display
Stop
DC Jack
Antenna
Menu
Forward /Up
Play/Pause
/Confirm
Backward
/Down
Earphone
Jack
USB Port
Battery Cover
Power ON/OFF
Page 6
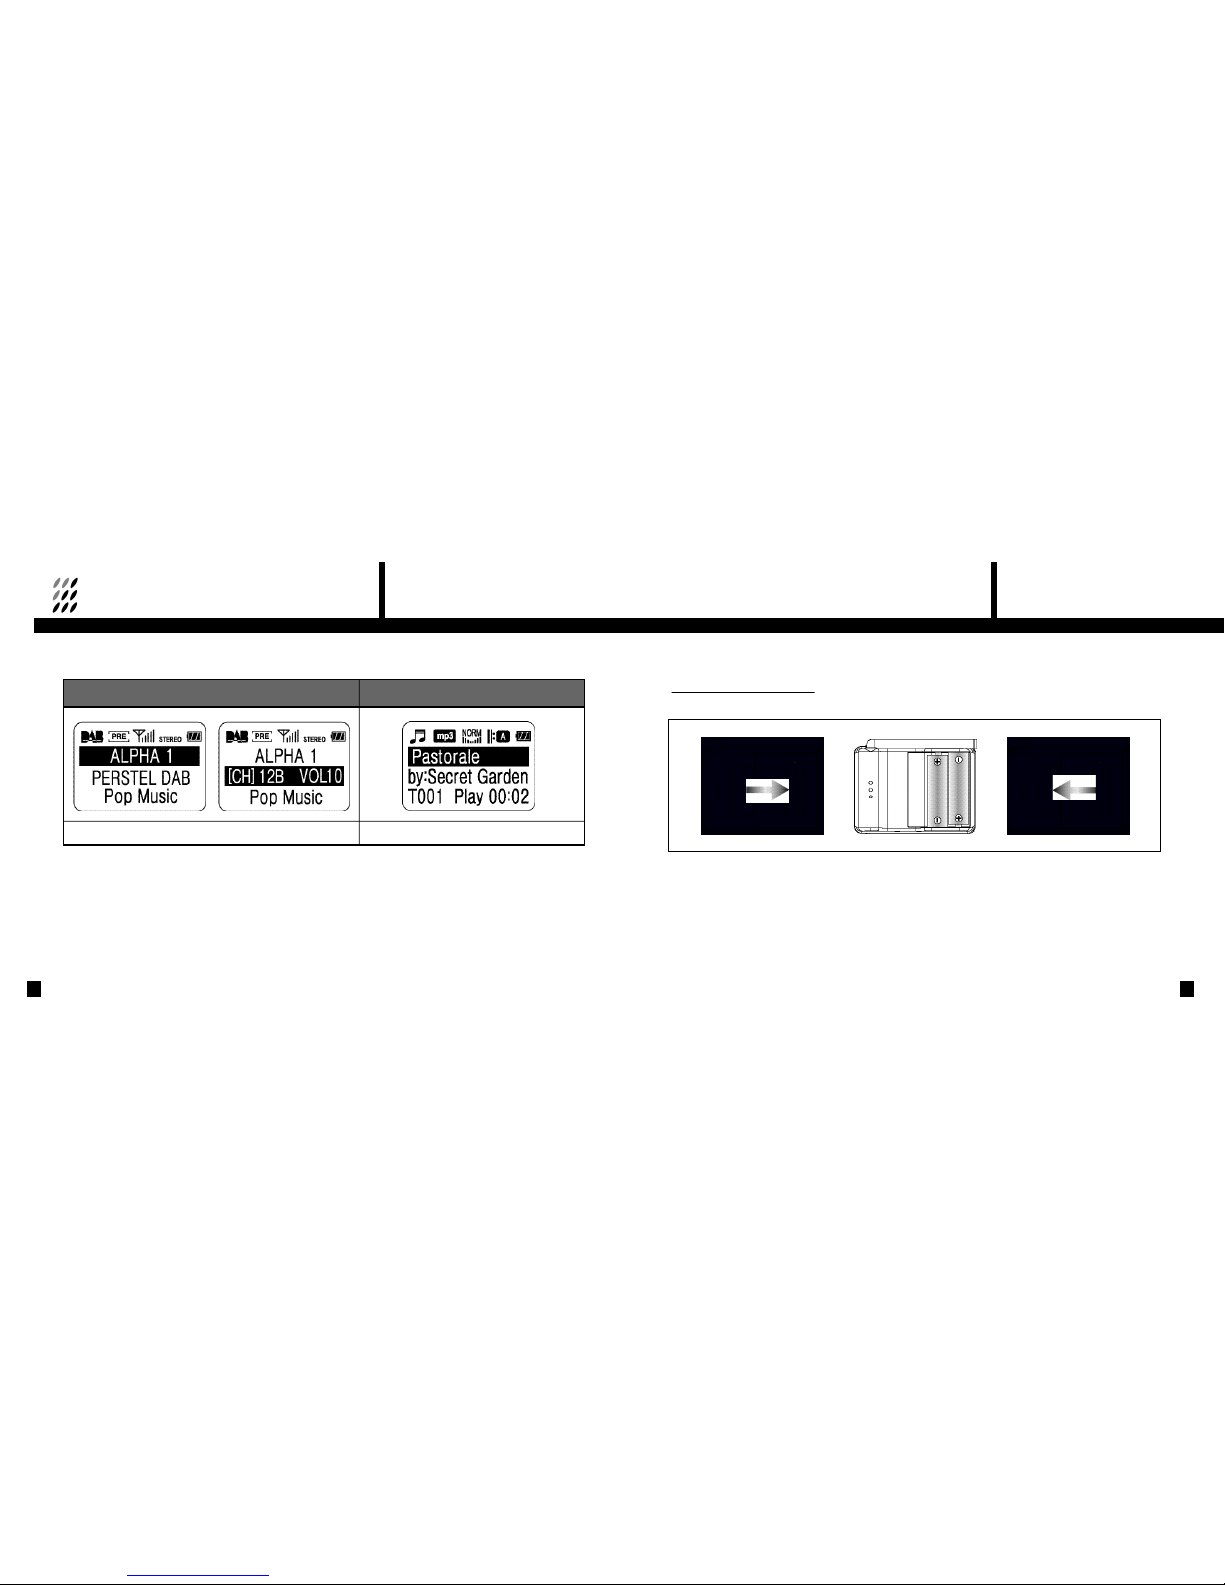
5 Preparation to Use
· Battery insertion/replacement
Make sure the power switch is at the "OFF" position before battery insertion or replacement.
①
Push the arrow marking on the battery cover and slide the battery cover to the right. Open the battery cover.
②
Insert two(2)AA sized alkaline batteries into the compartment following the polarity indication.
Pull the ribbon to release old batteries for replacement.
③
Place the battery cover on the original position and slide it to the left until it clicks.
④
For safety purpose, remove batteries from the unit when not used for a long time.
1. PREPARATION
11
1. PREPARATION
10
Fully Tuned Adjusting Volume Playing Music
4 LCD Display
DAB Mode Music Play Mode
Page 7
2. GETTING STARTED1. PREPARATION
12
13
· Plug-in Earphone
Before use, plug in the Earphone gently into the Earphone jack on top of the unit. Make sure you use the Earphone
supplied or one designed for stereo portable music systems to avoid possible damage.
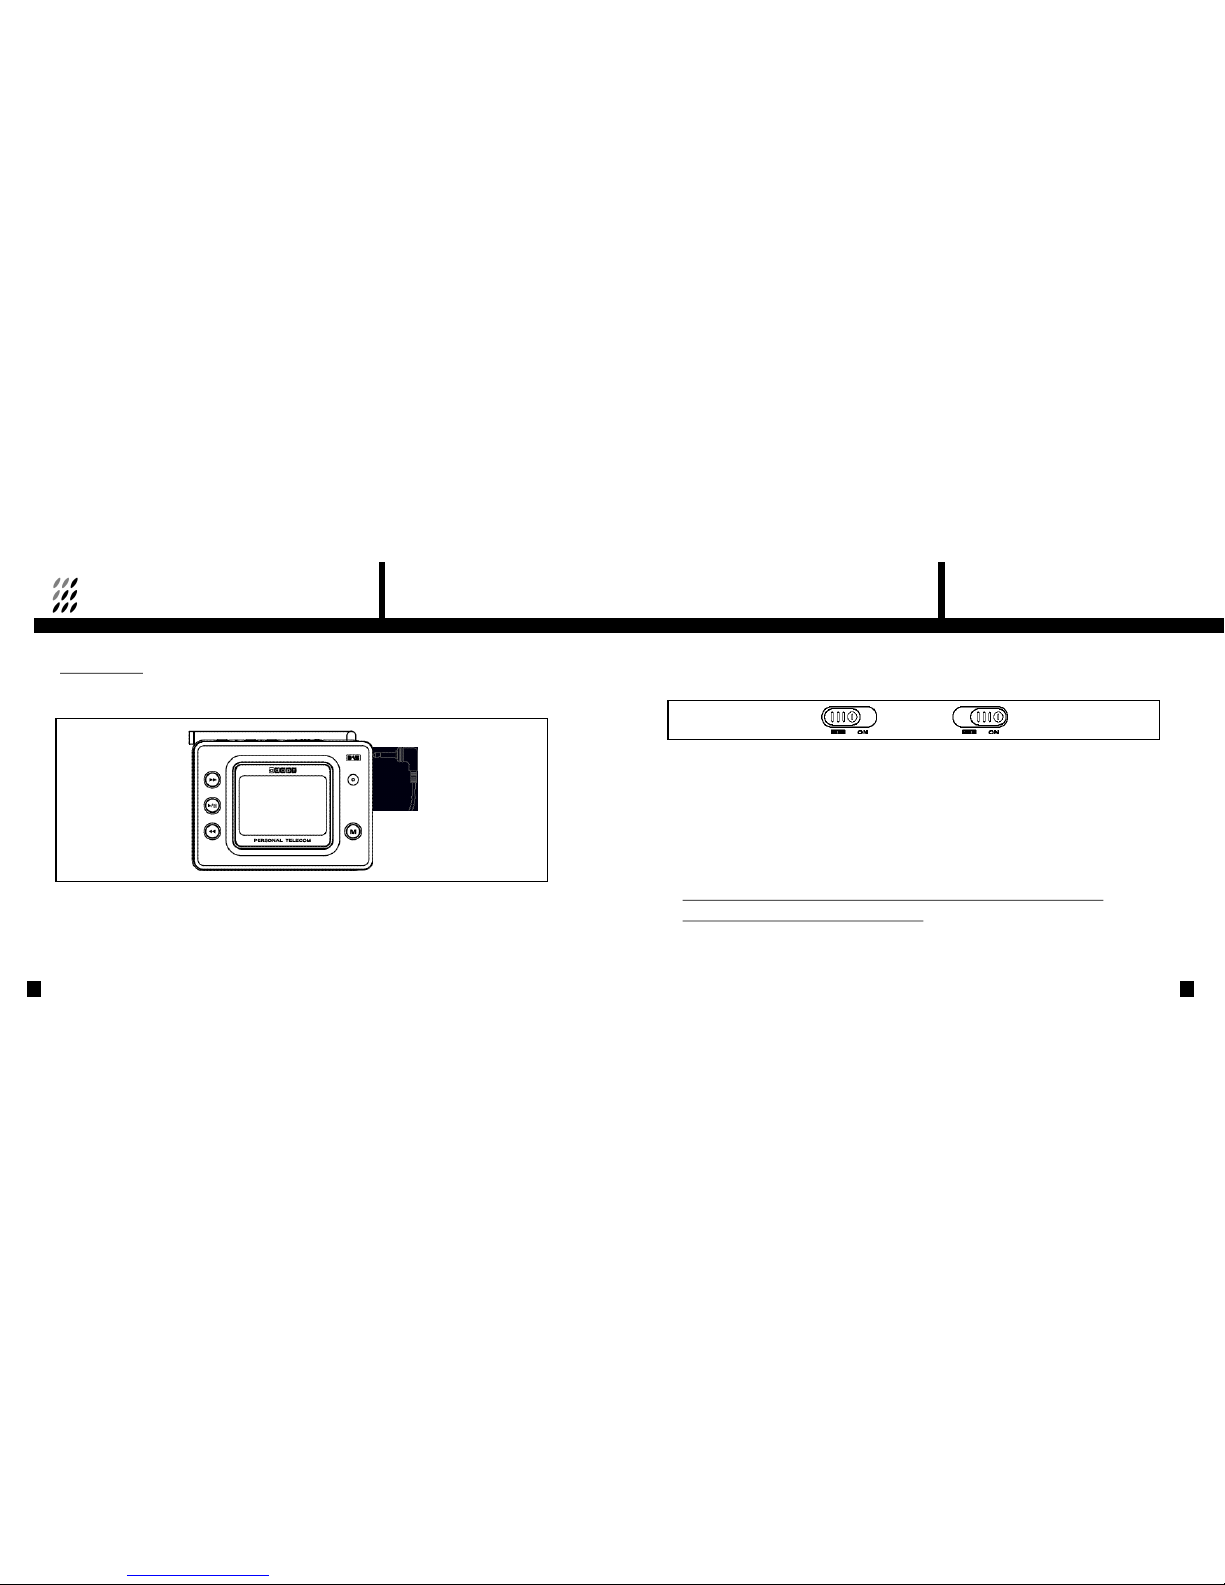
1 Power ON/OFF
①
Slide POWER Switch to "ON" position. The display will turn on in few seconds.
②
DR201 saves the last station and settings when powered off. When DR201 is powered on
again, it automatically recalls and resumes operation at the last saved status.
③
To turn the unit off, slide the Power Switch to the "OFF" position.
2 Antenna Setting
Depending on the model and the country of use, the DR201 is designed to work either in Band-III or
L-Band, or both. In order to maximize receiving performance you may need to adjust antenna length.
For optimum reception in Band III the antenna should be fully extended. In strong signal areas it is
possible to reduce the antenna length without loss of quality.
·When reception is weak you may need to redirect antenna position for better reception.
·Refer to Regional Frequency Table at Appendix 5.
Page 8
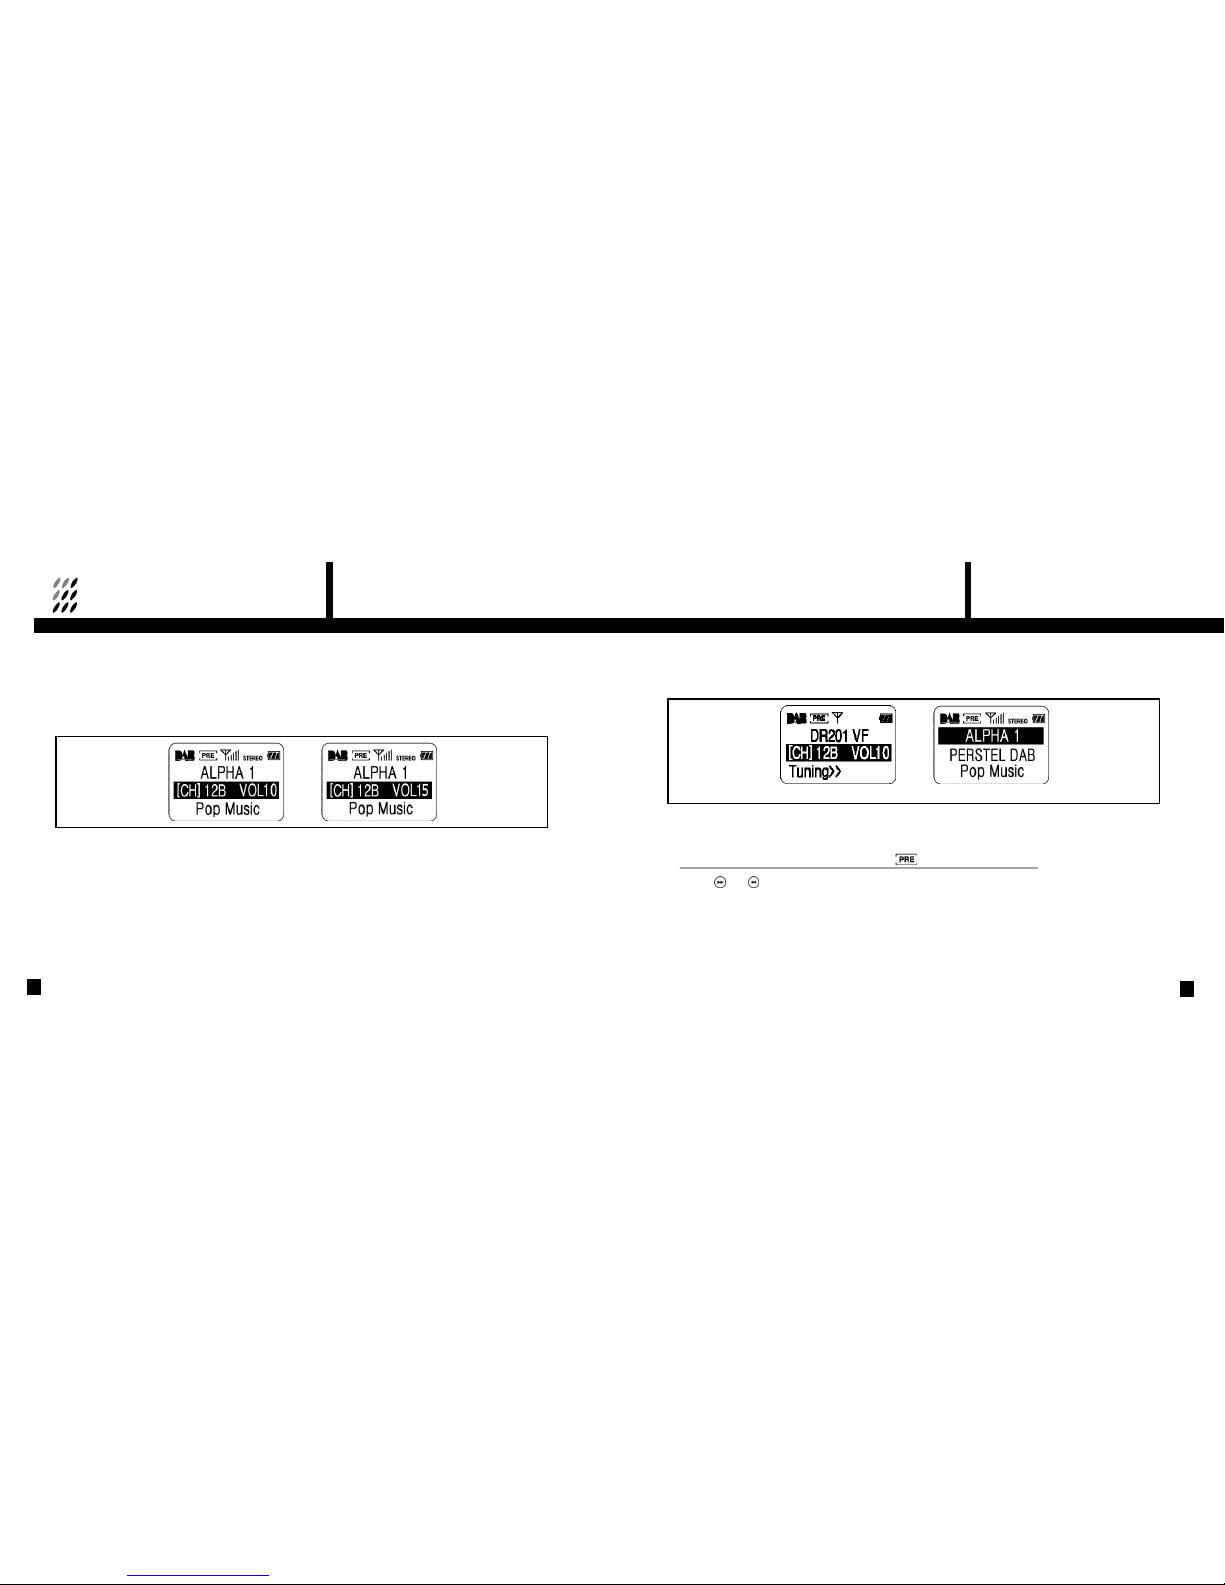
3 Volume Control
Adjust volume level to a desired position by pressing Volume (+ /-) button. DR201 has 21 steps of volume control.
When volume control button is pressed and held volume level will gradually be raised or lowered.
This volume control feature is common to DAB, Music Player and FM Radio Mode.
3. DAB OPERATION
15
2. GETTING STARTED
14
1 Ensemble Tuning
When DR201 is turned on in DAB Radio mode, it begins tuning from the last received channel.
However when the incoming signal is weak or no signal is available, you will need to retune the
receiver. The display will be as above <Turned on - Tuning Mode>
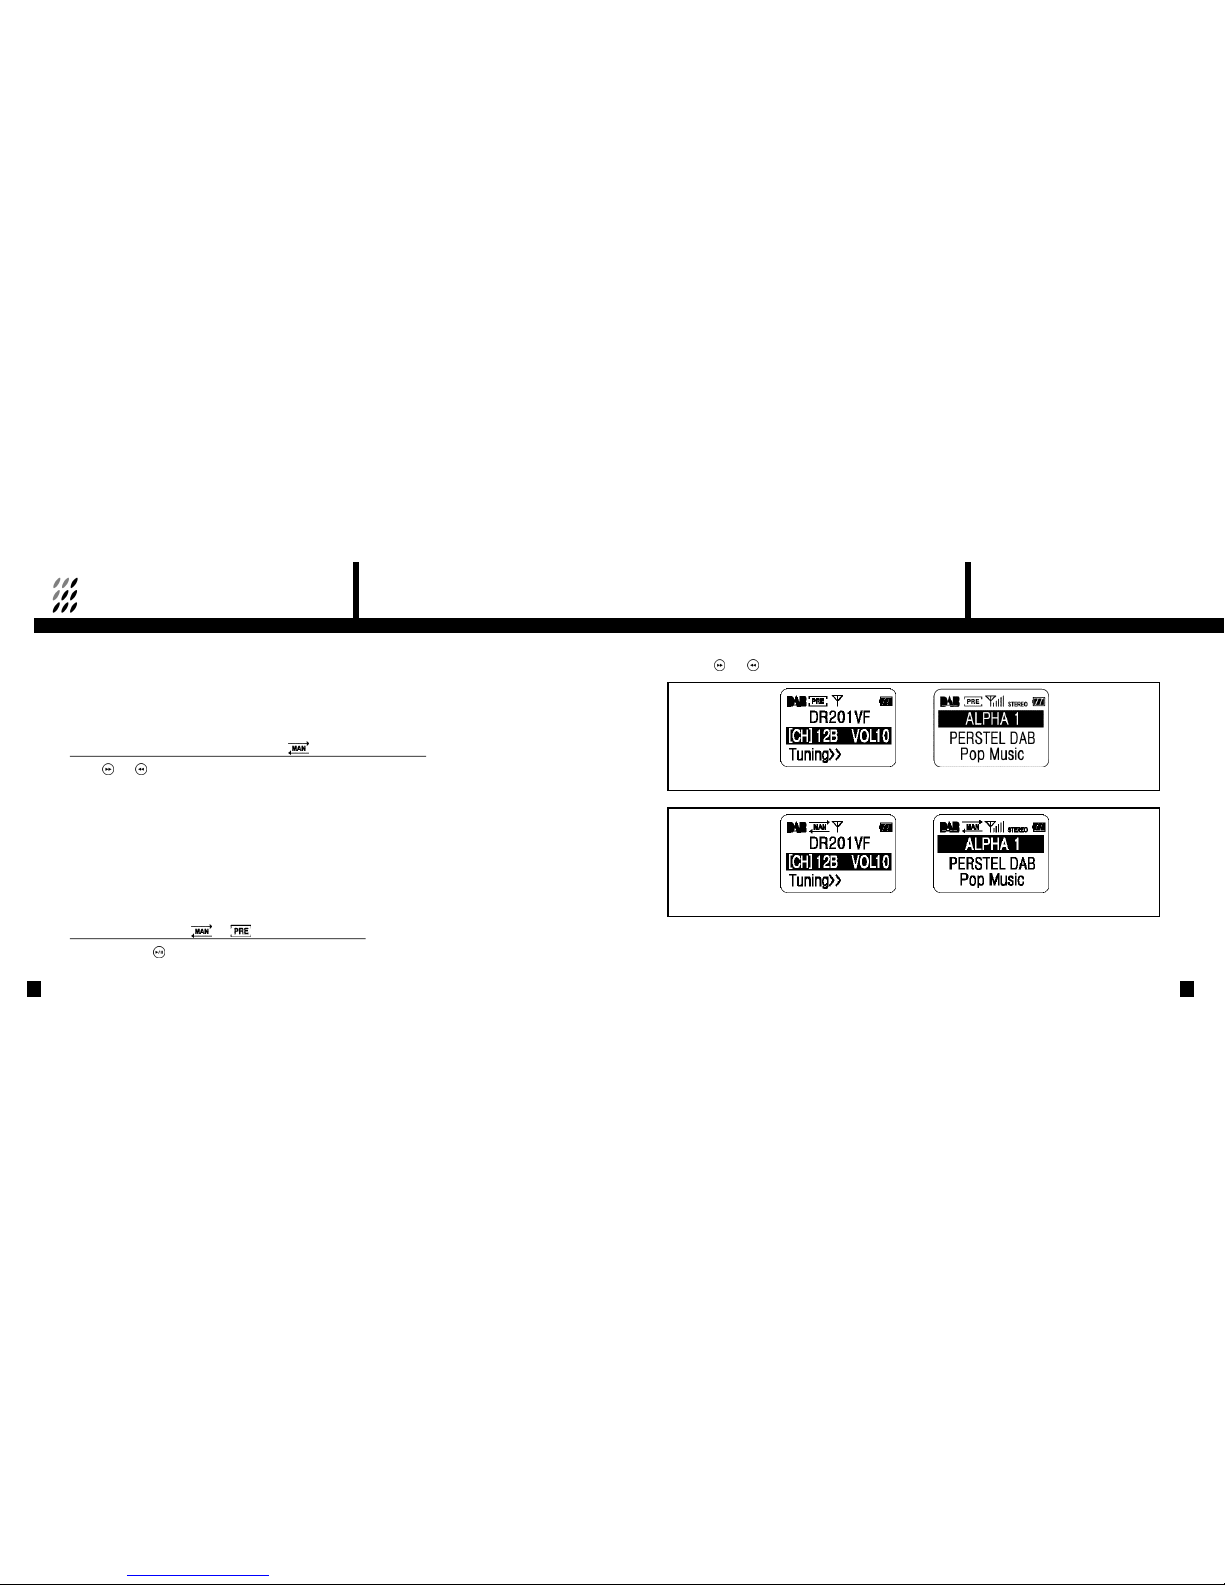
·Tuning an Ensemble: At Preset Tune Mode ( appears as Tuning Icon)
①
Press ( ) or ( ) repeatedly until the desired channel is displayed.
②
When tuned to the desired channel, it may take 1- 2 seconds for the receiver to capture the
signal and the display will change to <Tuned> as shown above.
③
When tuned, the name of the Service Component or individual station is shown on the first
line of the display, and this line is highlighted.
<Turned on - Tuning Mode> <Tuned>
Page 9
3. DAB OPERATION
17
3. DAB OPERATION
16
④
The name of the Ensemble is shown on the second line of the display.
⑤
The third line of the display shows additional information called DLS. This will appear after 1
to 3 seconds and may show programme information, news headlines or other information
depending on the station. It is possible to display other information on this line; (page 19).
⑥
Channel number and Volume level are replaced by the Ensemble name until next volume adjustment is made.
·Tuning an Ensemble : At Manual Tune Mode( appears as Tuning icon)
①
Press ( ) or ( ) repeatedly until the desired channel is displayed.
②
When tuned to the desired channel, it may take 1- 2 seconds for the receiver to capture the
signal and the display will change to <Tuned> as shown on previous page.
③
When tuned, the name of the Service Component or individual station is shown on the first
line of the display, and this line is highlighted.
④
The name of the Ensemble is shown on the second line of the display.
⑤
The third line of the display shows additional information called DLS. This will appear after 1
to 3 seconds and may show programme information, news headlines or other information
depending on the station. It is possible to display other information on this line; (page 19).
⑥
Channel number and Volume level are replaced by the Ensemble name until next volume adjustment is made.
·Changing the Ensemble ( or appears as Tuning Icon)
①
Press the Confirm ( ) button to highlight the second line of the display where the Ensemble name is displayed.
②
Press ( ) or ( ) repeatedly until the desired channel is displayed.
<Preset Tune> <Tuned>
<Manual Tune> <Tuned>
Page 10
2 Service Components Selection
①
When the unit is tuned, the highlighted line is the first line of the display where the Service Component name is displayed.
②
Press ( ) or ( ) button for other service components. Some Service components have
"secondary service components" which may form an additional channel. These will be listed
automatically after the primary component.
3 Displaying Other Service Information
When Ensemble and Service Component settings are done, you may wish to see other services provided by broadcasters.
①
Press the Confirm ( ) button to highlight the third line of the display.
②
Press ( ) or ( ) to see other available Service Information.
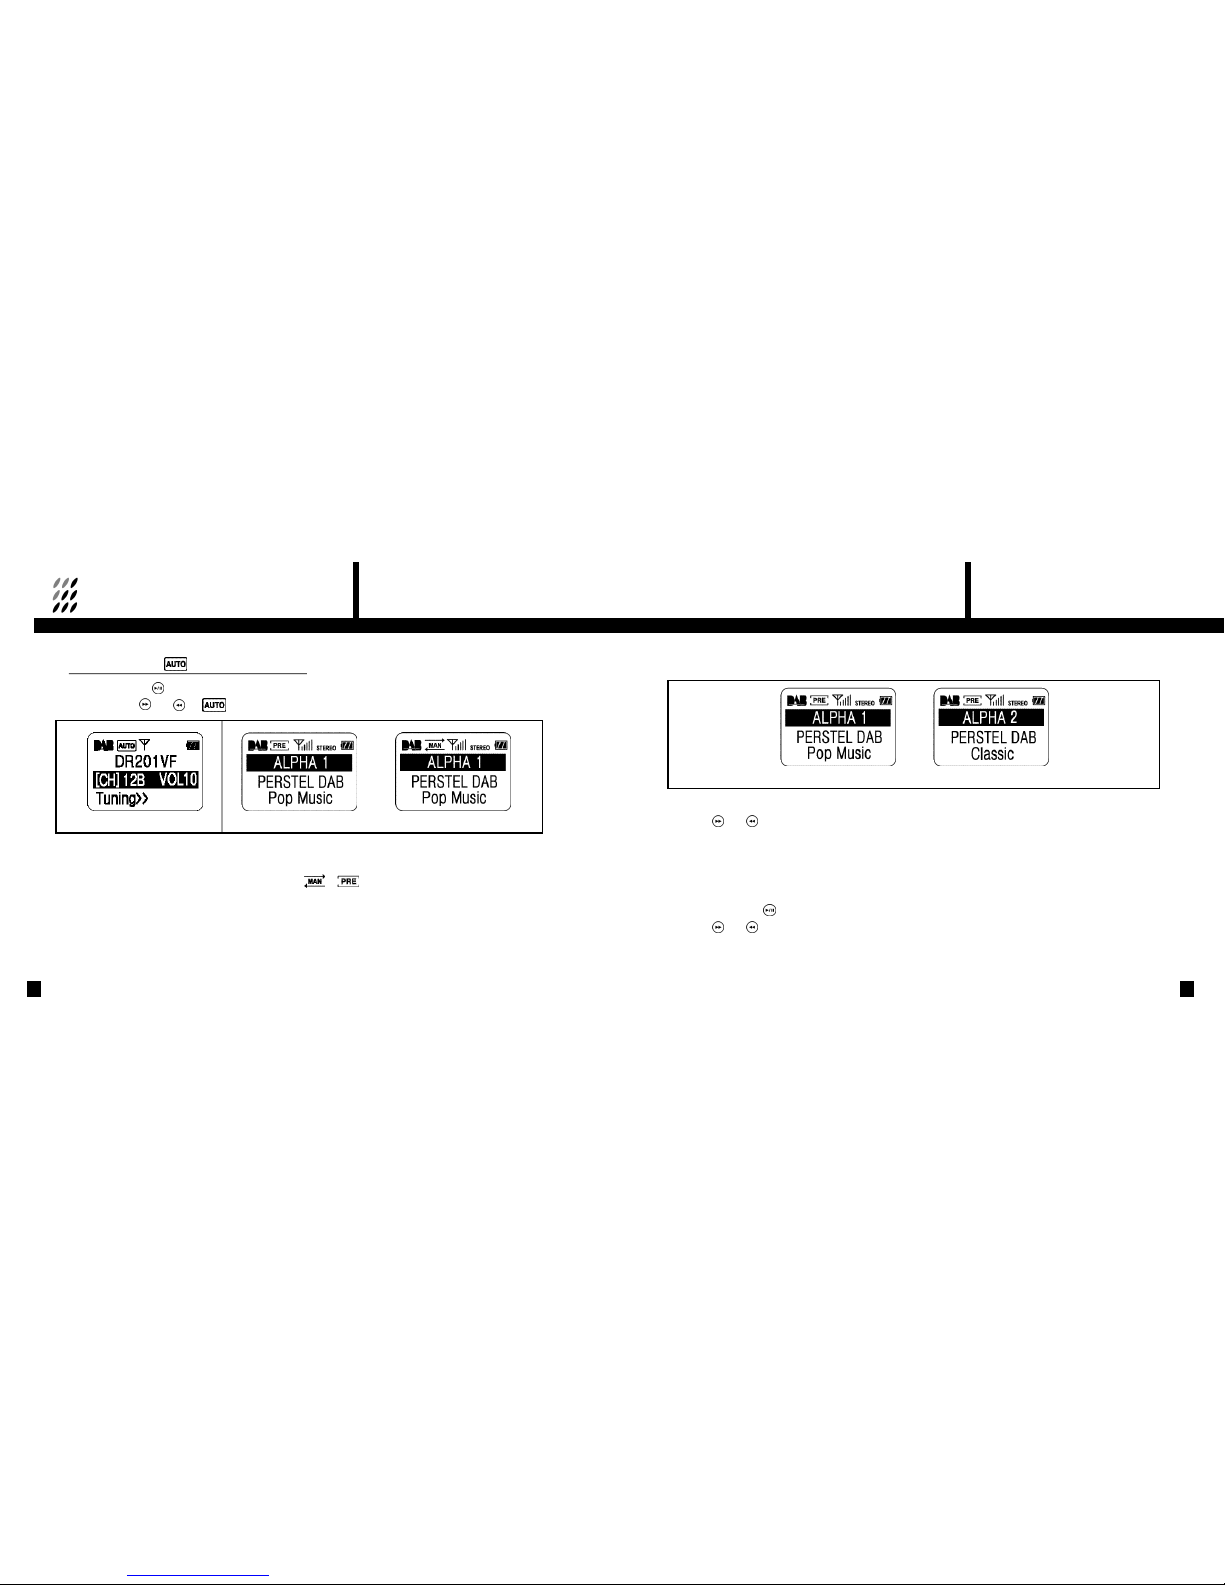
·Automatic Tuning ( appears as Tuning Icon)
①
Press the Confirm ( ) button to highlight the second line of the display.
②
Press and hold ( ) or ( ) till appears as Tuning icon.
③
When signal is captured, the Ensemble name is displayed at second line while Primary
Service Component name is on first line and other Service Information is on bottom line.
④
Tuning mode is then returned to normal mode displaying or as Tuning Icon.
⑤
When signal is not captured until the end of channel loop, the unit automatically moves to the first channel for tuning.
3. DAB OPERATION
19
3. DAB OPERATION
18
<Service Component ALPHA 1> <Another Service Component>
<Automatic Tuning Mode>
<Tuned - Back to Normal Mode>
Page 11
③
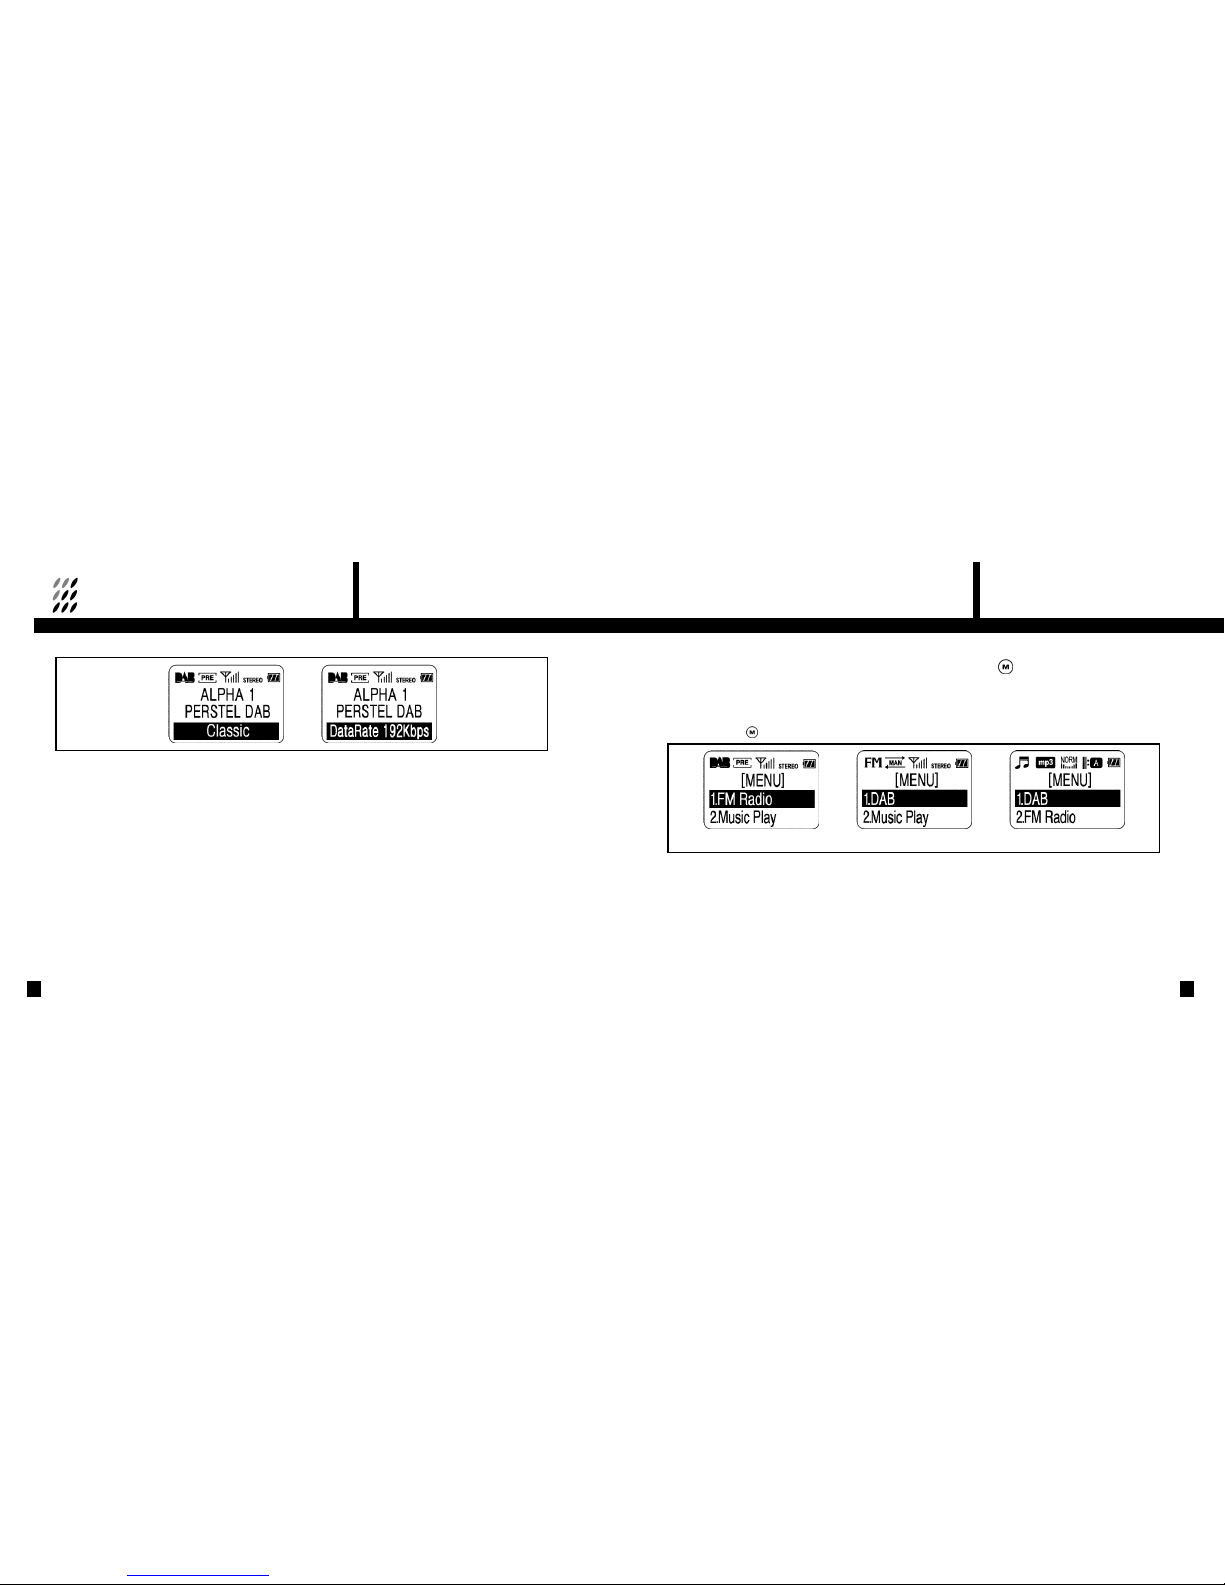
The following Service Information is available to be displayed. Note that some of the
information may not be available, depending on the station tuned.
⋏ Dynamic Label
⋏ Program Type
⋏ Data Rate Label
⋏ Current Time (If transmitted by the service)
⋏ DAB Mode information
1 DR201 Other Modes and Settings:MENU Button( )
DR201 has a Music Play, and FM Radio features in addition to the DAB receiver. The mode of
operation and other settings are controlled with the MENU button.
To change the DR201 mode;
Press the MENU ( ) button. The Menu will be displayed.
4. DR201 SETTING
21
▶
The menu options are available in DAB mode
1. FM Radio
2. Music Play
3. Button Hold
4. Backlight
5. Contrast
6. Preset Tune
7. Manual Tune
3. DAB OPERATION
20
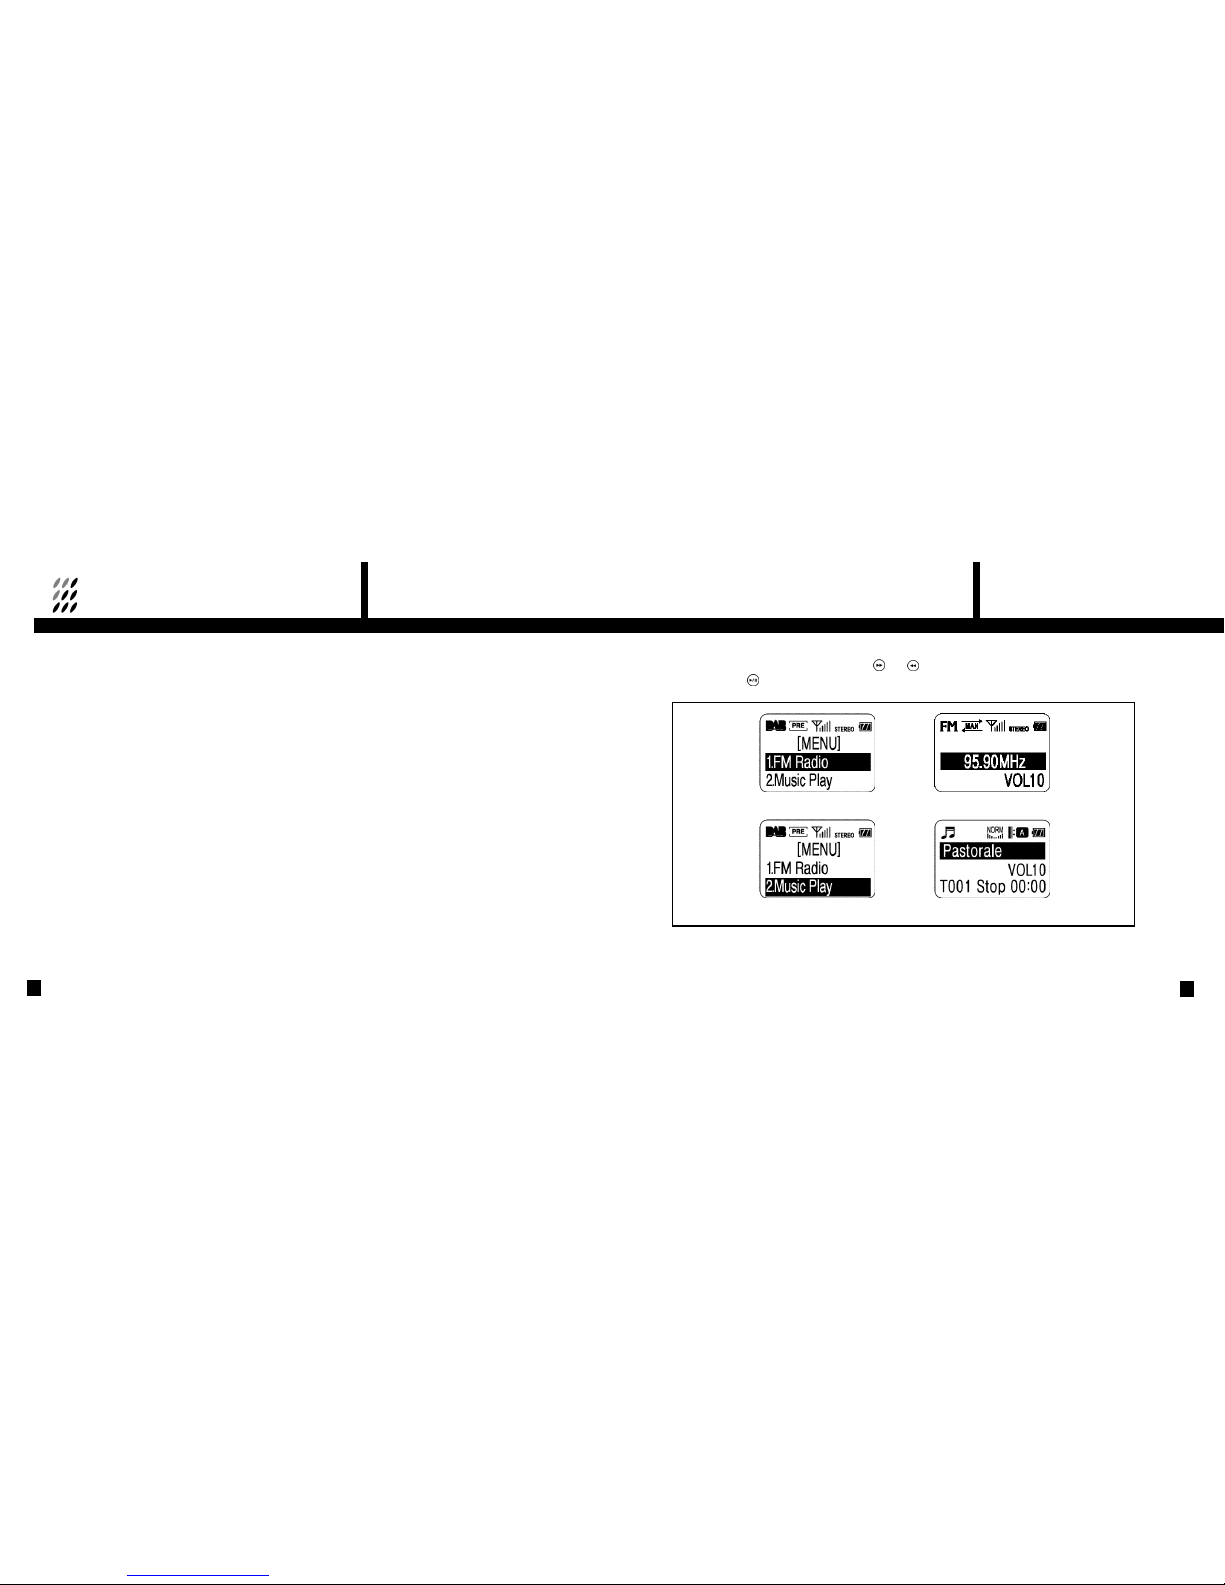
<DAB Mode> <FM Radio Mode> <Music Play Mode>
Page 12
·Choose the desired Menu option by pressing ( ) or ( ) so that the desired selection is highlighted, and then
press Confirm ( ) .
4. DR201 SETTING
23
4. DR201 SETTING
22
▶
The menu options are available in FM Radio mode
1. DAB
2. Music Play
3. Button Hold
4. Backlight
5. Contrast
▶
The menu options are available in Music Play mode
1. DAB
2. FM Radio
3. Button Hold
4. Backlight
5. Contrast
6. Play Mode
7. Equalizer
<DAB Mode → FM Radio Mode>
<DAB Mode →Music Play Mode>
Page 13
4. DR201 SETTING
25
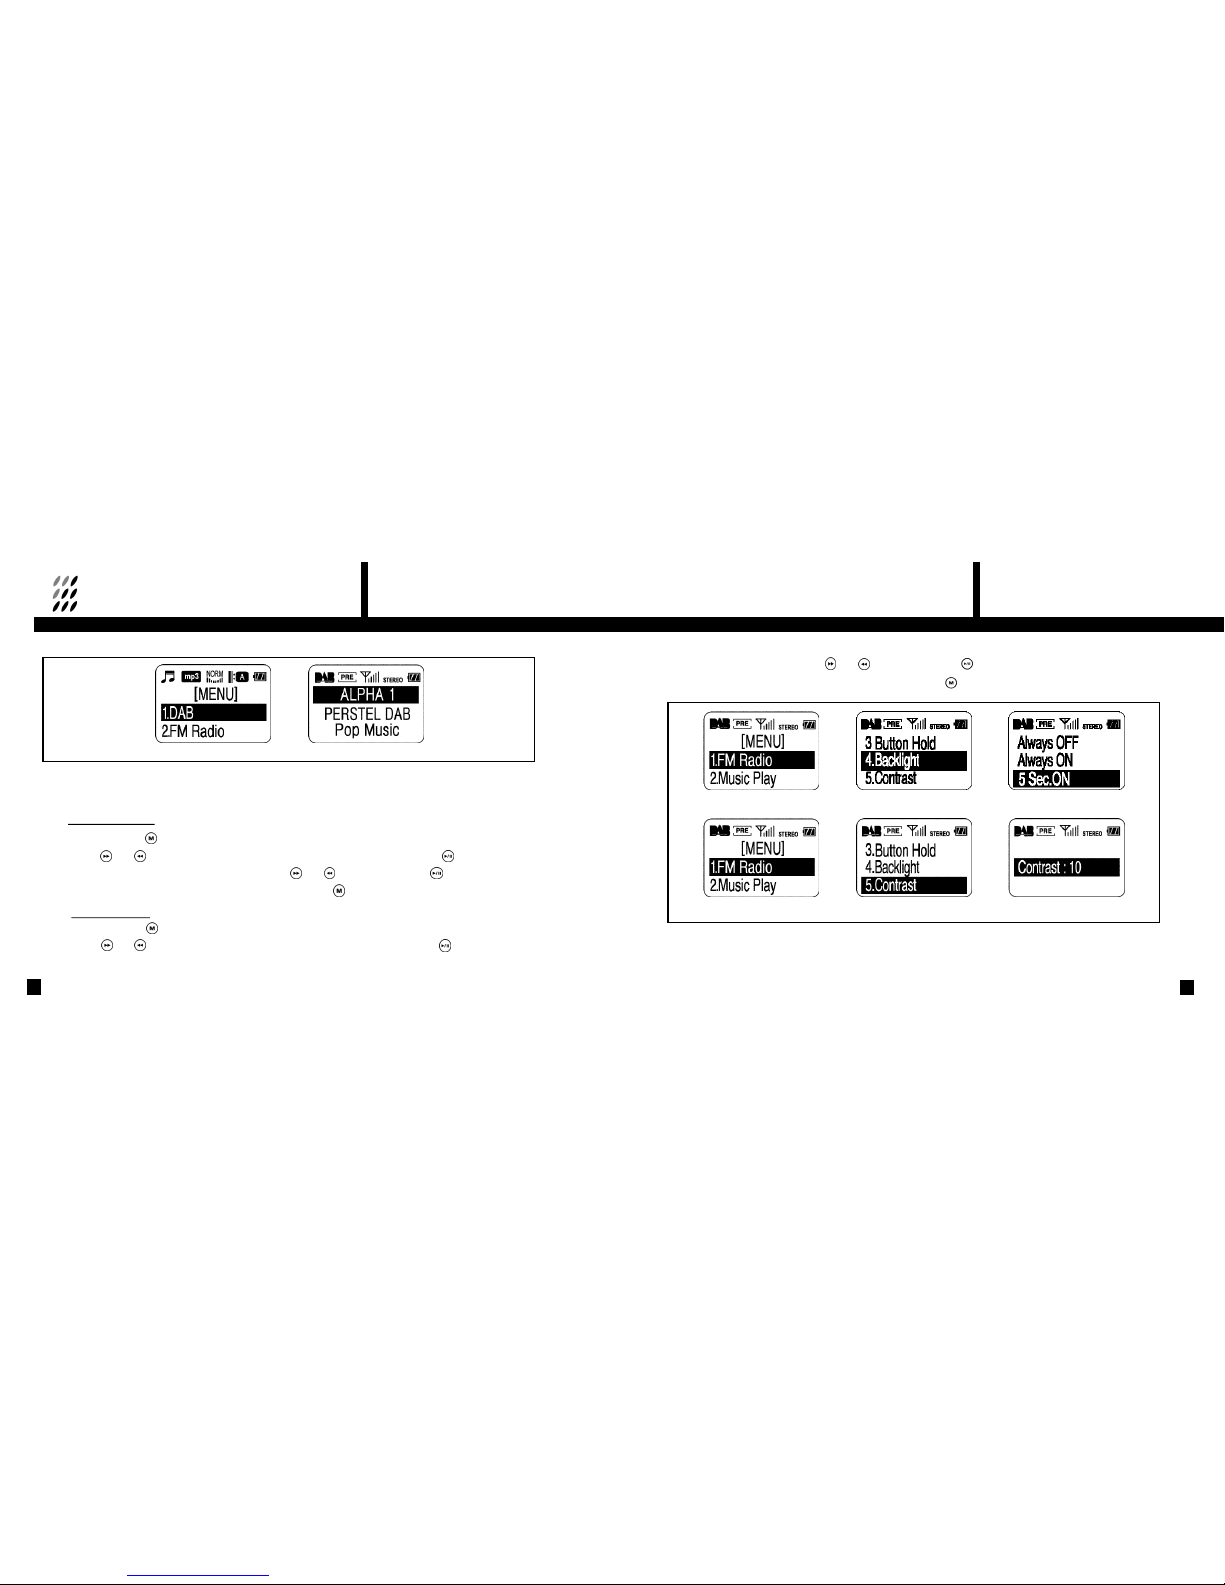
③
Adjust Contrast level by pressing ( ) or ( ), and press Confirm ( ) .
④
To cancel and go back to the original setting, press the MENU ( ) button at any time.
4. DR201 SETTING
24
2 Adjustment of Display
It is possible to adjust the Backlight and Contrast level.
·Backlight Setting
①
Press the MENU ( ) button. The Menu is displayed.
②
Press ( ) or ( ) so that the Backlight selection is highlighted, and then press Confirm ( ) .
③
Choose desired Backlight duration level by pressing ( ) or ( ) , and press Confirm ( ) .
④
To cancel and go back to the original setting, press the MENU ( ) button at any time.
·Contrast Setting
①
Press the MENU ( ) button. The Menu is displayed.
②
Press ( ) or ( ) so that the Contrast selection is highlighted, and then press Confirm ( ) .
<Backlight Setting>
<Contrast Setting>
<Music Play Mode → DAB Mode>
Page 14
5. FM OPERATION4.DR201 SETTING
26
27
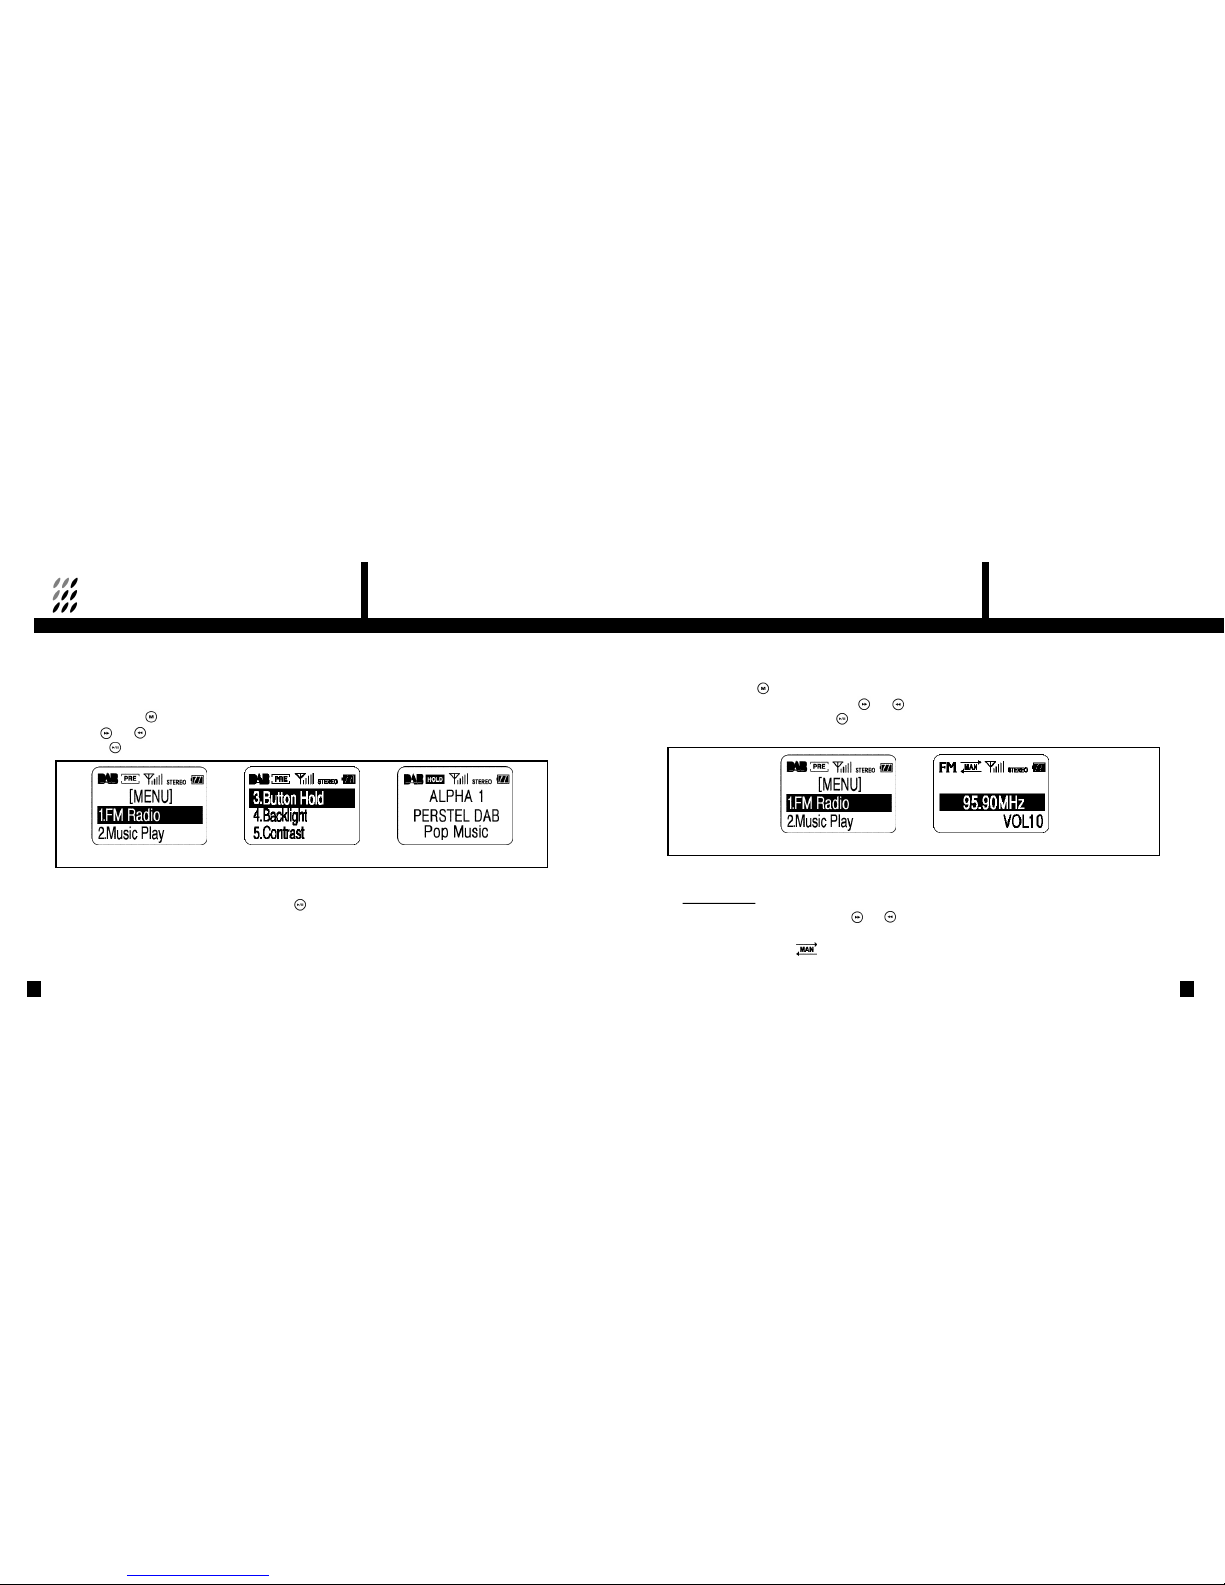
3 Button Hold
When DR201 is fully tuned and your settings are personalised, you can lock the keys to prevent
accidental button presses.
①
Press the MENU ( ) button. The Menu is displayed.
②
Press ( ) or ( ) button so that the Button Hold selection is highlighted, and then press
Confirm ( ) to activate Button Hold.
1 Switching to FM Radio Mode
①
Press the MENU ( ) button. The Menu is displayed.
②
Choose the FM Radio option by pressing ( ) or ( ) so that the FM Radio selection is
highlighted, and then press Confirm ( ) .
③
The FM icon appears when the mode switching is done.
2 Frequency Tuning
·Manual Tuning
①
To change the current frequency, press ( ) or ( ) until the desired frequency is displayed.
②
When a radio signal is tuned, the antenna signal bars and STEREO or MONO icons appear.
③
The tuning icon appears as (Normal mode + Manual Tuning mode).
③ The HOLD icon appears when Button Holdis activated. No key operation is accepted.
④
To deactivate Button Hold, press the Confirm button ( ) for more than 2 seconds.
HOLD icon disappears and key operation works normally.
<Menu> <Select> <Activated>
<DAB Mode> <Mode Switched>
Page 15
5 .FM OPERATION
29
③
The DAB icon appears when Mode Switching is done.
NOTE: When switching from Music Play to DAB or FM Radio modes, there is a
time delay of a few seconds.
5 .FM OPERATION
28
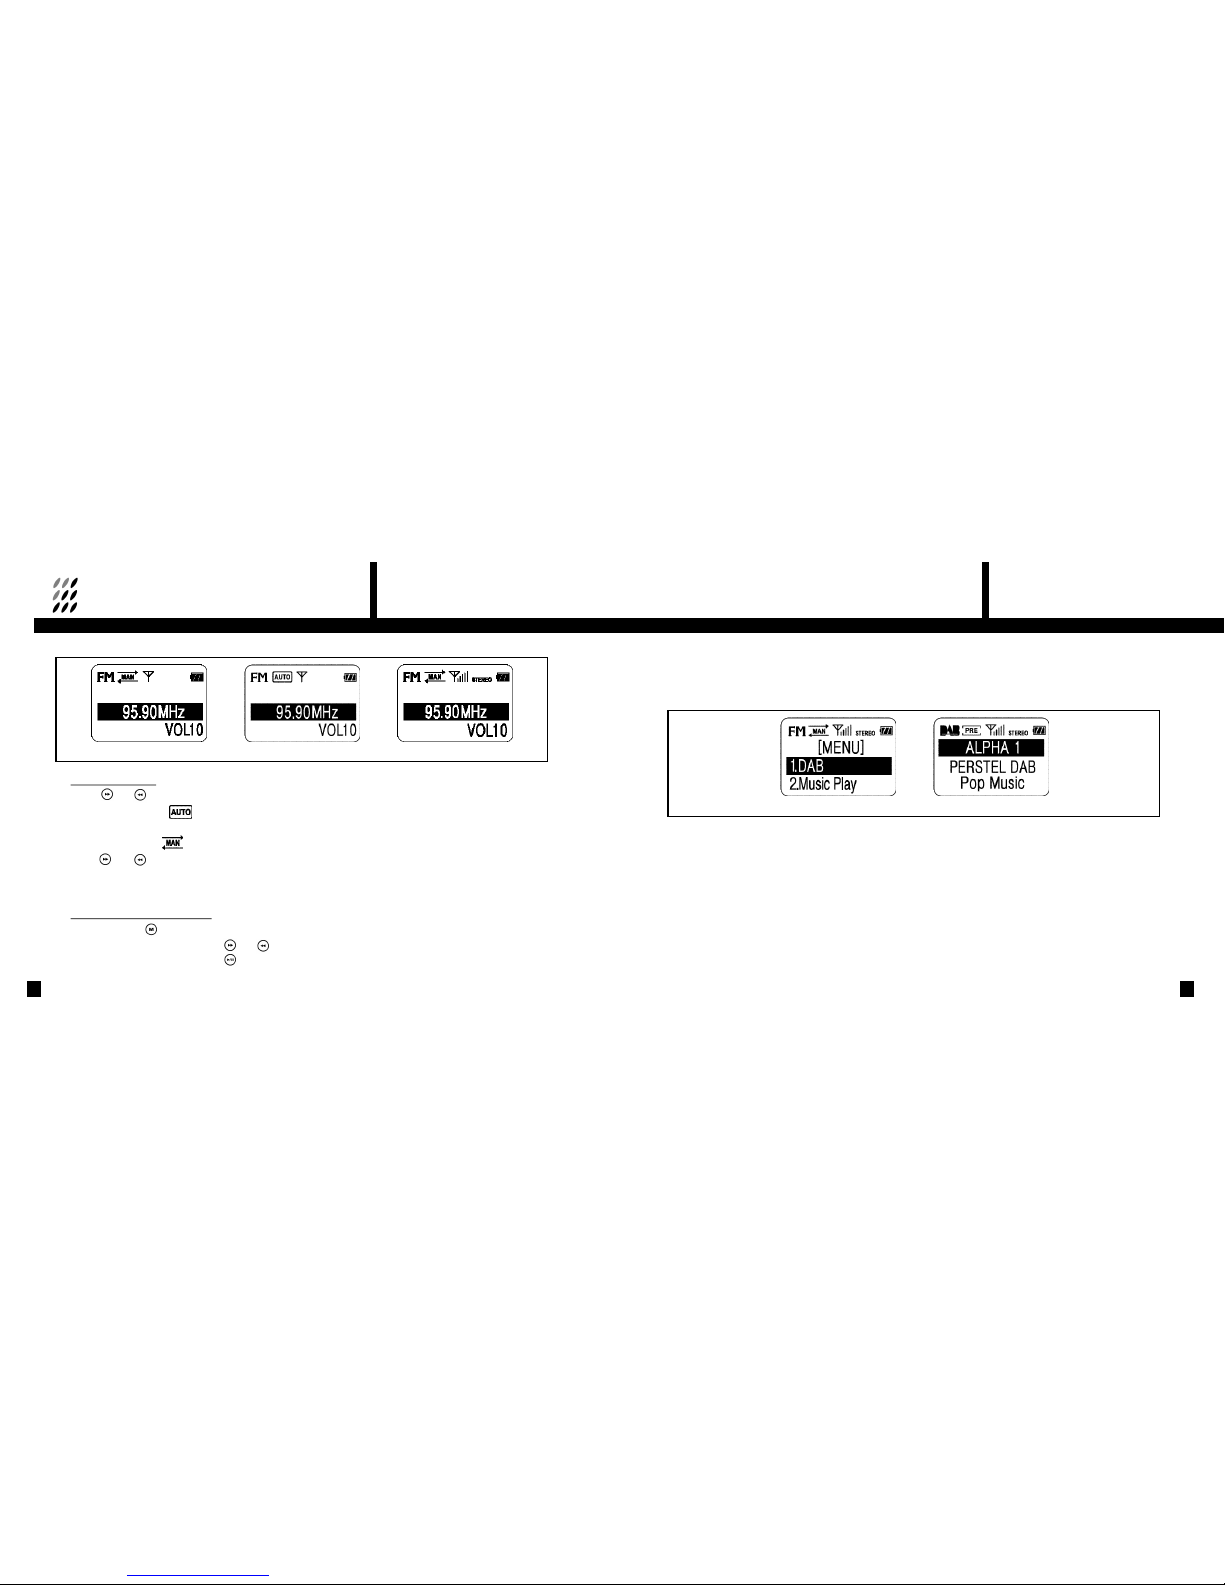
<Manual Tuning> <Automatic Tuning> <Tuned>
·Automatic Tuning
①
When ( ) or ( ) is pressed and held, the unit automatically searches next available frequencies.
②
Tuning icon appears as (Automatic Tuning mode → Refer to above drawing).
③
The unit stops and stays tuned when next available channel is captured, and the Tuning
icon switches back to .
④
Press ( ) or ( ) to stop Auto Tuning during Auto Tuning. Tuning stops and the unit
returns to normal mode.
⑤ When the end of channels is reached, the unit continues tuning from the first channel.
·Switching back to DAB Mode
①
Press the MENU ( ) button. The Menu is displayed.
②
Choose the DAB option by pressing ( ) or ( ) so that the DAB selection is
highlighted, and then press Confirm ( ) .
<FM Radio Mode> <Mode Switched to DAB>
Page 16
6. MUSIC PLAYER OPERATION
31
6. MUSIC PLAYER OPERATION
30
1 Mode Switching
Refer to section 1 on page 21.
2 Operation
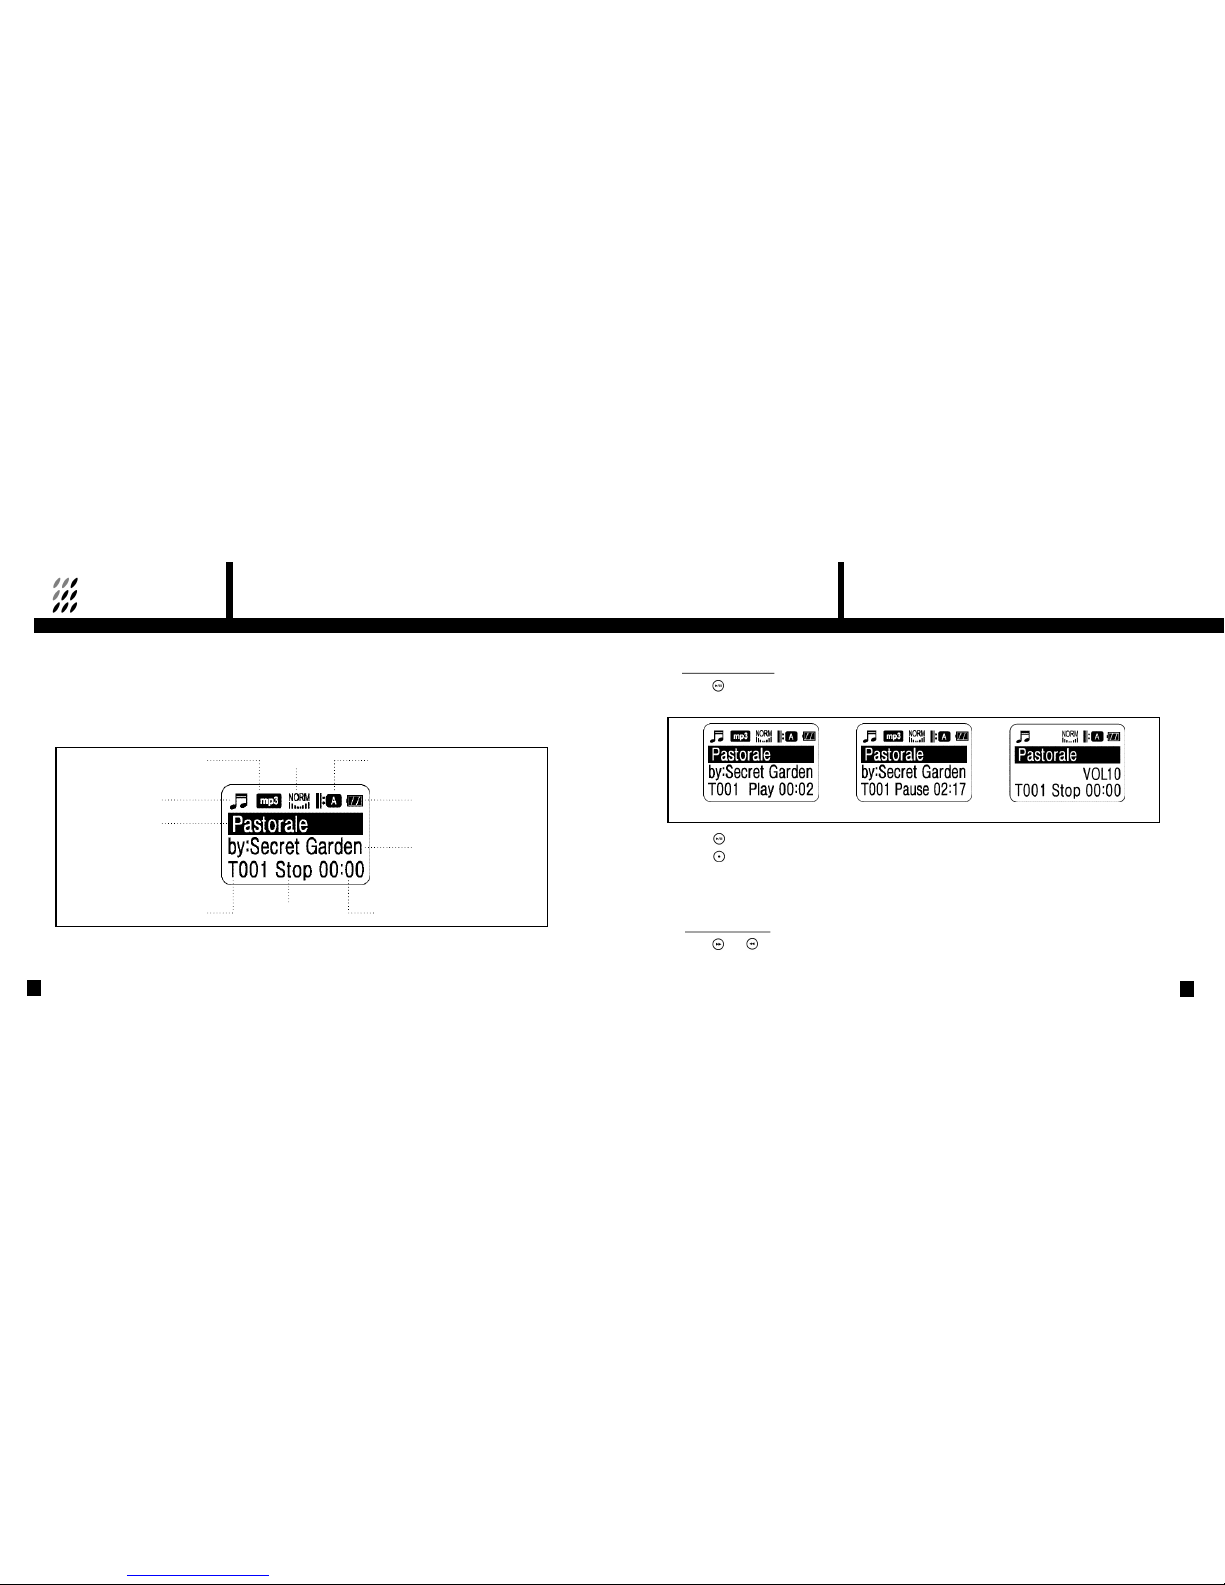
Display icons
EqualizerMusic format
Mode icon
File name
Play mode
Battery balance
Play timeTrack number Playback status
Artist name
·Play / Pause / Stop
①
Press ( ) button to playback the music file.
②
The file name and artist name will scroll across the display if it is longer than the display line.
③ Press
( )
button to pause, and press again to resume playback.
④
Press ( ) button to stop music during playback or pause mode.
⑤
When stopped, the unit goes to the beginning of the song and playtime resets at [00:00].
NOTE: Most of music files have fixed data rate such as 128kbps, 192kbps etc.
However, any music file with VBR (Various Bit Rate) play time may look unstable.
· Music File Search
①
Press ( ) or ( ) button to search saved files. File name and artist name are displayed accordingly.
(Search works during playback, pause and stop modes.)
<Play Mode> <Pause Mode> <Stop Mode>
Page 17
6. MUSIC PLAYER OPERATION
33
6. MUSIC PLAYER OPERATION
32
②
When you reach the desired file, press ( ) to start playback.
③
If you press ( ) or ( ) in Pause mode, next available track is automatically played
and Pause mode is released.
④
If you press ( ) or ( ) in Playback mode, next available track is automatically played.
⑤
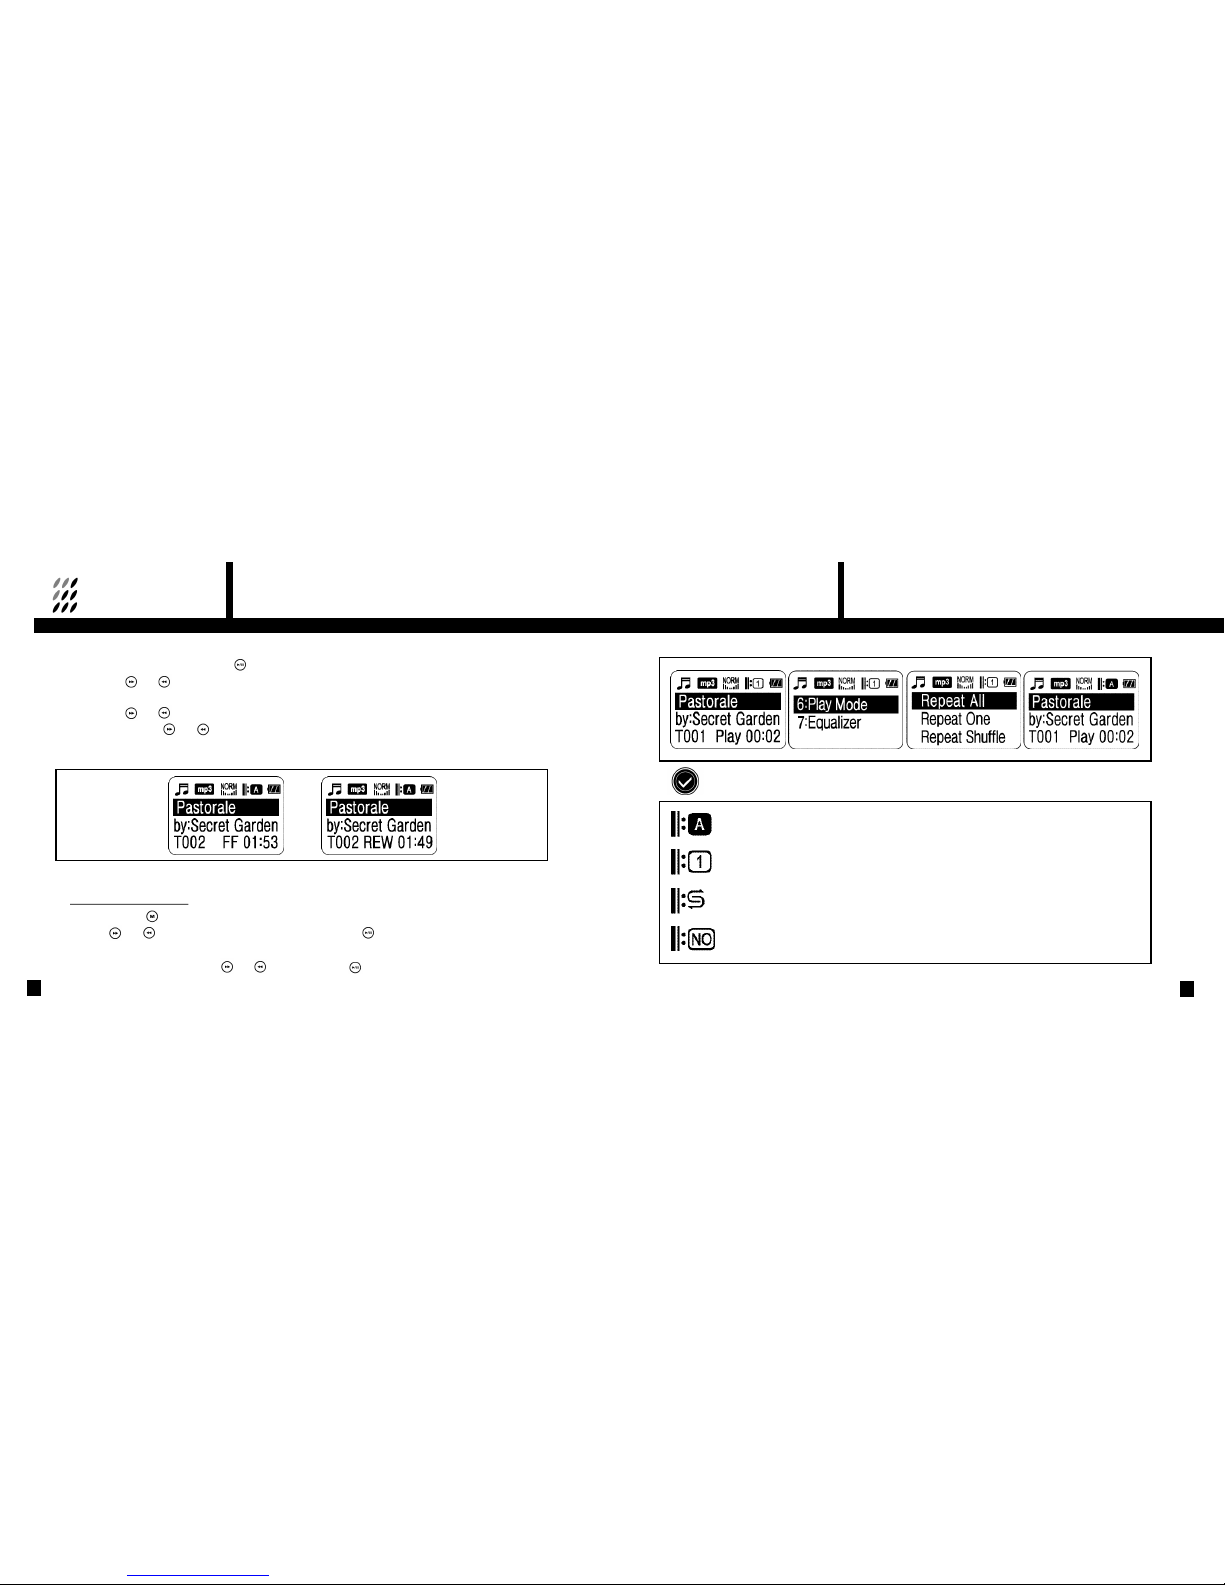
If you press and hold ( ) or ( ) button in Playback mode, ‘FF’ or ‘REW’ is displayed and playtime moves quickly.
This FF and REW function are useful when you wish to find a certain sector of the track quickly.
The FF and REW return to normal speed when the buttons are released.
3 Music Player Settings
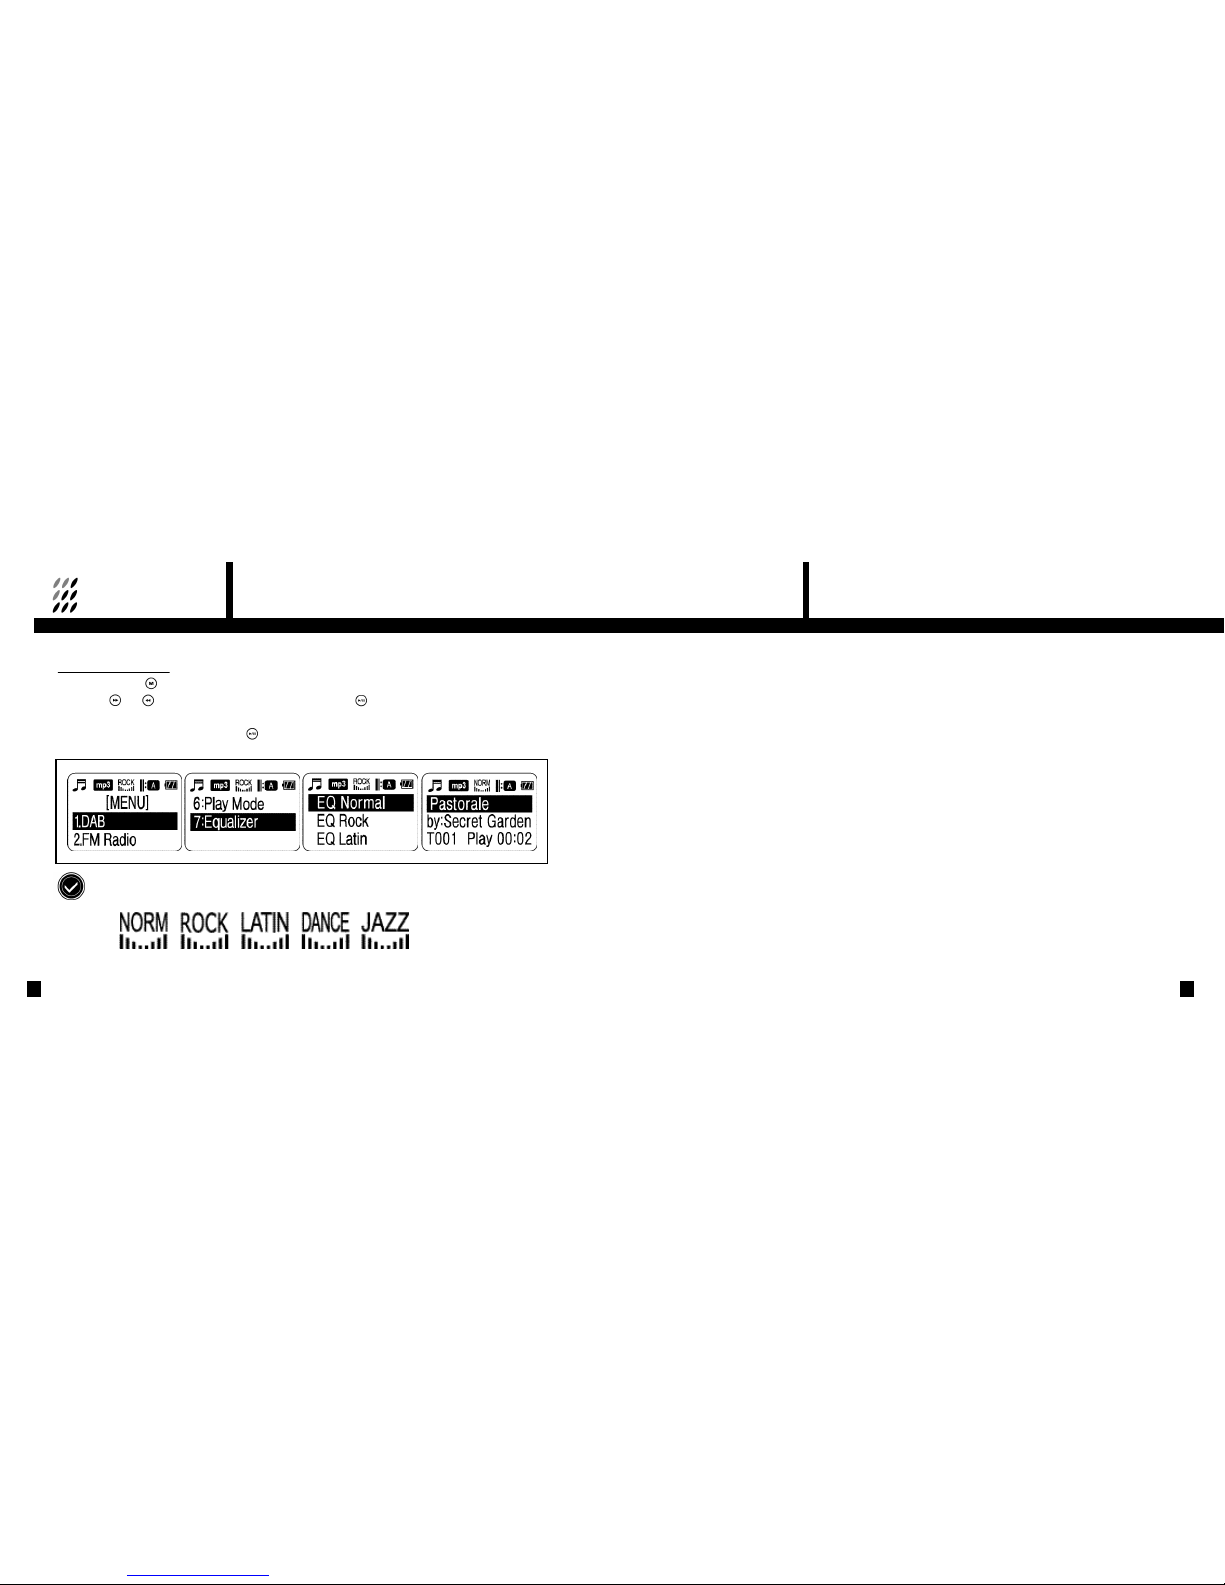
·Changing the Play Mode
①
Press the MENU ( ) button.
②
Use the ( ) or ( ) buttons to select Play Mode and press Confirm ( ) .
③
Various play modes will appear. (refer to next page for available Play Mode)
④
Choose one of Play Mode by using ( ) or ( ) button and press ( ) to select.
The Play Mode icon changes and the unit returns to playback mode.
Various Play Modes
Repeat All - Plays all the stored tracks repeatedly.
Repeat One - Plays one selected track repeatedly.
Repeat Shuffle - Plays all saved tracks in random order.
Play All - plays all of the saved tracks in sequence. Each track is played only once,
and playback ends at the end of last track.
Page 18
7. REMOVABLE DISC OPERATION
35
6. MUSIC PLAYER OPERATION
34
1 Connecting the DR201 to a PC
The DR201 functions as a Removable Disc when connected to a PC. This not only enables
you to download music files to play with the music player, but also to store any kind of data, music,
graphic, document or other data files in its built-in memory. This Removable Disc lets you bring
such data from office to home or anywhere there is PC (refer to system requirements).
Downloading and uploading your data is as simple as plugging-in the USB cable to the PC and to your DR201.
When you have downloaded MP3 music files with .mp3 extensions they will appear in the list of
music tracks and can be played with the Music Play.
NOTE : Do not connect the USB cable from the DR201 to a PC unless the DR201 is in Music Play mode.
If it is connected in DAB or FM Radio modes, some of the buttons may operate incorrectly.
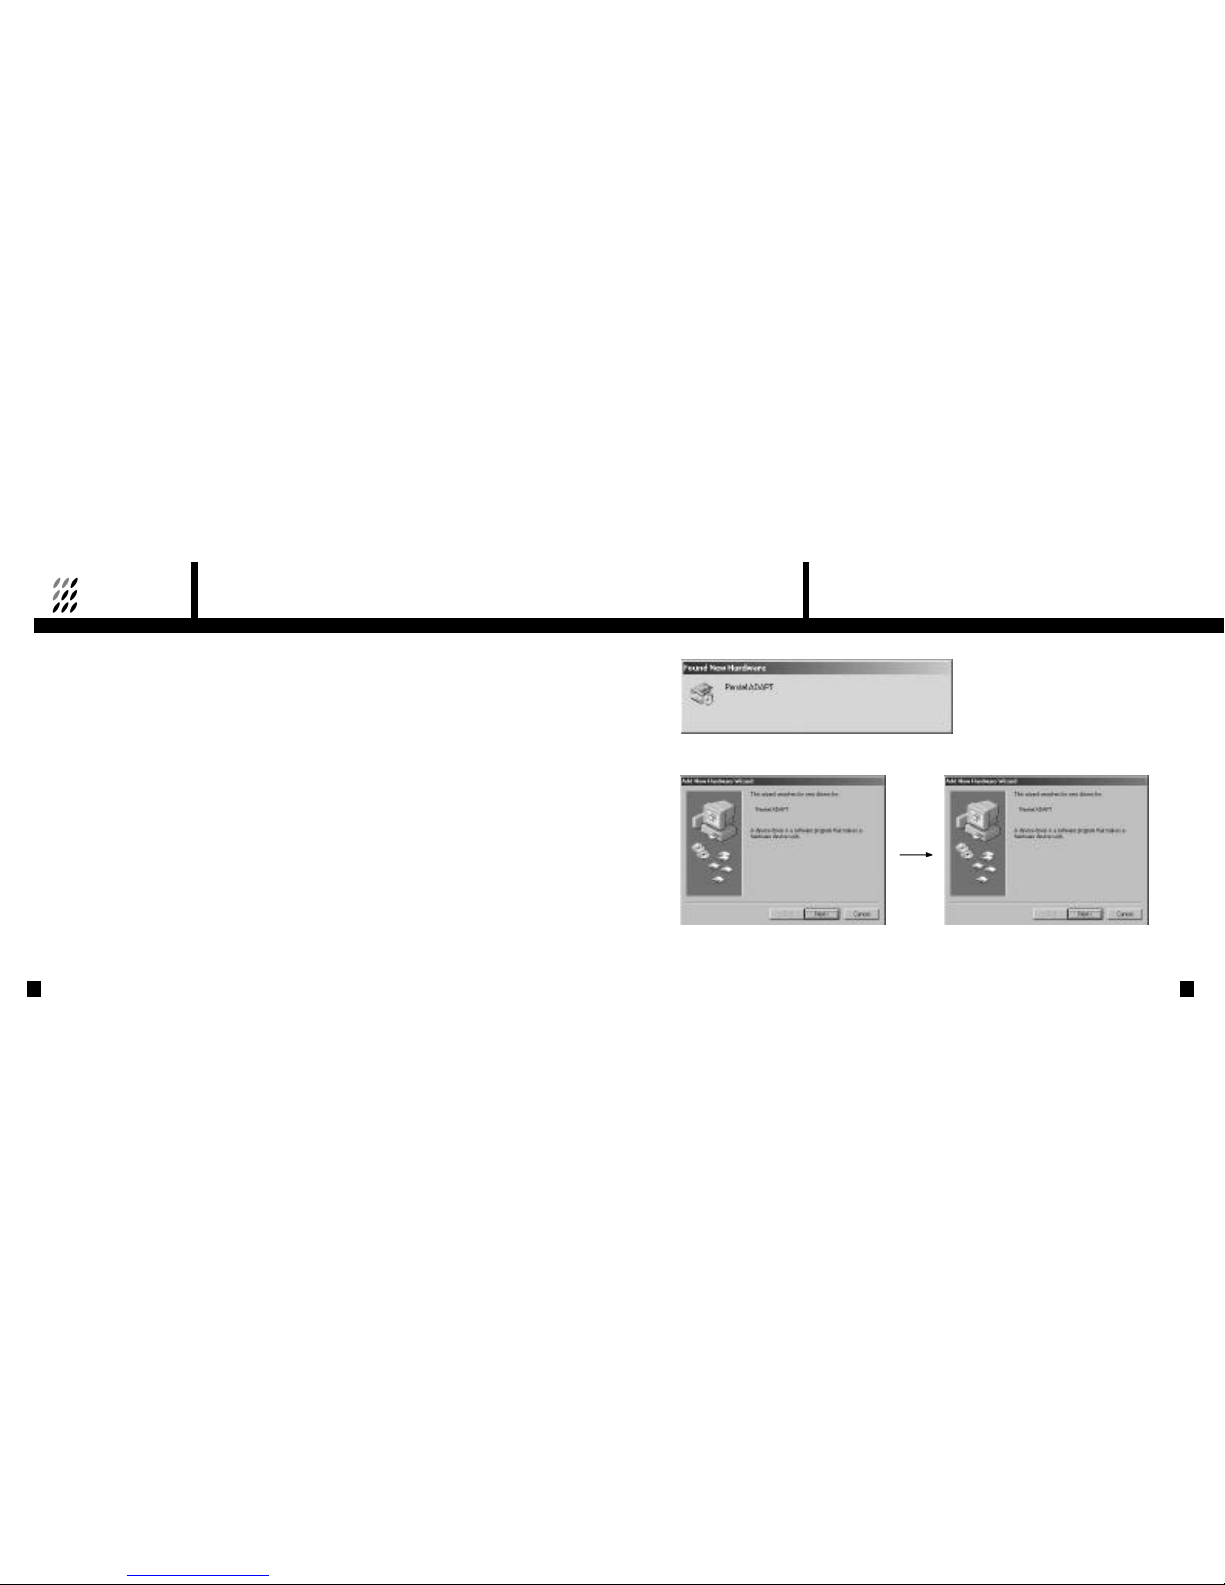
· Changing the Equalizer
①
Press the MENU ( ) button.
②
Use the ( ) or ( ) buttons to select Equalizer and press Confirm ( ) .
③
Various Equalizer Modes will appear. (refer to followings for available Equalizer Mode)
④
Choose one of Equalizer Mode and press ( ) to select. Equalizer icon changes and the
unit returns to playback mode.
Various Equalizer Modes
Page 19
7. REMOVABLE DISC OPERATION
37
7. REMOVABLE DISC OPERATION
36
2 Before File Upload /Download
·System requirements
- Pentium 133 MHz or higher
- Windows 98 / ME / 2000 / XP
- USB Port must be supported.
- 3.5" floppy disk driver
·When plugged in;
- Windows ME/2000/XP automatically recognizes it as an external Hard Disc.
- Windows 98 requires installation of Driver Program provided in the DR201 package.
·Installing USB Driver for Window 98
① Turn on DR201 and set it Music Play Mode.
② Connect the supplied USB cable to your PC.
③ Connect the USB cable to DR201.
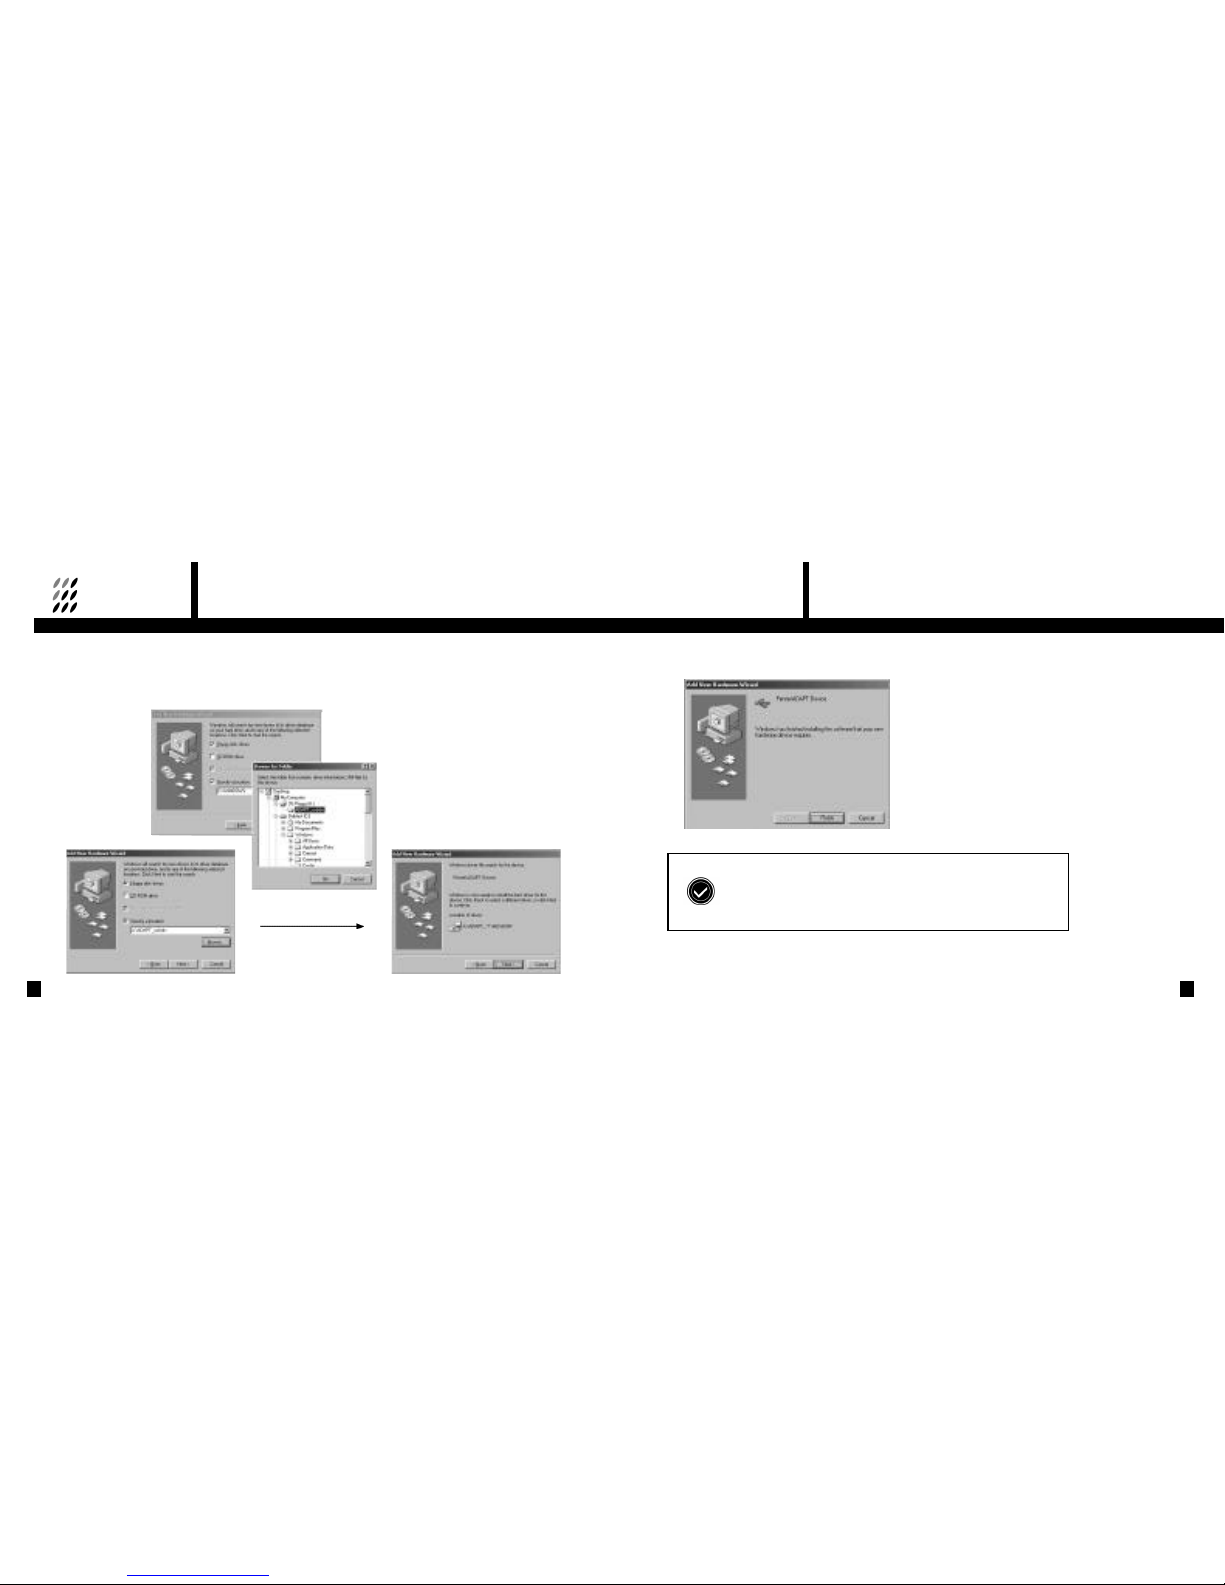
④ Windows 98 will detect the USB device as a [New Hardware].
⑤ You will be prompted to add New Hardware. Proceed Next.
Page 20
7. REMOVABLE DISC OPERATION
39
7. REMOVABLE DISC OPERATION
38
⑥
When you are asked for the driver location, insert the Installation Diskette into the floppy
disc drive [A: drive] and specify driver path to [A:\ADAPT_usbdrv], and click [OK].
⑦
When ready click on [Next], Driver Installation will begin automatically.
⑧
When Driver Installation is completed, click [Finish] to complete the installation process.
The above installation steps repeat twice more
- First for USB Mass Storage Class device
- Second for ADAPT device Interface
Page 21
41
7. REMOVABLE DISC OPERATION 7. REMOVABLE DISC OPERATION
40
⑨
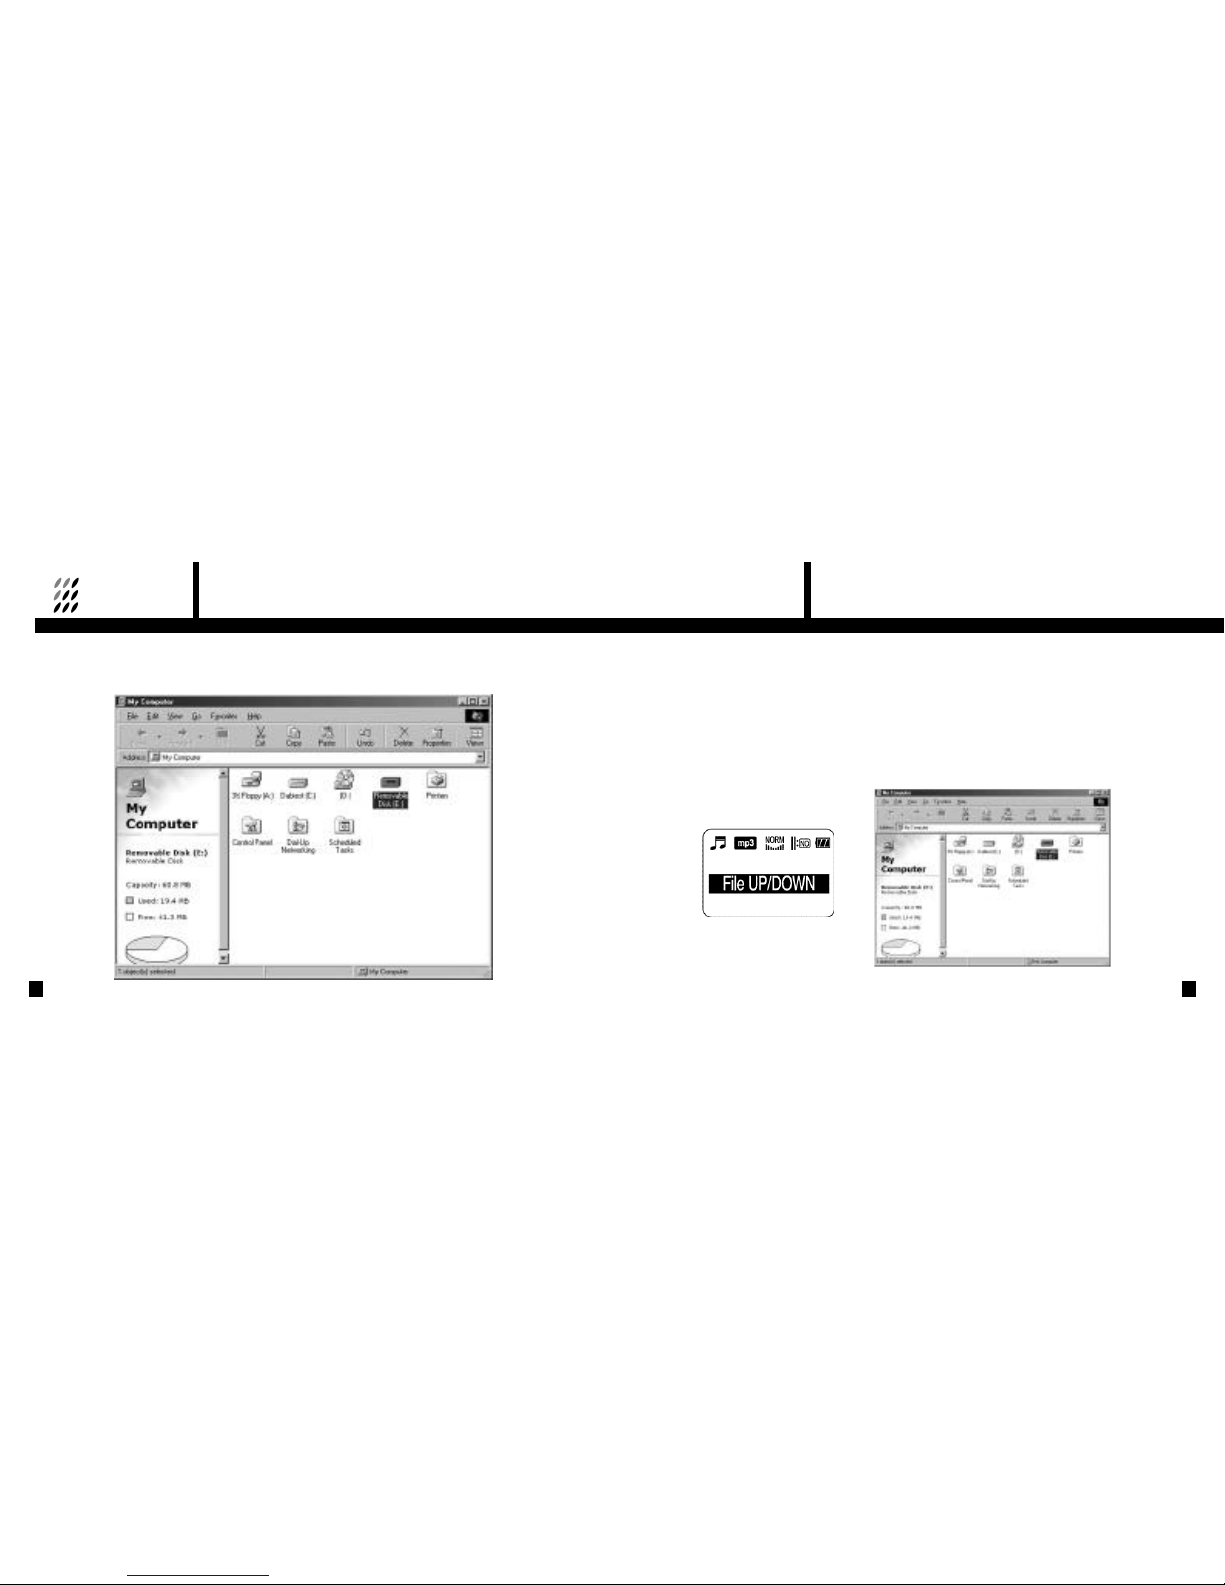
When installation is completed, you can check whether the DR201 has been correctly detected and installed
by opening 'My Computer'. A 'Removable Disc' should have appeared in the list of disc drives.
3 Operation
·Connecting to a PC
NOTE:The File upload/download operation works only in [Music Play] Mode.
①
Turn on DR201 and switch it to Music Play Mode.
②
Connect the USB cable to PC first and then to the DR201.
③
When the DR201 is connected to your PC, the display switches to [File UP/DOWN]. The PC
will have a Removable Disc as shown in the following figure.
Page 22
7. REMOVABLE DISC OPERATION
43
7. REMOVABLE DISC OPERATION
42
④
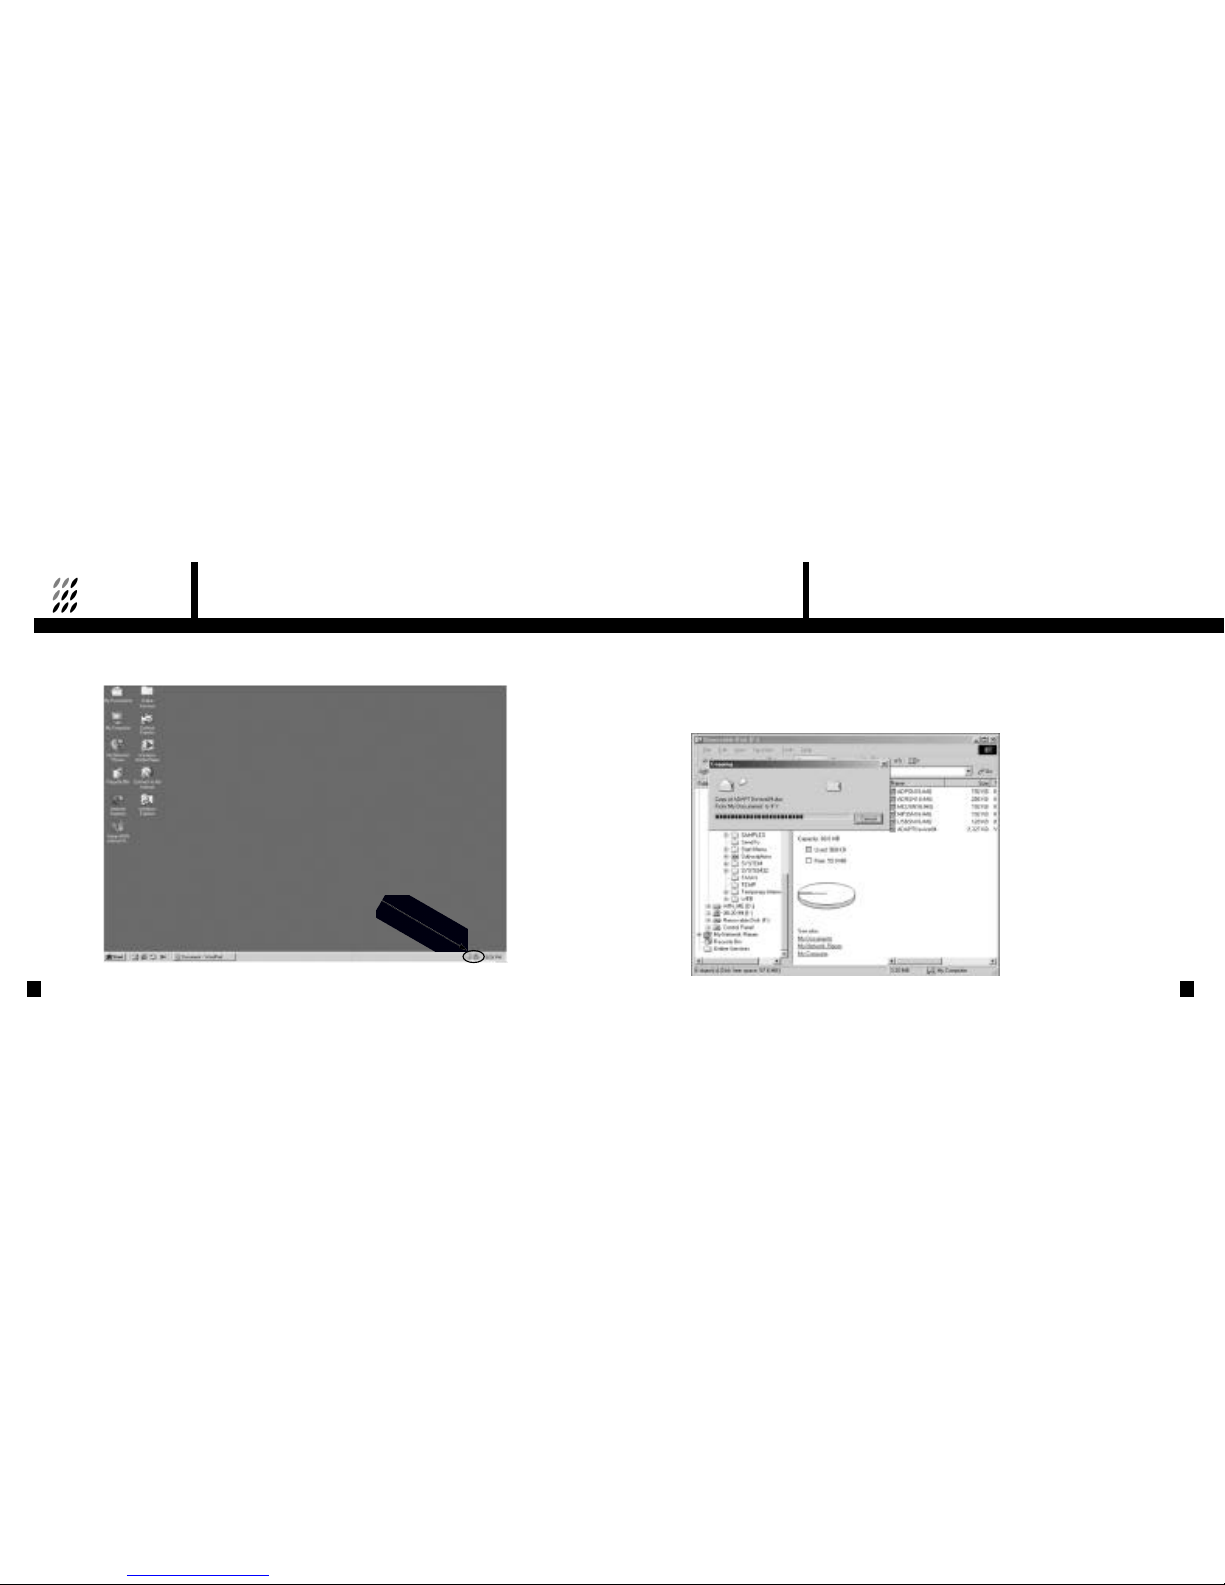
Also, you can find the removable disc icon on the Windows taskbar
·File Up/Download
File Up/Download is easy, and can be done with standard Windows methods either by copying
and pasting files or dragging and dropping files onto the Removable disc icon.
Music files with mp3 extensions can be played with the Music Play.
Page 23
7. REMOVABLE DISC OPERATION
45
7. REMOVABLE DISC OPERATION
44
·Disconnecting the DR201 from the PC
If USB cable is removed arbitrarily, DR201 may get damaged, or data may be lost. To avoid such
damage, make sure you follow the following procedures;
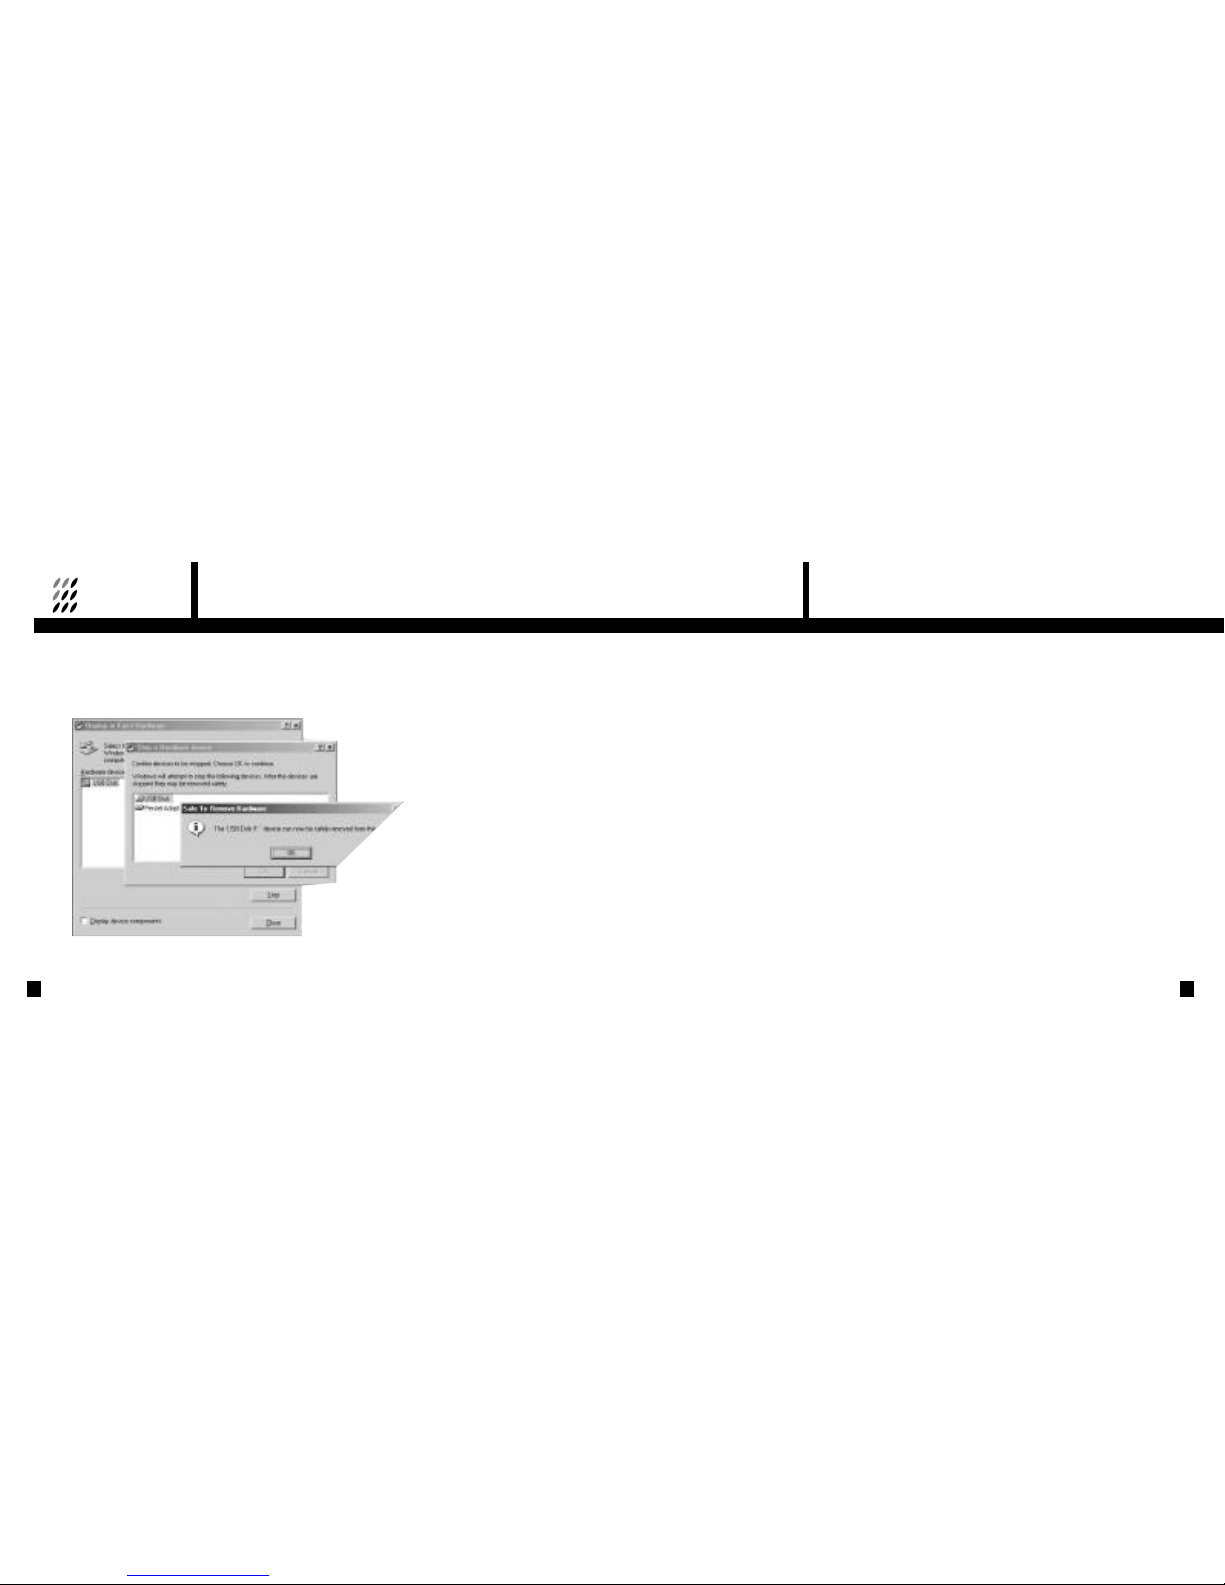
1. Double click the Removable Disc icon in the system tray. The Display or Eject Hardware window will be displayed.
2. Click the [USB Disk] and then click [Stop]
3. A confirm window will appear . Click the USB disc on this window and then click [OK]
4. A message will confirm that the 'USB Disc can now be safely removed from the system'. Click [OK]
5. Unplug the USB cable from the DR201.
Page 24
7. REMOVABLE DISC OPERATION
47
7. REMOVABLE DISC OPERATION
46
·Removable Disc Format
If a bad sector has developed in the DR201 memory due to a faulty download,
it may be necessary to format the DR201 internal memory.
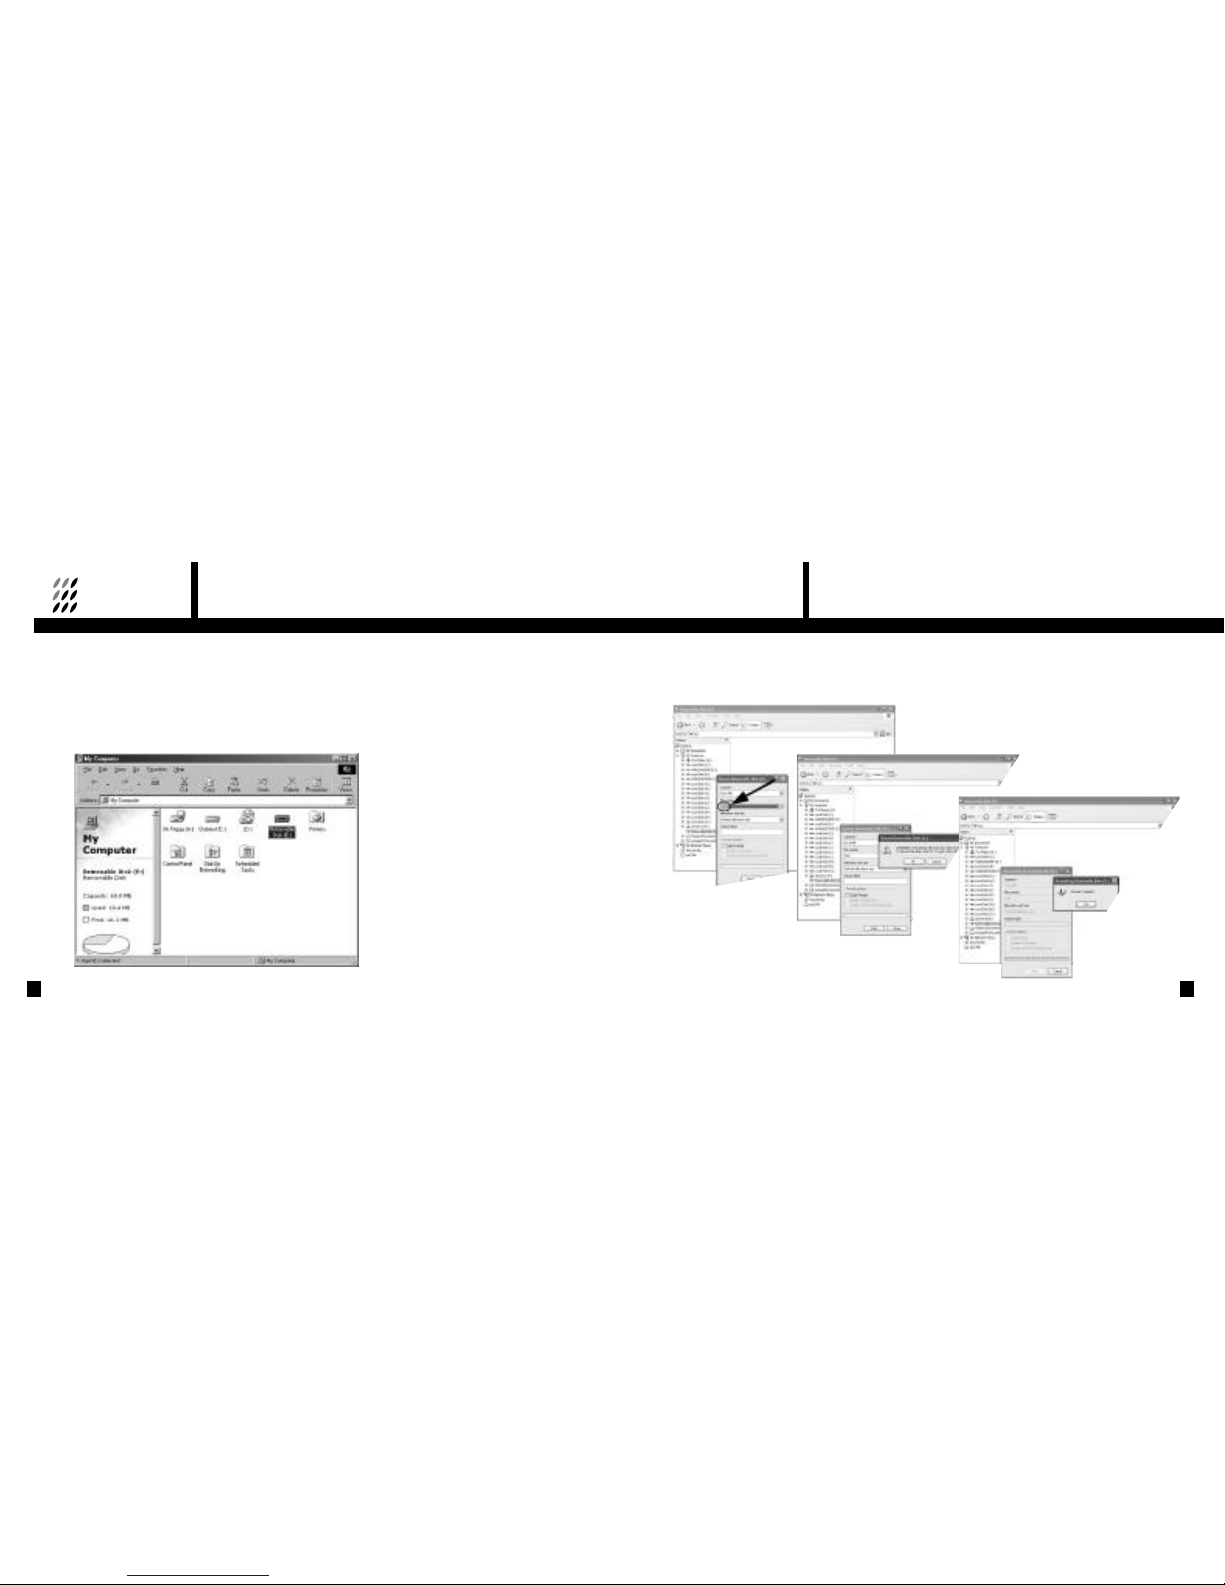
Select [Removable Disk], and click right button of mouse. Select [Format] and click.
NOTE : All music and other files in the DR201 are erased by this operation.
·NOTE : Make sure to click "FAT" file system when formatting the removable Disc.
Formatting under "FAT32" file system may cause malfunction of the unit.
Page 25
Plug & play
via USB
49
48
8.BATTERY AND MAINS OPERATION APPENDICES
1 Battery Operation
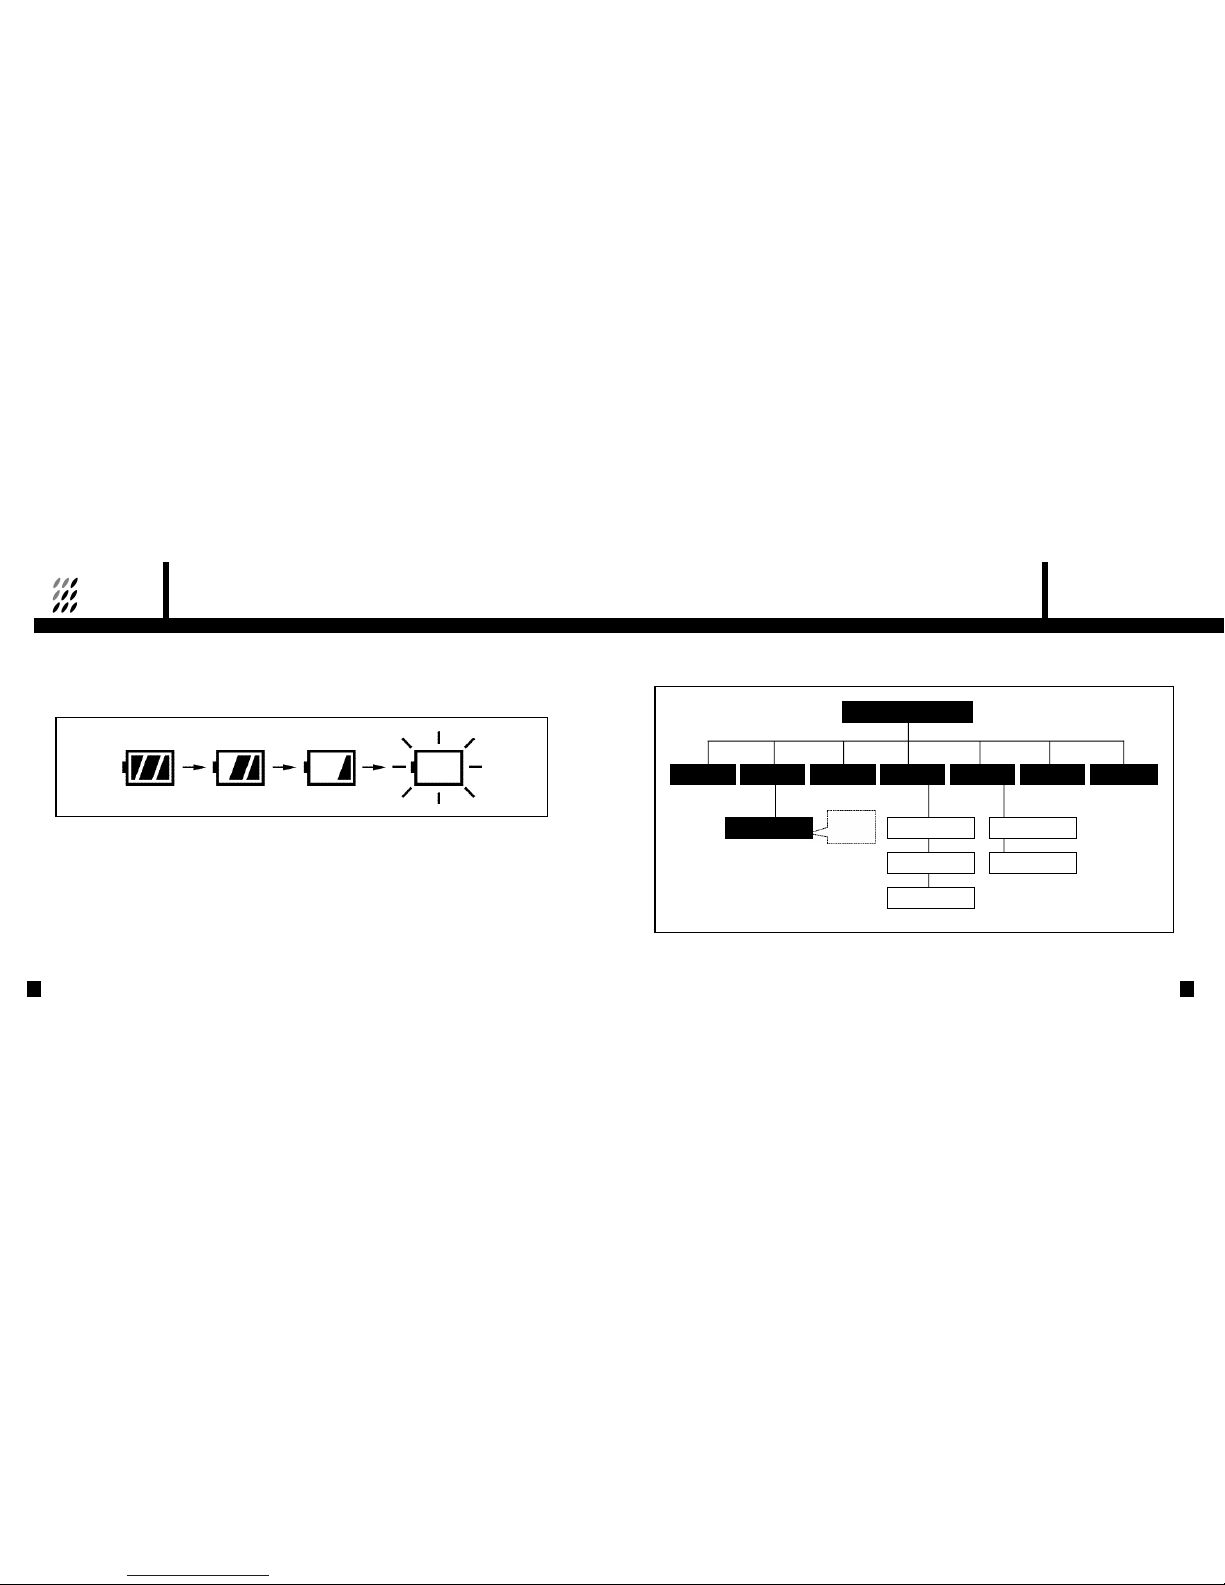
DR201 is a battery operated radio, and the battery display icon displays the state of the battery.
When battery icon blinks you must replace the batteries immediately.
For battery replacement, refer to Preparation Guide at page 11. It is important to use high quality
alkaline batteries for optimum performance.
NOTE : When the batteries are exhausted the display will show "Low Battery" and the DAB,
FM Radio and Music player functions will not operate.
2 Mains Operation
The DR201 is supplied with a mains power adaptor.
To connect, plug the adaptor into the socket on the side of the unit.
The internal batteries are disconnected when the power adaptor is plugged in.
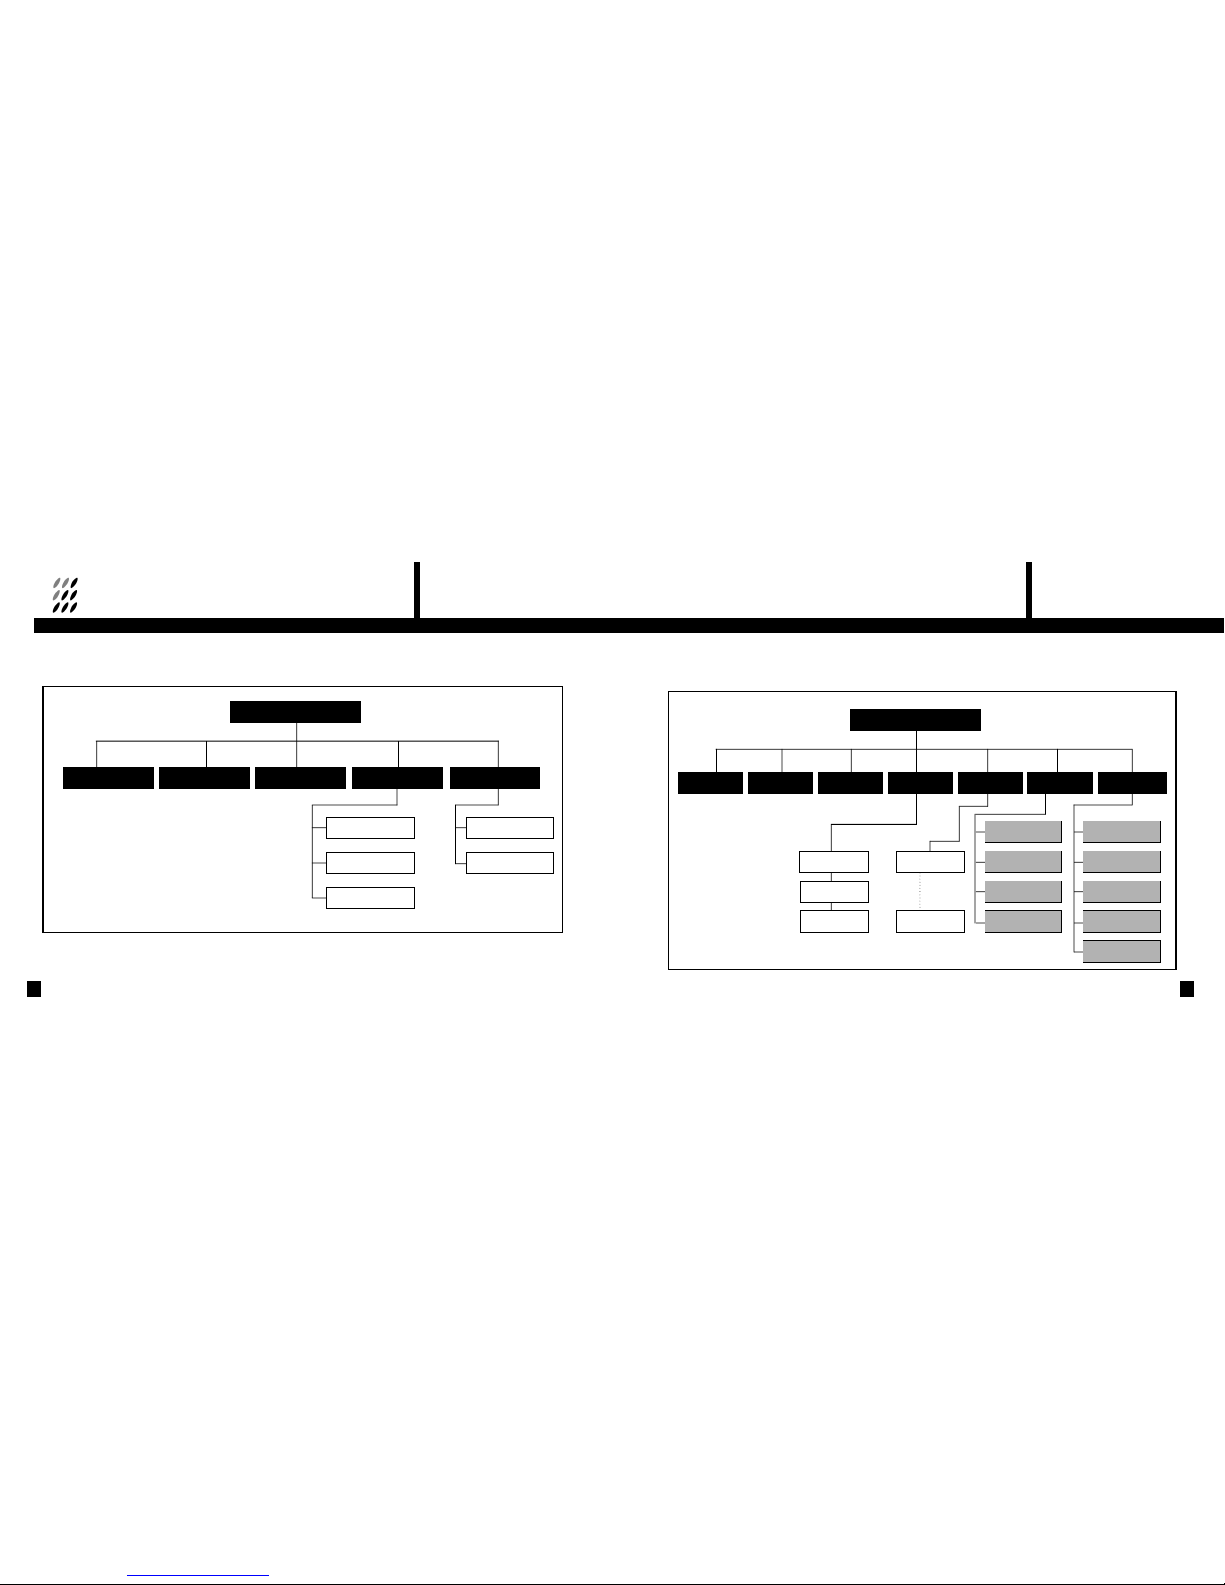
Appendix 1 Menu Tree - DAB Block
DAB
FM Radio Music Play Button Hold Backlight Contrast Preset Tune Manual Tune
Always OFF
Always ON
5 Sec.ON
File UP/DOWN Level 0...
...Level 20
Page 26
51
APPENDICES
50
APPENDICES
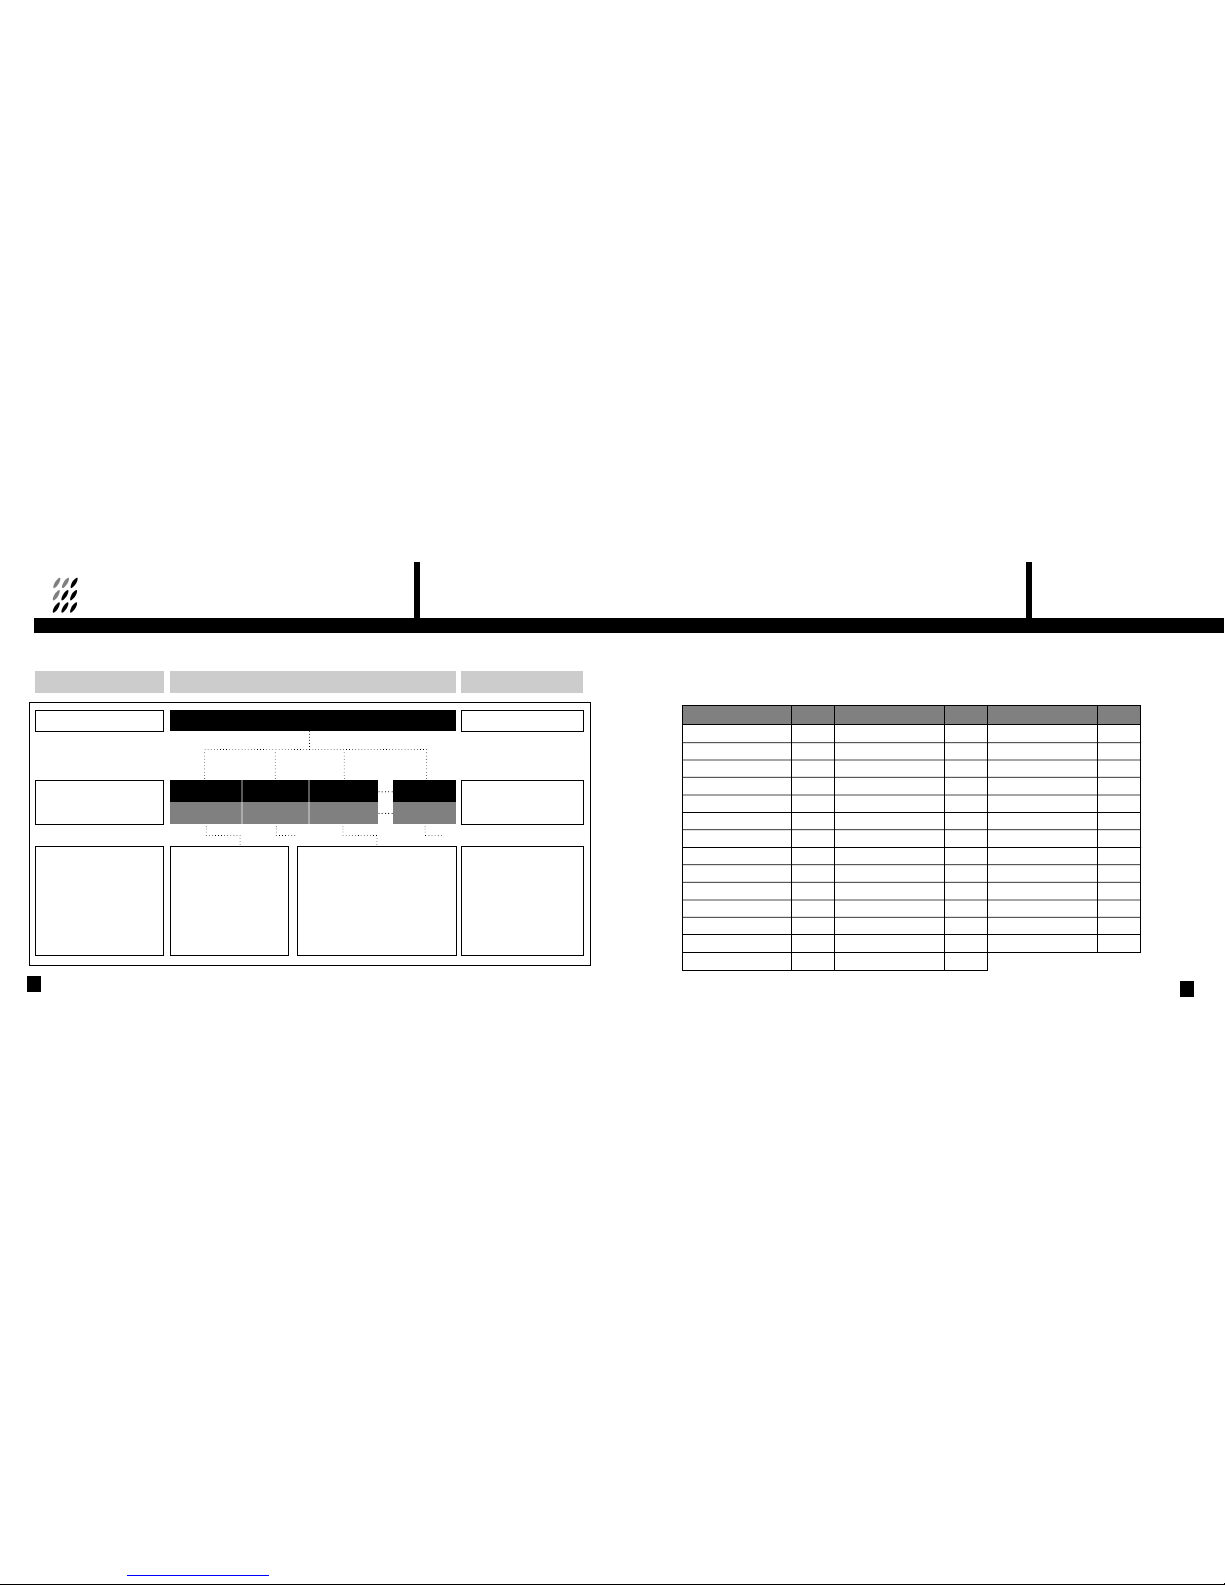
Appendix 3 Menu Tree - Music Play Block
Always OFF
Always ON
5 Sec. ON
Level 0...
...Level 20
Repeat All
Repeat One
Repeat Shuffle
Play All
DAB Music Play Button Hold Backlight Contrast
Appendix 2 Menu Tree - FM Radio Block
FM Radio
Always OFF
Always ON
5 Sec.ON
Level 0...
...Level 20
Music Play
DAB FM Radio Button Hold Backlight Contrast Play Mode E q u a l i z e r
EQ Rock
EQ Latin
EQ Dance
EQ Jazz
EQ Normal
Page 27
53
APPENDICES
52
APPENDICES
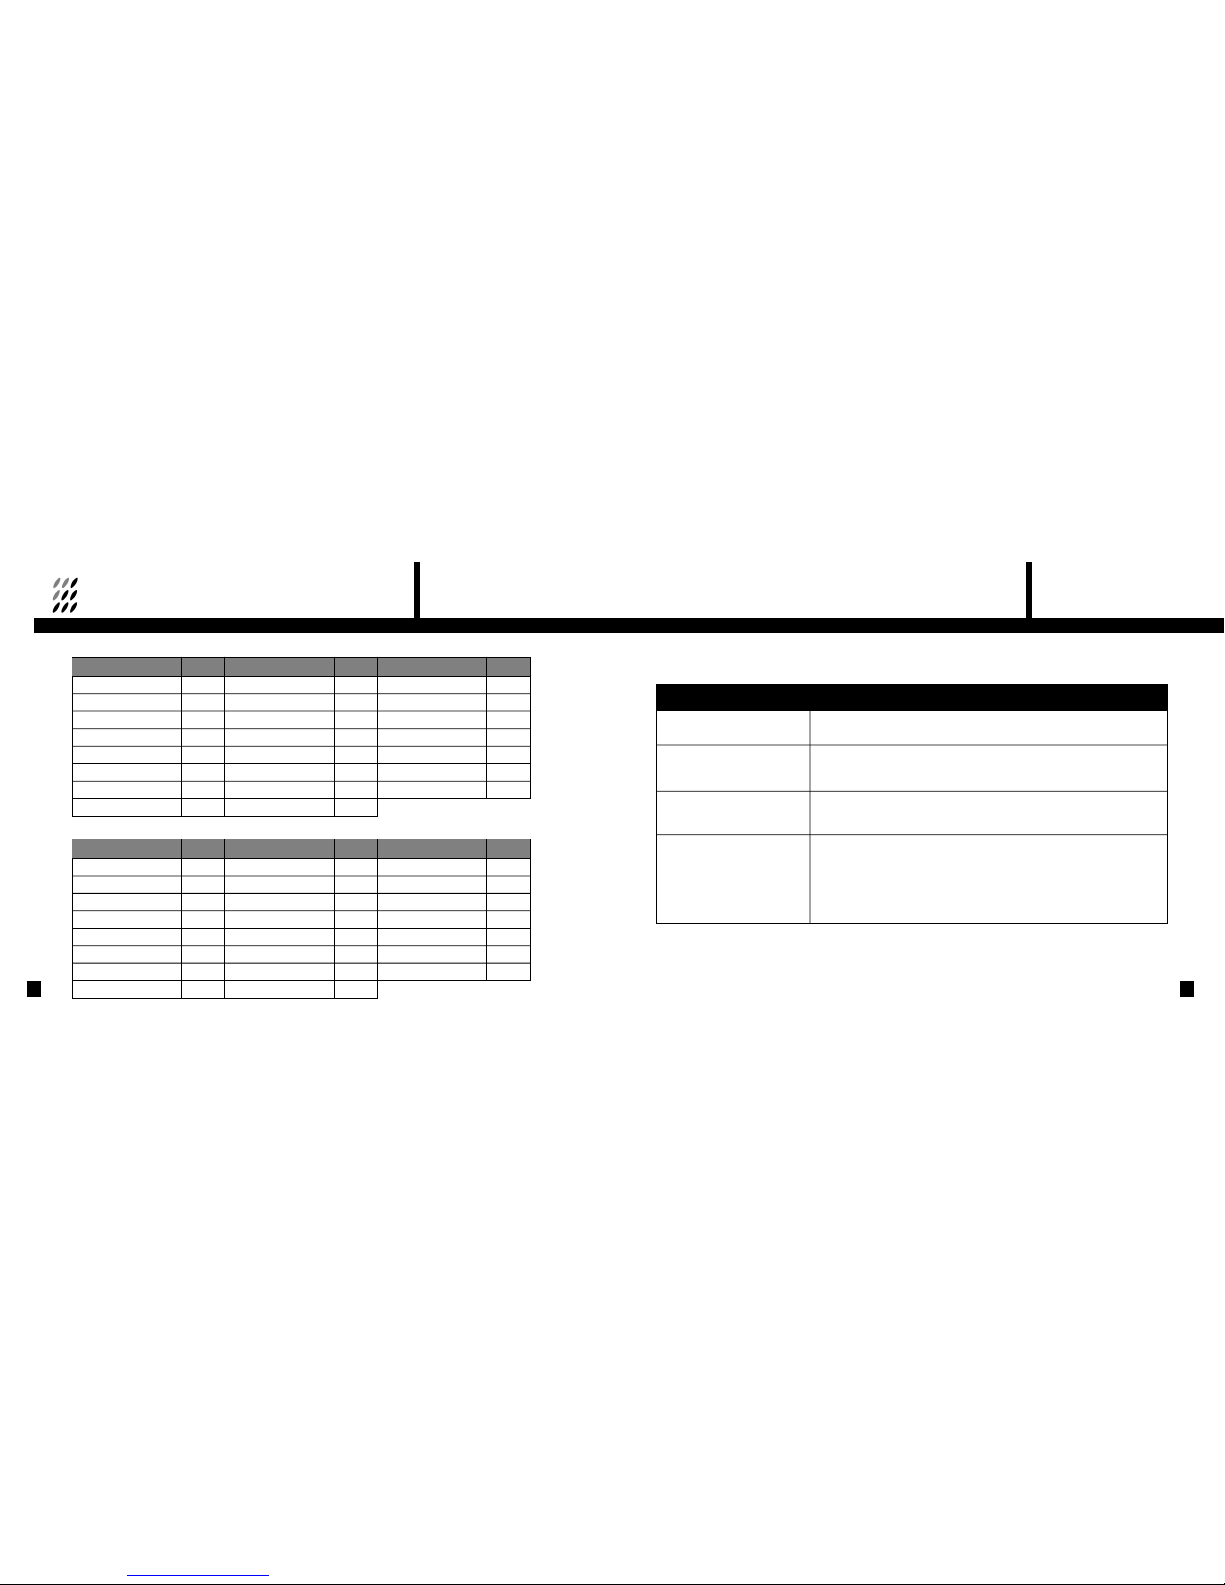
PERSTEL DAB
ALPHA 1
Pop Music News
Service Components
Song title
Singer name
Song introduction
Text information
Other Service Info.
Dynamic Label
Time Label
Data Rate Label
Other Label
ALPHA 2 ALPHA 3
Sports
ALPHA X
Data SVC
Service Label
Program Type
Displayed Information Information Label
Ensemble Label
Service Level
Ensemble
Regular Audio Service
Player Introduction
Team Results
Appendix 4 Ensemble Information Example
Appendix 5 Regional Frequency Table
1. BAND-III (Europe)
Frequency Label Frequency Label Frequency Label
174.928MHz 5A 199.360MHz 8C 220.352MHz 11C
176.640MHz 5B 201.072MHz 8D 222.064MHz 11D
178.352MHz 5C 202.928MHz 9A 223.936MHz 12A
180.064MHz 5D 204.640MHz 9B 224.096MHz 12N
181.936MHz 6A 206.352MHz 9C 225.648MHz 12B
183.648MHz 6B 208.064MHz 9D 227.360MHz 12C
185.360MHz 6C 209.936MHz 10A 229.072MHz 12D
187.072MHz 6D 210.096MHz 10N 230.784MHz 13A
188.928MHz 7A 211.648MHz 10B 232.496MHz 13B
190.640MHz 7B 213.360MHz 10C 234.208MHz 13C
192.352MHz 7C 215.072MHz 10D 235.776MHz 13D
194.064MHz 7D 216.928MHz 11A 237.488MHz 13E
195.936MHz 8A 217.088MHz 11N 239.200MHz 13F
197.648MHz 8B 218.640MHz 11B
Page 28
55
APPENDICES
54
APPENDICES
2. L-BAND (Europe)
3. L-BAND (Canada)
Frequency Label Frequency Label Frequency Label
1452.960MHz LA 1466.656MHz LI 1480.352MHz LQ
1454.672MHz LB 1468.368MHz LJ 1482.064MHz LR
1456.384MHz LC 1470.080MHz LK 1483.776MHz LS
1458.096MHz LD 1471.792MHz LL 1485.448MHz LT
1459.808MHz LE 1473.504MHz LM 1487.200MHz LU
1461.520MHz LF 1475.216MHz LN 1488.912MHz LV
1463.232MHz LG 1476.928MHz LO 1490.624MHz LW
1464.944MHz LH 1478.640MHz LP
Frequency Label Frequency Label Frequency Label
1452.816MHz LA 1466.768MHz LI 1480.720MHz LQ
1454.560MHz LB 1468.512MHz LJ 1482.464MHz LR
1456.304MHz LC 1470.256MHz LK 1484.280MHz LS
1458.048MHz LD 1472.000MHz LL 1485.952MHz LT
1459.792MHz LE 1473.744MHz LM 1487.696MHz LU
1461.536MHz LF 1475.488MHz LN 1489.440MHz LV
1463.280MHz LG 1477.232MHz LO 1491.184MHz LW
1465.024MHz LH 1478.976MHz LP
Appendix 6 T
r o u b l e s h o o t i n g
P r o b l e m s T r o u b l e s h o o t i n g
·The unit does not turn on. · Replace batteries. Battery might be exhausted.
· Check battery polarity.
·A DAB signal cannot · Check if you are out of available DAB service area.
be received. · Adjust antenna length or redirect antenna.
· Try other channels.
·The audio signal is · The received signal strength is too weak. Try extending or
intermittent or mutes re-positioning the antenna. It may be required to try another location.
· Keep away from PC’s or other possible interference sources
·The DAB signals received · Check audio format icon. If audio format shows “DATA”, no audio
but no sound heard. service is provided.
· Check data rate. (No sound is heard when data rate is over 256Kbps.)
· Earphone is not properly plugged, or malfunctioning.
Replace earphone or plug-in properly.
· Volume is turned fully down.
Page 29
57
APPENDICES
56
APPENDICES
C l a s s i f i c a t i o n s S p e c i f i c a t i o n s O p t i o n s
Frequency Range Band-III : 174
MHz~240MHz V
L-BAND : 1452 MHz~1492MHz L (Not applicable)
FM : 87.50 MHz~108MHz F
Power source +3.0V +/-20%
Battery 2AA size alkaline cells
Adaptor 3V / 500mA (2.8
Ø)
Display 4-Line Full graphic LCD with EL backlight
Audio Output Power 5mW @ 16Ω
Audio Frequency Range 20Hz-20KHz˚
Dimension (W×H×D) 84×60×24 mm
Operating Temperature -5˚C ~ +35˚C
Ambient temperature -40˚C ~ +80˚C
Music Player Format .mp3 (MP3 format up to 320kbps/sec)
Flash memory size 64MB
Appendix 7 Specifications
Information in this document is subject to change without notice.
P r o b l e m s T r o u b l e s h o o t i n g
·Buttons do not work · Check if “Hold”appeared on Tuning Icon. Release Button Hold mode
by pressing the Confirm button
( )
for more than 2 seconds.
· If USB Cable is connected to PC when in DAB or FM Radio modes,
remove the USB cable.
·LCD dim · Adjust the contrast of the LCD display.
·Backlight does not turn on · Check the backlight setting and adjust.
Page 30
59
APPENDICES
58
APPENDICES
Appendix 8 Information on Digital Radio Services in the United Kingdom.
This information is believed to be corrected in October 2002. The situation in digital radio is evolving
rapidly, and you are advised to check the operators or DRDB website for up to date information.
Details of regional service area licences and maps can be found at:
http://www.radioauthority.org.uk
More Information, news and links can be found at:
http://www.digitalradionow.com
UK National Services:
BBC
Block 12B: 225.648 MHz
Operator: BBC
Ensemble Label: BBC National DAB
http://www.bbc.co.uk/digitalradio
Digital One
England: Block 11D: 222.064MHz
Scotland: Block 12A: 223.936MHz
Ensemble Label: Digital1 Network
http://www.ukdigitalradio.com
Regional Services
Aberdeen
Block 11C: 220.352 MHz, Operator: Switchdigital Scotland
Ayr
Block 11B: 218.640 MHz, Operator: Score Digital Ltd
http://www.scoredigital.co.uk/
Bath & West Wilts
Block 12D: 229.072 MHz, Operator: Now Digital Ltd
http://www.now-digital.com/
Page 31
61
APPENDICES
60
APPENDICES
Birmingham
Block 11C: 220.352 MHz, Operator: CE Digital
Bournemouth
Block 11B: 218.640 MHz, Operator: Now Digital Ltd
http://www.now-digital.com/
Bradford/Huddersfield
Block 11B: 218.640 MHz, Operator: TWG Digital
Bristol and Bath
Block 11B: 218.640 MHz, Operator: Now Digital
http://www.now-digital.com/
Cardiff and Newport
Block 11C: 220.352 MHz, Operator: Capital Radio Digital
Central Lancashire
Block 12A: 223.936MHz, Operator: Emap Digital Radio
Coventry
Block 12D: 229.072 MHz, Operator: Now Digital
http://www.now-digital.com/
Dundee/Perth
Block 11B: 218.640 MHz, Operator: Score Digital Ltd
http://www.scoredigital.co.uk/
Edinburgh
Block 12D: 229.072 MHz, Operator: Score Digital
http://www.scoredigital.co.uk/
Exeter/Torbay
Block 11C: 220.352 MHz, Operator: Now Digital
http://www.now-digital.com/
Glasgow
Block 11C: 220.352 MHz, Operator: Score Digital
http://www.scoredigital.co.uk/
Greater London 1
Block 12C: 227.360 MHz, Operator: CE Digital
Greater London 2
Block 12A: 223.936 MHz, Operator: Switch Digital.
Page 32
APPENDICES
62
APPENDICES
63
Greater London 3
Block 11B: 218.640 MHz, Operator: The Digital Radio Group (London)
http://www.thedigitalradiogroup.co.uk/
Greater Manchester
Block 11C: 220.352 MHz, Operator: CE Digital
Humberside
Block 11B: 218.640 MHz, Operator: Emap Digital Radio.
Isle of Man
Block 11C: 220.352 MHz, Operator: mmO2, Virgin Radio and Crown Castle International
Leeds
Block 12D: 229.072 MHz, Operator: Emap Digital Radio
Liverpool
Block 11B: 218.640 MHz, Operator: Emap Digital Radio
Northern Ireland
Block 12D: 229.072 MHz, Operator: Score Digital
http://www.scoredigital.co.uk/
Southend/Chelmsford
Block 12D: 229.072 MHz, Operator: Now Digital
http://www.now-digital.com/
South Yorkshire
Block 11C: 220.352 MHz, Operator: Emap Digital Radio
Teesside
Block 11B: 218.640 MHz, Operator: Emap Digital Radio Ltd
Tyne & Wear
Block 11C: 220.352 MHz, Operator: Emap Digital Radio
Wolverhampton, Shrewsbury and Telford
Block 11B: 218.640 MHz, Operator: Now Digital
http://www.now-digital.com/
The information given here is correct to the best of our knowledge, but is for guidance only, and is liable to change.
Perstel Limited accepts no responsibility for any inaccuracy.
Page 33
WARRANTY
64
WARRANTY
1.About Warranty Service
Personal Telecom, Inc. Warrants that this product will be free from defects in materials and workmanship
for a period of one(1) year from the date of purchase. Within this period, simply take the product and
your proof of purchase to any local dealer and the product will be repaired without charge for parts and labor.
Personal Telecom, Inc. reserves the right to charge for transportation. Any product which has been
subject to misuse or accidental damage is excluded from this warranty.
This warranty is only applicable to a product purchased through right dealers and to a product that is
presented for repair in a country where Personal Telecom. Inc, offers the product for sale.
While this warranty does not confer any legal rights other than those set out above,
you may have additional statutory rights which will vary under the laws of the various countries,
states, provinces and other governmental entities in which Personal Telecom. Inc's
products are being sold. This warranty is subject to all statutory rights you may have in the country of purchase.
2.Product Information
3.Warranty Exclusion
①
Any service request due to lack of knowledge of product; Read Owner's Manual carefully.
② Misuse or improper modification; Do not open the circuitry without Service Manual.
③
Majeur forces; Keep away from fire, salty water, flood etc.
④
Out of product life; Charged service for parts replacement.
4.Warranty Statement
This warranty Statement will not be reissued.
Please keep with Owner's Manual with good care.
Product type □MP3 player □Digital Voice Recorder □DAB Receiver
Product code
Serial Number
Date of purchase / / ( mm/ dd/ y y )
D e a l e r
C u s t o m e r Name
Contact
65
 Loading...