

Page 1
Compatibility
sheet:
PE - DENNNN028EN 05/19
M1
PERRY ELECTRIC Srl - Via milanese, 11 - 22070 VENIANO (Como) ITALY - www.perry.it
INSTALLATION INSTRUCTIONS
COMPATIBILITY TO THE MOST COMMON RESIDENTIAL SERIES PLATES
CONTENT OF PACKAGING
1 Electronic recessed device
1 T1 model sub-frame
2 screws for fastening the sub-frame to the type 503 wall-mounted recess box
1 Front + with WHITE POLISHED finishinghandle (only for thermostat)
1 Front + with ANTHRACITE finishinghandle (only for thermostat)
1 Front + with SILVER MATT finishinghandle (only for thermostat)
1 Set of reduced thickness ledges (only for BTICINO Matix series)
1 Frame (only for Axolute BTICINO series)
Use and installation instructions
Compatibility to the most common residential series plates
3 series of month and year labels for replacement (only for gas detectors):
The trademarks:
Chiara is property of ABB SpA
Ave sistema 44, Personal 44, Zama 44, Vera 44 are property of AVE SpA
Axolute - Axolute Air - Light - Light Tech - Living - LivingLight - LivingLight Air - Matix brands are property of the BTICINO SpA company
Chorus ONE/LUX/FLAT/GEO - Playbus - Playbus Young, are proper ty of the GEWISS SpA company
Arké - Eikon - Eikon Evo - Idea - Plana, are property of the VIMAR SpA company
Delta futura graphit is proper ty of SIEMENS SpA
1
ACCESSORIES PARTS KIT FOR DIMENSIONAL AND CHROMATIC COMPATIBILITY (can be purchased separately)
- Sub-frame T2, Front, Ledges + with CREAMY WHITE finishinghandle (only for thermostat)
for chromatic combining with electrical outlets of the series: VIMAR: IDEA WHITE
- Sub-frame T2, ANTHRACITE Ledges finishing
for chromatic combining with electrical outlets of the series: VIMAR: IDEA ANTHRACITE - GEWISS: PLAYBUS, PLAYBUS YOUNG - SIEMENS: DELTA FUTURA GRAPHIT
DEVICE CAN BE INSTALLED WITH PLATES
ABB:
AVE:
BTICINO:
GEWISS:
SIEMENS:
VIMAR:
CHIARA
3
AVE SISTEMA 44 (Personal 44, Zama 44, Vera 44)
2
AXOLUTE: white/ anthracite/tech
32
AXOLUTE AIR: white/ anthracite/tech
LIVING - LIGHT - LIGHT TECH
LIVINGLIGHT: anthracite/white/tech - MATIX
3
LIVINGLIGHT AIR: anthracite/white/tech
CHORUS white/black: ONE/LUX/FLAT/GEO
2
CHORUS titanium: ONE/LUX/FLAT/GEO
1
PLAYBUS - PLAYBUS YOUNG
1
DELTA FUTURA GRAPHIT
ARKÉ - EIKON: grey/white/next
3
EIKON EVO: grey/white/next
1
IDEA anthracite/white
PLANA - PLANA SILVER
1
2
2
ACCESSORIES PARTS KIT FOR A PERFECT CHROMATIC COMPATIBILITY (can be purchased separately)
- Front, frame + with polished finishing: ANTHRACITE or SILVER (tech)handle (only for thermostat)
for chromatic combining with electrical outlets of the series: BTICINO AXOLUTE and AXOLUTE AIR: anthracite, tech
- WHITE polished frame for chromatic combination with electrical outlets of the series: BTICINO AXOLUTE and AXOLUTE AIR white
- Front + with SILVER POLISHED finishinghandle (only for thermostat)
for chromatic combining with electrical outlets of the series: GEWISS CHORUS titanium: ONE/LUX/FLAT/GEO - VIMAR: PLANA SILVER
3
ACCESSORIES PARTS KIT FOR DIMENSIONAL COMPATIBILITY (can be purchased separately)
- Sub-frame A
for dimensional compatibility to the residential series:
BTICINO: AXOLUTE AIR
- Sub-frame T4
for dimensional compatibility to the residential series: AVE: AVE SISTEMA 44
BTICINO: LIVINGLIGHT AIR
VIMAR: EIKON EVO
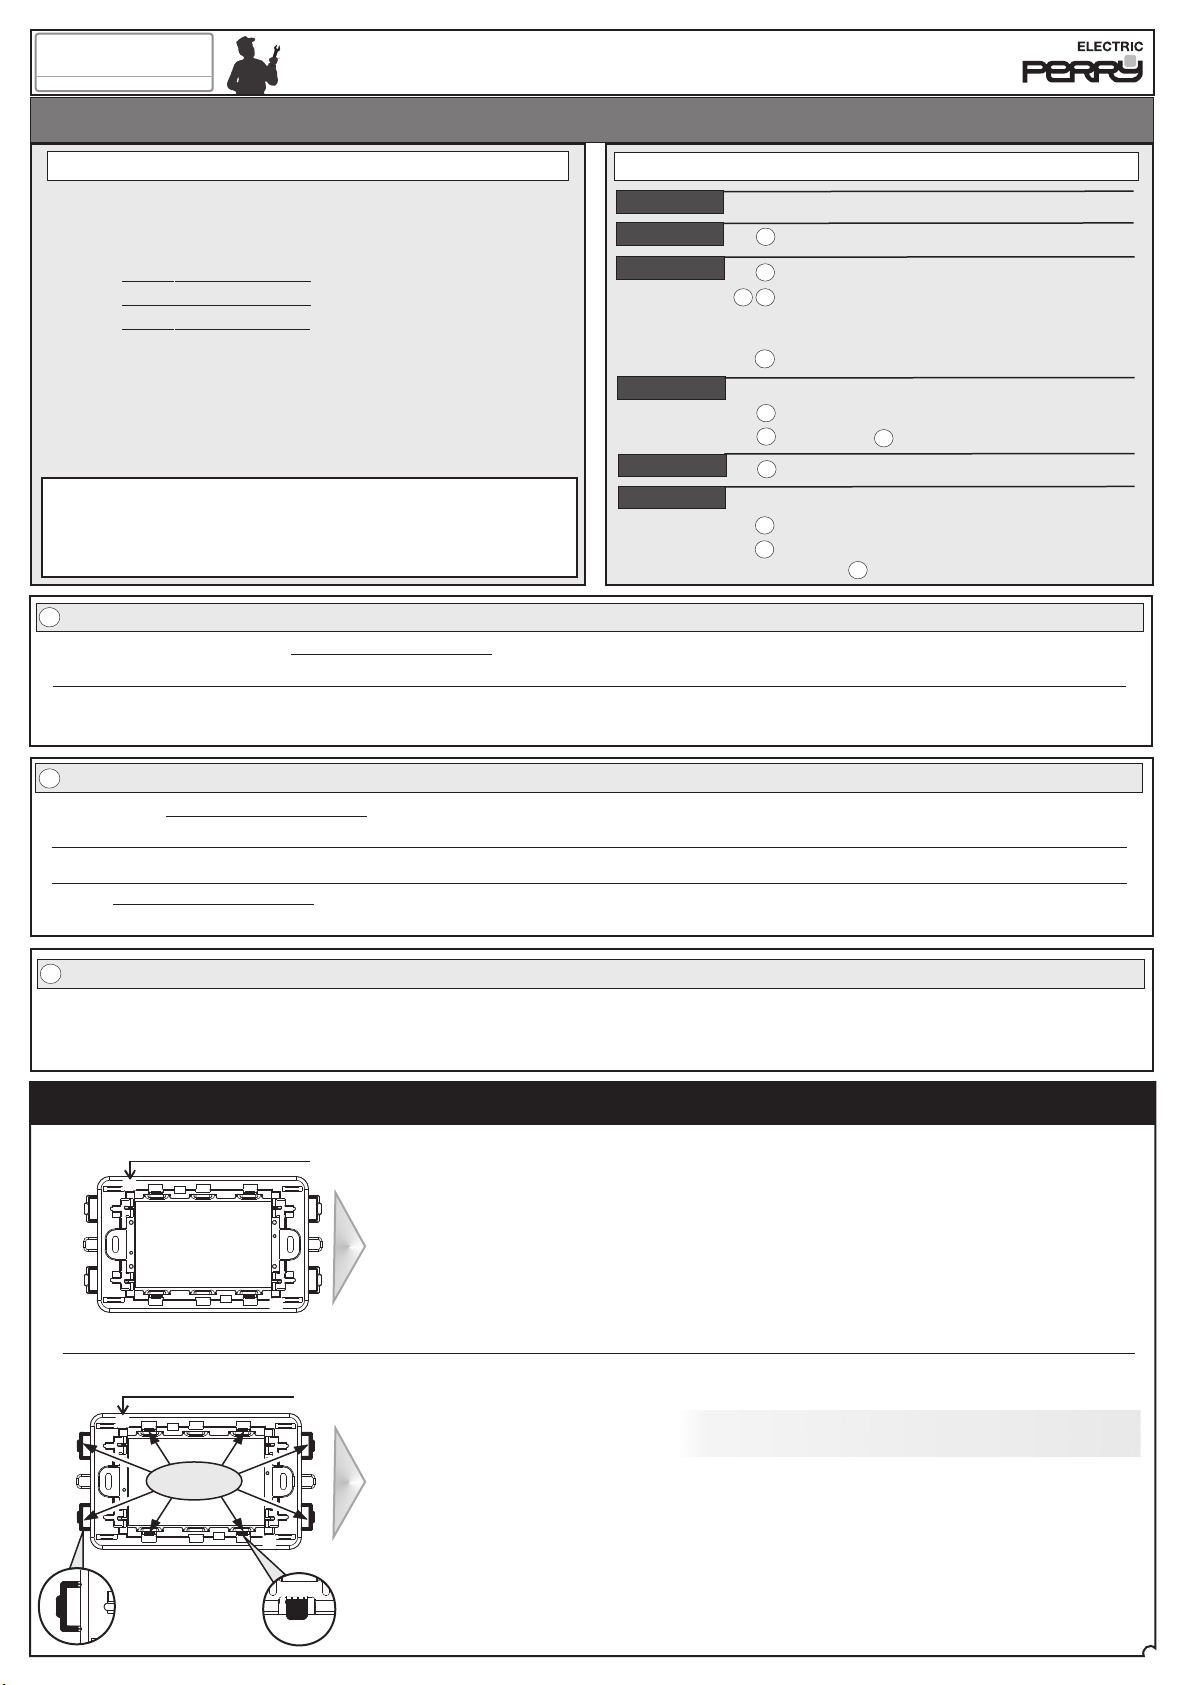
SET-UP OF SUB-FRAME (T1) BASED ON THE PLATE USED
Sub-frame 1 (T1)
T1
For plates of the series:
VIMAR: ARKÉ - EIKON - PLANA - PLANA SILVER
ABB CHIARA
T1
Sub-frame without any change
Sub-frame 1 (T1)
T1
REMOVE
Important:
remove the 4 side supports
and the 4 hooks completely
all the way to their base
For plates of the series:
BTICINO LIVING
BTICINO: LIGHT - LIGHT TECH
Note for the installer: BTICINO Living, Light, Light Tech, Livinglight, Livinglight tech
series
plates, ifthey are alreadypresent on therecess box andrespective BTICINO frames,it is
possible toinsert theelectronic device directlyin theseframes.
with
BTICINO LIVINGLIGHT
BTICINO MATIX
T1
BTICINO AXOLUTE (it also requires insertion of the frame) see assembly sequence on the back of the sheet
(it also requires insertion of the reduce thickness side ledges)
For plates of the series:
GEWISS CHORUS: ONE/LUX/FLAT/GEO
1
Page 2
Compatibility
sheet:
M1
INSTALLATION INSTRUCTIONS
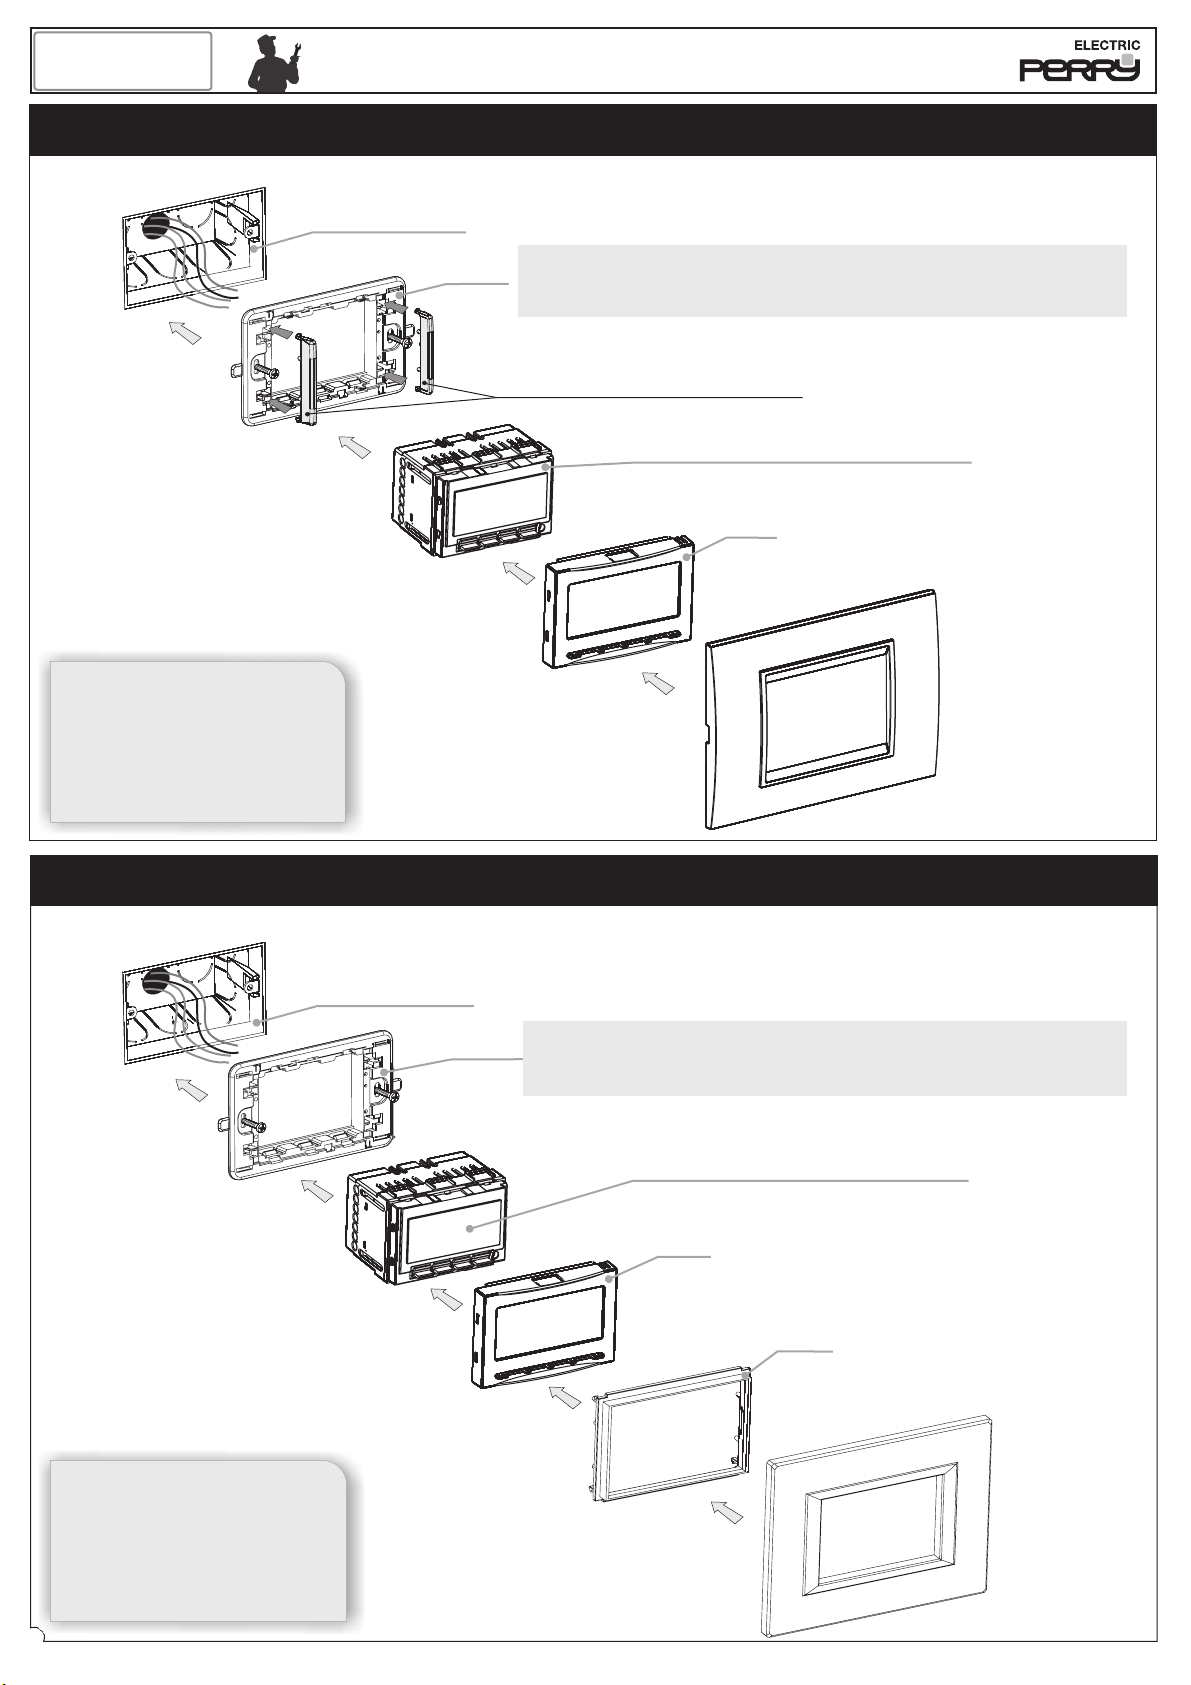
ASSEMBLY OF THE ELECTRONIC DEVICE BASED ON THE PLATE USED
Attention: before installing the electronic device, deactivate the 230V~ mains voltage
Important: plate seal on the sub-frame of the electronic device is only guaranteed through a correct installation of the 503 recess box
(set flush inthe wall without imperfections).
Recessed box (type 503)
Fasten the Sub-frame from
the type 503 recess box
Complete the electrical connections
as per image diagrams in the specific
instructions and insertthe device in the
sub-frame until itlocks
Note:
the images used for the electronic device
and the front are only indicative, useful to
show the correct installation sequence for
the thermostat, or programmable
thermostat, orgas detector.
For other indications, consult the
specific instructions for the device.
Sub-frame T1
Apply the chosen front (to the 4
lateral blocking teeth present on
the device)
Important: if necessary, prepare the sub-frame T1 and insert the side
ledges (only if required) based on the plate used
paragraph on thefront of the sheet).
attention to the position of the insertion pins of the ledges
note: reduced thickness extenders only for Bticino series Matix
Electronic device:
thermostat or programmable thermostat or gas detector
Note: insert the batteries in the devices with 3V power supply
Front
Note: only for thermostats where foreseen, also insert the handle
in the same direction as described in the specific instructions
(see the previous
Apply the plate to the sub-frame
ASSEMBLY OF THE ELECTRONIC DEVICE ONLY WITH AXOLUTE SERIES BTICINO PLATES
Attention: before installing the electronic device, deactivate the 230V~ mains voltage
Important: plate seal on the sub-frame of the electronic device is only guaranteed through a correct installation of the 503 recess box
(set flush in the wall without imperfections).
Recessed box (type 503)
Fasten the T1 Sub-frame to the type 503 recess box, after removing the 4
specific hooks and the 4 specific supports up to their base
sheet, see the Sub-frame T1 set-up paragraph)
Electronic device:
thermostat or programmable thermostat or gas detector
Note: insert the batteries in the devices with 3V power supply
Front
Note: only for thermostats where foreseen, also insert the handle in the same direction
as described in the specific instructions
Frame
The manufacturer reserves the right to make all technical and manufacturing modifications deemed necessary without prior notice.
(on the front of the
Apply the AXOLUTE
plate to the sub-frame
(rectangular or elliptical)
Fasten the Sub-frame from
the type 503 recess box
Complete the electrical connections
as per image diagrams in the specific
instructions and insertthe device in the
sub-frame until itlocks
Note:
The images used for the electronic device
and the front are only indicative, useful to
show the correct installation sequence for
the thermostat, or programmable
thermostat, orgas detector.
For other indications, consult the
specific instructions for the device.
2
Sub-frame T1
Apply the chosen front (to the 4
lateral blocking teeth present on
the device)
Hook the 4 hooks of the
frame to theT1 sub-frame
 Loading...