

Page 1
PE - DENNNN0 EN 0 /2442 7
Compatibility sheet:
M6
ENGLISH
PERRY ELECTRIC Srl - Via Milanese, 11 - 22070 VENIANO (CO) - ITALY - www.perry.it
INSTALLATION INSTRUCTIONS
COMPATIBILITY TO THE MOST COMMON RESIDENTIAL SERIES PLATES
CONTENT OF PACKAGING
n° 1 Electronic recessed device 3 modules
n° 1 T6 model sub-frame
n° 2 screws for fastening the sub-frame to the wall-mounted recess box (ex.: type 503)
n° 1 Front + handle (only for thermostat) with WHITE finishingEMBOSSED
n° 1 Front + handle (only for thermostat) with BLACK finishingEMBOSSED
n° 1 Adapter compatible with the VIMAR LINEA series
n° 1 Frame compatible with the VIMAR LINEA series EMBOSSED BLACK finishing
n° 1 Frame compatible with the VIMAR LINEA series EMBOSSED WHITE finishing
Use and installation instructions
Compatibility to the most common residential series plates
The trademarks ARKÉ, EIKON, PLANA, LINEA are property of VIMAR SpA company
The trademarks LIVING, LIGHT, LIVINGLIGHT, MATIX GO are property of BTICINO SpA company
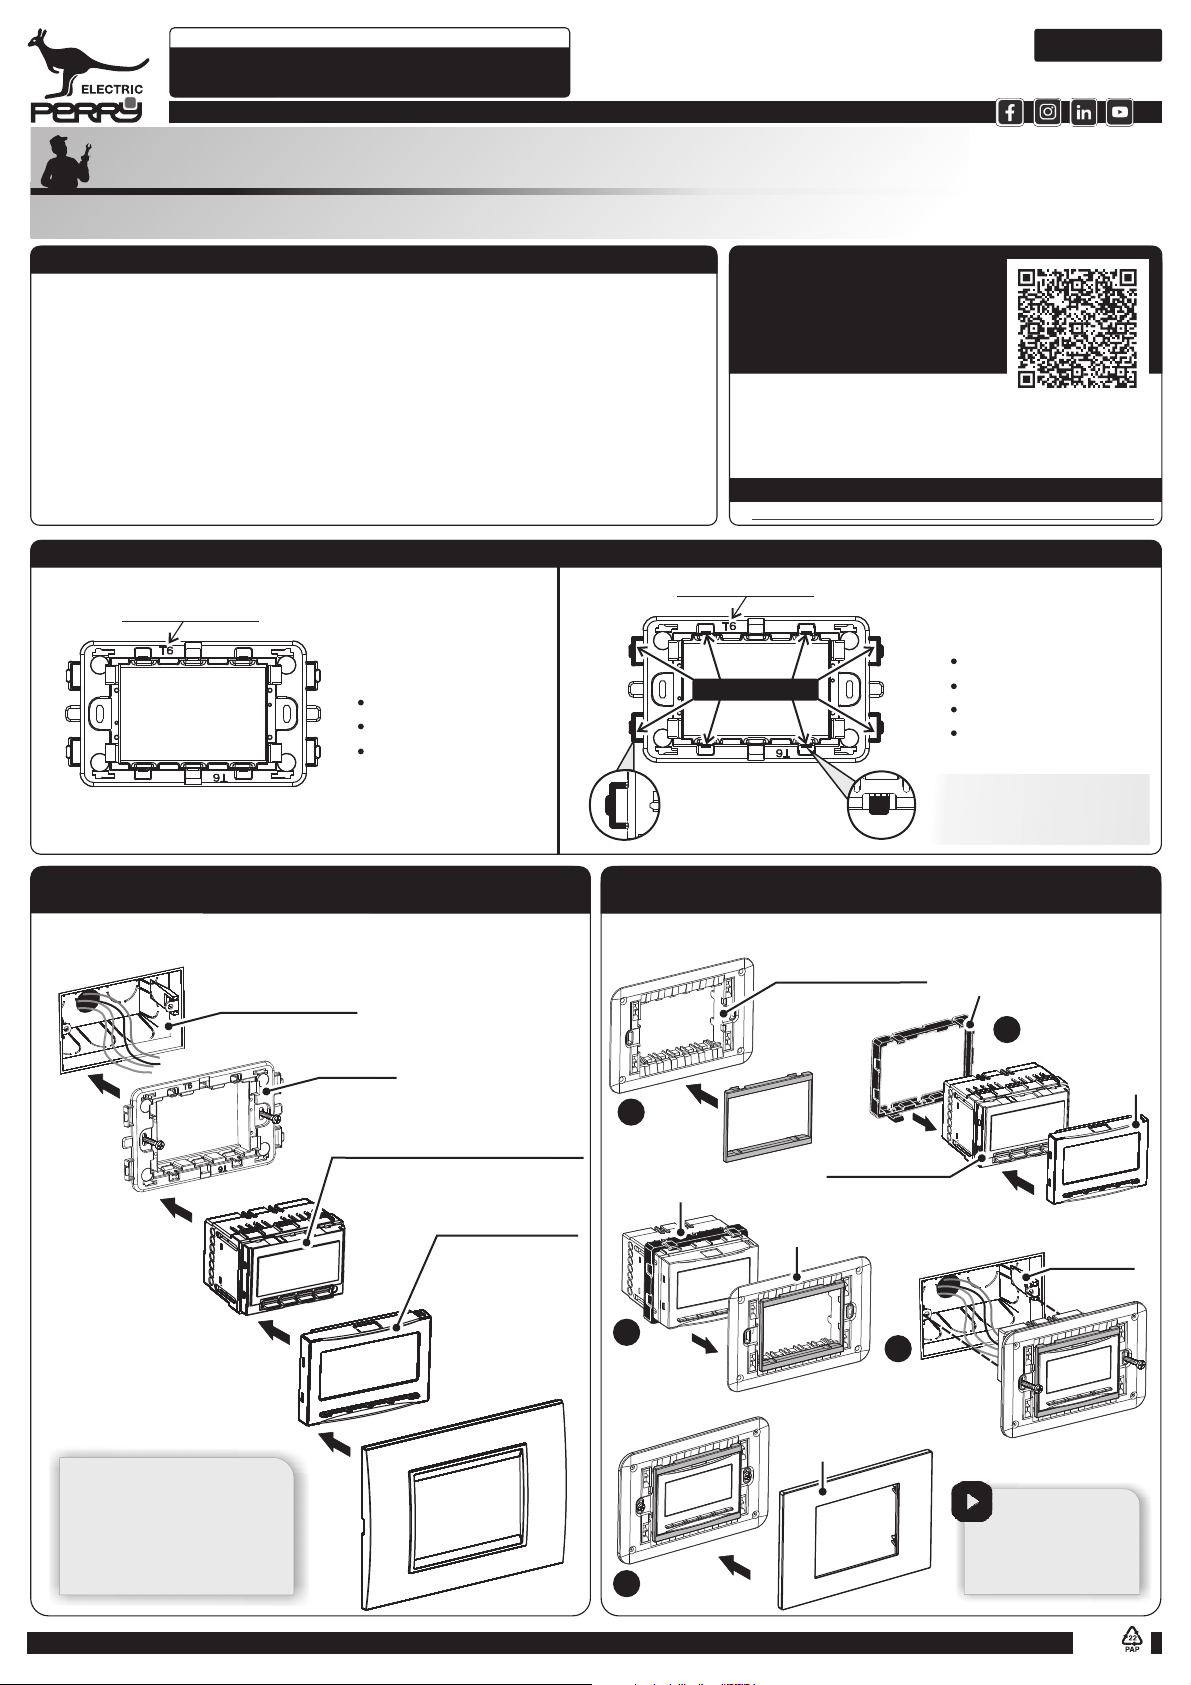
SET-UP OF SUB-FRAME (T6) BASED ON THE PLATE USED
Sub-frame T6
For plates of the series
VIMAR:
ARKÉ
EIKON
PLANA
Sub-frame without any change
To check ALL possible
compatibility of the device with
the most widespread civil series
(even with optional accessories)
frame the QRCODE
https://www.perry.it/qrcode/Compatibilita2024ProdottiIncassoSerieCivili.html
Sub-frame T6
REMOVE
Important:
remove the 4 side supports
and the 4 hooks completely
all the way to their base
or click to the following link:
For plates of the series
BTICINO:
LIVING
LIGHT
LIVINGLIGHT
MATIX GO
Note for the installer: with BTICINO
Living, Light, Livinglight series plates,
if they arealready present on the recess
box andrespective BTICINO frames,it is
possible to insert the electronic device
directly inthese frames.
ASSEMBLY OF THE ELECTRONIC DEVICE
BASED ON THE PLATE USED
Attention: before installing the electronic device,
deactivate the 230V~ mains voltage
Important: plate seal on the sub-frame of the electronic device is
only guaranteed througha correct installation of the503 recessbox
(set flushin thewall without imperfections).
Recessed box (type 503)
Sub-frame T6
Fasten the
Sub-frame
from the
type 503
recess box
Complete the electrical
connections as per
image diagrams in the
specific instructions
and insert the device in
the sub-frame until it
locks
Apply the chosen front (to the 4
lateral blockingteeth present on
the device)
Not :e
the images used for the electronic
device and the front are only indicative,
useful to show the correct installation
sequence for the thermostat, or
programmable thermostat, or motion
detector.
For other indications, consult the
specific instructions for the device.
Electronic device: thermostat or
programmable thermostat or motion detector
Note: insert the batteries in the devices
with 3V power supply
Front
Note: only for thermostats
where foreseen, also insert
the handle in the same
direction as described in
the specific instructions
Apply the plate to
the sub-frame
(not supplied)
ASSEMBLY OF THE ELECTRONIC DEVICE
ONLY WITH LINEA SERIES VIMAR PLATES
Attention: before installing the electronic device,
deactivate the 230V~ mains voltage
Support for 3 or 4 VIMAR LINEA
modules (Not supplied)
Note: Electronic device
mounting is NOT compatible
in the 7-module holder
1
Hook the frame
onto the support
Electronic device with adapter
and front panel included
Electronic device
Note: insert the batteries in the
devices with 3V power supply
Support with
frameincluded
3
Hook
the device
to the holder
5
Apply the plate
Plate from the
VIMAR LINEA series
(not supplied)
4
Make the electrical
connections and
secure everything
to thebuilt-in box
Adapter
Hook the adapter
and the front panel
2
to the device
CLICK!
CLICK!
example:
recess box
(type 503)
A detailed video
tutorial thatillustrates
the installation sequence,
illustrated above, is
avaiable on our YouTube
channel.
Front
Recycling: PAPER. Check the regulations of your municipality
&
Page 2
INSTALLATION INSTRUCTIONS
COMPATIBILITY TO THE MOST COMMON RESIDENTIAL SERIES PLATES
ONLY FOR
n° 1 Recessed Emergency lamp 3 modules
n° 1 T6 model sub-frame
n° 2 screws for fastening the sub-frame to the wall-mounted recess box (ex.: type 503)
n° 1 Front with WHITE EMBOSSED finishing
n° 1 Front with BALCK EMBOSSED finishing
n° 1 Adapter compatible with the VIMAR LINEA series
n° 1 Frame compatible with the VIMAR LINEA series EMBOSSED BLACK finishing
n° 1 Frame compatible with the VIMAR LINEA series EMBOSSED WHITE finishing
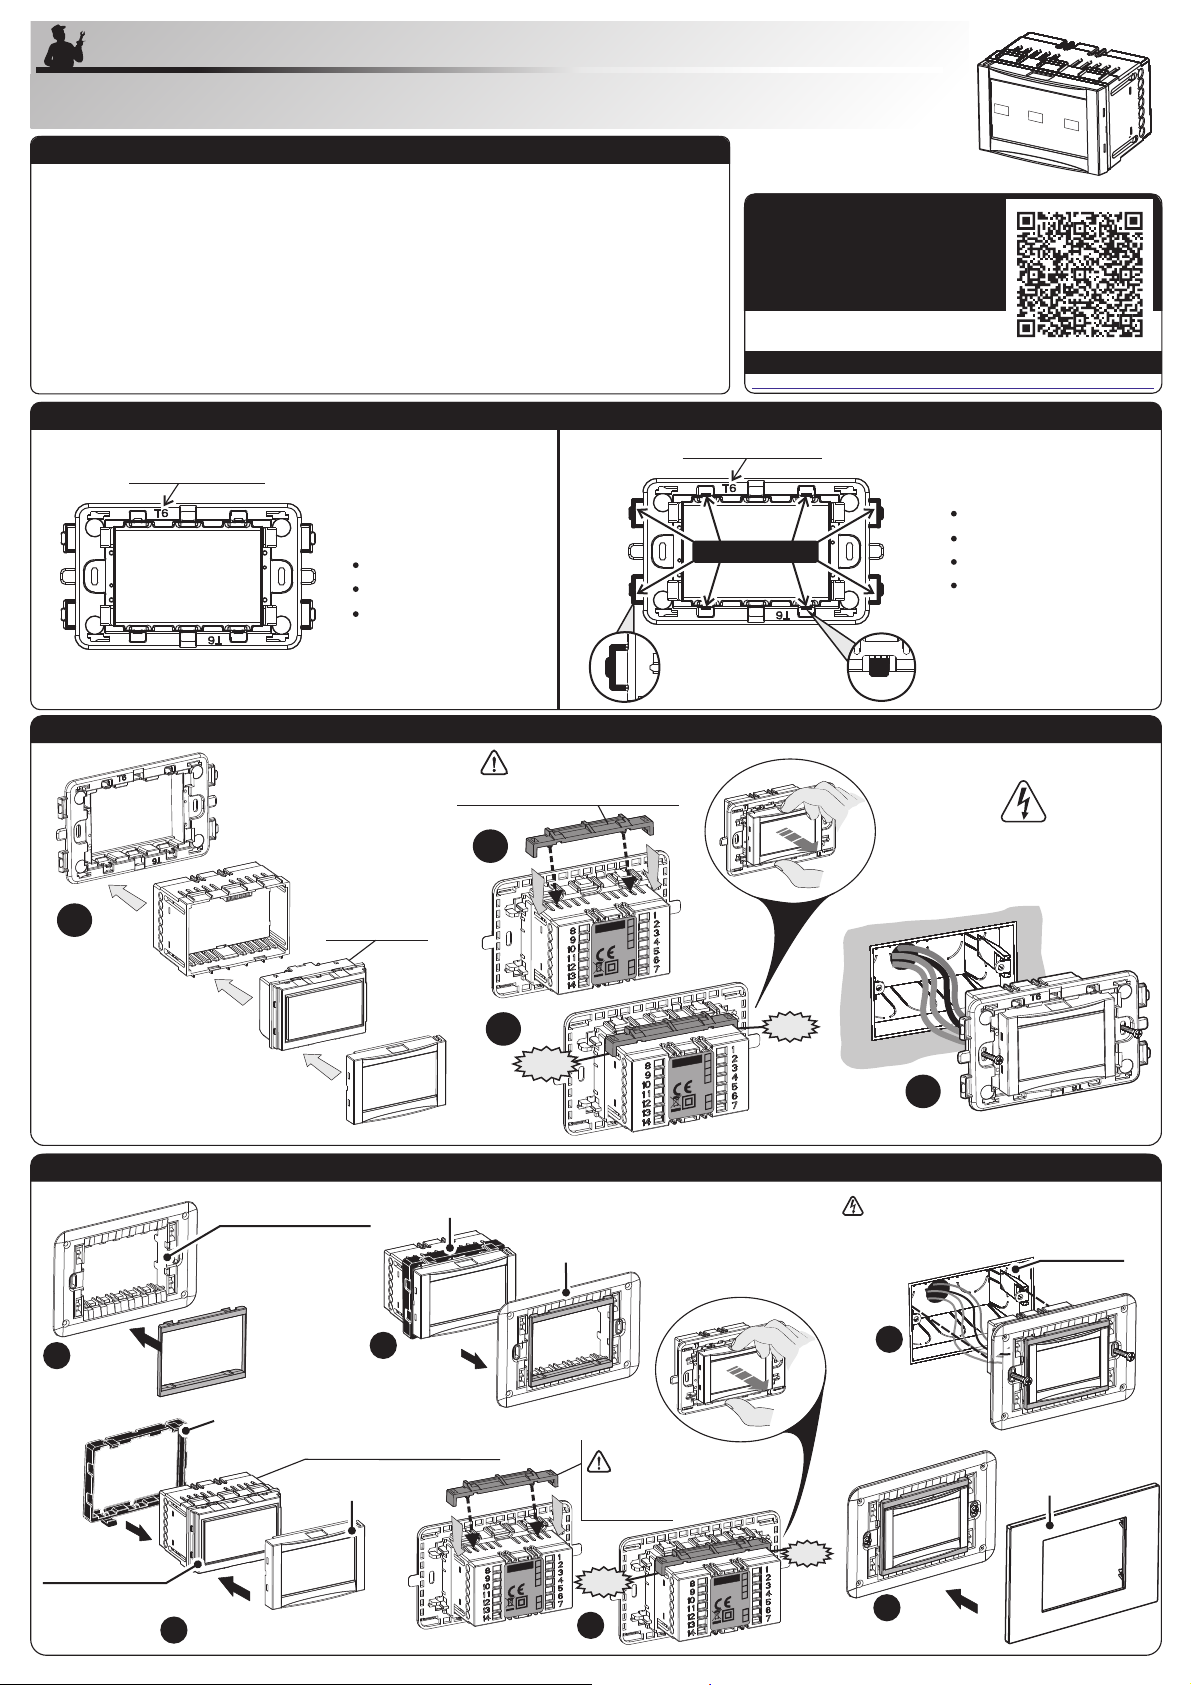
n° 1 Lamp module anti-extraction block
Use and installation instructions
Compatibility to the most common residential series plates
and of the mounting of the anti-extraction block
The trademarks ARKÉ, EIKON, PLANA, LINEA are property of VIMAR SpA company
The trademarks LIVING, LIGHT, LIVINGLIGHT, MATIX GO are property of BTICINO SpA company
Sub-frame without any change
EMERGENCY LAMP
CONTENT OF PACKAGING
(must be entered)
SET-UP OF SUB-FRAME (T6) BASED ON THE PLATE USED
Sub-frame T6
For plates of the series
VIMAR:
ARKÉ
EIKON
PLANA
To check ALL possible
compatibility of the device with
the most widespread civil series
(even with optional accessories)
frame the QRCODE
https://www.perry.it/qrcode/Compatibilita2024ProdottiIncassoSerieCivili.html
Sub-frame T6
REMOVE
Important:
remove the 4 side supports
and the 4 hooks completely
all the way to their base
or click to the following link:
For plates of the series
BTICINO:
LIVING
LIGHT
LIVINGLIGHT
MATIX GO
Note for the installer: with BTICINO
Living, Light, Livinglight series plates,
if they arealready present on the recess
box andrespective BTICINO frames,it is
possible to insert the electronic device
directly inthese frames.
1°
1
Hook the
frame to the frame
ASSEMBLY SEQUENCE OF THE ELECTRONIC DEVICE BASED ON THE PLATE USED
Take note
of the installation date
on the battery pack and
insert it respecting
the polarity (+)
ATTENTION!
MUST INSERT
THE ANTI-EXTRACTION BLOCK
2°
XXXXX
XXXXX
XXXXX
XXXXX
3°
Click!
XXXXX
XXXXX
XXXXX
XXXXX
Blocked!
Click!
before the electrical connections
deactivate the 230V~ mains voltage
Attention:
of the electronic device,
4°
Apply the plate to the
sub-frame (not supplied)
ASSEMBLY SEQUENCE OF THE ELECTRONIC DEVICE ONLY WITH LINEA SERIES VIMAR PLATES
VIMAR LINEA 3 or 4 module
frame (Not supplied)
Note: Electronic device
mounting is NOT
compatible in the
7-module holder
Adapter
CLICK!
Take note of the installation
date on the battery pack and
insert it respecting the polarity (+)
CLICK!
Electronic device - with adapter and
front panel included
3
Hook the
device to the
frame
Front
Frame with
included front frame
ATTENTION!
MUST INSERT THE
ANTI-EXTRACTION
BLOCK
Attention: before the electrical connections
of the electronic device,
deactivate the 230V~ mains voltage
blocked!
5
Make
the electrical
connections and secure
everything to the
built-in box
Recessed box
(type 503)
VIMAR LINEA
series plate
(not supplied)
Electronic device:
Note: insert the batteries in
the devices with 3V power supply
Hook the adapter
2
and the front panel to the device
XXXXX
XXXXX
XXXXX
XXXXX
Click!
4
XXXXX
XXXXX
XXXXX
XXXXX
Click!
6
Apply the plate
 Loading...