

Page 1
Introduction
This Quick Start Guide covers the key poi nts of the
installation for your IOLAN+ product. It is intended for
systems administrators familiar wi th operating systems
covered. To obtain the latest driver software please refer to the
driver matrix page under technical support in Perle web site.
The IOLAN+ is a TCP/IP communications serv er available in
both table top and rack mounted form. The table top unit has 8
or 16 RS-232 ports and the rack unit has 4, 8 or 16 RS-232
ports that can be used for terminals, modems, printers or other
serial devices. The serial ports are individually numbered.
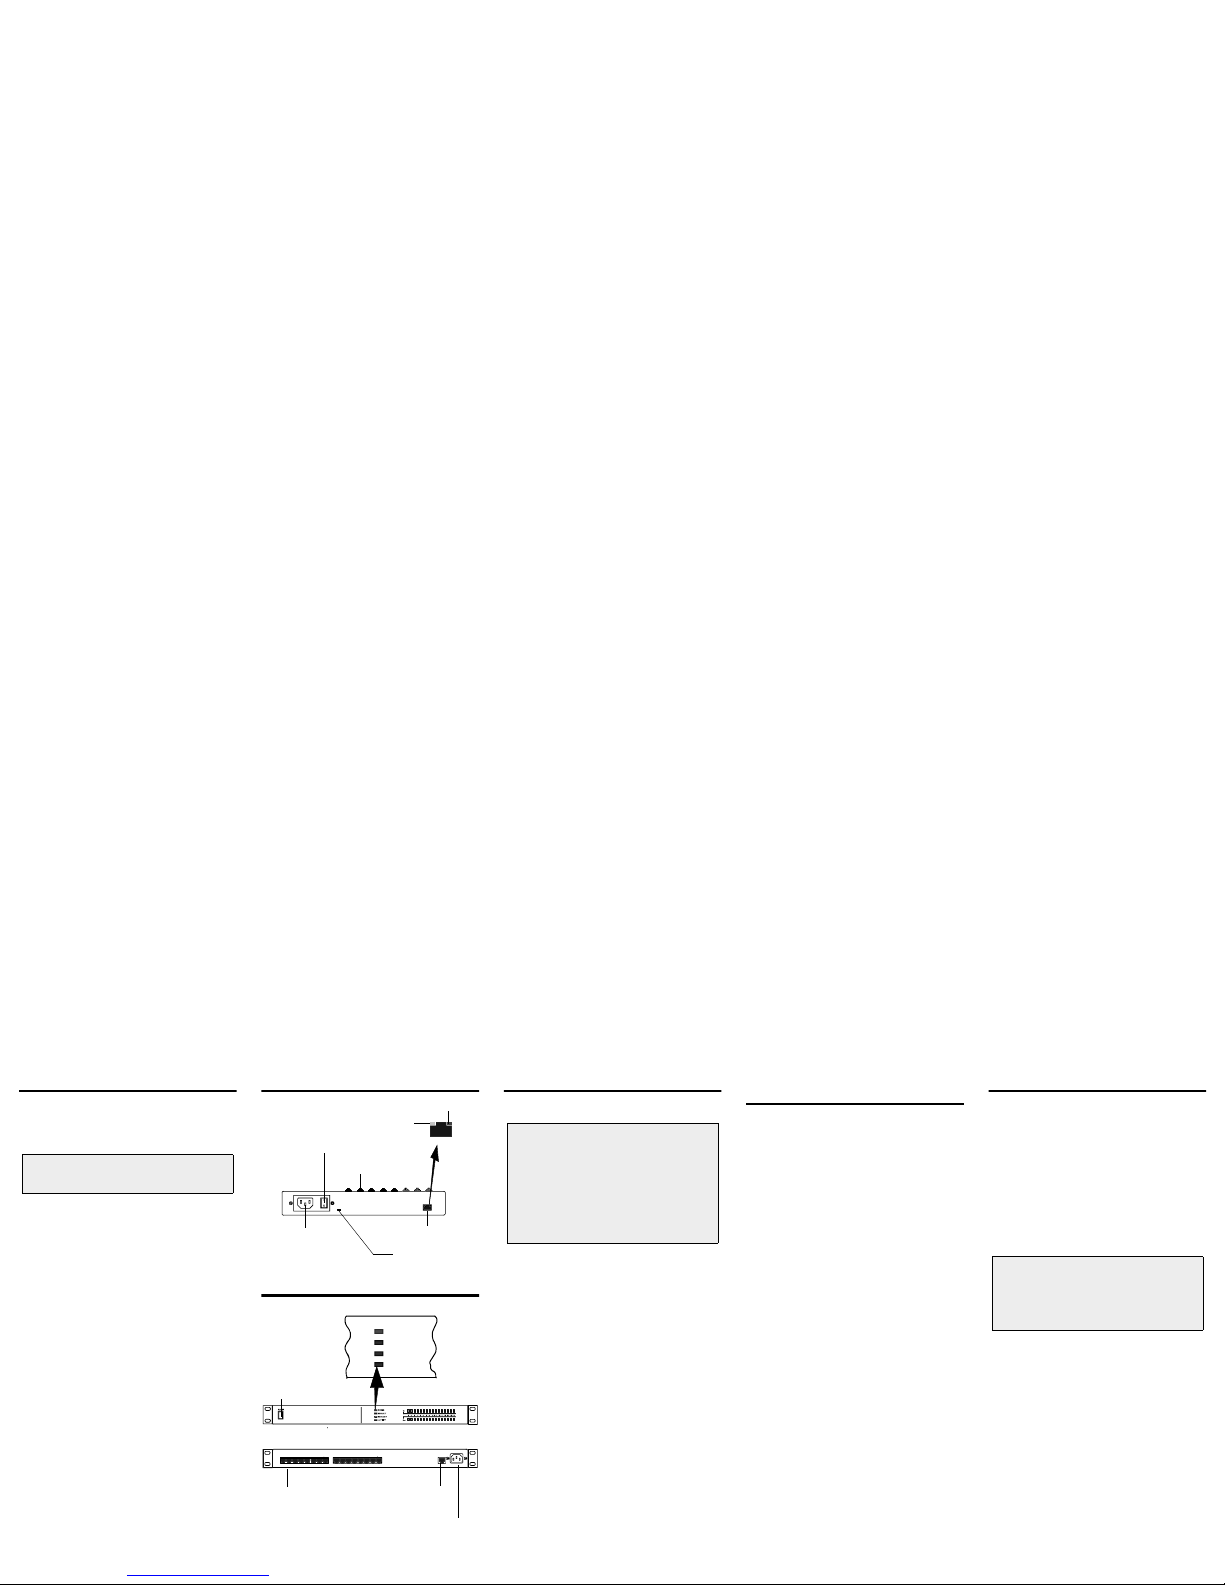
Table mounted
Rack mounted
Connectors and indicators
The functions of these are described in the IOLAN+ User and
Administration Guide.
Connecting up the IOLAN+ and
logging in from a remote host
1. Read the safety manual supplied with this product.
2. Connect the IOLAN+ to the ethernet.
3. Connect the power cable to the IOLAN+.
4. Power up the IOLAN+.
5. On a local host, for UNIX type:
arp -s a.b.c.d aa:bb:cc:dd:ee:ff
or for Windows NT type:
arp -s a.b.c.d aa-bb-cc-dd-ee-ff
replacing a.b.c.d with the IOLAN+ IP address
and aa:bb:cc:dd:ee:ff with the ethernet
address.
6. From the command prompt, run: telnet a .b.c.d
(This may take a few seconds to complete).
7. At the password prompt press Enter.
8. At the Local > prompt now displayed, type:
set term for supported terminals and press Enter.
9. Type set term <terminal> and then press Enter for the
appropriate terminal type.
You have now connected up and logged into the IOLAN+.
Setting the network parameters
1. Press CRTLA for th e ADMINISTRATIONMENU then
press CRTL P.
2. At the password prompt now displayed, type iolan as the
default password and press Enter.
3. In the administrator password window is now displayed,
use the cursor keys to select Server then press Enter.
The server menu is now displayed.
4. Enter the IP address and host name for the IOLAN+. Press
Enter twice to save the changes.
5. Select Reboot from the menu and press Enter.
6. Confirm Reboot and wait for the unit to restart.
Your IOLAN+ is now set up for operation.
Note
See IOLAN+ documentation on the Serial/Console Servers
CD supplied with this product for more detailed information.
Serial ports
10/100 BASE T socket
Main power switch
Power input socket
Power LED
10 BASE T Link/Activity - yellow LED
100 BASE T Link/Activity - green LED
I
O
10/100 BASE T socket
Main power swit ch
POWER
10 BASE T
100 BASE T
ACTIVITY
Serial ports
Power input socket
Note
These instructions assume the IOLAN+ is attached to the same
LAN as other host machines. Refer to the User and
Administration Guide for other situations.To perform the basic
IOLAN+ configuration you will need to know:
• The IP address of the IOLAN+
• The ethernet address of the IOLAN+ (displayed on
the unit)
• The host name of the IOLAN++
If in doubt please refer to your system administrator.
Notes
For setting up an IOLAN+ via a serially attached terminal,
refer to the appropriate section in the User and Administration
Guide.
For setting up an IOLAN+ via BOOTP, refer to the appropriate
section in the User and Administration Guide.
Page 2

Setting up a printer
This section assumes your printer client is set up for LPD
printing.
1. Power down the IOLAN+ and attach the serial printer
using a cable specified in the IOLAN+ User and
Administration Guide.
2. Power up the IOLAN+.
3. Log in and select the Administration Mode (using
CTRL A and then CTRL P).
4. Using the cursor keys select the Port option then enter t he
number of the serial port you attached the printer to.
5. On the Port Setup Menu, set the parameters in the
Hardware and Flow ctrl to match those of your printer.
6. Enter the print queue filename in the User Name field.
Press.
7. Set Access to Remote using the s pacebar to select the
appropriate action.
8. Set the Local Port field. This is a TCP Port num ber and for
LPD this should be set to 515.
9. Press Enter twice to save the changes.
10. From the ADMINISTRATION MENU select the Kill
option and enter the serial port number for the printer, then
press Enter.
The port is now setup, you can now send a print job to the
IOLAN+ to test printing.
Remote access dial in modem setup
1. Power down the IOLAN+ and attach the modem using a
cable specified in the IOLAN+ User and Administration
Guide.
2. Power up the IOLAN+.
3. Go to the Port Setup Menu as described earlier in Setting
up a printer on page 2.
4. Setup Hardware with Monitor DCD to yes and Flow Ctrl
to match the modem. In the IP address fields , set Src (local
end of PPP connection) and Dst (remote end) addresses.
5. Set Access to Local and Authentication to Host if user has
to be validated. Press Enter twice to save and exit.
6. On the ADMINISTRATION MENU select Access and
press Enter. Now select Remote Site Devices and press
Enter.
7. Select the entry from the Device type window where the
listed items represent the ports (i.e. first item = port1,
second item = port2, etc.), select the port you are attaching
the modem to and press Enter.
8. In the REMOTE SITE DEVICES MENU now displayed.
set the Inactivity timer to an appropriate value in minutes.
9. Set the Config field t o the modem’s initialisation
command string. Press Enter twice.
10. From the ADMINISTRATION MENU select Access.
11. In the Access pop-up window now displayed, select
Authentication/Logging and press Enter.
12. In the host AUTHENTICATION AND LOGGING menu
now displayed, go to the Auth Host field enter the IP
address of the authentication host.
13. Change the SuccessI ndication String field and
Failure Indication String field to suit your l ogin
sequence of your authentication hosts. Press Enter twice
to save and exit.
14. In the ADMINISTRATION MENU select kill and press
Enter.
15. Enter the modem port number and press Enter.
Setup is now complete. A remote user should now attempt to
log in.
IOLAN+
Communications server
Quick start guide
• 8 or 16 surge protected seria l ports
• Supports printers, modems, t erminals
• Desktop or rack mountable.
Note: If the src is left blank it defaults to the IP address of the
IOLAN+.
Contacting Perle Technical Support
Perle offers free technical support to Perle Authorised
Distributors and Registered Perle Resellers.
To access technical support please visit the Perle website
at www.perle.com/support.
Here you will find:
• latest drivers and firmware updates for download
• technical tips
• frequently asked questions
• documentation
• configuration support
• cabling information
• maintenance contract information
• and much more...
If you are unable to find the information you require, please
feel free to contact our technical support teams by email at:
USA
Email: [email protected]
Europe
Email: [email protected]
Asia
Email: [email protected]
Internet
www.perle.com/support
IOLAN+ Quick Start Guide
Part No: 5500046-13
Copyright © Perle Systems Limited, 2002
 Loading...