

Page 1
Owner’s Guide
PWF-100
Page 2

Owner’s Guide PWF-100
WARNING: No user-serviceable parts inside. Contact manufacturer or authorized personnel for service.
WARNING: Risk of fi re or electric shock. Connect only to UL listed Class 2 transformer for supply connection
CAUTION: Risk of electric shock. Install transmitter indoors. Do not expose to rain.
COMPLIANCE STATEMENT (PART 15.19)
This device complies with Part 15 of the FCC Rules.
Operation is subject to the following two conditions:
1. This device may not cause harmful interference, and
2. This device must accept any interference received, including interference that may cause undesired operation.
WARNING (PART 15.21)
Changes or modifi cations not expressly approved by Perimeter Technologies, Inc., could void the user’s authority to
operate the equipment.
FCC INTERFERENCE STATEMENT (PART 15.105(b))
This equipment has been tested and found to comply with the limits of Class B digital device, pursuant to Part
15 of the FCC rules. These limits are designed to provide reasonable protection against harmful interference in a
residential installation. This equipment generates, uses and can radiate radio frequency energy and, if not installed
and used in accordance with the instructions, may cause harmful interference to radio communications. However,
there is no guarantee that interference will not occur in a particular installation. If this equipment does cause harmful interference to radio or television reception, which can be determined by turninng the equipment off and on, the
user is encouraged to try to correct the interference by one or more of the following measures:
• reorient or relocate the receiving antenna
• increase the separation between the equipment and the receiver
• connect the equipment to an outlet or a circuit different from that to which the receiver is connected
• consult the dealer or an experienced radio/TV technician for help.
Page 3
Owner’s Guide PWF-100
Indoor
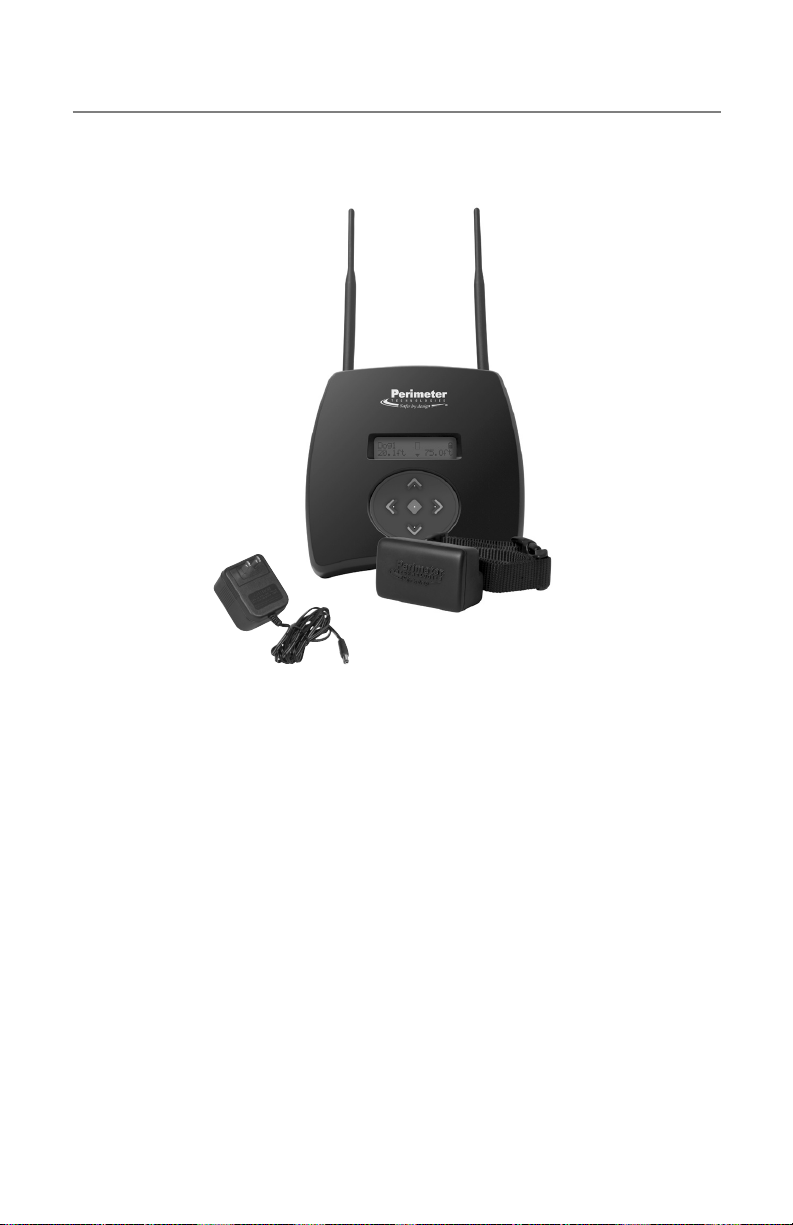
SmartStation
AC Adapter
™
™
PetLink
Collar
Congratulations! You have purchased the most technologically
advanced pet fencing system in the world for your cherished companion.
Wire-Free – The Wifi Fence
experienced pet fencing product development team to provide years of
worry-free freedom for both you and your pet.
™
was developed by the industry’s most
Should you have any diffi culty along the way, help is available by calling
the Customer Care Center at 1-866-900-2007.
www.buyperimeter.com
1
Page 4

Owner’s Guide PWF-100
Your new Pet Fencing System
AT A GLANCE
1. Frequently Asked Questions Page 3
2. System Features Page 7
3. System Alerts Page 8
4. System Precautions Page 8
5. Menu Map Page 9
6. Charging the PetLink™ Collar Battery Page 10
7. First Use Setup Page 10
STEP 1: Plug in the SmartStation
STEP 2: Charge Batteries
STEP 3: Pair the Collar & SmartStation
STEP 4: Locating the SmartStation
STEP 5: Setting the Boundary
8. Training Your Dog
Setting the PetLink™ Collar Stimulation
9. Troubleshooting
2
™
™
/Installing the Battery
Page 15
Page 19
Page 5

Owner’s Guide PWF-100
Frequently Asked Questions
Does the Wire-Free™ WiFi Fence require
a computer or internet service?
Wire-Free is a self contained fencing
system that requires no computer or
outside internet services. The Wire-Free
WiFi Fence utilizes WiFi-like radio signal
protocol 802.15 and operates completely
independent of your computer, WiFi router
or other computer devices.
Will the Wire-Free Fence interfere with
my home’s wireless computer router?
Wireless routers do operate on the same
2.4GHz radio frequency, however they
are utilizing a different signal protocol
– 802.11. The Wire-Free WiFi Fence utilizes WiFi-like radio signal protocol 802.15
and operates completely independent of
computer router or other WiFi devises.
Is the PetLink™ Collar waterproof?
The PetLink™ collar is submergible in water, however it should never be placed in a
dishwasher or washing machine to clean.
Does the terrain affect the fence range or
performance?
Unlike other wireless systems, the WireFree radio frequency signal is not affected
by most terrain. The Wire-Free Fence’s
effective range will be reduced over hilly
terrain only if the indoor SmartStation™
base station loses direct line of sight
(such as over a steep hill) with the dog’s
collar.
However, unlike all other wireless systems, the indoor SmartStation™ will actually benefi t from a higher location in the
house, such as a second story, to improve
its “line of sight” with the pet’s fencing
collar when dealing with diffi cult terrain
issues or other obstacles.
What is the maximum fence range or
coverage area?
Radio frequency device performance can
be infl uenced by any number of different
variables, so it is impossible to predict
exactly the range provided in your home.
However, given optimal circumstances,
the Wire-Free system has demonstrated
the ability to provide a radius of 200 ft. or
a total area of 2.5 acres with an unobstructed direct line of sight between the
dog and the indoor SmartStation
results may vary.
What could negatively infl uence the
products coverage area or general
performance?
Any large object or terrain that limits
or obstructs the line of sight between
the indoor SmartStation™ and your pet’s
PetLink™ collar can reduce the effective
range or coverage area of the Wire-Free
Fence. Even with natural obstructions
such as trees and hilly terrain, you will
fi nd that the Wire-Free system will out
perform any other wireless pet fence on
the market, however due to the number
of variables within your particular house
and property, Perimeter can not predict or
guarantee coverage area.
There are some obstructions you will need
to make particular note of when determining if a wireless fence is right for you. No
radio signal will pass through or will be
obstructed by large metal objects which
could include cars, metal studs and siding, metal sheds and water heaters. The
closer the metal object, the greater the
potential for unwanted interference and
will result in the reduction of or erratic
performance.
™
. Your
3
Page 6

Owner’s Guide PWF-100
How long does the battery last and is it
expensive to replace?
WARNING: THE BATTERIES THAT ARE
USED IN THIS SYSTEM ARE NOT MEANT
TO BE A DIRECT REPLACEMENT FOR AA
ALKALINE/NIMH BATTERIES IN OTHER
CONSUMER DEVICES. THESE LITHIUM
ION BATTERIES OPERATE AT MORE THAN
TWICE THE VOLTAGE OF AN ALKALINE
BATTERY AND 3 TIMES THE VOLTAGE
OF A NIMH CELL AND MAY DAMAGE OR
DESTROY YOUR DEVICE WHICH OPERATES ON STANDARD AA BATTERIES. DO
NOT USE PRIMARY/DISPOSALABLE BATTERIES IN THE WIRE-FREE SYSTEM. USE
MANUFACTURER APPROVED RECHARGABLE CELLS ONLY!
The rechargeable 3.6v lithium ion battery
should take 300 recharge cycles. Even
with frequent weekly charging the battery
will last years. For optimal battery life,
it is recommended to only charge the
collar battery when alerted to do so by
the indoor SmartStation™. This consumer
replaceable battery is inexpensive and
readily available.
Will my dog continue to be shocked when
outside of the safe area?
No. When exceeding the boundary area
that you set, the PetLink™ collar will sound
a one second warning tone, followed by
fi ve seconds of stimulation at the level you
have set from the SmartStation™. This is
followed by another fi ve seconds of warning tone. This sequence is repeated three
times until the dog returns to the safe
area. Should your dog stay out of the safe
area the tone only will continue to sound.
4
Page 7
Owner’s Guide PWF-100
How the Wire-Free System
Works
The Wire-Free – WiFi Fence is a new
kind of pet fence that incorporates some
very different technologies from other pet
fencing products. As such, the Wire-Free
system has some unique functions and
properties that are helpful to understand.
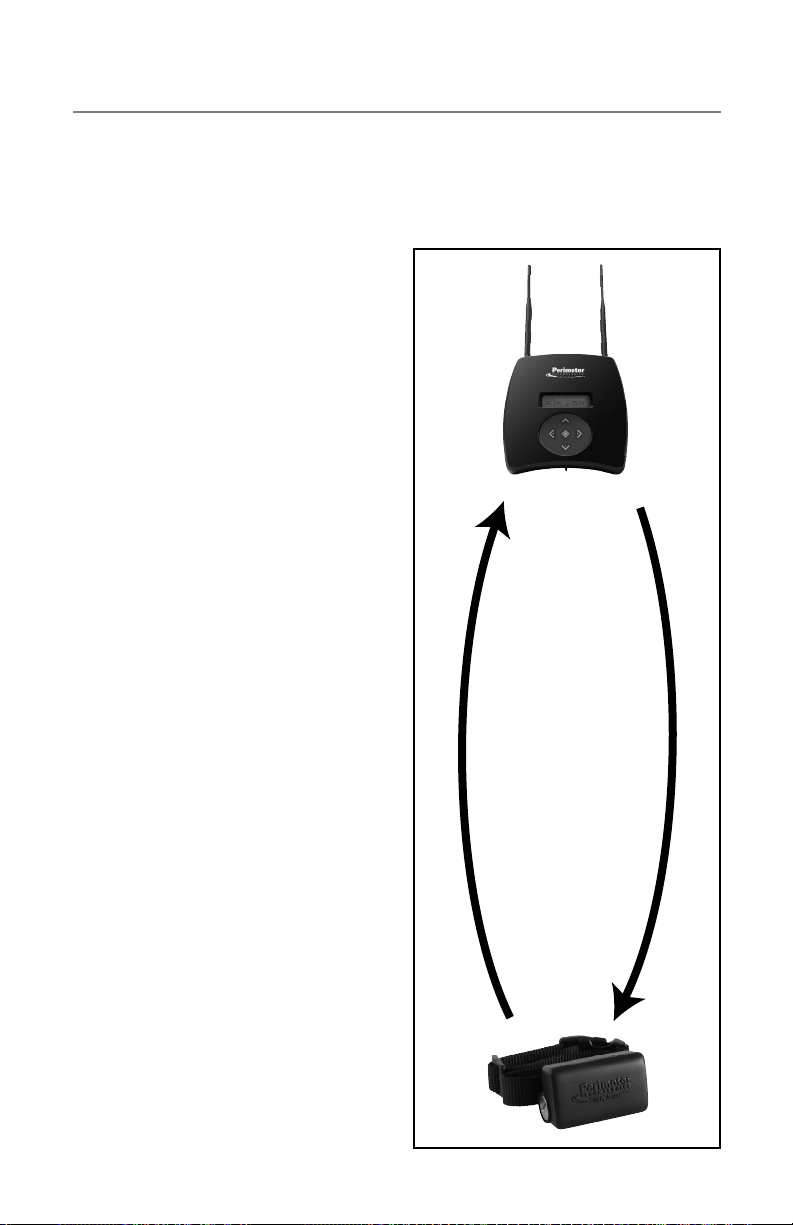
There are two primary components to
the Wire-Free System, an indoor SmartStation™ and the PetLink™ collar. The
SmartStation continually measures the
approximate distance to the dog’s PetLink
collar in relationship to the boundary
distance that you set.
When your dog exceeds the boundary limits, the collar emits a tone and electronic
stimulation at the level you determine. The
Wire-Free System can be set for levels
0 – Tone Only to level 8. Level 1 is very
gentle and level 8 would be for the most
determined dogs. It is suggested that you
start your training on 0, progress to level
1 and then determine what level is most
appropriate for your dog’s personality and
temperament.
e SmartStation™ and PetLink™
Collar 2-Way Communication
“How far away
are you?”
“Are you moving
fast or slow?”
“How far from
the boundary
are you?”
e System Update Speed
To maximize the battery life of the PetLink™
collar, the Wire-Free™ fence automatically
adjusts the speed that the SmartStation™
updates the PetLink™ collar location to
reduce power consumption. Your WireFree™ system knows when your pet is in a
safe location and when they are approaching the fence boundary.
™
You will notice that when the PetLink
collar is in close proximity to the Smart-
™
Station
, the update speed is very slow.
“Are you moving
towards me,
or towards the
boundary?”
5
Page 8
Owner’s Guide PWF-100
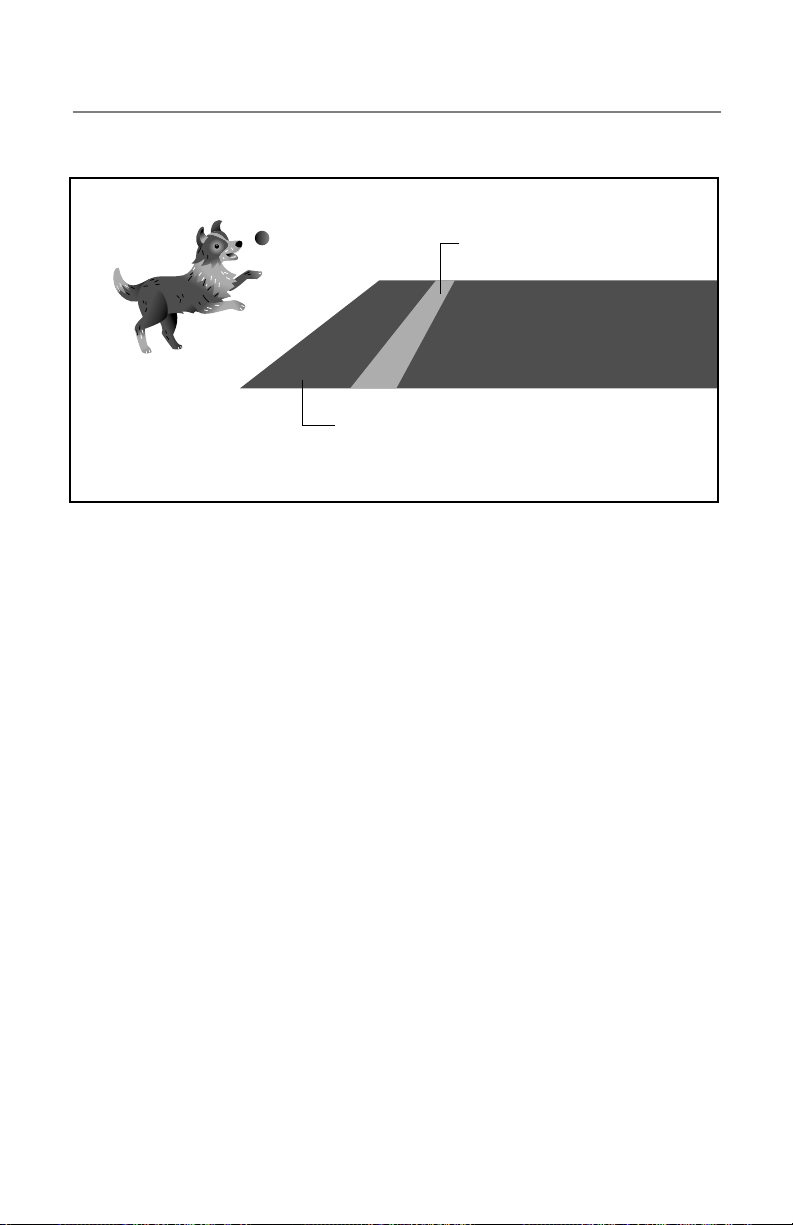
SAFE ZONE
ACTIVATION ZONE
Accuracy – +/- 3 feet
CORRECTION ZONE
No Limit –3 Correction & Tone
Cycles of 5 seconds, then Tone Only
CORRECTION ZONE
3 feet –10 feet
Discourages constant fence “testing,”
charging & fence running
However, when the SmartStation™ tracks
your dog closer to the outdoor boundary
location, the update speed between the
two components increases to every 1/10th
of a second. That is three times faster
than you can blink your eyes!
There are three system zones in the yard
for the PetLink™ collar.
ACTIVATION ZONE: This is the boundary limit that you have set where the
collar will fi rst start to tone and provide
electronic correction. This zone has an
accuracy of one meter or approximately
three feet.
CORRECTION ZONE: The Correction Zone
is the area that the collar will continue to
activate, encouraging your dog back into
the Safe Zone. The Correction Zone inside
the Activation Zone is approximately 5
– 10 feet. This area may increase on very
large coverage areas. There are several
benefi ts to this unique Correction Zone.
• The Correction Zone allows for lower
levels of stimulation to be used when
compared to traditional fencing systems, to encourage or “herd” the dog
back into the safe area.
• The Correction Zone discourages a dog
from constantly “testing” the system
by pulling their head back a few inches
when the warning tone is heard.
• The Correction Zone discourages fence
charging and fence running. There is
a small variation to where the correction will start and end leaving a buffer
that the dog can not anticipate and will
respect.
SAFE ZONE: This is the entire area within
the boundary you set.
6
Page 9
Owner’s Guide PWF-100
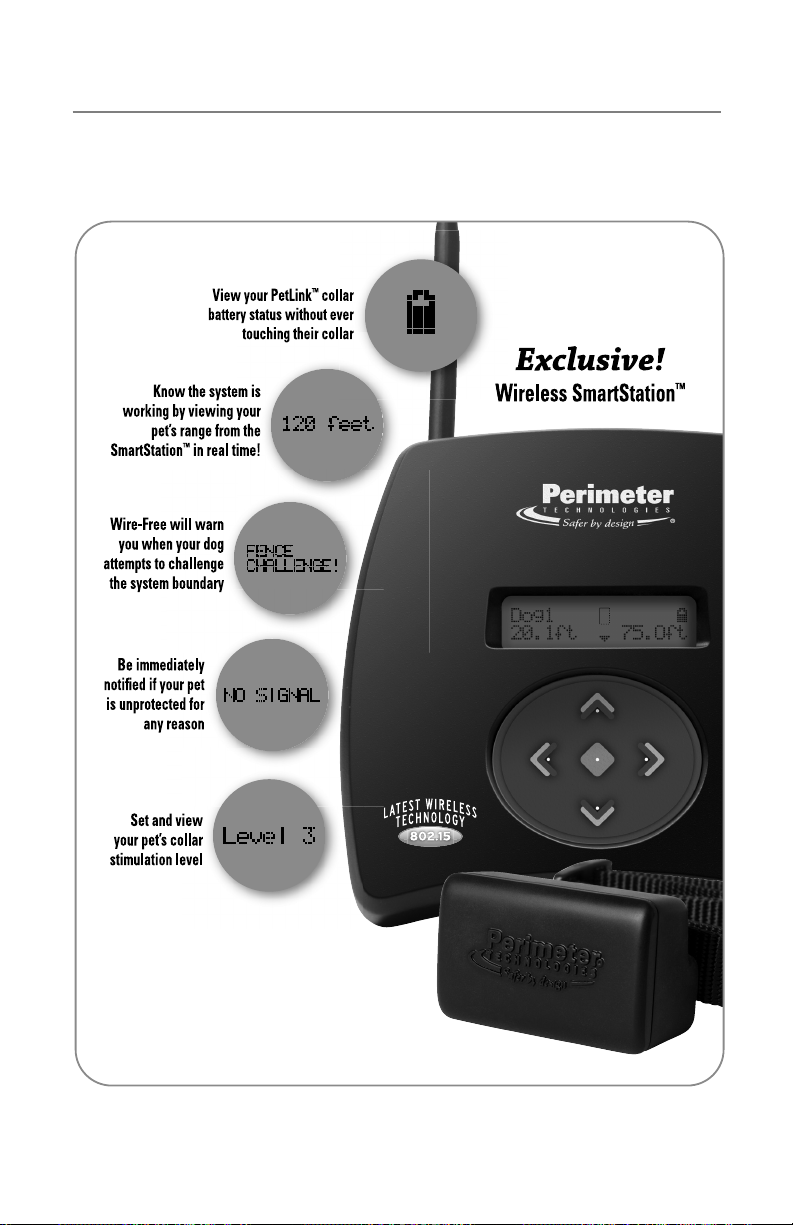
System Features
Wire-Free
PetLink
™
Collar
7
Page 10
Owner’s Guide PWF-100
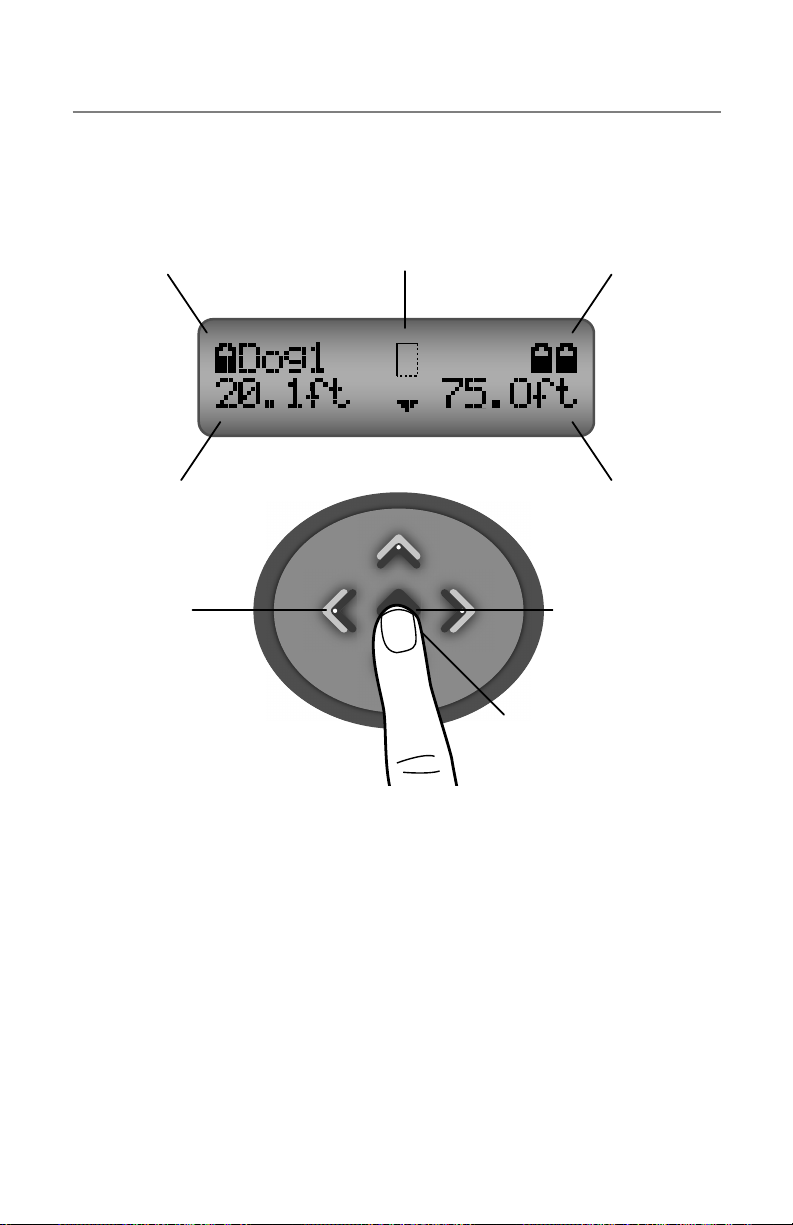
System Alerts
PetLink™ Collar
Battery Level Indicator
Press to EXIT
Menu & Return
to Home Screen
Distance to Dog
System Update
Speed Indicator
Charging Port
Indicators
Boundary Setting
Press and hold center
button to turn unit on
after plugging in.
Press and hold the center
button to cancel audible alerts.
System Precautions
• Any tight collar or consistent pressure on the skin can cause a condition
known as Pressure Necrosis (bed sores)
which if left untreated can be severe.
To help reduce the likelihood of pressure necrosis please do the following:
Remove the pets training collar every
12 hours. Look for any skin irritation and
discontinue product use until healed.
Wash pet’s neck and PetLink™ collar
frequently with warm soap and water.
Do not attempt to wash the PetLink™ collar in washing machine or dish washer.
8
• No containment method is foolproof and
your Wire-Free system is not a substitute for responsible pet ownership and
close supervision of your pet. Do not
use this product when away from home.
• Perimeter Technologies can not predict
how every animal is going to react to
the electronic stimulation. Start at the
lowest level possible during the training
process and never use this product if
you believe your pet poses any danger
to people, other animals or itself.
• Keep your dog safely contained and on
a leash during the training process.
Page 11
Owner’s Guide PWF-100
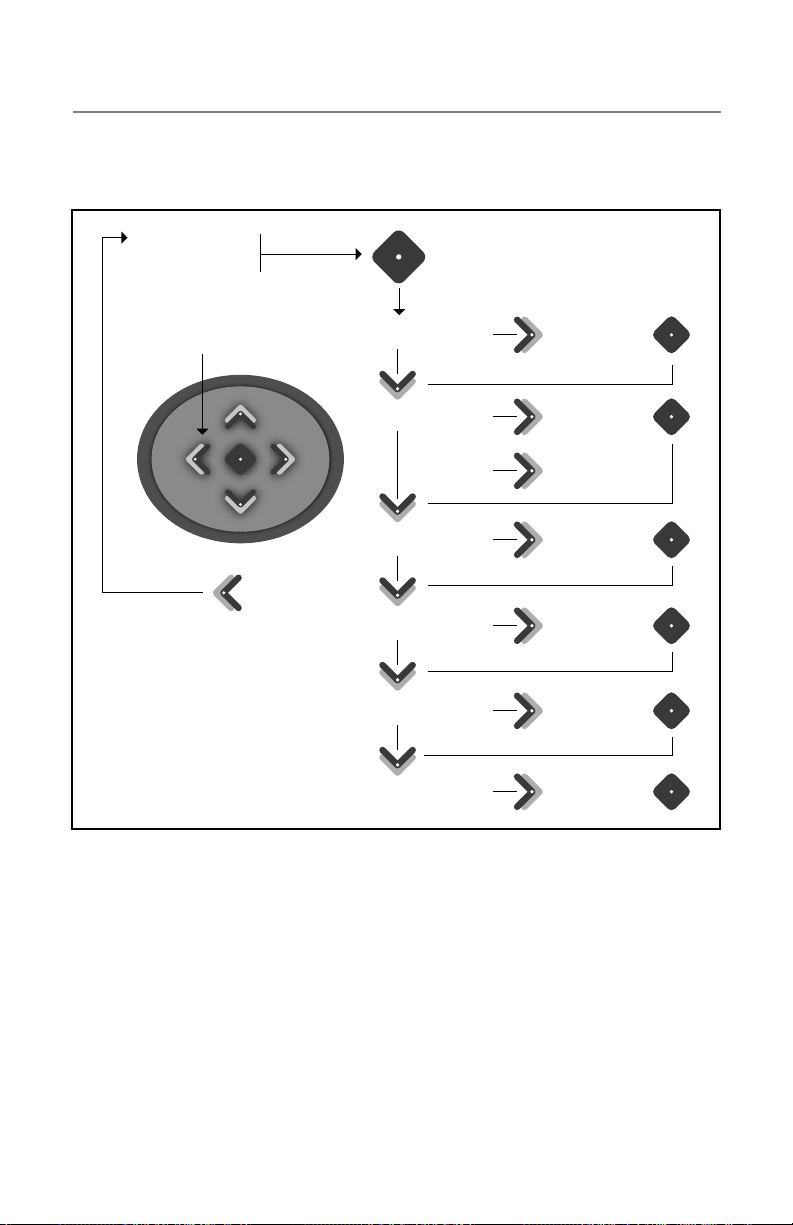
SmartStation™ Menu Screen Map
Home Screen
Press Left Arrow
to EXIT Menu
EXIT
SELECT
Menu: Boundary Define Fence
Menu: Collars
Menu: Calibration
Menu: Version
Boundary
Program
2nd Collar
Set Stimulation
Meters/FeetMenu: Units
Optional
Process
Software
Version
Erase SettingsMenu: Reset All
Locking and Unlocking the
Menu Options
To keep from accidently altering the
system boundaries and functions, it is a
good idea to lock the menu from being
accessed.
• Press and hold the UP arrow on the
SmartStation™ for three (3) seconds. A
beep will sound.
• The display will read LOCKED and return
to the HOME SCREEN
• If the menu options are attempted to
be accessed by pushing the SELECT
button, the display will read LOCKED
for 5 seconds and return to the HOME
SCREEN.
• To unlock the display, simply press and
hold the UP arrow for 3 seconds and a
beep will sound. The display will read
UNLOCKED and return to the HOME
SCREEN.
9
Page 12
Owner’s Guide PWF-100
First Use Setup
STEP 1
Plugging in the SmartStation
Plug the supplied 12v adapter in the back
of the SmartStation™. Plug the adapter into
any household 110v outlet. The SmartStation™ display will glow blue and read
PERIMETER TECHNOLOGIES. Should the
display not come on, press and hold the
center SELECT button for 3 seconds to
turn unit on.
The next screen will read NO COLLAR
PAIRED, PRESS ANY KEY.
Prior to proceeding with the setup, take
this time to charge the supplied rechargeable battery in the SmartStation™. Batteries
must be charged 6 hours before fi rst use.
STEP 2
Charging the PetLink™ Collar
Battery
WARNING: THE BATTERIES THAT ARE
USED IN THIS SYSTEM ARE NOT MEANT
TO BE A DIRECT REPLACEMENT FOR AA
ALKALINE/NIMH BATTERIES IN OTHER
CONSUMER DEVICES. THESE LITHIUM
ION BATTERIES OPERATE AT MORE THAN
TWICE THE VOLTAGE OF AN ALKALINE
BATTERY AND 3 TIMES THE VOLTAGE
OF A NIMH CELL AND MAY DAMAGE OR
DESTROY YOUR DEVICE WHICH OPERATES
ON STANDARD AA BATTERIES. DO NOT
USE PRIMARY/DISPOSALABLE BATTERIES
IN THE WIRE-FREE SYSTEM. USE MANUFACTURER APPROVED RECHARGABLE
CELLS ONLY!
10
RIGHT:
Primary
Charge
LEFT:
™
Charge Port
& Battery
Backup
Location
The supplied 3.6v lithium ion battery
requires 6 – 8 hours of charging prior to
fi rst use. The lithium ion battery will provide
300 recharge cycles in its useful life. The
right charge port will charge the lithium ion
battery at a much faster rate than the left
battery backup port. Even with frequent
weekly recharging, it should last years. The
batteries are readily available and inexpensive. You can call Perimeter Technologies
for more information and availability.
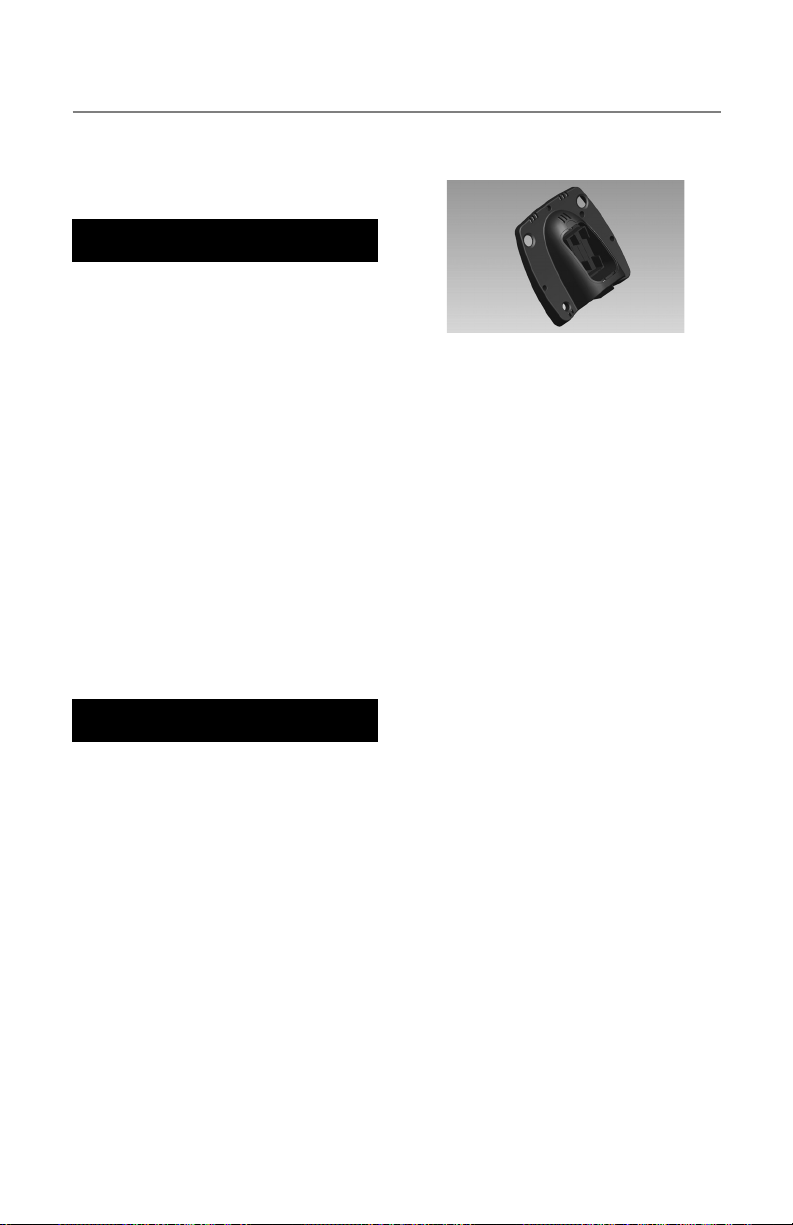
Remove the charge station compartment in
the back of the indoor SmartStation
the rechargeable battery with the position
side (+) in the up position. The circular
indent on the top of the battery indicates
the positive (+) end. You can charge up to
two additional batteries at one time. Charging will take approximately 6 – 8 hours.
The battery icon on the SmartStation™ will
fl ash when charging is in progress. Icon
is steady when charging is complete or
no battery is currently in the charge port.
During the fi rst charging session, there
will be no battery charging icons and the
SmartStation™ display will continue to read
NO COLLAR PAIRED – PRESS ANY KEY.
IMPORTANT: DO NOT USE PRIMARY/DISPOSALABLE BATTERIES IN THE WIREFREE SYSTEM. USE MANUFACTURER APPROVED RECHARGABLE CELLS ONLY! For
optimal battery life, recharge the battery
only when alerted to do so by the indoor
SmartStation
collar battery status in the SmartStation
display.
™
. You can view the PetLink™
Port
™
. Insert
™
Page 13
Owner’s Guide PWF-100
Battery Backup System
When a charged battery is inserted in
the left charge port of the SmartStation™,
it will act as a cordless battery backup
system. In case of power failure, the rechargeable battery will allow your indoor
SmartStation™ to function for approximately eight hours, giving you a chance to
secure your dog until power is restored.
Also works great for quick day trips where
power is not readily available.
STEP 3
Pair the PetLink™ Collar & SmartStation™/Installing the Battery
Before you insert the charged battery in
the PetLink™ Collar, ensure that the SmartStation™ display reads — NO COLLAR
PAIRED, PRESS ANY KEY.
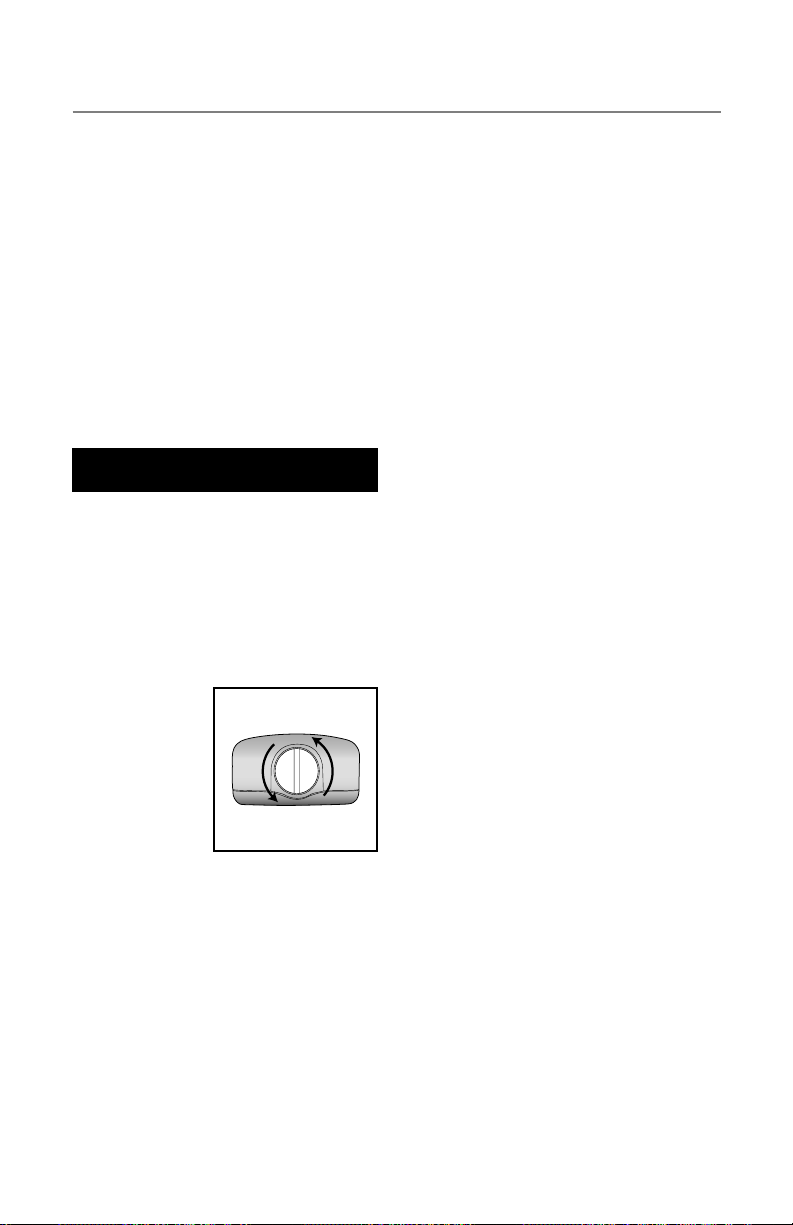
After fully charging, unscrew
the battery cap
turning counter
clockwise using
a coin or screw
driver. Insert the
rechargeable
battery with the positive side (+) in the up
position. You can determine the (+) side by
looking for the indented ring at the top of
the battery. DO NOT PUT ON THE BATTERY
CAP YET.
Now, press any key.
Follow the onscreen menu to to complete
the battery installation by replacing the
battery cap. Keep the PetLink collar and
SmartStation a few feet apart when pairing.
The two components should automatically
pair. The display will instruct you as to
whether the collar pairing was successful
or failed.
NOTE: Should your PetLink
contact with the SmartStation™ due being unplugged or loss of power without
battery backup, your PetLink™ collar will
continually search at the maximum update
speed for the SmartStation™ and resulting
in 12 hour battery life.
ADDING A 2nd PETLINK COLLAR
After pairing the fi rst PetLink
(DOG1) to the SmartStation
similar steps to program a 2nd dog’s collar:
Press the center SELECT button on the
SmartStation™ keypad.
Press the DOWN arrow (v) until MENU:
COLLARS is displayed
Ensure that you have the battery in the
PetLink™ collar with the positive side
facing out. You can determine the positive
side by the indented ring around the top
of the battery. DO NOT PUT ON THE BATTERY CAP YET.
Press the right arrow (>). Press the up or
down arrow to select DOG 1 or 2. If you
have already successfully paired the fi rst
collar, you will want to select DOG2.
Follow the onscreen menu to insert the
battery into the DOG2 PetLink™ collar and
replace the battery cap. Keep the PetLink™
collar and SmartStation™ a few feet apart
when pairing.
The display will instruct you as to whether
the collar pairing was successful or failed.
™
collar lose
™
collar
™
you can follow
11
Page 14

Owner’s Guide PWF-100
OPTIONAL STEP
Calibrating Your System
Your system comes pre-calibrated from
the factory for a displayed distance accuracy of +/- 15% on the SmartStation
display, therefore, should the display read
50 ft. of distance between the SmartStation and the PetLink collar, the actual
distance could be between 43 ft. - 57 ft.
This distance is only intended on being
helpful for you to determine the approximate distance to the boundary you set
and your dog’s proximity to the boundary
location. This in no way determines the
consistency of your pet boundary location.
It is recommended that you maintain the
factory preset calibration for optimal system performance and your convenience.
However, should you desire greater
measurement accuracy you can manually
calibrate your system by following the following process, where maximum distance
accuracy can be achieved.
Before proceeding to step 4. you will need
to understand the system’s SLEEP MODE.
4. Have a partner hold the PetLink
and move 3 feet away from the SmartStation. Three feet is approximately one
large adult step. Press and release the
SELECT button. Now move the PetLink™
collar approximately 6 feet away from
the SmartStation™ and again press and
release the SELECT button. Finally, move
the collar approximately 12 feet from the
SmartStation™ and press and release the
SELECT button. You can perform this process alone by moving the collar across
a room and returning to the SmartStation™ to SELECT the distance.
5. The SmartStation™ display will automatically return to the HOME DISPLAY
when calibration process is complete.
™
collar
1. Push and release the center SELECT
button on the SmartStation™ to enter
the programming menu. The display
should read MENU: BOUNDARY. This
calibration process will only need to be
performed once. The settings will be
retained in the system memory even if
power is interrupted.
2. Press the down arrow until the screen
displays – MENU: CALIBRATION
3. Press and release the right arrow (>) to
select.
12
Page 15
Owner’s Guide PWF-100
STEP 4
Locating the SmartStation
Now that you are familiar with the
controls of the Wire-Free system and the
components have been calibrated, you
can look for the ideal home for the indoor
SmartStation
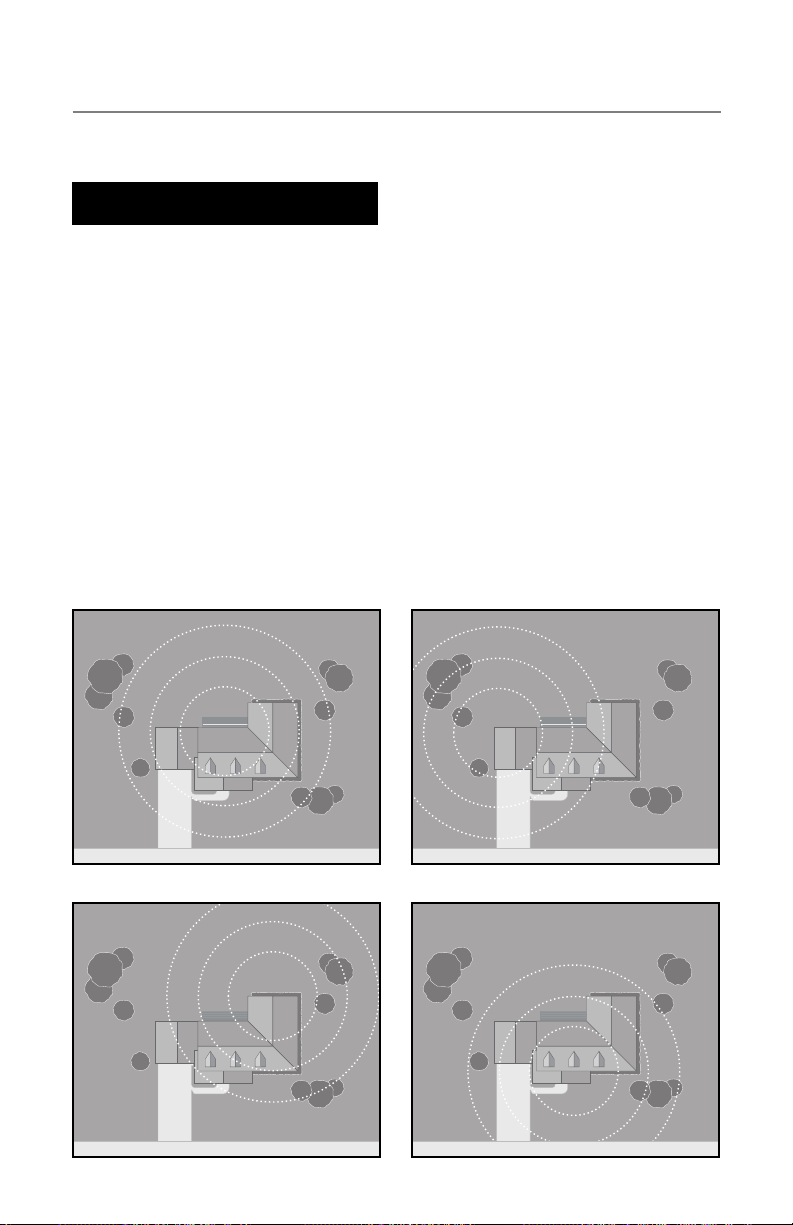
The proper SmartStation™ location is
perhaps the most important decision you
must make to enjoy the optimal Wire-Free
fence performance. Keeping in mind that
the SmartStation™ will be the center of
your pet’s boundary, a location toward
Centralized Location, Back Yard Back & Side Yard A
™
.
™
the back of the house will provide more
backyard coverage and less in the front
yard due to your house occupying some
of the signal area and natural interference
your house will cause the radio signal as it
passes through many walls and obstacles.
• Select a location that the SmartStation™ is unlikely to be moved. Your pet’s
boundary will move if you move the
location of the SmartStation™!
• The SmartStation™ is not weatherproof,
so it needs to be located indoors in a
dry and ventilated location that maintains a temperature above freezing.
Back & Side Yard B Centralized Location, Front Yard
13
Page 16

Owner’s Guide PWF-100
• Your system’s performance is enhanced
providing the SmartStation™ a clear “line
of sight” such as a table in front of a
window. Keep your SmartStation™ off the
fl oor and elevated on a table or shelf.
• You can place the SmartStation™ on a
home’s second story.
• All radio signals are blocked or
refl ected by metal objects and can
cause signifi cant disruption to your
system’s reception! Keep clear of metal
furniture, duct work, metal studs or
buildings.
Hilly Terrain and your Wire-Free system
Unlike other wireless systems, the WireFree radio frequency signal is not affected
by most terrain. The Wire-Free fence’s
effective range will be reduced over hilly
terrain only if the indoor SmartStation™
base station loses direct line of sight (such
as over a steep hill) with the dog’s collar.
Wire-Free is unique in that the indoor
SmartStation™ will actually benefi t from
a higher location in the house, such as a
second story, to improve its “line of sight”
with the PetLink™ collar when dealing with
diffi cult terrain issues or other obstacles.
asleep by looking at the “L” shaped icon
in the SmartStation
pet moves the L icon will rotate clockwise.
When the collar is at rest the icon will
remain still.
Due to the
SLEEP MODE,
it is important
to “jiggle” the
PetLink™ collar
during setup
functions for the
SmartStation
and PetLink™ collar to maintain constant contact between
the SmartStation™ and the PetLink™ collar.
After carefully selecting a location for
the system SmartStation™, you can now
defi ne the outside boundary area. Keep in
mind, that although the Wire-Free system
can cover an area as large as 2 ½ acres,
your property lines will dictate how large
of a circular area you can cover with your
fencing system.
• Push the center SELECT button on the
indoor SmartStation™.
• The SmartStation™ screen will readMENU: Boundary
™
screen. When your
STEP 5
Setting the Boundary
Understanding the system SLEEP MODE
In order to conserve the maximum amount
of battery power, the PetLink collar will
enter SLEEP MODE when the collar is not
in motion, such as when your dog is sleeping or the collar is simply off the dog sitting
on a table. You can determine the collar is
14
• Press and release the RIGHT arrow (>)
• Hold the PetLink™ collar by the nylon
strap approximately knee high.
IMPORTANT: Make sure to jiggle the
collar as it is walked around the yard to
ensure that the SmartStation™ continues
to receive continuous data from the collar.
Page 17
Owner’s Guide PWF-100
• Walk the PetLink™ collar to the nearest
boundary location. Return to the SmartStation™ and push the SELECT button.
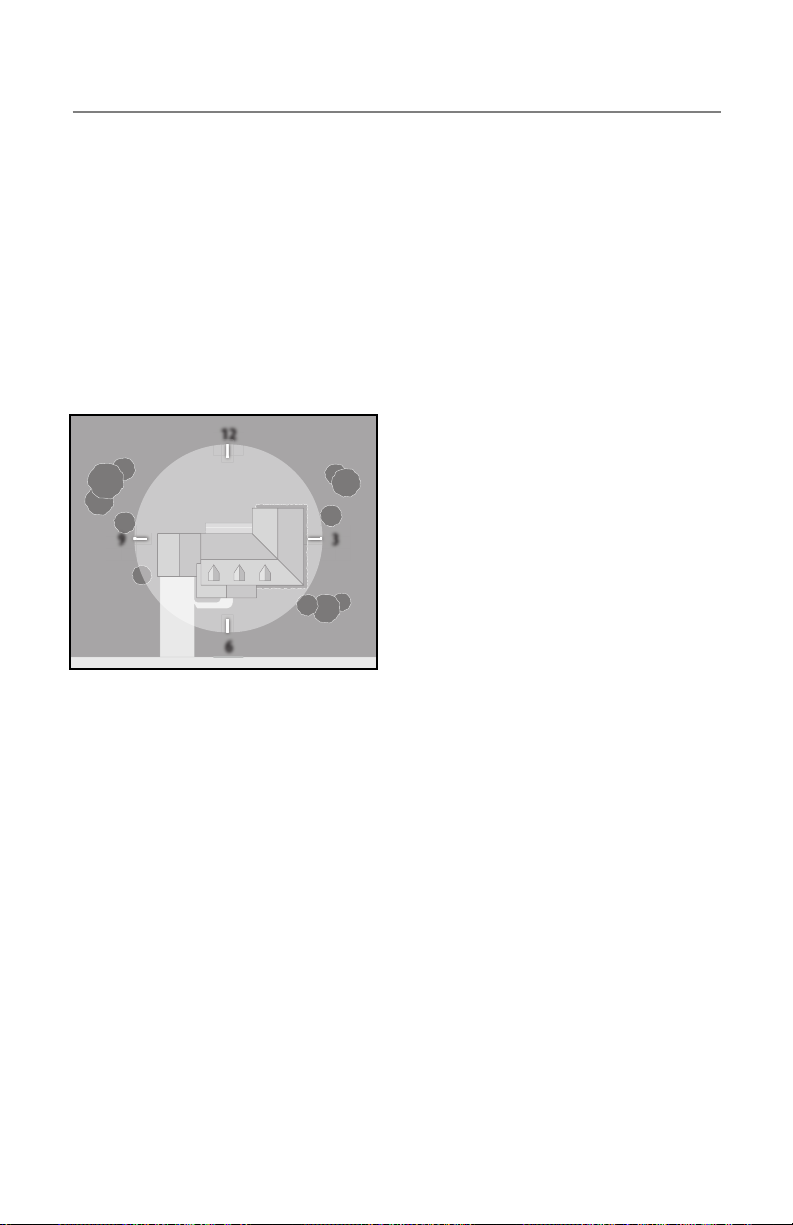
Once you have selected the boundary
location, test the PetLink collar around
your property by approaching the boundary location at 12, 6, 3 and 9 o’clock as illustrated. Listen carefully for the warning
beep as you test the fence locations.
12
39
6
Adjust the location of the indoor SmartStation™ or reset the system boundary as
required until you are satisfi ed with the
coverage area.
IMPORTANT: The distance measuring
accuracy between the SmartStation™
and your PetLink™ collar is approximately
three (3) feet. The collar may activate plus
or minus three feet from the exact location of the boundary setting. Due to this
variance, you should leave a distance of
ten feet from your signal boundary to any
streets or sidewalks.
Training Your Dog
Please take your time training your dog
and complete each step of the process
to enjoy optimal performance from your
system. If you have questions along the
way, expert advise is only a call away
(1-866-900-2007).
The goal of fence training is to help you
teach your dog to identify and respect her
new fence, to make the training fair—so
your dog will understand the consequences of leaving and to make the training
fun—so your dog will enjoy staying and
playing on your property.
Completely trusting your dog with his WiFi
Fence will take place over the course of
about 3 weeks. The training is a small part
of the three weeks, the rest of the time is
just close supervision.
Time should be set aside to work with your
dog for 10-15 minutes, two times per day.
Both you and your dog will appreciate
short, fun lessons and make the training
more effective. There are six phases to
the training lessons:
LESSON 1: Back Away From the Fence!
6 Sessions
LESSON 2: Respect the Fence
1 Session
LESSON 3: Adding interesting distractions
8 Sessions
LESSON 4: Off Lead With Supervision
1 Week
LESSON 5: Off Lead Unsupervised
2 Weeks
15
Page 18

Owner’s Guide PWF-100
• Use a calendar so you can keep track
of the training process. Your dog’s
behavior will tell you when it is time to
proceed to the next level.
• A training session includes putting the
PetLink™ collar on your dog, making
sure that the collar has the proper fi t
high on the dog’s neck and the collar is
making contact with the skin.
• Start every session playing with a
favorite toy and plenty of praise. Make
sure your dog is comfortable and having fun.
• Do boundary work at locations around
the entire boundary of your yard.
• Always end sessions with your dog
successfully avoiding the fence and
with more play and praise.
• If you are training more than one dog,
train each dog in separate training sessions.
training tone is
heard.
With your dog
on a leash, casually walk to
the boundary.
When your dog
reaches the
signal fi eld and hears the training beep,
immediately spin around and briskly jog
back into the yard. Your dog will feel the
tug and run after you. Praise enthusiastically.
On days two and three repeat the same
lesson in different part of the yard. As the
training sessions of the next three days
progress, you’ll see that your dog will start
to anticipate the signal and retreat without
your prompting.
Day three is successful if your dog
retreats without your prompting and
refuses to approach the boundary as you
approach. For each successful attempt be
sure to praise, praise and praise again.
LESSON 1
Back Away From the Fence!
Start the fi rst phase of training with the
Wire-Free System level set on LEVEL 0.
This is the training or “tone only setting”.
This is to ensure that your dog can hear
the training tone at the boundary, but
there is no chance of correction.
Put the electronic training collar on your
dog and make sure indoor SmartStation is
on and your pet’s boundary has been set.
The fi rst lesson is to introduce your dog to
the boundary and to help her understand
to back away from the fence when the
16
LESSON 2
Respect the Fence
Although your dog is learning fast and
avoiding the boundary, he will forget
or attempt to break the rules with an
interesting distraction beyond your yard.
To prevent this, your dog must experience
what happens if the fence boundaries are
not respected.
For the next lesson, you will want to
change the TRAINING LEVEL 0 – TONE
ONLY to a level of stimulation that will
discourage your dog from leaving the
yard. The level that is appropriate for your
Page 19
Owner’s Guide PWF-100
dog is determined by your dog’s personality and the level of interesting distractions
outside of the safe area. See CHANGING
THE STIMULATION LEVEL in this manual.
Choose from level one - low to the highest
setting of 8.
With your dog still on a leash, walk to the
boundary with your dog. Have a helper
walk on the outside of the fence area. The
helper should ignore your dog and never
coax the dog out of the fenced area.
Your dog will most likely forget earlier lessons and attempt to leave the safe area.
The moment your dog reacts to the fence
correction, immediately retreat to the safe
part of the yard and lavish your dog with
praise. Please note, it is very important
that your helper not stop, look back or
acknowledge the dog in any way.
Continue this lesson at a number of different areas around the boundary.
Should your
dog not appear
to have felt
the collar correction, check
to ensure the
collar is making
contact with
the skin. It may
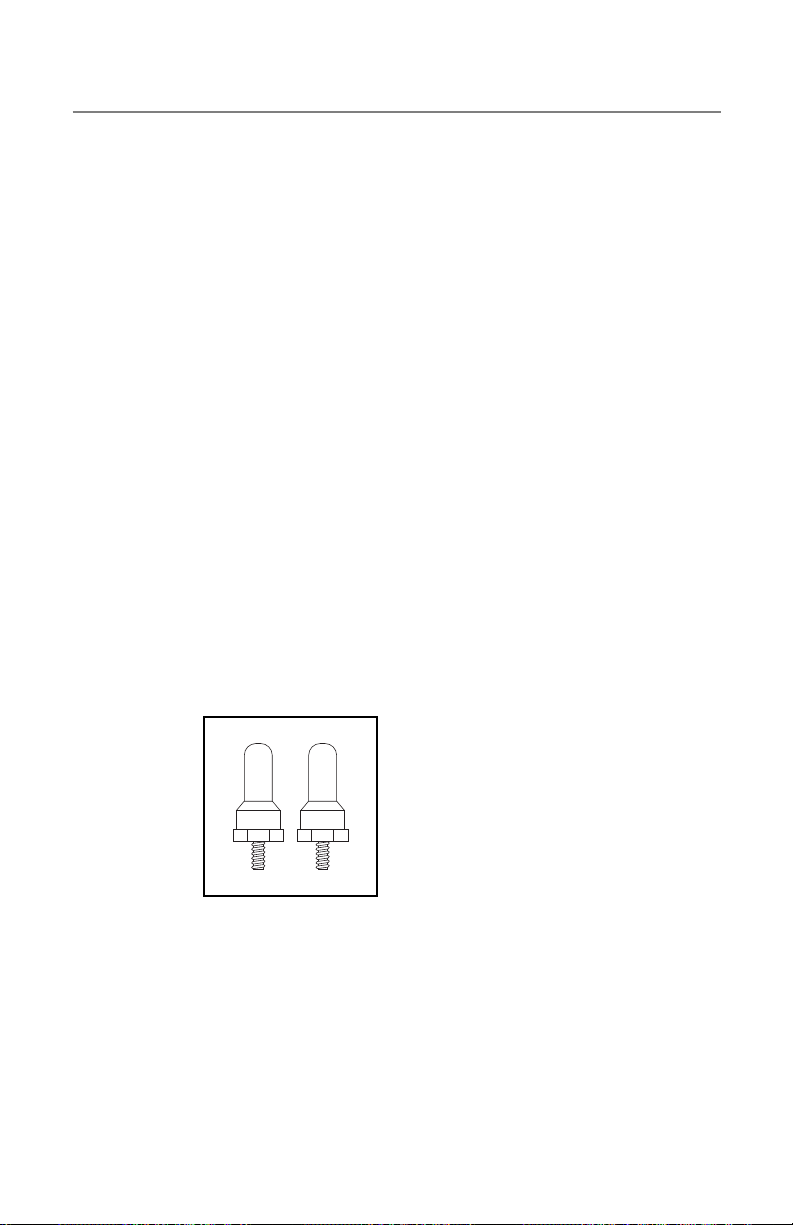
be necessary to use one of the longer
metal contacts provided for dogs with a
dense coat.
LESSON 3
Distractions
If your dog is avoiding the boundary at
multiple locations around your boundary,
you are ready to add more tempting distractions. Remember, never pull or coax
your dog into the boundary area.
This lesson teaches your dog that he must
resist all temptations to leave the yard.
You can’t assume that if your dog won’t
chase a ball out of the yard,
He won’t chase a bicycle.
Or favorite neighbor.
Your training has been successful at this
point if your dog has resisted the urge
to cross the boundary on leash with any
distraction you can dream up.
LESSON 4
Off Lead With Supervision
After several sessions of distractions,
your dog should be ready for off leash
play. You must stay in the yard for off leash
training.
The more your dog stays on the property
for the fi rst month, the less chance of your
dog ever attempting to leave the area.
Continue to supervise and play with your
dog outside for a period of one week.
Should your dog bolt out of the property
for any reason during this phase, retrace
your last training steps with distractions
with your dog on a leash.
17
Page 20

Owner’s Guide PWF-100
LESSON 5
Off Lead Unsupervised
When your dog resists all manner of
distractions, both on and off the leash, he
can be left unattended in the yard.
Keep a close eye on your dog for two
weeks from inside the house. This
freedom should be brief at fi rst and the
amount of time increased gradually.
Before and after each unsupervised
session, you must continue the play and
praise routine to reinforce that the yard is
a happy, fun and safe place to be.
Setting the PetLink
Your pet’s collar can be programmed to
fi t most any dog’s personality and training
requirements. You can select from any
one of eight stimulation levels and one
tone only setting. Level 1 setting is very
light and 8 being the highest for diffi cult
dogs. Your system has been factory programmed to TRAINING LEVEL 0 – or TONE
ONLY. To change the factory setting:
• Press and release the SELECT button.
• Press the DOWN arrow until you reach
MENU: COLLARS. Press the RIGHT arrow.
• Press UP or DOWN arrow to select
DOG1 or DOG2.
• Press RIGHT arrow to access STIMULATION MENU.
• Select stimulation level 0 - 8. 0 is the
factory setting of TONE ONLY. Level 1 is
the lowest and level eight is the highest
setting.
™
Collar Stimulation
18
Thank you for choosing Perimeter Pet
Fencing Systems.
Page 21
Owner’s Guide PWF-100
Troubleshooting
Pairing Collar Failed! Ensure that the PetLink™ collar battery was fully charged before
fi rst use.
These steps must be done in sequence:
Unplug and again plug in the SmartStation™. Press any key.
Insert battery in PetLink™ Collar. Ensure that the (+) is facing out.
The positive side will have the indented ring around the top.
™
Calibration Failed! Jiggle the PetLink
sending continuous stream of data.
Before calibrating to 3, 6 or 12 feet, try walking 10 paces away
and returning each time to the distance you are attempting to
calibrate.
Choose another location with less interference.
™
SmartStation
distance
does not exactly match
the distance to the
The distance indicated on the SmartStation™ is accurate to approximately 3 feet or one meter provided the unit was properly
calibrated.
PetLink™ collar.
Attempt calibration process again.
™
SmartStation
screen is
frozen or I can’t get out of
the calibration mode.
With the end of a paper clip, press the RESET button located in
the hole on the upper right of the back of the SmartStation™. The
SmartStation™ will shut off. Press and hold the center red button
on the key pad to turn on.
The system is behaving
erratically!
Recharge the PetLink
before fi rst use.
collar while holding to ensure the units are
™
collar battery and ensure to charge
™
collar will
PetLink
“tone” but there is no
stimulation.
How do I stop the LOST
RECEPTION alarm when I
recharge the battery?
™
My PetLink
Collar Bat-
tery only lasts 12 hours.
™
SmartStation
won’t turn
on.
Check for large metal objects such as cars, sheds, metal doors,
studs or siding. Relocate SmartStation™ away from objects that
can interfere.
Change the Stimulation setting in the setup menu to levels 1 – 8.
The factory setting is 0 or tone only for training purposes.
™
Press and hold the center button on the SmartStation
keypad to
cancel audible alarm.
Ensure that your SmartStation™ is always on. If the PetLink™ collar has the battery installed and the SmartStation™ has no power,
the collar battery life will be signifi cantly reduced.
Press and hold the center SELECT button for 3 seconds. Check
power outlet.
19
Page 22

Owner’s Guide PWF-100
NOTES:
20
Page 23

LIMITED LIFETIME WARRANTY
Call Customer Care First. We Can Help.
1-866-900-2007
Perimeter Technologies®, Inc. warrants that its products to the original retail purchaser
will be free from defects in material and workmanship, under normal use, for a period of
one year from the date of the original retail purchase at no cost. Shipping to repair center
not included. This coverage does not include accidental damage or misuse. After one
year from date of original consumer purchase, Perimeter will, at our option repair, replace
or upgrade the defective component at a fi xed rate based on the component, for the life of
the original owner. Owner must provide proof of purchase. Cost of shipping is not covered
under the limited lifetime warranty. Some shipping charges may apply.
Perimeter Technologies offers a hassle-free replacement program. Simply call 1-866900-2007 and let us help you with your problem. Please do not return this product to your
retailer.
Page 24

Perimeter Technologies, Inc.
1-866-900-2007
www.buyperimeter.com
©2009 Perimeter Technologies, Inc.
All rights reserved. Patents pending 13010033 Rev. G 0809
 Loading...