

Page 1

*** USER’S MANUAL ***
FCC ID : RKJB70
Page 2

English Manual
Page 3

Federal Communications Commission (FCC) Warning
THIS DEVICE COMPLIES WITH PART 15 OF THE FCC RULES. OPERATION IS
SUBJECT TO THE FOLLOWING TWO CONDITIONS: (1) THIS DEVICE MAY NOT
CAUSE HARMFUL INTERFERENCE, AND (2) THIS DEVICE MUST ACCEPT ANY
INTERFERENCE RECEIVED, INCLUDING INTERFERENCE THAT MAY CAUSE
UNDESIRED OPERATION.
Federal Communications Commission (FCC) Statement
This equipment has been tested and found to comply with the limits for a Class B
digital device, pursuant to Part 15 of the FCC Rules. These limits are designed to
provide reasonable protection against harmful interference in a residential
installation. This equipment generates, uses and can radiate radio frequency
energy and, if not installed and used in accordance with the instruction, may cause
harmful interference to radio communications. However, there is no guarantee
that interference will not occur in a particular installation. If this equipment does
cause harmful interference to radio or television reception, which can be
determined by turning the equipment off and on, the user is encouraged to try to
correct the interference by one or more of the following measures:
-- Reorient or relocate the receiving antenna.
-- Increase the separation between the equipment and receiver.
-- Connect the equipment into an outlet on a circuit different from
that to which the receiver is connected.
-- Consult the dealer or an experienced radio / TV technician for help.
Warning : A shielded-type power cord is required in order to meet FCC
emission limits and also to prevent interference to the nearby radio and
television reception. It is essential that only the supplied power cord be used.
Use only shielded cables to connect I/O devices to this equipment.
You are cautioned that changes or modifications not expressly approved
by the party responsible for compliance could void your authority to
operate the equipment.
Page 4

Table of Contents
INTRODUCTION..........................................................................5
Package contents...................................................................................................5
Mouse................................................................................................ ...............5
Mouse cover................................................................ .....................................5
Copyright.................................................................................................................5
Overview of mouse functionality ............................................................................6
Mouse functionality..........................................................................................6
Receiver/charger functionality.........................................................................6
START USING THE MOUSE .......................................................7
Step 1 – Insert the batteries...................................................................................7
Step 2 – Select the correct size battery cover for your hand................................7
Step 3 – Connect the receiver/charger to the computer.......................................7
Step 4 – Charging the mouse................................................................................8
Step 5 – Synchronise the mouse with the receiver...............................................8
USAGE AND HANDLING OF THE MOUSE..................................9
Tips and advice for better ergonomics ..................................................................9
Usage of the mouse on a table or another surface................................ ...............9
Attaching and removing the mouse cover.......................................................9
Attaching the cover ..........................................................................................9
Removing the cover.........................................................................................9
Use as a traditional mouse............................................................................10
Trackball usage ..............................................................................................10
Handheld usage of the mouse.............................................................................11
Two hand usage.............................................................................................11
Combined usage with a keyboard.................................................................12
One-handed usage........................................................................................12
ADDITIONAL INFORMATION....................................................13
Troubleshooting....................................................................................................13
Support .................................................................................................................14
Advanced settings................................................................................................14
Technical specifications .......................................................................................15
System requirements ...........................................................................................15
Accessories ..........................................................................................................15
Warranty ...............................................................................................................16
Page 5
Introduction
Introduction
Welcome as a new Wireless Dual Mouse user. We at Perific hope that you will
find the Wireless Dual Mouse a useful tool and that it will become a natural part of
your daily computer routine. We recommend that you read this manual in full to
ensure that the mouse is installed and used in the correct manner.
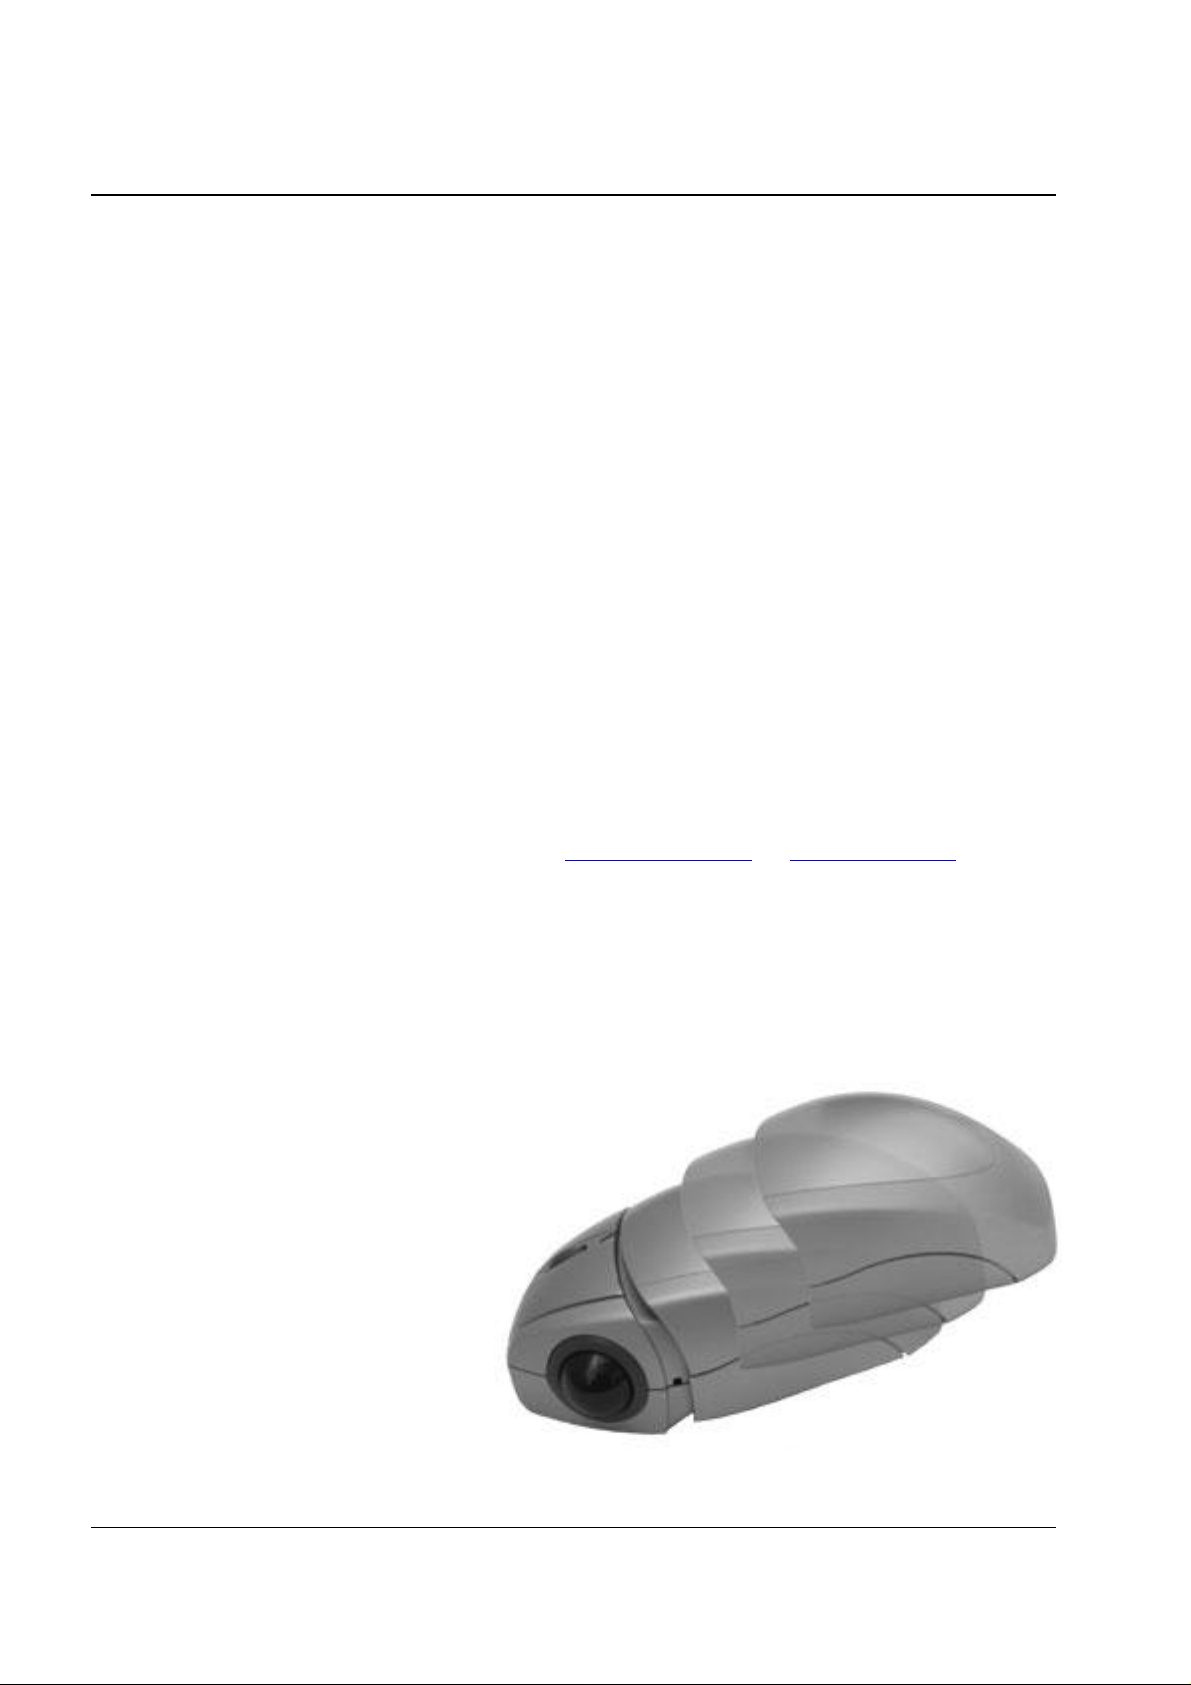
The Wireless Dual Mouse is a rechargeable wireless optical mouse that can be
used as a traditional mouse or alternatively as a handheld device. This makes it
possible for the Wireless Dual Mouse to offer many alternative manners of usage
allowing you to vary your working position in front of the computer.
By repeatedly varying your working position, ergonomic problems such as pain and
stiffness in hands, arms, and neck can be avoided. These complaints are commonly
known as mouse arm, which is a collective term for a multitude of medical problems
related to the use of a computer mouse or other input device. Mouse Arm
Syndrome (MAS) is a form of RSI - Repetitive Stress Injury.
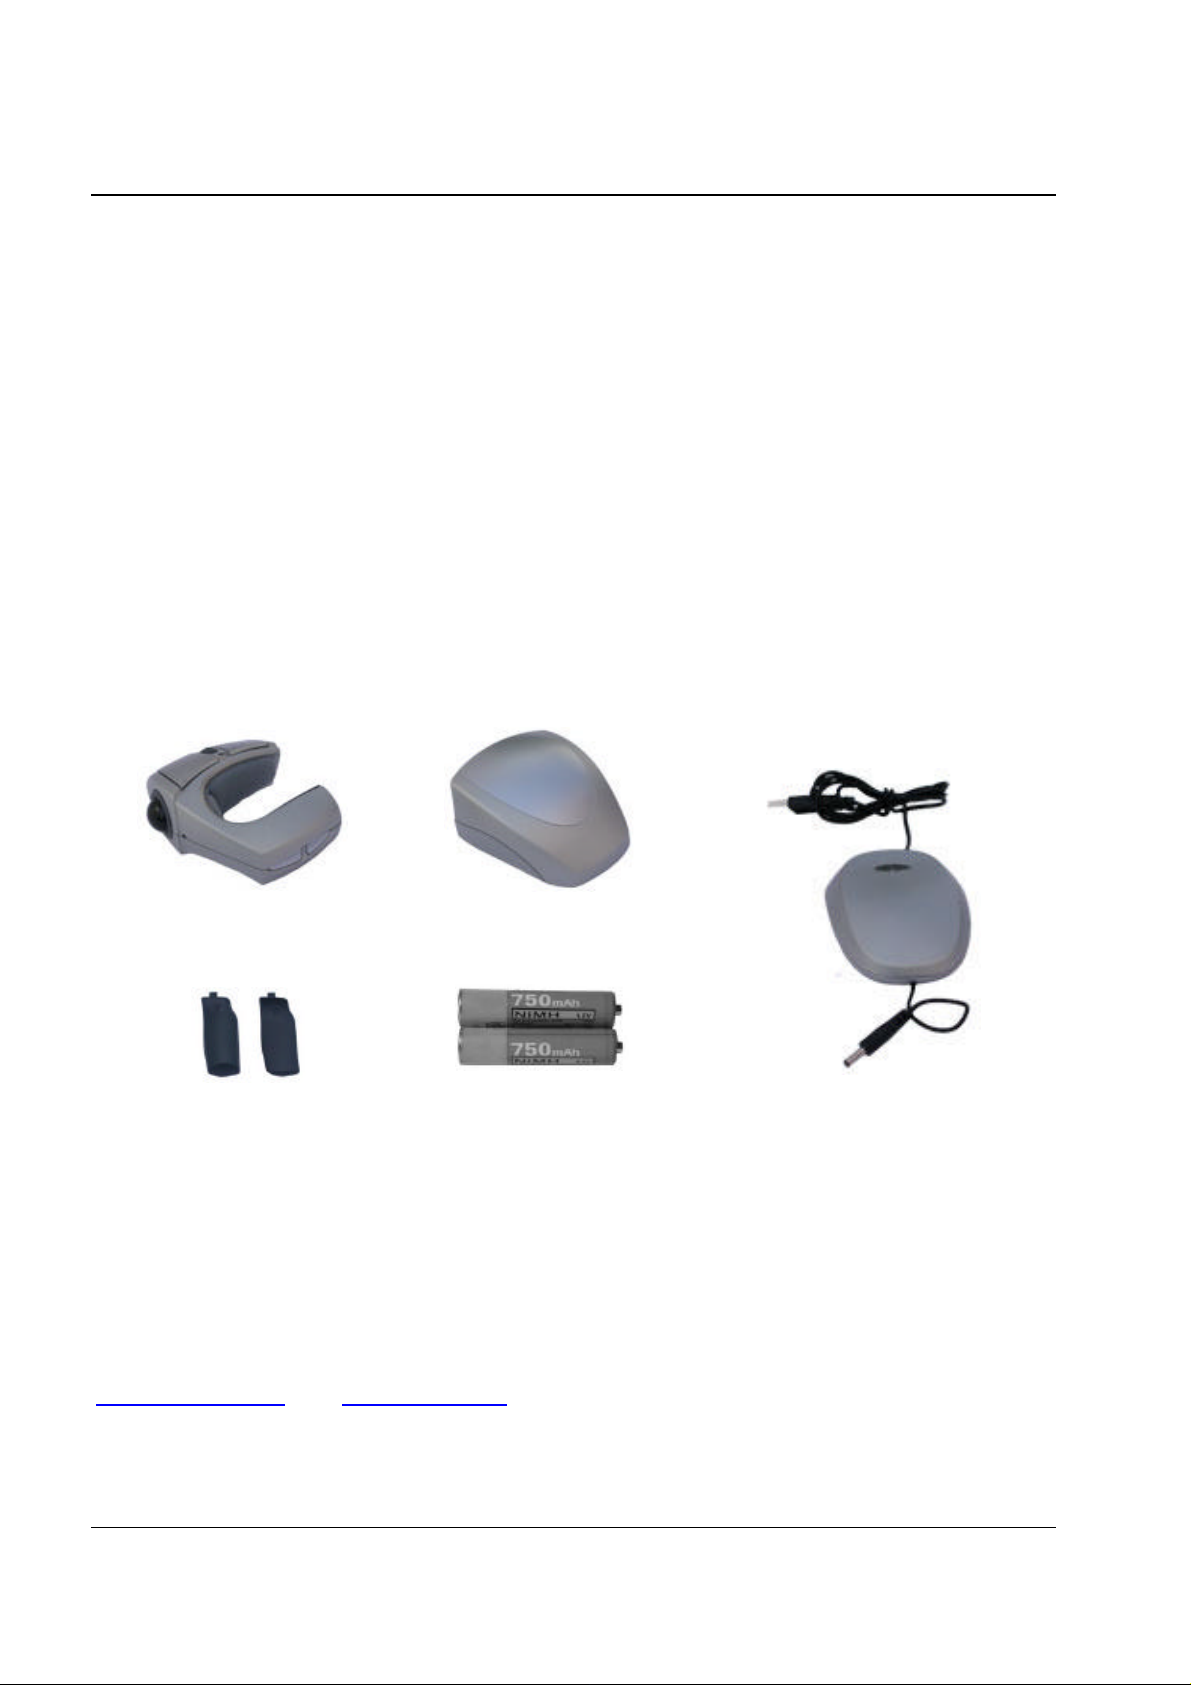
Package contents
Mouse
2 extra battery covers
Copyright
Mouse cover
2st NiMH AAA batteries
Manual
(six different languages)
Receiver/charger
This manual is published without guarantee by Perific AB. Perific reserves the
right at any time to improve or change this manual based on typographical mistakes,
errors in information or product improvements, without notice. Such improvements
will be introduced in updated editions of the manual, which will be made available at
www.Perific.com and www.perific.se.
Copyright 2003 Perific AB, all rights reserved. Perific, the Perific logo, and other
Perific trademarks are owned by Perific and may be registered trademarks. All other
trademarks are the property of their respective owners.
Copyright 2003 Perific AB 5
Page 6
1
2 3 4 5
6
7
8 9
11 12 13 14 15 16
Overview of mouse functionality
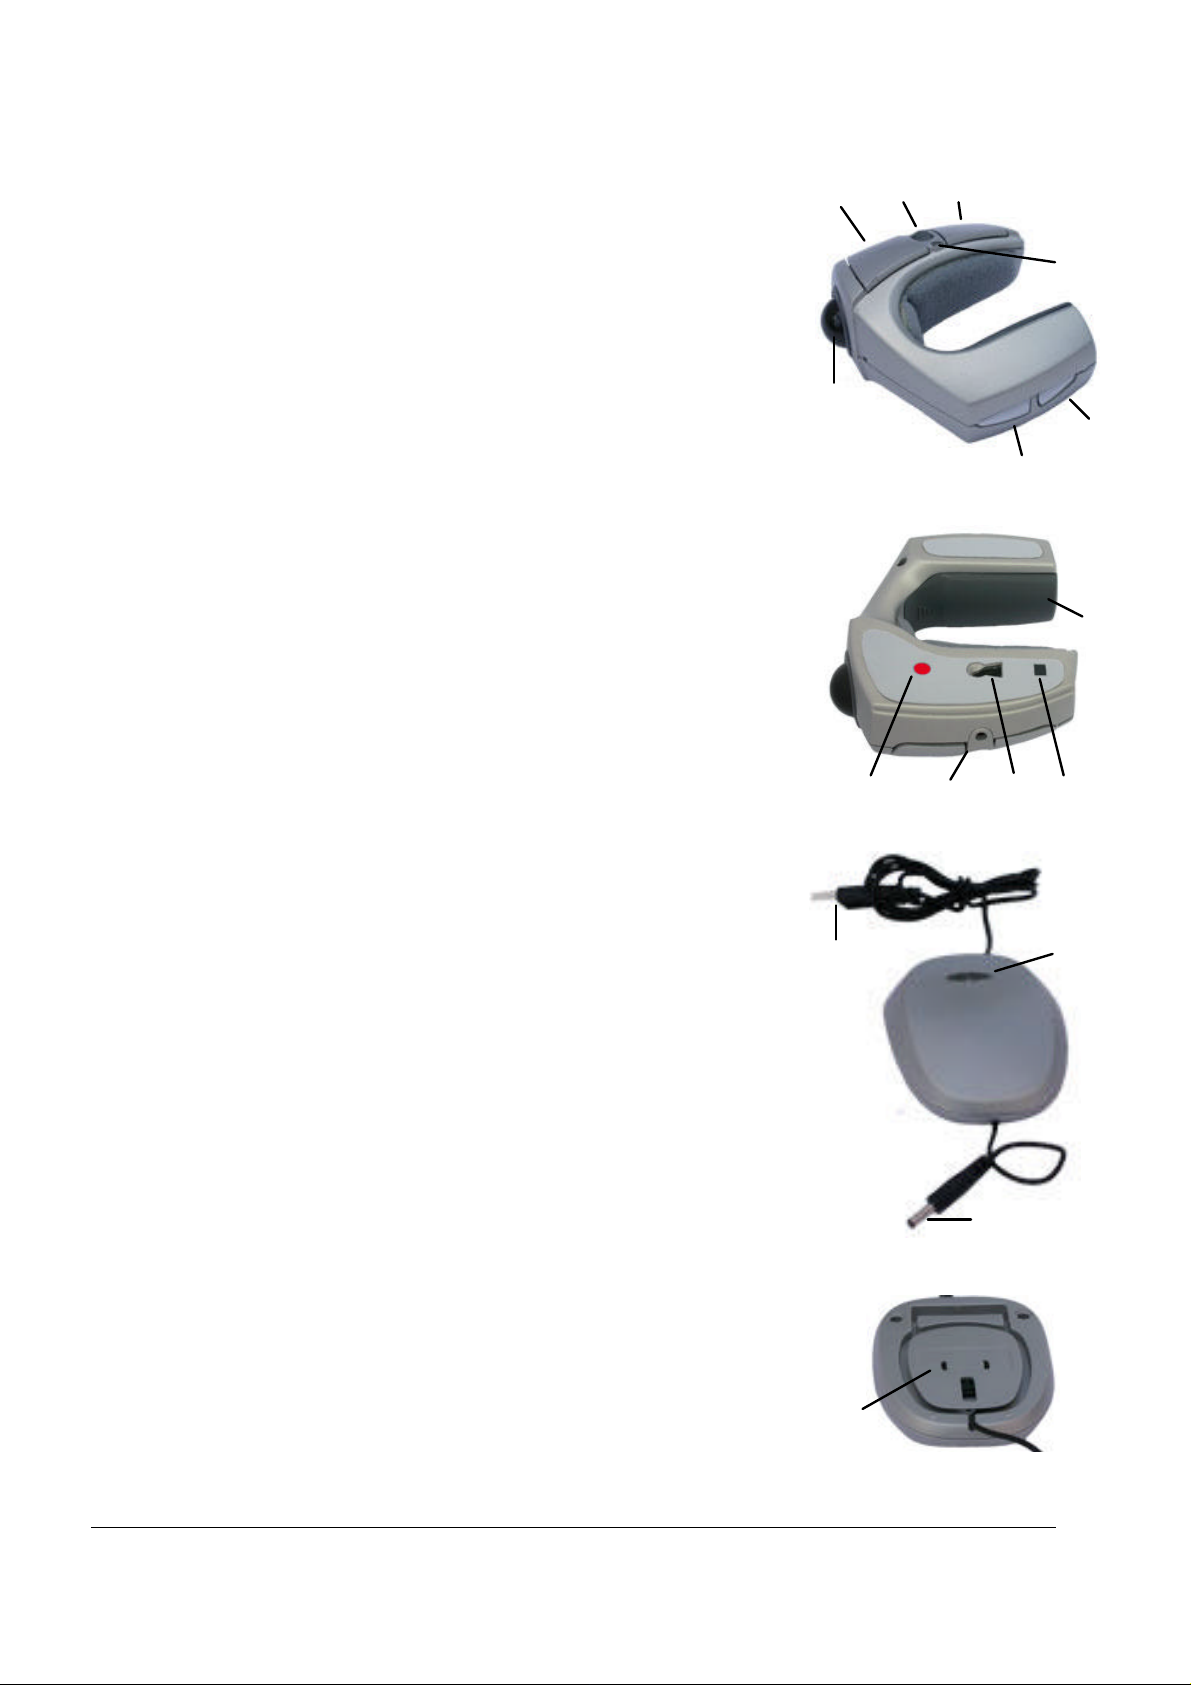
Mouse functionality
1.
Front left button
on a standard two button mouse i.e. used to select text
and to click menus.
2.
Scroll wheel
scroll through a document. The wheel can even be
pressed down, which allows you to scroll continuously
though a document by either: moving the mouse
backwards and forwards or moving the trackball.
3.
Front right button
button on a standard two-button mouse, in most
programs a drop-down menu will appear when the
button is pressed.
4.
LED
charging.
5.
Rear right button
right button, see above.
6.
Rear left button
left button, see above.
– indicates battery status during usage and
– same functionality as the left button
– the scroll wheel is used to browse and
– same functionality as the right
– has the same function as the front
– has the same function as the front
7.
Trackball
on screen.
8.
Battery cover –
9.
Desk sensor
flat surface or off-desk.
10.
Optical sensor
11.
Charging connector
the charger/receiver.
12.
Radio synchronisation button
synchronisation of the radio connection between the
receiver and the mouse.
Receiver/charger functionality
13.
Receiver USB plug
14.
Radio synchronisation button/LED
synchronisation of the radio connection between the
mouse and receiver; indicates reception of data from
the mouse.
– a finger-operated trackball used to navigate
three sizes supplied.
– detects whether the mouse is used on a
– indicates movement over a surface.
– connects the charge cable of
– used to set up
– plugs into the computer.
– used to set up
10
15.
Charging cable
16.
Cable wrapper
charge cable.
6 Copyright 2003 Perific AB
– used to charge the mouse.
– used to adjust the length of the
Page 7
Start using the mouse
Start using the mouse
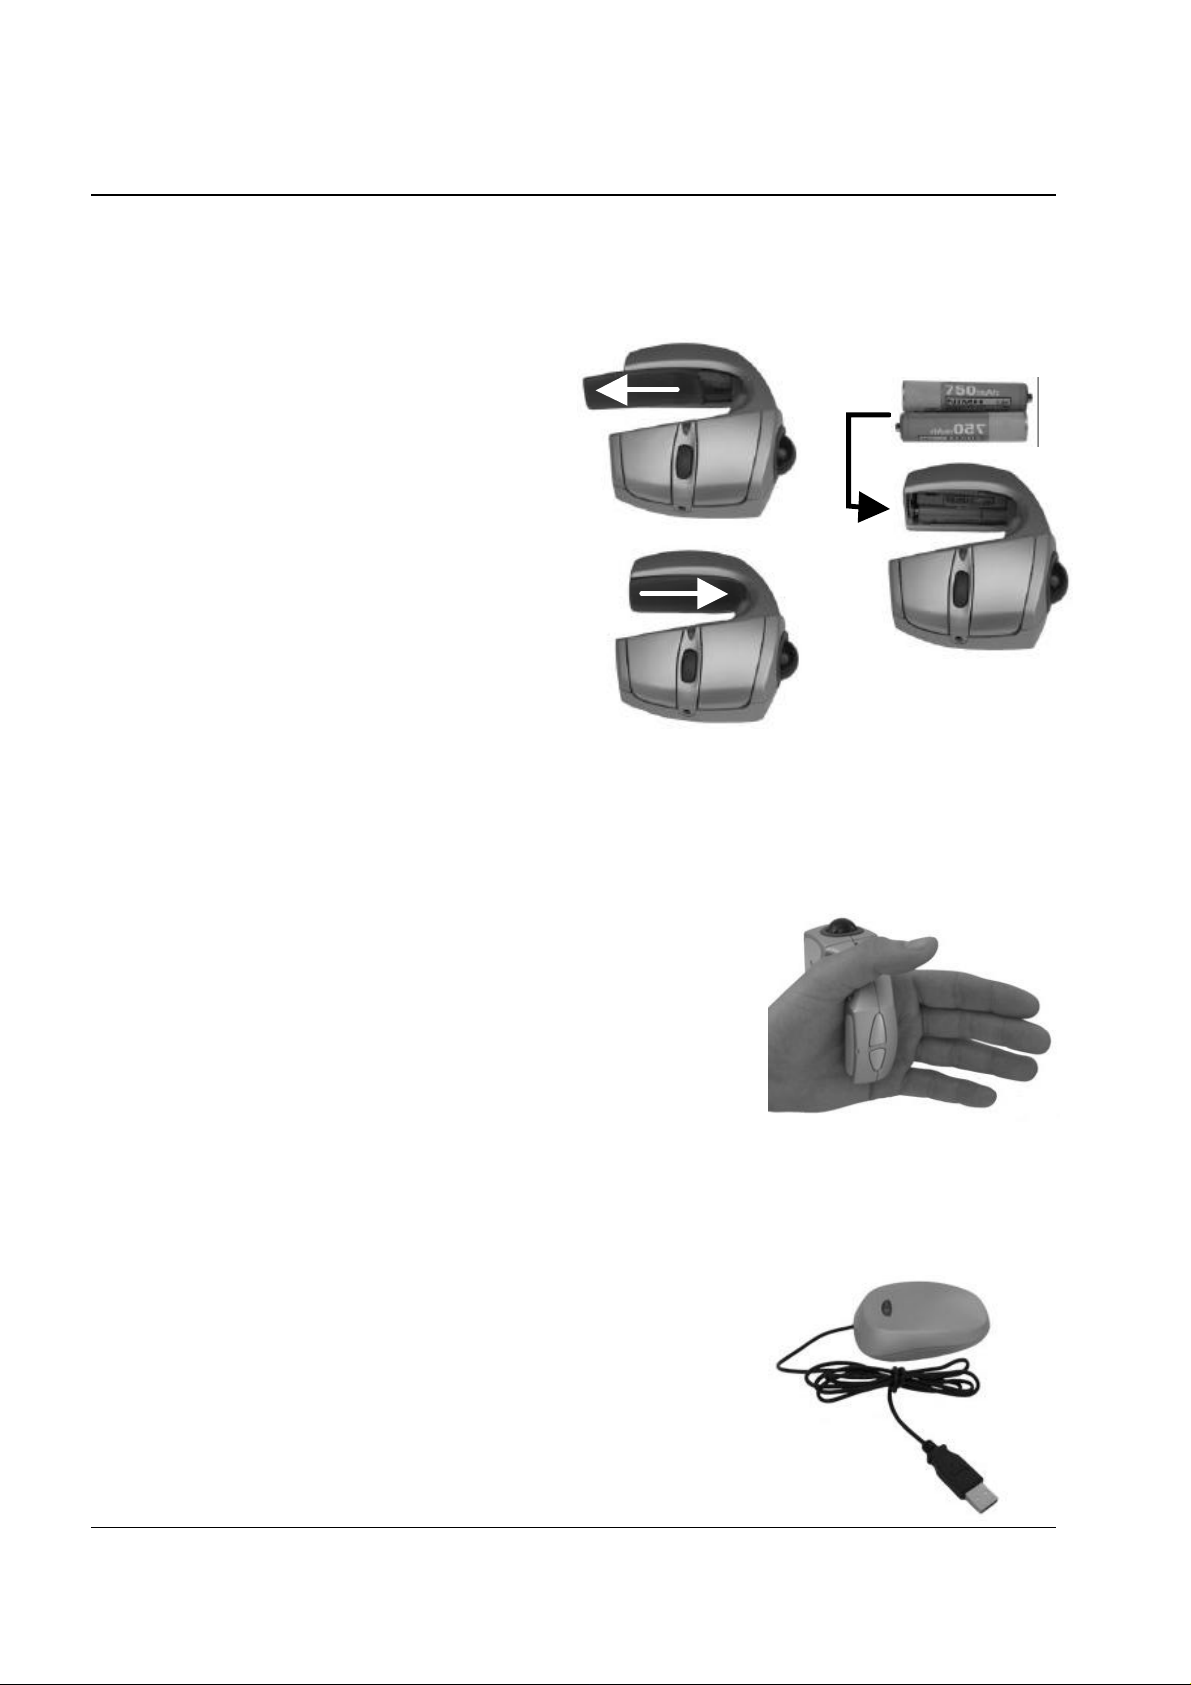
Step 1 – Insert the batteries
Use the supplied batteries. Batteries other than NiMH are not recommended.
1. Remove the battery cover.
2.
Insert the batteries
according to the instructions
on the mouse.
3. Replace the battery cover.
Step 2 – Select the correct size battery cover for your hand
The mouse is supplied with three differently sized battery covers, small, medium (as
supplied) and large. With the different battery covers you can adjust the size of the
mouse to the size of your hand so that it feels comfortable when not using it on the
desktop.
1.
Place the mouse in the left hand
2.
Test the mouse
different sizes of battery covers until the
mouse fits comfortably, without being too tight
or too loose.
by switching between the
.
Step 3 – Connect the receiver/charger to the computer
Communication between the receiver and the mouse makes use of radio waves;
this means that a “line of sight” placement is not required.
1. Turn on the computer
2.
Connect the receiver’s USB plug
available USB jack on the computer.
into an
3.
Place the receiver
you will use the mouse. The effective range is
approx. 1,5 meters.
close to the area where
Copyright 2003 Perific AB 7
Page 8
Step 4 – Charging the mouse
The mouse can be charged while in use; this is so the mouse can be used at all
times, even when the batteries are not charged. However, we recommend always
charging the mouse when is not being used. This way, there will never be a
situation where the mouse cannot be used without a cable.
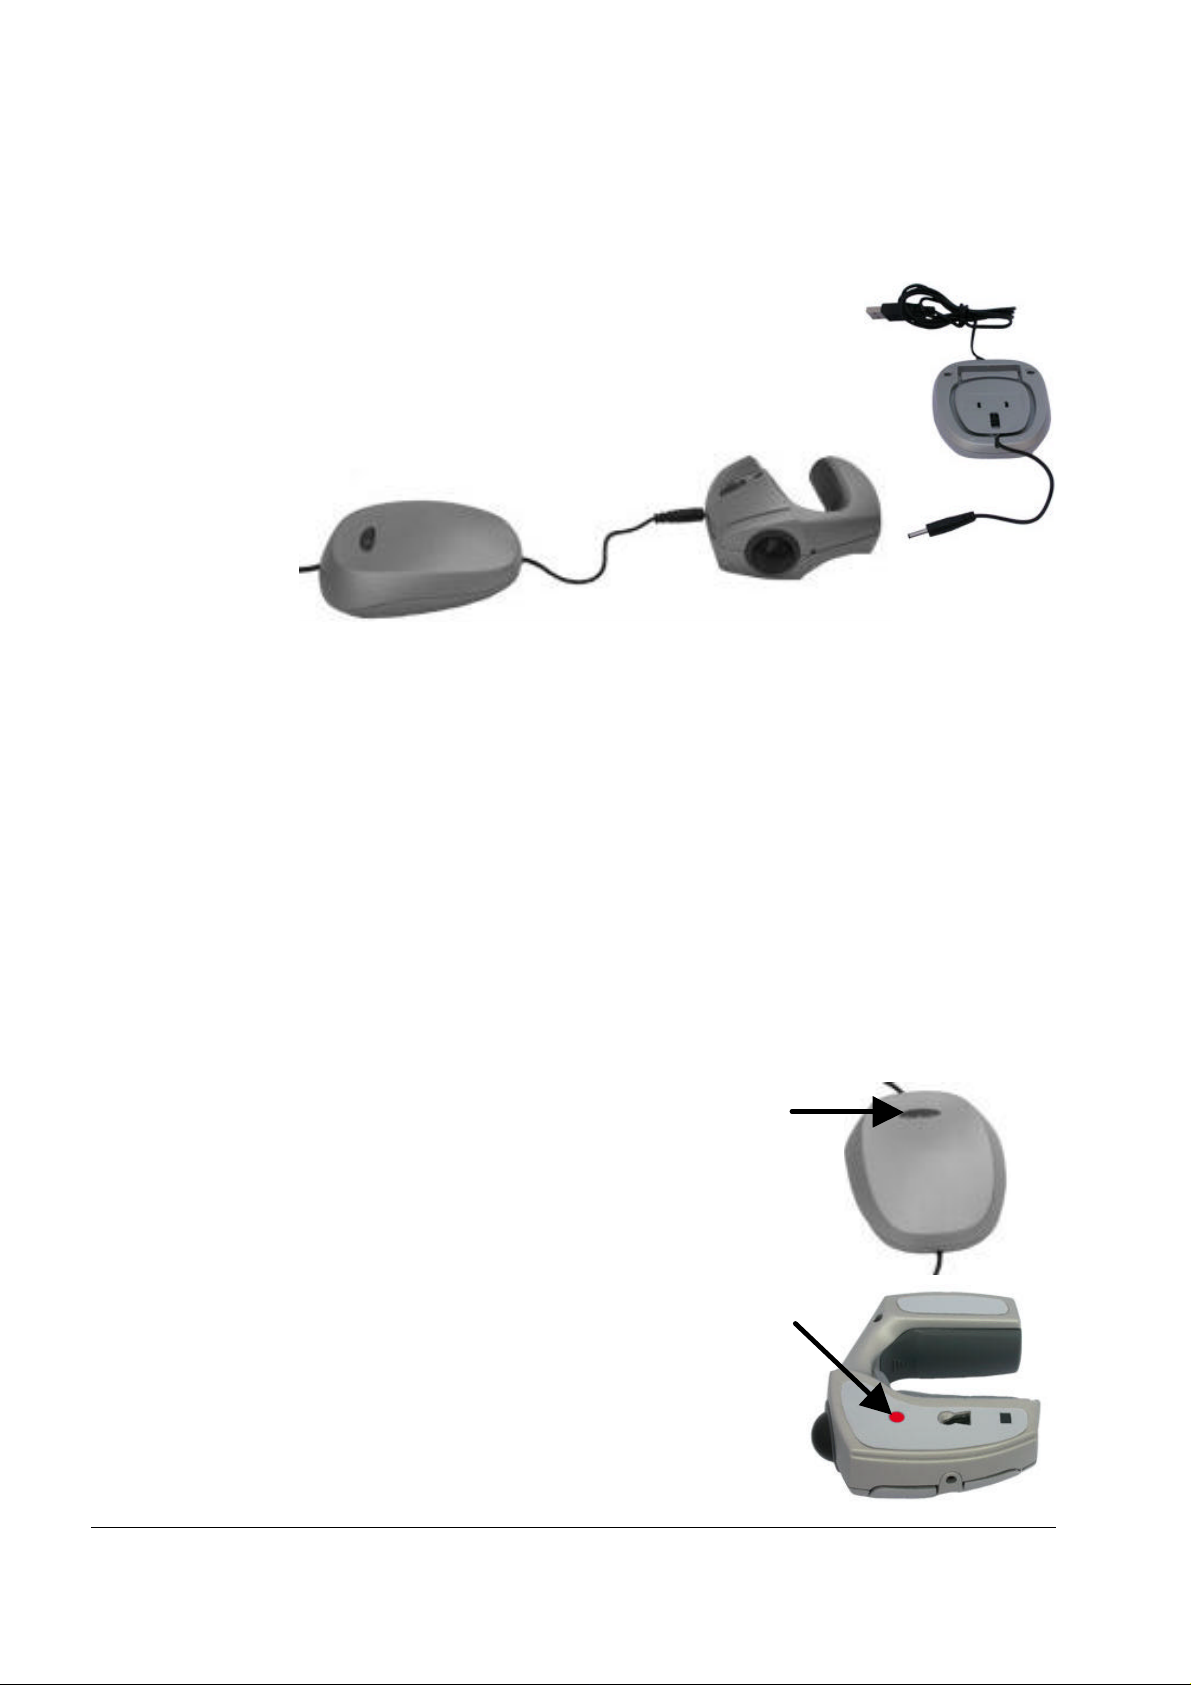
1.
Pull out the charge cable
in the bottom of the receiver/charger
which is wrapped
2.
Connect the charge plug
on the mouse.
LED indicator:
•
Flashes slowly (0,5 Hz) when the mouse is charging.
• Shines steadily when the mouse is fully charged.
• Flashes rapidly (2 -3 Hz) when the mouse needs to be charged.
•
Is dark when the battery is OK and the mouse is not charging.
The charge time is approx. 5 hours when the batteries are exhausted. Operating
time is about 15 hours when used intensively and about 1 week when used
regularly. The operating time is influenced by the type of surface the mouse is used
on.
to the charge jack
Step 5 – Synchronise the mouse with the receiver
Radio synchronisation needs to be set up in order to establish communication
between the receiver and the mouse. This is accomplished as described in the
following steps:
1.
Hold down and let go of the synchronisation
button on the receiver
receiver will begin to flash slowly with a red light.
2.
Hold down and let go of the synchronisation
button on the mouse
will flash at faster intervals when the button is
pushed. From now on the light indicator on the
receiver will flash irregularly depending on the
amount of data the receiver needs to process.
3. The mouse is now ready to use!
8 Copyright 2003 Perific AB
. The button on the
. The LED on the receiver
Page 9
Usage and Handling of the Mouse
Before starting to use the mouse, it is important to have followed the installation
instructions in the previous section.
The Wireless Dual Mouse is intended for use in the right hand or with both hands.
It is possible to use the mouse in a variety of different ways; this manual describes
the most common ones. Do use the mouse in other ways if this feels comfortable.
Tips and advice for better ergonomics
There is no working position or product that is ergonomically optimal in all respects.
There are some working positions which are better than others, but the most
important thing is to vary your working position as often as possible. Research has
shown that repetitive movement over long periods of time, unsuitable work postures,
bad working environments, and bad working routines may lead to physical problems
such as damage to nerves, tendons and muscles. Your work posture not only has
an influence on your health but also on your productivity.
You should contact a physician if you are experiencing pain, numbness, prickling
sensations, weakness, swelling, cramp, heat or stiffness in hands, wrists, arms,
shoulders, neck, or back. The sooner you act upon your problems, the easier it will
be to remedy them.
For more information or guidance about a good working environment and
ergonomics, we refer you to our web site www.perific.com or www.perific.se .
Usage of the mouse on a table or another surface
Attaching and removing the mouse cover
When operated on a table or another surface the mouse may be used with or
without the cover. This depends on user preference.
Attaching the cover
1. The cover is attached by
sliding it along the mouse
from the side and back.
2. You will hear a click when
the cover is attached.
Removing the cover
1. The cover is removed by
lifting it from the back.
2. Pull the cover back and
sideways while lifting.
9 Copyright 2003 Perific AB
Page 10
Usage and Handling of the Mouse
Use as a traditional mouse
The Wireless Dual Mouse can be used just like an ordinary mouse, i.e.:
• the front left and right buttons are used to mark text and to select items on
menus.
•
the scroll wheel is used to scroll though documents easily
• Note: in this mode the rear buttons will not be used.
For a detailed description of each button’s functionality, see the section Overview of
mouse functionality at the beginning of this manual.
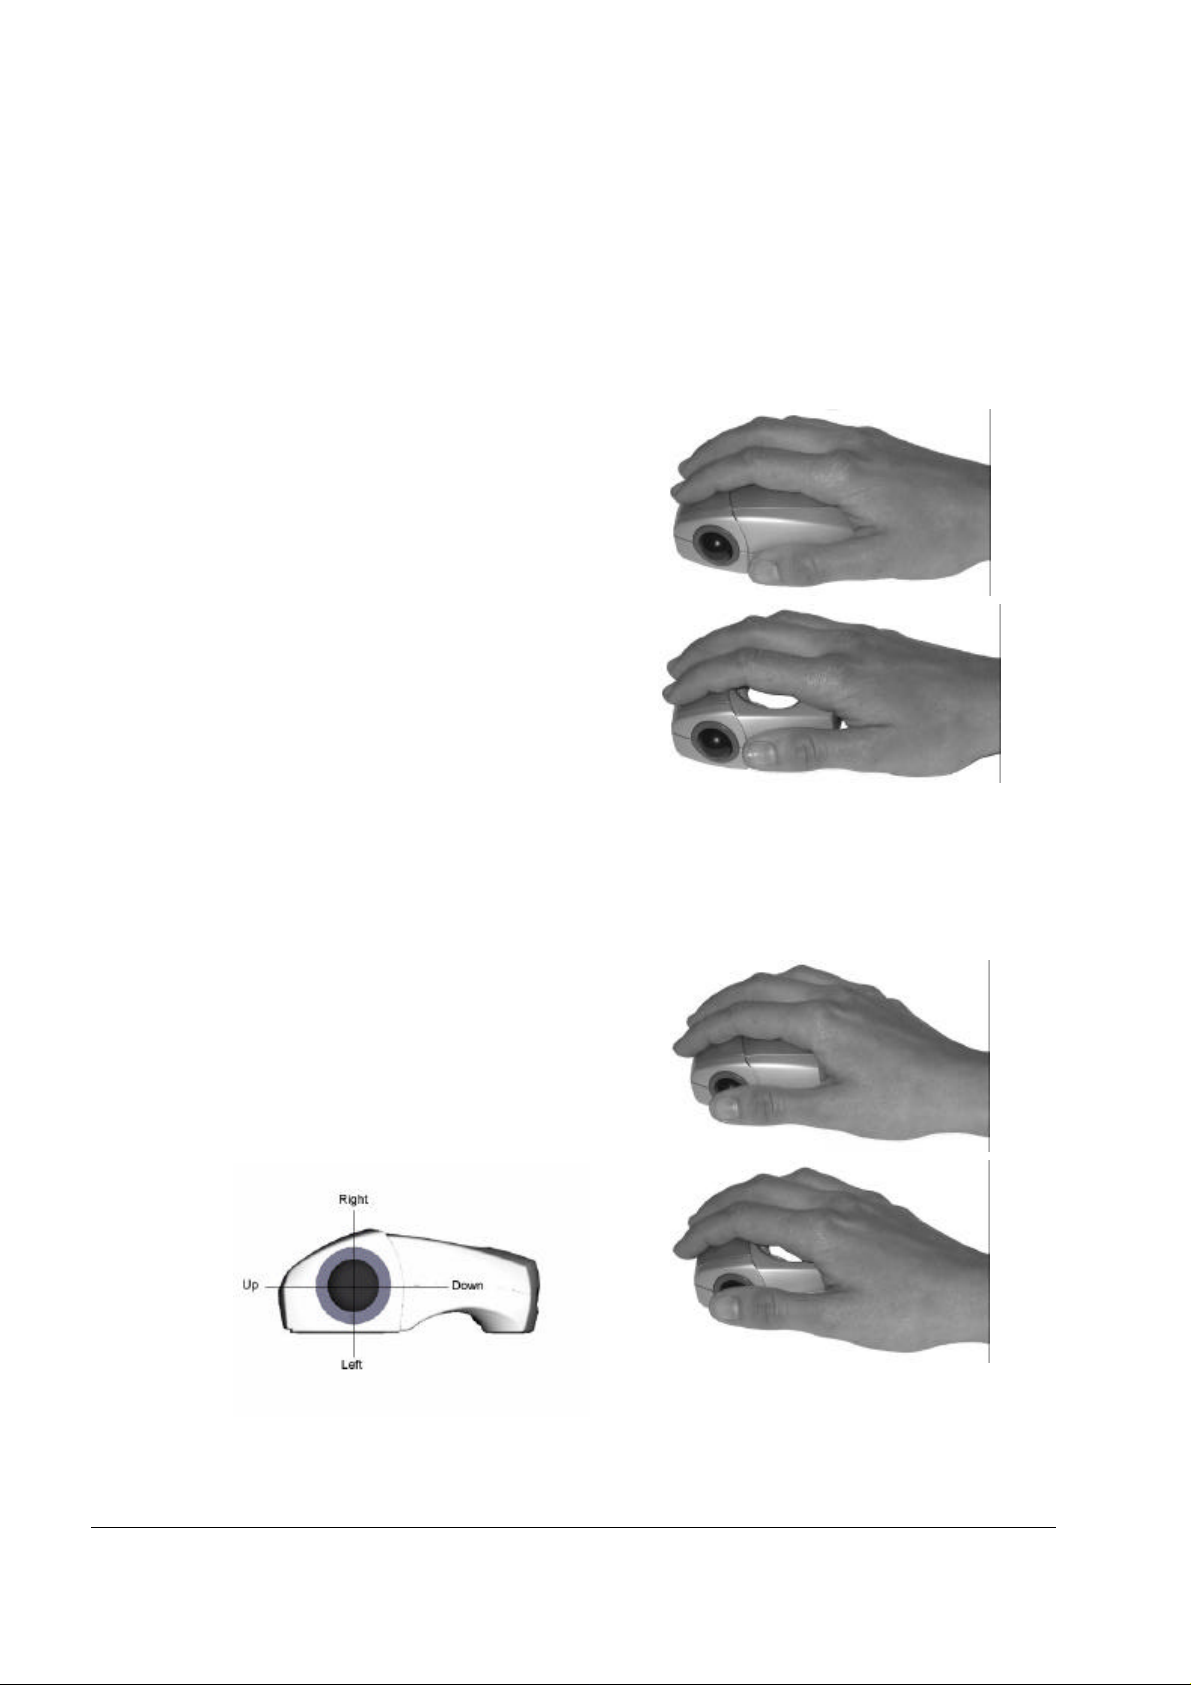
The mouse is held and used as shown at
right.
Bear in mind that the mouse is intended
for right-handed usage.
The Wireless Dual Mouse works on
most surfaces but you should avoid too
smooth, too transparent or too dark a
surface. If you encounter problems, use a
mousepad.
Trackball usage
The trackball can be used while the Wireless Dual Mouse is in place on the
desktop. The functionality is identical to that described above; the difference is that
instead of moving the mouse, the trackball is used when moving the cursor on the
screen.
The Wireless Dual Mouse is held and
used as shown to the right.
The trackball is thumb-controlled and the
buttons and scroll wheel are operated in
the same way as described above.
Trackball positioning is shown in the image
below.
Note: Bear in mind that simultaneously moving the mouse and trackball will make it
difficult to control the cursor on screen. Therefore, avoid moving the mouse when
using the trackball.
10 Copyright 2003 Perific AB
Page 11
Usage and Handling of the Mouse
Handheld usage of the mouse
When using the Wireless Dual Mouse away from the desktop, the mouse cover
should not be on.
The two most common work positions are described below. There are many other
work positions that can be tested and we recommend that you use the one that
works best for you. Do bear in mind that varying your working position is the key to
good ergonomics.
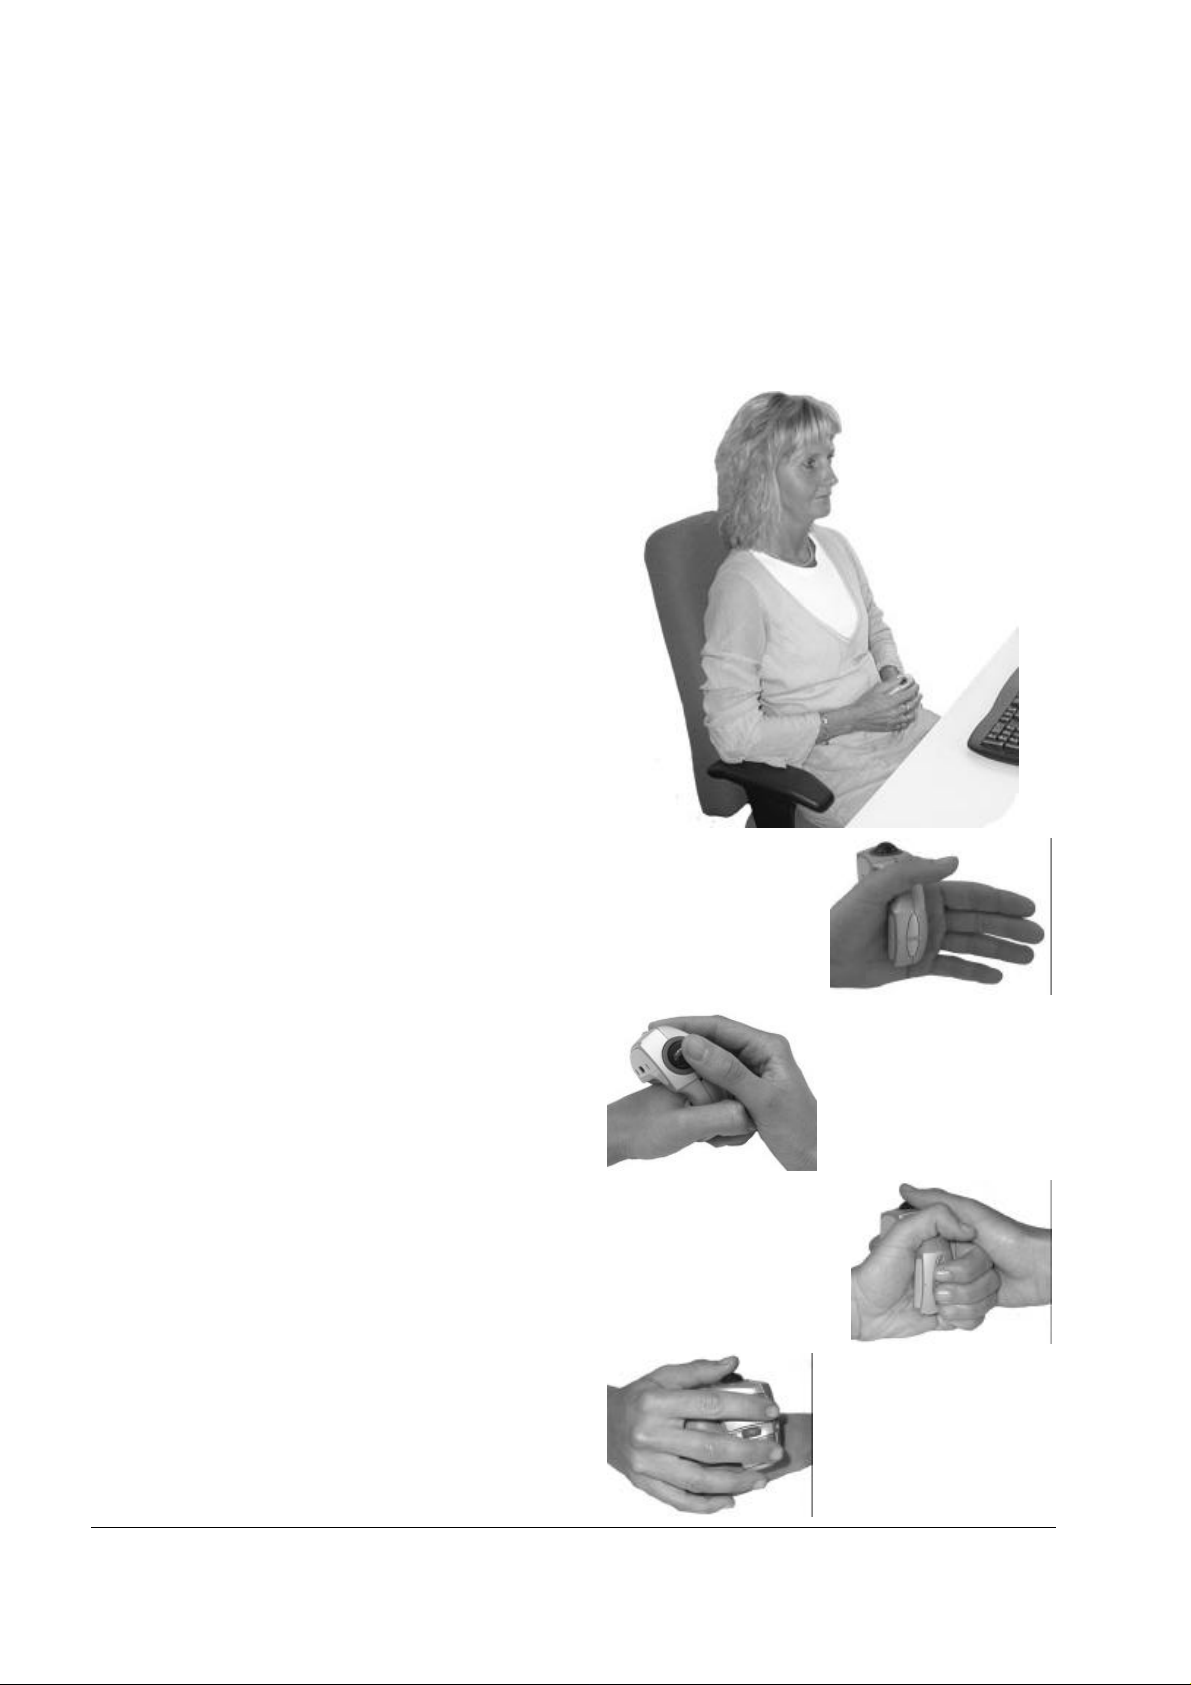
Two hand usage
This work position offers beneficial
ergonomics such that the user’s shoulders
are in a neutral position and arms are
close to the body. This manner of working
is ideal for reading or collecting
information.
The user is able to lean back comfortably
and there is no need to bend forward to
reach for a mouse.
Two-handed usage allows for working with
precision while maintaining a comfortable
and relaxed fashion.
1.
Place the mouse on your left hand
2.
Fold your hands together.
3.
Use your right-hand thumb to
control the trackball
4.
Use your left-hand to control the
rear buttons
.
.
.
5.
Use your right hand to control the
front buttons and the scroll wheel
Copyright 2003 Perific AB 11
.
Page 12
Usage and Handling of the Mouse
Combined usage with a keyboard
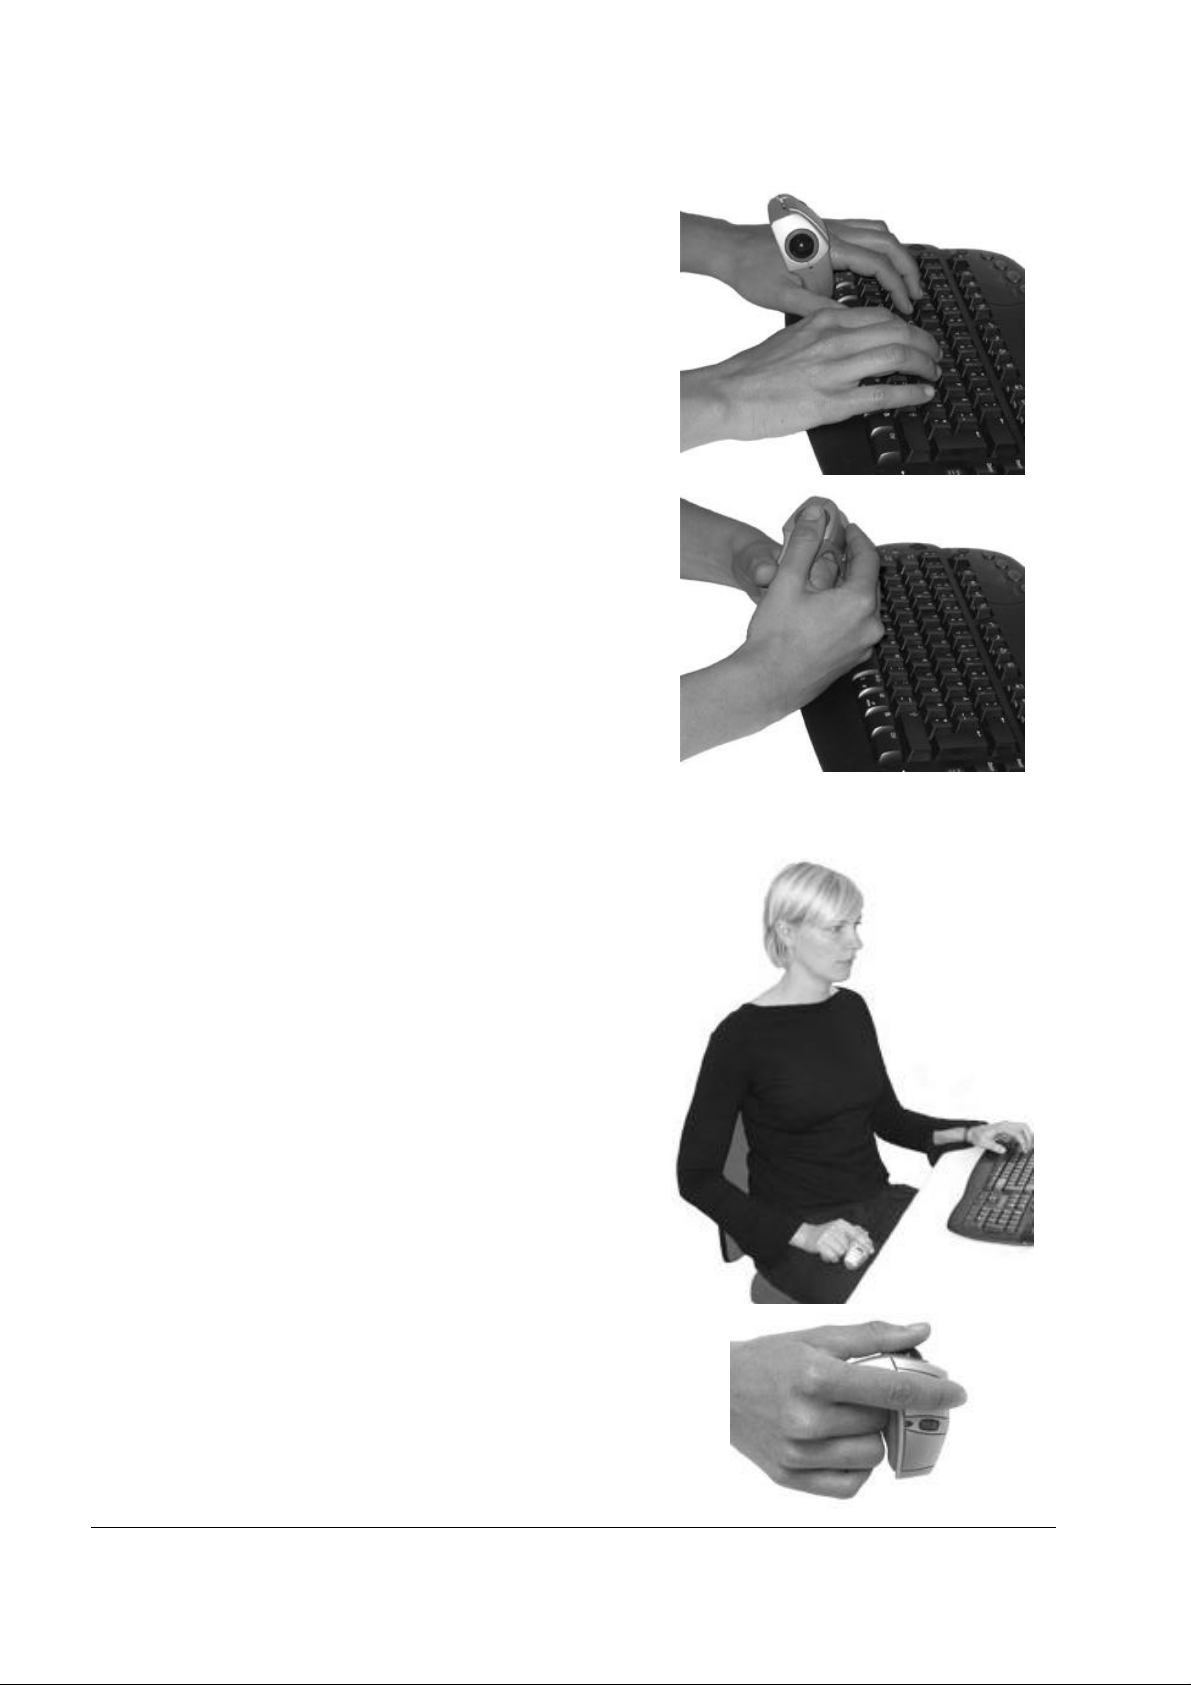
When using the mouse with two hands as
described above, the keyboard can be used
without having to remove the Wireless Dual
Mouse from your hand.
It is important to choose the right size of
battery cover so that working this way feels
comfortable.
When navigating on screen the user need only
place his/her hands together and steer the
trackball with the right-hand thumb. This way
of working is ergonomically very beneficial
because there is no need to reach for a
mouse. The user’s arms remain in front of and
close to the body.
One-handed usage
If the user prefers, the Wireless Dual Mouse
can also be operated with one hand. The
mouse is held in the right hand.
The user is free to lean back comfortably in
their chair, or even to get up and move around.
This allows for the possibility of a completely
unrestricted working posture.
The trackball is controlled by the thumb, and
the front left button is operated by the index
finger.
However, this grip does not offer a comfortable
hold of the scroll wheel or right mouse button.
Furthermore, the rear button cannot be used.
12 Copyright 2003 Perific AB
Page 13

Additional information
Troubleshooting
Symptom Possible cause – solution
The mouse
does not work
The mouse
does not
charge
• The mouse is not connected properly. See section Start
using the mouse.
• The mouse is not charged. See section Step 4 – Charging
the mouse
•
The receiver is placed too far away from the mouse. See
section Step 3 – Connect the receiver/charger to the
computer for correct placement.
• The batteries are faulty. Switch the batteries. See section
Step 1 – Insert the batteries
•
You are using the mouse on too dark or shiny a surface.
Use a mouse mat.
•
Radio communication needs to be synchronised. See
section Step 5 – Synchronise the mouse with the receiver.
•
The receiver is connected to the PS/2 port. Connect the
USB plug directly into the computer without the use of a
PS/2-USB adapter.
• The batteries are not installed. See section Step 1 – Insert
the batteries .
The mouse is
too slow or too
fast
The trackball
moves
erratically
•
The batteries are faulty. Switch the batteries. See section
Step 1 – Insert the batteries
•
The computer must be switched on in order to charge the
mouse.
• You need to alter the sensitivity at the mouse drivers. See
section Advanced settings.
•
The mouse is insufficiently charged. See section Step 4 –
Charging the mouse.
•
The receiver is placed too far awa y from the mouse. See
section Step 3 – Connect the receiver/charger to the
computer for correct placement.
•
The trackball needs cleaning. Remove the trackball by
turning the ring around the trackball counter-clockwise.
Take out the ball and clean it with a dry cloth. You can even
clean the visible wheel in the area where the ball was
resting. Use a small brush. Put the ball and ring back and
turn the ring clockwise to tighten.
13 Copyright 2003 Perific AB
Page 14

Additional Information
The mouse
does not move
smoothly when
used on a
surface
The mouse has
a bad reach
The optics
shines even
though the
mouse is not
sitting on a
surface.
• The mouse is insufficiently charged. See section Step 4 –
Charging the mouse.
•
The receiver is placed too far away from the mouse. See
section Step 3 – Connect the receiver/charger to the
computer for correct placement.
• You are using the mouse on too dark or shiny a surface.
Use a mouse mat.
• Radio communication needs to be synchronised. See
section Step 5 – Synchronise the mouse with the receiver.
• The mouse is insufficiently charged; see section Step 4 –
Charging the mouse.
• The receiver is placed too far away from the mouse. See
section Step 3 – Connect the receiver/charger to the
computer for correct placement.
•
The sensor that detects whether a mouse is lying on a
surface may be dirty or blocked. Try cleaning the sensor
with a small brush.
• Avoid touching the optics at the bottom of the mouse with
your fingers.
The operating
time is short
• The batteries are faulty. Switch the batteries. See section
Step 1 – Insert the batteries
Support
Support information can be found at www.perific.com and www.perific.se. Here you
will also find contact information and other additional help and guidance. The
website is updated continuously and will help you take full advantage of the
Wireless Dual Mouse
.
Advanced settings
This section is intended only for advanced users who would like to reconfigure the
basic settings of the mouse such as the functionality of the buttons or the sensitivity
of the mouse.
In Windows click Start and choose Control panel/Mouse. Here you will find several
properties you can set such as mouse button functions, speed and even
acceleration. Adjust these parameters to your liking. For more information about the
mouse drivers that are installed on your computer we would refer you to the manual
for these drivers.
For enthusiasts there is a special mouse driver with additional functionality and
configuration possibilities that can be downloaded at www.perific.com or
www.perific.se. More information about mouse drivers can be found in section
Accessories.
14 Copyright 2003 Perific AB
Page 15

Technical specifications
Additional Information
Optical sensor
Trackball
Programmable buttons
Rechargeable batteries
Operating time when
fully charged
Charge time
Power source
Radio
Connection USB (PS/2 adapter accessory)
Type of approval
Temperature for usage
800 dpi
400 dpi, opto-mechanic
5 (a special mouse driver is needed for total
configuration, see section Accessories)
2 NiMH AAA
Approx. 1 week with normal usage
Approx. 5 hours from empty to fully charged battery.
USB (separate charger accessory)
Reach approx. 1,5 m, 27 Mhz, 256 ID
CE and FCC
This product is specified as a consumer product for
usage between a temperature interval of 0°C (32F) to
40°C (104F).
System requirements
IBM® -computer or similar
•
Windows 98, Me, NT 4.0, 2000, XP
•
Available USB port (PS/2 adapter accessory)
Macintosh® -system
• Mac OS 8.6 or later
•
Available USB port
Accessories
Network charger and
USB-PS/2 adapter
Customised mouse
driver
For a complete accessory list, see www.perific.com or www.perific.se.
The mouse can be connected to a PS/2 contact and
charged via a wall outlet.
Mouse driver for more functionality and configuration
possibilities can be downloaded at www.perific.com or
www.perific.se.
Copyright 2003 Perific AB 15
Page 16

Additional Information
Warranty
Perific warrants this product to be free from material or functional defects at the time of original
purchase, and for a two year period from that date. For the purpose of this text, and unless
otherwise indicated, Perific refers to Perific AB (reg. no. 556602-8543), its subsidiaries and
resellers. If at any time during the warrantee period a defect becomes apparent that is due to
material or functional failure, Perific pledges to, at Perific’s option, either repair or replace the
faulty product with a new or equivalent model.
Perific takes no responsibility for:
1. Damages incurred by or during: delivery of the product, accidental damage,
deliberate damage, modification, incorrect usage of the product, force majeure, or
any other cause beyond the control of Perific, including but not limited to lightning,
water, fire, public disturbance, riot, strike, war, or any other similar conflicts.
2. Damages (including, but not limited to, direct or indirect personal injury, a loss of
profit, fall in production, losses of or alterations to processed information, or any
other incidental or consequential damages) caused by the product or usage of the
product, or on the grounds that the product cannot be used.
3. Deficient maintenance or incorrect repairs carried out by unauthorised parties.
4. Incompatibilities as a result of technological developments.
5. Defects caused by third party equipment or abnormal wear.
6. Defects caused by normal everyday wear and tear.
7. Problems caused by or resulting from upgrades, with additions or alterations to the
product through use of hardware or software not manufactured by or having the
written consent of Perific.
In the event that the Wireless Dual Mouse requires service under the warranty period, the
product must be returned to the reseller where it was purchased. It must be packed in its
original packaging, or in such a way that damages in transit are avoided. The origin al purchaser
must be able to show proof of purchase, including the date of purchase, with receipt/invoice
from point of purchase in order for this warranty to be valid. The warranty period will not be
renewed or extended as a result of repair or replacement the product. Any exchanged or
replaced defective parts will remain the property of Perific. At the end of the warranty period,
any guarantee regarding exchanged or replaced parts also expires. This product cannot to be
regarded as having material of functional defects if it must be rebuilt in order to be modified in
accordance with national or local technical safety regulations in a country other than one in
which the product was meant to be used.
Perific reserves all rights to the product, its hardware, software and trademark. Purchase of the
product does not imply the right to change, disassemble, reverse engineer or in any other way
use any part of the hardware or software of the product, except in the way and for the purposes
permitted by law. This warranty does not affect the purchaser’s rights in relation to the reseller in
accordance with the purchase agreement, nor the purchaser’s legal rights according to existing,
mandatory rules in applicable law; the purchaser’s rights are limited to those which are stated in
this warranty. Perific shall not be liable for any incidental or consequential damage for breach of
any expressed or implied warranty of this product.
16 Copyright 2003 Perific AB
Page 17

www.perific.com
www.perific.se
 Loading...