

Page 1
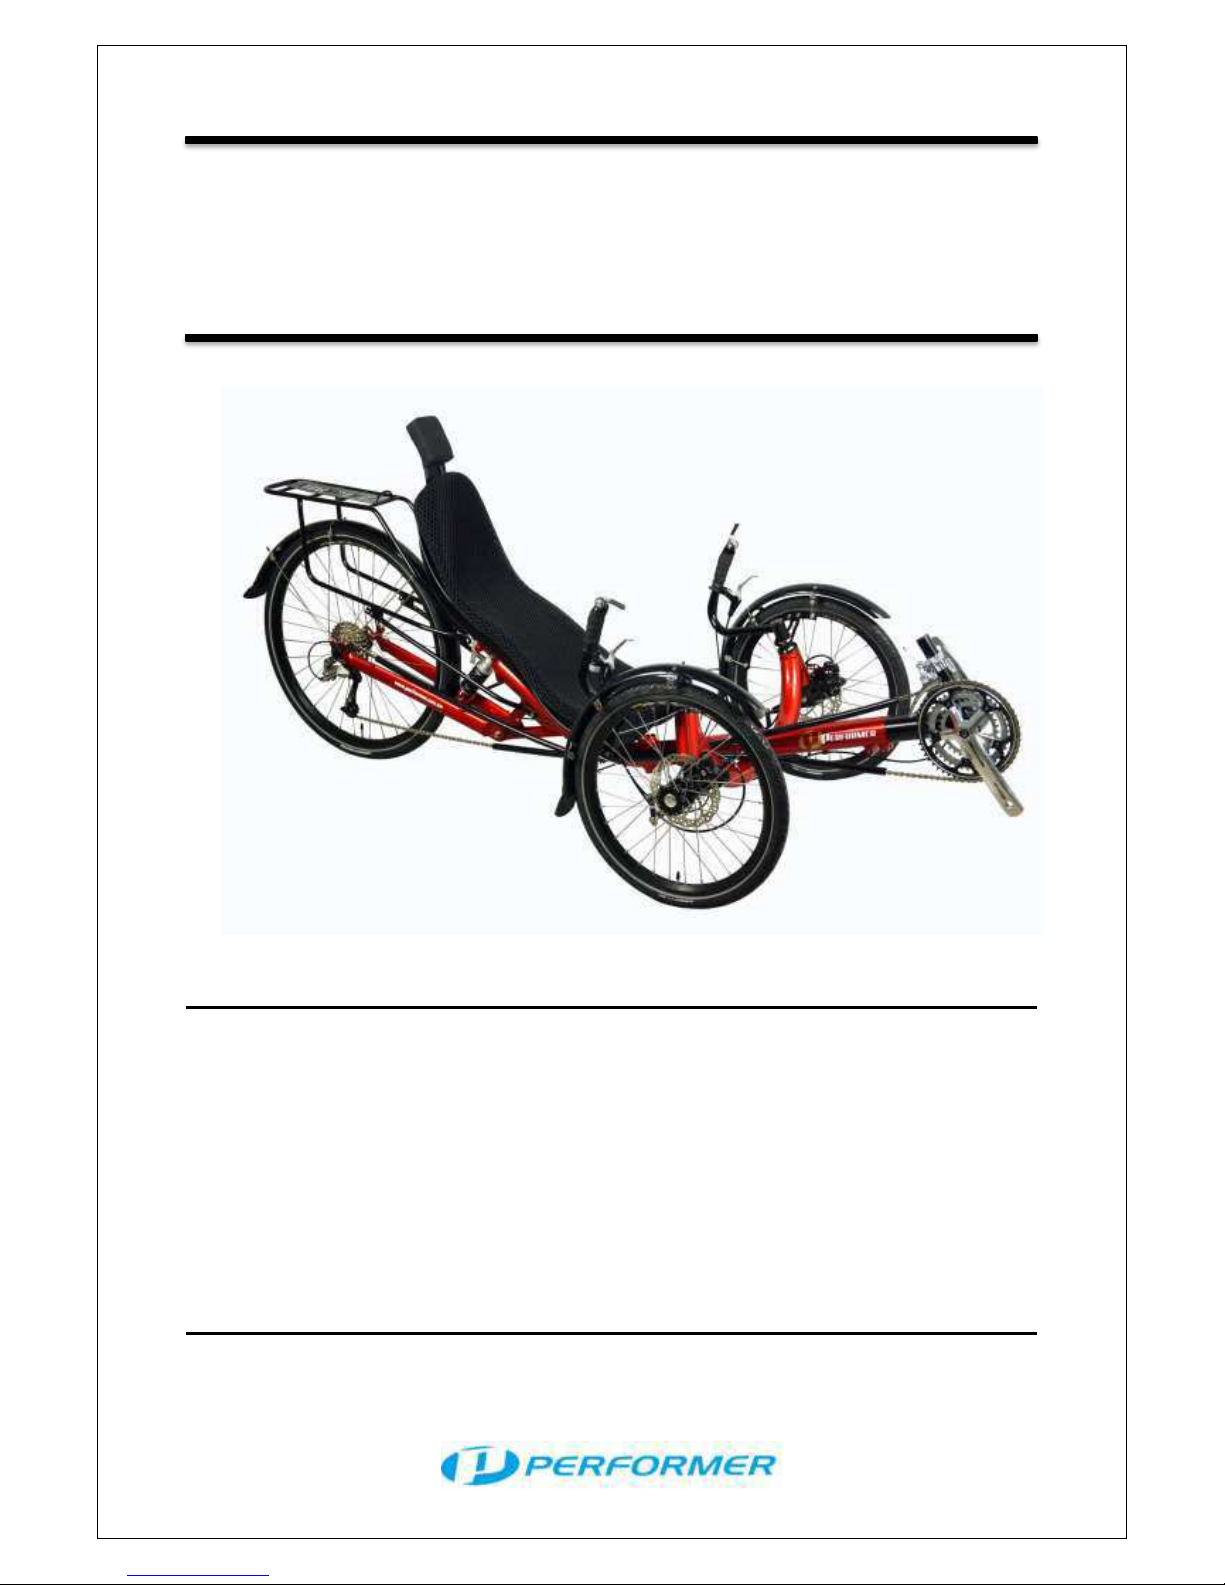
JC26-X
Assembly Guide
Congratulations on your purchase of a JC26-X Performer trike!
The Performer JC26-X is designed for everything from touring to
commuting and shopping in the city. The JC26-X frames are made
of lightweight aluminum with a large diameter to enhance strength
and durability.
When you receive your trike, please make sure everything in the
Included Parts List have been included. Your trike has already been
half assembled and this manual will provide details on the remaining
steps.
Page 2
2
Page 3

3
Table of Contents
Included Parts--------------------------------------------4
Assembly Guide-----------------------------------------5
Frame and Wheels--------------------------------------------------------------5
Frame Alignment----------------------------------------------------------------5
Installing Pedals-----------------------------------------------------------------6
Installing Seat--------------------------------------------------------------------6
Installing Brake and Shifter Cables-----------------------------------------6
Shifter Cables--------------------------------------------------------------------7
Brakes Cables-------------------------------------------------------------------7
Adjusting Handlebars----------------------------------------------------------8
Adjusting Boom------------------------------------------------------------------8
Routing Chain--------------------------------------------------------------------8
Adjusting Chain Length--------------------------------------------------------9
Adjusting Derailleurs-----------------------------------------------------------9
Safety Recommendations-------------------------10
Limited Warranty---------------------------------------------------------------10
Limited Warranty Contact Information------------------------------------11
Page 4
4
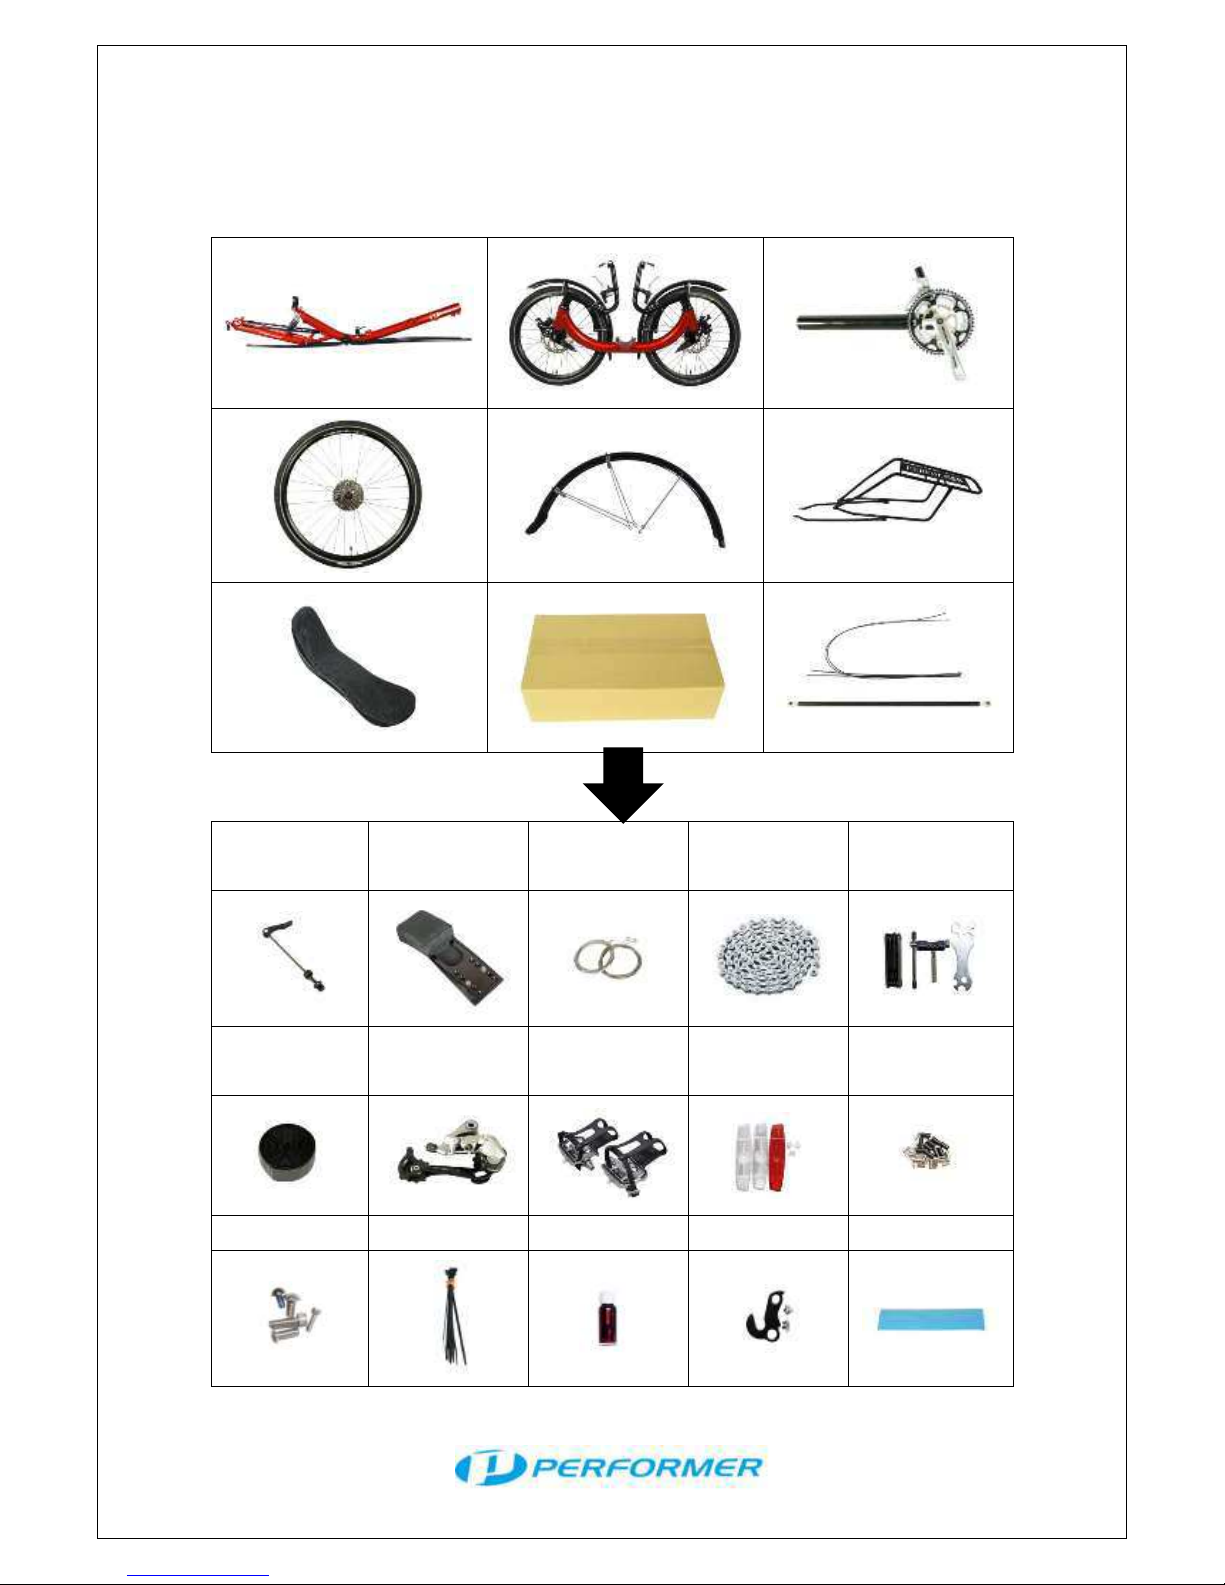
Included Parts List
Quick release
Headrest
Brake wires/
Shifter wires
Chain
Tools
Taps for
handlebar
Rear derailleur
Pedals
Reflector
Cable housing
Screws
Cable tie
Paint
Hanger
Protect sticker
Page 5
5
Assembly Guide
Frame and Wheels
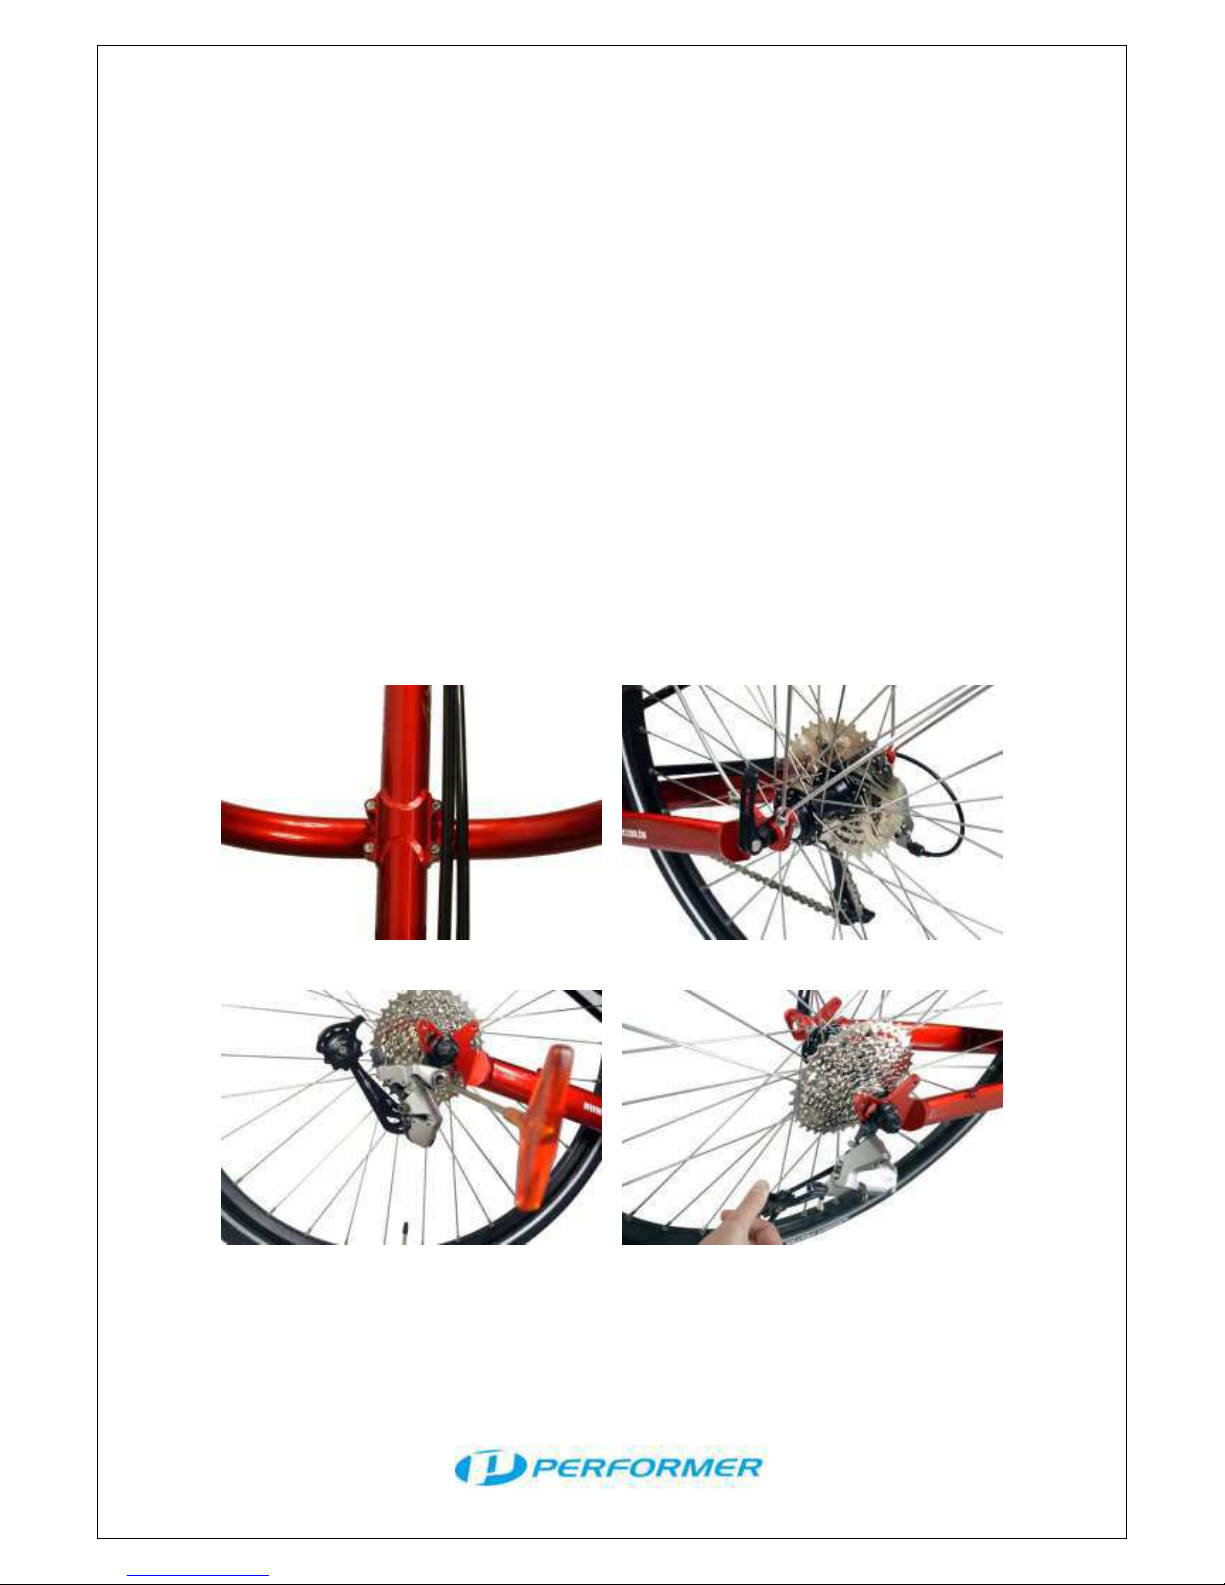
1. Place the frame on the outrigger tubes. (Pic 1)
2. Attach the four boom bolts without fully tightening.
3. Attach the rear wheel to the main frame. (Pic 2)
4. Remove the nut and one spring from the quick release. Insert
the quick release and remaining spring from the left side of the
trike through the rear axle and tighten.
5. Replace the spring and tension nut on the right side.
6. Install rear derailleur. (Pic 3)
7. Make adjustments to the rear derailleur if necessary now as this
is more easily done before attaching the chain. (Pic 4)
Pic 1
Pic 2
Pic 3
Pic 4
Page 6
6
Frame Alignment
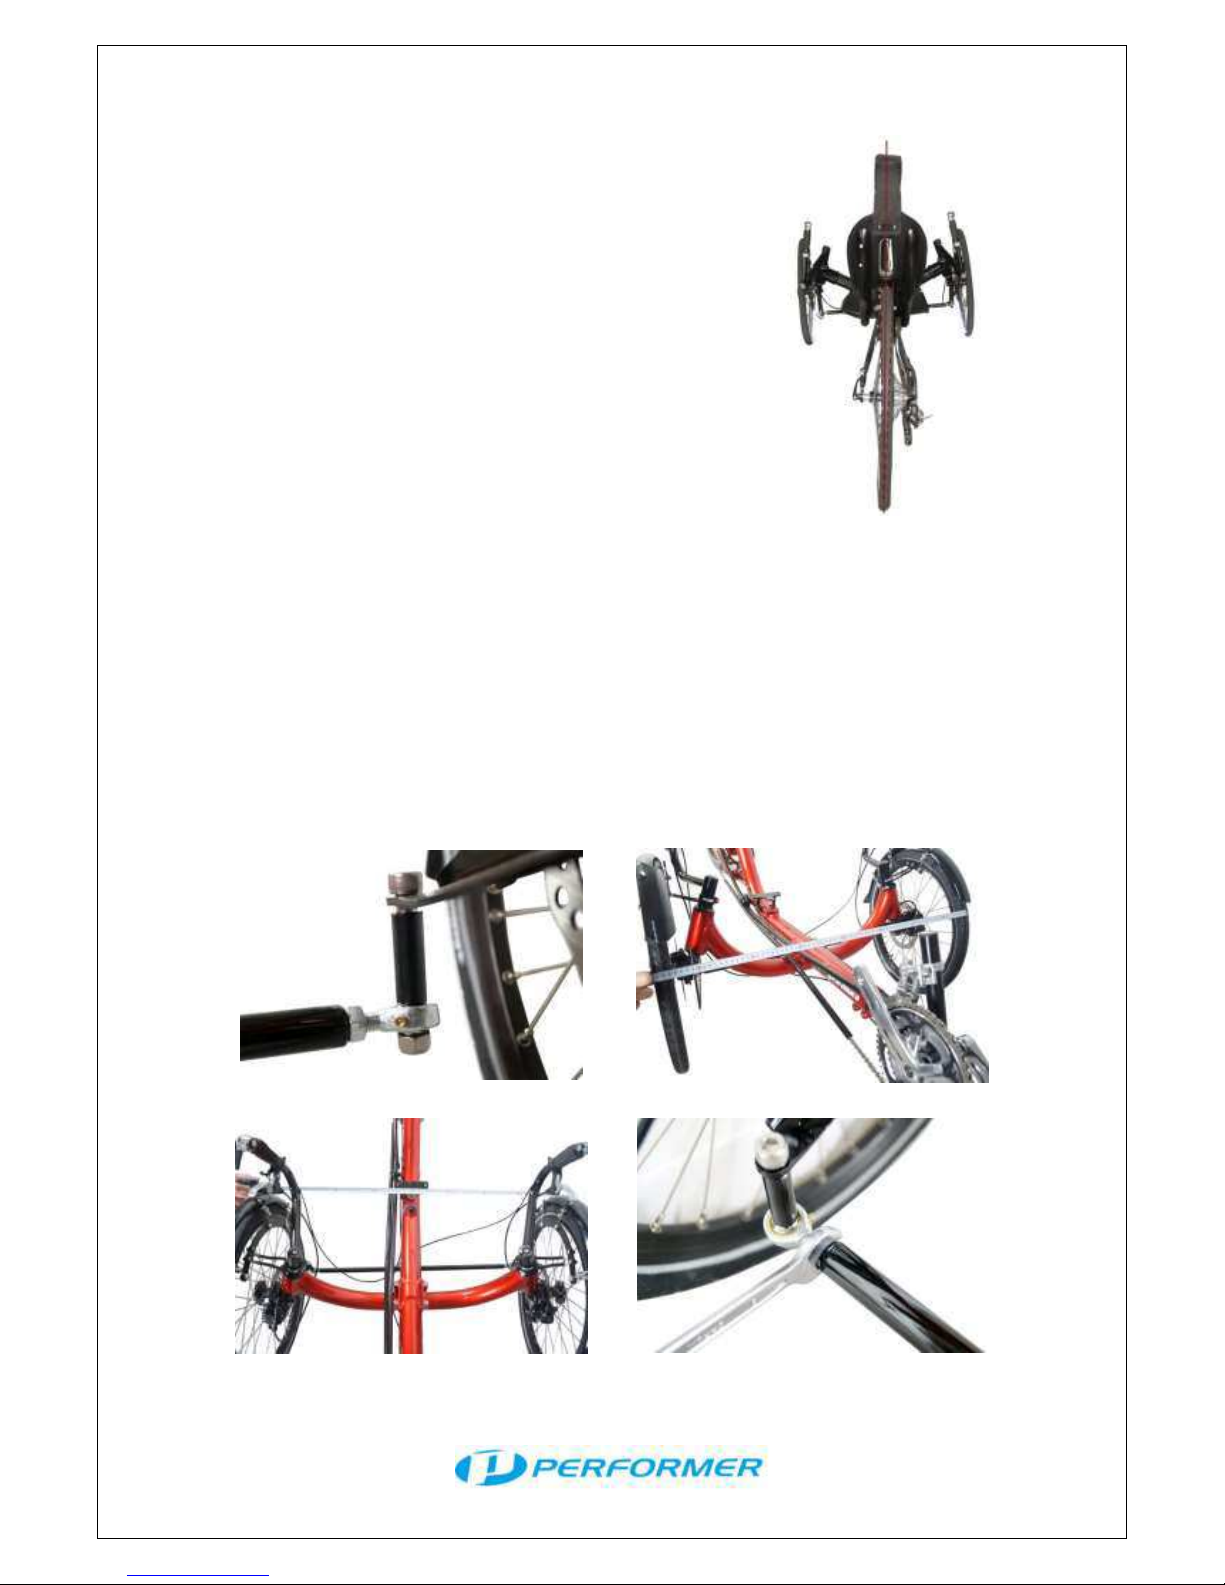
1. Make sure the rear wheel is vertical to
ground and the front two wheels are
parallel to each other.
2. Picture 5 shows the front wheels OUT of
alignment towards the right. To correct
this, loosen the right two bolts and then
tighten the left two bolts. Reverse this
process for correcting a lean towards the
left. Once the frame aligned, carefully
tighten the four bolts in an alternating
pattern to avoid misalignment until they Pic 5
are fully tightened.
3. Run the tie rod below the frame and attach it to the tie rod
mounts. (Pic 6)
4. Measure the distance between the tires at both the leading edge
(Pic 7) and the trailing edge of the tires. (Pic 8)
5. Rotate the tie rod until the two measurements in step 7 are
equal.
6. Tighten the two tie rod locking nuts. (Pic 9)
Pic 6
Pic 7
Pic 8
Pic 9
Page 7

7
Installing Pedals
Performer strongly recommend the clipless pedal system to reduce
leg fatigue and to avoid injury caused by feet slipping from the
pedals. Grease pedal and screw in the right pedal clockwise and left
pedal counterclockwise. Tighten the pedals at the base.
Installing Seat
Once you determine your preferred position, install seat onto the
seat bracket. Lock the seat clamp and headrest bolts tightly. Make
sure that the seat attachment are tightened securely. If the
attachments are not sufficiently tight, the loose bolts on the FRP
seat may break the seat from the bottom with use. Attach the seat
pad with the provided Velcro strips on the seat pad to the FRP seat.
Installing Brake and Shifter Cables
Attached to the frame are three cable guides for the rear derailleur
cable, as well as two cable guides for the front derailleur. Be sure to
avoid sharp bends while routing the cables. Grip shifters have been
installed on the handlebars with the shifter wire already threaded.
Shifter Cables
1. Insert the boom into the frame, making sure that the front
derailleur is on top and the crank is to the right. Do not fully
tighten the bolts.
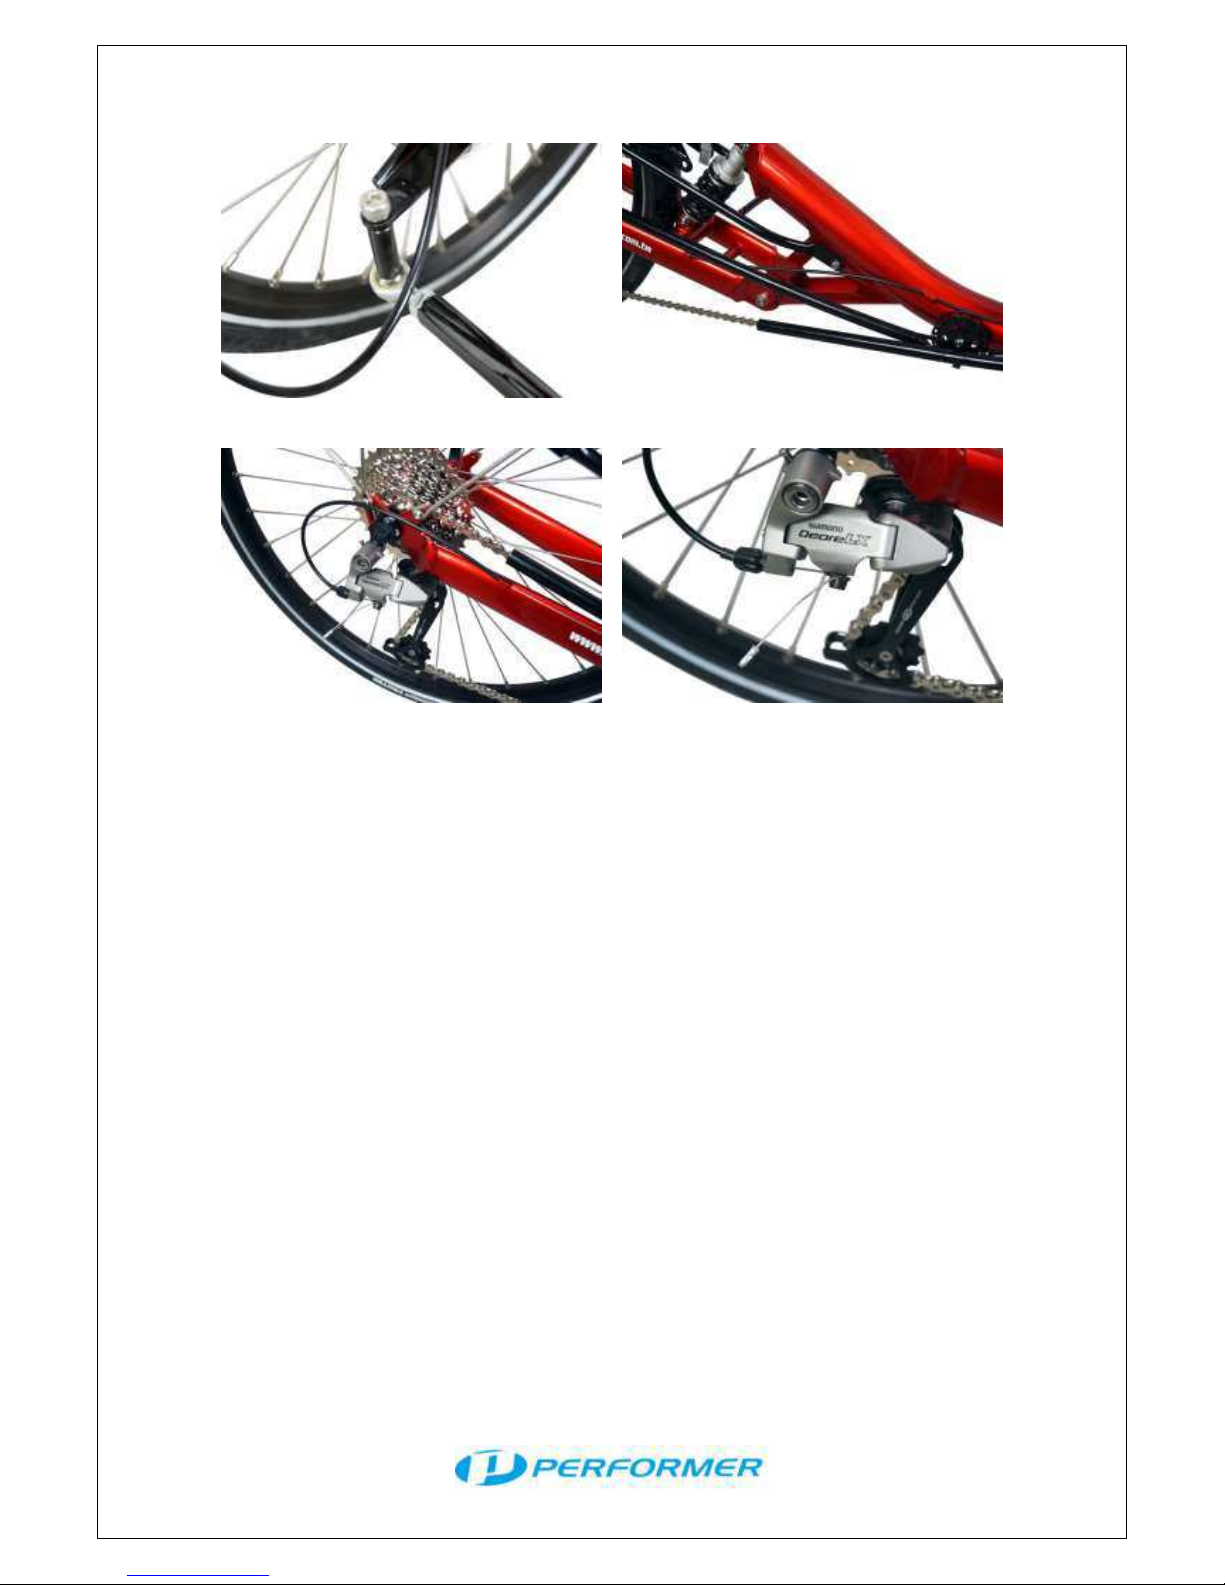
2. Slide the right hand shifter wire into a cable tube and route it
along the tie rod. (Pic 10)
3. Check that the cable is long enough for a full turn in both
directions.
4. Route the shifter cable under the seat bracket and through the
cable guide. (Pic 11)
5. Slide the shifter wire into a short cable tube. Insert the shifter
cable tubes into the rear frame guides, leaving an exposed
section of cable between them. Insert the shifter wire into the rear
dereailleur.
6. Pull the shifter wire tightly, tighten the derailleur wire screw, and
seal the end with a provided wire cap. (Pic 12. Pic 13)
Page 8
8
Pic 10
Pic 11
Pic 12
Pic 13
7. Slide the left hand shifter wire into a cable tube and also route it
along the tie rod.
8. Route the front shifter cable through the cable guide below the
boom and then into the guide on the boom itself. Insert the shifter
wire into the front derailleur, tighten the wire screw, and seal the
end with a provided wire cap.
Brake Cables
Front brake cable (right hand):
1. Squeeze the brake lever to open it up and place the head of the
cable into the lever.
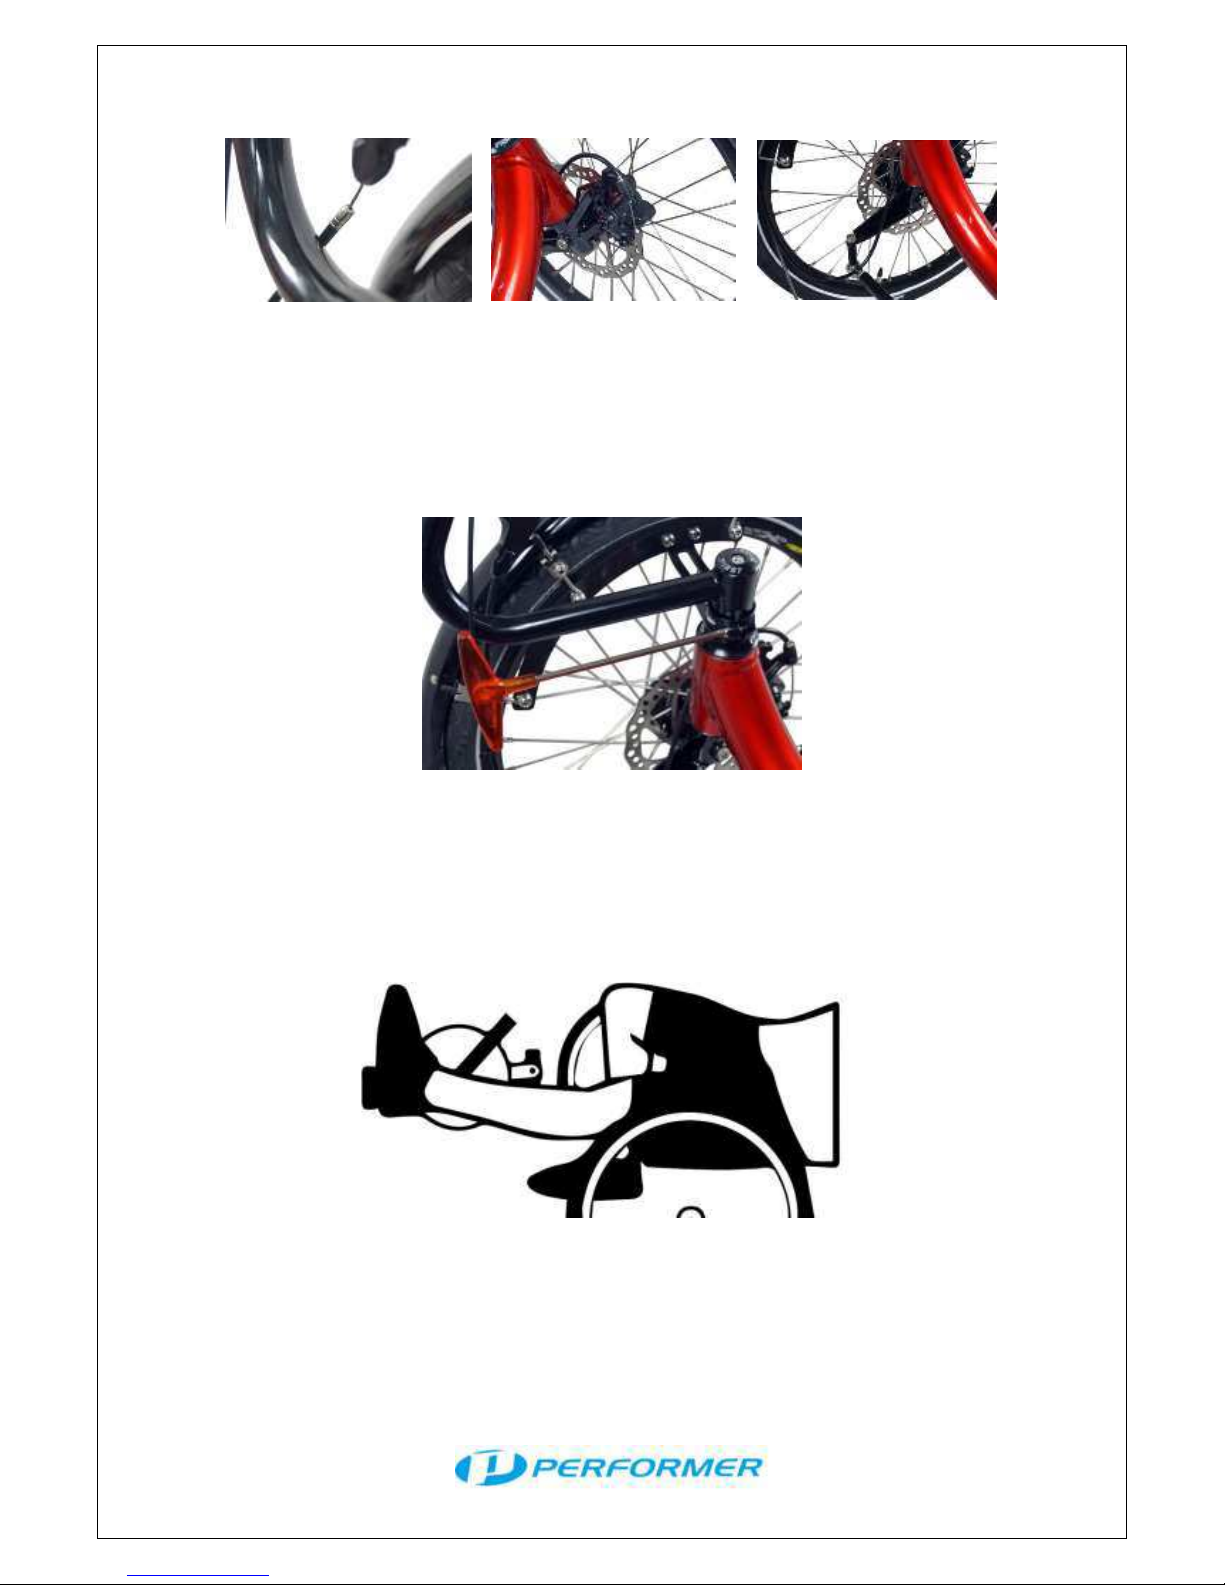
2. String the brake wire into a cable tube. (Pic 14)
3. Thread brake cable into brake arm and seal the end with a
provided cap. (Pic 15)
4. Attach the brake and shifter cables to the tie rod with a provided
zip tie. (Pic 16)
5. If the wheel drags slightly, adjust the brake pad by using the
brake pad adjusting knobs.
6. Repeat for the left slide.
Page 9
9
Pic 14
Pic 15
Pic 16
Adjusting Handlebars
Each handlebar may be adjusted independently. To adjust, loosen
the two handlebar bolts to and move the handlebar to a comfortable
position. Tighten handlebar bolts. (Pic 17)
Adjusting Boom
Sit on the seat and step against the pedal, carefully sliding the boom
in or out to adjust to a comfortable leg length. Make sure that the
crank is vertical and then tighten the two frame bolts securing the
boom in position. (Pic 18)
Routing Chain
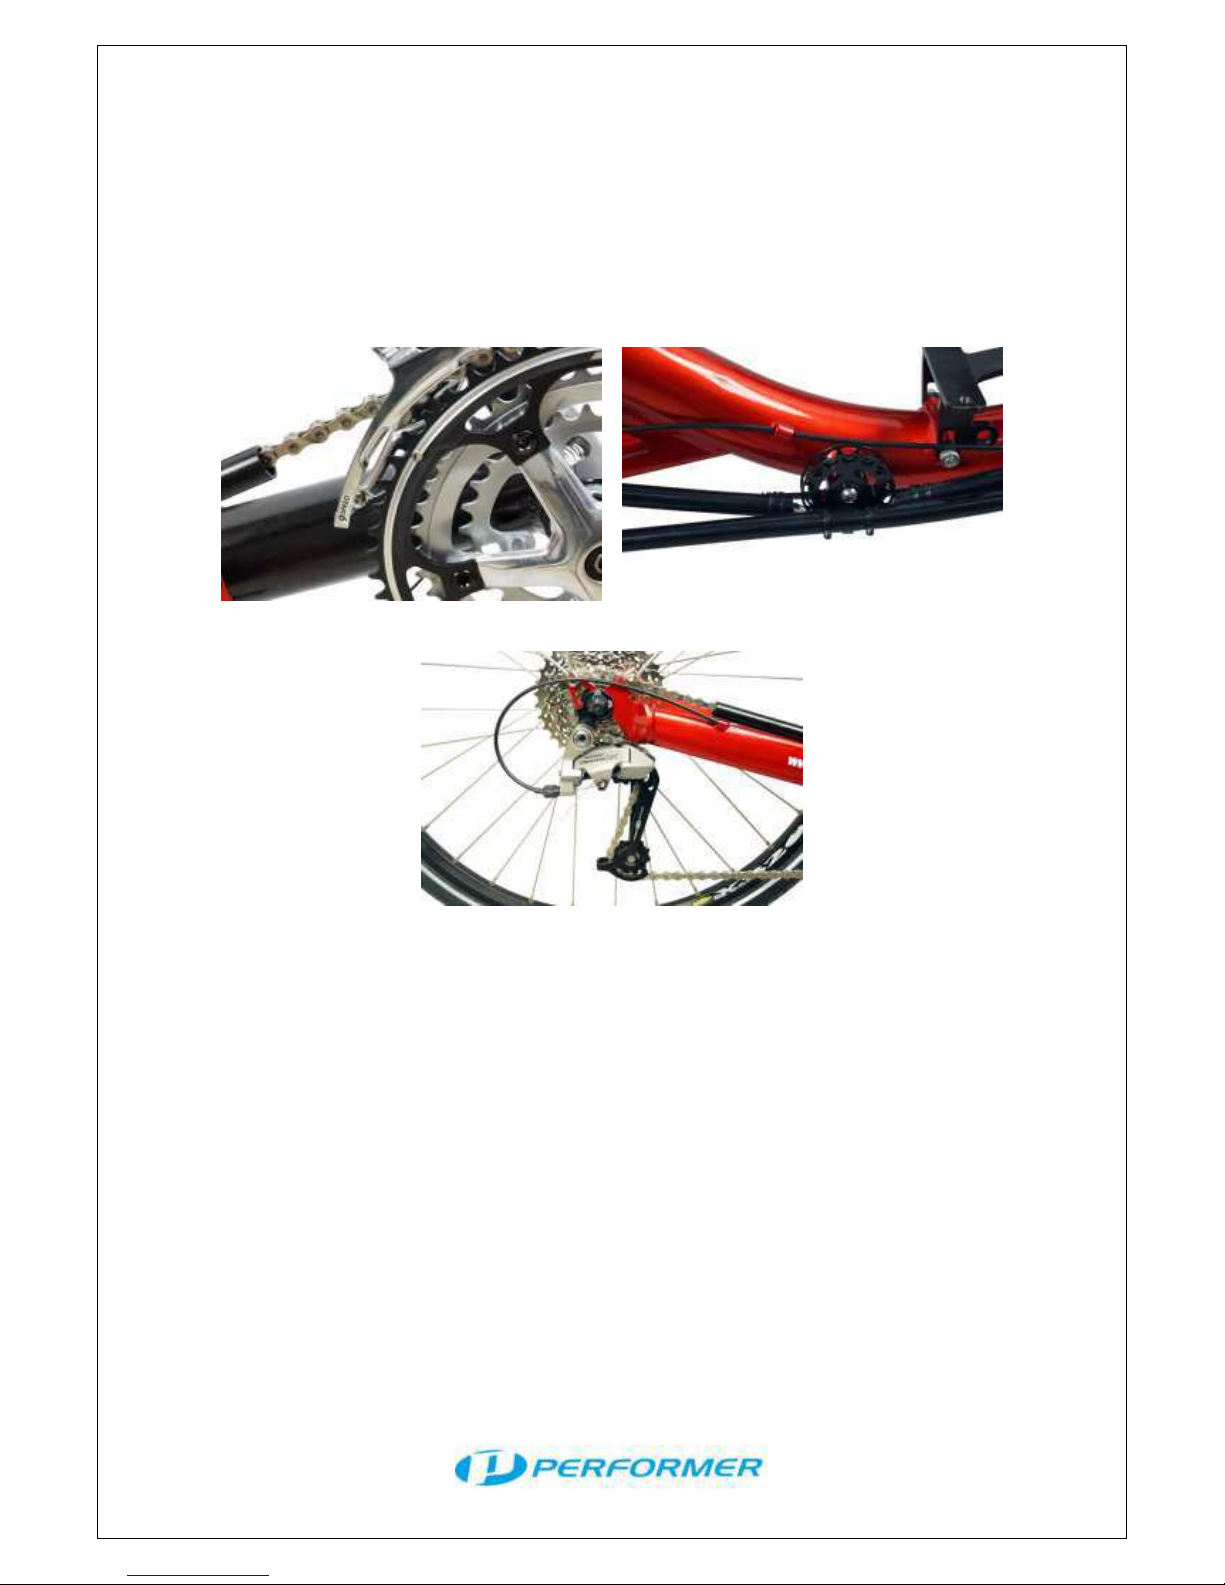
1. Moving in the reverse pedaling direction, route the chain over the
smallest chain ring, through the front derailleur and through the
upper chain tube. (Pic 19)
Page 10
10
2. Run the chain below the under-seat idler and through the idler
chain guard. (Pic 20)
3. Run the chain through the next chain tube (not shown), over the
sprockets, and then down through the rear derailleur. (Pic 21)
4. Finally, run the chain through the lower tube to reach the other
end of the chain. (Pic 21)
Pic 19
Pic 20
Pic 21
Adjusting Chain Length
The proper chain length is determined by the position of the rear
derailleur.
1. Shift to the smallest cog in both the front and the rear.
2. Pull the chain taut. If the chain is too short, there will be a gap as
in. (Pic 22)
3. There should be a small gap, enough to prevent rubbing,
between the derailleur and the chain. (Pic 23)
4. Once the proper length has been determined, break the chain
using the provided tool and use the provided master link to attach
the chain.
Page 11
11
Pic 22
Pic 23
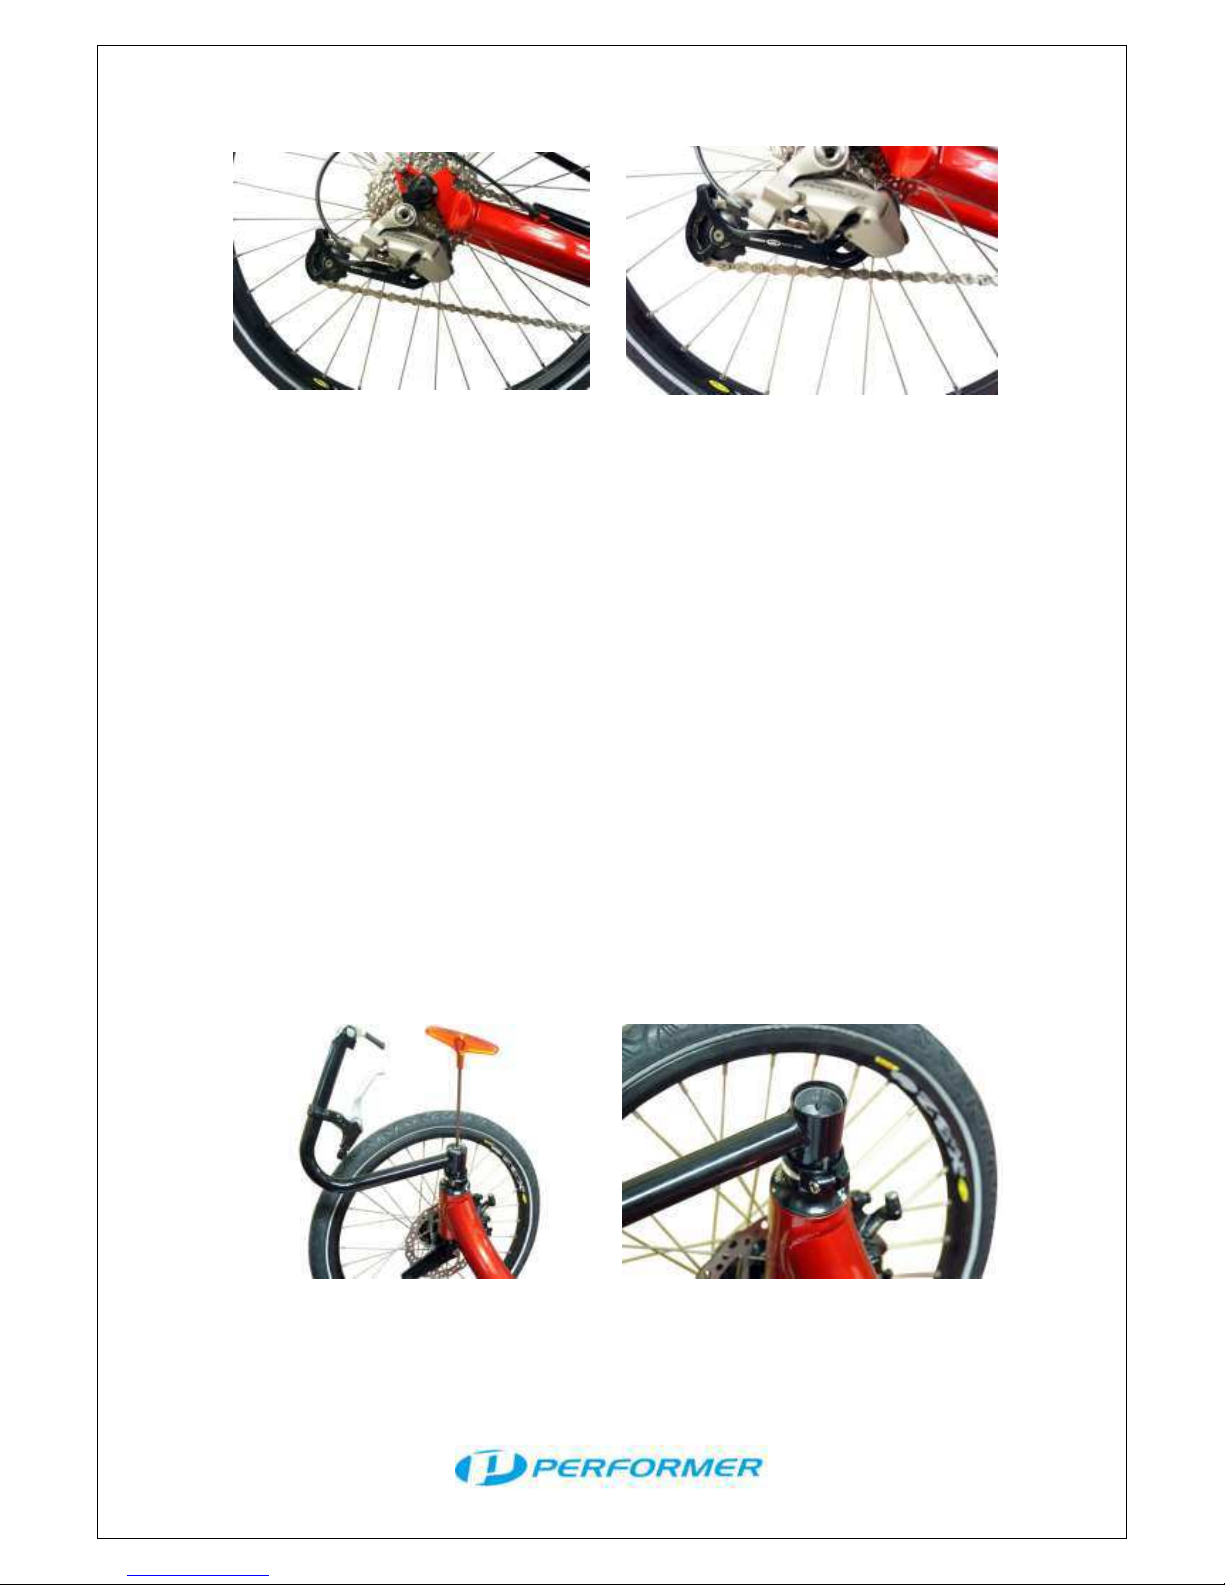
Adjusting Derailleurs
1. Check if the chain can shift to the largest and smallest cog on the
rear wheel, if not, the rear derailleur H/L limit screws will need to
be adjusted,
2. If the chain won’t go to the largest cog, loosen the L. If it won’t
shift to the smallest cog, loosen the H.
3. If the front derailleur won’t shift the chain to the largest chainring,
loosen the H .If it won’t shift the chain to the smallest chainring,
loosen the L.
Install Fender
Front fender:
1. Remove the screw from head parts. (Pic 24)
2. Remove handlebar. (Pic 25)
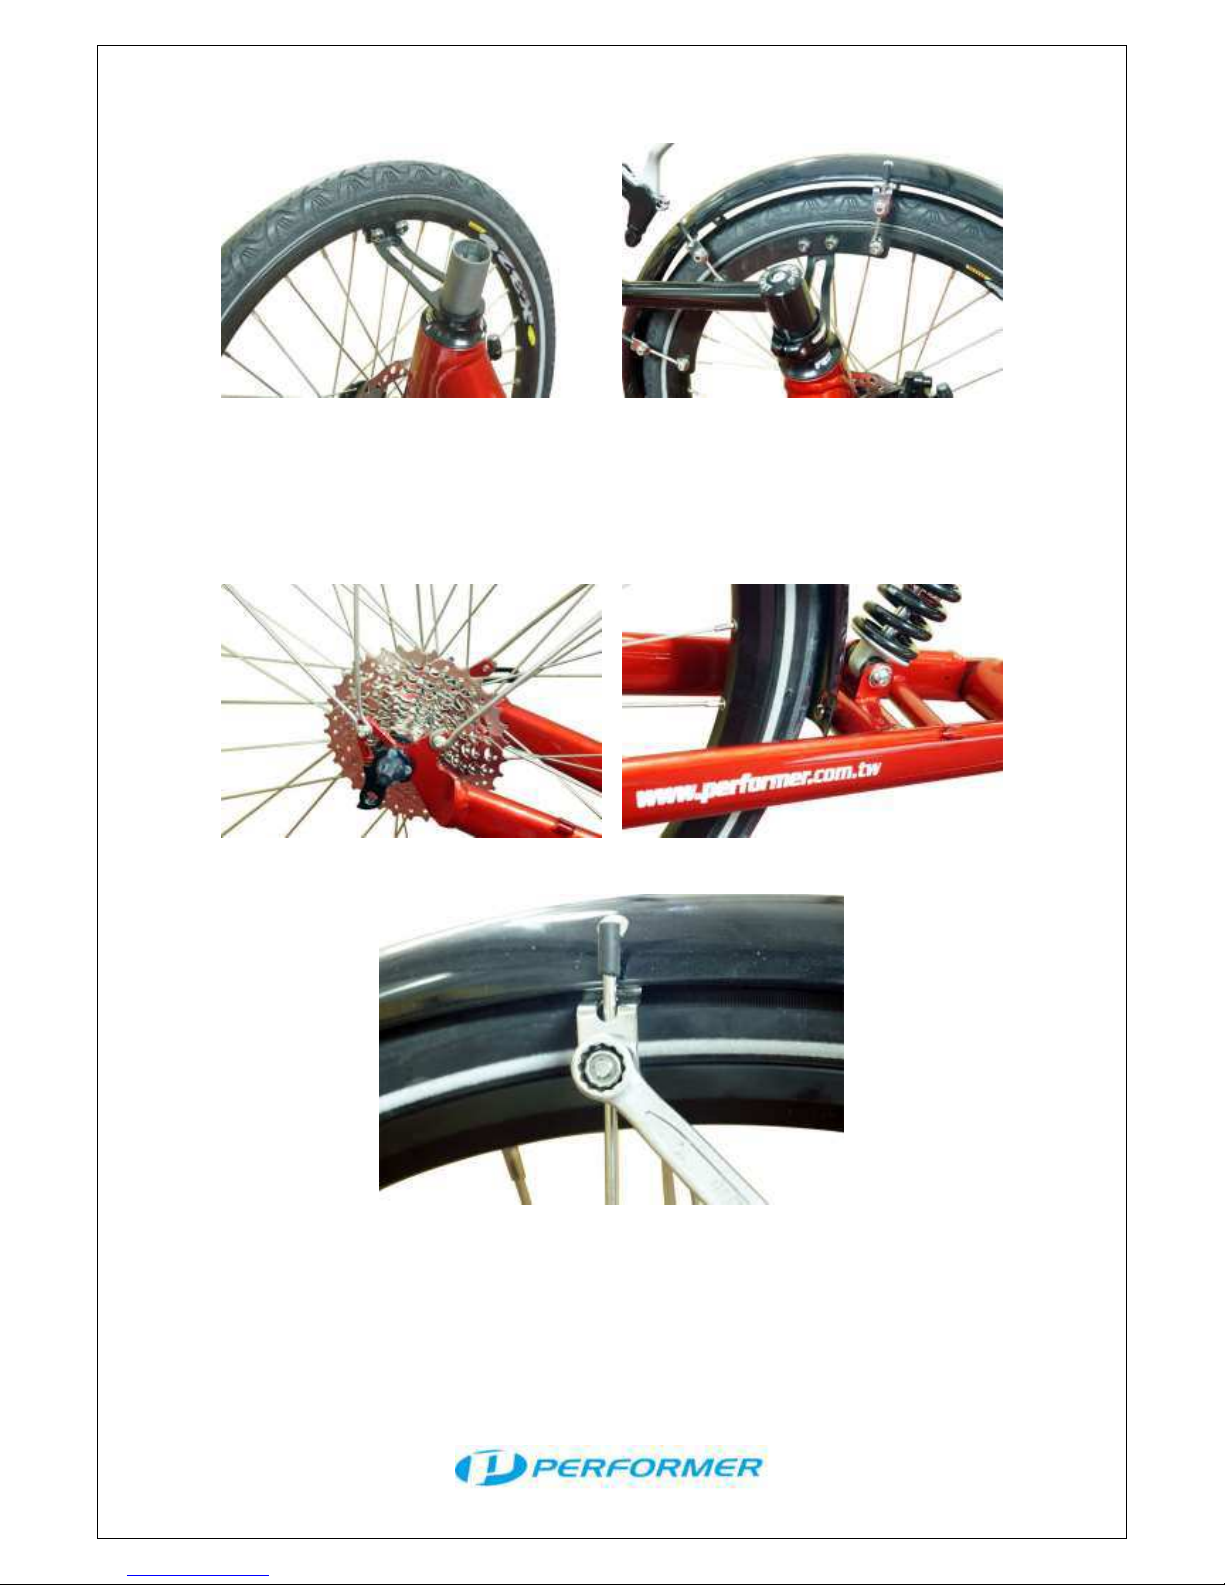
3. Place the fender holder and attach fender. (Pic 26)
4. Re-install handlebar and head parts. (Pic 27)
Pic 24
Pic 25
Page 12
12
Pic 26
Pic 27
Rear fender:
1. Place the rear fender on the rear wheel. (Pic 28)
2. Tighten the bolts. (Pic 29)
3. Adjusted the height. (Pic 30)
Pic 28
Pic 29
Pic 30
Page 13
13
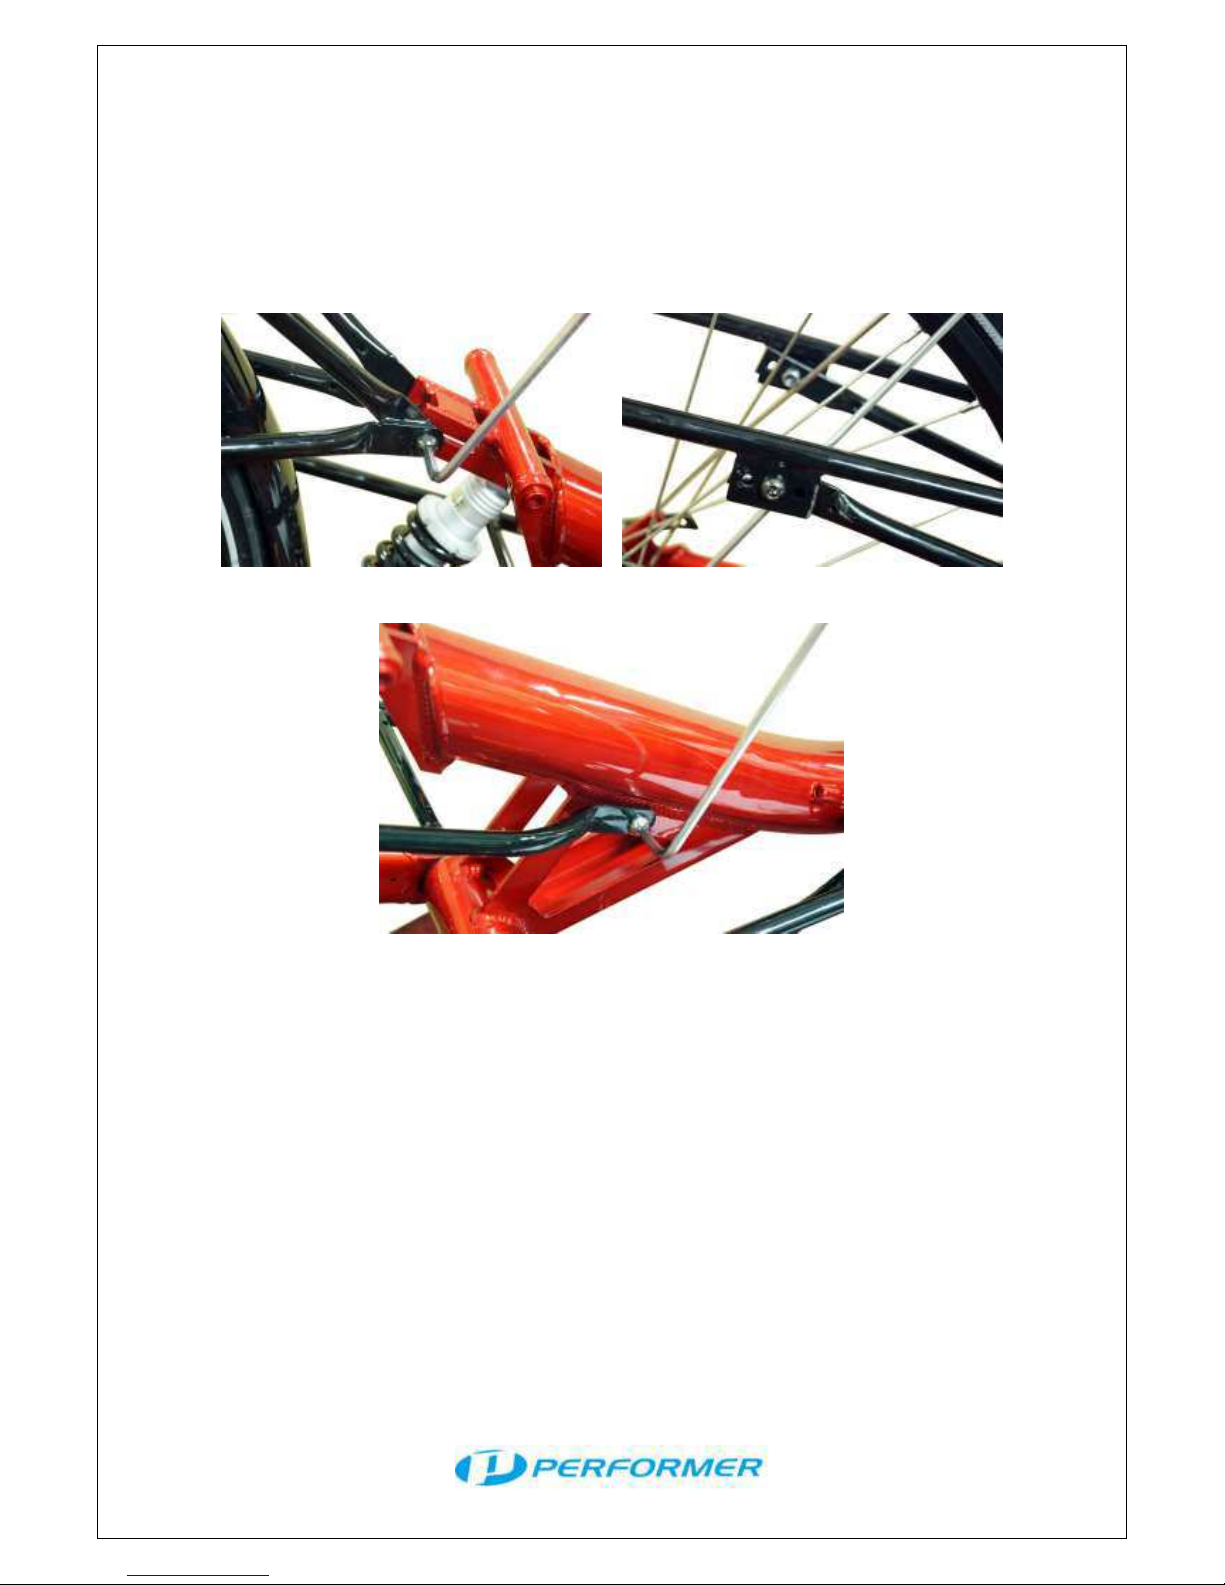
Install Rear Rack
1. Install rear rack on bracket. (Pic 31)
2. Lock bolts for both sides in the middle of rear rack. (Pic 32)
3. Tighten thread bolts.(Pic 33)
Pic 28
Pic 29
Pic 30
Page 14

14
Safety Recommendations
1. Always wear an approved cycling helmet.
2. Inspect your trike before every ride.
3. Tighten any parts which may have loosened.
4. Use a flag. Trikes are very low to the ground and a flag can
increase visibility.
5. The tires should be inflated to the pressure indicated on the rim.
6. Replace your tires before they wear out.
7. Be careful riding in wet weather conditions. Ride slower through
corners to avoid skidding.
8. Attach reflectors and use front and rear lights while riding at
night.
Limited Warranty
WARRANTY LIMITATIONS
To the extent permitted by law, this warranty is in lieu of all other
express or implied warranties. Performer disclaims all statutory and
implied warranties, including without limitation, warranties of
merchantability and fitness for a particular purpose, and warranties
against hidden or latent defects, to the extent permitted by law. Any
such warranty which cannot be disclaimed is limited to the duration
and remedies of this express warranty in so far as such a limitation
is allowed by law.
WHO IS COVERED
This warranty is extended only to the initial purchaser for as long as
the initial purchaser owns the trike and is not transferable. This
warranty only covers personal use and does not extend to business
or commercial use.
WHEN DOED THIS WARRANTY BEGIN
This warranty shall take effect on the date of original purchase.
Page 15

15
WHO WILL FULFULL THIS WARRANTY
Performer is solely responsible fulfilling the terms of this warranty.
The individual or company selling or distributing this trike shall not
be responsible for fulfilling the terms of this warranty; any work done
by the seller or distributor to replace or repair any part of this trike
shall not imply a duty by the seller or distributor to fulfill the terms of
this warranty. Repairs performed by anyone other than Performer,
or any person authorized by Performer, and replacement parts bot
supplied by Performer, are not covered under this warranty.
Performer may, at our sole discretion, authorize the initial purchase
or agent of the initial purchaser to perform repairs under this
warranty.
HOW WILL THIS WARRANTY BE FULFULLED
Under this warranty, Performer will repair, replace or refund, at our
sole discretion a defective frame, fork or other part with the same or
comparable model. Frame, fork or parts covered must be returned
to us, to an authorized dealer or any other person, at our discretion,
for inspection at the customer’s expense and must include a copy of
the original receipt. The owner is responsible for all labor, shipping
and travel costs connected with the repair or replacement of
warranted parts.
WHAT IS COVERED
Metal frames are covered for a period of five years. Carbon frames
are covered for a period of three years. Forks and non-consumable
parts are covered for a period of one year.
WHAT IS NOT COVERED
Consumable parts, including but not necessarily limited to, tires,
tubes, brake and shifter cables, brake shoes, grips, seat covering,
crankset, gears and chain are bot covered under this warranty.
In addition to the limitations above, normal wear and tear, damage
due to improper assembly and/or maintenance, modifications, or
installation of parts or accessories not included with this trike as sold,
including power assist, is expressly excluded from warranty and is
not covered.
Page 16

16
Further, any damage caused by any accident, act of God, abuse,
misuse, neglect or theft is not covered. This warranty does not cover
paint damage, rust or cosmetic damage including dents
or scratches.
NOT LIABLE FOR DAMAGES
In no event shall Performer be liable for any direct, indirect, punitive,
incidental, or consequential losses, injuries, damages or expenses
to property or life, whatsoever arising out of or connected with the
use or misuse of our products.
YOUR RESPONSIBILITES
The initial purchaser is responsible for inspecting this trike for
proper assembly, installation and adjustments at time of purchase,
and for subsequent normal maintenance and adjustments.
The initial purchaser or that person’s agent must notify Performer at
the email address below of any claims under this warranty. Such
notification must be given within the warranty periods stated above.
Limited Warranty Contact Information
Please notify Performer in writing with attached picture of the frame
showing damage to
[email protected] : For warranty
assistance, please contact Performer at this email address. For
faster service, attach a picture of the damage being claimed.
 Loading...