

Page 1
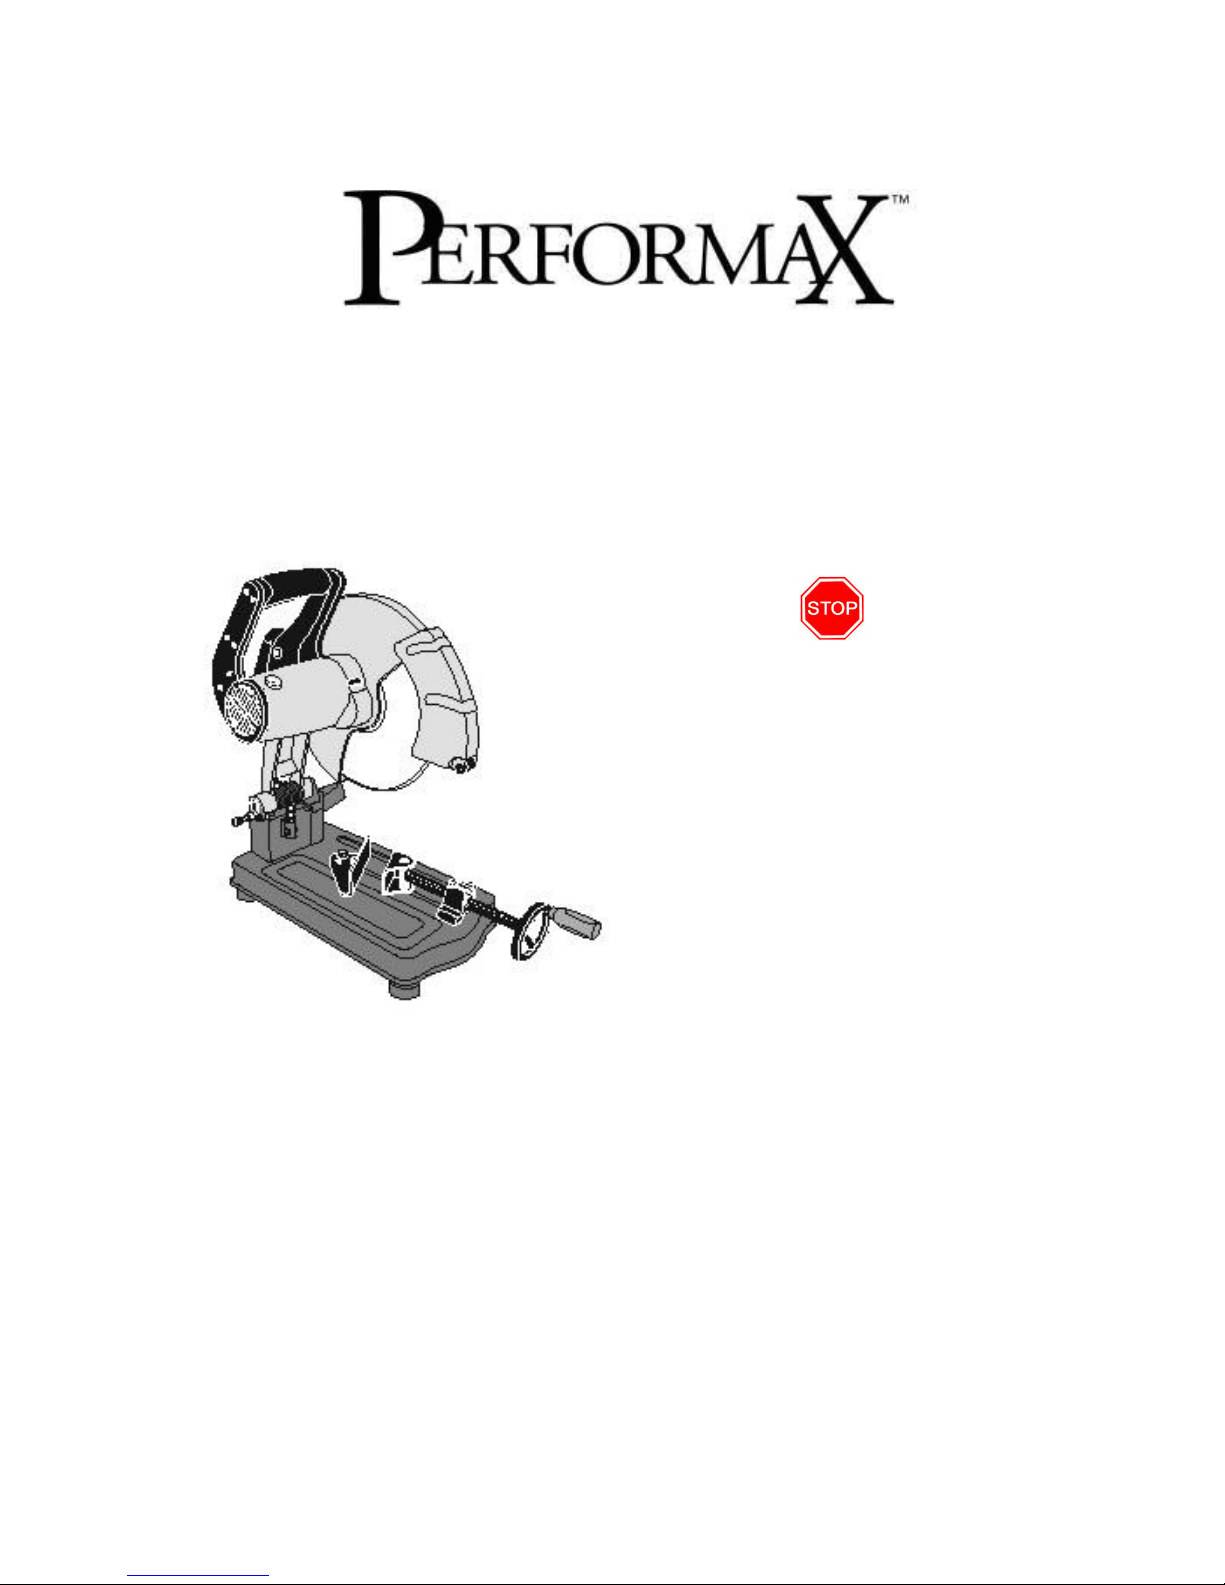
14" Cut-off Saw
With Laser Guide
DO NOT RETURN TO STORE
Questions? Problems?
Please call our customer help line:
(888) 315-3080 M-F 8-5 CST or
by email:
Operation and Safety Instructions
Model 90235
Page 2

Table of Contents
Technical data……………………………………………………………………… 2
General safety rules………………………………………………………………… 3
Specific safety rules for the cut-off saw……………………………………………. 5
Electrical information………………………………………………………………. 6
Know your cut-off saw…………………………………………………………….. 8
Assembly and adjustments…………………………………………………………. 9
Operation…………………………………………………………………………… 10
Maintenance………………………………………………………………………… 13
Replacement parts………………………………………………………………….. 14
Warranty……………………………………………………………………………. 16
Technical data
14" Cut-off Saw with Laser Line Model: 90235
Motor: 120 V, 60 Hz, 15 A
Horsepower: 2 1/2
Motor speed: 3800 RPM (no load)
Cutting disc: 14" (35.6 cm)
Arbor: 1" (2.5 cm)
Swiveling vise clamp: 0–45° right, 0–45° left
Maximum cutting diameter: 4 1/2" (11.4 cm)
Laser module: Class III, battery-operated
Laser wavelength: 640–660 nm
Laser output: ≤5 mW
Net weight: 46 lb 3 oz (21 kg)
2
Page 3

General safety rules
Safety is a combination of common sense, staying alert, and knowing how your cut-off saw works.
SAVE THESE SAFETY INSTRUCTIONS.
WARNING: To avoid mistakes that could cause serious injury, do not plug in the saw
until the following steps have been read and understood.
1. READ and become familiar with this entire instruction manual. Learn the tool’s applications,
limitations, and possible hazards.
2. AVOID DANGEROUS CONDITIONS. Do not use power tools in wet or damp areas or expose
them to rain. Keep work areas well-lit.
3. DO NOT use power tools in the presence of flammable liquids or gases.
4. ALWAYS keep your work area clean, uncluttered, and well-lit. Do not work on floor surfaces
that are slippery.
5. KEEP BYSTANDERS AT A SAFE DISTANCE from the work area, especially when the tool
is operating. NEVER allow children or pets near the tool.
6. DO NOT FORCE THE TOOL to do a job for which it was not designed.
7. DRESS FOR SAFETY. Do not wear loose clothing, gloves, neckties, or jewelry (rings,
watches, etc.) when operating the tool. Inappropriate clothing and items can get caught in
moving parts and draw you in. ALWAYS wear non-slip footwear and tie back long hair.
8. WEAR A FACE MASK OR DUST MASK as the sawing operation produces dust.
WARNING: Dust generated from certain materials can be hazardous to your health.
Always operate the saw in a well-ventilated area and provide for proper dust removal. Use dust
collection systems whenever possible.
9. ALWAYS remove the power cord plug from the electrical outlet when making adjustments,
changing parts, cleaning or working on the tool.
10. KEEP GUARDS IN PLACE AND IN WORKING ORDER.
11. AVOID ACCIDENTAL START-UPS. Make sure the power switch is in the OFF position
before plugging in the power cord.
12. REMOVE ADJUSTMENT TOOLS. Always make sure all adjustment tools are removed from
the tool before turning it ON.
3
Page 4
General safety rules (continued)
13. NEVER LEAVE A RUNNING TOOL UNATTENDED. Turn the power switch to OFF. Do
not leave the tool until it has come to a complete stop.
14. NEVER STAND ON A TOOL. Serious injury could result if the tool tips or is accidentally hit.
DO NOT store anything above or near the tool.
15. DO NOT OVERREACH. Keep proper footing and balance at all times. Wear oil-resistant
rubber-soled footwear. Keep the floor clear of oil, scrap, and other debris.
16. MAINTAIN TOOLS PROPERLY. ALWAYS keep tools clean and in good working order.
Follow instructions for lubricating and changing accessories.
17. CHECK FOR DAMAGED PARTS. Check for alignment of moving parts, jamming, breakage,
improper mounting, or any other conditions that may affect the tool’s operation. Any part that is
damaged should be properly repaired or replaced before use.
18. MAKE THE WORKSHOP CHILDPROOF. Use padlocks and master switches and ALWAYS
remove starter keys.
19. DO NOT operate the tool if you are under the influence of drugs, alcohol, or medication that
could affect your ability to use the tool properly.
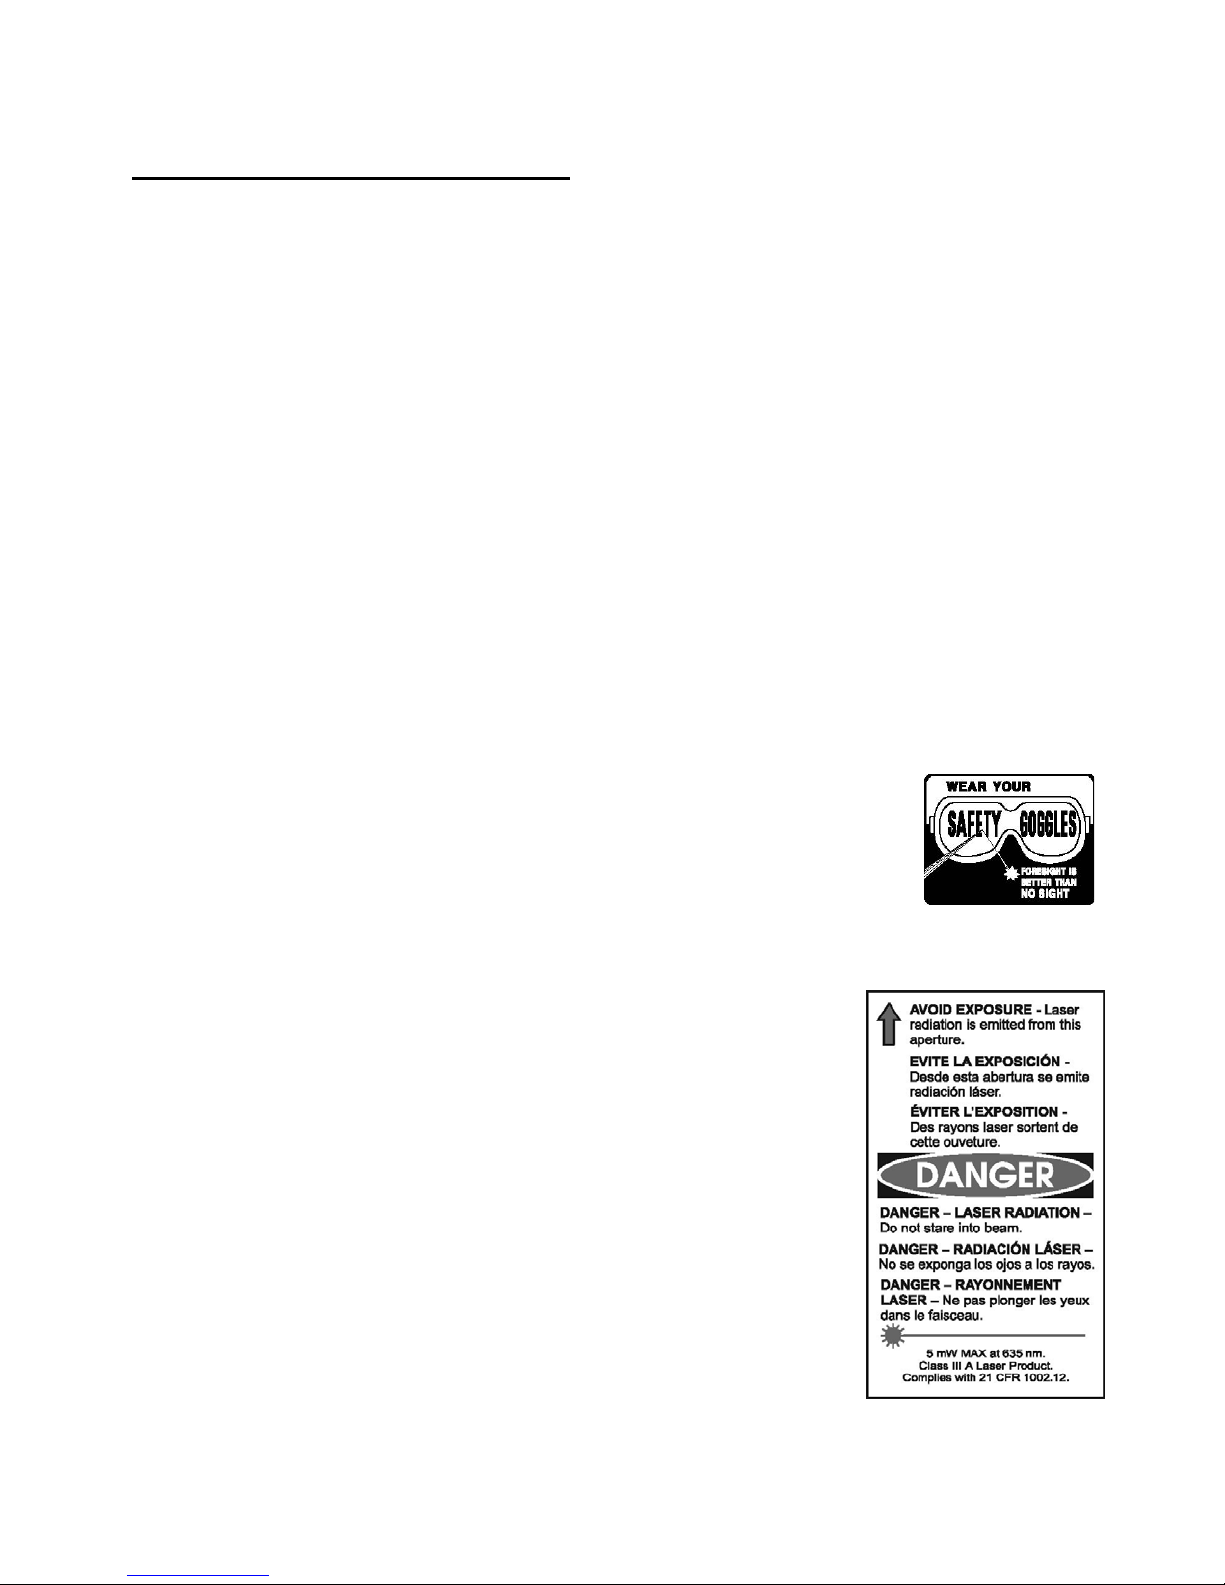
20. USE SAFETY GOGGLES AT ALL TIMES—that comply with
ANSI Z87.1. Normal safety glasses only have impact resistant lenses
and are not designed for safety. Wear a face or dust mask when
working in a dusty environment. Use ear protection, such as plugs or
muffs, during extended periods of operation.
Laser safety
1. Do not stare directly at the laser beam. Eye damage may
occur if you deliberately stare into the beam. Wear laser
enhancing glasses (not provided) when using the laser.
2. The laser light beam used in this system is Class III with ≤5
mW and 640–660 nm wavelengths. AVOID DIRECT EYE
EXPOSURE.
3. The laser must be used and maintained in accordance with
the manufacturer’s instructions:
• Never aim the beam at any person or an object other
than the workpiece.
• Do not project the laser beam into the eyes of others.
• Always ensure the laser beam is aimed at a workpiece
without reflective surfaces as the laser beam could be
projected into your eyes or the eyes of others.
4
Page 5

Specific safety rules for the cut-off saw
WARNING: Do not operate the saw until it is completely assembled and installed
according to the instructions.
1. If you are not thoroughly familiar with the operation of a cut-off saw, obtain advice from a
supervisor, instructor, or other qualified person.
2. ALWAYS WEAR SAFETY GOGGLES. Wear hearing protection during periods of extended
operation.
3. REPLACE A CRACKED METAL CUTTING DISC IMMEDIATELY. Handle the disc
carefully and inspect it for cracks before each use. Tighten the spindle bolt enough to hold the
disc firmly. Use only the disc flanges provided with your cut-off saw.
4. DO NOT stand in front of the cut-off saw when starting it. To start the saw, stand to one side,
turn on the saw, and wait until the saw reaches full speed. There is always the possibility that a
piece from a damaged disc may be thrown off when coming to full speed.
5. ONLY USE abrasive cut-off discs rated at 4100 RPM or higher.
6. DO NOT use a circular saw blade or tooth-type blade in the cut-off saw.
7. DO NOT cut wood with this cut-off saw.
8. DO NOT use the cut-off saw with the upper or lower blade guard removed.
9. ALWAYS CLAMP THE WORKPIECE with the vise-clamp assembly when cutting.
10. CAUTION! Flying sparks will occur when cutting. Sparks can cause personal injury and ignite
flammable materials.
11. DO NOT TOUCH the workpiece after cutting. It is hot and could burn the skin.
12. Release the trigger switch and allow the cutting disc to come to a complete stop before
removing anything from the cut-off saw table.
13. Keep your hands away from rotating parts.
14. AVOID DANGEROUS CONDITIONS. Do not use the cut-off saw in wet or damp areas, or
expose to rain. Use the cut-off saw in a well-ventilated area. This tool is for indoor use only.
5
Page 6
Electrical information
Grounding Instructions
IN THE EVENT OF A MALFUNCTION OR BREAKDOWN, grounding provides the path of
least resistance for electric current and reduces the risk of electric shock. This tool is equipped with
an electric cord that has an equipment grounding conductor and a grounding plug. The plug MUST
be plugged into a matching outlet that is properly installed and grounded in accordance with ALL
local codes and ordinances.
DO NOT MODIFY THE PLUG PROVIDED. If it will not fit the outlet, have the proper outlet
installed by an electrician.
IMPROPER CONNECTION of the equipment grounding conductor can result in electric shock.
The conductor with the green insulation (with or without yellow stripes) is the equipment
grounding conductor. If repair or replacement of the electric cord or plug is necessary, DO NOT
connect the equipment grounding conductor to a live terminal.
CHECK with a licensed electrician or service person if you do not completely understand the
grounding instructions, or if you are not sure if the tool is properly grounded.
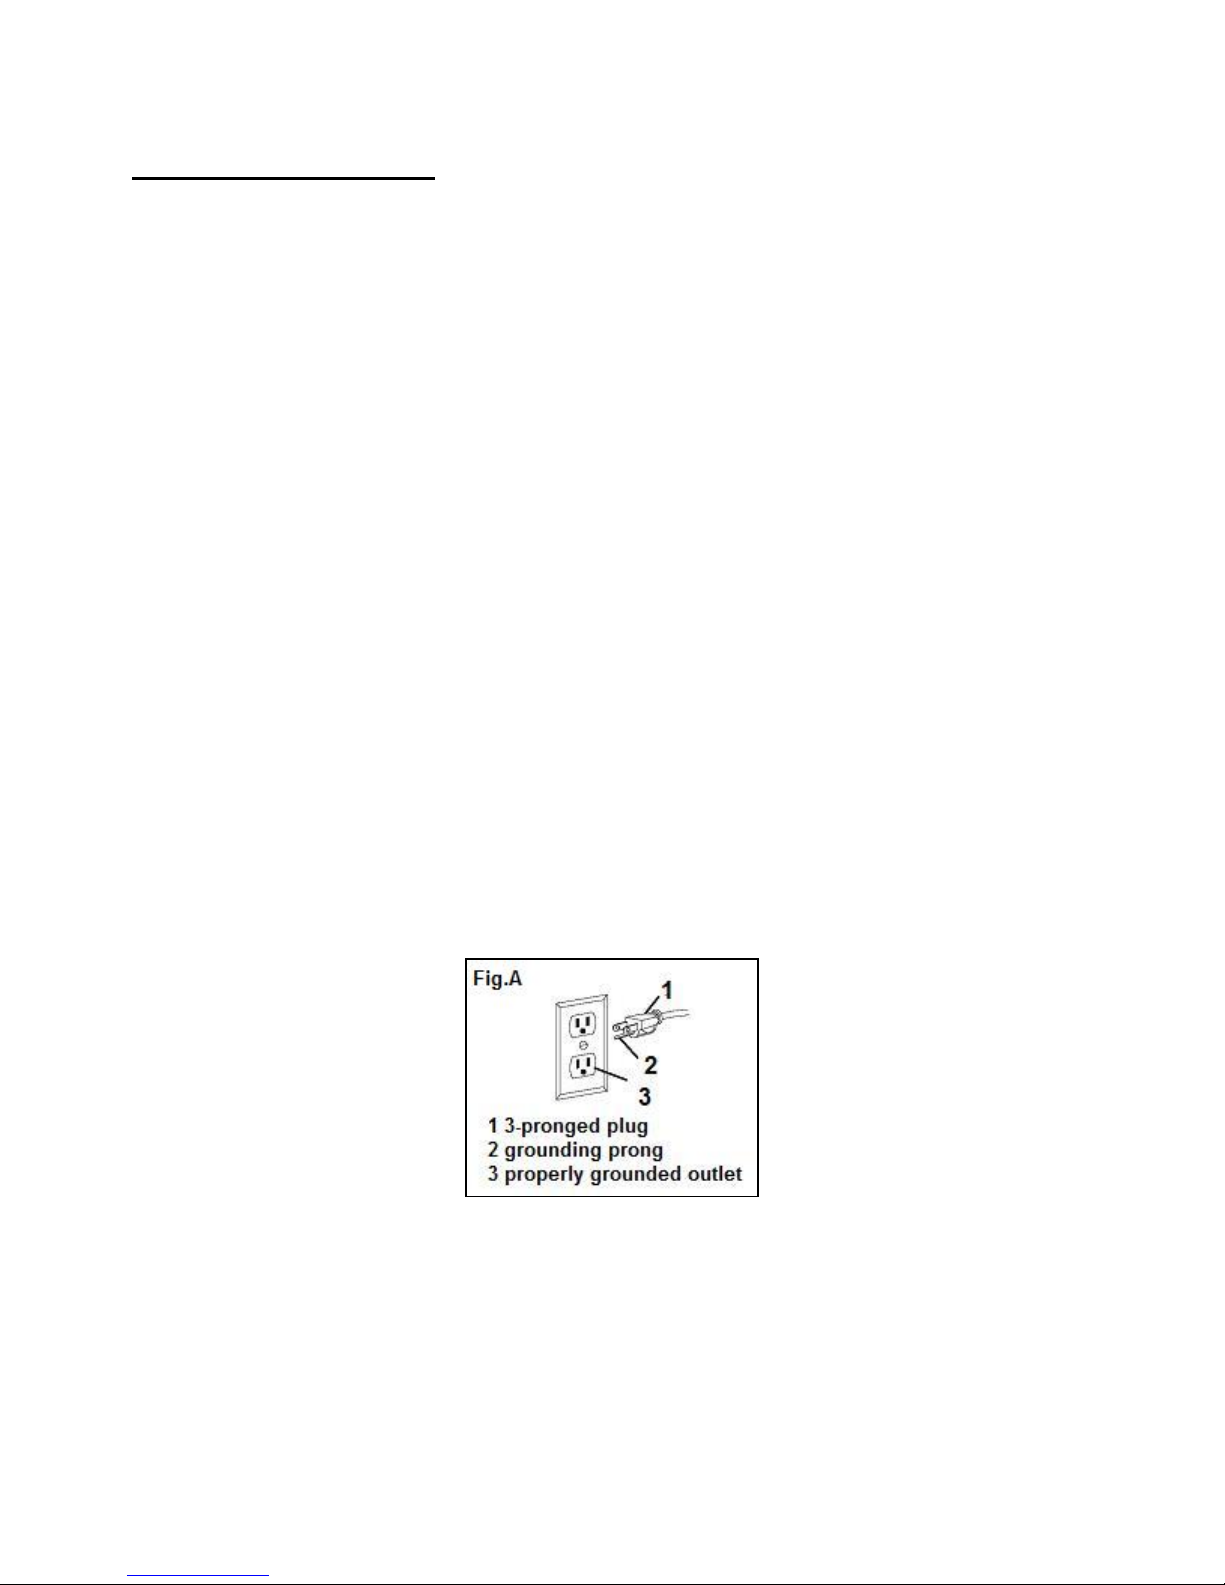
USE ONLY THREE-WIRE EXTENSION CORDS that have 3-pronged plugs and 3-pronged
outlets that accept the tool's plug as shown in Fig. A. Repair or replace a damaged or worn cord
immediately.
CAUTION: In all cases, make certain the outlet in question is properly grounded. If you are not
sure, have a licensed electrician check the outlet.
6
Page 7
Electrical information (continued)
Guidelines for using extension cords
WARNING: This tool is for indoor use only. Do not expose to rain or use in damp
locations.
Make sure your extension cord is in good condition. When using an extension cord, be sure to use
one heavy enough to carry the current your product will draw. An undersized cord will cause a drop
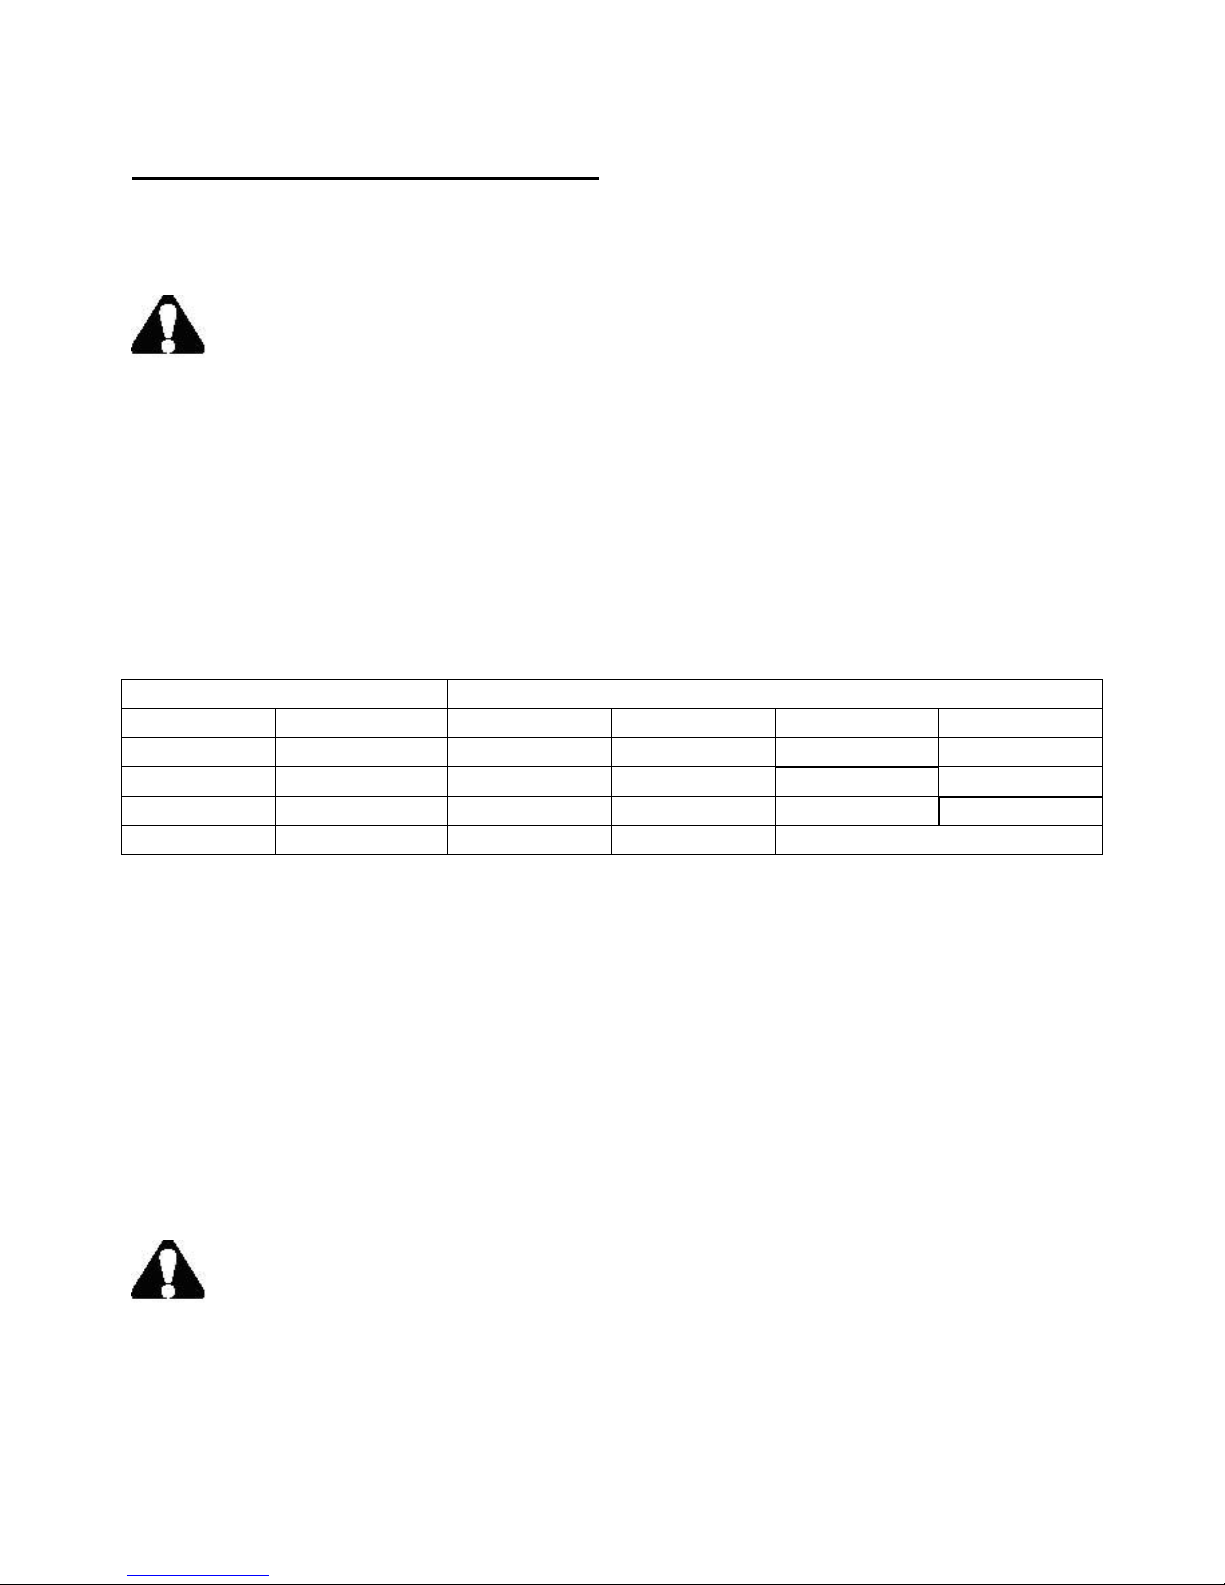
in line voltage resulting in loss of power and overheating. The table below shows the correct size to
be used according to cord length and nameplate ampere rating. If in doubt, use the next heavier
gauge. The smaller the gauge number, the heavier the cord.
Minimum Gauge for Extension Cords (AWG)
(When using 120 V only)
Ampere Rating Total Length of Cord in feet
More Than Not More Than 25 50 100 150
0 6 18 16 16 14
6 10 18 16 14 12
10 12 16 16 14 12
12 16 14 12 Not Recommended
Be sure your extension cord is properly wired and in good condition. Always replace a damaged
extension cord or have it repaired by a qualified person before using it.
Protect your extension cords from sharp objects, excessive heat and damp or wet areas.
Use a separate electrical circuit for your tools. This circuit must not be less than a #12 wire and
should be protected with a 15 A time-delayed fuse. Before connecting the motor to the power line,
make sure the switch is in the OFF position and the electric current is rated the same as the current
stamped on the motor nameplate. Running at a lower voltage will damage the motor.
WARNING: This tool must be grounded while in use to protect the operator from electric
shock.
7
Page 8
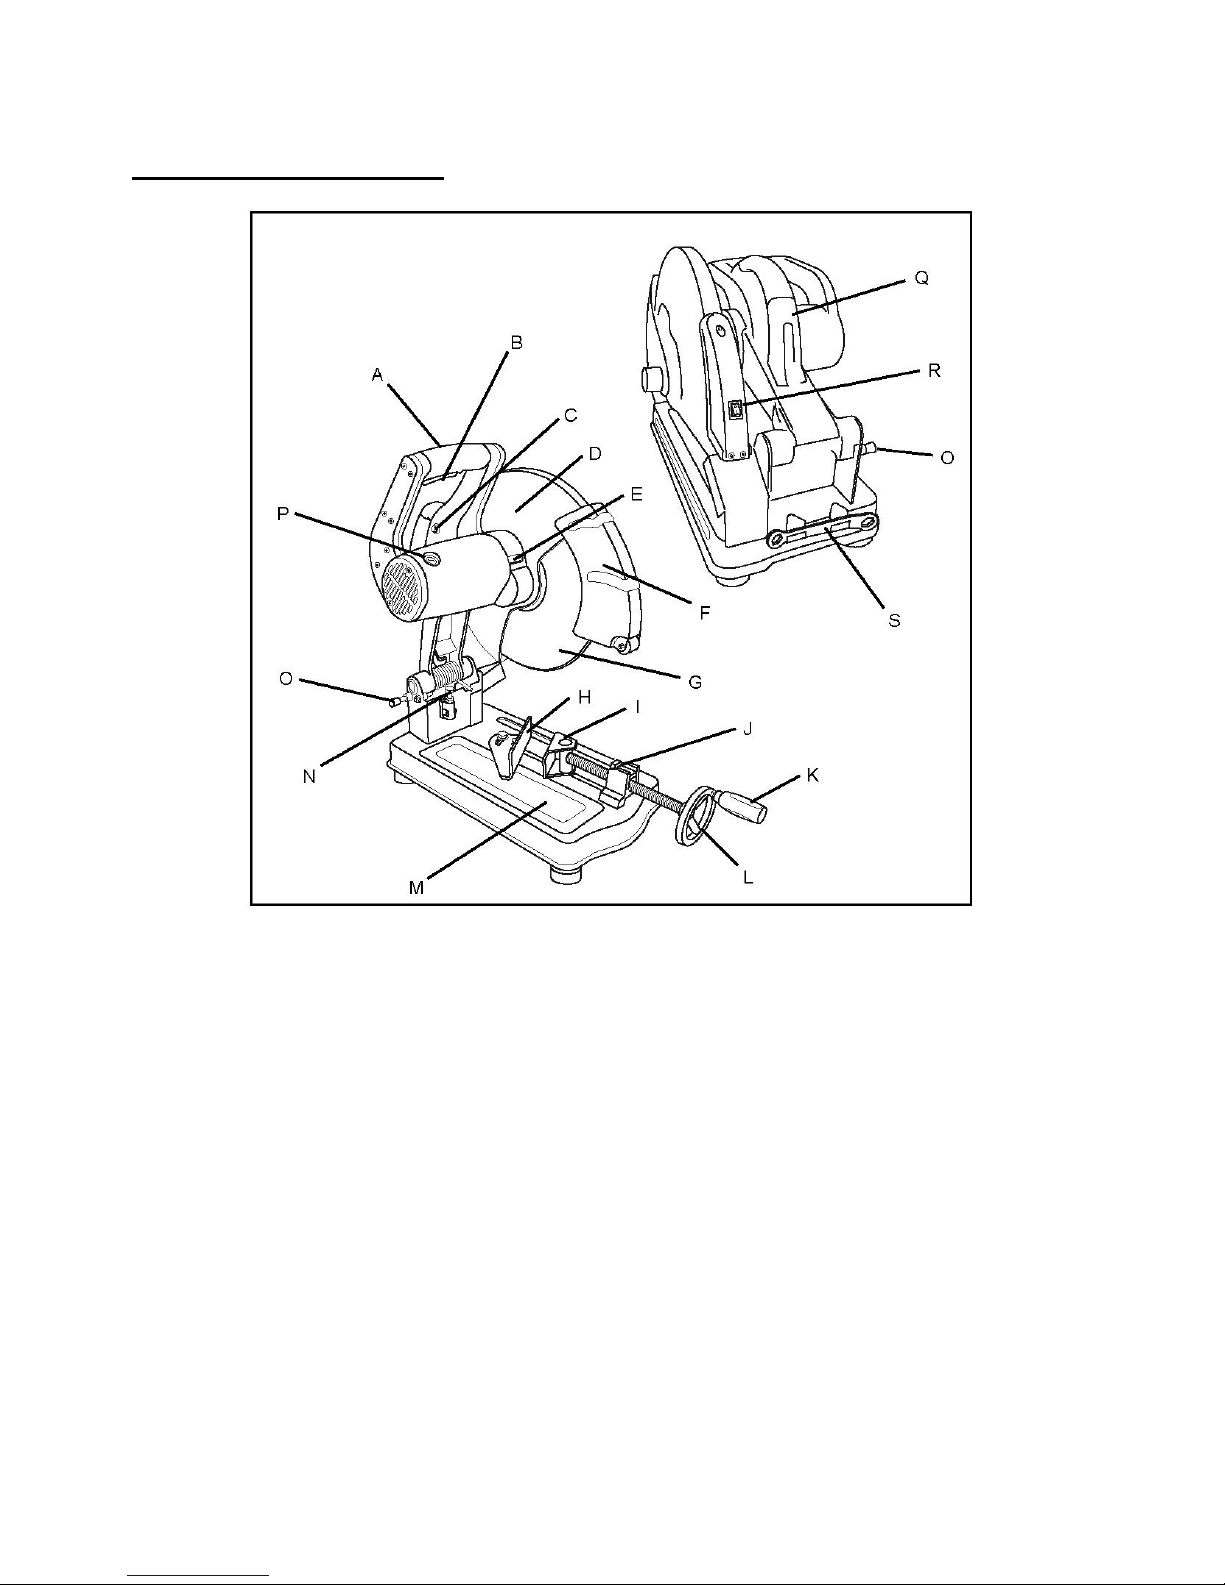
Know your cut-off saw
A D-handle K Vise handle
B Trigger switch L Vise wheel
C Reset switch M Saw table
D Upper blade guard N Depth stop bolt
E Arbor lock O Handle stop lock
F Lower blade guard P Carbon brush cap
G 14" metal cutting disc Q Carrying handle
H Angle plate R Laser switch
I Vise pressure plate S Wrench
J Quick-release latch
8
Page 9
Assembly and adjustments
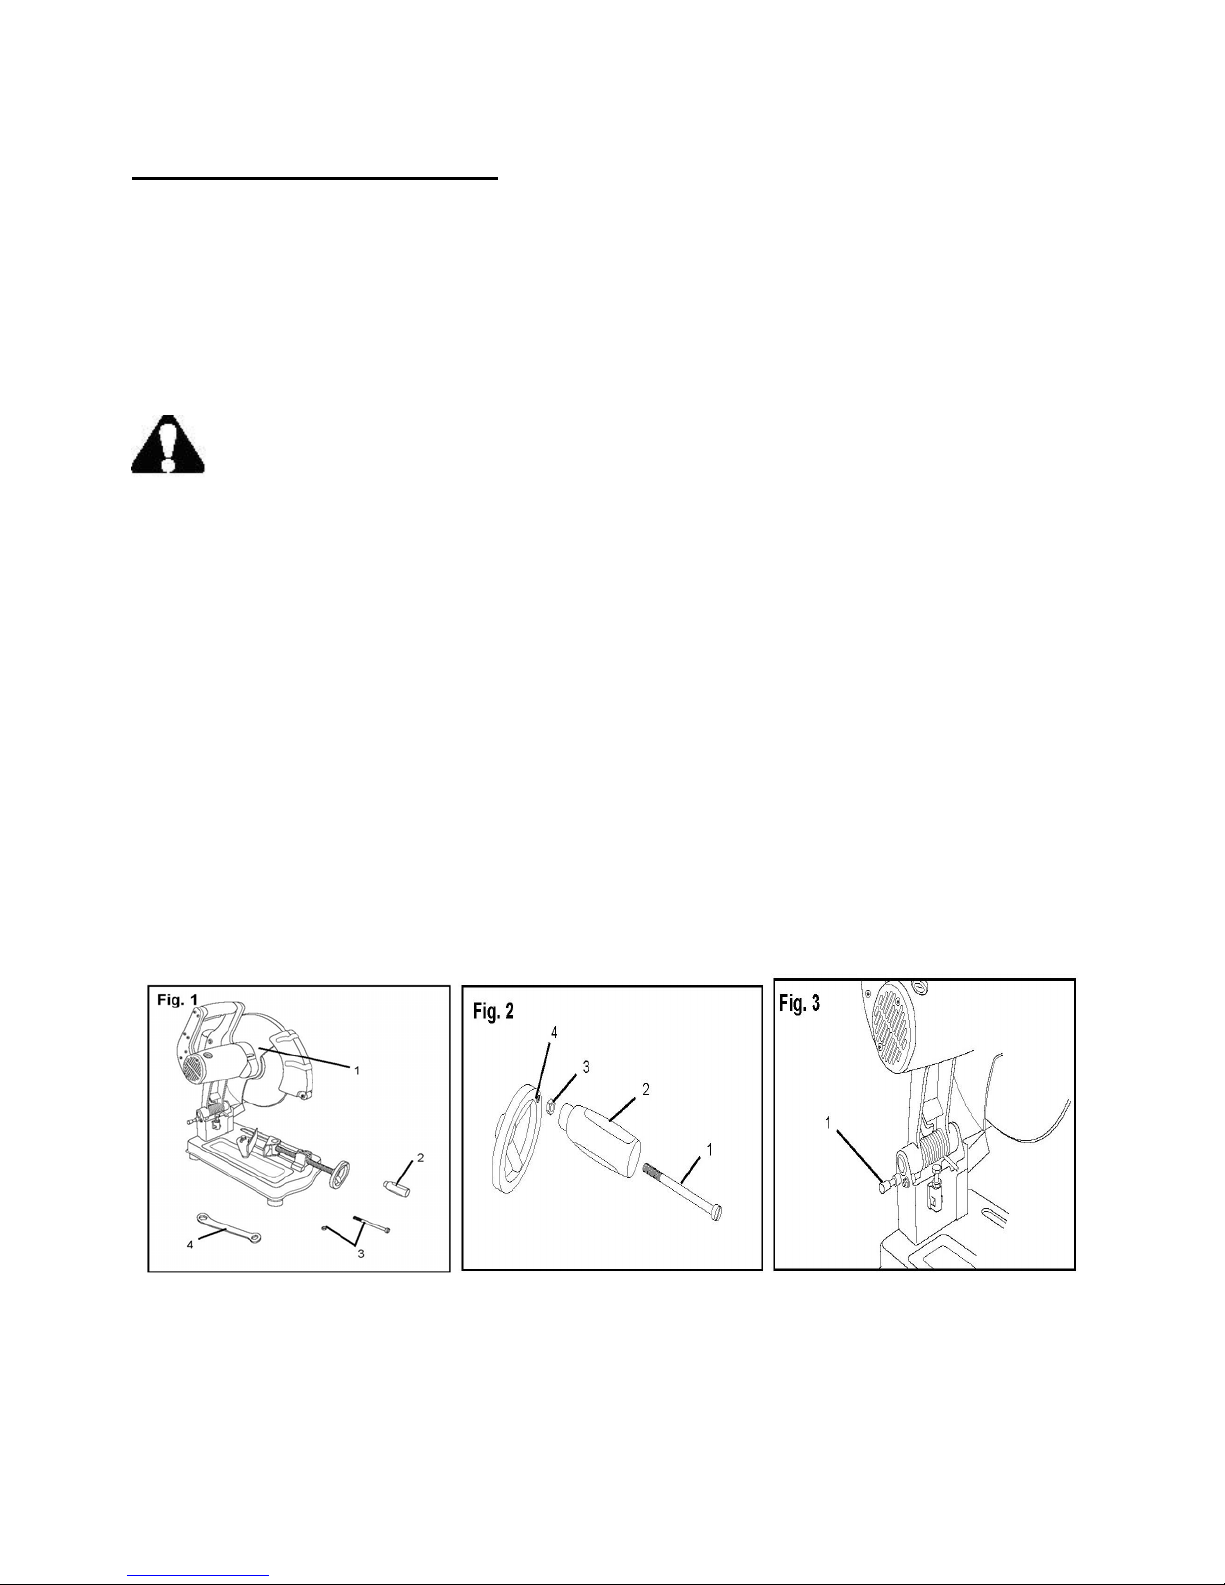
Unpacking (Fig. 1)
Carefully unpack the cut-off saw and all of its parts, and compare against the list below.
1 - Cut-off saw 2 - Vise clamp handle
3 - Threaded bolt and nut 4 - Blade wrench
Do not discard the carton or any packaging until the cut-off saw is completely assembled.
WARNING: If any part is missing or damaged, do not plug in the cut-off saw until the
missing or damaged part is replaced.
Although this cut-off saw requires minimal assembly, it does require adjustments to operate
properly. For your safety, make all adjustments prior to plugging in the saw.
Vise clamp assembly (Fig. 2)
1. Insert the bolt (1) through the vise clamp handle (2).
2. Put the nut (3) on the bolt and hand tighten.
3. Screw the assembled handle into the hole (4) on the vise wheel.
4. Tighten the nut to the wheel so that the handle rotates with the wheel.
Raise/lower the saw (Fig. 3)
1. Pull out the handle stop lock (1) and use the handle to raise or lower the cut-off saw.
2. Push in the handle stop lock (1) to lock the cutoff saw in the raised or lowered position.
9
Page 10
Operation
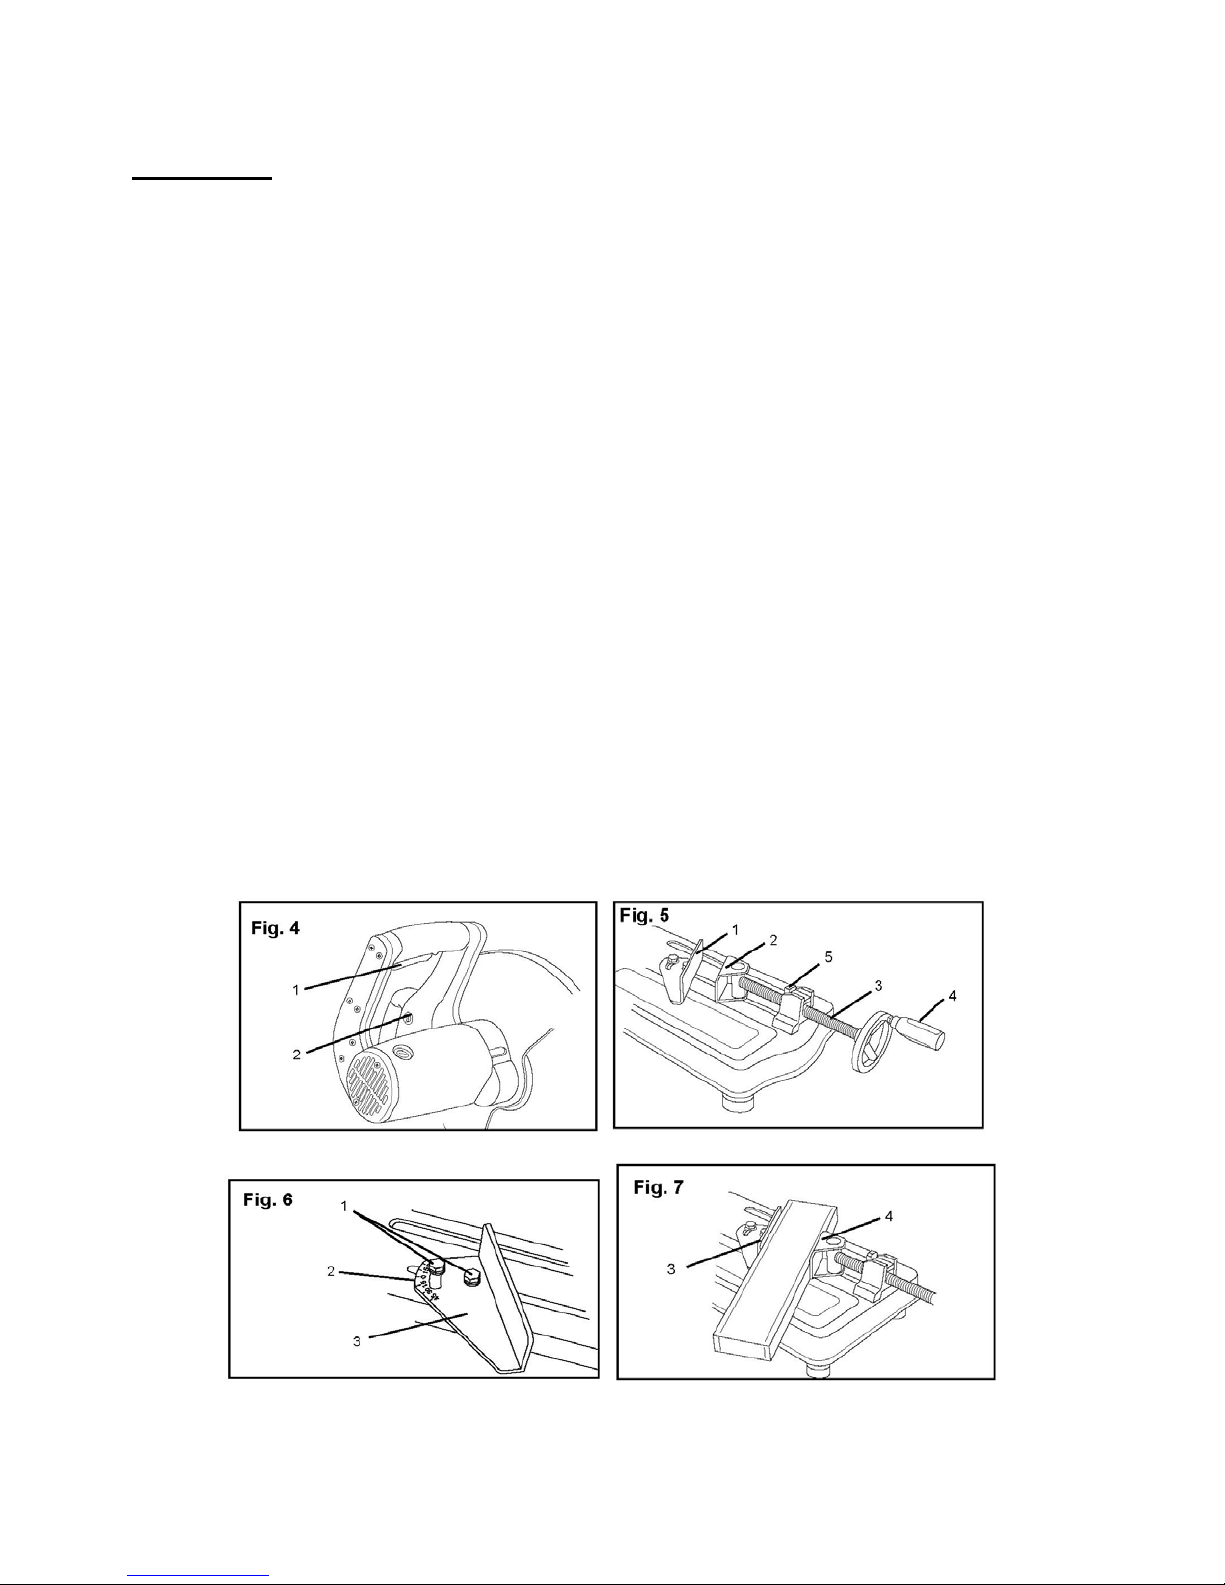
ON/OFF trigger switch (Fig. 4)
To start the cut-off saw, squeeze the trigger switch (1). To stop the cut-off saw, release the trigger
switch.
Reset switch (Fig. 4)
If the cut-off saw does not start when the trigger switch is depressed, press the reset switch (2).
Then, squeeze the trigger switch to start.
Swiveling vise-clamp assembly with quick-release latch (Fig. 5)
Always secure the workpiece between the angle plate and the vise pressure plate when cutting.
1. Place the workpiece between the angle plate (1) and the vise pressure plate (2).
2. Push the vise screw (3) toward the angle plate and turn the vise wheel (4) clockwise to secure.
To release, turn the wheel counterclockwise two turns, raise the quick-release latch (5) and pull
the vise screw toward you.
Angle plate (Fig. 6 and 7)
The angle plate can be moved forward, backward, or rotated for angle cutting.
1. To set a cutting angle, loosen the two bolts (1) and rotate the angle plate (3) up to 45° right or
45° left. Align the index (2) with the red line on the saw table. Retighten the bolts.
2. Always center the workpiece over the table slot web to maximize cutting depths. Move the vise
pressure plate (4) toward the angle plate (3). Use the wheel to secure the workpiece.
3. To move the angle plate (3), remove the two bolts (1) and washers. Move the angle plate to the
desired position and align the angle plate with the threaded holes on the saw base. Insert the two
bolts and washers and tighten to secure the angle plate to the table.
10
Page 11
Operation (continued)
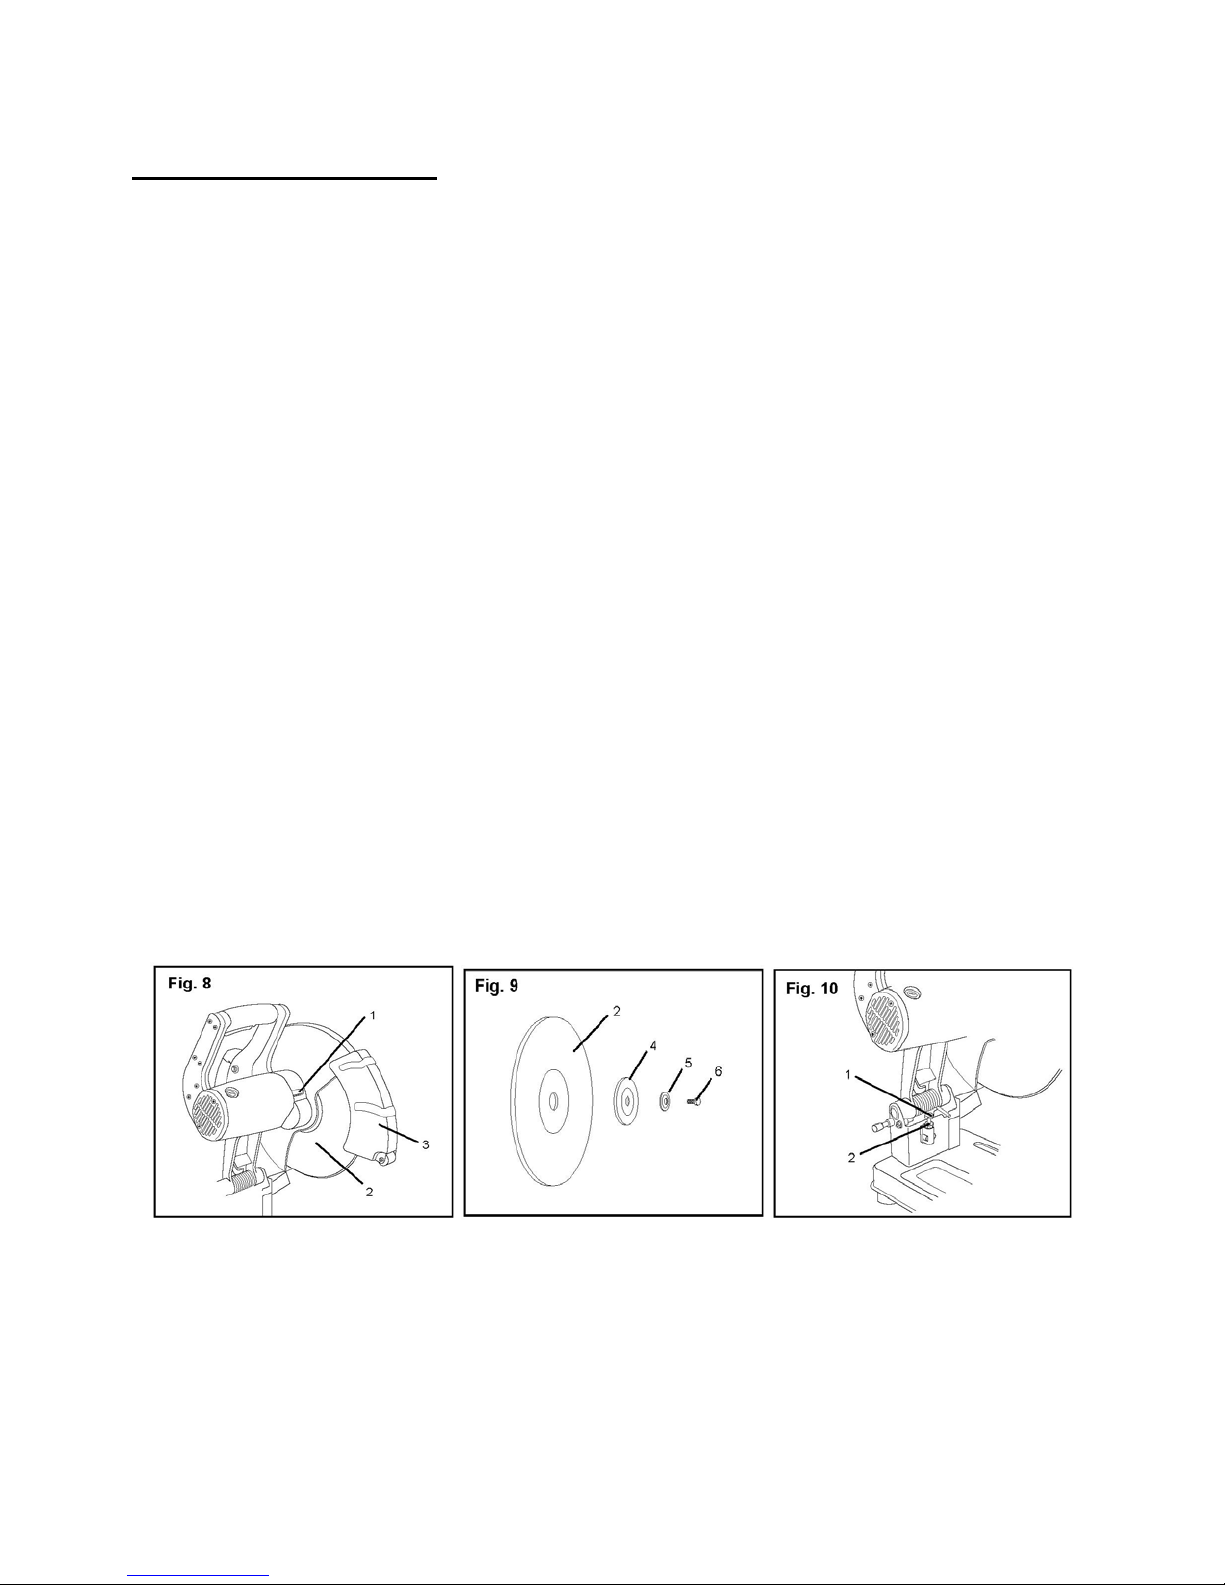
Installation and removal of metal cutting disc (Fig. 8–10)
1. Unplug the cut-off saw.
2. Push the arbor lock lever (1) towards the metal cutting disc (2) and slowly turn the disc (either
direction) until the disc locks (Fig. 8).
3. Push back the lower blade guard (3) and loosen the hex bolt (6) in the center of the disc using
the wrench. Remove the bolt (6), washer (5), flange (4), and disc (2) (Fig. 9).
4. To install a new metal cutting disc, reverse the process in step 3. Do not overtighten the bolt.
5. Make sure all guards are in place and the disc rotates freely.
6. Adjust the depth stop bolt (Fig. 10). Return the wrench to the storage slot.
7. Plug in the cut-off saw.
8. Run the cut-off saw and check to make sure the disc is in good condition. Always stand to one
side when turning on the cut-off saw. When testing a new disc, run the cut-off saw for 3
minutes. When testing an existing disc, run the cut-off saw for 1 minute.
Adjusting the cutting depth (Fig. 10)
The diameter of the metal cutting disc decreases with use. The depth stop bolt should be adjusted
periodically to prevent the disc from cutting the work surface below the cut-off saw table.
1. Loosen the lock nut (1).
2. Turn the stop bolt (2) to set the downward travel of the disc.
3. Lower the saw to check the depth.
4. Repeat steps 2 and 3 until the downward travel of the disc is at the desired level.
5. Tighten the lock nut (1) to secure the cutting depth assembly.
11
Page 12
Operation (continued)
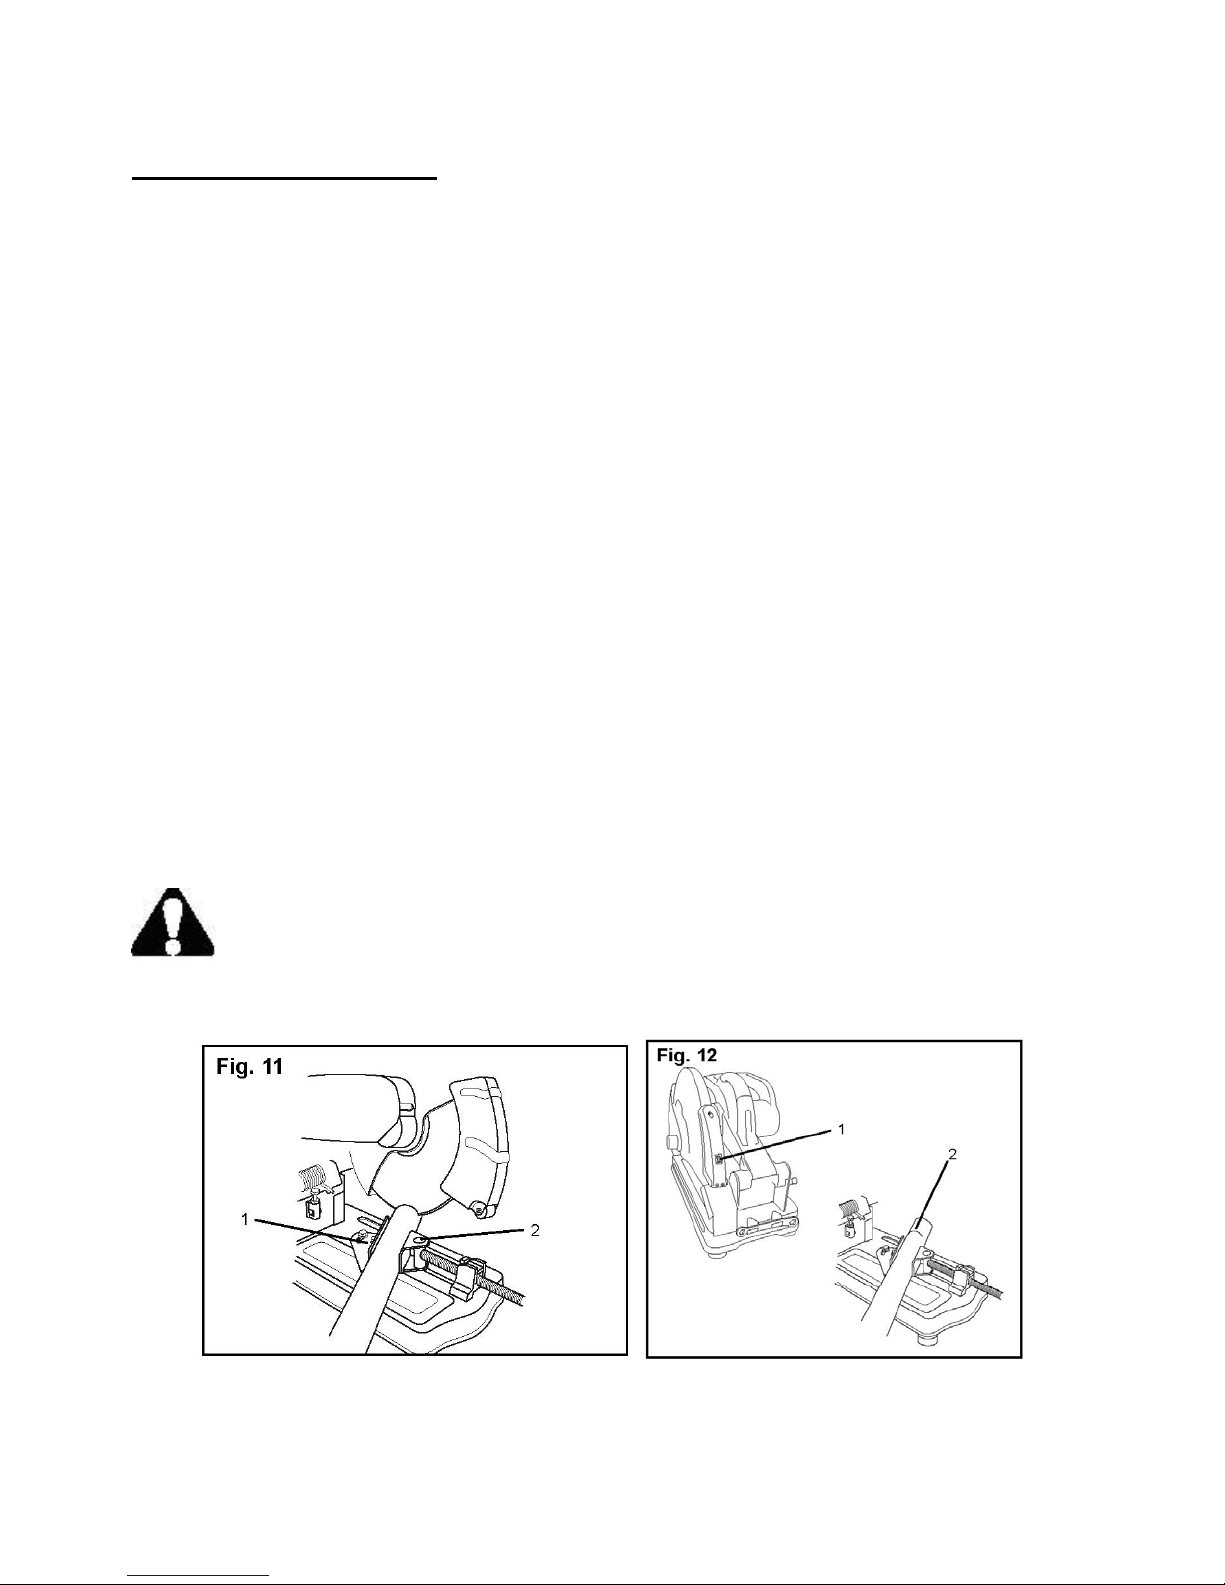
Cutting a workpiece (Fig. 11)
1. Set the angle plate (1) to the desired cutting angle.
2. Make sure the workpiece lies flat on the saw table.
3. Use the vise (2) to secure the workpiece to the table.
4. Squeeze the trigger switch.
5. After the motor reaches full speed, lower the disc into the center of the workpiece.
6. Using a smooth, firm, and gentle downward motion, make a clean cut through the workpiece. Do
not allow the disc to bump or jump when making contact with the workpiece; this may damage
both the workpiece and the disc.
7. Keep consistent pressure when coming to the bottom of the cut to avoid forming a heavy burr
and overheating the workpiece.
8. Raise the disc completely from the workpiece before releasing the trigger switch and allow the
motor to stop before removing the workpiece.
Note: Support a long workpiece on both ends with blocks of a non-flammable material so that the
workpiece is level with the cut-off saw table.
Using the laser line (Fig. 12)
1. Secure the workpiece in the vise clamp.
2. Turn the laser switch (1) to the ON position.
3. Check the location of the laser line on the workpiece. Move the workpiece (2), if needed.
WARNING: Do not stare directly at the laser beam! A hazard may exist if you
deliberately stare into the beam. Please observe all safety rules.
12
Page 13
Maintenance
WARNING: To avoid injury from unexpected start-up or electric shock, unplug the
power cord before attempting inspection or maintenance. Do not use a damaged cut-off saw.
Brush inspection and replacement
Replace both carbon brushes when either has less than 1/4" (6.4 mm) of carbon remaining. To
inspect or replace, unplug the cut-off saw, remove the carbon brush cap on the side of the motor
housing, and pull out the brush (the cap is spring-loaded). Repeat the steps on the other side. To
reassemble, reverse the procedure.
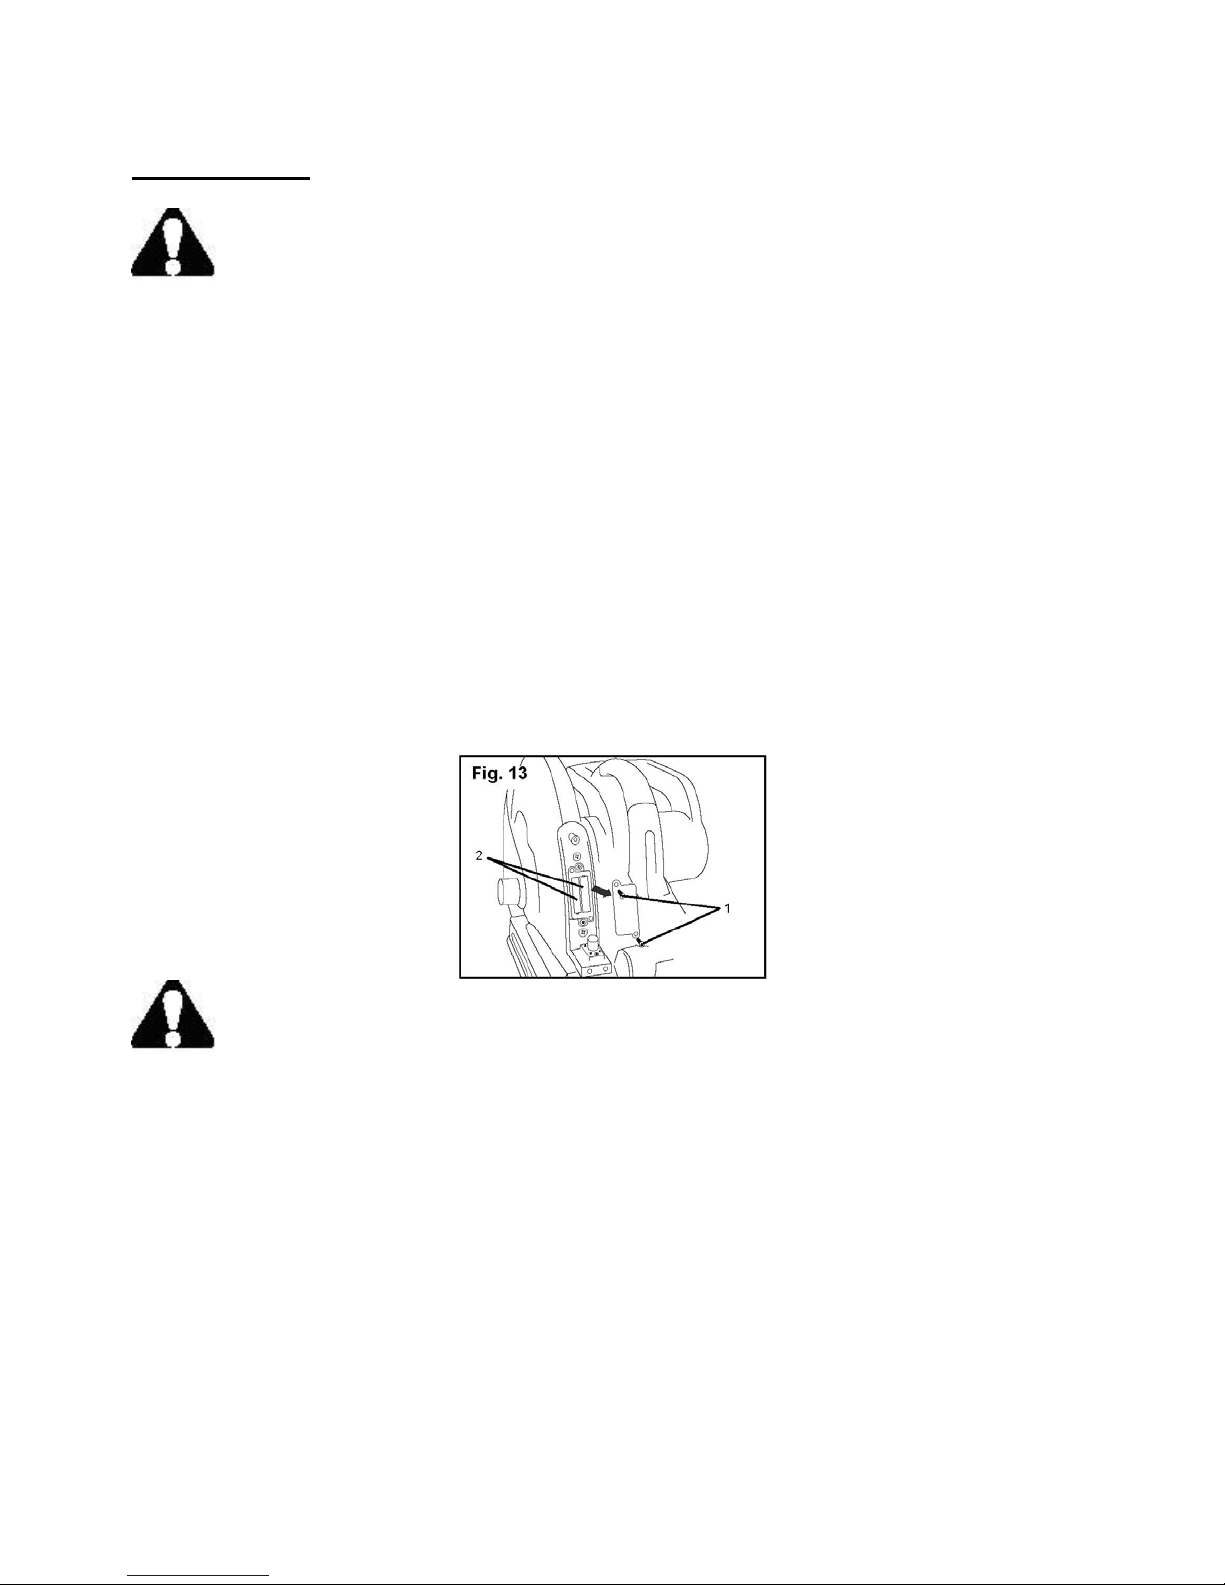
Replace the laser module batteries (Fig. 13)
1. Remove the three screws that secure the laser module cover to the housing. Remove the cover,
taking care not to damage the wires connected to the laser switch.
2. Remove the two screws (1) that secure the battery cover to the battery case. Remove the battery
cover.
3. Replace both "AAA" batteries (2).
WARNING: Never use flammable or combustible solvents around this cut-off saw.
When servicing, use only identical Performax™ replacement parts. Use of any other parts may
create a hazard or cause product failure.
Lubrication
Performax tools are properly lubricated at the factory and are ready to use. When necessary,
lubricate only those parts that pivot or move with a dry silicone spray. Lubricating motor bearings
and other internal parts should be done only by qualified service technicians.
13
Page 14

General maintenance
Before each use, inspect the guards, switches, power cord, and extension cord. Check for loose
screws, jamming, improper mounting, broken parts, and any other condition that may affect the
safe operation of the cut-off saw. If an unusual operating noise or vibration occurs, turn the cut-off
saw OFF and immediately correct the problem before using the cut-off saw again.
Cleaning
Clean dust and debris from vents, tabletop, and vise screw. Use a dry, clean rag to clean all areas of
the cut-off saw. Never use solvents or other harsh chemicals for cleaning as they are harmful to
plastic and other insulated parts. Petroleum-based products, brake fluid, thinners and ammonia
detergents will also permanently damage the cut-off saw.
14
Page 15
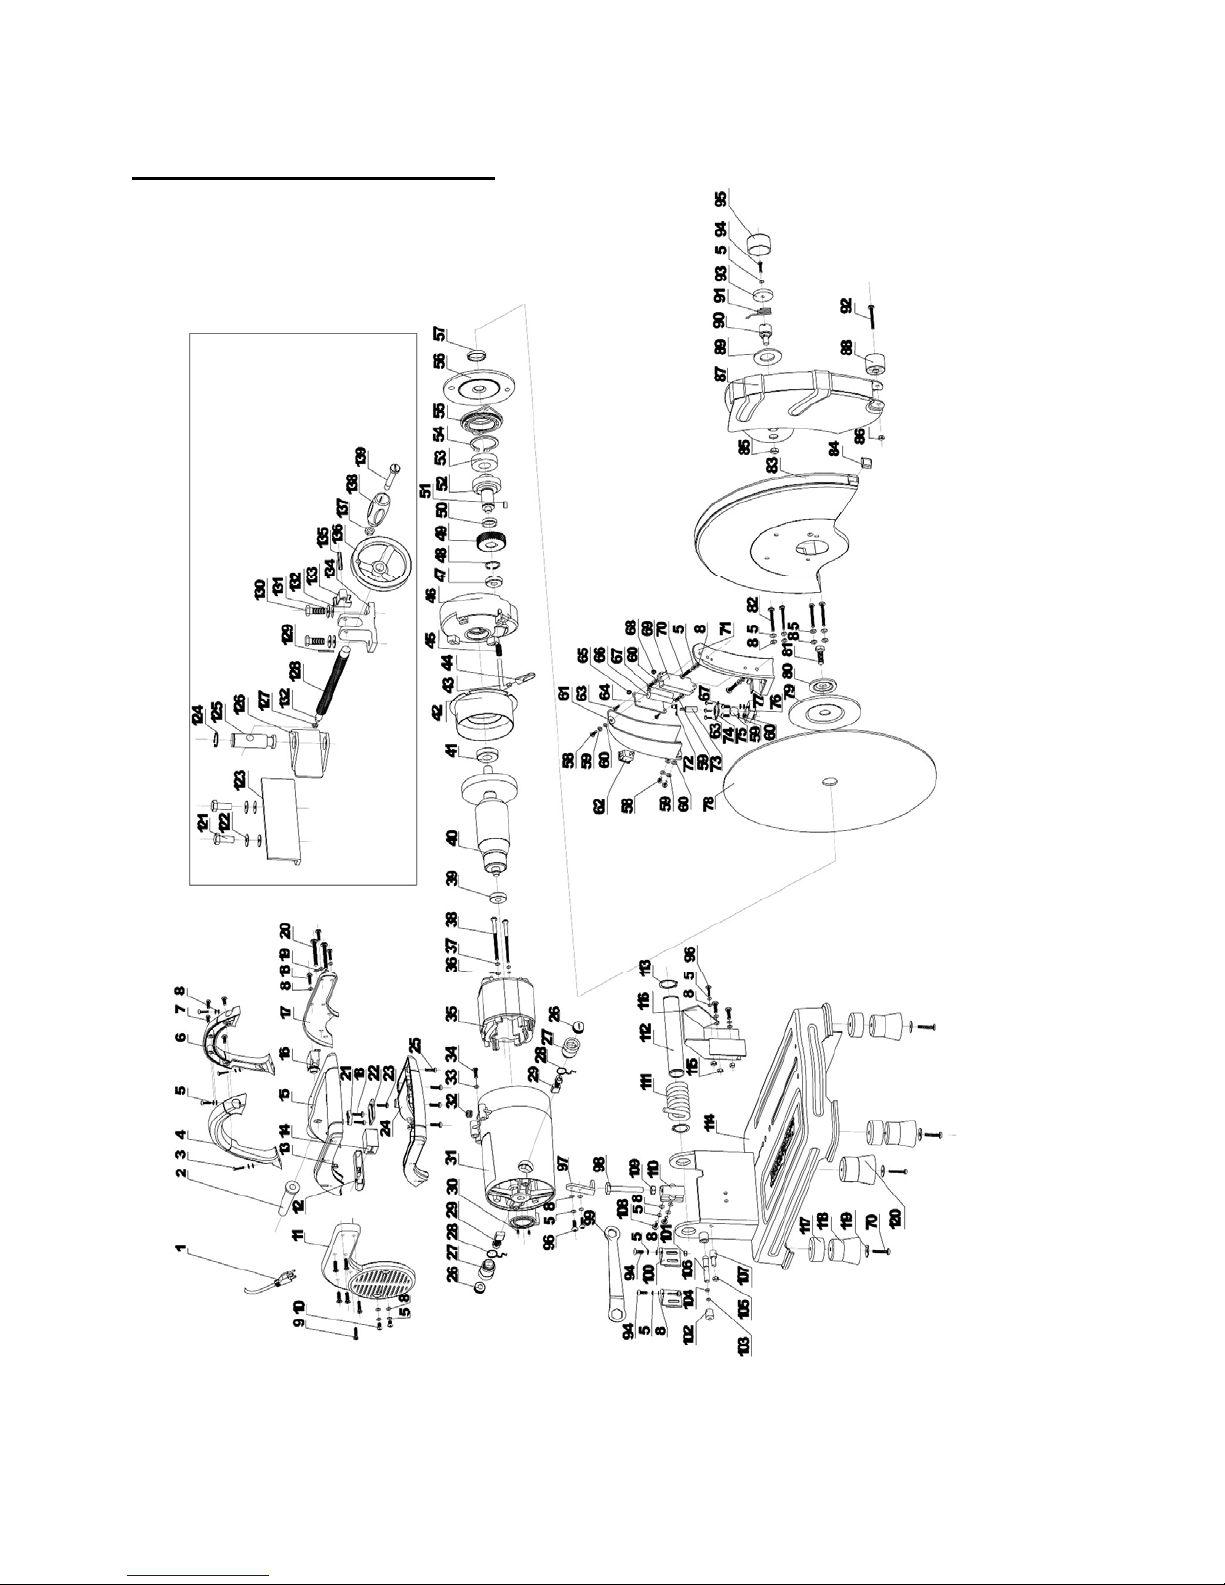
Exploded view & parts list
15
Page 16
Exploded view & parts list (continued)
Item# Description Qty Item# Description Qty
1A Motor Assembly (from 1~55) 1 46 Gear Box 1
1 Power 1 47 Bearing, 6000 1
2 Power Cord Bush 1 48 C-ring, GB894.1-86 22 1
3 Screw, GB818-85 M5x20 4 49 Big Gear 1
4 Carry Handle (L), PA6-GF30 1 50 Sleeve 1
5 Spring Washer, GB93-87 5 22 51 Key, 5x12 1
6 Carry Handle (R), PA6-GF30 1 52 Shaft 1
7 Screw, GB845-85 ST4x14 4 53 Bearing, 6004 1
8 Flat Washer, GB93-87 5 25 54 C-ring, GB894.1-86 42 1
9 Screw, GB819-85 ST5x16 4 55 Gear Box Cover 1
10 Screw, GB818-85 M5x8 2 56 In Flange 1
11 Left Side Board 1 57 Blade Sleeve 1
12 Switch Trigger 1 58 Screw, GB818-85 M4x10 3
13 Nut, GB6170-86 M6 3 59 Spring Washer, 1GB93-87 4 7
14 Switch, HY18 1 60 Flat Washer, GB93-85 4 5
15 D-handle (up), PA6-GF30 1 61 Laser Cover, PA6-GF30 1
16 Circuit Breaker 1 62 Laser Switch 1
17 Right Side Board 1 63 Screw, GB845-85 ST3x10 6
18 Screw, GB845-85 ST4x16 6 64 Battery Cover, PA6-GF30 1
19 Flat Washer, GB93-87 6 3 65 Battery Spring 3 1
20 Screw, GB818-85 M6x45 3 66 Battery 2
21 Strain Relief 1 67 Screw, GB818-85 M4x12 2
22 Wire Nip 1 68 Battery Spring 1 1
23 Screw, GB845-85 ST4x12 1 69 Battery Box 1
24 D-handle (down) 1 70 Screw, GB818-95 M5x25 2
25 Screw, GB845-85 ST5x16 4 71 Laser Base 1
26 Brush Cap 2 72 Battery Spring 2 1
27 Brush Holder 2 73 Laser 1
28 Spring 2 74 Laser Press Board 1
29 Carbon Brush 2 75 Laser Jointer 1
30 Screw, GB77-85 M5x6 2 76 Jointer Baser 1
31 Arm 1 77 Laser Guard 1
32 Wire Bush 1 78 Blade 1
33 Gear Washer, GB862.2-87 4 1 79 Out Flange 1
34 Screw, GB818-85 M4x8 1 80 Thickness Washer 1
35 Stator Assembly 1 81 Blade Screw 1
36 Flat Washer, GB95-85 5 2 82 Screw, GB818-85 M5x60 4
37 Spring Washer, GB93-87 5 2 83 Up Guard 1
38 Screw, GB818-85 M5x80 2 84 Guard Stop 1
39 Bearing 1 85 Locknut, GB/T889.1-2000 M8 1
40 Rotor Assembly 1 86 Locknut, GB/T889.1-2000 M5 1
41 Fan Bearing 1 87 Low Guard 1
42 Fan Ring, PA6-GF30 1 88 Guide Wheel 1
43 Lock Pin 1 89 Big Washer 1
44 Lock Pin Knob, PA6-GF30 1 90 Hinge 1
45 Spring, 65Mn 1 91 Spring, 65Mn 1
16
Page 17

Exploded view & parts list (continued)
Item# Description Qty Item# Description Qty
92 Screw, GB818-85 M5x40 1 99 Wrench 1
93 Screw Plate 1 100 Wrench Storage 2
94 Screw, GB818-85 M5x12 3 101 Nut, GB6170-86 M5 2
95 Hinge Cap 1 102 Pin Cap 1
96 Screw, GB818-85 M5x16 5 103 C-ring, X J002 1
97 Depth Plate 1 104 O-ring, GB3452.1-1992 1
98 Depth Bolt M8x55 1 105 Nut, GB6170-86 M6 1
17
Page 18

Warranty
Performax™ cut-off saws are warrantied against faulty workmanship and material for a period of
two (2) years from the date of purchase, with the exception of damage directly or indirectly due to
abuse, misuse, consumer negligence, accidents, alterations, or use for purposes other than those for
which the tool was designed. Any return must be preauthorized, so please contact our Customer
Service Department with warranty claims at 888-315-3080 M-F 8-5 CST for further instructions. If
it is determined that the product is within this warranty, replacement parts or complete product
replacement will be made at our discretion.
There are no warranties express or implied including fitness for a particular purpose and
merchantability which extend beyond the description on the face hereof; no other warranty, written
or oral, is authorized.
This warranty gives you specific legal rights. You may also have other rights, which vary from
state to state.
18
 Loading...