

Page 1

OPERATING MANUAL
5” RANDOM ORBIT SANDER
241-0972
IMPORTANT:
Carefully read this operating manual before using your new tool. Pay close
attention to all Safety Instructions, Warnings and Caution sections. Use your
tool properly and only for its intended use.
Safety symbols in this manual are used to call attention to possible dangers.
The safety symbols and their explanations require the operator’s full understanding. The safety warnings do not, by themselves, eliminate any danger, nor are
they a substitute for proper accident-prevention measures.
This Safety Alert Symbol indicates caution, warning, or danger. Failure to
obey a safety warning can result in serious injury to the operator or to others. To
reduce the risk of injury, fire, or electric shock, always follow the safety precautions.
10-06-17 manual 241-0972 En.indd 1 2010-6-18 12:00:01
Page 2
2
TABLE OF CONTENTS
Specifications ................................................................................. Page 2
Rules for Safe Operation ................................................................. Page 5
Description ...................................................................................... Page 9
Assembly and Adjustment ............................................................... Page10
Operation ........................................................................................ Page11
Maintenance ................................................................................... Page13
Accessories .................................................................................... Page14
Warranty ......................................................................................... Page14
SPECIFICATIONS
Motor: 120V, 60Hz, 2.0A
No load speed: 12000 OPM
Pad size: 5”
Paper type: Hook & loop
Cord length: 6’
10-06-17 manual 241-0972 En.indd 2 2010-6-18 12:00:01
Page 3
3
SAFTEY SYMBOLS
The purpose of safety symbols is to attract your attention to possible dangers.
The safety symbols and the explanations with them deserve your careful attention
and understanding. The symbol warnings do not, by themselves, eliminate any
danger. The instructions and warning they give are no substitutes for proper
accident prevention measures.
WARNING: Be sure to read and understand all safety instructions in this
manual, including all safety alert symbols such as “DANGER,” “WARNING” and
“CAUTION,” before using this tool. Failure to following all instructions listed
below may result in electric shock, fire and/or serious personal injury.
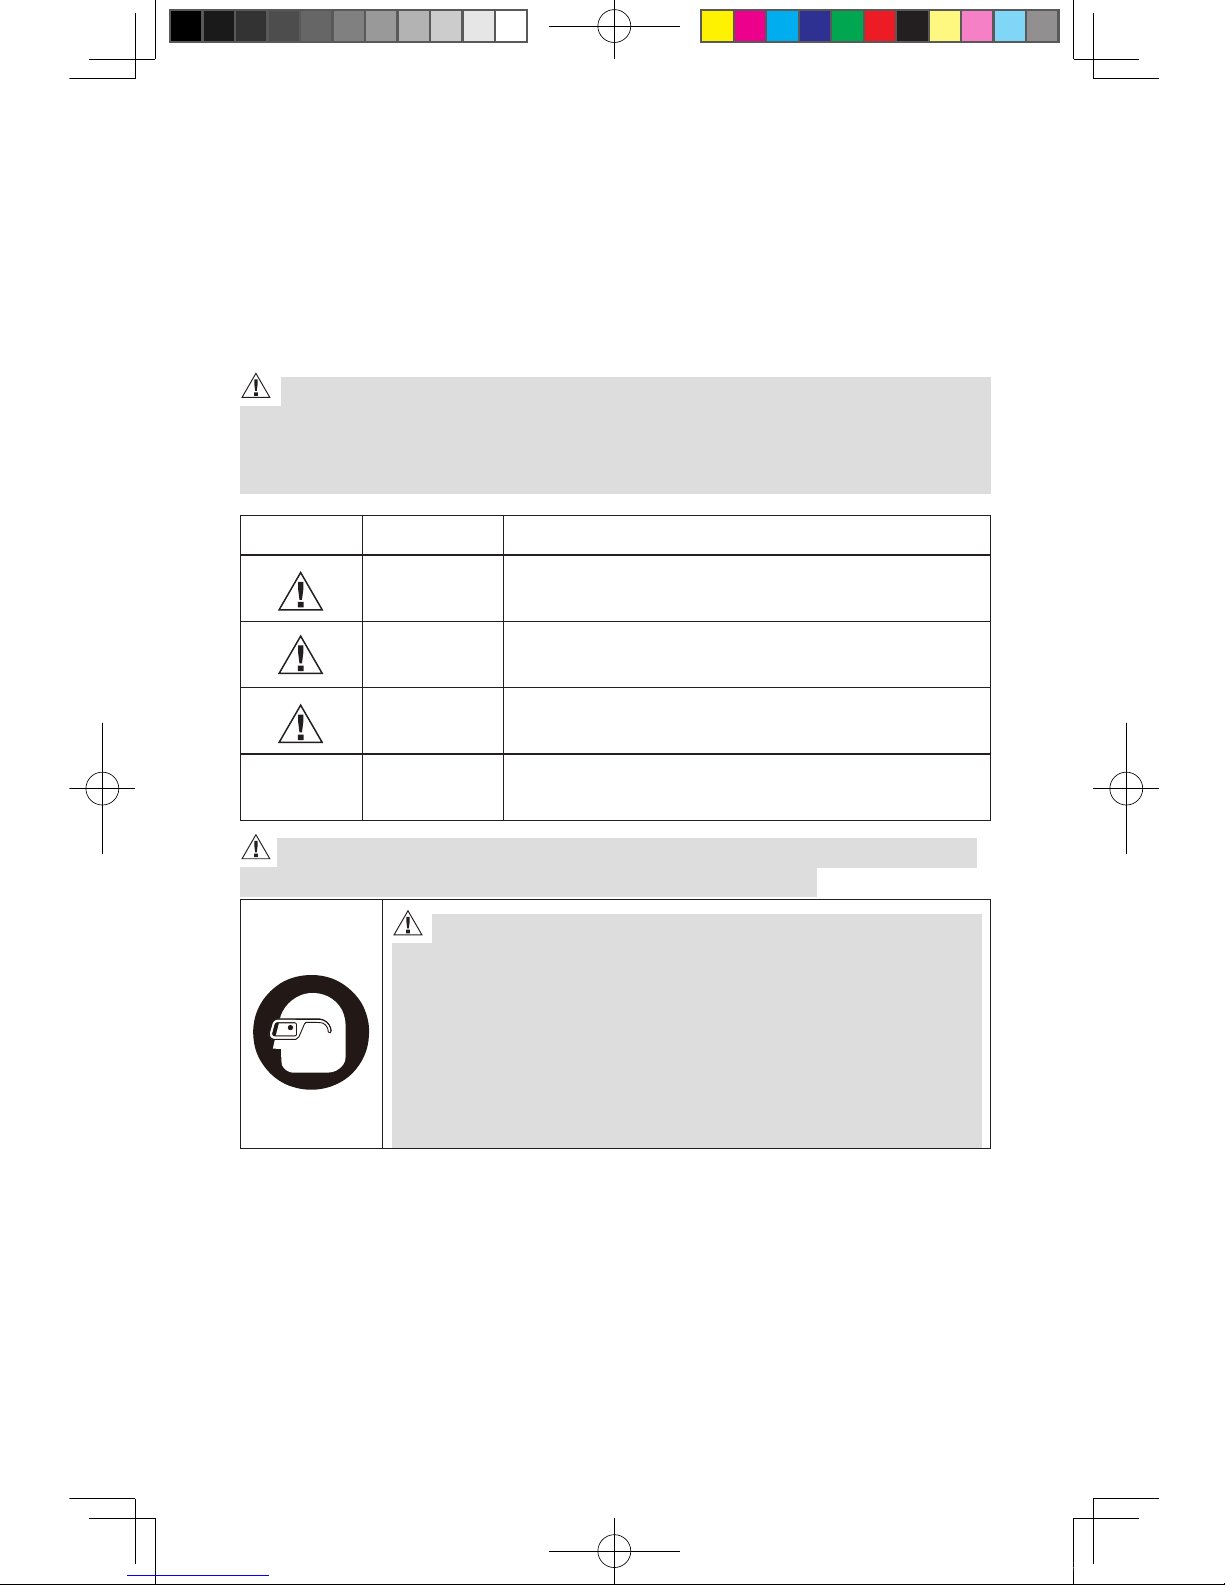
SYMBOL SIGNAL MEANING
DANGER:
Indicates an imminently hazardous situation, which,
if not avoided, will result in death or serious injury.
WARNING:
Indicates a potentially hazardous situation, which, if
not avoided, could result in death or serious injury.
CAUTION:
Indicates a potentially hazardous situation, which, if
not avoided, may result in minor or moderate injury.
NOTE:
(Without Safety Alert Symbol) Indicates a situation
that may result in property damage.
WARNING: To ensure safety and reliability, all repairs should be performed
by a qualified service technician at Authorized Service Center.
WARNING: The operation of any power tool can result in
foreign objects being thrown into your eyes, which can result
in severe eye damage. Before beginning power tool operation,
always wear safety goggles or safety glasses with side shields
and a full-face shield when needed. We recommend a Wide Vision Safety Mask for use over eyeglasses or standard safety
glasses with side shields. Always use eye protection which is
marked to comply with ANSI Z87.1
10-06-17 manual 241-0972 En.indd 3 2010-6-18 12:00:02
Page 4
4
SAFETY SYMBOLS FOR YOUR TOOL
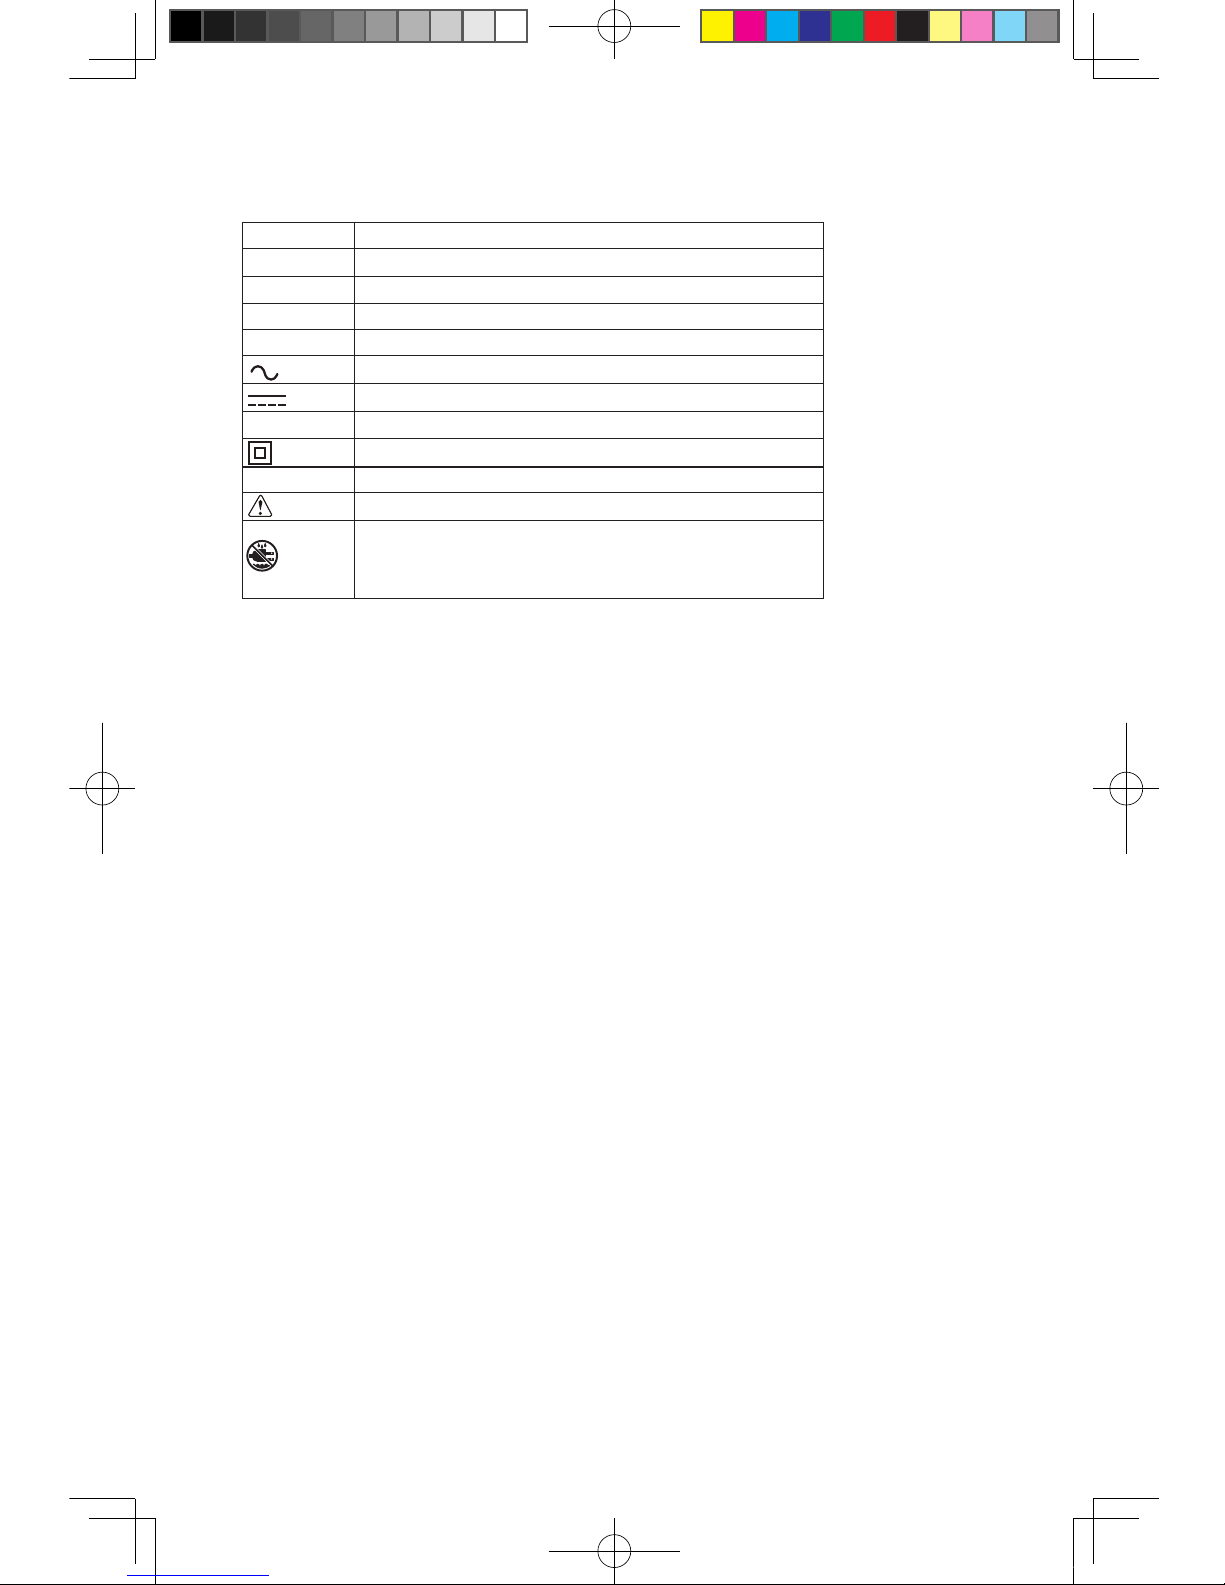
The label on your tool may include thefollowing symbols
V Volts
A Amps
Hz Hertz
W Watts
min minutes
Alternating current
Direct current
n
o No load speed
Class II construction,Double insulated
.../min Revolutions or Strokes per minute
Indicates danger,warning or caution.
It means attenti on!Your safety is involved
Wet Conditions Alert: Do not expose to
rain or use in damp locations
10-06-17 manual 241-0972 En.indd 4 2010-6-18 12:00:03
Page 5
5
RULES FOR SAFE OPERATION
KNOW THE TOOL
To operate this tool, carefully read this Owner’s Manual and all labels affixed to
the sander before using. Keep this Manual available for future reference.
IMPORTANT
This tool should only be serviced by a qualified service technician. For more
information, call the toll-free helpline,
1-866-858-2664.
GENERAL SAFETY RULES FOR ALL POWER TOOLS
WARNING: Read and understand all instructions. Failure to follow all in-
structions listed below may result in electric shock, fire and/or serious personal
injury.
SAVE THESE INSTRUCTIONS.
WORK AREA SAFETY
Keep the work area clean and well lit. Cluttered benches and dark areas
invite accidents.
Do not operate power tools in an explosive environment, such as in the
presence of flammable liquids, gases, or dust. Power tools create sparks
which may ignite dust or fumes.
Keep bystanders, children, and visitors away while operating a power
tool. Distractions can cause you to lose control.
ELECTRICAL SAFETY
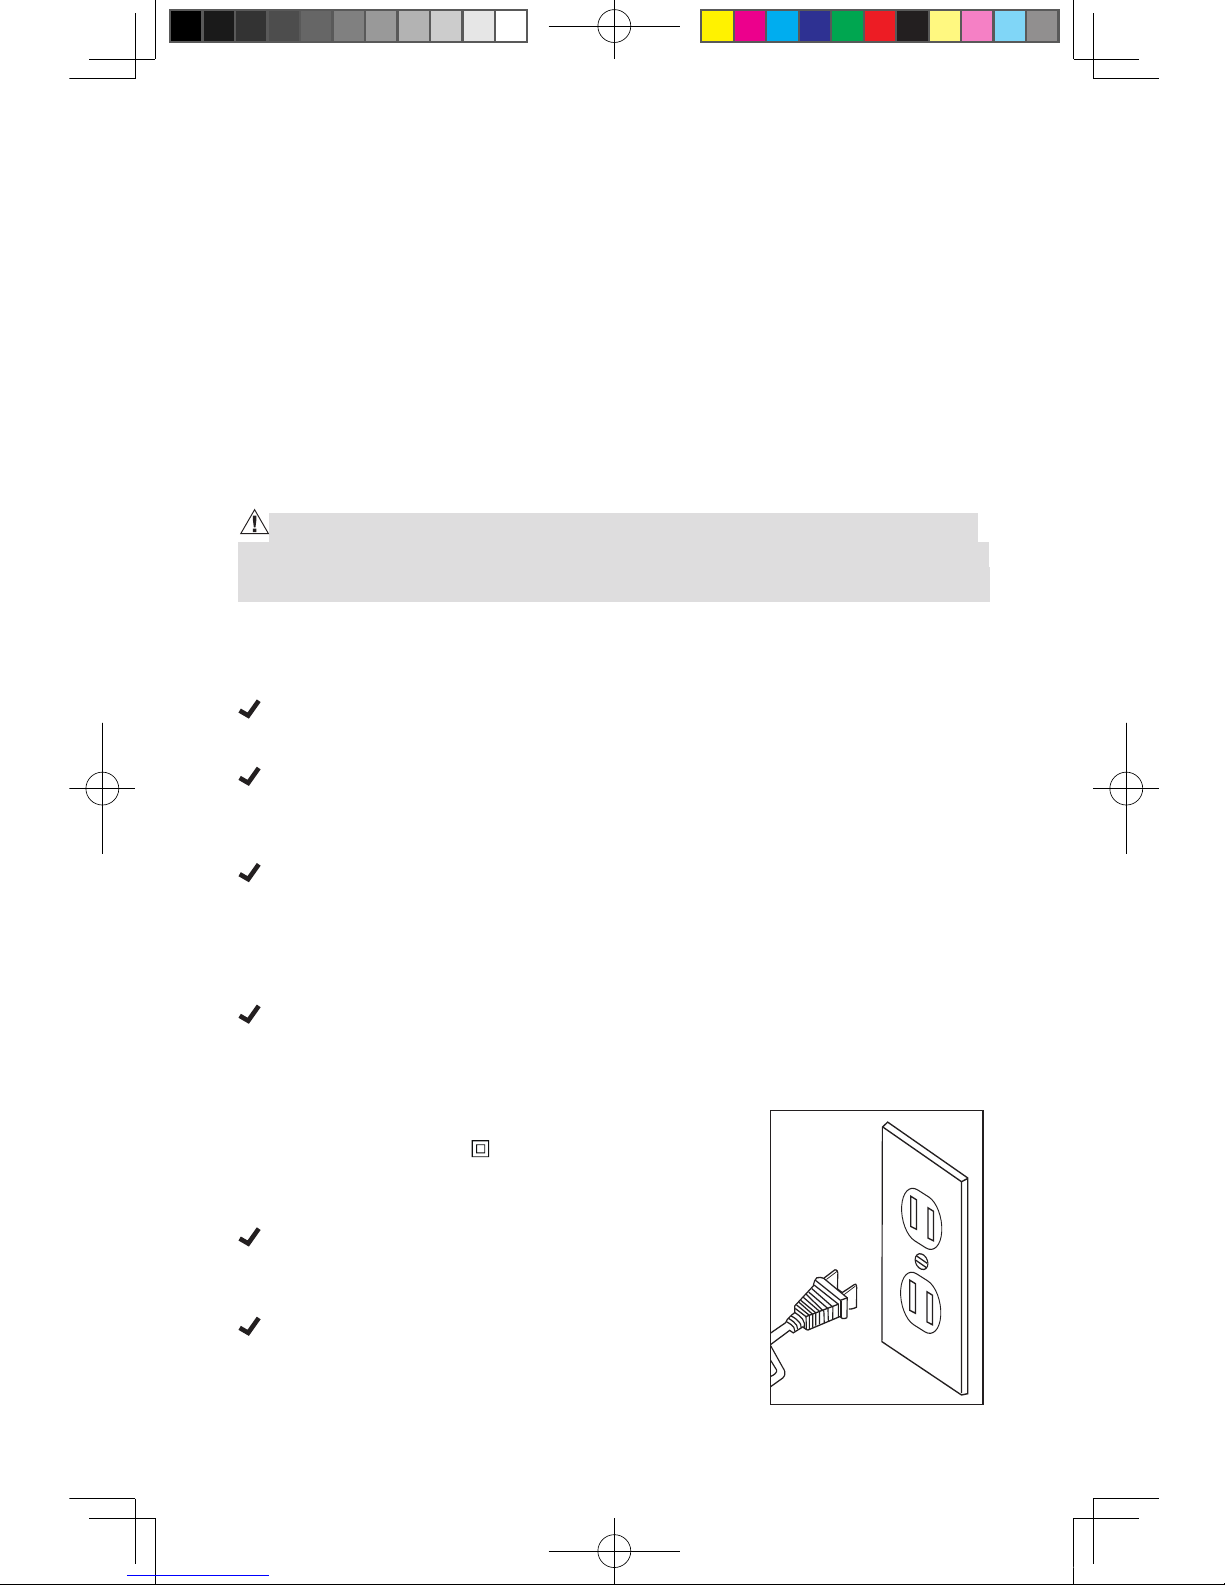
Double insulated tools are equipped with a polarized plug (one blade is
wider than the other.) This plug will fit in a polarized outlet only one way.
If the plug does not fit fully in the outlet, reverse the plug. If it still does
not fit, contact a qualified electrician to install a
polarized outlet. Do not change the plug in any
way. Double insulation
eliminates the need for the
three wire grounded power cord and grounded power
supply system.
Avoid body contact with grounded surfaces such as
pipes, radiators, ranges and refrigerators. There is an
increased risk of electric shock if your body is grounded.
Don’t expose power tools to rain or wet
conditions. Water entering a power tool will
increase the risk of electric shock.
120V ~ 60Hz
10-06-17 manual 241-0972 En.indd 5 2010-6-18 12:00:03
Page 6
6
Do not abuse the cord. Never use the cord to carry the tools or pull
the plug from an outlet. Keep cord away from heat, oil, sharp edges
or moving parts. Replace damaged cords immediately. Damaged cords
increase the risk of electric shock.
When operating a power tool outside, use an outdoor extension cord
marked “W-A” or “W”. These cords are rated for outdoor use and reduce
the risk of electric shock.
PERSONAL SAFETY
Stay alert, watch what you are doing and use common sense when
operating a power tool. Do not use the tool while tired or under the
influence of drugs, alcohol, or medication. A moment of inattention while
operating power tools may result in serious personal injury.
Dress properly. Do not wear loose clothing or jewelry. Contain long
hair. Keep your hair, clothing, and gloves away from moving parts.
Loose clothes, jewelry, or long hair can be caught in moving parts.
Avoid accidental starting. Be sure that the switch is OFF before
plugging in the tool. Carrying tools with your finger on the switch or
plugging in tools that have the switch on invites accidents.
Remove adjusting keys or wrenches before turning the tool on. A
wrench or a key that is left attached to a rotating part of the tool may result
in personal injury.
Do not overreach. Keep proper footing and balance at all times.
Proper footing and balance enable better control of the tool in unexpected
situations.
Use safety equipment. Always wear eye protection. Dust mask, non-skid
safety shoes, hard hat, or hearing protection must be used for appropriate
conditions.
Before connecting the tool to a power source (receptacle, outlet,
etc.), be sure that the voltage supplied is the same as that specified
on the nameplate of the tool. A power source with voltage greater than
that specified for the tool can result in serious injury to the user, as well as
damage to the tool.
TOOL USE AND CARE
Use clamps or another practical way to secure and support the
workpiece to a stable platform. Holding the work by hand or against your
body is unstable and may lead to loss of control.
10-06-17 manual 241-0972 En.indd 6 2010-6-18 12:00:03
Page 7
7
Do not force the tool. Use the correct tool for your application. The
correct tool will do the job better and more safely at the rate for which is
designed.
Do not use tool if switch does not turn it on or off. Any tool that cannot
be controlled with the switch is dangerous and must be repaired.
Disconnect the plug from the power source before making any
adjustments, changing accessories, or storing the tool. Such preventive
safety measures reduce the risk of starting the tool accidentally.
Store idle tools out of reach of children and other untrained persons.
Tools are dangerous in the hands of untrained users.
Maintain tools with care. Keep cutting tools sharp and clean. Properly
maintained tools, with sharp cutting edges are less likely to bind and are
easier to control.
Check for misalignment or binding of moving parts, breakage of
parts, and any other condition that may affect the tool’s operation.
If damaged, have the tool serviced before using. Many accidents are
caused by poorly maintained tools.
Use only accessories that are recommended by the manufacturer for
your model. Accessories that may be suitable for one tool may become
hazardous when used on another tool.
Do not alter or misuse the tool. These tools are precision built. Any
alteration or modification not specified is misuse and may result in a
dangerous condition.
SERVICE
Tool service must be performed only by qualified repair personnel.
Service or maintenance performed by unqualified personnel could result in a
risk of injury.
When servicing a tool, use only identical replacement parts. Follow
instructions in the Maintenance section of this manual. Use of
unauthorized parts or failure to follow Maintenance Instructions may create
a risk of electric shock or injury.
SPECIFIC SAFETY RULES FOR RANDOM ORBIT SANDER
Hold the tool by its insulated gripping surfaces when performing an
operation where the tool may contact hidden wiring or its own cord.
Contact with a “live” wire will make exposed metal parts of the tool “live”
and shock the operator.
10-06-17 manual 241-0972 En.indd 7 2010-6-18 12:00:03
Page 8
8
Unplug the sander before changing accessories. Accidental start-ups
may occur if sander is plugged in while changing an accessory.
Always wear safety goggles and dust mask when sanding, especially
when sanding overhead.
A suitable breathing respirator must be worn while sanding chemically
pressure treated objects.
Always wear ear protection
during extended periods of operation.
Whenever possible, use clamping devices
or other suitable means to
secure the workpiece to a firm surface.
Do not sand wet materials
(e.g., wallpaper) or moist surfaces. Penetration
of water into the machine increases the risk of an electric shock.
Do not use sandpaper larger than needed. Extra paper extending beyond
the sanding pad can also cause serious lacerations.
Use the dust bag and empty it frequently. Do not throw sanding dust on
an open fire, because materials in line particle form may be explosive.
Recommended size of extension cords
Amperage rating
of the tool (120 V
circuit only)
Total length of the extension cord
25’ (7.6 m) 50’ (15.2 m) 100’ (30.4 m) 150’ (45.7 m)
More
than
Not
more
than
Minimum Gauge for the extension cord (AWG)
0 6 18 16 16 14
6 8 18 16 14 12
WARNING: Some dust created by power sanding, sawing, grinding, drilling, and other construction activities contains chemicals known to cause
cancer, birth defects or other reproductive harm. Some examples of these
chemicals are:
•Lead from lead-based paints,
•Crystalline silica from bricks and cementand other masonry products, and
•Arsenic and chromium from chemically-treated lumber.
Your risk from these exposures varies,depending on how often you do this type
of work. To reduce your exposure to these chemicals: work in a well ventilated
area, and work with approved safety equipment, such as those dust masks that
are specially designed to filter out microscopic particles.
10-06-17 manual 241-0972 En.indd 8 2010-6-18 12:00:03
Page 9
9
DESCRIPTION
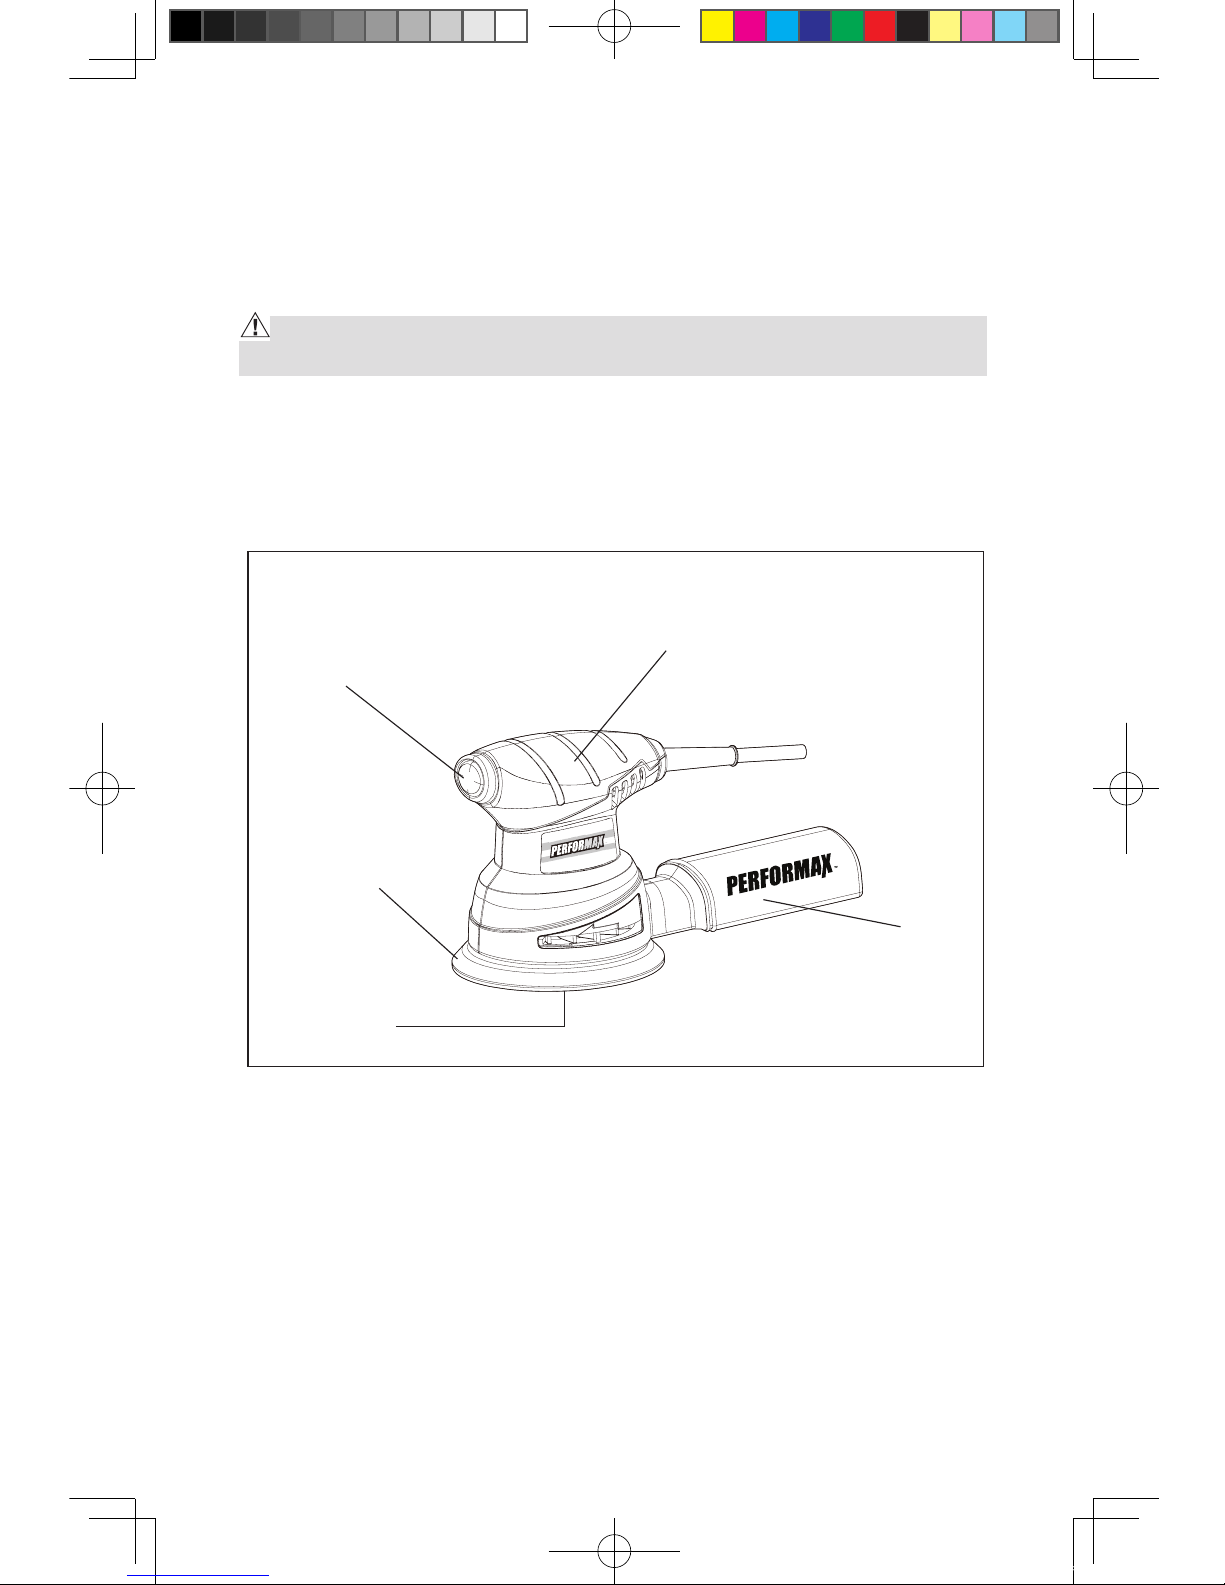
KNOW YOUR SANDER(Fig. 1)
Before attempting to use this sander, familiarize yourself with all its operating
features and safety requirements.
WARNING: Do not allow familiarity with your sander to make you careless.
Remember that a careless fraction of a second is sufficient enough to inflict
severe injury.
Rocker
ON/OFF switch
Rubberized
grip
Sanding pad
Sandpaper
Dust bag
Fig.1
10-06-17 manual 241-0972 En.indd 9 2010-6-18 12:00:04
Page 10
10
ASSEMBLY AND ADJUSTMENTS
Remove the random orbit sander from the carton and examine it carefully. Do not
discard the carton or any packaging material until all parts are examined.
NOTE: If any part of the random orbit sander is missing or damaged, do not
plug the sander in until the damaged part is repaired or replaced.
WARNING: To avoid injury, ALWAYS turn the switch OFF and disconnect
the sander from the power outlet before installing or changing the abrasive
discs or dust bag attachment.
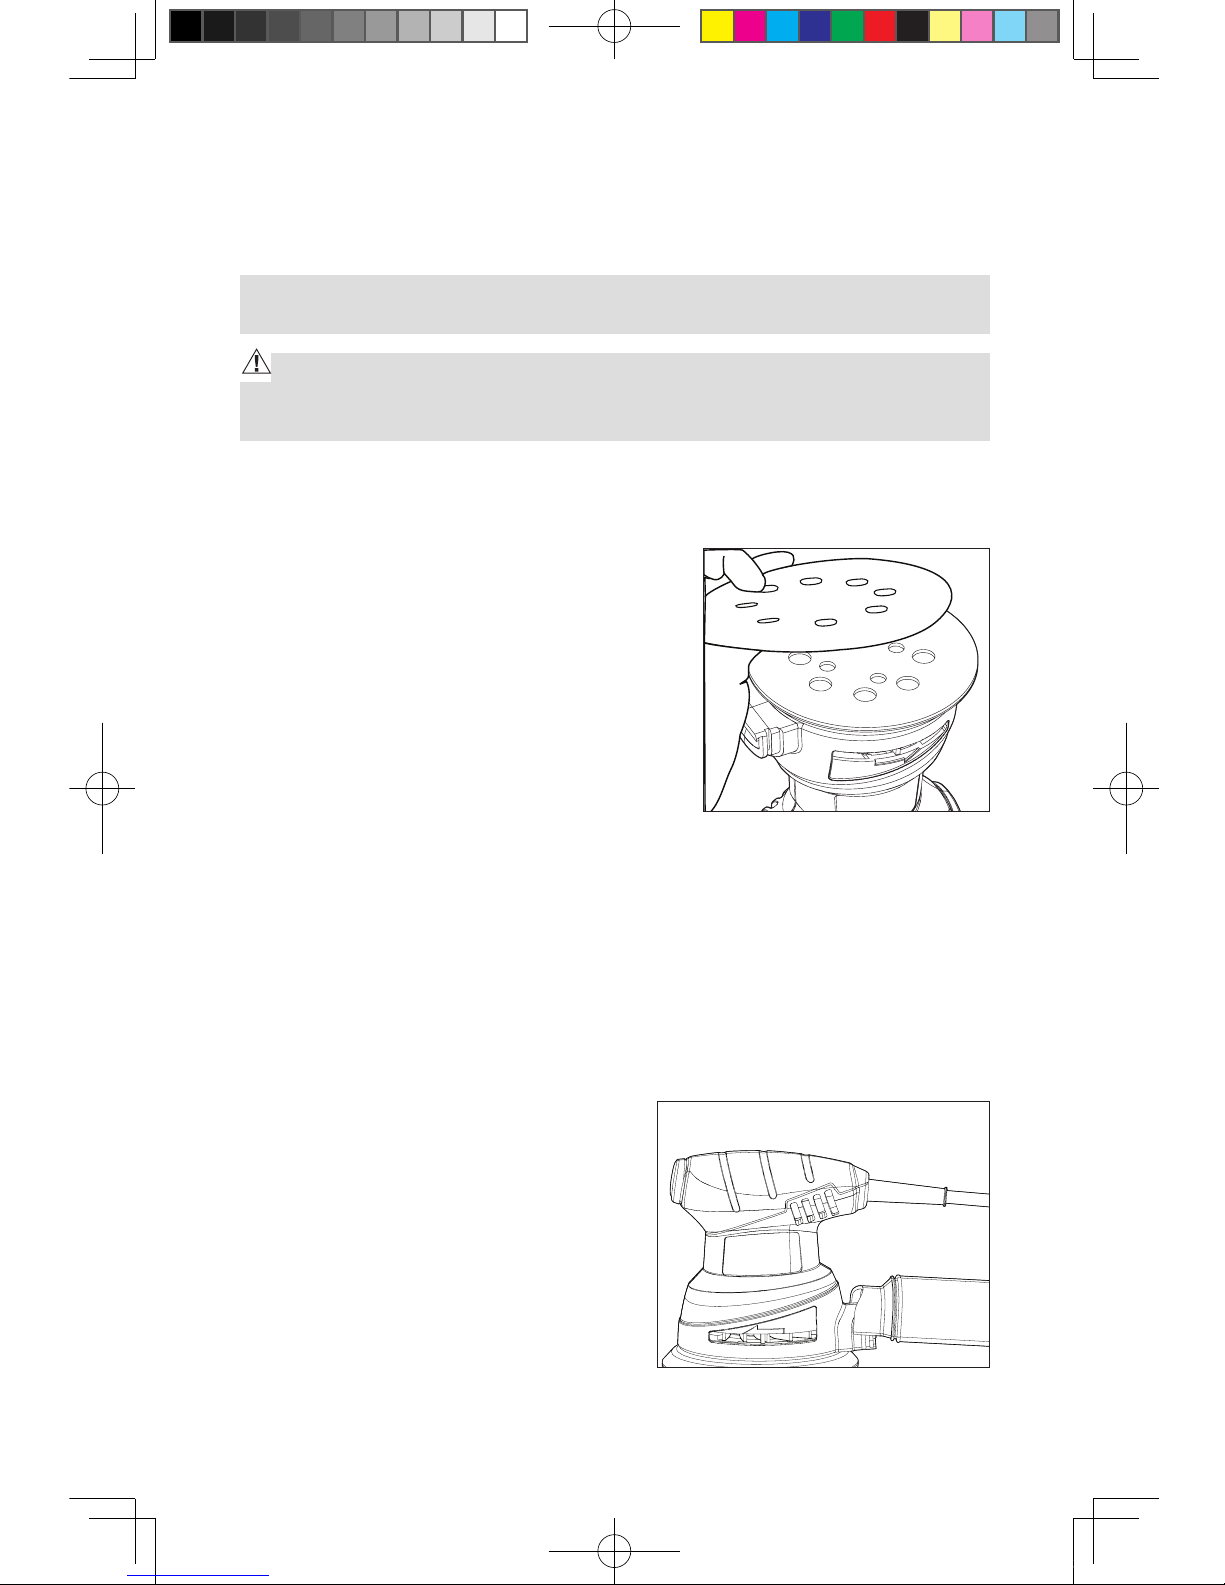
INSTALLING AND REMOVING THE ABRASIVE DISC (See Fig. 2)
To install:
1. Unplug the sander.
2. Remove all sanding dust or dirt from the
sanding pad.
3. Align the holes on the abrasive disc with the
holes in the sanding pad, making sure that
the pad is centered and the edges are aligned
with the edges of the sanding pad.
Note: The holes in the abrasive disc must line up
with the sanding pad holes for the dust collection
system to function properly.
4. Press the abrasive disc to the pad.
To remove
1. Unplug the sander.
2. Peel the disc off the sanding pad.
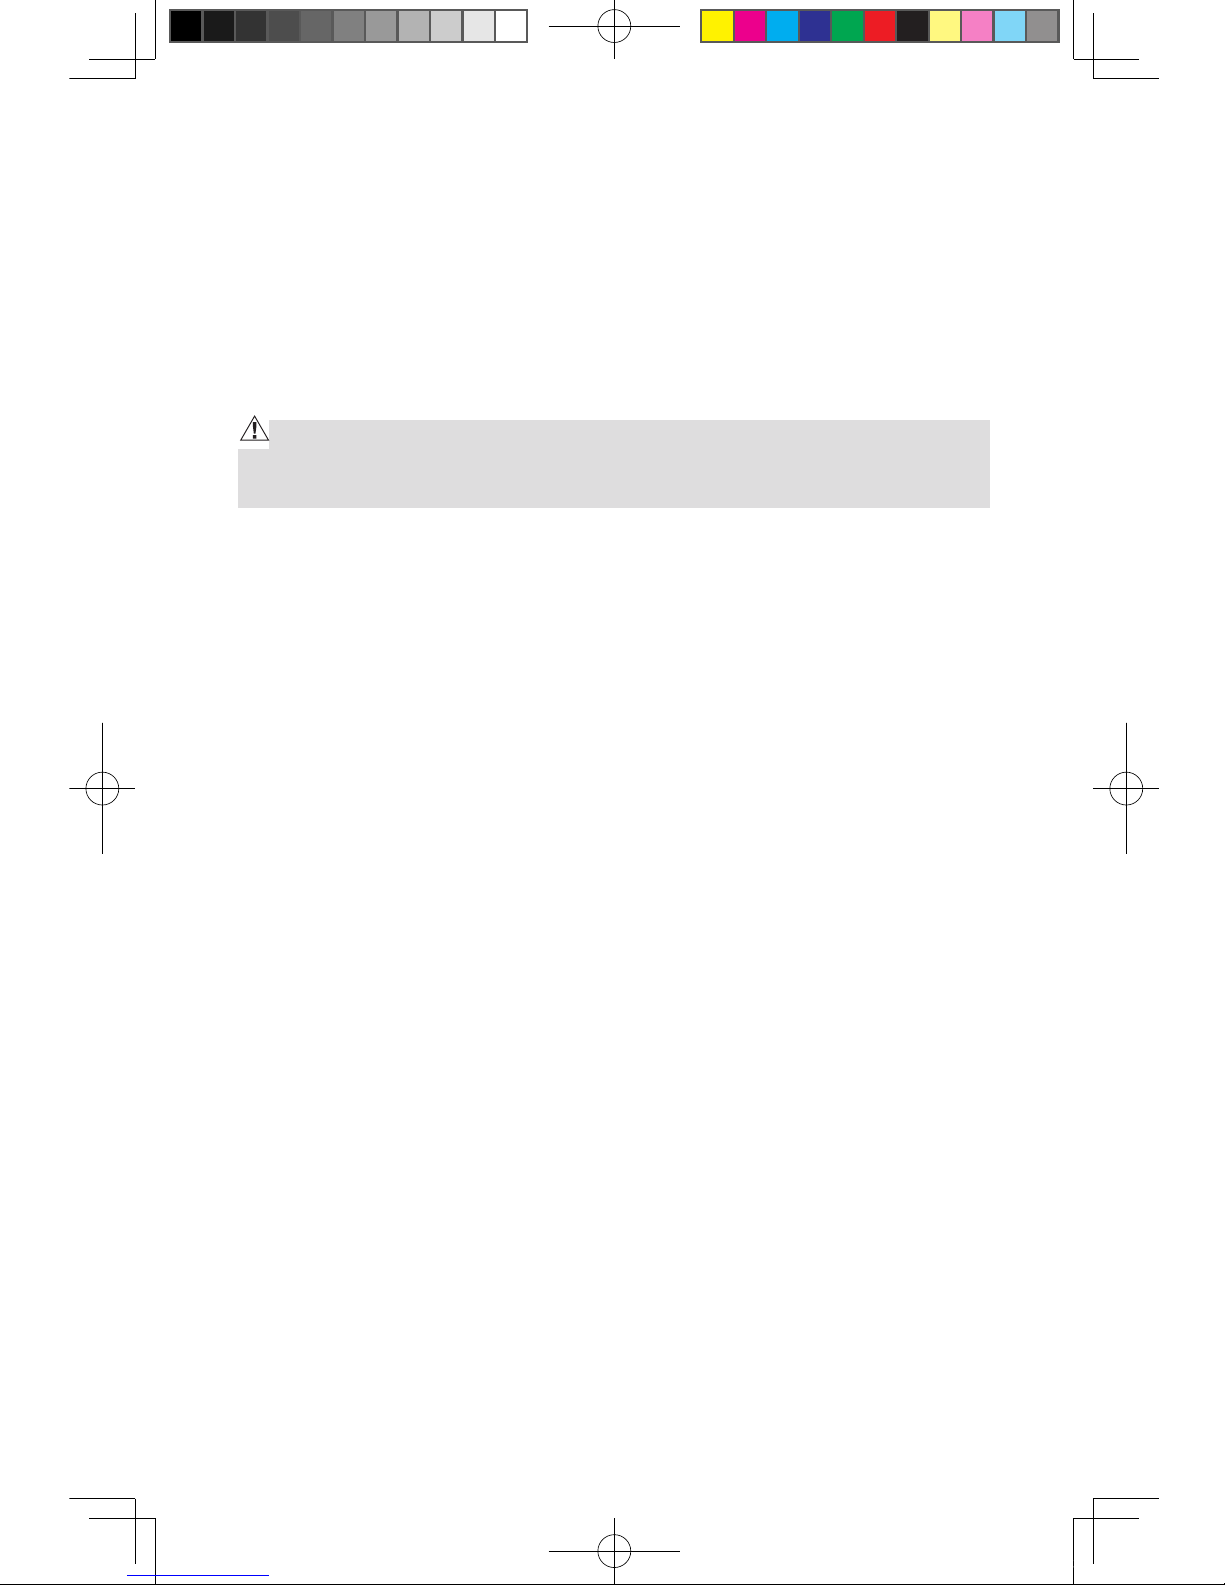
INSTALLING AND REMOVING THE DUST BAG (See Fig. 3)
To install:
Press the dust bag port down into the slot in
the dust chute until the chute’s detent fully
engages with the holes.
To remove:
Lift the bag port up. To empty the dust bag,
remove the bag from the sander, and gently
tap it to remove the dust.
OPERATION
Fig. 2
Fig. 3
10-06-17 manual 241-0972 En.indd 10 2010-6-18 12:00:05
Page 11
11
ROCKER ON/OFF SWITCH
This random orbit sander is equipped with a dust-sealed ON/OFF rocker switch,
located on the front of the handle.
1. To turn the sander ON, depress the rocker switch to the “I” position.
2. To turn the tool OFF, depress the rocker switch to the “O” position.
GENERAL SANDING
WARNING: Finish sanding can produce clouds of fine sanding dust that
could ignite in the presence of sparks or an open flame. To avoid injury,
always use your sander in a well ventilated area.
1. Place the sander on the workpiece BEFORE turning the switch ON. If the
sander is started before making contact with the workpiece, the free floating
work pad may cause scratches.
2. Move the sander in long sweeping strokes parallel to the grain, using some
lateral motion to overlap the strokes by as much as 75%. The random orbit
action allows cross-grain sanding, but be careful not to tilt the sander near
edges, or undesirable rounding may result.
3. The amount of downward pressure will affect the rotation speed and sanding
results:
a. Light pressure: recommended for fine work
b. Moderate pressure: recommended for rough work.
c. Do not exert heavy pressure; it does not allow the disc to rotate sufficiently.
4. Keep the sanding disc flat on the workpiece. Using the edges of the pad or
tipping the sander may cause an uneven finish and reduce the life of the
sanding pad.
5. Begin sanding with a coarser grit sandpaper and gradually use finer and finer
grits until the desired finish is achieved. Do not switch from a coarse grit to a
very fine grit in one step.
6. Random orbit sanders work more aggressively than simple orbital sanders.
Check your workpiece frequently.
7. To help prevent swirl marks when the job is completed, gently lift the tool from
the work surface, then switch the tool off.
10-06-17 manual 241-0972 En.indd 11 2010-6-18 12:00:05
Page 12
12
REMOVING PAINT OR VARNISH
1. If removing several layers of paint or varnish, first remove as much as possible
with a paint or varnish remover.
2. Scrape the residue off with a putty knife or scraping tool and allow the
surface to cool and dry before sanding.
3. Select and install a coarse grit sandpaper.
4. Keep the sander moving over new areas to avoid heating and softening the
old coating.
5. Work in wide, overlapping strokes to produce a uniform finish.
6. As the workpiece begins to show through the old coating, switch to a medium
grit sandpaper to avoid scratching the surface. Gradually switch to a finer grit
until you achieve the desired finish.
SANDPAPER SELECTION (SANDPAPER AVAILABLE SEPARATELY)
Sandpaper can be made from various grit materials. The grit material and
coarseness of the sandpaper should be selected according to the workpiece
material
Workpiece material Grit material
Fine woodwork Gamet or aluminum oxide
Rough woodwork Aluminum zirconia or ceramic
Manufactured wood products Silicon carbide or aluminum oxide
Solid surfacing material Silicon carbide or aluminum oxide
Metals Emery or aluminum oxide
The sandpaper is also graded by coarseness. Start your work with an abrasive
grit just coarse enough to remove the high spots and excessive roughness.
Follow with a second sanding using a grit one or two grades finer. Continue with
successively finer grits until you obtain the desired finish.
Do not switch from a coarse grit to a very fine grit in one step. It may be difficult
to remove the marks made by the coarse grit. Use the coarsest grits for the
roughing operation, and finish by using successively finer grits.
10-06-17 manual 241-0972 En.indd 12 2010-6-18 12:00:05
Page 13
13
Fig. 5
Coarse Grit 60–80
Initial sanding on rougher surfaces.
For fast stock removal.
Rough sanding and stripping of painted and rusted surfaces.
Medium Grit 100–140
Intermediate sanding.
Removal of minor surface imperfections.
Fine Grit 150–220
Fine sanding.
Sanding prior to staining, priming, or sealing.
MAINTENANCE
WARNING: To ensure safety and reliability, all repairs should be performed by a qualified service technician.
WARNING: For your safety, always turn off the switch and unplug the
reciprocating saw from the power source before performing any maintenance or cleaning.
Periodic maintenance of your sander allows for long life and trouble-free
operation. The sander can generate considerable quantities of sanding residue.
A cleaning and maintenance schedule should be maintained.
As a common-sense and preventive maintenance practice, follow these
recommended steps:
Inspect the pad; Check it for wear or damage
.
Keep the ventilation slots of the motor clean to prevent overheating of the
motor.
Electric tools are subject to accelerated wear and possible premature
failure when they are used to work on fiberglass, wallboard, spackling
compounds or plaster. The chips and grindings from these materials
are highly abrasive to electrical tool parts, such as bearings, brushes,
commutators, etc. Consequently, it is not recommended that this tool be
used for extended work on any fiberglass material, wallboard, spackling
compound, or plaster. During any use on these materials, it is extremely
important that the tool is cleaned frequently by blowing with an air jet.
Use a soft clean and damp cloth to wipe the tool housing. A mild detergent
can be used but nothing like alcohol, petrol or other cleaning agent. Never
use caustic agents to clean plastic parts.
10-06-17 manual 241-0972 En.indd 13 2010-6-18 12:00:05
Page 14

14
WARNING! Always wear safety goggles or safety glasses with side
shields during power tool operations or when blowing dust. If operation is
dusty, also wear a dust mask.
WARNING! Avoid using solvents when cleaning plastic parts. Most plas-
tics are susceptible to damage from various types of commercial solvents
and may be damaged by their use. Use clean cloths to remove dirt, dust,
oil, grease, etc.
ACCESSORIES
Dust Bag..................................................................................................1pc
80 Grits sandpaper...................................................................................3pcs
WARRANTY
If, during normal use, this PERFORMAX
TM
power tool breaks or fails due to a defect
in material or workmanship within two years from the date of original purchase,
simply bring this tool and its sales receipt back to your nearest Menards® retail
store for a free equivalent replacement within those two years.
The warranty:
(1) excludes expendable parts including but not limited to blades, bits, light
bulbs, and/or batteries;
(2) shall be void if this tool is used for commercial or/and rental purposes; and
(3) does not cover any losses, injuries to persons/properties, or costs. This
warranty does give you specific legal rights and you may have other rights,
which vary from state to state.
*SAVE YOUR RECEIPTS. Your warranty is void without them. For help, please call
to our customer center, toll free number: 1-866-858-2664.
10-06-17 manual 241-0972 En.indd 14 2010-6-18 12:00:06
Page 15

15
10-06-17 manual 241-0972 En.indd 15 2010-6-18 12:00:06
Page 16

16
10-06-17 manual 241-0972 En.indd 16 2010-6-18 12:00:06
 Loading...