

Page 1

Page 2

INSTRUCTION MANUAL · ENGLISH
Warnings .............................................................................. 3
Warranty .............................................................................. 4
Connections ......................................................................... 5
ESC Calibration .................................................................... 6
Programming your ESC ....................................................... 8
Available Parameters and default settings ..................... 9
Features ............................................................................. 10
Status LED Function .......................................................... 10
ESC Parameters Setup ...................................................... 10
SETTINGS ............................................................................ 12
Running mode ..................................................................... 12
Drag Brake Force ................................................................ 12
Drag Brake Rate ................................................................... 13
Low voltage cut-o .............................................................. 13
Start mode “Punch” ............................................................. 13
Max Brake Force .................................................................. 13
Max Reverse Force .............................................................. 14
BEC Output ........................................................................... 14
Neutral range ....................................................................... 14
Driving Frequency ............................................................... 14
Braking Frequency ..............................................................14
Motor type ............................................................................14
R-RPM Oset ........................................................................ 15
Motor rotation ..................................................................... 15
LED Program box ............................................................... 15
Restore Default Settings .................................................. 15
2 Copyright Performa Racing © 2019
Page 3

WARNINGS
• Do not let children use this product without the
supervision of an adult.
• Never leave the ESC unsupervised while it is powered on.
• The ESC might get hot during use, be careful when
handling it.
• Always disconnect the battery after use, do not store with
the battery connected.
• Do not use near ammable materials.
• If the ESC has suspicious reactions, immediately
disconnect the battery and discontinue use.
www.performaracing.com 3
Page 4

WARRANTY
Performa guarantees this product to be free from
manufacturing and workmanship defects. The warranty
does not cover incorrect installation, components worn by
use, or any other problem resulting from incorrect use or
handling of the product. No liability will be accepted for any
damage resulting from the use of this product. By the act of
connecting and operating this product, the user accepts all
resulting liability. Is considered incorrect use:
• Failure to follow instructions.
• Improper use of the product (abusive use, out of spec,
etc.)
• Failure to adapt settings for proper function (improper
connections, wrong gearing, installation, setup, etc.).
• Overload, overheating (desoldering, melting, etc.).
• Running in inadequate conditions (damage or rust from
rain, humidity, etc.).
• Improper maintenance (presence of dirt, etc.).
• Disassembly, modication by the user (modifying original
connectors, wires, components, etc.).
• Mechanical damage due to external causes.
4 Copyright Performa Racing © 2019
Page 5
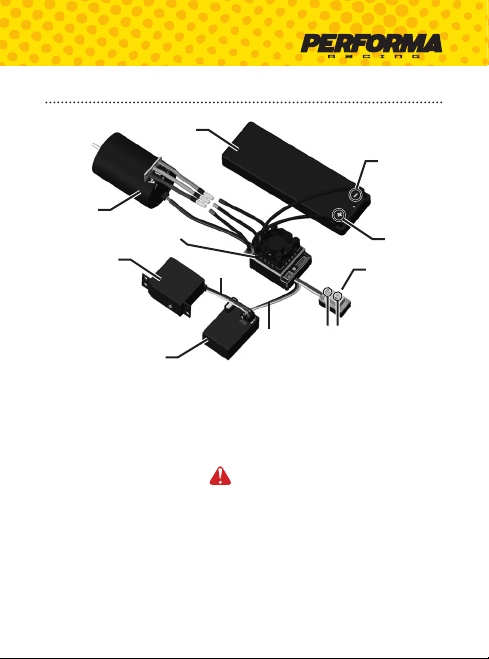
CONNECTIONS
Battery
- (black)
Motor
Performa ESC
Servo
ST/CH1
TH/CH2
SET
+ (red)
Switch
ON/OFF
Receiver
Sensorless brushless motors: When using a motor without
sensors, if the motor spins in the wrong direction, simply
reverse two of the motor wires.
Sensor brushless motors: When using a motor equipped
with sensors, the motor should also be connected to
the ESC via a sensor wire WARNING! When using
sensor equipped motors, you must respect the A-B-C wire
connection order, you can’t connect the wires randomly or
the motor will not spin at all!
Brushed motors: Connect the A and C ESC wires to the
+/- wires of the motor.
Note: the ESC has a setting to change the motor rotation
direction.
www.performaracing.com 5
Page 6

ESC CALIBRATION
In order to ensure proper function, the ESC must be
calibrated to your transmitter inputs. Center the trims and
reset all settings inside the transmitter before proceeding to
the calibration
Calibration procedure
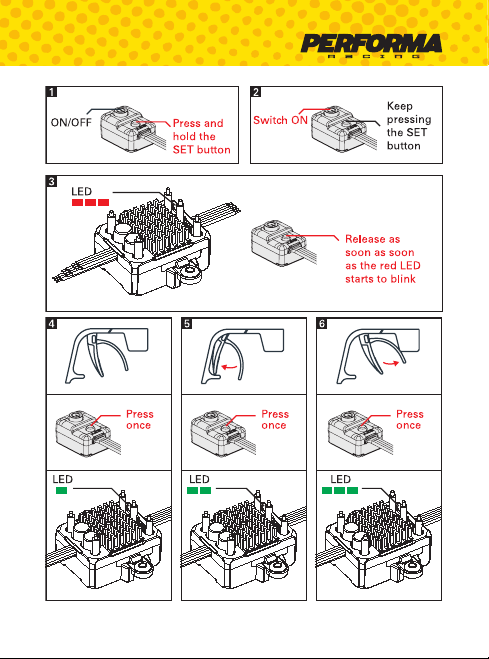
A. Make sure the ESC is switched o and switch the
transmitter on.
B. Press and hold the setup button (located on the switch),
then switch on the ESC. Release the button as soon as the
red LED starts to ash.
C. Calibrate the throttle points by pressing the button once
after each step.
1. Neutral point (1 ash)
2. Full throttle (2 ashes)
3. Full brakes/reverse (3 ashes)
D. The motor will run 3 seconds after the last step is
completed.
6 Copyright Performa Racing © 2019
Page 7
www.performaracing.com 7
Page 8
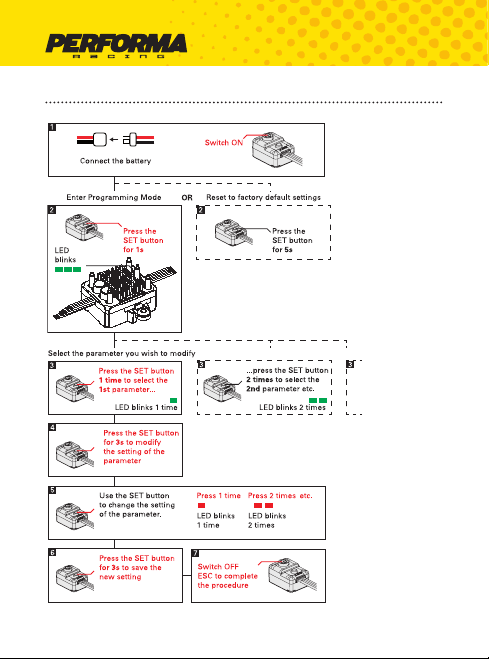
PROGRAMMING YOUR ESC
8 Copyright Performa Racing © 2019
Page 9
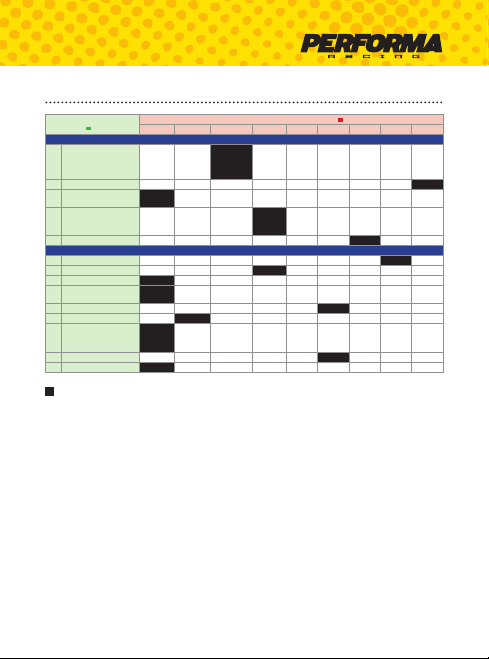
AVAILABLE PARAMETERS AND DEFAULT SETTINGS
Forward/
Reverse
with
Brake
9%
(Normal)
Sensored
Brushless
Motor
12% (Wide)
Sensorless
Setting (indicated by red LED )
Foward/
Reverse
(For Rock
Crawler)
Brushed
Brushless
Motor
Motor
3.2V/
3.4V/
Cell
Cell
Parameter (indicated by
green LED )
1 Running Mode Forward
2 Drag Brake Force 0% 5% 10% 50% 60% 70% 80% 90% 100%
3 Drag Brake Rate
(decreased)
4 Low Voltage
Cut-O Threshold
5 Start Mode (Punch) Level 1 Level 2 Level 3 Level 4 Level 5 Level 6 Level 7 Level 8 Level 9
6 Max Brake Force 12.50% 25% 37.50% 50% 62.50% 75% 87.50% 100%
7 Max Reverse Force 25% 50% 75% 100%
8 BEC Output 6V 7.4V
9 Neutral Range 6%
10 Driving Frequency 1k 2k 4k 8k 12k 16k
11 Braking Frequency 0.5k 1k 2k 4k
12 Motor Type
13 R-RPM Oset Level 1 Level 2 Level 3 Level 4 Level 5 Level 6 Level 7 Level 8
14 Motor Rotation CCW CW
1 2 3 4 5 6 7 8 9
Standard Parameters (adjustable with on/o switch)
with
Brake
Level 1 Level 2 Level 3 Level 4 Level 5 Level 6 Level 7 Level 8 Level 9
O 2.6V/Cell 2.8V/Cell 3.0V/Cell
Advanced Parameters (adjustable with program box only)
(Narrow)
AUTO
Default settings
www.performaracing.com 9
Page 10

Thank you for purchasing a Performa Brushless ESC.
This ESC features the latest brushless technologies. Our
World Championship winning development team has
spent countless hours developing this ESC so that you
can experience ultimate performance. Please read these
instructions thoroughly before using the ESC.
FEATURES
• Designed for Crawler cars.
• Waterproof design with special sensor connector case
• Fine tuned for use with the Performa Crawler brushless
motor
• Support 2S and 3S Lipo
• Multiple settings available for performance ne tuning
• Optional LED program box available
STATUS LED FUNCTION
• In the neutral position, no LED are lit
• The red LED lights when the car is moving forward,
backwards or is braking.
ESC PARAMETERS SETUP
You can adjust several parameters by using the setup button
located on the switch or by using the optional program box.
The green ashing LED indicates the parameter and the
red ashing LED indicates the setting value. To adjust the
parameters using the setup button, follow the procedure
below.
10 Copyright Performa Racing © 2019
Page 11

To modify the “advanced” parameters, the use of the
optional program box is mandatory!
Standard parameters setup using the setup button
located on the switch.
A. Switch on the ESC.
B. Press and hold the setup button until the green LED starts
ashing and then release the setup button (holding the
setup button for 5 seconds will restore the ESC to factory
defaults).
C. Press the setup button once more.
D. The green LED starts ashing repeatedly, indicating the
currently selected parameter. One ash = parameter 1,
two ashes = parameter 2 and so on. Press the button to
switch between the dierent available parameters.
E. To change the setting of the actual parameter, press and
hold the setup button until the LED starts ashing red.
F. The red LED ashes indicating the actual setting. One
ash = setting 1, two ashes = setting 2 and so on. Press
the button to switch between the dierent available
settings.
G. Press and hold the setup button for 3 seconds to save the
modication.
H. Switch the ESC o and back on to make the parameter
change eective.
Note: you can only change one setting at a time, after each
modication you need to switch the ESC o and back on to
make the parameter change eective and be able to modify
another parameter.
www.performaracing.com 11
Page 12

SETTINGS
Standard parameters can be modied using the setup
button located on the switch.
Running mode
1. “Forward Only with Brake” this mode is meant for racing.
In this mode the car can go forward and brake, there is
no reverse.
2. “Forward/Reverse with Brake” in this mode the car can go
forward, brake and reverse. If the car is moving forward
and you go into reverse, the car will rst brake and
stop, then you need to release the throttle and go into
reverse again for the car to go backwards. While braking
or in reverse, if you accelerate, the car will immediately
accelerate forward.
3. “Forward/Reverse”
This mode is meant for Rock Crawlers. In this mode there
is no brake function, the car goes from forward to reverse
or reverse to forward immediately without any pause
Note: Do not use this mode with other car types as it can
overload and/or damage the ESC.
Drag Brake Force
Sets braking power applied when the throttle is returned
at the neutral position. A higher drag brake setting means
stronger hold or hill brakes.
Note: stronger brakes cause more load on the drivetrain
and heat output will be increased, use with caution.
12 Copyright Performa Racing © 2019
Page 13

Drag Brake Rate
Sets the rate at which the drag brake is applied until it
reaches the pre-set value. A lower value causes the car to
slow down more smoothly and a higher value causes the car
to stop more abruptly.
You can also set a lower value to prevent load and wear on
the drivetrain if your car is reaching higher speeds.
Low voltage cut-o
This function helps to prevent battery over-discharge. If
the battery voltage becomes lower than the threshold for
2 seconds, the output power is shut o and the red LED
ashes. The cut-o threshold calculation is based on LiPo
individual cell voltage. For NiMH batteries, if the voltage
battery pack is higher than 9.0V, it will be considered as
a 3 cell LiPo battery pack; if it is lower than 9.0V, it will be
considered as a 2 cell LiPo battery pack.
Start mode “Punch”
Sets the initial throttle punch when the car accelerates.
Level 1 gives a very soft initial acceleration and level 9 gives
a very strong initial acceleration. A lower setting can help to
improve traction.
Max Brake Force
Sets the maximum braking force. If you want to run your car
like a normal car (the car rolls when you release the throttle)
you can disable or decrease the drag brake and use regular
braking to slow down the car instead.
Note: stronger brakes cause more load on the drivetrain
and heat output will be increased, use with caution.
www.performaracing.com 13
Page 14

Max Reverse Force
Sets the maximum power/speed when travelling in reverse.
BEC Output
The ESC BEC circuitry that supplies power to the receiver and
steering servo can output 6V or 7.4V.
You can use 7.4V for improved performance and if your
servo/receiver are compatible.
Note: using the wrong voltage setting can damage your
servo and/or receiver.
Neutral range
Sets the throttle sensitivity around the neutral point.
Depending on the transmitter this setting may need to
be adjusted to achieve the proper feeling. It can also help
in case of irregular drag brake function (due to imprecise
neutral of the transmitter.
Driving Frequency
Sets the frequency on the forward motor drive frequency. A
higher frequency gives a smoother power delivery, a lower
frequency gives a more aggressive response.
Braking Frequency
Sets the frequency on the braking motor drive frequency.
Use a higher frequency for smoother braking or a lower
frequency for more aggressive braking.
Motor type
The ESC is able to auto detect the motor type, however you
can use this setting if you want to ensure that the ESC is
using the correct drive mode.
14 Copyright Performa Racing © 2019
Page 15

R-RPM Oset
This setting aects the ESC response when you move the
throttle into the reverse or brakes position.
Some transmitters have a dierent range of movement
when moving the throttle forward or backward, this can
make the car dicult to control when going into reverse or
braking. This setting can help to smoothen out the throttle
response and improve driveability.
Motor rotation
Sets the motor rotation direction in the case that it’s rotating
the wrong way in relation to your transmitter inputs.
LED PROGRAM BOX
The optional LED program box PA9352 allows you to adjust
the ESC settings much more easily.
It is a recommended buy if you like tinkering with the ESC
settings.
RESTORE DEFAULT SETTINGS
With the throttle in the neutral position, press and hold the
“SET” key for 5 seconds, the red and green LED will ash
simultaneously indicating that the parameters have been
reset to the factory default values
www.performaracing.com 15
Page 16

 Loading...