

Page 1
AFTERGLOW™ AW.1
For Nintendo Wii
For:
PL-7602
CAUTION - Always Use Wrist Strap - Wii gameplay with the AFTERGLOW™ Remote
can involve rapid or vigorous motion. Please ensure to use the enclosed wrist
strap to prevent losing your grip on the AFTERGLOW™ Remote and causing damage to
the remote or surrounding objects, or injury to other people.
Thank you for purchasing the AFTERGLOW™ Remote for Wii®
Contents:
1 AFTERGLOW™ Remote for Wii®
1 AFTERGLOW™ Remote Wrist Strap
1 Manual
Using the AFTERGLOW™ Remote:
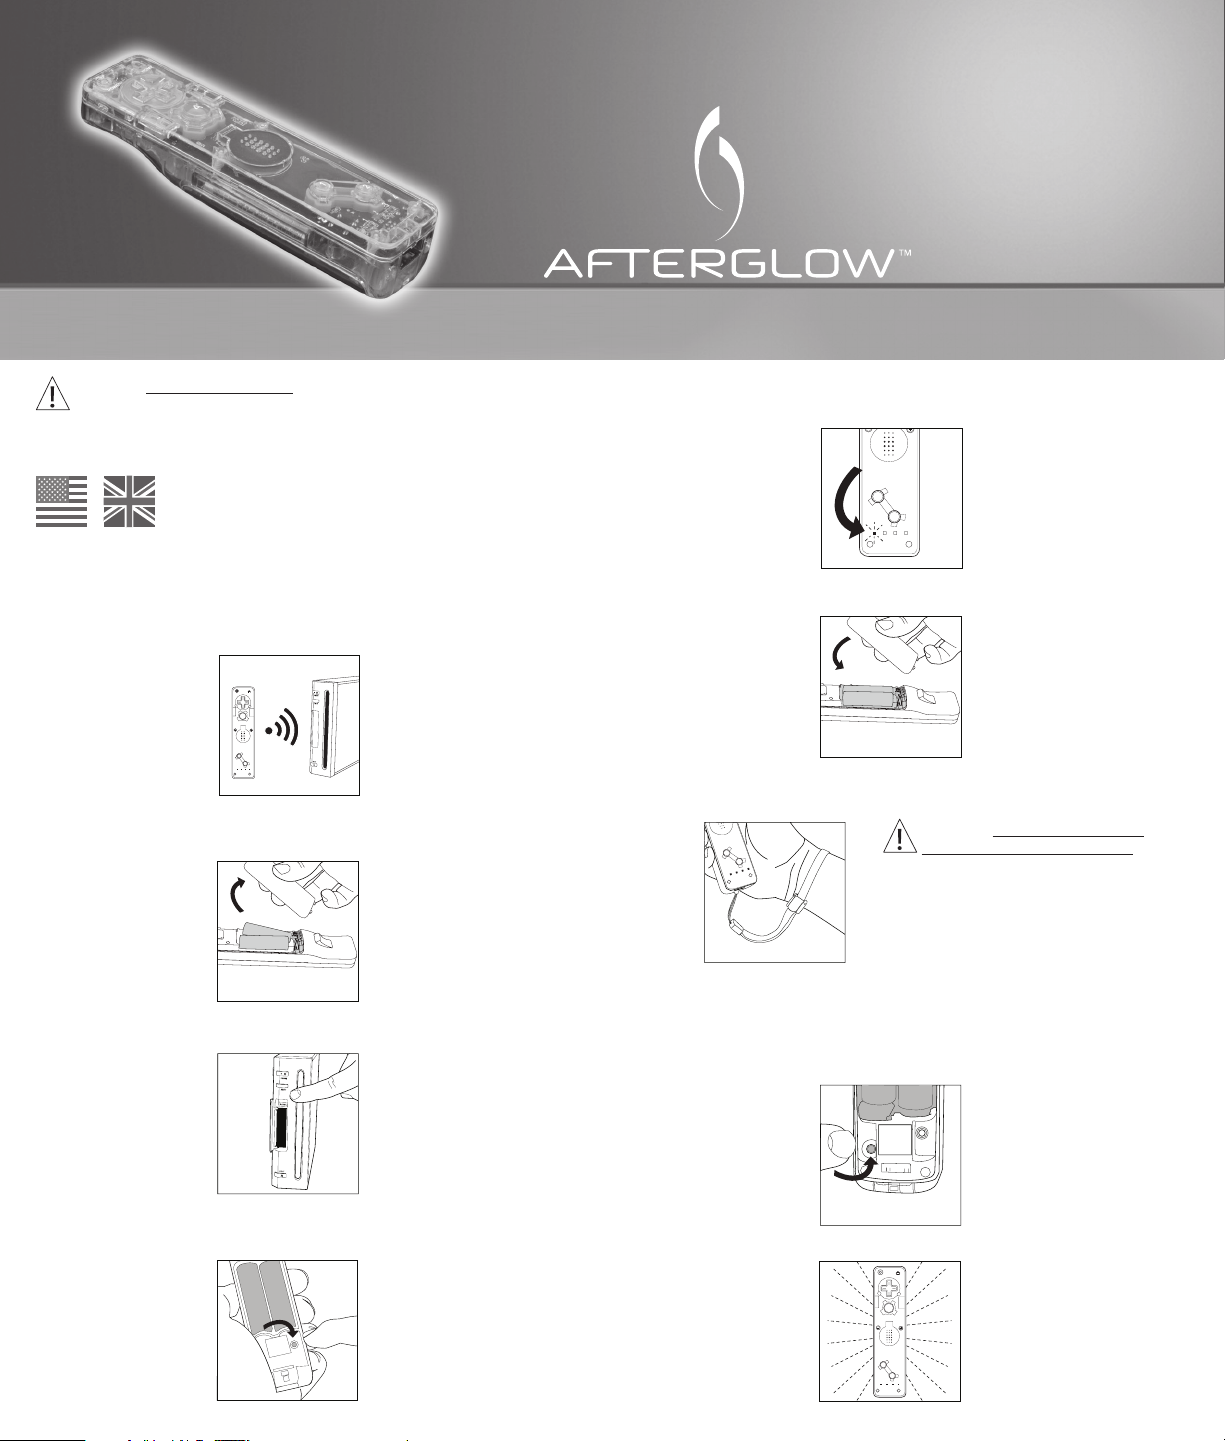
1) The AFTERGLOW™ Remote is designed to work with the Nintendo Wii® videogame system.
The AFTERGLOW™ Remote must be synced to the Nintendo Wii console in order to
function.
POWER
HOME
A
1
2
1
4
3
2
2) First, remove the bat tery door from the AFTERGLOW™ Remote and insert two (2) AA
batteries into the compartment according to the battery orientation instructions engraved
in the battery compartment.
3) Next, open the small door on the front of your Wii system. While the Wii is powered ON,
press the red “Sync” button within.
5) A sync between the AFTERGLOW™ Remote and the Wii console will be conrmed when the
player-indicator lights cease ashing and are replaced by a single glowing player-indicator
light.
1
2
1
4
3
2
6) Replace the battery door on the AFTERGLOW™ Remote.
7) Before play connec t the wrist strap to the AF TERGLOW™ Remote. Always wear the
AFTERGLOW™ Remote Wrist Strap and ensure that it is tightened securely around your
wrist.
CAUTION - Allow adequate room
1
2
4
3
2
1
around you during game play. Stay
at least 3 feet away from the TV. As you
move around during gameplay, make
sure objects and other people are out of
your range of movement or arm motion
to prevent damage or injury.
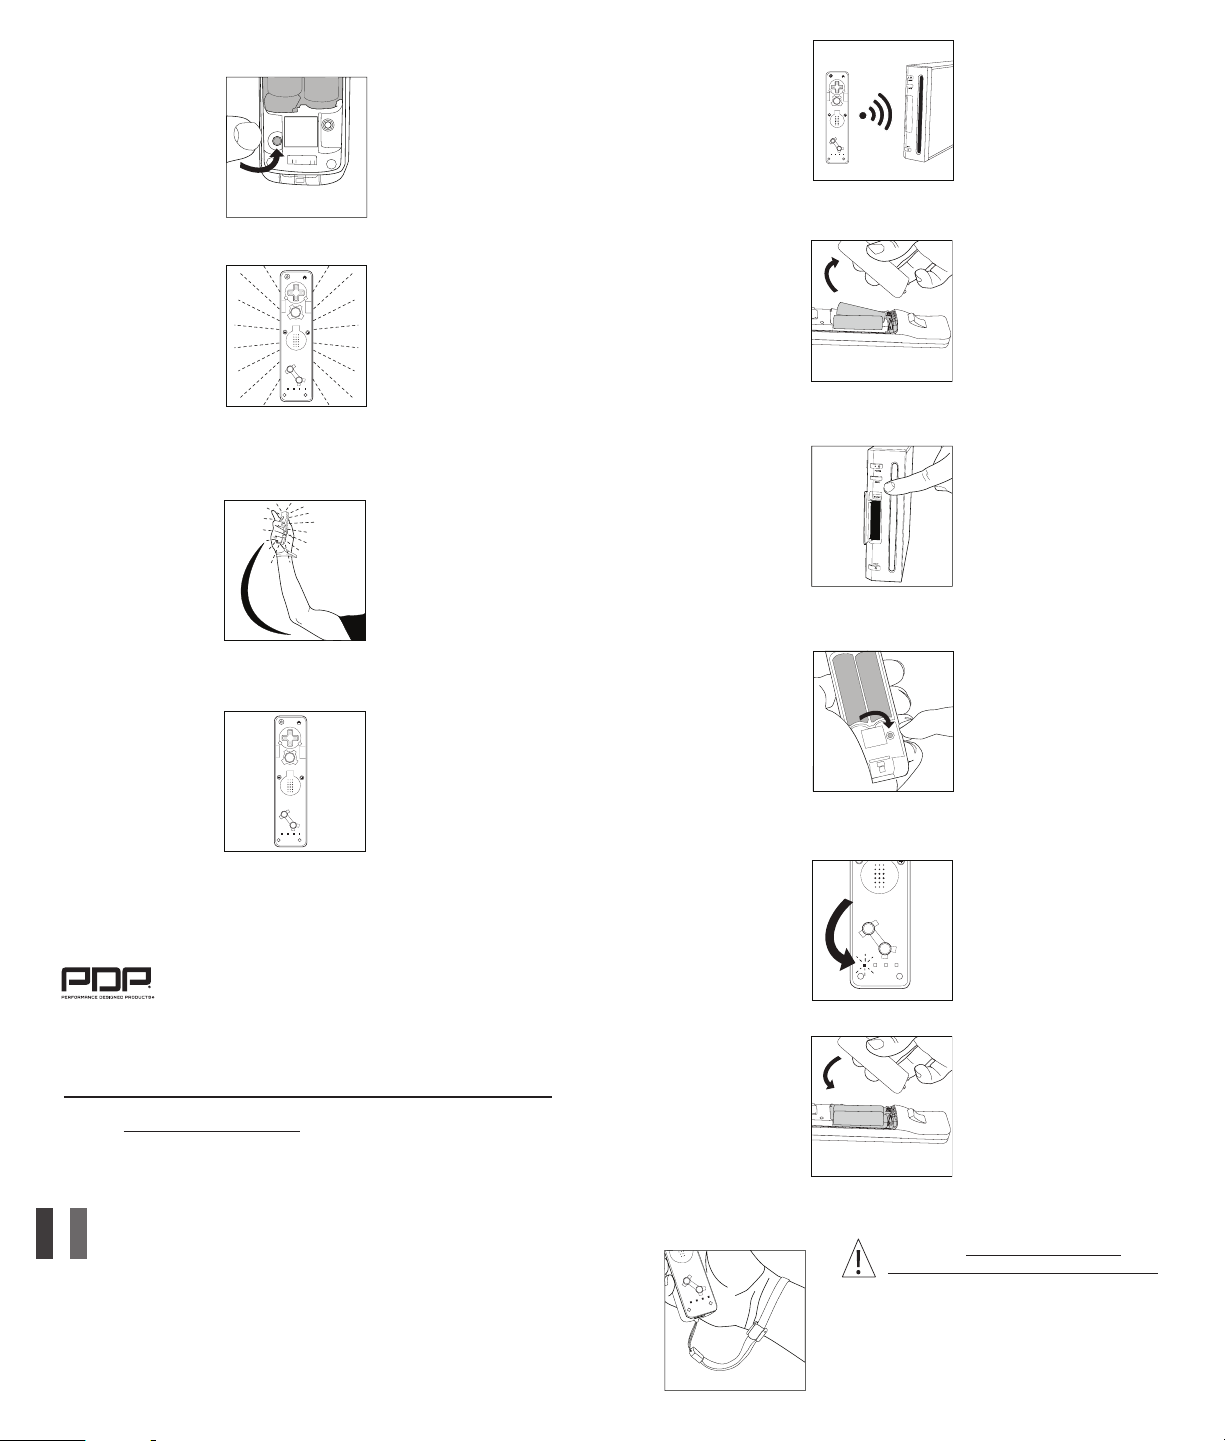
Changing AFTERGLOW™ Modes:
1) The AFTERGLOW™ Remote features three (3) modes of lighting eec ts: “ON”,
“ACCELERATOR”, and “OFF.”
2) The green AFTERGLOW™ button in the AF TERGLOW™ Remote’s battery compartment is
used to cycle through these three modes.
4) Now, press the red “Sync” button in the AFTERGLOW™ Remote’s battery compartment. The
four player-indicator LEDs on AFTERGLOW™ Remote will ash while communication takes
place.
3) Upon rst-use, the AF TERGLOW™ Remote will begin with the default ON setting.
POWER
HOME
A
1
2
1
4
3
2
Page 2
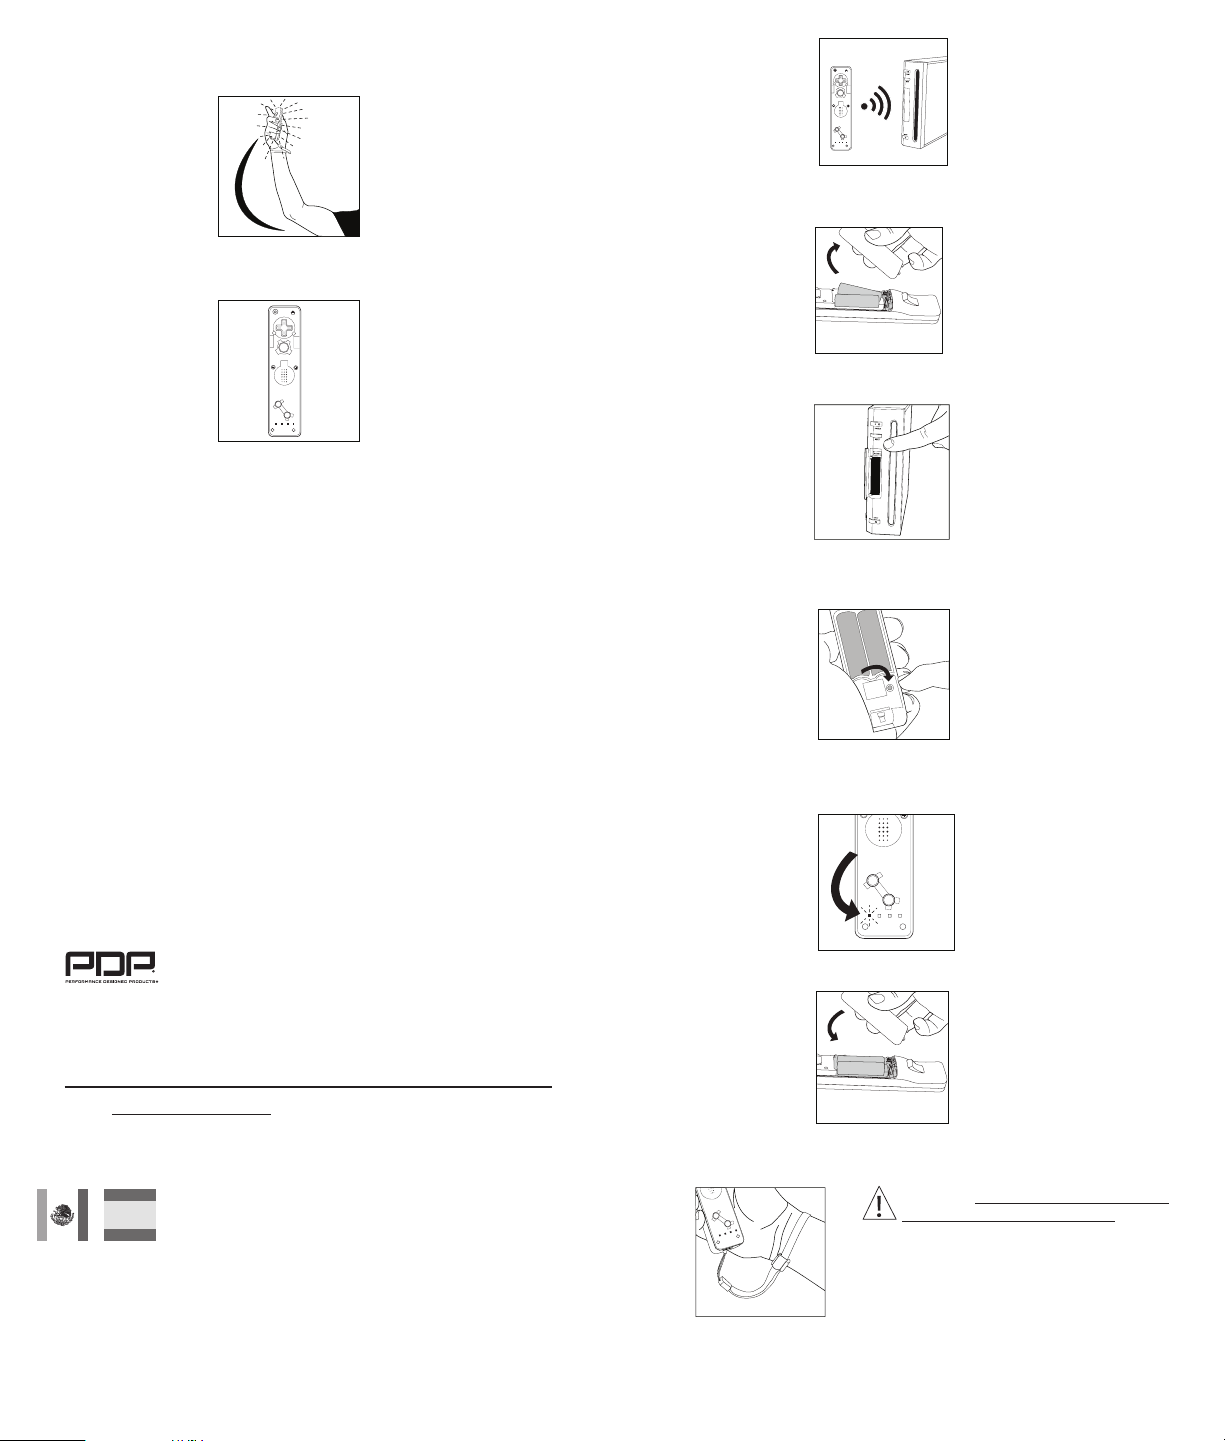
4) Press the AFTERGLOW™ button once to cycle to ACCELERATOR setting. The AFTERGLOW™
Remote will vibrate twice to signal the change. In ACCELERATOR mode, AF TERGLOW™
lighting will activate when the AFTERGLOW™ Remote experiences strong acceleration.
5) Press the AFTERGLOW™ button once more. Three vibrations will signal the AFTERGLOW™
Remote is now on the OFF setting. Only the AFTERGLOW™ Remote’s appropriate player
indicator light will glow.
POWER
HOME
A
1
2
1
4
3
2
6) To return to ON mode, press the AFTERGLOW™ button once more. One vibration will signal
the remote is now in ON mode.
7) Cycle through the three settings as often as you like and enjoy the AFTERGLOW™ in your
favorite mode!
Changes or modifications not expressly approved by the party responsible for compliance could void your authority
to operate the equipment.
This equi pment has bee n tested and fo und to comply wi th the limits f or a Class B digit al device, pur suant to par t 15 of the FCC
Rules. These limits are designed to provide reasonable protection against harmful interference in a residential installation.
This equi pment gene rates, uses a nd can radiate ra dio frequen cy energy an d, if not insta lled and used i n accordance wit h the
instruct ions, may cau se harmful in terferen ce to radio commu nications. H owever, there is no g uarantee tha t interfer ence will not
occur in a par ticular ins tallation. I f this equipm ent does caus e harmful inte rference t o radio or telev ision recept ion, which can b e
determi ned by turning t he equipmen t o and on, the us er is encourag ed to try to corre ct the inter ference by one o r more of the
following measures:
—Reori ent or relocat e the receivin g antenna.
—Incre ase the separa tion betwe en the equipm ent and receiv er.
—Conne ct the equipm ent into an outl et on a circuit d ierent fro m that to which the r eceiver is conn ected.
—Consul t the dealer or a n experie nced radio/ TV technici an for help.
FCC ID: X5B-P L7602E
This devic e complies wit h FCC radiation e xposure lim its set forth f or an uncontro lled enviro nment and it al so complies w ith Part 15
of the FCC RF Rule s. Operati on is subject t o the followi ng two conditi ons:
(1) this device may no t cause harmfu l interfer ence, and
(2) this device m ust accept any in terferen ce received, in cluding inte rference th at may cause un desired ope ration.
IC: 8814A-PL7602E
This device complies with Industry Canada licence-exempt RSS standard(s). Operation is subject to the following two conditions:
(1) this device may not cause interference, and (2) this device must accept any interference, including interference that may cause
undesired operation of the device.
Le présent appareil est conforme aux CNR d'Industrie Canada applicables aux appareils radio exempts de licence. L'exploitation
est autorisée aux deux conditions suivantes : (1) l'appareil ne doit pas produire de brouillage, et (2) l'utilisateur de l'appareil doit
doit accepter tout brouillage radioélectrique subi, même si le brouillage est susceptible d'en compromettre le fonctionnement.
*please keep this information for future reference
1840 East 27th Street
Vernon, CA 90058 USA
www.pdp.com or call: 1-800-331-3844 (USA & CANADA ONLY)
For technical questions please visit
CBX II - 382-390 Midsummer Blvd.,
Milton Keynes, Buckinghamshire MK9 2RG UK
POWER
HOME
A
1
2
1
4
3
2
2) Primero, remueva la puerta de las pilas del control remoto AFTERGLOW™ e inserte dos
(2) pilas AA dentro del compartimiento de acuerdo a las instrucciones de orientación
marcadas en el compartimiento de las pilas.
3) Luego, abra la puerta pequeña al frente de su sistema Wii. Mientras el Wii está ENCENDIDO,
presione el botón rojo de sincronización que se encuentra adentro.
4) Ahora, presione el botón rojo de sincronización en el compar timiento de las pilas del
control remoto AFTERGLOW™. Los indicadores LED de cuatro jugadores en el control
remoto AFTERGLOW™ parpadearán mientras la comunicación toma lugar.
5) La sincronización entre el control remoto AFTERGLOW™ y la consola Wii se conrmará
cuando las luces indicadoras de jugadores dejen de parpadear y se reemplacen con sólo
una luz indicadora de jugador iluminada
1
2
1
4
3
2
6) Coloque nuevamente la puerta de las pilas en el control remoto AFTERGLOW™.
© 2012 Performance D esigned Produc ts LLC. All rights r eserved. PDP an d AFTERGLOW are tra demarks of Per formance Desig ned
Product s LLC. Wii is a registe red trademark of N intendo of Americ a, Inc. This prod uct is not designe d, manufactu red, sponsored o r
endorsed by Nintendo.
CUIDADO - Siempre use la muñequera – Jugar Wii con el control remoto AFTERGLOW™ puede
involucrar movimientos rápidos o vigorosos. Favor use la muñequera incluida para no soltar
el control remoto AFTERGLOW™ y causar daños al control remoto o a los objetos que están
alrededor o lesiones a personas.
Gracias por comprar el control remoto AFTERGLOW™ para Wii®
Contenido:
1 control remoto AFTERGLOW™ para Wii®
1 muñequera para el control remoto AFTERGLOW™
1 manual
Uso del control remoto AFTERGLOW™:
1) El control remoto AFTERGLOW™ está diseñado para funcionar con el sistema de video
juegos Nintendo Wii®. El control remoto AF TERGLOW™ debe ser sincronizado con la
consola Nintendo Wii para poder funcionar.
7) Antes de jugar, enganche la muñequera al control remoto AFTERGLOW™. Siempre use la
muñequera para el control remoto AFTERGLOW™ y asegúrese de que esté apretada rme
mente alrededor de su muñeca.
CUIDADO - Deje sucientemente espacio
1
2
4
3
2
1
en su alrededor mientras juegue. Quédese
por lo menos a 3 pies del televisor. Mientras se
desplace durante el juego, asegúrese de que
Cambio de m odo de AFTERGLOW ™:
1) El control remoto AFTERGLOW™ cuenta con tres (3) modos de efectos de iluminación: “ON”
(Activado), “ACCELERATOR” (Acelerador) y “OF” (Desactivado).
los objetos y las personas sean alejados de sus
movimientos o del movimiento de su brazo
para evitar daños o lesiones.
Page 3
2) El botón verde de AFTERGLOW™ en el compartimiento de las pilas del control remoto
AFTERGLOW™ se usa para alternar entre estos tres modos.
3) Después de usar por primear vez, el control remoto AFTERGLOW™ comenzará con el ajuste
predenido de activado (ON).
POWER
HOME
A
POWER
HOME
A
1
2
1
4
3
2
2) Tout d’abord, ouvrez le couvercle des piles de la télécommande AFTERGLOWMC et insérez
2 piles AA dans le compartiment en les orientant par référence aux signes gravés dans le
compartiment des piles.
1
2
1
4
3
2
4) Presione el botón de AF TERGLOW™ una vez para cambiar al ajuste de acelerador
(ACCELERATOR). El control remoto AFTERGLOW™ vibrará dos veces para identicar el
cambio. En el modo de acelerador (ACCELERATOR), la iluminación de AFTERGLOW™ se
activará cuando el control remoto AFTERGLOW™ experimenta una aceleración fuerte
5) Presione el botón AFTERGLOW™ una vez más. Tres vibraciones señalarán que el control
remoto AFTERGLOW™ se encuentra en el ajuste desactivado (OFF). Sólo el indicador
AFTERGLOW™ de jugador apropiado del control remoto se iluminará.
POWER
HOME
A
1
2
1
4
3
2
6) Para regresar al modo activado (ON), presione AFTERGLOW™ una vez más. Una vibración
señalará que el control remoto se encuentra activado (ON).
7) ¡Alterne entre los tres ajustes tan a menudo como guste y disfrute del AFTERGLOW ™ en su
modo favorito
© 2012 Performance D esigned Produc ts LLC. Todos los dere chos reservad os. PDP y AFTERGLOW s on marcas comercia les de
Perform ance Designed Pro ducts LLC. Wii e s una marca registr ada de Nintendo of Am erica, Inc. Es te producto no es tá diseñado,
fabricado, patrocinado o endosado por Nintendo.
* Por favor guarde esta información para referencia en el futuro.
1840 East 27th Street
Vernon, CA 90058 USA
www.pdp.com o llame al: 1-800-331-3844 (EE.UU. Y CANADÁ ÚNICAMENTE)
Si tiene preguntas técnicas, favor visite
CBX II - 382-390 Midsummer Blvd.,
Milton Keynes, Buckinghamshire MK9 2RG UK
3) Ensuite, ouvrez le petit couvercle sur le devant du système Wii. Quand la Wii est mise en
marche (ON), appuyez sur le bouton rouge de synchronisation (Sync).
4) Puis, appuyez sur le bouton rouge de synchronisation (Sync) AFTERGLOWMC dans le
compartiment des piles de la télécommande. Les quatre témoins DEL des joueurs de la
télécommande AFTERGLOWMC clignoteront pendant que la liaison s’eectue.
5) La synchronisation entre la télécommande AFTERGLOWMC et la console Wii sera conrmée
quand les témoins des joueurs cesseront de clignoter et seront remplacés par la DEL d’un
joueur allumée en continu.
1
2
1
4
3
2
6) Replacez le couvercle des piles sur la télécommande AFTERGLOWMC.
ATTENTION - Utilisez toujours la dragonne – Les jeux vidéo pour Wii avec la télécommande
AFTERGLOWMC peuvent faire l’objet de mouvements rapides et puissants. Veuillez toujours
utiliser la dragonne fournie pour éviter que la télécommande AFTERGLOWMC ne vous échappe,
ce qui pourrait l’endommager, ainsi que les objets environnants ou blesser des personnes.
Merci d’acheter d’avoir acheter la télécommande AFTERGLOWMC pour WiiMD
Contenu :
1 télécommande AFTERGLOWMC pour WiiMD
1 dragonne pour télécommande AFTERGLOWMC
1 manuel
Utilisation de la télécommande AFTERGLOWMC :
1) La télécommande AFTERGLOWMC est conçue pour être utilisée avec le système de jeux
vidéo Nintendo WiiMD. La télécommande AFTERGLOWMC doit être synchronisée avec la
console Nintendo Wii pour fonctionner.
7) Avant de jouer, accrochez la dragonne à la télécommande AFTERGLOWMC. Utilisez toujours
la dragonne de la télécommande AFTERGLOWMC et vériez qu’elle est susamment serrée
autour de votre poignet.
ATTENTION - Prévoyez susamment
1
2
4
3
2
1
d’espace autour de vous pendant le jeu.
Restez à au moins 91 cm (3 pieds) du téléviseur. Quand vous vous déplacez pendant le
jeu, veillez à ce que les objets et les personnes
soient toujours hors de portée de vos mouvements ou de ceux de votre bras pour éviter des
dommages ou des blessures.
Page 4

Modication des Mode s de l’AFTERGLOWMC :
1) La télécommande AFTERGLOWMC intègre trois (3) modes d’eets lumineux : « ON » (Activé),
« ACCELERATOR » (Accélérateur) et « OFF » (Désactivé).
2) Le bouton vert AFTERGLOWMC dans le compartiment des piles de la télécommande
AFTERGLOWMC permet d’alterner entre ces trois modes.
3) Lors de la première utilisation la télécommande AFTERGLOWMC le mode par défaut est ON
(Activé).
POWER
HOME
A
Verwendung der AFTERGLOW™ Fernbedienung:
1) Die AFTERGLOW™ Fernbedienung ist für das Videospiel-System Nintendo Wii® konzipiert.
Die AFTERGLOW™ Fernbedienung funktioniert erst, wenn sie mit der Nintendo Wii® Konsole synchronisiert wurde.
POWER
HOME
A
1
2
1
4
3
2
2) Önen Sie die Abdeckung des Batteriefachs der AF TERGLOW™ Fernbedienung und legen
Sie zwei (2) AA-Batterien in das Batteriefach ein. Beachten Sie dabei die Polangaben im
Batteriefach.
1
2
1
4
3
2
4) Appuyez une fois sur le b outon AFTERGLOWMC pour passer en mode ACCELERATOR
(Accélérateur). La télécommande AFTERGLOWMC vibrera deux fois pour indiquer le
changement de mode. En mode accélérateur (ACCELERATOR), la lumière de l’AFTERGLOWMC
sera activée quand la télécommande AFTERGLOWMC sera soumise à une accélération
importante.
5) Appuyez une nouvelle fois sur le bouton AFTERGLOWMC. Trois vibrations indiqueront que
la télécommande AFTERGLOWMC est désormais en mode désactivé (OFF). Uniquement le
témoin DEL du joueur approprié utilisant la télécommande AFTERGLOWMC sera allumée.
POWER
HOME
A
1
2
1
4
3
2
6) Pour revenir au mode activé (ON), appuyez de nouveau sur le bouton AFTERGLOWMC. Une
vibration indiquera que la télécommande est désormais en mode activé (ON).
7)Alternez entre ces trois possibilités autant que vous le souhaitez et divertissez-vous avec
l’A FTERGLO WMC dans votre mode favori!
* Veuillez conserver cette information pour toute référence ultérieure
1840 East 27th Street
Vernon, CA 90058 USA
www.pdp.com ou appelez le : 1-800-331-3844 (ÉTATS-UNIS ET CANADA UNIQUEMENT)
© 2012 Performance D esigned Produc ts, LLC Tous droits rése rvés. PDP et AFT ERGLOW sont des marqu es de commerce de Per formance Desig ned Products L LC. Wii est une marqu e déposée par Ni ntendo of America , Inc. Ce produit n’a pas é té conçu, fabriqu é,
commandité ou approuvé par Nintendo.
Pour toute question technique allez sur le site
CBX II - 382-390 Midsummer Blvd.,
Milton Keynes, Buckinghamshire MK9 2RG UK
3) Önen Sie die kleine Klappe vorne an der Wii-Konsole. Drücken Sie die rote Taste „SYNC“
hinter der Klappe. (Die Konsole muss eingeschaltet sein.)
4) Drücken Sie die rote Taste „SYNC“ im Batteriefach der AFTERGLOW™ Fernbedienung. Die
vier Spieler-LEDs auf der AFTERGLOW™ Fernbedienung blinken während der
Kommunikation zwischen Fernbedienung und Konsole.
5) Sobald die Spieler-LEDs nicht mehr blinken und nur noch eine Spieler-LED dauerhaft
leuchtet, ist die AFTERGLOW™ Fernbedienung mit der Wii-Konsole synchronisiert.
1
2
1
4
3
2
6) Verschließen Sie das Batteriefach der AFTERGLOW™ Fernbedienung wieder mit der
Abdeckung.
VORSICHT – Legen Sie immer die Handgelenkschlaufe an! Es kann vorkommen, dass Sie beim Spielen
schnelle und heftige Bewegungen mit der AFTERGLOW™ Fernbedienung für Wii® machen! Bitte legen
Sie zum Spielen immer die beiliegende Handgelenkschlaufe an, damit Sie die AFTERGLOW™ Fernbedienung nicht versehentlich wegschleudern und andere Personen verletzen oder Schäden verursachen
(an der Fernbedienung selbst oder an Gegenständen in der Umgebung).
Vielen Dank für den Kauf der AFTERGLOW™ Fernbedienung für Wii®.
Inhalt:
1 AFTERGLOW™ Fernbedienung Wii®
1 Handgelenkschlaufe für die AFTERGLOW™ Fernbedienung
1 Anleitung
7) Befestigen Sie vor dem Spielen die Handgelenkschlaufe an der AFTERGLOW™ Fernbedi
enung. Legen Sie zum Spielen immer die Handgelenk schlaufe der AFTERGLOW™ Fernbedi
enung an, und achten Sie darauf, dass die Schlaufe fest und sicher an Ihrem Handgelenk
sitzt.
Page 5

AVORSICHT – Achten Sie beim Spielen
1
2
4
3
2
1
immer auf ausreichenden Sicherabstand zu Ihrer
Umgebung! Ihr Abstand zum Fernsehgerät muss mindestens 1 Meter betragen. Stellen Sie sicher, dass sich
andere Personen und Gegenstände immer außerhalb
Ihres Bewegungsradius und außerhalb der Reichweite
Ihrer Arme benden, wenn Sie sich beim Spielen im Raum
bewegen.dommages ou des blessures.
Ändern der AFTERGLOW™ Leuchtarten:
1) Die AFTERGLOW™ Fernbedienung bietet drei (3) verschiedene Leuchtarten: „EIN“,
„BESCHLEUNIGUNG“ und „AUS“.
2) Mit der grünen Taste „AFTERGLOW“ im Batteriefach der AFTERGLOW™ Fernbedienung
können Sie von Leuchtart zu Leuchtart weiterschalten.
3) Bei der ersten Verwendung steht die AFTERGLOW™ Fernb edienung auf der
Standardeinstellung „EIN“.
POWER
HOME
A
1
2
1
4
3
2
4) Drücken Sie einmal die Taste „AFTERGLOW“, um zur Leuchtart „BESCHLEUNIGUNG“
weiterzuschalten. Die AFTERGLOW™ Fernbedienung vibriert zwei Mal, um die Änderung
der Leuchtart zu bestätigen. In der Leuchtart „BESCHLEUNIGUNG“ leuchtet die AFTER
GLOW™ Fernbedienung nur dann auf, wenn sie eine starke Beschleunigung registriert.
ATTENZIONE : indossa sempre il laccetto. Durante il gioco, l’utilizzo del telecomando AFTERGLOW™ per console Wii può implicare l’esecuzione di movimenti rapidi e violenti. Assicurati
di indossare sempre il laccetto fornito per evitare di perdere la presa sul telecomando AFTERGLOW™ e di scagliarlo da qualche parte nella stanza danneggiando il telecomando stesso o
eventuali oggetti circostanti o ferendo eventuali persone presenti.
Grazie per aver acquistato il telecomando AFTERGLOW ™ per console Wii®
Contenuto della confezione:
1 telecomando AFTERGLOW™ per console Wii®
1 laccetto per telecomando AFTERGLOW™ per console Wii®
1 manuale
Come utilizzare il telecomando AFTERGLOW™
1) Il telecomando AF TERGLOW™ è stato progettato per funzionare in abbinamento con la
console Nintendo Wii®. Per funzionare, il telecomando AFTERGLOW™ deve essere prima
sincronizzato con la console Nintendo Wii.
POWER
HOME
A
1
2
1
4
3
2
2) Prima di tutto, togliere lo sportello del vano batterie dal telecomando AFTERGLOW™ e
inserire due (2) batterie di tipo AA nel vano, nel senso indicato in rilievo all’interno del vano
stesso.
3) Poi, aprire lo sportellino anteriore della console Wii. Con la console Wii accesa, premere il
pulsante di sincronizzazione interno.
5) Drücken Sie noch einmal die Taste „AFTERGLOW“. Die AFTERGLOW™ Fernbedienung
vibrier t drei Mal, um anzuzeigen, dass jetzt die Leuchtart „AUS“ eingestellt wurde. In dieser
Leuchtart leuchtet nur die zutreende Spieler-LED auf der AFTERGLOW™ Fernbedienung.
POWER
HOME
A
1
2
1
4
3
2
6) Um in die Leuchtart „EIN“ zurückzukehren, drücken Sie erneut die Taste „AFTERGLOW“.
Die AFTERGLOW™ Fernbedienung vibriert einmal, um anzuzeigen, dass wieder die
Leuchtar t „EIN“ eingestellt ist.
7) Sie können auf diese Weise immer nacheinander von Leuchtart zu Leuchtart schalten, um
die AFTERGLOW™ Fernbedienung so leuchten zu lassen, wie es Ihnen am besten gefällt.
*Bitte bewahren Sie diese Anleitung für den späteren Gebrauch auf.
1840 East 27th Street
Vernon, CA 90058 USA
www.pdp.com oder telefonisch unter 1-800-331-3844 (nur aus USA/Kanada)
© 2012 Performance D esigned Produc ts LLC. Alle Recht e vorbehalten. PD P und AFTERGLOW sind M arken von Perfor mance
Designe d Products LLC. Wi i ist eine eingetr agene Marke von Ni ntendo of America , Inc. Dieses Pro dukt wurde nicht vo n Nintendo
entwicke lt und wird nicht von So ny hergestellt , gefördert od er empfohlen.
Hilfe bei technischen Fragen nden Sie unter
CBX II - 382-390 Midsummer Blvd.,
Milton Keynes, Buckinghamshire MK9 2RG UK
4) Ora premere il pulsante di sincronizzazione rosso nel vano batterie del telecomando
AFTERGLOW™. Durante la fase di sincroniz zazione dei dispositivi, i quattro LED sul teleco
mando AFTERGLOW™ lampeggiano.
5) L’avvenuta sincronizzazione tra il telecomando AFTERGLOW™ e la console Wii viene
confermata dall’accensione ssa di un unico LED giocatore sul telecomando.
1
2
1
4
3
2
6) Richiudere lo sportello del vano batterie del telecomando AFTERGLOW™.
Page 6

7) Prima di giocare, collega il laccet to al telecomando AFTERGLOW™. 7) Indossa sempre il
laccetto del telecomando AFTERGLOW™ assicurandoti che sia ben stretto attorno al polso.
7) Possibile passare da una condizione all’altra con la frequenza desiderata per utilizzare il
telecomando AFTERGLOW™ nella modalità preferita!
*conservare queste informazioni per un’eventuale futura consultazione
1840 East 27th Street
© 2012 Performance D esigned Produc ts LLC. Tutti i dirit ti riservati. PD P e AFTERGLOW sono m archi commerciali d ella Performa nce
Designe d Products, LLC. W ii è un marchio regis trato dalla Ninten do of America, In c. Questo prodot to non è stato prog ettato,
prodott o, sponsorizz ato o in altro modo sup portato dalla N intendo.
Vernon, CA 90058 USA
www.pdp.com o chiamare il numero:
1-800-331-3844 (solo USA e CANADA)
CBX II - 382-390 Midsummer Blvd.,
Milton Keynes, Buckinghamshire MK9 2RG UK
1
2
4
3
2
1
aver spazio suciente intorno. Mantieni
una distanza di almeno 1,8 metri dal televisore.
Per evitare possibili danni o lesioni, mentre ti
muovi giocando, assicurati che non ci siano
oggetti o altre persone vicino a te o nella zona di
movimento del braccio.dommages ou des
blessures.
Modica delle modalità di illuminazione del telecomando AFTERGLOW™:
1) Il telecomando AF TERGLOW™ si può illuminare in tre (3) modalità diverse: “ACCESO”,
“ACCELERATO”, e “SPENTO”.
2) Il pulsante verde AFTERGLOW™ all’interno del vano bat terie serve a passare da una
modalità all’altra.
3) Quando viene utilizzato per la prima volta il telecomando AFTERGLOW™, la modalità di
illuminazione predenita è “ACCESO”.
ATTENZIONE – Mentre giochi, assicurati di
4) Premere il pulsante AFTERGLOW™ una volta per passare alla modalità “ACCELERATO”. Una
doppia vibrazione del telecomando AFTERGLOW ™ segnala il cambio di modalità. In
modalità “ACCELERATO”, il telecomando AFTERGLOW™ si illuminerà nel momento in cui
avvertirà una forte accelerazione.
POWER
HOME
A
1
2
1
4
3
2
CUIDADO - Utilize sempre a correia para o pulso - Jogar com o comando AFTERGLOW™ pode
envolver movimentos rápidos ou enérgicos. Não se esqueça de utilizar a correia para o pulso
incluída para evitar que o comando AFTERGLOW™ caia, causando danos neste ou nos objectos
que o rodeiam ou ferimentos em outras pessoas.
Obrigado por ter adquirido o comando AFTERGLOW™ para Wii®
Conteúdo:
1 Comando AFTERGLOW™ para Wii®
1 Correia para o pulso do comando AFTERGLOW™
1 Manual
Usar o comando AFTERGLOW™:
1) O comando AFTERGLOW™ foi concebido para funcionar com o sistema de videojogos
Nintendo Wii®. O comando AFTERGLOW™ tem de ser sincronizado com a consola Nintendo
Wii para poder funcionar.
POWER
HOME
A
1
2
1
4
3
2
2) Primeiro, retire a tampa do compartimento das pilhas do comando AFTERGLOW™ e insira
duas (2) pilhas AA no compartimento, de acordo com as instruções de orientação gravadas
neste.
3) Em seguida, abra a pequena porta na parte da frente do sistema Wii. Com o Wii ligado,
pressione o botão vermelho “Sync” no seu interior.
5) Premere nuovamente il pulsante AFTERGLOW™. Tre vibrazioni segnalano che la modalità
di illuminazione del telecomando AFTERGLOW™ è “SPENTO”. Rimane acceso solo il LED
corrispondente al giocatore che impugna il telecomando AFTERGLOW™.
POWER
HOME
A
1
2
1
4
3
2
6) Per portare di nuovo il telecomando su “ACCESO”, premere nuovamente il pulsante
AFTERGLOW™. Una vibrazione segnala che il telecomando è “ACCESO”.
4) Agora, pressione o botão vermelho “Sync” no compar timento das pilhas do comando
AFTERGLOW™. Os quarto LEDs de indicação dos jogadores do comando AFTERGLOW™
piscam durante a comunicação.
5) A sincronização entre o comando AF TERGLOW™ e a consola Wii é conrmada quando as
luzes de indicação dos jogadores deixam de piscar, sendo substituídas por uma única luz
brilhante de indicação do jogador.
Page 7

1
2
1
4
3
2
6) Volte a colocar a tampa do compartimento das pilhas no comando AFTERGLOW™.
7) Antes de jogar ligue a correia para o pulso ao comando AFTERGLOW™. Coloque sempre a
correia para o pulso do comando AFTERGLOW™ e certique-se de que ca bem ajustada
em volta do pulso.
CUIDADO - Deixe um espaço suciente
1
2
4
3
2
1
à sua volta durante o jogo. Mantenha-se
a pelo menos 1 m de distância da televisão. Ao
movimentar-se durante o jogo, certique-se de
que os objectos e outras pessoas estão fora do
alcance dos seus movimentos ou do movimento
do seu braço para evitar danos ou ferimentos.
dommages ou des blessures.
Alterar os modos AFTERGLOW™:
1) O comando AFTERGLOW™ possui três (3) modos dos efeitos luminosos: “ LIGADO”,
“ACELERADOR” e “DESLIGADO”.
2) O botão verde AFTERGLOW™ existente no compartimento das pilhas do comando é
utilizado para alternar entre esses três modos.
POWER
HOME
A
1
2
1
4
3
2
6) Para voltar ao modo LIGADO, pressione novamente o botão AFTERGLOW™. Uma vibração
indica que o comando encontra-se agora no modo LIGADO.
7) Alterne entre as três denições as vezes que desejar e desfrute do AFTERGLOW™ no seu
modo favorito!
*Guarde estas informações para referência futura
1840 East 27th Street
© 2012 Performance D esigned Produc ts LLC. Todos os direito s reservados . PDP e AFTERGLOW são m arcas comerciais d a Performance Desig ned Products L LC. Wii é uma marca reg istada da Nintend o of America, Inc . Este produto não é co ncebido, fabri cado,
patrocinado ou aprovado pela Nintendo.
Vernon, CA 90058 USA
www.pdp.com ou telefone para:
1-800-331-3844 (APENAS NOS E.U.A. E CANADÁ)
CBX II - 382-390 Midsummer Blvd.,
Milton Keynes, Buckinghamshire MK9 2RG UK
WAARSCHUWING – Gebruik altijd je polsriem – Bij het spelen van Wii games met de AFTERGLOW™ remote maak je snelle en felle bewegingen. Gebruik dus altijd de meegeleverde
polsriem. Daardoor voorkom je dat de AFTERGLOW™ remote uit je hand glipt waardoor de
remote of objecten in de omgeving schade kunnen oplopen of andere personen gewond
raken.
Hartelijk voor de aankoop van de AFTERGLOW™ afstandsbediening voor Wii®
Inhoud:
1 AFTERGLOW™ afstandsbediening voor Wii®
1 Polsband voor AFTERGLOW™ afstandsbediening
1 Handleiding
De AFTERGLOW™ afstandsbediening gebruiken:
1) De AFTERGLOW™ afstandsbediening is ontworpen voor gebruik met het Nintendo Wii®
videogamesysteem. U kunt de AFTERGLOW™ afstandsbediening pas gebruiken nadat hij
met de Nintendo Wii-console is gesynchroniseerd.
3) Quando é utilizado pela primeira vez, o comando AFTERGLOW™ é iniciado com a
predenição LIGADO.
POWER
HOME
A
1
2
1
4
3
2
4) Pressione o botão AFTERGLOW™ uma vez para mudar para a denição ACELERADOR . O
comando AFTERGLOW™ vibra duas vezes para indicar a alteração. No modo ACELERADOR,
a iluminação do AFTERGLOW™ é activada quando é dada uma forte aceleração ao
comando AFTERGLOW™.
5) Pressione novamente o botão AFTERGLOW™. Três vibrações indicam que o comando
AFTERGLOW™ se encontra agora na denição DESLIGADO. Só a luz de indicação do jogador
adequada acenderá no comando AFTERGLOW™.
POWER
HOME
A
1
2
1
4
3
2
2) Maak om te beginnen het klepje van het batterijenvak van de AFTERGLOW™ afstandsbe
diening open en plaats hierin twee (2) AA-batterijen in de stand die in het batterijenvak is
aangegeven.
3) Open vervolgens het deurtje aan de voorkant van uw Wii-systeem. Terwijl het Wii-systeem
is ingeschakeld, drukt u op de rode “Sync”-knop achter het deurtje.
4) Vervolgens drukt u op de rode “Sync”-knop in het bat terijenvak van de AFTERGLOW™
afstandsbediening. De vier spelerstatuslampjes op de AFTERGLOW™ afstandsbediening
knipperen terwijl de communicatie wordt opgebouwd.
Page 8

5) De synchronisatie tussen de AFTERGLOW™ afstandsbediening en de Wii-console is een feit
wanneer de spelerstatuslampjes niet meer knipperen en door één oplichtend spelerstatus
lampje is vervangen.
1
2
1
4
3
2
6) Plaats het klepje op het batterijenvak van de AFTERGLOW™ afstandsbediening terug.
7) Maak de polsriem aan de AFTERGLOW™ Remote vast voordat je begint te spelen. Draag
altijd de polsriem van de AFTERGLOW™ Remote en zorg er voor dat deze stevig om je pols is
bevestigd.
WAARSCHUWING – Zorg voor voldoende
1
2
4
3
2
1
bewegingsruimte wanneer je deze games
speelt. Om schade en verwondingen te
voorkomen, moet je minstens op een meter
afstand van de tv blijven. Zorg ervoor dat er
geen voorwerpen of andere personen in de
buurt zijn als je tijdens het gamen in actie
bent.
Een ander AFTERGLOW™ lichteect kiezen:
1) De AFTERGLOW™ afstandsbediening heeft drie (3) verschillende lichteecten: “ON” (Aan),
“ACCELERATOR” (Versneller) en “OFF” (Uit).
2) U kunt uit deze drie standen kiezen met behulp van de groene AFTERGLOW™ k nop in het
batterijenvak van de AFTERGLOW™ afstandsbediening.
5) Druk nu nog een keer op de AFTERGLOW™ knop. Drie trillingstoten geven aan dat u de
AFTERGLOW™ afstandsbediening daardoor naar de stand “OFF” (Uit) hebt overgeschakeld.
Alleen het eigen spelerstatuslampje van de AFTERGLOW™ afstandsbediening licht nu op.
POWER
HOME
A
1
2
1
4
3
2
6) Om naar de “ON” (Aan)-stand terug te schakelen, drukt u eenvoudig nog een keer op de
AFTERGLOW™-knop. Eén trillingstoot betekent dat u de af standsbediening weer naar de
“ON” (Aan)- stand hebt overgeschakeld.
7) U kunt deze drie standen zo vaak als u wilt gebruiken om met de AFTERGLOW™ in uw
favoriete stand veel spelplezier te beleven!
Ga voor technische informatie naar
1840 East 27th Street
© 2012 Performance D esigned Produc ts LLC. Alle rechte n voorbehoude n. PDP en AFTERGLOW z ijn handelsmerk en van Performance Desig ned Products L LC. Wii is een gedep oneerd hande lsmerk van Nintend o of America, Inc . Dit product is ni et ontworpen,
gefabriceerd, gesponsord of goedgekeurd door Nintendo.
Vernon, CA 90058 USA
1-800-331-3844 (gælder KUN i USA og Canada)
www.pdp.com of bel:
CBX II - 382-390 Midsummer Blvd.,
Milton Keynes, Buckinghamshire MK9 2RG UK
3) Wanneer u de AFTERGLOW™ afstandsbediening voor de eerste keer gebruikt, wordt de
standaard “ON” (Aan)-stand ingeschakeld.
POWER
HOME
A
1
2
1
4
3
2
4) Druk één keer op de AFTERGLOW™ knop om naar de stand “ACCELERATOR” (Versneller)
door te schakelen. De AFTERGLOW™ afstandsbediening trilt twee keer om aan te geven
dat u hebt overgeschakeld. In de “ACCELERATOR” (Versneller)-stand lichten de lampjes van
AFTERGLOW™ afstandsbediening op als deze een sterke versnelling ondervindt.
 Loading...