

Performance Designed PL051003T UserMan

HEADSET USER MANUAL
MANUEL D’UTILISATION DU CASQUE-MICRO
AURICULARES MANUAL DEL USUARIO
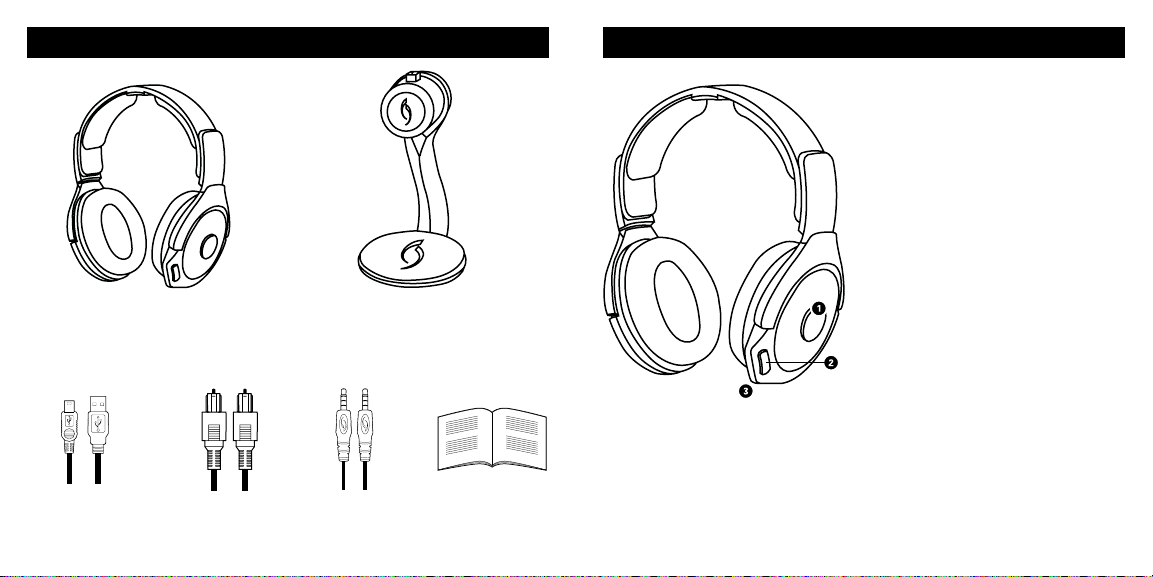
WHAT’S IN THE BOX ENGLISH HEADSET OVERVIEW ENGLISH
1. ON/OFF/MUTE BUTTON: Press
and hold to power ON; repeat to
power OFF. When ON, the button
will function as a MUTE BUTTON.
Click once to mute your microphone,
and click again to unmute.
2. AUDIO MODE BUTTON: Controls
audio modes and manual lighting.
3. BOOM-LESS MICROPHONE:
Internal dual microphone design for
chat communications.
Afterglow Fener™
Wireless Headset
Micro USB Play
& Charge Cable
Afterglow Transmitter/
Charging Dock
Optical Cable 3.5mm
Aux Cable
User Manual
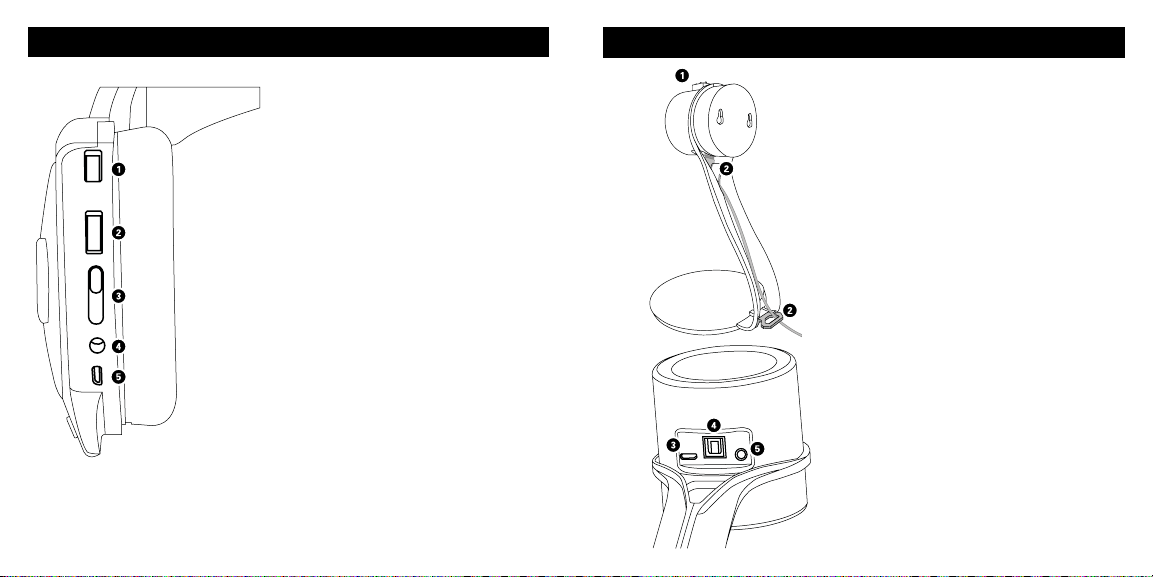
HEADSET OVERVIEW ENGLISH
TRANSMITTER/CHARGING DOCK OVERVIEW ENGLISH
1. GAME VOLUME DIAL: Adjusts game
volume level.
2. CHAT VOLUME DIAL: Adjusts chat
volume level.
3. AFTERGLOW LIGHTING MODE
SWITCH: Choose between Manual
lighting mode (set any color manually)
or Auto lighting mode (which
automatically cycles through all colors).
The third position turns off the lights
while keeping your headset functions
active.
4. UNIVERSAL AUDIO LINE-IN: Plug the
grey color 3.5mm auxiliary cable into
this port and the other end into a sound
source (mobile device, tablet, PC).
Microphone, sound and lighting
capabilities are supported in
Mobile mode.
5. MICRO USB CHARGING PORT: This
port enables you to charge your
Afterglow Wireless headset while
in use.
1. CHARGING PINS: When the headset
is sitting on the dock, the transmitter’s
charging pins make contact with the
headset’s charging pins for wireless
charging. The headset can be placed in
both directions.
2. CABLE MANAGEMENT SYSTEM:
The hole in the stand and clasp at the
base are part of the stand’s cable
management system. The Optical (or
3.5mm) and USB cables can be fed
through this hole and routed to the
base of the stand where they are held
neatly in place by the clasp.
3. MICRO USB INPUT: Plug the provided
USB to micro USB cable from console
to this port for power and chat audio.
4. OPTICAL INPUT PORT: Use this input
for use with your console or any audio
device with an digital audio/optical output.
5. 3.5MM Auxiliary LINE-IN PORT:
Plug the grey 3.5mm audio cable
into this port and the other end into a
sound source to transmit analog audio
wirelessly to your Afterglow headset.
NOTE: The optical port has priority
over the aux line in.
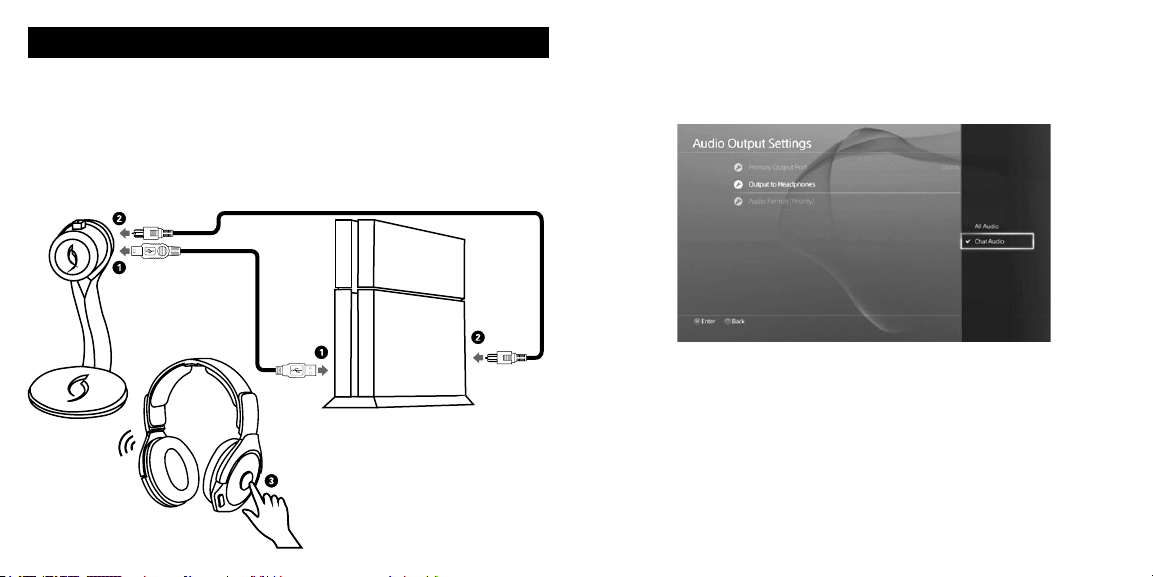
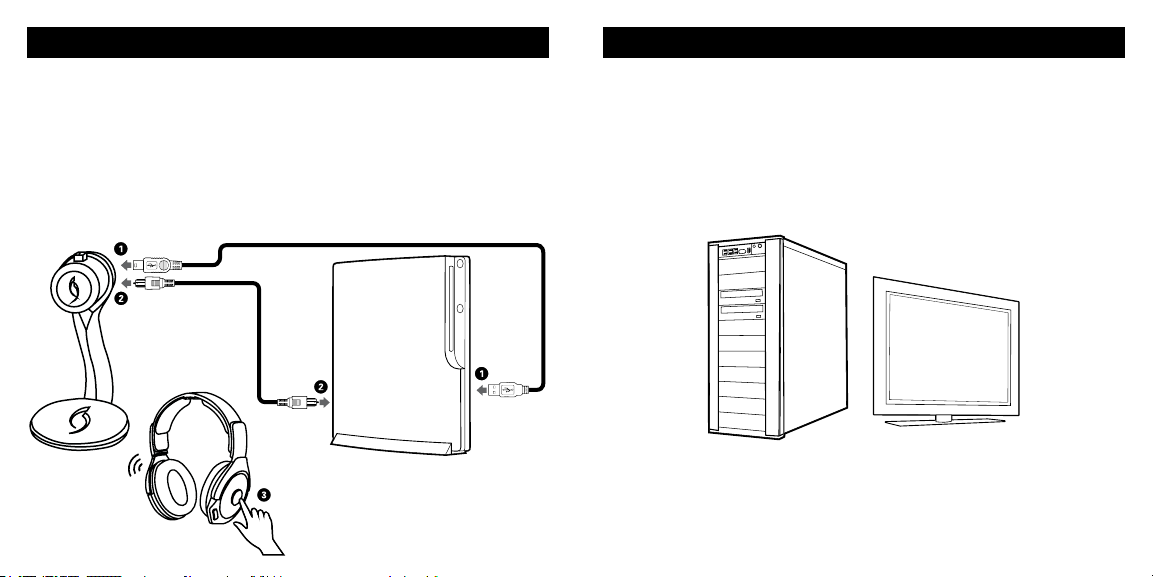
SET UP: PLAYSTATION® 4 ENGLISH
1. Plug the micro USB cable into the Afterglow Transmit ter Dock/Stand and into an active
USB por t on the PS4 console. Your Dock’s LED light will ash, indicating that it is on and
searching for your headset.
2. Plug one end of the included optical cable into the wireless transmitter and the other end
into the PlayStation® 4 console.
3. P ress and hold the large ON/OFF button on your headset to power it on. The alternating
LED colors of the headset ear cup will indicate the headset is searching for your wireless
transmitter. When the headset ear cup and transmitter dock LED turn a solid blue, your
headset and transmitter are communicating.
4. To ensure your Af terglow Headset will retrieve game and chat audio: Go to the PlayStation
menu > Sound and Screen Settings > Audio Output Settings > Output to Headphones >
Select “Chat Audio” > Hit “X” to conrm.
(Headset will receive the game audi o from the optical cable. Using this set u p, you can
control game a nd chat aud io separate ly.)
®
4
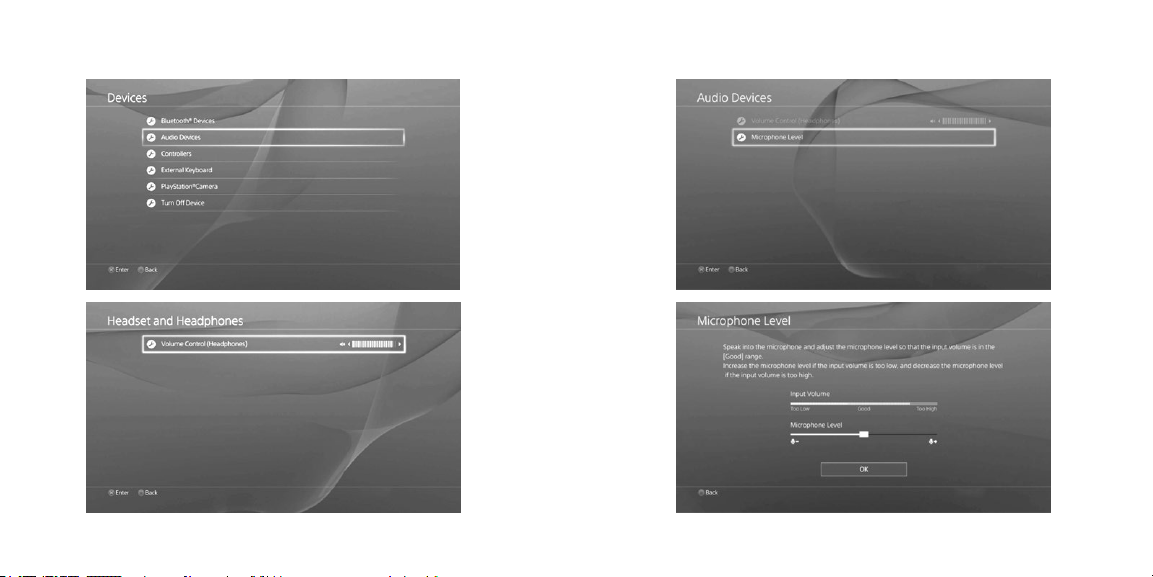
5. M ake sure your volume is turned up. If you want to further increase the volume, you can do
so in the PlayStation® 4 menu: Go to the PlayStation® 4 menu > Settings > Devices > Audio
Devices > Volume Control
6. You can also adjust your microphone input levels: Go to PlayStation® 4 menu >Set tings >
Devices > Audio Devices > Microphone Level
** To mute your microphone, press the large MUTE button located on your left ear cup.
SET UP: PLAYSTATION® 3 ENGLISH SET UP: PC / MAC ENGLISH
1. Plug the micro USB cable into the Afterglow Transmit ter Dock/Stand and into an active
USB por t on the PlayStation® 3 console. Your Dock ’s LED light will ash, indic ating that it is
on and searching for your headset.
2. Plug one end of the included optical cable into the wireless transmitter and the other end
into the PlayStation® 3 console.
3. P ress and hold the large ON/OFF button on your headset to power it on. The alternating
LED colors of the headset ear cup will indicate the headset is searching for your wireless
transmitter. When the headset ear cup and transmitter dock LED turn a solid blue, your
headset and transmitter are communicating.
4. Check to make sure your headset is recognized by your PlayStation® 3 by checking your
console’s sound settings.
1. Plug the micro USB end of the provided cable into the Afterglow Transmitter Dock and the
other side into a USB port on your PC. Your transmitter’s LED light will ash, indicating that
it is on and searching for a headset.
2. Plug one end of the grey 3.5mm cable into an aux port in your PC, and the other end into
the 3.5mm analog port in your wireless transmitter.
*If your PC has an optical output, you may connect your wireless transmitter using the
included optical cable instead of the 3.5mm cable.
3. P ress and hold the large ON/OFF button on your headset to power on. The alternating LED
colors on the ear cup indicate the headset is searching for your wireless transmitter. When
the ear cup and transmitter LED turns a solid blue, your headset and transmitter
are communicating.
** For passive use, simply plug one end of the grey 3.5 mm cable into an analog jack in your PC
and the other end into your headset.
4. Make sure your Af terglow wireless headset is chosen as an audio out on your PC: Right click
the small speaker icon in the bot tom tool bar > Select “Volume Options” > Select Afterglow
Headset under “Sound Devices”. You can further adjust the volume on your headset through
your PC through your audio settings indicated by a small speaker.
SET UP: MOBILE DEVICES ENGLISH LIGHTING MODES ENGLISH
1. To enable Afterglow lighting effects while in mobile mode, rst make sure your wireless
transmitter is not plugged in.
2. P ress and hold the mute button on your headset to power the headset ON. You will see the
headset ’s lights alternating, indicating that it is searching for a transmitter.
3. To put the headset in mobile mode, press the audio mode button for 10 seconds until you
hear a beep. Your headset is now in mobile mode.
4. Plug the grey 3.5mm cable and plug one end into the Afterglow Headset and the other into
the audio output in your mobile device. The microphone capability will be enabled for
phone calls.
5. A djust the volume as desired on your mobile device.
*NOTE: Your headset’s lighting effects can be adjusted while in mobile mode by moving the
lighting switch between modes.
In order to bring your Afterglow Headset out of mobile mode, hold down the large mute button
for 3 seconds to power the headset off.
When you power the headset on again, your headset will be out of mobile mode. You will
notice the alternating lights, indic ating your headset is searching for a wireless transmitter.
THE AF TERGLOW WIRELESS HEADSET INCLUDES THREE LIGHTING MODES:
MANUAL LIGHTING: In this mode, the Afterglow lights will be set to blue by default. You can
transition the colors by pressing and holding the mode button. Upon release the ear cup LED
will set at the desired color.
The Afterglow Wireless Headset is programmed to remember your headset ’s chosen color.
The next time you turn on your Afterglow W ireless Headset, the ear cups will be the color you
had previously chosen.
m
AUTOMATIC LIGHTING: The Afterglow Wireless Headsets also has the capability of cycling
through all colors of the spectrum while in use. Move the switch on the lef t ear cup to the light
bulb icon with an A. The ear cups will continue to cycle through the prismatic colors during use.
AUDIO MODES ENGLISH
AUDIO MODES ARE INDICATED BY THE VOICE CUES THAT TELL YOU WHAT MODE
YOU ARE IN .
PURE AUDIO: Pure audio offers a well -balanced and wide ranged audio experience that
enables you to hear the game exactly as the game developers intended with no
extra enhancements.
BASS BOOST AUDIO: For those who prefer the extra kick on low end, this mode boosts
the low frequencies and adds the extra depth to your explosions without sacricing the
undistorted, clean audio.
LIGHTING OFF: To turn off your ear cup lighting, simply move the switch to the crossed light
bulb icon. *NOTE: In this mode, the headset functions will operate normally.
a

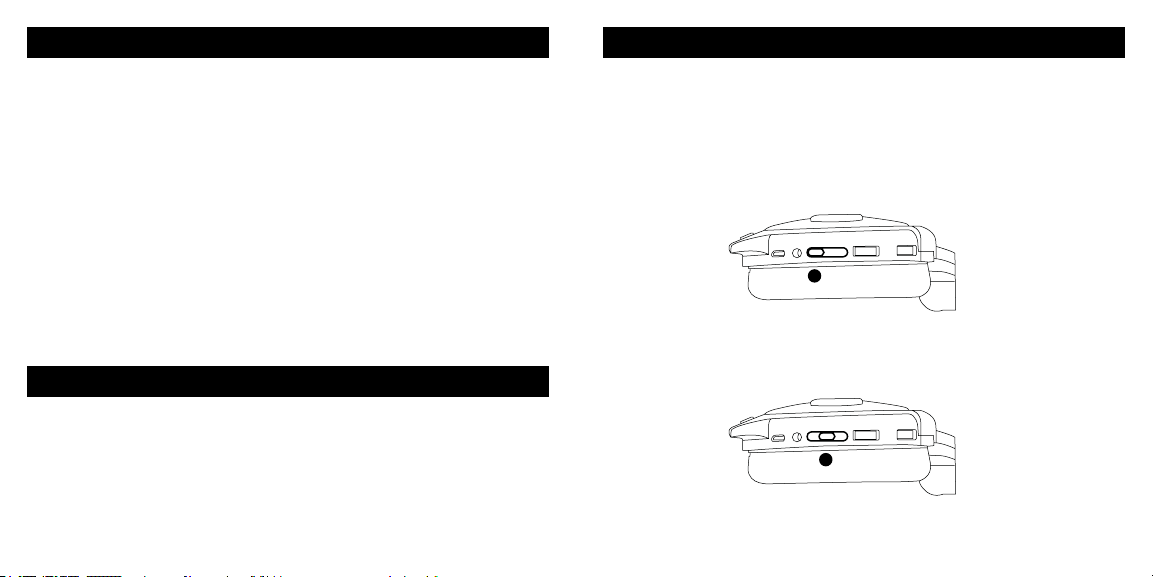
CHARGING ENGLISH
AFTE RGLOW HEADSET HE ADSET OFFERS TWO CHARGING METHODS:
1) V ia provided play&charge cable – which let’s you charge the headset while in use
2) Via Transmitter/Charging Dock:
a. You can place the Afterglow Headset on the charging dock in both possible positions
b. You can tell that the headset is charging as the earcup lights start pulsating
c. Once the headset is fully charged, the earcup lights will stay solid
d. You can unscrew the Transmitter/Charging dock from its stand and wall/desk mount it.
Use the provided template to make sure it is leveled on your wall or desk.
BAT TERY LIFE ENGLISH
YOUR AFTERGLOW HEADSET IS ENGINEE RED TO PROVIDE GAMERS UP TO 10 HOURS
OF BATTERY LIFE ON A SINGLE CHARGE .
LOW BAT TERY:
• Your Afterglow Headset will alert you when the bat tery life is low.
• When your headset has about 10 minutes of power left, your headset’s LED ear cup
lights will shut off, but you will still be able to hear your game and chat audio.
• For a full battery charge, your headset will need a few hours to charge. You may con-
tinue using your headset while charging by connecting the Play & Charge cable to your
headset and an active USB port.
LED CHARGING INDICATION:
• When charging, the ear cup lights will pulsate, which indicates charging.
• When fully charged, the ear cup lights will go back to your set lighting color.
TROUBLESHOOTING ENGLISH
I cannot hear game audio – make s ure…
• The Afterglow transmitter and charging dock is connected to the USB por t on your
PlayStation®4 system and the system is on.
• Your headset is turned on and paired with the transmitter dock.
• Your Afterglow transmitter and charging dock are paired successfully. This is indicated
by a solid LED on the Af terglow transmit ter and charging dock and the ear cups.
• Your volume is turned up.
• Your headset is recognized as an audio out for your system.
I cannot hear others – make sure…
• Your chat volume dial is turned up.
• You have enabled “chat audio” in your Play Station® 3 or 4 sound settings.
Others cannot hear me – make s ure…
• Your headset is ON and paired with your wireless transmitter. This is indicated by a
solid LED on the ear cup and the Afterglow transmitter and charging dock.
• Your mic is not muted. Click the large MUTE button on the left ear cup to mute and
unmute yourself. **NOTE: When you mute your microphone, a voice cue will tell you
“Comms disabled”
• On a PC, make sure your headset is selected as a microphone input by right clicking
the speaker icon in your bottom tool bar > Recording Devices > select Headset
microphone.
My headset and trans mit ter a re not paired – make sure …
• Your headset is not in passive mode. To take your headset out of mobile mode, turn
your headset off by holding down the mute button for 3 seconds until you hear a beep.
When you turn your headset back on, it will not be in mobile mode.
• Your Afterglow transmitter and charging dock and ear cups (with the lighting switch on
the automatic or manual mode) are a solid light. This indicates that your headset and
transmitter are paired.
• The Afterglow transmitter and charging dock is plugged into an active USB port.
• Your headset ’s batter y is not completely dead.
 Loading...