

Page 1
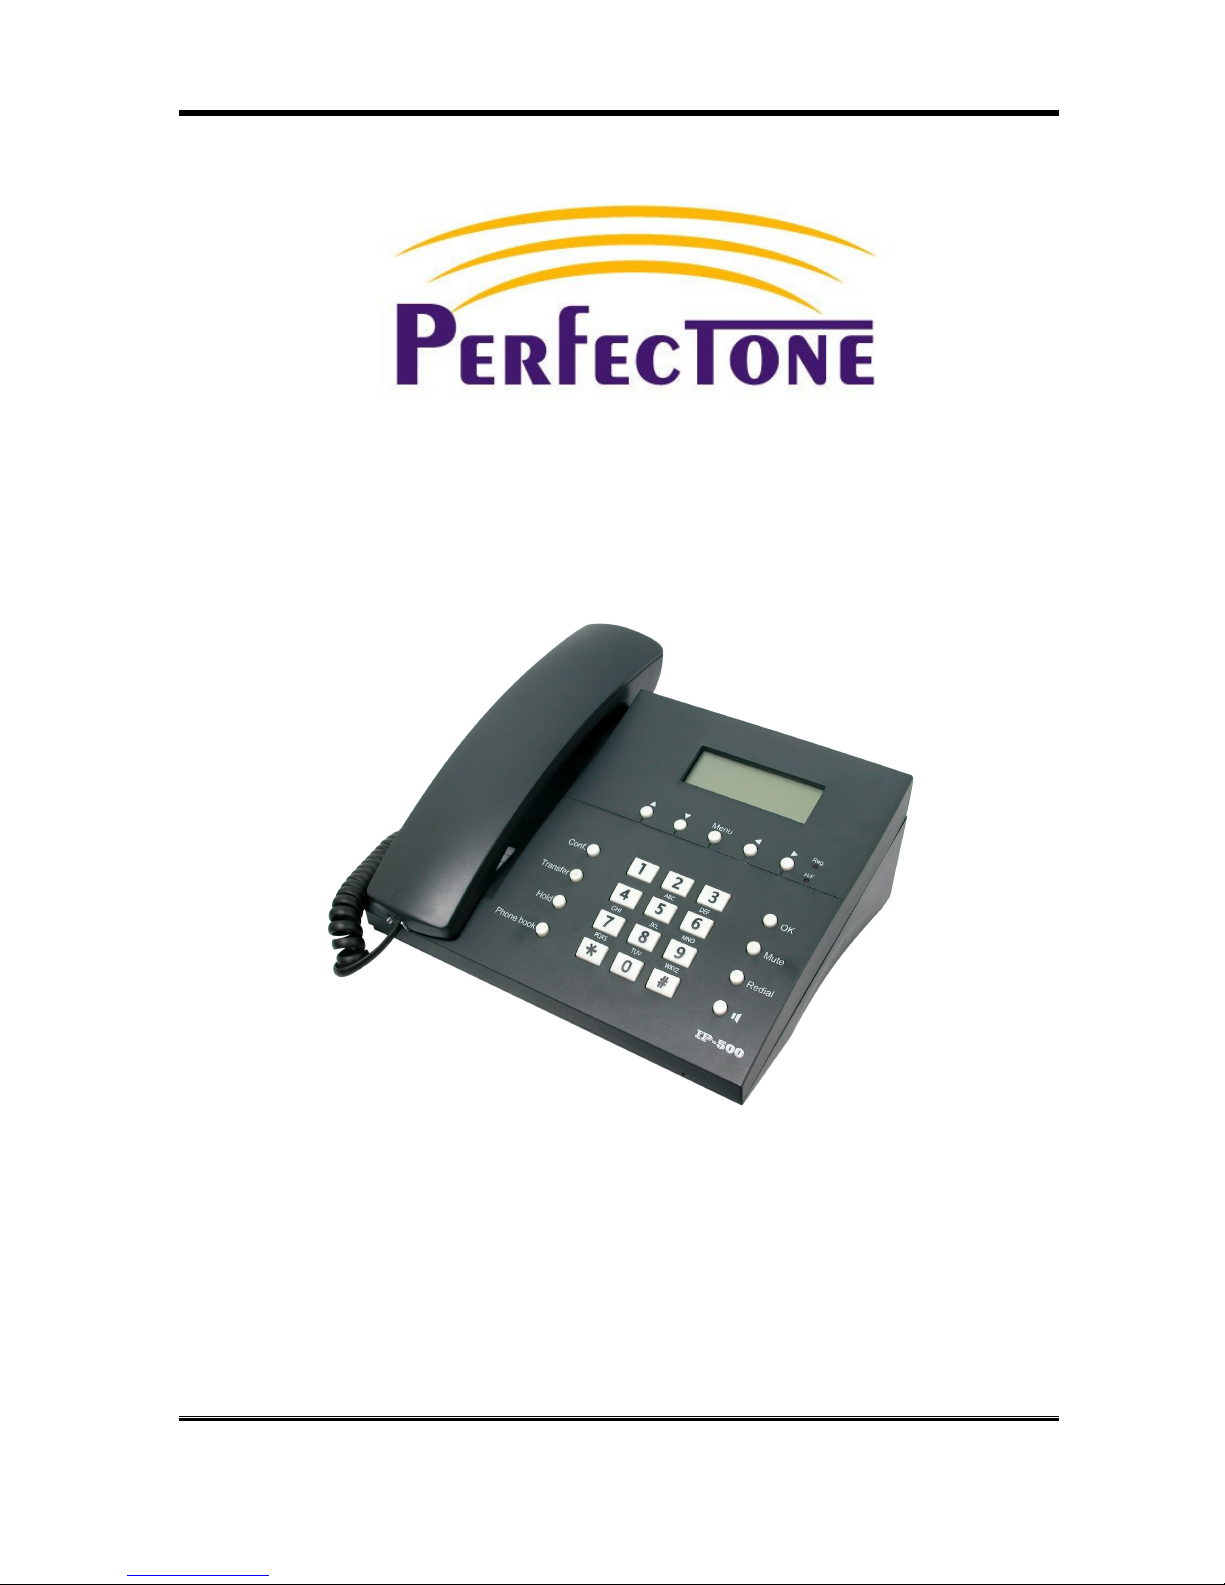
IP500 User Manual
1
IP 500 Internet
IP 500 Internet IP 500 Internet
IP 500 Internet Phone
PhonePhone
Phone
[VoIP]
[VoIP][VoIP]
[VoIP]
User Manual
Page 2

IP500 User Manual
2
Index
1.
Introduction................................................................................................................................ 3
1.1 Hardware Overview...............................................................................................................3
1.2 Software Overview ................................................................................................................3
1.3 Operating requirements: .......................................................................................................4
1.4 Electric requirements: ...........................................................................................................4
1.5 Size: ......................................................................................................................................4
1.6 Phone diagram ......................................................................................................................4
1.7 Keypad description................................................................................................................5
2.
Installating the IP Phone ........................................................................................................... 5
3.
Setup the VoIP Phone by Keypad............................................................................................. 8
3.1 Keypad Setting List ...............................................................................................................8
4.
Setup the VoIP Phone by Web Browser ................................................................................. 12
4.1 Login....................................................................................................................................12
4.2 System Information for the VOIP PHONE ..........................................................................12
4.3 Phone Book.........................................................................................................................13
4.4 Phone Setting......................................................................................................................14
4.5 Network ...............................................................................................................................17
4.6 SIP Settings.........................................................................................................................20
4.7 NAT Trans. .......................................................................................................................... 24
4.8 Others..................................................................................................................................24
4.9 System Authority .................................................................................................................25
4.10 Save Change ......................................................................................................................26
4.11 Update.................................................................................................................................26
4.12 Reboot.................................................................................................................................27
5.
Setup the VoIP Phone by using Console (Hyper Terminal) .................................................... 28
5.1 Configure the COM port ......................................................................................................28
5.2 Login into the VoIP Phone...................................................................................................29
5.3 Using CLI command to configure the VoIP Phone..............................................................30
6.
Phone function list ................................................................................................................... 36
Page 3

IP500 User Manual
3
1. Introduction
IP is abbreviation of Internet Protocol. An IP phone is a telephone transporting voice by grouping
data package of IP protocol. IP phone can be used on IP Networks from an enterprise-wise LAN to a
city-wide WAN.
An IP phone transports voice message over data communication network at extremely low price but
of excellent sound quality just like ordinary fixed telephone lines do. With our IP500 Internet phone,
you’re going to save dramatically on internetional calls.
With its unique generalized outline and linner line modes. IP500 Internet phone functions much like
an ordinary telephone switching between inner and out line, it brings great convenience to the users.
When IP500 Internet phone is in generalized inner line mode, it is free of charge to call another
IP500 wherever the destination phone is in the world. When IP500 series IP net phone is in
generalized out line mode, it can place calls to every ordinary telephones in the world at an
extremely low price.
With its stability, sound quality, compatibility and rich functionalities, IP500 leverages your wealth
with high quality communications!
1.1 Hardware Overview
• Main Chip – CM5000
• Data Memory – 16M
• Program Memory – 64M
• Ethernet Jack – 2 x 10/100M jacks
• AC/DC adapter – Input AC230V, output 9V 1200mA
1.2 Software Overview
• Network Protocol
- SIP V1 (RFC2543), V2 (RFC3261)
- IP/TCP/UDP/RTP/RTCP
- ICMP/ARP/RARP/SNTP
- TFTP Client/DHCP Client/ PPPoE Client, Static IP
- Telnet/HTTP Server
- DNS Client
• Codec
- G.711
- G.723
- G.726
- G.729A
- G.729B
• IP Assignment
- Static IP
- DHCP
- PPPoE
Page 4

IP500 User Manual
4
• Voice Quality
- VAD(Voice Activity Detection)
- CNG(Comfortable Noise Generator)
- LEC(Line Echo Canceller)
- Packet Loss Compensation
- Adaptive Jitter Buffer
• Security
- HTTP 1.1 basic/digest authentication for Web setup
- MD5 for SIP authentication (RFC2069/ RFC 2617)
• Configuration
- Web Browser
- Telnet
- Keypad Configuration
• Firmware Upgrade
- TFTP
- HTTP
1.3 Operating requirements:
• Operation temperature: 0 to 50 ºC
• Storage temperature: -10 to 60 ºC
• Humidity: 10 to 90% no dew
1.4 Electric requirements:
• Voltage: 9V DC
• Power adaptor: AC/DC input 230V, output 9V 1200mA
• Network interface: 2 X RJ-45 Ethernet connectors
• FXO: 1 X FXO connector
1.5 Size:
204 x 187 x 75 mm (L x W x H)
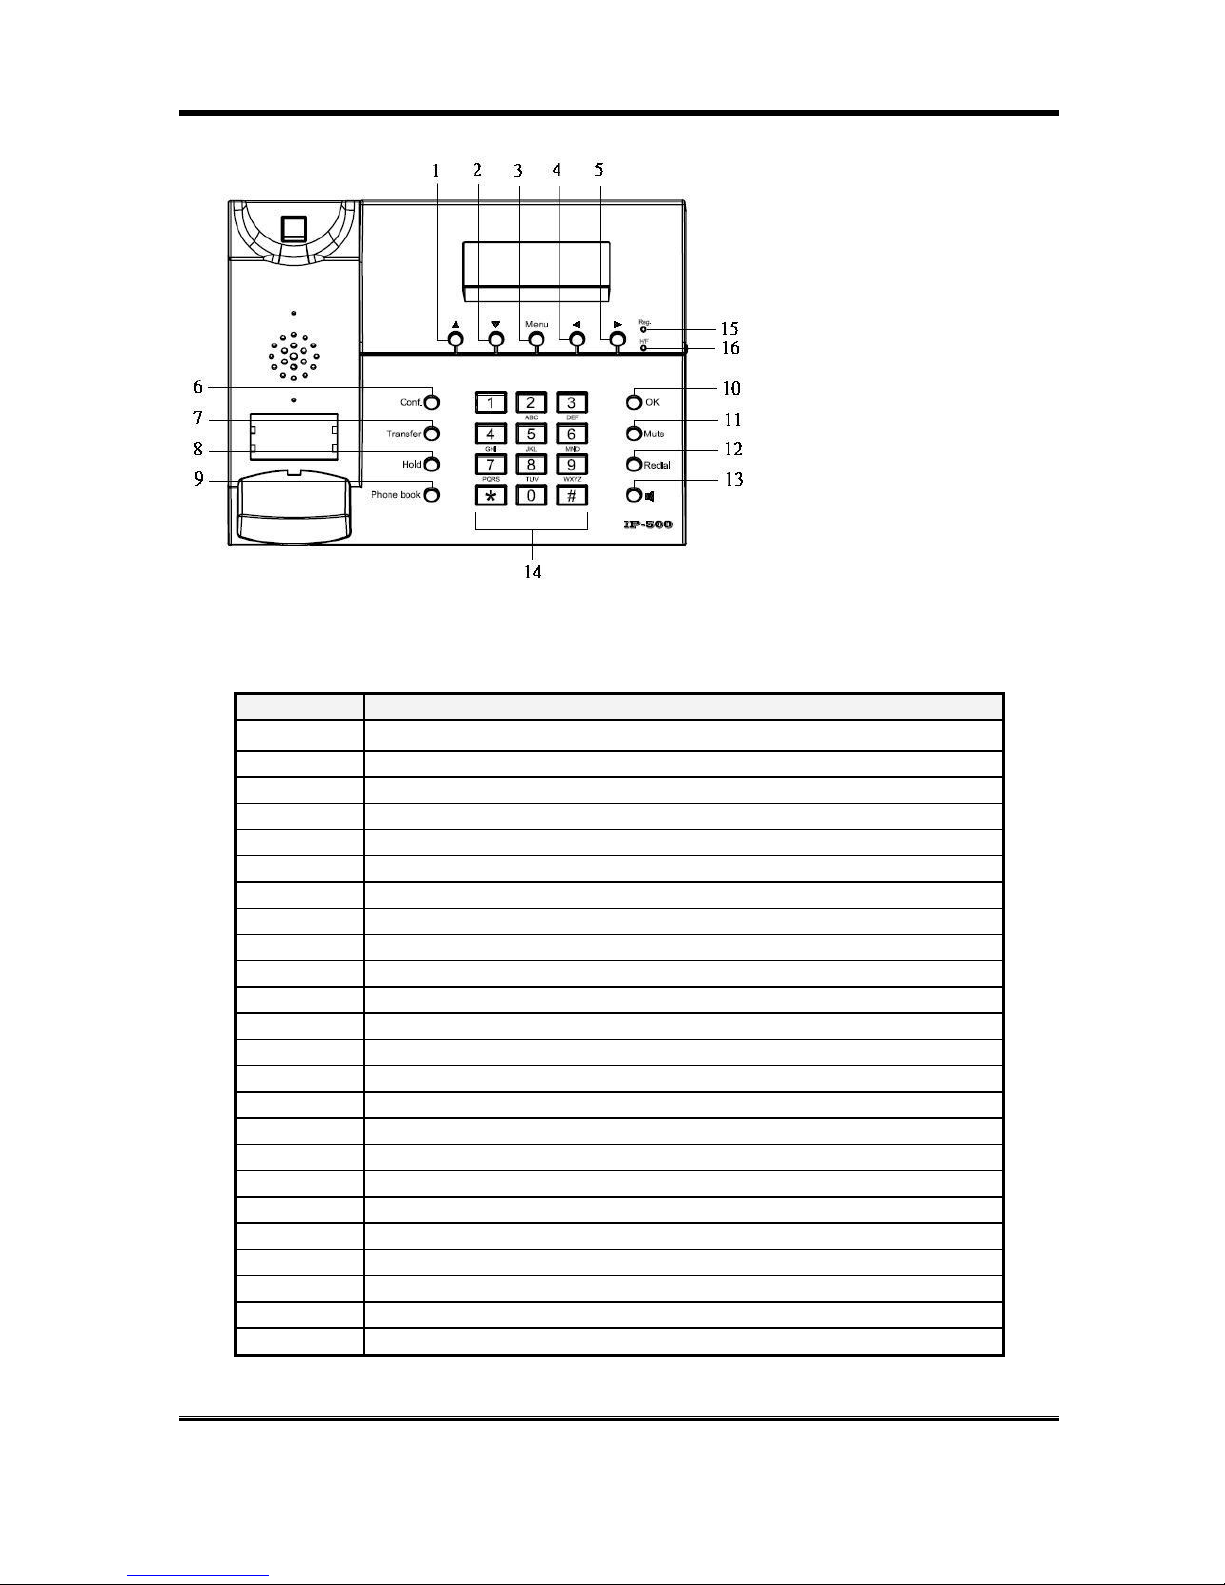
1.6 Phone diagram
Page 5
IP500 User Manual
5
1. Up key
2. Down key
3. Menu
4. Left key
5. Right Key
6. Conference
7. Transfer
8. Hold
9. Phone book
10. Confirm
11. Mute
12. Redial
13. Speaker
14. Number key
15. Reg LED
16. H/F LED
1.7 Keypad description
Key Name Description
1
“1”, “-“, “”, “!”, “?”
2 “2”, “a”, “b”, “c”, “A”, “B”, “C”
3 “3”, “d”, “e”, ”f”, “D”, “E”, “F”
4 “4”, “g”, “h”, “I”, “G”, “H”, “I”
5 “5”, “j”, “k”, “l”, “J”, “K”, “L”
6 “6”, “m”, “n”, “o”, “M”, “N”, “O”
7 “7”, “p”, “q”, “r”, “s”, “P”, “Q”, “R”, ‘S”
8 “8”, “t”, “u”, “v”, “T”, “U”, “V”
9 “9”, “w”, “x”, “y”, “z”, “W”, “X”, “Y”, “Z”
0 “0”, “space”
* “*”, “•”, “:”, “@”, Switch between PSTN dialing and IP dialing
# Start dialing process
UP/DOWN This is Up↑ and Down↓ key
MENU This is the “Menu” key to set the IP Phone
LEFT/RIGHT This is Left← and Right→ key
CONF This is three way conference function
TRANSFER This is “Transfer” to the other phone number
HOLD This is “HOLD” function
Phone book Go to Phone book directly
Mute This is “Mute” function
OK This is “OK”, accept setting
Mute This is “Mute” function
Reg LED Show the status of IP Phone’s registration
H/F LED Show the status of Hand-Free mode.
2. Installating the IP Phone
Page 6

IP500 User Manual
6
Before installing your IP phone, it is useful to know what kind of IP addressing your LAN or router is using.
2.1 What is the IP addressing of your network?
Most networks, including the Internet, use identification codes IP (Internet Protocol) addresses to
identify and locate the devices that share their services.
There are two systems for assigning these addresses:
DHCP Addressing: With this system, your LAN or router automatically assigns all the
required IP parameters to any device connected to it when the device logs on.
(Some ISPs who use DHCP require a host name, which must be entered manually.)
Note: Your IP Phone is shipped from the factory with DHCP on, or enabled. So, if your LAN or
router is configured to use DHCP addressing, your IP Phone’s LAN parameters will automatically be
configured as soon as it is connected to the LAN or router and powered up.
Static Addressing: If your LAN does not use DHCP addressing, each device
concurrently connected to it must be assigned its own unique IP address. In this
case, your LAN’s configuration information must be manually entered into the IP
phone. You will need to know the following parameters:
- IP address
- Subnet mask
- Gateway address
- Primary DNS address
- Secondary DNS address (required by some systems)
Note: If your system uses static addressing, this is a good time to make sure know these
parameters, since you will need them to configure your IP Phone. If you don’t know them, contact
your network administrator to obtain the necessary information.
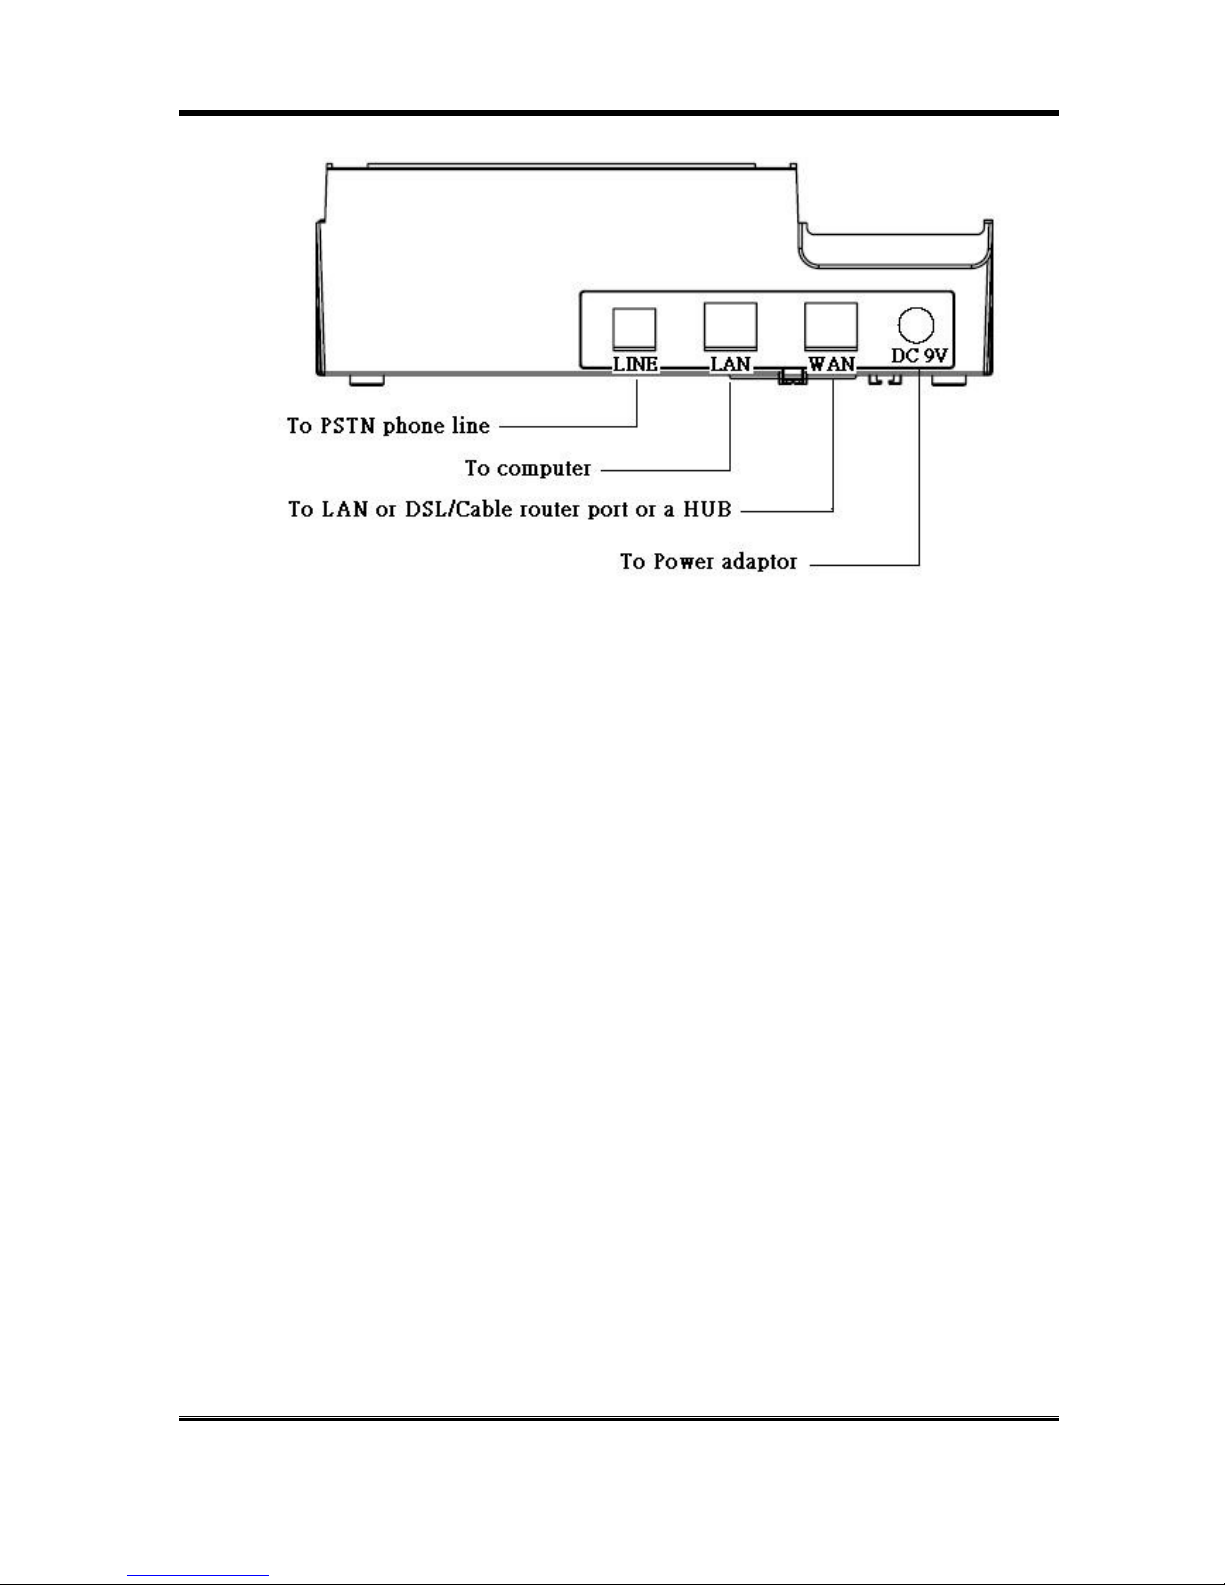
2.2 Connection of the IP phone:
1. Connect handset to the base: insert handset cord into handset jack at the left side of the base.
2. Connect IP phone to Internet: Plug a RJ-45 Ethernet cable into the Ethernet jack named ‘WAN’
of the IP phone. Plug the other end of the cable into an appropriate LAN or DSL/Cable router
port or a HUB.
3. Connect IP phone to a computer if necessary: Plug a RJ-45 Ethernet cable into the Ethernet jack
named ‘LAN’ of the IP phone. Plug the other end of the cable to a computer.
4. Connect IP phone to PSTN line: Plug a RJ-11 line cord into the phone jack named ‘Line’ of the IP
phone. Plug the other end of the cord into PSTN wall jack.
5. Power on IP phone: Plug the power adapter into the Power Jack of the IP phone. Then plug the
other end of the power adapter into the appropriate wall outlet.
Page 7
IP500 User Manual
7
Page 8

IP500 User Manual
8
3. Setup the VoIP Phone by Keypad
The configuration of the VoIP phone can be set by the keypad on the unit.
3.1 Keypad Setting List
1. Phone Book
Search:Search Phone Book.
Add entry:Add new phone number to phone book
Speed dial:Add speed dial phone number to speed dial list.
Erase all:Erase all phone number from Phone Book.
2. Call history
Incoming calls: Show all incoming call.
Dialed numbers: Show all dialed call.
Erase record: Delete call history.
o All: Delete all call history.
o Incoming: Delete all incoming call.
o Dialed: Delete all dialed out call.
3. Phone setting
Call forward
o
All Forward.
Activation: To Enabled/Disabled this function.
Number: Forward to a Speed Dial Number.
o
Busy Forward.
Activation: To Enabled/Disabled this function.
Number: Forward to a Speed Dial Number.
o
No Answer Forward.
Activation: To Enabled/Disabled this function.
Number: Forward to a Speed Dial Number.
o
Ring Timeout: Set the time to start the no answer forward function, ex: 20
means after 20 seconds then forward to the dedicated number.
Block Setting
o All: Block all the incoming calls
o By Time: Block all the incoming calls within a period of time
o Duration: Set the start time and end time to Block Setting.
Date/Time setting
o
Date & Time: Set the IP Phone Date and Time.
o
SNTP setting
SNTP : Enabled / Disable SNTP.
Primary SNTP: Set Primary SNTP server IP address.
Secondary SNTP: Set Secondary SNTP server IP address.
Time zone: Set Time zone.
Adjustment Time: Set adjustment time period.
Volume & Gain
o
Handset volume: Set Handset volume from 0~15 (max.).
o
Speaker volume: Set Spearer phone volume from 0~15 (max.).
o
Handset Gain: Set Handset gain from 0~15 (max.).
o
Speaker Gain: Set Speaker gain from 0~15 (max.).
Page 9

IP500 User Manual
9
Ringer
o
Ringer volume: Ringer volume setting from 0~15 (max.).
o
Ringer type: Ringer tone selection from 1~4.
Auto Dial: Set Auto Dial time from 3~9 seconds.
4. Network
WLAN Setup
o
IP Type
Fixed IP client
DHCP client
PPPoE client
o
Fixed IP setting
IP Address
Subnet mask
Default Gateway
MAC address
o
PPPoE setting
User name
Password
LAN Setup
Bridge
NAT
DNS
Primary DNS
Secondary DNS
VLAN
Activation
VID: service provider to set your VID Priority(VID 2~4094)
CFI: Canonical Format Indicator(0~1)
Status: Show WAN and LAN IP addresses
5. SIP Settings
Service domain
o
First realm
Activation
User name
Display name
Register name
Register password
Proxy server
Domain server
Outbound proxy
Page 10

IP500 User Manual
10
o
Second realm
Activation
User name
Display name
Register name
Register password
Proxy server Proxy
Domain server
Outbound proxy
o
Third realm
Activation
User name
Display name
Register name
Register password
Proxy server Proxy
Domain server
Outbound proxy
Codec
o
Codec type
G.711 uLaw
G.711 aLaw
G.723
G.729
G.726-16
G.726-24
G.726-32
G.726-40
o
VAD: To Enabled/Disabled the Voice Active Detection function.
RTP setting
o
Outband DTMF
o
Duplicate RTP
No duplicate
One duplicate
Two duplicate
RPort Setting: RPort Enabled/Disabled
Hold by RFC : On the talk state selece the hold for disable or enable(RCF:3261)
Status
o First Realm: First SIP server register status
o Second Realm: Second SIP server register status
o Third Realm: Third SIP server register status
6. NAT Transversal
STUN setting
o
STUN: To Enabled/Disabled this function.
o
STUN server
Page 11

IP500 User Manual
11
7. Administrator
Auto Config
o
Config mode
Disable
TFTP
FTP
o
TFTP server: Setting the TFTP server IP address.
o
FTP server: Setting the FTP server IP address
o
FTP Login Name: Setting the FTP login name
o
FTP Password: Setting the FTP password
Default setting
System Authentication: To do the SIP setting from Keypad, need to input the password
first. Default is “test”.
Version
Watch dog
Restart
Page 12
IP500 User Manual
12
4. Setup the VoIP Phone by Web Browser
The VoIP Phone provides a built-in web server. You can use Web browser to configure the VoIP Phone.
First please input the IP address in the Web page. In the end of IP address, please add the port number
“:9999”. Ex:http://192.168.1.100:9999
4.1 Login
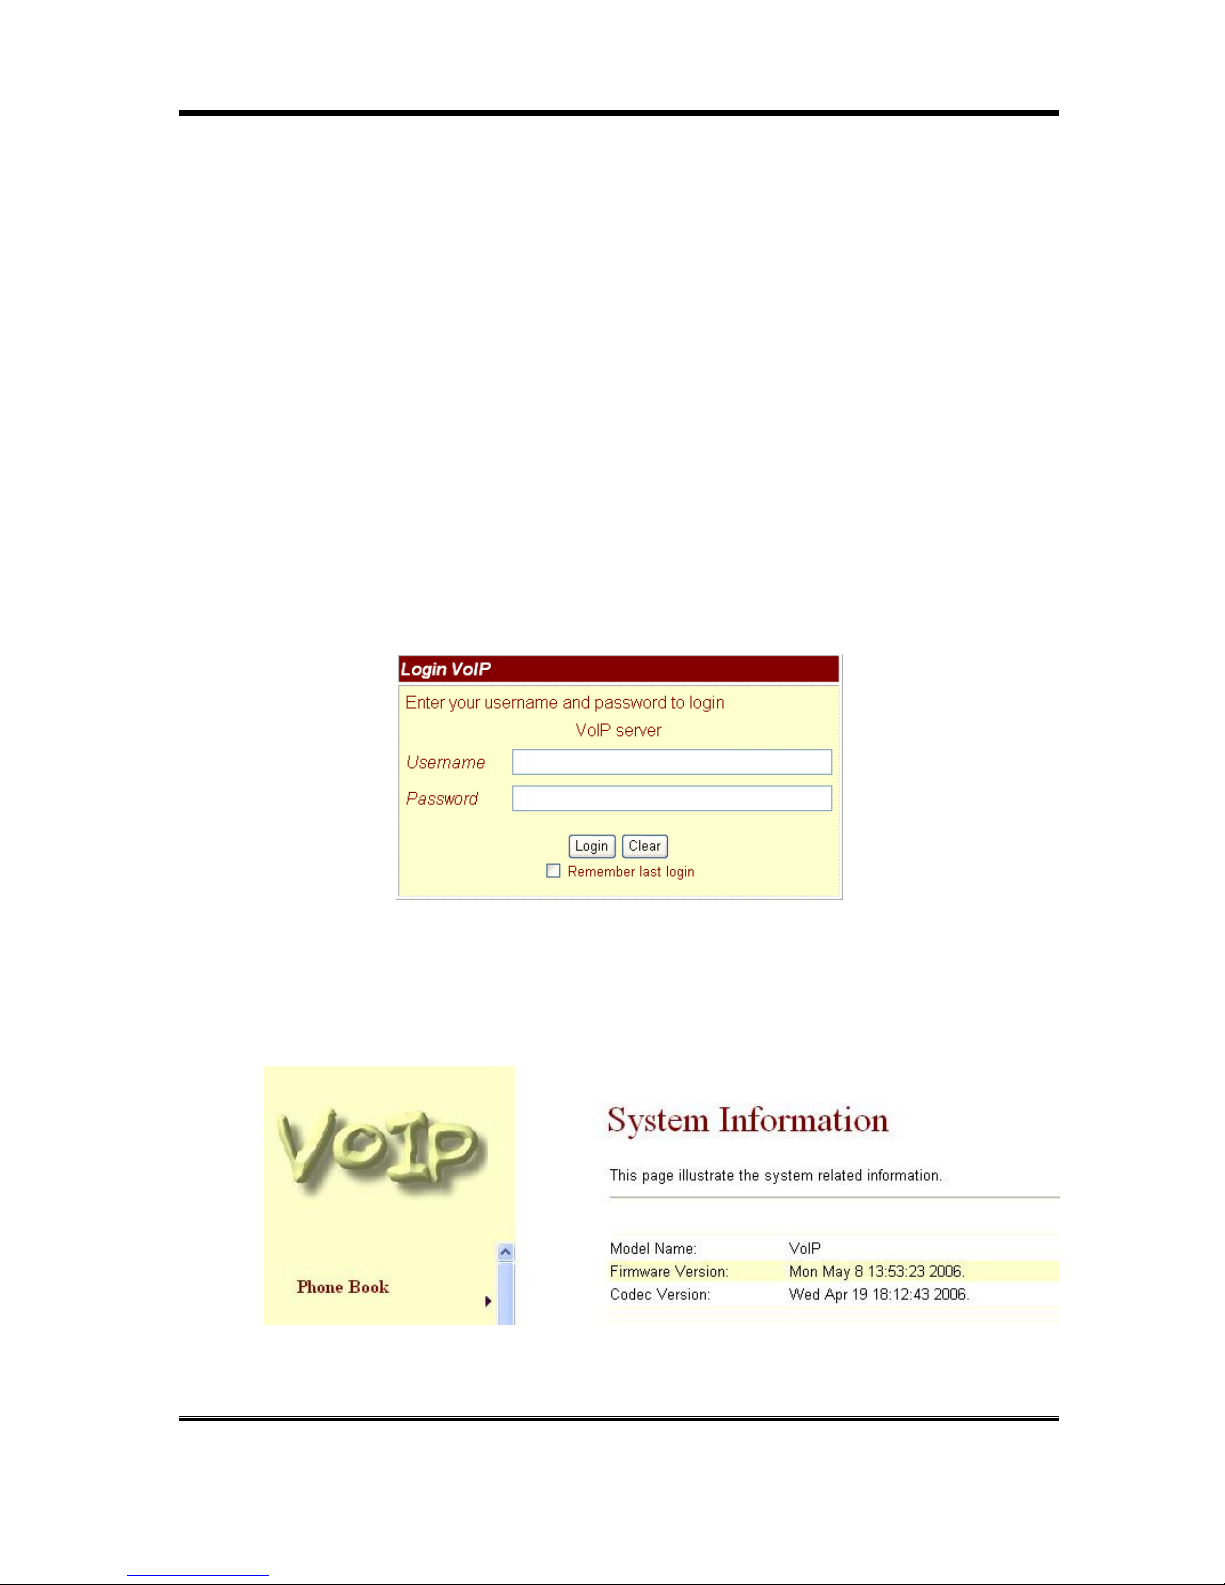
4.1.1 Please input the username and password into the blank field. The default setting is:
1. For Administrator, the username is: root; and the password is: test. If you use the account login,
you can configure all the setting.
2. For normal user, the username is: system or user; and the password is: test. If you use the
account login, but you cannot configure the SIP setting.
4.1.2 Click the “Login” button will move into the VOIP PHONE web based management information
page.
4.1.3 If you change the setting in the Web Management interface, please do remember to click the
“Submit” button in that page. After you finished the change of the setting, click the “Save” function
in the left side, and click the Save Button. When you finished the setting, please click the Reboot
function in the left side, and click the Reboot button in that page. After the system restart, all the
setting can work properly.
4.2 System Information for the VOIP PHONE
4.2.1 When you login the web page, you can see the VOIP PHONE current system information like
firmware version, company… etc in this page.
4.2.2 Also you can see the function lists in the left side. You can use mouse to click the function you
want to set up.
Page 13
IP500 User Manual
13
4.3 Phone Book
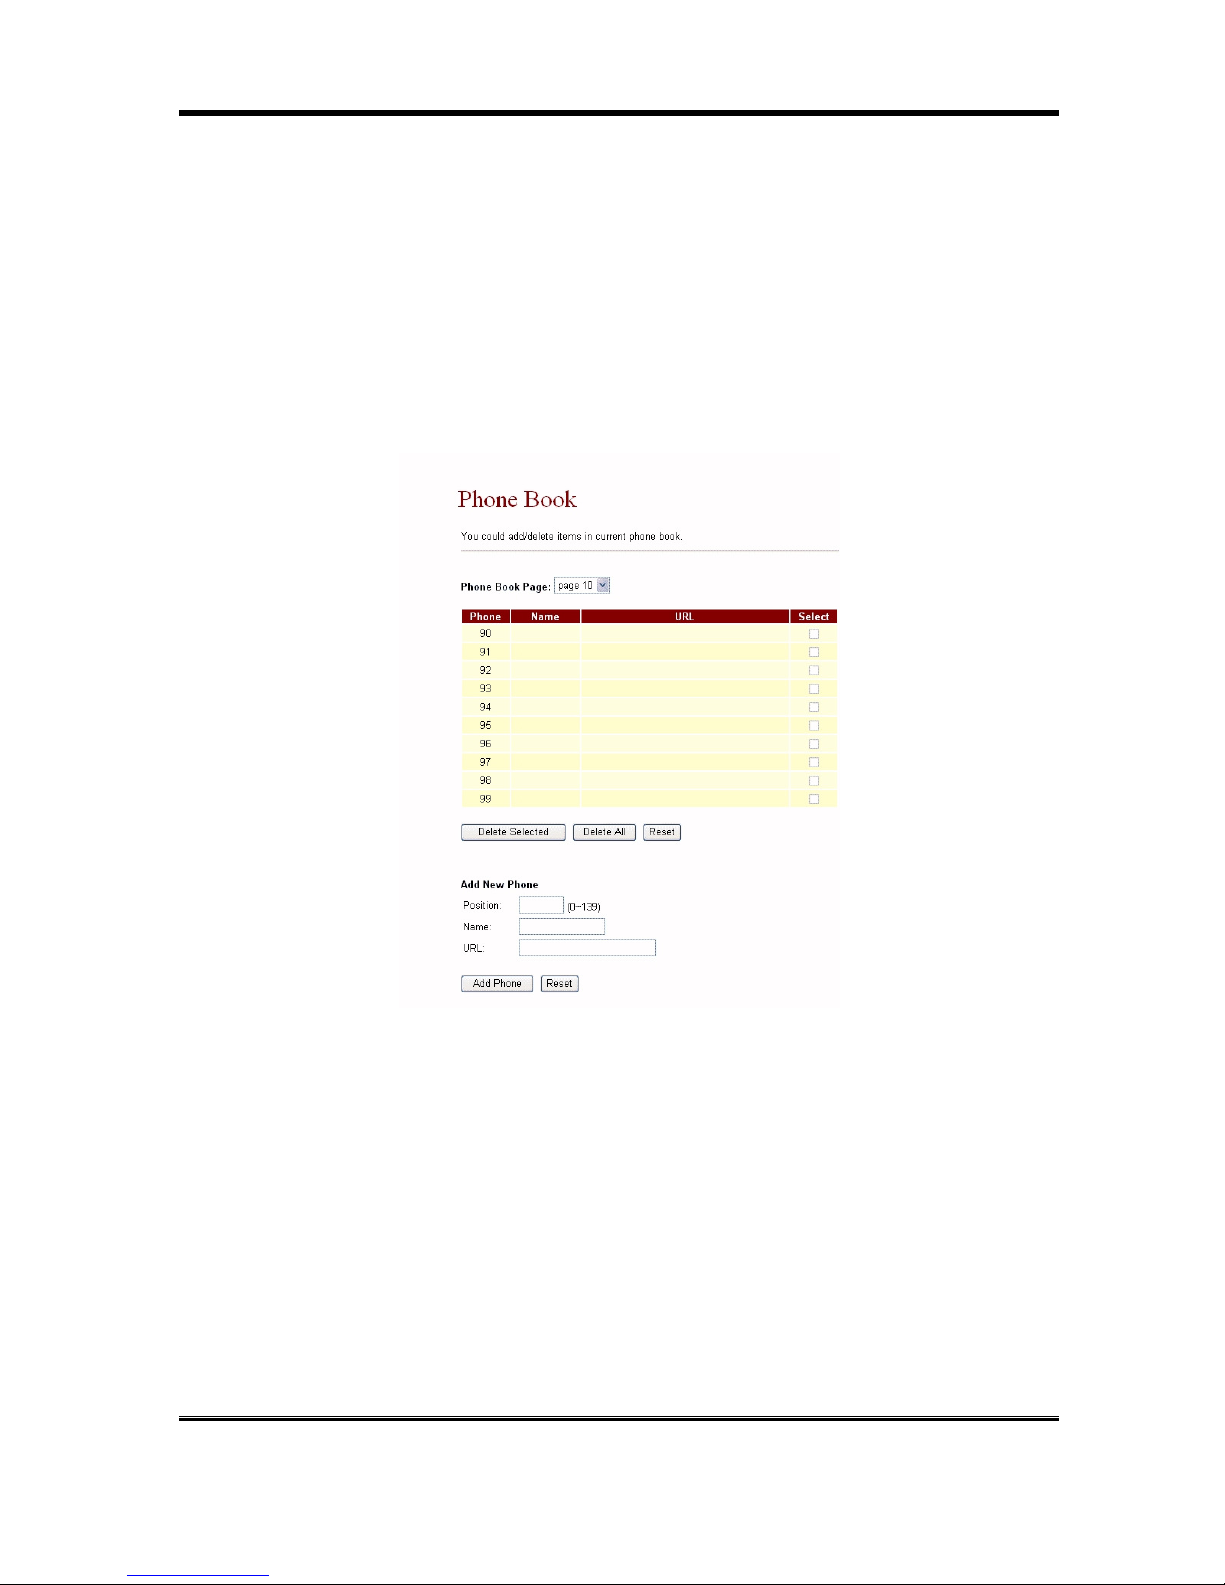
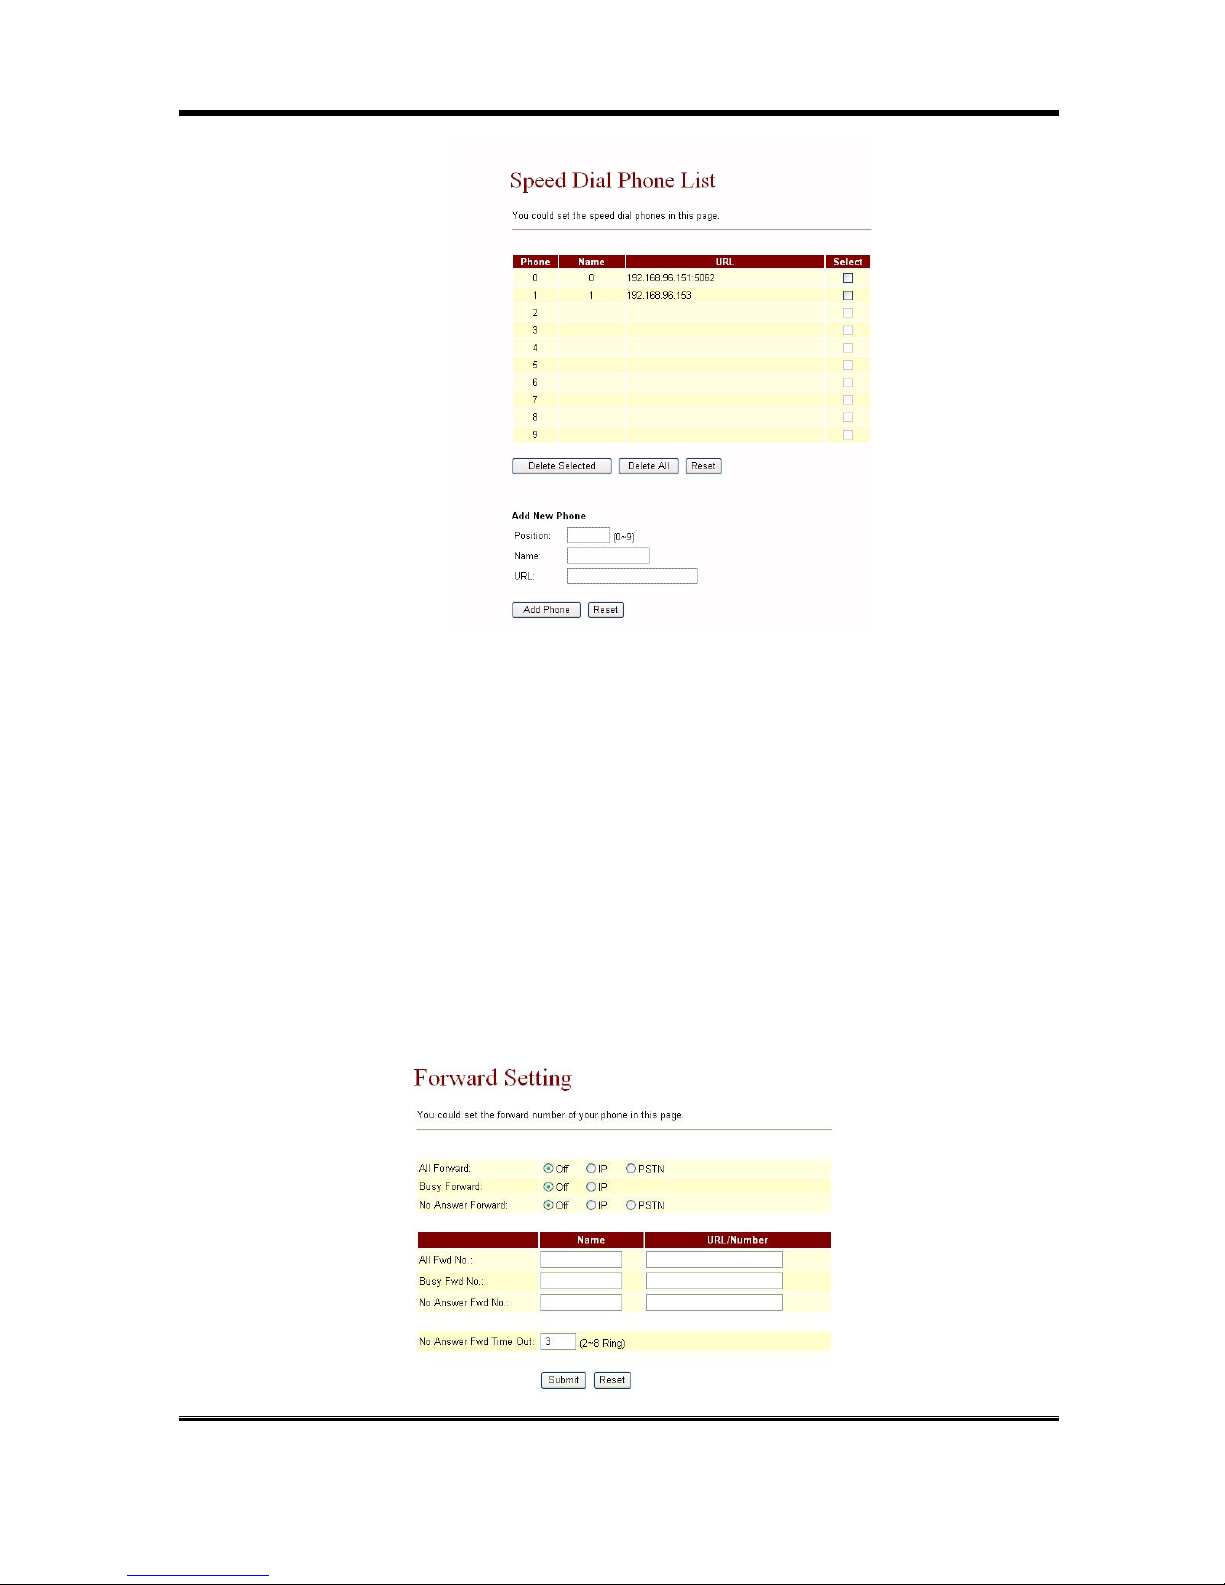
4.3.1 In Phone Book contains Phone Book and Speed Dial Settings. You can setup the Phone Book
and Speed Dial number. The Phone Book can store 140 phone numbers and the Speed Dial can
store 10 phone numbers. If you want to use Speed Dial you just dial the speed dial number (from
0~9) then press “#”.
4.3.2 In the Phone Book function you can add/delete the phone number in the phone book list. You can
input maximum 100 entries phone book list.
If you need to add a phone number into the phone book, you need to input the position, the
name, and the phone number (by URL type). W hen you finished a new phone list, just click
the “Add Phone” button.
If you want to delete a phone number, you can select the phone number you want to delete
then click “Delete Selected” button.
If you want to delete all phone numbers, you can click “Delete All” button.
4.3.3 In Speed Dial setting function you can add/delete Speed Dial number. You can input maximum 10
entries speed dial list.
If you need to add a phone number into the Speed Dial list, you need to input the position,
the name, and the phone number (by URL type). When you finished a new phone list, just
click the “Add Phone” button.
If you want to delete a phone number, you can select the phone number you want to delete
then click “Delete Selected” button.
If you want to delete all phone numbers, you can click “Delete All” button.
Page 14
IP500 User Manual
14
4.4 Phone Setting
4.4.1 In Phone Setting contains Call Forward, SNTP Settings, Volume Settings, Melody Settings, Block
Setting, and Auto Dial Setting functions.
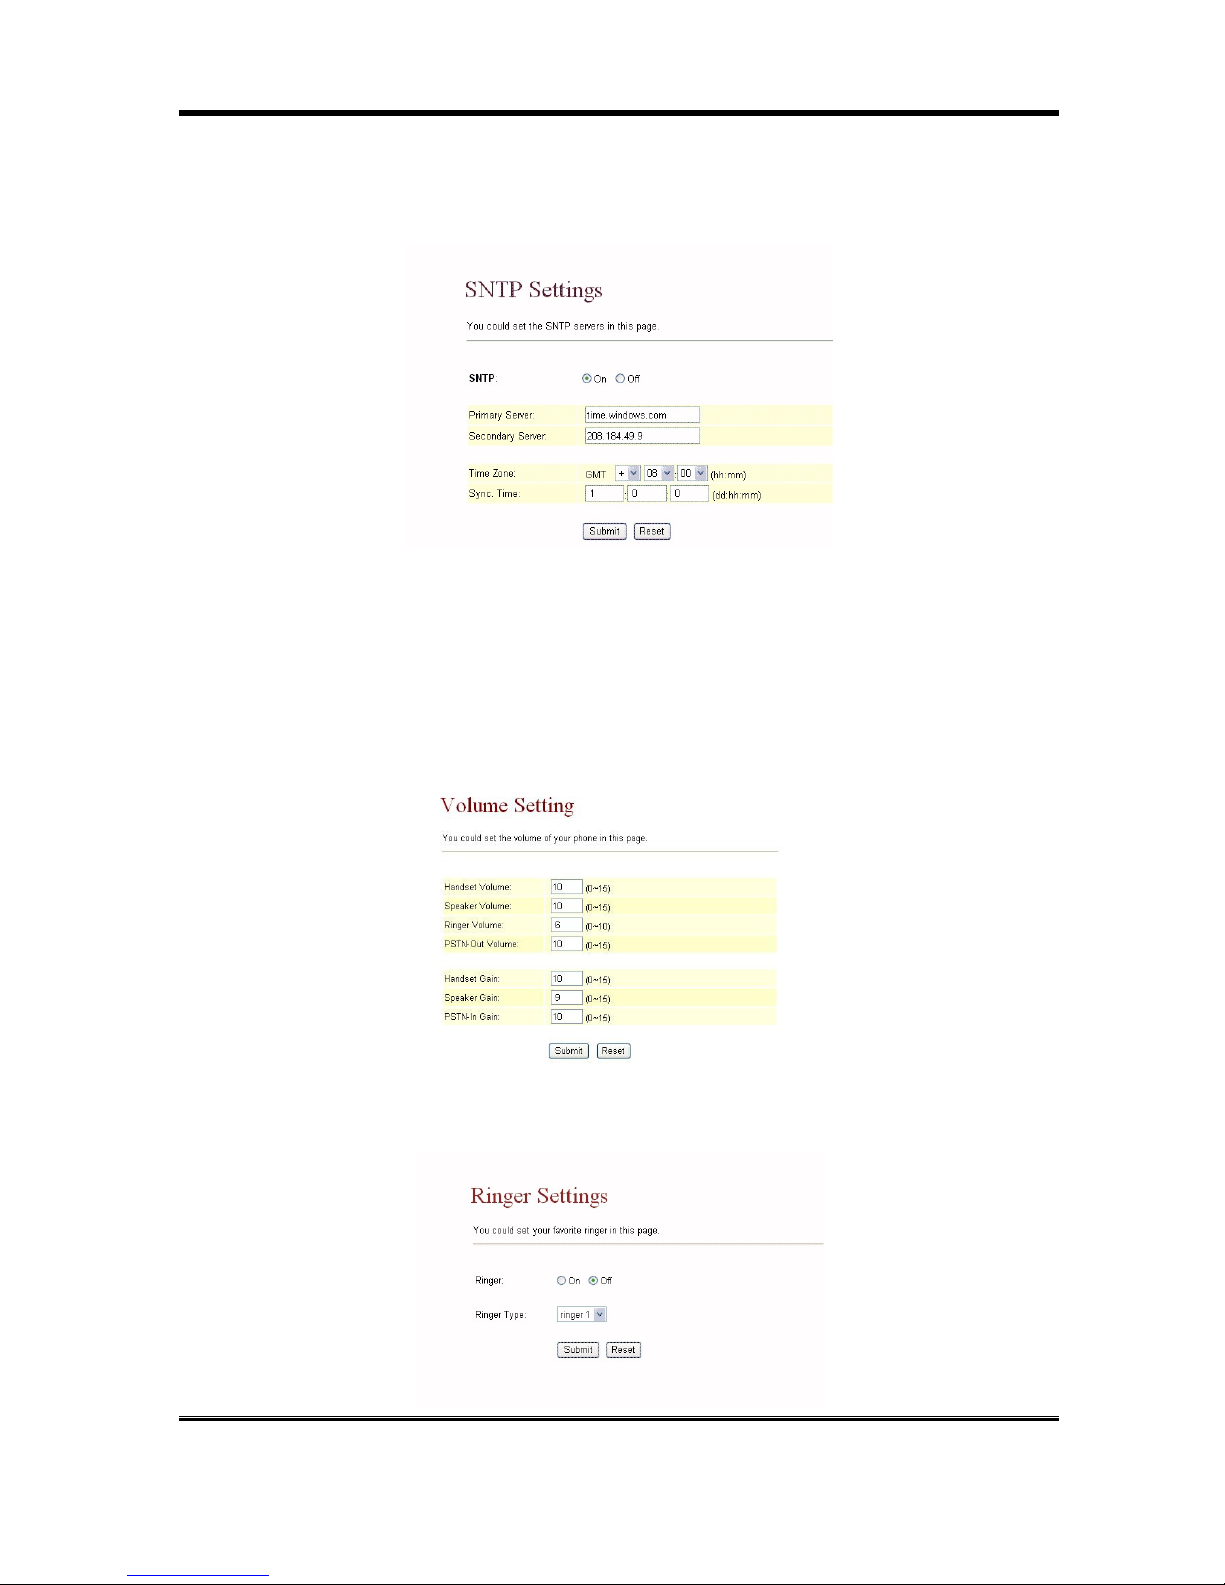
4.4.2 Call Forward function: you can setup the phone number you want to forward in this page. There
are three type of Forward mode. You can choose All Forward, Busy Forward, and No Answer
Forward by click the icon.
All Forward: All incoming call will forward to the number you choosed. You can input the
name and the phone number in URL field. If you select this function, then all the incoming
call will direct forward to the speed dial number you choose.
Busy Forward: If you are on the phone, the new incoming call will forward to the number
you choosed. You can input the name and the phone number in URL field.
No Answer Forward: : If you can not answer the phone, the incoming call will forward to
the number you choosed. You can input the name and the phone number in URL field.
Also you have to set the Time Out time for system to start to forward the call to the number
you choosed.
When you finished the setting, please click the Submit button.
Page 15
IP500 User Manual
15
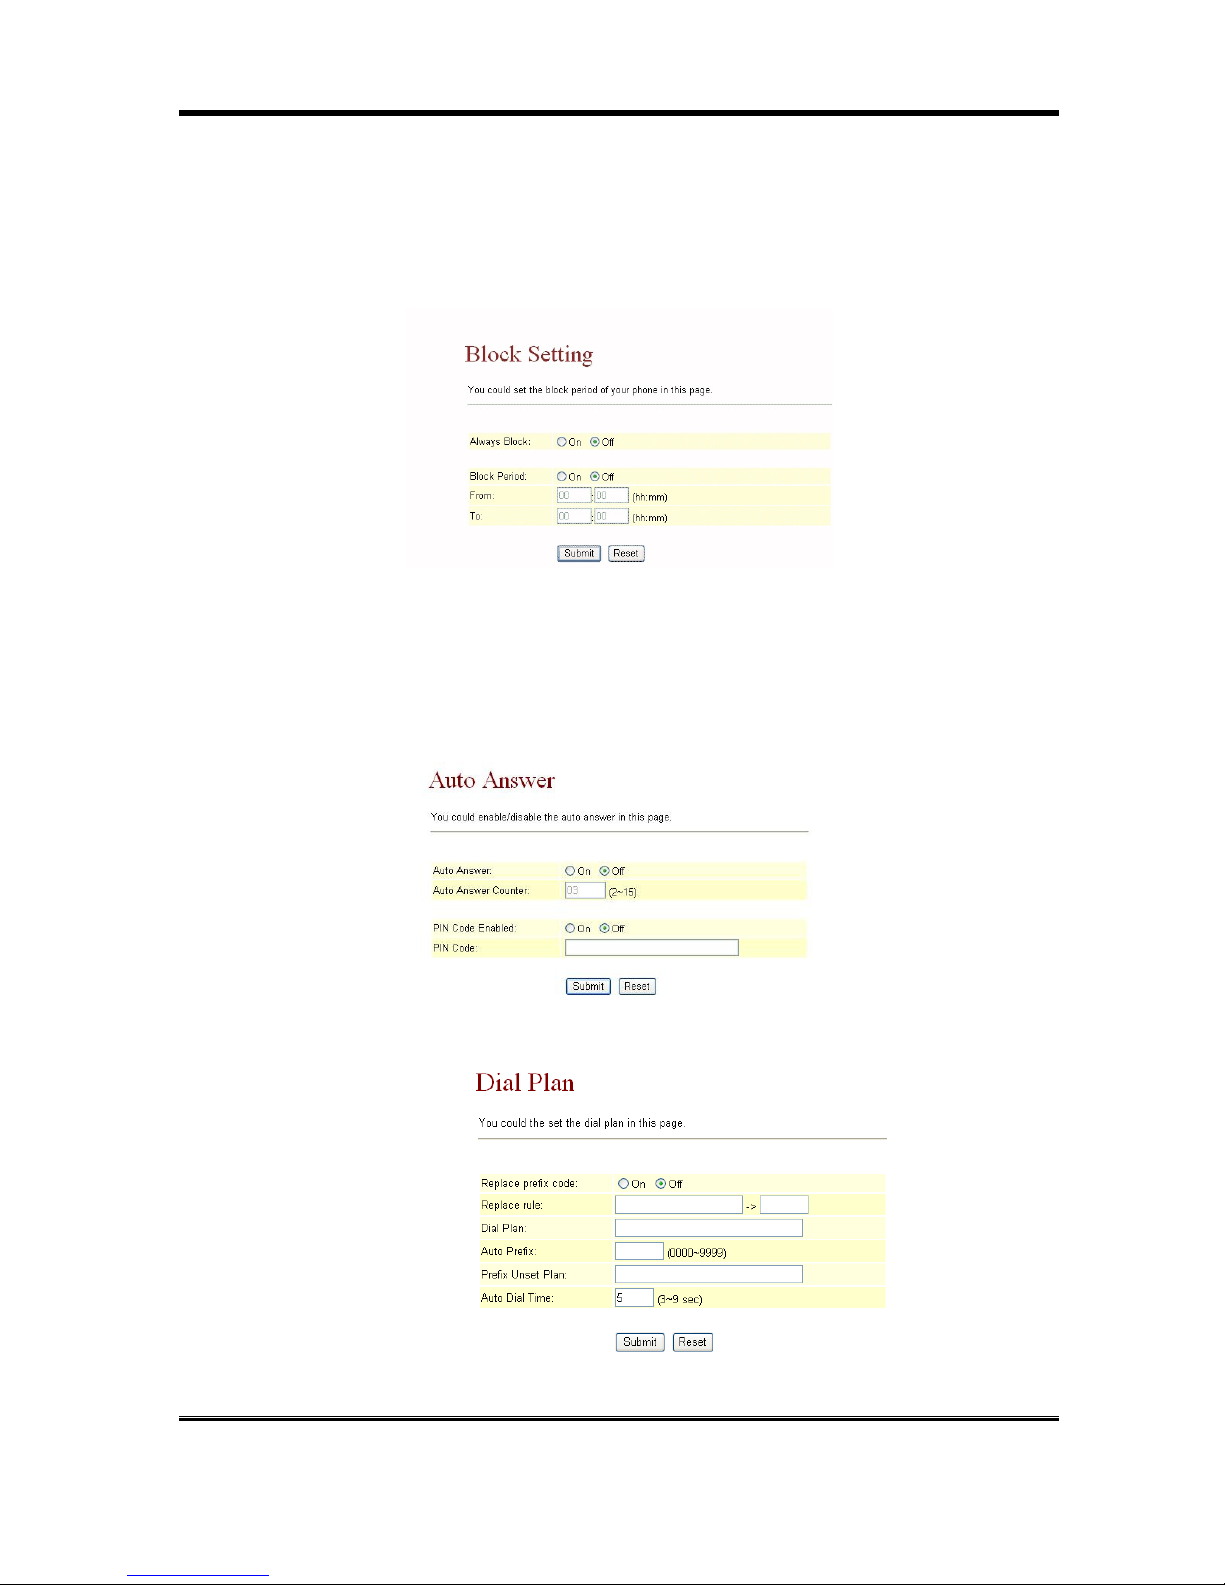
4.4.3 SNTP Setting function: you can setup the primary and second SNTP Server IP Address, to get
the date/time information. Also you can base on your location to set the Time Zone, and how long
need to synchronize again. When you finished the setting, please click the Submit button.
4.4.4 Volume Setting function: you can setup the Handset Volume, Ringer Volume, and the Handset
Gain. When you finished the setting, please click the Submit button.
Handset Volume is to set the volume you hear from the handset.
Speaker Volume is to set the volume you hear from the speaker phone.
Ringer Volume is to set the ringer volume.
PSTN-Out Volume is to set PSTN send volume.
Handset Gain is to set the volume send out from the handset.
Speaker Gain is to set the volume send out from the micro phone.
PSTN-In Gain is to set PSTN receving volume.
4.4.5 Melody Setting function: you can select the melody for the imcoming call. When you finished the
setting, please click the Submit button.
Page 16
IP500 User Manual
16
4.4.6 Block Setting function: you can setup the Block Setting to keep the phone slience. You can
choose Always Block or Block a period.
Always Block: All incoming call will be blocked until disable this feature.
Block Period: Set a time period and the phone will be blocked during the time period. If the
“From” time is large than the “To” time, the Block time will from Day 1 to Day 2.
When you finished the setting, please click the Submit button.
4.4.7 Auto Answer function: You can set the Auto Answer function to answer the incoming call by the
phone. If the call is come from the IP, then the TA can let user to redial the call to PSTN phone
number. If the call is coming from PSTN, then the TA can let user to redial to IP Phone number.
Auto Answer Counter is to set after the ring count meet the number you set then the auto answer
will enable. For security issue, You’d better to set the PIN Code. If you have set the PIN code,
you will hear a tone to inform you input the PIN Code then you can dial out.
4.4.8 Dial Plan function: This function is when you input the phone number by the keypad but you don’t
need to press “#”. After time out the system will dial directly.
Page 17
IP500 User Manual
17
Symbol explan:
Replace rule:If replace prefix code is ON and prefix number is matched with rule then 005
will replace prefix.
Auto Dial Time : Stop dialing after seconds then send dial number out.
Dial Plan: When match with pattern then send dial number out but if fisrt digit is ‘0’ then dial
plan will be ignored.
Example:
*xx If matched with one of *00,*01….*99 then will send number out
#xx If matched with one of #00,#01….#99 then will send number out
10x If matched with one of 100,101….109 then will send number out
11x If matched with one of 110,111….119 then will send number out
Xxxxxxxx If dial with 8 digits then send number out
Auto Prefix : Number for add before dial number.
Prefix Unset Plan : When first digit or dial numeb match with pattern then ignore auto
prefix.
When you finished the setting, please click the Submit button.
If there is nothing need to change, please click the Save Change Item in the left side, then
click the Save button. The change you made will save into the system and the system will
Reboot automatically.
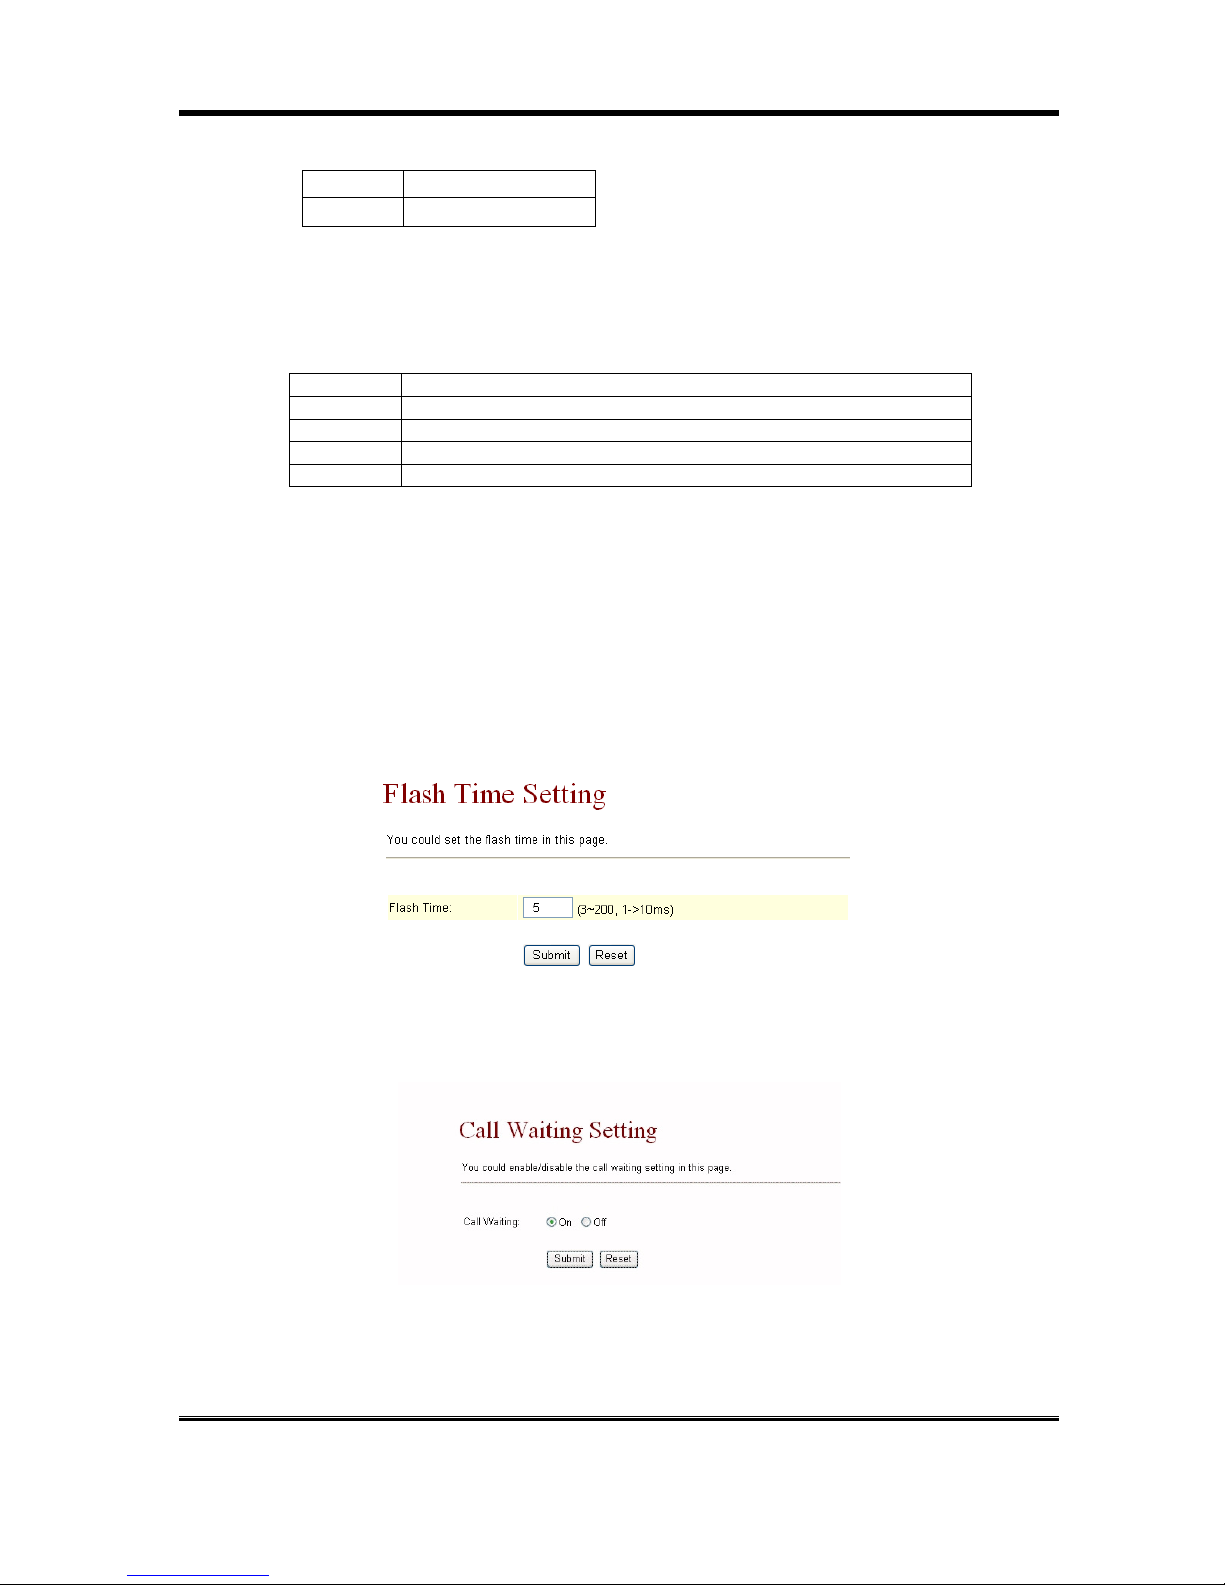
4.5 Flash Time Setting function: When you use the PSTN Phone and you need to press the Hook to
do the Flash (Switch to the other phone line or HOLD), this function is for you to set the time you
press the Hook to represent the Flash function.
4.5.1 Call Waiting Setting function: If user doesn’t want to be inform there is a new incoming call, user
can set the function off.
4.6 Network
4.6.1 In Network you can check the Network status, configure the Network Settings and DDNS
settings.
x or X 0,1,2,3,4,5,6,7,8,9
+ or
Page 18
IP500 User Manual
18
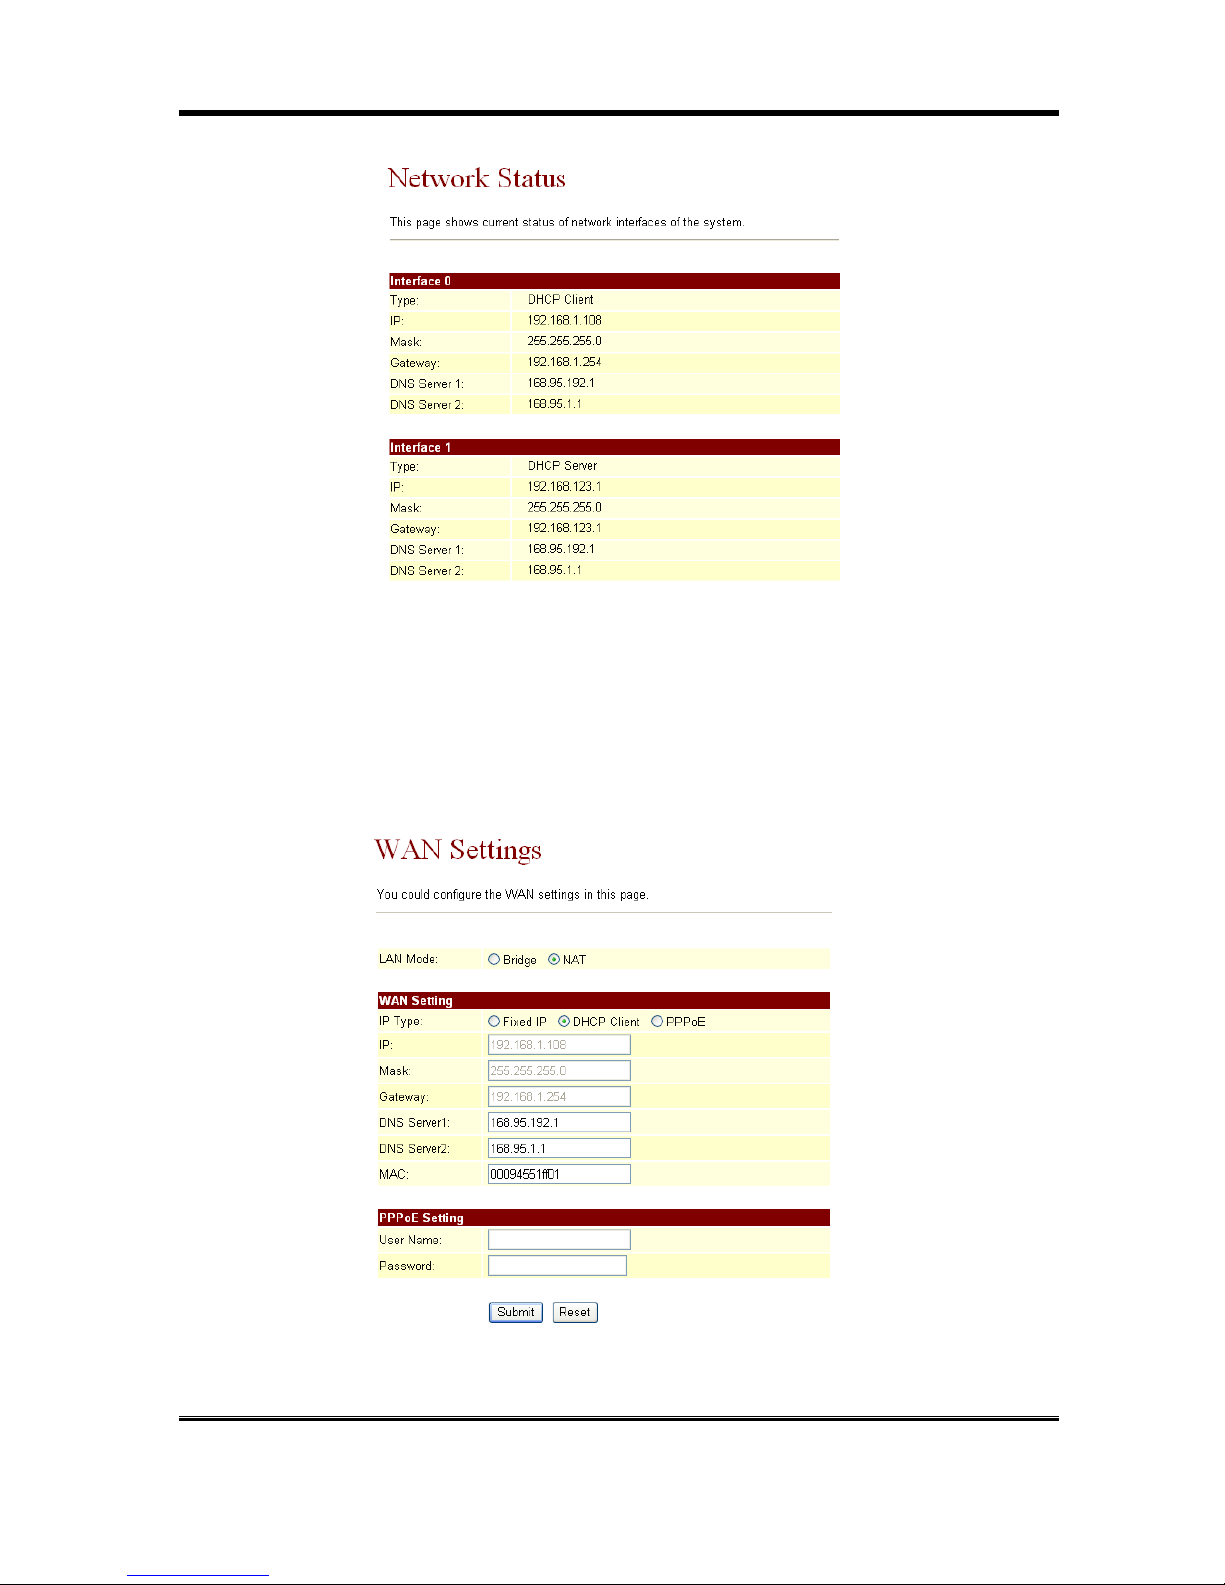
4.6.2 Network Status: You can check the current Network setting in this page.
4.6.3 WAN Settings: You can configure the VoIP Phone Network setting in this page.
You can choose Brigde or NAT for the LAN mode. If you set the Bridge On, then the two
Fast Ethernet ports will be transparent.
The WAN setting item is to setup the LAN port’s network environment. You may refer to
your current network environment to configure the VoIP Phone properly.
The PPPoE Configuration item is to setup the PPPoE Username and Password. If you
have the PPPoE account from your Service Provider, please input the Username and the
Password correctly.
When you finished the setting, please click the Submit button.
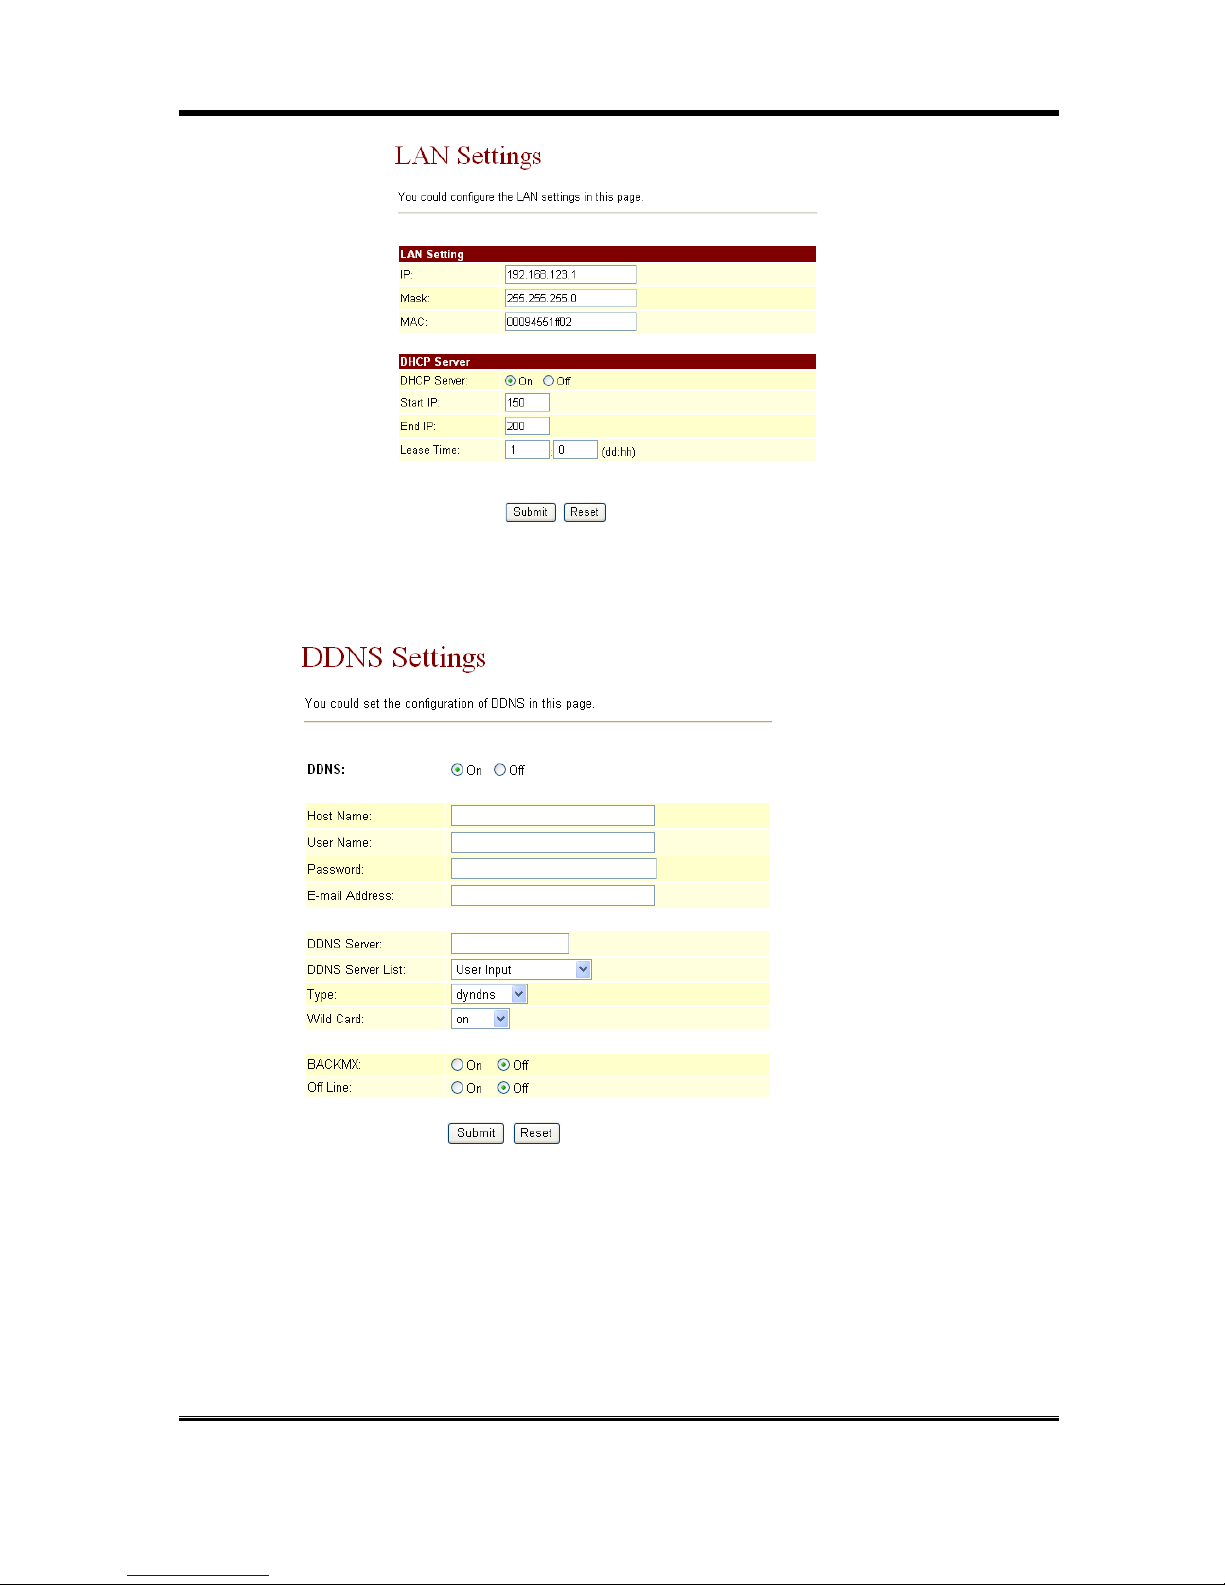
4.6.4 LAN Settings: You can configure the VoIP Phone Network setting in this page.
Page 19
IP500 User Manual
19
4.6.5 DDNS Setting: You can configure the DDNS setting in this page. You need to have the DDNS
account and input the informations properly. You can have a DDNS account with a public IP
address then others can call you via the DDNS account. But now most of the VoIP applications
are work with a SIP Proxy Server. When you finished the setting, please click the Submit button
Page 20
IP500 User Manual
20
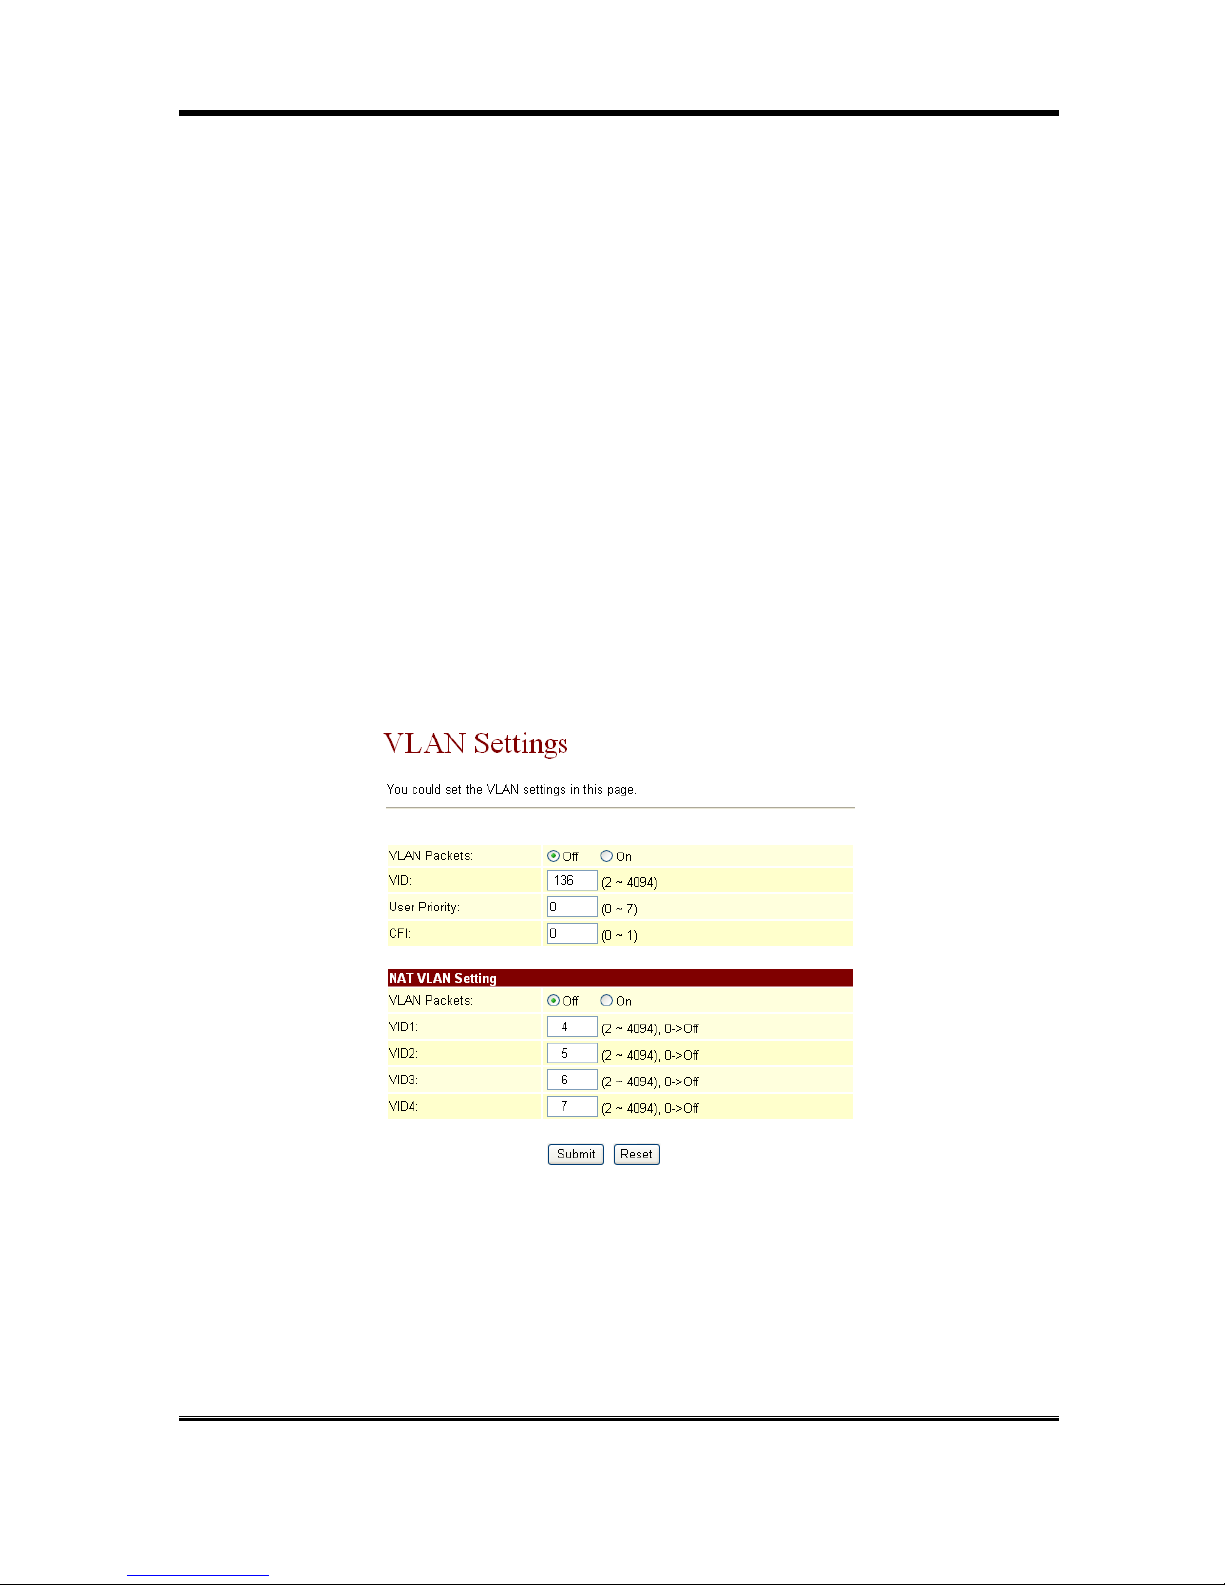
4.6.6 VLAN Settings: ou can set the VLAN setting in this page. There are two parts in this page. First
one is to set the packets related to the IP Phone, and the second parts is if you use the VLAN
setting in the NAT Mode.
There are two kind of destination packets will come from the WAN port of IP Phone, one
kind of packets will go to the IP Phone , the other will go through the LAN port to the PC.
VLAN Packets: if you enable the first VLAN Packets and set the VID, User Priority, and
CFI, then all the incoming packets will be check with the IP Address and the VID.
VID: You can follow your service provider to set your VID.
User Priority: Defines user priority, giving eight (2^3) priority levels. IEEE 802.1P defines
the operation for these 3 user priority bits. Usually this will be defined by your service
provider.
CFI: Canonical Format Indicator is always set to zero for Ethernet switches. CFI is used for
compatibility reason between Ethernet type network and Token Ring type network. If a
frame received at an Ethernet port has a CFI set to 1, then that frame should not be
forwarded as it is to an untagged port.
When you enable the first VLAN Packets and set the VID, User Priority, and CFI, then all
the incoming packets with the IP address of IP Phone and the same VID will be accept by
the IP Phone. If the incoming packets with theIP Phone IP address but the different VID
then the packets will be discard by the IP IPhone. The Other incoming packets with
different IP address will go through the LAN port to the PC.
NAT VLAN Setting: When you set your device in NAT mode, the IP Phone can help you to
filter the wrong incoming packets. You can separate the other device connectd behind the
IP Phone into 4 VLAN group. You can set different VID for these 4 groups. When the
incoming packets go through the WAN port of IP Phone then the IP Phone will check the
VID, if the packets is not going to the IP Phone (with the IP address of IP Phone and the
correct VID), and the VID is not these four VID you set, then the packets will be discard by
the IP Phone.
4.7 SIP Settings
4.7.1 In SIP Settings you can setup the Service Domain, Port Settngs, Codec Settings, Codec ID
Settings, RTP Setting, RPort Setting and Other Settings. If the VoIP service is provided by ISP,
you need to setup the related informations correctly then you can register to the SIP Proxy Server
correctly.
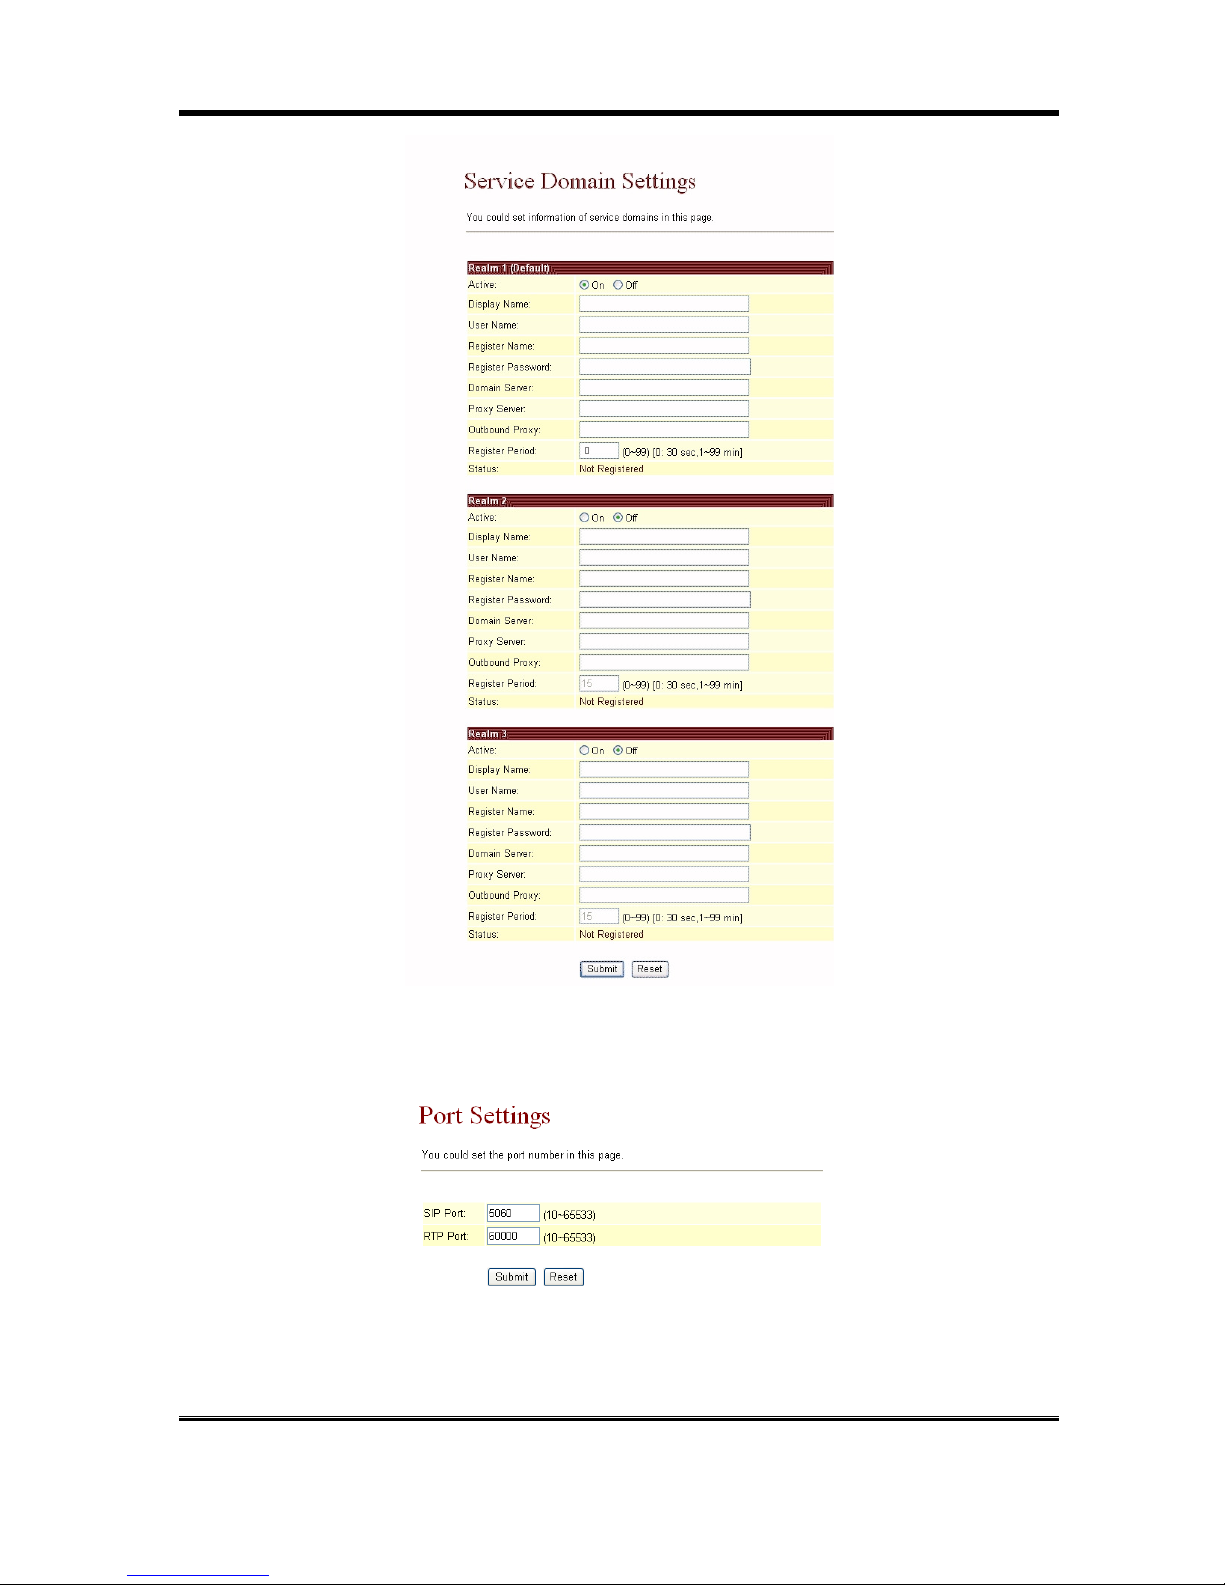
4.7.2 In Service Domain Function you need to input the account and the related informations in this
page, please refer to your ISP provider. You can register three SIP account in the VoIP Phone.
Page 21

IP500 User Manual
21
You can dial the VoIP phone to your friends via first enable SIP account and receive the phone
from these three SIP accounts.
First you need click Active to enable the Service Domain, then you can input the following
items:
o
Display Name: you can input the name you want to display.
o
User Name: you need to input the User Name get from your ISP.
o
Register Name: you need to input the Register Name get from your ISP.
o
Register Password: you need to input the Register Password get from your ISP.
o
Domain Server: you need to input the Domain Server get from your ISP.
o
Proxy Server: you need to input the Proxy Server get from your ISP.
o
Outbound Proxy: you need to input the Outbound Proxy get from your ISP. If your
ISP does not provide the information, then you can skip this item.
o
Register Period: you need to input the Register Period get from your ISP. This is
count in minute.
o
You can see the Register Status in the Status item. If the item shows “Registered”,
then your VoIP Phone is registered to the ISP, you can make a phone call direcly.
o
If you have more than one SIP account, you can following the steps to register to
the other ISP.
o
When you finished the setting, please click the Submit button.
Page 22
IP500 User Manual
22
4.7.3 Port Settings: you can setup the SIP and RTP port number in this page. Each ISP provider will
have different SIP/RTPport setting, please refer to the ISP to setup the port number correctly.
When you finished the setting, please click the Submit button.
Page 23
IP500 User Manual
23
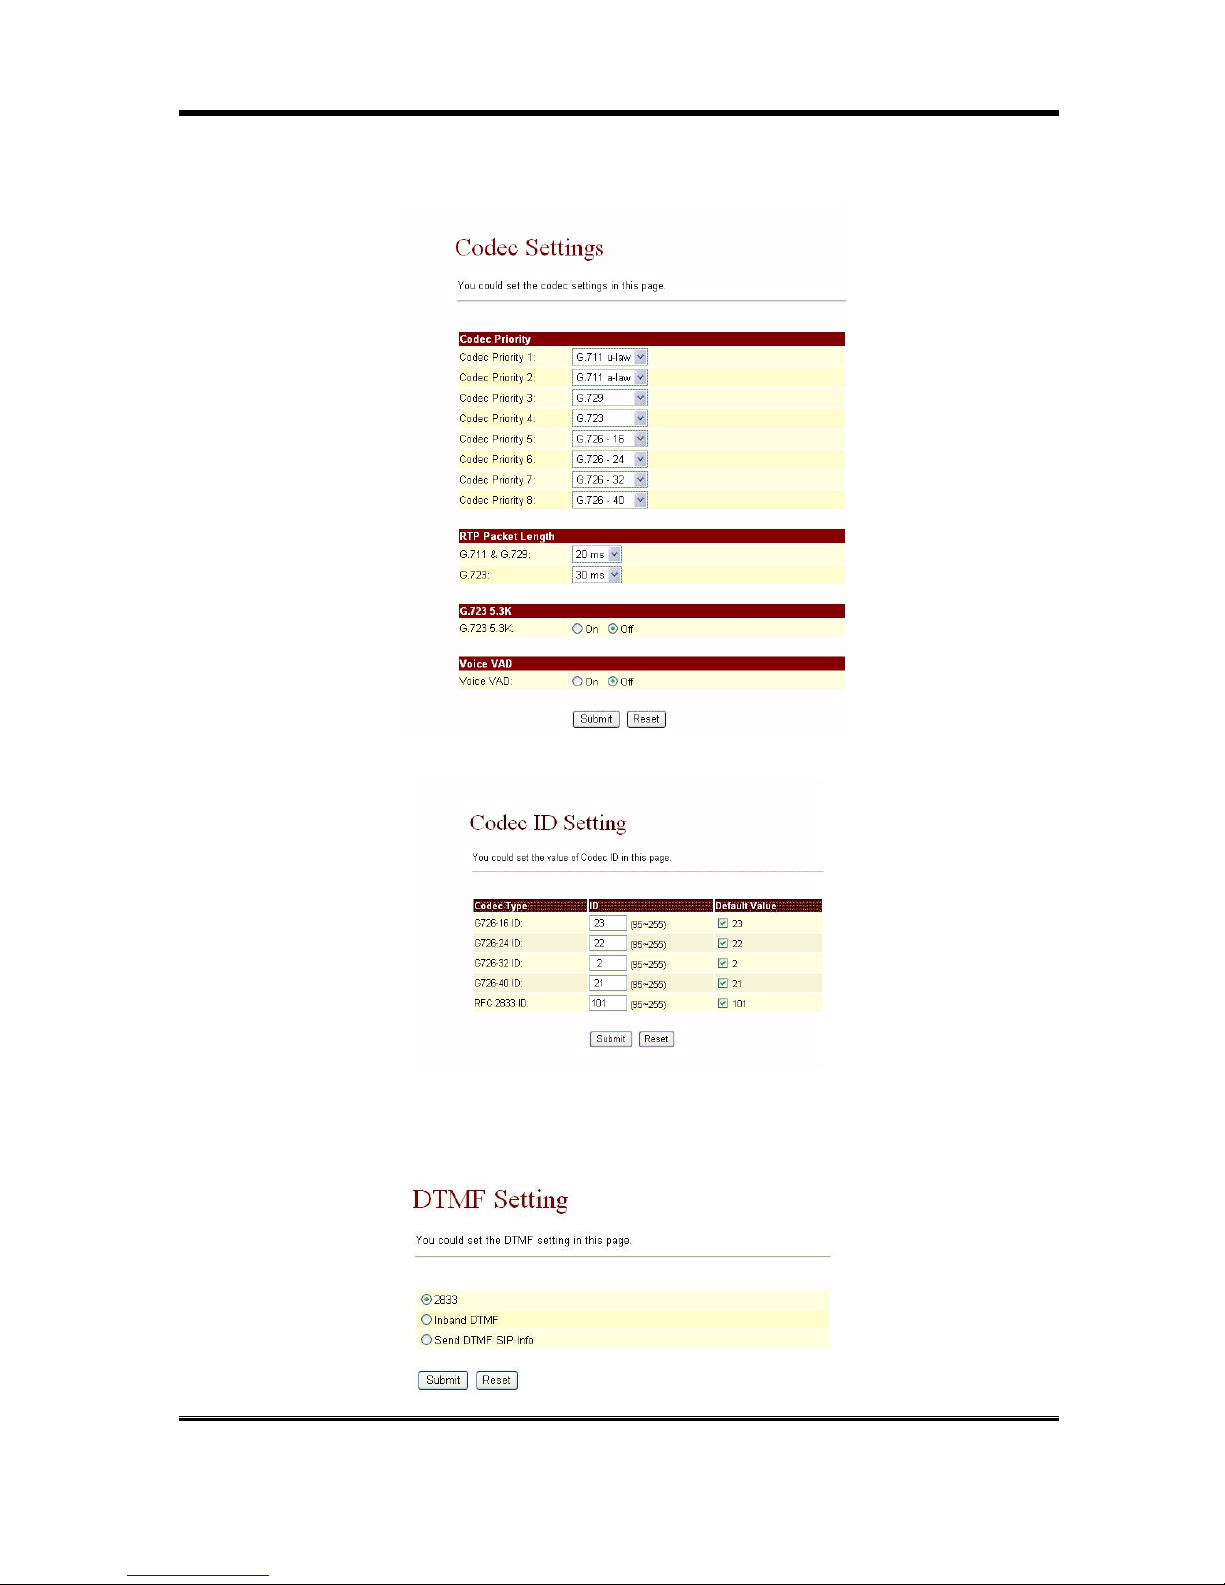
4.7.4 Codec Settings: you can setup the Codec priority, RTP packet length, and VAD function in this
page. You need to follow the ISP suggestion to setup these items. When you finished the setting,
please click the Submit button.
4.7.5 Codec ID Settings: you can set the Codec ID to meet the other device’s requirement. When you
finished the setting, please click the Submit button.
4.7.6 DTMF Setting: you can choose among 2833, Inband DTMF and Send DTMF SIP info in this
page. To change this setting, please following your ISP information. When you finished the
setting, please click the Submit button. This
Page 24
IP500 User Manual
24
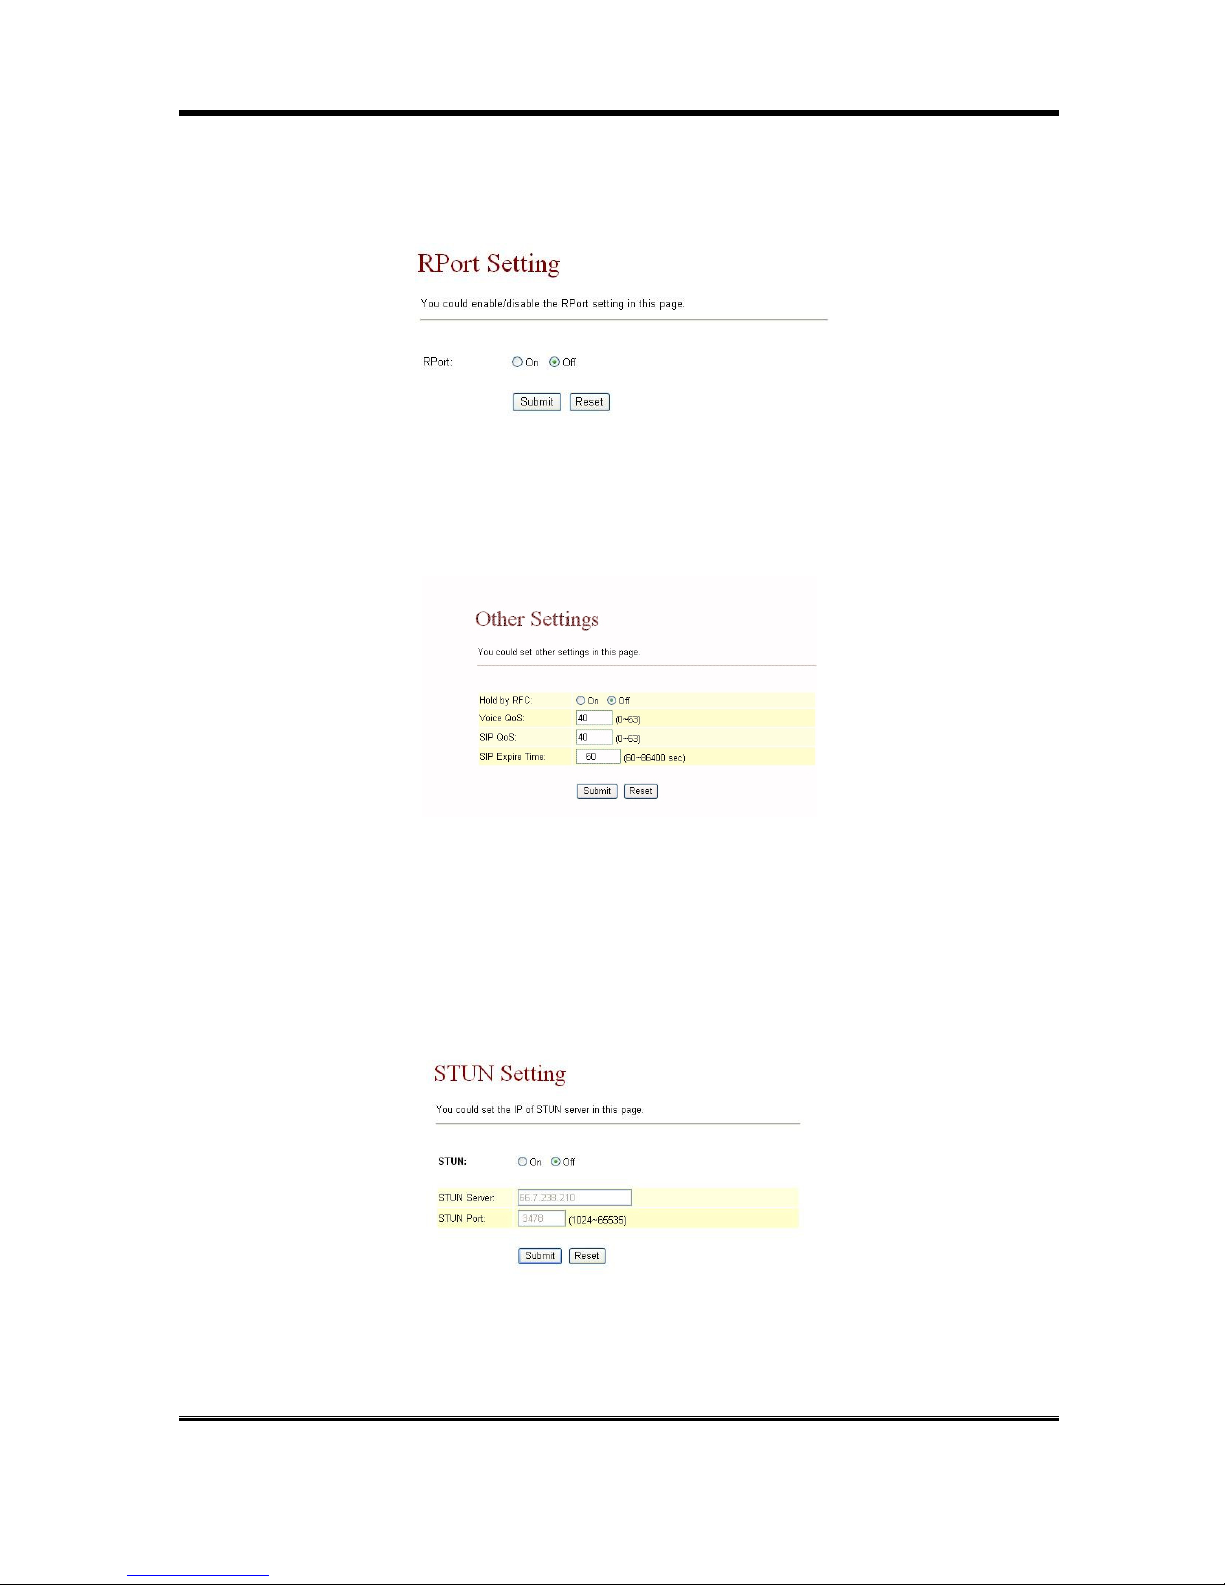
4.7.7 RPort Function: you can setup the RPort Enable/Disable in this page. To change this setting,
please following your ISP information. When you finished the setting, please click the Submit
button.
4.7.8 Other Settings: you can setup the Hold by RFC, Voice/SIP QoS and SIP expire time in this page.
To change these settings please following your ISP information. When you finished the setting,
please click the Submit button. The QoS setting is to set the voice packets’ priority. If you set the
value higher than 0, then the voice packets will get the higher priority to the Internet. But the QoS
function still need to cooperate with the others Internet devices.
4.8 NAT Trans.
4.8.1 In NAT Trans. you can setup STUN function. These functions can help your VoIP Phone working
properly behind NAT.
4.8.2 STUN Setting: you can setup the STUN Enable/Disable and STUN Server IP address in this
page. This function can help your VoIP Phone working properly behind NAT. To change these
settings please following your ISP information. When you finished the setting, please click the
Submit button.
4.9 Others.
4.9.1 In Others you can setup Auto config function. The function can configure your VoIP Phone
automatically.
Page 25
IP500 User Manual
25
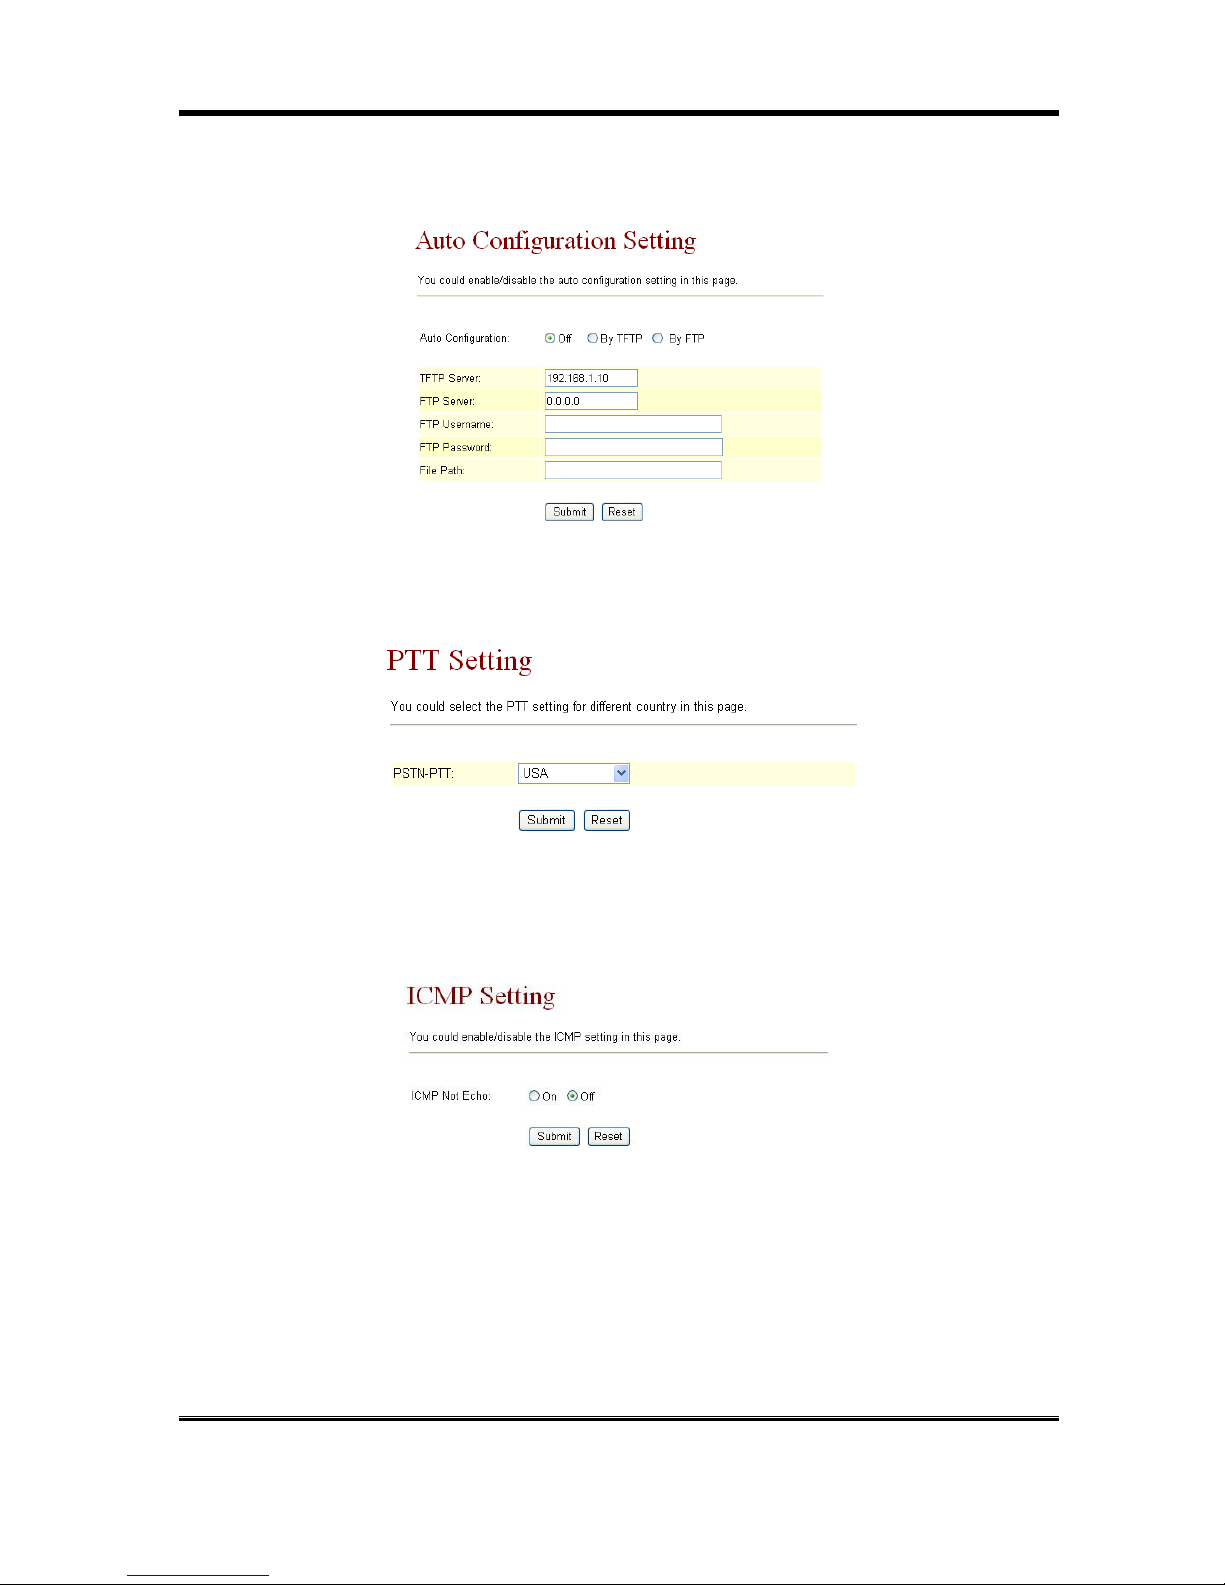
4.9.2 Auto Config: you can setup the Auto Configuration to Disable, Enable by TFTP or FTP, and auto
configuration TFTP or FTP Server IP address in this page. This function can automatically
download the configure file to setup your VoIP Phone. When you finished the setting, please click
the Submit button.
4.9.3 PTT Setting: you can select different country for the PTT setting in this page. When you finished
the setting, please click the Submit button.
4.9.4 ICMP Setting: you can setup the ICMP Setting Enable/Disable in this page. When you finished
the setting, please click the Submit button.
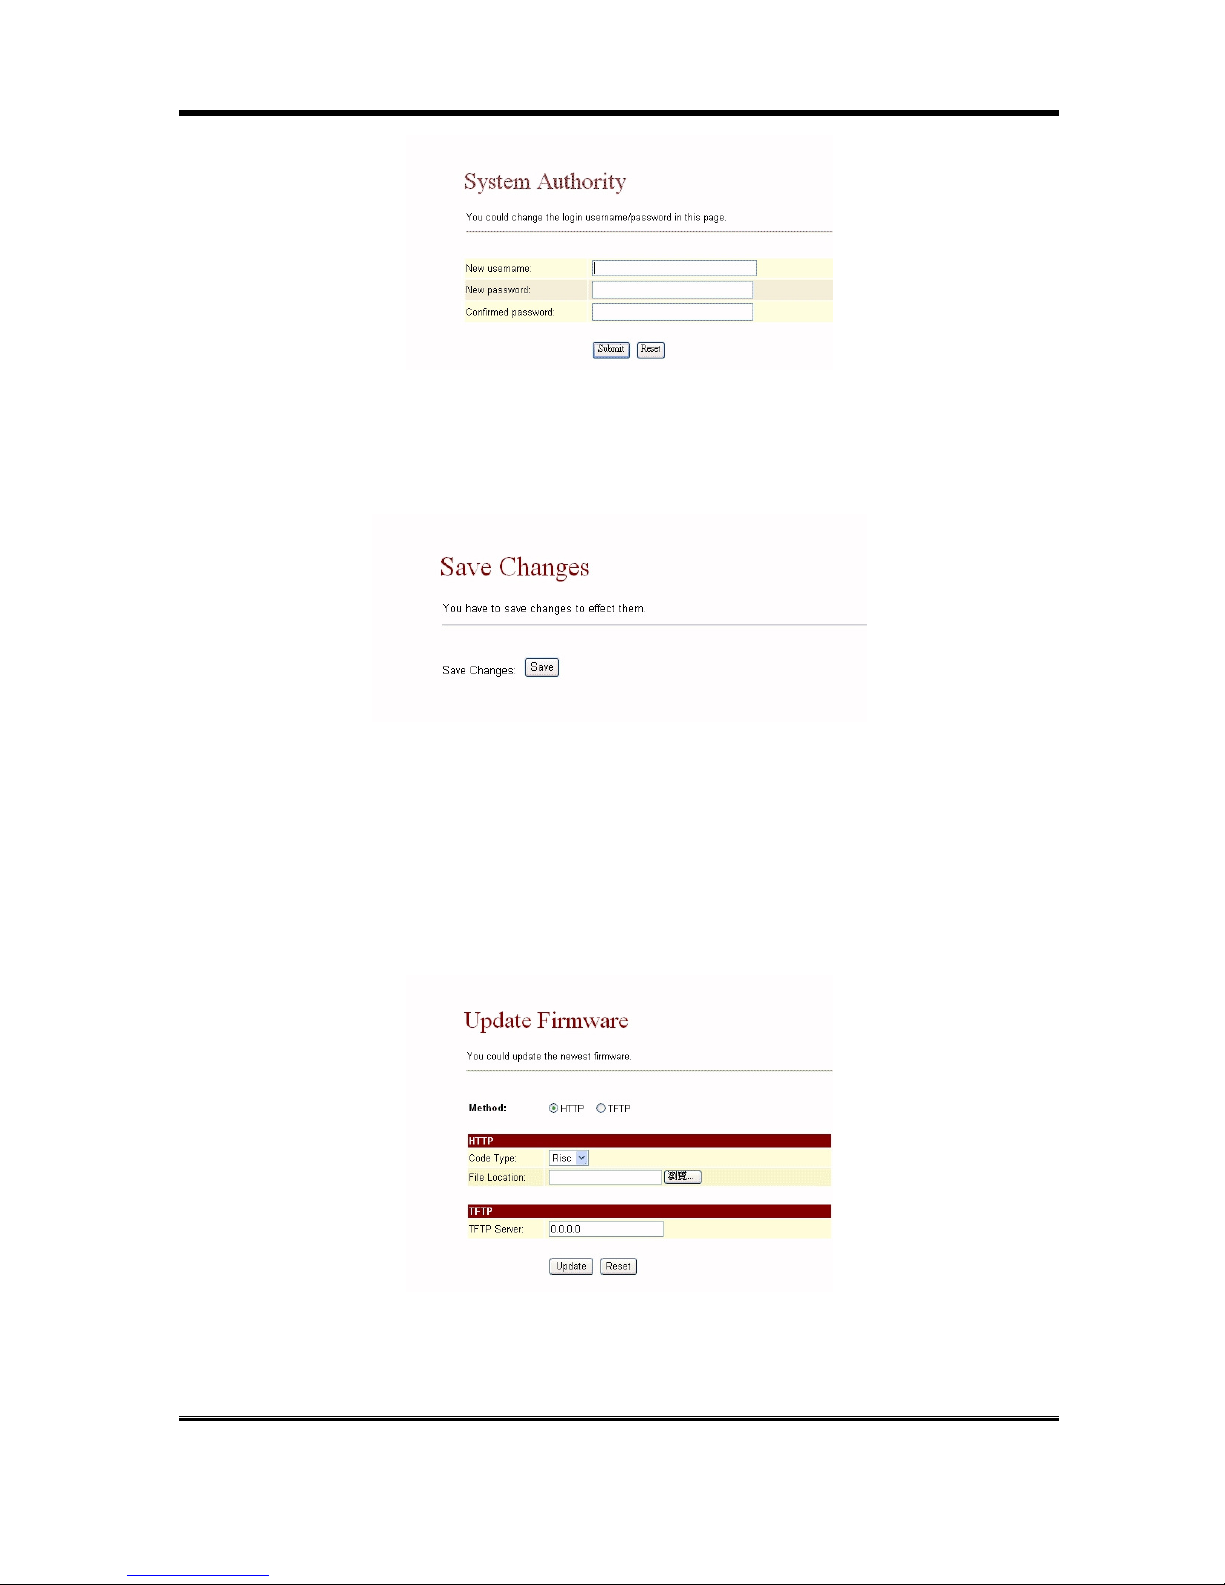
4.10 System Authority
4.10.1 In System Authority you can change your login name and password.
Page 26
IP500 User Manual
26
4.11 Save Change
4.11.1 In Save Change you can save the changes you have done. If you want to use new setting in the
VoIP Phone, You have to click the Save button. After you click the Save button, the VoIP Phone
will automatically restart and the new setting will effect.
4.12 Update
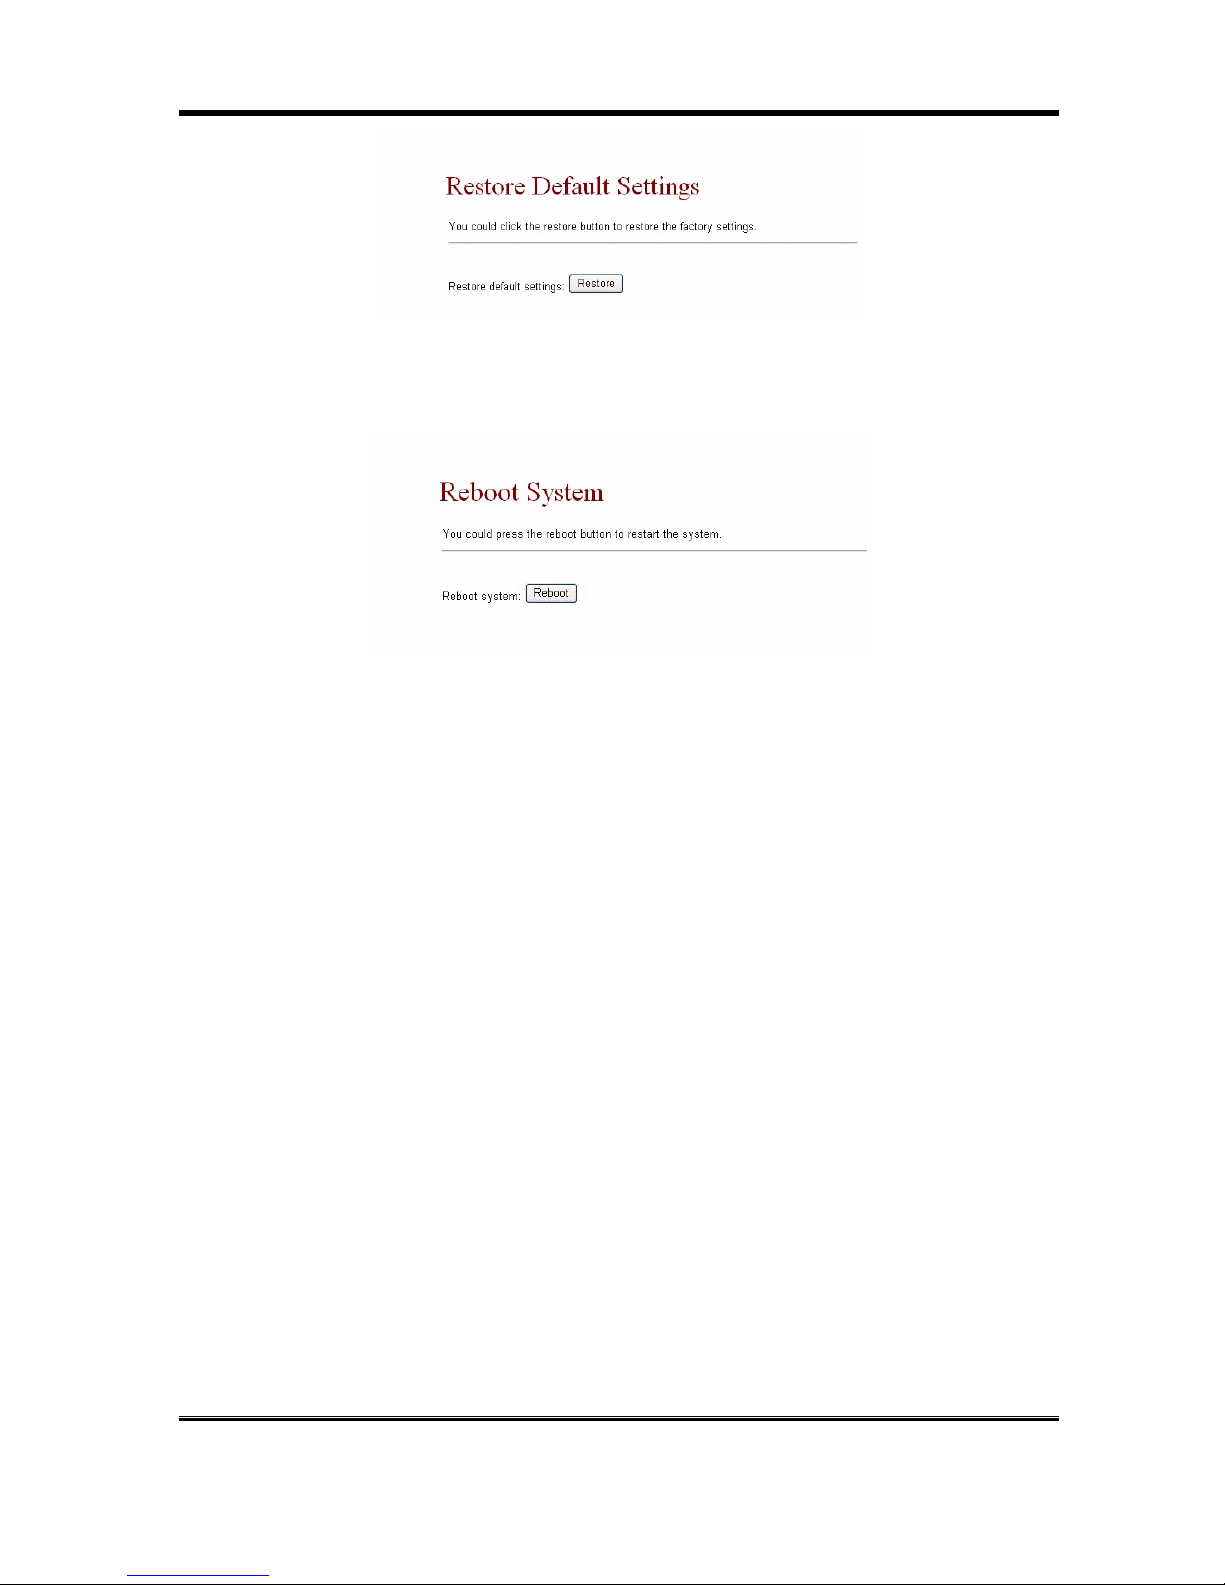
4.12.1 In Update you can update the VoIP Phone’s firmware to the new one or do the factory reset to let
the VoIP Phone back to default setting.
4.12.2 In New Firmware function you can update new firmware via HTTP in this page. You can ugrade
the firmware by the following steps:
Select the firmware code type, Risc or DSP code.
Click the “Browse” button in the right side of the File Location or you can type the correct
path and the filename in File Location blank.
Select the correct file you want to download to the VoIP Phone then click the Update
button.
4.12.3 In Default Setting you can restore the VoIP Phone to factory default in this page. You can just
click the Restore button, then the VoIP Phone will restore to default and automatically restart
again.
Page 27
IP500 User Manual
27
4.13 Reboot
4.13.1 Reboot function you can restart the VoIP Phone. If you want to restart the VoIP Phone, you can
just click the Reboot button, then the VoIP Phone will automatically.
Page 28
IP500 User Manual
28
5. Setup the VoIP Phone by usingTelnet (only suppurt
Windonw xp)
5.1 Configure
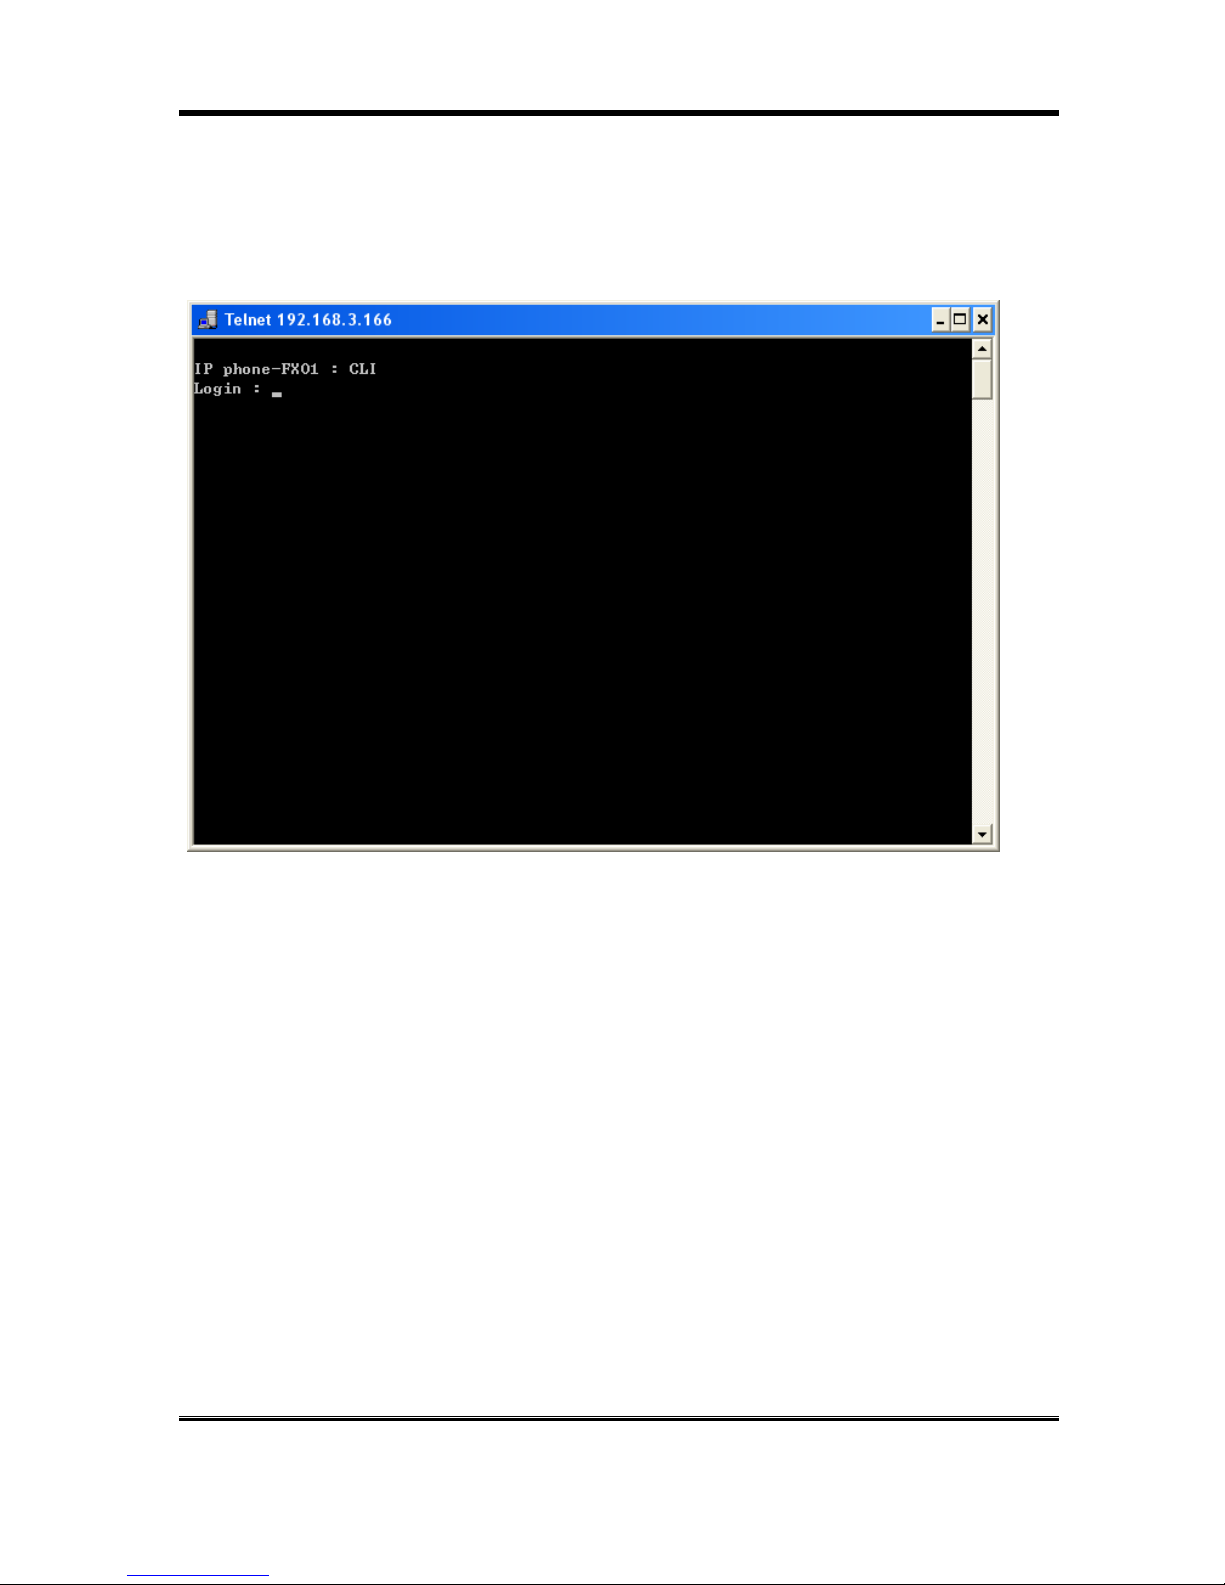
On the PC choose Start>Run, and then type telnet 192.168.1.100 into Run field in popuping Run dialog. Or
input telnet 192.168.1.100 in the DOS window. Then the following information will be displayed.
Page 29
IP500 User Manual
29
Login into the VoIP Phone
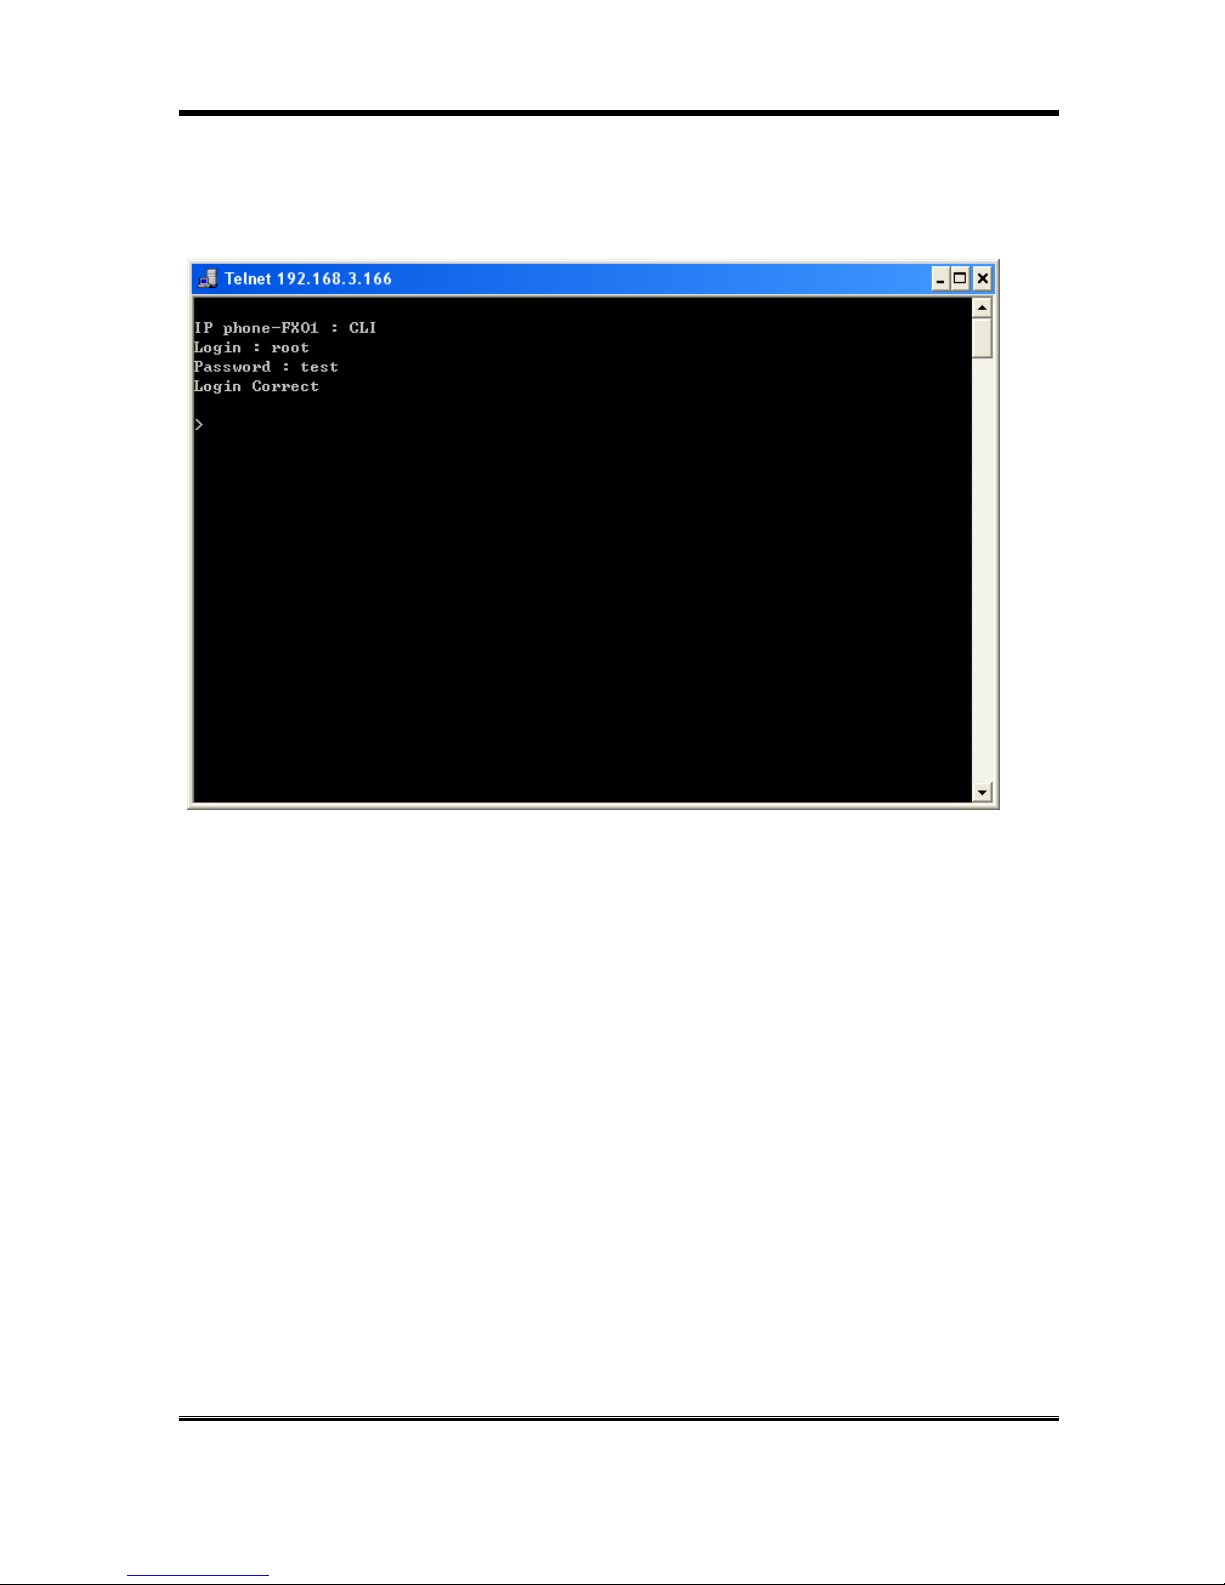
Press “Enter” and the hyper terminal will show the “Login: “. Input “root” and press the “Enter” button. Then
hyper terminal will show the “Password: “. Input “test” and press the “Enter” button. Now you already login
the VoIP Phone.
Page 30

IP500 User Manual
30
5.2 Using CLI command to configure the VoIP Phone
CLI command list as below:
Itno Command Description
1 ? Show CLI Command
2 arp ARP Configuration
3 ipconfig Interface Configuration
4 save Save to flash
5 reboot Reboot
6 exit Exit
7 debugmode Enter Debug Mode
8 update Update Flash Code/RAM
9 auth Change User Name and Password
10 nat NAT Configuration
11 dns DNS Configuration
12 ping ping [-lN] [IP-addr|host-name]
13 sip SIP Configuration
14 ddns DDNS Configuration
15 sntp SNTP Configuration
16 vlan VLAN Configuration
17 time Get System Time
18 mactab Show MAC Learning Table
19 dump Read/Write Memory
20 book Edit phone book
21 reload Reload Factory Setting
22 watchdog WatchDog Function
23 phone Phone Setting
24 weblogo Change Web's logo
25 dsp Show dsp type
26 addport Add Nat Port Mapping
27 cid Select slic Cid
28 slic read or write slic registers
29 ver Firmware Version
“?” function is to show CLI command list in the screen.
arp function
Itno Command Description
1 ? Show 'arp' Option
2 -a Show ARP Table
3 -d Delete ARP Table
4 -s Set Static ARP Table
5 (null) Show ARP Table
ipconfig function
Itno Command Description
1 ? Show 'ipconfig' Option
2 -if0 Interface 0
3 -if1 Interface 1
4 -if2 Interface 2
5 -h Set Host Name
6 -a Set ARP Cache Expire
7 -r Restore Current Setting
8 (null) Show IP Setting
Page 31

IP500 User Manual
31
o
ipconfig –ifN function N is 0, 1, 2
Itno Command Description
1 ? Show 'ipconfig -ifN' Option
2 -t Set Host Type
3 -m Set MAC Address
4 -i Set IP Address
5 -nm Set Net Mask
6 -g Set Gateway
7 -dns0 Set Primary DNS server
8 -dns1 Set Secondary DNS server
9 -dr Set Default Route
10 -nat Set NAT
11 on Enable Interface
12 off Disable Interface
13 -dhcps DHCP Server Setting
14 -ddns Set DDNS
15 -bridge Set Bridge
16 -dev0 Set Device 0 Setting
17 -dev1 Set Device 1 Setting
18 -dev2 Set Device 2 Setting
19 (null) Show Interface Setting
save function
Itno Command Description
1 ? Show 'save' Option
2 -book Save phone book
3 -sys Save system setting
reboot function is to restart the system.
exit function is to exit the CLI.
debugmode function is to enter the debugmode.
update function
Itno Command Description
1 ? Show 'update' Option
2 -os Update OSImage(IP filename)
3 -dsp Update DSP Image(IP filename)
4 -all Update All Image(IP filename)
5 -server Update Server (IP filename length)
6 -pcm PCM(IP filename)
-alaw alaw (IP filename)
-ulaw ulaw (IP filename)
-g729 g729 (IP filename)
-g723 g723 (IP filename)
-g726.16 g726.16 (IP filename)
-g726.24 g726.24 (IP filename)
-g726.32 g726.32 (IP filename)
-g726.40 g726.40 (IP filename)
IP is the TFTP server’s IP address, and the filename is the image you want to download into the
system.
Page 32

IP500 User Manual
32
auth function
Itno Command Description
1 ? Show 'auth' Option
2 -admin Change Administrator user name/password
3 -sys0 Change System user0 user name/password
4 -sys1 Change System user1 user name/password
5 -sys2 Change System user2 user name/password
6 -sys3 Change System user3 user name/password
7 -sys4 Change System user4 user name/password
8 -norm0 Change Normal user0 user name/password
9 -norm1 Change Normal user1 user name/password
10 -norm2 Change Normal user2 user name/password
11 -norm3 Change Normal user3 user name/password
12 -norm4 Change Normal user4 user name/password
13 -ppp Change PPP user name/password
14 (null) Show auth Setting
In each item includes
Itno Command Description
1 ? Show 'auth' Option
2 -user Change User Name.'auth -sys3 -user xxx '
3 -pass Change Password. 'auth -sys3 -pass xxx xxx'
4 (null) Show auth's System/PPP Setting
If you want to change the password, you need to type the password twice in the CLI.
nat function
Itno Command Description
1 ? Show 'nat' Option
2 -vs Set 'nat -vs' Option
3 -dmz Set 'nat -dmz' Option
4 (null) Show NAT Setting
In DMZ item includes
Itno Command Description
1 ? Show 'nat -dmz' Option
2 on EnableDMZ
3 off EnableDMZ
4 -ip Set DMZ IP address
5 (null) Show DMZ Setting
dns function
Itno Command Description
1 ? Show 'dns' Option
2 -q DNS query. dns -q domain-name
3 (null) Show DNS Table
ping function
Itno Command Description
1 ? Show 'ping' Option
2 -l ping [-l N] [IP-addr|host-name]
3 (null) ping [IP-addr|host-name]
Page 33

IP500 User Manual
33
sip function
Itno Command Description
1 ? Show 'sip' Option
2 -proxy0 sip -proxy0
3 -proxy1 sip -proxy1
4 -proxy2 sip -proxy2
5 -upnp sip -upnp on/off/show
6 -exts sip -exts sip upnp external-port
7 -extr sip -extr rtp upnp external-port
8 -sipp sip udp port
9 -rtpp sip rtp port
10 -stun sip -stun on/off
11 -rport sip -rport on/off
12 -sserver sip -sserver stun-server
13 -out sip -out outbound-proxy
14 -dump sip –dump
15 -log sip -log on/off
16 -drtp sip -drtp 0/1/2
17 -rtpnc sip -rtpnc on/off
18 -wanip sip –wanip
19 -nattype sip –nattype
20 -hbyrfc sip –hbyrfc
21 -dereg sip -dereg
22 -restart sip -restart
23 -jbt sip -jitter buffer Threshold
24 (null) Show SIP Setting
ddns function
Itno Command Description
1 ? Show 'ddns' Option
2 -type Set DDNS Type
3 -host Set Host Name
4 -wild Set Wild Card Mode
5 -mx Set Mail Exchanger
6 -backmx Set Mail Exchanger Mode
7 -offline Set Offline Mode
8 -user Set Login User Name
9 -pass Set Login Password
10 (null) Show DDNS Setting
sntp function
Itno Command Description
1 ? Show 'sntp' Option
2 -on Enable SNTP Client
3 -off Disable SNTP Client
4 -ip1 Set SNTP Server1 IP
5 -ip2 Set SNTP Server2 IP
6 -mode Set SNTP Client Mode
7 -zone Set GMT Time Zone: [+|-][hour]:[min]
8 -adjust Set Adjustment Time: [second]
9 (null) Show SNTP Setting
Page 34

IP500 User Manual
34
vlan function
Itno Command Description
1 ? Show 'vlan' Option
2 -tx Tx Vlan setting
3 -rx Rx Vlan setting
4 (null) Show Vlan Setting
time function
Itno Command Description
1 ? Show 'Time' Option
2 -t Modify Time: hour:min:sec
3 -d Modify date: year:mon:date
4 (null) Show Data & Time
mactab function is to show MAC learning table.
dump function
Itno Command Description
1 ? Show 'dump' Option
2 -r dump -r XXXXxxxx
3 -w dump -w XXXXxxxx XX
book function
Itno Command Description
1 ? Show 'book' Option
2 -a Show answer list
3 -c Show call list
4 -s speed dial
5 -p phone book
reload function is to Reload Factory Setting, please make sure you want to do the factory
reset.
watchdog function
Itno Command Description
1 ? Show 'WatchDog' Option
2 on Enable WatchDog
3 off Disable WatchDog
4 (null) Show WatchDog Setting
phone function
Itno Command Description
1 ? Show 'phone' Option
2 -autoanswer phone auto answer
3 -vol Volume setting
4 -block Block Incoming call
5 -ring Set Melody Ringer
6 -forward Auto-forward Incall to Phone[0-9] in Book
7 (null) Show Phone Setting
Page 35

IP500 User Manual
35
weblogo function
Itno Command Description
1 ? Show 'weblogo' Option
2 -on Vender Logo
3 -off Crystal media Logo
4 (null) Show weblogo Setting
dsp function is to show dsp code type.
addport function is to add Nat Port Mapping
cid function
Itno Command Description
1 ? Show 'cid' Option
2 -off Disable Slic Cid signal
3 -1 Tx FSK after 1st Ring
4 -2 Tx FSK before 1st Ring
5 -3 Tx DTMF before 1st Ring
6 -4 Tx FSK with Line reversal before 1st Ring
7 -5 Tx DTMF with Line reversal before 1st Ring
8 -time FSK cid with time message
9 -single Single type FSK CID
10 (null) Show Cid Option
slic function
Itno Command Description
1 ? Show 'slic' Option
2 -ring Issue Ring signal
3 -r read slic addr
4 -w write slic addr
5 -a read all slic reg
6 (null) Show slic register
ver function is to show Firmware Version.
Page 36

IP500 User Manual
36
6. Phone function list
When your VoIP Phone is configured properly, you can make a phone call to your friend located in the
same service provider. If you want to make a phone call, you can dial the phone number then press “#”
button to start to dial the phone number or wait for a while then system will dial the number automatically.
The VoIP Phone provides some functions that list as below:
1. Switcing from IP dialing to PSTN dialing: The IP phone is defaulted as IP dialing. In order to
change it to PSTN dialing, pick up the handset and press ‘ 0’and ’*’ button. Then it will show ‘PSTN
Dialing’ on the display of the phone.
2. Call Hold: You can push the ‘Hold’ buton to hold the current call for a while, then push ‘Hold’ button
again to keep talking.
3. Call Waiting: When a new call is coming while you are talking, you can push the ‘Hold’ button to
switch to the new call. You can push the ‘Hold’ button to switch between the two calls.
4. 3-Way Conference: If you want to make a 3-way conference call, you can make a phone call to the
first phone number. After the call is established, push the ‘Hold’ button then you can hear the Dial
tone, then make a phone call to the second phone number. When the second call is established,
press the ‘Conf’ button.
5. Call Transfer: Below is the operation method.
Step 1: A call B
Step 2: B press "Transfer" then A will be held
Step 3: Make a new call to C
Step 4: Before C answers the call, hang up the phone
6. Redial: User can push the Redial button to dial the last dialed number.
7. Speaker Phone: You can use Speaker phone to make a phone call.
8. Pre Dial: User can dial the number first, after finished then raise the handset or push the speaker
button; the IP Phone will start to dial.
9. Phone book: When Press the phone book key ,the LCD will display to “Seach: [ ]” . Enter you want
name, then press the “OK” key .the LCD will display to the name.and press the “SPK” key or pick up
the hendset. Auto dail the number.
Page 37

IP500 User Manual
37
Appendix
Get a FWD account
1. The website is www.freeworlddialup.com; you can apply an account to use the VoIP communication. You can
follow the instruction to input the information. After you finished, you will receive a mail sent by the FWD mail
system, you will get the account information in the mail.
2. When you got the account, you can setup the related information into the VoIP Phone.
3. You can setup the related information into the VoIP Phone by web browser. Also you can use Telnet, Console via
CLI command to configure the VoIP Phone. You need to input the Proxy Name, Domain Name, Register Name,
and password. The Display Name you can input what you want to let others see.
4. After you registered to the SIP Server, you can try to call your friends who also registered in the same SIP Server.
You just need to dial your friend’s user name (registered name) and press “#” then you can make a phone call to
your friend.
5.
If you want to make a phone call to the other in the internet, first you need to registered in a Proxy Server (with
SIP Server IP, Domain IP, registered name, Password), make sure you already enable Stun function, then you can
try
 Loading...