

Page 1
W AR N IN G
Im p r o p er in s ta lla t i o n ,
a d ju stm e n t, alt e ra ti o n , se r vi c e o r
m a in te n a n c e c a n c a u s e in ju r y o r
p ro p e rt y d a m a g e .
R e a d th e in s ta llatio n ,
o p e r ati o n a n d m a in te n a n c e
in stru ctio n s th o ro u g h ly b e fo r e
in stallin g o r s e r vic in g th is
e q u ip m e n t.
D AN G E R
F a il u re to fo llow th e s e
in s tr u c t io n s c o u ld re s u lt in fir e
o r e x p lo s io n th a t c o u ld c a u s e
p r o p ert y d a m a g e , p e r s o n a l
in ju r y o r d e ath .
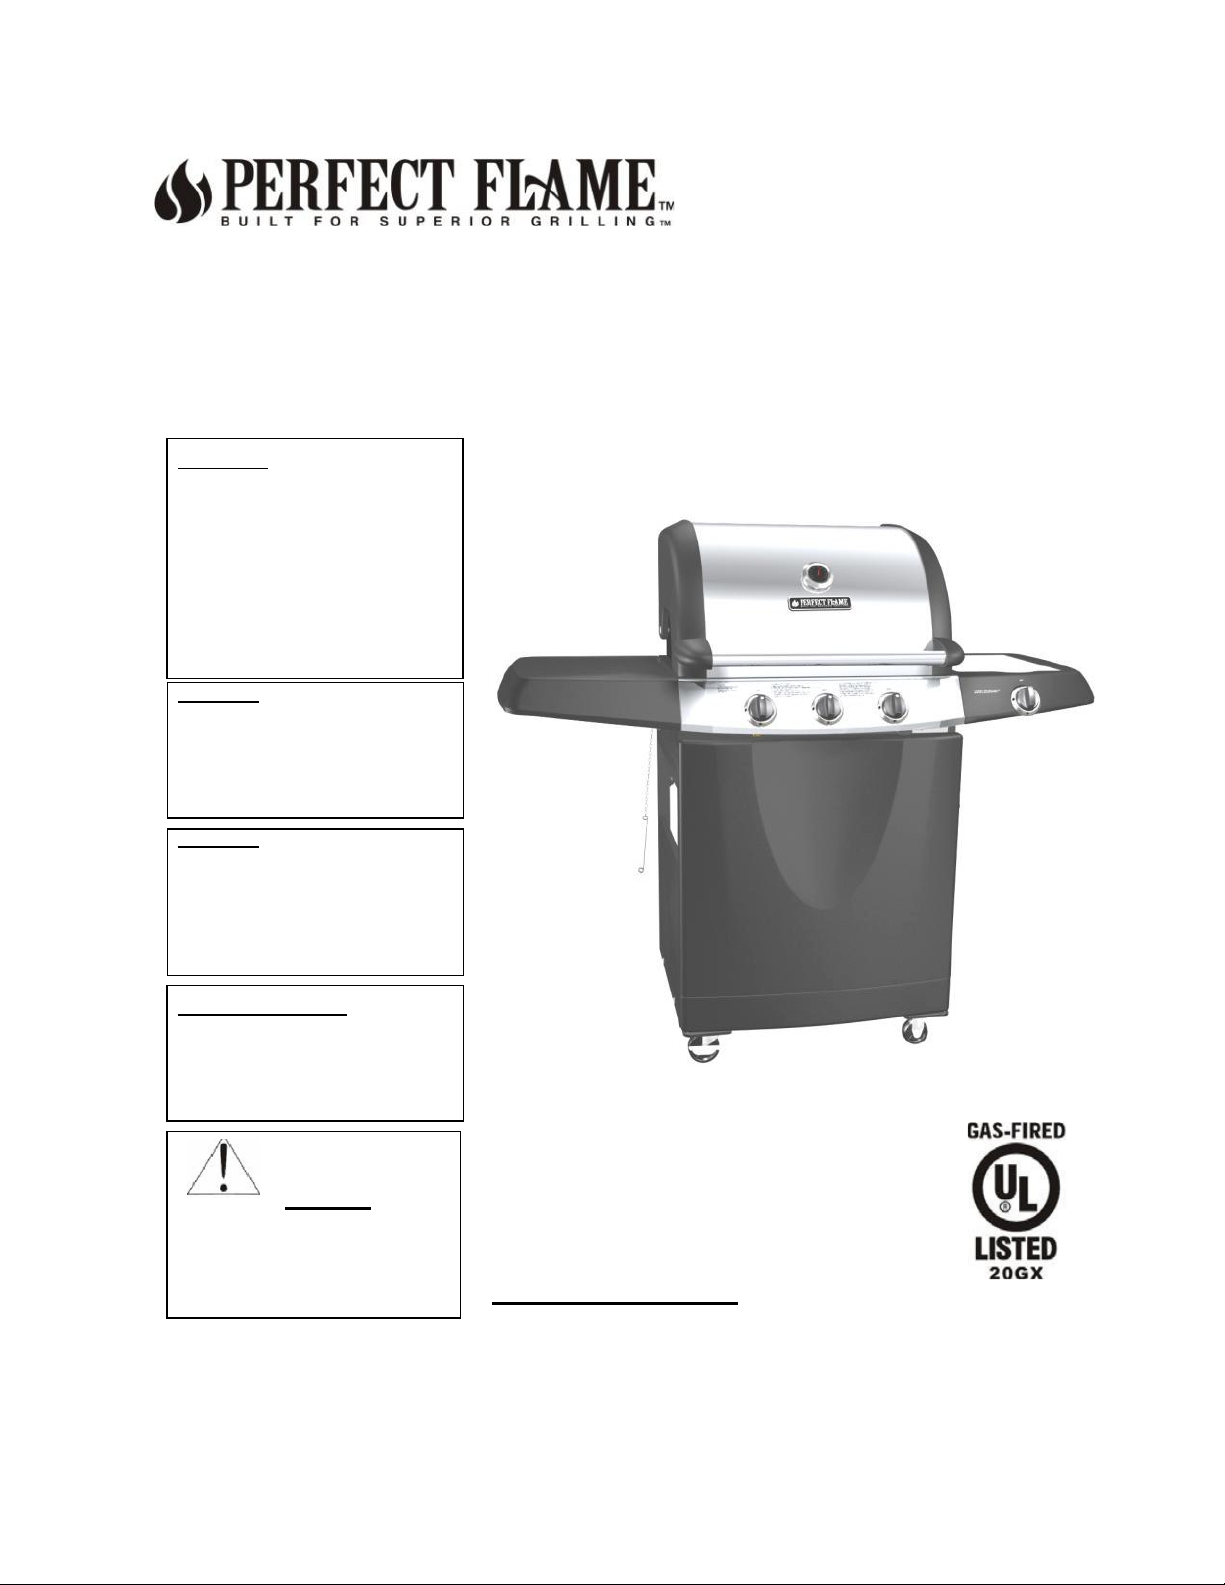
3 -B u rn e r L P G a s G rill
IT E M # 61701
D AN G E R
D O N O T u s e g a s g ri l l f o r in d o o r
c o o k in g o r h e a ti n g . T O X I C
fu m e s c a n a c c u m u l ate a n d
c a u s e a s p h yx ia tio n . D O N O T
u s e in o r o n b o a ts o r
r ec re a ti o n a l ve h ic le s.
P R O P 6 5 W A R N IN G
C h e m ic a ls k n o w n to th e st ate o f
C a lif o r n ia to c a u s e c a n c e r, b irth
d e f e c ts o r o t h e r r e p ro d u c ti ve
h a rm ar e c re ate d b y th e
c o m b u s tio n o f p ro p a n
WARNING
FOR YOUR SAFETY :
For Outdoor Use Only
(outside any enclosure)
e.
SAVE THESE INSTRUCTIONS FOR FUTURE
REFERENCE. IF YOU ARE ASSEMBLING THIS
UNIT FOR SOMEONE ELSE, GIVE THIS
MANUAL TO HIM OR HER TO SAVE FOR
FUTURE REFERENCE.
FOR CUSTOMER SERVICE, EMAIL TO
SERVICE@BBQTEK.COM OR
CALL 1-888-571-6888 (TOLL-FREE),
6 A.M. – 5 P.M.(PST), MONDAY-FRIDAY.
S L G 2 0 07 A
O w ner’s M anu a l
0
Page 2
Grill Operation 1-2-3
Before Grilling,
Step 1
Step 2
Step 3
During Grilling,
(To avoid tripping safety valves, please follow these instructions careflly!)
Keep your grill a safe distance away from your property.*
Always Perform a Leak Test on all connection and hoses. *
Keep children away from the grill.
Step 1
Step 2
Step 3
After Grilling,
First open lid and turn gas tank on slowly.
Turn only one knob on at a time when lighting up the grill.
Use protective gloves when grill gets hot.
Step 1
Step 2
Step 3
* Please refer to the owner’s manual for details.
1. D O not store o r us e gas olin e or o th e r
Flam m a b le liquids or vapor in the vicinity of
this or any other appliance.
2. An LP cylinder not connected for use shall
not be stored in the vic in
o th e r a p p lia n c e .
A lw a ys re a d a n d u n dersta nd th e W A R N IN G S a n d IN S T R U C T IO N S th at are c on ta in e d in th is m a nu a l b e fore
attem p tin g to u se th is g a s b arb e c u e grill, to pre ve nt p o ssib le b o dily in jur y o r prop erty d am a g e.
A lw a ys k e e p t h is m a n u a l f o r c o n ve n ie n t fu tu re re fe re n c e .
S L G 2 0 07 A
O w ner’s M anu a l
Always burn grill for 10-15 minutes to burn off food residues after use.
Wait until the grill is completely cooled before closing lid.
Clean up grease build-up to avoid grease fire and cover your grill to prevent rust.
W AR N IN G
1. S h ut off gas to th e a pplianc e.
DANGER
If you smell gas:
2. E xtin g uish an y op e n flam e.
3. O p e n lid.
4.
If o
dor c o ntinu es, ke ep a w a y from the a p p lianc e
an d im m e diately c all your g as su p plier or yo ur fir e
ity of th is o r a n y
d ep artm e nt.
1
Page 3

T a b le o f C o n te n ts
For Your Safety................................................................................................3
Illustrated Parts List ........................................................................................5
Hardware List....................................................................................................6
Assembly Instructions......................................................................................7
Operating Your Grill.........................................................................................13
Connecting Gas Cylinder..................................14
Checking for Leaks...........................................14
Lighting Your Grill.............................................14
Care and Maintenance......................................................................................17
Award-Winning Barbecue Recipes..................................................................19
Excess flow safety valve reset procedure..........16
Troubleshooting.................................................................................................20
Warranty Program..............................................................................................22
S L G 2 0 07 A
O w ner’s M anu a l
2
Page 4

Dear Value d C u stom er,
C ong ratula tio ns on your new barbecue grill p urchase ! Y ou’ve m ade th e righ t choice . In this m a nua l, yo u w ill find
asse m bly in stru ctio ns , sug g estion s for g rillin g a nd help ful hin ts, as w ell as guideline s for the safe o pera tion, proper
care an d use o f your grill. O ur expert sta ff strives to pro vid e you w ith an ea sy to assem ble pro duct. Should you ha ve
any question s or problem s w ith this product, plea se call our cu stom er service de pa rtm en t at 1 -888-571-688 8
6:00 am - 5 :00 pm (PS T), M onda y through Frida y.
N O T E : Th e u se a nd installa tio n o f this p roduct m u st co nform to lo cal co de s. In th e a b sen ce of lo cal co de s, u se the
N ation al F uel G a s C ode , AN S I Z 2 23 .1 / N F P A5 4. R e ference to N a tural G as a nd P ropane In stalla tio n cod e C S A
B 149 .1 or P ropa n e S torag e and H andling code B 1 49 .2
IM P O R T A N T N O T IC E : R E A D A L L IN S T R U C T IO N S P R IO R T O A S S E M B L Y A N D U S E
S a fe ty F ir s t !
R e a d a n d u n d e r sta n d a ll w a rn in g s a n d p re c a u ti o n s p rio r to o p e r a tin g yo u r g rill.
W A R N IN G
1.
T h is
2. T h e u se o f a lco ho l, pre scriptio n or non-prescriptio n drug s m a y im pair an individua l’s a bility to properly
assem b le or safely o perate th is applia nce.
3. A lw a ys open the g rill lid carefully an d slo wly a s h e a t a nd ste am tra p pe d with in the grill could caus e severe burns .
4. A lw a ys p lace yo u r grill on a h ard and le ve l surface fa r a wa y from com b ustib le m aterials and structures . An
asp halt or blacktop su rfa ce m a y n o t b e accepta ble fo r th is p urp ose .
5. D o n o t le a ve a lit grill un atte n d ed .
6. K ee p ch ildren an d p e ts a wa y from th e grill at all tim e s.
7. T h is is n o t a ta b leto p grill. D o n o t p la ce this grill on an y type of tableto p surfa ce.
8. Do not us e th e grill in high win ds.
9. T h is grill m u st b e u se d with pro pa n e g a s o n ly (pro pa ne gas cylinde r not include d ).
10.
Do no t
11.
Do
12 D o n ot use g asolin e, ke ro se ne or alco ho l for lighting. T h e LP -gas su p p ly cylin d er m u st b e co nstru cte d an d
m ark e d
Transporta tion (DO T) C F R 49.
13. This o utd oor gas a p plia nce is n ot inte n de d to b e in sta lled in or on re cre atio n ve h icle s a nd/or b o ats.
14. D o not attem p t to m ove th e grill wh ile it is lit.
15. D o no t u se th e grill u n less it is C O M P L E T E L Y a sse m b led a nd a ll p arts are secu rely fastened a nd tigh te ned.
16.
Kee p com bustib le item s a n d surfa ce s at le a st 24 inch e s a wa y from th e grill at all tim es. D O NO T u se this ga s grill
or an y g as prod uct u nder a ny overh ead encl o su re or n e ar an y u n protected co m b u stib le co nstru ctio ns.
1 7. D o n o t u se in a n e xp lo sive a tm o sp h ere . K e ep grill are a clear and free f rom com bustible m aterials,
ga so lin e and other flam m a ble va pors an d liquid s.
18. Do not attem pt to us e or asse m bly w ith m issing or dam aged parts. Contact custo m er service for a replacem ent.
C AU T IO N -P re ve n tio n o f B u rn s
1.
To
or u nle ss yo u are w ea rin g prote ctive g e ar su ch a s po t h old ers, protective glo ve s or m ittens.
2.
Do n o t a
3.
Clea n an d in spe ct th e h ose b e fore e a ch use. If th ere is evid e nce o f a bra sion , wear, cuts o r le ak s, th e hose m ust
b e re pla ce d prior to o peratio n. T he re pla cem e nt h ose a ssem bly sh ou ld b e in acco rda nce w ith the
m an ufactu rer’s specificatio n s .
4.
M o ve g a s h o
5.
N e
co u ld o p en th e re lief va lve a n d allo w g as to e sca pe.
grill is for outsid e u se on ly. It sho u ld not b e use d in a bu ildin g, g ara g e or an y other e nclose d area.
atte m pt to atta ch th is grill to the self-co ntained pro pa ne s ystem o f a cam p er , tra iler, m o tor h o m e or h ou se .
not use charco a l or lighte r flu id.
in a
ccord an ce
avoid burns, do not touch m eta l parts of th e g rill until th e y have com pletely cooled fo r at least 45 m inutes
lte r the g rill in a n y m ann er.
ses a s far awa y a s p o ssible from h ot surfaces a n d dripp ing hot grea se .
ver kee p a fille d gas co n tain er in a hot car or car trunk . Hea t w ill ca use the g a s pre s sure to in cre a se , wh ich
w
ith th e
S L G 2 0 07 A
O w ner’s M anu a l
For Your Safety
sp
ecifica tio ns fo r propa n e ga s cylin d ers of the U.S. De p a rtm e nt of
3
Page 5
S a fe L o c a tio n s F o r U s e O f T h is O u td o o r G rill
D A N G E R
Ne ver use this outdoor grill inside an y build ing, garage, sh ed or breeze w a y, or inside an y boat, trailer or recreational
ve hicle, to prevent a possible fire and to prevent the possibility of carbo n m onoxide poisoning or asph yxiation.
WARNINGS
Do not use this appliance under overhead combustible surface or covered area (e.g., awnings, umbrellas, porches or
gazeboes).
Always confirm that this grill is not positioned under the overhang of a house, a garage or other structure before lighting it.
An overhang will serve to deflect flare-ups and radiated heat into the structure itself, which could result in a fire.
Always confirm that this grill is positioned more than 24 inches (61 cm) away
from any combustible materials or surface before lighting it, and that no gasoline
or other volatile substances are stored in the vicinity of this grill.
(See diagram to right). The temperature of a grease fire or of the radiated heat
might otherwise be sufficient to ignite nearby combustible or volatile substances.
Always locate this grill where there will be ample combustion and ventilation air,
but never position it in the direct path of a strong wind.
Always locate this grill where there will be ample combustion and ventilation air,
but never position it in the direct path of a strong wind.
Never allow the grill to operate while unattended, to prevent uncontrolled
grease fires from erupting.
24 Inches
24 Inches
Never attempt to move this grill while it is in operation or while it is still hot, to prevent possible personal injury.
Never store or use gasoline or other flammable or volatile substances in the vicinity of this grill or in the vicinity of any other
heat-generating appliance, because of the danger of starting a fire.
Always confirm that the installation of this grill conforms with the requirements of all local codes or, in the absence of
applicable local codes, with either the National Fuel Gas Code, ANSI Z223. NFPA 54 or CAN/CGA-B149.2.
D AN G E R – G a s S a fe ty
Liq uid pro pan e (LP ) gas is flam m ab le an d ha za rd ou s if ha n dle d im pro perly. Bec o m e a w a re of its
ch aracteristics b efore usin g a n y pro pan e prod uct.
•
P
rop ane C h aracteristic s: Flam m a b le, e xp lo sive u nd er pre ssu re, h e avier th an air and se ttle s in p oo ls in lo w
areas.
•
In
its n atural sta te, pro pa n e ha s n o o dor. F or yo ur sa fety, a n o dora nt ha s b e en a dd ed.
•
Con tact w ith propane co uld ca use freeze burn s to the skin.
•
T h is
grill is ship ped from th e facto ry for pro pane g as u se on ly.
•
Ne
ver use a pro pan e c ylin der with a dam aged b od y, va lve, co lla r or footin g.
•
De n te d or ru
sted propan e cylinde rs m a y b e ha za rdou s a nd sh ould be che ck e d b y you r propan e gas su p p lier.
C AU T IO N
It is e ss e ntia l to k eep th e grill’s va lve com p artm ent, b urn e rs an d circu latin g a ir pa ssa g es c lea n.
Inspe ct th e grill be fore ea ch use
Step 1. Inspect all hoses and connections and make certain they are secure.
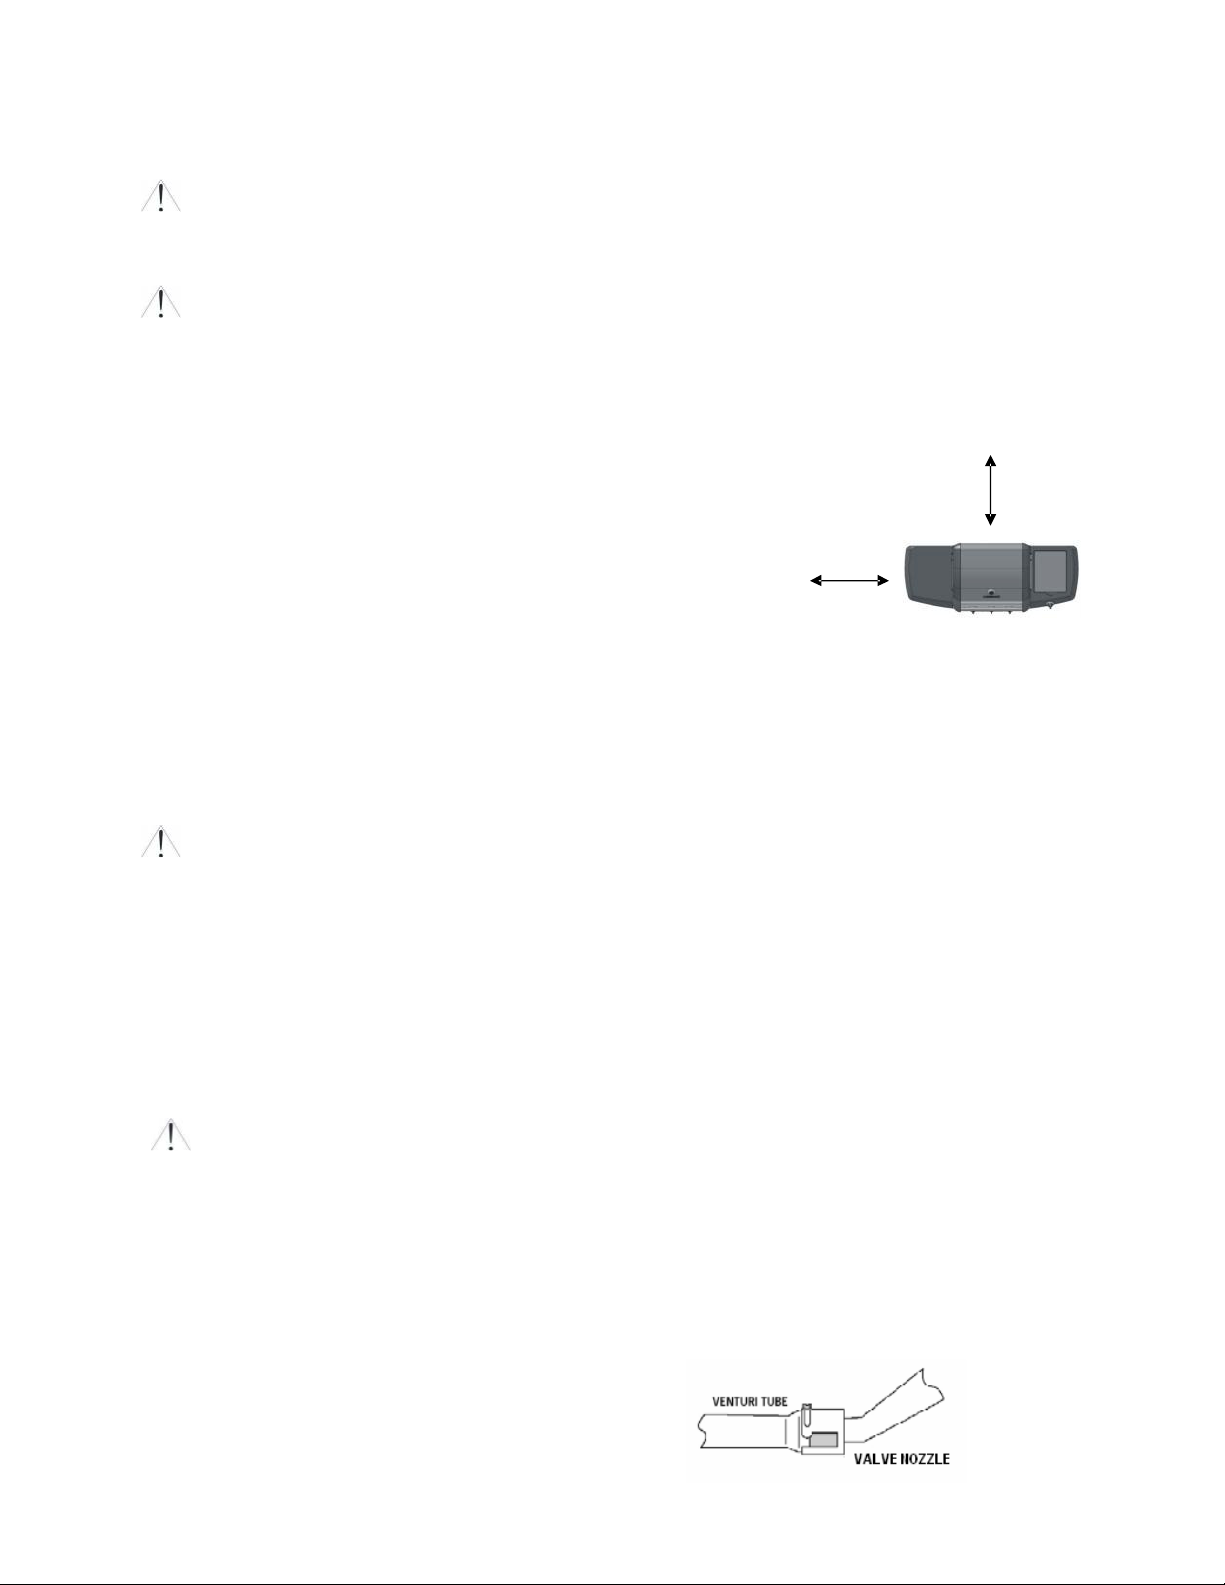
Step 2. Check and clean the burner venturi tubes for insects and insect nests by removing the burner and inserting a
Step 3. Ensure that the valve nozzle is pointing straight and completely inserted into the venturi tube.
.
bottle brush cleaner into each tube to make sure the passage is clear.
*** A clogged tube can lead to a fire beneath the grill. ***
G E N E R A L IN F O R M A T IO N
1.
A pr o
pane g a s cylin d er is required fo r op eration.
2.
This ga s grill is NO T inte nd ed for com m ercial u
S L G 2 0 07 A
O w ner’s M anu a l
se .
4
Page 6
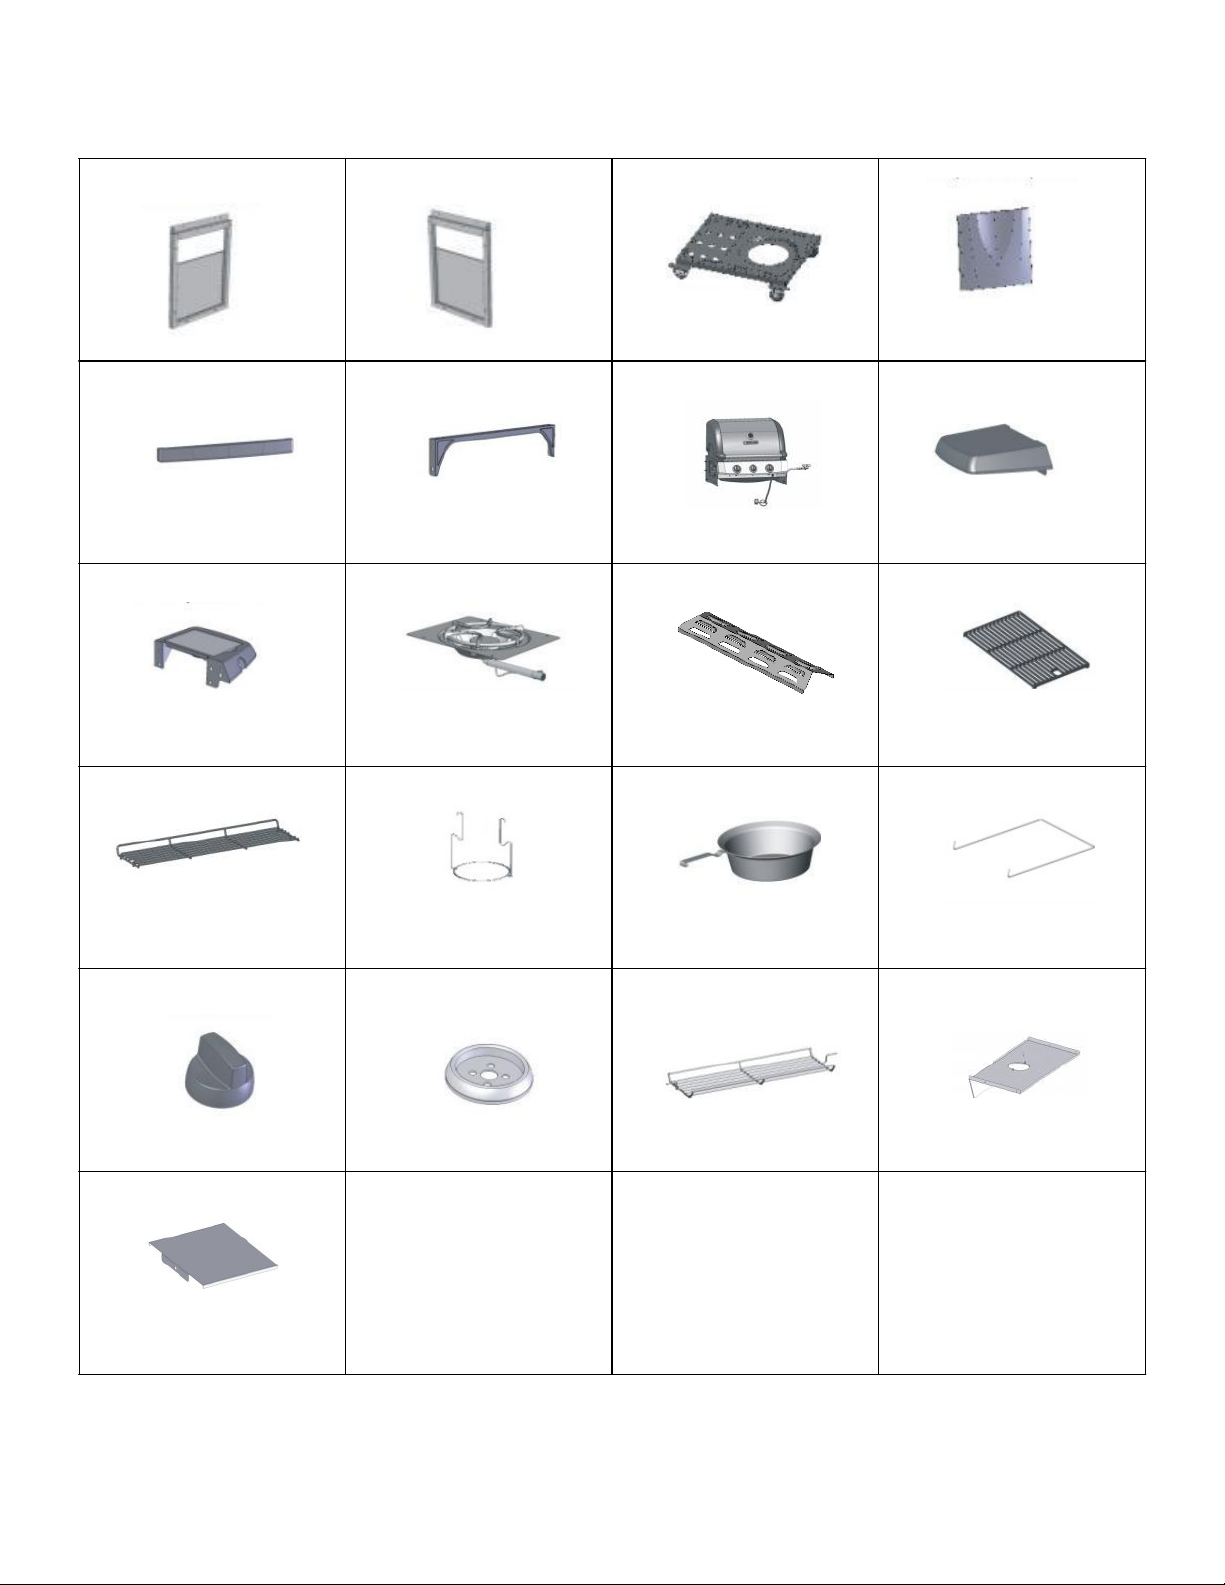
Illustrated Parts List
1. Left side panel.. .............. 1pc 2. Right side panel…………1pc 3. Bottom panel……………1pc 4. Front panel………..…….. 1pc
5. Front beam………….….. 1pc 6. Top beam…………….….1pc
7. Body assembly …….…….1pc 8. Left side shelf……………1pc
..
9. Right side shelf ……..…..1pc
..
10. Side burner assembly…..1pc 11. Heat plate………..........3pcs
.
12. Cooking grate…………2pcs
13. Warming grate-body ….1pc 14. Cup seat…. ...................1pc
15. Grease cup …….……..1pc 16.Tank clip………………..1pc
17. Side burner knob.........1pc 18. Side knob seat…..…..1pc 19. Warming grate-lid….….1pc 20. Heat insulating plate…1pc
21. Spare tank stopper ......1pc
S L G 2 0 07 A
O w ner’s M anu a l
5
Page 7
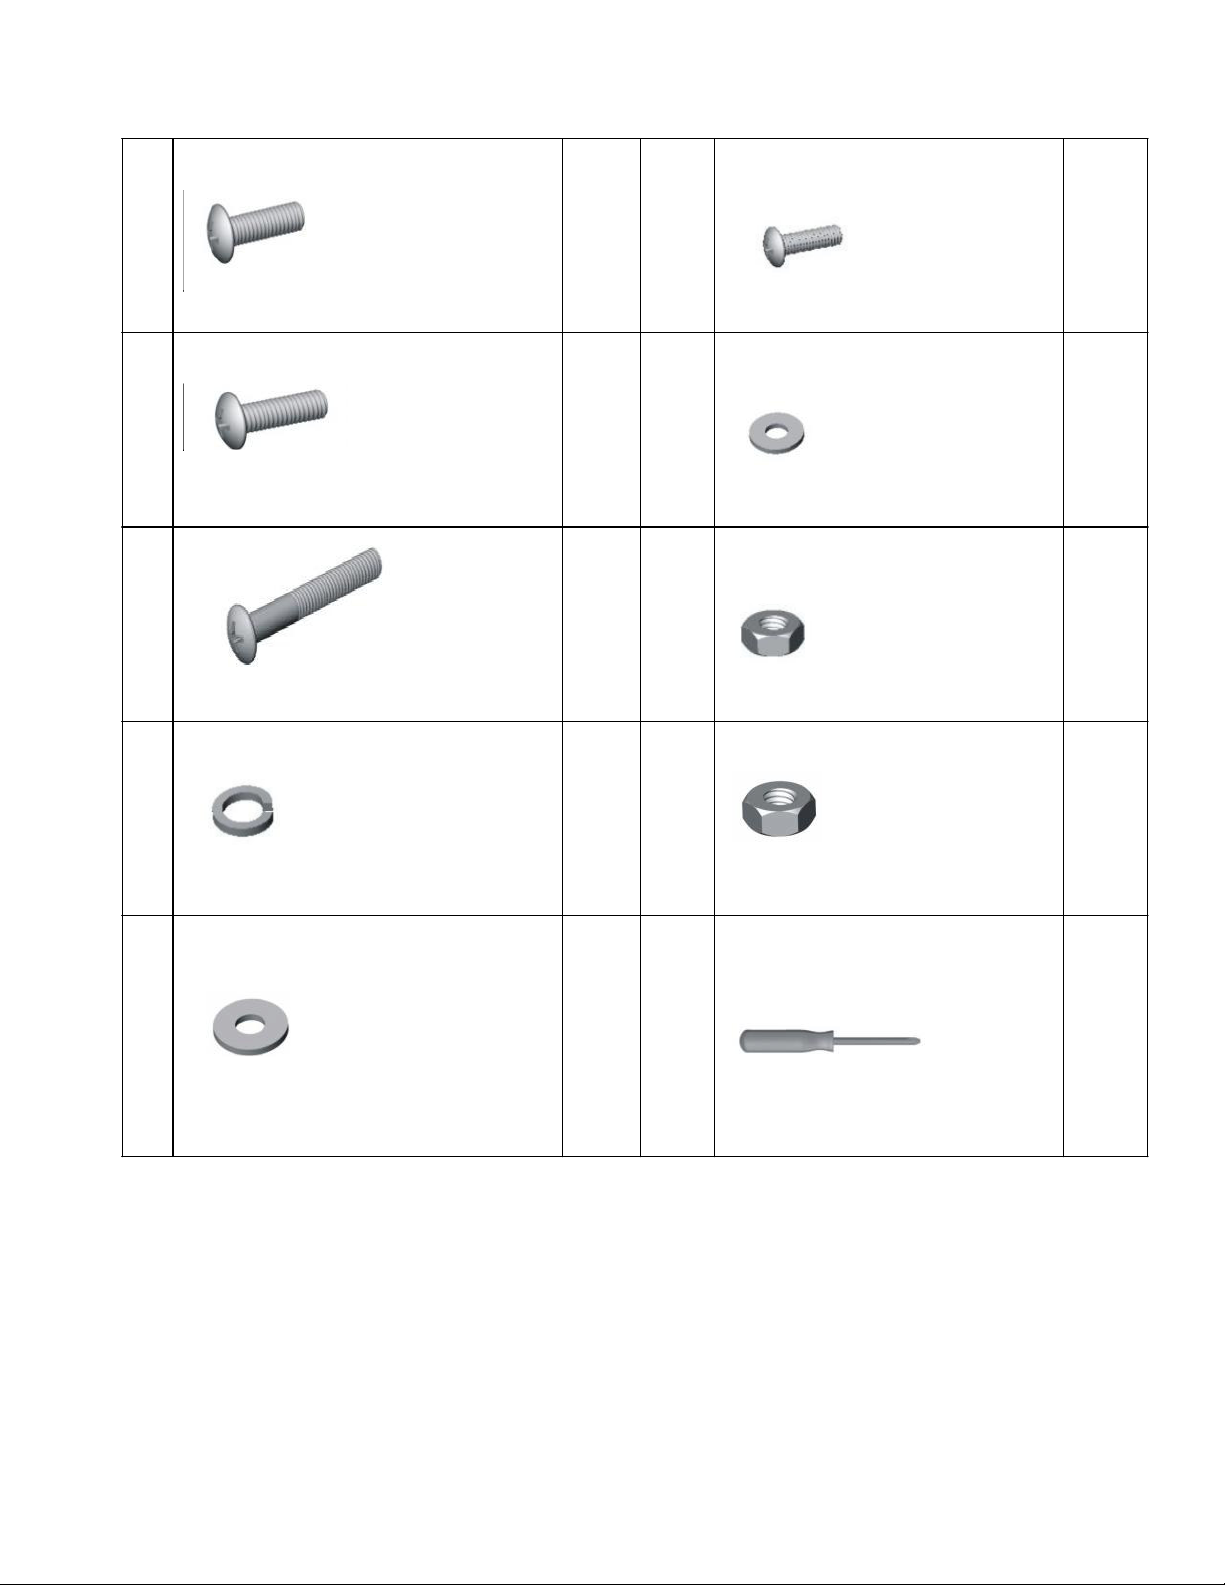
Hardware List
A
M6x15mm Bolts
B
C
M6x20mm Bolts
M6x45mm Bolts
13pcs
4pcs
6pcs
F
G
H
Spring
D
Washer
E
Hardware listed above is not scaled to exact size.
(A screwdriver is required on assembly and is included for your convenience).
M6 Washers
17pcs
21pcs
I
J
S L G 2 0 07 A
O w ner’s M anu a l
6
6pcs
6pcs
4pcs
1pc
1pc
M4x12mm
Small Washer
M4 Nut
M6 Nut
screwdriver
Page 8
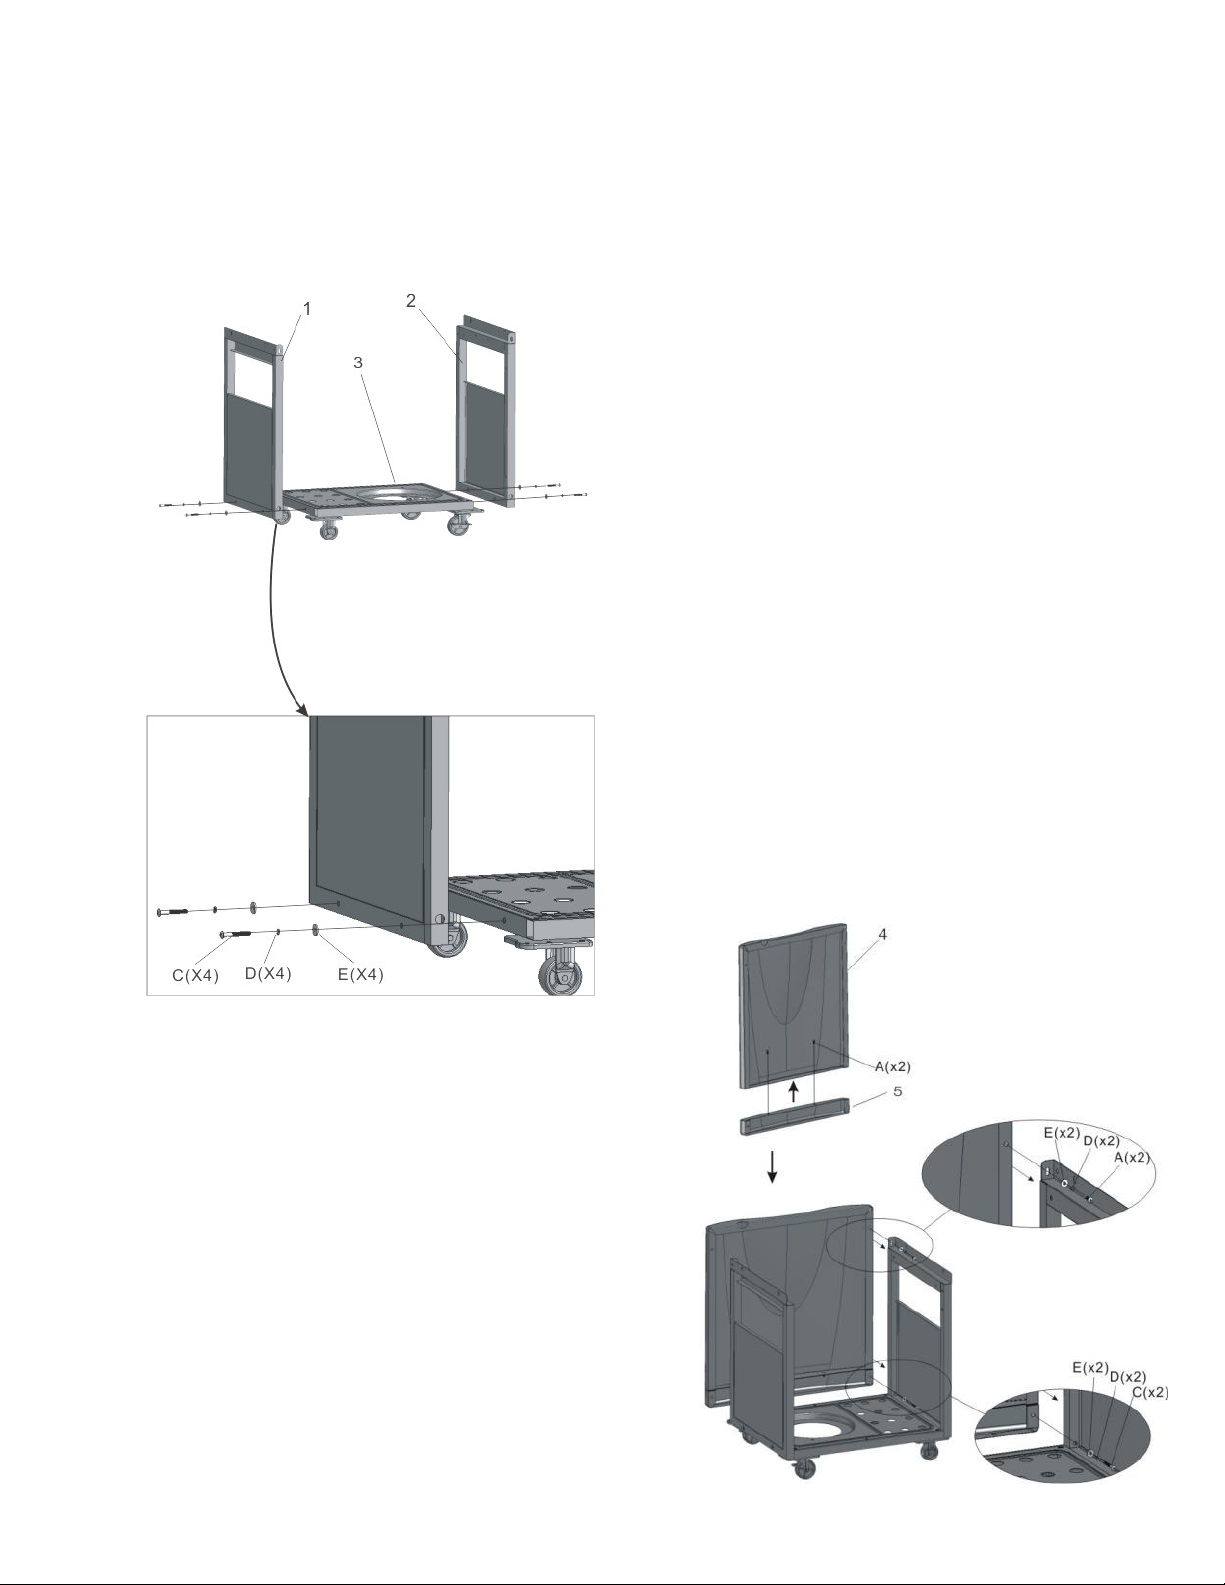
Assembly Instructions
R e m o ve a ll conte nts from the carton pa ck ag ing. M a ke su re a ll parts are pre sent b efore attem ptin g asse m b ly. O nc e the
grill is fu lly a sse m bled, go b a ck and check to m ake certain all the bolt s are secure . T igh te n a g a in u sin g the screwdriver
pro vid e d if n e ce ssar y.
E stim ated As sem bly T im e: 50 m inu tes.
Ste p 1
Note: Before beginning assembly, make certain the
wheels of the cart assembly are locked.
a) Align the holes at the bottom of the left side panel (1)
with the holes on the left side of the bottom panel (3). b)
Insert one M6x45mm bolt (C), one spring washer (D)
and one M6 washer (E) into each pre-drilled hole.
c) Tighten by hand until secured.
d) Repeat the procedure for the right side panel (2).
e) Go back to tighten all the bolts using the screwdriver
provided.
Ste p 2
a) Align the hole on the front panel (4) with the hole on the left side of front
beam (5). Insert one M6x15mm Bolt (A) into each hole. Tighten by hand
until secured.
Repeat the procedure for the right side of front beam.
b) Loosen four back panel bolts(pre-attached) and insert the front panel.
c) Align the holes on top of the front panel with the holes on the right side
panel. Insert one M6x15mm Bolt (A), one spring washer (D) and one M6
washer (E) into each pre-drilled holes. Tighten by hand until secure.
Repeat the procedure for the left side panel.
d) Align the holes on right side of the front beam with the holes on the right
side of bottom panel (3). Insert one M6x15mm Bolt (C), one spring
washer (D) and one M6 washer (E) into each pre-drilled holes.
Tghten by hand until secure. Repeat the procedure for the left side of the
bottom panel.
e) Go back to tighten all the bolts using screwdriver provided.
S L G 2 0 07 A
O w ner’s M anu a l
7
Page 9

Ste p 3
a) Place the top beam (6) in front of the cart assembly.
Align the holes on the left inside of the cart assembly with holes
on the cart top beam.
b) Insert one M6x15mm Bolt (A), one spring washer (D) and one
M6 washer (E) into each hole.
Tighten by hand until secure.
c) Repeat the procedure for right inside of the cart assembly.
d) Go back to tighten all the bolts using the screwdriver provided.
S L G 2 0 07 A
O w ner’s M anu a l
S tep 4
a) Slide the heat insulating plate (20) into the back of the cart
assembly.
Align the hole on the cart with pre-drilled holes on the heat
insulating plate. Screw one M6 bolt (A) and one M6 washer
(E) into each pre-drilled holes
b) Tighten all the bolts using the screwdriver provided.
c) Align the hole on the cart with pre-drilled holes on the spare
tank stopper (21). Lock it by screw one M6 bolt (A), one
spring washer (D) and one M6 washer (E) into one M6 nut
( I ) by hand.
d) Tighten all the bolts using the screwdriver provided.
8
Page 10

S tep 5
a) Place the body assembly (7) on top of the cart assembly.
Note:
Make certain the pre-drilled holes on the left side of
the body assembly are properly aligned.
b) Insert one M6x20mm bolt (B), one spring washer (D) and
one M6 washer (E) into each hole on left sides of the
body assembly.
Tighten the bolt by hand until secured.
c) Repeat the procedure for right side of the body
assembly.
d) Go back to tighten all the bolts using the screwdriver
provided.
S L G 2 0 07 A
O w ner’s M anu a l
S te p 6
a) Loosen the four side panel bolts (pre-attached) on right
side of the body assembly and allow
extend from the body assembly.
b) Align the large holes of the left side shelf (8) with the
bolts extended from the body assembly.
c) Push down the left side shelf until the shelf locks into
place.
Tighten bolt connections by hand until secure.
d) Repeat the same procedure for the right side shelf (9).
e) Go back to tighten all the bolts using the screwdriver
provided.
9
1/4
bolts length to
Page 11

S te p 7
a) Align the holes on side knob seat (18) with the holes
on the right side shelf and side burner valve. Screw
one M4x16mm bolt (F) and one small washer (G) into
each pre-drilled hole.
b) Tighten the bolts using the screwdriver provided.
Insert the side burner knob (17) into knob shaft of
valve.
S te p 8
a) Open the side burner lid and place the side burner
assembly (10) on the right side shelf. Make certain the
venturi tube is connected properly with valve.
b) Align the holes on the side burner assembly with the holes
on the right side shelf.
Insert one M4x12mm Bolts (F) and one small washer (G)
from bottom side into the most right front pre-drilled hole
and screw one M4 nut (H) into each bolts by hand.
c) Go back to tighten all the bolts using screwdriver provided.
S L G 2 0 07 A
O w ner’s M anu a l
10
Page 12

S te p 9
a) Co nne ct th e side burn er ign ition cab le
b y in serting it into the e le ctro de.
M ake certa in the con ne ctio n is se cure ly.
S te p 1 0
a) Place the three heat plates (11) inside the grill upon
b) Place the two cooking grates (12) inside the grill upon
c) Insert the four feet of warming grate-body (13) into the
d) Insert two ends of side warming grate-lid (19) into the
S L G 2 0 07 A
O w ner’s M anu a l
the burners.
the heating shields.
holes on top of grill body.
holes on inside the top lid.
11
Page 13

S te p 1 2
a) In sert the ta nk clip (1 6) into th e h ole s o n th e
ga s ta nk su pp ort. P la ce the ga s ta nk o n the
tank su pp ort an d clip it u sin g the tank clip.
b) Co nne ct th e ta nk w ith reg ulator b y scre w in g
the co llar onto th e ta nk va lve . (S ee diag ram
to right).
c) M ake certain a ll co nn ectio ns are co nn e cte d
se curely.
S L G 2 0 07 A
O w ner’s M anu a l
S te p 1 1
a) Hook the cup support (14) into the grooves
b) Place the grease cup (15) on the cup support.
beneath the heat insulating plate.
12
Page 14

Fully Assembled View
L eft Sid e
R ig ht S id e
O p e ra tin g th e G rill
C A U T IO N :
U s e o n ly th e r e g u la to r p ro v id e d . If a re p la c e m e n t is n e c e s s a r y, c a ll o u r c u s to m e r s e r vic e c e n te r . T h e u s e o f
u n a u th o rize d p a r ts c a n c rea te a n u n s a fe c o n d iti o n a n d e n viro n m e n t.
T he propa ne ga s su pply cylin der u sed m u st be con stru cted and m arke d in accorda n ce w ith th e S p ecifica tio ns fo r P ro p a n e G a s
C ylin d ers o f the U .S . D epartm ent o f T ra nsporta tio n (D O T ). O nly cylin d ers w ith a listed o ve rfill pre ve ntion de vice (O P D ) a nd
m arke d “pro pan e” m a y be u se d . C ylin ders w ith a n O P D w ill ha ve va lve h andles w ith thre e “lo bes” (pron gs).
The pressure regulator and hose assembly supplied with the outdoor cooking gas appliance must be used. Replacement pressure
regulators and hose assembly must be those specified by the outdoor cooking gas appliance manufacturer. O nly u se 20 pou nd
cylind ers equ ippe d w ith a cylin der con ne ction d evice co m patib le w ith the conne ctio n f or ou tdo or co oking applian ce s. T he cylind er
m ust include a collar to pro tect the cylin der valve . T he gas cylin d er should not be dropped or han dled roug hly. If the applian ce is
not in u se , th e ga s cylind er m ust b e disconn ecte d.
S torage of the a pplia nce ind oors is perm issib le O N LY if the cylinde r is disconn ected and rem o ve d fro m th e appliance. C ylin de rs
m ust be store d o utd oors and ou t o f the re ach o f children . C ylind er m u st n ot be stored in a build ing , g arag e o r o the r enclosed area .
Y our cylin der m u st ne ver be stored w he re tem pera tures ca n re ach over 125F .
B efore con ne cting , m a ke su re there is no deb ris caugh t in the head o f the g as cylin d er, reg ulator va lve o r in the h ead o f the burn er
and b urner ports. C o nne ct regula tor va lve an d han d tigh ten firm ly. D isco nne ct the propane cylin der fro m th e reg ulator va lve w he n
the grill is n ot in u se . D O N O T ob stru ct the flo w o f co m bustio n air or ventila tion air to the grill. T he propan e cylin der m u st be
arrang ed for va por w ithdraw al a nd equ ippe d w ith a liste d o verfill pre ven tion d evice (O P D ).
D a n g e r: A fi re c a us in g d eath or s erio u s in ju r y m a y o c c ur if th e follow in g is n o t follow ed e xa ctl y:
Never store or use gasoline or other volatile subs tance s in the vicinity of this grill .
N ever store a sp a re pro pan e c ylinder in th e vicinity of th is grill, or in the vicin ity o f a n othe r
pote ntial hea t source .
N ever fill the propane cylinder beyond 80 % full.
S L G 2 0 07 A
O w ner’s M anu a l
W a rn in g : D o n ’t store s p are g as c ylin d er in o r ne ar g rill.
13
Page 15

Connecting
the Gas Cylinder
L P (P ro p a n e ) G a s S u p p ly C o n n e c tio n
1.
Always place the propane cylinder on the tank brackets located on the right side of the cart.
2.
Always confirm that all burner control knobs are in the OFF position before activating the gas supply.
3.
Before connection, be sure that there is no debris caught in the head of the gas cylinder, head of the regulator valve, or in
the head of the burner and burner ports.
4.
Always connect the gas supply regulators as follows:
Insert the nipple of the valve coupling into the tank valve and tighten the connection collar
by turning it clockwise with one hand while holding the regulator with the other hand.
(See diagram to right)
5.
Disconnect the propane cylinder from the regulator valve when the grill is not in use.
6.
Do
not obstruct the flow of combustion air and ventilation air to the grill.
7.
Keep ventilation openings of the cylinder enclosure free and clear from debris.
8.
Place dust cap on cylinder valve outlet whenever the cylinder is not in use. Onl y install the
type of dust cap on cylinder valve outlet that is provided with the cylinder valve. Other types
of caps or plugs may result in leakage of propane.
D A N G E R
To prevent fire or explosion hazard when testing for a leak:
1.
Always perform the “leak test“ on page 14 before lighting the grill and each time the cylinder is connected for use.
2.
Do
3.
Conduct the leak test outdoors in a well-ventilated area.
4.
Do
5.
Do
appliance service or your local propane gas supplier.
not smoke or allow other sources of ignition in the area while conducting a leak test.
not use matches, lighters or a flame to check for leaks.
not use grill until all leaks have been stopped. If you are unable to stop a leak, disconnect the propane supply, call for gas
C h e c k in g for Le a ks
1. M a ke 2-3 o z. of le ak solution b y m ixin g o ne part liq u id dish w a shing soap with three parts w a ter.
2. M a ke sure con tro l kno b s are in the “O F F ” po sition .
3. S pra y so m e solu tio n on the ta nk valve up to th e reg ulato r connection.
(S ee dia gram to righ t).
4. Inspe ct the solu tion a t the conne c tion s for bub ble s. If no b ubbles a p pea r,
the con n ectio n is se cure .
5. If bub ble s app ear, you have a lea k. G o to ste p 6 .
6. D isco nne ct the re gula to r from the tan k a nd re con ne ct. M ake sure the con ne ctio n is se cure d.
7. R etes t with solutio n.
8. If you con tin u e to see b ubble s, re pla ce th e c ylinder.
.
D a n g e r: F ailure to o pen lid w hile igniting the grill’s burn ers or no t w aiting 5 m inu te s to allow ga s to c le ar if the grill d oe s not
lig ht, m a y result in a n explo sion , w hich could cau se serious bo dily injury or de ath.
L ig h tin g Y o u r G rill
W A R N IN G : N e ver sta nd w ith your h ead directly over th e grill w hen pre paring to ligh t the m ain burn ers , to pre ve nt po ssible
M ain B u rn e r
1. O pen lid w hile lig h tin g b urners.
obstru ctio n s of airflo w to the ga s unit. S pide rs an d insects ca n ne st an d clo g th e b urn er/ven turi tub e at the o rifice . A clog ged
burner tube ca n le ad to a fire be nea th the app lia nce .
2. All valves m u st be in th e “O FF ” po sition .
S L G 2 0 07 A
O w ner’s M anu a l
bodily injury.
W A R N IN G : Atte m pting to lig ht the b urne r w ith the lid clo sed m ay ca u se a n e xp lo sio n . M ake` sure there are no
14
Page 16

3. O pen c ylind er valve .
4. Ignite only the bu rners you w ish to use , u sin g the sa m e m e thod for ea ch :
P u sh de sired burn er valve knob an d ro tate slow ly a bout 1 /4 cou nte r -clo ckw ise until a click is heard. T he b u rner should
lig ht. If the burner doe s no t light, re turn the valve knob to the “O F F ” po sition im m ediately . W a it five m inutes for the g as
to clear an d rep e at the pro cedure . A fte r burn er is lit, re p eat the pro ce dure w ith an y othe r burn er de sire d .
6.
Adjust valve kn ob(s) to desired coo king tem pera ture .
U s in g th e L ig h ti n g S tic k to L ig h t th e M a in B u rn e rs
1. In ser t a m a t ch int o th e en d o f lig hting stick. Lig ht the m a tch.
2. O nce lit, pla ce the fla m e thro ugh the hole o n grill b ody to rea ch the burn er ports.
(S e e d iagram to rig ht).
3. P re ss the valve kn o b a nd rotate it coun ter clo ck w ise to th e ‘’H IG H ’’ po sition . T h e
burner shou ld lig h t im m ediately. If m ore than on e b u rner is desired, repe at the
sam e pro ce dure for the adjacent burner and continue in sequence until all
desired burners are lit.
4. A d ju st bu rners to the d e sire d coo king tem pera ture .
P r e c a u ti o n s
1. A fte r lig hting , ob serve the burner fla m e. M a ke sure all b urne r ports are lit.
2. If the bu rner flam e go es ou t d urin g operation , im m e diately turn the ga s “O F F”.
O pen lid to le t th e ga s clea r for a t lea st 5 m inu te s be fore re -lighting .
3. B e fore coo king o n the g rill for the first tim e , op e rate the grill fo r approxim ate l y 15 m inute s w ith th e lid clos ed and th e ga s
turn ed on “H IG H ”. T his will “heat cle an” the in tern al pa rts, dissipa te o dor from the m anufactu ring pro cess and p ainted finish.
4. C lea n the grill afte r ea ch u se . D O N O T use abra siv e or flam m able cle ane rs. this m a y dam a ge parts of th e grill and cau se a
fire .
S id e B u r n e r
1. O pen lid while lig h tin g the b urner. Lid m u st re m ain open w hile b u rner is lit.
2. V alve m u st b e in th e “ O F F ” positio n.
3. O pen c ylin der valve.
4. P u sh
sho uld ligh t. If th e burner do es not lig ht, turn the kn ob to the “O F F ” position im m e dia te ly. W ait five m in ute s fo r the g as to clear
and rep eat the proced ure.
5. A d ju st valve knob to th e de sired coo king tem perature
side burner knob fully and ro ta te it slow ly abo ut 1/4 turn cou nter-clo ckw ise , th en pre ss the ig niter pro m ptly . T he burner
U s in g th e L ig h ti n g S tic k to L ig h t th e Side B u rn e r
1. O pen lid w hile ligh ting the b urner. L id m u st rem a in ope n w hile bu rner is lit
2. Remove the lighting stick th en i n ser t a m at ch in to th e end o f lig h tin g
stick. L igh t th e m a tch .
3. O nce lit, pla ce the fla m e to re ach the bu rner po rts.
4. P re ss the con tro l kn ob and ro ta te it coun ter clo ckw ise to the ‘’H IG H ’’
positio n. T he b urne r sho uld lig ht im m e dia tely.
5. A d ju st bu rner to th e de sired co oking tem perature .
2 in.
1 in.
O b s e r ve fla m e h e ig h t w h e n lit:
F la m e s h o u ld b e a b lu e / ye llo w c o lo r b e tw e e n 1 to 2 in c h e s h ig h .
S L G 2 0 07 A
O w ner’s M anu a l
0 in.
15
Page 17

Confirm that the burner is properly lit and that the flame pattern is as desired (see fig. A,B and C below for the proper flame patterns).
If the flame pattern is other than normal, consult the troubleshooting guide on page 20 for corrective action.
FIG. A
FIG. B
FIG. C
Normal: Soft blue flames with yellow tips
between I inch - 2 inches high.
Out of adjustment: Noisy hard blue
flames – too much air.
Poor combustion: Wavy, yellow
flames- too little air.
B u rn er in s ta lla tio n an d ad ju stm en t
1. End edge face up side fo r install the bu rner
1. R elease the screw on venturi tube.
2. Adjust the flam e by turnin g the collar
on hea d of ventu re tube.
3. Tighten the screw and m ake certain it
is secure d.
Flare-ups
“Flare-ups” sometimes occur when food drippings fall onto the hot heat distribution plate or burners and ignite. Some flaring is normal
and desirable, as it helps impart the unique flavors associated with grilled foods. Controlling the intensity of the flare-ups is necessary,
however, in order to avoid burned or unevenly cooked foods and to pre vent the possibility of accidental fire.
WARNING: Always monitor the grill closely when cooking and turn the flame level down to LOW or OFF, if flare-ups
intensify.
Shutting Off Burners
1.
A lw a ys
turn th e valve kn ob (s) clo ckwise to the ‘’H IG H ’’ p osition, th en pre ss a nd turn it to ‘’O F F ’’. N e ver force the kn o b w itho ut
pre ssing it. T his co uld da m age th e valve .
2. P rom p tly turn the g as sup ply to the “O F F” po sitio n at th e pro p ane c ylind er.
3. C lo se the lid o f the grill.
E x c e s s flow s a f et y va l ve re s et p ro c e d u re
T h e n e w re g u la to rs are e qu ip pe d w ith a safety d e vice th at re stricts th e g a s flo w in th e e ve nt of a g a s lea k. H o w e ver, un sa fe
pra ctice s of grill o p era tio n co u ld a ct iva te th e sa fety d e vic e w ith ou t h a vin g a g a s le ak .
A su d d e n sh ut off of th e g a s flo w typ ica lly o ccu rs if yo u o p en th e L P tan k va lve ra p idly, or if o ne or m ore of th e b u rner co ntro l
kn o b s is in a n o p en po sitio n w h e n o pe n in g th e L P ta nk v a lve.
T h is pr o ce d ure is e ffe ctive w ith a ll L P T a nk size s a s w e ll a s N a tural G a s. W he n p erform in g th e pro ce dure o n a
N a tura l G a s m o d e l, sim ply s u b stitu te "N a tu ral G a s va lve " for "L P T a nk ".
T o e n sure th e pro ce du re is safe ly a n d su cce s sfu lly p erform e d , p lea se carefu lly fo llo w th e in stru ctio n s a s:
1. C lo se the L P ta nk va lve .
2. T urn a ll b urn er co n tro l k n ob s to th e O F F p o sitio n.
S L G 2 0 07 A
O w ner’s M anu a l
16
1. O verlap 20 m m betw een
venturi tube and nozzle w he n
assem bly.
2. Keep the center line of venturi
tube and no zzle on one line.
Page 18

3. D is co n n e ct th e re g u la tor fro m th e L P ta nk .
4.
O p e n
5.
T
6.
W
7.
T
8.
W
9.
R e
1 0. S lo w ly tu rn th e L P ta nk va lve ¼ tu rn a t a tim e an d h a ve th e va lve a ll th e w a y o p e n.
1 1.
W
1 2. A fter th e first fron t b urn e r is lit, tu rn o n th e oth er co ntro l k n o b(s) to th e H IG H p o sitio n. **If yo u h a ve m ore th a n tw o b urn ers,
1 3. W hen a ll fro nt b urners a re lit, clo se th e grill lid .
1 4. W ait for 10 -1 5 m in ute s, t h e te m perature sh o u ld re a ch 4 0 0 – 4 5 0 F °
the lid of th e grill.
urn b urn er co n tro l k n ob s to H IG H .
ait a t le a st 1 m in ute.
urn b urn er co n tro l k n ob s O F F .
ait fo r at le a st 5 m in ute s.
-co n ne ct th e reg u lator to th e L P ta nk .
ith th e lid o pe n : F or grill w ith ig n itio n b utto n: O N L Y turn on O N E fro n t burn er co ntro l k n ob to th e H IG H p o sitio n. Ig n ite th e
grill b y p u sh ing th e ig n itio n b utto n . F or grill w ith an au to m atic ign itio n : P u sh d o w n th e co ntro l kn o b yo u w a n t to ligh t, turn
co u nter clo ck w ise un til yo u h ear th e ig n ition click.
O N L Y tu rn th em o n O N E A T A T IM E .
WARNING: The cylinder valve always has to be above the horizontal position, for the cylinder to have vapor withdrawl
only.
CORRECT WRONG WRONG WRONG
C a re a n d M a in te n a n c e
IMPORTANT
Always allow to completely cool off before covering your grill to prevent corrosion from condensation.
C au tio n : All cleaning and m aintenan ce should be don e w hen th e g rill is co ol, with th e fu el supp ly turn ed o ff a t th e co ntrol dial
and th e prop ane c ylind er discon ne cte d. D O N O T
finish .
C le an in g
Burning o ff th e g rill a fter eve ry u se (approx. 15 m in utes) will kee p exce ss ive food re sidue from b uilding up .
R e c o m m e n d e d c le a n in g m a te ria ls -
M ild d ish w ash ing liq uid de te rgen t
N ylo n clea ning pad
Paper clip
C om presse d air
D O N O T use cle ane rs th at conta in acid, m in eral spirits o r x ylen e.
S L G 2 0 07 A
O w ner’s M anu a l
clean a n y grill part in a self-clea nin g oven. Th e e xtre m e h ea t w ill d a m age the
H o t w ater
W ire b ru sh
Putty knife/scraper
17
Page 19

O u ts id e s u rfa c e s
U se a m ild dishw a shin g de tergen t and ho t w a ter so lutio n to clean . R inse th or ou ghly w ith wa ter.
In s id e s u rfa c e
If the in side surfa ce o f the g rill lid ha s th e appe aran ce o f pee lin g p ain t, ba ke d on g re ase ha s turne d to carbo n an d is fla king off.
C lean th o roug hly w ith a stro ng solution o f d etergen t an d ho t w ate r. R in se w ith wa ter and allow it to co m ple tely dry.
Inte rior o f g rill b otto m – R e m ove re sid ue u sing brush, scrape r and /or clea ning pa d. W ash w ith a dishw ashin g d ete rg en t and ho t
w ater solution . R in se w ith w ater a nd le t d r y.
C ooking G rate s – T h e porce lain gra te s ha ve a gla ss -like co m p ositio n th at shou ld be handled with care . U se a m ild dishw a sh ing
detergen t or b aking soda an d h ot w a ter solu tion . N on -a b rasive scouring po w de r ca n be used on stubbo rn stains. R inse with w ater.
H eat Plate s – C lea n residue w ith w ire brush a nd w a sh w ith so ap y w a ter. R in se w ith w ater.
G rea se C up – P e riodically e m pty the g re ase cu p and cle an with a dishw a shin g d eterg en t an d ho t w ate r solution .
C le a n in g th e B u rn e r A s s e m b ly
1. T urn gas o ff at the co n trol kno bs a nd prop ane tan k.
2. R em o ve co o kin g gra te s and he at pla te.
3. R em o ve grea se cup.
4. R em o ve b u rner b y u nscre w ing n ut fro m be nea th b urner “foo t” u sing a scre w driver an d pliers.
5. L ift burn er up an d aw a y from the g as valve orifice .
6. C le an inle t ( ven turi tub e ) of burn er with sm a ll bottle b ru sh o r com pre sse d air.
7. R em o ve all foo d residu e an d dirt on ou tside o f burn er surfa ce .
8. C le an an y clog ged ports w ith a stiff w ire (su ch a s a n op ene d p aper clip ).
9. In spe ct burn er for d am a ge (cra cks or ho le s). If dam a ge is fo und , rep la ce with a n ew bu rn er. R e install b urne r. M ake certain the
gas valve orific es are co rre ctly po sitione d , p oin ting stra ight in to bu rner inlet (ve nturi tube ). A lso , che ck po sition o f sp ark
electro de .
S L G 2 0 07 A
O w ner’s M anu a l
18
Page 20

Award-Winning Barbecue Recipes
N e ve r-f a il B a rb e c u e S a u c
In g re d ie n ts :
¼ cup
2 tablespoon s
¼ cup
1 tablespoon
¼ te aspoo n
1
1 cu p
¼ cup
1 tea sp o o n
P re p a re :
C oo k onio n and garlic in m a rgarine u ntil tend er. A dd
rem ainin g ingre dien ts and b rin g to a b oil. S im m er
uncovered 15 to 20 m inu te s. R e frigerate lefto ve rs
afte r u se .
M a m m a ’s M a r in a te d C h ic k e n
In g re d ie n ts :
¼ cup
2 tablespoon s
1 ½ te aspoo ns
½ te aspoo n
¼ tea sp oon
4
P re p a re :
C om bine in gredien ts, m ixin g w ell. M arinad e chicken
for se veral h ours. G rill un co ve red , o ver m edium h ea t,
for 10 to 1 5 m inu te s. C hicke n is do ne w hen juice s ru n
clea r.
B arb e c u e d H o n e y S te a k
In g re d ie n ts :
5 po und s
2 tablespoon s
1 tea sp o on
2
1 large
1 cu p
P re p a re :
C om bine all ing redients a nd m arinate ste ak for 7-8
hours. R em o ve m ea t from m arinad e and grill o ver
very high hea t to d esired do nene ss. H e at lefto ve r
m arinad e to a bo il and po ur over g rilled stea k to
serve .
S L G 2 0 07 A
O w ner’s M anu a l
e
F in ely chop ped on ion
B u tte r o r m arga rine
B ro w n sug ar, firm ly p acked
W orce stersh ire sa uce
H ot sa uce
G a rlic clo ve , fine ly c h o p p ed
C atsup
L e m on juice
P repare d m ustard
D ijo n m u sta rd
F re sh le m o n ju ice
W orce stersh ire sa uce
D ried tarrag o n
F reshly grou nd b la ck pep per
Bo nele ss , skin less chicken
brea st h alve
B eef sirloin stea k
R ed p eppe r -- cru sh ed
B lack pepp er
G arlic clo ve s -- crushed
O nion
H one y
H a r d c o re G
In g re d ie n ts :
¼ cup
2 tablespoon s
2 tablespoon s
2 tablespoon s
1 tablespoon
½ teaspoo n
½ teaspoo n
4 bro ok tro u t -- about 1 p ou nd e ach
P re p are :
C om bine lem on ju ice, m arg arine , oil, parsle y, hot
sau ce , gin ger and salt. M ix w ell. Pierce skin of fish
in se vera l p la ce s. R oll fish in juice m ixture to coat
inside a nd ou t. C o ver a nd re frige rate 30 m inu te s to
1 ho u r, turning o cca sionall y. R em ove fish from
m arinad e . P la ce fish on grill; b ru sh fish w ith
m arinad e w hile g rilling . C o o k ove r h igh he at for 5
m inutes. T urn an d b ru sh w ith m arin ade . C oo k 5
m inutes lo nger. Fish is don e when it fla ke s ea sily
w ith fork.
G rille d V e g g ie s
In g re d ie n ts :
¾ cup
¼ cup
1 tea sp o on
1 tea sp o on
1 tea sp o on
1 tea sp oon
1 tablespoon
½ te aspoon
½ te aspoon
2 po un d s asso rte d vege tables, ch oppe d or w hole
accord ing to ta ste.
P re p are
C om bine all ing redien ts in a sm all bowl. M arin ade
veg eta ble s w ith sau ce . C o ver a nd refrigerate fo r 2
hrs. G rill ve ge tab les o ver m edium heat un til tende r,
brushing them w ith m arinad e w hile th e y co ok.
C ookin g tim es w ill vary a cco rding to the veg et able s
cho se n.
19
rille d T ro u t
L e m on or lim e juice
M elte d b utte r
V e geta ble oil
C h opped p arsley
H ot sau ce
G roun d gin ger
S alt
O live oil
R ed w ine vineg ar
F resh ro sem ary
F resh th ym e le aves
F resh basil, ch o pped
F resh o rega no , ch opp ed
M ince d garlic
S alt
G roun d bla ck p eppe r
Page 21

P r o b lem
B u rn er w ill n o t lig ht u sing kn o b s o r
ign ite r.
B u rn er w ill n o t lig ht u sing a m atch .
S u d de n d rop in g a s flo w or
re d uc ed fla m e he ig ht.
Irre g ula r flam e p a tte rn, fla m e d o e s
no t run th e fu ll le ng th of b u rn e r.
F la m e is ye llo w or ora n g e .
S L G 2 0 07 A
O w ner’s M anu a l
Tro u b le s ho otin g
P o s sib le C a u s e
W ire s/o r electro de co ve re d w ith
coo kin g resid u e .
E le ctro d e a nd b urn e rs a re w e t.
E le ctro d e cra ck e d or bro ke n –
spa rks at c ra ck .
W ire loo se or d isco n n ected .
N o g a s flo w .
C o u p ling n ut a n d re g u lato r not fully
con ne c te d.
O bstru ction o f g as flo w .
D ise ng a g e m e n t o f b u rn e r to valve . R e en ga g e b u rn er a n d va lve .
S pid er w e b s or in s e ct n e st in
ven tu ri.
B u rne r p orts c lo gg e d o r b lo ck ed.
Ta n k o ut of g as.
E xc e ss flo w s afety d e vice m a y
ha ve b ee n activated .
B u rne r p orts are clo g g ed o r
blo c ke d .
N e w b urn e r m a y h a ve resid u a l
m a nu fa ctu rin g oils.
S pid er w e b s or in s e ct n e st in
ven tu ri.
F o od re sidu e , gre a se o r s e as o nin g
sa lt o n b urn er.
P o o r align m e n t of va lve to b urne r
ven tu ri.
20
P re ve n tio n /C u re
C lea n w ire a nd /o r electro d e w ith
ru bb in g a lco h o l.
W ipe dry w ith cloth .
R e pla c e e le ctro d e .
R ec on n e ct w ire or re p la ce
ele ctro d e/w ire a sse m b ly.
C he ck if pro pa n e tank is e m pty. If
em pty, re plac e o r refill. If p ro p a n e ta n k
is n ot e m p ty, re fe r to E x c e s s ive flo w
sa fe t y va lv e re s e t p ro ce d u re o n
p a ge 1 6 .
Turn th e cou p ling n ut a b o ut o ne -h a lf
to thre e qu arters a d ditio nal turn un til
so lid stop. Tig h te n b y h a n d O N L Y do n ot u se to o ls.
C le ar bu rn er tub e s.
C he ck fo r be nt or kink e d ho s e .
C lea n ve nturi.
C lea n b u rne r p o rts.
C he ck fo r gas in p ro pa ne ta nk .
R efer to th e E x c e s sive fl o w sa fet y
va lv e re s e t p ro c e d u re o n p a ge 1 6.
C lea n b u rne r p o rts.
Burn grill for 1 5 m in ute s w ith the lid
clos ed .
C lea n ve nturi.
C lea n b u rne r.
As su re bu rn er ven tu ri is p rop e rly
en ga g e d w ith valve .
Page 22

F la m e b lo w o u t.
F la re -u p .
P e rsiste n t gre as e fire .
F las h ba c k [fire in b urne r tu b es ].
Insid e o f lid is p ee lin g – like p an t
pe e lin g .
Irre g ula r flam e .
S L G 2 0 07 A
O w ner’s M anu a l
H ig h o r g u stin g w in d s.
Lo w o n p ro p a n e g as.
E xc e ss flo w va lve tripp e d .
G re ase bu ild up .
E xc e ssive fa t in m e at.
E xc e ssive co okin g te m pe ra ture .
G re ase trap p e d b y fo o d bu ild u p
arou n d b u rn e r s yste m .
B u rne r a nd /o r b urn er tu be s are
lo ck ed .
Th e lid is stainless ste el, n o t
pain te d .
A ir flo w is no t co rrect.
F la m e b lu e w ith ye llo w tip s, 1-2”
hig h . Too little a ir: w a vy yello w o r
oran g e flam e s. To o m u ch a ir: no is y
blu e fla m e s.
C o
rrect
21
Turn front o f g rill to fa c e w in d or
in cre a se fla m e h eig ht.
R e pla c e or re fill p rop a ne ta n k.
R efer to th e E x c e s sive fl o w sa fet y
va lv e re s e t p ro c e d u re o n p a ge 1 6.
C lea n g rill.
Trim fat from m e at b efo re g rillin g.
Adju s t (lo w e r) te m p erature
acc ord in g ly.
Turn kn obs to O F F . Tu rn g a s O F F a t
prop a n e ta nk. Le a ve lid in clo sed
pos itio n a nd le t fire bu rn o u t. A fter grill
co o ls, re m o ve a n d cle an all p arts .
C lea n b u rne r a n d/o r b urn e r tu be (s) .
B a ke d on grea se b u ild u p h as turne d
to ca rbo n a n d is flaking o ff. C le a n
tho ro u g h ly.
If fla m e s a re ye llo w o r o ra n g e – o p e n
flap a t th e e n d o f th e ven turi tu b e s in
1/8 ” in cre m e nts u ntil flam e s are
co rre ct.
If fla m e s a re b lu e a nd n o is y – clo se
flap a t th e e n d o f th e ven turi tu b e s in
1/8 ” in cre m e nts u ntil flam e s are
co rre ct.
*Pro p a n e M o d e ls m u st be o p e n a
m in im um of 1 /8”
*N atura l G a s Mo d els m ust be o p e n a
m in im um of 1 /16 ”
Page 23

Warranty Program
P ro o f o f p urc h a s e is re qu ire d to a c ce ss th is w a rran ty p ro gra m , w h ich is in effe ct fro m the d ate o f p ur ch a se . In a b ility to
pro vide pro of of p urc ha se or a fter th e w arra nt y h a s e xp ire d, cu s tom ers w ill b e su b je ct to p art s, sh ip p in g an d h an d lin g fe es.
Full 30-Day Warranty
Any missing parts can be replaced at no charge within 30 days from the date of purchase, with a valid proof of purchase.
L im it e d W a r ra n t y
1 Yea r W arranty o n a ll p arts in re g a rd s to d a m ag e affe ctin g th e opera tion o f th e ga s grill.
W arranty Pro vision s:
- T h is w a rranty is n o n-tran sferab le a nd d oe s n o t co ve r fa ilure s d u e to m isu se or im pro p er in s ta llatio n or m a in te n ance .
- T h is w a rran ty is fo r rep lacem ent o f de fe c tive p arts o n ly. W e are n o t re s po n sib le for in cid en ta l or co n se q ue n tia l
d am ag e s or la bor co sts.
- T h is w a rranty d o e s no t co v er ch ip s a n d scra tch e s of p orc e la in or p a inte d surfa ce s, n or do e s it co ver corro sio n o r
d is co loration d u e to m isu se , la ck of m ain te na n ce, h o stile e n viro nm e nt, a c cid ents, alteration s, ab u se or ne g le ct.
- T h is w a rranty d o e s no t co v er d am ag e ca u se d b y h ea t, a bra sive an d ch em ica l cle an ers, re su ltin g in ch ipp ed p o rce lain
en am e l p arts or a n y d am age to oth er com p on en ts u se d in th e in sta lla tion or o pera tio n of th e g a s grill.
In a b ilit y t o p ro vi d e p ro o f o f p u rc h a s e o r a ft e r th e w a rra n t y h a s e x p ir e d , c u s to m e rs w ill b e s u b je c t to p a rt s ,
s h ip p in g a n d h a n d lin g fe e s .
S o m e sta t e d o n o t allo w th e lim ita tio n o r e xc lu s io n of in c id e nta l o r c o ns e q u e nti a l d a m a g es , s o th e a b o ve lim itati o n s
or ex c lu sio n s m a y n o t a p p ly to yo u . T his w arra nt y g iv e s yo u s p e cif ic le ga l r ig hts , a n d yo u m a y a ls o ha ve o th e r rig hts
th a t va r y fr o m sta t e to sta t e .
If yo u h a ve a n y q u e s tio n s re la te d to th e p ro d u ct o r w arra n ty, ple a se vis it o ur w eb site at w w w.bbqtek .com o r e m ail us
to service@bbqtek.com or c all o ur c ust o m e r servi c e c e nte r a t 1 -8 88-57 1 -6 88 8 , 6:0 0 A.M . to 5:0 0 P .M . (P S T ), M o n d a y
th r o u g h Fri d a y.
D is trib u te d b y:
L G S o u rc in g In c.
P .O . B o x 1 5 3 5
N o rth W ilk e s b o ro
N C 2 8 6 5 9 , U S A
Page 24

S L G 2 0 07 A
O w ner’s M anu a l
22
P ri n te d in C h in a
 Loading...