

Page 1
.
WARNING:
Improper installation, adjustment,
alteration, service or maintenance
could cause injury or property
damage.
Read the installation, operation and
maintenance instructions thoroughly
before assembling or servicing this
equipment. Failure to follow these
instructions could result in fire or
explosion that could cause property
damage, personal injury or death.
PROP 65 WARNING:
Chemicals known to the state of
California to cause cancer, birth
defects or other reproductive harm
are created by the combustion of
charcoal or charcoal-like briquettes.
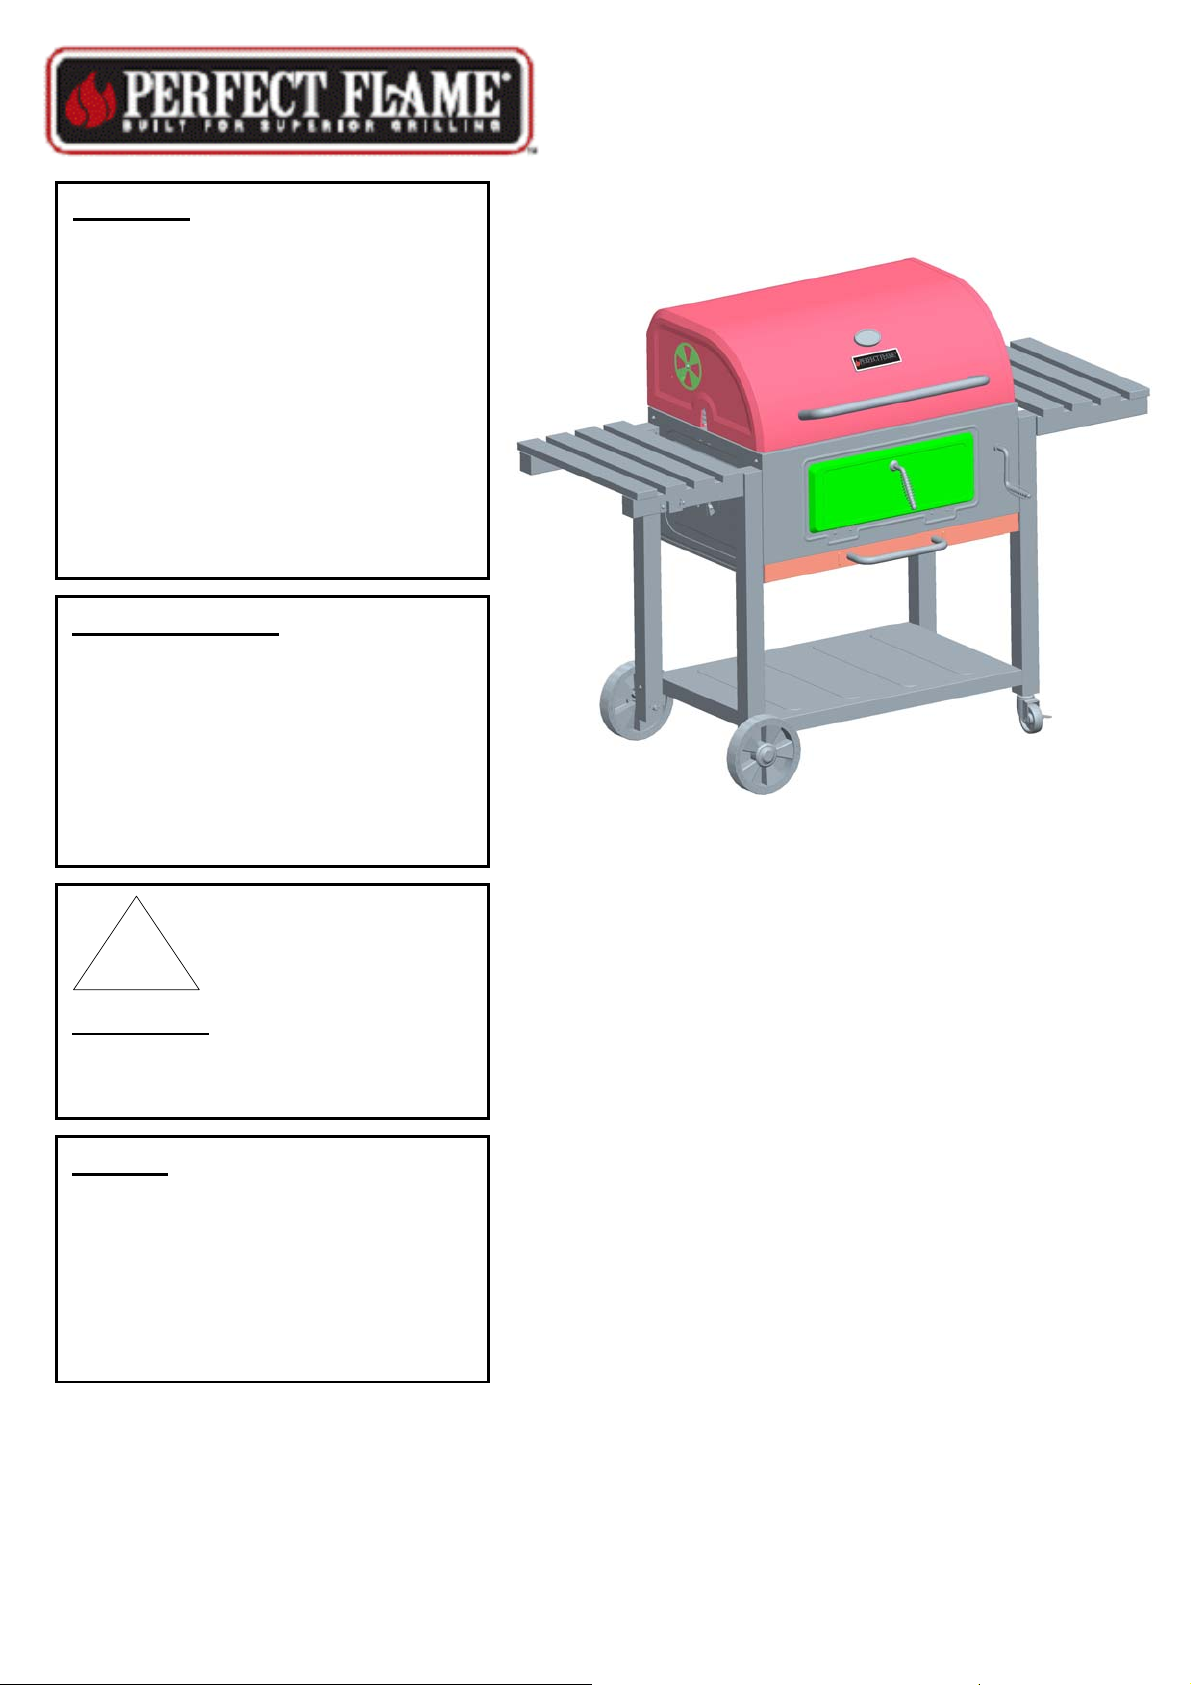
ITEM#:170696
Charcoal Grill
!
WARNING
For Outdoor Use Only
(outside any enclosure)
DANGER:
DO NOT use charcoal grill for indoor
cooking or heating. TOXIC fumes can
accumulate and cause asphyxiation.
Do not use in or on boats or
recreational vehicles.
SAVE THESE INSTRUCTIONS FOR
FUTURE REFERENCE. IF YOU ARE
ASSEMBLING THIS UNIT FOR SOMEONE
ELSE, GIVE THIS MANUAL TO HIM OR HER
TO SAVE FOR FUTURE REFERENCE.
FOR CUSTOMER SERVICE, CALL
1-866-869-5300, 8 A.M. - 6 P.M. EST,
MONDAY - FRIDAY.
Customercare@Geoglobalpartners.com
Printed in China
Page 2

! WARNING
Burning charcoal gives off carbon monoxide which
has no odor; therefore, burning charcoal in an
enclosed environment can cause death or serious
injury. NEVER burn charcoal inside homes, vehicles,
or tents.
Page 3

Table of Contents
For Your Safety . . . . . . . . . . . . . . . . . . . . . . . . . . . . . . . . . . . . . . . . . . . . . . . . . . . .
Illustrated Parts List. . . . . . . . . . . . . . . . . . . . . . . . . . . . . . . . . . . . . . . . . . . . . . . . .
Assembly Instructions . . . . . . . . . . . . . . . . . . . . . . . . . . . . . . . . . . . . . . . . . . . . . . .
Operating Your Grill. . . . . . . . . . . . . . . . . . . . . . . . . . . . . . . . . . . . . . . . . . . . . . . . .
Warranty Program . . . . . . . . . . . . . . . . . . . . . . . . . . . . . . . . . . . . . . . . . . . . . . . . .
Replacement Parts List . . . . . . . . . . . . . . . . . . . . . . . . . . . . . . . . . .. . . . . . . . . . . .
3
5
8
19
21
22
2
Page 4

GGP00101 Owner’s Manual
1. DO NOT store or use gasoline or any other flammable vapors and liquids within 25 feet (8 m) of
this or any other appliance.
2. When cooking with oil/grease, do not allow the oil/grease to exceed 350° F (177°C). Do not
store or use extra cooking oil in the vicinity of this or any other appliance.
WARNING
FOR YOUR SAFETY
For Your Safety
Dear Valued Customer,
Congratulations on your new barbecue grill! You have made the right choice. In this manual, you will find
assembly instructions, helpful hints, as well as guidelines for the safe operation, proper care and use of your
grill. Our expert staff strives to provide you with an easy-to-assemble product. Should you have any questions,
problems or missing parts with this product, please call our customer service department at 1-866-869-5300
8:00am - 6:00pm (EST), Monday through Friday.
IMPORTANT NOTICE: Read all instructions prior to assembly and use.
Read and understand all warnings and precautions prior to operating your grill.
CAUTION
1. Do not use gasoline, kerosene or alcohol for lighting. This grill is not intended to be used in or installed on
recreation vehicles and/or boats.
2. Do not attempt to move the grill while it is in use.
3. Do not use the grill unless it is completely assembled and all parts are securely fastened and tightened.
4. Keep all combustible items and surfaces at least 36 inches (914 cm) away from the sides and back of the
grill at all times.
5. DO NOT use this grill near unprotected combustible constructions.
6. Do not use in an explosive atmosphere. Keep grill area clear and free from combustible materials, gasoline
and other flammable vapors and liquids.
7. Do not touch metal parts of grill until it has completely cooled (about 45 minutes) to avoid burns, unless
you are wearing protective gear (pot holders, gloves, BBQ mittens, etc.).
8. Do not alter this grill in any manner.
9. Do not leave hot ashes unattended until the grill cools completely.
3
Page 5

WARNING
1. This grill is for outside use only, and should not be used in a building, garage or any other enclosed area.
2. The use of alcohol, prescription or non-prescription drugs may impair the operator's ability to properly
assemble or safely operate the grill.
3. Always open grill lid slowly and carefully as heat and steam trapped within the grill can burn you severely.
4. Always place your grill on a hard, level surface far away from combustibles. A carpeted or wooden deck
surface may not be acceptable for this purpose.
5. Do not leave a lit grill unattended. Keep children and pets away from the grill at all times.
6. Do not place this grill on any type of tabletop surface.
7. Do not use the grill in high winds.
8. Dispose of cold ashes by wrapping them in heavy-duty aluminum foil and placing them in a
noncombustible container. Make sure that there are no other combustible materials in or near the
container.
9. If you must dispose of ashes before they can completely cool down, remove the ashes from the unit, place
them in heavy-duty aluminum foil, and soak them completely in water before disposing them in a
noncombustible container.
10. Allow the unit to completely cool before performing any cleaning or maintenance.
11. When opening the hood, keep hands, face, and body a safe distance away from the hot steam and
possible flame flare ups.
12. Close the hood to suffocate the flame.
Read assembly instructions prior to beginning assembly process.
Remove all parts and hardware from packaging, and compare to parts and hardware lists. If any parts are
missing or damaged, do not attempt assembly. Call our customer service center at 1-866-869-5300, 8:00 AM
to 6:00 PM (EST), Monday through Friday. Do not return your grill to retailer.
4
Page 6
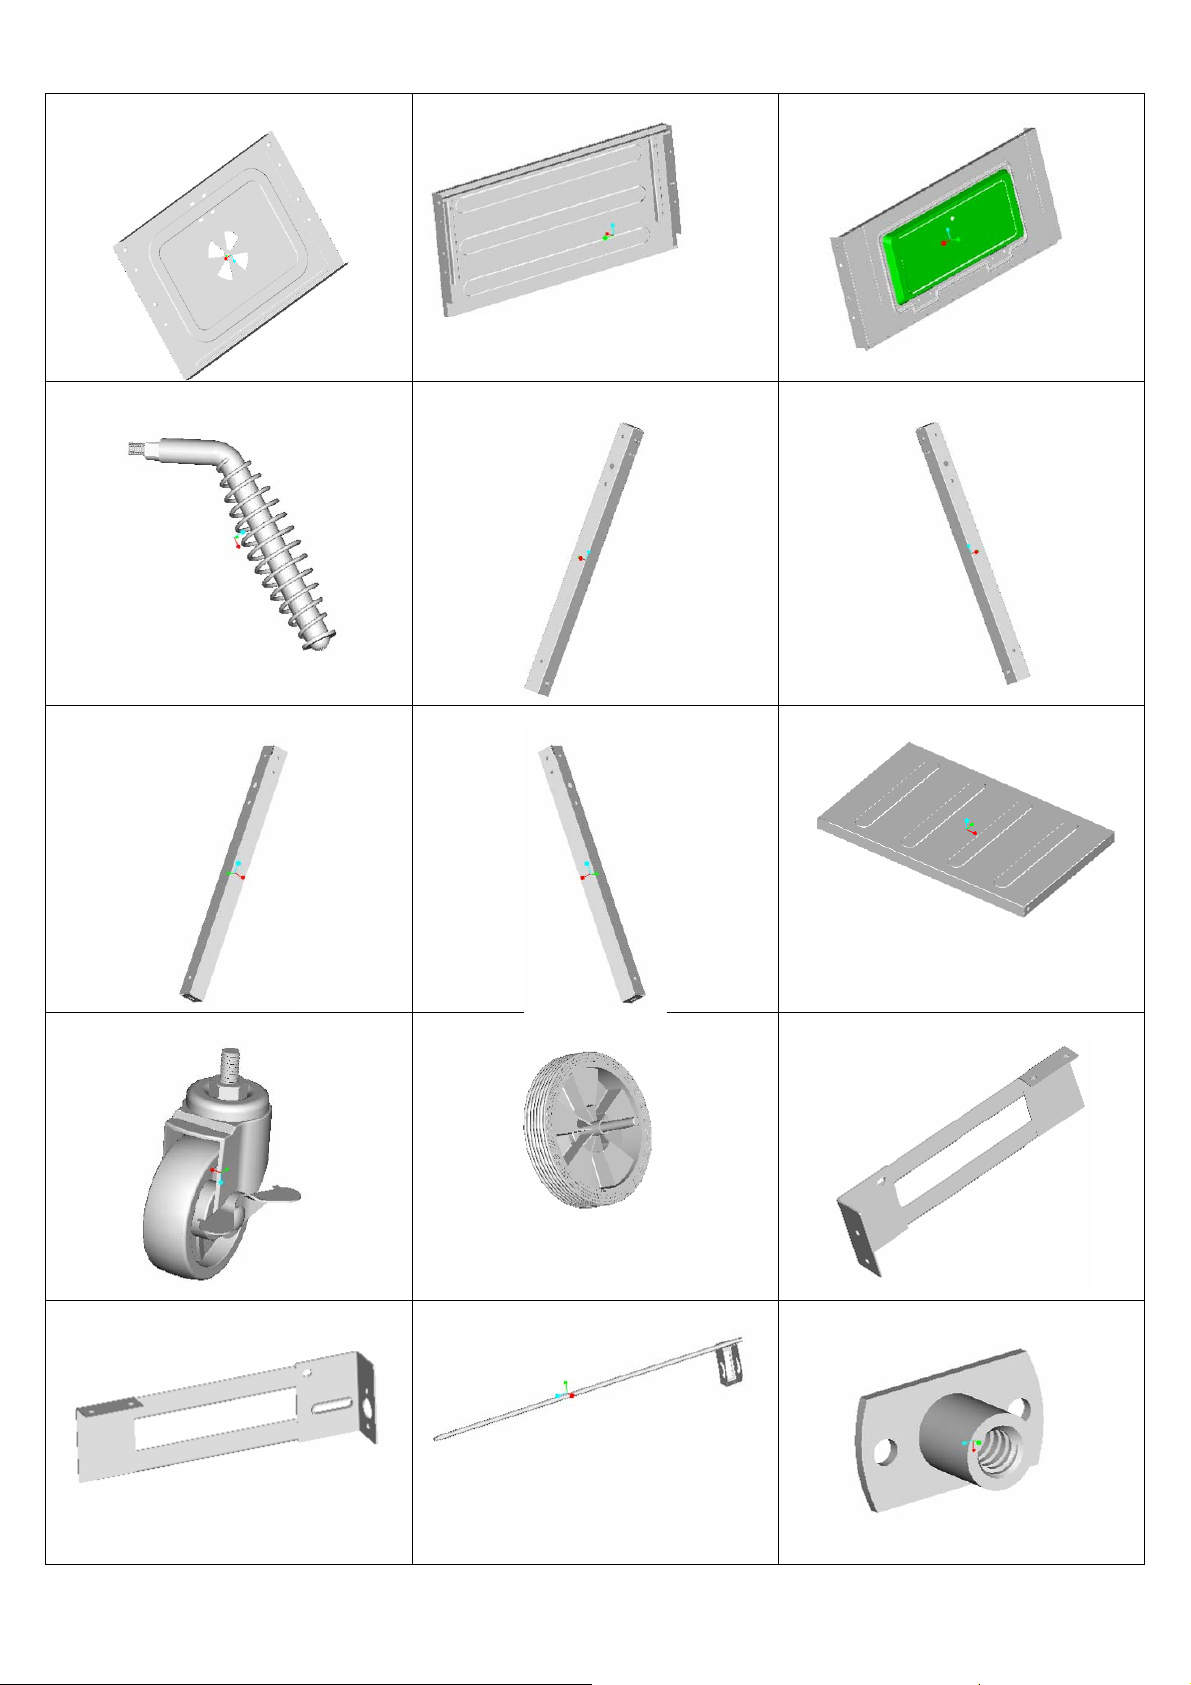
ILLUSTRATED PARTS LIST
A. Side Panel………………...2 PCS B. Back Panel………………….1 PC
C. Front Panel…………………….1 PC
D. Charcoal Door Handle………..1 PC
G. Right Leg (Front)……………1 PC
E. Left Leg (Front)………………..1 PC F. Left Leg (Rear)…………………1PC
H. Right Leg (Rear)………………1 PC I. Base Panel…………………...1 PC
J. Caster Wheel……………….2 PCS
M. Right Side Lift………………...1 PC
K. Wheel Assembly……………2PCS
N. Lift Rotation Bar……………...1 PC
L. Left Side Lift………………….1 PC
O. Threaded Collar……………...1 PC
5
Page 7
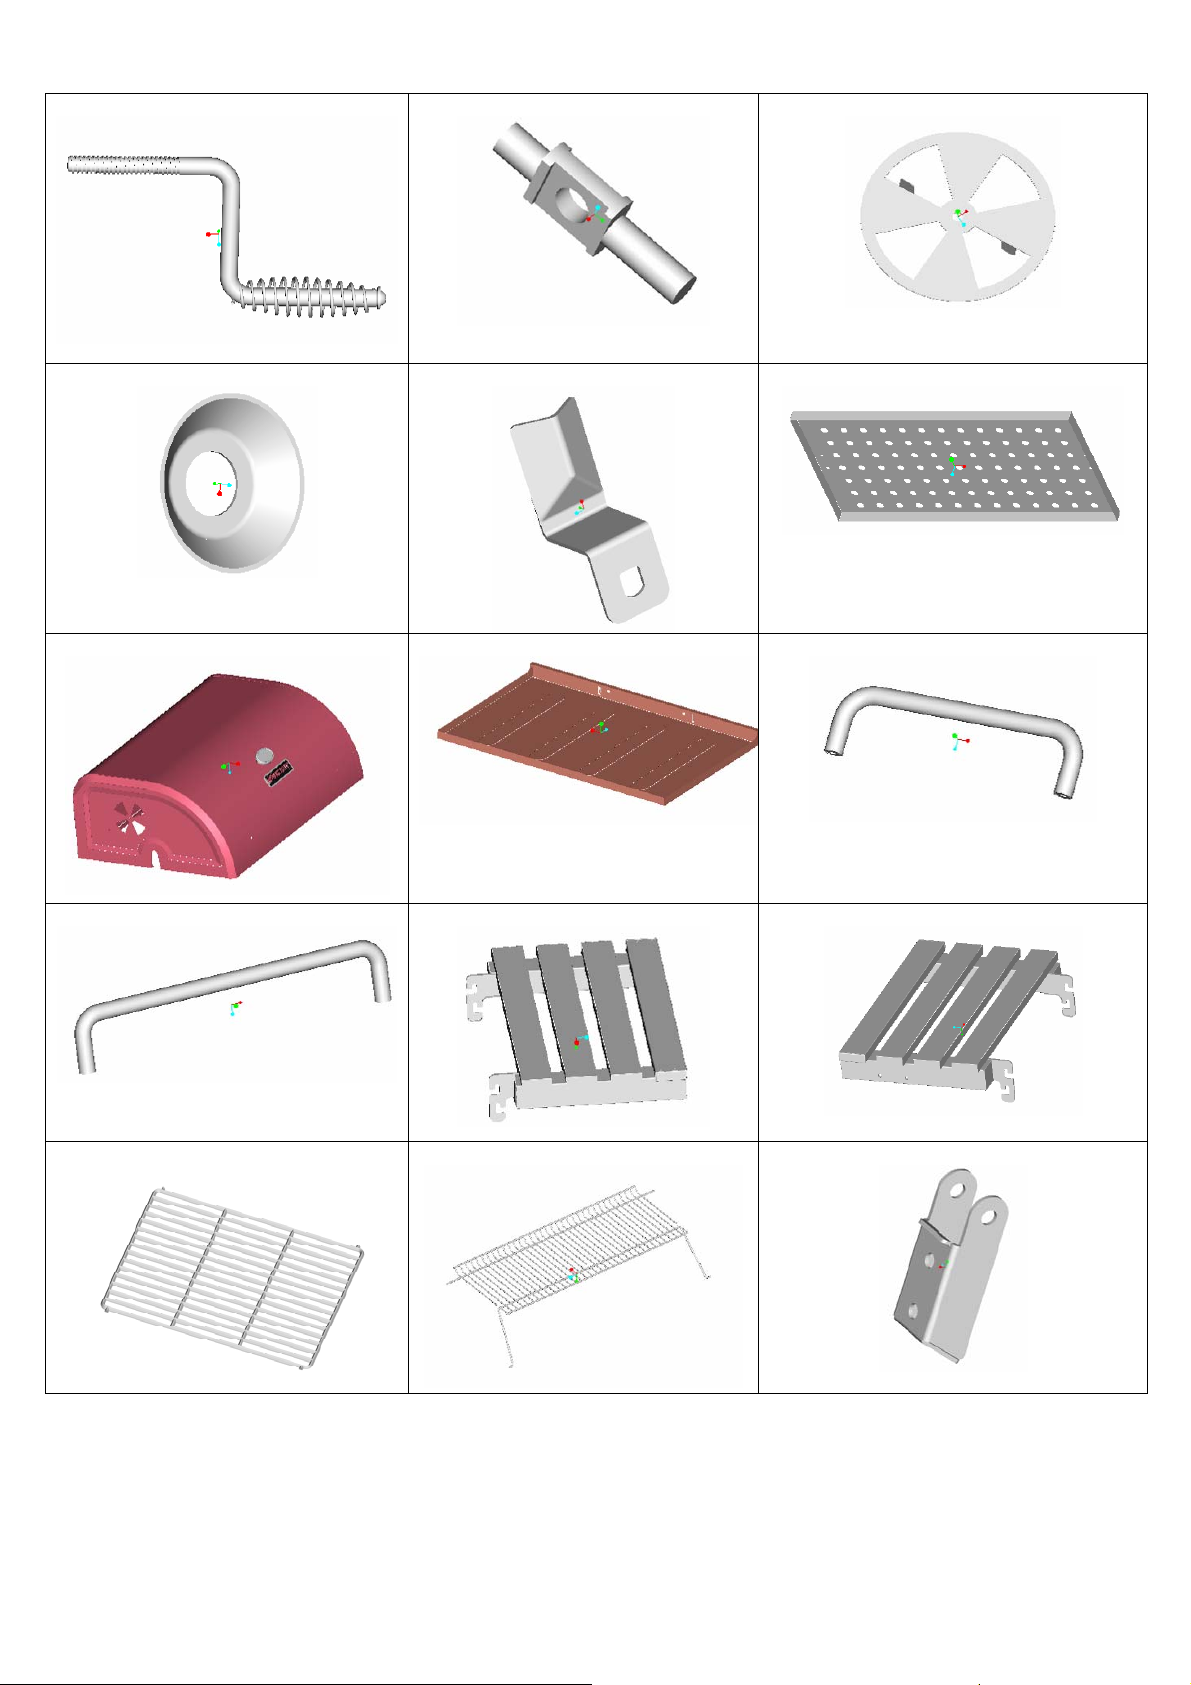
P. Charcoal Crank.……………..1 PC
Q. Crank Axle…...……………1PC
R. Damper……………………….4 PCS
S. Charcoal Door Washer……..1 PC
V. Hood………….…………...….1 PC
T. Charcoal Door Latch………1 PC
W. Ash Pan……….……………1 PC
U. Charcoal Tray…………….....1 PC
X. Ash Pan Handle………….....1 PC
Y. Hood Handle………………...1 PC Z. Right Side Table…………...1 PC AA. Left Side Table………….....1 PC
BB. Cooking Grate…………..2 PCS CC. Warming Rack..………….1 PC DD. Back Panel Hinge………......2 PCS
6
Page 8

EE. Hood Hinge…………….. 2 PCS
FF. Hood Hinge Pin…………..2 PCS
HARDWARE PACK (parts not drawn to scale)
GG. Bottle opener………......1 PC
HH
M6 X 10 SCREW (BLACK)
JJ
M6 X 40 SCREW (BLACK)
LL
M6 X 16 SCREW (WHITE)
NN
NUT (BLACK)
PP
R-PIN LARGE (BLACK)
RR
TUBE (WHITE)
M6 X 10 SCREW (WHITE)
TT
32 PCS
4 PCS
1 PC
13 PCS
2 PCS
1 PC
3 PCS
II
M6 X 30 SCREW (BLACK)
KK
M6 X 60 SCREW (BLACK)
MM
WASHER (BLACK)
OO
R-PIN SMALL (BLACK)
QQ
WASHER (WHITE)
SS
LOCK WASHER (WHITE)
4 PCS
4 PCS
2 PCS
4 PCS
1PC
1PC
Required Tools:
Phillips Screwdriver
Adjustable Wrench
7
Page 9

Assembly Instructions
Note: Estimated assembly time is 35-45 minutes.
Step 1
Assemble the DAMPER (R) to the SIDE PANEL (A) using Two M6 x 10 Screws (HH) and Two M6 Nuts (NN).
A
R
NN
HH
Step 2
Attach the CHARCOAL DOOR HANDLE (D) to the FRONT PANEL(C) using the CHARCOAL DOOR LATCH
(T) and the CHARCOAL DOOR WASHER (S). To secure a tight fit, tighten the Nut (NN) provided with the
CHARCOAL DOOR HANDLE (D) with an adjustable wrench.
T
NN
C
S
D
8
Page 10

Step 3
Assemble both SIDE PANELS (A) to both the FRONT PANEL(C) and the BACK PANEL (B) using EIGHT M6
x 10 Screws (HH).
B
HH
A C
Step 4
A
Carefully re-orient the Panel Assembly as depicted in the figure below. Using Eight M6 x 10 Screws (HH),
attach the RIGHT LEGS [ FRONT (G) AND REAR (H) ] and the LEFT LEGS [ FRONT (E) AND REAR (F) ] to
the SIDE PANEL (A) respectively.
E
A
HH
F
G
9
H
Page 11

Step 5
Using Four M6 x 60 Screws (KK), attach the BASE PANEL (I) to both the RIGHT LEGS [ FRONT (G) AND
REAR (H)] and the LEFT LEGS [ FRONT (E) AND REAR (F) ].
E
KK
F
G
H
I
Step 6
Attach the CASTER WHEELS (J) to the RIGHT LEGS [ FRONT (G) AND REAR (H) ], and using Two R-PIN
SMALL (OO) attach the WHEEL ASSEMBLY(K) to the LEFT LEGS [ FRONT (E) AND REAR (F) ].
E
F
OO
H
G
K
10
J
Page 12

Step 7
Place the LIFT ROTATION BAR (N) in both the RIGHT SIDE LIFT (M) and the LEFT SIDE LIFT (L), and
secure with Two R-PIN SMALL (OO).
M
L
N
OO
L
OO
N
11
Page 13

Step 8
Place the THREADED COLLAR (O) in the allotted hole on the FRONT PANEL (C) and secure the Lift
Assembly to the FRONT PANEL (C) and THREADED COLLAR (O) using Four M6 x 10 Screws (HH).
DET AIL A
DETAIL B
HH
O
C
HH
DETAIL B DET AIL A
12
Page 14

Step 9
Screw the CHARCOAL CRANK HANDLE (P) into the THREADED COLLAR (O).
O
P
Step 10
Insert the CRANK AXLE (Q) into the slot provided on the LIFT ROTATION BAR (N). Once in place, turn the
CHARCOAL CRANK HANDLE (P) so that it is threaded into the CRANK AXLE (Q) and secure this fitting by
installing the M6 x 16 Screw (LL) & Lock washer (SS) & Washer (QQ) & Tube (RR) on the end of the
CHARCOAL CRANK HANDLE (P).
N
Q
13
QQ
RR SS LL
Page 15

Step 11
Attach the CHARCOAL TRAY (U) to the LEFT SIDE LIFT (L) and RIGHT SIDE LIFT (M) using Four M6 x 10
Screws (HH) and Four NUTS (NN) as shown, and tighten with adjustable wrench.
HH U
L
Step 12
Attach the BACK PANEL HINGE (DD) to the BACK PANEL (B) using Four M6 x 30 (II) Screws.
M
NN
DD
II
B
14
Page 16

Step 13
Attach the BOTTLE OPENER (GG) to the LEFT SIDE TABLE (AA) using three M6 x10 (TT) Screws.
AA
GG
TT
Step 14
Attach the RIGHT SIDE TABLE (Z) to the RIGHT LEGS FRONT (G) AND REAR (H) by first inserting the
lower slot over the lower set screw, and then pivot the side table upwards to insert the top slot over the top set
screw. Repeat to attach the LEFT SIDE TABLE (AA).
Z
AA
15
Page 17

Step 15
Attach the HOOD HINGE (EE) to the HOOD (V) using Four M6 x 40 Screws (JJ) and Four Nuts (NN).
V
NN
JJ
EE
Step 16
Using the M6 x 10 Screw (HH) and the NUT (NN), attach the DAMPERS (R) to both sides of the HOOD (V).
Using the M6 x 10 Screw (HH) and the WASHER (MM), attach the HOOD HANDLE (Y) to the HOOD (V).
V
NN
HH
R
Y
MM
16
Page 18

Step 17
Place the HOOD (V) on the Grill Assembly and insert the HOOD HINGE PIN (FF) through the HOOD HINGE
(EE) and BACK PANEL HINGE (DD). Use R-PIN LARGE (PP) to secure.
V
FF
DD
PP
Step 18
Insert the WARMING RACK (CC) into the holes provided on the SIDE PANELS (A) and on the left and right
sides of the HOOD (V).
CC
Step 19
Place the COOKING GRATES (BB) on the Grill Assembly.
17
BB
Page 19

Step 20
Attach the ASH PAN HANDLE (X) to the ASH PAN (W) using Two M6 x 10 Screws (HH).
W
Step 21
Slide the Ash Pan Assembly into the Grill Assembly.
HH
X
W
Fully Assembled
18
Page 20

OPERA TING YOUR GRILL
Lighting Your Grill
1. Open the hood as well as the side vent plates.
2. Remove the cooking grates and raise the charcoal pan to its highest setting using the crank.
3. Pour about 4-5 pounds of charcoal briquettes or about 2-3 pounds of natural wood lump charcoal into
the pan and make a pile. DO NOT POUR MORE THAN 6 POUNDS OF CHARCOAL BRIQUETTES
OR 4 POUNDS OF LUMP CHARCOAL INTO THE PAN.
4. Lower the charcoal pan to its lowest position using the crank and light the fire.
5. If you choose to use lighter fluid or instant light charcoal briquettes, please follow the manufacturer’s
instructions to avoid injury. Allow the charcoal enough time to completely ash over before beginning to
cook so that the lighter fluid has time to burn off. Starting to cook the food too soon may leave food
with a lighter fluid taste.
6. After the charcoal has ashed over, use long-handled tongs to spread the charcoal into a single layer on
the pan.
Note: Chimney starters, electric starters, or other types of fire starters may be used instead of lighter fluid to
light fire but use only according to the manufacturer’s instructions. NEVER USE INSTANT LIGHT
CHARCOAL OR CHARCOAL LIGHTER FLUID WITH ANY OF THESE OTHE R STARTING METHODS.
Allow enough time for your grill to heat up before attempting to cook. You cannot cook properly when the grill
is cold nor can you nurse a fire to life while busy with food. Once the fire is burning well, it is easy to keep it
going with little attention.
Controlling the Fire
Rising heat will move up and out of the grill, pulling in cooler air behind it, providing oxygen for the fire. Use
the four dampers to control the air flow and the cooking temperature. After the fire is established and the grill
reaches the desired cooking temperature, the dampers can be left completely open for maximum airflow and a
higher cooking temperature or they can be closed as needed to decrease airflow for a lower cooking
temperature. Use the thermometer to monitor the temperature of the grill.
By opening the upper damper on one side of the hood and the lower damper on the opposite side on the
firebox (while keeping the remaining dampers closed), a convection current inside the grill will form when the
hood is closed. This allows for extended cooking times when barbecuing.
The adjustable charcoal pan can also be used to control the temperature. Use the crank to raise it for quick
searing and lower it for slower cooking methods.
ALWAYS USE A FLAME RETARDANT INSULATED GRILL MITT WHEN ADJUSTING B UTTERFLY
DAMPERS OR ADJUSTING THE CHARCOAL PAN.
Adding Additional Charcoal
For extended cooking times, additional charcoal can be added through the charcoal pan access
door. WARNING: USE EXTREME CAUTION WHEN OPENING CHARCOAL PAN ACCESS DOOR OR
WHEN ADDING CHARCOAL TO AVOID INJURY.
1. Using crank, lower charcoal pan to its lowest setting.
2. Open charcoal pan access door using a flame retardant insulated grill mitt (handle will be very hot).
3. Using flame retardant insulated grills mitts and long-handled tongs, stoke coals enough to allow some
of the excess ash to fall through the slots in the charcoal pan, into the slide out ash pan below.
4. Using flame retardant insulated grill mitts and long-handled tongs, add charcoal to the pan as needed
and close the access door.
5. Raise charcoal pan to the desired level.
19
Page 21

Seasoning the Grill
Before the first time the grill is cooked on, you should season the unit to enhance the cooking and to provide
better overall durability. Failure to properly follow these steps may damage the finish and/or add metallic
flavors to your foods.
1. Before cooking, place about 40 briquettes in the charcoal pan.
2. Coat the interior surfaces of the grill with vegetable oil.
3. Light the briquettes and set the ash pan at a medium height by turning the crank handle.
4. Let the fire burn for about two hours with the lid closed and make sure the dampers are about ¼ of the
way open.
5. Allow the grill to cool properly, and once completely cool, the unit is ready for use.
Cleaning and Care
Cleaning Ash From The Grill
WARNING: DO NOT ATTEMPT TO EMPTY THE ASH PAN OF BURNING CHARCOAL PIECES OF HOT
ASH.
After the ashes and grill have completely cooled, it is imperative that you clean out the ashes from inside the
grill before moisture can combine with the ash. Ash and moisture can create lye, which is very acidic and can
cause rusting.
Cleaning Cooking Grates
If the cooking grates are brushed just after cooking (while the coals are still hot) they will be easier to keep
clean. After brushing, allow the grill and cooking grates to completely cool before attempting to clean any
further.
Grill Touch Up
Over time, rusting may occur on your grill. Surface rust can be removed with a wire brush. After removing rust,
use a high temperature paint suitable for this application with a color and texture that match the original finish.
Follow the paint manufacturer’s instruction.
20
Page 22

WARRANTY PROGRAM
Proof of purchase is required to access this warranty program, which is in effect from date of purchase.
Inability to provide proof of purchase, or after the warranty has expired, customers will be subject to parts,
shipping and handling fees.
Full 30-Day Warranty
For 30 days from the date of purchase, any missing and damaged parts will be replaced at no charge, with a
valid proof of purchase.
Limited Warranty
• 1-Year Warranty on the parts in regards to damage affecting the operation of the gas grill. Please refer to
the parts list on Page 22.
• Warranty Provisions:
-This warranty is non-transferable and does not cover failures due to misuse or improper installation
or maintenance.
-This warranty is for replacement of defective parts only and not responsible for incidental or
consequential damages or labor costs.
-This warranty does not cover chips and scratches of porcelain or painted surfaces nor does it cover
corrosion or discoloration due to misuse, lack of maintenance, hostile environment, accidents,
alterations, abuse or neglect.
-This warranty does not cover any damage caused by heat, abrasive and chemical cleaners, resulting
in chipping on porcelain enamel parts or any damage to other components used in the installation
or operation of the gas grill.
Inability to provide proof of purchase, or after the warranty has expired, customers will be subject to
parts, shipping and handling fees.
Some states do not allow the limitation or exclusion of incidental or consequential damages, so the
above limitations or exclusions may not apply to you. This warranty gives you specific legal rights,
and you may also have other rights that vary from state to state.
If you have any questions related to the product, please call our customer service center @ 1-866-8695300, 8:00 AM to 6:00 PM (EST), Monday through Friday.
Distributed By:
GeoGlobal Partners
111 Corporate Blvd. Suite H
South Plainfield, New Jersey 07080, USA
21
Page 23

REPLACEMENT PARTS LIST
Hood G2U001-001S
Hood Handle G2E020-045S
Damper G2E020-016S
Left Side Table G2U001-022S
Right Side Table G2U001-018S
Wheel Assembly G2U001-028S
Ash Pan G2A001-006S
Ash Pan Handle G2E020-046S
Left Leg (Front) G2U001-024S
Left Leg (Rear) G2U001-025S
Right Let (Front) G2U001-026S
Right Leg (Rear) G2U001-027S
Caster Wheel G3K013-001S
Base Panel G2U001-029S
Left Side Lift G2U001-015S
Right Side Lift G2U001-014S
Threaded Collar G2E020-042S
Charcoal Tray G2A001-004S
Thermometer G3K003-001S
Cooking Grate G2E020-048S
Charcoal Crank G2U001-012S
Warming Rack G2E020-047S
Charcoal Door Latch G2E020-018S
Charcoal Door Handle G2U001-013S
Charcoal Door Washer G2E020-017S
Front Panel G2U001-009S
Back Panel G2U001-006S
Left Side Panel G2A001-002S
Right Side Panel G2A001-002S
Lift Rotation Bar G2U001-016S
Hood Hinge Pin G2E020-058S
Hood Hinge G2E020-019S
Back Panel Hinge G3V003-001S
Description Part Number
22
 Loading...