

Perfect Flame 14103, SLG2006B Owner's Manual

ITEM # 1
4103
5-Burner
LP
Gas
Gr
ill
WARNING
Improper installation, adjustment,
alteration, service or maintenance
can cause injury or property
damage.
Read the assembly, operation
and maintenance instructions
thoroughly before assembling
or servicing this equipment.
DANGER
Failure to follow these
instructions could result in fire
or explosion that could cause
property damage, personal
injury or death.
DANGER
DO NOT use gas grill for indoor
cooking or heating. TOXIC fumes
can accumulate and cause
asphyxiation. DO NOT use in or
on boats or recreational vehicles.
PROP 65 WARNING
Chemicals known to the state of
California to cause cancer, birth
defects or other reproductive
harm are created by the
combustion of liquid propane
gas
.
SLG2006C
Owner’s Manual
WARNING
FOR YOUR SAFETY:
For Outdoor Use Only.
(outside any enclosure)
SAVE THESE INSTRUCTIONS FOR FUTURE
REFERENCE. IF YOU ARE ASSEMBLING THIS UNIT
FOR SOMEONE ELSE, GIVE THIS MANUAL TO HIM
OR HER TO SAVE FOR FUTURE REFERENCE.
FOR CUSTOMER SERVICE,
SERVICE@PYROMAGICBBQ.COM OR
CALL 1-877-885-8227 (TOLL-FREE),
6 A.M. – 5 P.M.
(PST)
,MONDAY-FRIDAY.
EMAIL TO
Printed in China

1
.
Grill Operation Quick Reference
Before Grilling,
Step 1
Step 2
Step 3
Keep your grill a safe distance away from your property.*
Always Perform a Leak Test on all connections and hoses.*
Keep children away from the grill.
During Grilling,
(To avoid tripping safety valves, please follow these instructions carefully!)
Step 1
Step 2
Step 3
First open lid and turn gas valve on slowly.
Turn only one knob on at a time when lighting up the grill.
Use protective gloves when grill gets hot.
After Grilling,
Step 1
Step 2
Step 3
Burn grill for 10-15 minutes to burn off food residues.
Wait until the grill is completely cooled before closing lid.
Clean up grease build-up and cover your grill.
* Please refer to the owner’s manual for details.
SPECIAL WARNINGS
1. DO NOT store or use gasoline or other flammable vapors and liquids within 25 feet
of this or any other appliance.
2. When cooking with oil/grease, do not allow the oil/grease to exceed 350°F
(177°C).
3. Do not store or use extra cooking oil in the vicinity of this or any other appliance.
4. When using rotisserie burner, DO NOT turn on main burners. (if applicable)
5. If you smell gas:
• Shut off gas to the appliance.
• Extinguish any open flames.
• Open lid.
• If odor continues, immediately call your gas supplier or fire
department.
Always read and understand the WARNINGS and INSTRUCTIONS that are
contained in this manual before attempting to use this gas barbecue grill, to
prevent possible bodily injury or property damage.
SLG2006C
Owner’s Manual

2
Table of Contents
For Your Safety ......................................................................................................3
Illustrated Parts List ................................................................................................5
Hardware List .........................................................................................................6
Assembly Instructions ............................................................................................7
Operating Your Grill .............................................................................................15
Propane tank Connection .....................................16
Checking for Leaks ..............................................16
Lighting Your Grill ................................................16
Excess flow safety valve reset procedure …….…18
Care and Maintenance .........................................19
Award Winning Barbecue Recipes .....................................................................20
Troubleshooting ....................................................................................................21
Warranty Program ................................................................................................23
SLG2006C
Owner’s Manual

3
For Your Safety
Dear Valued Customer,
Congratulations on your new barbecue grill purchase! You’ve made the right choice. In this manual, you will find
assembly instructions, suggestions for grilling and helpful hints, as well as guidelines for the safe operation, proper care
and use of your grill. Our expert staff strives to provide you with an easy to assemble product. Should you have any
questions or problems with this product, please email us at service@pyromagicbbq.com or call our customer service
department at 1-877-885-8227, 6:00 am - 5:00 pm (PST), Monday through Friday.
NOTE:
Gas Code, ANSI Z223.1/NFPA 54, Storage and Handling of Liquefied Petroleum Gases, ANSI/NFPA 58 or CSA B149.1,
Natural Gas and Propane Installation Code.
IMPORTANT NOTICE: READ ALL INSTRUCTIONS PRIOR TO ASSEMBLY AND USE
Safety First!
Read and understand all warnings and precautions prior to operating your grill.
WARNING
1. This grill is for outside use only. It should not be used in a building, garage or any other enclosed area.
2. The use of alcohol, prescription or non-prescription drugs may impair an individual’s ability to properly assemble or safely
3. Always open the grill lid carefully and slowly as heat and steam trapped within the grill could cause severe burns.
4. Always place your grill on a hard and level surface far away from combustible materials and structures. An asphalt or
5. Do not leave a lit grill unattended.
6. Keep children and pets away from the grill at all times.
7. This is not a tabletop grill. Do not place this grill on any type of tabletop surface.
8. Do not use the grill in high winds.
9. This grill must be used with propane gas only.
10. Do not attempt to attach this grill to the self-contained propane system of a camper, trailer, motor home or house.
11. Do not use charcoal or lighter fluid.
12. Do not use gasoline, kerosene or alcohol for lighting. The LP-gas supply cylinder must be constructed and marked in
13. This outdoor gas appliance is not intended to be installed in or on recreation vehicles and/or boats.
14. Do not attempt to move the grill while it is lit.
15. Do not use the grill unless it is
16. Keep combustible items and surfaces at least 24 inches away from the grill at all times. DO NOT use this gas grill or any gas
17. Do not use in an explosive atmosphere. Keep grill area clear and free from combustible materials, gasoline and other
18. Do not attempt to use or assemble with missing or damaged parts. Contact customer service for a replacement.
CAUTION-Prevention of Burns
1. To avoid burns, do not touch metal parts of the grill until they have completely cooled for at least 45 minutes or
2. Do not alter the grill in any manner.
3. Clean and inspect the hose before each use. If there is evidence of abrasion, wear, cuts or leaks, the hose must be
4. Move gas hoses as far away as possible from hot surfaces and dripping hot grease.
5. Never keep a filled gas container in a hot car or car trunk. Heat will cause the gas pressure to increase, which could
The use and installation of this product must conform to local codes. In absence of local codes, use the National Fuel
operate this appliance.
blacktop surface may not be acceptable for this purpose.
accordance with the specifications for propane gas cylinders of the U.S. Department of Transportation (DOT) CFR 49.
COMPLETELY
product under any overhead enclosure or near any unprotected combustible constructions.
flammable vapors and liquids.
assembled and all parts are securely fastened and tightened.
unless you are wearing protective gear such as pot holders, gloves, BBQ mittens, etc.
replaced prior to operation. The replacement hose assembly should be in accordance with
specifications.
open the relief valve and allow gas to escape.
the
manufacturer’s
SLG2006C
Owner’s Manual
4
24Inc
hes
24Inc
hes
Safe Locations for Use of This Outdoor Grill
DANGER
Never use this outdoor grill inside any building, garage, shed or breezeway, or inside any boat, trailer or recreational vehicle, to
prevent a possible fire and to prevent the possibility of carbon monoxide poisoning or asphyxiation.
WARNINGS
Do not use this appliance under an overhead combustible surface or covered area (e.g., awnings, umbrellas, porches or
gazeboes).
Always confirm that this grill is not positioned under the overhang of a house, a garage or other structure before lighting it. An
overhang will serve to deflect flare-ups and radiated heat into the structure
itself, which could result in a fire.
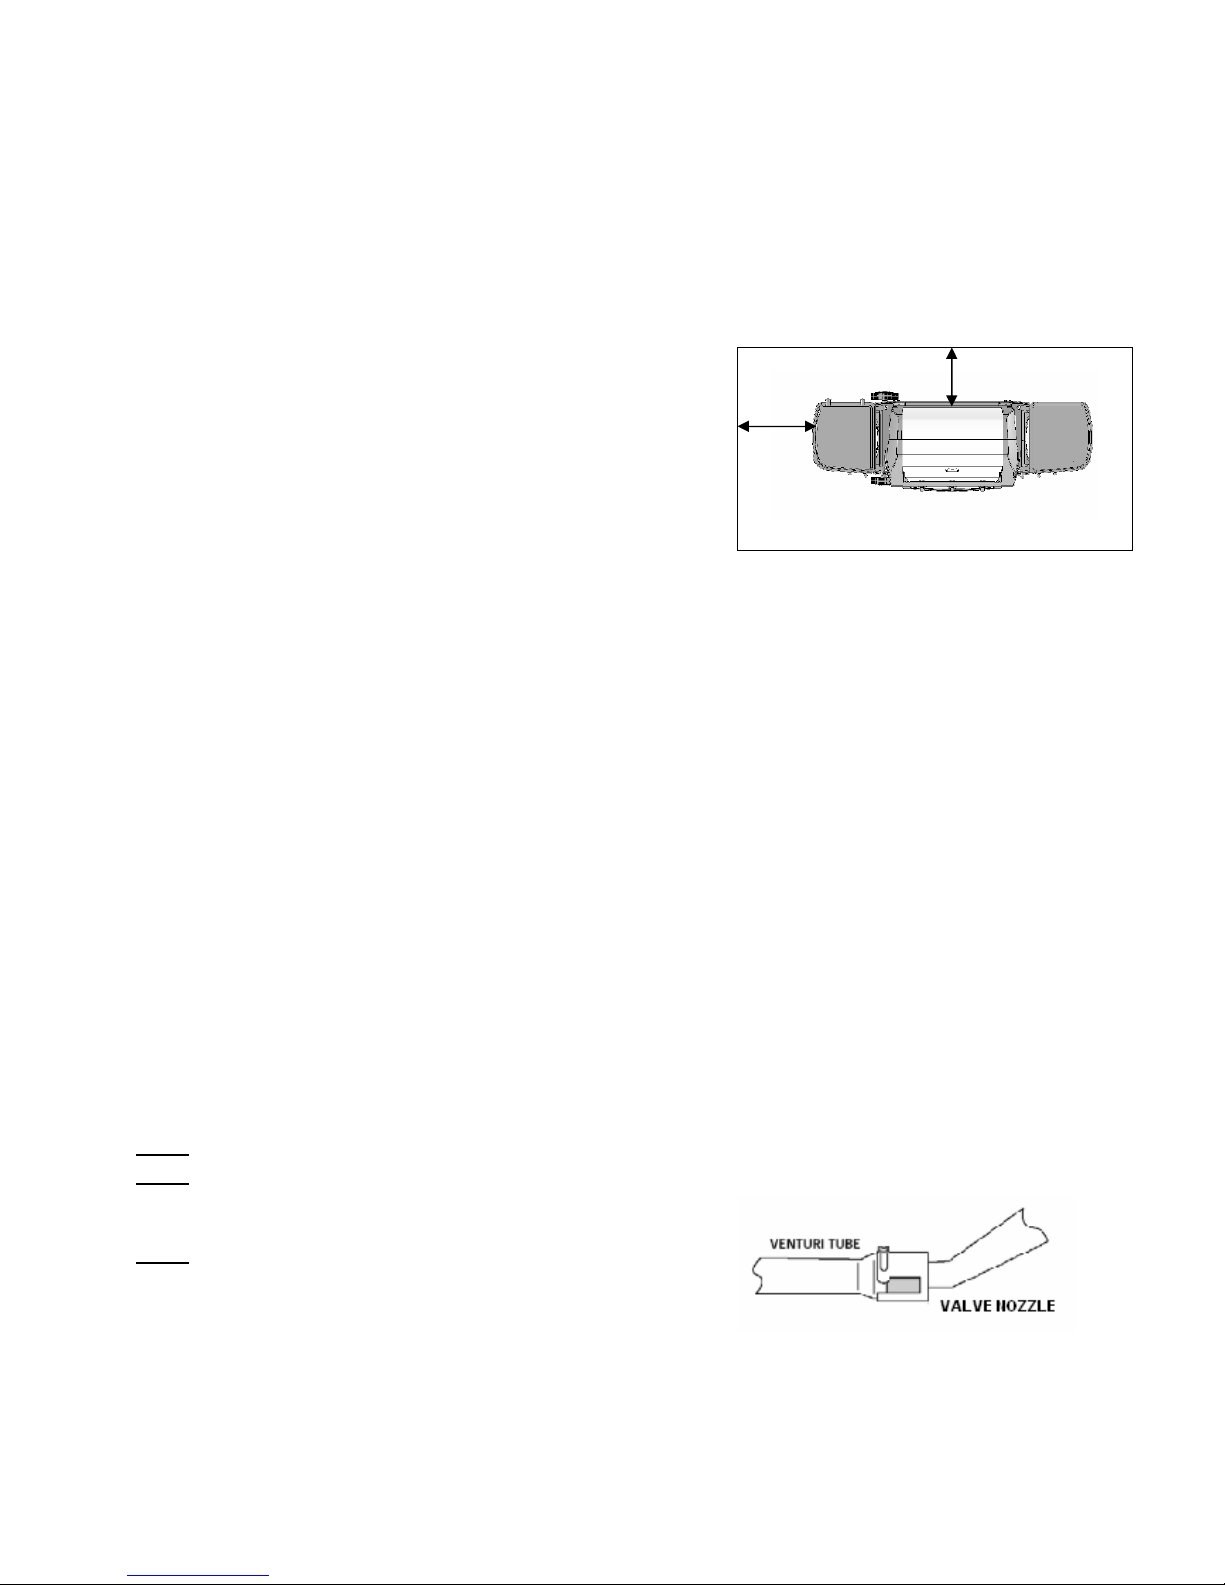
Always confirm that this grill is positioned more than 24 inches (61 cm)
away from any combustible materials or surface before lighting it, and that
no gasoline or other volatile substances are stored in the vicinity of this grill.
The temperature of a grease fire or of the radiated heat might otherwise be
sufficient to ignite nearby combustible or volatile substances.
(As the fig. shown on right).
Always locate this grill where there will be ample combustion and
ventilation air, but never position it in the direct path of a strong wind.
Never allow the grill to operate while unattended, to prevent uncontrolled grease fires from erupting.
Never attempt to move this grill while it is in operation or while it is still hot, to prevent possible personal injury.
Never store or use gasoline or other flammable or volatile substances in the vicinity of this grill or in the vicinity of any other heat-
generating appliance, because of the danger of starting a fire.
Always confirm that the installation of this grill conforms with the requirements of all local codes or, in the absence of
applicable local codes, with either the National Fuel Gas Code, ANSI Z223. NFPA 54 or CAN/CGA-B149.2, Propane
Installation Code.
DANGER – Gas Safety
Liquid propane (LP) gas is flammable and hazardous if handled improperly. Become aware of its characteristics before using
any propane product.
•
Propane Characteristics: Flammable, explosive under pressure, heavier than air and settles in pools in low areas.
•
In its natural state, propane has no odor. For your safety, an odorant has been added.
•
Contact with propane could cause freeze burns to the skin.
•
This grill is shipped from the factory for propane gas use only.
•
Never use a propane cylinder with a damaged body, valve, collar or footing.
•
Dented or rusted propane cylinders may be hazardous and should be checked by your propane gas supplier.
CAUTION
•
•
Step 1
Step 2 C
*** A clogged tube can lead to a fire beneath the grill.
Step 3
It is essential to keep the grill’s valve compartment, burners and circulating air passages clean.
Inspect the grill before each use:
Inspect all hoses and connections and make certain they are secure.
heck and clean the burner venturi tubes for insects and insect nest by removing the burner and inserting a bottle
brush into each tube to make sure the passage is clear.
Ensure that the valve nozzle is pointing straight and completely
inserted into the venturi tube.
GENERAL INFORMATION
1. A propane gas cylinder
2. This gas grill is NOT intended for commercial use.
is
required for operation.
SLG2006C
Owner’s Manual
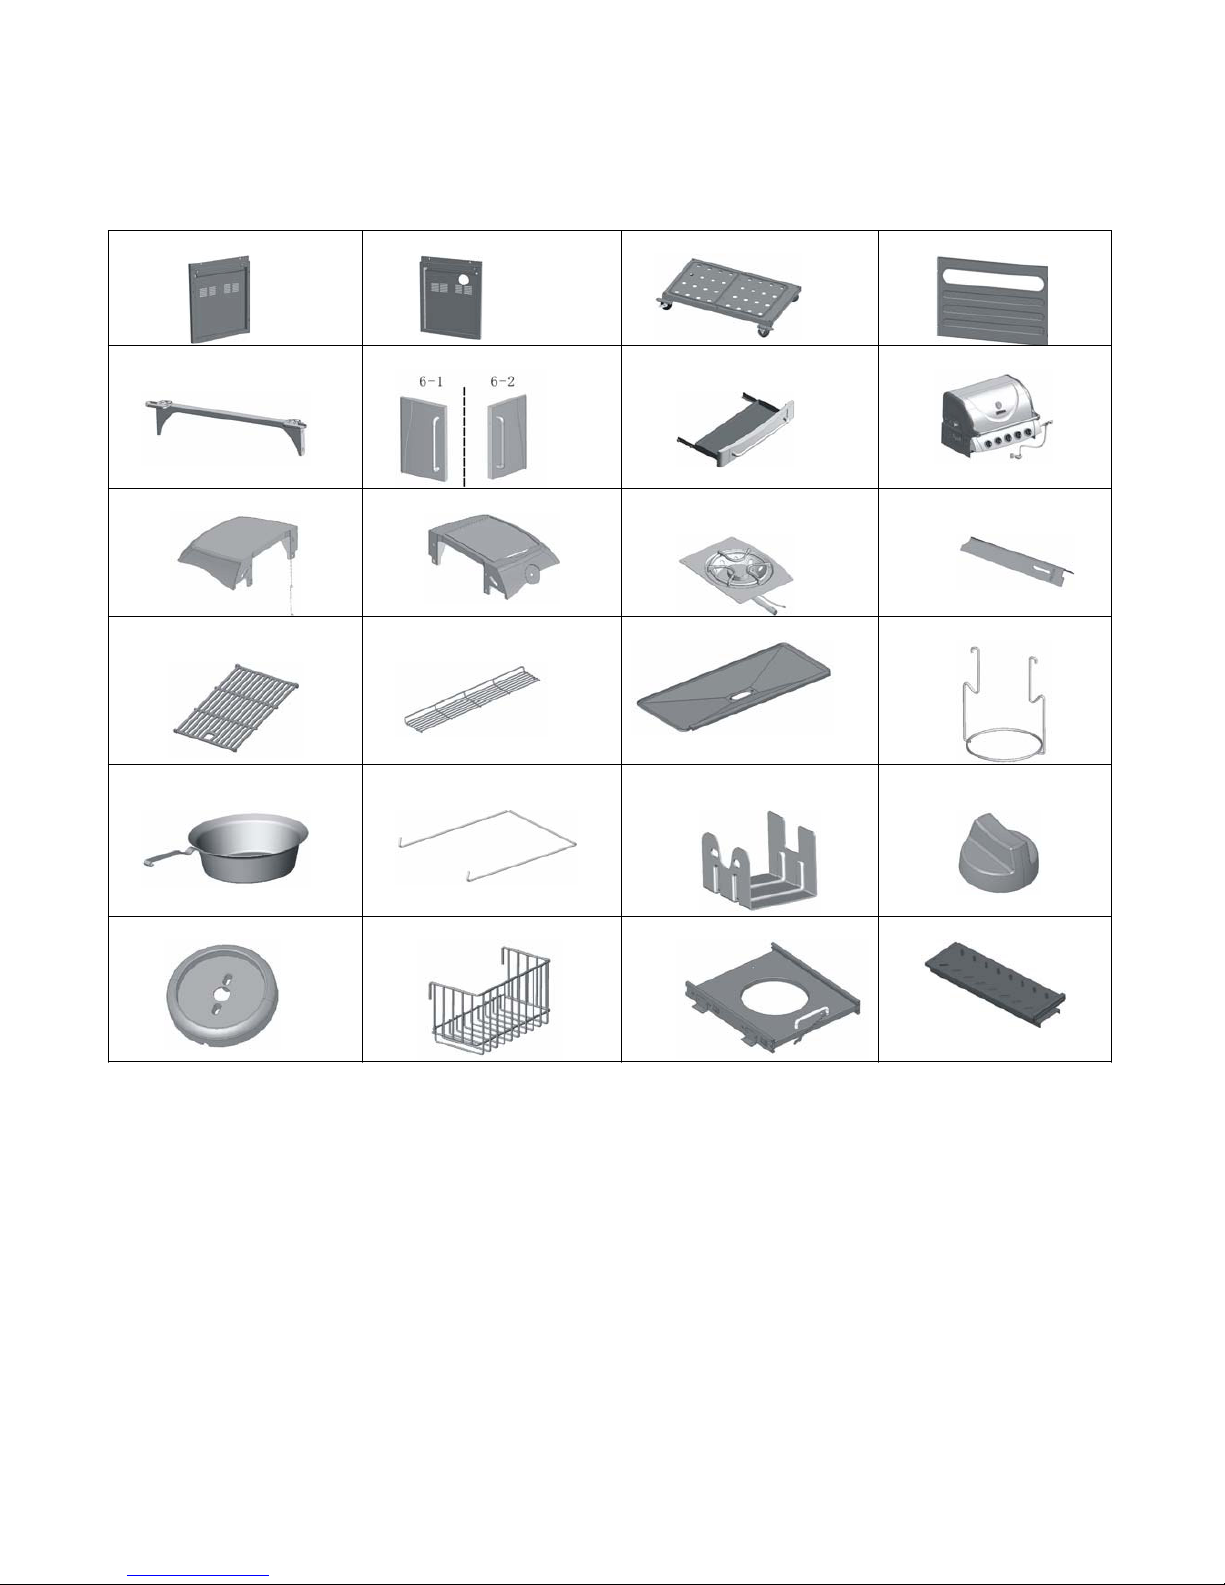
Illustrated
Parts
List
1
. Right Panel
-------------1pc
2. Left
Panel--
-------------1pc
3. Bottom Panel
-----------1pc 4. Back Pane
l
-----------
1pc
5. Cart front Beam--- -
1pc 6
. Door
------------------2pcs 7. Dr
awer-
--------------------1pc 8. Body
Assembly
------1pc
9. Right side
shelf----------1pc 10. Side Burner
Shelf --------
1pc 11. Side
Burner Set--------
1pc 12 Heat
plate
--- ---------5pcs
13. Cooking G
rid
----------3pcs
14. Warmi
ng Rack-------1pc 15. Grease Pan ------------
1pc 16. Cup
Supp
ort--------1pc
17. Grease Cup
------------
1pc 18
. Tank Clip
--------------1pc
19. Rotisserie Motor
Support
---
-----
------------------
1pc
20. Side Burner Knob
------------------
-----
1pc
21.
Side kn
ob
Support
------
1pc 22.Basket
--------
-------------
1pc 23.Tan
k
Seat---------------1pc
24.Smok
e Box----------
1pc
SLG2006C
Owner’s Manu
al
5

Hardware
Li
st
A
M6 x15 mm
Bolts
10pcs
B
M6x20mm
Bolts 4pcs
C
M6 x45 mm
Bolts
D
Spring Was
her 18pcs
E
M6 Washer
18pcs
F
M4x12mm
Bolt 4pcs
G
M4 Washer
M4 Nut 3pcs
I
M4x16 mm
Bolts
K
M4 x29 mm
Stud
L
Screwdriver
1pc
Hardware listed abo
v
e is not scaled to
e
xact size
(A sc
rewdriver is included for
your convenience.)
Owner’s Manu
al
6
M6 Nut
2pcs
4pcs
6pcs
H
2pcs
1pc
J
SLG2006C
Assembly Instructions
Remove all contents from the carton packaging. Make sure all parts are present before attempting assembly. Once the grill is
fully assembled, go back and check to make certain all the bolts are tight. Tighten again with the screwdriver provided if it is
necessary.
Estimated Assembly Time:
SLG2006C
Owner’s Manual
Step 2
Loosen two bolts (pre-attached) each on left and
right panel and allow 1/4 bolt length to extend from
the panel.
Align the large holes of the back panel (4) with the
bolts extended from the right and left panel and
push down until the back panel locks into place.
Tighten four panel bolts by hand until secure.
Go back to tighten all the bolts with the
screwdriver provided.
It will take less than
40 minutes to assemble the grill.
Step 1
Note:
Before beginning assembly, make certain the
wheels of the cart assembly are locked.
Align the holes at the bottom of the right side panel (1)
with the holes on the right side of the bottom panel (3).
Insert a M6x45mm bolt (C), a spring washer (D) and a
M6 washers (E) into each pre-drilled hole.
Tighten by hand until secure.
Repeat the procedure for the left side panel (2).
Go back to tighten all the bolts with the
screwdriver provided.
7
 Loading...