

Page 1
TABLETOP
COOL MIST
HUMIDIFIER
USER MANUAL
FOR MODEL:
PAU13
Your Source for Home Comfort
Before using your ultrasonic
humidifier, please read this
manual carefully and keep
it for future reference,
along with your receipt.
Page 2

CONTENTS
Safety Guidelines .....................................................2-3
Technical Data ............................................................ 3
Features ...................................................................... 3
Structure Diagram ....................................................... 4
Operating Instructions
• Setting up your humidifier ..................................... 5
• How to use your humidifier ................................... 6
Weekly Maintenance Cleaning & Care..................... 6-7
Storage Instructions .................................................... 7
Warranty...................................................................... 7
Troubleshooting........................................................... 8
1
Page 3

SAFETY GUIDELINES
When using electrical appliances, basic safety precautions should always be followed. Failure to
follow these safety precautions may result in personal injury, property damage, fire or shock.
1. Always have water in water tank when operating unit.
2. Use only clean, distilled or FILTERED tap water. Using tap water with a high mineral content
(hard water) will result in a white dust and the need for more frequent cleanings. Hard water
can be harmful to unit and may eventually cease its operation.
3. Be sure the cap of the tank is firmly tightened.
4. Position the unit within the room so the air output from the mist control output nozzle is
aimed away from children, walls and furniture.
5. When removing the tank, use one hand on the tank handle and the other on the bottom of
the tank.
6. DO NOT use if tank is cracked.
7. DO NOT place the appliance near heating devices such as a stove. Keep it out of direct
sunlight. Keep the cord away from heated surfaces and areas where it can be stepped on or
tripped over.
8. Use only 110-120V AC outlet. Be sure unit is plugged in firmly and completely. As with any
electrical device, plug and unplug unit with dry hands only.
9. Turn the humidifier
10. To avoid the risk of fire, shock or personal injury, do not use an extension cord.
Warning: Never operate unit with a damaged cord or plug.
11. Never set on floor. Always place unit on a flat, level, waterproof surface at least 24 inches off
floor AWAY from direct sunlight, computers or other sensitive electronic equipment. DO NOT
place the humidifier on wood furniture or other surfaces that can be damaged by water.
DO NOT place on floor or carpet.
12. DO NOT add medication or cleaning products of any type into the mist control nozzle, base
or water tank. (See “Weekly Maintenance Cleaning & Care” section of this manual for proper
instructions on cleaning the unit.) DO NOT cover, block or place anything over any opening.
NEVER drop or insert any object into any openings.
13. The unit should not be left unattended in closed rooms as air could become saturated and
leave condensation on walls or furniture. Always leave room door partially open.
14. DANGER: NEVER immerse the humidifier motor unit (base) in water or other liquids as
electrical shock may occur.
15. DO NOT use outdoors.
16. Turn humidifier OFF if the relative humidity exceeds 60% or if you notice condensation on
inside of windows. For proper humidity reading, use a hydrometer which is available in many
retail stores.
17. The nebulizer (ultrasonic transducer) is highly sensitive. Keep this important part clean and
treat it gently. Only clean per instructions.
WARNING:
• Do not touch the nebulizer while the unit is operating, as possible burns could result.
• Do not touch the nebulizer with fingers. Any residue on the metal will reduce mist output.
18. The unit contains no consumer serviceable parts. To reduce the risk of electrical shock, do
not attempt to open the base of the humidifier.
off and unplug the unit when not in use, when moving or when cleaning.
2
Page 4

SAFETY GUIDELINES (continued)
DANGER!
To reduce the risk of electrical shock, this product has a polarized plug (one blade is wider than
the other). As a safety feature this plug will fit into the outlet only one way. If the plug does not fit
fully into the outlet, reverse the plug. If it still does not fit, contact a qualified electrician. DO NOT
attempt to bypass this safety feature. Improper use of electric cords and plugs can cause a fire or
electric shock hazard. NEVER pull on the cord to remove the plug from the outlet. Grip plug and
pull from outlet. Check the power cord and plug for damage. A damaged cord or plug must be
repaired before using the humidifier.
TECHNICAL DATA
Model PAU13
Voltage 110-120V~/60Hz
Watts 35W
Output per Hour 3.5–10.8 oz/hr
Water Tank Capacity 1.3 gallons
Net Weight 4.46 lbs
FOR HOUSEHOLD USE ONLY
All data was tested by the factory and is for
reference only.
This product is designed for home use only.
FEATURES
Micro Mist
Whisper Quiet
Operation
Adjustable
Output Levels
Auto
Shut-Off
360º Adjustable
Output Direction
Waterless
Indicator
Active Built-in
Carbon Filter
Ultrasonic Technology
Ultrasonic technology is widely used in various domains. Water is atomized by ultrasonic
sound waves and propelled through the air by a small fan. These ultrasonic pulses are silent
and produce visible mist that quickly disperses to increase the level of humidity in the
immediate area. The unit features an easy to clean ultrasonic transducer (nebulizer) for
increased longevity.
Auto Shut Off Protection / Waterless Indicator
When the water tank is empty, the motor will shut off automatically and Power Indicator Light
will turn red.
Micro Mist
Micro mist water particles are smaller than water particles produced by regular ultrasonic
humidifiers. Benefits of micro mist technology include up to 40% greater output, water vapor
particles 70-80% smaller for quicker air dispersion, 25% greater room coverage, and less
condensation on and around unit.
Overload Protection
The unit will automatically shut off if a circuit is overloaded.
Night Light
Creates a soft illumination. To turn on night light, push night light button. Repeat process to
turn off.
3
Easy Fill
Design
Page 5

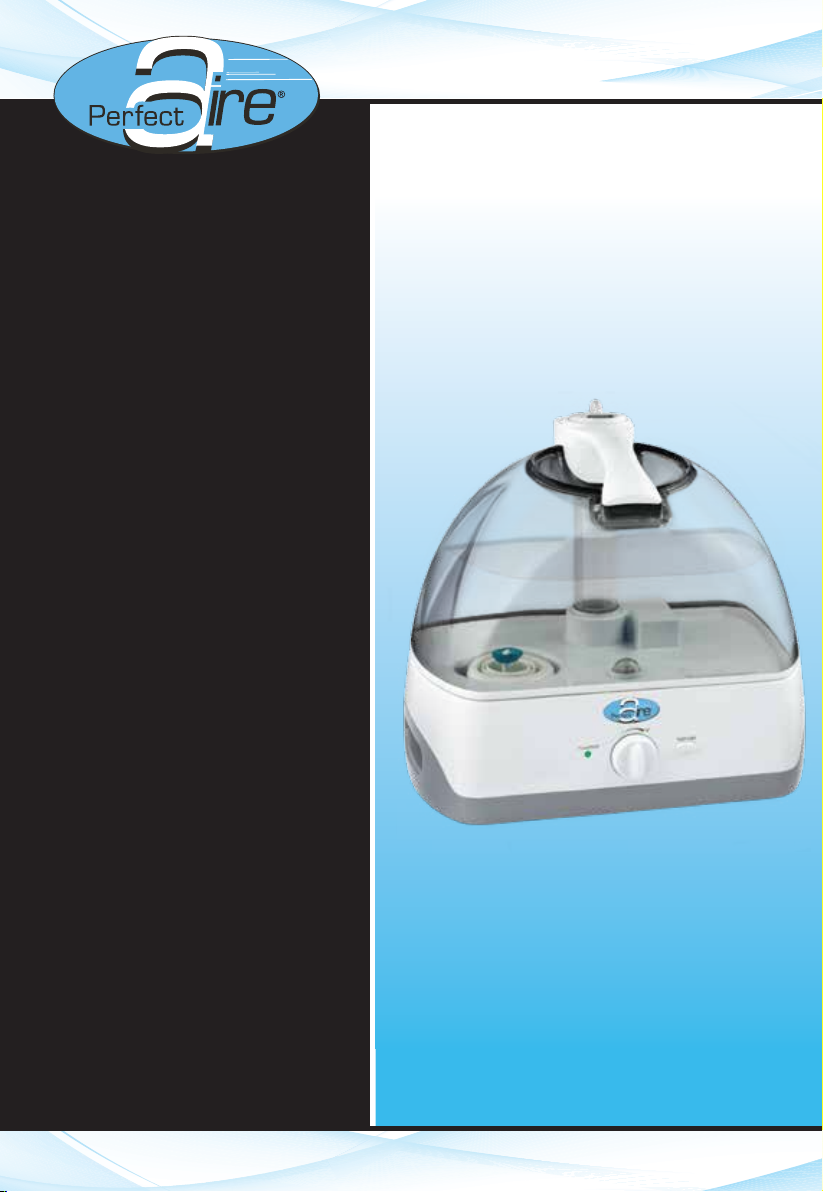
STRUCTURE DIAGRAM
o
A. Mist Output Control Nozzle
B. Water Tank Handle
C. Water Tank
D. Tank Filling Cap (on bottom)
E. Power/Output Adjustment Knob
F. Power Indicator Light / Water Refill Light
G. Ultrasonic Transducer
(Nebulizer - white circle inside black
circle at bottom of base)
H. Base Body
I. Base Board
J. Power Cord
K. Water Sensor
L. Cleaning Brush for Nebulizer
M. Night Light
N. Night Light On/Off Switch
O. Base Handle
4
Page 6

OPERATING INSTRUCTIONS
Placement of unit
SETTING UP YOUR HUMIDIFIER
1. Place the unit at least 6 feet away
from wood furniture, TVs, stereos and
other electronic appliances.
>6 feet
3. Do not place unit near curtains,
paintings/portraits, bedding or
wood furniture.
Water Re f il l
1a. Remove mist output nozzle from tank.
1b. Hold the tank handle and lift the water
tank from the base.
1a
2. Always place humidifier on a firm, flat,
level, waterproof surface, at least 24
inches off the floor.
4. Do not place unit near the stove or
other heat sources. Do not place
the unit in direct sunlight.
2. Carefully turn the water tank upside
down; unscrew the tank cap by turning
it counter-clockwise and set aside.
1b
3. Steady the base of tank on surface
with left hand. Fill the tank with clean,
cool distilled or FILTERED tap water.
5. Set b ase in appropriate location and replace tank carefully onto base. Bas e will partiall
fill with water.
6. Replace mist output control nozzle (which was removed in step 1a) before starting humidifier.
4. Replace the tank cap by firmly
turning clockwise.
5
y
Page 7

OPERATING INSTRUCTIONS
IMPORTANT NOTES REGARDING HUMIDIFIER USAGE
1. It is recommended that the humidifier base be cleaned before first use. See cleaning
instructions on next page.
2. Be sure unit is at least 24 inches off of the floor. Place unit on a firm, level surface. Do not
place unit on overly soft, unstable surface, towel or wood. The humidifier should be placed at
least four (4) inches away from all walls and away from heat sources.
3. When filling the tank, note:
a. Always unplug unit before filling and replacing tank.
b. Distilled or softened water is highly advised. Minerals in (hard) tap water may cause a
“white dust” to appear on furniture and also can eventually cause unit failure.
c. Extreme temperatures can damage unit. Water temperatures should NEVER be too hot
or too cold. Water temperature should fall between 40°F and 90°F.
d. Return tank securely to base before turning on humidifier.
4. To Turn Unit On
a. Plug power cord into a 110-120V AC wall outlet only.
b. Turn the On/Off Adjustment Knob in a clockwise direction to begin operation of unit.
c. Press night light button to illuminate water tank for night time operation.
d. Turn mist output control nozzle to manually adjust mist direction.
5. To Turn Unit Of f
a. Turn unit off when desired room humidity is achieved by turning the On/Of f Adjustment
Knob counter-clockwise.
b. Always turn unit off when water tank is empty.
c. Unit will automatically stop creating mist when water level in base is very low.
d. Do not let water sit in water bottle tank or base for more than 24 hours.
e. Unplug when not in use.
HOW TO USE YOUR HUMIDIFIER
DANGER!
Improper use of electric cords and plugs can cause a fire or electric shock hazard. NEVER pull on
the cord to remove the plug from the outlet. Grip plug and pull from outlet. Check the power cord
and plug for damage. A damaged cord or plug must be repaired before using the humidifier.
WEEKLY MAINTENANCE CLEANING & CARE
For optimum performance, clean your humidifier weekly according to the following instructions.
IMPORTANT:
• Unplug the power cord before cleaning.
• NEVER use any cleaning products/solutions which are abrasive, corrosive or flammable, as
these can be harmful to the unit and void warranty if used.
STEP ONE: Scale Removal
1. Fill the base with one 8-oz cup of undiluted white vinegar.
2. Let solution stand for 20 minutes.
3. With the vinegar in the base, clean all interior surfaces with a soft cloth or brush to help
remove scales. Do not touch the nebulizer with fingers. Any residue on the nebulizer will
reduce mist output.
4. Carefully rinse with clean, warm water and gently wipe clean.
Continued on Next Page >
6
Page 8

WEEKLY MAINTENANCE CLEANING & CARE (continued)
STEP TWO: Disinfecting
1. Fill the tank with a solution of bleach and water. (Use 1 teaspoon of household bleach in
one gallon of water.)
2. Let solution stand for 20 minutes, shaking vigorously every few minutes.
3. Rinse with warm water until the bleach smell is gone.
STORAGE INSTRUCTIONS
1. Clean unit thoroughly according to instructions and allow to dry completely before storing.
2. Store unit in an upright position away from sunlight. Do not store in temperatures below 41ºF.
ONE YEAR LIMITED WARRANTY
PERFECT AIRE®
product will be free from defects in material and workmanship. Perfect Aire, at its discretion, will
repair or replace this product or any component of this product found to be defective during the
warranty period. This is a one-time replacement warranty. If the product is no longer available,
Perfect Aire will replace the unit with a similar model of equal or greater value.
This warranty is not transferable. Proof of purchase is REQUIRED in order to obtain warranty
assistance.
This warranty does NOT cover:
• Damages caused by improper installation or improper cleaning.
• Negligent use or misuse of the product.
• Damages as the result of not using product in accordance with provided instructions.
• Damage to product, walls paintings/portraits, furniture, floor, etc. as the result of high mineral
content in water.
• Damage to product, walls, paintings/portraits, any furniture (wood), floors, etc. as a result of
improper installation and/or cleaning.
• Use of improper voltage or current.
• Additional or extended warranties offered by retailers.
• Disassembly or repair by anyone other than an authorized Perfect Aire service center provider.
• Products used in a commercial setting.
• Floor display 'as-is' models.
• Damage caused by acts of nature such as hurricane, tornado, fire, etc.
• Incidental or consequential damages caused by breach of any expressed, implied or statutory
warranty or condition with exception to the extent prohibited by law.
• Any performance issues that fall outside of the 1 year warranty.
Note: Some states do not allow the exclusion or limitation of incidental or consequential
damages. This limitation or exclusion may not apply to you.
DO NOT RETURN THIS PRODUCT TO THE STORE.
If you have any questions about this product or its warranty, please call consumer
services at toll-free 877-365-6274.
warrants that during the first year from the original date of purchase, this
7
Page 9

TROUBLESHOOTING
Problem Reason Solution
Plug in unit and turn on the power / output
Wall outlet has no power Check the circuit and fuse; try another socket.
Air unit out in cool place for 12 hours without
Thoroughly clean unit and place fresh water in
Vibration between the
water tank
Water contains high
Switch to distilled or filtered water; clean
Unit too far from end of
Move unit closer to edge of table so mist has
more time to disperse. Do not place unit on floor.
Tank cap not securely attached or needs
No water in the water tank Add water to the water tank.
The power / output adj.
Rotate the power / output adjustment knob
The humidifier is not on a
There is scaling on the
Clean the nebulizer / transducer according to
Tank was cleaned with
Use fresh water to clean the water tank
Thoroughly clean unit and place fresh water
The nebulizer / transducer
877-365-6274
Condensation on
Scaling on
No mist /
Please check the following troubleshooting tips before calling for assistance.
Power light is off
Unit / Mist has
peculiar smell
Excessive noise
White dust
Damp table or
floor
Little mist /
Mist stuck
Unit not plugged in
New unit
The water is dirty or stale
humidifier and surface
Low water level in
mineral content
table or too close to floor
Base overflowed
Base overfilled Empty base and restart.
knob is not turned on
flat surface
nebulizer / transducer
adjustment knob.
the tank on the unit.
tank.
Place the unit on a stable, waterproof surface.
Fill the water tank.
nebulizer according to instructions.
replacement.
clockwise to power the unit on.
Put the humidifier on a flat surface.
instructions.
wrong type of cleaner
The water level is too low
The water is dirty or stale
or fan does not work
windows or
machine
nebulizer /
transducer
The room is too small or
too humid
Water is too hard Use distilled or filtered water.
completely and then let tank dry completely.
Add water to the water tank.
in tank.
Call Perfect Aire Consumer Services:
Turn down the mist volume or turn the unit off
completely.
8
Page 10

Your Source for Home Comfort
Distributed by:
Perfect Aire, LLC
5151 Belt Line Rd.
Suite 878
Dallas, TX 75254
877-365-6274
www.perfectaire.us
Specification and performance data is subject to change without notice.
Printed in China
 Loading...