

Perfect Aire PATWH10002, 2PATWH12000, PATW14002, PATWH14002 User Manual
CONTENTS
SAFETY PRECAUTIONS ..................................................................................... 2
IMPORTANT SAFETY INSTRUCTIONS ...............................................................4
NORMAL SOUNDS .............................................................................................. 5
AIR CONDITIONER FEATURES..........................................................................5
INSTALLATION INSTRUCTIONS .........................................................................9
CARE AND CLEANING.......................................................................................23
TROUBLESHOOTING TIPS ............................................................................... 24
This manual provides the information needed for proper use and maintenance of this air
conditioner. Basic preventative care can help extend the life of this unit. The “Troubleshooting
Tips” section in this manual contains a chart with solutions to the most common problems.
Referring to this section may save time and prevent the need for a service call in the event of
a problem.
!
CAUTION
● Contact an authorized service technician for repair or maintenance of this unit.
● Contact an installer for installation of this unit if necessary.
● The air conditioner is not intended for use by young children without supervision.
Young children should be supervised to ensure that they do not play with the air conditioner.
● Disabled persons may require assistance with set up.
● If the power cord is to be replaced, replacement work should be performed by authorized
personnel only.
● Installation and repair work must be performed in accordance with the national wiring
standards by authorized personnel only.
● Do not operate your air conditioner in a wet room such as a bathroom or laundry room.
● Units with a heating function should be at least 3 1/3 ft (1 meter) away from any combustible/
flammable materials.
NOTE: All the illustrations in this manual are for explanation purposes only. Unit purchased
may be slightly different.
The design and specifications are subject to change without prior notice for product
improvement. Contact customer service for details.
1
SAFETY PRECAUTIONS
To prevent injury to the user or other people and property damage, the following instructions
must be followed. Incorrect operation due to ignoring of instructions may cause harm or
damage. The seriousness is classified by the following indications.
! !
!
WARNING
CAUTION
This symbol indicates the possibility of death or serious injury.
This symbol indicates the possibility of injury or damage to property.
Meanings of symbols used in this manual are as shown below.
!
!
!
!
Plug in power plug properly.
Failure to do so may cause
electric shock or fire due to
excess heat generation
Do not modify power cord
length or share the outlet with
other appliances.
Doing so may cause electric
!
shock or fire due to heat
generation.
Always ensure effective
grounding.
Never do this.
Always do this.
! !
Do not operate or stop the unit
by inserting or pulling out the
power plug directly from the wall.
Doing so may cause electric
shock or fire due to heat generation.
.
Do not operate with wet hands
or in damp environment.
Doing so may cause electric shock.
Do not allow water to run into
electric parts.
WARNING
Do not use a damaged power
cord.
Doing so may cause electric shock
or fire. If the power cord is
damaged, it must be replaced by the
manufacturer or an authorized
service center or a similarly qualified
person in order to avoid a hazard.
Do not direct airflow directly at
room occupants.
This could cause health issues.
!!
Always install circuit breaker
and a dedicated power circuit.
Incorrect grounding may cause
!
electric shock.
!
Always unplug the unit if
strange sounds, smell or
smoke comes from the unit.
!
Failure to do so may cause fire
and electric shock.
Do not use firearms near unit.
Doing so may cause fire.
!
!
Ventilate room before operating air conditioner if
there is a gas leakage from another appliance
such as a stove.
Failure to do so may cause explosion,
fire and burns.
Doing so may cause failure of
machine or electric shock.
Do not use the socket if it is
loose or damaged.
Doing so may cause fire and
electric shock.
Do not use the power cord close
to heating appliances.
Doing so may cause fire and
electric shock.
Do not use the power cord near flammable gas
or combustibles, such as gasoline, benzene,
thinner, etc.
Doing so may cause an explosion or fire.
2
Incorrect installation may cause fire
and electric shock.
Do not open the unit during
operation.
Doing so may cause electric shock.
Do not disassemble, modify,
or drill holes into the air
conditioner.
Doing so may cause failure and
electric shock.
CAUTION
!
When removing air filter, do not
touch metal parts of the unit.
Doing so may cause an injury.
!
Unit and Circuit breaker/fuse
must be switched OFF when
cleaning.
.
Cleaning unit when power is ON
may cause fire and electric shock
and may cause an injury.
Stop operation and close the
window in severe storms or
hurricanes.
Operation with windows open may
cause moisture to enter the room.
Do not clean with water.
Water may enter the unit and
degrade the insulation causing an
electric shock.
Do not put a pet or house plant
where it will be exposed to
direct air flow.
This could injure the pet or plant.
!! !
Hold the plug by the head of the
power plug when taking it out.
Failure to do so may cause electric
shock and damage.
!
Ensure proper ventilation
especially in rooms with a stove
or other appliances.
Failure to do so may result in an
oxygen shortage.
!
Use only as intended.
This unit is NOT intended to
preserve precision devices, food,
pets, plants, and art objects. It may
cause deterioration of quality, etc.
If unit will not be used for a long
period of time, turn OFF main
power switch.
Leaving power on may cause unit
failure or fire.
Do not place obstacles around
air-inlets or inside of air-outlet.
Obstacles may cause appliance
failure or accident.
!
Use only a soft cloth to clean
the unit.
Cleaners or detergents may change
the color or scratch the surface of
the unit.
Do not place heavy objects on the power cord
and always ensure that the cord is not
compressed.
There is danger of fire or electric shock.
!
Periodically check installation
bracket for damage.
Prolonged exposure to outdoor
elements may cause damage to
installation bracket causing unit to
fall.
!
Use caution when unpacking
and installing.
Sharp edges could cause injury.
!
Always insert the filters securely.
Clean filter AT LEAST once
every two weeks.
.
Operation without secured filters
may cause failure. A dirty filter
can cause the unit to not run
efficiently.
NEVER drink water drained from
air conditioner.
Water from unit contains
contaminants and could cause
illness.
!
If water enters the unit, turn the unit off at the power
outlet and switch off the circuit breaker. Isolate supply
by taking the power-plug out and contact a qualified
serviced technician.
There is danger of electric shock.
3
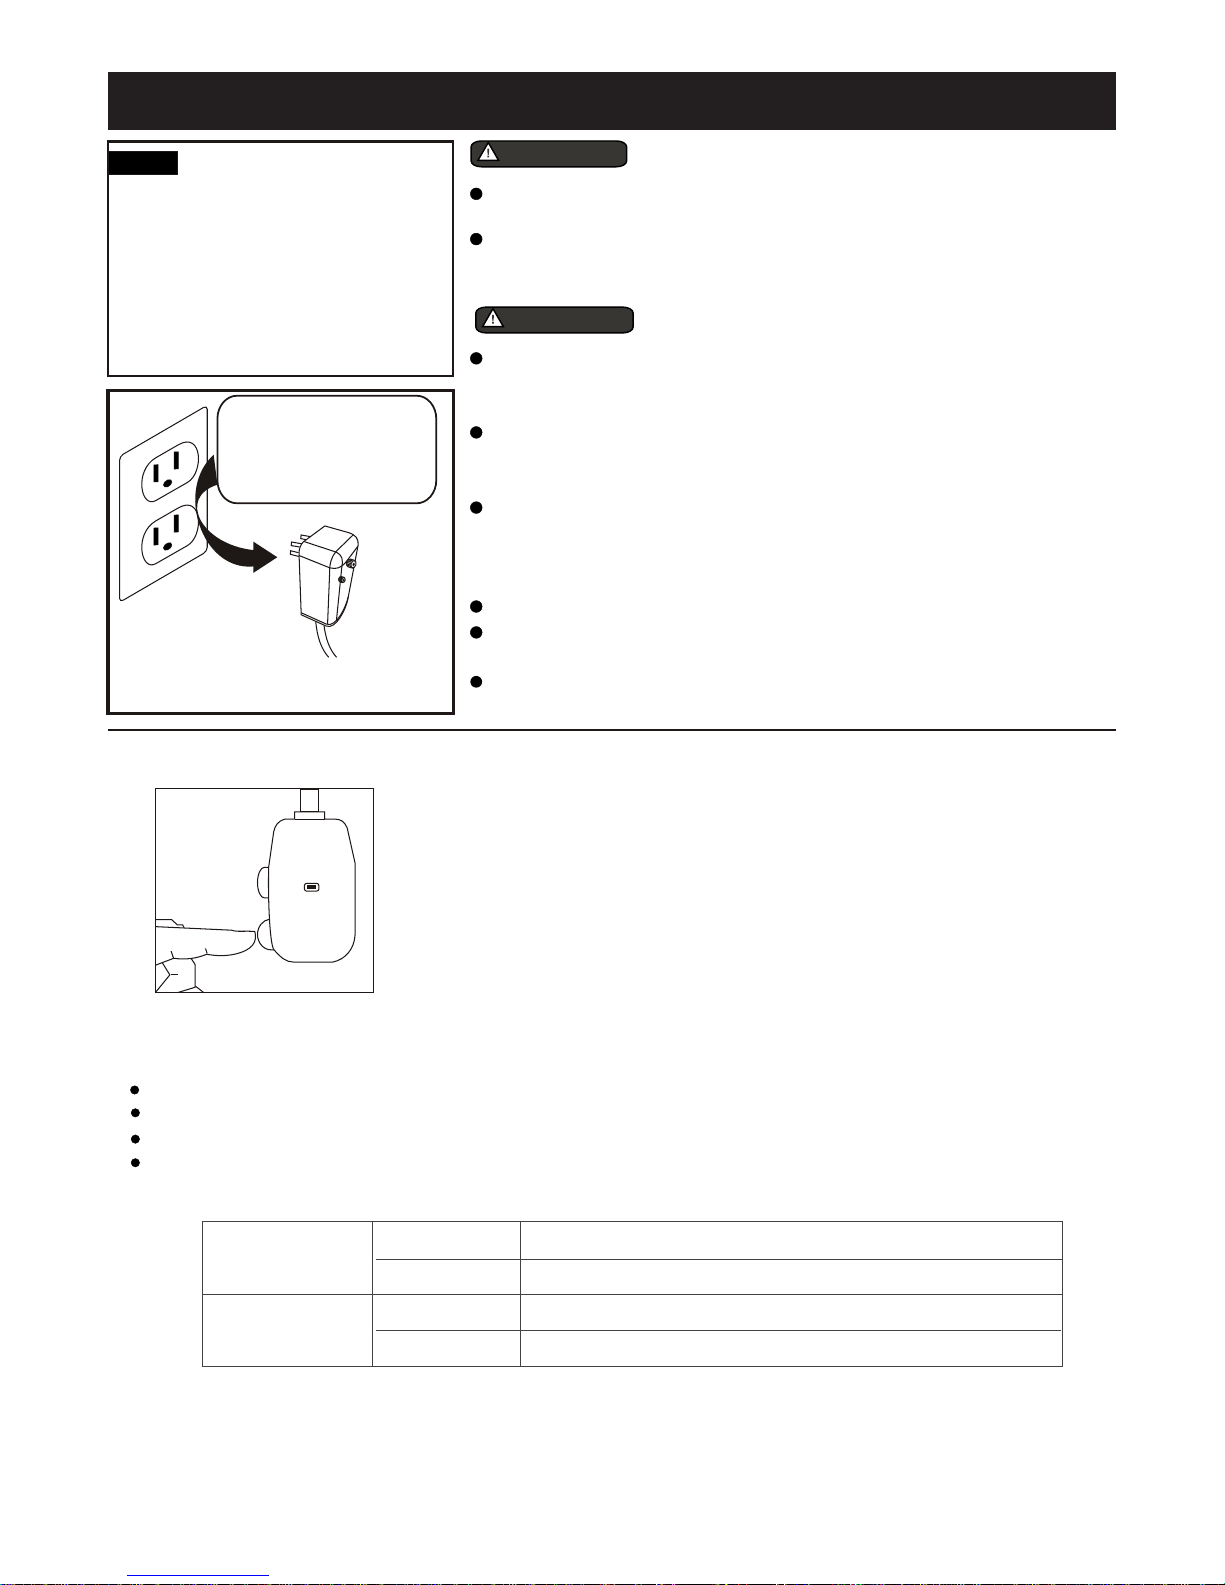
IMPORTANT SAFETY INSTRUCTIONS
NOTE
Power supply cord
with 3-prong grounding plug
and current detection device
The power supply cord with
this air conditioner contains a current
detection device designed to reduce
the risk of fire.
Please refer to the section "Operation
of Current Device" (below) for details.
In the event that the power supply cord
is damaged, it MUST be replaced by
an authorized repairman.
DO NOT, under any
circumstances, cut,
remove, or bypass
grounding prong.
WARNING!
DO NOT store or use gasoline or other flammable vapors or liquids in
the vicinity of this or any other appliance.
Avoid fire hazard or electric shock. DO NOT use an extension cord or
an adaptor plug. DO NOT remove any prong from the power cord.
WARNING!
Be sure the electrical service is adequate for the model you have chosen.
This information can be found on the serial plate, which is located on the
side of the cabinet and behind the grille.
Be sure the air conditioner is properly grounded. To minimize shock and fire
hazards, proper grounding is important. The power cord is equipped with a
three-prong grounding plug for protection against shock hazards.
Your air conditioner must be used in a properly grounded wall receptacle. If
the wall receptacle you intend to use is not adequately grounded or
protected by a time delay fuse or circuit breaker, have a qualified electrician
install the proper receptacle.
Ensure the receptacle is accessible after the unit installation.
Do not run air conditioner without side protective cover in place. This could
result in mechanical damage within the air conditioner.
Do not use an extension cord or an adaptor plug.
For Your Safety
Electrical Information
Operation of Current Device
Plug in &
press RESET
TEST
RESET
NOTE: Some plugs have
buttons on the top.
NOTES:
Do not use this device to turn the unit on or off.
Always make sure the RESET button is pushed in for correct operation.
The power supply must be replaced if it fails to reset when either the TEST button is pushed or it cannot be reset.
If power supply cord is damaged, it cannot be repaired. Please call customer service to assist with replacement.
NOTE: This air conditioner is designed to be operated under conditions as follows:
Cooling operation
Heating operation
The power supply cord contains a current device that senses damage to the power
cord. To test your power supply cord do the following:
1. Plug in the air conditioner.
2. The power supply cord will have TWO buttons on the plug head. Press the TEST
button. The RESET button will click as it pops out.
3. Press the RESET button; again you will notice a click as the button engages.
4. The power supply cord is now supplying electricity to the unit.
(On some products this is also indicated by a light on the plug head.)
Outdoor temp: 18-43°C/64-109°F (18-52°C/64-125°F for special tropical models)
Indoor temp: 17-32°C/62-90°F
Outdoor temp: -5-24°C/23-76°F
Indoor temp: 0-27°C/32-80°F
*Please note that not all units come with a heating element. The “Heating operation” specifications only
apply for units that DO have a heating element.
If the unit is ope rated beyond the conditions specified above, it may cause a fai lure of the unit.
4
Sound of Rushing Air
At the front of the unit you
may hear the sound of
rushing air being moved
by the fan.
Gurgle/Hiss
“Gurgling” or “Hissing”
noise may be heard due to
refrigerant passing through
evaporator during normal
operation.
NORMAL SOUNDS
High Pitched Chatter
High efficiency compressors
may have high pitched chatter
during the cooling cycle.
Vibration
Unit may vibrate and make
noise because of poor wall or
window construction or incorrect
installation.
Pinging or Switching
Droplets of water hitting condenser
during normal operation may cause
“pinging” or “switching” sounds.
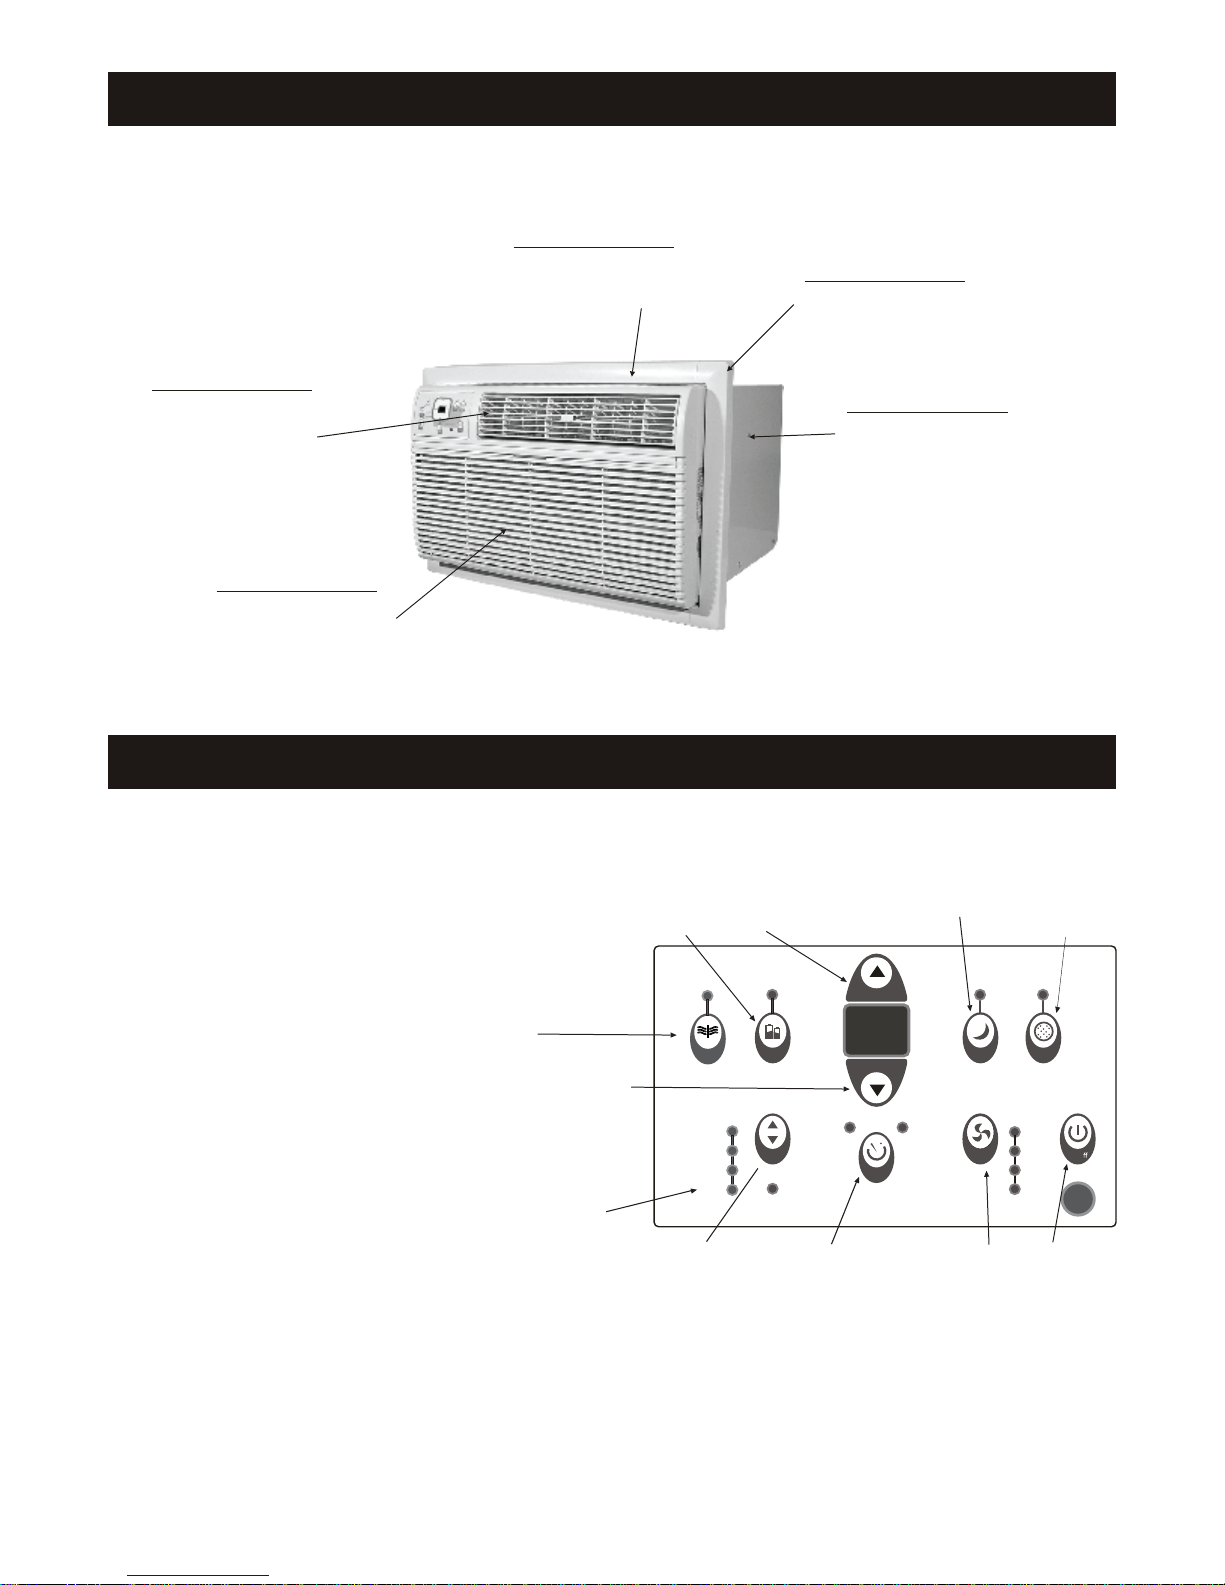
AIR CONDITIONER FEATURES
ELECTRONIC CONTROL
OPERATING INSTRUCTIONS
Before you begin, thoroughly familiarize
yourself with the control panel as shown
to the right and all its functions. Then,
follow the symbol for the functions you desire.
The unit can be controlled by the unit
controls alone or with the remote control.
NOTE: This illustration is for explanation
purposes only. The actual appearance of
the control panel on the air conditioner
purchased may be slightly different.
CLEAN AIR
FUNCTION
(Only on some models)
ADJ USTS
TEMPERATURE
OR TIME
HEAT LIGHT
ON UNITS
WITH HEATING
FUNCTION ONLY
ENERGY
SAVER MODE
SETS MOD E
ADJUSTS
TEMPERATURE
Clean
Air
Auto
Cool
Dry
Heat
UNIT CONTROLS
OR TIME
TEMP/TIMER
Ener gy
Saver
Mode
Fan
ACT IVATES
TIMER
TEMP/TIMER
on
off
Timer
SLEEP MODE
Sleep
Fan
SETS FAN
SPEED
CHECK FILTER
RESET BUTTON
Check
Filt er
Auto
Low
On/o
Med
High
TURNS UNIT
ON OR OFF
5
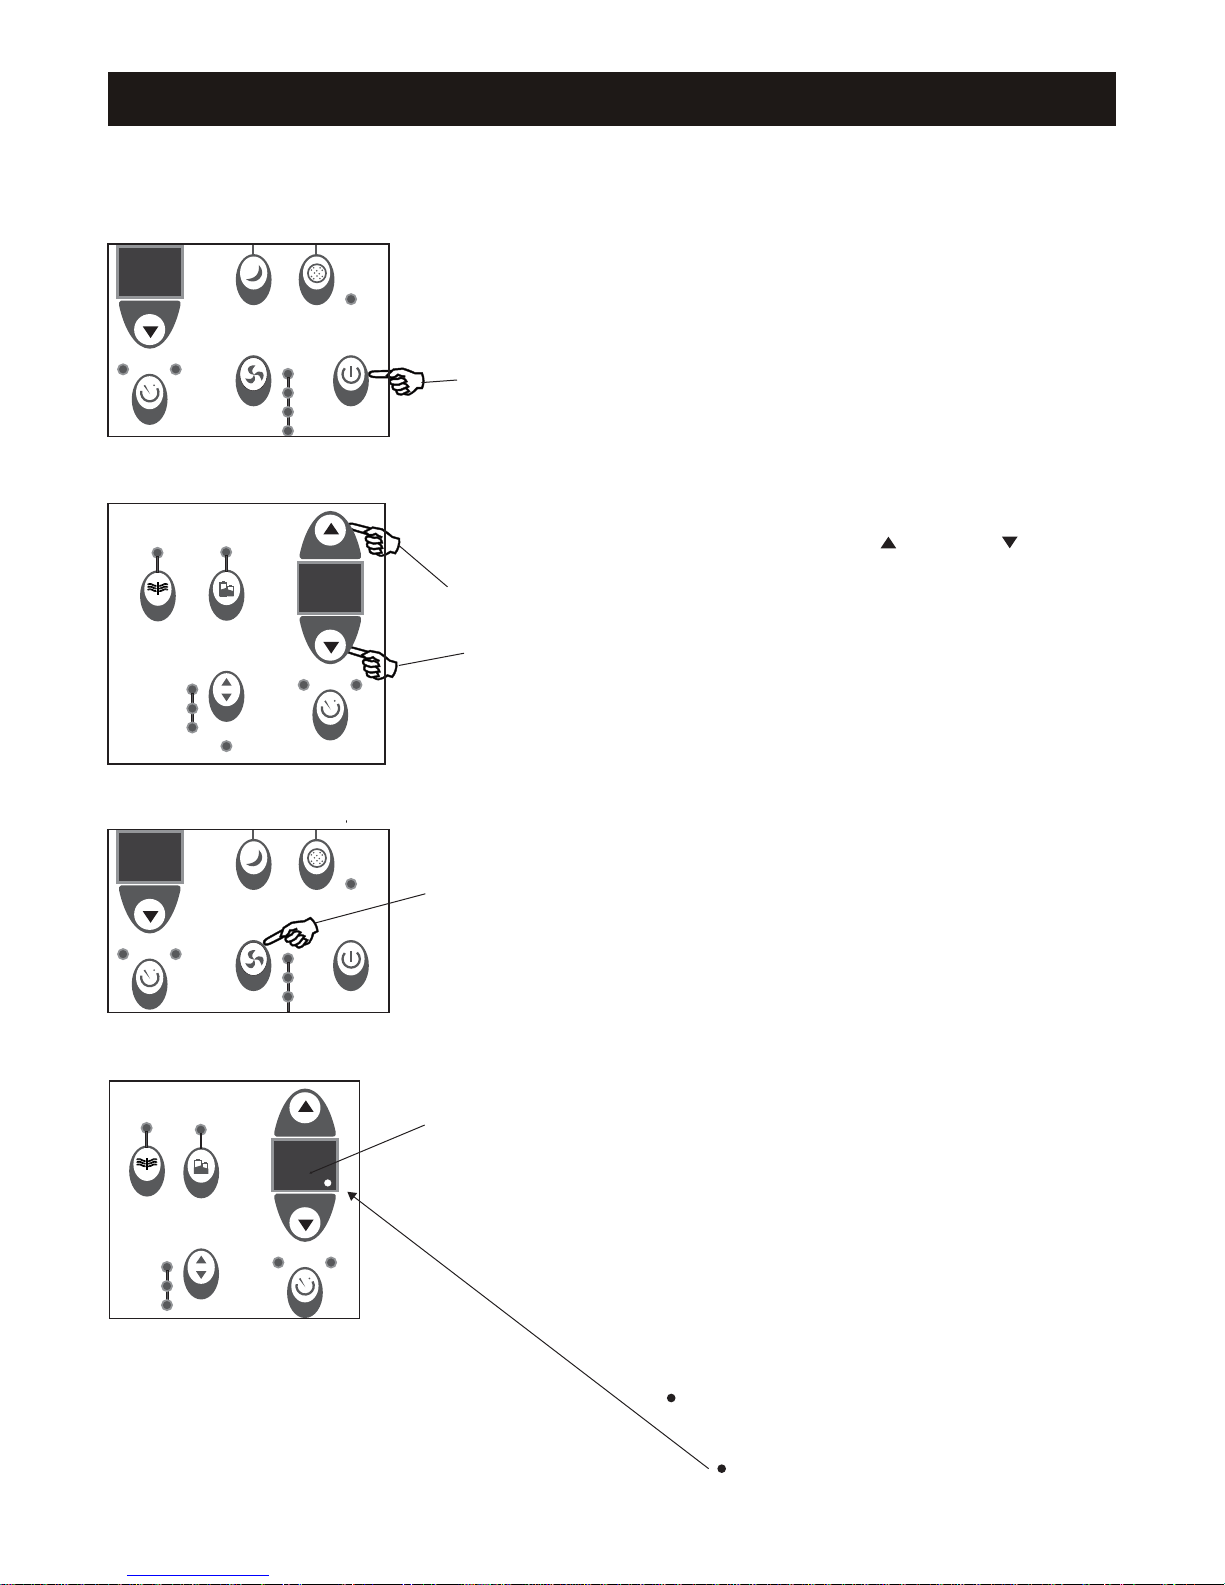
AIR CONDITIONER FEATURES (CONTINUED)
NOTE: The following instructions represent the Unit Controls. The same instructions can be used
for the Remote Control.
TO TURN UNIT ON:
TEMP/TIMER
TEMP/TIMER
Sleep
Check
Filter
Follow
Me
NOTE: The unit will automatically initiate the
Energy Saver function under “Cool,” “Dry” and
“Auto” (only Auto-Cooling and Auto-Fan) modes.
on
off
Timer
Auto
High
Med
Low
On/o
Fan
DO THIS:
Press the On/Off button.
TO CHANGE TEMPERATURE SETTING:
TEMP/TIMER
Clean
Energy
Auto
Cool
Saver
Mode
Dry
Fan
TEMP/TIMER
on
off
Timer
Air
DO THIS:
Press to raise
Press to lower
TO ADJUST FAN SPEEDS:
DO THIS:
Press “Fan” to
select fan speed
TEMP/TIMER
on
off
Timer
Sleep
Check
Filter
Follow
Me
Auto
High
Med
On/o
Fan
NOTE: UP/DOWN button
Press or hold e ither Up ( ) or Down ( ) but ton
until the desired temperature is seen on the
display. This temperature will be automatically
maintained anywhere between 62ºF(17ºC) a nd
86ºF(30ºC).If you want the display to read
the actual room temperature, see “To Operate
on Fan Only” section.
NOTE: FAN button
There are four (4) fan speeds: “Auto,” “Low,”
“Med” or “High.” Each time the button is pressed,
the fan speed mode is shifted. On “Dry” mode
the fan speed is controlled at low automatically.
For some models with heating capabilities, the
fan speed cannot be adjusted under “Heat” mode.
DISPLAYS:
Displays
Clean
Auto
Cool
TEMP/TIMER
Energy
Air
Saver
Mode
Dry
TEMP/TIMER
on
off
Timer
NOTES:
- If the unit breaks off unexpectedly due to power
being cut, it will restart with the previous function
setting automatically when the power resumes.
- In “Fan” only mode, unit will display “Lo” or “Hi”.
NOTE: DISPLAYS
Shows the set temperature in “°C” or “°F” and the
Auto-timer settings. While on “Fan” only mode, it
shows the room temperature.
Error Codes:
AS - Room temperature sensor error - Unplug the
unit and plug it back in. If error repeats, call
customer service.
HS - Electric heating sensor error - Unplug the
unit and plug it back in. If error repeats, call
customer service.
- Evaporator temperature sensor error -
Unplug the unit and plug it back in. If error
repeats, call customer service.
(“ ” is displayed as shown in left picture.)
6
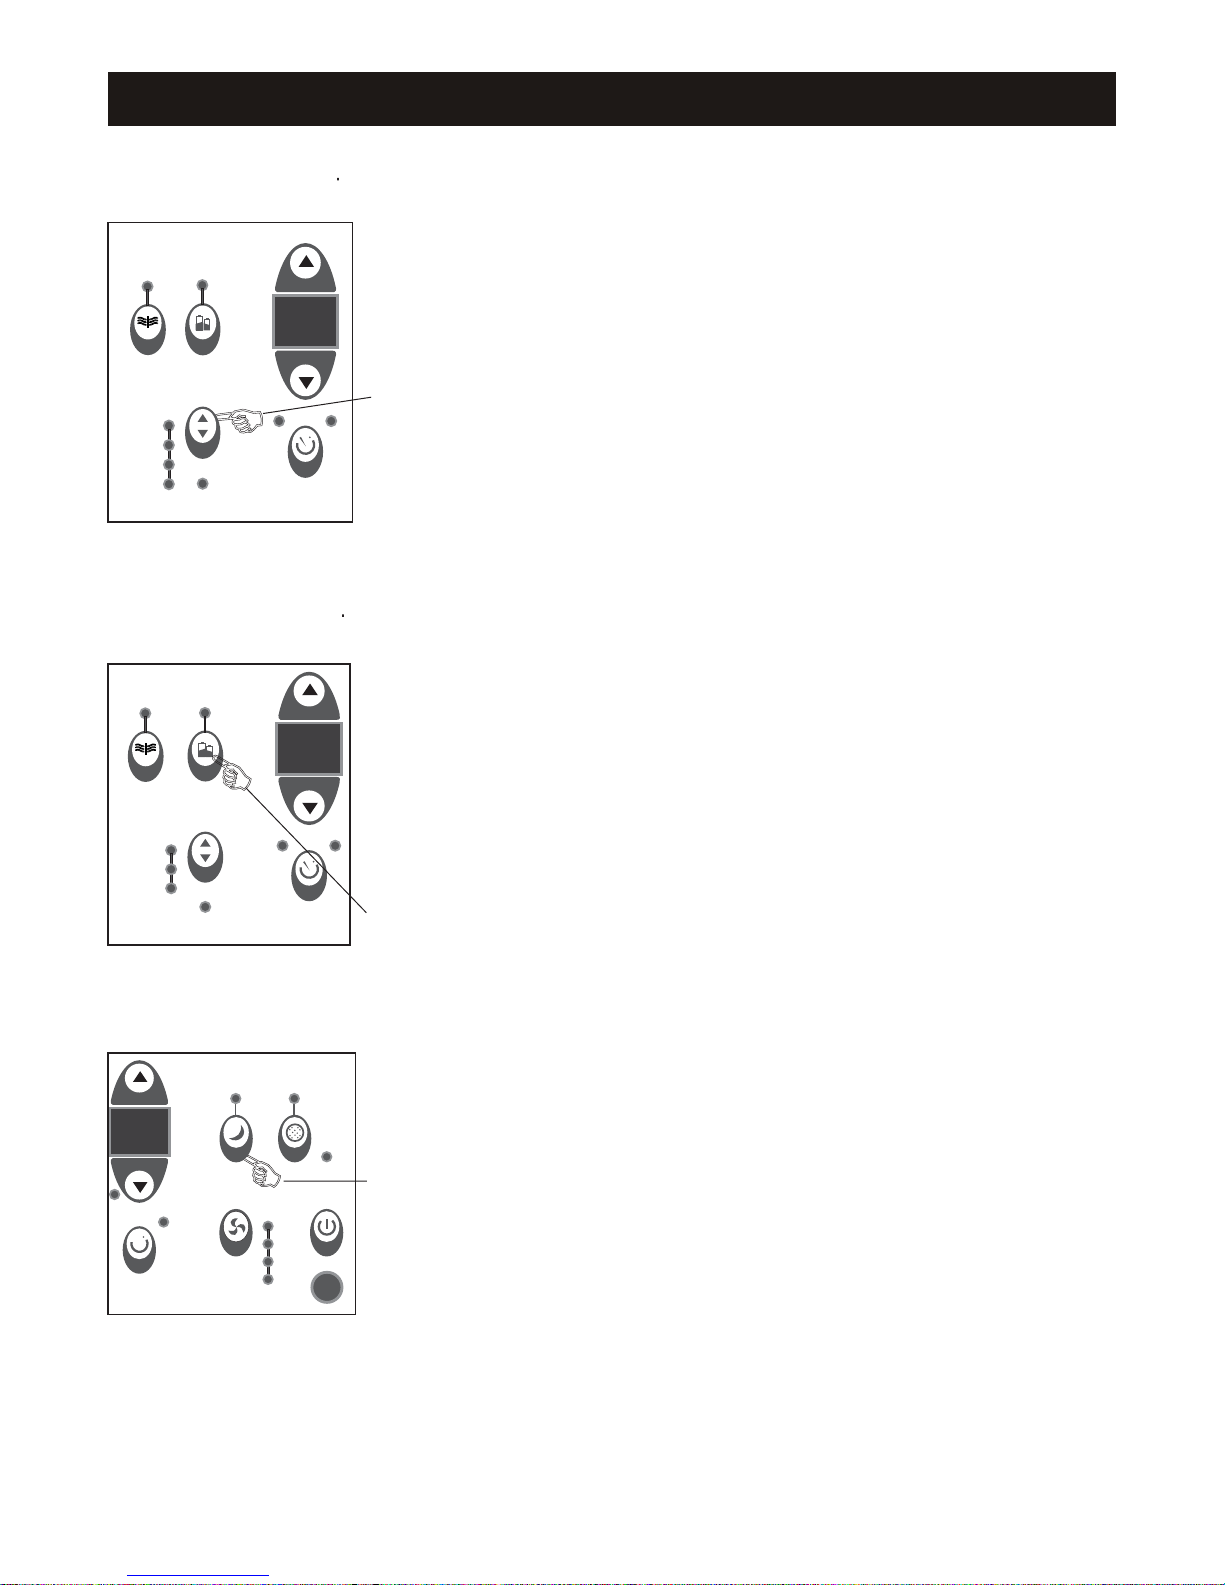
AIR CONDITIONER FEATURES (CONTINUED)
TO SELECT THE
OPERATING MODE:
TEMP/TIMER
Clean
Energy
Air
Auto
Cool
Heat
Saver
Mode
Dry
Fan
TEMP/TIMER
on
off
Timer
TO USE THE ENERGY
SAVER FEATURE:
TEMP/TIMER
Energy
Clean
Air
Auto
Cool
Saver
Mode
Dry
Fan
TEMP/TIMER
on
Timer
NOTE: MODE button
To choose operating mode, press the “Mode” button.
Each time you press the button, a mode is selected in a
sequence that goes from “Auto,” “Cool,” “Dry,” “Heat,”
(for units with heating function) and “Fan.” The indicator
light will be illuminated and remain on once the mode
is selected. The unit will automatically initiate the
Energy Saver function under “Cool,” “Dry,” and
“Auto” (only Auto-Cooling and Auto-Fan) modes.
DO THIS:
Press the
“Mode” button.
To operate on “Auto” feature:
When you set the air conditioner in “Auto” mode, it will
automatically select cooling, heating (on models with
heating capabilities), or fan only operation depending on
what temperature you have selected and the room
temperature.The air conditioner will control room
temperature automatically around the temperature you set.
In this mode, the fan speed cannot be adjusted.
It starts automatically at a speed according to the
room temperature. If the room does not get too warm,
it will stay at “Low” speed.
To operate on “Fan” only (not available on all models):
Use this function only when cooling is not desired,
such as for room air circulation or to exhaust stale
air. (Remember to open the vent during this function,
but keep it closed during cooling for maximum cooling
efficiency.) You can choose any fan speed you prefer.
During this function, the display will show the actual
room temperature, not the set temperature as in the
off
DO THIS:
Press the
“Energy Saver”
button
cooling mode.
To operate on “Dry” mode:
In this mode, the air conditioner will reduce air
humidity. If the space is a closed or sealed area, some
degree of cooling will continue.
SLEEP FEATURE:
TEMP/TIMER
Check
Sleep
TEMP/TIMER
off
on
Timer
Filter
Follow
Me
DO THIS:
Press “Sleep”
Auto
High
Fan
On/o
Med
Low
button
NOTE: ENERGY SAVER button
This function is available on “Cool,” “Dry,” and “Auto”
(only Auto-Cooling and Auto-Fan) modes. In this
mode,the fan will continue to run for 3 minutes after the
compressor shuts off.The fan then cycles on for 2
minutes, at 10 minute intervals, until the room
temperature is abovethe set temperature, at which
time the compressor turns back on and cooling starts.
NOTE: SLEEP button
In this mode the selected temperature will increase
(cooling) or decrease (heating - units with heater only)
O
by 2
F/1OC 30 minutes after the mode is selected.The
temperature will then increase (cooling) or decrease
(heating - units with heater only) by another 2
O
F/1OC
after an additional 30 minutes. This new temperature
will be maintained for 6 hours before it returns to the
originally selected temperature. This ends the Sleep
mode and the unit will continue to operate as originally
programmed. The Sleep mode program can be
cancelled at any time during operation by again
pressing the “Sleep” button.
7
 Loading...