

Page 1
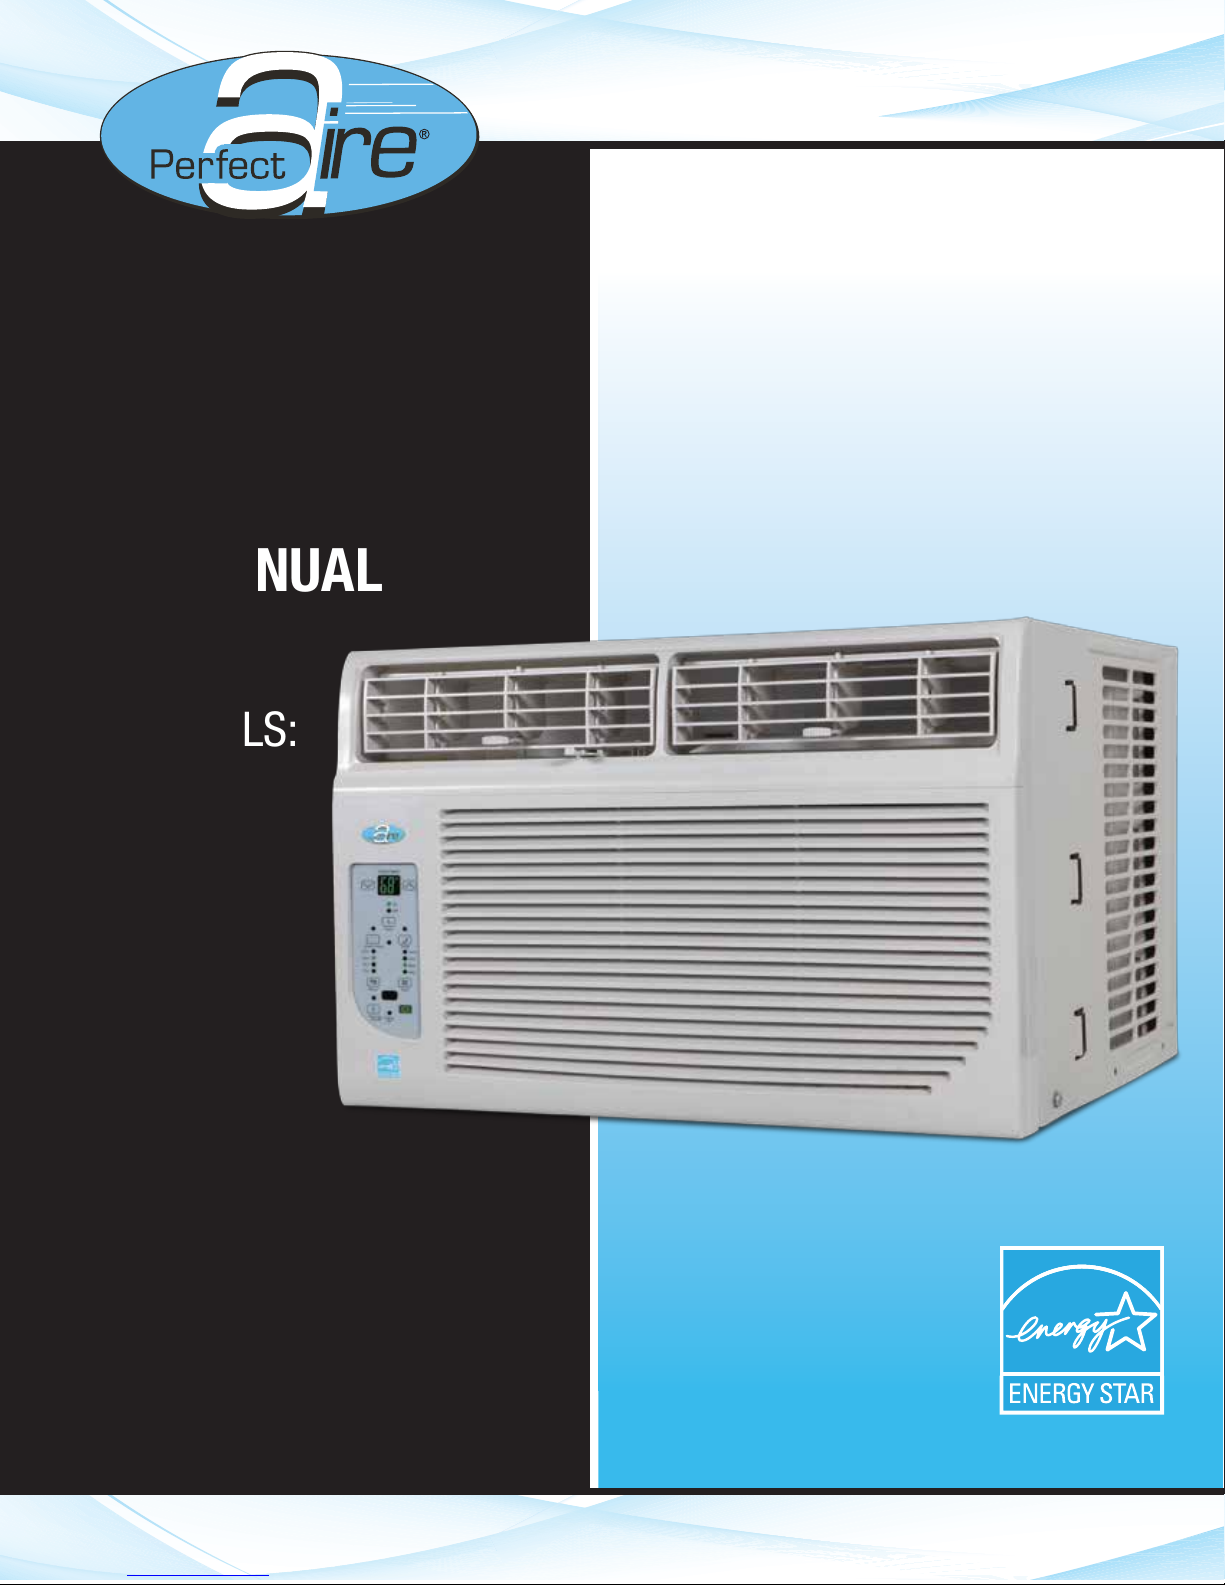
(6,000, 8,000, 10,000 & 12,000 BTU)
WINDOW
AIR CONDITIONER
USER MANUAL
Your Source for Home Comfort
FOR MODELS:
2PAC6000
2PAC8000
2PAC10000
2PAC12000
2PAC12002
Before using your window air
conditioner, please read this manual
carefully and keep it for future
reference, along with your receipt.
Page 2
CONTENTSCONTENTS
TEMP/TIMER
SAFETY PRECAUTIONS ..................................................................................... 2
IMPORTANT SAFETY INSTRUCTIONS ...............................................................4
NORMAL SOUNDS .............................................................................................. 5
AIR CONDITIONER FEATURES..........................................................................5
INSTALLATION INSTRUCTIONS .......................................................................10
CARE AND CLEANING.......................................................................................14
TROUBLESHOOTING TIPS ............................................................................... 15
This manual provides the information needed for proper use and maintenance of this air
conditioner. Basic preventative care can help extend the life of this unit. The “Troubleshooting
Tips” section in this manual contains a chart with solutions to the most common problems.
Referring to this section may save time and prevent the need for a service call in the event of
a problem.
!
CAUTION
● Contact an authorized service technician for repair or maintenance of this unit.
● Contact an installer for installation of this unit if necessary.
● The air conditioner is not intended for use by young children without supervision.
Young children should be supervised to ensure that they do not play with the air conditioner.
● Disabled persons may require assistance with set up.
● If the power cord is to be replaced, replacement work should be performed by authorized
personnel only.
● Installation and repair work must be performed in accordance with the national wiring
standards by authorized personnel only.
● Do not operate your air conditioner in a wet room such as a bathroom or laundry room.
NOTE: All the illustrations in this manual are for explanation purposes only. Unit purchased
may be slightly different.
The design and specifications are subject to change without prior notice for product
improvement. Contact customer service for details.
1
Page 3
SAFETY PRECAUTIONS
To prevent injury to the user or other people and property damage, the following instructions
must be followed. Incorrect operation due to ignoring of instructions may cause harm or
damage. The seriousness is classified by the following indications.
! !
!
WARNING
CAUTION
This symbol indicates the possibility of death or serious injury.
This symbol indicates the possibility of injury or damage to property.
Meanings of symbols used in this manual are as shown below.
!
!
!
!
Plug in power plug properly.
Failure to do so may cause
electric shock or fire due to
excess heat generation
Do not modify power cord
length or share the outlet with
other appliances.
Doing so may cause electric
!
shock or fire due to heat
generation.
Always ensure effective
grounding.
Never do this.
Always do this.
! !
Do not operate or stop the unit
by inserting or pulling out the
power plug directly from the wall.
Doing so may cause electric
shock or fire due to heat generation.
.
Do not operate with wet hands
or in damp environment.
Doing so may cause electric shock.
Do not allow water to run into
electric parts.
WARNIN
G
Do not use a damaged power
cord.
Doing so may cause electric shock
or fire. If the power cord is
damaged, it must be replaced by the
manufacturer or an authorized
service center or a similarly qualified
person in order to avoid a hazard.
Do not direct airflow directly at
room occupants.
This could cause health issues.
!!
Always install circuit breaker
and a dedicated power circuit.
Incorrect grounding may cause
!
electric shock.
!
Always unplug the unit if
strange sounds, smell or
smoke comes from the unit.
!
Failure to do so may cause fire
and electric shock.
Do not use firearms near unit.
Doing so may cause fire.
!
!
Ventilate room before operating air conditioner
if there is a gas leak from another appliance
such as a stove.
Failure to do so may cause explosion,
fire and burns.
Doing so may cause failure of
machine or electric shock.
Do not use the socket if it is
loose or damaged.
Doing so may cause fire and
electric shock.
Do not use the power cord close
to heating appliances.
Doing so may cause fire and
electric shock.
Do not use the power cord near flammable gas
or combustibles, such as gasoline, benzene,
thinner, etc.
Doing so may cause an explosion or fire.
2
Incorrect installation may cause fire
and electric shock.
Do not open the unit during
operation.
Doing so may cause electric shock.
Do not disassemble, modify,
or drill holes into the air
conditioner.
Doing so may cause failure and
electric shock.
Page 4
SAFETY PRECAUTIONS (CONTINUED)
CAUTION
!
When removing air filter, do not
touch metal parts of the unit.
Doing so may cause an injury.
!
Unit and circuit breaker/fuse
must be switched OFF when
cleaning.
Cleaning unit when power is ON
may cause fire and electric shock
and may cause an injury.
Stop operation and close the
window in severe storms or
hurricanes.
Operation with windows open may
cause moisture to enter the room.
Do not place obstacles around
air-inlets or inside of air-outlet.
Obstacles may cause appliance
failure or accident.
.
Do not clean with water.
Water may enter the unit and
degrade the insulation causing an
electric shock.
Do not put a pet or house plant
where it will be exposed to
direct air flow.
This could injure the pet or plant.
!! !
Hold the plug by the head of the
power plug when taking it out.
Failure to do so may cause electric
shock and damage.
!
Periodically check installation
bracket for damage.
.
Prolonged exposure to outdoor
elements may cause damage to
installation bracket causing unit to
fall.
!
Ensure proper ventilation
especially in rooms with a stove
or other appliances.
Failure to do so may result in an
oxygen shortage.
!
Use only as intended.
This unit is NOT intended to
preserve precision devices, food,
pets, plants, and art objects. It may
cause deterioration of quality, etc.
If unit will not be used for a long
period of time, turn OFF main
power switch.
Leaving power on may cause unit
failure or fire.
!
Always insert the filters securely.
Clean filter AT LEAST once
every two weeks.
Operation without secured filters
may cause failure. A dirty filter
can cause the unit to not run
efficiently.
!
Use only a soft cloth to clean
the unit.
Cleaners or detergents may change
the color or scratch the surface of
the unit.
Do not place heavy objects on the power cord
and always ensure that the cord is not
compressed.
There is danger of fire or electric shock.
!
Use caution when unpacking
and installing.
Sharp edges could cause injury.
NEVER drink water drained from
air conditioner.
Water from unit contains
contaminants and could cause
illness.
!
If water enters the unit, turn the unit off at the power
outlet and switch off the circuit breaker. Isolate supply
by taking the power-plug out and contact a qualified
serviced technician.
There is danger of electric shock.
3
Page 5
IMPORTANT SAFETY INSTRUCTIONS
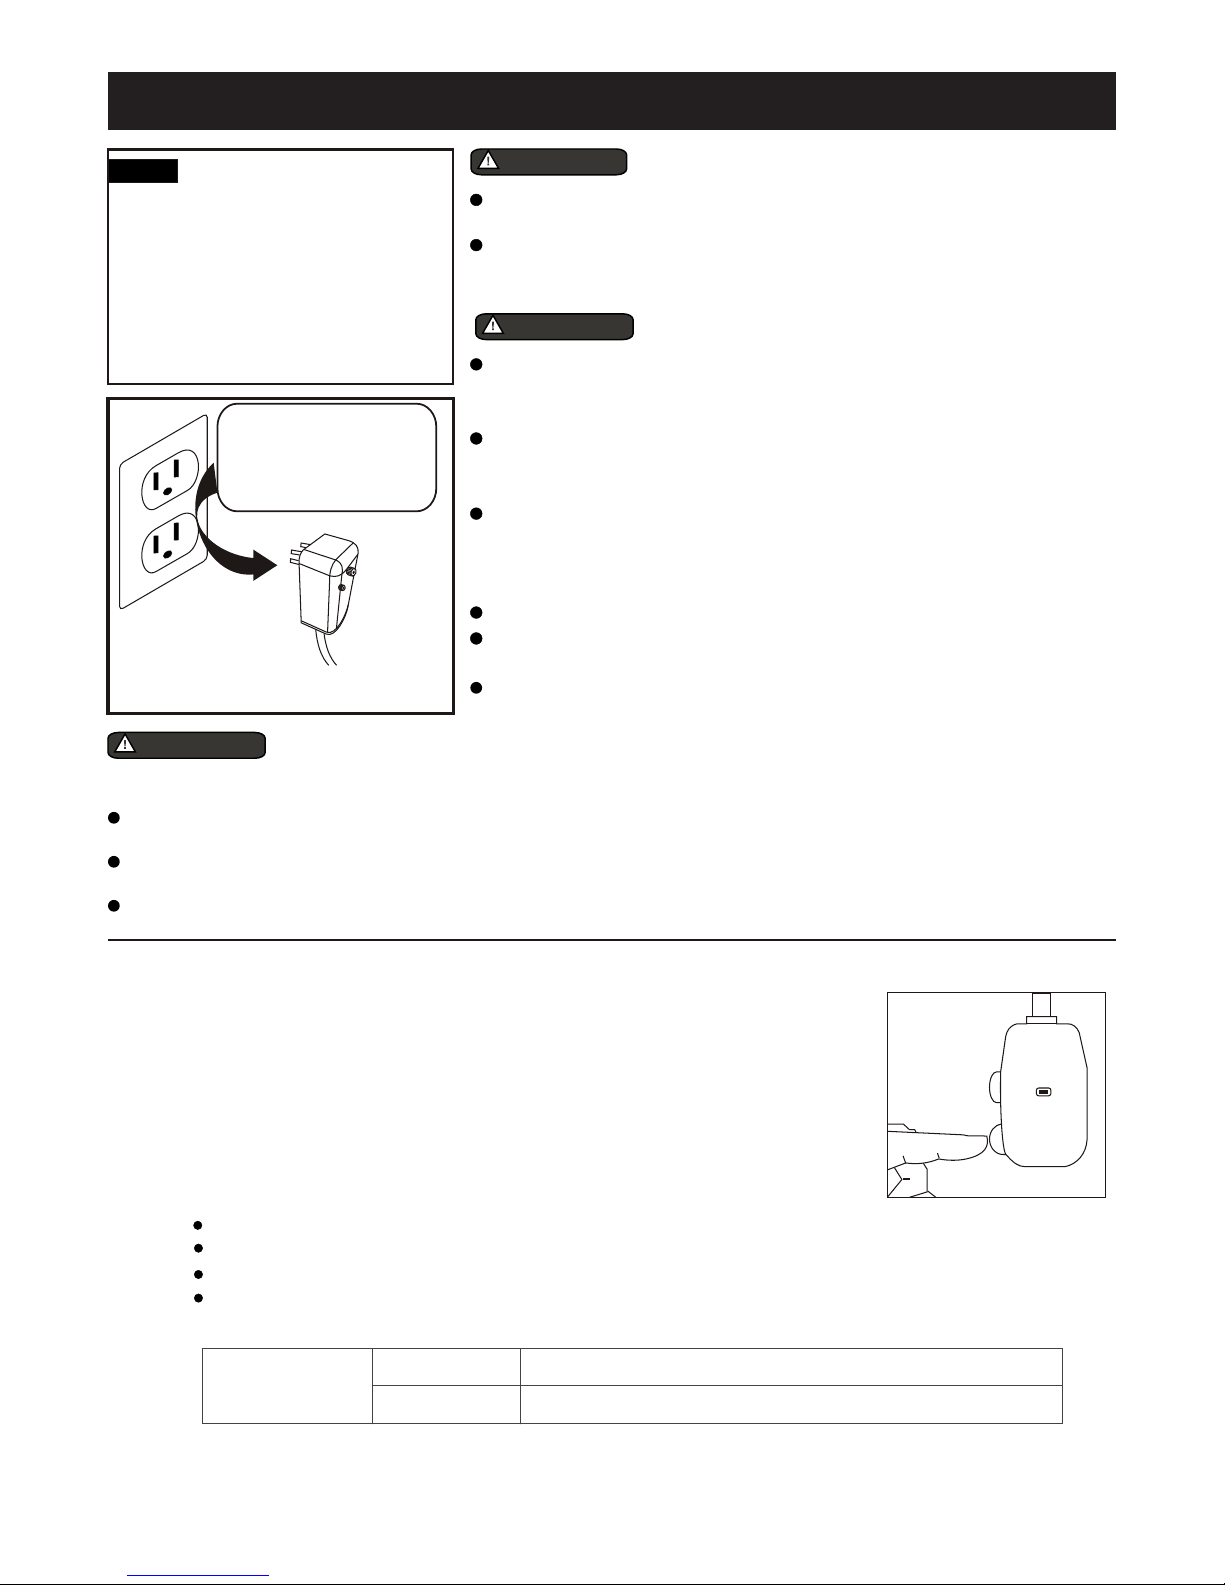
NOTE
this air conditioner contains a current
detection device designed to reduce
the risk of fire.
Please refer to the section "Operation
of Current Device" (below) for details.
In the event that the power supply cord
is damaged, it MUST be replaced by
an authorized repairman.
Power supply cord
with 3-prong grounding plug
and current detection device
The power supply cord with
DO NOT, under any
circumstances, cut,
remove, or bypass
grounding prong.
WARNING!
DO NOT store or use gasoline or other flammable vapors or liquids in
the vicinity of this or any other appliance.
Avoid fire hazard or electric shock. DO NOT use an extension cord or
an adaptor plug. DO NOT remove any prong from the power cord.
WARNING!
Be sure the electrical service is adequate for the model you have chosen.
This information can be found on the serial plate, which is located on the
side of the cabinet and behind the grille.
Be sure the air conditioner is properly grounded. To minimize shock and fire
hazards, proper grounding is important. The power cord is equipped with a
three-prong grounding plug for protection against shock hazards.
Your air conditioner must be used in a properly grounded wall receptacle. If
the wall receptacle you intend to use is not adequately grounded or
protected by a time delay fuse or circuit breaker, have a qualified electrician
install the proper receptacle.
Ensure the receptacle is accessible after the unit installation.
Do not run air conditioner without side protective cover in place. This could
result in mechanical damage within the air conditioner.
Do not use an extension cord or an adaptor plug.
For Your Safety
Electrical Information
r.
WARNING!
To reduce the risk of fire, electrical shock, or injury to persons when using your air conditioner, follow basic precautions,
including the following:
If the air conditioner is to be installed in a window, you will probably want to clean both sides of the glass first. If the window
is a triple-track type with a screen panel included, remove the screen completely before installation.
Be sure the air conditioner has been securely and correctly installed according to the installation instructions in this manual.
Save this manual for possible future use in removing or installing this unit.
When handling the air conditioner, be careful to avoid cuts from sharp metal fins on front and rear coils.
Prevent Accidents
Operation of Current Device
The power supply cord contains a current device that senses damage to the power
cord. To test your power supply cord do the following:
1. Plug in the air conditioner.
2. The power supply cord will have TWO buttons on the plug head. Press the TEST
button. The RESET button will click as it pops out.
3. Press the RESET button; again you will notice a click as the button engages.
4. The power supply cord is now supplying electricity to the unit.
(On some products this is also indicated by a light on the plug head.)
NOTES:
Do not use this device to turn the unit on or off.
Always make sure the RESET button is pushed in for correct operation.
The power supply must be replaced if it fails to reset when either the TEST button is pushed or it cannot be reset.
If power supply cord is damaged, it cannot be repaired. Please call customer service to assist with replacement.
NOTE: This air conditioner is designed to be operated under conditions as follows:
Plug in &
press RESET
TEST
RESET
NOTE: Some plugs have
buttons on the top.
Cooling operation
If the unit is ope rated beyond the conditions specified above, it may cause a fai lure of the unit.
Outdoor temp: 18-43°C/64-109°F (18-52°C/64-125°F for special tropical models)
Indoor temp: 17-32°C/62-90°F
4
Page 6
NORMAL SOUNDS
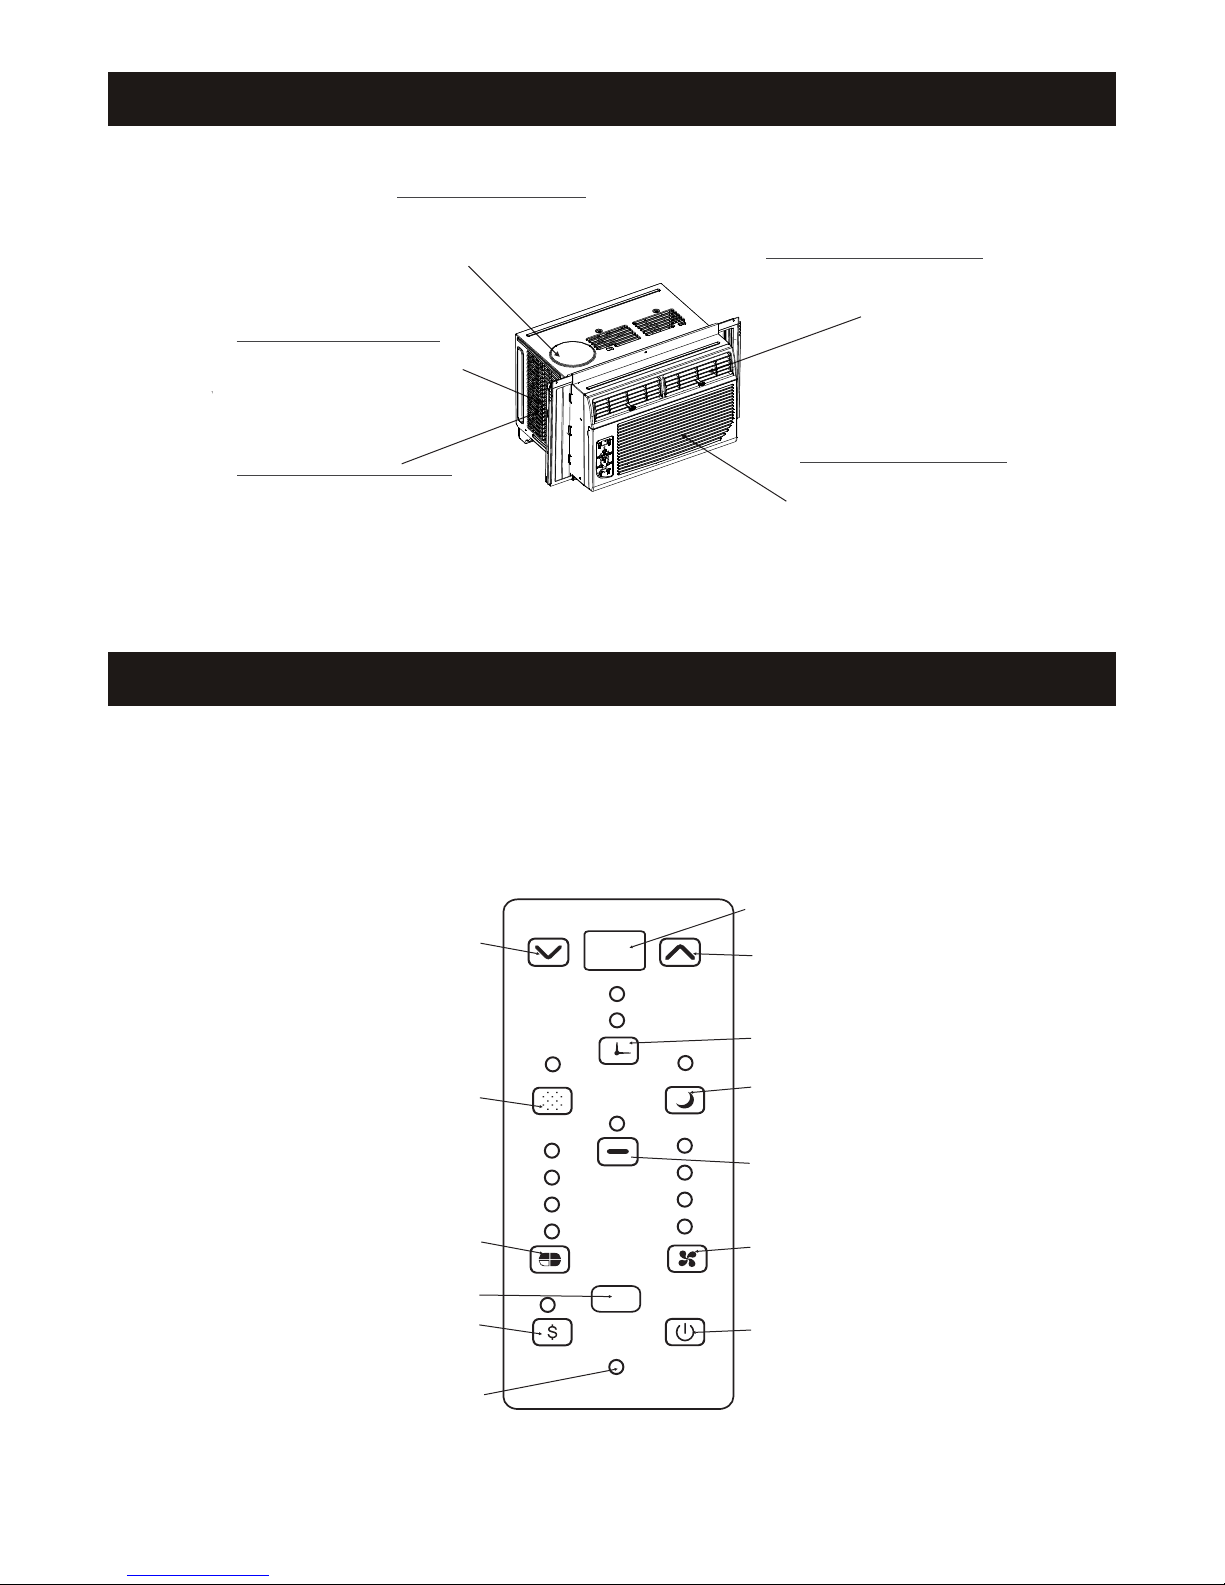
High Pitched Chatter
High efficiency compressors
may have a high pitched chatter
during the cooling cycle.
Sound of Rushing Air
At the front of the unit, the sound of
rushing air being moved by the fan
may be heard.
Vibration
Unit may vibrate and make noise
because of poor wall or window
construction or incorrect installation.
This DOES NOT indicate a
defective unit.
Pinging or Switching
Droplets of water hitting condenser
during normal operation may cause
“pinging” or “switching” sounds.
Gurgle/Hiss
“Gurgling” or “hissing” noise may
be heard due to refrigerant
passing through evaporator
during normal operation.
NOTE: All of the pictures in this manual are for explanatory purposes only. The actual shape/look of the
air conditioner purchased may be slightly different, but the operations and functions are similar.
AIR CONDITIONER FEATURES
ELECTRONIC CONTROL OPERATING INSTRUCTIONS
Thoroughly familiarize yourself with the control panel as shown below and all of its functions. Afterwards,
follow the symbol for the functions you desire BEFORE operating the unit. This unit can be controlled by
the unit control or with the remote control.
UNIT CONTROL
DISPLAYS TEMPERATURE,
TIME, OR ERROR CODES
ADJUSTS TEMPERATURE OR TIME
ACTIVATES TIMER
SLEEP MODE
Auto
CLEAN AIR BUTTON
Low
(on some models)
Med
High
SETS FAN SPEED
TURNS UNIT ON OR OFF
ADJUSTS TEMPERATURE OR TIME
CHECK FILTER RESET BUTTON
SETS MODE
REMOTE SIGNAL RECEPTOR
ENERGY SAVER MODE
FOLLOW ME INDICATOR
Auto
Cool
Dry
Fan
Check
Filter
Mode
Energy
Saver
TEMP/TIMER
On
Off
Timer
Ion
Follow
Me
Sleep
Fan
5
Page 7
Low
Auto
Med
High
Auto
Cool
Dry
Fan
On
Off
Sleep
Timer
Check
Filter
Ion
Low
Auto
Med
High
TEMP/TIMER
Auto
Dry
On
Off
Sleep
Timer
Check
Filter
Ion
AIR CONDITIONER FEATURES (CONTINUED)
NOTE: The following instruct ions represent the Uni t Controls, the same instructio ns can be used
Fan
.
NOTE: The unit will automatically initiate the
Energy Saver function under “Cool,” “Dry” and
“Auto” (only Auto-Cooling and Auto-Fan) modes.
for the Remote Con trol
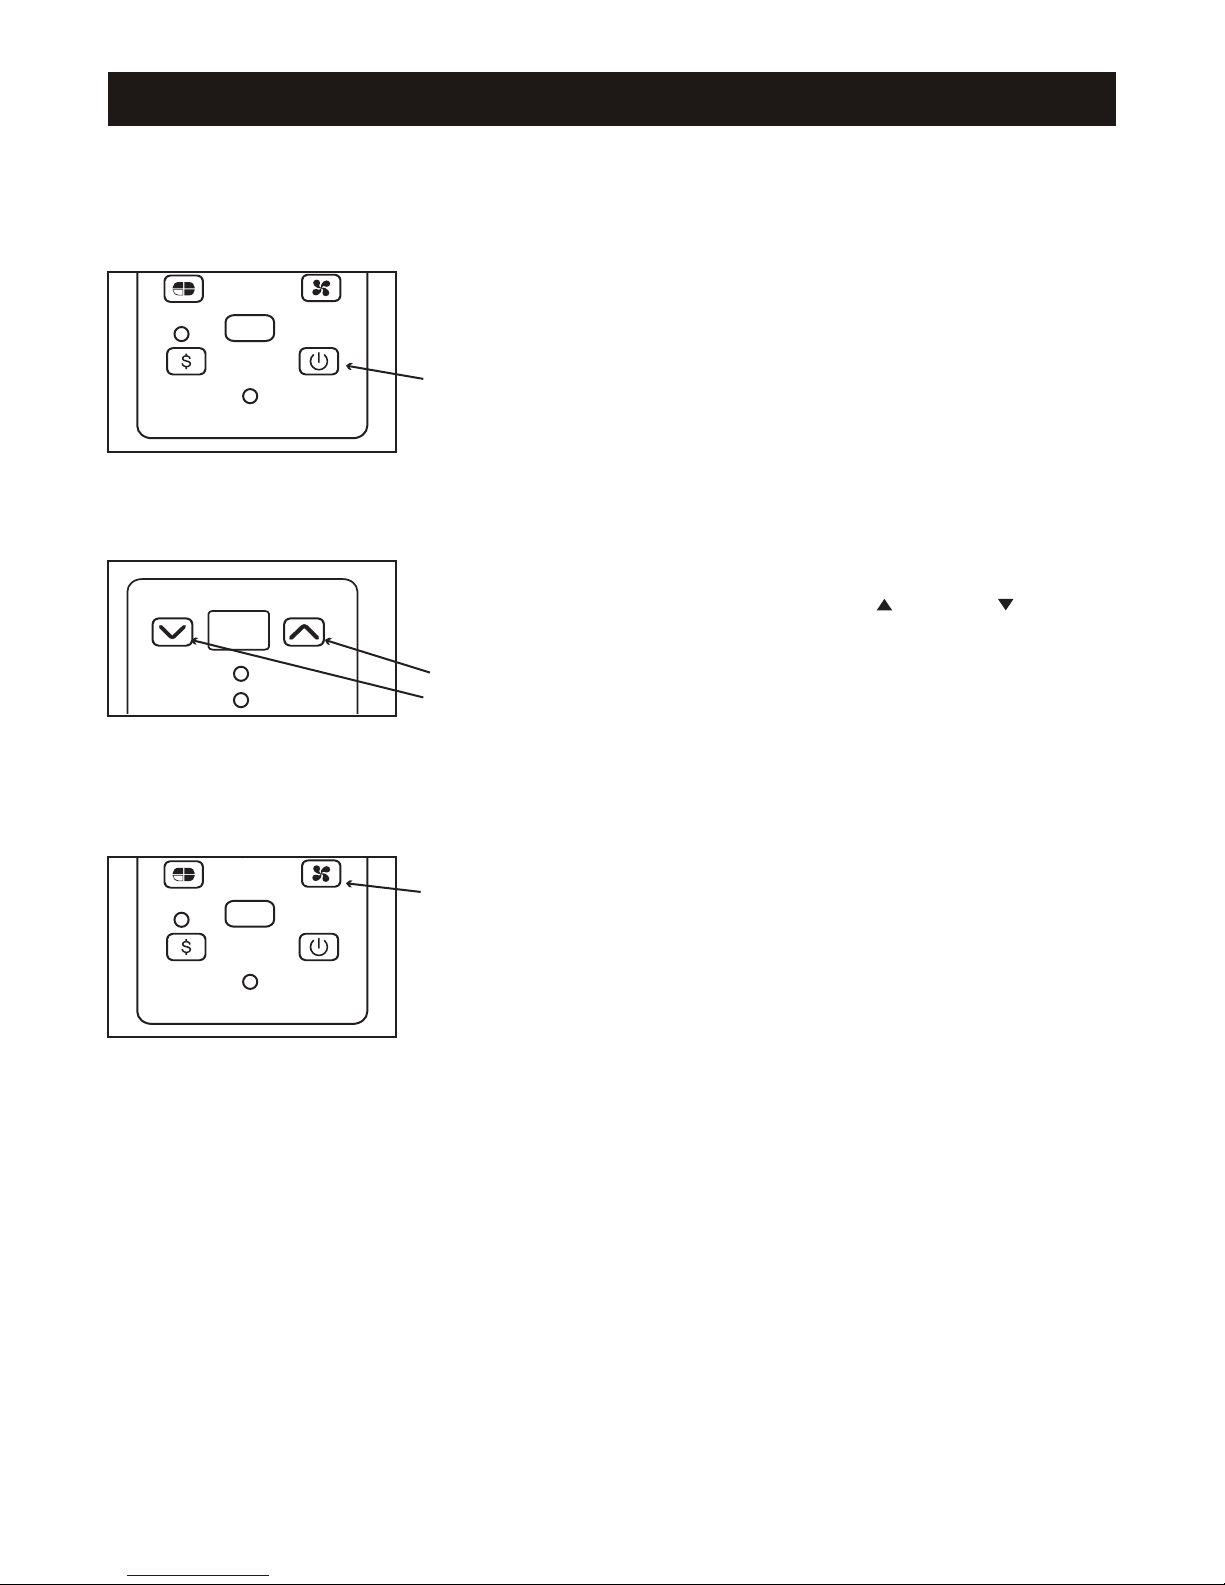
TO TURN UNIT ON:
Mode
Energy
Saver
Follow
Me
DO THIS:
Press the
On/Off button.
TO CHANGE TEMPERATURE SETTING:
TEMP/TIMER
DO THIS:
On
Off
Press to raise
Press to lower
TO ADJUST FAN SPEEDS:
Mode
Fan
DO THIS:
Press “Fan” to
select fan speed
Energy
Saver
Follow
Me
NOTE: (UP/DOWN button)
Press or hold e ither Up ( ) or Down ( ) but ton
until the desired temperature is seen on the
display. This temperature will be automatically
maintained anywhere between 62ºF (17ºC) and
86ºF (30ºC). If you want the display to read
the actual room temperature, see “To Operate
on Fan Only” section.
NOTE: (FAN button)
There are four (4) fan speeds: “Auto,” “Low,”
“Med” or “High.” Each time the button is pressed,
the fan speed mode is shifted. On “Dry” mode
the fan speed is controlled at low automatically.
6
Page 8
Low
Ion
AIR CONDITIONER FEATURES (CONTINUED)
TO SELECT THE
OPERATING MODE:
Auto
Cool
Dry
Fan
Mode
Ion
Fan
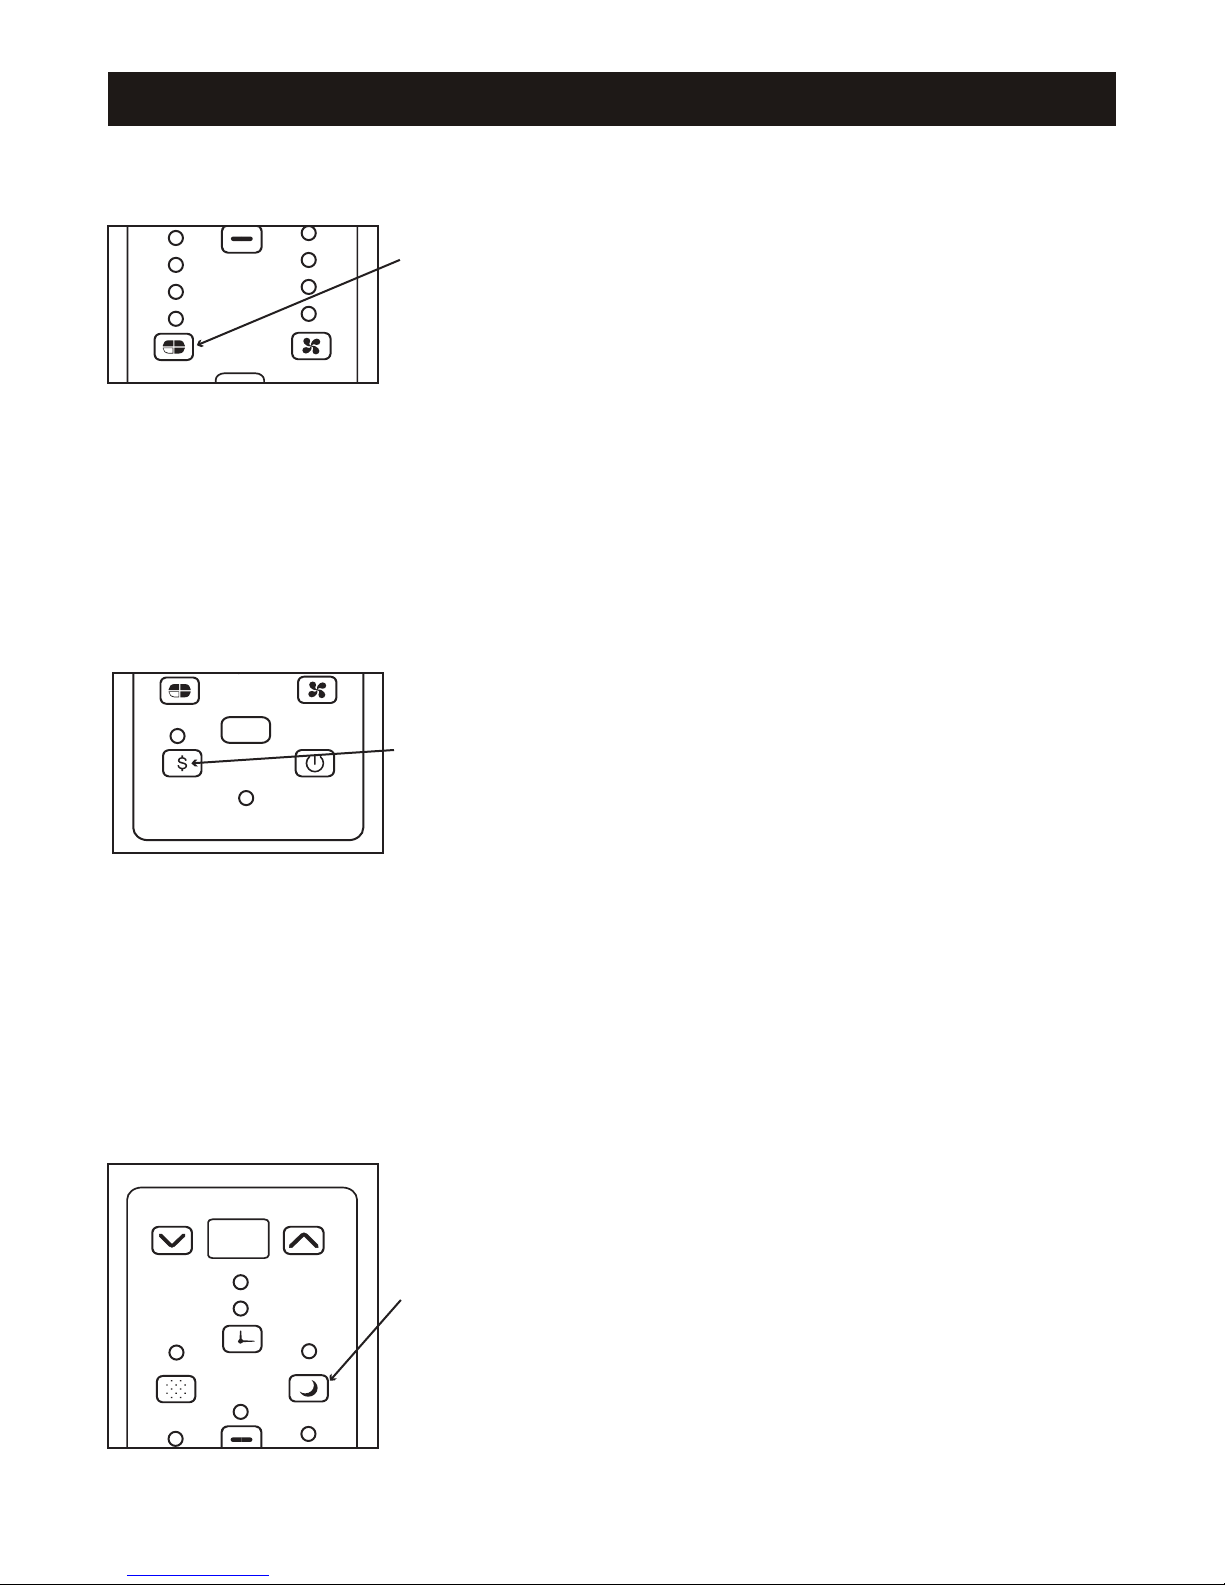
TO USE THE ENERGY
SAVER FEATURE:
Mode
Energy
Saver
Follow
Me
Fan
Auto
Low
Med
High
DO THIS:
Press the
“Mode” button.
DO THIS:
Press the
“Energy Saver”
button
NOTE: MODE button
To choose operating mode, press the “Mode” button.
Each time you press the button, a mode is selected
in a sequence that goes from “Auto,” “Cool,” “Dry,”
and “Fan.” The indicator light will be illuminated and
remain on once the mode is selected. The unit will
automatically initiate the Energy Saver function
under “Cool,” “Dry,” and “Auto” (only Auto-Cooling
and Auto-Fan) modes.
To operate on “Auto” feature:
When you set the air conditioner in “Auto” mode, it will
automatically select cooling, heating (on models with heating
capabilities), or fan only operation depending on what
temperature you have selected and the room temperature.
The air conditioner will control room temperature
automatically around the temperature you set.
In this mode, the fan speed cannot be adjusted.
It starts automatically at a speed according to the
room temperature. If the room does not get too warm,
it will stay at “Low” speed.
To operate on “Fan” only (not available on all models):
Use this function only when cooling is not desired,
such as for room air circulation or to exhaust stale
air. (Remember to open the vent during this function,
but keep it closed during cooling for maximum cooling
efficiency.) You can choose any fan speed you prefer.
During this function, the display will show the actual
room temperature, not the set temperature as in the
cooling mode.
SLEEP FEATURE:
TEMP/TIMER
On
Off
Timer
Check
Filter
Auto
Sleep
Auto
DO THIS:
Press “Sleep”
button
To operate on “Dry” mode:
In this mode, the air conditioner will reduce air humidity.
If the space is a closed or sealed area, some degree of
cooling will continue.
NOTE: ENERGY SAVER button
This function is available on “Cool,” “Dry,” and “Auto”
(only Auto-Cooling and Auto-Fan) modes. In this
mode,the fan will continue to run for 3 minutes after the
compressor shuts off.The fan then cycles on for 2
minutes,at 10 minute intervals, until the room
temperature is above the set temperature, at which
time the compressor turns back on and cooling starts.
NOTE: SLEEP button
In this mode the selected temperature will increase by
O
F/1(or 2)OC 30 minutes after the mode is selected. The
2
temperature will then increase by another 2
O
F/1(or 2)OC
after an additional 30 minutes. This new temperature
will be maintained for 6 hours before it returns to the
originally selected temperature. This ends the Sleep
mode and the unit will continue to operate as originally
programmed. The Sleep mode program can be
cancelled at any time during operation by again
pressing the “Sleep” button.
7
Page 9
Low
Auto
Med
High
TEMP/TIMER
Auto
Dry
On
Off
Sleep
Timer
Check
Filter
Ion
AIR CONDITIONER FEATURES (CONTINUED)
Auto
Fan
Mode
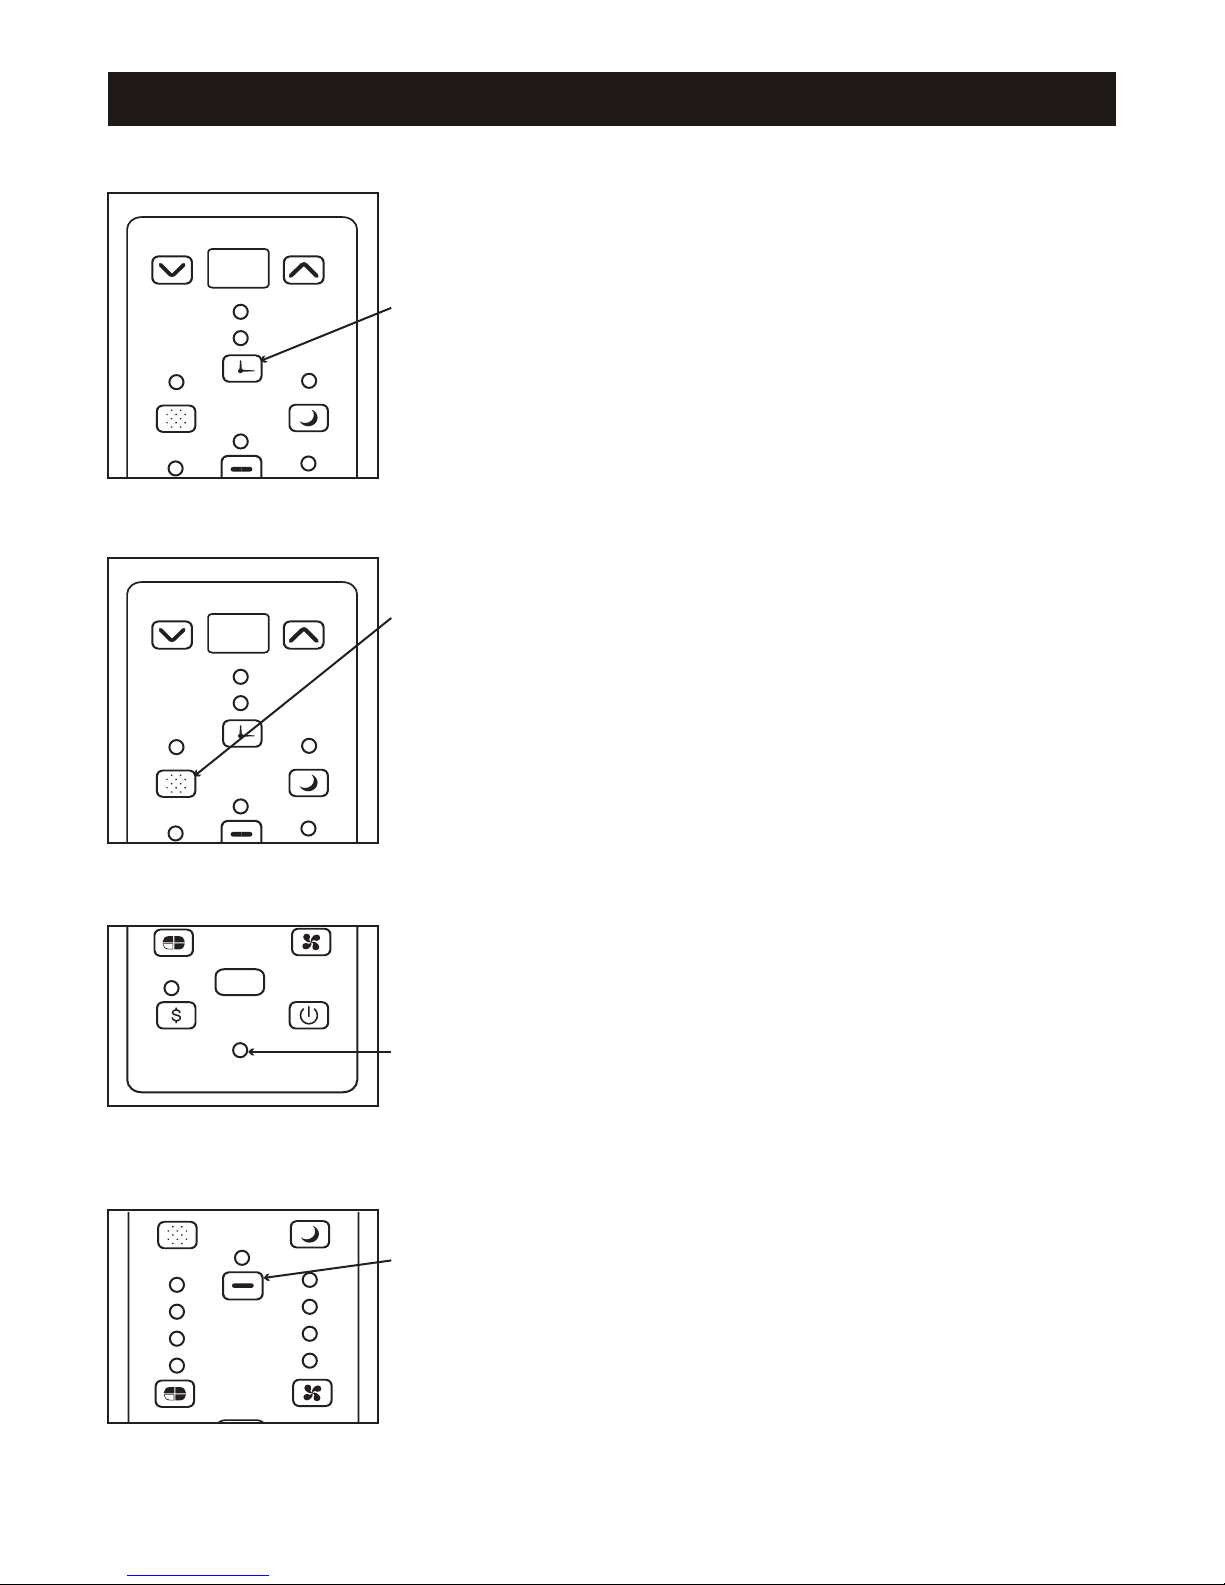
TIMER: AUTO START/
STOP FEATURE:
TEMP/TIMER
On
Off
Timer
Check
Filter
CHECK FILTER FEATURE:
Sleep
Auto
DO THIS:
Press “Timer”
button
NOTE: TIMER button
First press the “Timer” button. The indicator light
beside the word “On” will illuminate indicating the Auto
Start p rogram is on.
Press or hold the Up or Down Temp/Timer arrows to
change the Auto time by 0.5 hour increments, up to 10 hours,
then at 1 hour increments up to 24 hours.
The control will count down the time remaining until start.
The selected time will register for 5 seconds and the
system will automatically revert back to display the previous
temperature setting.
When the “Timer On” is displayed, press the “Timer” button
again and the “Timer Off” indicator light illuminates. It indicates
the Auto Stop program is initiated.
Turning the unit on or off at any time or adjusting the timer setting
to 0.0 will cancel the
Auto Start/Stop function.
TEMP/TIMER
Check
Filter
Auto
FOLLOW ME FEATURE:
Mode
Energy
Saver
CLEAN AIR FEATURE:
(on some models)
Check
Filter
Auto
Cool
Dry
Fan
Timer
Follow
Me
Ion
On
Off
Sleep
Fan
Sleep
Auto
Auto
Low
Med
High
DO THIS:
Press “Check
Filter” button
Light flashing
DO THIS:
Press “Clean
Air” button
NOTE: CHECK FILTER button
This feature i s a remi nder to clean the Air F ilter for
more efficient operation. The LED (light) will
illuminate
after
250 hours of operation. To reset after cleaning the filter, press
the “Check Filter”
button and the light will go off.
NOTE: FOLLOW ME indicator light
This feature can ONLY be activated from the remote control.
The remote control serves as a remote thermostat allowing for
precise temperature control at its location.
To activate the Follow Me feature, point the remote control
towards the unit and press the “Follow Me” button. The remote
displays the actual temperature at its location. The remote control
will send this signal to the air conditioner every 3 minutes
until the “Follow Me” button is pressed again. If the unit does
not receive the “Follow Me” signal during any 7 minute interval,
the unit will beep to indicate the Follow Me mode has ended.
The actual temperature can be displayed at the unit by
pressing the “Fan” only mode. When in the “Cool” mode, the
unit display indicates the set temperature.
NOTE: CLEAN AIR button
Press the “Clean Air” button.The ion
generator is
energized and will help to remove pollen and impurities
from the air and trap them in the filter.
8
Page 10
AIR CONDITIONER FEATURES (CONTINUED)
Sleep
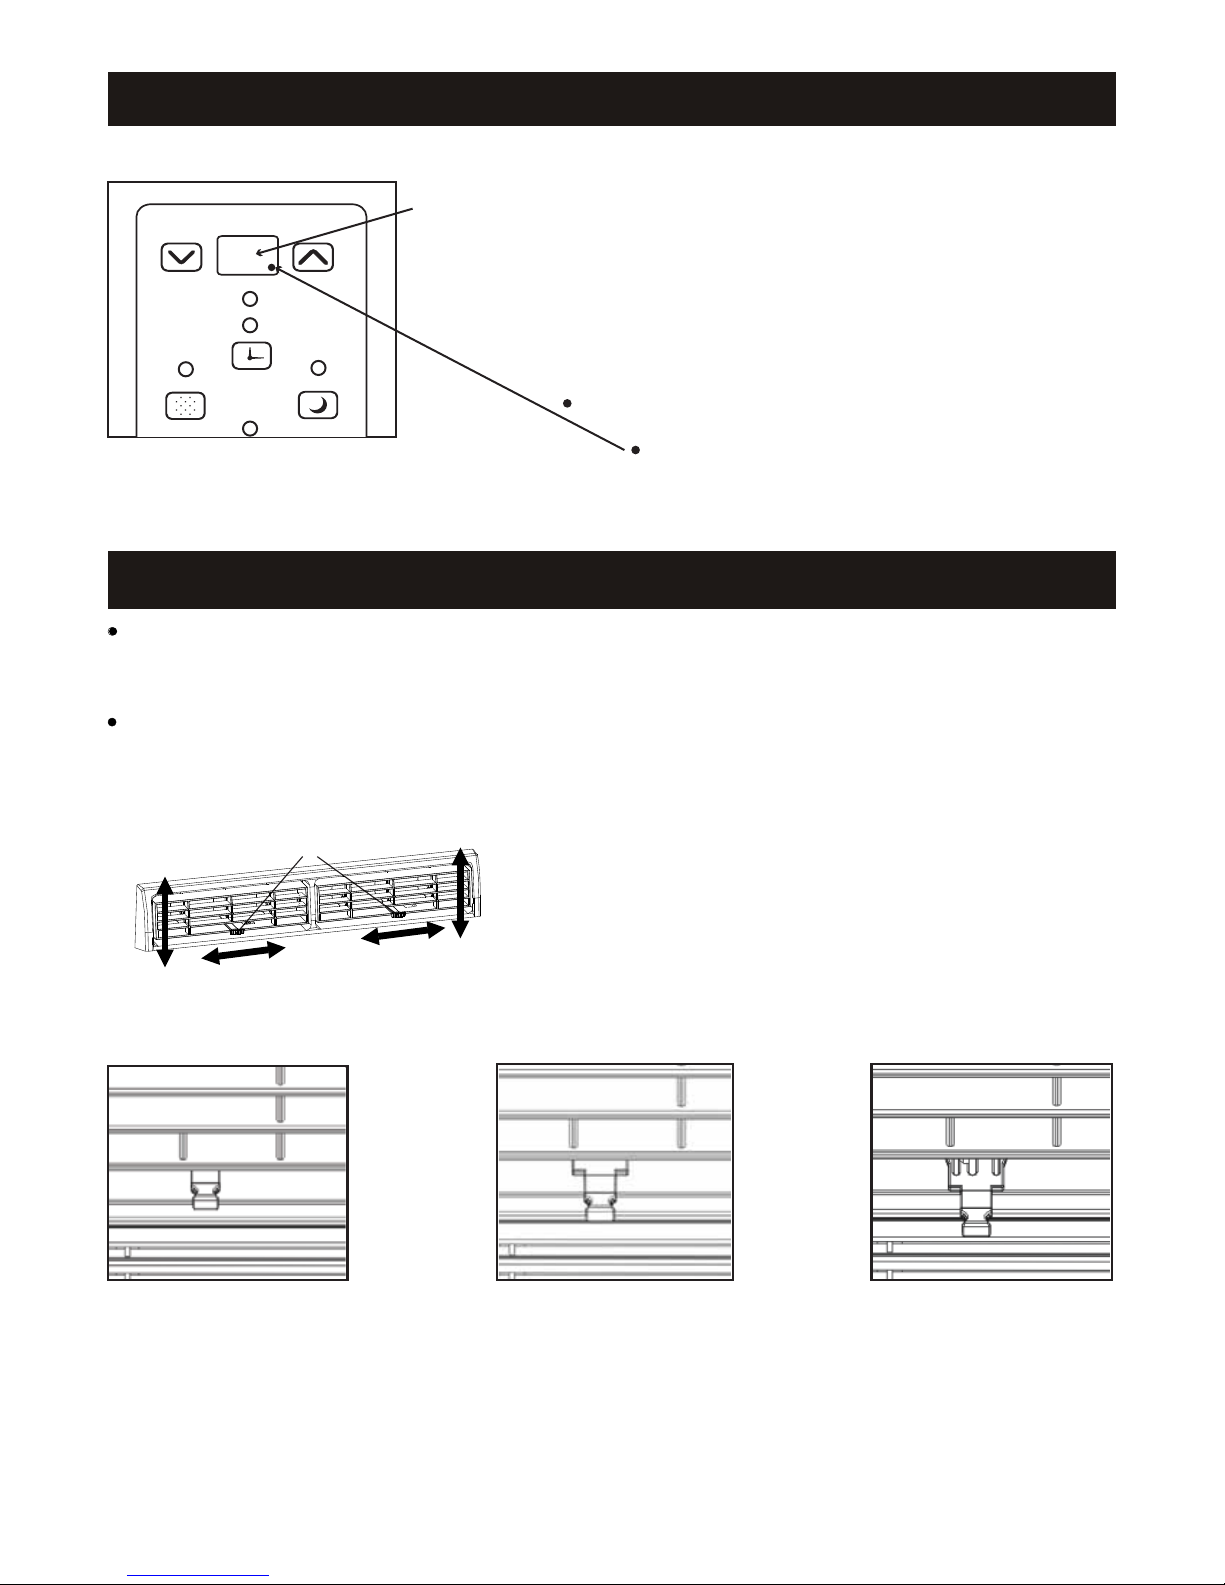
DISPLAYS:
NOTE: DISPLAYS
Shows the set temperature in “°C” or “°F” and the Auto-
TEMP/TIMER
Displays
timer settings. While on “Fan” only mode, it shows the
room temperature.
Error Codes:
On
Off
AS - Room temperature sensor error - Unplug the unit and
plug it back in. If error repeats, call customer service.
HS - Electric heating sensor error - Unplug the unit and
Timer
plug it back in. If error repeats, call customer service.
- Evaporator temperature sensor error - Unplug the unit
Check
and plug it back in. If error repeats, call customer service.
(“ ” is displayed as shown in left picture.)
NOTE: In “Fan” only mode, unit will display “Lo” or “Hi”.
NOTE: If the unit breaks off unexpectedly due to power being cut, it will restart with the previous function setting
automatically when the power resumes.
ADDITIONAL THINGS YOU SHOULD KNOW
The Cool circuit has an automatic 3 minute time de layed start if t he unit is tur ned off and on quickly.
After unit is turned off, leave unit off for a minimum of 3 minutes before attempting to turn back on. This prevents
overheating of the compressor and possible circuit breaker tripping. The fan will continue to run during this time.
The control is capable of displaying temperature in degrees Fahrenheit or degrees Celsius.
To convert from one to the other, press and hold the Up and Down Temp/Timer buttons at the
same time, for 3 seconds.
Air D irect ional Louvers
Levers
Air
Direction
Fresh Air Vent Control (on some models):
Figure A
(VENT CLOSED)
The Fresh Air Vent allow s the air condi tioner to:
1. Reci rculate inside air - Vent Closed (See Fig.A)
2. Draw fresh air into the room - Vent Open (see Fig.B)
3. Exch ange air from the room and draw f resh air into
3. Exch ange air from the room and draw f resh air into
the room - Vent and Exhaust Open (see Fig. C)
the room - Vent and Exhaust Open (see Fig. C)
HOW TO USE:
Use the 4-way directional louvers to direct the air flow
up or down and left or right throughout the room as
needed. Pivot horizontal louvers until the desired up/
down direction is obtained.
Move the levers from side to side until the desired
left/right direction is obtained.
Figure B
(VENT OPEN)
Figure C
(VENT & EXHAUST OPEN)
9
Page 11
INSTALLATION INSTRUCTIONS
BEFORE YOU BEGIN
Read these instructions completely
and carefully.
IMPORTANT- Save these instructions.
IMPORTANT- Observe all
governing codes and ordinances.
Note to Installer- Be sure to leave these
instructions with the Consumer.
Note to Consumer- Keep these
instructions for future reference.
Skill level- Installation of this appliance
requires basic mechanical skills.
Completion time- Approximately 1 hour.
We recommend that two people install
this product.
Proper installation is the responsibility
of the installer.
Product failure due to improper installation
is not covered under the Warranty.
You MUST use all supplied parts and use
proper installation procedures as described
in these instructions when installing this air
conditioner.
CAUTION
Do not, under any circumstances, cut or
remove the third (ground) prong from the
power cord.
Do not change the plug on the power cord
of the air conditioner.
Aluminum house wiring may present special
problems- consult a qualified electrician.
When handling unit, be careful to avoid cuts from
sharp metal edges and aluminum fins on front and
rear coils.
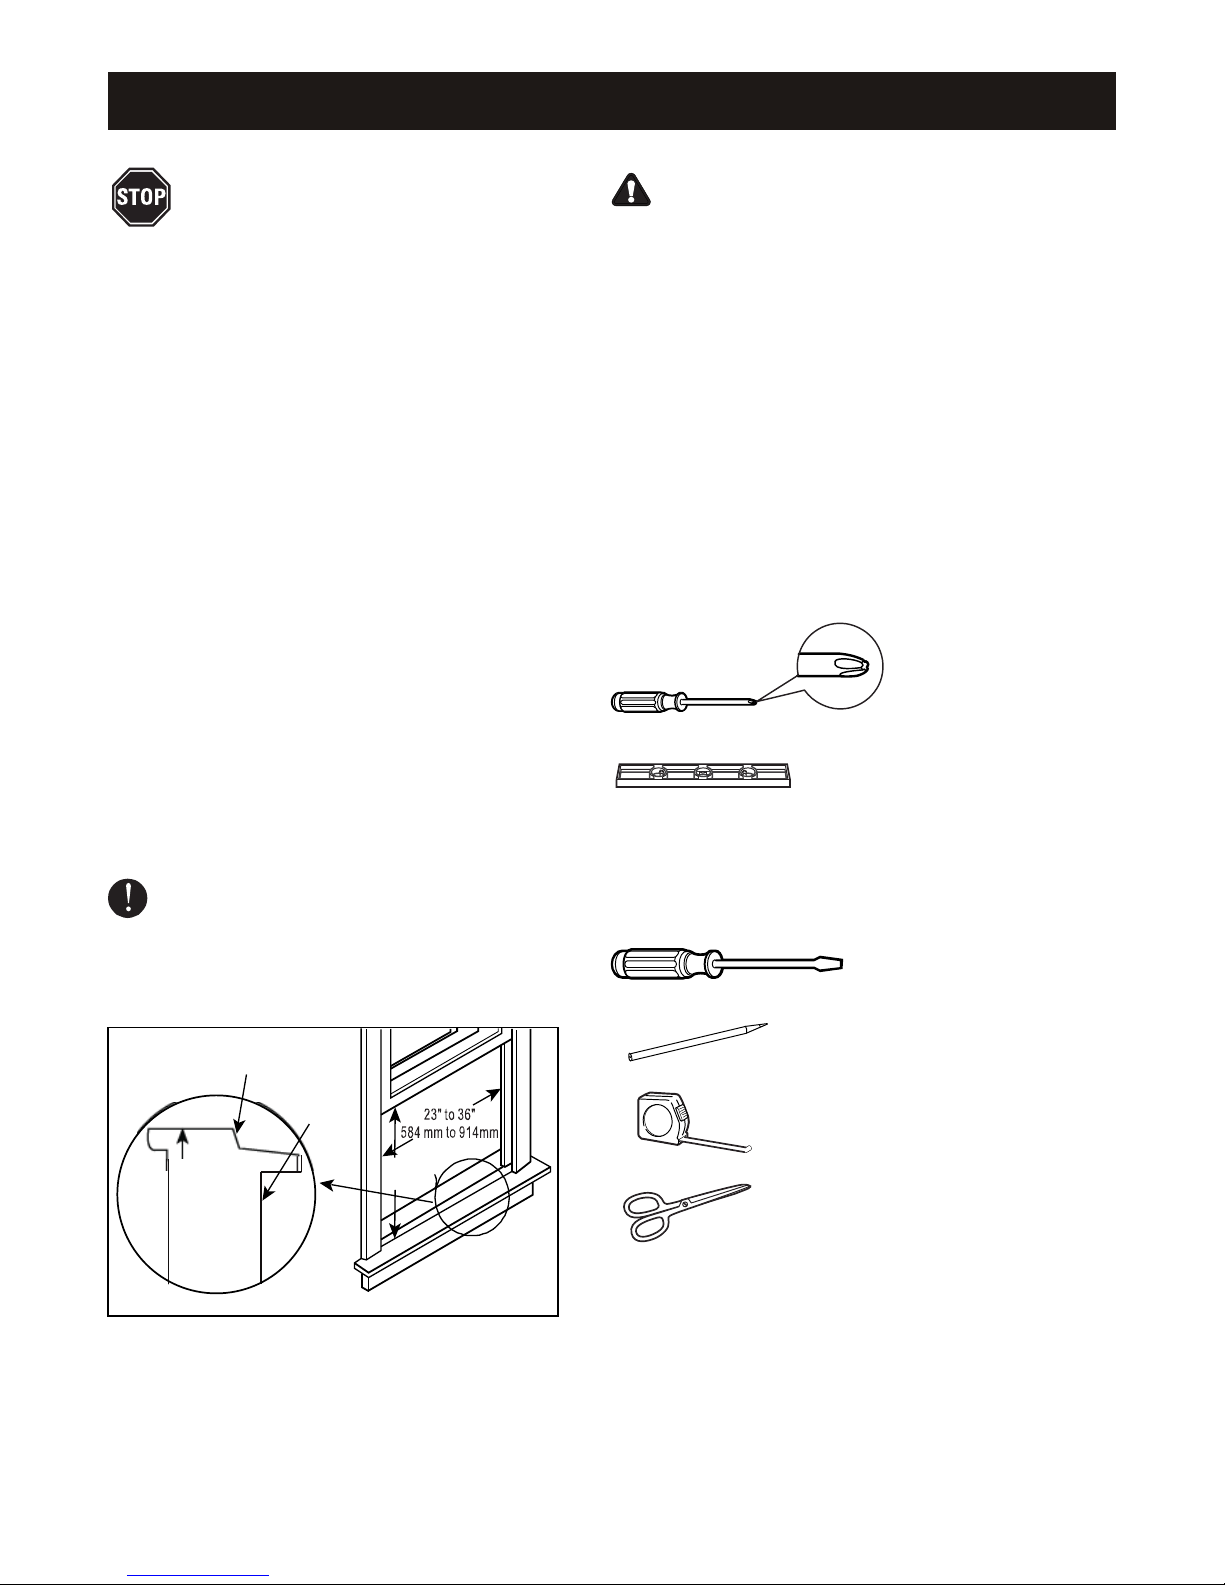
TOOLS YOU WILL NEED
Phillips
Screwdriver
Level
WINDOW REQUIREMENTS
Your air conditioner is designed to install in
standard double hung windows with opening
widths of 23 to 36 inches (584 mm to 914 mm).
TOOLS YOU MAY USE
Screwdriver
Pencil
OFFSET
EXTERIOR
WALL
INNER
INNER
WINDOW
SILL
INTERIOR
WALL
NOTE: H = vertical opening. See Table 1 on next page.
H
Wooden Windows
Ruler or tape measure
Scissors or knife
NOTE: Save carton and these Installation Instructions for future reference.
The carton is the best way to store unit during winter or when not in use.
10
Page 12
INSTALLATION INSTRUCTIONS (CONTINUED)
PREPARE THE WINDOW
1
Lower sash must open sufficiently to allow a clear
vertical opening (H) of the following size. (See
Table 1 below.) Side louvers and the rear of the AC
must have clear air space to allow enough airflow
through the condenser for heat removal. The rear
of the unit must be outdoors, not inside a building
or garage.
Mounting Hardware
3/4 (or 1/ 2 )
Screws
(7)
Lock Frame
(2)
Table 1
Model
Size (H)
2
5000~8000 Btu/h 10000~12000 Btu/h
14” (356 mm) 15-1/2” (394 mm)
PREPARE AIR CONDITIONER
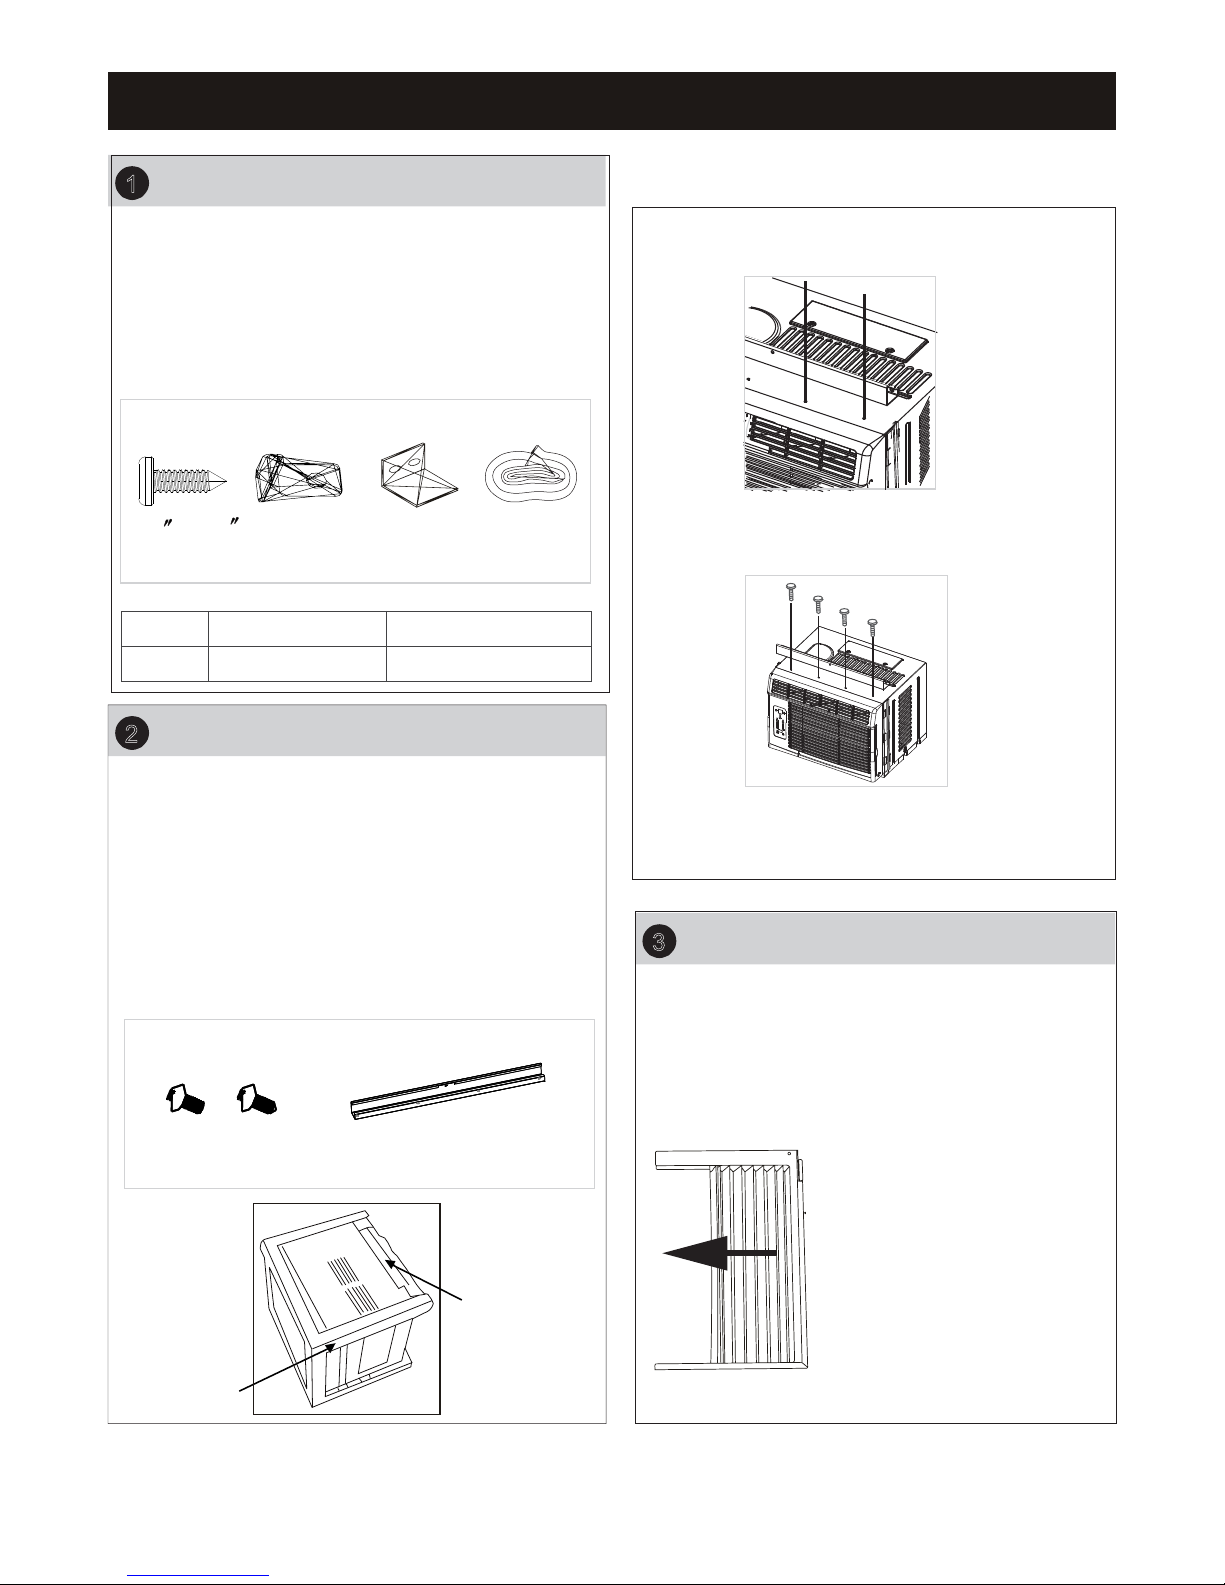
A: Remove the air conditioner from the carton and
place on a flat surface.
NOTE: The top rail hardware and Fig. A, Fig. B,
and Fig. C are not applicable to the units
10,000 BTU/h or greater. For models less than
10,000 BTU/h, the top rail must be assembled.
Remove top rail from the rear of the packaging
B:
material as shown in Fig. A.
Sash Lock
(1)
Window sash
seal foam
(1)
Top Rail Hardware
oror
C: Align the hole in the top rail with those in the
top of the unit as shown in Fig.B
Fig.B
D: Secure the top rail to the unit with the 3/8"
screws as shown in Fig.C.
Fig.C
NOTE: For safety reasons, all four(4) screws
MUST be securely fastened.
INSTALL THE ACCORDION PANELS
3
NOTE: Top rail and sliding panels on each side
are offset to provide the proper pitch of 5/16" to
the rear. This is necessary for proper condensed
water utilization and drainage. If you are not
using the side panels for any reason, this pitch to
the rear must be maintained.
3/8" Screws
(4)
Packaging
Top Rail
(1)
Fig.
A
Top Rail
A.Place unit on floor, a bench
or a table. Hold the
accordion panel in one
hand and gently pull back
the center to fill the
open end. See Fig.1.
Fig.1
11
Page 13
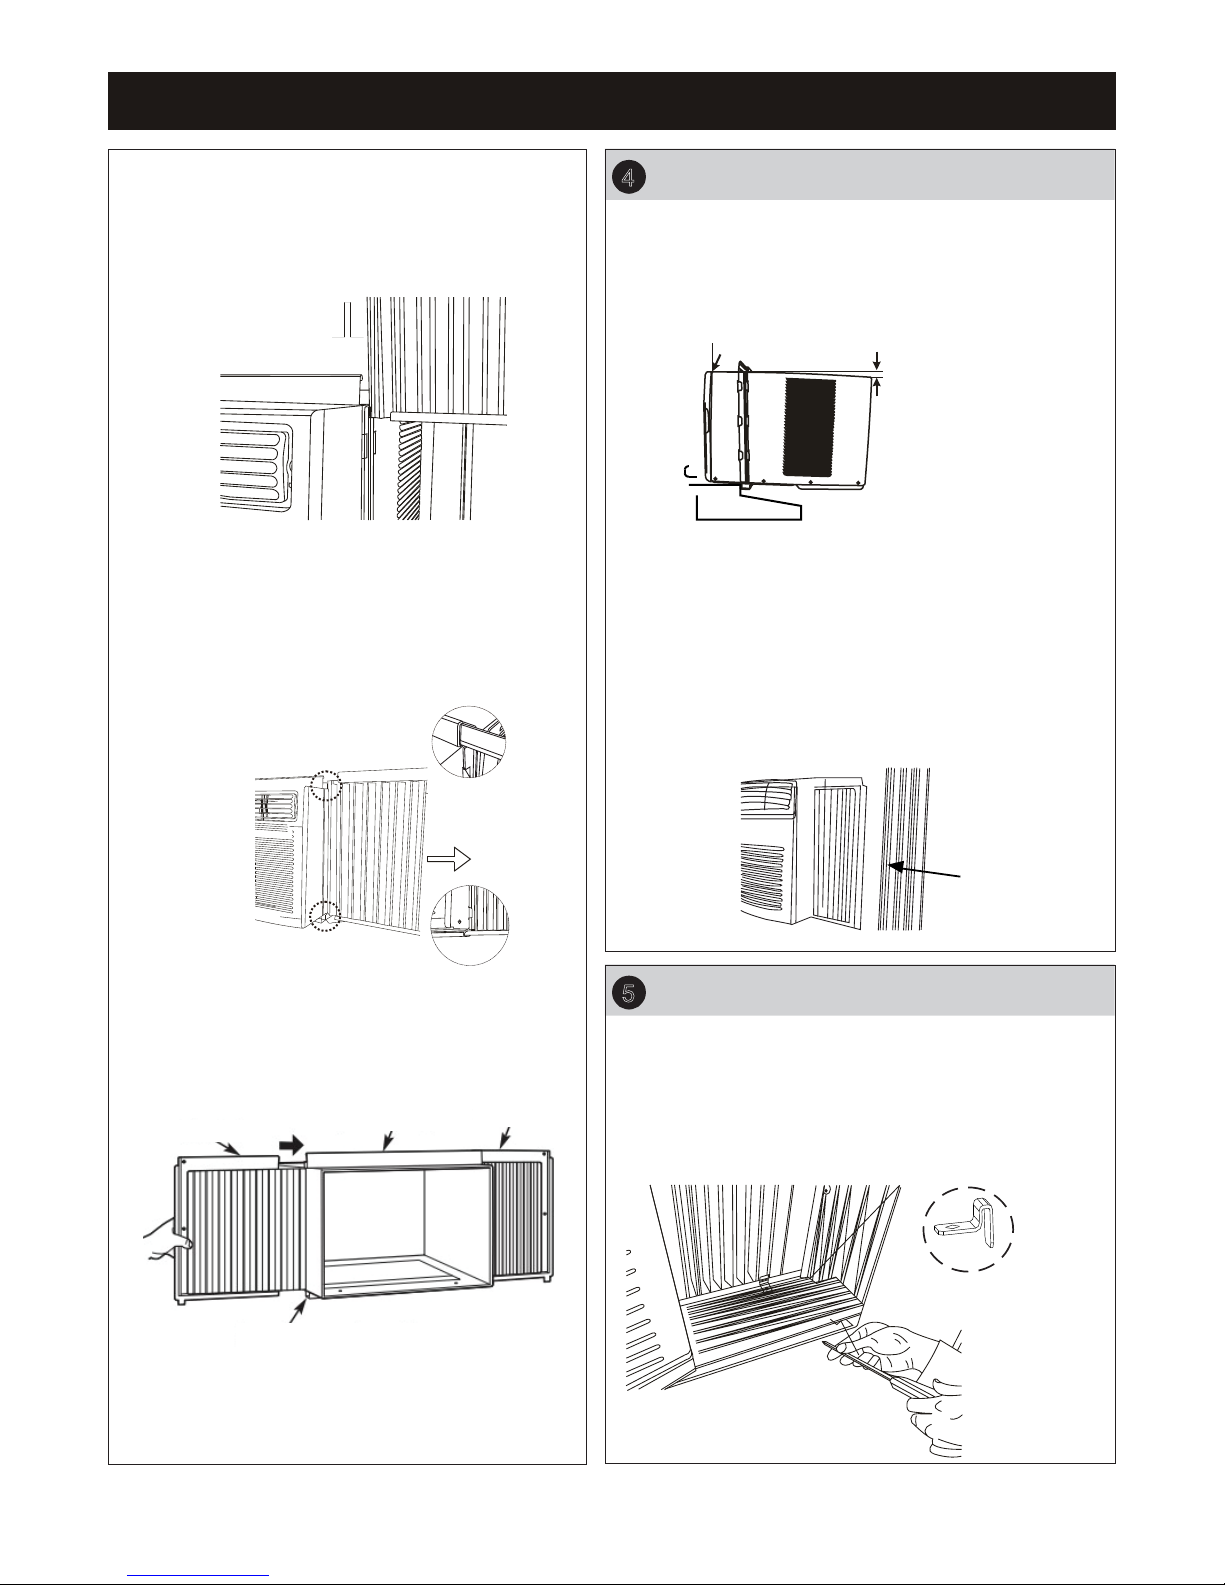
INSTALLATION INSTRUCTIONS (CONTINUED)
B. Slide the free end "「" section of the panel
directly into the cabinet as shown in Fig. 2.
Slide the panel down. Be sure to leave
enough space to slip the top and bottom of
the frame into the rails on the cabinet.
"「"section
Fig. 2
C. Once the panel has been installed on the
side of the cabinet, make sure it sits securely
inside the frame channel by making slight
adjustments. Slide the top and bottom ends
of the frame into the top and bottom rails of
the cabinet. Fig. 3.
Top Rail
SECURE THE ACCORDION PANELS
4
A. Keeping a firm grip on the air conditioner,
carefully place the unit into the window opening so
the bottom of the air conditioner frame is against
the window sill (Fig. 5). Carefully close the window
behind the top rail of the unit.
Fig. 5
INSIDE
NOTE: Check that air conditioner is tilted back
approximately H (Fig. 5 above) (tilted about 3
Measure from the cabinet edge
OUTSIDE
Wooden Windows
H
H: Approx. 3/4” to 1” for
5,000-8,000 BTU units
H: Approx. 1” to 1 3/8” for
10,000-12,000 BTU units
O
to 4
downward to the the outside). If, after proper
installation, condensation does not drain from the
overflow drain hole during normal use, adjust slope.
B. Extend the side panels out against the window
frame (Fig. 6).
Fig. 6
O
Bottom Rail
Fig. 3
D. Slide the panel all the way in and repeat
on the other side.
Top Rail
Top left
Bottom Rail
Fig. 4
Top right
NOTE: If storm window blocks AC, see Fig. 11.
window
frame
INSTALL SUPPORT BRACKET
5
A. Place the frame lock between the frame
extensions and the window sill as shown in Fig. 7.
Drive 3 / 4" (19 mm ) or 1/2 " (12.7 mm) locking
screws through the frame lock and into the sill.
NOTE: To prevent window sill from splitting,drill
1/8" (3 mm) pilot holes before driving screws.
Fig. 7
12
Page 14
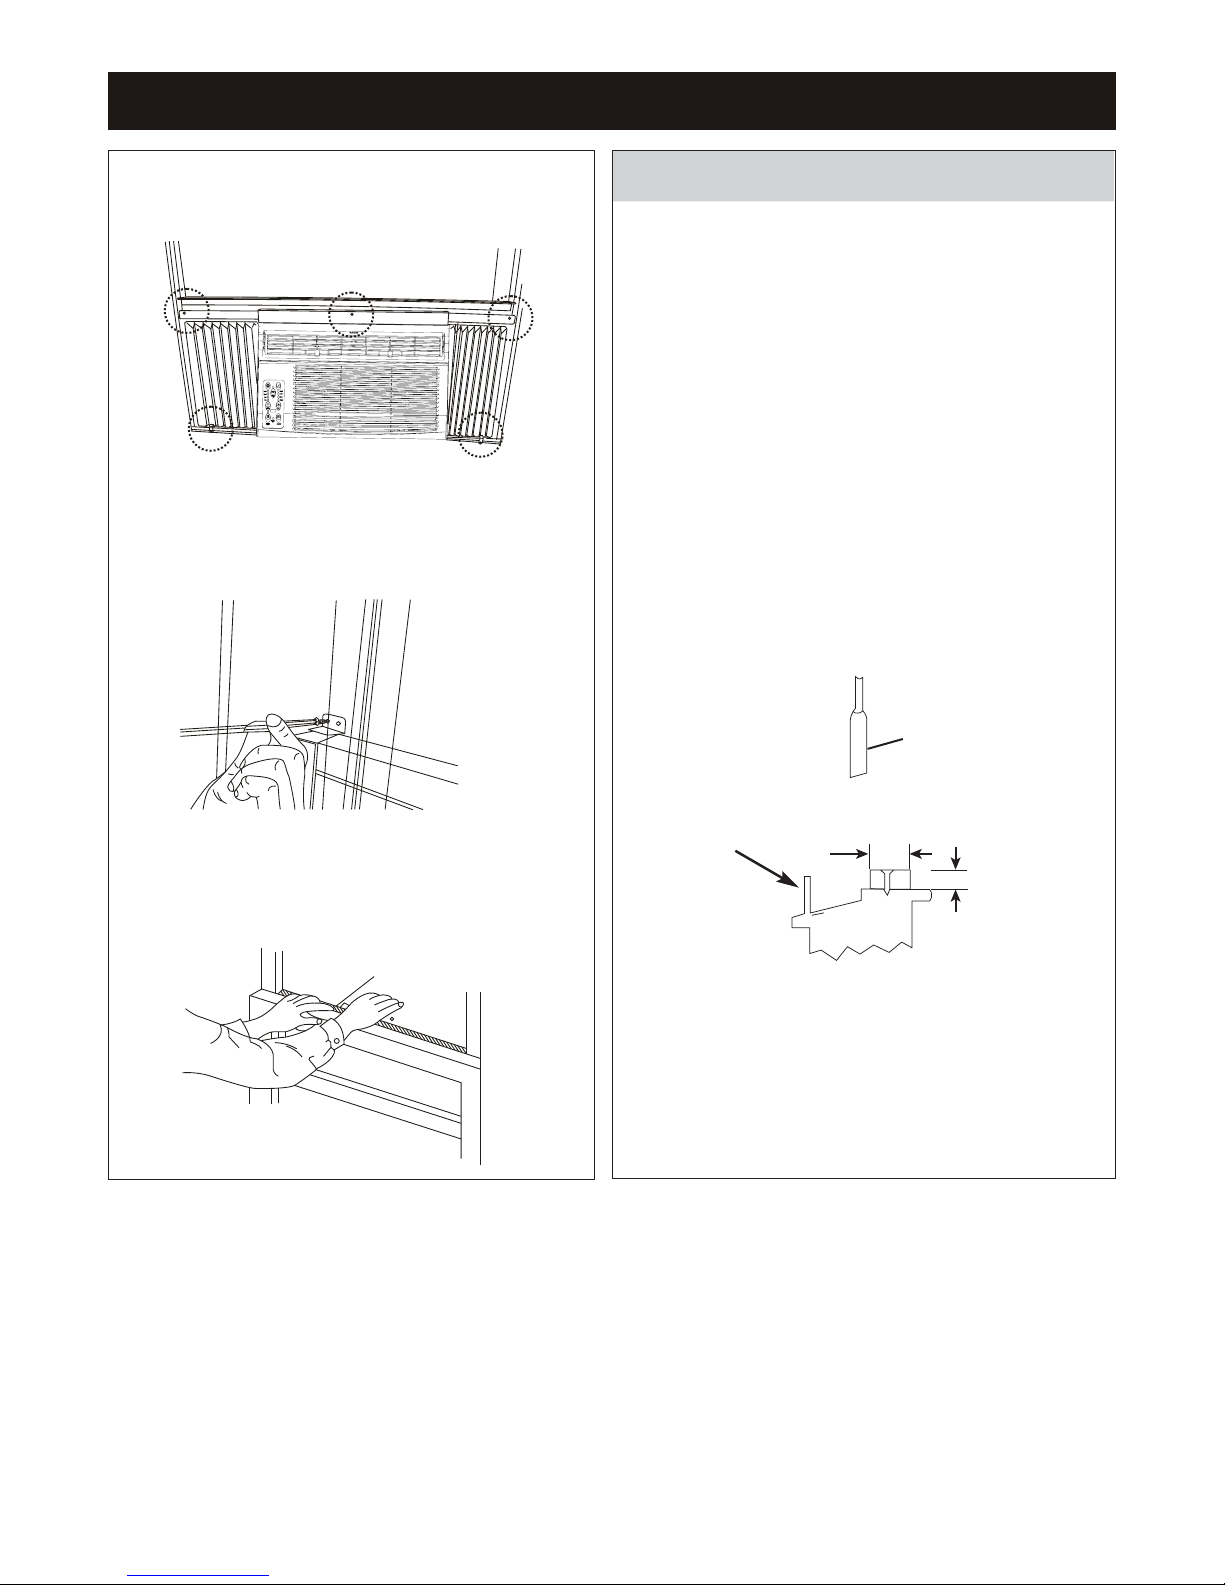
INSTALLATION INSTRUCTIONS (CONTINUED)
B. Drive 3/4" (19 mm) or 1/2" (12.7 mm)
locking screws through frame holes into window
sash (Fig. 8).
Fig. 8
C. To secure lower sash in place, attach right
angle sash lock with 3/4" (19 mm) or 1/2"
(12.7 mm) screw as shown (Fig. 9).
If AC is Blocked by Storm Window
Add wood as shown in Fig.11, or remove storm
window before air conditioner is installed.
If storm window frame must remain, be sure the
drain holes or slots are not caulked or painted shut.
Accumulated rain water or condensation must be
allowed to drain out.
Removing AC From Window
● Turn AC off, and disconnect power cord.
● Remove sash seal from between windows, and
unscrew safety sash lock.
● Remove screws installed through frame and
frame-lock.
● Close (slide) side panels into frame.
● Keeping a firm grip on air conditioner, raise sash
and carefully remove.
● Be careful not to spill any remaining water
while lifting unit from window. Store parts WITH
air conditioner.
SASH
Fig. 9
D. Cut Window sash seal foam and insert it in the
space between the upper and lower sashes
(Fig. 10).
FOAM SEAL
Fig. 10
Storm window
frame or other
obstruction.
1-1/2" min
(38 mm)
Fig. 11
Board
thickness
as required,
for proper
pitch to rear,
along entire
sill. Fasten
with nails or
screws.
13
Page 15
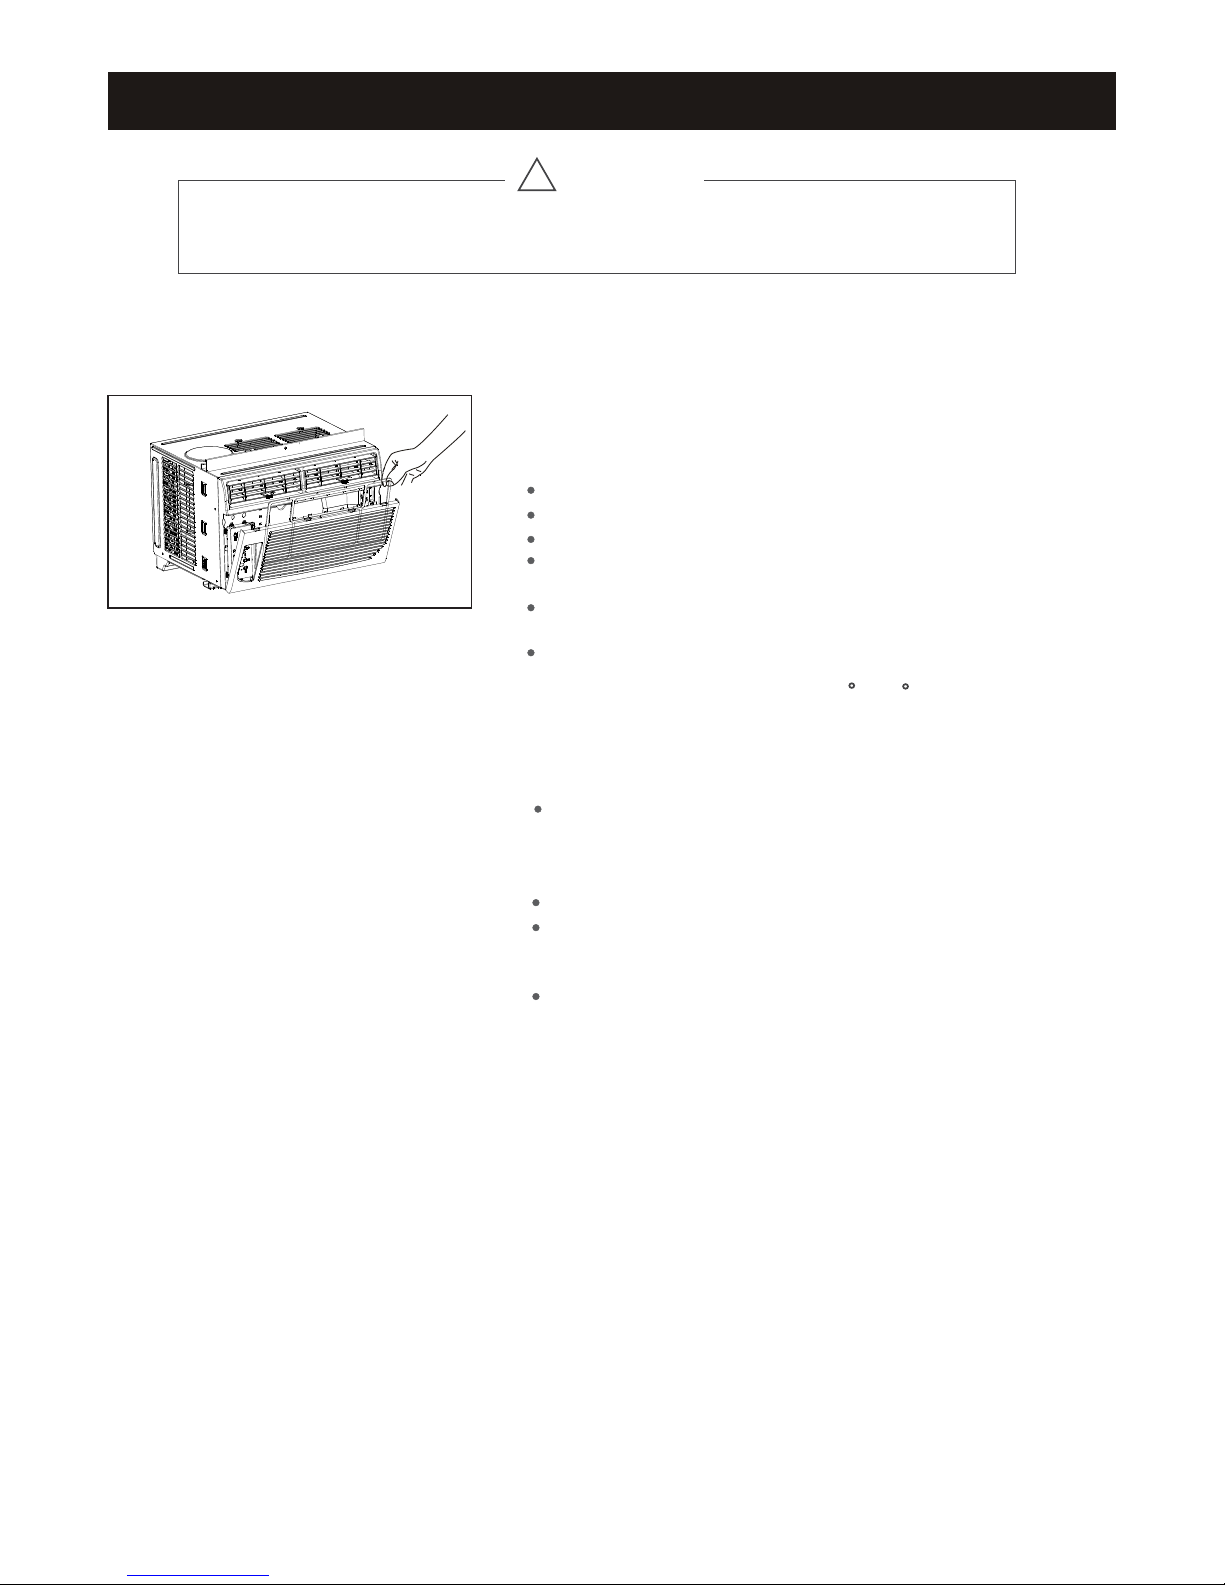
CARE AND CLEANING
CAUTION
!
Clean air conditioner occasionally to keep it looking and operating like new. Be sure to
unplug the unit before cleaning to prevent shock or fire hazards.
Air Filter Cleaning
The air filter should be cleaned at least every two weeks or as
necessary. Trapped particles in the filter can build up and cause an
accumulation of frost on the cooling coils.
Push the vent handle to the Vent Closed position (where applicable).
Open the front panel.
Grasp the filter by the center and pull up and out.
Wash the filter using liquid dishwashing detergent and warm water.
Rinse filter thoroughly.
Gently shake excess water from the filter. Be sure the filter is
thoroughly dry before replacing.
As an alternative, vacuum the filter clean.
N
NOTE: Never use hot water over 104 F (40 C) to clean the air filter.
Never attempt to operate the unit without the air filter.
Cabinet Cleaning
Be sure to unplug the air conditioner to prevent shock or fire
hazard. The cabinet and front may be dusted with an oil-free
cloth or with a cloth dampened in a solution of warm water and
mild liquid dishwashing detergent. Rinse thoroughly and wipe dry.
Never use harsh cleaners, wax or polish on the cabinet front.
Be sure to wring excess water from the cloth before wiping the
controls. Excess water in or around the controls may cause
damage to the air conditioner.
Plug in air conditioner after unit has dried completely.
Winter Storage
If air conditioner will be stored during the winter, remove it
carefully from the window according to the installation
instructions. Cover it with plastic or return it to the original
carton. Always store unit in upright position.
14
Page 16
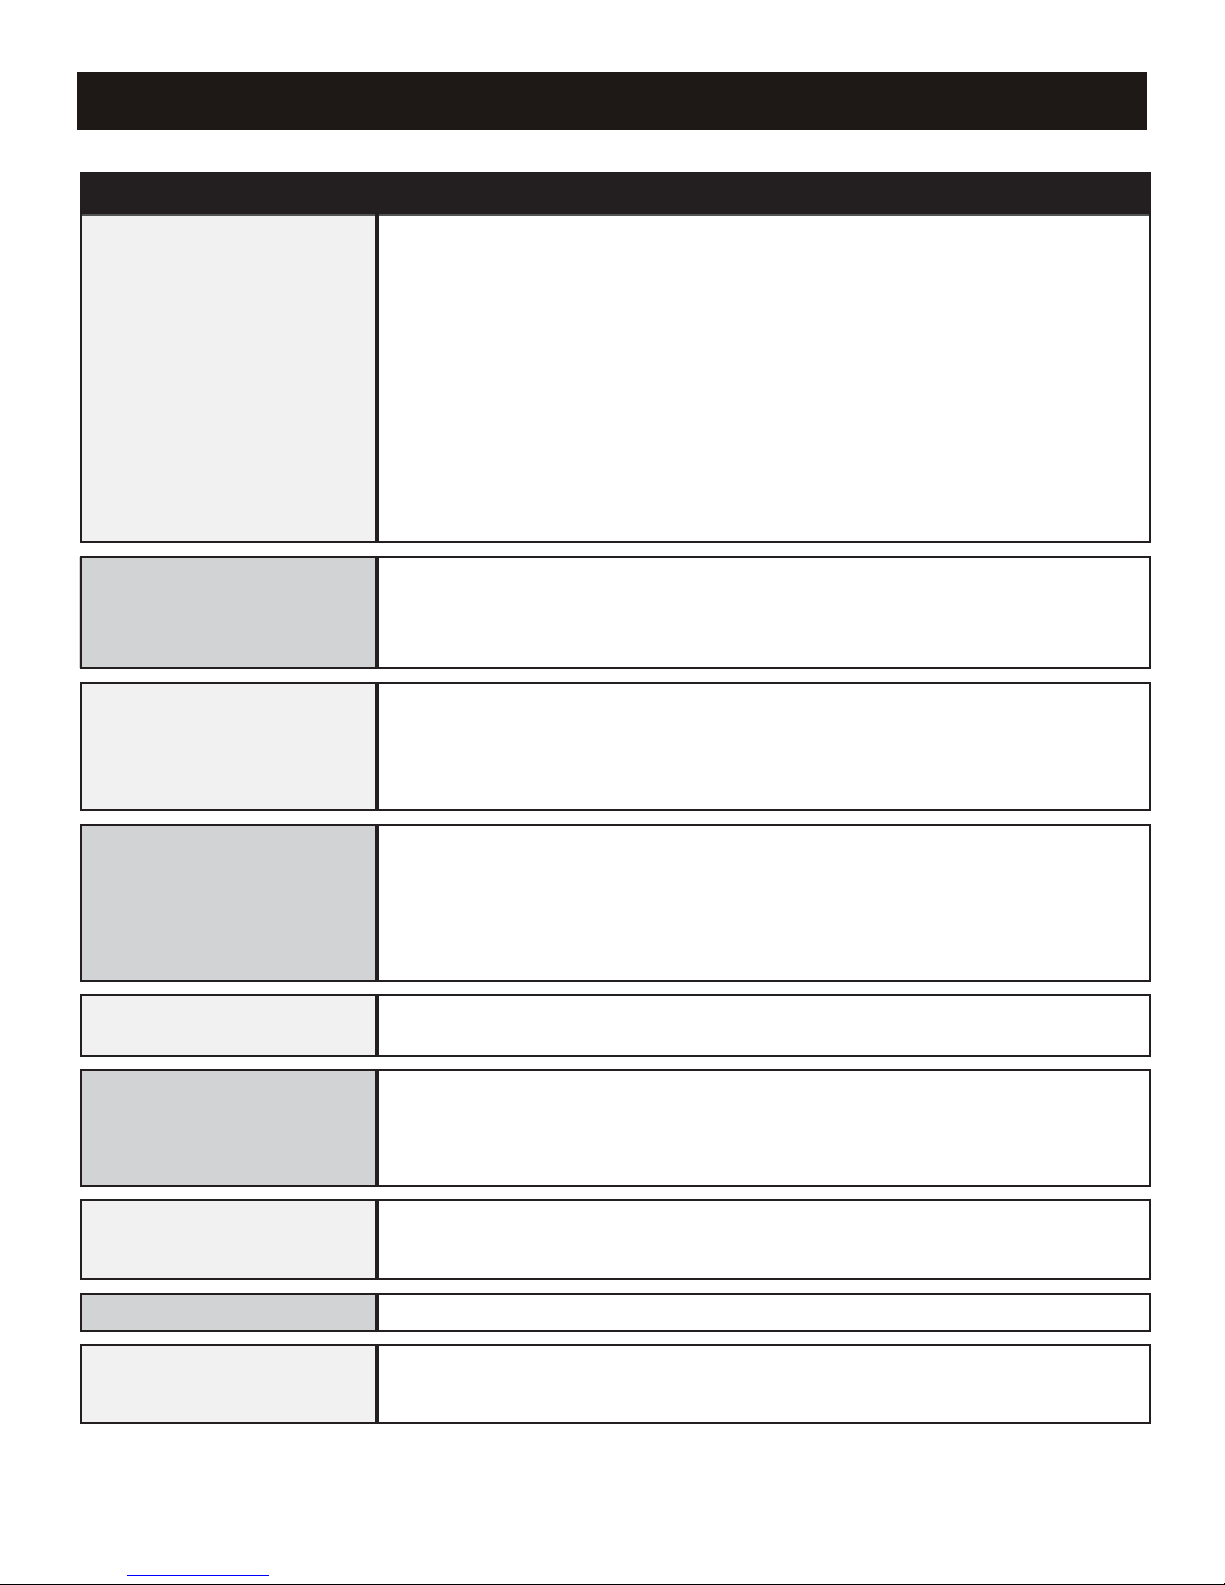
Before calling for service, please review the chart below.
Issue Possible Solutions
AIR
CONDITIONER NOT
COOLING ROOM, OR NOT
BLOWING COLD AIR
TROUBLESHOOTING TIPS
• Be sure unit is not too large or too small for the area of the room.
• Verify that all doors, windows, curtains and any other openings are closed off. Verify nothing is obstructing the
front grille of unit, such as curtains, etc.
• Allow enough time for room to cool, especially if outside temp is very high.
• Check that the filter is not dirty and louvers are open all the way and blowing in the direction desired.
• Check that unit is set to Cool Mode and that temperature is down enough (but not too low).
• If unit is near a heat source, such as a stove, etc., then relocate unit.
• If air coming from unit is cool to the touch, then unit is working properly; please double check the first three
bullet points above.
• If using Follow Me remote feature, move remote away from unit.
• Temperature sensor behind air filter touching cold coil. These two elements should not be touching.
Carefully straighten tube away from coil.
• Unplug unit for at least 5 minutes. Follow Reset instructions on plug.
AIR CONDITIONER COOLING BUT
ROOM IS TOO WARM - ICE
FORMING ON COOLING COIL
BEHIND DECORATIVE FRONT
AIR CONDITIONER
CYCLING ON AND OFF TOO
FREQUENTLY OR NOT ENOUGH
UNIT WILL NOT TURN ON
UNIT BLOWS FUSES OR POPS
CIRCUIT BREAKER
AIR CONDITIONER IS
MAKING NOISES
• Outdoor temperature is below 64ºF (18ºC). To defrost the coil, set to Fan Only mode.
• Air filter may be dirty. Clean filter. Refer to Care and Cleaning section. To defrost, set to Fan Only mode.
• Thermostat is set too cold for night-time cooling. To defrost the coil, set to Fan Only mode. Then, set
temperature to a higher setting.
• Be sure unit is not too large or too small for the area of the room.
• Remove grille and make sure the temperature sensor is not too close to the coils. These two elements should
not be touching. Carefully straighten tube away from coil.
• Make sure nothing is blocking the grille or side vents.
• Make sure there is no dirt or debris inside the unit or on the filter.
• Reset circuit breaker. Make sure there are not too many items (ie lamps, TV’s, etc.) working off the
same breaker.
• Check plug connection.
• If plug is operating on an on/off switch, be sure that the switch is ‘on’.
• Try plugging unit into another outlet.
• Unplug unit for at least 5 minutes. Follow Reset instructions on plug.
• Make sure there are enough available amps on the circuit for the air conditioner.
• Large units which run on a 230v will require a dedicated 20 or 30 amp circuit.
• Check to be sure the unit is free from debris such as leaves, sticks, etc. Verify nothing is obstructing the unit.
• Check the fan blade for cracks or chips.
• Make sure the unit is properly and securely mounted inside the window or wall.
• Clean the air filter.
WATER PUDDLES INSIDE UNIT
OR IS COMING INTO ROOM
WATER DRIPPING OUTSIDE
REMOTE SENSING / FOLLOW ME
DEACTIVATING PREMATURELY
• Adjust the slope of the unit so that it drains downward toward the exterior of the home.
(See Installation Instructions.)
• Make sure that there is no debris blocking the drainage area of the unit.
• Unit is removing a large quantity of moisture from a humid room. This is normal during excessively humid days.
• Remote control not located within range. Place remote control within 20 ft and 180º radius of the front
of the unit.
• Remote control signal obstructed. Remove obstruction.
NOTE: A highly recommended troubleshoot for any issue in general consists of turning off unit and unplugging for 5 minutes.
It is also recommended to try another wall outlet.
15
Page 17
Your Source for Home Comfort
Distributed by:
Perfect Aire, LLC
5151 Belt Line Rd.
Suite 878
Dallas, TX 75254
877-365-6274
www.perfectaire.us
Specification and performance data is subject to change without notice.
Printed in PRC
 Loading...