

Perfect Aire 1PAMSH09-SZW-15, 1PAMSH09-SZW-14.5, 1PAMSH09-SZO-15, 1PAMSH12-SZO-15, 1PAMSH18-SZO-15 Installation Manual
...
COMFORT...BUILT TO LAST
9,000, 12,000 and 18,000 BTU
SINGLE-ZONE DUCTLESS
MINI-SPLIT SYSTEM
Heat Pump
INSTALLATION
MANUAL
INDOOR UNIT:
1PAMSH09-SZW-14.5
1PAMSH09-SZW-15
1PAMSH12-SZW-15
1PAMSH18-SZW-15
OUTDOOR UNIT:
1PAMSH09-SZO-14.5
1PAMSH09-SZO-15
1PAMSH12-SZO-15
1PAMSH18-SZO-15
Before using your air conditioner, please read
this manual carefully and keep it for future
reference, along with your receipt.

Contents
This manual provides the information needed for proper use and maintenance of this air conditioner. Basic preventative
care can help extend the life of this unit. The “Troubleshooting Tips” section in this manual contains a chart with solutions
to the most common problems. Referring to this section may save time and prevent the need for a service call in the event
of a problem.
Safety Precautions
Installation Precautions .............................................................................................................................................2
Warning .....................................................................................................................................................................2
Caution ......................................................................................................................................................................2
Installation Instructions
Selecting installation location ................................................................................................................................ 3–4
Accessories ...............................................................................................................................................................4
Indoor unit installation............................................................................................................................................ 5–7
Outdoor unit installation ......................................................................................................................................... 8–9
Air Purging and Test Operation
Air Purging and Test Operation ........................................................................................................................... 9–10
-1-
Safety Precautions
INSTALLATION PRECAUTIONS
• Read this installation manual carefully before operating the unit to ensure correct installation.
• Installation must be performed in accordance with the requirement of NEC and CEC by a trained service
technician only.
• Contact a trained service technician for repair, maintenance and installation of this unit.
• The air conditioner is not intended for use by young children without supervision. Young children should be
supervised to ensure that they do not play with the air conditioner.
• Disabled persons may require assistance with set up.
• All pictures in these instructions are for explanation purposes only.
• The design and specications of this system are subject to change without prior notice.
To prevent injury to the user or other people and property damage, the following instructions must be followed. Incorrect
operation due to ignoring instructions may cause harm or damage.
Failure to adhere to each of the following precautions can lead to results classied as follows:
! !
!
1. Install according to these installation instructions. Defective/incorrect installation can result in water leakage,
electrical shock or re .
2. Install the indoor unit per these instructions. Make sure it is secured properly to the wall. If not installed properly, the
unit could drop or fall, causing injury.
3. An independent circuit breaker must be used for each indoor unit. If the circuit breaker is not sized properly, electrical
shock and/or a re can result.
4. Use the specied cable and connect it properly to the terminals. If connection is not perfect, it can cause the
connection to heat up and possibly set re.
5. Routing of the wiring must be properly arranged so the control board cover is xed properly. If the control board cover
is not xed perfectly, it can cause the connection to heat up, set re, or electrical shock.
6. When connecting the refrigerant piping, make sure no debris or foreign matter gets into the refrigerant piping.
!
• This equipment must be grounded properly. Follow the local and national codes when choosing the proper outdoor
electrical disconnect. The unit will not run properly and could cause an electrical shock if not installed properly.
• Do not install this unit in a place where leakage or ammable gas may occur. A gas leak near the unit can cause re.
• Carry out drainage piping as mentioned in installation instructions. If drainage is not installed properly, water could
back up in the system and cause water damage.
WARNING
!
CAUTION
WARNING - This symbol indicates the possibility of death or serious injury.
CAUTION - This symbol indicates the possibility of injury or damage to property.
!
-2-
Installation Instructions
Selecting an installation location
Please read through the following directions completely before installing. When installing, follow these step by step.
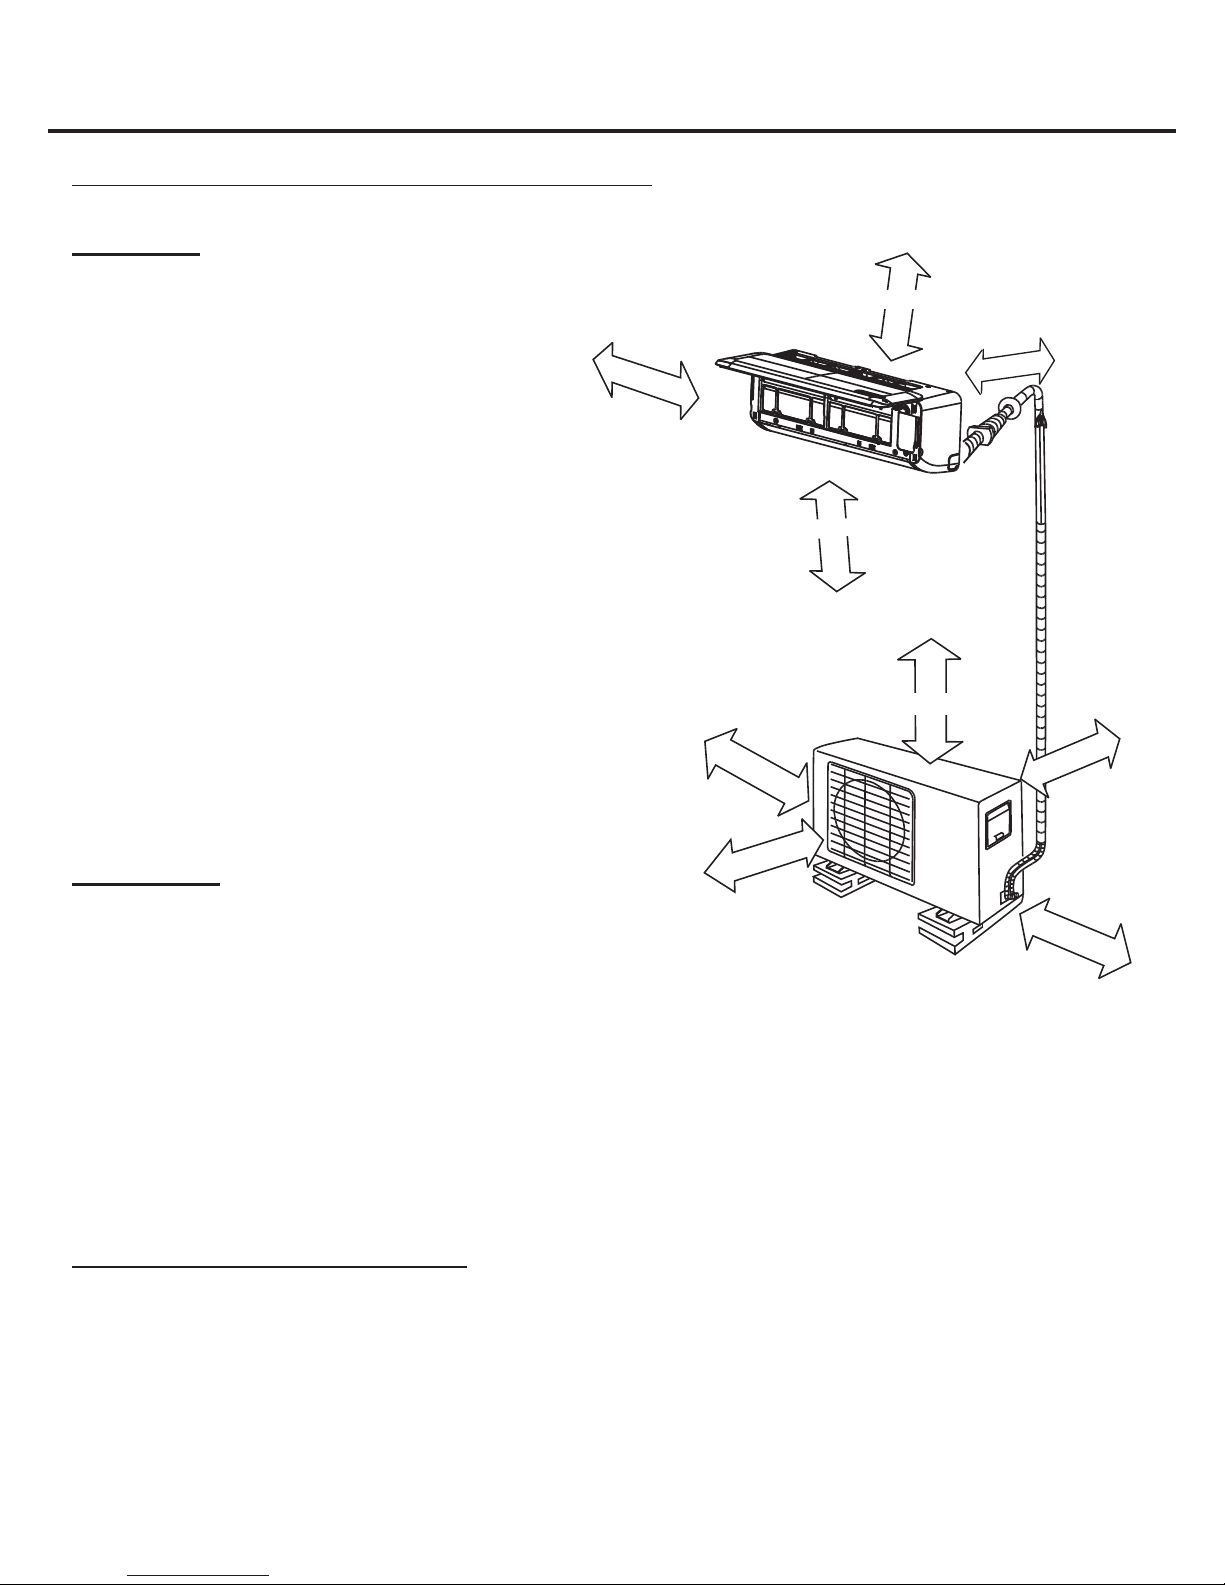
Indoor Unit
• Do not expose the indoor unit to heat or steam.
• Select a place where there are no obstacles in front
or around the unit and the air circulation in the room
is good.
• Make sure that condensation drainage can be
conveniently routed away.
• Select a location where noise prevention is taken into
consideration.
• Do not install near a doorway.
• Ensure that the space on the left and right of the unit
is more than 4.75 in. (12 cm).
• Use a stud nder to locate studs to prevent
unnecessary damage to
the wall.
• The indoor unit should be installed on the wall at a
height of 7.55 ft
(2.3 m) or more from the oor.
• The indoor unit should be installed allowing a
minimum clearance of
6 in. (15 cm) from the ceiling.
• There should not be any direct sunlight. Sunlight will
fade the plastic cabinet and affect its appearance.
≥ 4.8 in.
≥ 11.9 in.
≥ 7.5 ft
≥ 6 in.
≥ 23.7 in.
Fig. 1
≥ 4.8 in.
≥ 11.9 in.
Outdoor Unit
• If an awning is built over the outdoor unit to prevent
direct sunlight or rain exposure, make sure that heat
radiation from the condenser is not restricted.
• Do not place animals and plants in the path of the air
inlet or outlet.
• Refer to Fig. 1, which notes the amount of space there must be between the unit and any walls, ceiling, fences, and
other obstacles/items.
• Install the outdoor unit on concrete or plastic pad or mount to a wall with the proper brackets (see section below) and
secure per local and national codes. Make sure the unit is level.
• Install the outdoor unit in a location where the noise and vibration level will not be an issue.
• Select a location where the warm air and noise from the outdoor unit does not disturb neighbors.
• Do not place any items near the unit that will cause a short circuit of the discharged air.
≥ 6.75 ft
≥ 23.7 in.
Outdoor Unit - Rooftop Installation
• If the outdoor unit is installed on a roof, be sure to level the unit.
• Ensure the roof structure and anchoring method are adequate for the unit location.
• Consult local codes regarding rooftop mounting.
• If the outdoor unit is installed on a roof structure or external walls, this may result in excessive noise and vibration, and
may also be classied as a non-serviceable installation.
-3-
 Loading...