

Page 1
Ground Fixed
Babel Drum
Page 1 of 3
Instrument
Components:
Installation Instructions
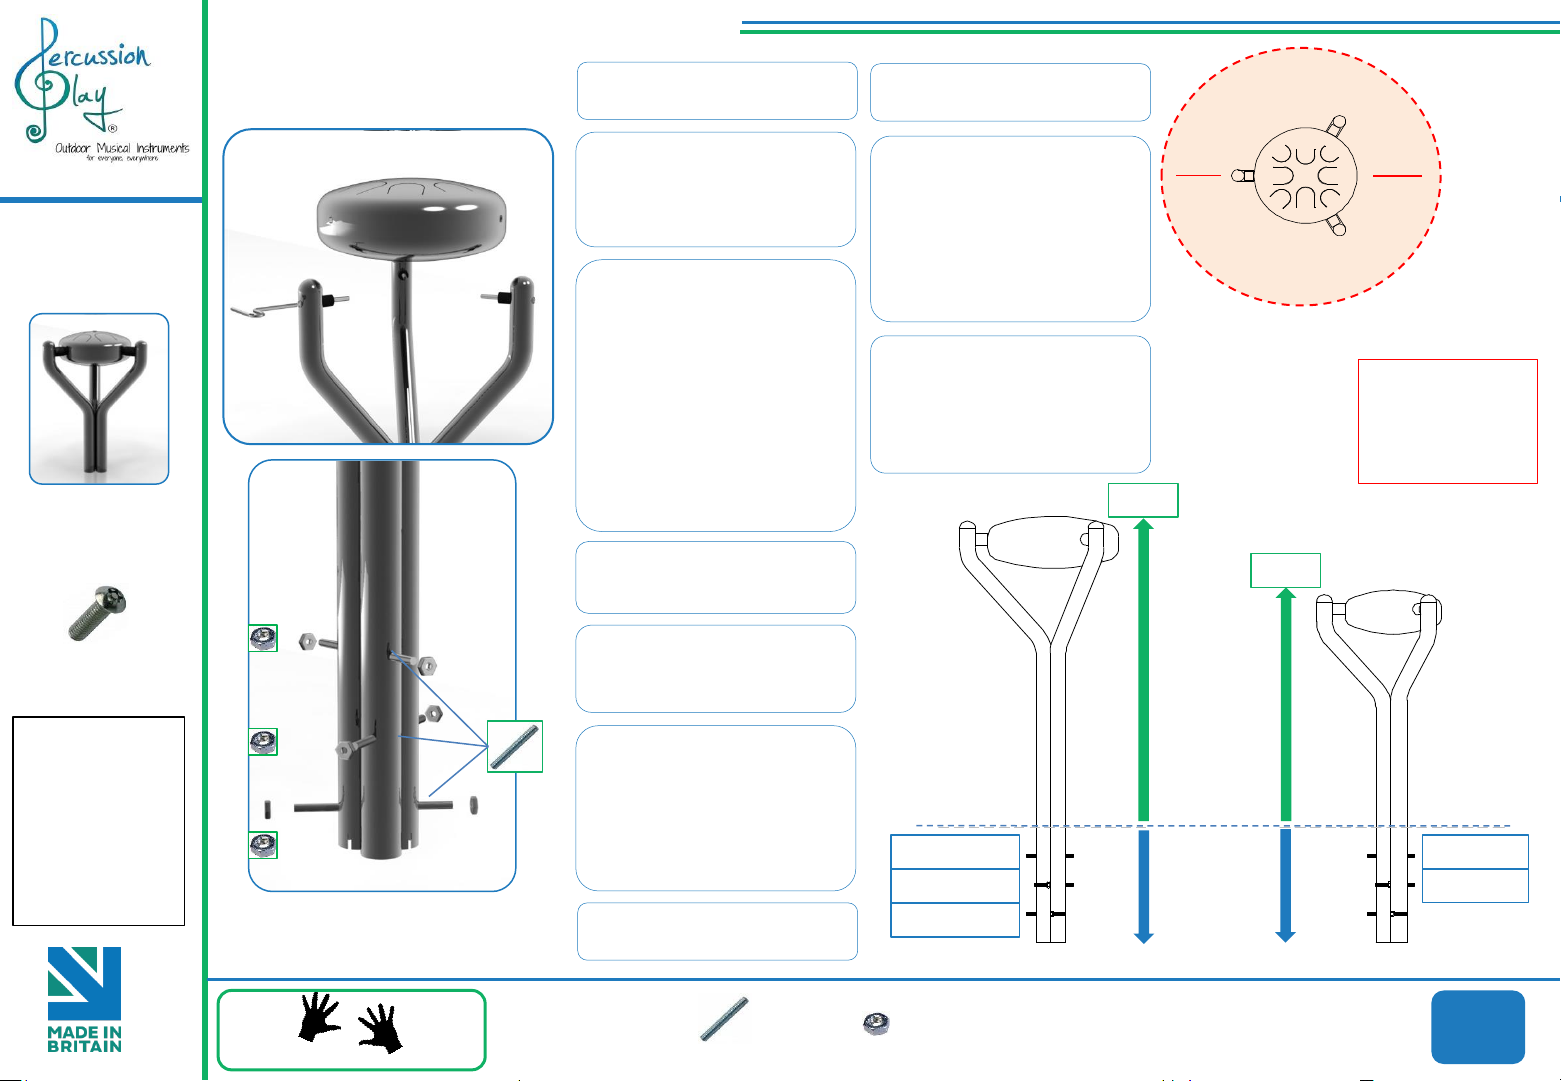
1. Unpack ground fixing legs
3no.
2. Lay packaging out on floor
or assemble on non-abrasive
surface to prevent marking of
polished stainless steel.
3. Align holes on legs
(opposite end to polished
domes) and secure in place
using 3no. M10 x 200mm
threaded bar and 6no. M10
nuts provided
Tools required 2no. 17mm
metric spanner/wrench (11/16
inch or alternatively using
adjustable wrench)
4. Invert assembled frame so
domed ends face upwards.
8. Align holes in side of babel
drum with bolts on legs.
9. Using 8mm Hex Key screw
bolts into drum to secure in
place.
Use thread locking solution
All hole locations are laser cut
for accuracy to ensure holes in
drum align perfectly with legs.
10. Using TX40 driver provided
secure M8 x 25mm security
bolts into external holes in
legs 3no. Use thread lock
solution
Adult
1.5m
KS2
Install
Instrument
with 1.5m free
space (from
widest point)
1.5m
CAUTION: Drum
surface can get hot
in direct sunlight, if
possible install in
shaded areas.
around it.
x3
M8x25mm Pin Torx
Metric Conversion:
200mm/ 8”
400mm/ 16”
570mm/ 22”
600mm/ 24”
700mm/ 28”
770mm/ 30”
870mm/ 34”
1070mm/ 42”
1.5m/ 59”
BS EN 1176
x2
x2
x2
Weight of heaviest part 17.5kg (Large Babel Drum)
Weight of heaviest part 13.4kg (Small Babel Drum)
Played with hands
5. Place 8mm Hex Key
supplied into hole in leg and
lock into internal bolt.
x3
6. Remove M10 nut on
opposite side of leg and
keeping Hex Key in place, slide
black polyurethane damper
over bolt until flush with end
of bolt. Repeat for other 2 legs
7. Unpack babel drum leaving
black film in place to protect.
Ground Fix
Components:
x3
M10x200 Threaded bar
KS1 – 700mm
KS2 – 870mm
Adult- 1070mm
Ground Surface
Adult 400mm
KS2 600mm
KS1 770mm
x6
M10 BZP Nut
Large 8 note
Small 6 note
Spares available from
percussionplay.com or from your
local distributor
KS2 400mm
KS1 570mm
22 Kg
13.4 Kg
Page 2
Assembly Guide PPBDL-S
Tools:
Ground Fixed
Babel Drum
Page 2 of 3
Instrument
Components:
x3
M8x25mm Pin Torx
Thread Lock Solution
Required
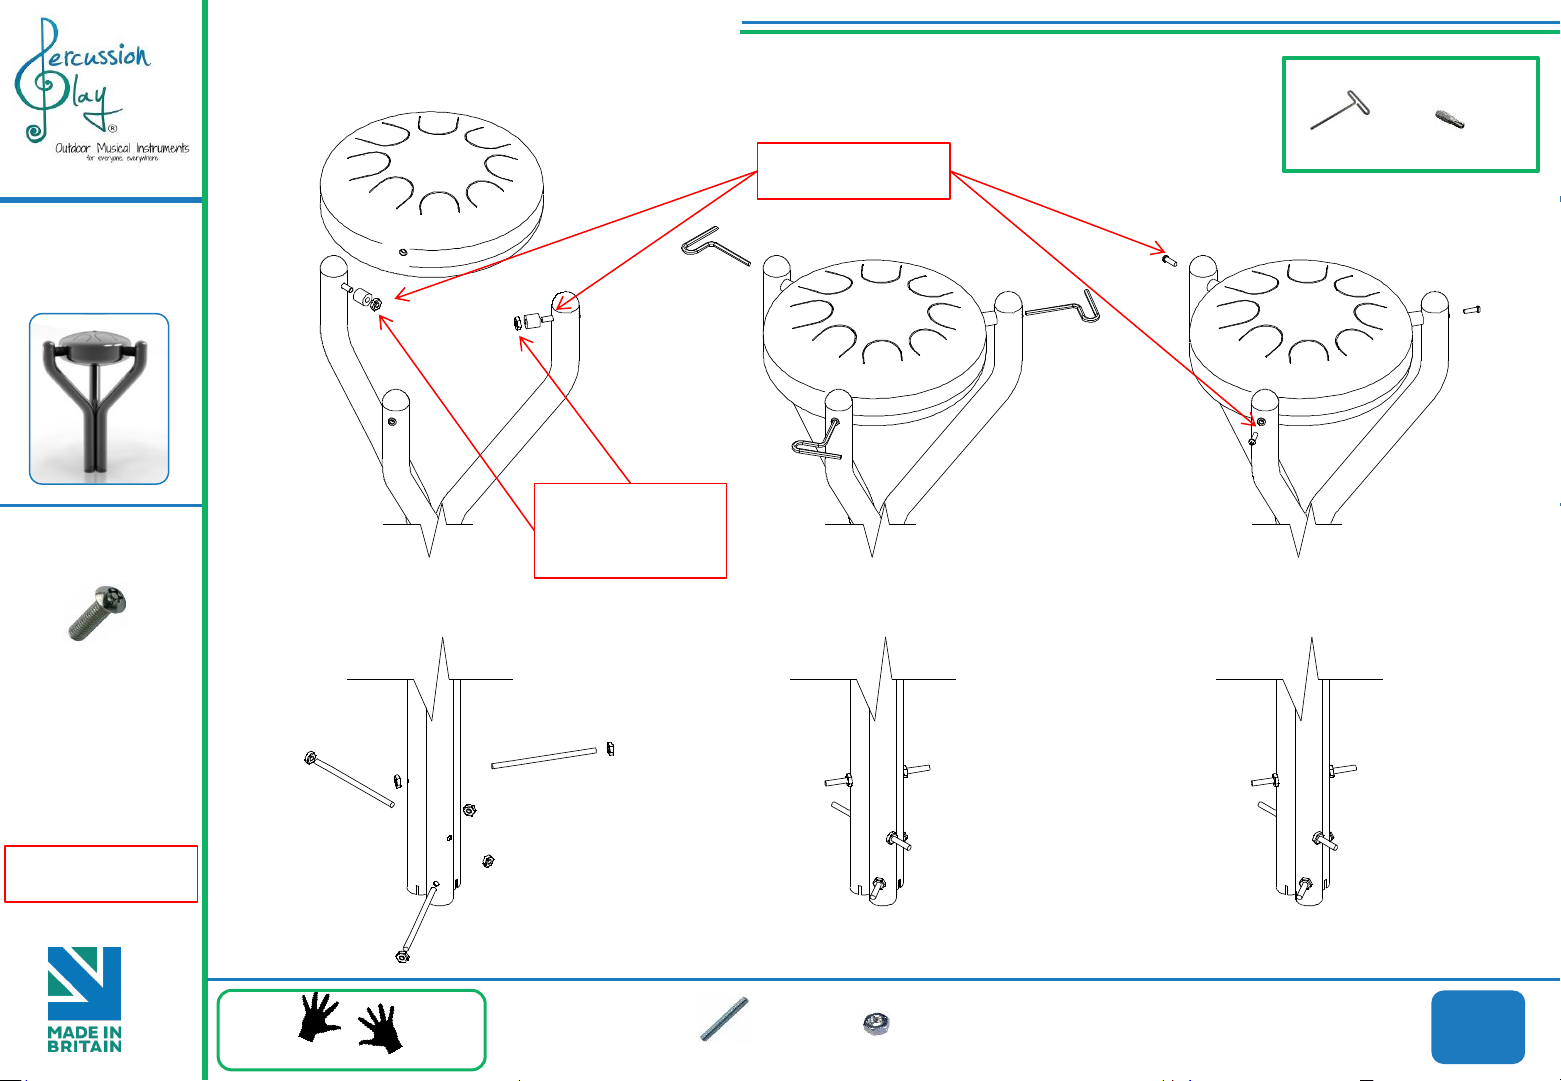
Remove M10
Nuts before
installing Drum
1 2 3
Hex T Key
x1
x1
TX 40 Driver Bit
Thread Lock Solution
Required
BS EN 1176
Played with hands
Ground Fix
Components:
x3
M10x200 Threaded bar
x6
M10 BZP Nut
Spares available from
percussionplay.com or from your
local distributor
22 Kg
13.4 Kg
Page 3
250
450
350
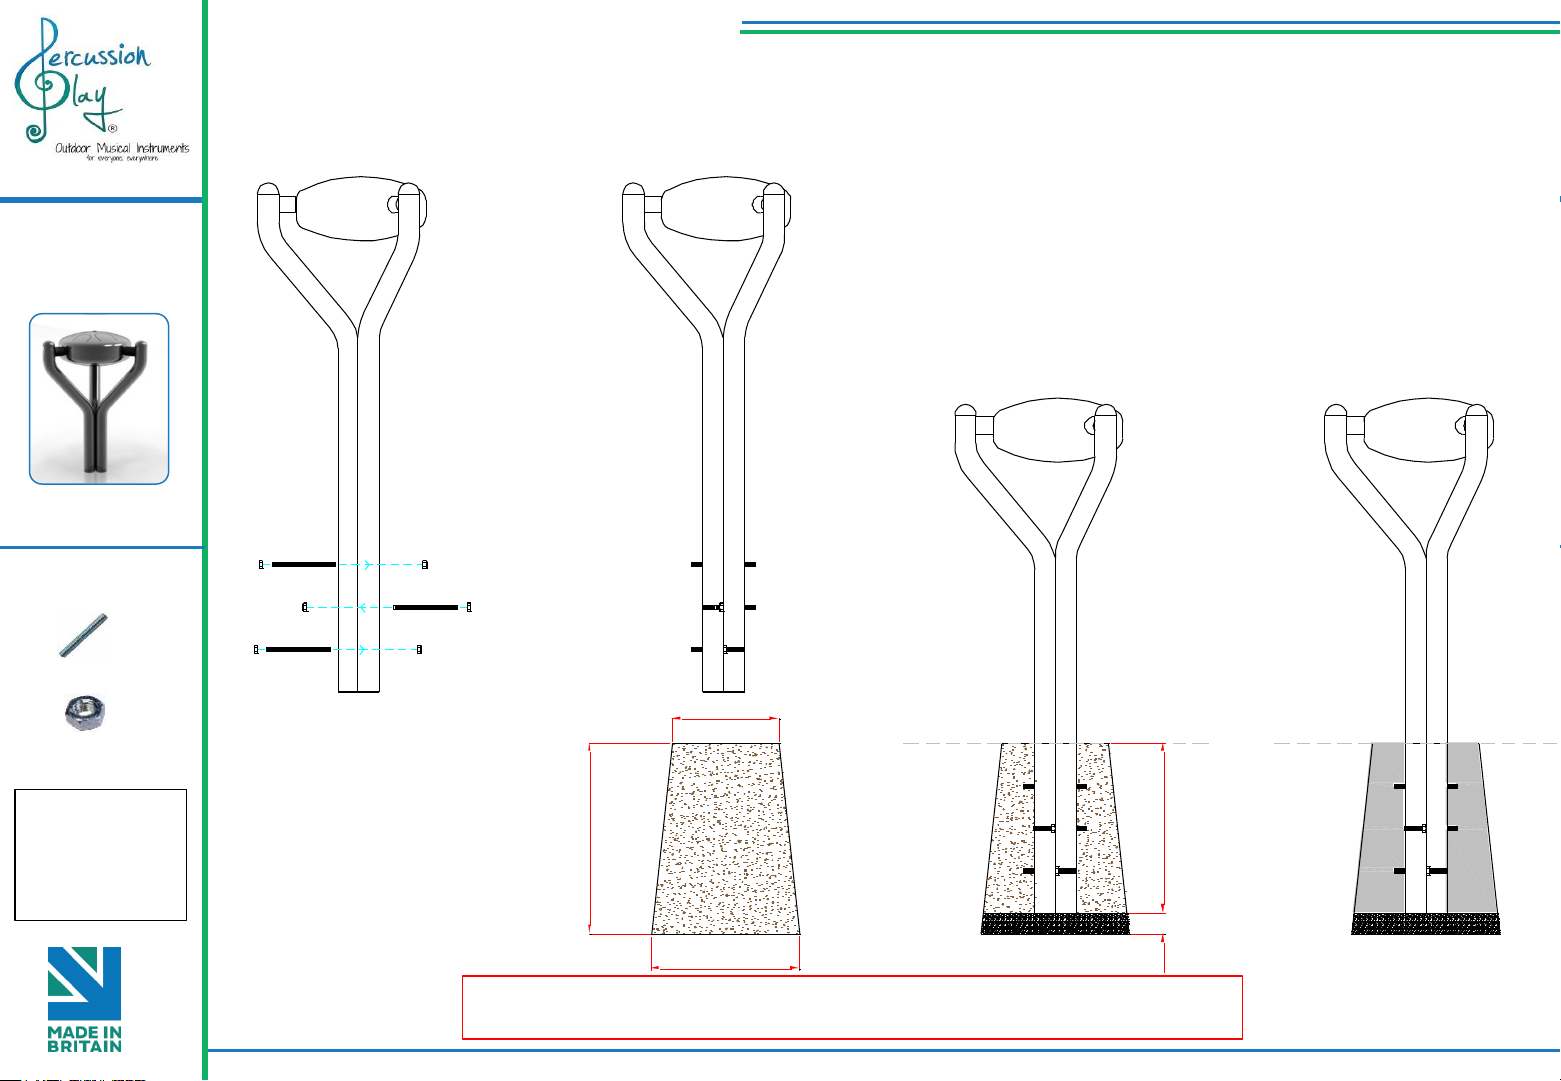
Insert M10x 200 Threaded
bar into pre drilled holes
in Fra me of Babel Drum
using M10 BZP Nuts
Excavate a holes with a
250mm diameter tapering
down to 350mm diameter
and 450mm depth
Compact base of hole with
50mm of aggregate.
Lowe r ground Fix post
attached to instrument
into hole (check
instrument straight and
level before filling with
concrete)
Fill hole with fast drying
concrete to manufacturers
specifications.
40050
If Drum ne eds to
be po sitioned
lowe r a deeper
hole can be
excavated.
Ground Fix Installation
Ground Fixed
Babel Drum
Page 3 of 3
Components:
x3
M10x200 Threaded Bar
1
2
(1.1)
3
4
x6
M10 BZP Nut
Metric Conversion:
50mm/ 2”
250mm/ 10”
350mm/ 14”
400mm/ 16”
450mm/ 18”
BS EN 1176
Foundations should not present a hazard. These foundations are recommended as a guide,
for more information on foundation details for various surface see Part 7 of BS EN 1176.
Page 4
Ground Fixed
Rainbow Sambas
Page 1 of 4
Instrument
Components:
Rainbow
Sambas
are preassembled
Installation Instructions
(1.1)
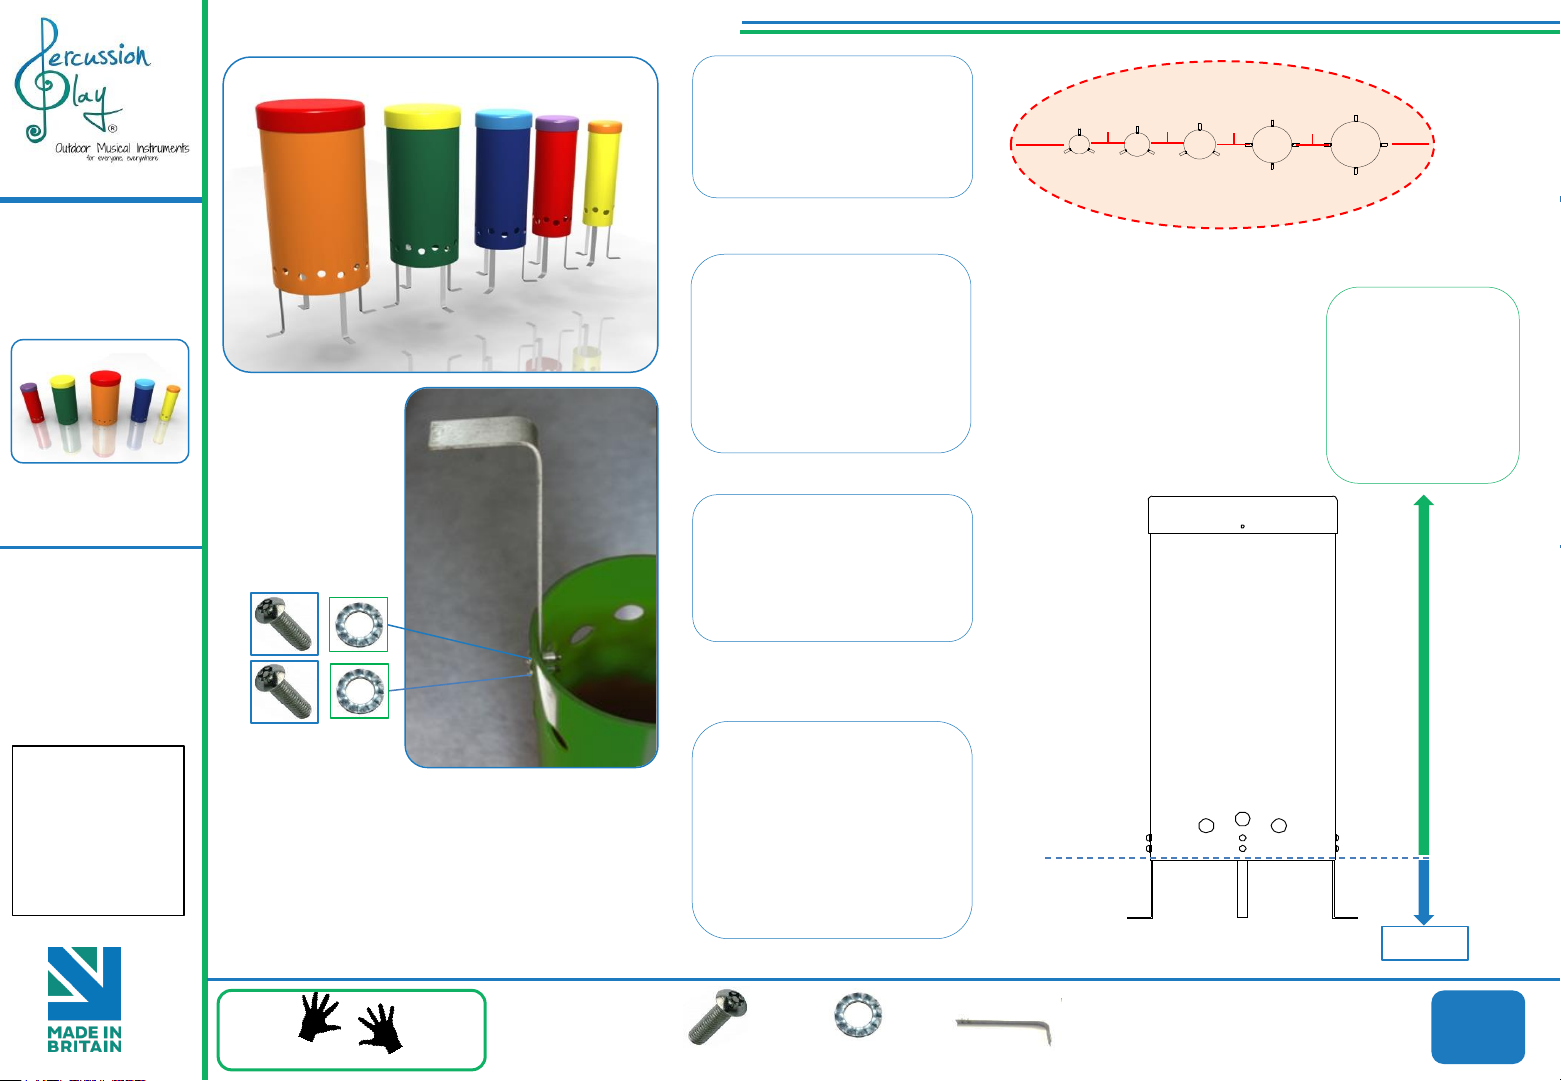
1. Assemble fixing brackets to
base of sambas using
M8x25mm security screws
and lock washers. (1.1)( See
Assembly Guide)
2.Arrange Sambas with
minimum spacing between
each drum at 230mm and
mark holes for excavation.
Each hole should be 80100mm larger than the drum
itself.
3. Excavate marked holes to
300mm depth making sure
the holes have a level base
allow the sambas to sit
vertical.
1.5m
230mm 230mm
230mm
230mm
1.5m
Sambas will arrive
on site in pre set
heights. In ground
fixing depth 300mm
for all 5 sambas.
Install Instrument
with 1.5m free space
(from widest point)
around it.
Metric Conversion:
80mm/ 3”
100mm/ 4”
230mm/ 9”
300mm/ 12”
400mm/ 16”
450mm/ 18”
1.5m/ 59”
BS EN 1176
Weight of heaviest part 14.6kg (XL Samba)
Ground Fix
Components:
Played with hands
4. Once happy with location of
the sambas, fill holes using
rapid hardening concrete. Be
sure to compact concrete
around metal brackets and
leave to dry according to
manufactures guidelines.
x34
M8x25 Security Screw
x34
M8 Lock Washer
Ground Surface
L Brackets
x17
Spares available from
percussionplay.com or from your
local distributor
300mm
44 Kg
Page 5
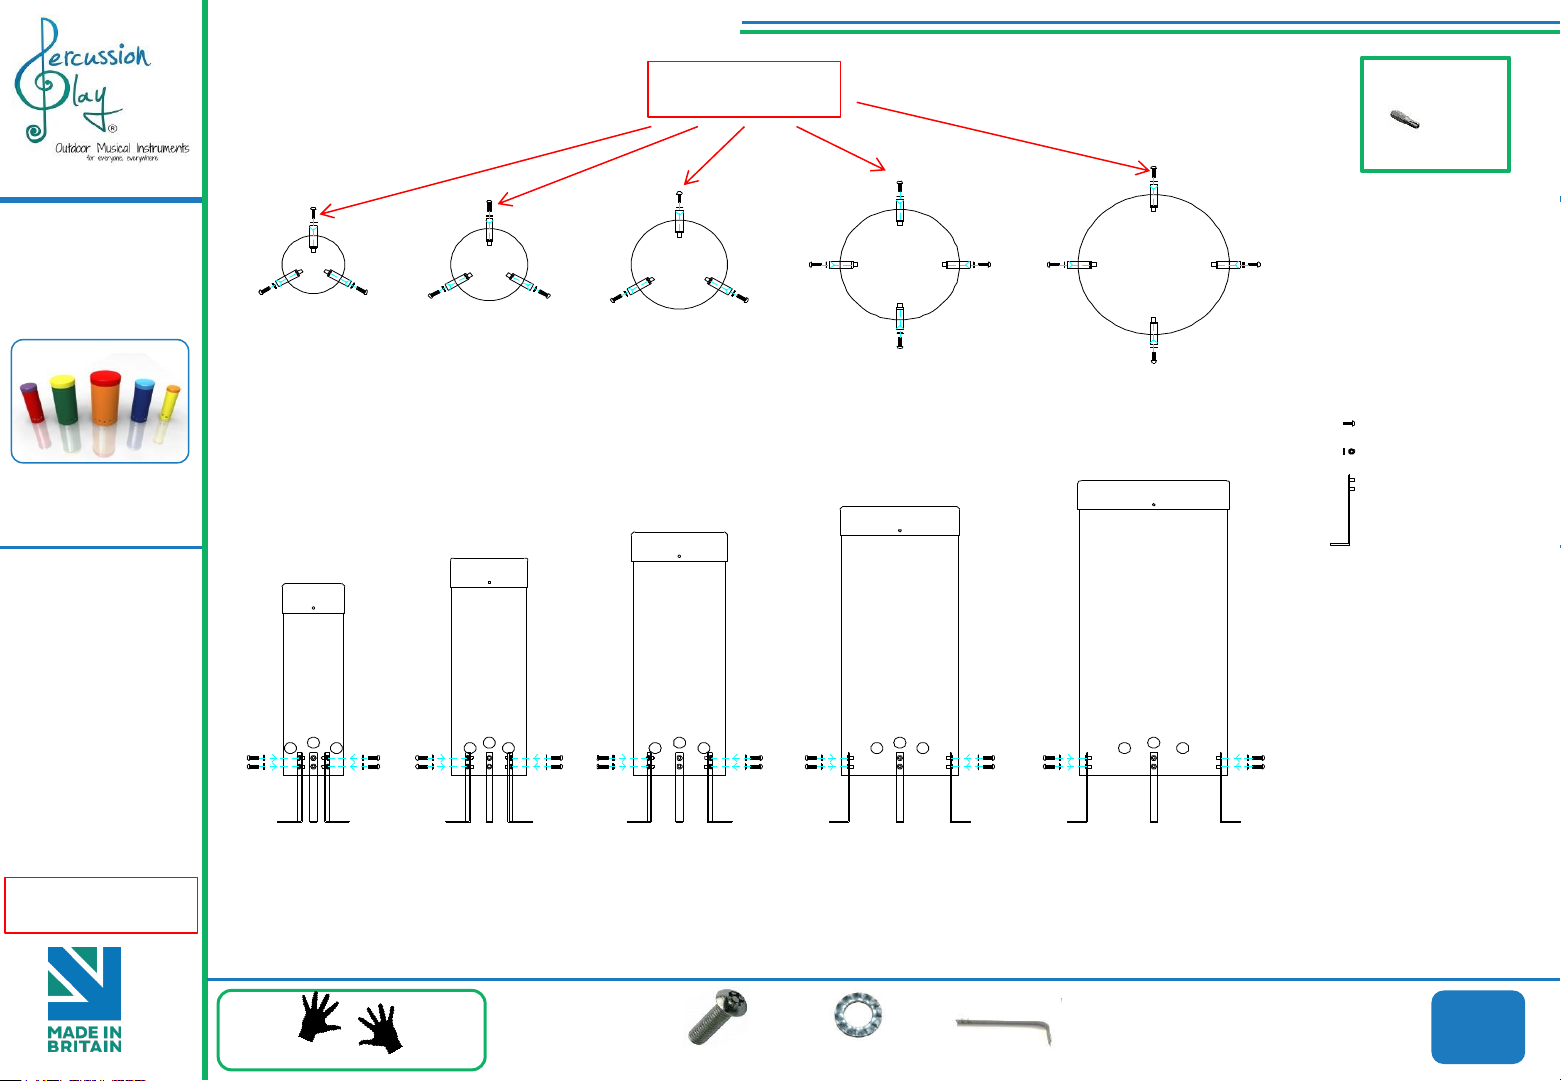
Assembly Guide PPRASA
PPRASA FRONT
PPRASA PLAN
M8x25 Pin torx X34
M8 Lock washer X34
COMPONENTS LIST:
Ground Fix L Bracket X17
Ground Fixed
Rainbow Sambas
Page 2 of 4
Instrument
Components:
Rainbow
Sambas
are preassembled
Thread Lock Solution
Required (Not Supplied)
Tools:
x1
TX 40 Driver Bit
Thread Lock Solution
Required (Not Supplied)
BS EN 1176
Played with hands
Components:
Ground Fix
x34
M8x25 Security Screw
x34
M8 Lock Washer
L Brackets
x17
Spares available from
percussionplay.com or from your
local distributor
44 Kg
Page 6
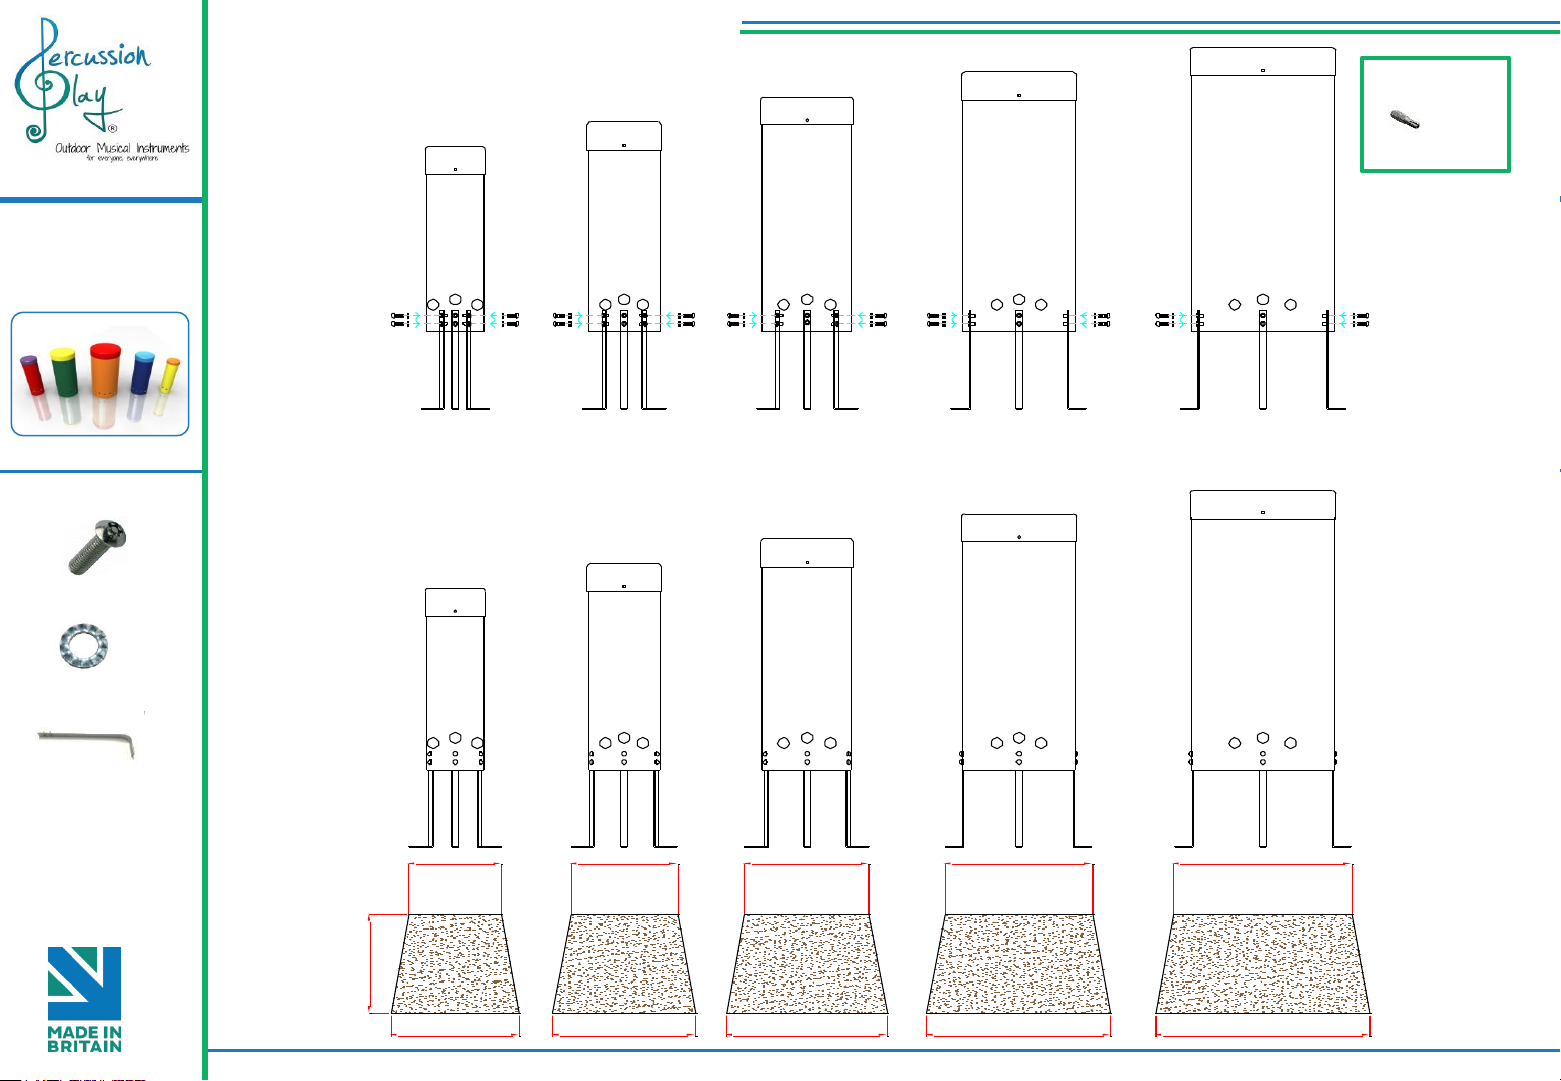
300
260 300 350 415 500
360 400 450 515 600
300
65
360 400 450
260 300 350 415 500
Att ach L- Brackets
to b ase of each
drum using M8x25
Bolts and lock
washers provided.
Excavate 5 holes
300mm deep that
are 1 00mm larger
than each samba.
Each hole should
taper down making
the base diameter
at least 100mm
larger than the
surf ace hole
Comp act each hole
with a maximum of
65mm of aggregate
and lower each
samba into its hole
300
65
360 400 450 515 600
260 300 350 415 500
Fill each hole with
fast drying concrete
to manufacturers
specifications.
Ground Fix Installation
Tools:
x1
TX 40 Driver Bit
Ground Fixed
Rainbow Sambas
Page 3 of 4
Components:
x17
M8x25mm Pin Torx
x34
M8 Lock Washer
L Brackets
x17
1
(1.1)
2
BS EN 1176
Page 7
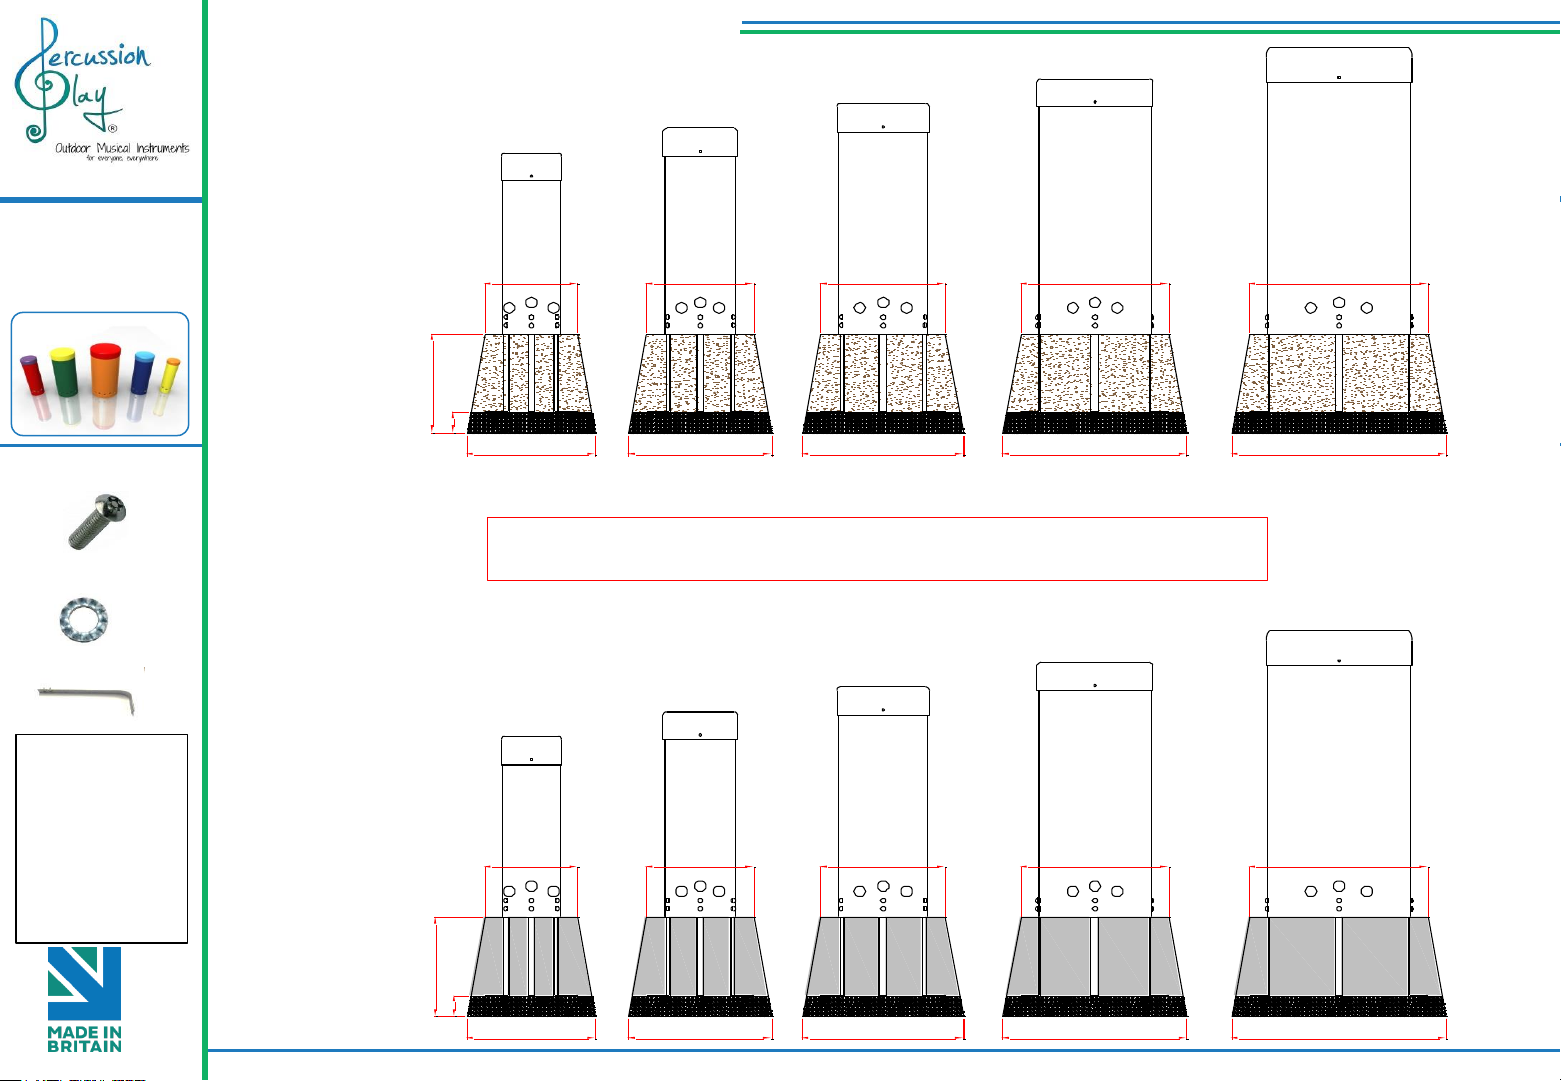
Ground Fixed
300
65
360 400 450
515
600
260 300 350 415 500
Comp act each hole
with a maximum of
65mm of aggregate
and lower each
samba into its hole
300
65
360 400 450 515 600
260 300 350 415 500
Fill each hole with
fast drying concrete
to manufacturers
specifications.
Rainbow Sambas
Page 4 of 4
Components:
Ground Fix Installation
3
(1.1)
x17
M8x25mm Pin Torx
x34
M8 Lock Washer
L Brackets
Metric Conversion:
65mm/ 3”
250mm/ 8”
300mm/ 12”
350mm/ 14”
415mm/ 16”
450mm/ 18”
500mm/ 20”
515mm/ 20”
600mm/ 24”
BS EN 1176
x17
Foundations should not present a hazard. These foundations are recommended as a guide,
for more information on foundation details for various surface see Part 7 of BS EN 1176.
4
Page 8
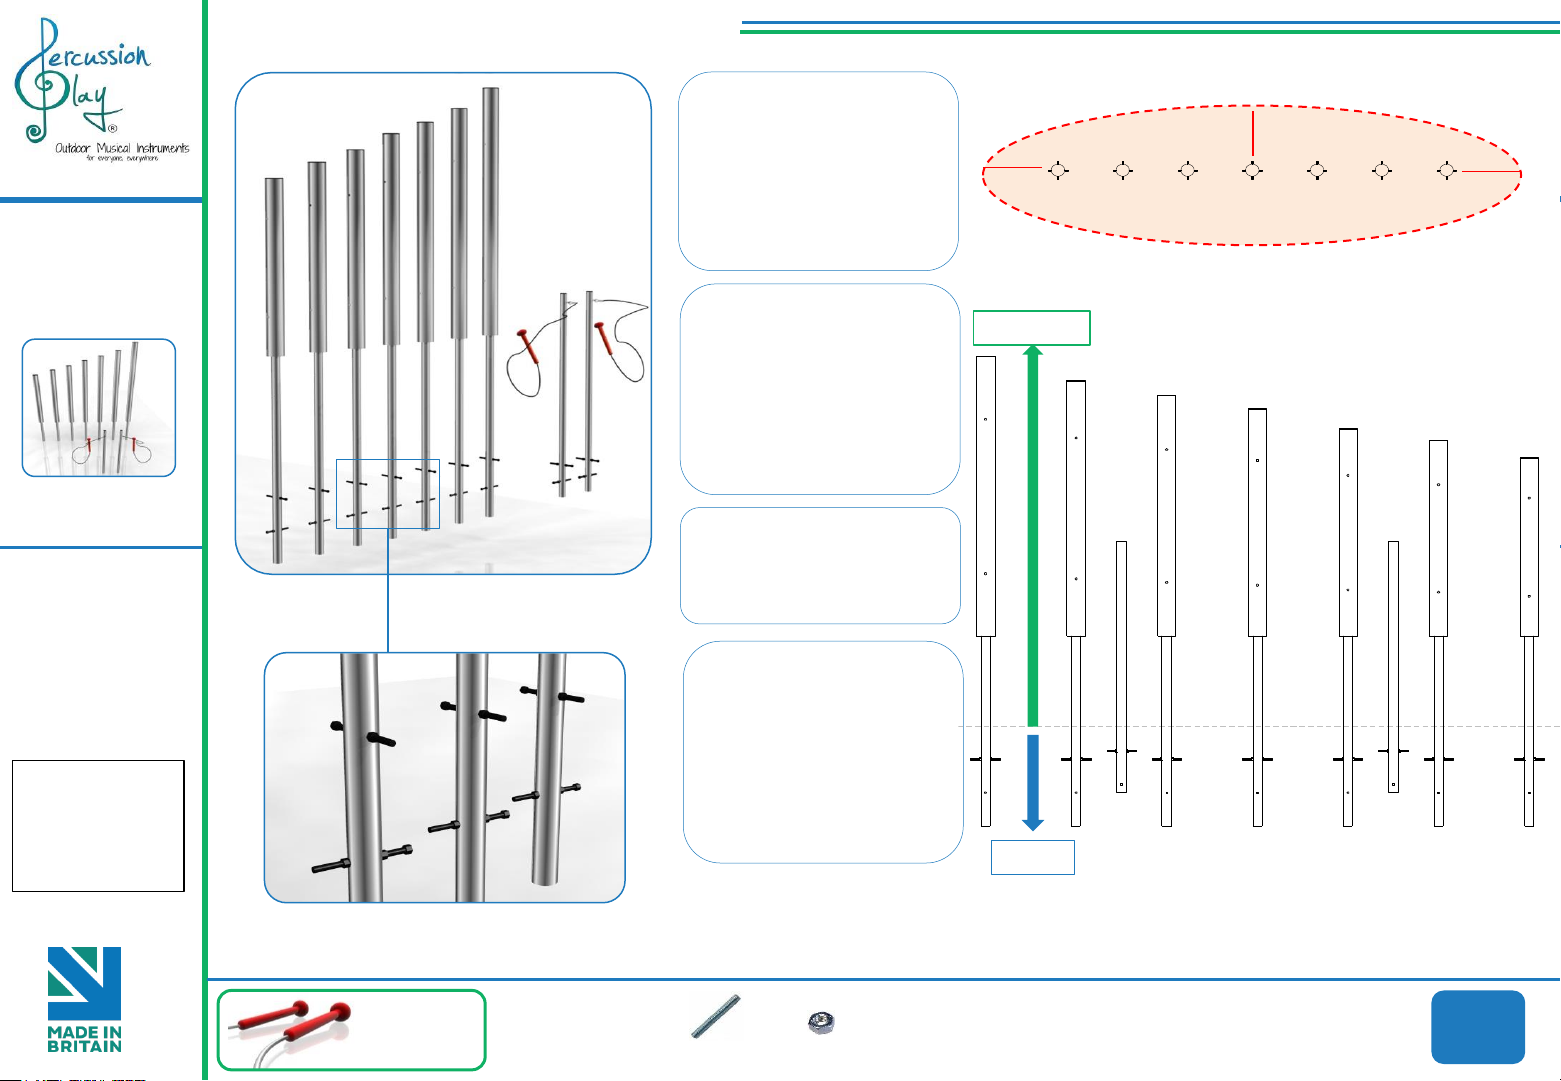
Ground Fixed
Tubular Bells
Page 1 of 2
Instrument
Components:
Tubular Bells
are preassembled
Metric Conversion:
250mm/ 10”
400mm/ 16”
600mm/ 24”
1.5m/ 59”
2207mm/ 98”
Installation Instructions
1. Using M10 nuts and
150mm bolts supplied locate
through pre drilled holes and
secure bolts in place to
support in ground pole in
concrete. 2 bolts per leg at 90
degree angles
2.Excavate 7 holes for Tubular
Bells 250mm diameter by
600mm deep. 2 further holes
will be needed for the beater
poles according to layout of
Bells at 250mm diameter and
400mm deep.
3. Locate (lower) legs into
holes making sure they are
vertical and level prior to
concreting in place
4. Once happy with location of
the Tubular Bells, fill holes
using rapid hardening
concrete. Be sure to compact
concrete around legs and
leave to dry according to
manufactures guidelines
In ground fixing always 600mm for each chime and
400mm for beater poles
1.5m
1.5m
Install Instrument
with 1.5m free space
(from widest point)
around it.
2207
600mm
1.5m
Ground
Surface
BS EN 1176
Weight of heaviest part 10kg (XXL Bell)
Pair Large Red
Beaters X1
Ground Fix
Components:
M10x150 Bolt
x14
M10 Nut
x28
Spares available from
percussionplay.com or from your
local distributor
59 Kg
Page 9
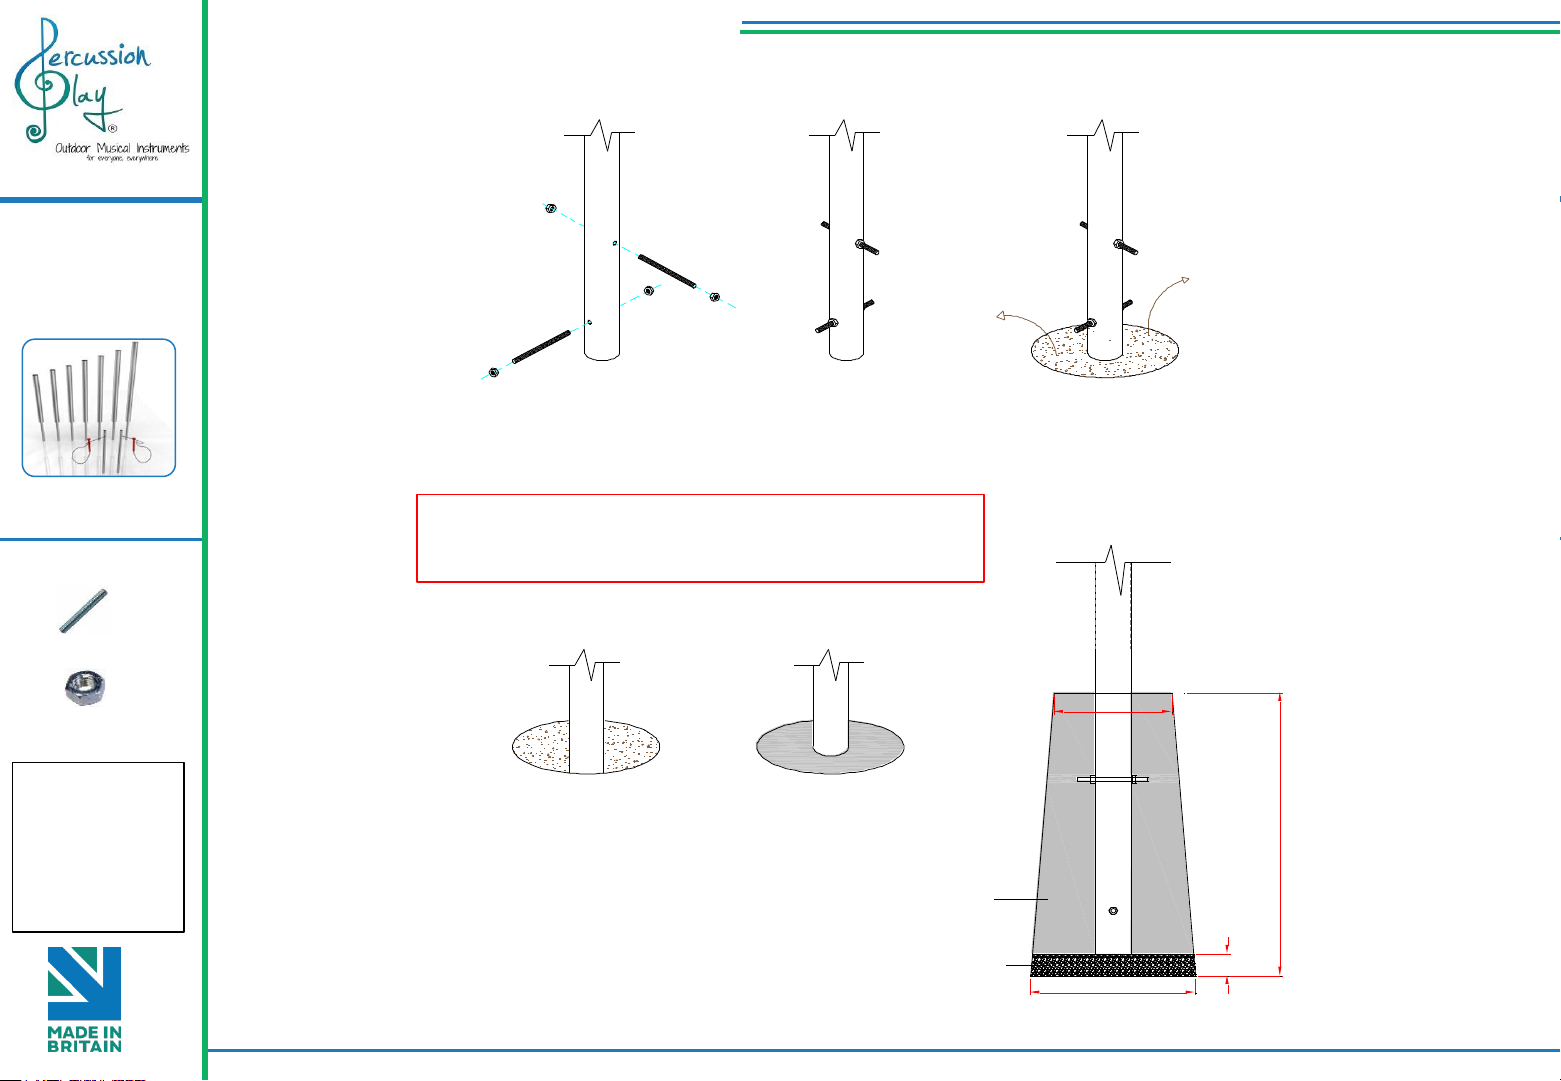
Ground Fixed
Insert M10x 150 Threaded
bar into pre drilled holes
in Ground Fixing Post
Fix M10x 150 Threaded
bar in place using M10
Nuts
Excavate 7 holes with a
250mm diameter tapering
down to 350mm diameter
and 650mm depth
Compact base of hole with
50mm of aggregate.
Lower ground Fix post
attached to instrument
into hole (check
instrument straight and
level before filling with
concrete)
Fix hole with fast drying
concrete to manufacturers
specifications.
650
50
350
250
Aggregate
Concrete
Tubular Bells
Page 2 of 2
Ground Fix Post Installation
1 2 3
Components:
x14
M10x200 Threaded Bar
x28
M10 BZP Nut
Metric Conversion:
50mm/ 2”
250mm/ 10”
350mm/ 14”
400mm/ 16”
450mm/ 18”
600mm/ 24”
650mm/ 26”
BS EN 1176
Foundations should not present a hazard. These foundations are
recommended as a guide, for more information on foundation
details for various surface see Part 7 of BS EN 1176.
5
(1.1)
6
600mm max depth 7x Tubular Bells
400mm max depth 2X Beater Poles
 Loading...