

Page 1
Install
Instrument
with 1.5m free
space (from
widest point)
around it.
1.5m
1.5m
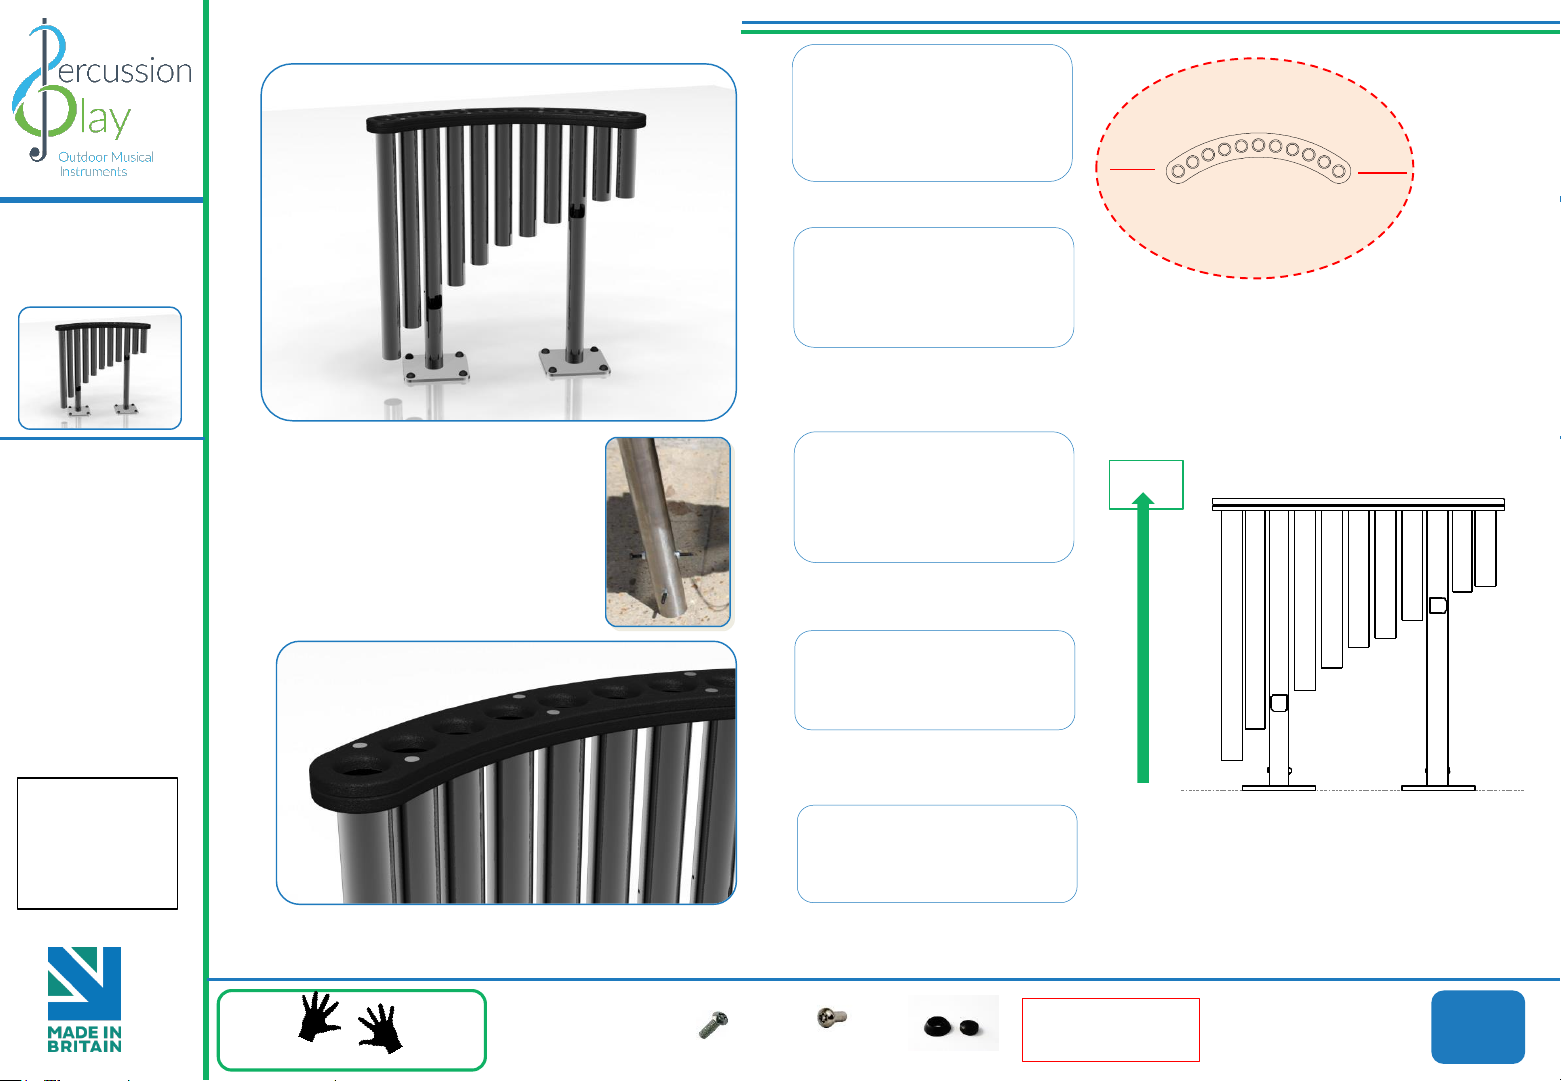
Surface Fixed
Babel Drum
Page 1 of 2
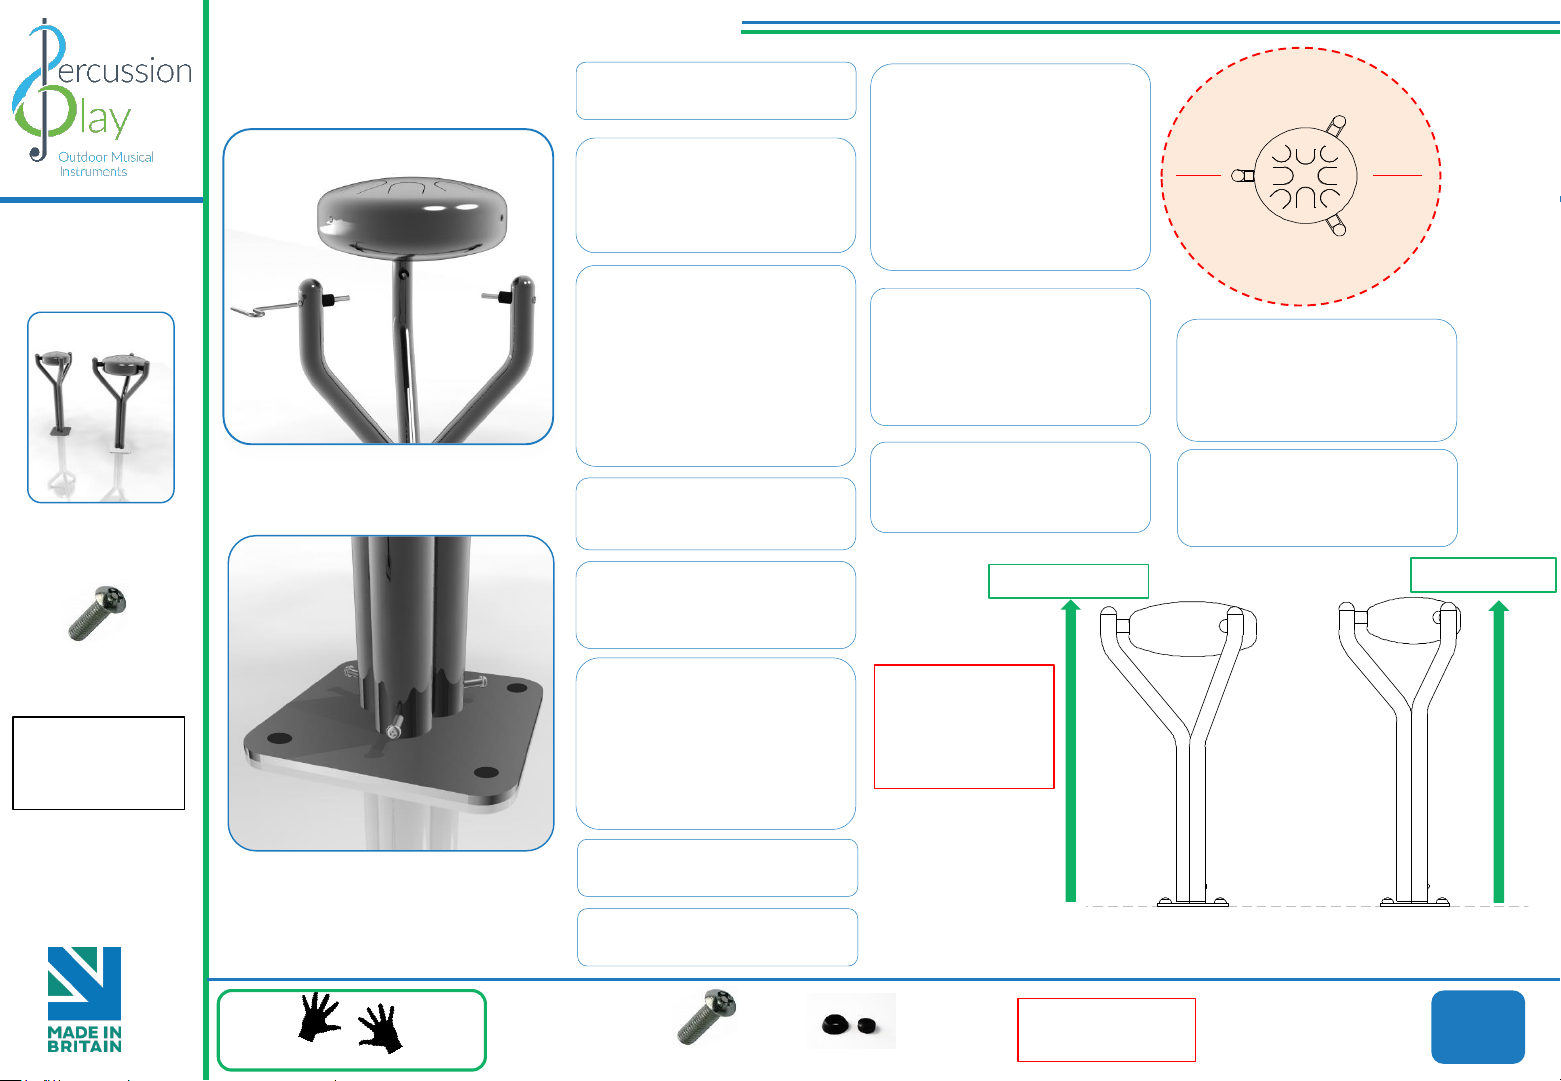
1. Unpack ground fixing legs
3no.
Installation Instructions
Played with hands
22 Kg
13.4 Kg
Ground Fix
Components:
Weight of heaviest part 17.5kg(Large Babel Drum)
Weight of heaviest part 13.4kg(Small Babel Drum)
BS EN 1176
Metric Conversion:
850mm/ 33 15/32”
855mm/ 33 21/32”
1.5m/ 59”
CAUTION: Drum
surface can get hot
in direct sunlight, if
possible install in
shaded areas.
2. Lay packaging out on floor
or assemble on non-abrasive
surface to prevent marking of
polished stainless steel.
3. Align holes on legs to holes
on surface fixing(opposite
end to polished domes) and
secure in place using 3no.
M10 x 30mm Screws
provided
Tools required TX 45 Driver
Bit)
4. Invert assembled frame so
domed ends face upwards.
5. Place 8mm Hex Key
supplied into hole in leg and
lock into internal bolt.
6. Remove Black Cap
opposite side of leg and
keeping Hex Key in place,
slide black polyurethane
damper over bolt until flush
with end of bolt. Repeat for
other 2 legs
8. Align holes in side of babel
drum with bolts on legs.
9. Using 8mm Hex Key screw
bolts into drum to secure in
place.
Use thread locking solution
All hole locations are laser cut
for accuracy to ensure holes
in drum align perfectly with
legs.
7. Unpack babel drum leaving
black film in place to protect.
10. Using TX40 driver
provided secure M8 x 25mm
security bolts into external
holes in legs 3no. Use thread
lock solution
Instrument
Components:
M8x25mm Pin Torx
x3
Ground Surface
850mm from Plate
Large 8 note
Small 6 note
11.Locate Babel Drum in
desired location and mark
holes to fix to desired surface.
12. Fix to Surface using
recommended ground
anchors (Ground Anchors are
not supplied)
13. Make sure all fixings are
covered and secure using
cover caps provided
M10x30 Security Screw
x3
2 Part Cover Cap
x4
Ground Anchors
not supplied
Spares available from
percussionplay.com or from your
local distributor
855mm from Plate
Page 2
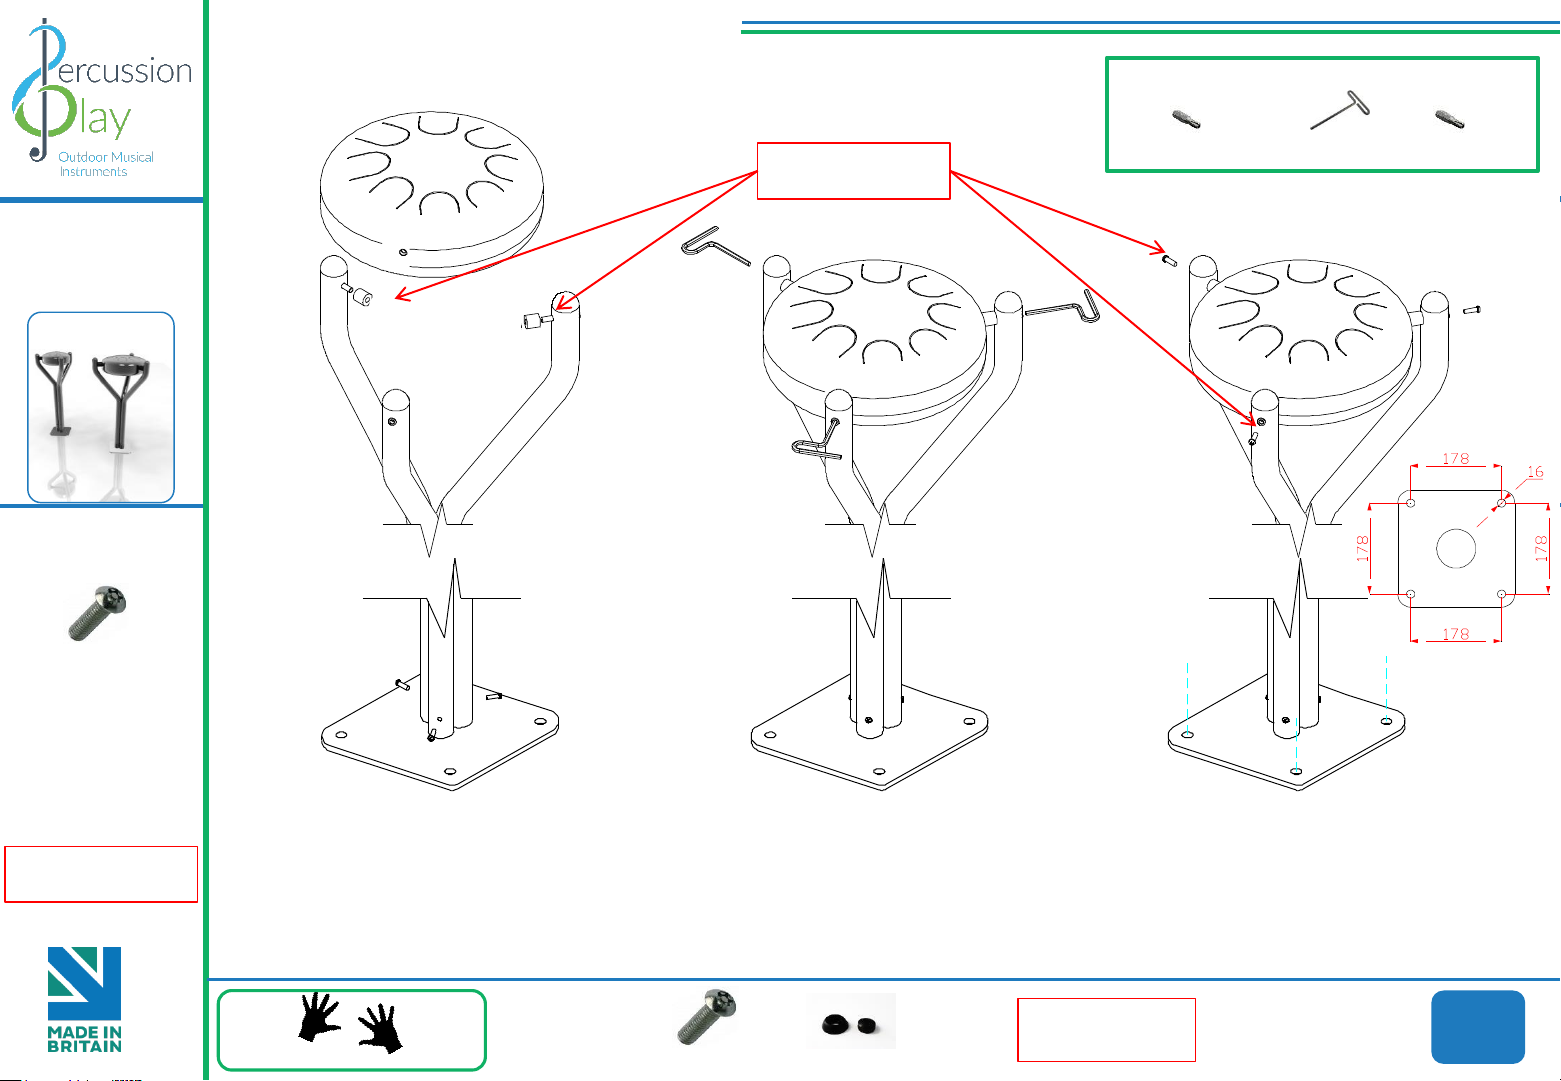
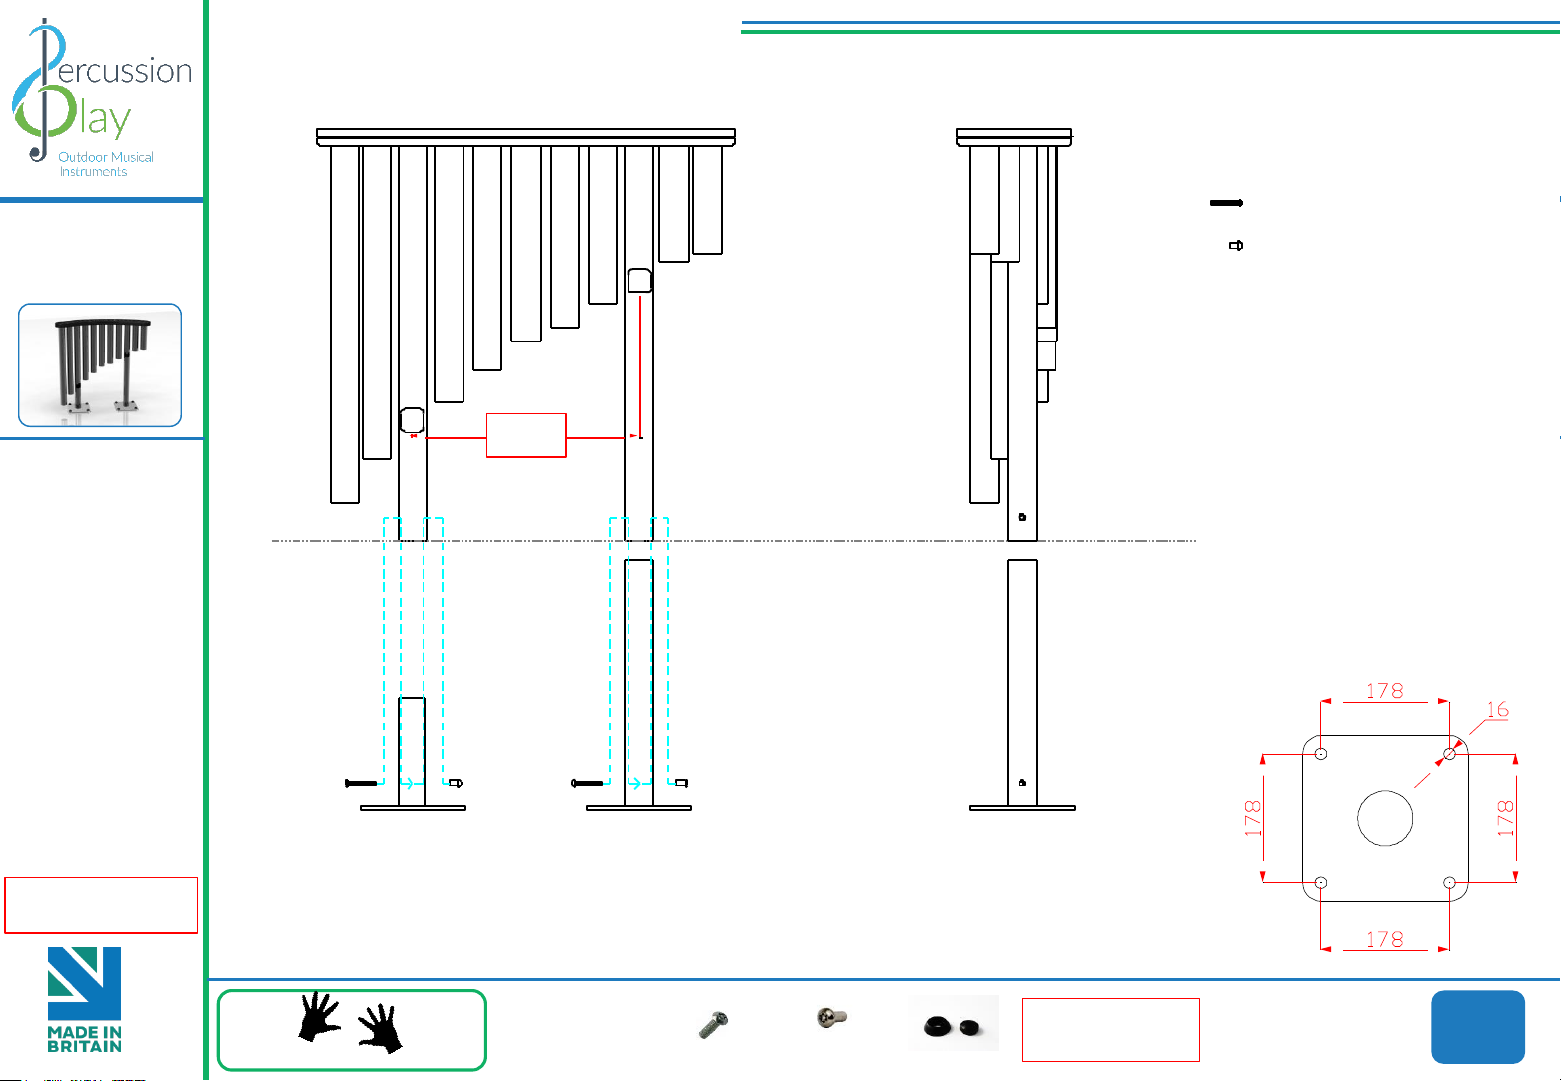
Locate the Surface fix
Plate into the leg of the
instrument.
Fix instrument to Surface
fix plate using M10
Screws and use thread
locking solution to
prevent fixings working
loose.
Fix Surface Plate to the
ground surface Ground
Anchors Not provided
cover fixings with caps
provided
Surface Fixed
Babel Drum
Page 2 of 2
Assembly Guide PPBDL-S
Played with hands
Instrument
Components:
Ground Fix
Components:
22 Kg
13.4 Kg
BS EN 1176
M8x25mm Pin Torx
x3
1 2 3
Thread Lock Solution
Required
Thread Lock Solution
Required
Hex T Key
x1
TX 40 Driver Bit
x1
Tools:
M10x30 Security Screw
x3
2 Part Cover Cap
x4
Ground Anchors
not supplied
TX 45 Driver Bit
x1
Spares available from
percussionplay.com or from your
local distributor
Page 3
Surface Fixed
Instrument
Components:
M6x20 Security Screw
x4
1525mm
M6 Saddle Strap
x2
Ground Surface
Installation Instructions
M10 Barrel Nut
M10x70 Security Screw
x1
Ground Fix
Components:
23.5 Kg
Install Instrument
with 1m free space
(from widest point)
around it.
1.5m
x1
Pair Small Red
Beaters X1
1.5m
Bell Lyre
Page 1 of 2
Weight of heaviest part 14.4kg(Bell Lyre)
BS EN 1176
Metric Conversion:
1.5m/ 59”
1525mm/ 60”
CAUTION: Bell
Lyre surface can
get hot in direct
sunlight, if possible
install in shaded
areas.
2 Part Cover Cap
x4
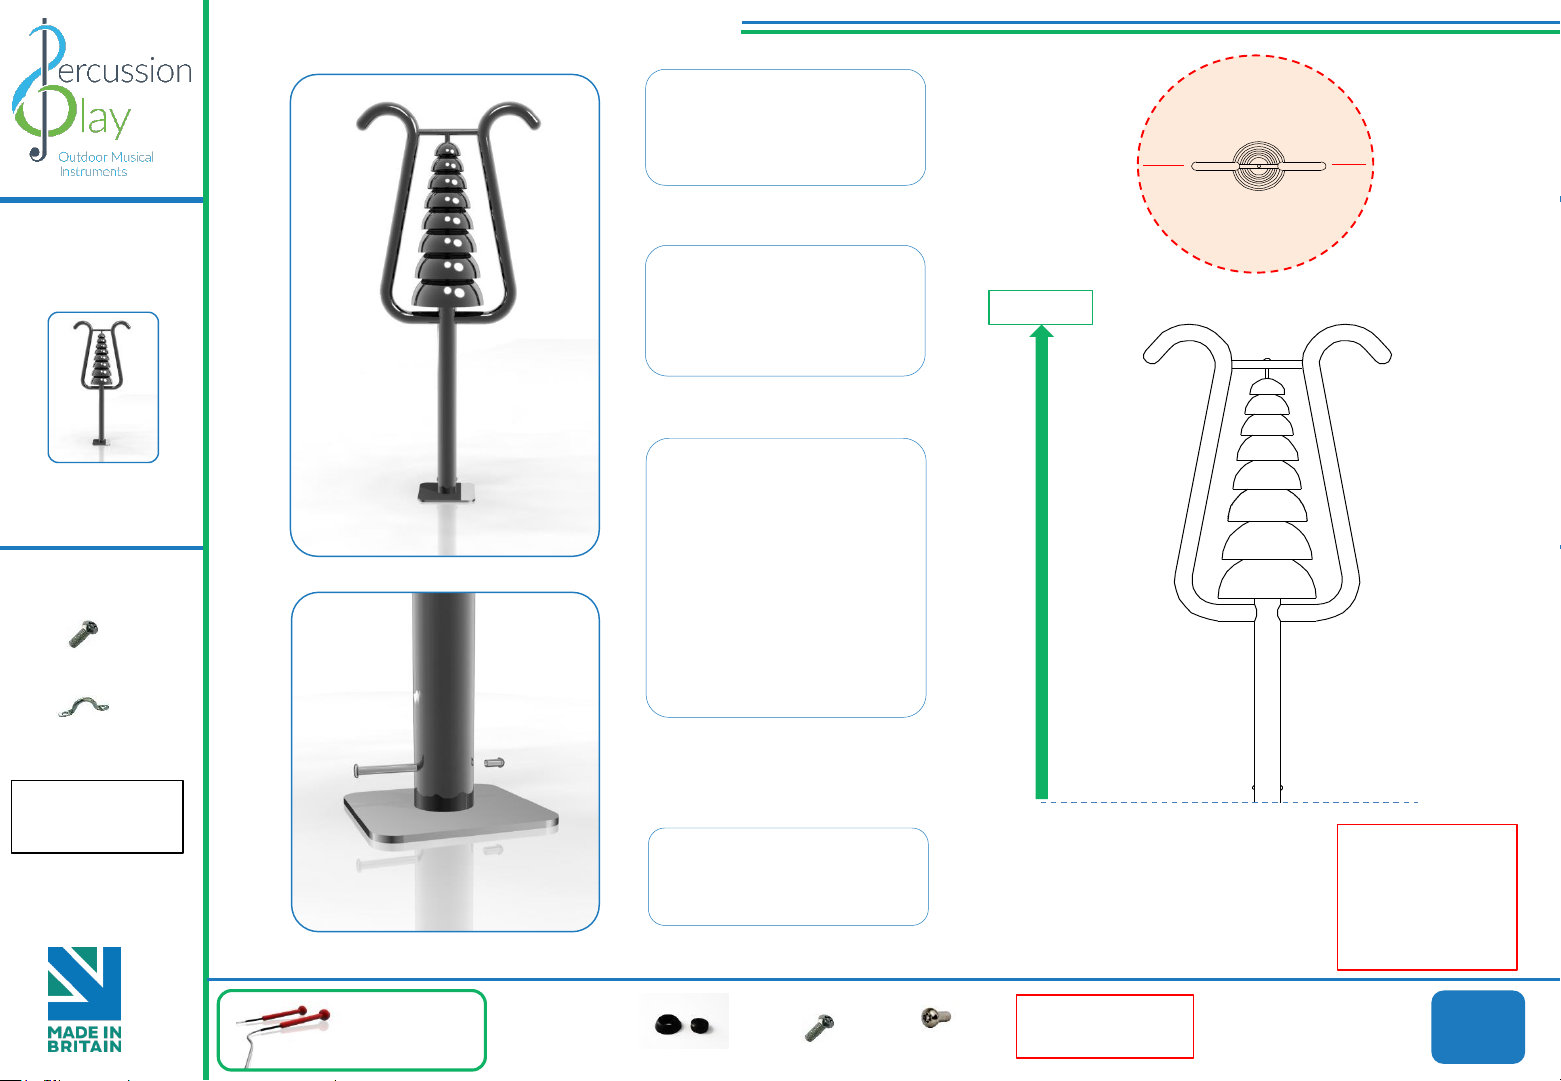
1. Attach Surface Fixing posts
to legs(See Surface Fix Post
Installation Sheet)
3. Fix Surface Plate to level
surface using Coachscrews,
Rawlbolts, chemical anchors
or similar as deemed
appropriate by Installer.
(It is your responsibility to
ensure that the existing
surface is suitable to
receive the appropriate
fixing)
2.Locate Plate in desired
location and mark holes to fix
to desired surface.
4. Make sure all fixings are
covered and secure using
cover caps provided
Ground Anchors
not supplied
Spares available from
percussionplay.com or from your
local distributor
Page 4
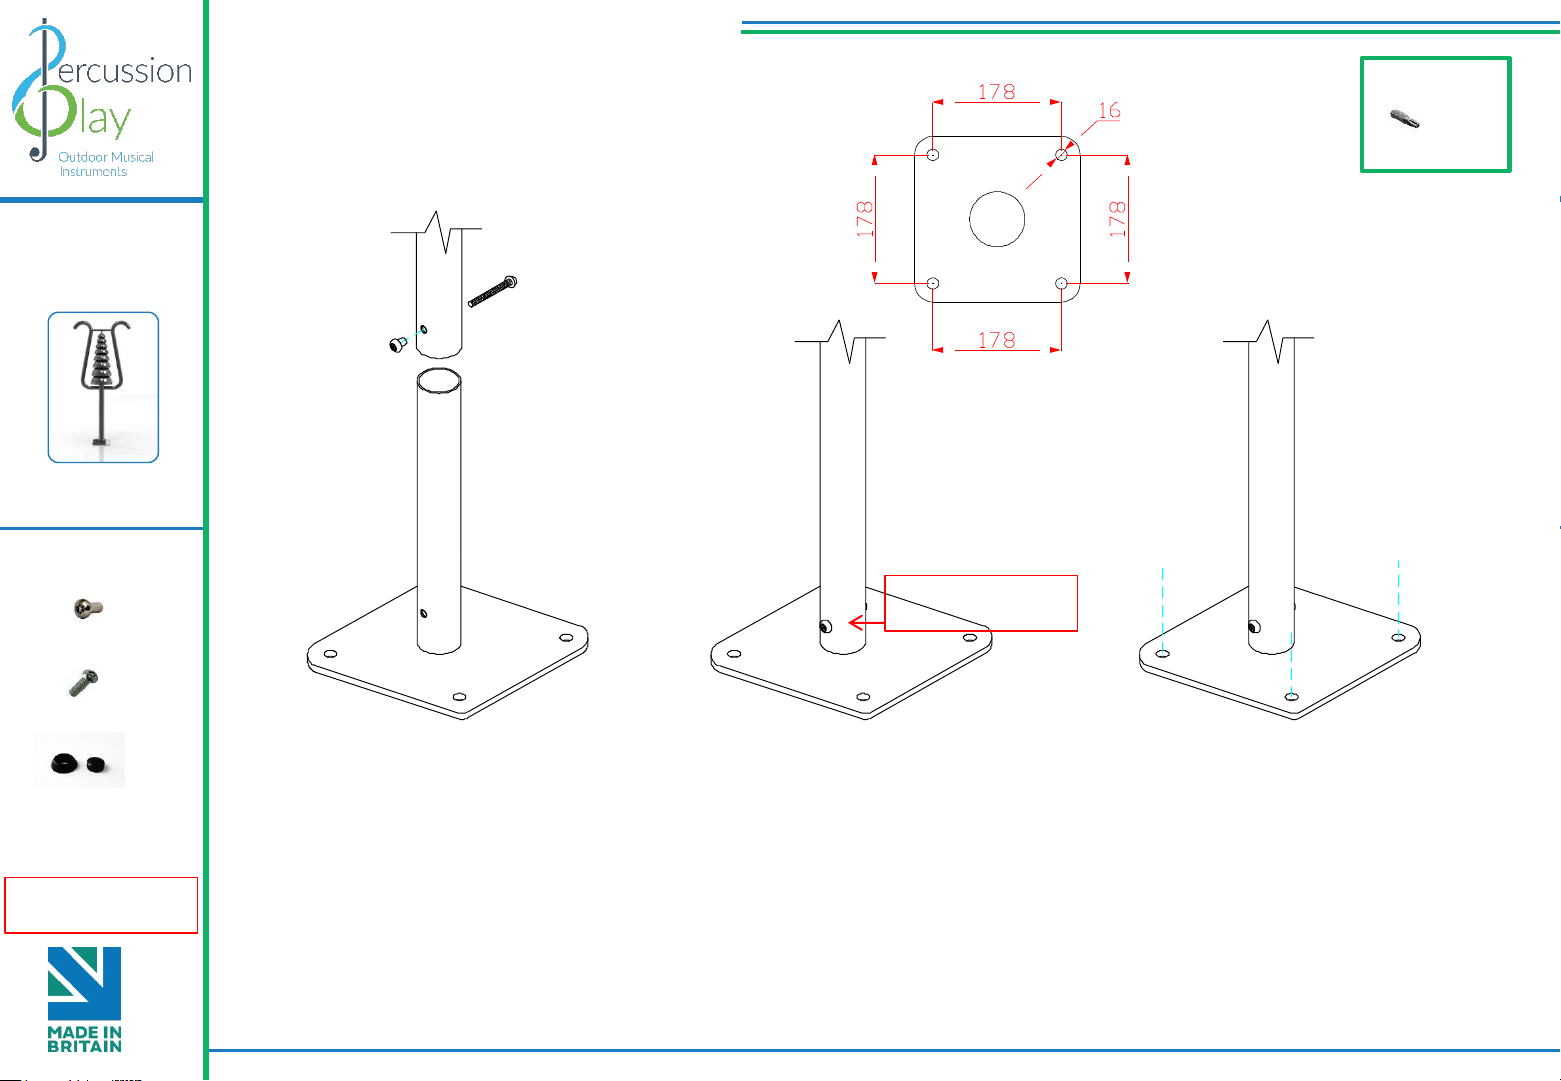
Locate the Surface fix
Plate into the leg of the
instrument.
Fix instrument to Surface
fix plate using M10 bolt
and Barrel Nut and use
thread locking solution
to prevent fixings working
loose.
Fix Surface Plate to the
ground surface Ground
Anchors Not provided
cover fixings with caps
provided
Surface Fixed
Components:
Surface Fix Post Installation
(1.1)
1
2 3
Bell Lyre
Page 2 of 2
M10 Barrel Nut
x1
M10x70 Security Screw
x1
TX 45 Driver Bit
Tools:
x2
BS EN 1176
Thread Lock Solution
Required (Not Supplied)
Thread Lock Solution
Required (Not Supplied)
2 Part Cover Cap
x4
Page 5
Surface Fixed
Handpipes
Page 1 of 3
Ground Surface
905m
m
Installation Instructions
(1.1)
Instrument
Components:
25 Kg
2. Attach Surface Fixing posts
to legs (See Surface Fix Post
Installation Sheet)
1. Handpipes will arrive on
site assembled, Surface
Fixings will need to be
installed (1.1) (See Assembly
Guide)
Install Instrument
with 1.5m free space
(from widest point)
around it.
1.5m
1.5m
Weight of heaviest part 20kg(Handpipes)
BS EN 1176
Metric
Conversion:
250mm/ 10”
400mm/ 16”
905mm/ 35”
1.5m/ 59”
Played with hands
Instrument assembled
Surface Fix
Components:
M10 Barrel Nut
x2
M10x50 Security Screw
x2
Ground Anchors
not supplied
2 Part Cover Cap
x8
4. Fix to Surface using
recommended ground
anchors not supplied
3.Locate Instrument in
desired location and mark
holes to fix to desired surface.
5. Make sure all fixings are
covered and secure using
cover caps provided
Spares available from
percussionplay.com or from your
local distributor
Page 6
CO MPO NE NTS LIST:
M10 x60mm Security Screw X2
M10 Barrel Nut X2
Surface Fixed
Assembly Guide PPHAND
(1.1)
Surface Fix
Components:
25 Kg
Handpipes
Page 2 of 3
BS EN 1176
Thread Lock Solution
Required (Not Supplied)
Played with hands
Instrument
Components:
Instrument assembled
M10 Barrel Nut
x2
M10x50 Security Screw
x2
Ground Anchors
not supplied
2 Part Cover Cap
x8
498
Spares available from
percussionplay.com or from your
local distributor
M10x50 Security Screw X2
Page 7
Surface Fixed
Components:
Surface Fix Post Installation
Handpipes
Page 3 of 3
BS EN 1176
Metric
Conversion:
50mm/ 2”
250mm/ 10”
350mm/ 14”
400mm/ 16”
450mm/ 18”
TX 45 Driver Bit
Tools:
x2
(1.1)
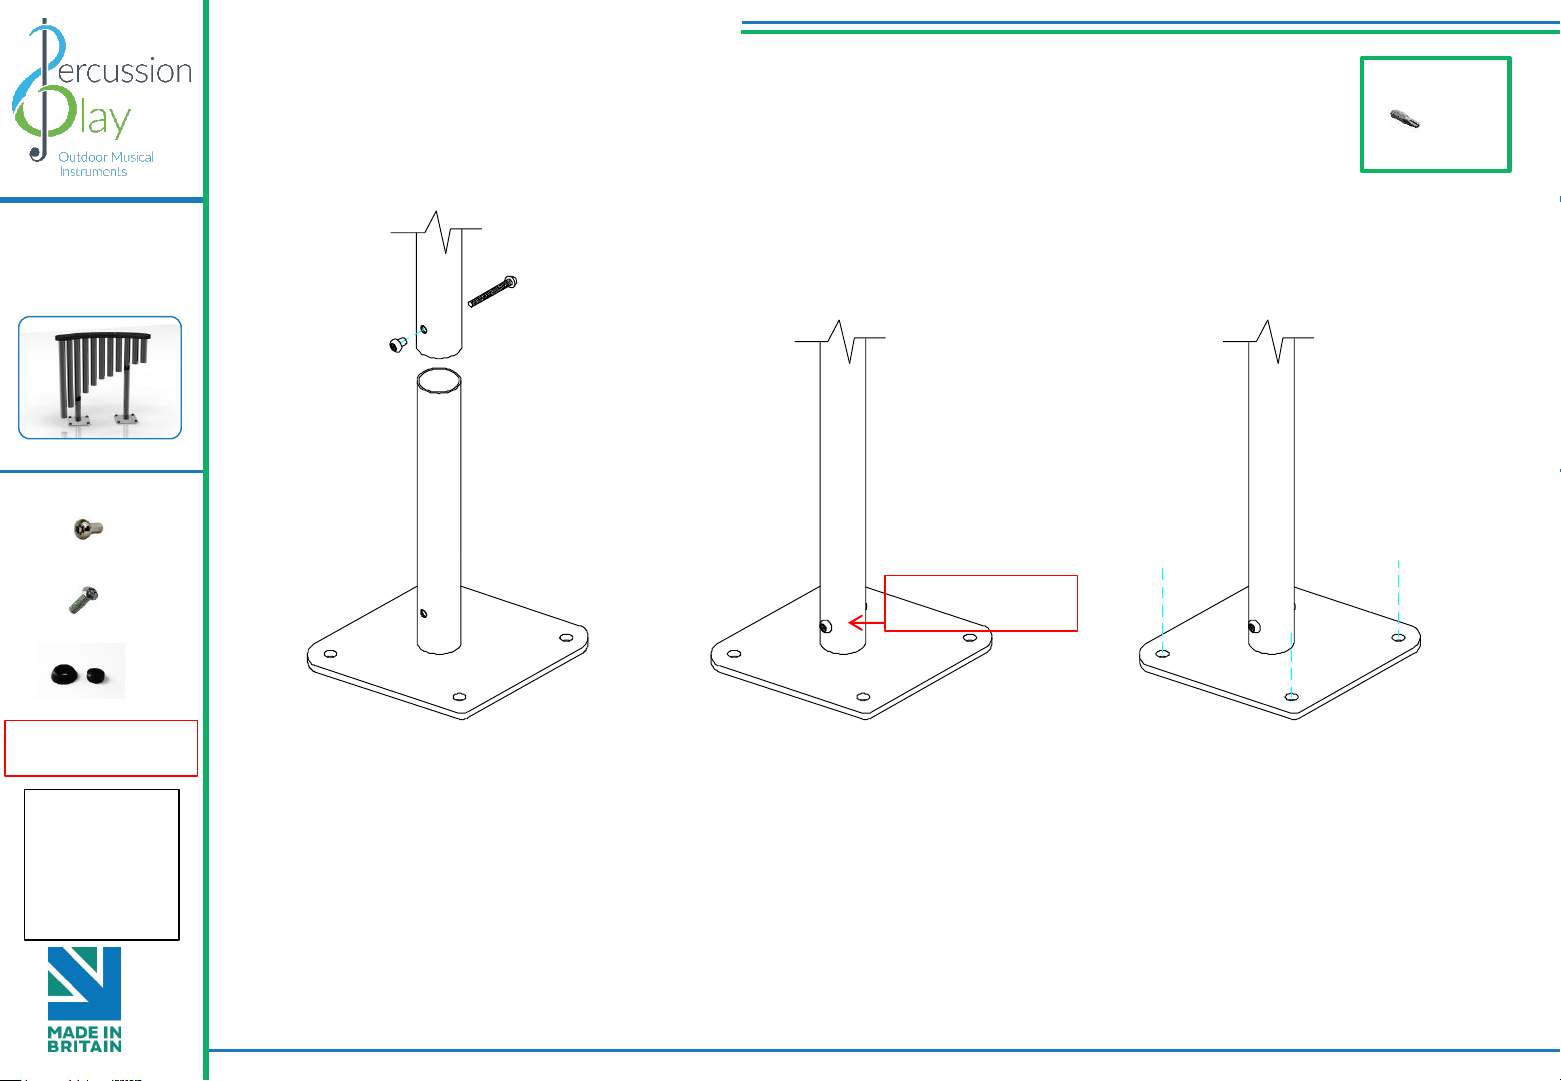
Locate the Surface fix
Plate into the leg of the
instrument.
Fix instrument to Surface
fix plate using M10 bolt
and Barrel Nut and use
thread locking solution
to prevent fixings working
loose.
Fix Surface Plate to the
ground surface Ground
Anchors Not provided
cover fixings with caps
provided
1
2 3
Repeat Parts 1-3 for both legs
Thread Lock Solution
Required (Not Supplied)
M10 Barrel Nut
x2
M10x50 Security Screw
x2
Thread Lock Solution
Required (Not Supplied)
2 Part Cover Cap
x8
Page 8
Surface Fixed
1385mm
Ground Surface
Installation Instructions
M8x60 Security Screw
x2
Surface Fix
Components:
20 Kg
Install Instrument
with 1.5m free space
(from widest point)
around it.
1.5m
1.5m
Pair Small Red
Beaters X1
M10 Nut
M6x20 Security Screw
x6
M6 Saddle Strap
x3
Instrument
Components:
Flat Pack Harmony
Page 1 of 2
Weight of heaviest part 16kg(Harmony Frame)
BS EN 1176
Metric Conversion:
178mm/ 7”
250mm/ 10”
400mm/ 16”
1385mm/ 55”
1.5m/ 59”
CAUTION:
Harmony surface
can get hot in
direct sunlight, if
possible install in
shaded areas.
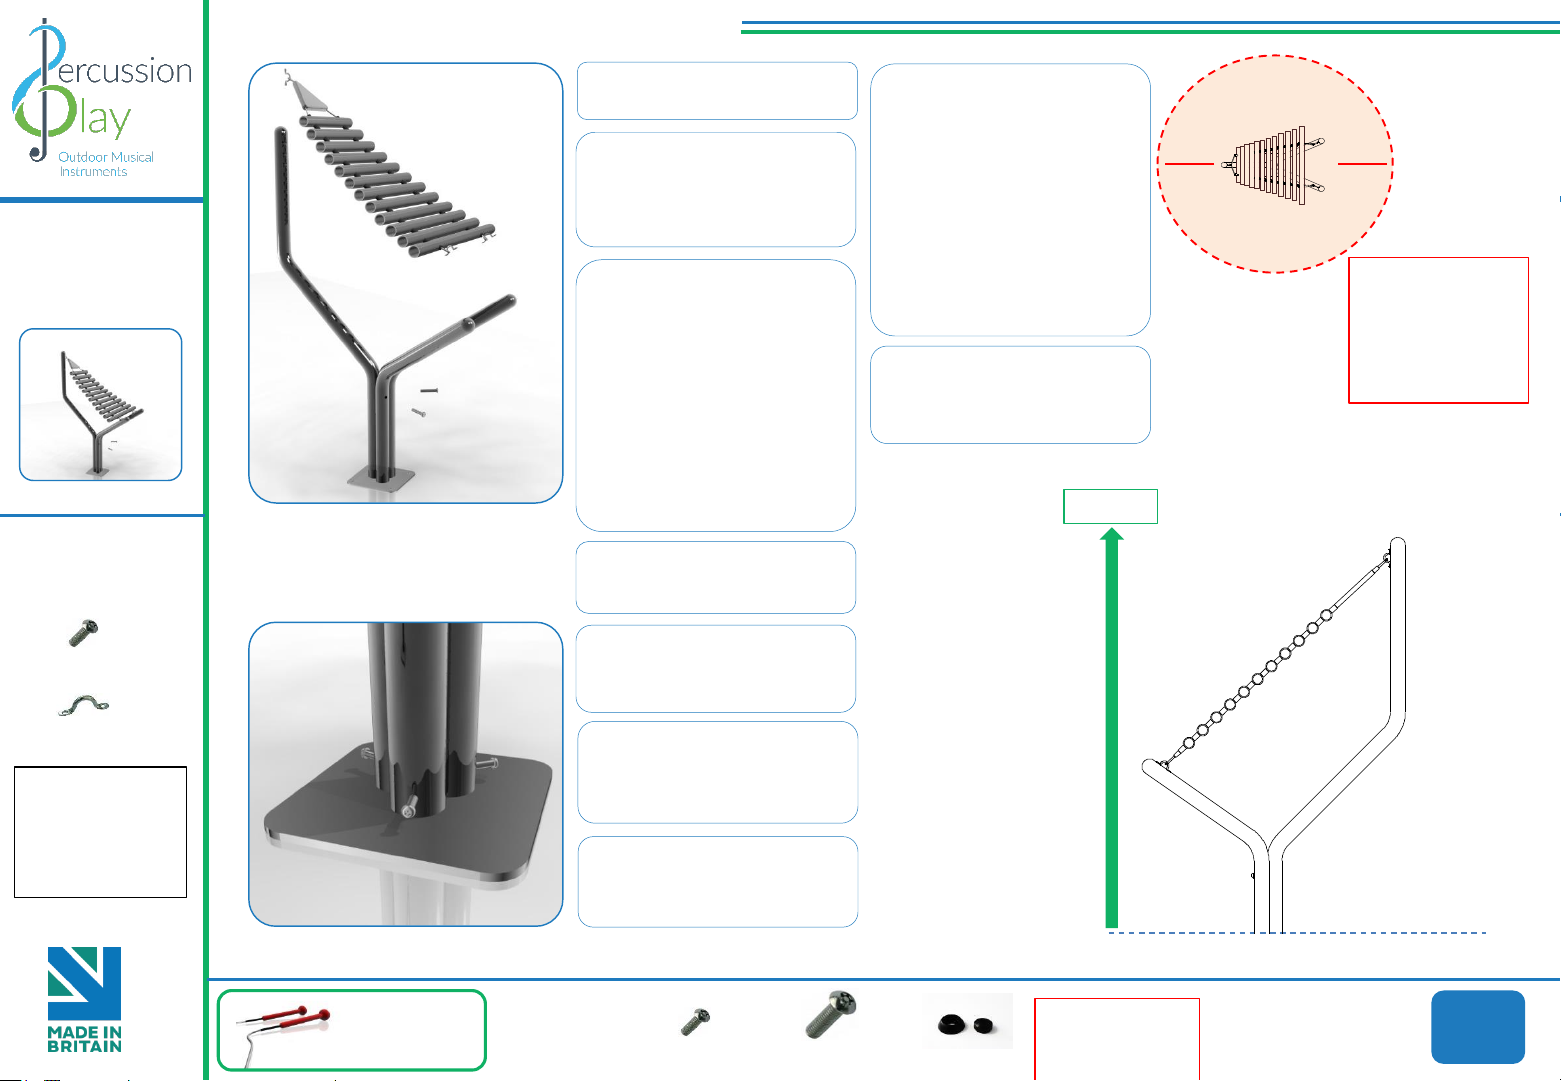
1. Unpack frame 3no.
2. Lay packaging out on floor
or assemble on non-abrasive
surface to prevent marking of
polished stainless steel.
3. Align holes on legs
(opposite end to polished
domes) and secure in place
using 3no. M10 x 200mm
threaded bar and 6no. M10
nuts provided
Tools required 2no. 17mm
metric spanner/wrench (11/
16
inch or alternatively using
adjustable wrench)
4. Invert assembled frame so
domed ends face upwards.
5. Insert M8x60mm Security
screws into pre drilled holes
in frame using TX40 bit.
6. Attach Notes and Surface
Plate to Harmony Frame. (See
Assembly Guide Sheet)
7.Locate Harmony in desired
location and mark holes to fix
to desired surface.
8. Fix Surface Plate to level
surface using Coachscrews,
Rawlbolts, chemical anchors
or similar as deemed
appropriate by Installer.
(It is your responsibility to
ensure that the existing
surface is suitable to
receive the appropriate
fixing)
9. Make sure all fixings are
covered and secure using
cover caps provided
M8x25 Security Screw
x3
2 Part Cover Cap
x4
Ground
Anchors not
supplied
Spares available from
percussionplay.com or from your
local distributor
Page 9
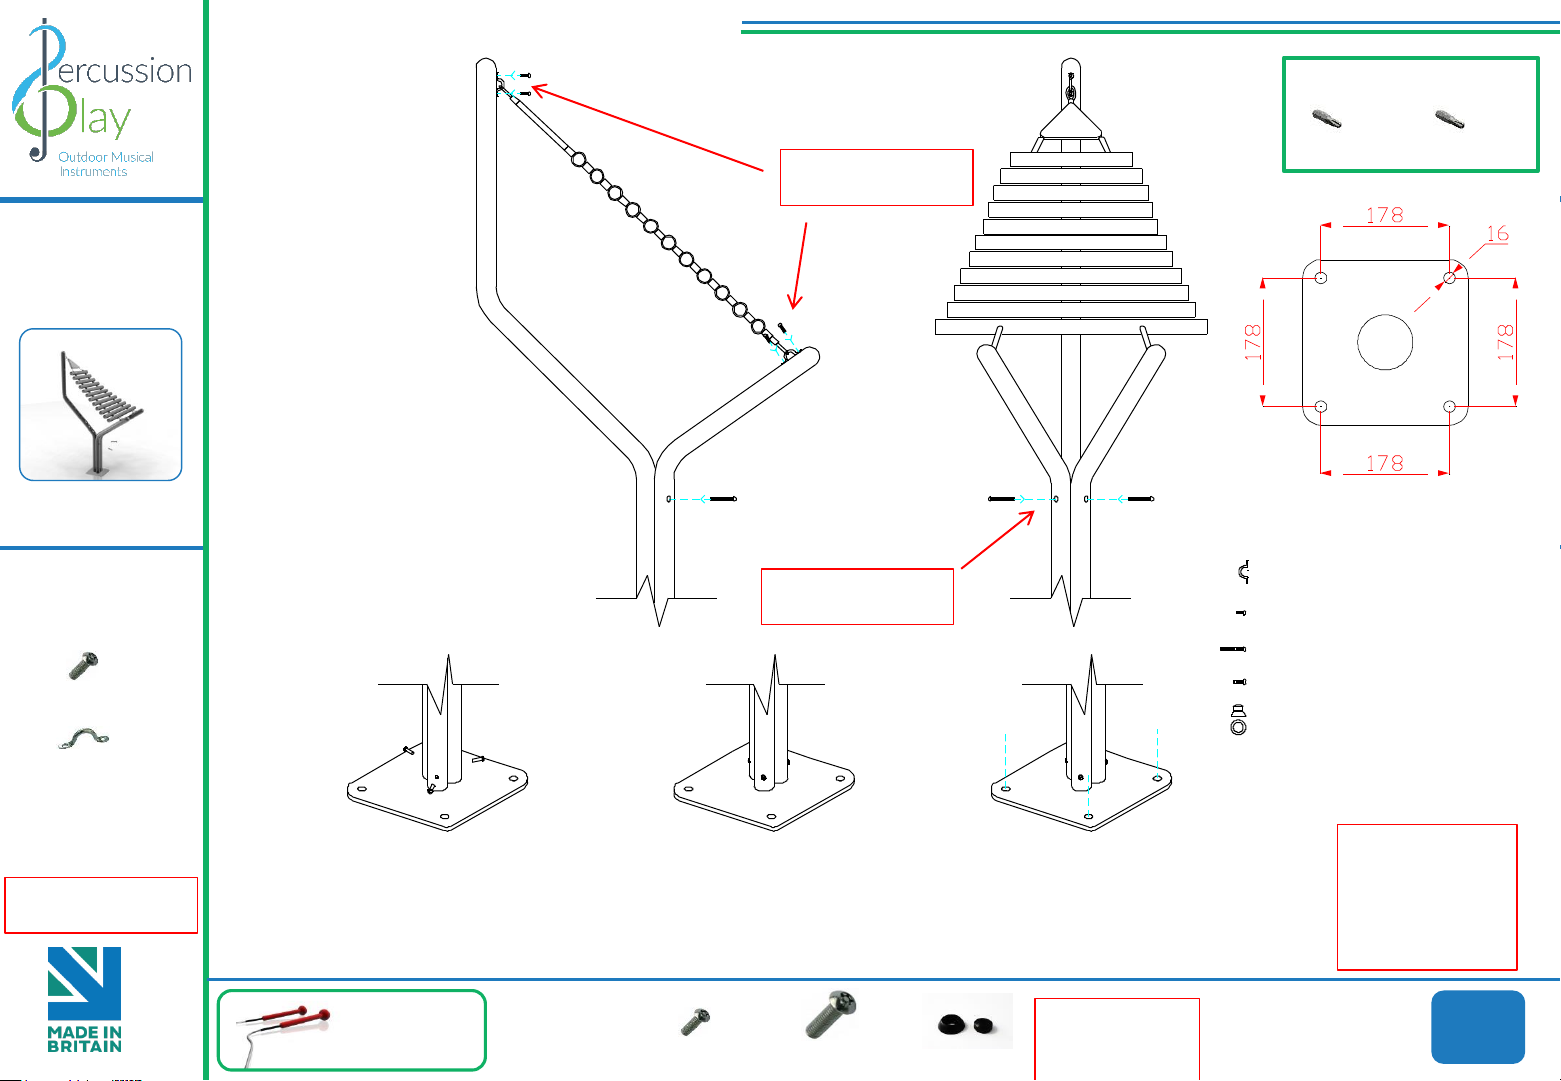
Saddle Strap X3
M6x2 0 Pi n torx X6
M8x6 0 Pi n torx X2
COMPONENTS LIST:
Locat e t he Surface fix
Plate into the leg of the
instrument.
Fix inst ru ment to Surface
fix plate using M8x25
Screws and use thread
locki ng solution to
prevent fixings working
loose.
Fix Surf ace Plate to the
ground surface Ground
Anchors Not provided
cover fixings with caps
provided
2 Part Cover Cap X8
M8x2 5 Pi n torx X3
Surface Fixed
Instrument
Components:
M6x20 Security Screw
x6
M6 Saddle Strap
x3
TX 30 Driver Bit
x1
Assembly Guide PPHARM
Surface Fix
Components:
20 Kg
Pair Small Red
Beaters X1
Harmony Flat Pack
Page 2 of 2
TX 40 Driver Bit
x1
Tools:
BS EN 1176
Thread Lock Solution
Required
Thread Lock Solution
Required
Thread Lock Solution
Required
CAUTION:
Harmony surface
can get hot in
direct sunlight, if
possible install in
shaded areas.
M8x60 Security Screw
x2
M8x25 Security Screw
x3
2 Part Cover Cap
x4
Ground
Anchors not
supplied
Spares available from
percussionplay.com or from your
local distributor
Page 10
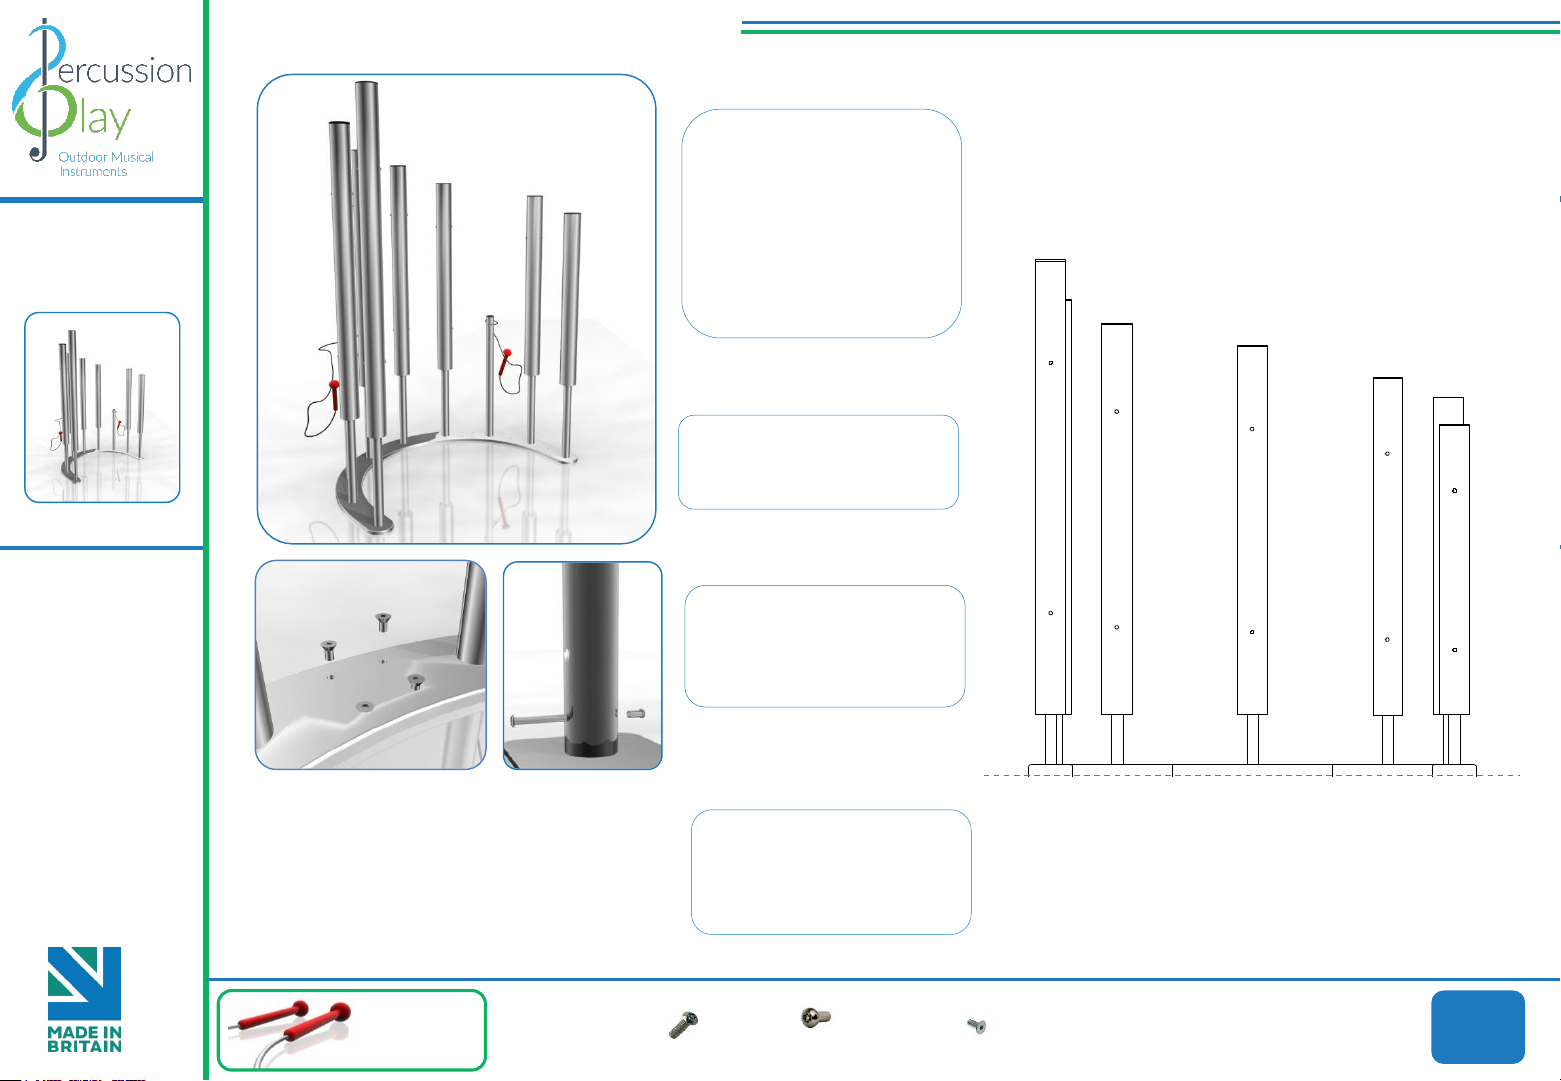
Surface Fixed
2. Assemble Upper 3 Base
sections using M8 x 16 mm
CSK screws provided (1.1)
Installation Instructions
Tubular Bells will arrive on
site pre assembled
Ground Surface
90 Kg
Pair Large Red
Beaters X1
Instrument
Components:
Tubular Bells
are preassembled
Weight of heaviest part 30kg(ALU Base)
Tubular Bells
Page 1 of 4
BS EN 1176
1.Locate Base in desired
location before attaching the
bells. Fix lower sections to
surface using pre drilled holes
provided. (Surface Anchors
Not supplied) Recommended
M10 Female Rawl Bolts or
chemical anchors
Spares available from
percussionplay.com or from your
local distributor
3. Using the M10x 40 screw
and Barrel Nuts to attach
each of the 9 legs to the base
(1.2)
1.2
4. Make sure that all fixings
are tightly secured and thread
locking solution used if
required.
1.1
M10 Barrel Nut
x9
M10x40 Security Screw
x9
M8x16 CSK Security Screw
x34
Surface Fix
Components:
Page 11
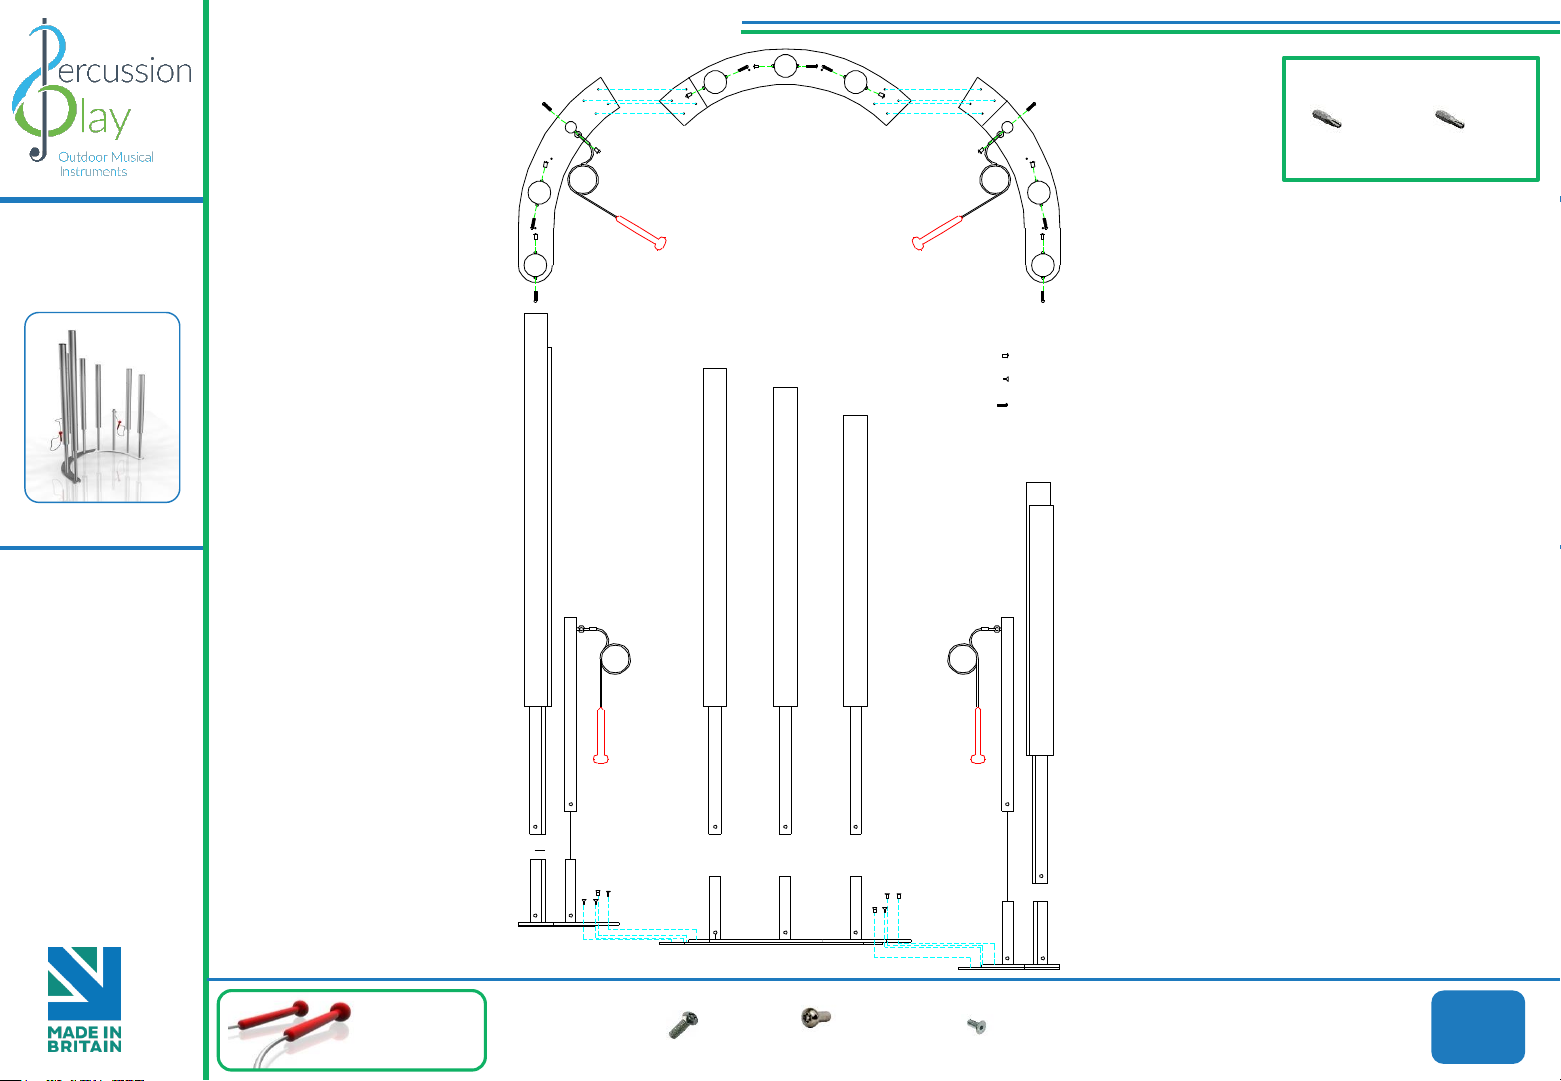
Surface Fixed
Assembly Guide TBEL SF
90 Kg
Instrument
Components:
Tubular Bells
Are Preassembled
Tubular Bells
Page 2 of 4
BS EN 1176
Surface Fix
Components:
Spares available from
percussionplay.com or from your
local distributor
Pair Large Red
Beaters X1
M10 Barrel Nut
x9
M10x40 Security Screw
x9
M10x16 CSK Security Screw
x34
TX 45 Driver Bit
Tools:
TX 40 Driver Bit
x2
x1
M10 x40 P in torx X9
M8x1 6 CSK Screw X34
M10 Bar rel Nut Pin torx X9
COMPONENTS LIST:
Page 12
Surface Fixed
Assembly Guide TBEL SF
90 Kg
Instrument
Components:
Tubular Bells
Are Preassembled
Tubular Bells
Page 3 of 4
BS EN 1176
Surface Fix
Components:
Spares available from
percussionplay.com or from your
local distributor
Pair Large Red
Beaters X1
M10 Barrel Nut
x9
M10x40 Security Screw
x9
M8x16 CSK Security Screw
x34
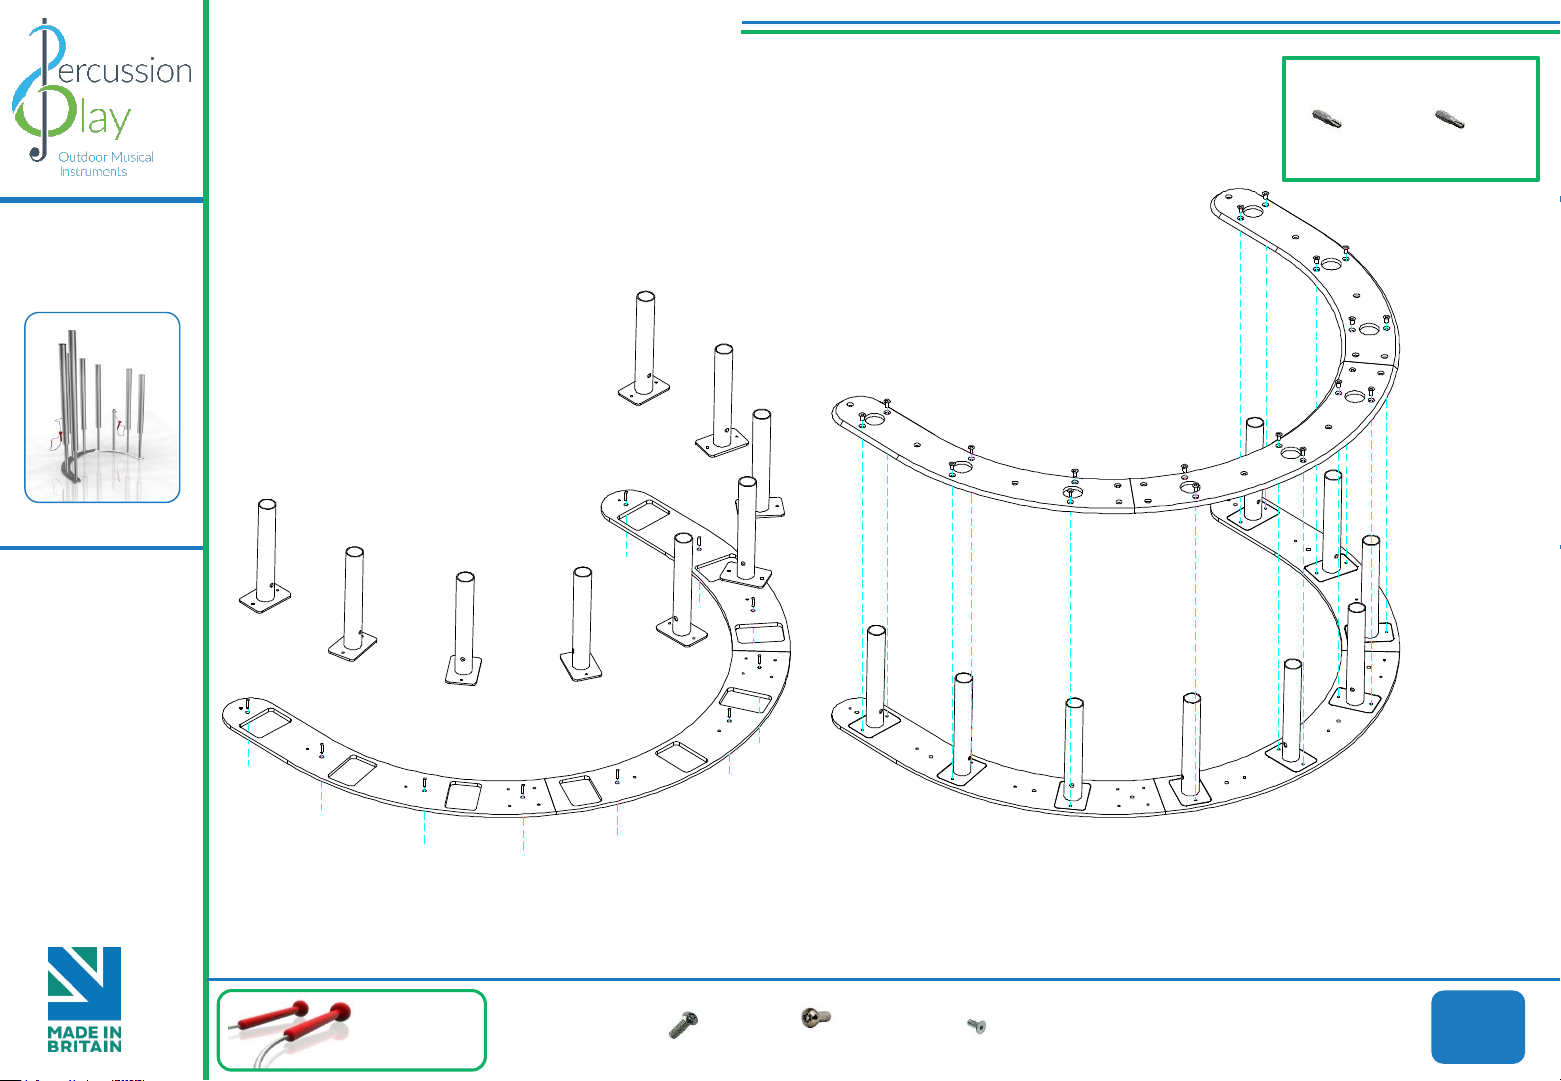
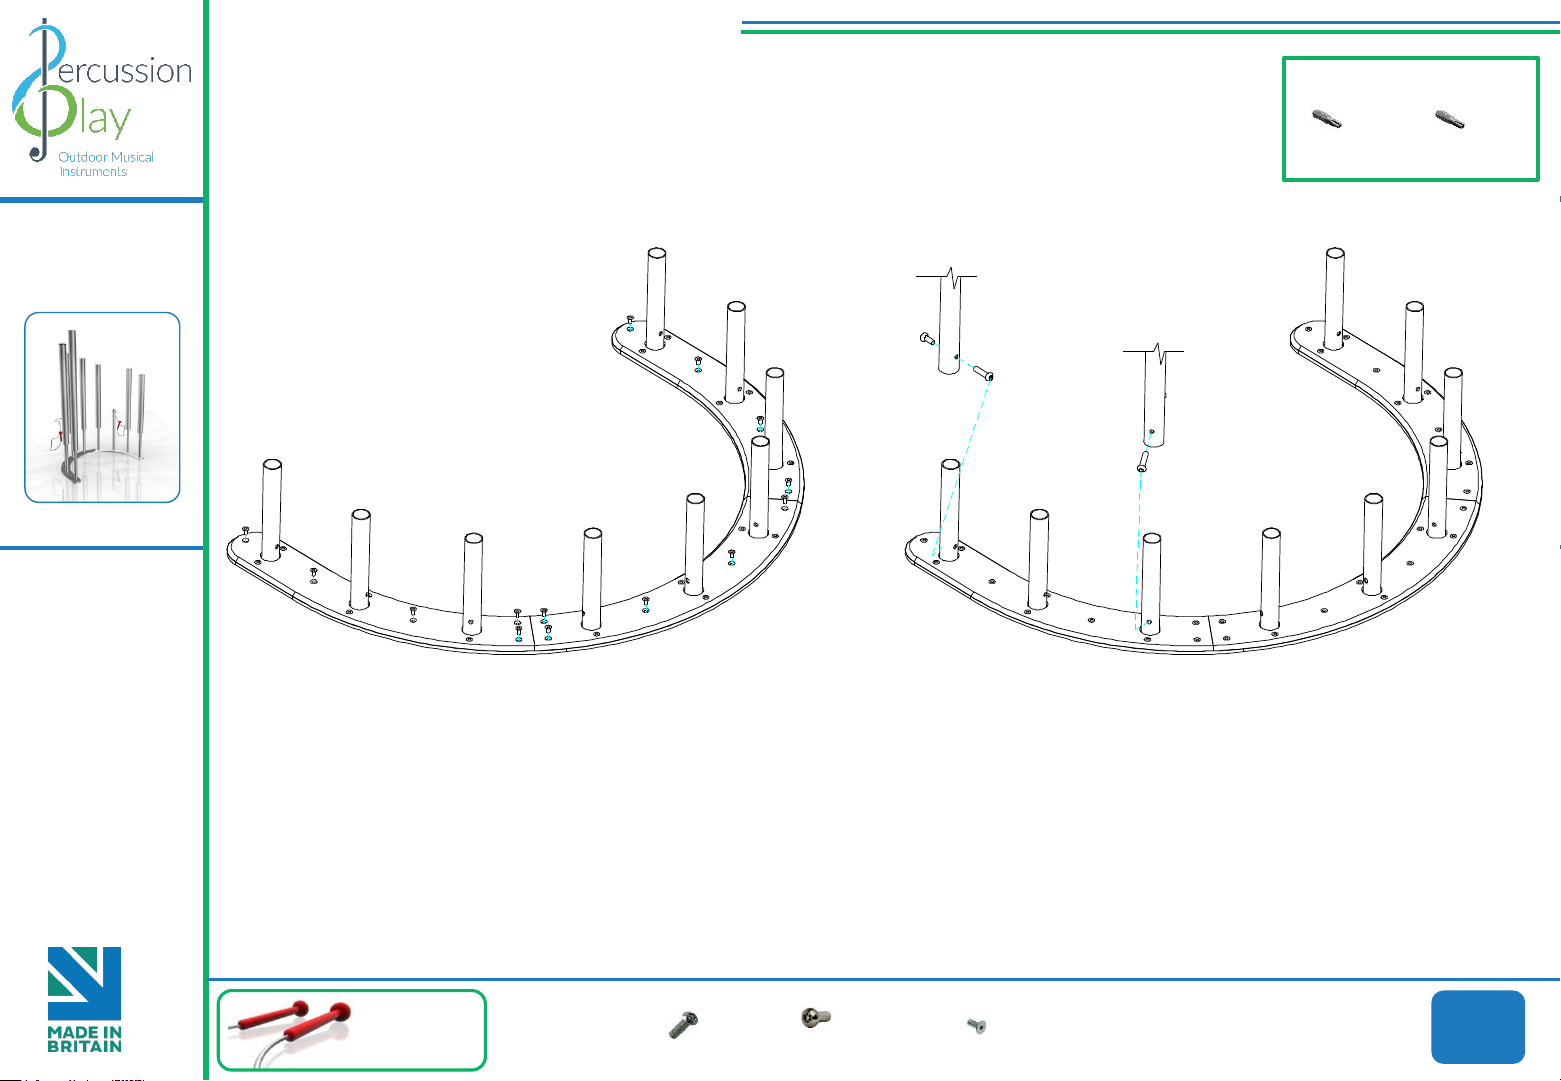
Mount this section of each base to the
deck Deck Anchors Not provided
using pre drilled holes
Insert instrument plates with
stanchions and attach with CSK
M8x16mm Screws provided
TX 45 Driver Bit
Tools:
TX 40 Driver Bit
x2
x1
Page 13
Surface Fixed
Assembly Guide TBEL SF
90 Kg
Instrument
Components:
Tubular Bells
Are Preassembled
Tubular Bells
Page 4 of 4
BS EN 1176
Surface Fix
Components:
Spares available from
percussionplay.com or from your
local distributor
Pair Large Red
Beaters X1
M10 Barrel Nut
x9
M10x40 Security Screw
x9
M8x16 CSK Security Screw
x34
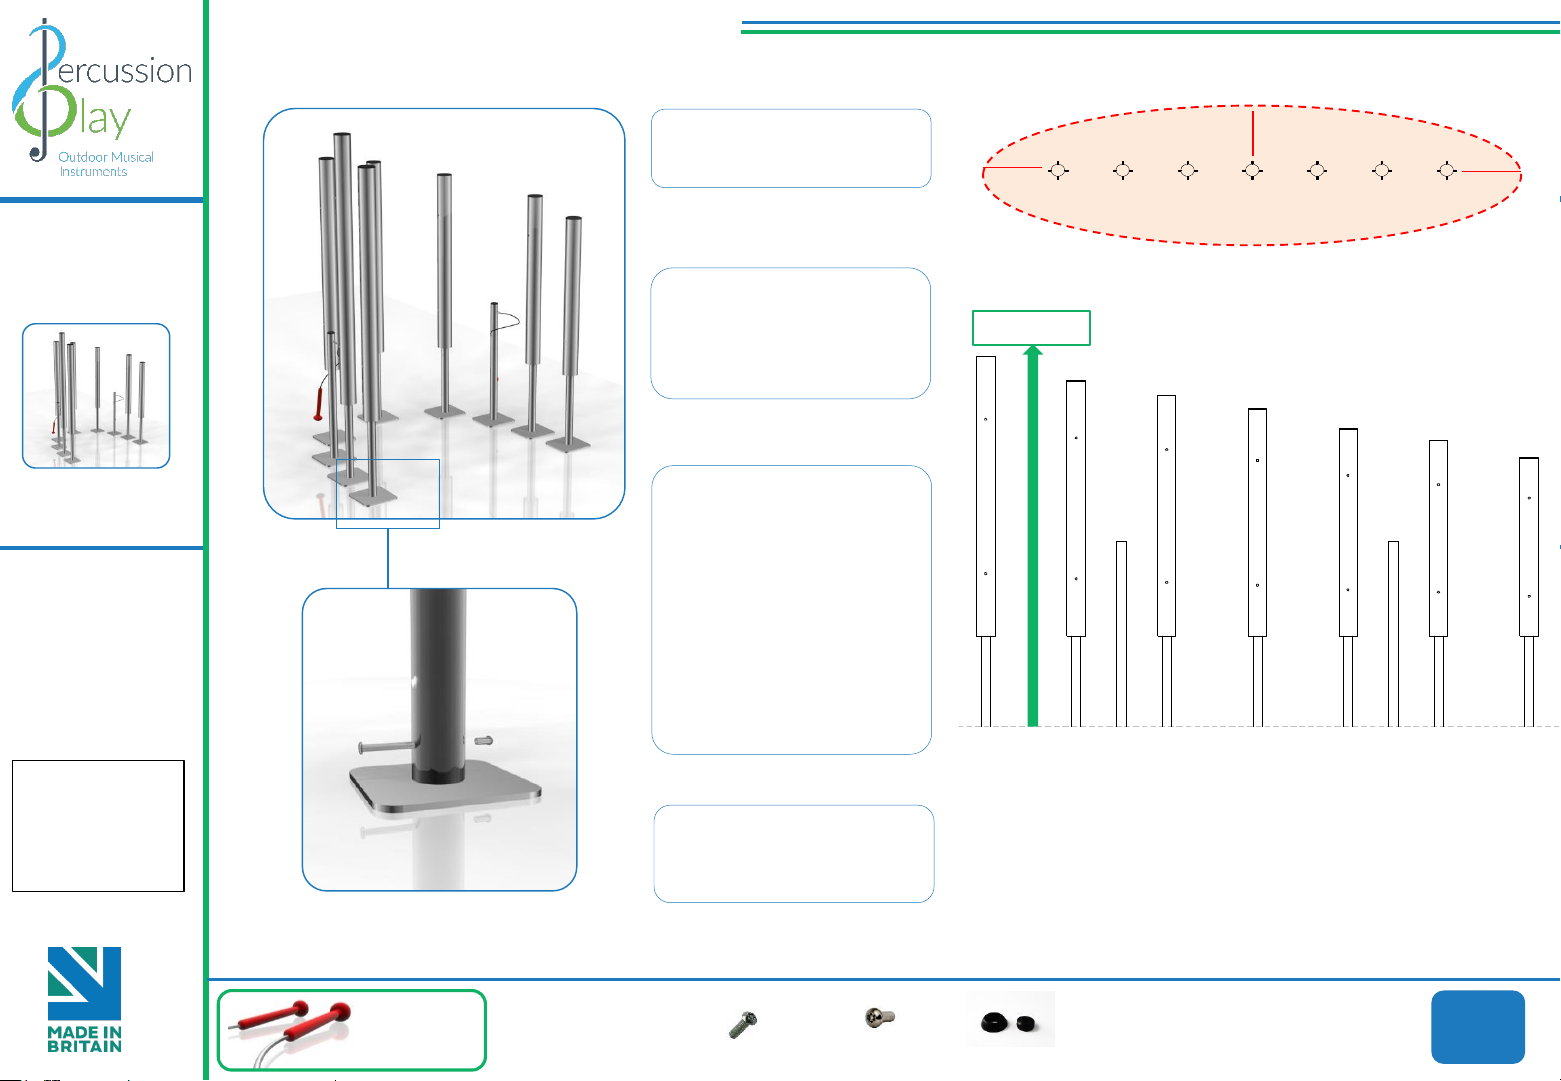
Join the upper and lower base
sections with CSK M8x16mm Screws
provided
Lower Instrument over the stanchions and attach with
fixings provided(see surface fix installation
instructions)
TX 45 Driver Bit
Tools:
TX 40 Driver Bit
x2
x1
Page 14
Surface Fixed
Installation Instructions
Ground
Surface
2207
Surface Fix
Components:
59 Kg
Pair Large Red
Beaters X1
Instrument
Components:
Tubular Bells
are preassembled
Weight of heaviest part 10kg(XXL Bell)
Tubular Bells
Page 1 of 2
BS EN 1176
Install Instrument
with 1.5m free space
(from widest point)
around it.
1.5m
1.5m
1.5m
Metric Conversion:
250mm/ 10”
400mm/ 16”
600mm/ 24”
1.5m/ 59”
2207mm/ 98”
Spares available from
percussionplay.com or from your
local distributor
M10 Barrel Nut
x9
M10x40 Security Screw
x9
2 Part Cover Cap
x36
1. Attach Surface Fixing plates
to each of the 9 legs(1.2)
3. Fix Surface Plate to level
surface using Coachscrews,
Rawlbolts, chemical anchors
or similar as deemed
appropriate by Installer.
(It is your responsibility to
ensure that the existing
surface is suitable to
receive the appropriate
fixing)
2.Locate each chime in
desired location and mark
holes to fix to desired surface.
4. Make sure all fixings are
covered and secure using
cover caps provided
1.2
Page 15
Surface Fixed
Surface Fix Plate Installation
(1.1)
Components:
Tubular Bells
Page 2 of 2
BS EN 1176
(1.1)
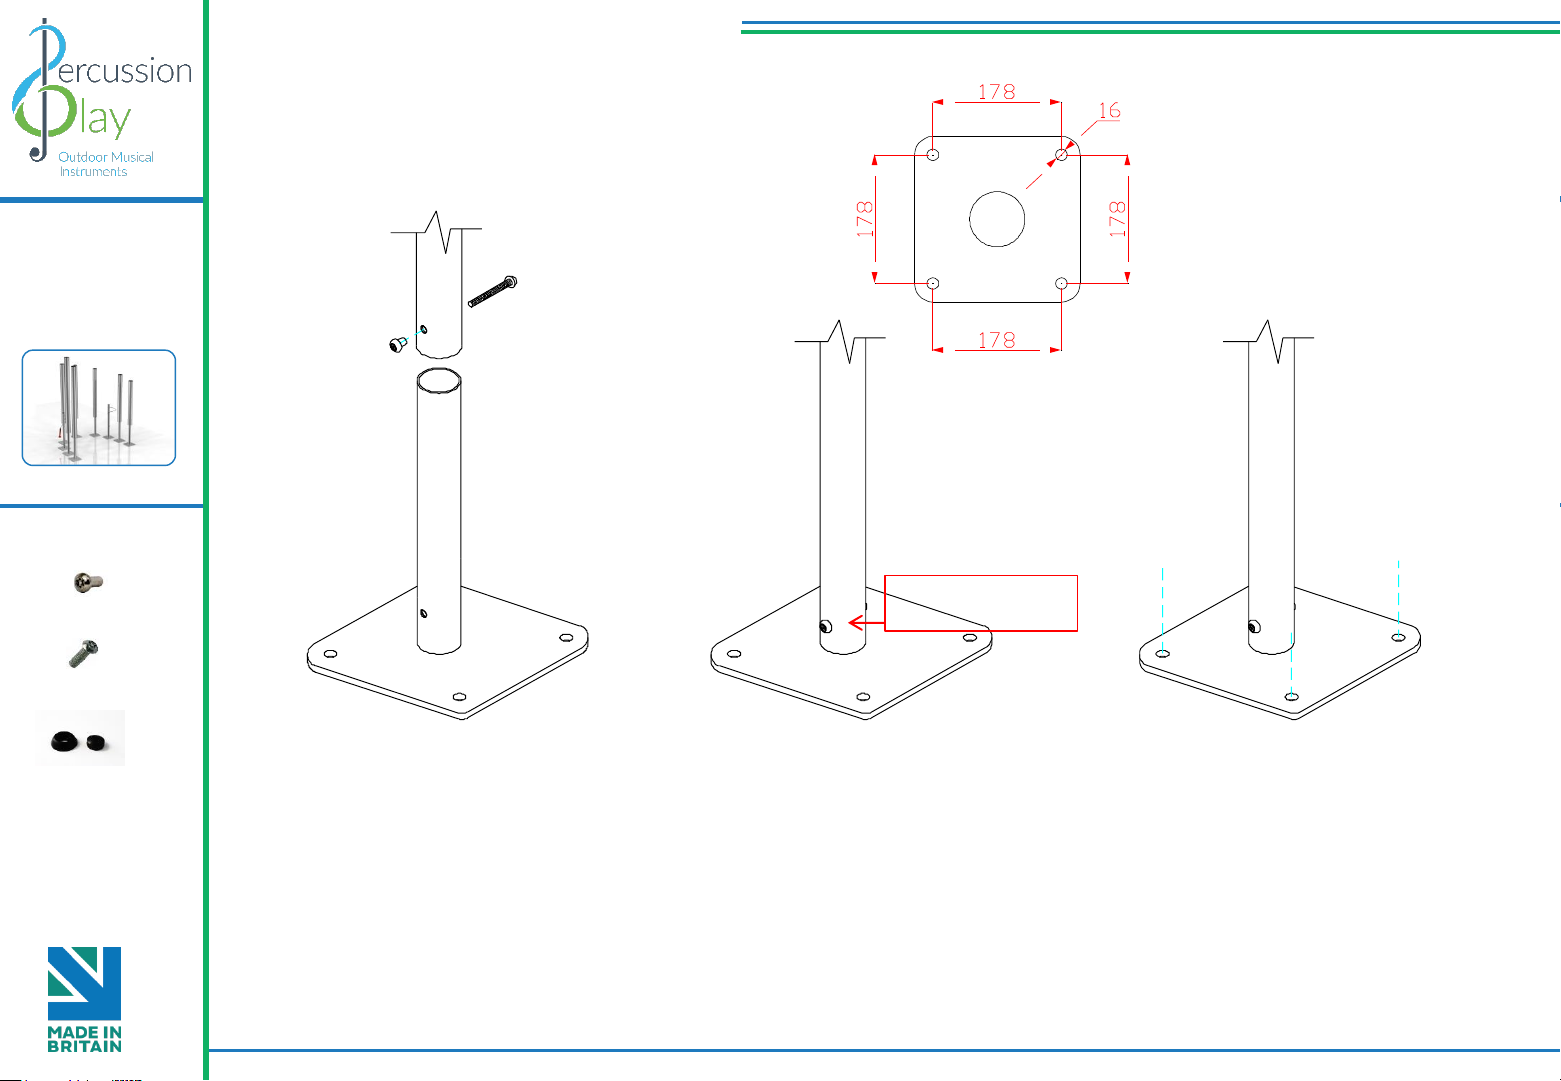
Locate the Surface fix
Plate into the leg of the
instrument.
Fix instrument to Surface
fix plate using M10 bolt
and Barrel Nut and use
thread locking solution
to prevent fixings working
loose.
Fix Surface Plate to the
ground surface Ground
Anchors Not provided
cover fixings with caps
provided
1
2 3
Repeat Parts 1-3 for all 9 legs
Thread Lock Solution
Required (Not Supplied)
M10 Barrel Nut
x9
M10x40 Security Screw
x9
2 Part Cover Cap
x8
 Loading...