

Page 1

The following is a draft User Manual with operational instructions. Any
reference to “Frequency Hopping” should read “Direct Sequencing”.
A final copy of the User Manual will be sent to the FCC as soon as it
is available.
Page 2

>>
DOS PORTABLE DATA TERMINAL
™
Falcon RF
®
Lucent WaveLAN
Wireless LAN
Supplement
Page 3

Percon Falcon RF™: Lucent WaveLAN
®
Wireless LAN Supplement
©1999
1800 Millrace Drive
Eugene, OR 97403
Voice: (541) 344-1189
Fax: (541) 344-1399
E-mail: [email protected]
Web: http://www.percon.com
All rights reserved. No part of this work may be reproduced,
transmitted, or stored in any form or by any means without
prior written consent, except by a reviewer, who may quote
brief passages in a review, or as provided for in the Copyright
Act of 1976.
00-656-00
7/99
Percon
®
is a registered trademark of Percon Incorporated.
Falcon™ and Falcon RF™ are trademarks of Percon Incorporated.
WaveLAN
Microsoft
Workgroups
Novell
®
is a registered trademark of Lucent Technologies Inc.
®
, Microsoft Windows®, and Windows for
®
are registered trademarks of Microsoft Corp.
®
is a registered trademark of Novell Inc. NetWare Client™
is a trademark of Novell Inc.
PhoenixCARD Manager Plus ©1993, 1994 Phoenix Technologies
Ltd.
Many of the designations used by manufacturers and sellers to
distinguish their products are claimed as trademarks. Where
these designations appear here and the authors were aware of a
trademark claim, the designations have been printed with a
trademark (™) or registered trademark (
®
) symbol.
The information contained in this document is subject to
change without notice.
Page 4

Software License Agreement
This software license agreement is your proof of license to use the Falcon RF Utilities for WaveLAN (hereinafter “Software”). This license permits the purchaser to use portions of the Novell NetWare Client™,
which are included in the Software, under the terms listed below. If you do not agree with the terms of
this agreement for any reason, you may return the software immediately to the location where you purchased it for a refund of the purchase price of the Software.
PERCON Incorporated (“PERCON”) grants to you a nonexclusive, nontransferable license to use this copy
of the Software and accompanying documentation according to the following terms:
LICENSE
You may:
1. use the Software on one or more Falcon RF portable data terminals; and
2. make only those number of copies of the Software as are essential for back up or archival use of the
Software.
You may not:
1. decompile and reverse assemble the Software to discover the source code; or
2. time-share, lease, rent, distribute, transfer, sublicense, and use the Software in an unauthorized
manner, without prior written consent of PERCON.
This license is not for sale. Title and copyrights to the Software, accompanying documentation, and any
copy made by you, remain with PERCON and Novell, Inc. Human-readable code of the Software (source
code) is not licensed to the licensee. Unauthorized copying of the Software or the accompanying documentation, or failure to comply with the above restrictions, will result in automatic termination of this license and will make available to PERCON other legal remedies.
DISCLAIMER AND 30-DAY GUARANTEE
If the Software is inoperable due to any defects in the media on which the Software resides, then you
may return the Software to the location where you purchased the Software within the 30-day period
from the date of your invoice. PERCON's entire liability and your exclusive remedy under this guarantee
(subject to your returning the Software to the location where you purchased the software with a copy of
your receipt) will be, at PERCON's option, either (a) return of the price paid or (b) repair or replacement of
the Software. This guarantee does not apply to the Software if the failure of the Software has resulted
from accident, abuse, or misapplication. Outside of the United States, these remedies are not available
without proof of purchase from an authorized non-U.S. source. In the case of your return of the Software
for any reason, you will delete any copy of the Software on your computer, and any other copy in object
code or source code form, and you further agree not to use the Software until a repaired or replaced
copy of the Software is returned to you by PERCON.
Falcon RF WaveLAN Supplement < iii >
Page 5

Software License Agreement
EXCEPT FOR THE ABOVE GUARANTEE, PERCON MAKES AND YOU RECEIVE NO WARRANTIES OR CONDITIONS, EXPRESS,
IMPLIED, STATUTORY, OR IN ANY COMMUNICATION WITH YOU, AND SPECIFICALLY DISCLAIMS ANY IMPLIED WARRANTY
OF NONINFRINGEMENT, MERCHANTABILITY, OR FITNESS FOR A PARTICULAR PURPOSE. PERCON DOES NOT WARRANT
THAT THE SOFTWARE WILL BE UNINTERRUPTED OR ERROR FREE.
LIMITATION OF LIABILITY
IN NO EVENT WILL PERCON BE LIABLE FOR ANY DAMAGES, INCLUDING LOSS OF DATA, LOST PROFITS, COST OF COVER,
OR OTHER SPECIAL, INCIDENTAL, CONSEQUENTIAL, OR INDIRECT DAMAGES ARISING FROM THE USE OF THE SOFTWARE
OR ACCOMPANYING DOCUMENTATION, HOWEVER CAUSED AND ON ANY THEORY OF LIABILITY. THIS LIMITATION WILL
APPLY EVEN IF PERCON OR AN AUTHORIZED RESELLER HAS BEEN ADVISED OF THE POSSIBILITY OF SUCH DAMAGE. YOU
ACKNOWLEDGE THAT THE LICENSE FEE REFLECTS THE ALLOCATION OF RISK. SOME STATES DO NOT ALLOW THE LIMITATION OR EXCLUSION OF LIABILITY FOR INCIDENTAL OR CONSEQUENTIAL DAMAGES, AND SO THE ABOVE LIMITATION
MAY NOT APPLY TO YOU.
GOVERNMENT RESTRICTED RIGHTS LEGEND; INTERNATIONAL USE
Use, duplication, or disclosure by the United States Government is subject to restrictions of Restricted Rights for computer software developed at private expense as set forth in FAR Sec. 52.227-19 or DOD FAR Supplement Sec. 252,2277013(c)(1)(ii), and successor thereof, as applicable. If you are sublicensing or using the Software outside of the United
States, you must comply with the applicable local laws of your country, U.S. export control laws, and the Englishlanguage version of this Software License Agreement.
GENERAL
This Agreement is governed by the laws of the State of Oregon, without reference to conflict-of-laws principles. This
Agreement is the entire agreement between us and supersedes any other communications or advertising with respect to
the Software and accompanying documentation. If any provision of this Agreement is held invalid, the remainder of this
Agreement will continue in full force and effect. If you have any questions, please contact in writing: PERCON, 1720 Willow Creek Circle, Suite 530, Eugene, Oregon 97402.
< iv > Falcon RF WaveLAN Supplement
Page 6

Contents
Software License Agreement. . . . . . . . . . . . . . . . . . . . . . . . . . . . . . . . . . . . iii
Introduction . . . . . . . . . . . . . . . . . . . . . . . . . . . . . . . . . . . . . . . . . . . . . . . . . ix
FCC Requirements . . . . . . . . . . . . . . . . . . . . . . . . . . . . . . . . . . . . . . . . . . . . . . . . . . . . . . . . . . . . x
Chapter One:
About Falcon RF with the WaveLAN Wireless LAN PC Card . . . . . . . . . . . . 1
WaveLAN. . . . . . . . . . . . . . . . . . . . . . . . . . . . . . . . . . . . . . . . . . . . . . . . . . . . . . . . . . . . . . . . . . . 2
Network Operating System Support . . . . . . . . . . . . . . . . . . . . . . . . . . . . . . . . . . . . . . . . . . . . . .2
Power Management . . . . . . . . . . . . . . . . . . . . . . . . . . . . . . . . . . . . . . . . . . . . . . . . . . . . . . . . . . 3
Attaching the Antenna Connector. . . . . . . . . . . . . . . . . . . . . . . . . . . . . . . . . . . . . . . . . . . . . . . .3
Chapter Two:
Configuring the Falcon RF . . . . . . . . . . . . . . . . . . . . . . . . . . . . . . . . . . . . . . 5
Getting Started . . . . . . . . . . . . . . . . . . . . . . . . . . . . . . . . . . . . . . . . . . . . . . . . . . . . . . . . . . . . . .6
Installing ODI Drivers. . . . . . . . . . . . . . . . . . . . . . . . . . . . . . . . . . . . . . . . . . . . . . . . . . . . . . . . . .6
ODI with TCP/IP . . . . . . . . . . . . . . . . . . . . . . . . . . . . . . . . . . . . . . . . . . . . . . . . . . . . . . . . . . . 7
ODI with NetWare Client. . . . . . . . . . . . . . . . . . . . . . . . . . . . . . . . . . . . . . . . . . . . . . . . . . .11
ODI with IPX/SPX. . . . . . . . . . . . . . . . . . . . . . . . . . . . . . . . . . . . . . . . . . . . . . . . . . . . . . . . .15
ODI with Custom Installations. . . . . . . . . . . . . . . . . . . . . . . . . . . . . . . . . . . . . . . . . . . . . . .18
AUTOEXEC.BAT . . . . . . . . . . . . . . . . . . . . . . . . . . . . . . . . . . . . . . . . . . . . . . . . . . . .18
CONFIG.SYS. . . . . . . . . . . . . . . . . . . . . . . . . . . . . . . . . . . . . . . . . . . . . . . . . . . . . . .19
NET.CFG . . . . . . . . . . . . . . . . . . . . . . . . . . . . . . . . . . . . . . . . . . . . . . . . . . . . . . . . .20
DOS Configuration Parameters . . . . . . . . . . . . . . . . . . . . . . . . . . . . . . . . . . . . . . . . . . . . . . . . . 21
Falcon RF WaveLAN Supplement < v >
Page 7

Contents
Chapter Three:
Wireless Topologies and Site Surveys . . . . . . . . . . . . . . . . . . . . . . . . . . . . 23
Single-Cell Topology . . . . . . . . . . . . . . . . . . . . . . . . . . . . . . . . . . . . . . . . . . . . . . . . . . . . . . . . .24
Multiple-Cell Topology . . . . . . . . . . . . . . . . . . . . . . . . . . . . . . . . . . . . . . . . . . . . . . . . . . . . . . .24
Site Surveys . . . . . . . . . . . . . . . . . . . . . . . . . . . . . . . . . . . . . . . . . . . . . . . . . . . . . . . . . . . . . . . .26
< vi > Falcon RF WaveLAN Supplement
Page 8

Introduction
This manual contains information specific to radio frequency (RF) models of the
Falcon DOS portable data terminal using the WaveLAN wireless LAN PC Card. It is
provided as a supplement to the Falcon User’s Guide. The user’s guide contains
important information about using the Falcon, along with bar codes for setting programming parameters.
Please read the Falcon Users Guide to familiarize yourself with the Falcon’s opera-
tion before reading this manual or using the Falcon.
Falcon RF WaveLAN Supplement < ix >
Page 9

Introduction
>> FCC Requirements
This device must operate in compliance with Federal Communications Commission (FCC) Rules and Regulations Parts 15.
This equipment has been tested and found to comply with the limits
for Class A or Class B digital device, pursuant to Part 15 of the FCC
Rules. These limits are designed to provide reasonable protection
against harmful interference when the equipment is operated in a
commercial environment. This equipment generates, uses, and can
radiate radio frequency energy and, if not installed and used in accordance with the instructions in this manual, may cause harmful
interference to radio communications. Operation of this equipment
in a residential area is likely to cause harmful interference, in which
case the user will be required to correct the interference at his or her
own expense.
However, there is no guarantee that interference will not occur in a
particular installation. If this equipment does cause harmful interference to radio or television reception, as determined by turning the
equipment off and on, the user is encouraged to try to correct the
interference by one or more of the following measures:
G Reorient or relocate the receiving antenna.
G Increase the separation between the equipment and the receiver.
G Connect the equipment into an outlet on a circuit different from
that to which the receiver is connected.
G Consult the dealer or an experienced radio/TV technician for help.
< x > Falcon RF WaveLAN Supplement
Page 10

>> Chapter One
About Falcon RF with the WaveLAN
Wireless LAN PC Card
With Lucent’s WaveLAN wireless LAN, a Falcon RF user can roam freely throughout a
facility. A PC card and one or more access points allow the Falcon RF to maintain a
continuous, seamless connection to a wired network.
This chapter provides an overview of the WaveLAN wireless LAN PC card (Percon part
no. 0840-0011-00) and its use with the Falcon.
NOTE: For information about WaveLAN access points, see the user’s guide provided
by Lucent Technologies Inc.
CHAPTER CONTENTS
WaveLAN <2>
Network Operating System Support <2>
Power Management <3>
Attaching the Antenna Connector <3>
< 1 >
Page 11

About Falcon RF with the WaveLAN Wireless LAN PC Card
>> WaveLAN
The WaveLAN PC card is a long-range, high-performance, one-piece
wireless LAN adapter. When used with Falcon RF units, the
WaveLAN’s frequency-hopping, spread-spectrum technology provides the following benefits:
G Seamless, full roaming mobility within a facility while staying
connected to the LAN
G Low power consumption
G High throughput capacity
G High network capacity
G A 2-Mbps data rate, for fast operation
G Configurable radio settings
G Standard NDIS (Network Driver Interface Specification) and ODI
(Open Data-link Interface) drivers for DOS
G Support for Socket Services v2.0 and Card Services v2.1
The WaveLAN wireless LAN PC card allows a mobile unit (MU) to
connect to the WaveLAN network through access points (APs).
With a WaveLAN PC card installed in a Falcon, the Falcon becomes a
mobile unit associated with WaveLAN APs in a given domain. The
Falcon appears as a peer to other MUs on the network. The PC card
offers high-level performance while making low power demands on
the portable.
>> Network Operating System Support
Falcon's open architecture design allows for connectivity to many
network operating systems. Using the standard NDIS and ODI drivers provided on the Falcon RF utilities disk, the developer can load a
wide variety of protocol stacks on the Falcon RF. The software provided on the RF utilities disk includes support for the following network operating systems:
G Novell NetWare v3.x or v4.x, through Novell IPX/SPX Protocol
v3.01, Novell VLM (Virtual Loadable Module Manager) v1.20, and
Novell TCP/IP Transport v5.0
G Windows for Workgroups v3.11, through NDIS drivers and cus-
< 2 > Falcon RF WaveLAN Supplement
tomer-provided NetBEUI drivers
Page 12

G Windows NT, through NDIS drivers and customer-provided
NetBEUI drivers
G TCP/IP-based networks, through Novell TCP/IP Transport v5.0
G TCP/IP-based networks, through ODI and NDIS packet driver
shims and a customer-provided TCP/IP stack
G Others using NDIS or ODI
Novell IPX/SPX Protocol, Novell VLM, Novell TCP/IP, the ODI packet
driver shim, and the NDIS packet driver shim are all included in the
RF utilities disk for Falcon.
>> Power Management
When operating in a Falcon unit, the WaveLAN wireless LAN PC card
reduces power usage by suspending communication while the associated AP saves data for the Falcon. The Falcon wakes at given intervals and checks for messages from the AP.
Power Management
>> Attaching the Antenna Connector
NOTE: If your Falcon’s PC card is already installed, go on to the next
chapter.
The Lucent WaveLAN PC card is certified for use only with the following antennas:
G Huber + Suhner dipole (Percon part no. 8912-0057-00)
G Toko Internal antenna (Percon part no. 5501-9245-00)
G Cushcraft dipole (Cushcraft part no. RTN2400SXR)
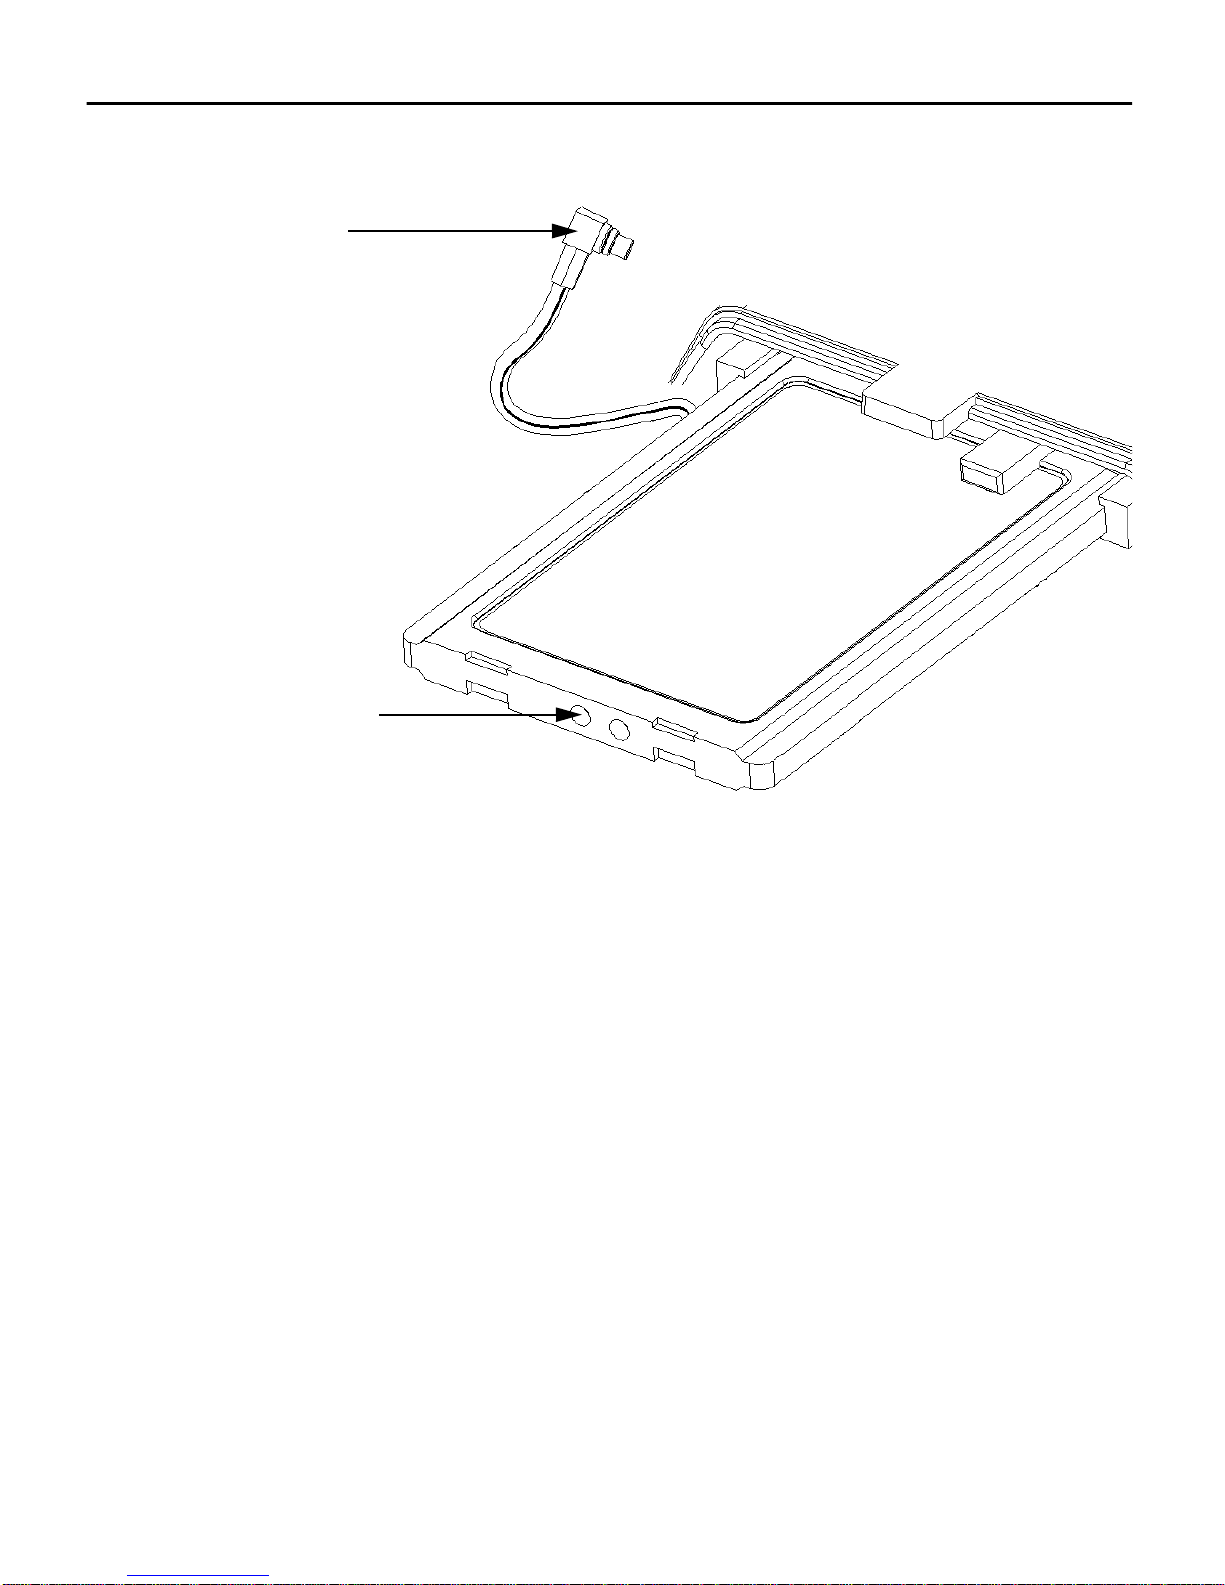
Open the PC card slot on your Falcon and insert the WaveLAN PC
card as instructed in the user’s guide for the Falcon. Insert the antenna connector into the correct socket on the WaveLAN card (see
figure 1-1). Then replace the PC card slot cover on the Falcon.
Falcon RF WaveLAN Supplement < 3 >
Page 13
About Falcon RF with the WaveLAN Wireless LAN PC Card
Figure 1-1: Connecting the Antenna to the PC Card
Antenna connector
Antenna socket
NOTE: Be sure to insert the connector into the correct socket, as
shown in the figure.
< 4 > Falcon RF WaveLAN Supplement
Page 14

>> Chapter Two
Configuring the Falcon RF
After installing the WaveLAN LAN PC card (see the user’s guide for your Falcon
model), you must configure the Falcon to use the card. This is accomplished with
the Falcon Configuration Utility. Use of the utility is covered in the Falcon User’s
Guide.
This chapter contains configuration information specific to the use of the Lucent
WaveLAN wireless LAN PC card.
CHAPTER CONTENTS
Getting Started <6>
Installing ODI Drivers <6>
ODI with TCP/IP
ODI with NetWare Client
ODI with IPX/SPX
ODI with Custom Installations
DOS Configuration Parameters <21>
< 5 >
Page 15

Configuring the Falcon RF
>> Getting Started
The Falcon Configuration Utility is provided with every Falcon unit,
including the RF models. If you have not already installed it on your
PC, install the utility now following the directions in the Falcon
User’s Guide.
The documentation set for Falcon RF includes an RF utilities disk. After installing the Falcon Configuration Utility, run the
gram on the utilities disk. Complete the setup procedure to install
the drivers and other files required for RF operation onto your PC.
NOTE: For complete information about the Falcon Configuration
Utility, see the Falcon User’s Guide.
>> Installing ODI Drivers
The Falcon RF installation package includes open data-link interface
(ODI) drivers for TCP/IP, IPX/SPX, NetWare Client, and custom instal-
lations.
SETUP.EXE pro-
G For TCP/IP, the package provides software from Novell. Novell’s
TCP/IP stack runs on top of the ODI driver.
G For NetWare Client, Novell’s
the IPX/SPX protocol stack, which runs on top of the ODI driver.
These applications allow the user to run Novell client/server applications; to mount drives, printers, and other hardware; and to
treat the Falcon RF as if it were a client on a Novell network.
G For other IPX/SPX solutions, the package provides software from
Novell. Novell’s IPX/SPX stack runs on top of the ODI driver.
G For other software implementations, you can customize one of
the provided configurations.
NETX.EXE and VLM.EXE programs use
< 6 > Falcon RF WaveLAN Supplement
Page 16
Installing ODI Drivers
ODI with TCP/IP Complete the following steps to install the ODI drivers for TCP/IP:
1. Start the Falcon Configuration Utility by double-clicking on the
Falcon icon in the Falcon Configuration Utility group on your PC.
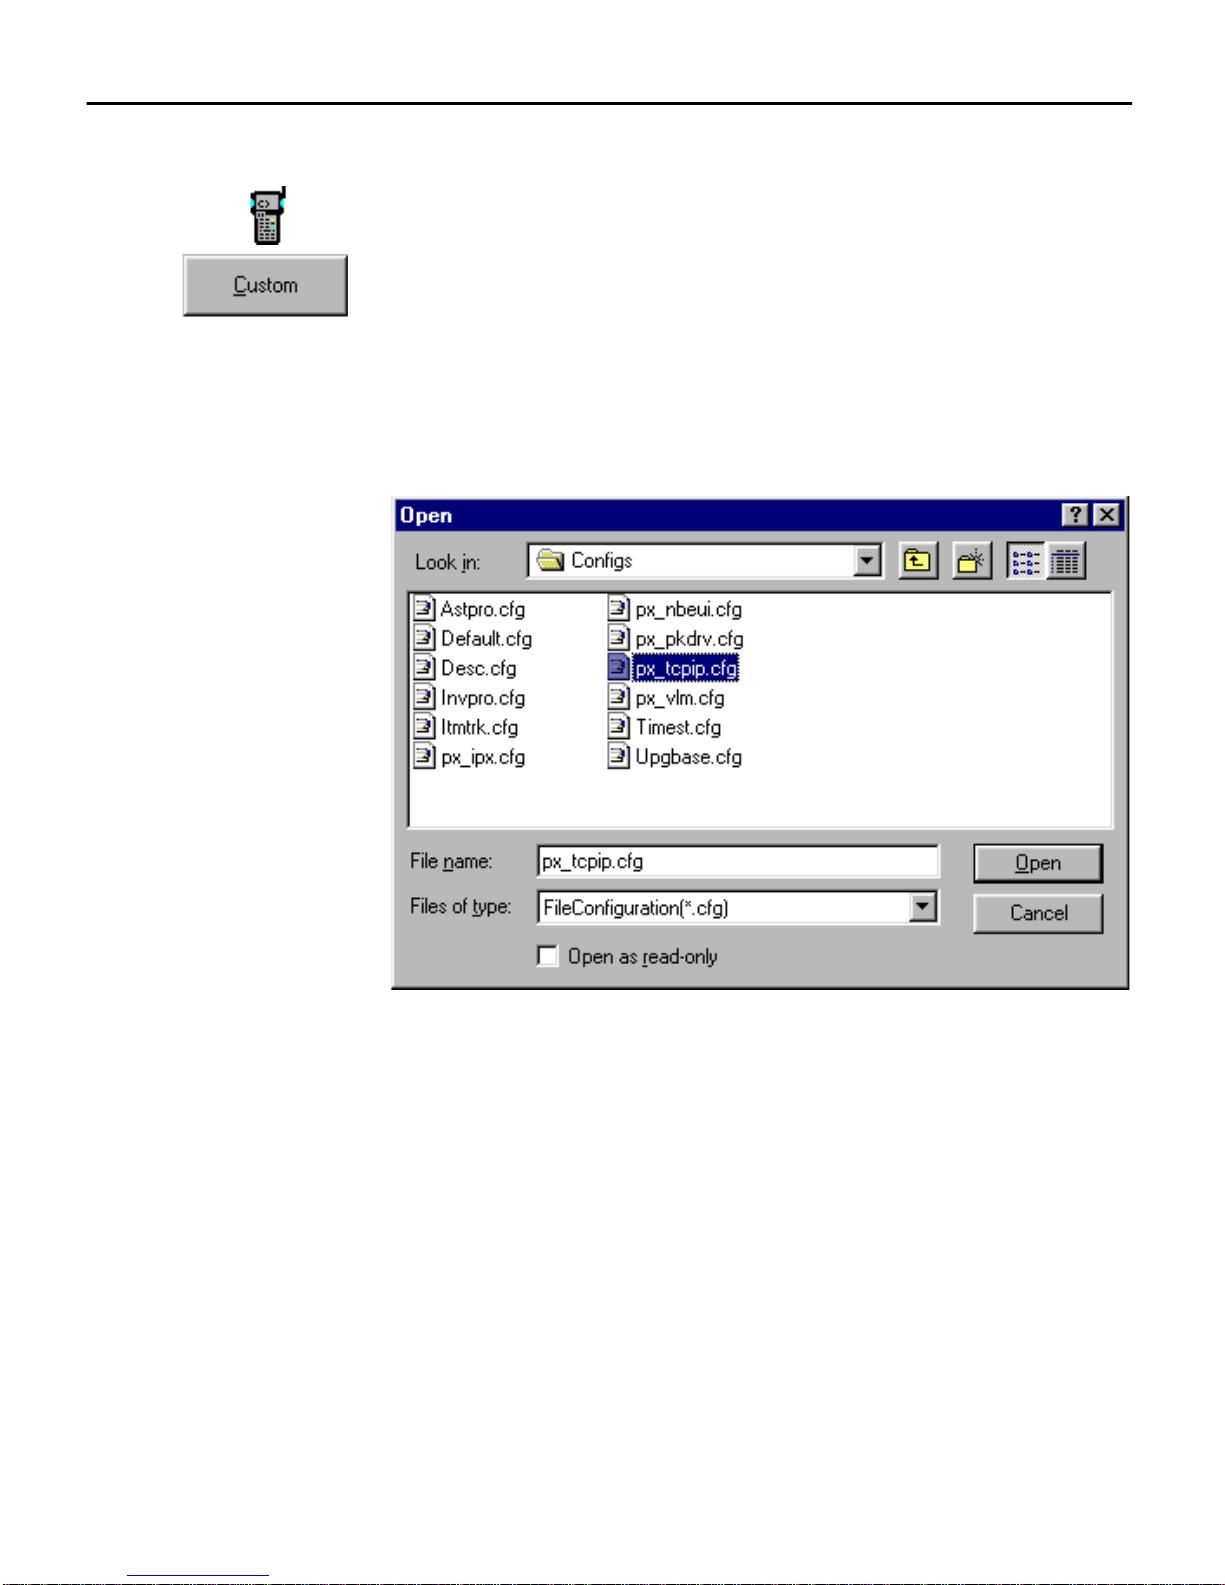
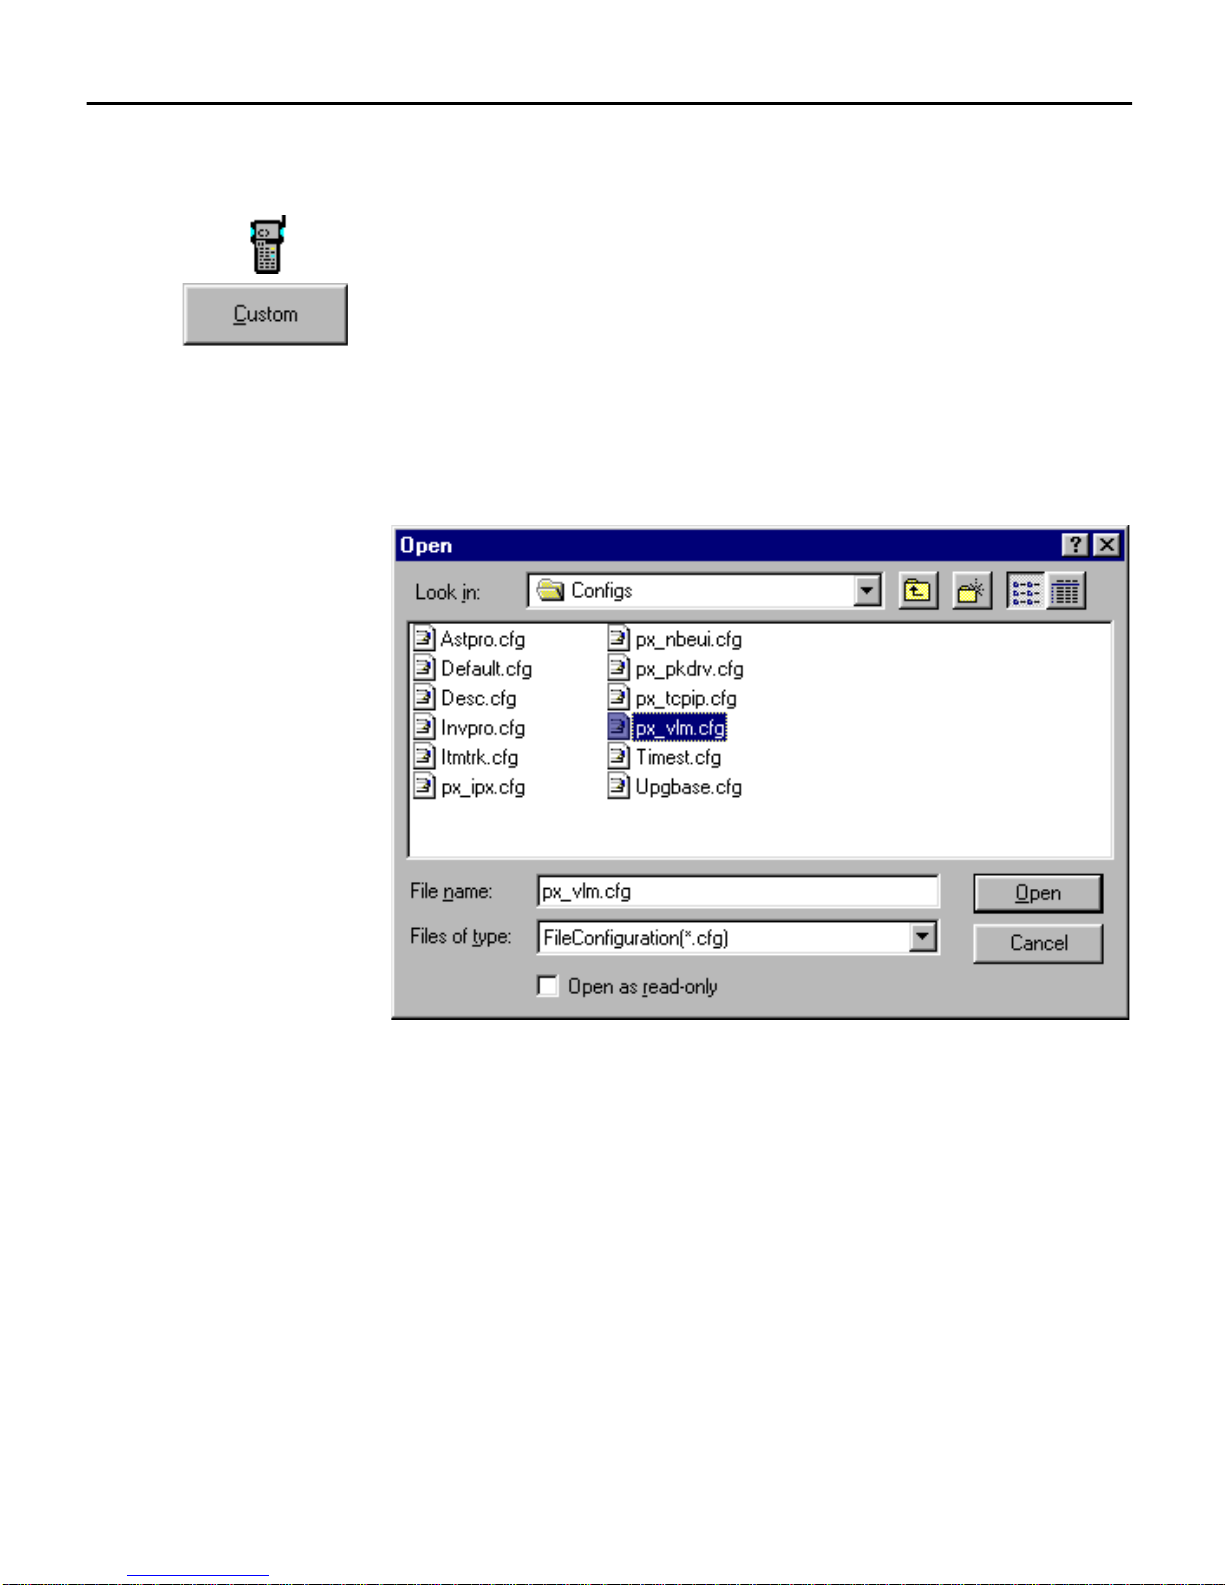
2. From the Main Menu, select the Custom button.
3. An Open dialog box will appear (see figure 2-1). Select the
PX_TCPIP.CFG configuration file. In the next Open dialog box,
select a program-settings file. (If you do not have a specific one
that you want to use, select
Figure 2-1: The Open Dialog Box for Selecting a Configuration File
DEFAULT.PRS.)
The following files are included automatically as part of the NetWare Client download:
G
G
G
G
G
You need to select your Falcon application and related files.
WAVECAD.SYS - WaveLAN card access driver
LSL.COM - Link support layer driver
NET.CFG - ODI configuration file
WVLAN43.COM - WaveLAN ODI driver
TCPIP.EXE - TCP/IP protocol driver
Falcon RF WaveLAN Supplement < 7 >
Page 17
Configuring the Falcon RF
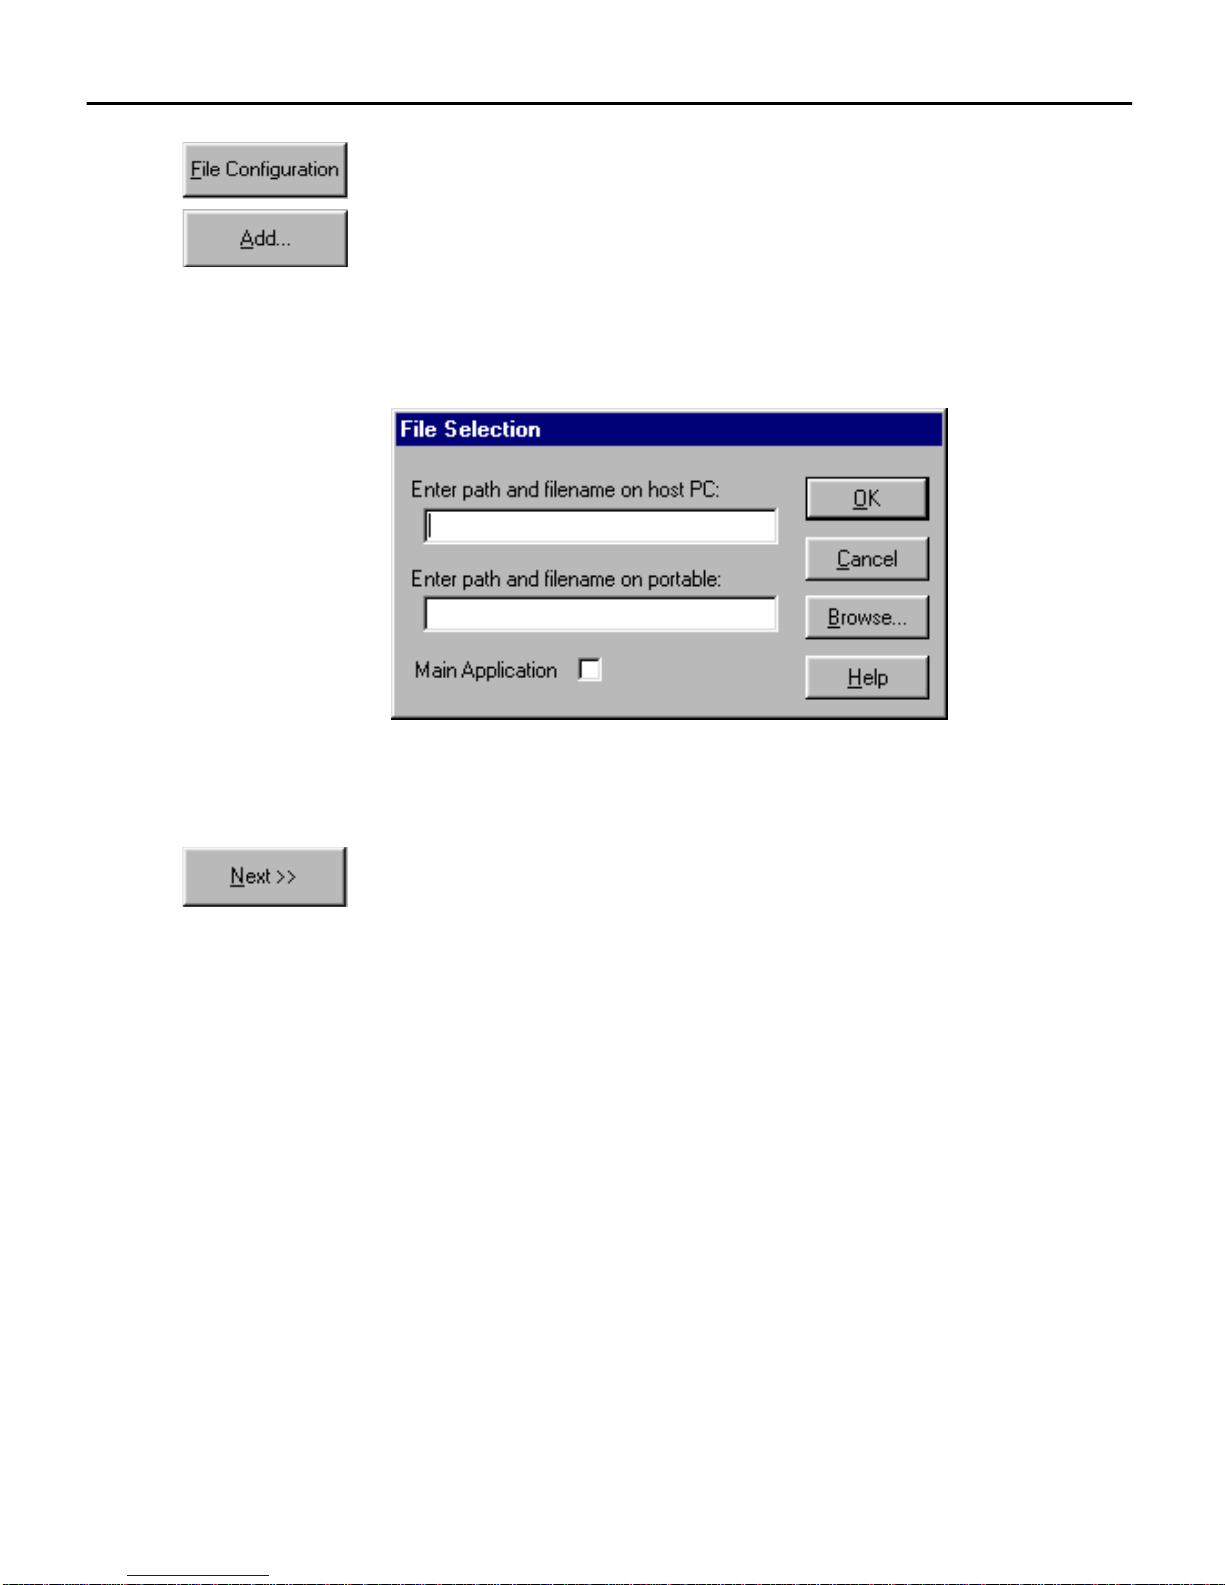
4. Select the File Configuration button in the Custom Configuration menu.
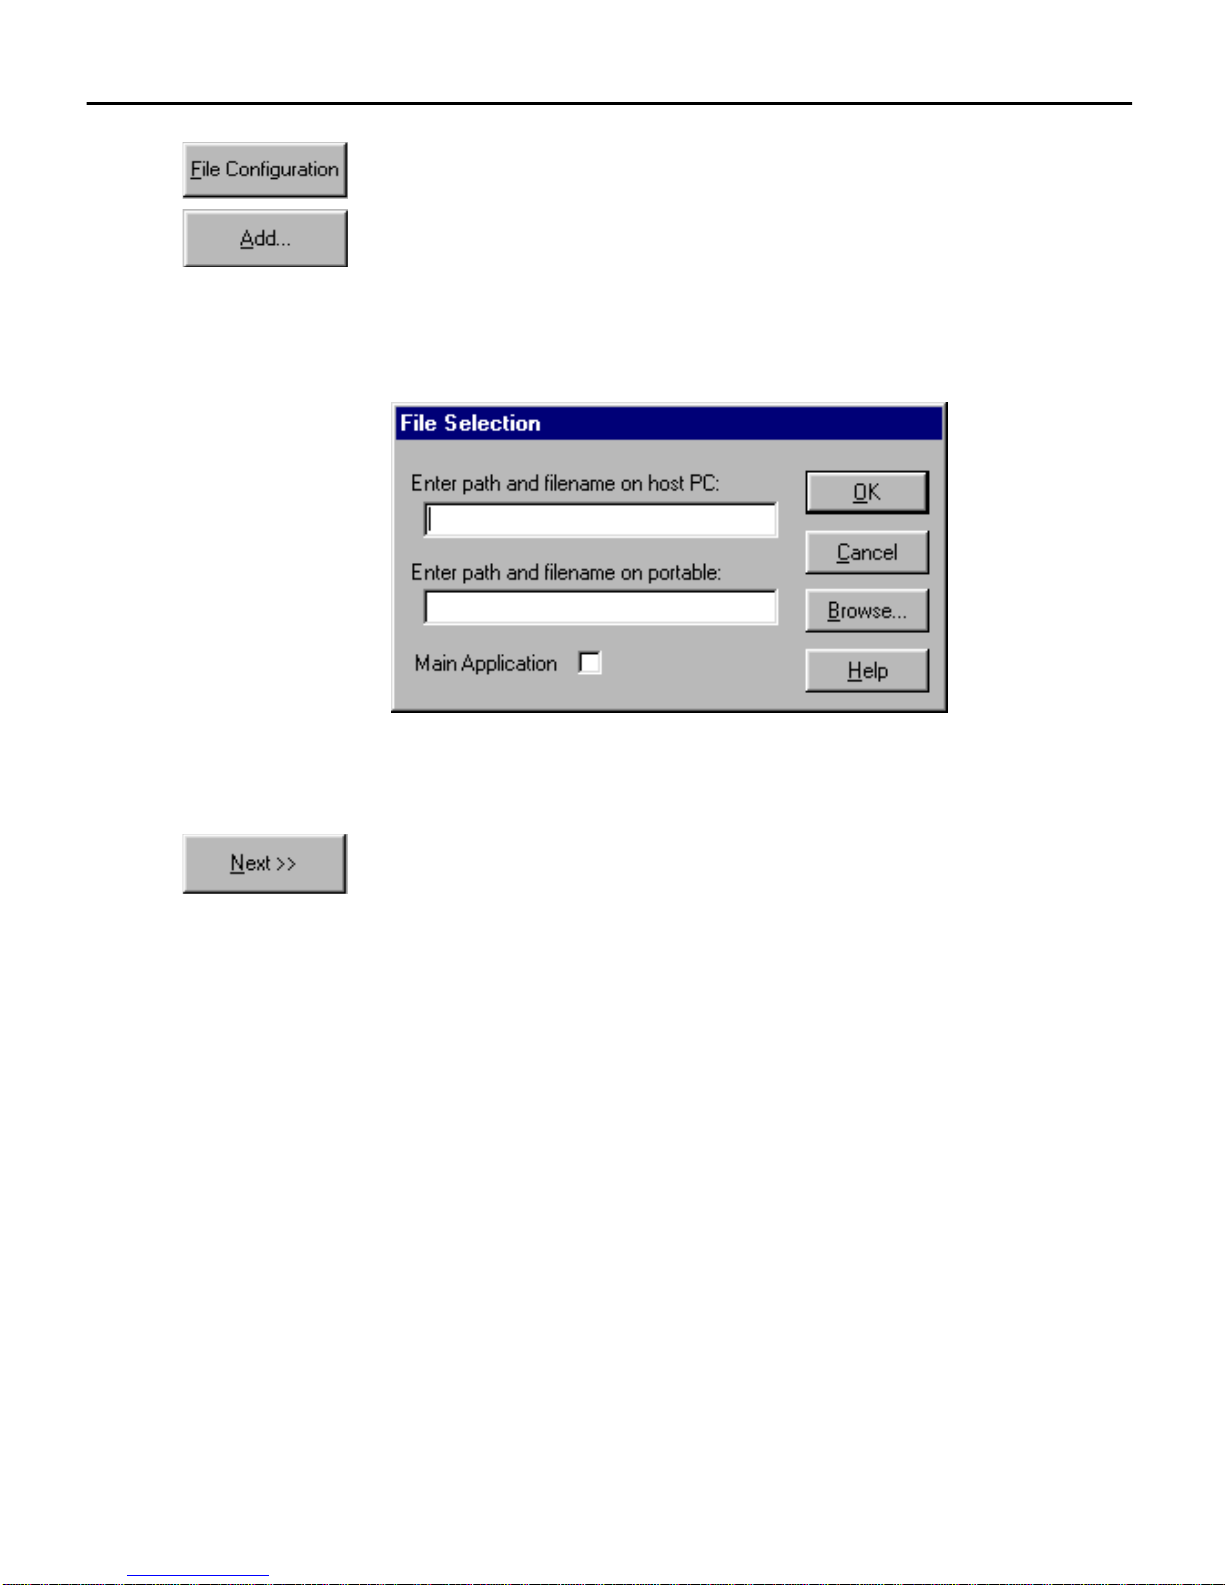
5. Select the Add button, and use the File Selection dialog box (see
figure 2-2) to include the main application and additional files
in your custom installation. Be sure to turn on the Main Appli-
cation switch for the one you want the Falcon to use.
Figure 2-2: The File Selection Dialog Box for Adding an Application File
REMINDER: See the Falcon User’s Guide for complete information
on using the menus and dialog boxes in the Falcon Configuration
Utility.
6. Select the Next button at the bottom of the File Configuration
window.
7. In the second File Configuration window, make sure the Vendor
Specific option is selected (see figure 2-3). This option identifies
which Phoenix drivers to download.
NOTE: The I/O-card drivers are not compatible with WaveLAN’s
client driver. Do not select the I/O Cards options when using RF.
< 8 > Falcon RF WaveLAN Supplement
Page 18
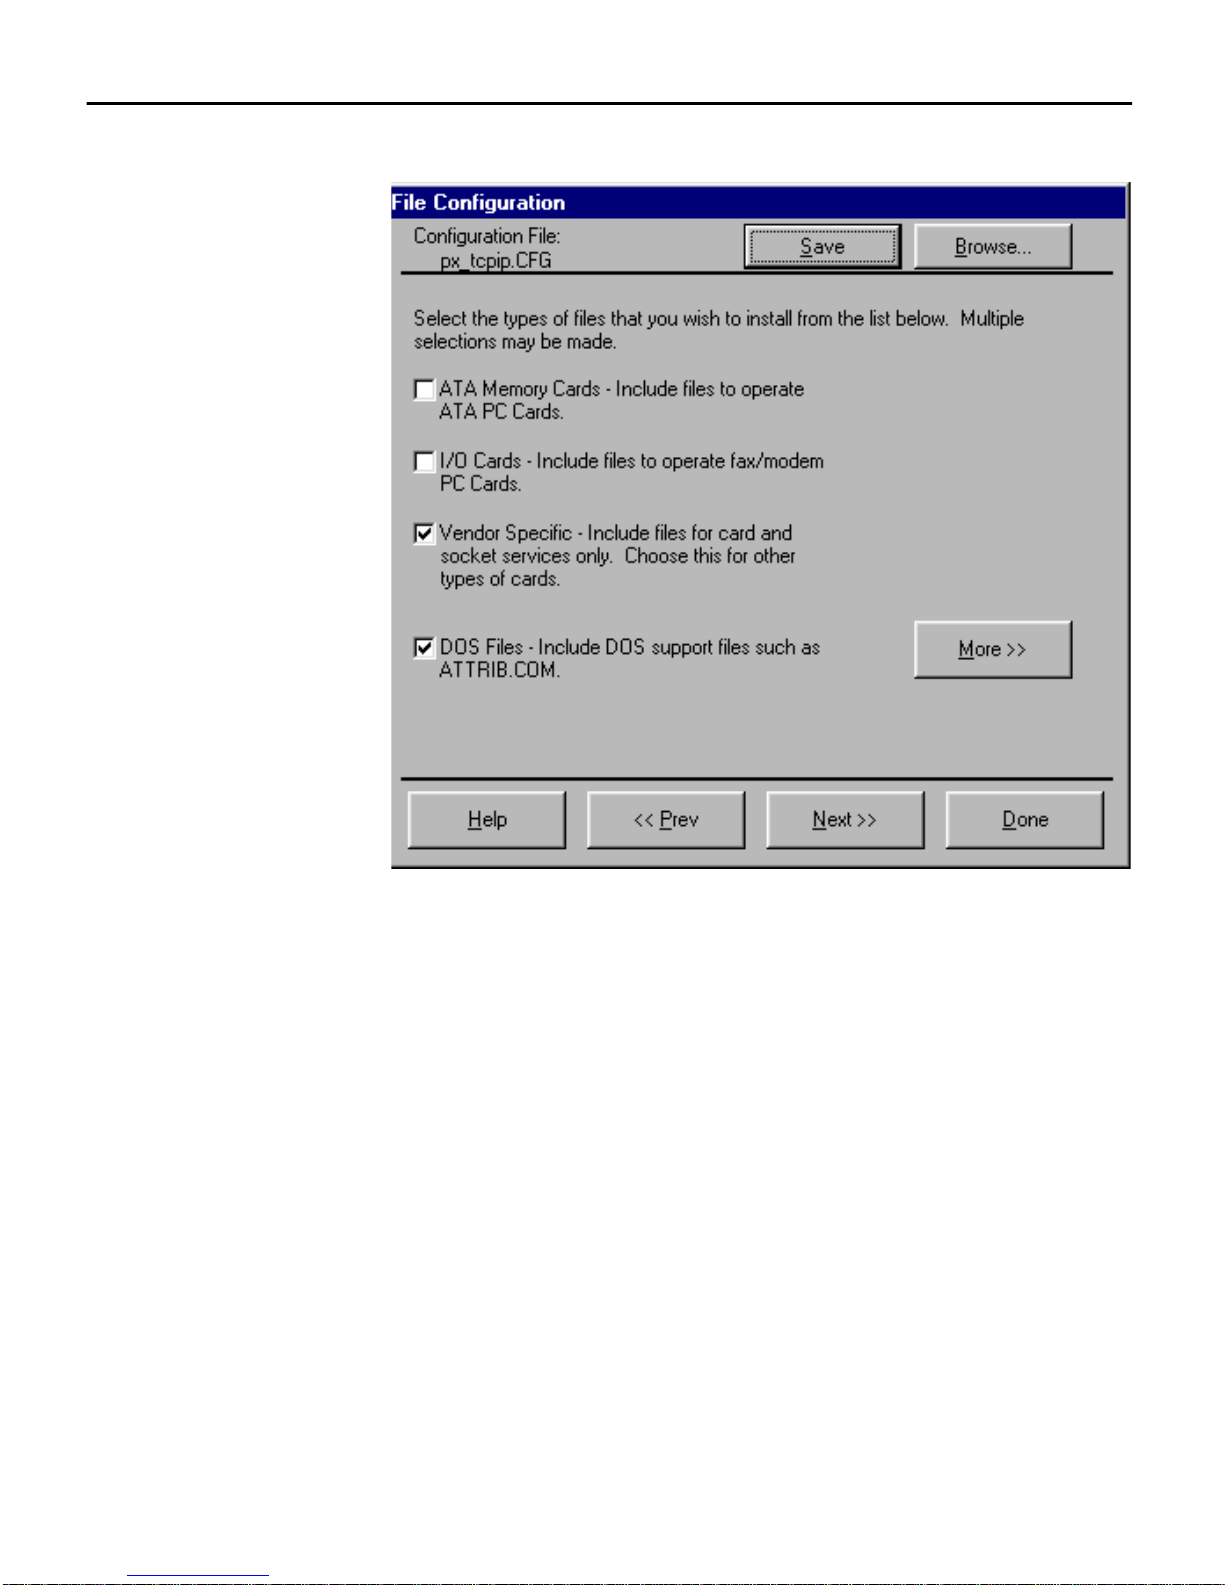
Figure 2-3: The Second File Configuration Window
Installing ODI Drivers
8. Select the More button to verify that the DOS files you need are
included in the download. After viewing the file list and making
any necessary changes, return to the File Configuration window.
9. Select the NEXT button to move to the third File Configuration
window.
10. If you want to include commands to be executed in the
AUTOEXEC.BAT file, select the AUTOEXEC.BAT button. Enter the
commands, and save the revised file before exiting from the text
editor.
NOTE: Verify that the drive and directories of any drivers loaded
in the
AUTOEXEC.BAT file are correct. The default PX_TCPIP.CFG file
assumes these drivers will go to a specific location on the
Falcon. If you change the destination directory on the Falcon for
these files, be sure to change them here, too. The file that you
selected as the main application will automatically be appended
to the
AUTOEXEC.BAT file before it is downloaded to the Falcon.
Falcon RF WaveLAN Supplement < 9 >
Page 19

Configuring the Falcon RF
11. If you want to make changes to the
CONFIG.SYS file, select the
CONFIG.SYS button.
NOTE: Certain default configuration parameters and card and
socket services drivers will automatically be included at the beginning of the
CONFIG.SYS file before it is downloaded to the
Falcon.
12. Select the Text File button and open the
PERCON\FALCON\RF\LUCENT directory.
NET.CFG file in the
13. Under the heading Protocol TCPIP, replace the Xs with the
appropriate IP address, IP router, and IP netmask numbers.
14. Save the
NET.CFG file before exiting from the text editor.
15. Select the Done button in the File Configuration window to
return to the Custom Configuration menu.
16. Modify your program settings and communications settings, if
necessary.
17. Select the Download button in the Custom Configuration menu
to install the custom TCP/IP configuration on the Falcon.
18. Reboot the Falcon when the download is completed.
< 10 > Falcon RF WaveLAN Supplement
Page 20
Installing ODI Drivers
ODI with
NetWare Client
Complete the following steps to install the ODI drivers for NetWare
Client:
1. Start the Falcon Configuration Utility by double-clicking on the
Falcon icon in the Falcon Configuration Utility group on your PC.
2. From the Main Menu, select the Custom button.
3. An Open dialog box will appear (see figure 2-4). Select the
PX_VLM.CFG configuration file. In the next Open dialog box,
select a program-settings file. (If you do not have a specific one
that you want to use, select
DEFAULT.PRS.)
Figure 2-4: The Open Dialog Box for Selecting a Configuration File
The following files are included automatically as part of the Novell
TCP/IP download:
G
G
G
G
G
G
G *.
WAVECAD.SYS - WaveLAN card access driver
IPXODI.COM - IPX/SPX driver
LSL.COM - Link support layer driver
NET.CFG - ODI configuration file
WVLAN43.COM - WaveLAN ODI driver
VLM.EXE - Virtual loadable module manager
VLM - Virtual loadable modules
Falcon RF WaveLAN Supplement < 11 >
Page 21
Configuring the Falcon RF
4. Select the File Configuration button in the Custom Configuration menu.
5. Select the Add button, and use the File Selection dialog box (see
figure 2-5) to include the main application and additional files
in your custom installation. Be sure to turn on the Main Appli-
cation switch for the one you want the Falcon to use.
Figure 2-5: The File Selection Dialog Box for Adding an Application File
REMINDER: See the Falcon User’s Guide for complete information
on using the menus and dialog boxes in the Falcon Configuration
Utility.
6. Select the Next button at the bottom of the File Configuration
window.
7. In the second File Configuration window, make sure the Vendor
Specific option is selected (see figure 2-6). This option identifies
which Phoenix drivers to download.
NOTE: The I/O-card drivers are not compatible with WaveLAN’s
client driver. Do not select the I/O Cards options when using RF.
< 12 > Falcon RF WaveLAN Supplement
Page 22
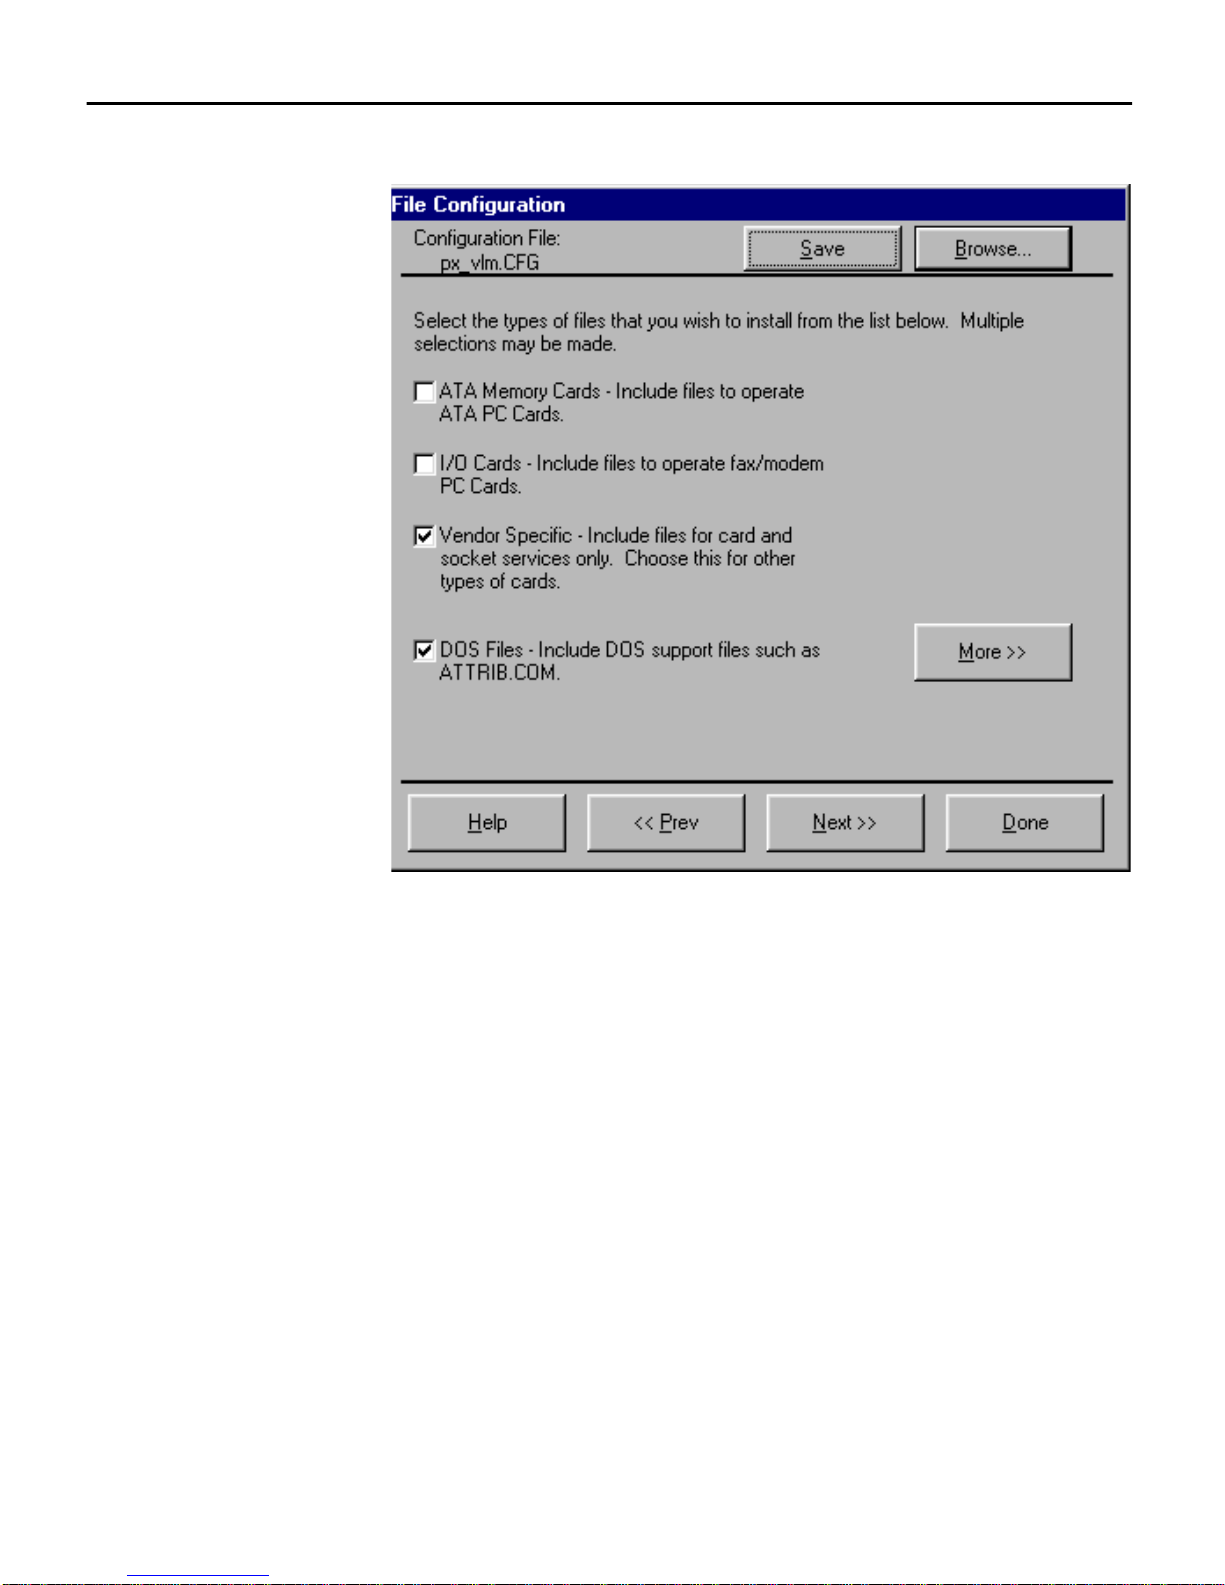
Figure 2-6: The Second File Configuration Window
Installing ODI Drivers
8. Select the More button to verify that the DOS files you need are
included in the download. After viewing the file list and making
any necessary changes, return to the File Configuration window.
9. Select the NEXT button to move to the third File Configuration
window.
10. If you want to include commands to be executed in the
AUTOEXEC.BAT file, select the AUTOEXEC.BAT button. Enter the
commands, and save the revised file before exiting from the text
editor.
NOTE: Verify that the drive and directories of any drivers loaded
in the
AUTOEXEC.BAT file are correct. The default PX_VLM.CFG file
assumes these drivers will go to a specific location on the
Falcon. If you change the destination directory on the Falcon for
these files, be sure to change them here, too. The file that you
selected as the main application will automatically be appended
to the
AUTOEXEC.BAT file before it is downloaded to the Falcon.
Falcon RF WaveLAN Supplement < 13 >
Page 23

Configuring the Falcon RF
11. If you want to make changes to the
CONFIG.SYS file, select the
CONFIG.SYS button.
NOTE: Certain default configuration parameters and card and
socket services drivers will automatically be included at the beginning of the
CONFIG.SYS file before it is downloaded to the
Falcon.
12. Select the Text File button and open the
PERCON\FALCON\RF\LUCENT directory.
NET.CFG file in the
13. In the NetWare DOS Requester section, assign whatever
drive letter you want to FIRST NETWORK DRIVE. Set PRE-
FERRED SERVER to the name of the network to which you will
be connecting.
14. Save the
NET.CFG file before exiting from the text editor.
15. Select the Done button in the File Configuration window to
return to the Custom Configuration menu.
16. Modify your program settings and communications settings, if
necessary.
17. Select the Download button in the Custom Configuration menu
to install the NetWare Client configuration on the Falcon.
18. Reboot the Falcon when the download is completed.
< 14 > Falcon RF WaveLAN Supplement
Page 24
Installing ODI Drivers
ODI with IPX/SPX The IPX/SPX configuration downloads the same adapter and proto-
col drivers as the NetWare Client configuration. It does not download the VLM files.
Complete the following steps to install the ODI drivers for IPX/SPX:
1. Start the Falcon Configuration Utility by double-clicking on the
Falcon icon in the Falcon Configuration Utility group on your PC.
2. From the Main Menu, select the Custom button.
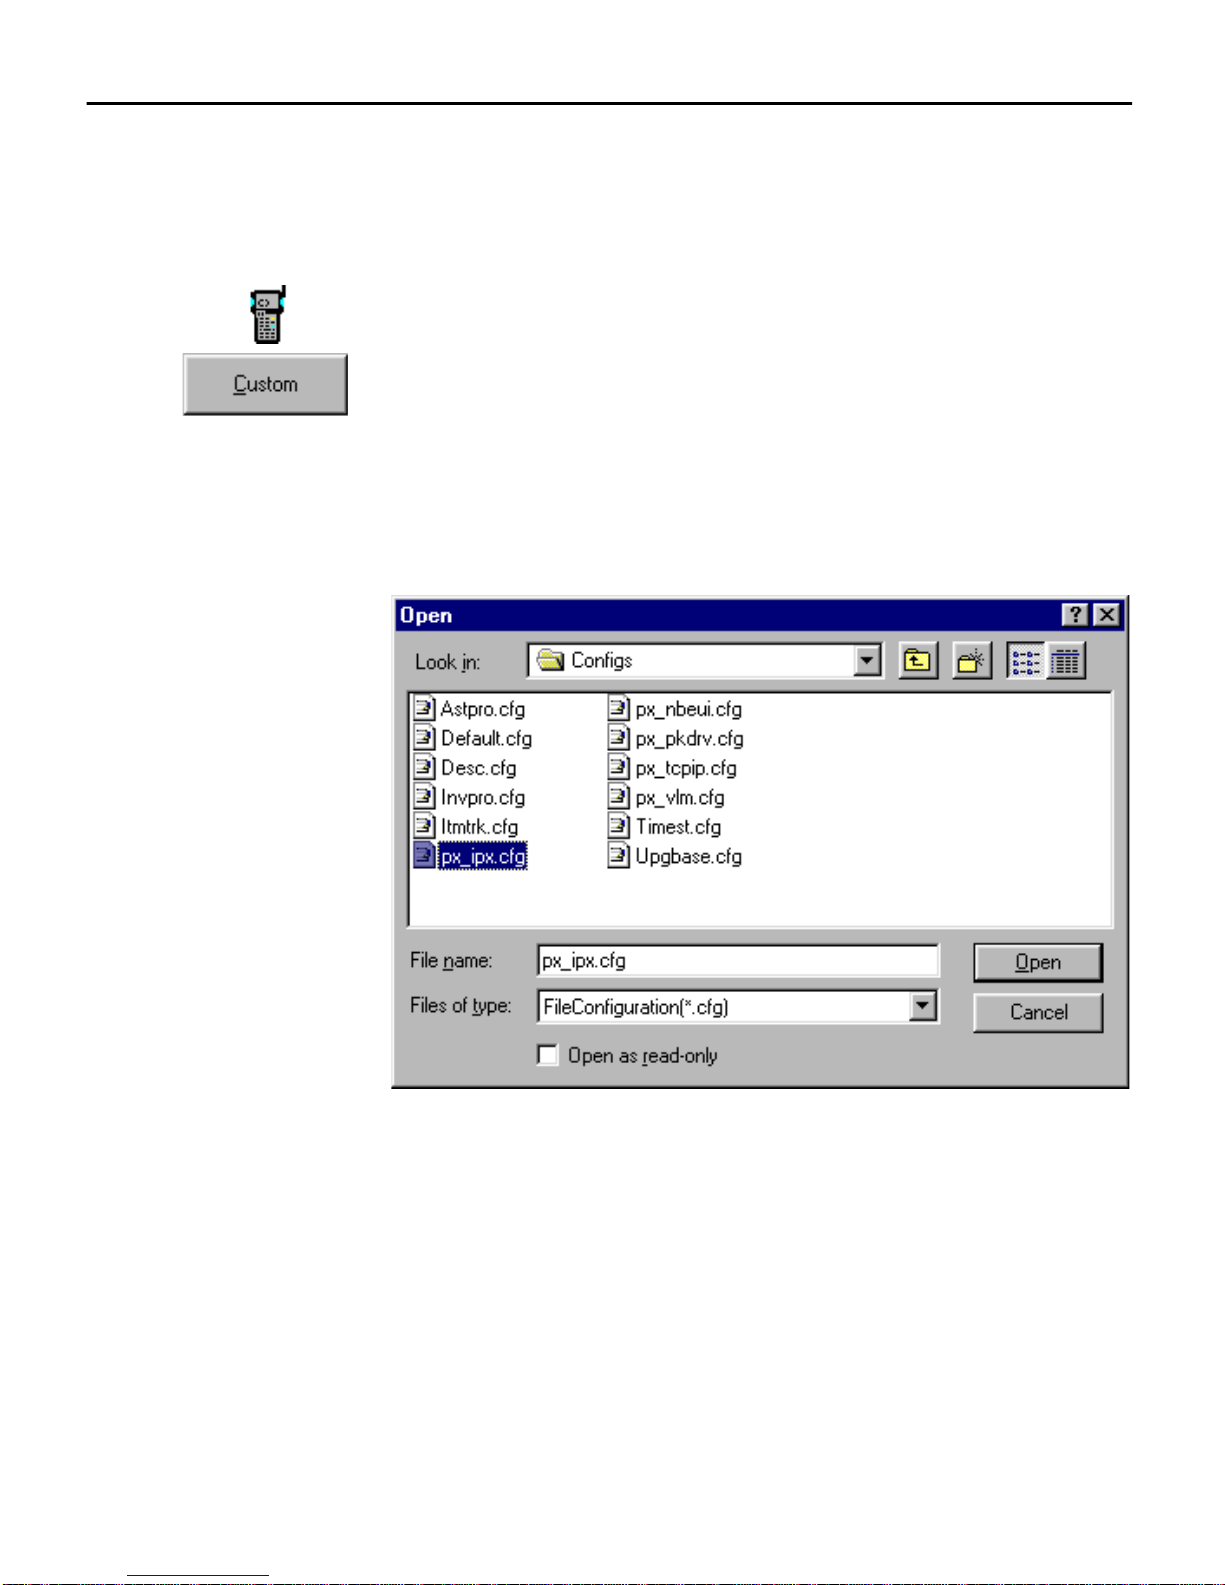
3. An Open dialog box will appear (see figure 2-7). Select the
PX_IPX.CFG configuration file. In the next Open dialog box, select
a program-settings file. (If you do not have a specific one that
you want to use, select
Figure 2-7: The Open Dialog Box for Selecting a Configuration File
DEFAULT.PRS.)
The following files are included automatically as part of the IPX/SPX
download:
G
G
G
G
G
WAVECAD.SYS - WaveLAN card access driver
IPXODI.COM - IPX/SPX driver
LSL.COM - Link support layer driver
NET.CFG - ODI configuration file
RL2PCM.COM - Lucent RF ODI Driver
Falcon RF WaveLAN Supplement < 15 >
Page 25
Configuring the Falcon RF
4. Select the File Configuration button in the Custom Configuration menu.
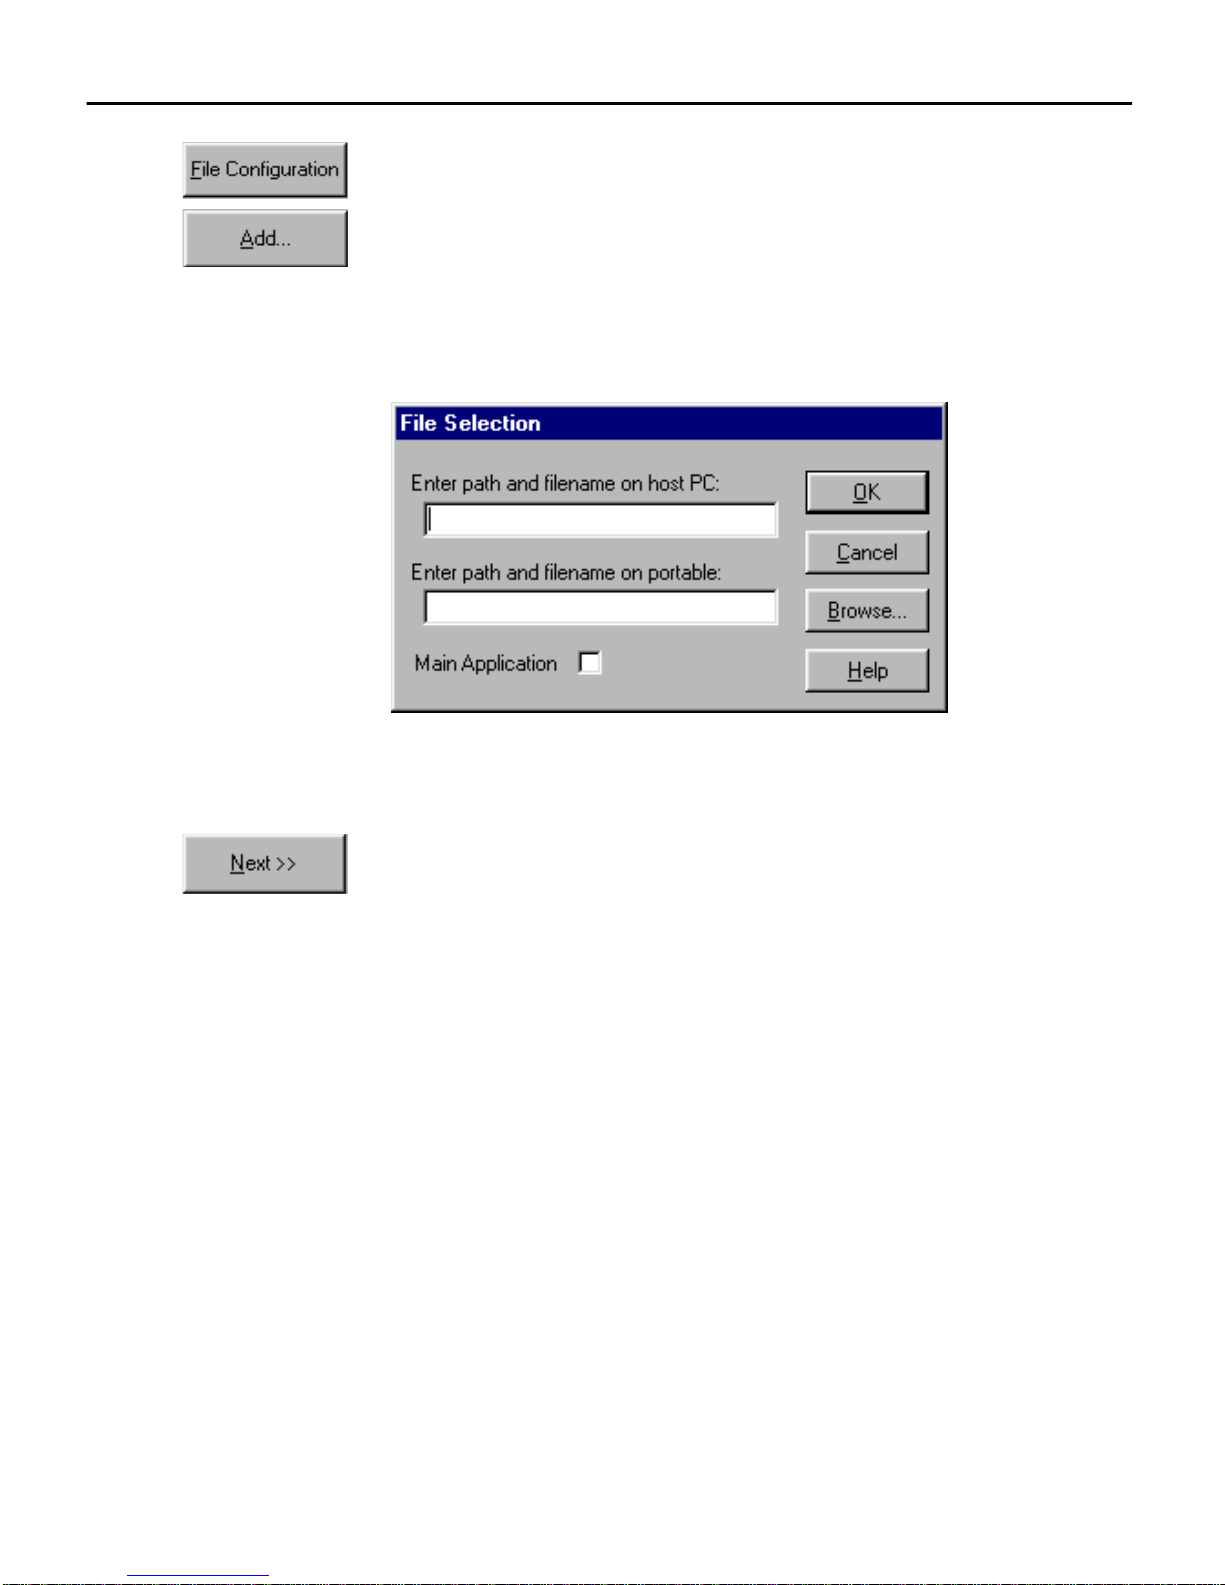
5. Select the Add button, and use the File Selection dialog box (see
figure 2-8) to include the main application and additional files
in your custom installation. Be sure to turn on the Main Appli-
cation switch for the one you want the Falcon to use.
Figure 2-8: The File Selection Dialog Box for Adding an Application File
REMINDER: See the Falcon User’s Guide for complete information
on using the menus and dialog boxes in the Falcon Configuration
Utility.
6. Select the Next button at the bottom of the File Configuration
window.
7. In the second File Configuration window, make sure the Vendor
Specific option is selected (see figure 2-9). This option identifies
which Phoenix drivers to download.
NOTE: The I/O-card drivers are not compatible with WaveLAN’s
client driver. Do not select the I/O Cards options when using RF.
< 16 > Falcon RF WaveLAN Supplement
Page 26
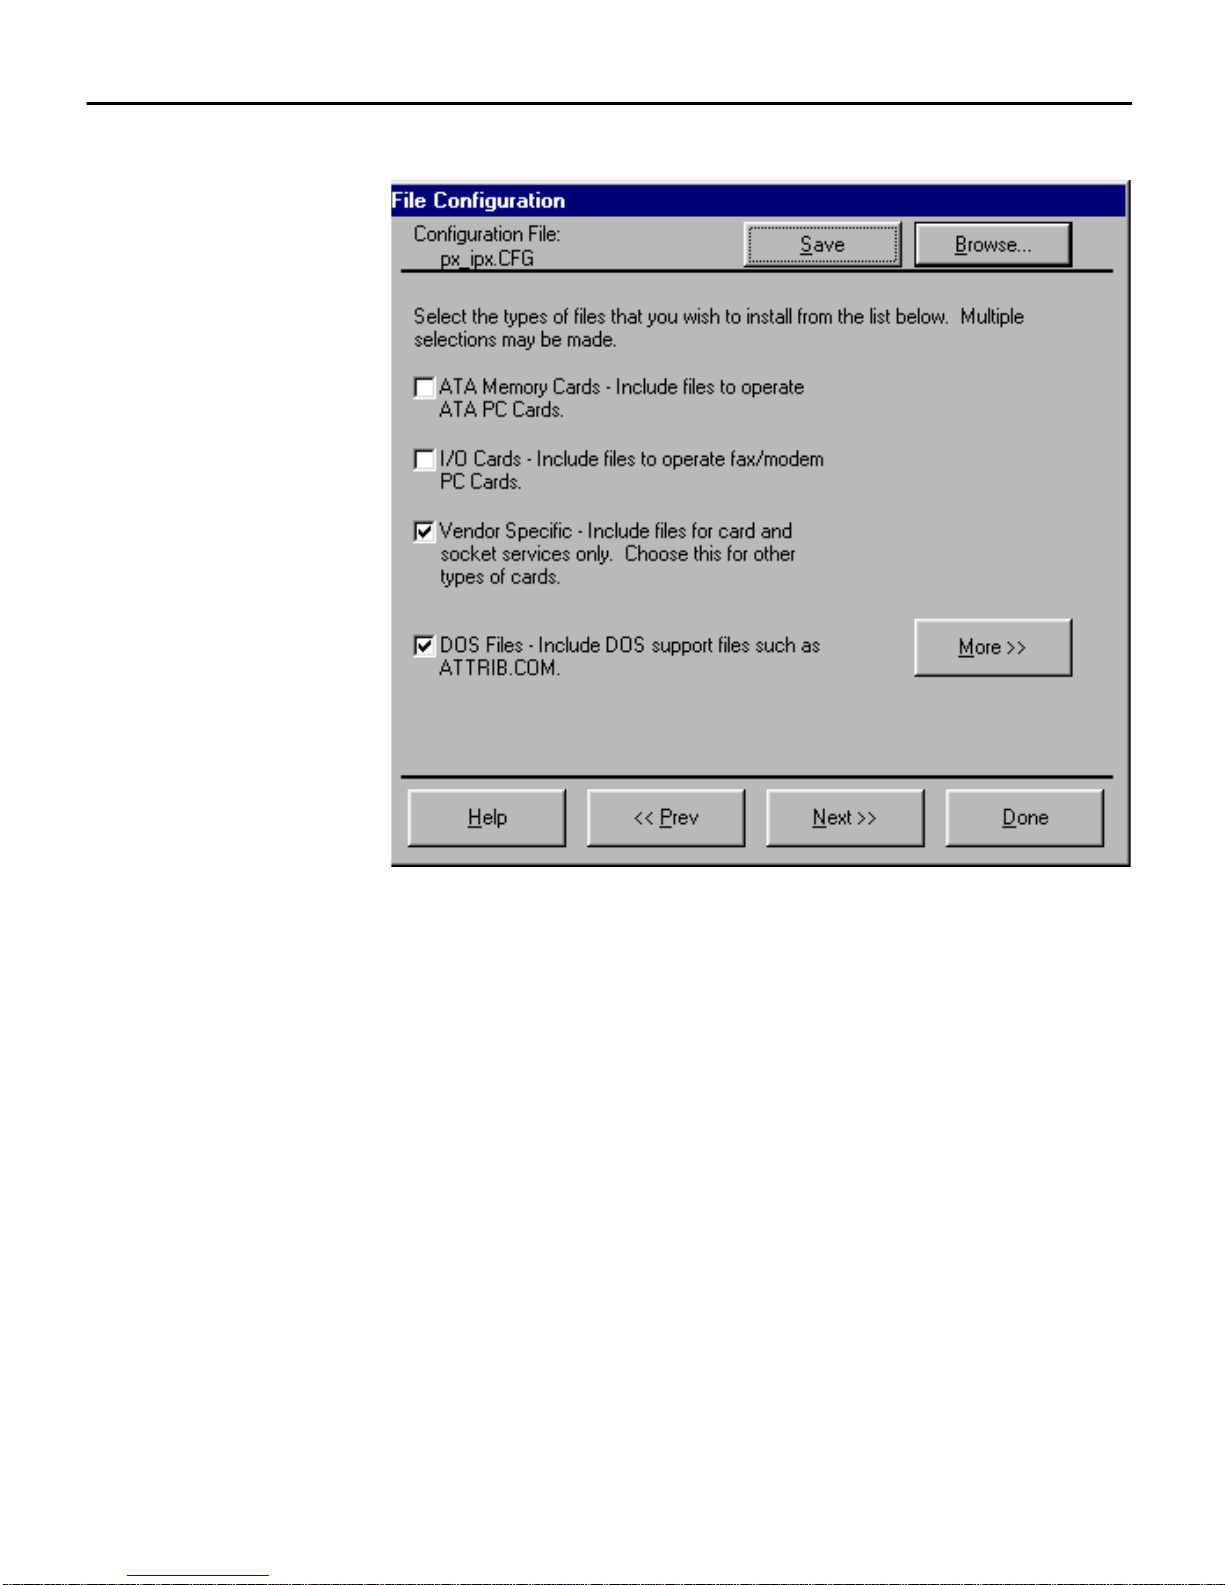
Figure 2-9: The Second File Configuration Window
Installing ODI Drivers
8. Select the More button to verify that the DOS files you need are
included in the download. After viewing the file list and making
any necessary changes, return to the File Configuration window.
9. Select the NEXT button to move to the third File Configuration
window.
10. If you want to include commands to be executed in the
AUTOEXEC.BAT file, select the AUTOEXEC.BAT button. Enter the
commands, and save the revised file before exiting from the text
editor.
NOTE: Verify that the drive and directories of any drivers loaded
in the
AUTOEXEC.BAT file are correct. The default PX_IPX.CFG file
assumes these drivers will go to a specific location on the
Falcon. If you change the destination directory on the Falcon for
these files, be sure to change them here, too. The file that you
selected as the main application will automatically be appended
to the
AUTOEXEC.BAT file before it is downloaded to the Falcon.
Falcon RF WaveLAN Supplement < 17 >
Page 27

Configuring the Falcon RF
ODI with Custom
Installations
11. If you want to make changes to the
CONFIG.SYS file, select the
CONFIG.SYS button.
NOTE: Certain default configuration parameters and card and
socket services drivers will automatically be included at the beginning of the
CONFIG.SYS file before it is downloaded to the
Falcon.
12. Select the Done button in the File Configuration window to
return to the Custom Configuration menu.
13. Modify your program settings and communications settings, if
necessary.
14. Select the Download button in the Custom Configuration menu
to install the IPX/SPX protocol stack on the Falcon.
15. Reboot the Falcon when the download is completed.
This section covers the fundamental theory behind the various configuration files used to configure a generic ODI implementation on
the Falcon. The sample files can be used as a starting point for any
implementation that relies on ODI.
AUTOEXEC.BAT The following is a sample
AUTOEXEC.BAT file that
could be used for NetWare Client:
@echo off
REM ****************************************************************
REM *** THE FOLLOWING LINES SET UP DEFAULT PARAMETERS FOR SOME
REM *** ENVIRONMENT VARIABLES. THESE LINES MAY BE MODIFIED OR
REM *** OEVERRIDDEN IN THE USER SECTION BELOW.
REM ****************************************************************
SET PROMPT=$P$G
SET DIRCMD=/OGN /P
REM ****************************************************************
REM *** THE FOLLOWING SECTION IS FOR CUSTOMIZED USER ENTRIES.
REM *** INSERT USER-SPECIFIC OPTIONS AND COMMANDS HERE.
REM *** LOAD THE LINK SUPPORT LAYER, THE LUCENT WAVELAN ODI
REM *** DRIVERS, AND THE IPX/SPX PROTOCOL STACK.
REM ****************************************************************
C:\NET\LSL.COM
C:\NET\WVLAN43.COM
C:\NET\IPXODI.COM
REM ****************************************************************
REM *** THE FOLLOWING LINES ADD SYSTEM COMPONENTS TO THE PATH AND
REM *** RUN THE MAIN APPLICATION EXECUTABLE, IF ONE WAS SPECIFIED.
REM ****************************************************************
IF EXIST C:\BPARAMS.INI COPY C:\BPARAMS.INI PARAMS
SET PATH=C:\;C:\NET;C:\DOS;%PATH%
C:
CD\NET
VLM /V4
F:
LOGIN SUPERVISOR
< 18 > Falcon RF WaveLAN Supplement
Page 28

Installing ODI Drivers
REM ****************************************************************
REM *** Change into the root directory of the C drive and run the app.
C:
CD\
MYPROG.EXE
The next example is a sample AUTOEXEC.BAT file that could be used
with Novell TCP/IP software:
@echo off
REM ****************************************************************
REM *** THE FOLLOWING LINES SET UP DEFAULT PARAMETERS FOR SOME
REM *** ENVIRONMENT VARIABLES. THESE LINES MAY BE MODIFIED OR
REM *** OEVERRIDDEN IN THE USER SECTION BELOW.
REM ****************************************************************
SET PROMPT=$P$G
SET DIRCMD=/OGN /P
REM ****************************************************************
REM *** THE FOLLOWING SECTION IS FOR CUSTOMIZED USER ENTRIES.
REM *** INSERT USER-SPECIFIC OPTIONS AND COMMANDS HERE.
REM *** LOAD THE LINK SUPPORT LAYER, THE LUCENT WAVELAN ODI
REM *** DRIVERS, AND THE TCP/IP PROTOCOL STACK.
REM ****************************************************************
C:\NET\LSL.COM
C:\NET\WVLAN43.COM
C:\NET\TCPIP.EXE /X
REM ****************************************************************
REM *** THE FOLLOWING LINES ADD SYSTEM COMPONENTS TO THE PATH AND
REM *** RUN THE MAIN APPLICATION EXECUTABLE, IF ONE WAS SPECIFIED.
REM ****************************************************************
IF EXIST C:\BPARAMS.INI COPY C:\BPARAMS.INI PARAMS
SET PATH=C:\;C:\NET;C:\DOS;%PATH%
C:
CD\
CONFIG.SYS The CONFIG.SYS file is generally not used to load driv-
ers specific to the ODI implementations. Standard card and socket
services must be loaded in the
CONFIG.SYS file, along with any DOS
configuration commands that would normally be used. You can select the Vendor Specific option in the second File Configuration
window to cause the appropriate card and socket services drivers to
be loaded automatically.
Falcon RF WaveLAN Supplement < 19 >
Page 29

Configuring the Falcon RF
NET.CFG The following code contains explanations of the contents of the
LAN PC card. The
and the client redirector. The Protocol ODIPKT section also allows
this
shim, if one is needed for a third-party TCP/IP stack over ODI.
;Configuration settings for LSL.COM (Link Support Layer)
; Mempool 4096 : required for Novell LSL and TCP/IP
; Buffers 8 1500 : required to avoid "Network jammed" message
; : in Clarkson Terminal Emulator
Link Support
;Configuration for Packet Driver shim. This shim is used by third;party protocol stacks.
Protocol ODIPKT
;Configuration for TCPIP protocol.
;Substitute the appropriate IP addresses in order for your network
;to function properly.
; IP_Address XXX.XXX.XXX.XXX
; IP_Router XXX.XXX.XXX.XXX
; IP_Netmask XXX.XXX.XXX.XXX
Protocol TCPIP
NET.CFG ODI configuration file for the WaveLAN wireless
NET.CFG file is suitable for use with Novell TCP/IP
NET.CFG file to work correctly with an ODI–to–packet driver
MEMPOOL 4096
BUFFERS 8 1500
BIND WVLAN43
IP_Address 208.152.16.84
IP_Router 255.255.255.0
IP_Netmask 255.255.255.0
;Configuration Information to Install Lucent WaveLAN II drivers
Link Driver WVLAN43
; WAVELAN_NETWORK_NAME ANY
STATION_NAME WAVELAN TEST 1
AP_Density 1
Transmit_Rate 3
Medium_Reservation 2345
; Node Address 02000000cafe
Card_Power_Management N
Maximum_Sleep_Duration 100
Receive_All_Multicasts Y
Frame Ethernet_II
Frame Ethernet_802.2
Frame Ethernet_802.3
; Configuration Information for Novell's Network Shell
; FIRST NETWORK DRIVE : F is standard first drive.
; NOTE: First available drive
;isE
; PREFERRED SERVER : Update for your server
NetWare DOS Requester
FIRST NETWORK DRIVE = F
PREFERRED SERVER = SERVER
NOTE: Some of the driver-specific information is set up to work on
the Falcon, and changing these values will likely produce failures.
See “DOS Configuration Parameters,” beginning on page 21, for
more information.
< 20 > Falcon RF WaveLAN Supplement
Page 30

>> DOS Configuration Parameters
Configuration parameters for DOS are contained in the NET.CFG file.
You can use an ASCII text editor to add or modify parameters in
those files, or you can edit them using the Text File button in the
third File Configuration window of the Falcon Configuration Utility.
The modifiable parameters are described in table 3-1.
Table 3-1: DOS Parameters
DOS Configuration Parameters
NOTE: Hex values are indicated with a leading 0x.
not use the 0x;
PROTOCOL.INI values require the 0x.
NET.CFG values do
Keyword Description
WAVELAN_NETWORK_NAME Specifies an IEEE 802.11 network to connect to. If you
do not provide a specific network name, the WaveLAN
card will connect automatically to the network that
provides the best level of communication.
STATION_NAME Identifies your WaveLAN station to other computers on
the network.
AP_Density Controls the roaming sensitivity of your wireless station.
This parameter should be set according to the density of
the WavePOINT-II access points that have been installed
through the wireless network area and the respective
setting of this parameter in the configuration of the
access points. Valid values are 1, Low (default), 2,
Medium and 3, High.
Transmit_Rate Identifies the preferred data-transmission speed of your
WaveLAN PC Card. Where transmissions at lower data
speed are usually more reliable, your may prefer higher
throughput performance over a greater coverage of the
WaveLAN radio signal. The transmit rate selector enables
you to balance speed versus reliability. Valid values are 1,
Fixed 1 Mbit/second, 2. Fixed 2 Mbit/second, and 3, Auto
Rate Select 2 Mbit/s-1 Mbit/2 (default).
Medium_Reservation Enables Request to Send (RTS) / Clear to Send (CTS)
protocol based on the length of the WaveLAN message
that is to be transmitted. The length of the message is
identified by the medium reservation threshold. When a
message is shorter than the “user-defined” medium
reservation threshold, your WaveLAN card will transmit
the message when it senses that the medium is free.
When the length of a message exceeds the “userdefined” threshold, the station will send an RTS to the
WavePOINT-II access point and defer transmission until
the WavePOINT-II has responded with a CTS message.
Valid values:
2347 (default) disables medium reservation
0–2346 enables RTS/CTS mechanism and sets the frame
length threshold
Falcon RF WaveLAN Supplement < 21 >
Page 31

Configuring the Falcon RF
Keyword Description
Node Address ??? Can't find in their manual
Card_Power_Management ??? Can't find in their manual. Valid values Y/N.
Maximum_Sleep_Duration ??? Can't find in their manual.
Receive_All_Multicasts ??? Can't find in their manual.
< 22 > Falcon RF WaveLAN Supplement
Page 32

>> Chapter Three
Wireless Topologies and Site Surveys
Many companies have an existing Ethernet or wired LAN infrastructure and want to
be able to extend that capability to wireless nodes. This is accomplished by attaching an access point to the wired LAN, allowing the wireless clients to access the network resources.
Falcon portable data terminals, like other 386-compatible DOS computers, can be
connected to networks. With Falcon RF models, radio signals between the Falcon
units and the AP replace the wires connecting the nodes to the network.
Falcon RF units may be used in various network topologies, which are described in
this chapter. All of your Falcon applications will work with the WaveLAN wireless
LAN without any special wireless-networking software.
A site survey is an important part of setting up a wireless network. This chapter also
provides information about site surveys.
CHAPTER CONTENTS
Single-Cell Topology <24>
Multiple-Cell Topology <24>
Site Surveys <26>
< 23 >
Page 33
Wireless Topologies and Site Surveys
>> Single-Cell Topology
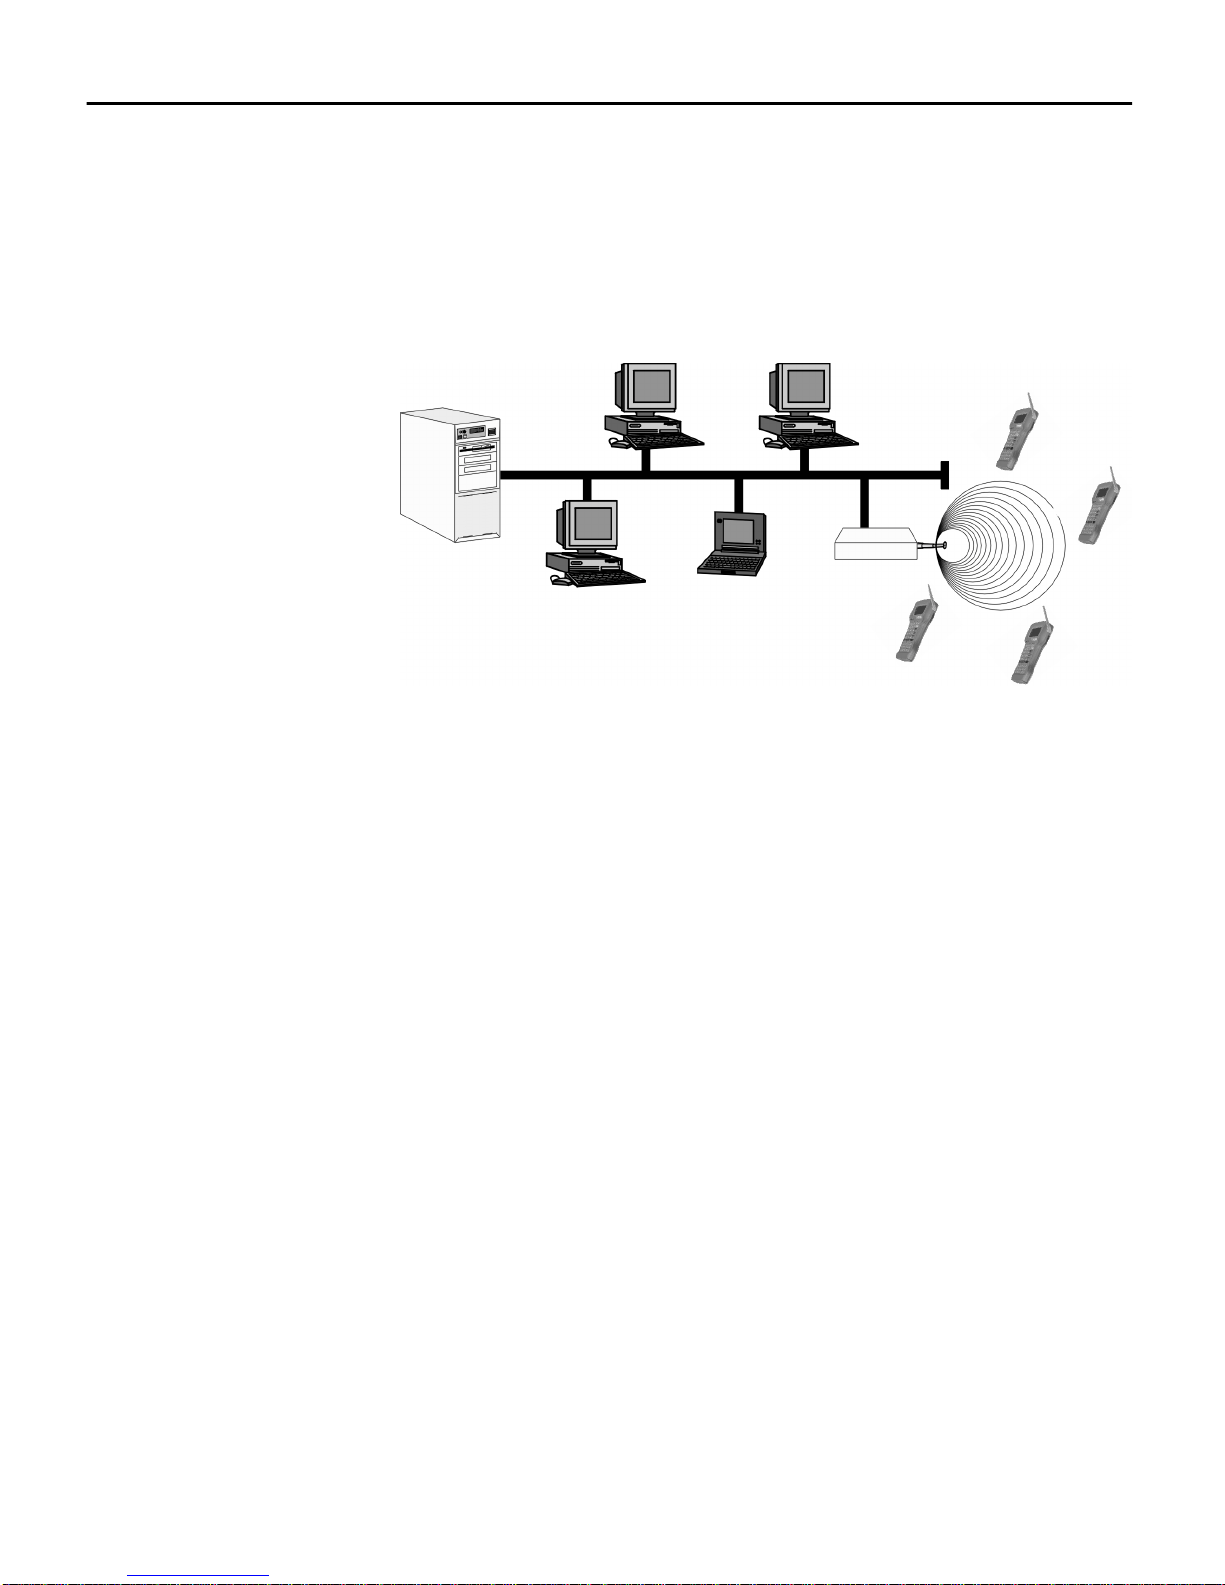
A single access point (AP) can be used as a bridge between the
Ethernet and the radio network. This results in a single-cell wireless
network for mobile units (MUs), as shown in figure 3-1.
Figure 3-1: A Single AP on a Network
>> Multiple-Cell Topology
WaveLAN supports the ability to roam from one wireless communication range, or cell, to another while maintaining the same network connection. APs establish cells similar in concept to those of a
cellular phone network. Any mobile unit (in this case, a Falcon RF
unit) will connect with any access point that is within range.
Multiple access points can also be used to increase the aggregate
throughput supported by the network. The APs can coexist as separate, individual radio networks without interference. The total range
of communication of the cells is called the coverage area (see figure
3-2). Overlapping cells in a coverage area ensure that there are no
gaps in coverage.
< 24 > Falcon RF WaveLAN Supplement
Page 34

Figure 3-2: Multiple APs with Overlapping Cells
Each cell in a coverage area is identified with an access point identifier (AP_ID). When a mobile unit is located in a particular cell, the AP
for that cell provides communication, or association, to the MU. The
MU uses the AP_ID to recognize which AP it is associated with.
All APs in a single coverage area use the same network domain. The
MU searches for an AP with a matching domain and establishes
communication with it. This allows the MU to move freely, or roam,
within the coverage area. Roaming is transparent in high-level applications, such as those used with the Falcon RF.
Multiple-Cell Topology
Coverage area
In a WaveLAN wireless LAN, the user can move freely between the
access points in the network. When the roaming Falcon RF unit
leaves the transmission range of one WaveLAN access point, the PC
card automatically polls other access points in the same domain to
continue the network connection.
You can install multiple wireless LANs in a single environment by assigning their APs to different domains. As an MU roams, it preserves
its network connectivity by switching APs. The MU selects an AP on
the basis of best signal strength and load on the AP. If the MU does
not find an AP with a workable signal, it performs a scan to find any
AP in the same domain.
Once the WaveLAN PC card associates with an AP, the transmit and
receive functions to support user messages are enabled. When the
PC card is unassociated or attempting to associate, only system
transmit and receive functions are enabled.
Falcon RF WaveLAN Supplement < 25 >
Page 35

Wireless Topologies and Site Surveys
>> Site Surveys
For most office environments, a site survey is not necessary. For
large, industrial environments requiring multiple APs, however, you
should perform a site survey before installing a WaveLAN network
system. Run Lucent’s setup program on a laptop using a WaveLAN
card.
The purpose of a site survey is to calculate the most effective number of access points at a site and the best placement and positioning of antennas for optimal reception of radio signals. This is done
by identifying areas where transmission failures occur.
As each site is unique, the surveyor needs to consider the exact conditions as they will appear in the final installation. In addition to
such climate factors as moisture, excessive heat, and dust, a site survey can also be affected by physical obstructions and electromagnetic interference. Also important is the identification of potential
cabling, connector, or power problems.
< 26 > Falcon RF WaveLAN Supplement
 Loading...