


Assembly and operation manual
Electromechanical
LC-72.4
Lock

Electromechanical
Lock
LC-72.4
Assembly
and Operation Manual

Assembly and Operation Manual
2
1. APPLICATION
The LС-72.4 electromechanical mortise door lock (hereinafter – the lock) is designed to
control light and medium office doors.
The lock can be installed in wooden and non-metal doors 38–50 mm thick. The lock is universal
because it is compatible both with right-handed and left-handed doors using standard lock
cylinders (Chapter 6).
The lock is designed to work as a part of access control system (ACS).
2. TECHNICAL SPECIFICATIONS
Technical parameters of the lock comply with GOST 538-2001 and GOST 5089-2003.
The lock with regard to unauthorized access protection complies with GOST Р 51241-2008
(means of normal protection).
The lock resistance to opening complies with GOST 5089-2003, class 1.
DC voltage.................................................................................................................... 11 – 13 V
Operational current................................................................................................. 0.08 – 0.12 A
Lock cylinder type............................................................................................................ pin-type
Bolt throw, day-time mode.................................................................................................11 mm
Bolt throw, night-time mode............................................................................................18.5 mm
Product type .................................................................................................................... fail-safe
Dimensions........................................................................................................105×20×150 mm
Centre-to-centre spacing...................................................................................................72 mm
MTBF ........................................................................................... 200000 number of operations
Average lifetime............................................................................................................... 8 years
Protection class .....................................................................................................III at IEC335-1
Weight ......................................................................................................... not more than 0.5 kg
3. STANDARD DELIVERY SET
Electromechanical mortise lock .................................................................................................1
Strike plate ................................................................................................................................1
Screw 4×30 ...............................................................................................................................4
Package box ..............................................................................................................................1
Assembly and operation manual ...............................................................................................1
Installation template ..................................................................................................................2
The lock cylinder with a set of keys, door levers with fixing elements, control cable are not
included in the delivery set. They should be provided by the Customer.
4. OPERATION CONDITIONS
The lock with regard to resistance to environmental exposure complies with GOST 15150-69,
category NF4 (operation in premises with climate control). Operation of the lock is allowed at
ambient air temperature from +1°С to +45°С and at relative air humidity of 75% at +15°С.
5. SAFETY REQUIREMENTS
The lock safety requirements comply with GOST R IEC 335-1-94. The electric shock protection
class is III as per GOST R IEC 335-1-94, clause 2.4.10.

LC-72.4 Electromechanical Lock
6. DESIGN FEATURES
Design and composition of the lock is shown in Fig. 1.
Fig. 1 LС-72.4 electromechanical lock design.
1 - Lock; 2 - Forend; 3 - Door lever with escutcheon plates; 4 - Screw 4×30;
5 - Escutcheon plate fastening screw
; 6 - Key; 7 - Lock cylinder;
8 - Strike plate; 9 - Lever rod
; 10 - Locking bolt; 11 - Screw;
12 - Control cable; 13 - Day / night mode switch.
Lock features:
all body parts of the lock and strike plate have corrosion-resistant coating;
lock is resistant to self-opening, for instance as the result of a hard kick on the door;
the control cable is laid through the door leaf with pliant coupling;
low power consumption;
the design of the lock does not require preventive maintenance and lubrication from the
customer for the entire period of operation;
centre-to-centre hole spacing between the lever and cylinder – 72 mm;
a universal lock construction enables its installation on both right-handed and left-handed
doors by relocating of the bolt during the lock installation;
the lock is designed for remote operation by an ACS controller (not included in the
delivery set).
3
Not included in the delivery set.
Assembly and Operation Manual
The universal construction provides:
use of standard pin-type lock cylinders, standard EuroDIN (V DIN 18254), e.g. type 8809,
8209, 8259 produced by company ISEO (Italy) or lock cylinders of D series by Wilco
Supply (type 254 – 274 – 294, 453, 454, 554);
installation of escutcheon plates and door levers from leading manufacturers – ABLOY,
Azbe, GARD, KALE, CISA and other, that enables the usage of lock with doors of up to
50 mm width.
7. OPERATING PRINCIPLE
The lock is a fail-safe device and opens by turning the lever after the locking device is released.
Until the locking device is released the lever is blocked from turning.
Unblocking of the lock is performed by:
turning the key in lock cylinder counter clockwise against stop and holding it and after
turning the lever;
de-energizing the lock from an ACS controller and after turning the lever;
After unblocking of the lock and turn of the lever (about 40º) the locking bolt is moved inside, and
the door can be opened. You just need to shut the door to lock it, without turning the lever due to
locking bolt moves to the skew.
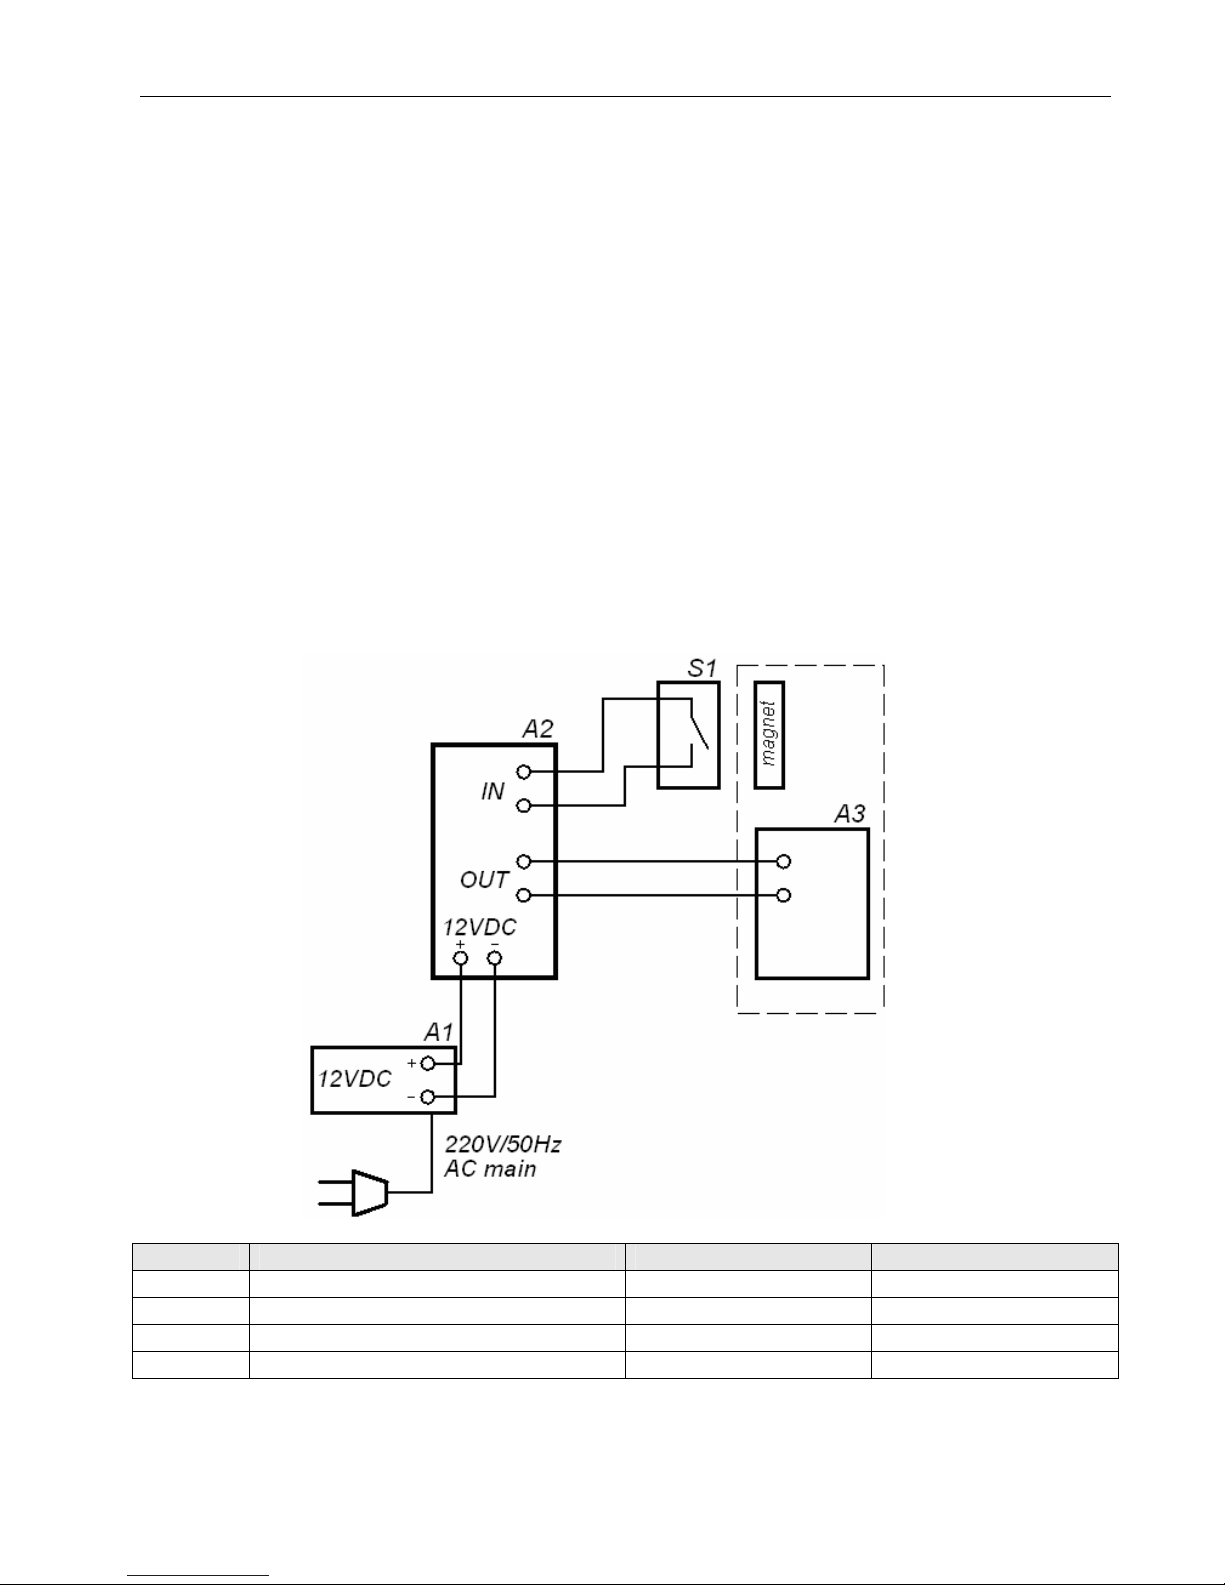
Position Unit Quantity Note
A1 Power supply unit 1 12V, 0.5A, 6W
A2 Lock controller 1
A3 Lock 1
S1 Reed switch 1
Fig. 2 LC-72.4 electromechanical lock connection layout
4

LC-72.4 Electromechanical Lock
For regular operation an ACS controller, controlling the lock, should have possibility of
connecting reed switch to it. Lock connection scheme is shown in Fig. 2. The lock is connected
to controller with no order to signal polarity. Power supply unit (A1) parameters should
correspond to controller (A2) parameters.
To open the lock an ACS controller (A2) de-energizes the lock till the moment of door opening
(this is possible either by signal from a reed switch or by removal of voltage for certain duration).
The door can be closed without lock de-energizing.
If for some reason the lock can’t be de-energized from an ACS controller it can be opened by a
key turn (counter clockwise against stop and after turn the lever).
In day-time locking mode the bolt throw is 11 mm which makes it possible to close the lock in
latch mode independent if it is energized / de-energized.
Change to night-time locking mode.
While the door is open move up the day / night mode switch (13) on the forend as far as it goes.
After that close the door and the lock will automatically switch to night-time mode. The switch
frees additional 7.5 mm bolt throw. This avoids the possibility to push out the door and improves
lock reliability.
Opening of the lock in night-time mode is similar to the one in day-time mode, i.e. by a signal
from ACS or use of the key. The lock will automatically return to day-time mode after that.
8. INSTALLATION INSTRUCTIONS
Making of holes in the door leaf for installing the lock (1), lock cylinder, door lever, forend and
strike plate (8) in the door frame should be made according to Fig. 3 and installation template
from the delivery set.
Note
For providing stable lock operation an accurate vertical mounting of the lock and strike
plate is required.
Normal lock operation sits for the spacing between the door frame and door leaf (between
the strike plate and lock) within 1 – 4 mm (optimal – 2 - 3 mm).
Make the hole marking for lock cylinder, lever with the rod and cable using installation template
from the delivery set. Prior cut out the installation template and apply it to the door inner side.
The cable hole is made on the door inner side after marking. In case the cable is laid through the
door leaf the Ø6 hole is not made. The cable laying method is determined by lock installer and
the Customer.
Install the lock in the following order (see Fig. 1):
1) Make the carving in the door according to the marking (measures given in Fig. 3);
2) If necessary relocate the door bolt for its correct orientation to the door (right-handed / lefthanded):
totally unscrew the screw (11) using the Allen key S=2.5 (Fig. 1);
take out the bolt and set it in the required position;
install the bolt back into the lock and fix it with the screw;
Note
At delivery the bolt is installed for the left-handed door.
3) Lay the control cable from controller on the inner door leaf leaving the loop at the door
opening line. Bring the cable inside the locating pocket through according hole and connect it to
5

Assembly and Operation Manual
the lock connector block. After that install the lock in the locating pocket of the door and fasten it
with screws from the delivery set;
4) Mount the lock cylinder (7) inside the lock (1) and fix it with the screw through hole on the
front plate of the lock (1) (lock cylinder is not included in the delivery set);
5) Adjust the door levers with escutcheon plates (3) and fasten them with screws (not
included in the delivery set);
Note
When installing the reed switch ensure the firm contact closure at closing of the door.
6) Check the lock operation in day-time mode.
Insert the key (6) into lock cylinder (7) and turn it clockwise against stop (for right-handed doors
– clockwise direction, for left-handed doors – counter clockwise on the door front side). Holding
the key turn the lever. The bolt should fully move inside the lock without sticking. Check that the
lever is blocked unless the key in lock cylinder is turned.
Closing and blocking of the lock should be checked while the door is opened. Lock closing
(sinking of the bolt) by turning the lever must be impossible when the key is taken out.
Check the lock operation several times at the opened door.
7) Check the lock operation in night-time mode.
In order to change day-time mode to night-time mode move up the switch on the forend. After
that the door can be closed and the lock will automatically switch to night-time mode.
The imitation of closing at the opened door can be made by sinking the locking bolt. The day /
night mode switch frees the locking bolt and after sinking it moves out for additional 7.5 mm.
After that the bolt is blocked.
Opening of the lock in night-time mode is made by a key turn (clockwise against stop) and after
that holding the key turn the lever. The lever should turn freely without sticking. After releasing
the lever the lock automatically switches to day-time mode (the bolt throw is limited). Check the
lock operation several times at the opened door.
8) Check the control signal passage before fixing the lock (1) by connecting the control cable
to lock connector block.
When energized the lock is blocked and impossible to open by turning the door lever. Closing of
the lock is checked by sinking the locking bolt (the lock is energized at that). The locking bolt
should move freely without sticking. After the lock is energized the turn of the lever is blocked.
Do this checking several times.
9) Mounting of the strike plate (8) should be made in the following order:
make the carving in the door frame according to Fig. 3;
mount the strike plate (8) into the door
frame providing 1.5 – 3 mm spacing between
the strike plate and the forend (2) when the door is closed. The channel of the strike
plate (Fig. 3) must lay symmetrical to bolt’s cross section;
fix the strike plate with screws from the delivery set.
If the lock is operated as a part of access control system (ACS) it is recommended to install the
voltage regulator diode BZW06-15B or P6KE16CA (or another model with equal parameters) on
contact clips.
Note
The voltage regulator diode is used for maintaining the device which sends the control
signal.
6

LC-72.4 Electromechanical Lock
Make the installation of an ACS reading device in accordance with its assembly and operation
manual.
Disassembling of the lock should be made in the reverse order.
Fig. 3 LC-72.4 electromechanical lock installation layout
9. TRANSPORTATION AND STORAGE
The lock in the original package can be delivered by means of land (railway and road), sea
and air transport. It is allowed to stack the boxes while in transit.
Locks storage is allowed indoors at ambient temperature from – 50°C to + 50°C. Storage time
in closed package is 12 months.
10. PERCO WARRANTY
PERCo (the Manufacturer) warrants that the LC-72.4 electromechanical mortise door lock
(the Product) complies with applicable statutory safety requirements, electromagnetic
compatibility provided that the instructions on storage, installation and operation, given in the
Assembly & Operation Manual are observed.
The warranty period is 12 (twelve) months commencing from the date of sale.
Should there be no date of sale on the warranty card, the warranty period shall commence
from the date of manufacture.
Within the warranty period the Product is repaired free of charge at the Manufacturer’s site.
The Warranty does not cover Products with external mechanical damages or disassembled by
the Customer.
Transportation cost to and back from the place of repair shall be borne by the Customer.
Company PERCo is always ready to give you necessary technical support in case of any
question arise during the Product assembly or operation.
7

PERCo
P.O. Box 87,
Saint Petersburg, 194295,
Russia
Tel: +7 812 321 61 72
Fax: +7 812 516 48 76
e-mail: support@perco.ru
www.percoweb.com

www.perco.ru
www.percoweb.com
 Loading...