

Instruction Manual
Thermal cycler
peqSTAR 2X Double block thermal cycler
peqSTAR 96X, 384X and in situ X thermal cycler
v1212E
Creating the future together
.


Instruction Manual peqSTAR X thermal cyclers
PEQLAB_v1212E
I
CONTENT
page
1 System Overview 1
2 Safety instructions 1
3 License Notice 2
4 Installation 2
4.1 Content of delivery 2
4.2 Installing the thermal cycler 2
4.3 Operation of the thermal cycler 2
4.4 Connections of the thermal cyclers 3
5 General Operation 3
6 Main menu 4
6.1 Run 4
6.2 Programs 4
6.3 Diagnostics 4
6.4 GLPs 4
6.5 System 4
6.6 Help Button 4
7 Run dialogue 5
7.1 Run dialogue: Overview 5
7.2 Run dialogue: Operating elements 5
7.2.1 Incubation mode 5
7.2.2 Start 5
7.2.3 Stop 5
7.2.4 Pause 5
7.2.5 Info button 6
7.2.6 Lid lock / unlock 6
7.2.7 Select program 6
7.3 Select Program dialogue 6
7.4 Info Button 6
7.4.1 Steps 6
7.4.2 Program Options 7
7.4.3 Print 7
7.5 Lid lock / unlock 7
7.6 Starting a program 7
7.7 A program is running 8
7.7.1 General: 'Pause' and 'Stop' button 8
7.7.2 'Pause' button 8
7.7.3 'Stop' button 8
7.7.4 Status Display 8
7.7.5 Program window 9
7.7.6 Save GLP Report 9
7.7.7 Not create GLP Report 9
7.7.8 Switch off the GLP report query 9
8 Incubation mode 10
8.1 Run incubation 10
8.2 Setting the block and lid temperature 10
8.2.1 Stop 10
8.2.2 Lid lock / unlock 10
8.2.3 Timer 10
8.2.4 Block 10
8.2.5 Lid 10
9 Programs 11
9.1 Program selection 11
9.1.1 Open a program 11
9.1.2 Copy 11

Instruction Manual peqSTAR X thermal cyclers
PEQLAB_v1212E
II
9.1.3 New program 12
9.1.4 New folder 12
9.1.5 Delete 12
9.1.6 'Info' button 12
9.2 Operating elements of the 'Programs' dialogue 13
9.2.1 Entering a command 13
9.2.2 List view 13
9.2.3 Diagram view 13
9.2.4 New program 14
9.2.5 Open a program 17
9.2.6 Info-Button 17
9.2.7 Deleting a command from the program 17
9.2.8 Saving a program 17
9.2.9 Save & Run 17
9.2.10 Editing a command 17
9.3 Available commands (program steps) 18
9.3.1 Unlock 18
9.3.2 Lock 18
9.3.3 Heat Lid 18
9.3.4 Temperature 19
9.3.5 'Elongation Time' and 'Melting Temp.' 19
9.3.6 Gradient step 19
9.3.7 Cycle: 21
9.3.8 Start Cycle - Manual cycle beginning 21
9.3.9 Close Cycle - Manual cycle ending 21
9.3.10 Pause 21
9.3.11 Store 21
10 Diagnostics 22
10.1 Operation of the 'Diagnostics' dialogue 22
10.2 General view 23
10.2.1 Zones 23
10.2.2 Single view 23
10.2.3 Automatic scrolling active 23
10.2.4 Automatic scrolling inactive 23
11 GLPs dialogue 24
11.1 Displaying a GLP report 24
11.2 Operating elements of the 'GLPs' dialogue 24
11.2.1 Select GLP 24
11.2.2 Open GLP report 24
11.2.3 Printer 24
11.2.4 Delete 25
11.2.5 Copy 25
11.2.6 New folder 25
12 System 26
12.1 Time / Date 26
12.2 Show/Hide mouse cursor 26
12.3 User Call 26
12.3.1 Sound 26
12.3.2 Email 27
12.4 User Management 28
12.4.1 Change User 29
12.4.2 User Management 29
12.4.3 Setting up a new user group 30
12.4.4 User logout 31
12.5 Network Settings 32
12.6 Hardware 33

Instruction Manual peqSTAR X thermal cyclers
PEQLAB_v1212E
III
12.6.1 Overtemp test 33
12.7 Firmware 33
12.7.1 Control Unit 33
12.7.2 Power Unit 35
12.8 Print 35
12.9 Display 36
12.9.1 Brightness 36
12.10 Protocol 36
12.11 LAN Control 36
12.11.1 New Lan Connect 36
12.11.2 Lan Connect 37
12.11.3 Lan Disconnect 37
12.11.4 Zigbee Configure 37
12.11.5 Zigbee Connect 38
12.11.6 Zigbee Disconnect 39
12.12 USB Recovery 39
12.13 Service 39
13 Maintenance & repair of the Thermal cycler 40
13.1 Cleaning, maintenance and repair of the thermal cycler 40
13.2 Test of the overtemperature protection 40
13.3 Temperature check-up 40
13.4 Calibration 40
14 Warranty 40
15 Disposal Instruction 41
16 Technical data 41
16.1 General characteristics 41
16.2 Gradient feature (optional) 41
16.3 User interface/functions 41
16.4 Block capacity 42
Instruction Manual peqSTAR X thermal cyclers
PEQLAB_v1212E
1
1 SYSTEM OVERVIEW
The peqSTAR X thermal cyclers are the ideal PCR devices for all molecular biological and biochemical laboratories
working in the field of basic research or routine diagnostic. The 250 °C HTR (High Temperature Range) Peltier
technology allows quick changes in temperature up to 5 °C/sec (max). The individual monitoring and controlling
of each of the eight or 16 Peltier elements per block equipped with 'Long Life Technology' ensure the tightest
correlation of target and actual temperature across the entire thermal plate leading to highest reproducibility of the
results. To avoid condensation each block is equipped with a heated lid (except for the in Situ block).
The peqSTAR X thermal cyclers are equipped with a touch-sensitive, graphic colored TFT display of the newest
generation, allowing operation of the device by simply touching symbols and graphic elements on the screen. This
leads to easy and intuitive handling and programming of the device. Additionally a mouse can be connected via
USB.
Furthermore an Ethernet port is available to connect the devices with the Microsoft Windows® or Linux network. It
is therefore possible to use an external server for archiving programs and GLP reports which will be available
globally in the network (e.g. for other thermal cyclers).
Transfer of data can be done by using commercially available USB memory sticks enabling a nearly unlimited
saving space for programs and GLP reports, which can be printed using a printer connected to the thermal cycler
via the network.
Notice:
Notice:Notice:
Notice: The USB ports support only standard cable mice and standard USB sticks.
The maximum acceptable length of the connecting cable of the port is 3 m!
2 SAFETY INSTRUCTIONS
Before the first use of the thermal cycler please read the instruction manual entirely.
Special notice should be taken of the following
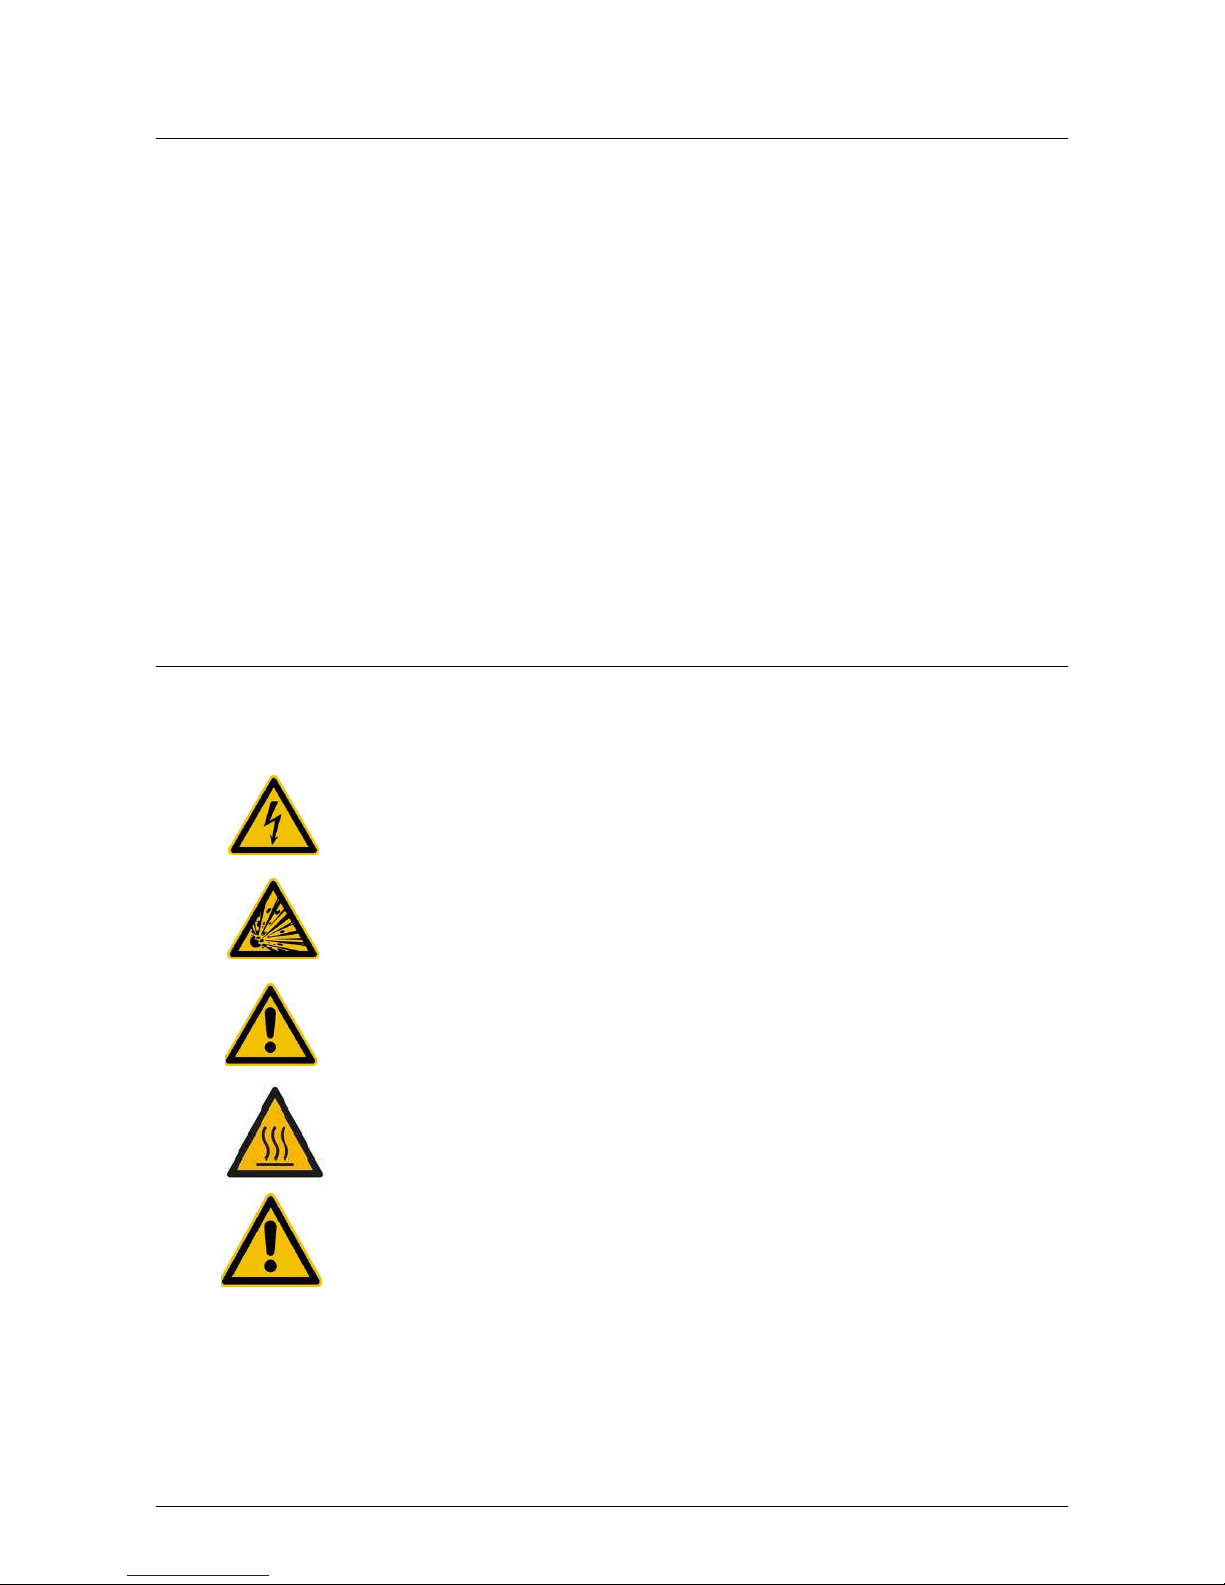
Caution of dangerous voltage
Please ensure the voltage indicated on the device exactly matches your local electrical supply.
Caution of dangerous explosive material
Explosive or reactive material mustn’t be heated in the thermal cycler.
Caution - liquids
Ensure that no liquids can enter the device.
Reaction tubes must be filled outside of the thermal cycler.
Caution - hot surfaces
The thermal plate, the heated lid and the reaction tubes quickly reach temperatures above
50 °C. There is danger of burning! Keep the lid closed until the temperature reaches 30 °C or
less. Only use materials (tubes, tube caps, plates and sealing films) which are heat resistant to
120 °C.
Caution – environment
The ventilation of the device must not be covered.
Note:
Note:Note:
Note: If the thermal cycler is used in any manner not specified in these instructions, the intended protection of the
user can not be guaranteed.

Instruction Manual peqSTAR X thermal cyclers
PEQLAB_v1212E
2
3 LICENSE NOTICE
This instrument is licensed for research and development and for uses other than human in vitro diagnostics under
one or more of the following patens of Applera Corporation: U.S. Patent Nos. 5,656,493, 5,038,852,
5,333,675, 5,475,610 (claims 1-159 and 164-166), 6,703,236 (claims 7-10) and 7,238,517 or corresponding
claims in their non-U.S. counterparts. No right is conveyed expressly, by implication or by estoppels under any
other patent of Applera, including but not limited to U.S. Patent No. 6,814,934 and its non-U.S. counterparts,
which describe and claim thermal cyclers capable or real-time detection.
4 INSTALLATION
4.1 Content of delivery
1 Thermal cycler
1 Power cord
1 Instruction manual
1 CD PC-software 'peqSTAR Manager'
Please check delivery for completeness and transport damage upon arrival. If any transport damage is noticed,
contact your distributor or manufacturer immediately.
IMPORTANT NOTICE: IF YOU FIND ANY DAMAGE OF THE DEVICE, DO NOT USE THE DEVICE!
4.2 Installing the thermal cycler
Check the packaging for any transport damage. Remove the packaging and place the thermal cycler onto a solid
surface. The device should not be exposed to direct sunlight. There should be enough space to make sure that the
ventilator grills on the front and back are not covered and sufficient ventilation is provided. The accessibility of the
mains switch must be assured and not hindered. There should be a distance of at least 25 cm (10 inch) to the wall
or the next device. Two thermal cyclers should not be placed back-to-back or back to front. Room temperature
between 4 °C und 25 °C is advised.
All original packaging should be stored in case a need arises to return the instrument to the supplier.
4.3 Operation of the thermal cycler
Before starting up the thermal cycler for the first time make sure that your local power supply is matching the
voltage and frequency range of the device. Plug in the mains plug of the thermal cycler to an electricity supply with
PE connection. The outlet and the power switch are located at the back of the device. The mains switch serves as
disconnection from the mains supply. The serial number is written onto a typed label at the bottom of the device.
The device should only be used by authorized staff. To ensure this, a user management with appointing rights for
specific users is available in the device.
More details about this and a detailed instruction manual can be found in the following chapters.

Instruction Manual peqSTAR X thermal cyclers
PEQLAB_v1212E
3
4.4 Connections of the thermal cyclers
5 GENERAL OPERATION
The operation of the thermal cycler can be run by the internal touch screen, either using the touch sensitive surface
of the display or by using a mouse connected to a free USB port. Furthermore the thermal cycler can also be
controlled by computer integrated to a net work or wireless ZigBee connection (option). The supplied application
software offers the same functions as the internal software of the thermal cycler, except for some system settings.
If the user has to enter numbers or text the corresponding field has to be touched on the touch screen or clicked
with the mouse. An appropriate keyboard will appear on the screen according to the expected entry.
All functions of the thermal cycler will be served by operating elements explained in the following chapters. An
operating element is activated by touching or clicking with the mouse.
Operating elements which are not available in an actual operating mode are displayed in a grey color. Not all
operating buttons are available in each operating mode.
2x USB interface
2x USB interface
Ethernet interface
Mains power inlet
Mains switch

Instruction Manual peqSTAR X thermal cyclers
PEQLAB_v1212E
4
6 MAIN MENU
The main menu consists of five dialogues, which can be selected via tabs at the right side of the screen. PeqSTAR
2X thermal cyclers offer two tabs 'L' (left) and 'R' (right) for choosing the desired block. This option is not available
for peqSTAR 96X, 384X und in situ X systems. Each dialogue contains a help button for direct help function. The
functions of the individual dialogues are explained below.
6.1 Run
This dialogue is used for selecting, executing and monitoring existing PCR protocols. A detailed
description of the 'Run' dialogue is given in chapter 7. Additionally, the incubation mode can
be activated here in order to manually program temperatures of the thermal plate and heated
lid. This is useful for fast and easy incubations similar to a digital dry bath. Further instructions
for the Incubation Mode are given in chapter 8.
6.2 Programs
This dialogue is used for creating, editing and organizing PCR protocols (see chapter 9).
6.3 Diagnostics
This dialogue is used for monitoring the actual temperature profile of the thermoplate. Also the
temperature of the heated lid and the temperature of the cycler interior are displayed (see
chapter 10).
6.4 GLPs
This dialogue is used for displaying and organizing GLP reports created by the thermal cycler
(see chapter 11).
6.5 System
This dialogue is used for changing the general settings of the device and for the user
management functions (see chapter 12).
. .
. The 'System' dialogue is also used for checking serial
and version numbers of hardware and software, respectively.
6.6 Help Button
Use this button to activate (deactivate) the direct help mode. The help function is active, when
the button appears pressed. If the mouse pointer is visible a question mark appears alongside.
By touching a function button or other dialogue element the corresponding help window will
appear. Closing the opened window or pressing the help button again, will deactivate the
direct help mode and the system returns to normal operation.

Instruction Manual peqSTAR X thermal cyclers
PEQLAB_v1212E
5
7 RUN DIALOGUE
The Run dialogue is used for running and monitoring existing PCR protocols.
7.1 Run dialogue: Overview
The following functions are found in the 'Run' dialogue:
7.2 Run dialogue: Operating elements
7.2.1 Incubation mode
Using this button the incubation mode can be activated. In this mode block and lid temperatures
can be adjusted manually (see chapter 8).
7.2.2 Start
Use this button to start a PCR protocol.
7.2.3 Stop
Use this button to stop a PCR protocol which is in progress.
7.2.4 Pause
Use this button to pause a PCR protocol which is in progress.
Program window
Block selection left / right
(only for peqSTAR 2X systems)
Direct help
List view /
diagram view
Lid lock /
unlock
Incubation Mode /
Stop Button
Start Button
Info Button
Select program
Program name

Instruction Manual peqSTAR X thermal cyclers
PEQLAB_v1212E
6
7.2.5 Info button
Use this button to display details of a PCR protocol (name, program options, author, settings,
comments and program steps).
7.2.6 Lid lock / unlock
Use this button to lock or unlock the lid. Furthermore the button shows the current status of the
lid.
7.2.7 Select program
Using this button a stored PCR protocol can be selected and loaded.
7.3 Select Program dialogue
Stored programs can be selected and
loaded by using this button.
If a program is selected the adjoining
window appears.
If a program is marked, the 'i' button
appears.
By 'Open' the chosen program will be
loaded in the run dialogue.
Further information on this dialogue can be found at chapter 9.1.1
7.4 Info Button
Using this button a new window will open, which shows detailed information of the chosen
program. If wanted, this information could be printed. The header contains program name and
the link to the program.
You will have the following options:
You will have the following options:You will have the following options:
You will have the following options:
7.4.1 Steps
Using this tab, the single steps of
the selected program are listed.

Instruction Manual peqSTAR X thermal cyclers
PEQLAB_v1212E
7
7.4.2 Program
Options
Using this tab, the settings of
the selected program are
shown.
7.4.3 Print
With peqSTAR X thermal
cyclers, PCR programs and
GLPs could be printed on a
network printer. Using this
dialogue, you can type in the
path for a printer in the
network.
Please refer to your local
network administrator for the
required settings.
If the path for the printer is already entered, simply click for printing.
Using the button , a test printing will be performed to check the correct settings.
7.5 Lid lock / unlock
Use this button to lock or unlock the lid.
For systems with HPL lids(High Pressure Lid) there is the option to define the lid pressure in an
opening dialogue.
7.6 Starting a program
If a program is opened, the
content of the program can be
seen in the program window.
The loaded program is started
by using the 'Start' button.

Instruction Manual peqSTAR X thermal cyclers
PEQLAB_v1212E
8
7.7 A program is running
7.7.1 General: 'Pause' and
'Stop' button
After starting the chosen program, you
can use these buttons to either pause or
to stop the program.
7.7.2 'Pause' button
If the 'Pause' button is pressed during the operating
sequence, the adjoining window appears. If this
request is confirmed, the program is paused and the
'Start' button appears which can be used to continue
the program.
During the break the status 'Paused' is shown.
7.7.3 'Stop' button
If this button is pressed after starting a program, the
adjoining security query appears.
By confirming the security query with 'Yes', the
program will be stopped.
7.7.4 Status Display
In this window the following information on the status is shown during a run:
Cycle:
Cycle:Cycle:
Cycle:
The number of
finished cycles is
shown
Lid:
Lid: Lid:
Lid:
Temperature of the
heated lid
Time remain.:
Time remain.: Time remain.:
Time remain.:
Remaining time of
PCR program
Total Progress:
Total Progress: Total Progress:
Total Progress:
Total progress of
PCR program in %
Block:
Block:Block:
Block:
Average temperature of
the thermoblock

Instruction Manual peqSTAR X thermal cyclers
PEQLAB_v1212E
9
7.7.5 Program window
In the program window the blue flashing bar is
showing the actual program step.
7.7.6 Save GLP Report
If stopping the program after the security query, the
adjoining query to create a GLP report appears.
Note: The GLP report query also appears when a
program is finished.
Will the query be confirmed by 'Yes', a GLP report
will be created and shown on the display. It will be
saved under the file name <program name>_<date>_
<time>.glp if not deleted by the user. For this the
adjoining window is shown.
The GLP report can be opened and printed in the
'GLPs' dialogue (see chapter 11).
7.7.7 Not create GLP Report
There will be no GLP report created for the aborted program. At the next run the GLP report query will
appear again. You will return to the 'Run' dialogue, which shows the last chosen program, which can be
started again.
7.7.8 Switch off the GLP report query
When you press this button, there will be no GLP reports created in the future. After the abort or end of a
program no GLP report query will appear again. The setting can be reset in the system dialogue (see
chapter 12.7.1.2).
Instruction Manual peqSTAR X thermal cyclers
PEQLAB_v1212E
10
8 INCUBATION MODE
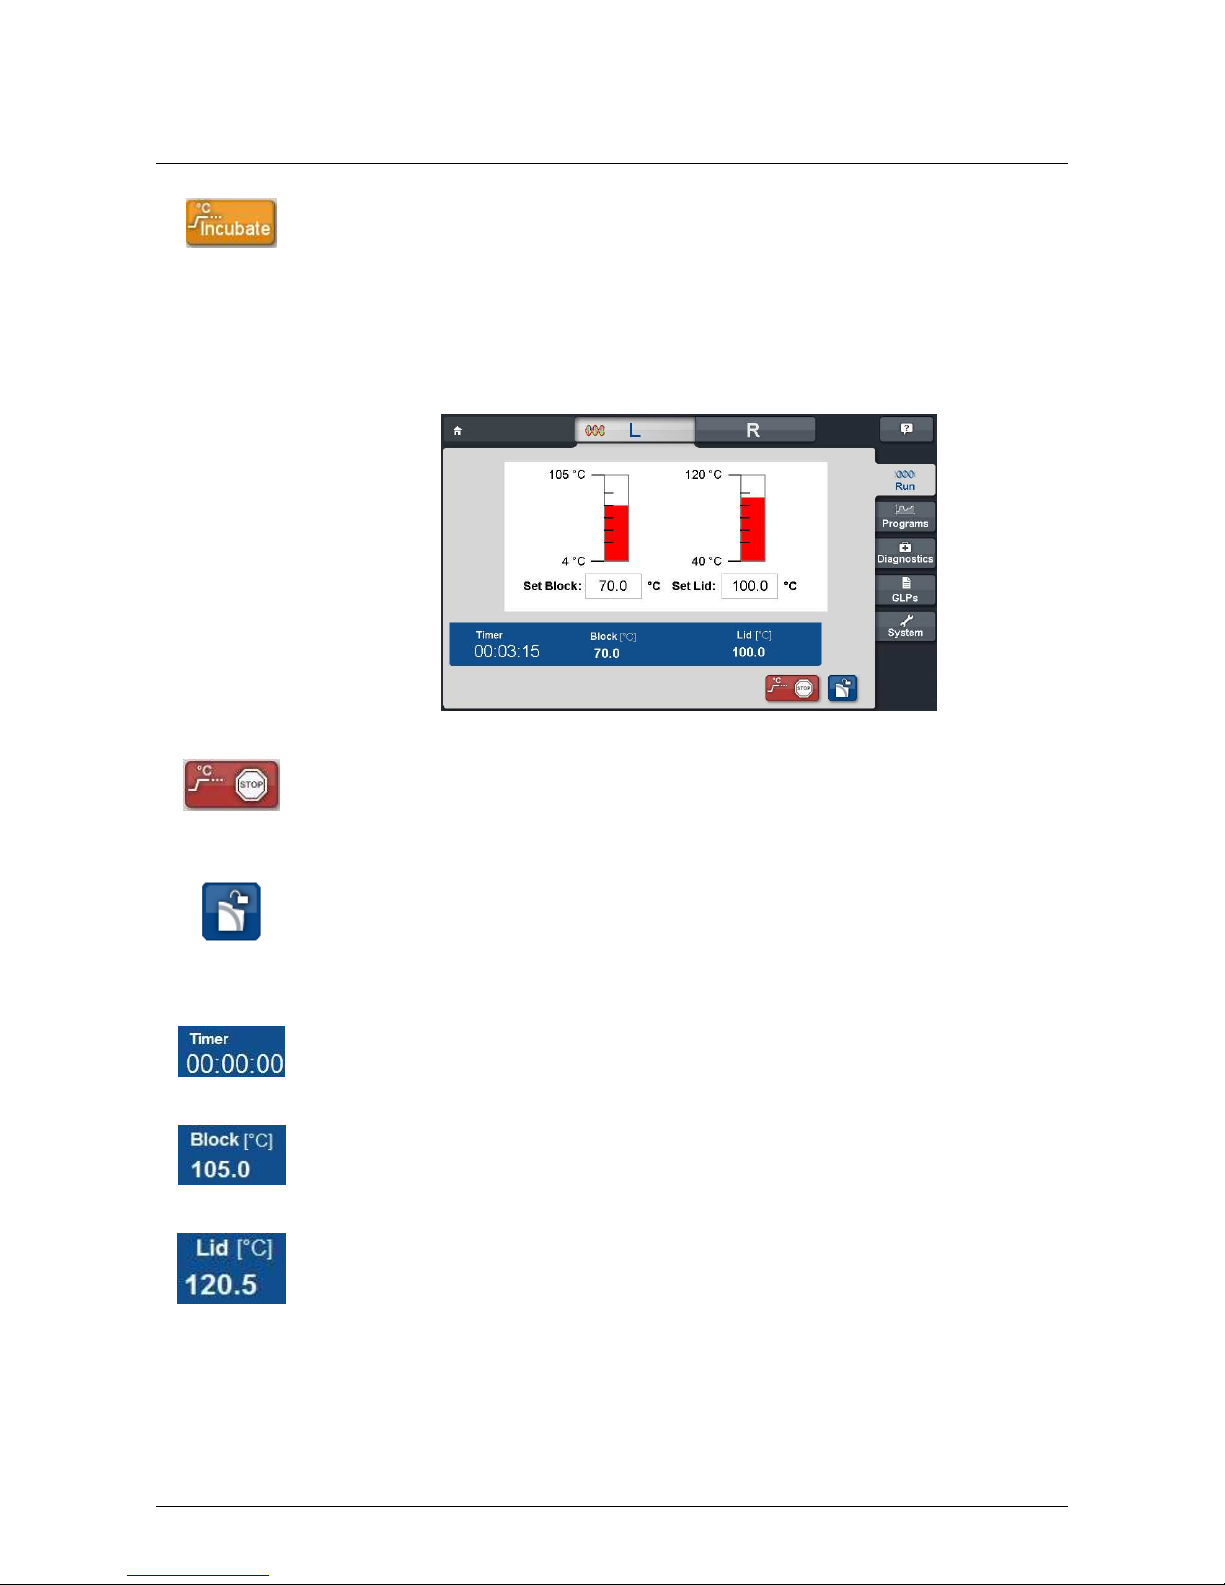
8.1 Run incubation
Use this button to set the device into the incubation mode. The temperature for the thermal plate
and lid can be set manually.
8.2 Setting the block and lid temperature
Set temperatures of block and lid by entering the values of choice in the corresponding editor
fields. By entering values < 40 °C the lid heating will be turned off.
8.2.1 Stop
Use this button to quit the incubation mode. Heating of the thermal plate and lid are then
deactivated.
8.2.2 Lid lock / unlock
Use this button to lock or unlock the lid.
For systems with HPL lids(High Pressure Lid) there is the option to define the lid pressure in an
opening dialogue.
8.2.3 Timer
The clock shows the time passed by in the incubation mode.
8.2.4 Block
Actual temperature of the thermal plate.
8.2.5 Lid
Actual temperature of the lid heat.
Instruction Manual peqSTAR X thermal cyclers
PEQLAB_v1212E
11
9 PROGRAMS
The 'Programs' dialogue serves for generating and editing PCR protocols (programs). This is a list of commands,
which the thermal cycler performs in sequence after starting the program. The 'Programs' dialogue provides an
editor for this purpose.
9.1 Program selection
By touching the 'Programs' dialogue the selection dialogue shows up where a new program can be set or an
existing program can be opened to edit.
The selection dialogue can be opened at any time in the program editor by using the adjoining button .
Existing programs can be selected and opened for editing, folders can be created and new programs can be
generated, copied and deleted.
The operation of the dialogue is as follows:
The operation of the dialogue is as follows:The operation of the dialogue is as follows:
The operation of the dialogue is as follows:
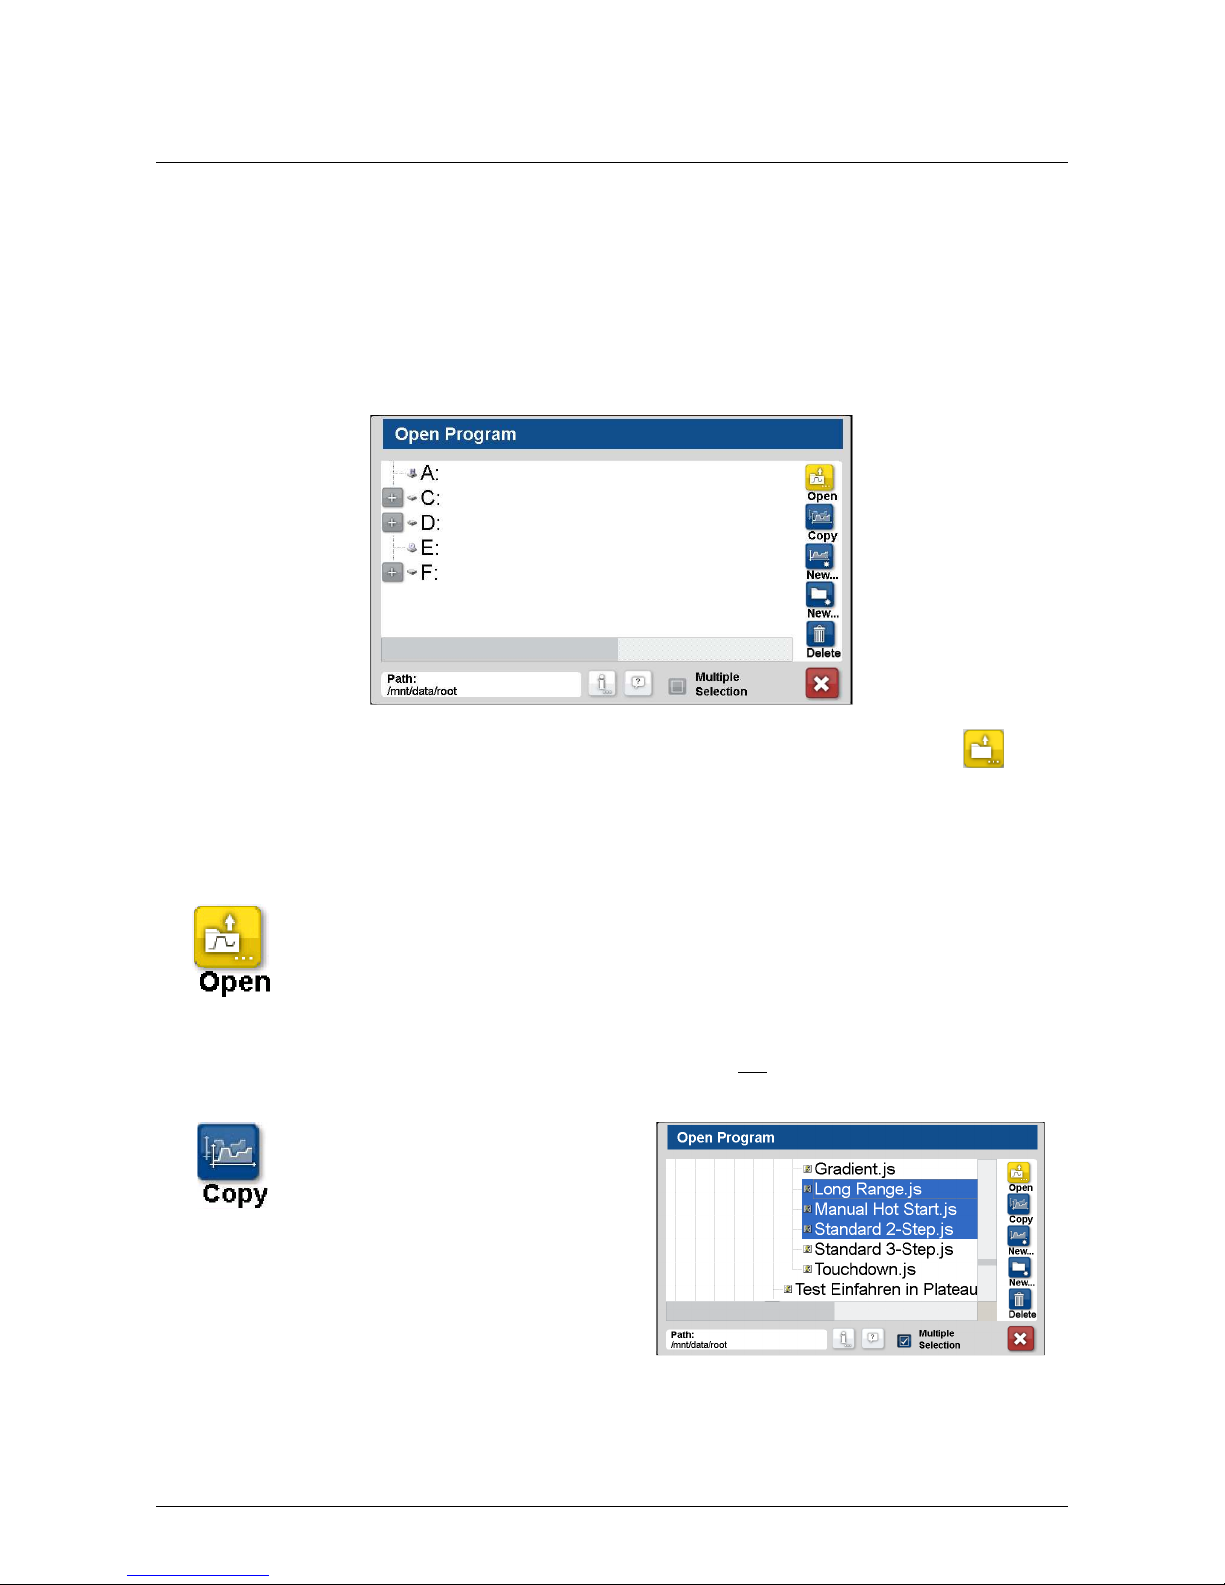
9.1.1 Open a program
Saved programs can be selected with this button. By touching the desired program it will be
selected of the file list and opened by using the 'Open' button. After this the thermal cycler
returns to the 'Pograms' dialogue. After the selection of a program several operating elements
are available, which are described in chapter 9.2 and 9.3.
Note: The command 'Open' is only active, when only one program is marked. Via 'Open' the
chosen program will be loaded in the 'Programs' dialogue.
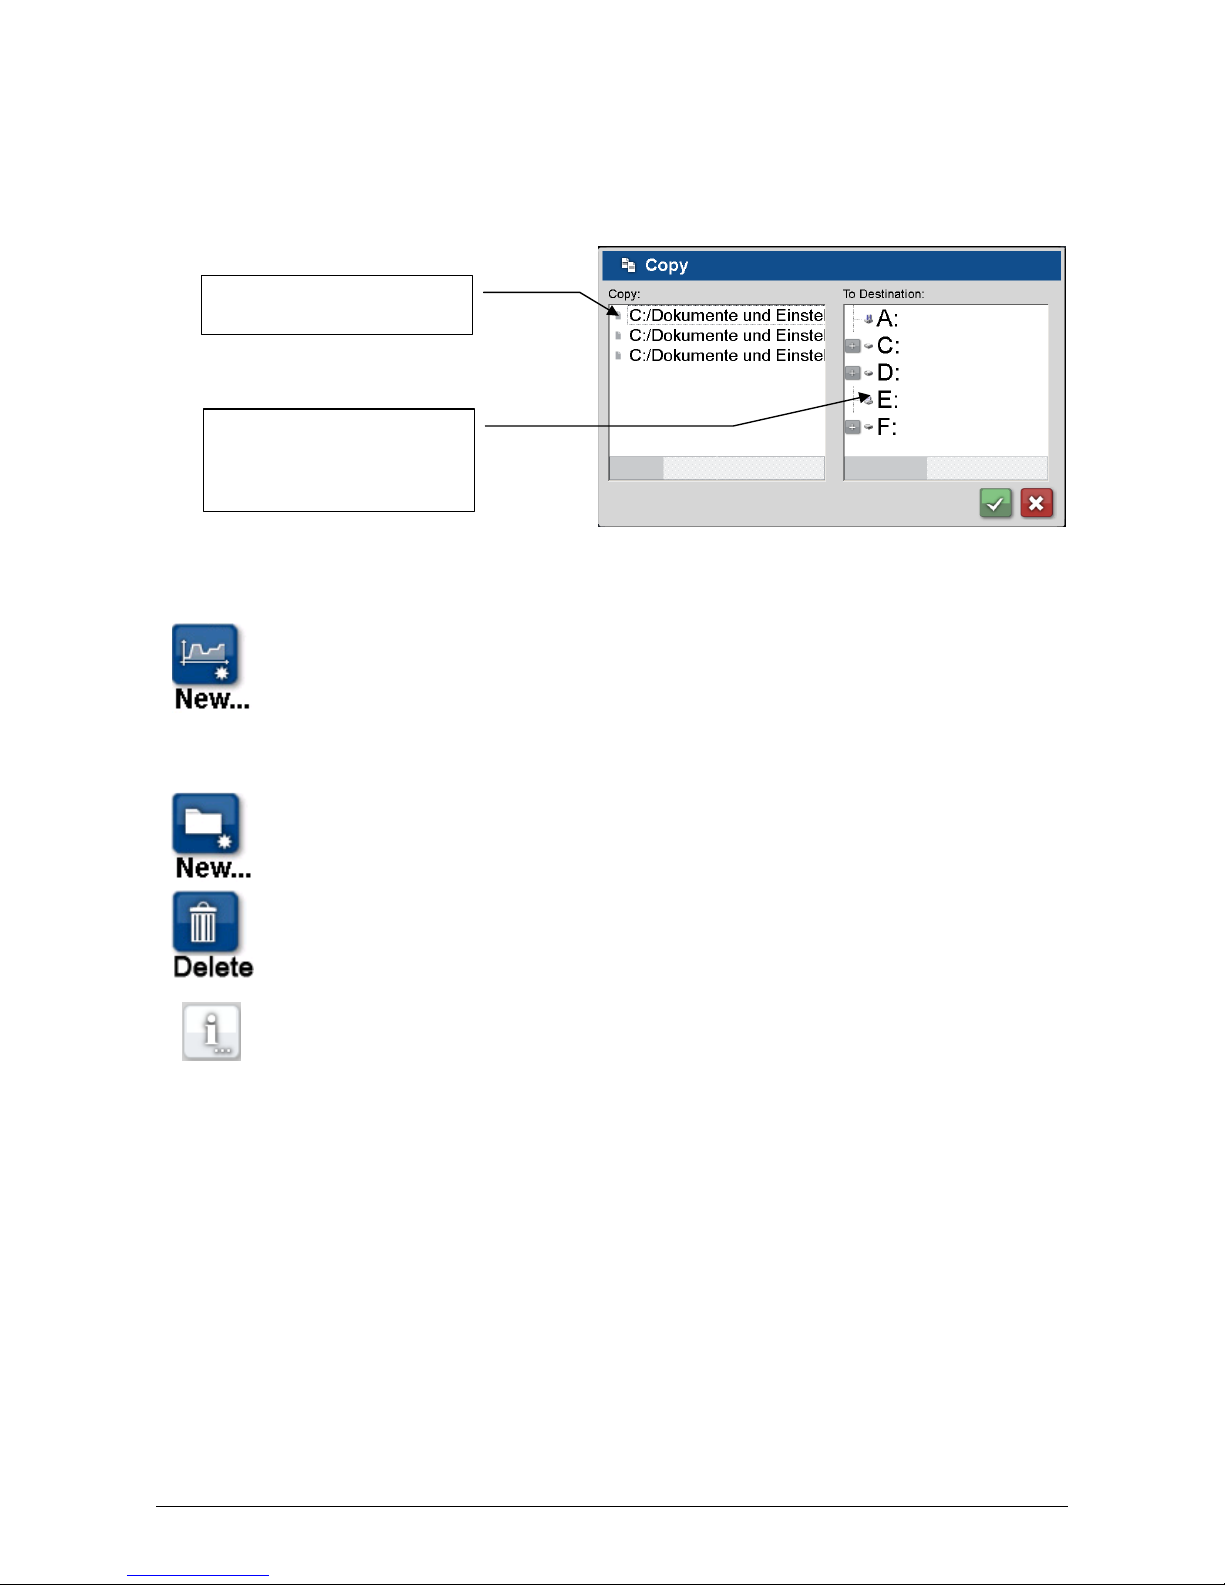
9.1.2 Copy
Pushing this button saved programs or
folders can be copied. Several
programs/folders can be marked via
mouse click simultaneously if the option
'Multiple Selection' is chosen. Marked
programs/folders are shown with a blue
background.
Instruction Manual peqSTAR X thermal cyclers
PEQLAB_v1212E
12
By using the 'Copy' button the following dialogue appears:
In this dialogue the directory can be selected.
Copy the files with 'OK' or quit the operation with 'Cancel'.
9.1.3 New program
A new program can be generated, after pushing this button the program’s name has to be
defined. Optionally author, user, any comment and different program options can be entered.
These data serve for information and can also be retrieved in the 'Run' dialogue.
9.1.4 New folder
Use this button to create a new subfolder after selecting an existing folder, in which the new
subfolder should be created.
9.1.5 Delete
Programs or folders can be deleted with this button.
9.1.6 'Info' button
Further details at chapter 7.4.
Destination for the copied files
(desired folder has to be selected
by clicking)
List of the selected files to copy
Instruction Manual peqSTAR X thermal cyclers
PEQLAB_v1212E
13
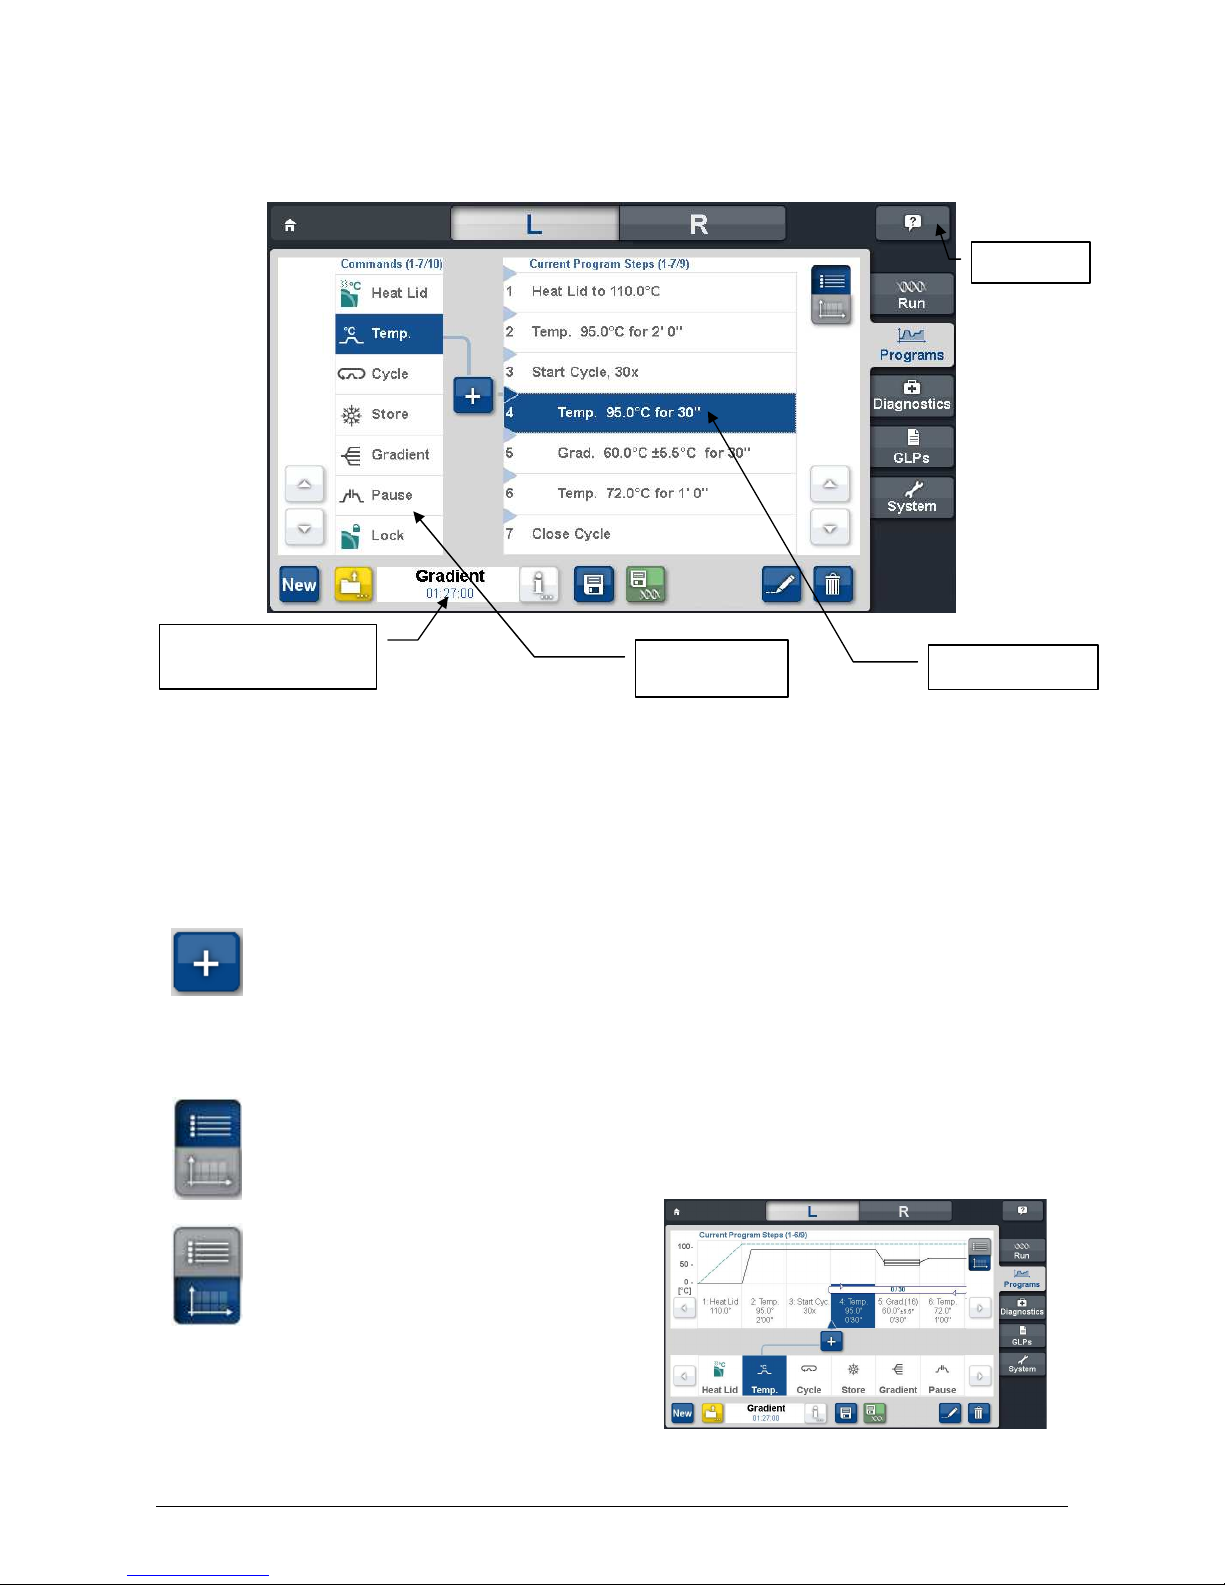
9.2 Operating elements of the 'Programs' dialogue
The 'Program window'
'Program window''Program window'
'Program window' displays the list of commands (steps) the program is composed of. The 'List of available
'List of available'List of available
'List of available
commands'
commands' commands'
commands' is displaying all steps which can be entered into a program. The meaning of the single commands is
explained in chapter 9.3. The function buttons
function buttonsfunction buttons
function buttons serve for editing of programs and the administration of program
files on the system and will be described in the following.
Function buttons of the 'Programs' dialogue:
9.2.1 Entering a command
To enter a new command into a program the desired line has to be selected. From the left side of the
program window a blue arrow will point on the desired line. After selecting the program command of
the list in the left window it can be inserted into the desired place via the '+' button. Alternatively this
can be made by double click on the program command. Thereupon the corresponding parameters will
be asked. To enter a parameter the desired input field has to be touched. A keyboard will be shown
on the screen.
9.2.2 List view
Pushing this button, the selected program will be displayed in the list view, like shown in chapter 9.2.
9.2.3 Diagram view
Pushing this button, the selected program will
be displayed in the diagram view, like shown
at the right.
Program window
Name of the PCR program and total time
List of available
commands
Direct help

Instruction Manual peqSTAR X thermal cyclers
PEQLAB_v1212E
14
9.2.4 New program
A new program can be generated, after pushing this button the program’s name has to be defined.
Optionally author, user, any comment and the program options can be entered.
9.2.4.1 New Cyclerprogram
Enter the name of the PCR program,
optionally also add name of the author and
a comment.
‘Path’ shows you the directory where the
program is stored. Over the button
you could change the path.
9.2.4.2 Program Options
Using the button the
adjoining window appears:
9.2.4.3 Power Fail Denaturation
If 'Power Fail Denaturation' is activated by
pushing the 'checkbox' the
adjoining dialogue appears:
If a power failure had happened while a program was
running the thermal cycler restarts the program at the
point it was stopped as soon as the power returns
(Autorestart after power failure).
Additionally, if the option 'Power Fail Denaturation' is
activated the thermal block will heat to the stated
temperature for the set time before continuing with the
program.
9.2.4.4 Global Program Ramp
Using the Checkbox a global
ramp rate in °C/s can be programmed. This global ramp
rate will be used in all temperature and gradient steps of
the PCR program, but could be changed in a single
temperature or gradient step manually by entering the
desired value at the step.
Instruction Manual peqSTAR X thermal cyclers
PEQLAB_v1212E
15
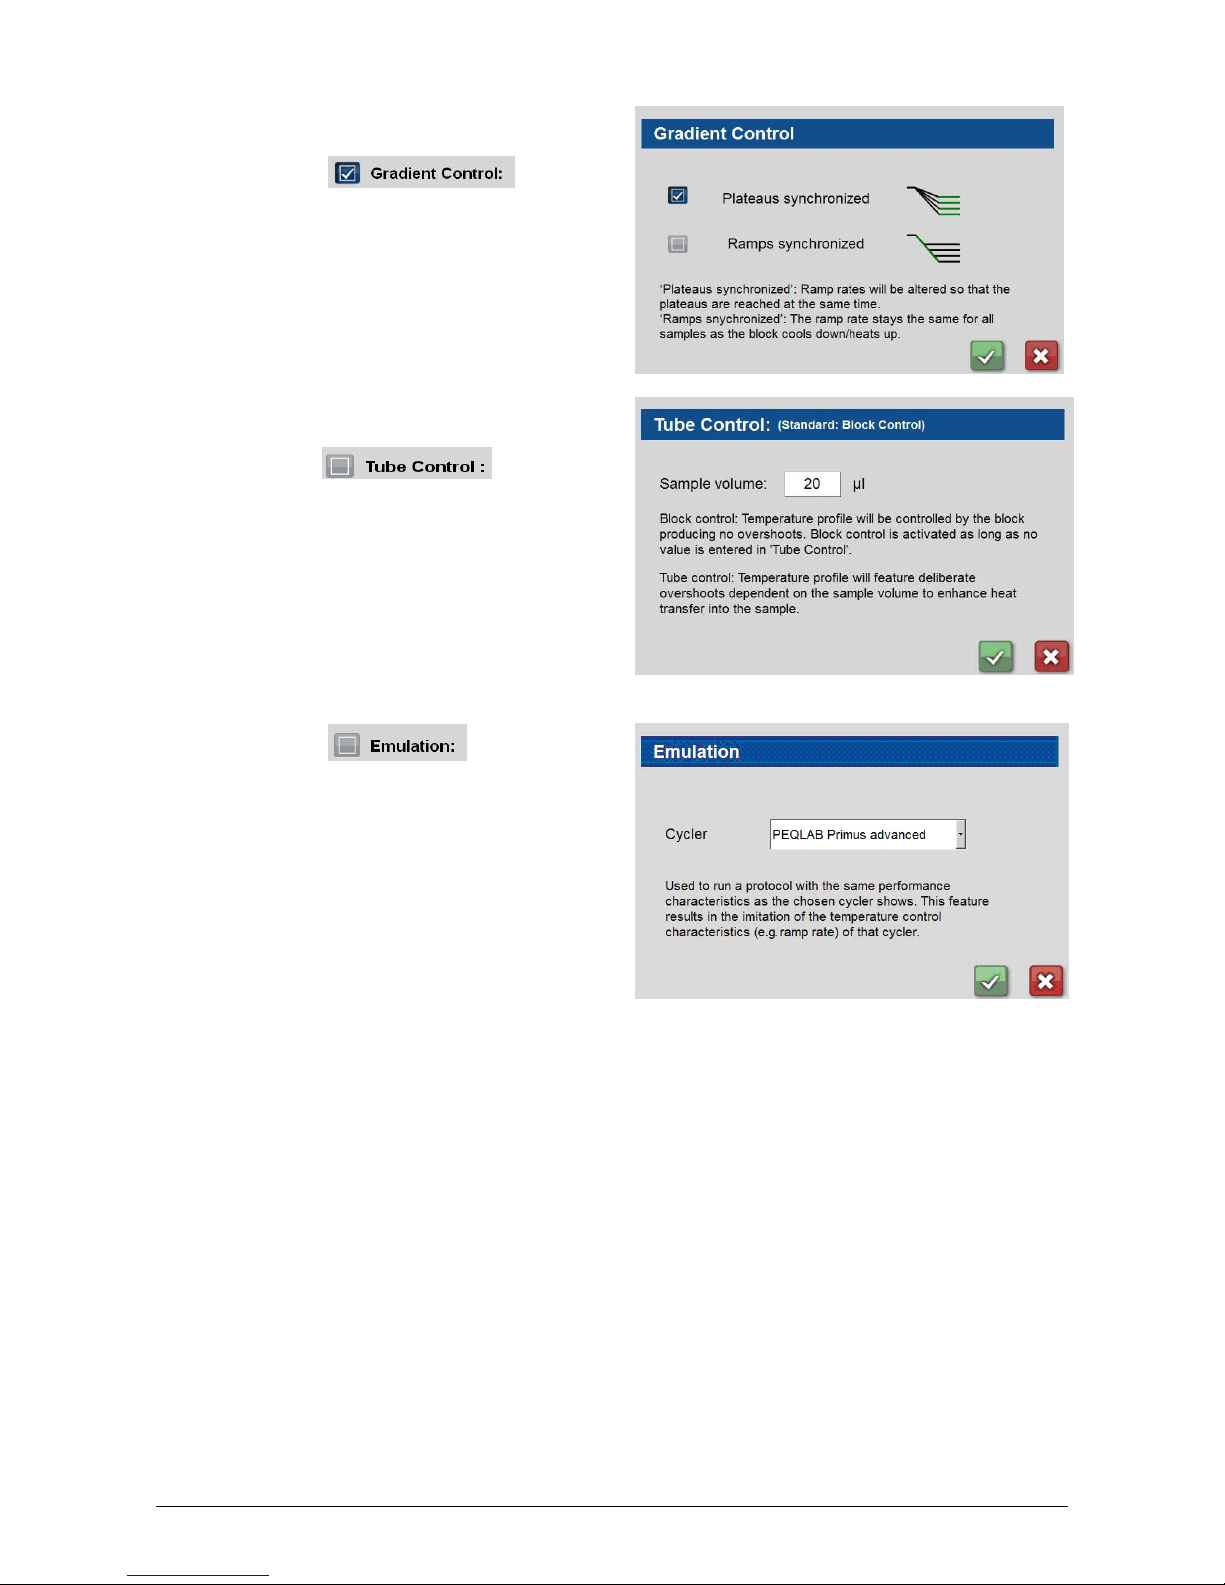
9.2.4.5 Gradient Control
Using the Checkbox you can
decide whether in a gradient step the plateaus (Plateaus
synchronized) or the Ramps (Ramps synchronized) should
be synchronized for all rows.
9.2.4.6 Tube Control
With the Checkbox you have the
possibility to adjust temperature regulation for a
temperature step accordingly to sample volume. If
necessary, the temperature regulation will perform shortterm deliberate overshoots and undershoots depending
on the entered sample volume during PCR run.
9.2.4.7 Emulation
Using the Checkbox the thermal cycler
will perform PCR like the chosen cycler, emulating its
performance. This function could be useful if a PCR
program should be transferred to the peqSTAR from
another type and model of thermal cycler.

Instruction Manual peqSTAR X thermal cyclers
PEQLAB_v1212E
16
How to emulate a protocol ABC from cycler XY on a peqSTAR in the right way?
Program:
Enter the protocol ABC in the program editor
of the peqSTAR the same way you did it on
the cycler XY.
Emulation:
Go to ‚Program Options’ => ‚Emulation’ and
choose the cycler XY that you have used
previously.
Tube Control:
Did you had to enter a volume setting in your
cycler XY (Tube Control mode)?
If yes, please enter the same volume in the
peqSTAR in the ‚Program Options’ under
‚Tube Control’.
Ramp Rate:
Have you worked on cycler XY with a
reduced ramp rate?
Throughout the whole protocol?
Then you could adjust the ramp rate in the
‚Program Options’ under ‚Global Program
Ramp’ for the whole protocol.
Only for single steps in the protocol?
Then you could adjust the ramp rate for each
single temperature or gradient step.

Instruction Manual peqSTAR X thermal cyclers
PEQLAB_v1212E
17
9.2.5 Open a program
See chapter 9.1.1.
9.2.6 Info-Button
See chapter 7.4.
9.2.7 Deleting a command from the program
The command has to be selected by marking it and then pushing the 'Delete' button.
9.2.8 Saving a program
Use this button to save a program. The
adjoining window appears and the
corresponding information can be entered or
changed in the dialogue window. Further
information regarding program options can
be found at chapter 9.2.4.2.
9.2.9 Save & Run
A program can be saved and run
immediately using this button. In advance
there will be a security check which needs to
be confirmed with 'Yes'. The program is then
loaded to the 'Run' tab and started.
At the peqSTAR 2X the desired block can be
chosen by using this dialogue.
9.2.10 Editing a command
The parameters of a command can be modified by touching the corresponding command line of the
program and changing it with the 'Edit' button. (The same function has a double click on the command
line).

Instruction Manual peqSTAR X thermal cyclers
PEQLAB_v1212E
18
9.3 Available commands (program steps)
Unlock
9.3.1 Unlock
Use this command to unlock the lid in case that it has been locked in a previous program step.
Lock
9.3.2 Lock
Use this button for lid locking in order to
avoid accidental opening while a
program is running. Using this
command, the adjoining window
appears.
9.3.2.1 Lid Pressure On
By activating
you can set lid pressure on the samples
between 100 – 250 N. When using a
thermal cycler without High Pressure Lid
(HPL) the inserted pressure value will be
ignored. When using a thermal cycler
with HPL and not inserting any pressure
value, the lid will automatically set the
pressure on the samples to 50 N.
Heat Lid
9.3.3 Heat Lid
Using this command you can activate or
deactivate lid heat and the adjoining
window appears.
By activating 'Lid heat on' it is possible
to insert the desired lid temperature. The
temperature needs to be in a range of
40 - 120 °C. When 'Lid heat on' is not
activated, the lid heat is switched off.
When creating a new program, the step 'Heat Lid' will be automatically inserted at the beginning
of the PCR. This stetting can be changed at the tab System (see chapter 12.7.1.2).
Please note:
• When reaching a 'Store'-Step the 'Heat Lid' is deactivated automatically.
• Furthermore the 'Heat Lid' is deactivated automatically during temperature steps < 30 °C.
When temperature steps ≥ 30 °C will follow, the 'Heat Lid' is reactivated automatically in
case it was activated before the temperature step < 30 °C.

Instruction Manual peqSTAR X thermal cyclers
PEQLAB_v1212E
19
Temp
9.3.4 Temperature
Use this button to insert a temperature
step in the PCR program.
9.3.4.1 Temperature
Set the temperature, which should be held
during the step.
9.3.4.2 Time
Set the time how long the desired
temperature should be held.
9.3.4.3 Ramp-Rate
When activating the checkbox a ramp rate can be set. The setting here will overwrite the 'Global
Program Ramp' in the program options.
9.3.4.4 Temp-Incr./Decr
Change of temperature within a program cycle. The sign indicates, whether the temperature will be
increased or decreased.
9.3.4.5 Time Incr./Decr
Change of time within a program cycle. The sign here defines whether the time will elongate or
reduce.
9.3.5 'Elongation Time' and 'Melting Temp.'
The elongation time and the melting temperature of the primers can be calculated by using this
button. They have to be considered as guideline values. Depending on the application of the user
further optimization might be necessary. Typically the optimal annealing temperature is about 3 °C
lower than the calculated melting temperature.
Gradient
9.3.6 Gradient step
Use this button to enter a temperature gradient.
The following dialogue appears:
9.3.6.1 Center
The temperature desired in the middle of
the Gradient can be set in 'Center
Temperature'.
9.3.6.2 Gradient ±
The field 'Gradient ±' shows the difference
in temperature between the middle and the
right and left side of the thermal plate. The
resulting temperatures in the 8 rows are
given on the buttons at the left side of the
window.

Instruction Manual peqSTAR X thermal cyclers
PEQLAB_v1212E
20
9.3.6.3 Time
Set the duration of this step in the field 'Time'.
9.3.6.4 Ramp Rate
When activating the checkbox a ramp rate can be set. The setting here will overwrite the 'Global
Program Ramp' in the program options. This command will only be available, if 'Ramps
synchronized' was activated in the program options under 'Gradient Control'.
9.3.6.5 Temp-Incr./Decr.
Change of temperature within a program cycle. The sign indicates, whether the temperature will be
increased or decreased.
9.3.6.6 Time-Incr./Decr.
Change of time within a program cycle. The sign here defines whether the time will elongate or
reduce.
For the peqSTAR 2X the gradient is realised
over the 8 rows of the block from the top to
the bottom (as displayed in 9.3.6.1).
This is also the default setting for gradients
in the peqSTAR 96X, where the complete
row (from well 1 to well 12) has the same
temperature.
Furthermore there is the possibility of a 16
gradient distribution. Different temperatures
are regulated in the left and right half of the
block leading to a gradient within a single
row from the left to the right. The
temperatures displayed in the software
window are only reached in rows 3 and 10,
so the user is asked to put the tubes only in
the specified wells, when programming or
using a program with such a gradient step.
By selecting one of the temperature buttons
different options will be available:
When the checkbox was
deactivated before, the single temperatures
of each row can be adjusted within a special
range using the button 'Adjust Temperature'.
Moreover the selected temperature can be
used as new center value or the gradient
step can be changed in a temperature step
using the selected temperature. These two
functions are independent of the settings
regarding gradient linearity.

Instruction Manual peqSTAR X thermal cyclers
PEQLAB_v1212E
21
Cycle
9.3.7 Cycle:
Use this button to define a program cycle
(loop), consisting of several individual
program steps.
In the field 'Number of Cycles' the amount
of cycles is entered.
In the following dialogue the commands
'Temp' and 'Gradient' can be entered in
the cycle. The corresponding values are
explained in chapter 9.3.4 and 9.3.6.
When all steps of the cycle are
programmed, the dialogue could be left
using the button 'Close Cycle'.
Start Cycle
9.3.8 Start Cycle - Manual cycle beginning
Close Cycle
9.3.9 Close Cycle - Manual cycle ending
Pause
9.3.10 Pause
Use this button to interrupt the running
program temporarily.
The adjoining window appears where you
can enter a temperature value for the
pause
Store
9.3.11 Store
This command keeps the thermal plate
temperature on the set value.
Automatically the lid heat is turned off.
This command usually is the last program
step, and is used to store the samples at a
constant temperature until removal.
If the exact time of sample removal is
uncertain activate the 'Infinite' field to store
for an infinite time.
Instruction Manual peqSTAR X thermal cyclers
PEQLAB_v1212E
22
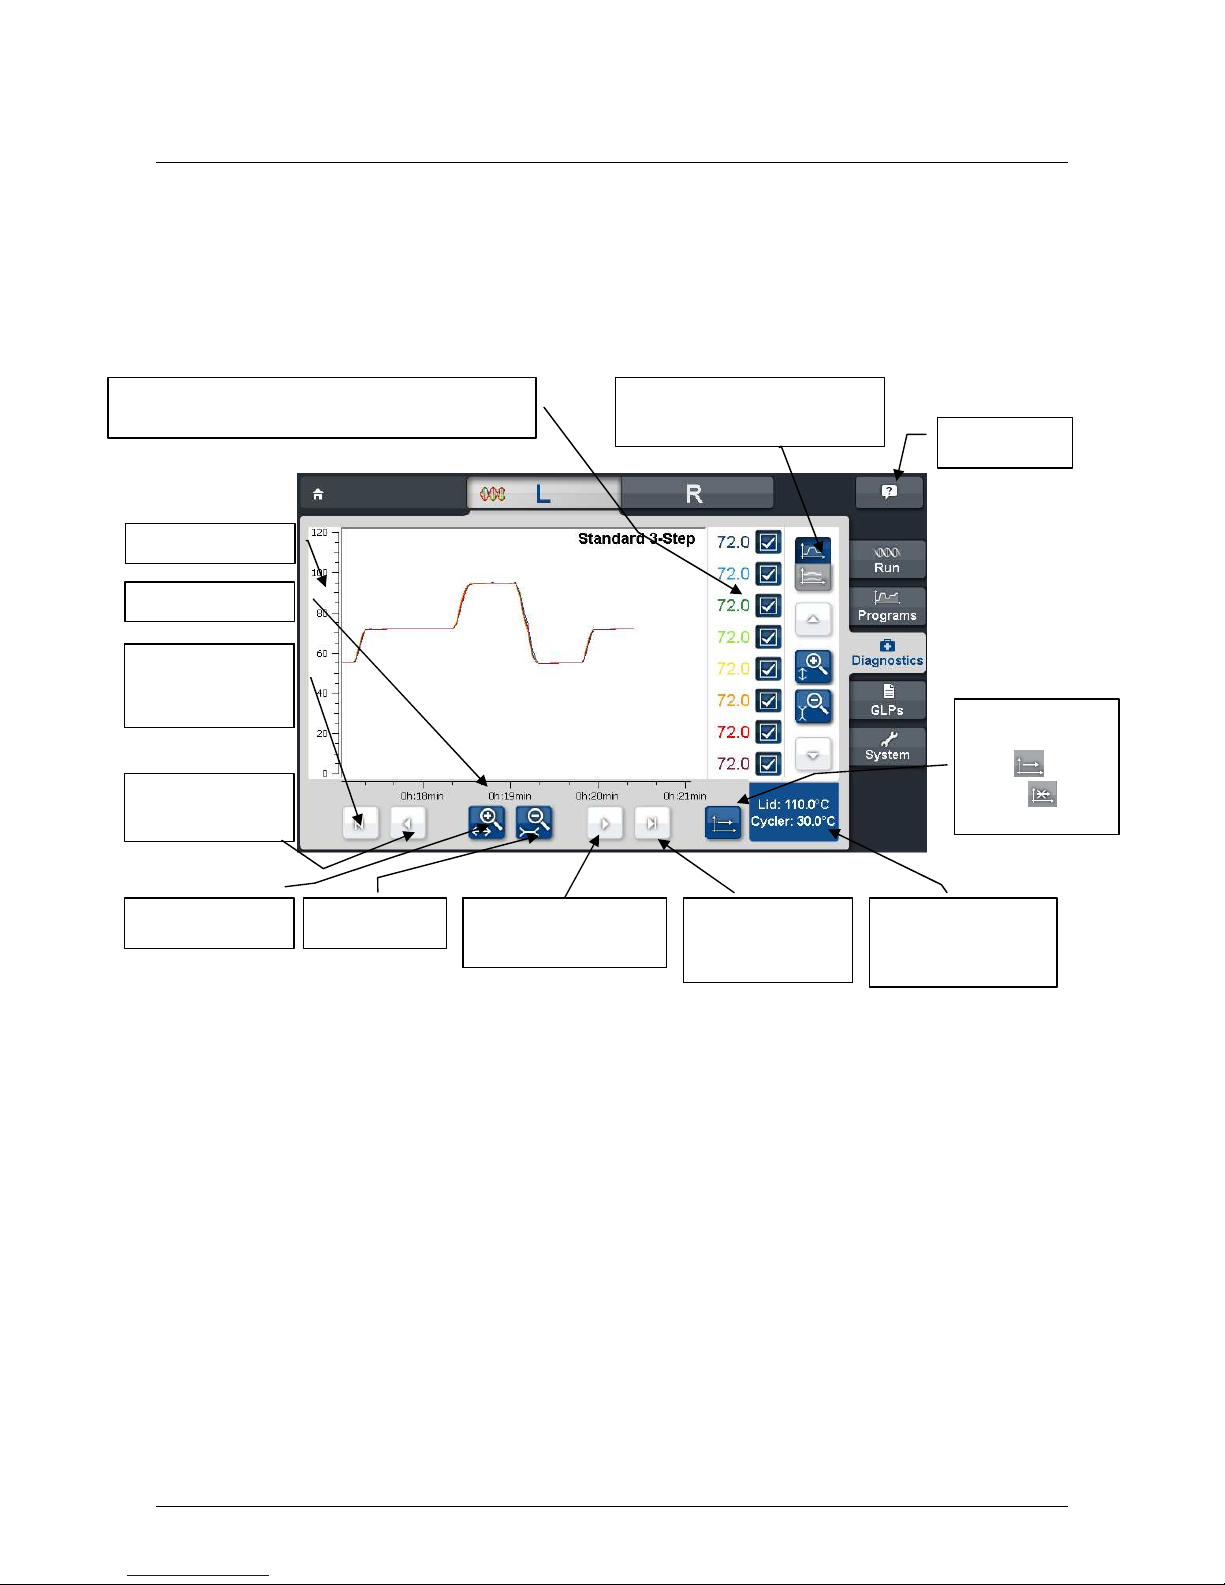
10 DIAGNOSTICS
The 'Diagnostics' dialogue visualizes the temperature profile of the thermal plate. The actual values will be shown
for lid and cycler temperature. While a PCR protocol or incubation is running, the thermal cycler automatically
records all temperatures. The record will be finished as soon as the PCR program or the incubation has been
stopped.
10.1 Operation of the 'Diagnostics' dialogue
Different operating elements for indication and navigation within a diagram are available:
Navigation button:
To the end of the
record
Navigation button:
One page forward
Navigation button:
To the beginning of
the record
Zoom 0.5 fold
Zoom 2
-
fold
Time scale
Help Mode
Lid
: Lid temperature
Cycler: Temperature
of cycler interior
Selection of single view or
complete view of the eight zones
Automatic
scrolling
active or
inactive
Navigation button:
One page back
Temperature scale
Display of the selected zones (8 zones each block for
the peqSTAR 2X, 16 zones for the peqSTAR 96X)

Instruction Manual peqSTAR X thermal cyclers
PEQLAB_v1212E
23
10.2 General view
General view of the zones of the thermal plate showing the temperature profile of the eight or 16 zones in one
combined diagram (see 10.1) when choosing the 'Diagnostics' dialogue. The temperature profile of the single
zones is shown in one window lying upon another.
10.2.1 Zones
By selecting the chosen zones these will be shown or
hidden in the general view. Hidden zones won’t be
shown in the diagram window anymore, but the
record of the corresponding temperatures will be
continued.
10.2.2 Single view
By pushing the button the single view of the
zones will be shown.
Using the single view of the zones the temperature
profile of each zone will be shown in separate
diagrams. The arrangement of the single diagrams
match to the arrangement of the zones on the
thermal plate.
10.2.3 Automatic scrolling active
10.2.4 Automatic scrolling inactive
For convenient view of the PCR record the automatic scrolling can be inactivated. Using
this function, already recorded parts of the diagram can be looked at without
automatic screen scrolling.
Instruction Manual peqSTAR X thermal cyclers
PEQLAB_v1212E
24
11 GLPS DIALOGUE
The 'GLPs' dialogue is used for the administration, viewing and printing of the GLP reports generated by the
thermal cycler.
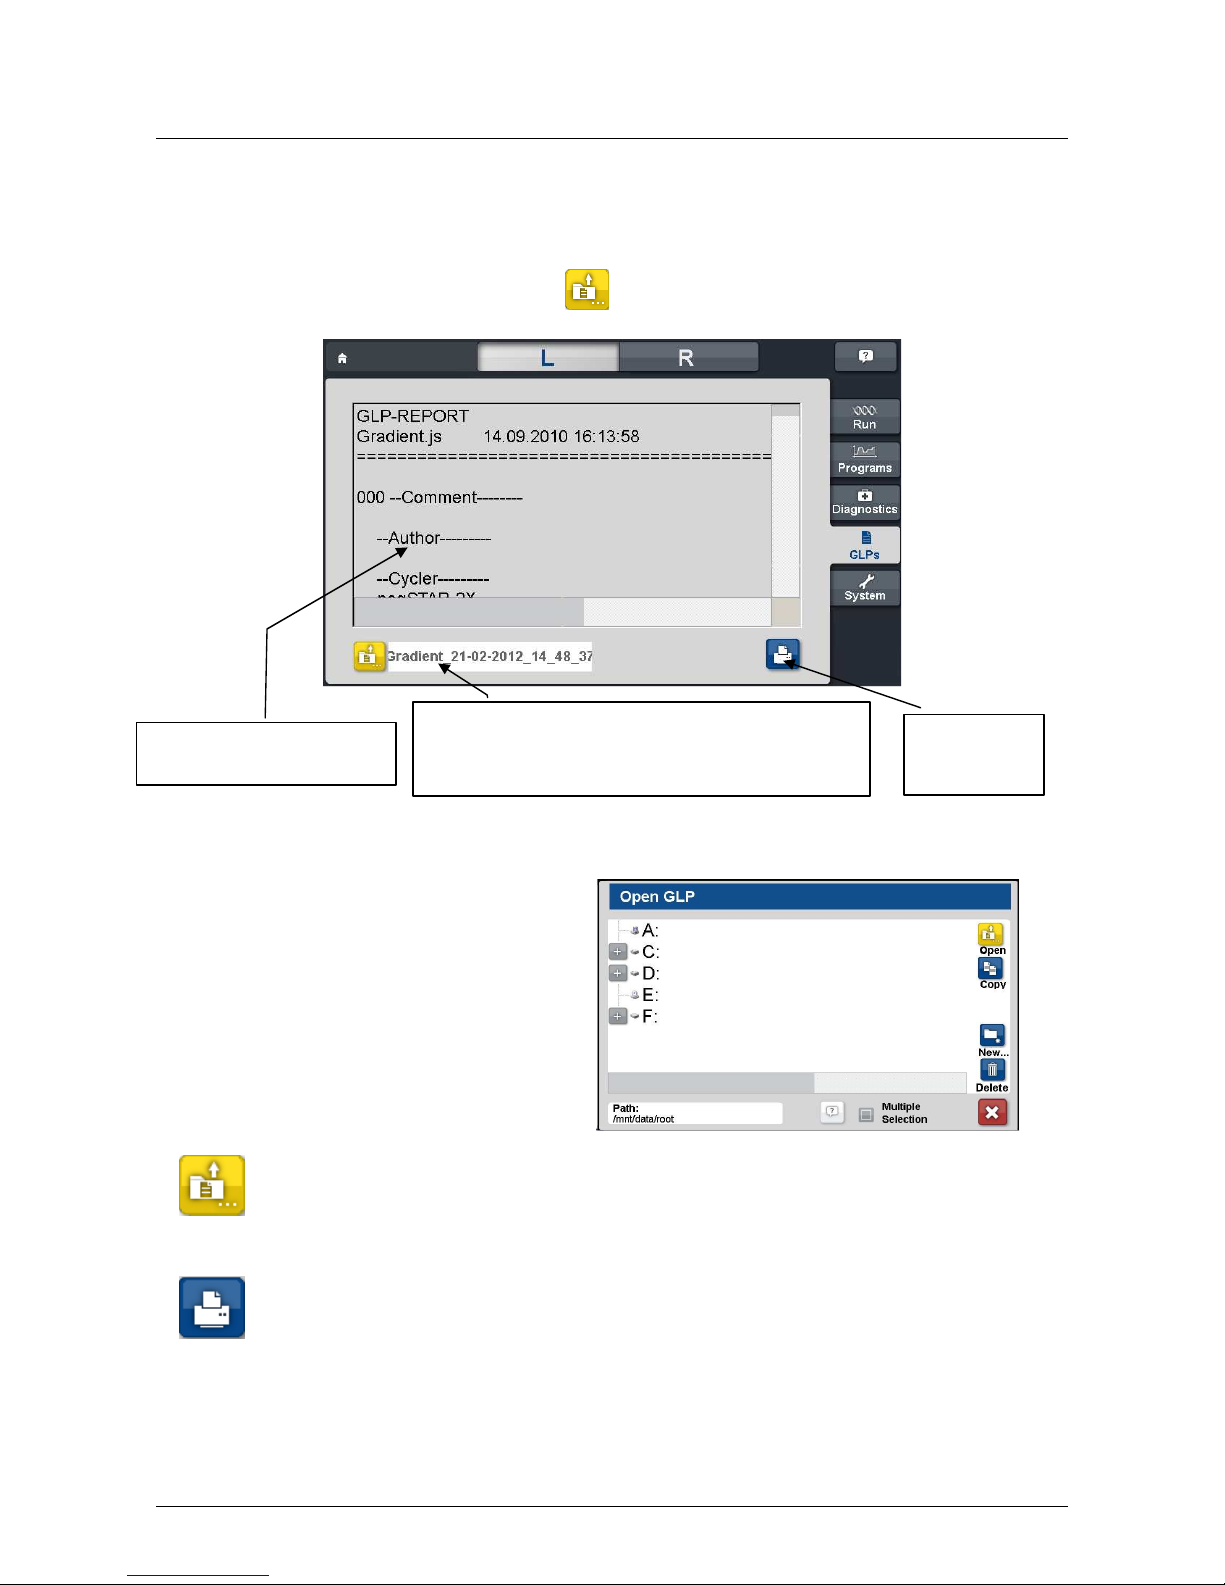
11.1 Displaying a GLP report
After pushing the GLP button a dialogue appears to select a GLP report, which will be directly shown. The
dialogue can also be opened by pushing the button .
11.2 Operating elements of the 'GLPs' dialogue
11.2.1 Select GLP
Select a GLP report (shown in
the adjoining text window). GLP
reports can also be copied or
deleted and a new folder can be
created for GLP reports.
11.2.2 Open GLP report
Use this button to open a stored GLP report. Select the desired GLP report of the file list and open it
by pushing the button 'Open'. The GLP report is shown as displayed in chapter 11.1.
11.2.3 Printer
Use this button to print out the selected GLP report.
This window shows the
content of the GLP report.
Shows the name of the selected GLP report. The name
of the GLP is composed of the name of the PCR
program, date and time.
Printing of the
GLP report.

Instruction Manual peqSTAR X thermal cyclers
PEQLAB_v1212E
25
11.2.4 Delete
Use this button to delete a GLP report.
11.2.5 Copy
Pushing this button saved GLP reports
or files can be copied. Several GLP
reports/files can be marked via mouse
click simultaneously if the option
'Multiple Selection' was chosen.
Marked GLP reports/files are shown
with a blue background.
By using the 'Copy' button the
adjoining dialogue appears.
Pushing 'OK' the files will be copied;
the operation can be aborted with
Cancel.
11.2.6 New folder
A new folder can be created using this button.
Instruction Manual peqSTAR X thermal cyclers
PEQLAB_v1212E
26
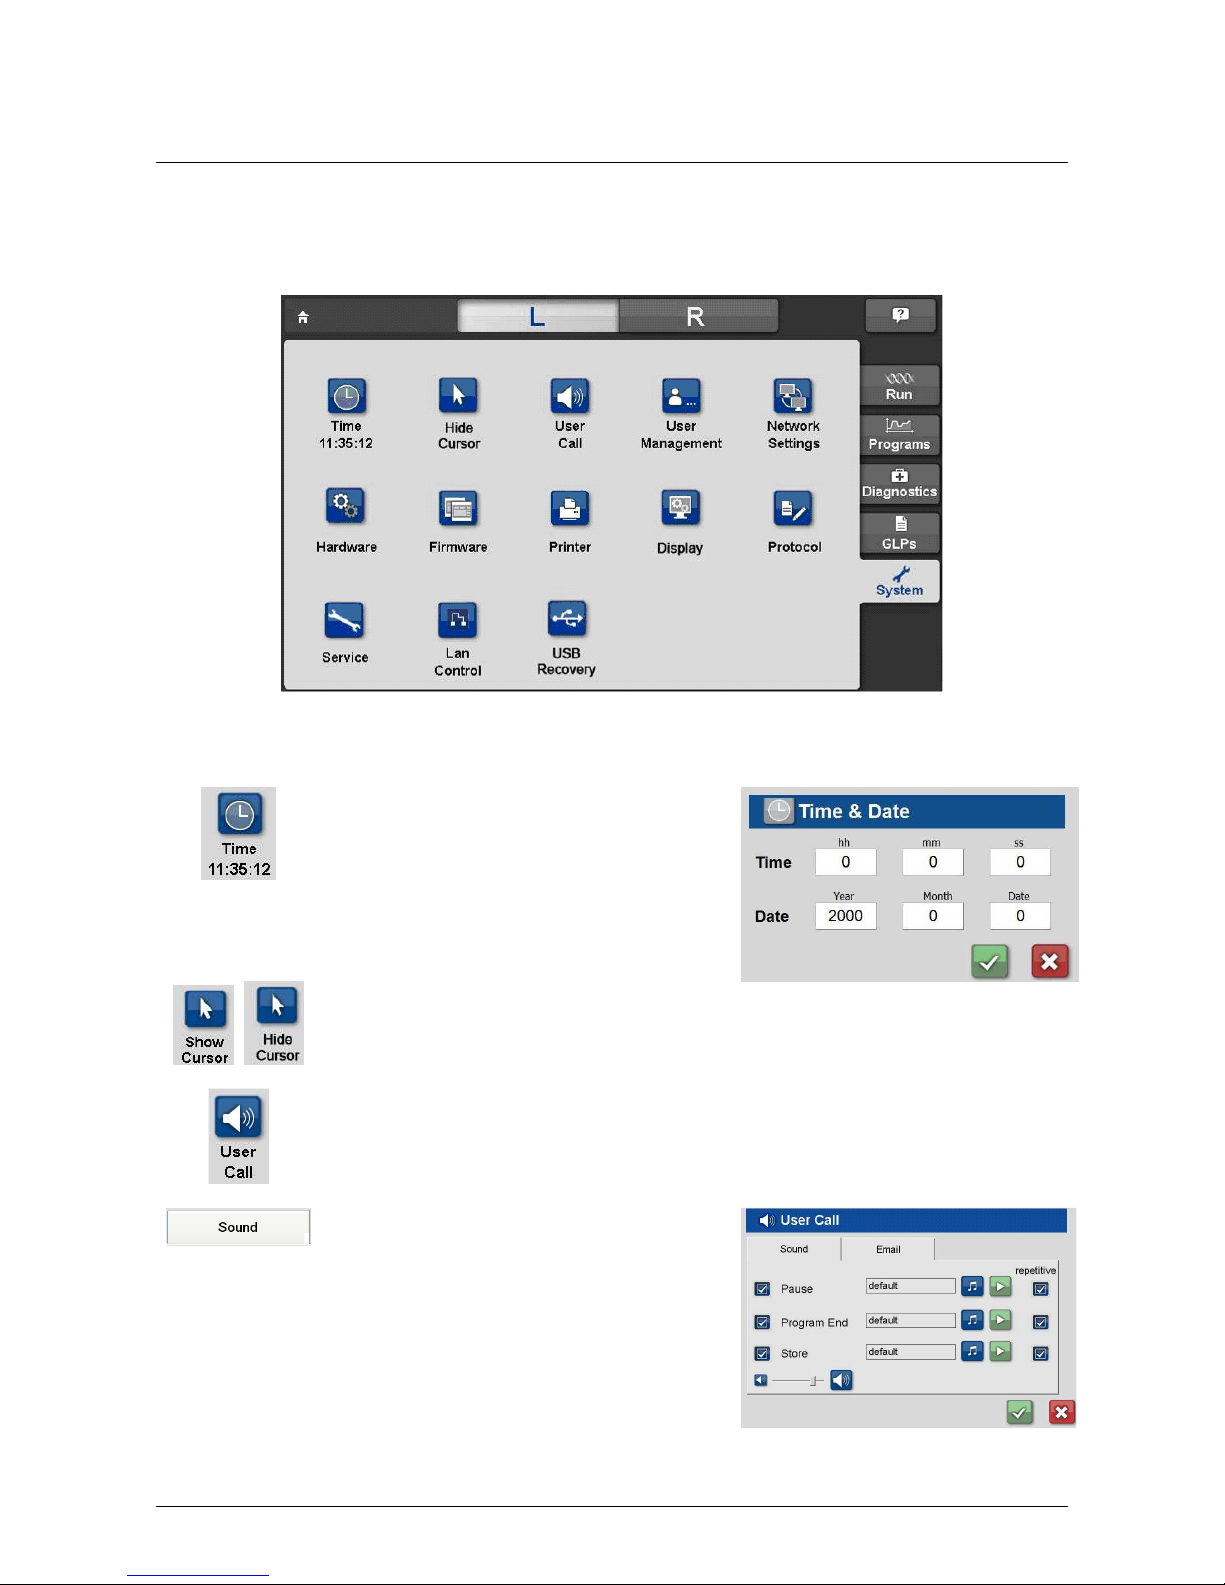
12 SYSTEM
In this dialogue the configuration and settings of general parameters of the device can be carried out.
Elements of the 'System' dialogue: Overview
Having selected one of the symbols the function is called up and the corresponding settings can be executed or
changed as explained in the following dialogue.
12.1 Time / Date
Setting of actual time and date:
By pushing the clock button, the adjoining window
appears and time and date can be set.
12.2 Show/Hide mouse cursor
Use the button to show or hide the cursor on the screen.
12.3 User Call
Using this button different user calls can be set.
12.3.1 Sound
Selecting the tab 'Sound', the adjoining window
opens and the settings for sounds can be changed:
For activating the appropriate sound mark the
checkbox. It can be chosen between single
(standard setting) or repetitive signal in case of
occurrence of an event.
Instruction Manual peqSTAR X thermal cyclers
PEQLAB_v1212E
27
12.3.1.1 Repetitive
When this checkbox is activated, the user call will be repeated periodically as long as the
event is open.
12.3.1.2 Sound intensity:
Set the desired sound intensity.
12.3.1.3 Select sounds
By pushing the button a selection window will appear. Different MP3 sounds can be
chosen and stored for the events 'Pause', 'Store' and 'Program End'.
12.3.1.4 Play melody
The selected sound can be listened to when pushing this button.
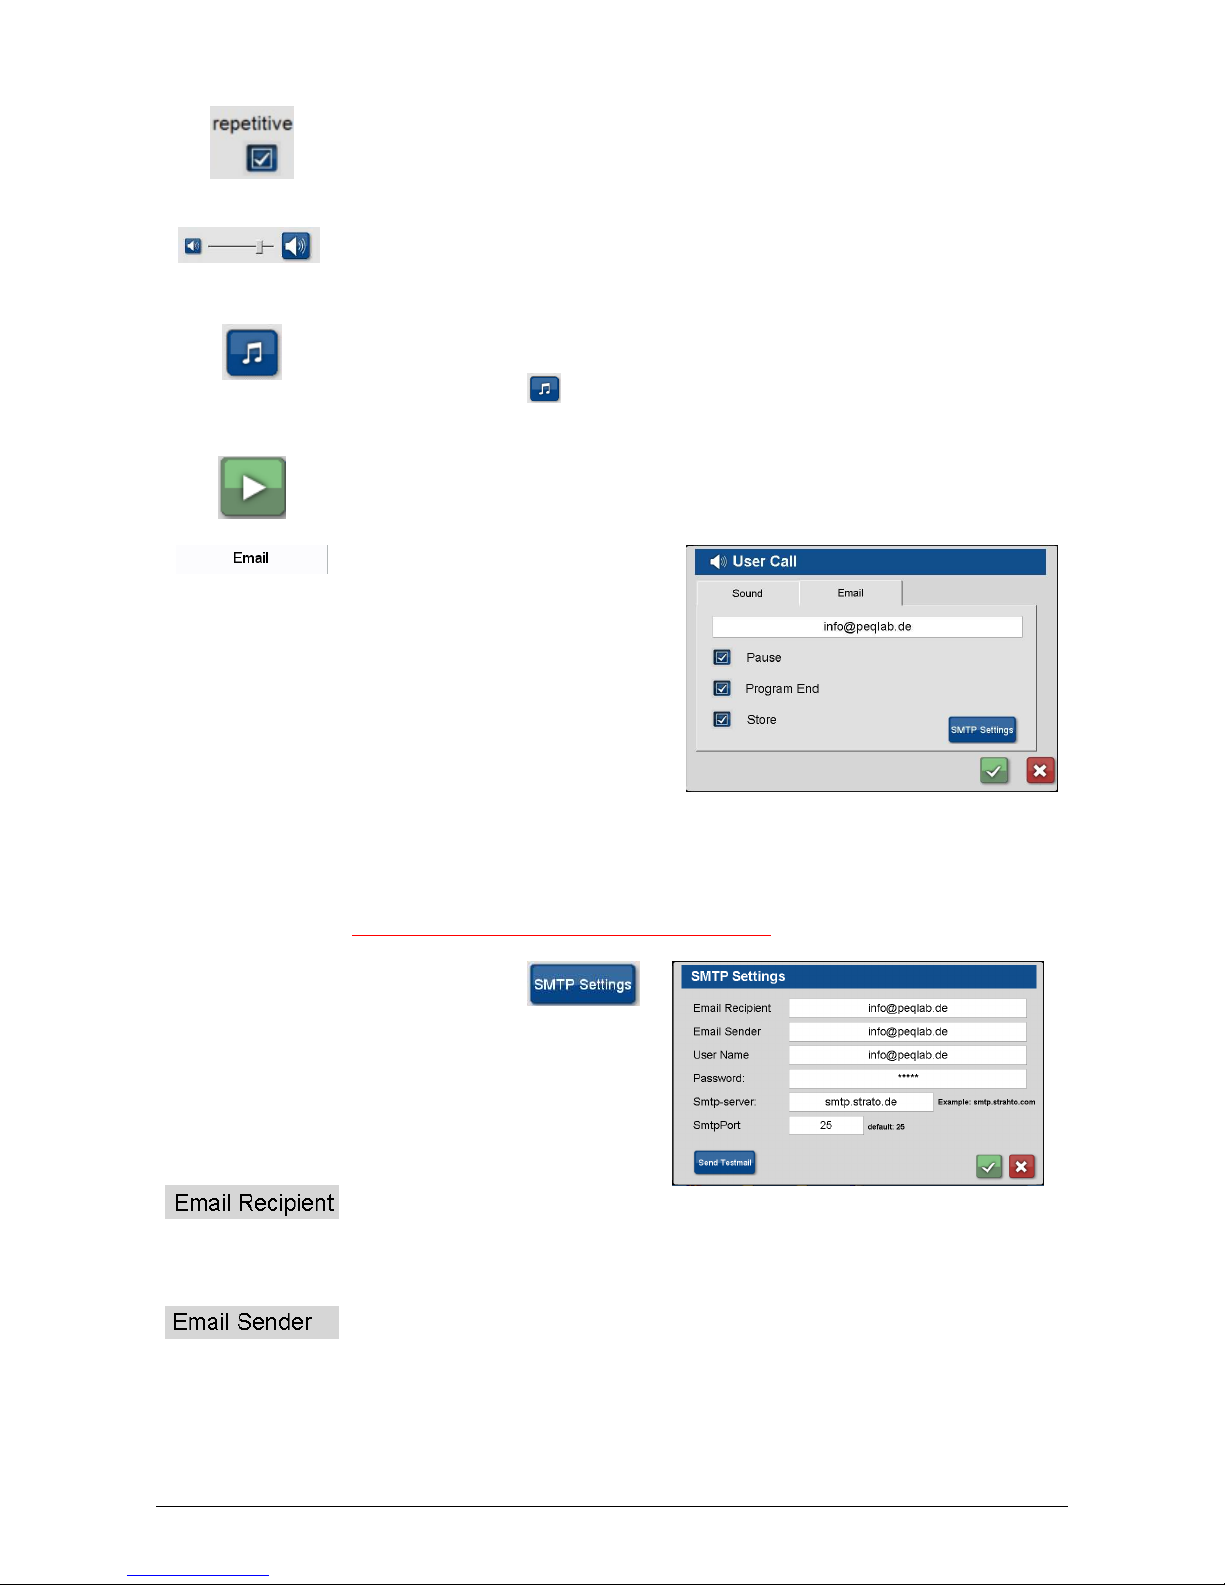
12.3.2 Email
By selecting the tab 'Email' the
adjoining window appears. When
activating a checkbox the cycler will
send an Email in case of occurrence of
the corresponding event.
Note: The peqSTAR X needs to be installed in a network with access to the internet so that
it can send an email to the user when needed. Please check settings under System →
Network, as for example the entry of the DNS Server is necessary for sending emails.
Please ask the administrator for the required settings.
Please ask the administrator for the required settings.Please ask the administrator for the required settings.
Please ask the administrator for the required settings.
By pushing the button
the settings could be entered.
12.3.2.1 Email Recipient:
Please enter the email address where the info should be sent to from the cycler in case of
occurrence of an event.
12.3.2.2 Email Sender:
Here you could enter the name of the email sender, e.g. the cycler name or the same email
address as for ‘Email Recipient’:

Instruction Manual peqSTAR X thermal cyclers
PEQLAB_v1212E
28
12.3.2.3 User name
Please enter the user name of the used email account. Please note that you have to enter
the SMTP settings here. In case you have defined different user names for incoming and
outgoing mail server in your account settings, enter here the user name for the outgoing
mail server.
12.3.2.4 Password
Please enter the email password of the used email account. Please note that you have to
enter the SMTP settings here. In case you have defined different passwords for incoming
and outgoing mail server in your account settings, enter here the password for the
outgoing mail server.
12.3.2.5 SMTP-Server:
Please enter the outgoing mail server which should be used for sending the email.
12.3.2.6 SMTP Port:
Please enter the SMTP port which should be used for sending the email. Standard setting
for the port is 25.
12.3.2.7 Send Testmail:
By pushing this button a test mail is sent, to check whether the settings are correct and
emails could be send by the cycler.
In case the test mail could not be sent successfully, please ask your network administrator
for the required settings.
12.4 User Management
In the user accounts management, user groups or single users can be configured and their
settings e.g. right of access (reading programs, edit programs etc.) will be administered.
The users are assigned to given or predefined user groups which are assigned to rights of
access.
Important: the thermal cycler supports the assignment of rights of access to certain user
groups. This means that rights for the operation of functions are given or refused to certain
user groups. In the user administration, user groups are configured and equipped with
rights. Single users of those groups are limited to the appropriate rights.
Rights are not assigned to single users but user groups. Users of a certain user group
inherit the rights of the related group.
The name of a user appears in the program header of a program generated by the user as
well as in the GLP report of a program run by the user.
Instruction Manual peqSTAR X thermal cyclers
PEQLAB_v1212E
29
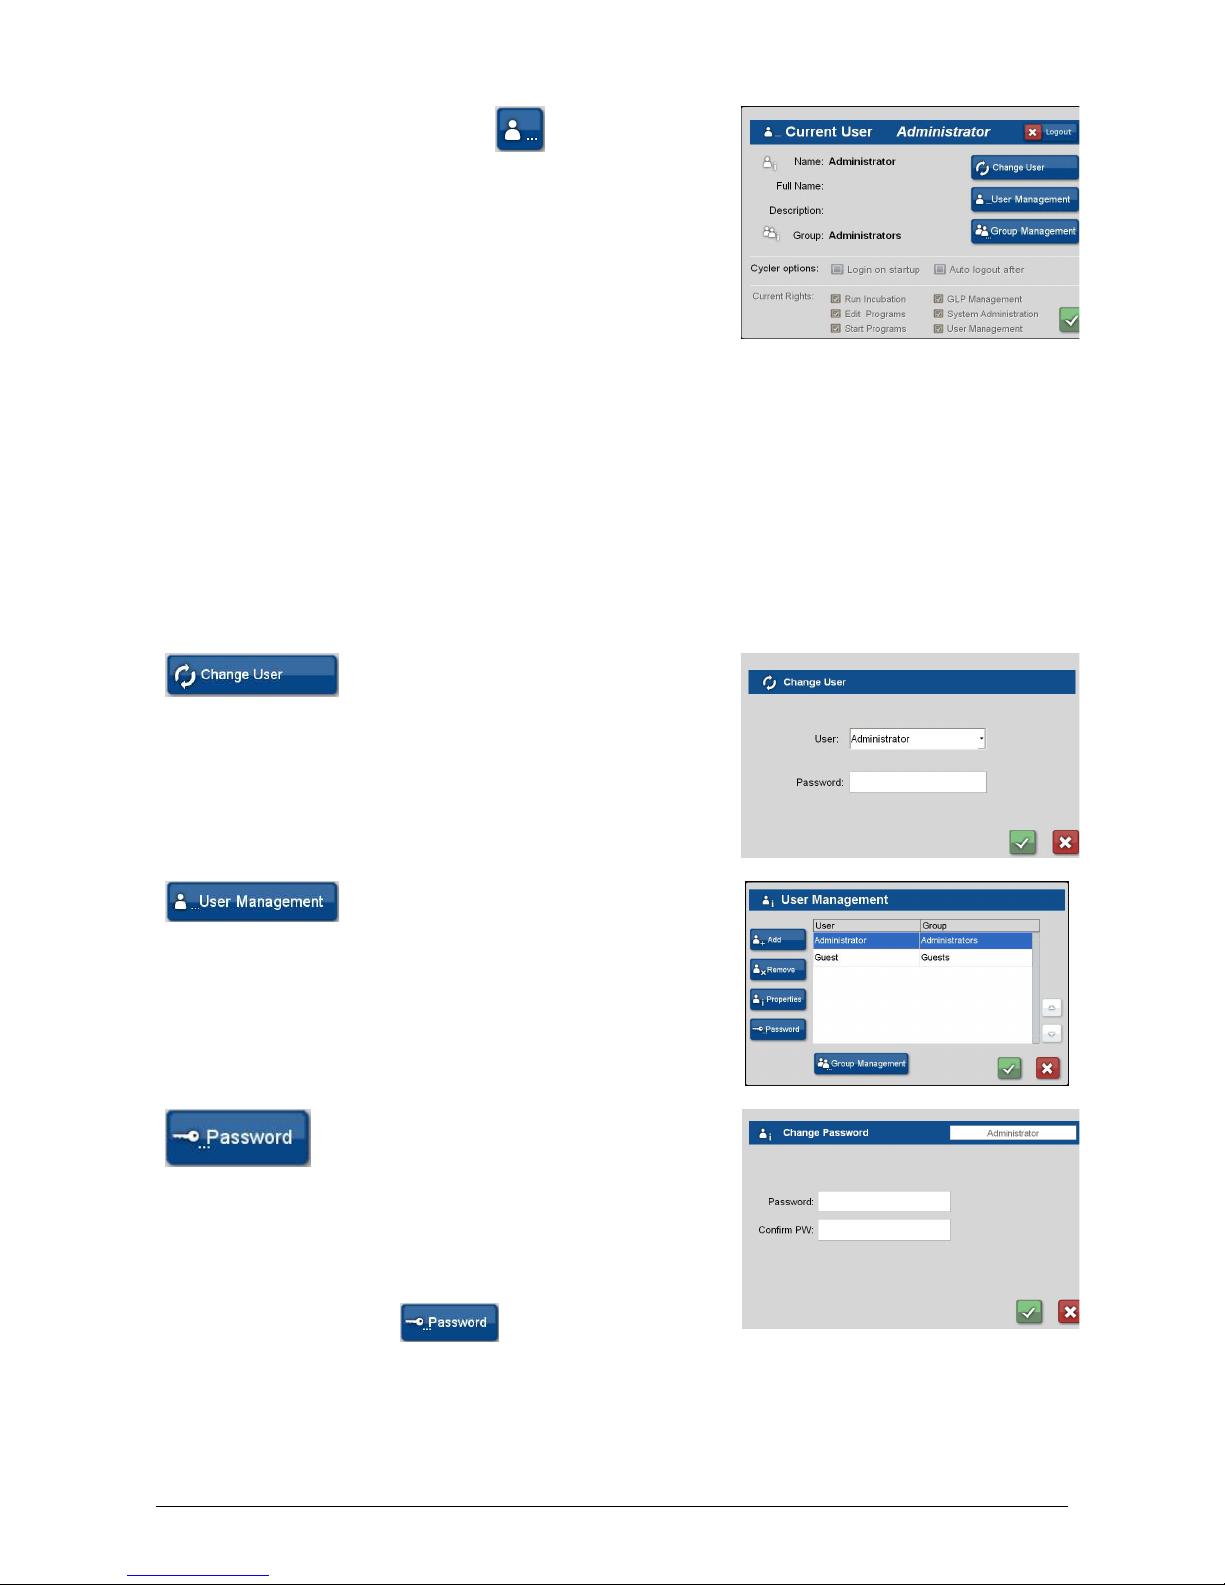
After pressing the button the adjoining
dialogue appears:
To call up the user administration the user has
to log in with his password. The user (in
general the administrator) must have the
appropriate right for the administration of
users. At the state of delivery (condition) an
'administrator' with the required access is
configured.
Using the 'Logout' button the current user can log out. The user 'Guest' is then
automatically logged in, who has only minimal rights as factory settings. The administrator
can change these settings (see 12.4.3.1 and 12.4.3.3).
At 'Cycler options' you could activate the function 'Login on startup' with the checkbox. Is
this option activated, when turning on the instrument, an obligatory Login request appears.
By using the checkbox 'Auto logout after' the user can define a time span when the logged
in user is automatically logged out.
Originally the password for the
Originally the password for theOriginally the password for the
Originally the password for the 'administrator' is admin.
'administrator' is admin. 'administrator' is admin.
'administrator' is admin.
12.4.1 Change User
Using this dialogue window, users can be
changed.
Please select the user and enter the appropriate
password.
Originally the password for the 'administrator'
is admin
adminadmin
admin.
12.4.2 User Management
The adjoining dialogue window appears. In
this dialogue single users can be added,
changed or deleted. Use the button 'Group
Management' to call up the administration of
groups.
12.4.2.1 Change Password
In case that any user forgot his password or
wants to change it, the administrator can
allocate a new password. This could also be
done by a user with the right for 'User
Management'. Select the user and allocate a
new password by pushing the
button .

Instruction Manual peqSTAR X thermal cyclers
PEQLAB_v1212E
30
12.4.2.2 Set up a new user and assign a
password
Use this button to set up a new user. The
adjoining dialogue window appears where
several data can be added.
Save the data with the button and the newly set up user is displayed in the user list
among the related user group.
Important:
Important: Important:
Important: If a new user should only have limited rights, it might be useful to set up a new
user group with the appropriate rights to access. (see chapter 12.4.3)
12.4.2.3 Administration of user groups
See chapter 12.4.3.
12.4.2.4 User Information
Use this button to get further information on the
user (user name, full name, description and
group membership).
12.4.2.5 Delete a user
Select a user and remove it with this button. For safety reasons a query appears if the user
should be removed for sure.
12.4.3 Setting up a new user group
12.4.3.1 Add a new user group
Using this button a new user group and its
description can be set up.
It is possible to allow/refuse access to certain
functions of the instrument.

Instruction Manual peqSTAR X thermal cyclers
PEQLAB_v1212E
31
List of available rights:
List of available rights:List of available rights:
List of available rights:
Run incubation Run incubation mode
Edit programs Edit programs
Start programs Start programs
GLP management Watch GLP reports
User management Administrate user and user groups
System administration Modify/administrate configurations
12.4.3.2 Delete a group
Select the group and delete it using this button.
For safety reasons a query appears if the group should be removed for sure.
12.4.3.3 Show and change group information
12.4.4 User logout
If a user logs out by using the button 'Logout' the user 'Guest' is automatically logged on.
The user 'Guest' initially does not have any rights. This is to make sure that a new user,
who wants to work with the peqSTAR X, must log in first. The Administrator or other users
with the right 'User Management' can assign more rights to the user 'Guest' if required
(see 12.4.3.1).

Instruction Manual peqSTAR X thermal cyclers
PEQLAB_v1212E
32
12.5 Network Settings
Using this button, network settings can be changed.
At the tab the adjoining
dialogue appears and the required
settings for network integration can be
entered.
Please ask your network administrator for
the required settings.
At the tab the adjoining
dialogue appears:
The entered cycler name appears when
using the email user call in the sent mail
notification.
At the tab the adjoining
dialogue appears and the required
settings for access to a released network
device can be entered.
Username: to log on the network
Password: to log on the network
Network path: which is available for
the user as additional
path for cycler pro grams and GLP reports
after the successful
network connection.
This path is assembled of:
//<IP address, where release network path is located>/<directorypath>
Please note that there need to be the corresponding access authorities (write and read
access) for the indicated path.
Please ask the administrator for the required settings.
At the tab the adjoining
dialogue appears:
By activating the checkbox ‘always
accept remote control’, it is not necessary
any more to confirm cycler access when
performing PC or master/slave control.

Instruction Manual peqSTAR X thermal cyclers
PEQLAB_v1212E
33
12.6 Hardware
Shows actual version of thermal block,
control and power unit.
Changes can only be made by authorized
technical service.
12.6.1 Overtemp test
At Hardware => Thermo Block =>
Overtemp Test a periodical test (e.g. every
month) of the overtemperature protection
can be found according to the following
procedure:
First the result of the last check of the
overtemperature protection is reported. To
continue with the test, confirm the dialogue
with ‘Yes’. Initialization and
overtemperature test is done automatically
for both blocks at the peqSTAR 2X.
Press OK after the test has finished.
If one or both results are not “OK”, the
overtemperature protection is damaged. In
In In
In
this case, the therm
this case, the thermthis case, the therm
this case, the thermal
al al
al cycler must not
cycler must notcycler must not
cycler must not be
be be
be
used anymore and must be sent back to the
used anymore and must be sent back to the used anymore and must be sent back to the
used anymore and must be sent back to the
manufacturer for a check.
manufacturer for a check.manufacturer for a check.
manufacturer for a check. (see chapter
13.1).
12.7 Firmware
12.7.1 Control Unit
Display and administration of the
firmware versions of the control unit with
the adjoining dialogue.
12.7.1.1 Info Button
Shows the current version of the control unit firmware.
Instruction Manual peqSTAR X thermal cyclers
PEQLAB_v1212E
34
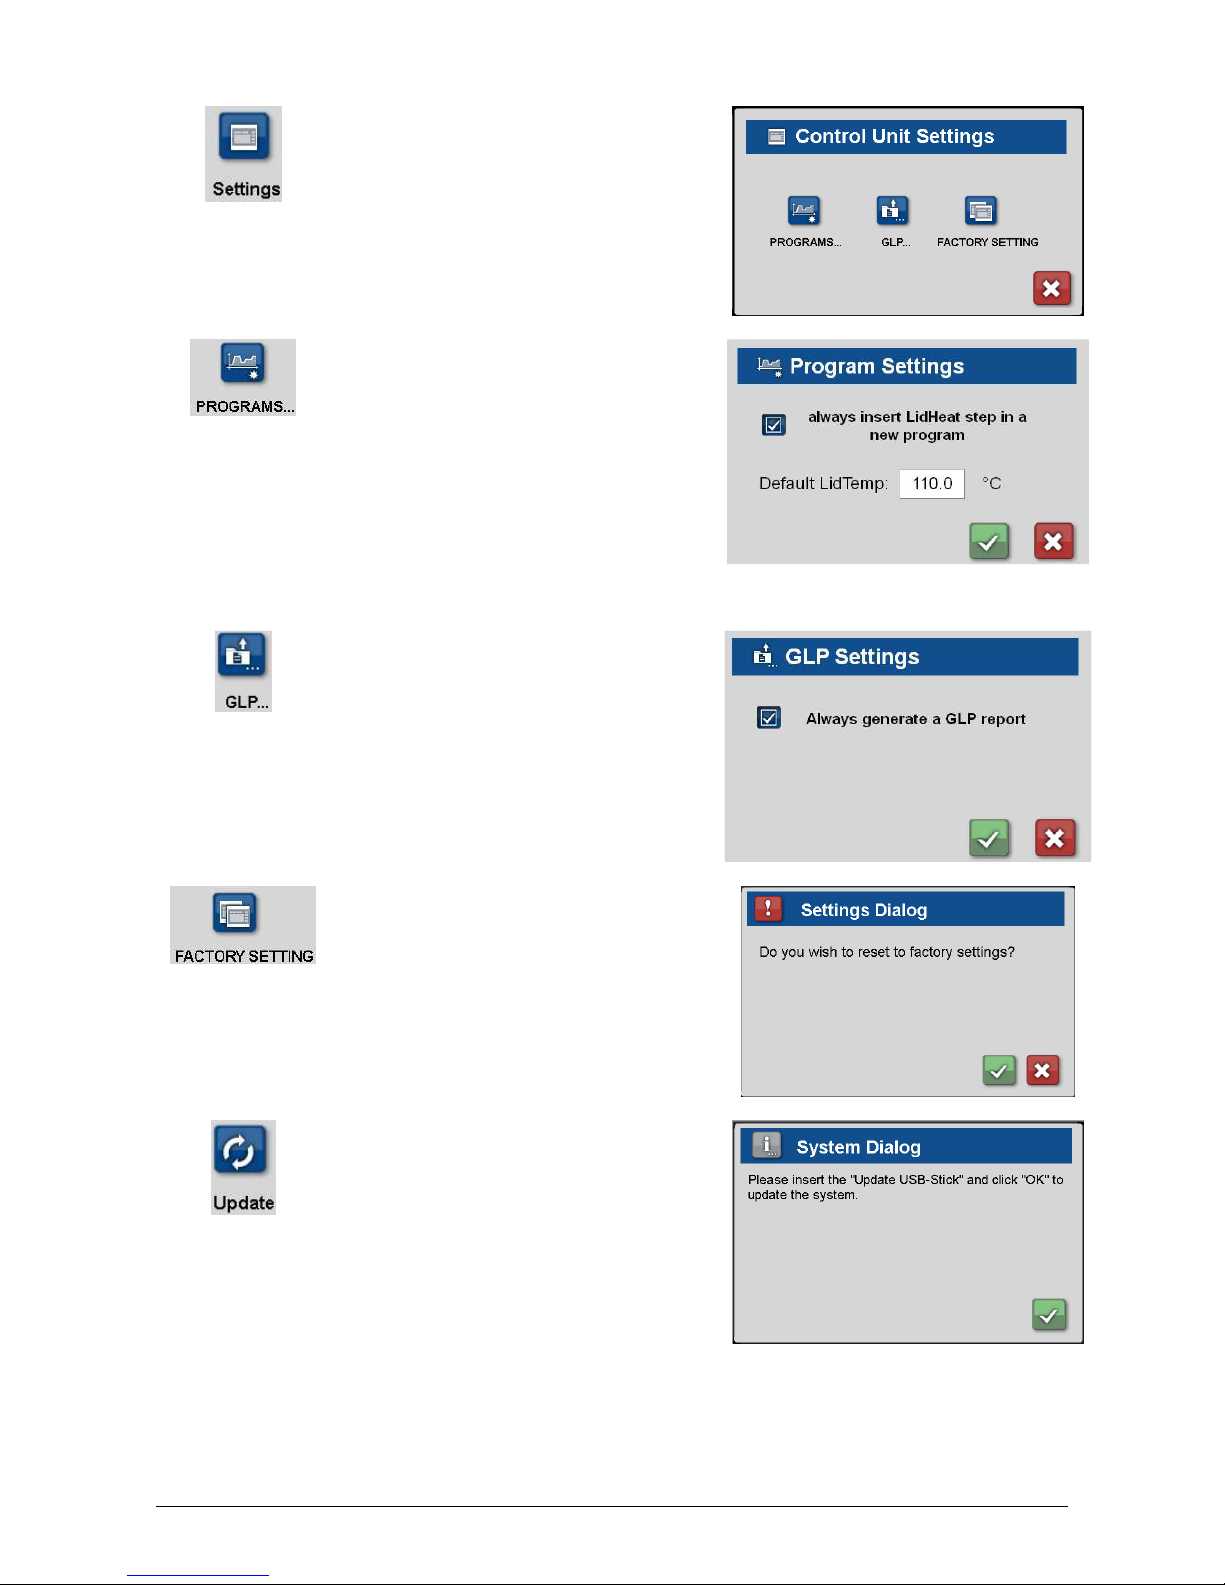
12.7.1.2 Settings
Pushing this button the adjoining dialogue
appears. The following menu items are
available: 'Programs…', 'GLP…' and
'Factory Settings'.
12.7.1.2.1 Programs Settings
Setting a check mark in this box, a 'Lid Heat'
step will be automatically inserted as first
step when generating a new program. In the
field next to 'Default LidTemp' the
temperature can be entered which shall
appear as preset value within the insertion
dialogue of a new temperature step. This
value can be changed manually in the PCR
program.
12.7.1.2.2 GLP Settings
Setting a check mark in this box, a GLP
report will be created after every run after
the query. If the box is not marked, no GLP
report will be created. No according query
will appear.
12.7.1.2.3 Factory Setting
The configurations set under Firmware >
Control Unit >Settings can be changed to the
factory settings.
12.7.1.3 Update
Updates the firmware of the control unit. The
firmware must be available on a USB
memory stick connected to the device.
Next it will be asked whether the software of control unit should be updated. If you confirm with
'Yes' the update starts.

Instruction Manual peqSTAR X thermal cyclers
PEQLAB_v1212E
35
Important:
Important:Important:
Important:
The USB memory stick may not be removed during update proces
The USB memory stick may not be removed during update procesThe USB memory stick may not be removed during update proces
The USB memory stick may not be removed during update process!
s!s!
s!
After a successful update the display shows the corresponding message and the software starts
again. The USB memory stick can be removed then.
12.7.2 Power Unit
Display and administration of the firmware
version of the power unit. The adjoining
dialogue appears.
12.7.2.1 Info
Shows the current version of the power unit firmware.
12.7.2.2 Update
Updates the firmware of the power unit.
The firmware must be available on a USB
memory stick connected to the device.
Next it will be asked whether the software of power unit should be updated. If you confirm with
'yes' the update starts.
Important:
Important:Important:
Important:
The USB memory stick may not be removed during the update process!
The USB memory stick may not be removed during the update process!The USB memory stick may not be removed during the update process!
The USB memory stick may not be removed during the update process!
After a successful update the display shows the corresponding message and the USB memory
stick can be removed then. After the successful update the instrument has to be switched off and
on again.
12.8 Print
The peqSTAR X thermal cyclers can print
PCR programs and GLPs on a network
printer. Using this dialogue, the path for
the network printer, which the peqSTAR X
should use, can be entered.
Please refer to your local network administrator for the correct printer path.
Using the button a test printing will be performed to check the correct settings.
Instruction Manual peqSTAR X thermal cyclers
PEQLAB_v1212E
36
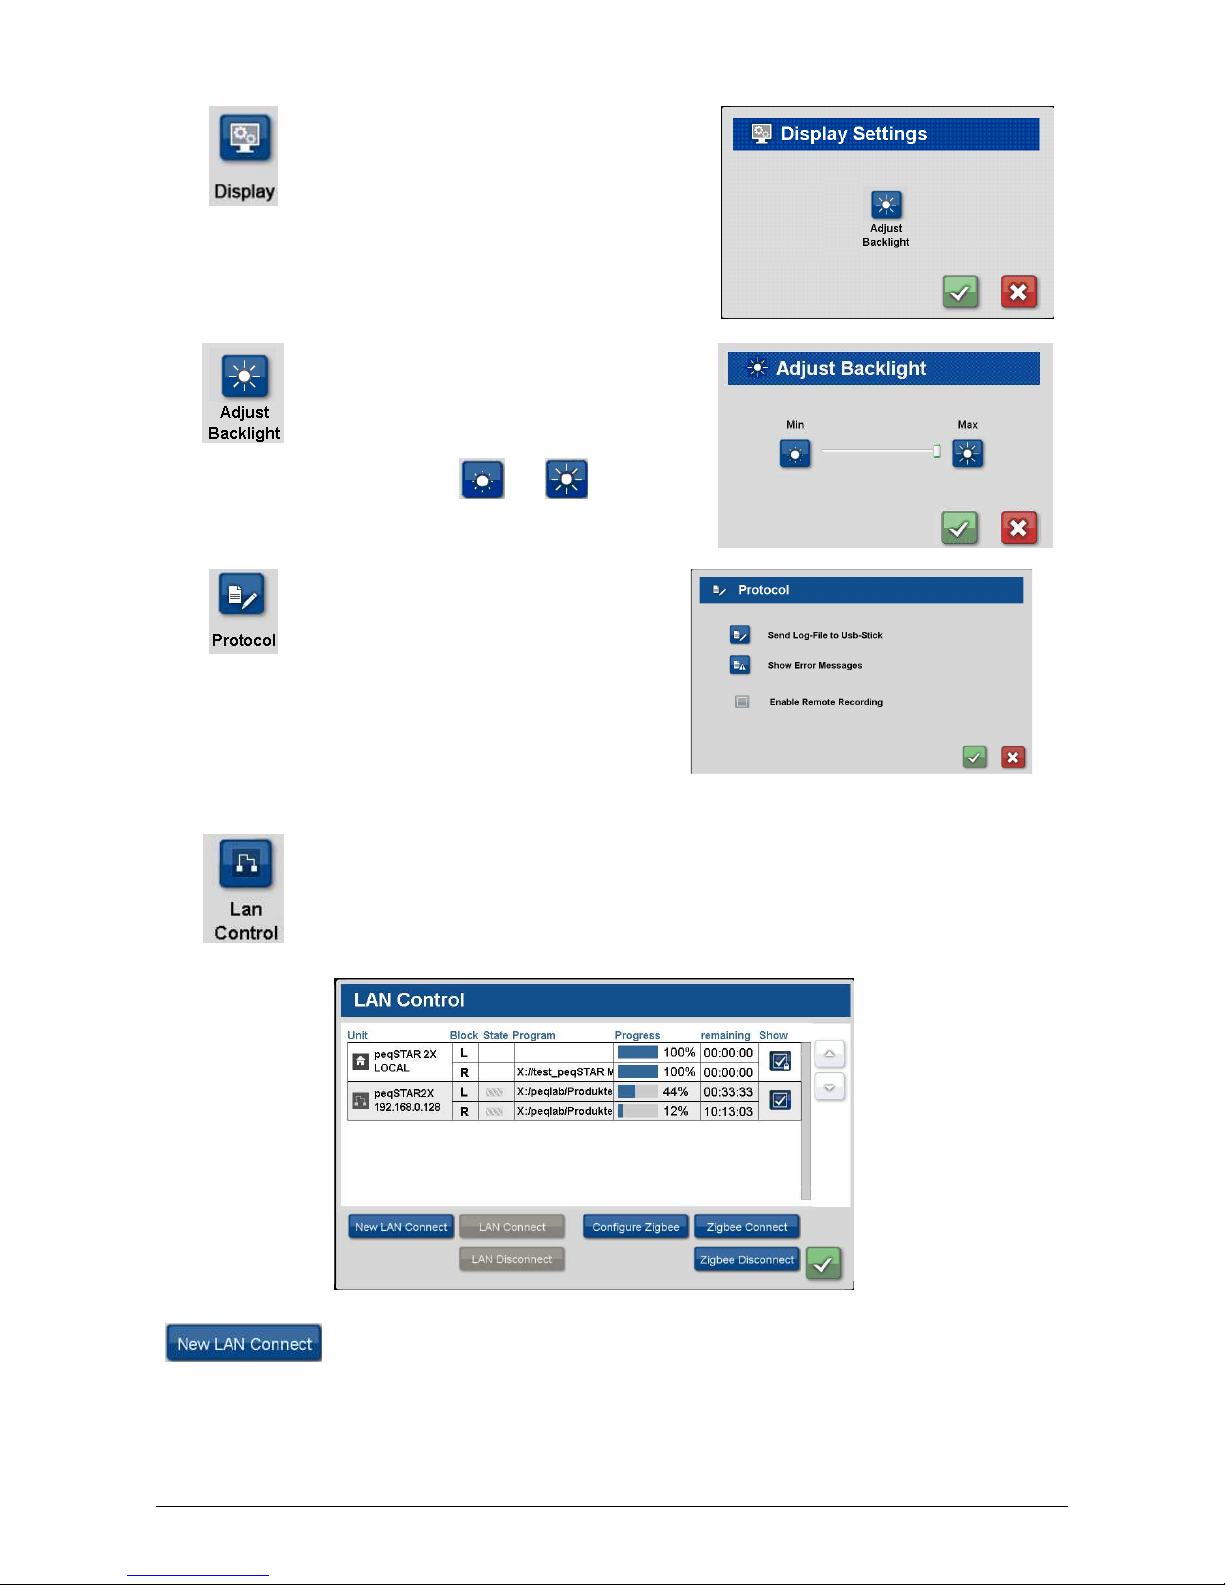
12.9 Display
Pushing this button, the adjoining window
opens:
12.9.1 Brightness
The following dialogue appears after
pressing the button:
By pressing the and buttons or
moving the roll bar the backlight of the
display can be adjusted.
12.10 Protocol
For troubleshooting, the thermal cycler can
record its own internal communication. The
protocol file „log.txt“ can be stored on a
USB stick. By using the button 'Send LogFile to Usb-Stick' the protocol file 'log.txt'
can be saved on a USB stick. Alternatively
possible error messages can be shown by
pressing the button 'Show Error Messages'.
12.11 LAN Control
This dialogue is used to connect with a thermal cycler via network or zigbee, to be able to
remote control the instrument.
When instruments should be available using the instrument button at the top of the display,
the checkbox under 'Show' needs to be activated.
The following command buttons are available:
12.11.1 New Lan Connect
Using this button a LAN connection to a new cycler for remote control can be set up. Enter the
IP address of the cycler, which should be available for remote control, in the input box.
The following message appears, when the connection starts:

Instruction Manual peqSTAR X thermal cyclers
PEQLAB_v1212E
37
'The connection to
'The connection to 'The connection to
'The connection to
IP Address Remote Cycler
IP Address Remote CyclerIP Address Remote Cycler
IP Address Remote Cycler
will be done as so
will be done as so will be done as so
will be done as soon as the o
on as the oon as the o
on as the other part confirms
ther part confirms ther part confirms
ther part confirms
the request.
the request.the request.
the request.''''
The cycler which should be available for remote control shows the following message:
'Do you want to accept connection to
'Do you want to accept connection to 'Do you want to accept connection to
'Do you want to accept connection to
IP Address Control Unit
IP Address Control UnitIP Address Control Unit
IP Address Control Unit
?'
?' ?'
?'
If this message will be confirmed with 'Yes' and the remote control accepted, the display of the
control unit shows the following message then:
'User from
'User from 'User from
'User from
IP Address Remote Cycler
IP Address Remote CyclerIP Address Remote Cycler
IP Address Remote Cycler
has accepted LAN remote.'
has accepted LAN remote.' has accepted LAN remote.'
has accepted LAN remote.'
If a check mark is set at 'Always accept remote control' under 'System' => 'Network Settings'
=> 'Remote' the link connection is carried out without any further queries.
The cycler will then be entered in the display overview and is marked with the LAN sign ,
which confirms the active LAN connection.
When the instrument should be available using the instrument buttons at the top of the display,
the checkbox under „Show“ needs to be activated.
As soon as the cycler is displayed, it can be remote controlled by the control unit.
12.11.2 Lan Connect
As soon as a cycler was once remote
controlled via LAN connection, it will be
displayed in the LAN control window (in our
example: peqSTAR 2X 192.168.0.121) and
marked as non connected.
For a new LAN connection with this cycler,
mark it in the overview and use the button
'LAN Connect' to start a new connection.
12.11.3 Lan Disconnect
For disconnect a LAN connection with a cycler, mark the chosen unit in the overview and use
the button 'LAN Disconnect'. The cylcer could then be controlled again via touch screen.
Alternatively the LAN connection will be stopped when the cycler will be switched off or in
case that the software at the PC will be closed.
12.11.4 Zigbee Configure
The optional available ZigBee module is needed for wireless remote control (order number:
95-0ZIG). It consists of one module which is installed in the remote cycler and a ZigBee dongle
for the PC as control unit.
To start a connection between the remote cycler and the PC as control unit, both ZigBee
modules need to be configured.
At the PC:
At the PC:At the PC:
At the PC:
The message 'ZigBee dongle detection' appears if the peqSTAR Manager' software is opened
while the ZigBee dongle is connected or will be connected subsequently. The message also
shows at which COM port the ZigBee dongle is installed at the PC.
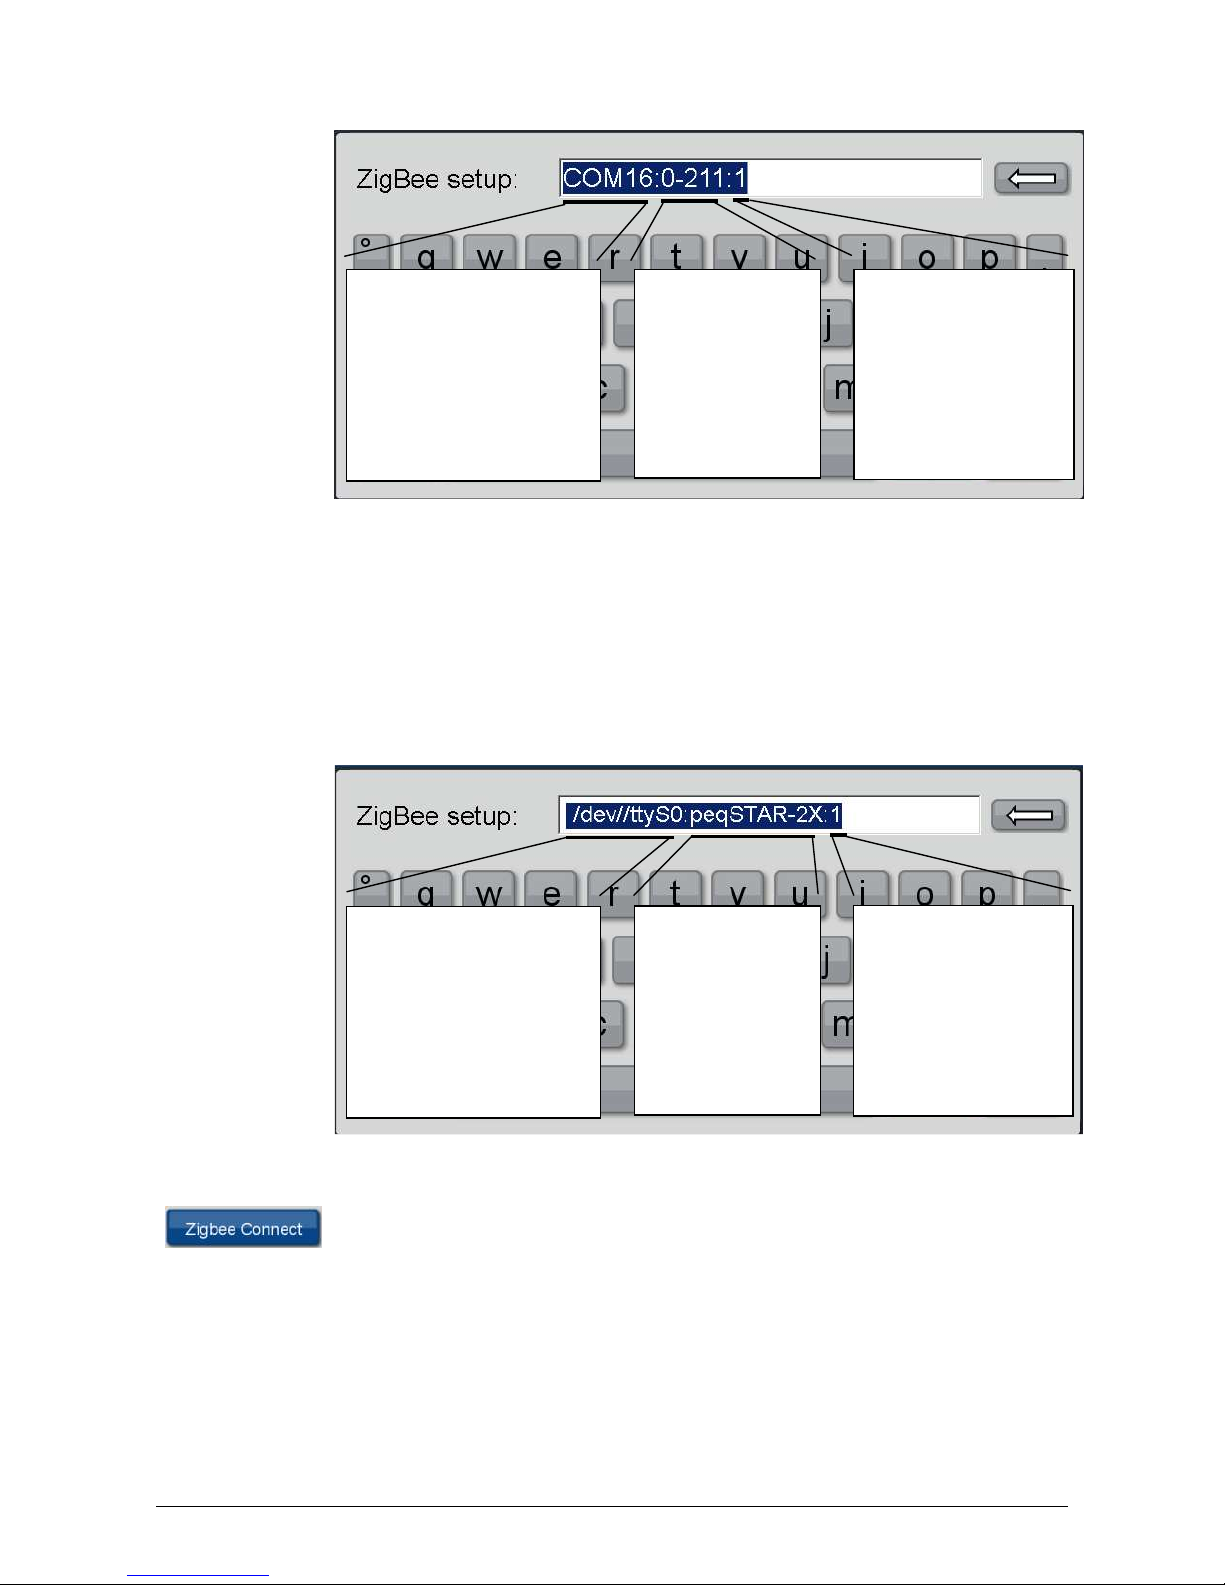
To configure the ZigBee dongle choose 'ZigBee Configure' at 'System' => 'LAN Control' in the
'peqSTAR Manager' software. A dialogue will appear with an automatic Setup window that
might/must be adapted accordingly.
Enter: COM#:PC name:Network level
Example: COM16:0-211:1
Instruction Manual peqSTAR X thermal cyclers
PEQLAB_v1212E
38
At the Remote Cycler:
At the Remote Cycler:At the Remote Cycler:
At the Remote Cycler:
To configure the ZigBee dongle choose 'ZigBee Configure' at 'System' => 'LAN Control' in the
'peqSTAR Manager' software. A dialogue will appear with an automatic Setup window that
might/must be adapted accordingly.
Enter: Interface:Cycler name:network level
Example: /dev/ttyS0:peqSTAR-2X:1
The adresses for PC and remote cycler need to be different.
The adresses for PC and remote cycler need to be different.The adresses for PC and remote cycler need to be different.
The adresses for PC and remote cycler need to be different.
12.11.5 Zigbee Connect
To start the wireless connection between PC and remote cycler, push the button 'ZigBee
Connect' at the PC.
Enter the name of the remote cylcer, e.g. 'peqSTAR-2X'.
If the connection is successful the following message appears:
'The connection to IP Address Remote Cycler will be done as soon as the other part confirms
the request.'
Then the following message appears on the system that shall be controlled:
'Do you want to accept connection to
IP Address Control Unit
?'
COM Interface
COM InterfaceCOM Interface
COM Interface
As COM number use the
COM port where the ZigBee
dongle was installed (this
can be checked in the
Device Manager if
necessary).
PC name,
PC name,PC name,
PC name,
that is shown at the
thermal cycler
(„ZigBee remote
control by
PC-
Name
“)
Network level
Network levelNetwork level
Network level
Default setting is '1' for
cycler and PC. Cycler
and PC must always be
configured at the same
network level.
Interface
InterfaceInterface
Interface
The cycler automatically
enters the interface of the
ZigBee module.
Cycler name,
Cycler name,Cycler name,
Cycler name,
that must be
entered at the PC to
connect the Remote
cycler.
Network level
Network levelNetwork level
Network level
Default setting is '1' for
cycler and PC. Cycler
and PC must always be
configured at the same
network level.
.

Instruction Manual peqSTAR X thermal cyclers
PEQLAB_v1212E
39
If this message is confirmed with 'Yes' and therefore the remote control authorized, the
following message appears on the control unit.
'User from IP Address Remote Cycler has accepted LAN remote.'
If a check mark is set at 'Always accept remote control' under 'System' => 'Network Settings'
=> 'Remote' the link connection is carried out without any further queries.
The cycler will then be displayed in the overview and is marked with the ZigBee sign ,
which shows the active wireless connection.
If the system shall be addressed directly through the buttons at the top of the screen, a check
mark must be set at 'Show'. As soon as the cycler is displayed, it can be controlled via
operating software as usual.
12.11.6 Zigbee Disconnect
To disconnect a ZigBee connection with a cycler, mark the chosen unit in the overview and use
the button 'Zigbee Disconnect'. The cylcer could then be controlled again via touch screen.
Alternatively the LAN connection will be stopped when the cycler will be switched off or in
case that the software at the PC will be closed.
12.12 USB Recovery
USB sticks are differently formatted by
manufacturers. The actual type of format
is not obvious to the customer. Therefore
some USB sticks are not automatically
detected by the peqSTAR X system. In
this case the USB stick can be manually
mounted by using the function 'USB
recovery'.
12.13 Service
Use of the service function is restricted to
authorised, technical service. Access to
this function is therefore password
protected.

Instruction Manual peqSTAR X thermal cyclers
PEQLAB_v1212E
40
13 MAINTENANCE & REPAIR OF THE THERMAL CYCLER
13.1 Cleaning, maintenance and repair of the thermal cycler
For safety reasons the device must be switched off and the mains plug pulled before cleaning is carried out!
For safety reasons the device must be switched off and the mains plug pulled before cleaning is carried out!For safety reasons the device must be switched off and the mains plug pulled before cleaning is carried out!
For safety reasons the device must be switched off and the mains plug pulled before cleaning is carried out!
The surface of the thermal cycler can be wiped off with a damp cloth or ethanol. Do not use aggressive or
Do not use aggressive or Do not use aggressive or
Do not use aggressive or
scouring cleaners or organic solvents for cleaning. The device must be protected from aggressive chemicals. Make
scouring cleaners or organic solvents for cleaning. The device must be protected from aggressive chemicals. Make scouring cleaners or organic solvents for cleaning. The device must be protected from aggressive chemicals. Make
scouring cleaners or organic solvents for cleaning. The device must be protected from aggressive chemicals. Make
sure that no liquid penetrates into the interior of the device.
sure that no liquid penetrates into the interior of the device. sure that no liquid penetrates into the interior of the device.
sure that no liquid penetrates into the interior of the device. If sample liquids penetrates into the drill holes of the
thermal cycler clean them immediately with mild soap followed by distilled water. You can use mild disinfectants
You can use mild disinfectants You can use mild disinfectants
You can use mild disinfectants
for decontamination.
for decontamination.for decontamination.
for decontamination.
Maintenance (test of the overtemperature shutdown and temperature check-up see 13.2. and 13.3) should be
carried out regularly to detect possible technical failures.
The electric fuses are placed at the back of the device between the power switch and the mains plug. After pulling
off the mains plugs and pushing upwards a safety catch the fuses can be changed. Use only fuses with correct
values (indications about the fuse type are placed at the back of the device).
The device may only be opened by a qualified specialist. Unauthorized work on the device voids the warranty. All
kinds of repairs may only be carried out by authorized persons using original replacement parts.
The replacement of single components of the device must not be done by the user but exclusively by authorized
specialists. Therefore the device must be sent to the manufacturer. The surface of the device should be
The surface of the device should be The surface of the device should be
The surface of the device should be
decontaminated with a lint free cloth soaked with 70 % ethanol before sending.
decontaminated with a lint free cloth soaked with 70 % ethanol before sending.decontaminated with a lint free cloth soaked with 70 % ethanol before sending.
decontaminated with a lint free cloth soaked with 70 % ethanol before sending. The drill holes of the thermoblock
shall be cleaned with a 1.5 % hypochlorite solution with the help of a cotton bud. Please fill in and sign the
Please fill in and sign the Please fill in and sign the
Please fill in and sign the
decontamination certificate and send it to the manufacturer together with the device.
decontamination certificate and send it to the manufacturer together with the device.decontamination certificate and send it to the manufacturer together with the device.
decontamination certificate and send it to the manufacturer together with the device.
13.2 Test of the overtemperature protection
A periodical test of the overtemperature protection is recommended (see chapter 12.6.1).
13.3 Temperature check-up
Maintenance of the temperature at regular intervals is recommended. The thermometer for use should be equipped
with wired sensing devices (e.g. Pt1000) and should have an accuracy of measurements of 1/10 class B (∆T =
±0.03 °C) in the range of 0 to 100 °C. While processing the temperature control the room temperature should be
25 °C at maximum.
13.4 Calibration
If there is a reasonable suspicion that the device has deviated from the calibration range, because the variations of
the temperature check-up are considerably out of the acceptable tolerance, a new calibration must be carried out
by the manufacturer. Please contact your local distributor.
14 WARRANTY
The period of warranty for the product at hand is 24 month from date of purchase. The warranty does not apply
for defects caused by incorrect, improper or inappropriate use. The customer has to check up on obvious defects
promptly upon receipt of the device and send a written report. Otherwise the claim for warranty expires. The
manufacturer reserves the right to carry out changes to the thermal cycler or to the technical documentation of the
thermal cycler on the basis of product development or improvement without prior notice.

Instruction Manual peqSTAR X thermal cyclers
PEQLAB_v1212E
41
15 DISPOSAL INSTRUCTION
This product is subject to the WEEE disposal regulations and cannot be disposed of with regular
waste.
Please contact PEQLAB Biotechnologie GmbH or your local distributor for disposal of peqSTAR
X thermal cyclers. Old electronic equipment is not useless waste. Environmentally friendly
disposal can help to retrieve valuable resources. Thereby you contribute to the protection of the
environment and human health.
16 TECHNICAL DATA
16.1 General characteristics
2 x 8 or 16 Peltier elements with Long-Life-technology and 2 x 8 or 16 control circuits with Pt 1000
temperature sensors, respectively
Maximal heating and cooling rate: 5 °C/s
Block uniformity (at 72 °C): ± 0.2 °C
Temperature range thermoblock: 4 to 105 °C
Control accuracy thermoblock: ± 0.1 °C
Variable ramping: 0.1 to 3.0 °C/s
Increment/Decrement time: 0:00:01 to 9:59:59
Increment/Decrement temperature: 0.1 to 9.9 °C
Lid heating temperature range: 40 to 120 °C
Programmable Lid locking mechanism
4 x USB, 1 x Ethernet interfaces (MS Windows
®
or Linux), maximal length of USB cords 3 m!
Note: USB interfaces only support standard USB sticks, cord mouse and keyboards!
Dimensions (B x H x D): 30 x 28 x 38 cm
Weight incl. block: 13.3 kg
Electrical power supply: 90 – 264 V AC, 50 – 60 Hz, 850 VA
Fuse: 10 A time lag
Pollution rate: 2
Environmental temperature range: +10 °C to +30 °C
Max. relative humidity: 70 %
Maximum height above sea level: 2000 m
For indoor use only!
Noise level: < 37 dB (A)
16.2 Gradient feature (optional)
Maximal gradient range over 8 or 16 columns, respectively: 30 °C (± 15 °C)
Temperature range Gradient: 35 to 105 °C
Gradient accuracy: ± 0.1 °C
16.3 User interface/functions
Touch sensitive TFT-Display (VGA, Graphic, 65535 colours), operation via USB mouse possible
Direct help function, Tm- and elongation time calculator
Internal flash memory for 500000 typical PCR programs in free configurable folders/subfolders
Unlimited number of programs via network PC or USB memory stick
Free PC software for the generation of PCR programs on the computer
Unlimited number of steps per program
Password protected user accounts with variable access rights
GLP reports for complete recording of all runs
Quickstart function of the last used program

Instruction Manual peqSTAR X thermal cyclers
PEQLAB_v1212E
42
Automatic restart after power failure, Power-Fail-Denaturation, Instant Incubation
Remote control and monitoring of instruments via PC-software
MP3 sounds free of choice
User call per email
Master-/Slave-control (optionally also wireless available)
16.4 Block capacity
peqSTAR 2X/2X Gradient:
Two 48 well Universal blocks with: lid heating and automatic height adaption for 48 x 0.2 ml tubes, 48 well PCR
plates or 24 x 0.5 ml tubes with flat caps.
peqSTAR 96X/96X Gradient:
96 well Universal block with: lid heating and automatic height adaption for 96 x 0.2 ml tubes, 96 well PCR plates
or 48 x 0.5 ml tubes with flat caps.
peqSTAR 96X HPL/96X HPL Gradient:
96 well block with High Pressure lid (HPL, 100 – 250 N) for the safe sealing of 96 well PCR plates
peqSTAR 384X HPL:
384 well block with High Pressure lid (HPL, 100 – 250 N) for the safe sealing of 384 Well PCR plates
peqSTAR In situ X:
In situ block with integrated buffer reservoir, for up to 4 microscope slides

D PEQLAB Biotechnologie GmbH, 91052 Erlangen, Freecall (D): 0800 100 20 16, info@peqlab.de, www.peqlab.de
AT PEQLAB Biotechnologie GmbH, 6404 Polling, Tel: +43 (0) 5238 84 169, info@peqlab.at, www.peqlab.at
UK PEQLAB Ltd., Southampton SO31 7ZN, Freephone (UK): 0808 202 1302, info@peqlab.co.uk, www.peqlab.co.uk
USA PEQLAB LLC, Wilmington, DE 19810, Toll-Free (US): 877 737 5220, info@peqlab.us, www.peqlab.us
Creating the future together
. Creating the future together
.
 Loading...