

Page 1

FACTORY AUTOMATION
MANUAL
WRM-F301-IO-B15-2V15
SmartBridge Interface
Page 2

WRM-F301-IO-B15-2V15
With regard to the supply of products, the current issue of the following document is ap-
plicable: The General Terms of Delivery for Products and Services of the Electrical Indus-
try, published by the Central Association of the Electrical Industry (Zentralverband
Elektrotechnik und Elektroindustrie (ZVEI) e.V.) in its most recent version as well as the
supplementary clause: "Expanded reservation of proprietorship"
Page 3

WRM-F301-IO-B15-2V15
1 Introduction................................................................................. 4
1.1 Content of this Document ................................................................... 4
1.2 Target Group, Personnel...................................................................... 4
1.3 Symbols Used ...................................................................................... 5
2 Product Description ................................................................... 6
2.1 Use and Application............................................................................. 6
2.2 Application Types and Benefits .......................................................... 7
2.3 The Function of the SmartBridge Interface ....................................... 7
2.4 The Function and Structure of the SmartBridge App ....................... 9
2.5 LED Indicators and Operating Elements ......................................... 15
2.6 Interfaces and Connections.............................................................. 16
2.7 Delivery Scope and Accessories...................................................... 17
3 Installation................................................................................. 18
3.1 Installing the SmartBridge Interface ................................................ 18
3.2 Installing the SmartBridge App ........................................................ 19
3.3 Data Logging—Preparation and Activation ..................................... 20
4 Commissioning......................................................................... 22
4.1 Commissioning the SmartBridge® System..................................... 22
3
Page 4

WRM-F301-IO-B15-2V15
Introduction
1 Introduction
1.1 Content of this Document
This document contains information required to use the product in the relevant phases of the
product life cycle. This may include information on the following:
■
Product identification
■
Delivery, transport, and storage
■
Mounting and installation
■
Commissioning and operation
■
Maintenance and repair
■
Troubleshooting
■
Dism ounting
■
Disposal
Note!
For full information on the product, refer to the further documentation on the Internet at
www.pepperl-fuchs.com.
The documentation comprises the following parts:
■
This document
■
Datasheet
In addition, the documentation may comprise the following parts, if applicable:
■
EU-type examination certificate
■
EU declaration of conformity
■
Attestation of conformity
■
Certificates
■
Control drawings
■
Instruction manual
■
Other documents
1.2 Target Group, Personnel
Responsibility for planning, assembly, commissioning, operation, maintenance, and
dismounting lies with the plant operator.
Only appropriately trained and qualified personnel may carry out mounting, installation,
commissioning, operation, maintenance, and dismounting of the product. The personnel must
have read and understood the instruction manual and the further documentation.
Prior to using the produ ct make yourself familiar with it. Read the document carefully.
2019-04
4
Page 5
WRM-F301-IO-B15-2V15
Introduction
1.3 Symbols Used
This document contains symbols for the identification of warning messages and of informative
messages.
Warning Messages
You will find warning messages, whenever dangers may arise from your actions. It is mandatory
that you observe these warning messages for your personal safety and in order to avoid
property damage.
Depending on the risk level, the warning messages are displayed in descending order as
follows:
Danger!
This symbol indicates an imminent danger.
Non-observance will result in personal injury or death.
Warning!
This symbol indicates a possible fault or danger.
Non-observance may cause personal injury or serious property dam age.
Caution!
This symbol indicates a possible fault.
Non-observance could interrupt the device and any connected systems and plants, or result in
their complete failure.
Informative Symbols
Note!
This symbol brings important information to your attention.
Action
This symbol indicates a paragraph with instructions. You are prompted to perform an action or
a sequence of actions.
2019-04
5
Page 6
WRM-F301-IO-B15-2V15
Bluetooth
1
2
3
4
Product Description
2 Product Description
2.1 Use and Application
Intended Use
The SmartBridge interface is mainly used to quickly and conveniently capture information on
individual IO-Link devices via the IO-Link protocol, parameterize these devices, or detect their
operating states. This is possible in the machine control without complicated program ming or
implementations. From the perspective of the machine control, this data is accessed
completely without reaction. The SmartBridge interface can be used as both an active (master
mode) and a passive communication interface (monitor mode).
SmartBridge® System
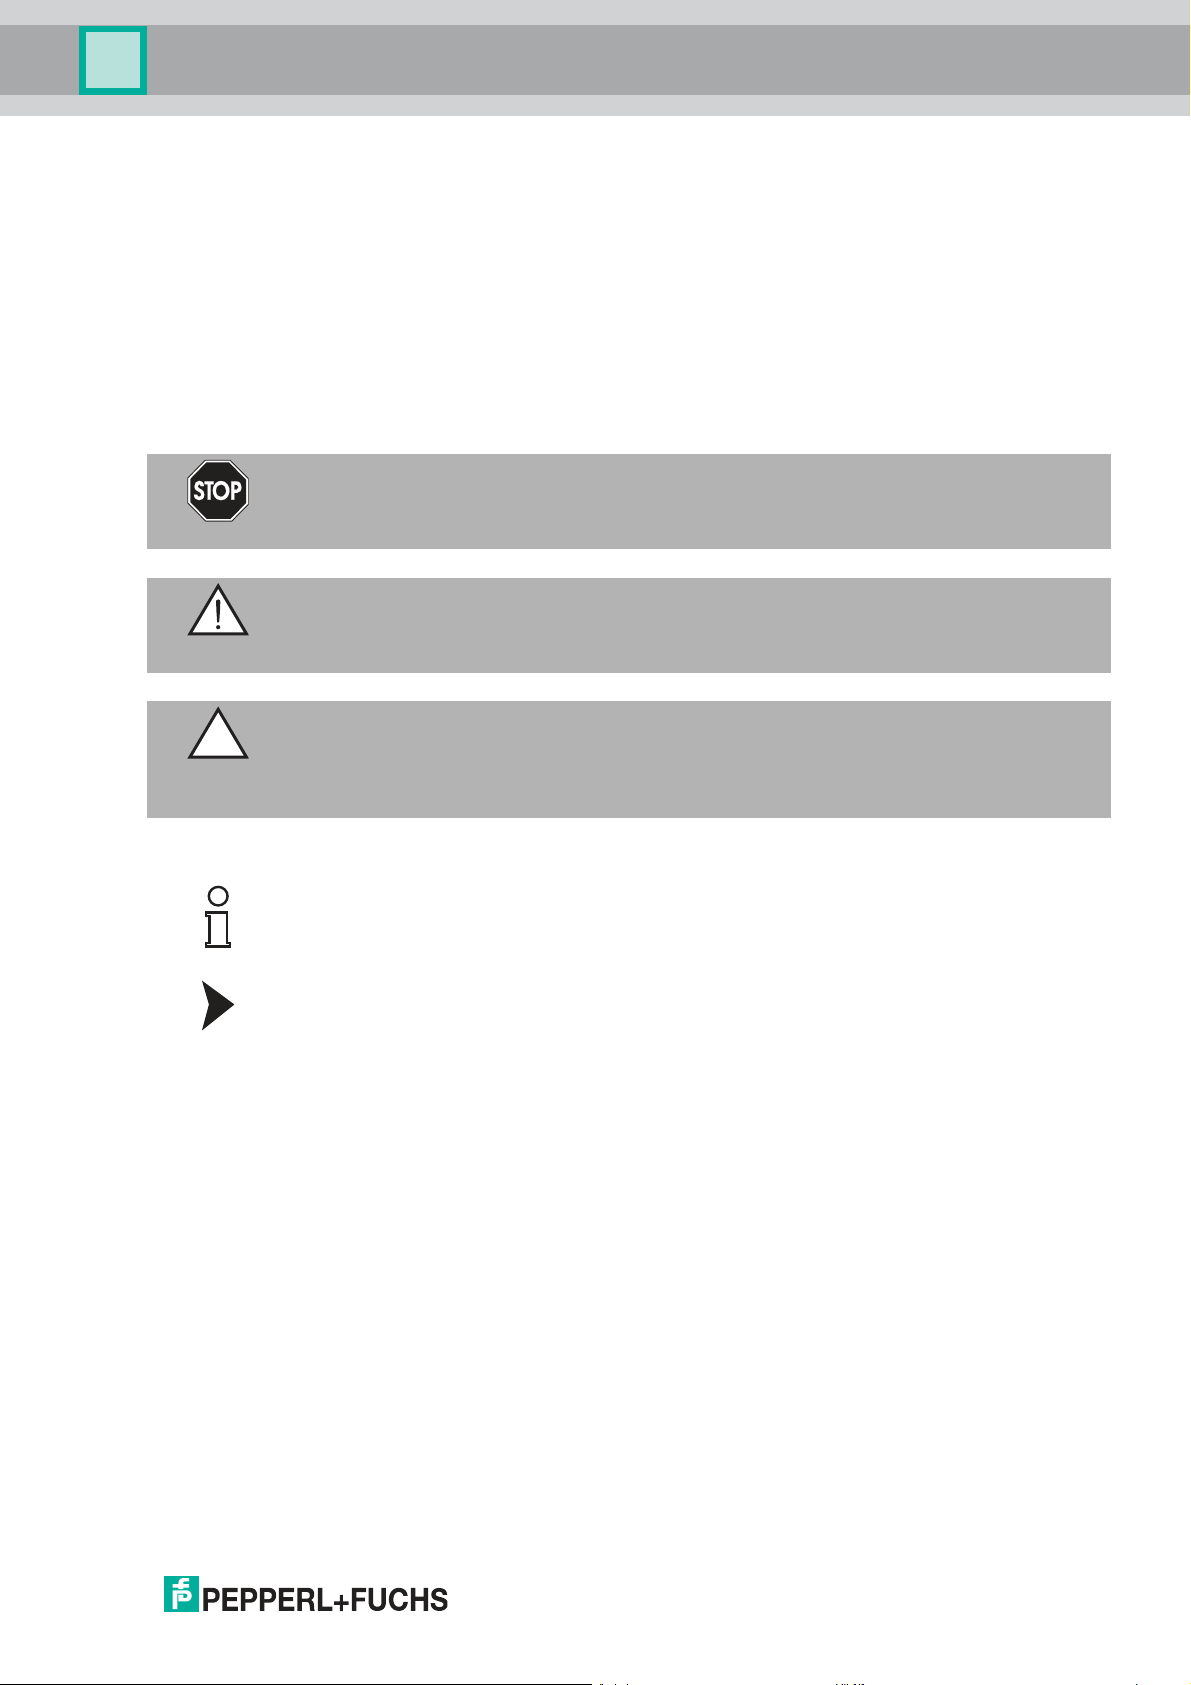
The SmartBridge® system involves accessing sensor and actuator data in the field level of
automation technology on the basis of the IO-Link protocol. It serves as a simple operating and
display system for IO-Link devices (sensors and actuators), in which the data is read using the
SmartBridge interface and visualized in the SmartBridge app.
The SmartBridge system consists of the SmartBridge interface (hardware) and the
SmartBridge app (software) for mobile devices. The SmartBridge interface is placed between
an IO-Link-capable industrial sensor or actuator (IO-Link device) and the machine control unit
(PLC) in the connection line. The SmartBridge interface taps the IO-Link signal and transfers it
to a tablet or sm artphone via Bluetooth. The installed SmartBridge app visualizes the device
data.
Figure 2.1
1 Ultrasonic sensor UC500
2 SmartBridge interface
3 Machine control, e.g., PLC
4 Mobile device such as a tablet with the SmartBridge a pp
IO-Link devices, such as the Pepperl+Fuchs ultrasonic sensor UC500 shown in the figure,
provide a variety of process and device data (e.g., distance values, sound cone width,
switching delay, device name, etc.). This data can be read and modified using the SmartBridge
system.
2019-04
6
Page 7

WRM-F301-IO-B15-2V15
Product Description
2.2 Application Types and Benefits
For the following application types, the SmartBridge® system provides a valuable advantage:
Clearer Application Parameterization of IO-Link Devices
Intelligent sensors and actuators often have many functions w ith w idely differing parameters.
With the SmartBridge app, it is very simple to display and modify functions and the associated
parameters.
Easier Commissioning of Machines and Plants
When commissioning machines and plants, it is often the case that not all of the required
control functions are implemented. In this situation, the SmartBridge system will indicate
whether the parameters of the sensors and actuators are set correctly, and whether all of the
data is transferred in full.
Easier Troubleshooting in the Event of Repair or Maintenance
Troubleshooting is often a time-consuming task, especially if faults occur only sporadically. In
such a case, it is helpful to log the actual function for a certain period of time, and then
subsequently evaluate the data on a PC.
Continuous Status Monitoring of IO-Link Devices
Some sensors or actuators are located at critical points in a machine or plant. Here, repeated
deviations from the intended function can develop for a variety of reasons, such as mechanical
wear, electrical faults, or climatic changes. In situations like this, continuous monitoring of the
limit values or notification thresholds may be required. The SmartBridge system is also
designed for permanent use in a machine or system and therefore offers easy visual monitoring
of critical operation and status data.
2.3 The Function of the SmartBridge Interface
Overview
The SmartBridge interface can be used in the connection line between the IO-Link device and
machine control, or it can be used autonomously with one IO-Link device only. For autonomous
use, an external power supply via a 24 V power supply unit or battery is required.
The SmartBridge interface features the operating modes m aster mode and monitor mode,
which are designed for different application types. In monitor mode, the SmartBridge interface
is a passive communication component. In master mode, it serves as an active component. In
terms of the machine control, data is accessed via the SmartBridge interface without any
reaction.
While monitor mode is suitable for recording data in an existing IO-Link connection, master
mode also enables the active modification of device parameters.
Depending on the selected operating mode, the SmartBridge® system can be used for the
following tasks:
Monitor mode
■
Displaying and recording process data
Master mode
■
Displaying process and status data
■
Displaying and modifying parameter data
■
Recording process and status data
2019-04
7
Page 8
WRM-F301-IO-B15-2V15
IO-Link
Device
L +
L Q3
Q2
Q1
1
3
5
2
4
24 V DC
L+
L-
1
3
4 C/Q
4 C/Q
Bluetooth
PLC
IO-Link
Device
L +
L Q3
Q2
1
3
1
3
5
2
4
Q1
4 C/Q4 C/Q
I/O
D I/O
Bluetooth
Product Description
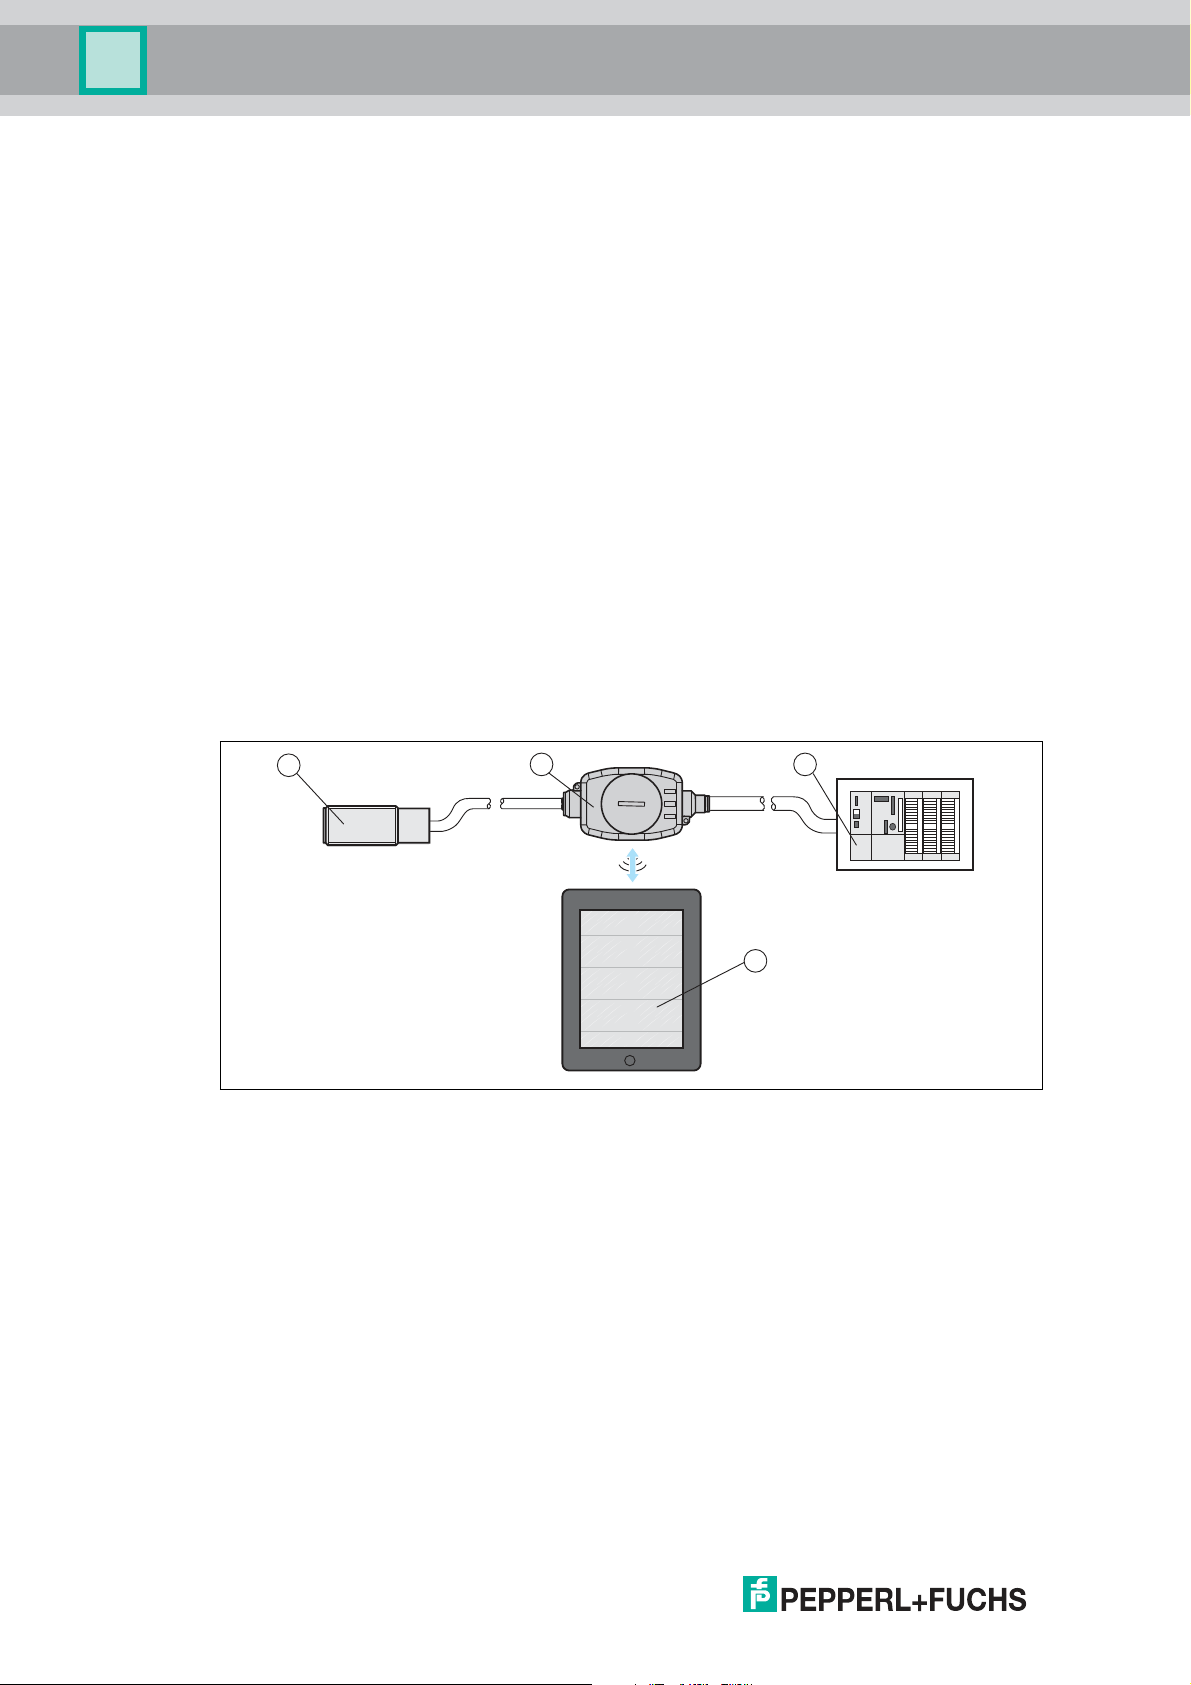
Master Mode
In master mode, the SmartBridge interface actively communicates with the connected IO-Link
device. This mode should be selected only if no additional IO-Link master module is connected
on the control side.
Depending on the type of connection, 3 application types can be identified in master mode:
■
Master Offline
This is the default function. In this case, 1 power supply only is connected on the
connection side of the SmartBridge interface directed toward the machine control. Any
signal lines belonging to the IO -Link device and SmartBridge interface remain
unconnected. The 24 VDC power supply can be supplied using either a power supply unit
or batteries. The respective connection method must be equipped with an M12 industrial
socket. Application scenarios for "offline" are pre-parameterization, function diagnostics,
and the commissioning of an IO -Link device.
Figure 2.2 Connection for "Master Offlin e"
■
Master Inline 3-pin
In this case, the SmartBridge interface is integrated into the supply line to a machine
control (PLC). For the IO-Link device, the interface serves as an IO-Link master. For the
control system, it emulates the binary standard input and output signal (SIO switching
signal) of the IO-Link device. Due to the emulation of the process data, this can lead to
delays in transferring process values. Application scenarios for "Inline 3-pin" consist of
diagnostics and parameterization of the IO-Link device within its machine or plant
application and the additional transmission of binary process data.
Figure 2.3 Connection for "Master Inline 3-pin"
8
2019-04
Page 9
WRM-F301-IO-B15-2V15
PLC
IO-Link
Device
L +
L -
1
3
4 C/Q Q2
I/O
1
3
5
22
4
Q2
Q1
Q3
4 C/Q
Bluetooth
PLC
IO-Link
Master
IO-Link
Device
1
3
4 C/Q
1
3
5
2
4
24 V DC
L+
L-
L +
L -
Q2
Q1
Q3
Bluetooth
Product Description
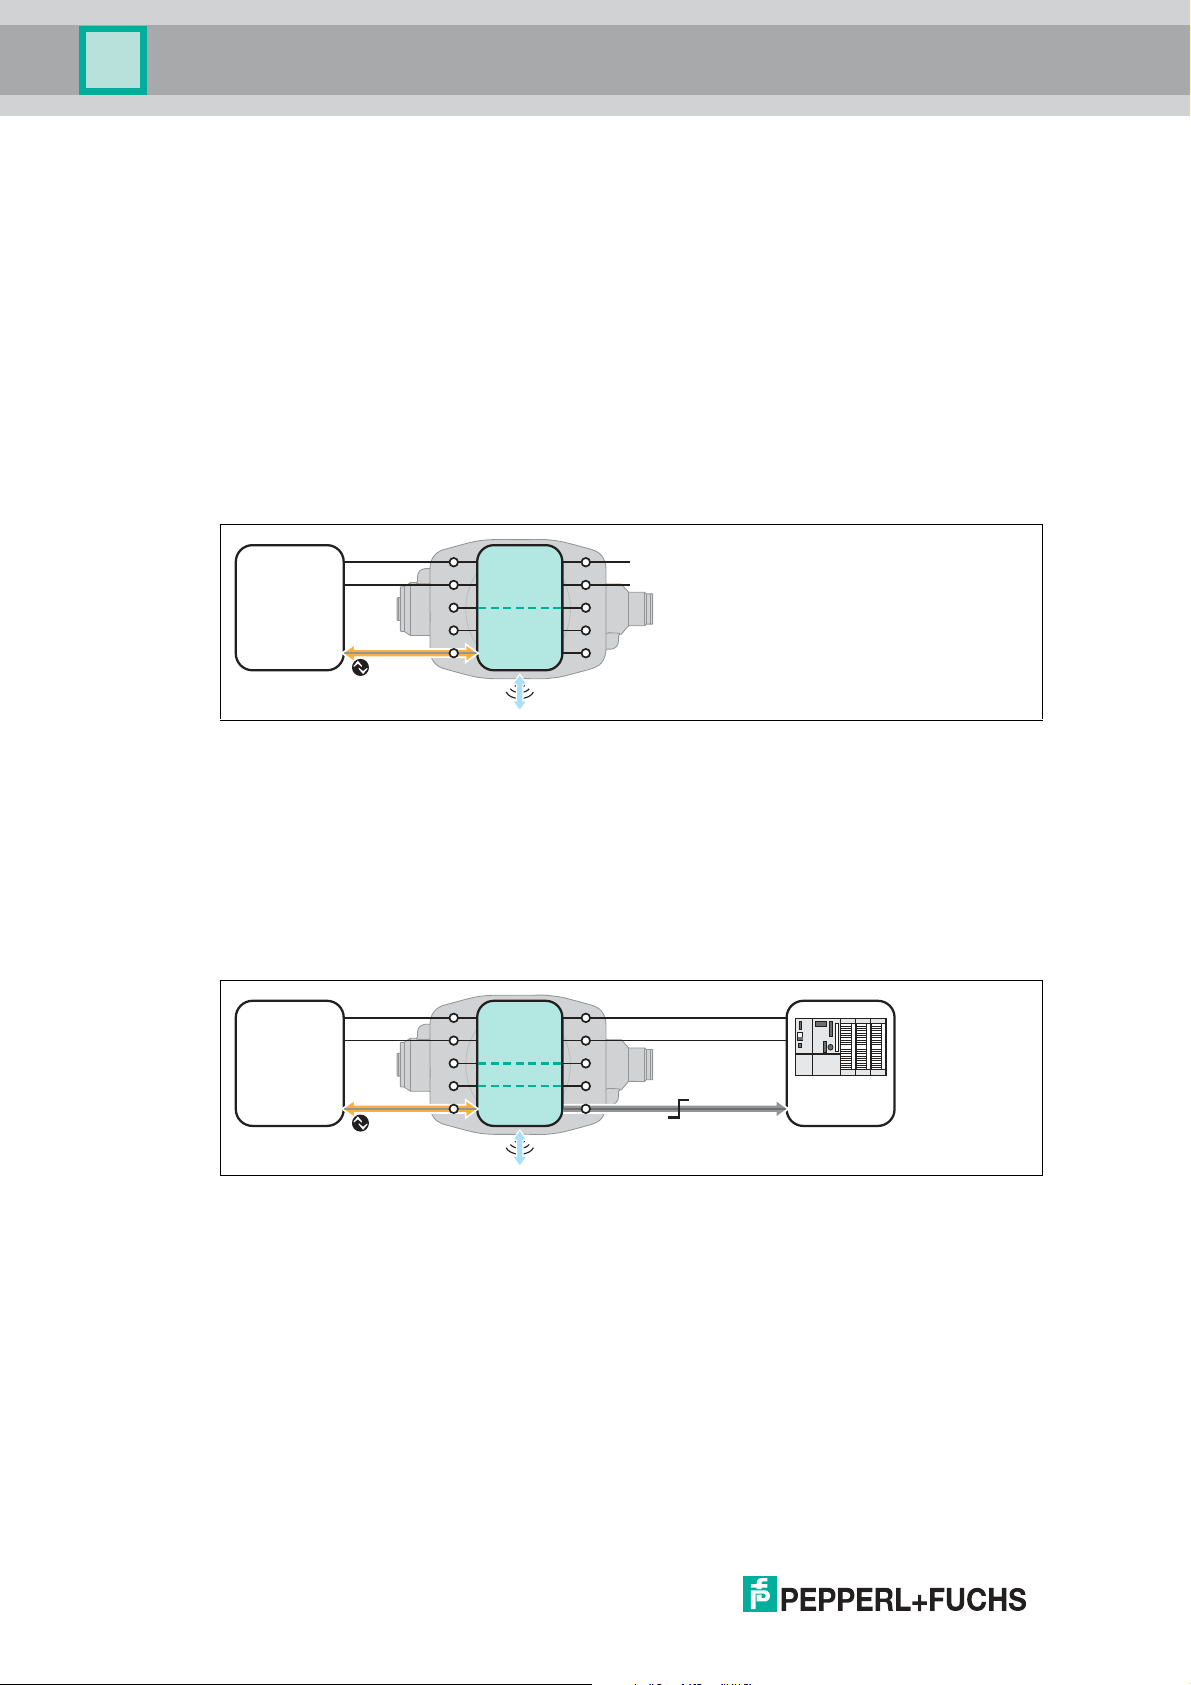
■
Master Inline 4/5-pin
In this case, the use of the SmartBridge interface is enabled without a time lag in the
process data on the machine control. In this "special case," signal line Q2 (pin 2, input) is
diverted without modification to Q 1 in the SmartBridge interface, and then connected to
the control system. Application scenarios for "Inline 4/5-pin" consist of diagnostics and
param eterization of the IO-Link device within its application in the time-sensitive
processing of process data.
Figure 2.4 Connection for "Master Inline 4/5-pin"
Monitor Mode
■
Monitor
In this mode, the SmartBridge interface behaves passively. It logs the IO-Link communication
(line C/Q) between the IO-Link device and an IO -Link-compatible control system or an
intermediate IO-Link master module. In this operating mode, the contents of the data log are
displayed in the SmartBridge® app. Alternatively, these contents can also be written onto the
internal microSD card with a time stamp.
Figure 2.5 Connection for "Monitor"
Application scenarios for monitor mode are:
■
Logging the status of the IO-Link device
■
Visualizing local process data using the SmartBridge® app
■
Analyzing faults in the IO-Link communication
2.4 The Function and Structure of the SmartBridge App
Function
To make sure that the process, status, and diagnostic data of an IO-Link device connected to a
Smar tBridge interface can be processed by the SmartBridge app, the appropriate drivers are
required. After the successful registration of the SmartBridge interface in the SmartBridge app,
the interface transmits the "Vendor ID" (=ma nufacturer) and the "Device ID" (=device type) of
the connected IO-Link device to the app. Using this information, the app automatically loads
the appropriate IODD (IO-Link Device Description) for the IO-Link device and, if available, the
relevant GDD (Graphical Device Description) from a central data server. This requires the
mobile device to have an Internet connection, at least during the initial com missioning of a new
2019-04
9
Page 10

WRM-F301-IO-B15-2V15
Device Discovery
Graphical View IODD View SmartBridge Settings App Settings
Product Description
IO-Link device. The GDD is responsible for the graphical representation of process data in the
form of scales, graphs, etc., as well as buttons for param eterization. If no GDD exists for a
particular sensor, a default GDD is displayed. The default GDD contains an image of the
connected device and information about the "Vendor Name," "Product N ame," and "Product
ID."
Structure of the SmartBridge App
The SmartBridge app consists of the menus shown below.
Figure 2.6
Depending on the user role and application type, the SmartBridge app provides different
information, parameterization, and diagnostic options for the connected IO-Link device. The
main functions of the 4 menus are introduced in the following section.
"Device Discovery" Menu
This menu is shown directly after the app starts.
Figure 2.7
The main functions of the m enu are:
■
Establishing a connection to the SmartBridge interface and a connected IO-Link device
■
Authenticating the SmartBridge interface in the SmartBridge app via an intermediate
dialog.
10
2019-04
Page 11

WRM-F301-IO-B15-2V15
Product Description
"Graphical View" Menu
Figure 2.8
If a GDD is available for the connected IO-Link device, the app will switch to the Graphical
View m enu right after the connection has been successfully established. If no GDD is
available, a default GDD is displayed. The default GDD contains an image of the connected
device and information about the "Vendor Name," "Product Name," and "Product ID."
The Graphical View menu graphically visualizes the IO-Link device's process data.
2019-04
11
Page 12

WRM-F301-IO-B15-2V15
1
2
1
2
Product Description
"IODD View" Menu
Figure 2.9 IODD View using the example of distance sens or OMT550-R 200-2EP-IO-V31
1 Line-by-line representation of information, functions, and device parameters in the re-
spective menu
2 Menu structure of the IODD View
You can use this menu to perform the following operations for the connected IO-Link device:
■
Display process data in text form,
■
Set the device parameters,
■
Retrieve diagnosis information.
Adjusting the Device Parameters in IODD View
12
Figure 2.10
1. Go to the device parameter settings in the "Parameter" menu (1).
Additional menus relating to parameters or parameter groups will be displayed
depending on the device.
2. Press the required value field for the parameter and change the setting or the numerical
value. Confirm the changes by pressing the check mark (2) so that the data can be
transferred to the device. After changing several parameters in a pa rticular menu, you can
also confirm all of your changes in a single step.
2019-04
Page 13

WRM-F301-IO-B15-2V15
Product Description
"SmartBridge Settings" Menu
This menu provides information about system data and settings for the SmartBridge interface.
Figure 2.11
Information
■
Displays the serial number and designation of the SmartBridge interface.
■
Displays the firmware version of the IO-Link processor and system processor.
Configuration Options
■
Location Mode: Pressing this button causes the LEDs to flash briefly so that the relevant
SmartBridge can be visually identified among a number of devices.
■
Local Nam e: Displays and offers the option to change the name of the SmartBridge
interface.
■
Interface Time: Indicates the time set on the SmartBridge and offers the option to
synchronize it with the time set on the mobile device (e.g., for evaluation of a log file).
■
Startup Mode (setting the application):
• Monitor in monitor operating mode
• Master Offline in master operating mode
• Master Inline 3-pin in master operating mode
• Master Inline 4/5-pin in master operating mode
2019-04
13
Page 14

WRM-F301-IO-B15-2V15
Product Description
"App Settings" Menu
This menu is used to adjust various settings within the SmartBridge® app.
Figure 2.12
Caution!
Resetting to factory settings clears data!
Please note that if you reset the SmartBridge app, all stored IODDs and GDDs belonging to
previously connected IO-Link devices will be deleted. This data can be reloaded if you connect
the relevant IO-Link device to the SmartBridge interface and connect to the SmartBridge app.
The prerequisite for this is a working Internet connection. Before resetting the SmartBridge
App, consider whether you can ensure that the conditions for reloading IODDs and GDDs are
met.
Configuration Options
■
Device Descriptor Index: Displays the time stamp of the locally available device catalog.
Pressing UPDATE updates the device catalog
■
Reset App Settings / Cache: Reset app settings to the factory settings
■
Reset GDD Cache: Clear the GDD cache
■
Demo Mode: Enable/disable demo mode
■
GDD Tester: Test page with GDD elements. For developing GDDs
■
Load custom IODD/GDD: Manually integrate an IODD/GDD
Information
■
Terms of use
14
■
Privacy policy
■
Imprint
■
Licenses
2019-04
Page 15

WRM-F301-IO-B15-2V15
SmartBridge
Connect
Mode
Power
Product Description
2.5 LED Indicators and Operating Elements
LED Indicators
The SmartBridge interface is equipped with 3 indicator LEDs for carrying out visual function
checks and rapid diagnostics. The "Connect" LED has 1 color (blue), while the "Mode"
(yellow/green) and "Power" (green/red) LEDs have 2 colors.
Figure 2.13
LED Operating mode Color Status Function
Connect Blue On Establishing a connection
Blue Flashing Transferring data
Power - Off No supply voltage available
Green On N ormal operation
Green Flashing Low voltage at L+
Red On Overload at C/Q
Red Flashing System error
Mode Monitor mode Yellow On Synchronization with IO-Link
device. Communication between
master and device.
Monitor mode Yellow Flashing Synchronization and data logging
active
Monitor mode Yellow/greenFlashing
alternately
Master mode Green On Communication with IO-Link
Master mode Green Flashing SmartBridge interface active, but
Table 2.1
SmartBridge interface active, but
no connection to the IO-Link
device
device
no connection to the IO-Link
device
2019-04
15
Page 16

WRM-F301-IO-B15-2V15
Connect
Powe
r
M
o
de
2
1
Connect
Power
Mode
2
3
1
Product Description
Operating Elements
The SmartBridge interface is mainly operated via the SmartBridge app. The only operating
element is the reset button. This is only accessible after opening the cover.
Figure 2.14
1. Open the cover (1) of the interface using a suitable tool (e.g., a coin) by turning it counterclockwise.
2. Remove the cover (1).
3. Press the reset button (2) with a pointed object such as a ballpoint pen refill.
The SmartBridge interface per forms a restart.
4. Place the cover (1) back in the opening and secure by turning it clockwise.
2.6 Interfaces and Connections
Interfaces
A separate microSD card (not included in the scope of delivery) is required for data logging.
The microSD card must be inserted into the intended SD card slot (2).
If you wish to transfer the data saved on the microSD card to a PC, you can choose between 2
options:
■
You can remove the microSD card and read in the data on the PC using an SD card
reader.
■
Alternatively, you can leave the microSD card inserted and connect a USB 2.0 cable with
micro USB plug to the SmartBridge interface (3).
Note: A USB 2.0 cable with micro USB plug is not included in the scope of delivery!
The Bluetooth connection to the mobile device is interrupted during data transfer via USB.
16
Figure 2.15
2019-04
Page 17

WRM-F301-IO-B15-2V15
1
4
Ub+
C/Q
3
0 V
2
5
1
4
3
IO-Link
2
5
1
3
4
5
2
1
5
3
2
4
21
Product Description
1 Cover
2 microSD card slot
3 USB 2.0 micro-B socket
Connections
Figure 2.16
1 M12x1 connector plug, 5-pin, connection to the machine control/external 24 VDC power
supply
2 M12x1 socket, 5-pin, connection for IO-Link device
2.7 Delivery Scope and Accessories
Scope of Delivery
The SmartBridge interface is supplied with a mounting bracket and a Quick Start Guide.
The desired mobile device app can be downloaded from the respective app store:
■
Android devices: Google Play Store
■
Apple devices: Apple App Store
Optional Accessories
Designation Description
V15-G-1M-PUR-V15-G M12 to M12 connection cable, 5-pin PUR cable, to connect the
IO-Link device to the SmartBridge module
MEMORYCARD MICRO
SD 2GB
MicroSD card with 2 GB storage capacity
2019-04
17
Page 18

WRM-F301-IO-B15-2V15
IO-Link
Device
L +
L Q3
Q2
Q1
1
3
5
2
4
24 V DC
L+
L-
1
3
4 C/Q
4 C/Q
Bluetooth
PLC
IO-Link
Device
L +
L Q3
Q2
1
3
1
3
5
2
4
Q1
4 C/Q4 C/Q
I/O
D I/O
Bluetooth
Installation
3 Installation
3.1 Installing the SmartBridge Interface
Mounting
If you wish to use the SmartBridge interface in a stationary position for longer periods, we
would recommend the use of the supplied mounting clamp.
The mounting clamp has two 4.5 mm holes to mount the interface using screws.
1. Drill 2 corresponding holes to secure the SmartBridge interface.
2. Push the m ounting clamp onto the SmartBridge interface.
3. Attach the SmartBridge interface in the desired location using screws. The interface is
clamped by tightening the screws.
Electrical Connection
Depending on the operating mode and the application, there are different connection types for
the Smar tBridge interface.
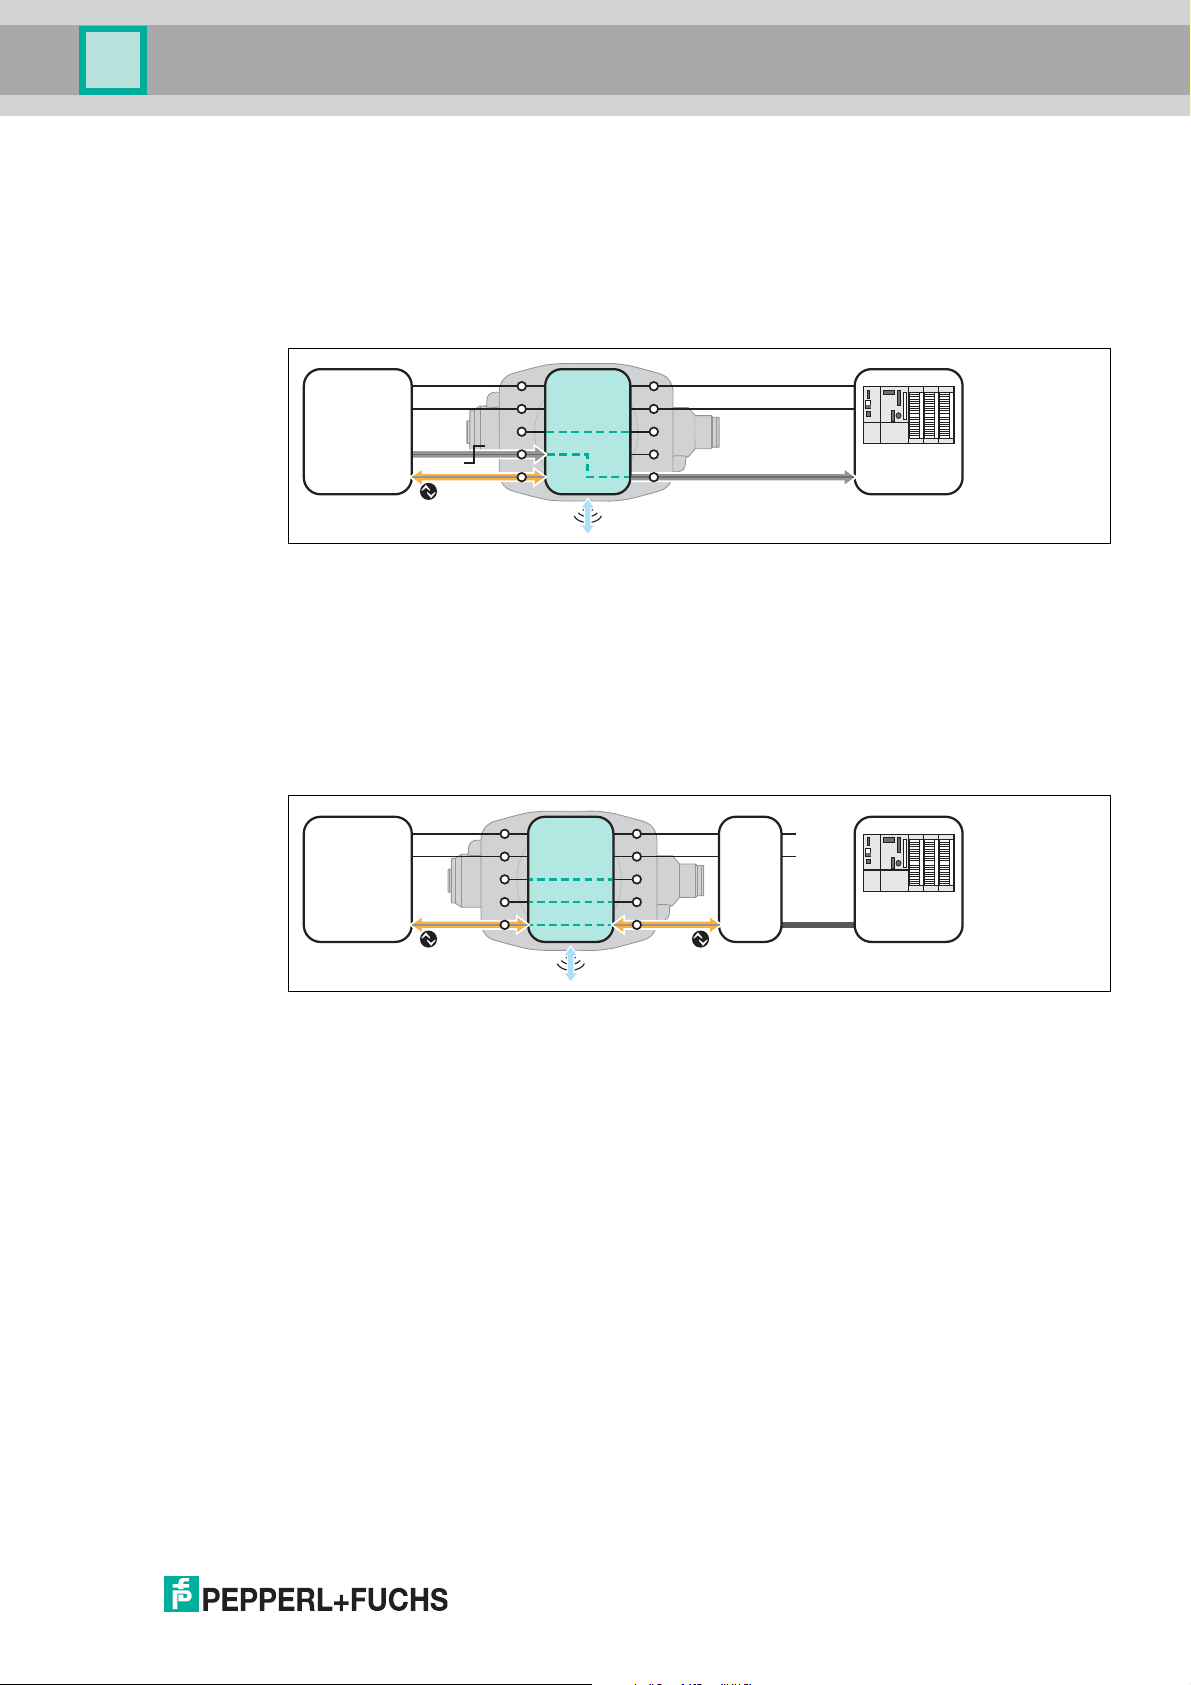
Master mode is split between the following applications:
■
Offline
Figure 3.1 Connection when "offline" in ma ster mode
In the "offline" application, an external 24 VDC voltage supply is required for the SmartBridge
interface via a power supply unit or battery/batteries.
■
Inline 3-pin
18
Figure 3.2 Connection for "inline 3-pin"
2019-04
Page 19

WRM-F301-IO-B15-2V15
PLC
IO-Link
Device
L +
L -
1
3
4 C/Q Q2
I/O
1
3
5
22
4
Q2
Q1
Q3
4 C/Q
Bluetooth
PLC
IO-Link
Master
IO-Link
Device
1
3
4 C/Q
1
3
5
2
4
24 V DC
L+
L-
L +
L -
Q2
Q1
Q3
Bluetooth
Installation
■
Inline 4/5-pin
Figure 3.3 Connection for "inline 4/5-pin"
Monitor mode has the following connection:
■
Monitor
Figure 3.4 Connection for "Monitor"
Note!
Use the machine control to ensure the correct wiring. The SmartBridge interface is ready for
operation as soon as it is connected to the 24 VDC supply voltage.
1. Fam iliarize yourself with the desired operating mode and application.
2. Connect the IO-Link device to the SmartBridge interface via a connecting cable (M12
connector). Note that a 3-pin, 4-pin, or 5-pin cable must be connected, depending on the
application.
3. Using a 2nd cordset, connect the SmartBridge interface (M12 connector) to the machine
control unit (PLC), an IO-Link master, or an external 24 VDC power supply.
3.2 Installing the SmartBridge App
System requirements
The SmartBridge® app is available in the respective app store (Apple App Store; Google Play).
You can install it on mobile devices such as smartphones and tablets that support "Bluetooth
LE" (low energy) or "Bluetooth 4.0" and use the iOS (from version 10) or Android (from version
6.0) operating systems.
Note!
An Internet connection is required to load the SmartBridge app during installation and to load
additional driver files for the initial commissioning of a new IO-Link device.
2019-04
19
Page 20

WRM-F301-IO-B15-2V15
Installation
Downloading the SmartBridge App
1. Go to the relevant app store.
2. Search for the "SmartBridge – Sensor Technology 4.0" app by Pepperl+Fuchs GmbH
Figure 3.5 App icon for SmartBridge
3. Follow the instructions to download and install the SmartBridge app.
Note!
Required driver files for IO-Link devices (IO DD: IO Device Description; GDD: Graphical Device
Description) are provided by the respective IO-Link device manufacturer. The SmartBridge®
app identifies a connected IO-Link device during commissioning and downloads the
associated driver file from the Internet. A functioning Internet connection is required for this.
Testing for Successful Installation
Open the SmartBridge® app on your mobile device by clicking on the SmartBridge icon.
Figure 3.6 App icon for SmartBridge
The "Device Discovery" menu is displayed if the app is installed correctly.
3.3 Data logging—Preparation and Activation
Prerequisites
The data logging function can only be used in the "Monitor" startup mode. A separate microSD
card (not included in the scope of deliver y) is required for this function. The microSD card must
be inserted into the designated SD card slot.
If you wish to transfer the data saved on the microSD card to a PC, you will need to use a USB
2.0 cable with a micro USB plug (3). If necessary, you can do this repeatedly when operating
the Smar tBridge interface.
Activation
20
If the SmartBridge is already active and the IO-Link device is excluded, recording of the IO-Link
communication begins as soon as an SD card is inserted into the designated slot. It is
recommended to insert the SD card first and then to switch on the SmartBridge. Completing
the steps in this order ensures that all comm unication data can be recorded.
Note!
The Bluetooth connection is disabled during a data connection via USB.
2019-04
Page 21

WRM-F301-IO-B15-2V15
Connect
Power
Mode
2
3
1
Installation
Figure 3.7
1. Open the cover (1) of the interface using a suitable tool (e.g., a coin) by turning it counterclockwise.
2. Remove the cover (1).
3. Insert the microSD card into the slot (2).
4. Place the cover (1) back in the opening and secure by turning it clockwise.
2019-04
21
Page 22

WRM-F301-IO-B15-2V15
Commissioning
4 Commissioning
4.1 Commissioning the SmartBridge® System
Note!
The process outlined below applies both to the initial commissioning of the SmartBridge
system and to recommissioning. Once the drivers for an IO-Link device have been downloaded
via the SmartBridge app, they are stored in a library on the mobile device. In this way,
recommissioning is possible with a previously known IO-Link device, even without an Internet
connection (e.g., when operating in areas/plants without an Internet connection).
Prerequisites
■
The SmartBridge interface and the IO-Link device are connected.
■
The SmartBridge interface is connected to a machine control or an external 24 VDC
voltage supply, depending on the application selected.
■
On the mobile device:
• The SmartBridge app is installed,
• The Bluetooth interface is activated,
• Access to the SmartBridge app location is permitted (positioning service is
enabled),
• An Internet connection is available.
Important: During initial com missioning and when connecting a previously
unregistered IO-Link device (driver download).
■
A microSD card (not included in the scope of delivery) is needed to change the interface
name and device key.
Activating the SmartBridge System
1. Start the SmartBridge app on the mobile device.
Figure 4.1
The mobile device displays the Device Discovery start menu and detects the
SmartBridge interfaces present within the detection range. All SmartBridge interfaces found
are then listed under "Devices in range."
22
2019-04
Page 23

WRM-F301-IO-B15-2V15
Commissioning
2. Press the button for the (desired) SmartBridge®.
The authentication dialog starts.
SmartBridge® Authentication
When establishing a connection between the mobile device and the SmartBridge interface, an
authentication process first takes place between the communication partners. For this, each
Smar tBridge interface has a unique device key. The device key is located on the back of the
Smar tBridge interface in the form of a QR code and as text with the name "Key." After the initial
connection, the SmartBridge app remembers the device key. The user does not need to enter it
again, but must simply confirm it to establish the connection.
1. From the menu, select the SmartBridge interface you would like to use and follow any further
instructions.
On delivery, the interface name is "SB_PF." The user can change this. To do so at a later
point, go to "SmartBridge Settings" and "Local Name."
2. Share the device key to the mobile device:
Either by typing in the key
or
by reading in the Q R code using the mobile device's camera. Tap the Scan Code button
when using the camera.
Figu re 4.2
2019-04
23
Page 24

WRM-F301-IO-B15-2V15
Commissioning
Figure 4.3
3. Select "SPECIALIST" as the user role to be able to use the entire range of programming
features.
4. The rights of each user role are defined in detail in the respective IODD. The "SPECIALIST"
role has the most privileges. Users with the "OBSERVER" role are restricted to read only
access to the data.
The SmartBridge® app automatically loads the driver files for the connected IO-Link
device from the default server. The drivers are loaded from the librar y if the connected
device type has already been connected to the SmartBridge® app.
If an associated GDD is loaded for the IO-Link device, the app will switch straight to the
Graphical View m enu. If no GDD is available, a default GDD is displayed. This contains
both an image of the connected device and information about the "Vendor Name," "Product
Name," and "Product ID." In this scenario, you will need to switch to IODD View to change
the parameters.
24
2019-04
Page 25

WRM-F301-IO-B15-2V15
Commissioning
Figu re 4.4
Note!
The respective manufacturer of the IO-Link devices is responsible for providing the driver files
(IODD, GDD). These files are stored in a central location online, to which the SmartBridge App
has access.
2019-04
25
Page 26

WRM-F301-IO-B15-2V15
Commissioning
Setting the Application
1. Set the desired application in the Startup Mode field.
Figure 4.5
■
Application setting:
• "Monitor" in monitor operating mode
• "Master Offline" in master operating mode
• "Master Inline 3-pin" in master operating mode
• "Master Inline 4/5-pin" in master operating mode
Changing the Interface Name and Device Key
Note!
If you only want to change the name of the interface, a simple way of doing this is to execute the
"Local Name" function in the "App Settings" menu (see chapter 2.4).
On delivery, the SmartBridge interface has the nam e "SB-PF" and a default device key (key,
QR code). You can change both to make your system more secure against access. The
interface name can be a maximum of 8 characters. The device key can be a maximum of 64
characters and consists of individual HEX numbers in the range of 0 – F. The interface name
and device key are changed using a microSD card. An INI file that has been created with a
simple text editor such as Notepad must be stored on this card.
1. Open a suitable editor such as Microsoft® Windows® Notepad.
2. Enter the desired data in the editor as follows:
ο LocalNam eString="max. 8 characters" then press the RETURN key
ο AuthKeyHex="max. 64 characters" in HEX code" then press the RETURN key
26
By pressing the RETURN key, each line is concluded with a line feed (CR/LF). This line feed
is absolutely necessary.
2019-04
Page 27

WRM-F301-IO-B15-2V15
Connect
P
ower
Mode
2
3
1
Commissioning
3. First, save the file under the name "ConfSBA.ini" on your PC.
Below is an example with the interface name "SBridge1" and the new device key "1A4F."
Figu re 4.6
4. Copy the file "ConfSBA.ini" from the PC to the microSD card.
Figu re 4.7
5. Open the cover (1) of the interface using a suitable tool (e.g., a coin) by turning it
counterclockwise.
6. Remove the cover (1).
7. Insert the microSD card into the slot (3).
8. Press the reset button (2) with a pointed object such as a ballpoint pen refill.
The SmartBridge interface performs a restart.
9. Press the reset button (2) again after approx. 5 s.
The SmartBridge interface performs an additional restart and adopts the new settings for
the interface name and the device key.
10.Remove the microSD card again or leave it inserted.
Important: If the microSD card is inserted, it is read again following a restart of the
SmartBridge interface, and the data in the INI file will be processed.
11.Place the cover (1) back in the opening and secure by turning it clockwise.
2019-04
27
Page 28

FACTORY AUTOMATION –
SENSING YOUR NEEDS
Worldwide Headquarters
Pepperl+Fuchs GmbH
68307 Mannheim · Germany
Tel. +49 621 776-0
E-mail: info@de.pepperl-fuchs.com
USA Headquarters
Pepperl+Fuchs Inc.
Twinsburg, Ohio 44087 · USA
Tel. +1 330 4253555
E-mail: sales@us.pepperl-fuchs.com
Asia Pacific Headquarters
Pepperl+Fuchs Pte Ltd.
Company Registration No. 199003130E
Singapore 139942
Tel. +65 67799091
E-mail: sales@sg.pepperl-fuchs.com
www.pepperl-fuchs.com
Subject to modifications
Copyright PEPPERL+FUCHS • Printed in Germany
/ DOCT-5055A
04/2019
 Loading...