

Page 1
VisuNet Control Center
Version 4
Manual
Page 2

With regard to the supply of products, the current issue of the following document is applicable: The
General Terms of Delivery for Products and Services of the Electrical Industry, published by the Central
Association of the Electrical Industry (Zentralverband Elektrotechnik und Elektroindustrie (ZVEI) e.V.)
in its most recent version as well as the supplementary clause: "Expanded reservation of proprietorship"
Worldwide
Pepperl+Fuchs Group
Lilienthalstr. 200
68307 Mannheim
Germany
Phone: +49 621 776 - 0
E-mail: info@de.pepperl-fuchs.com
North American Headquarters
Pepperl+Fuchs Inc.
1600 Enterprise Parkway
Twinsburg, Ohio 44087
USA
Phone: +1 330 425-3555
E-mail: sales@us.pepperl-fuchs.com
Asia Headquarters
Pepperl+Fuchs Pte. Ltd.
P+F Building
18 Ayer Rajah Crescent
Singapore 139942
Phone: +65 6779-9091
E-mail: sales@sg.pepperl-fuchs.com
https://www.pepperl-fuchs.com
Page 3

VisuNet Control Center Version 4
Contents
1 Introduction................................................................................................................ 5
1.1 Note................................................................................................................. 5
1.2 Content of this Document............................................................................. 5
1.3 Target Group, Personnel ............................................................................... 5
1.4 Symbols Used ................................................................................................ 6
2 Product Description ..................................................................................................7
2.1 Overview......................................................................................................... 7
2.2 Program features........................................................................................... 7
2.3 Licensing ........................................................................................................ 8
2.4 Installation...................................................................................................... 9
3 VisuNet CC Setup .................................................................................................... 10
3.1 Main Structure (User Interface).................................................................. 10
3.2 Device Structure .......................................................................................... 15
4 Manage (Home)........................................................................................................ 16
4.1 Group Management..................................................................................... 16
4.2 View............................................................................................................... 17
4.3 Group Actions ..............................................................................................18
4.4 Device Backup ............................................................................................. 25
4.5 User Management........................................................................................ 25
4.6 About............................................................................................................. 27
5 Manage (Device)...................................................................................................... 28
5.1 Device Function Tiles .................................................................................. 28
5.1.1 Device Status................................................................................... 29
5.1.2 Device Settings (Tile)....................................................................... 30
5.2 Device Settings (Ribbon)............................................................................ 35
5.3 Device Management ....................................................................................35
5.4 Device Commands....................................................................................... 45
5.5 Device Backup ............................................................................................. 51
5.6 Profile Clipboard.......................................................................................... 64
5.7 Profiles.......................................................................................................... 64
6 "How Tos" ................................................................................................................. 66
2020-12
3
Page 4

VisuNet Control Center Version 4
Contents
6.1 Preparing an RM / BTC for Centralized Management...............................66
6.2 Connecting to an RM / BTC .........................................................................66
6.3 Uploading a Configuration to an RM / BTC................................................ 68
6.4 Shadowing a Session ..................................................................................70
6.5 Creating a New Local User..........................................................................70
6.6 Build up a connection with your own certificate via Session Shadowing
to increase the security level...................................................................... 71
7 Troubleshooting .......................................................................................................77
2020-12
4
Page 5

VisuNet Control Center Version 4
Introduction
1 Introduction
1.1 Note
This manual revision was released with VisuNet® Control Center version 4.7 but also covers all
previous versions of VisuNet Control Center 4.
1.2 Content of this Document
This document contains information that you need in order to use your product throughout the
applicable stages of the product life cycle. These can include the following:
• Product identification
• Delivery, transport, and storage
• Mounting and installation
• Commissioning and operation
• Maintenance and repair
• Troubleshooting
• Dismounting
• Disposal
Note
This document does not substitute the instruction manual.
Note
For full information on the product, refer to the instruction manual and further documentation on
the Internet at www.pepperl-fuchs.com.
The documentation consists of the following parts:
• Present document
• Instruction manual
• Datasheet
Additionally, the following parts may belong to the documentation, if applicable:
• EU-type examination certificate
• EU declaration of conformity
• Attestation of conformity
• Certificates
• Control drawings
• Additional documents
1.3 Target Group, Personnel
Responsibility for planning, assembly, commissioning, operation, maintenance, and dismounting lies with the plant operator.
Only appropriately trained and qualified personnel may carry out mounting, installation, commissioning, operation, maintenance, and dismounting of the product. The personnel must have
read and understood the instruction manual and the further documentation.
2020-12
5
Page 6
VisuNet Control Center Version 4
Introduction
Prior to using the product make yourself familiar with it. Read the document carefully.
1.4 Symbols Used
This document contains symbols for the identification of warning messages and of informative
messages.
Warning Messages
You will find warning messages, whenever dangers may arise from your actions. It is mandatory
that you observe these warning messages for your personal safety and in order to avoid property damage.
Depending on the risk level, the warning messages are displayed in descending order as follows:
Danger!
This symbol indicates an imminent danger.
Non-observance will result in personal injury or death.
Warning!
This symbol indicates a possible fault or danger.
Non-observance may cause personal injury or serious property damage.
Caution!
This symbol indicates a possible fault.
Non-observance could interrupt the device and any connected systems and plants, or result in
their complete failure.
Informative Symbols
Note
This symbol brings important information to your attention.
Action
This symbol indicates a paragraph with instructions. You are prompted to perform an action or
a sequence of actions.
2020-12
6
Page 7
VisuNet Control Center Version 4
Product Description
2 Product Description
2.1 Overview
The VisuNet Control Center (VisuNet CC) is a software tool for the centralized management of
Pepperl+Fuchs VisuNet Remote Monitors (RMs) and Box Thin Clients (BTCs). The software
can be installed on any Windows®-based PC, such as a service Notebook or a virtualized Engineering Workstation. It allows remote setup, management, and maintenance of all RMs and
BTCs that are connected to the same network infrastructure. VisuNet CC offers the following
valuable functions:
• Remotely set up device configuration (e.g., hostname) of an RM / BTC
• Create and edit remote profiles (e.g., a RDP connection profile) on an RM / BTC
• Clone device settings and profiles from one RM / BTC to another RM / BTC
• Copy one or multiple remote profiles from one RM / BTC to another RM / BTC via copy
and paste function keys of the keyboard or via the copy and paste icons in the ribbon
• Monitor operators’ screens and support them remotely via session shadowing
• Update system firmware
• Restart and reboot an RM / BTC
Note
VisuNet CC is compatible with all Pepperl+Fuchs devices with pre-installed RM Shell 4.1
firmware or newer.
Tip
VisuNet CC provides further information for several functions via tool tips. Please hover with the
mouse cursor over a user interface item (e.g. button) to get tool tip information.
Caution!
Time settings
The Time zone, Time and Date Settings of the RM Shell and the VisuNet CC must be identical,
otherwise the time is invalid and a synchronization is not possible.
The maximum feasible Date and time difference is 12 h.
2.2 Program features
The VisuNet Control Center allows the user to manage all HMI systems with RM Shell 5 as well
as RM Shell 4.1 or newer from a central location. Therefore, the administrators no longer need
to enter hazardous areas or other restricted areas like clean rooms to setup or maintain a
Remote Monitor or box thin client. Instead, access to the Remote Monitors is granted from a
central location, which saves time and costs.
Via the VisuNet Control Center, connection profiles can be created for a Remote Monitor and
then transferred to other devices. Firmware updates are realized with a single click. In addition,
the user can connect to any Remote Monitor with RM Shell 5 or 4, monitor the device status
and the screen content or even take over control remotely. This simplifies support and significantly increases the availability of the devices.
2020-12
7
Page 8
VisuNet Control Center Version 4
Product Description
Figure 2.1
• Efficient, centralized remote configuration (e.g. device settings, remote profiles)
• Easy and simplified Maintenance (e.g. security patches and updates)
• Monitoring and remote support (e.g. secured session shadowing via own own public key
certificate)
• Optimally aligned to P+F Firmware Shell 5 and 4
• Mass configuration and profile copying to multiple devices
• Wizards that guide users simply through the different processes
2.3 Licensing
VisuNet Control Center can be downloaded from the Pepperl+Fuchs website. Visit www.pepperl-fuchs.com and use the search term “VISUNET-CONTROL-CENTER.”
To unlock the VisuNet CC management interface on an RM / BTC, an additional license must
be entered.
Item number Type code Description
#548284 VISUNET-RM-SHELL5-CC One license per RM Shell 5 device required to
#548285 VISUNET-RM-SHELL5-CC 55 licenses keys to enable VisuNet Control
#548286 VISUNET-RM-SHELL5-CC 1010 licenses keys to enable VisuNet Control
#548287 VISUNET-RM-SHELL5-CC 3030 licenses keys to enable VisuNet Control
#548288 VISUNET-RM-SHELL5-CC 5050 licenses keys to enable VisuNet Control
#548024 VISUNET-RM-SHELL5-CC One license per RM Shell 4 device required to
#548030 VISUNET-RM-SHELL4-CC 55 licenses keys to enable VisuNet Control
#548031 VISUNET-RM-SHELL4-CC 1010 licenses keys to enable VisuNet Control
#548032 VISUNET-RM-SHELL4-CC 3030 licenses keys to enable VisuNet Control
Table 2.1
unlock the VisuNet CC interface.
Center
Center
Center
Center
unlock the VisuNet CC interface.
Center
Center
Center
2020-12
8
Page 9

VisuNet Control Center Version 4
Product Description
2.4 Installation
VisuNet CC can be installed via a standard installer. Follow the installation wizard to perform
the installation. The software is tested for Microsoft® Windows® 7, but can be installed on any
newer Windows® operating system version that supports the Microsoft® .NET Framework (ver-
sion 4.5.2).
Tip
The firewall on either a service PC or Pepperl+FuchsRM / BTC will be configured automatically.
During the installation the firewall rules will be activated.
For individual firewall settings at your service PC use the following ports:
• VisuNet CC Discovery UDP 3702 and 137
• VisuNet CC Download/Upload TCP 8023
• VisuNet CC Session Shadowing TCP 5900
• VisuNet CC Default Secure Tunnel Port TCP 22314
2020-12
9
Page 10
VisuNet Control Center Version 4
VisuNet CC Setup
3 VisuNet CC Setup
VisuNet CC uses a project-based approach. This means that the configuration of RMs /BTCs
can be stored in a file, e.g., on the local hardware drive, or shared among different computers
running VisuNet CC.
All configuration changes made in VisuNet CC are stored locally. To synchronize the local configuration that is stored in a project with the configuration on the RMs / BTCs use the "download" function of VisuNet CC. This function loads the configuration from an RM / BTC into the
local representation in the project file.
To apply changes to an RM / BTC, the changes must be uploaded to the RM / BTC. Use the
“upload” function to upload the configuration to an RM / BTC. This allows the modification of
configurations even when an RM / BTC is offline.
VisuNet CC Wizard:
Whenever actions need to be perfomed for multiple devices it is necessary to perform these
with the VisuNet CC Wizard.The Wizard guides you with a sequence of dialog boxes through
defiend steps and turns complex tasks into easy executable steps.
3.1 Main Structure (User Interface)
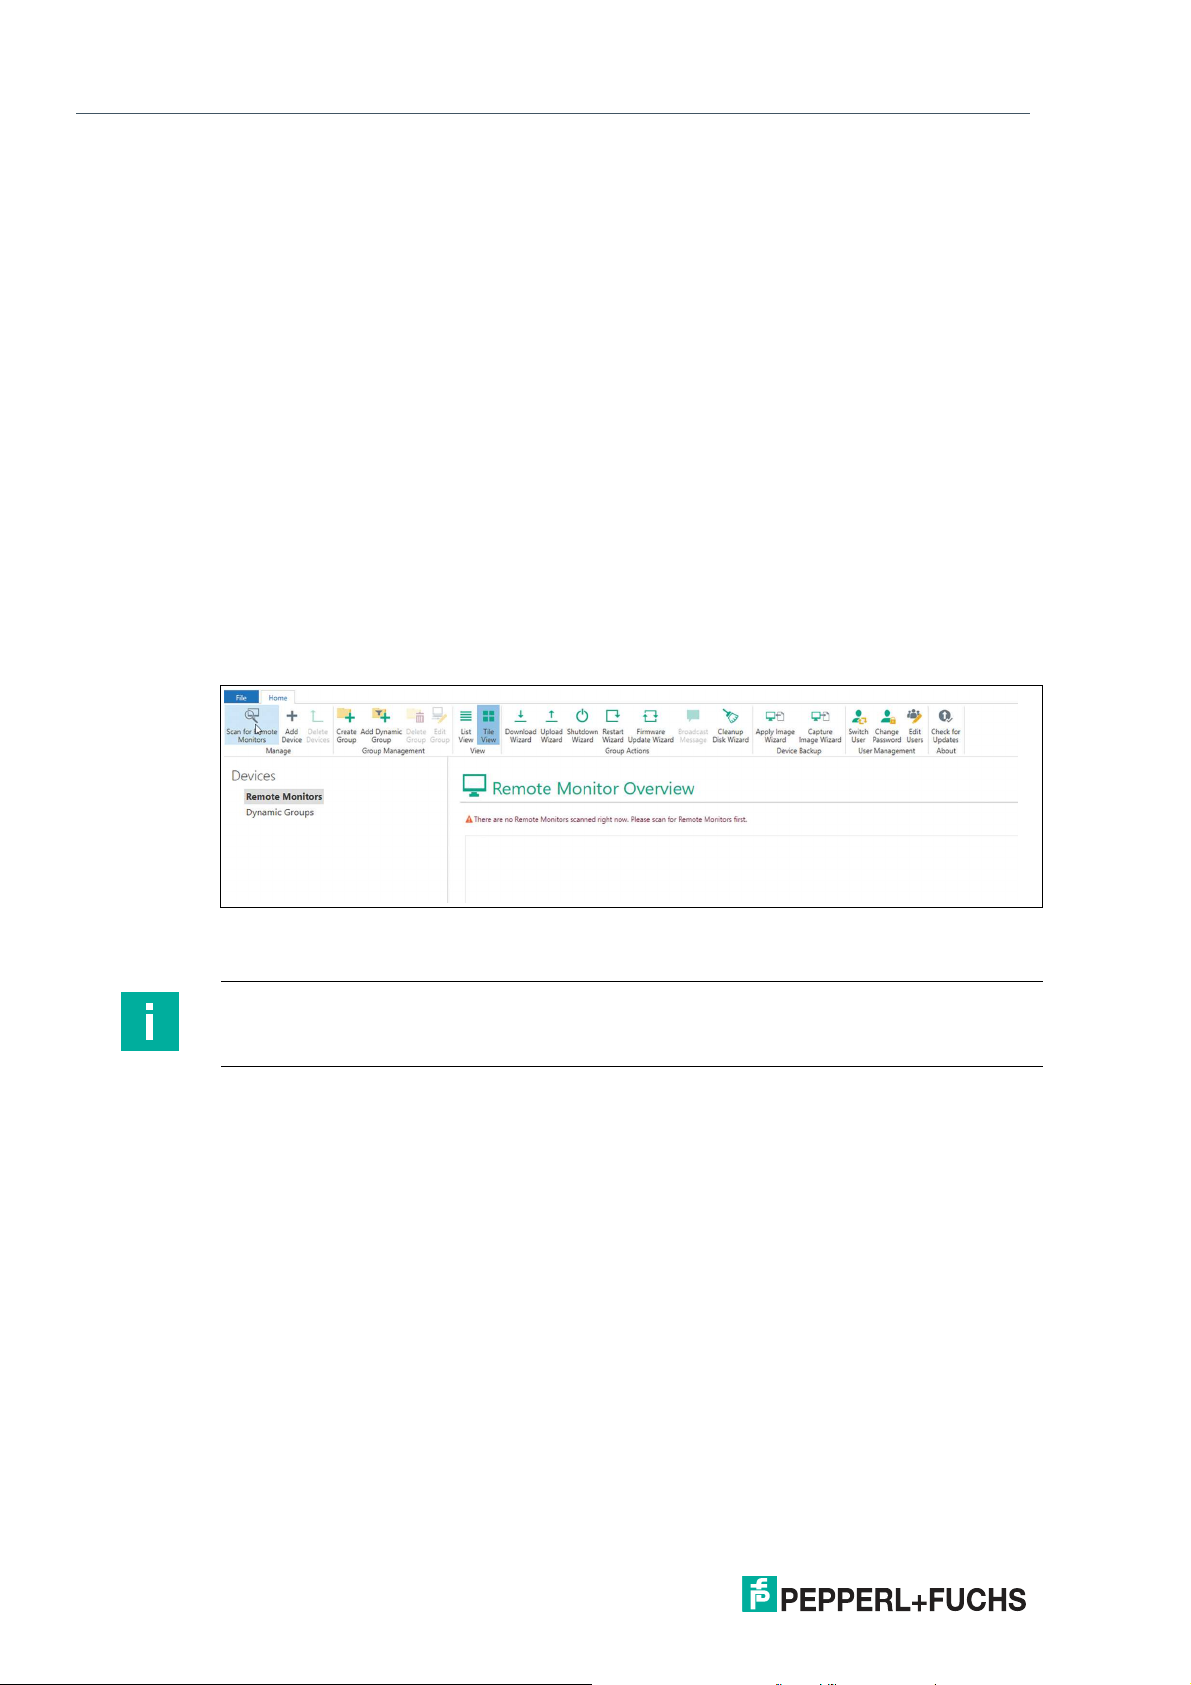
To find all your devices in the network, use the “Scan for Remote Monitors” icon.
Figure 3.1
All online devices, Remote Monitors and Box Thin Clients are listed.
Note
If your device is not listed, you can use the “Add Device” function and add a device manually by
stating the IP address.
10
2020-12
Page 11
VisuNet Control Center Version 4
VisuNet CC Setup
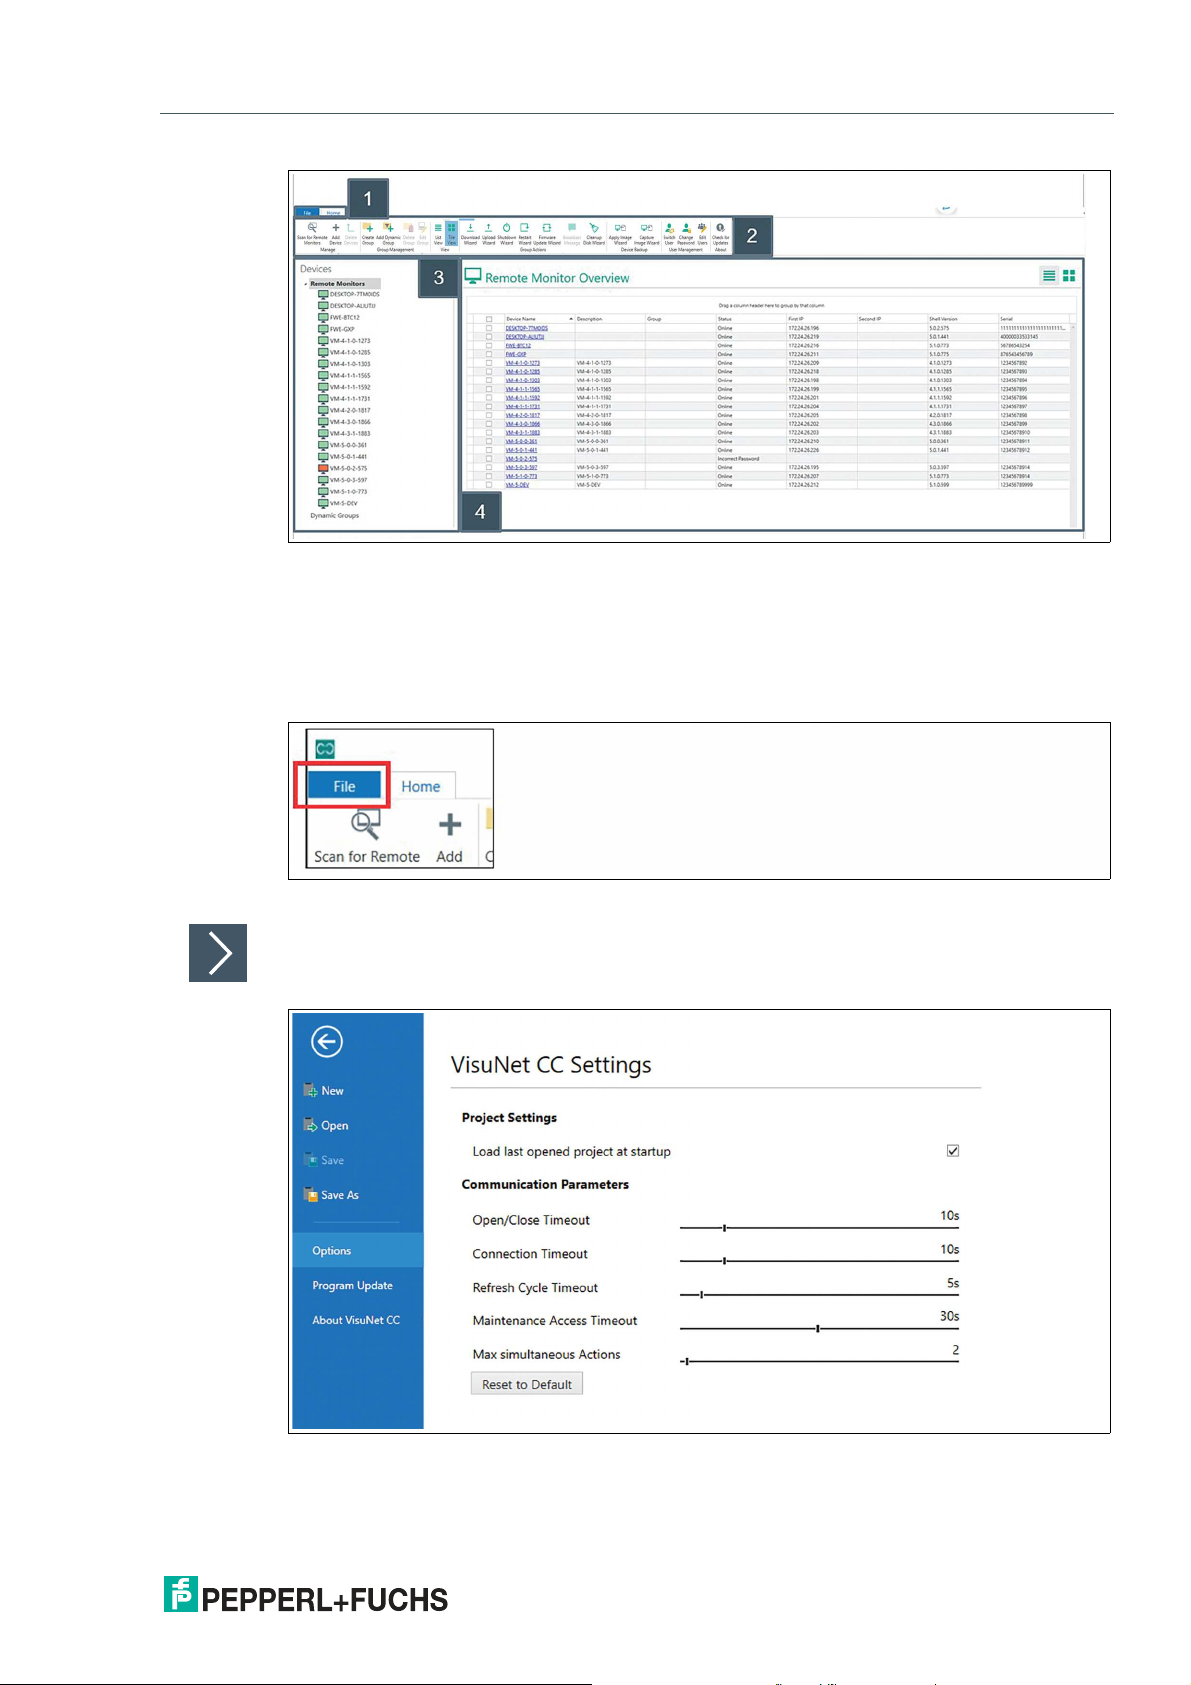
Figure 3.2 User Interface Main - Home Structure
VisuNet CC’s user interface is divided into three main sections:
1 Tabbed toolbars: In the toolbar the following tabs can be selected:
File: Click the "File" tab in the top-left corner of the VisuNet CC screen to enter the
file view.
Figure 3.3
VisuNet CC Settings
Select "Options" from the navigation bar to adjust VisuNet CC settings. The following settings
can be adjusted:
Figure 3.4
2020-12
11
Page 12
VisuNet Control Center Version 4
VisuNet CC Setup
Function Description
Open/Close Timeout Specifies the time VisuNet CC waits for an answer from the RM /
Connection Timeout Specifies the time VisuNet CC waits for an answer from the RM /
Refresh Cycle Timeout Specifies the time intervals in which VisuNet CC automatically
Maintenance Access Timeout
Max simultaneous Actions: Specifies the number of actions performed simultaneously.
BTC during establishing/closing of a connection before a timeout
occurs. Increase the timeout, when there are problems establishing a connection to device.
BTC when a connection has been established before a timeout
occurs.
polls the connected RM / BTC for new device information.
Increase the timeout, if connections are interrupted at short
notice from time to time.
Specifies the time the local operator is given to respond to the
dialog prompt before the maintenance mode is automatically
entered.
Note: Multiple simultaneous action can cause high network traffic, resulting in high latencies for other devices on the network.
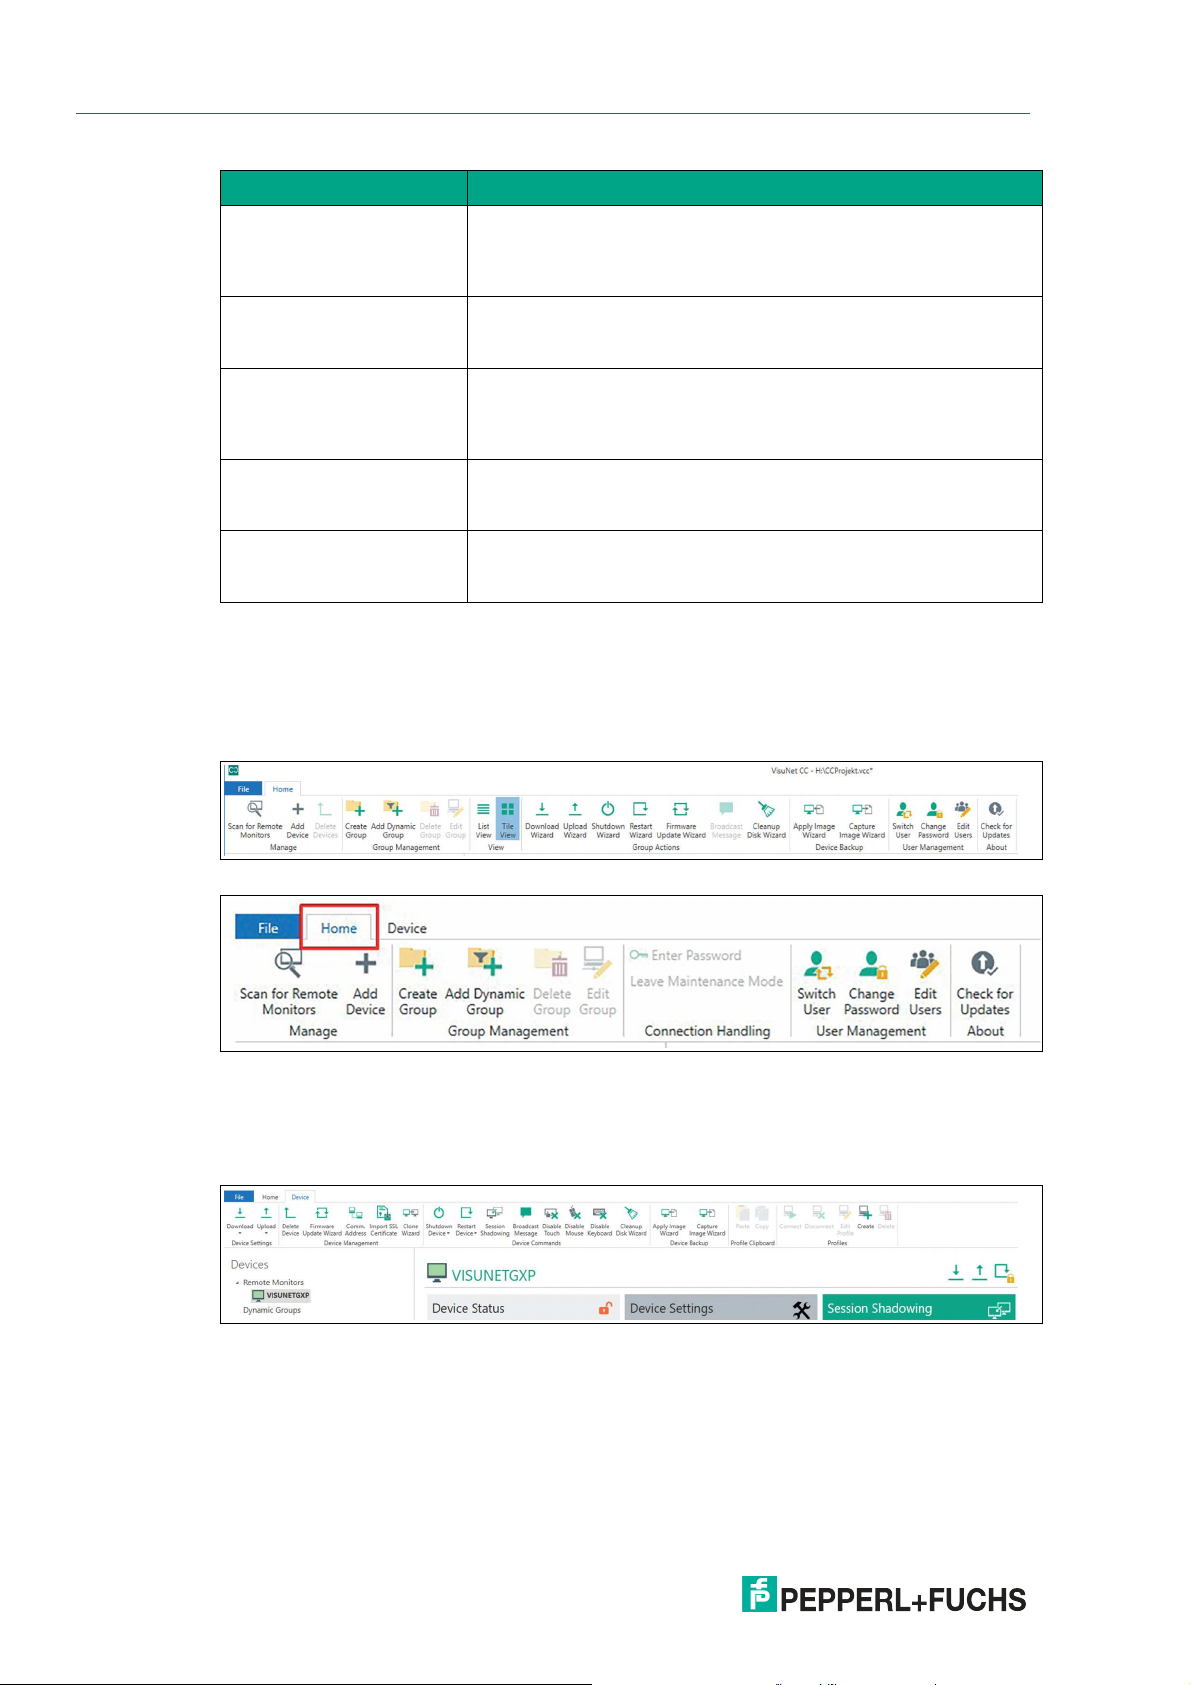
Home: Click the "Home" tab in the top-left corner of the VisuNet CC screen to enter
the home view.
There are two different “Home” ribbon toolbars, depending on if a device is selected or the
group view is active
Figure 3.5 Ribbon toolbar, when the group view is activated
Figure 3.6 Ribbon toolbar (reduced), when one device is selected
Device: the device ribbon toolbar will only appear when a device is selected
Click the "Device" tab in the top-left corner of the VisuNet CC screen to enter the
device view
12
Figure 3.7
For detailed information on the icons and their functions, see chapter 3.2.
2 Ribbon toolbar
On the toolbar, all available functions that can be performed in the mode currently in
use, are grouped together.
For detailed information on the icons and their functions, see chapter 3.2.
2020-12
Page 13
VisuNet Control Center Version 4
VisuNet CC Setup
3 Navigation menu
• The navigation menu lists all RMs/BTCs, that have been found during a network
scan or have been added manually.
• The navigation menu list shows offline RMs/BTCs, that have been added to the
project.
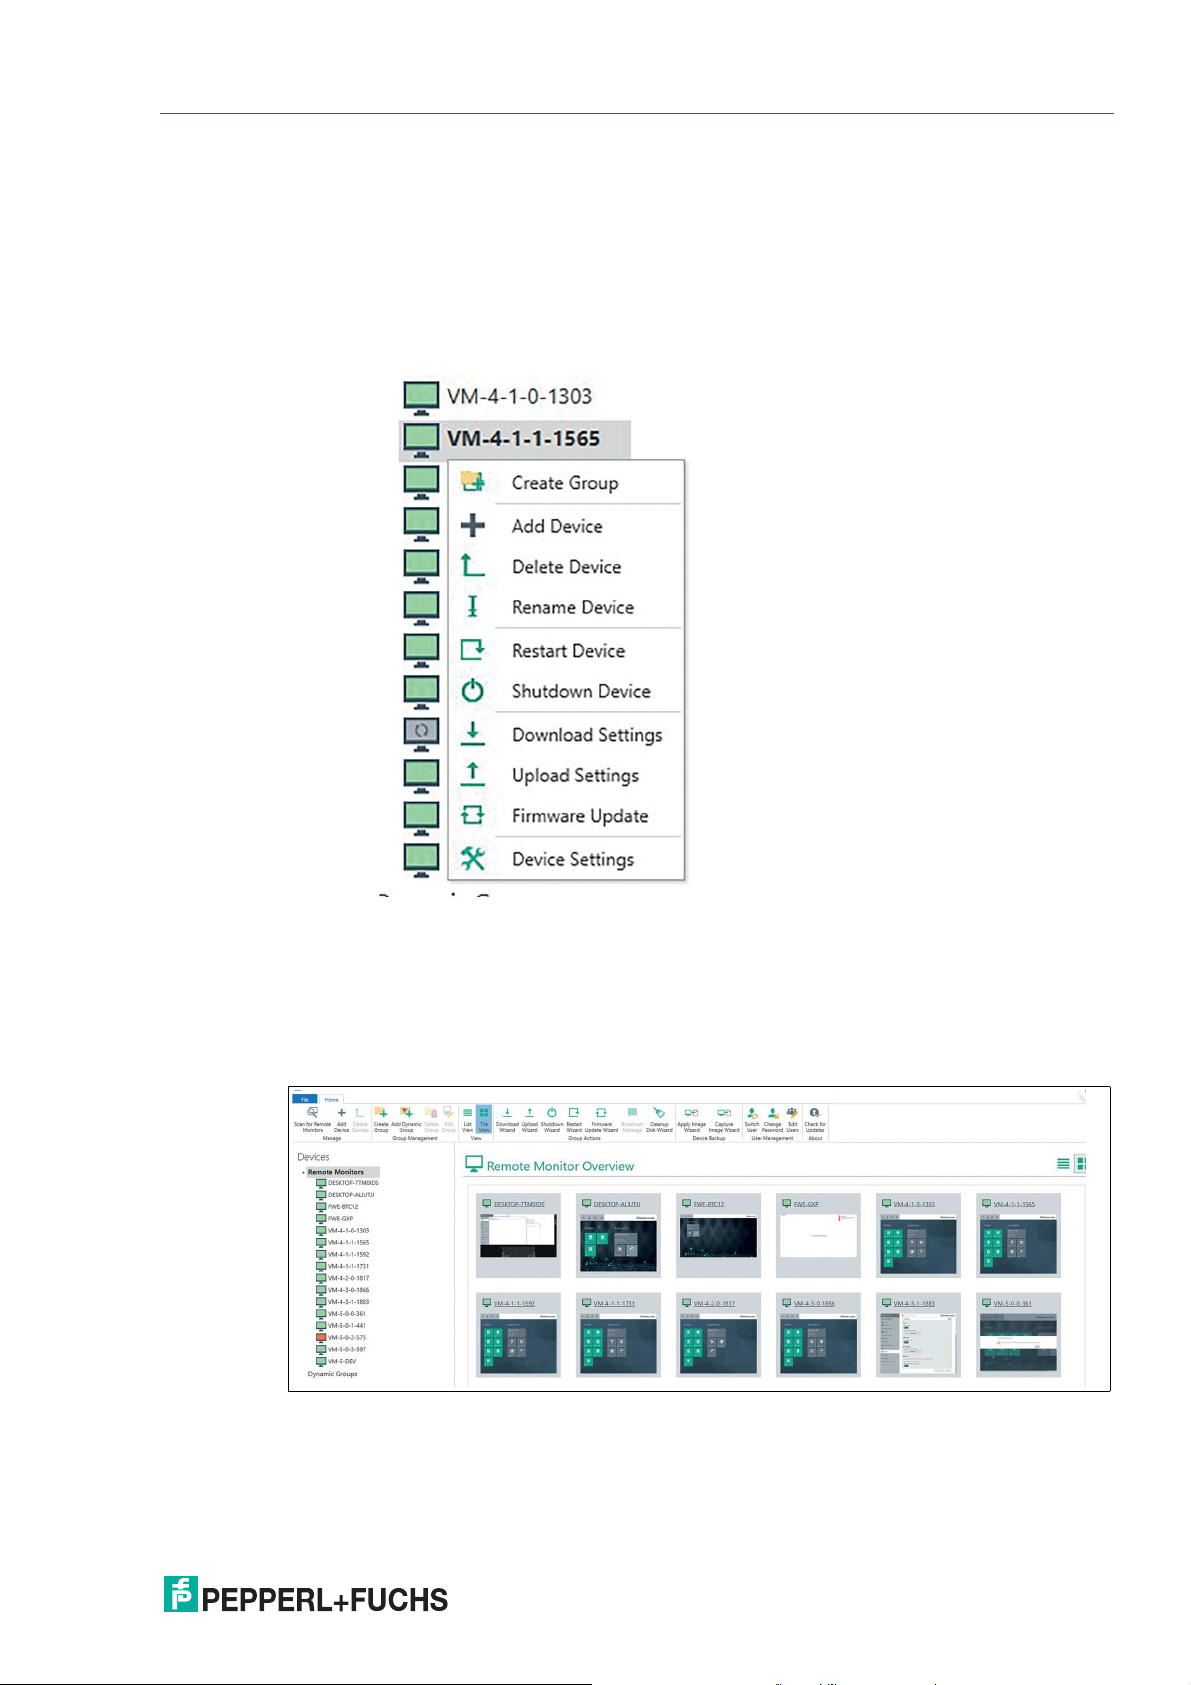
• The navigation menu allows RMs/BTCs to be added to group folders. With this
feature, RMs/BTCs can be grouped according to their location.
• The devices can be right-clicked to open a top down menu with quick access.
4 Main screen: In the center of the user interface, the main information is displayed.
Click "Remote Monitors" in the navigation menu to view an overview of all devices. "Tile view"
is the default mode. This mode displays a live screenshot of each device.
Figure 3.8
2020-12
Based on the mode currently in use, the information for a RM/BTC, a group of
RMs/BTCs or a general device overview either as list or tile view is presented.
13
Page 14

VisuNet Control Center Version 4
VisuNet CC Setup
Click either on the ribbon tool bar or in the upper right corner to switch to list
view. This mode displays a table of the devices with information about their online status, IP
addresses, VisuNet RM Shell version and serial number.
Figure 3.9
The single tiles or devices in the table are selectable by clicking. One or more RMs/BTCs can
be selected to perform either single or group actions (ctrl + click to select multiple devices in
the tile view).
After double-clicking, the selected device is displayed.
14
2020-12
Page 15
VisuNet Control Center Version 4
VisuNet CC Setup
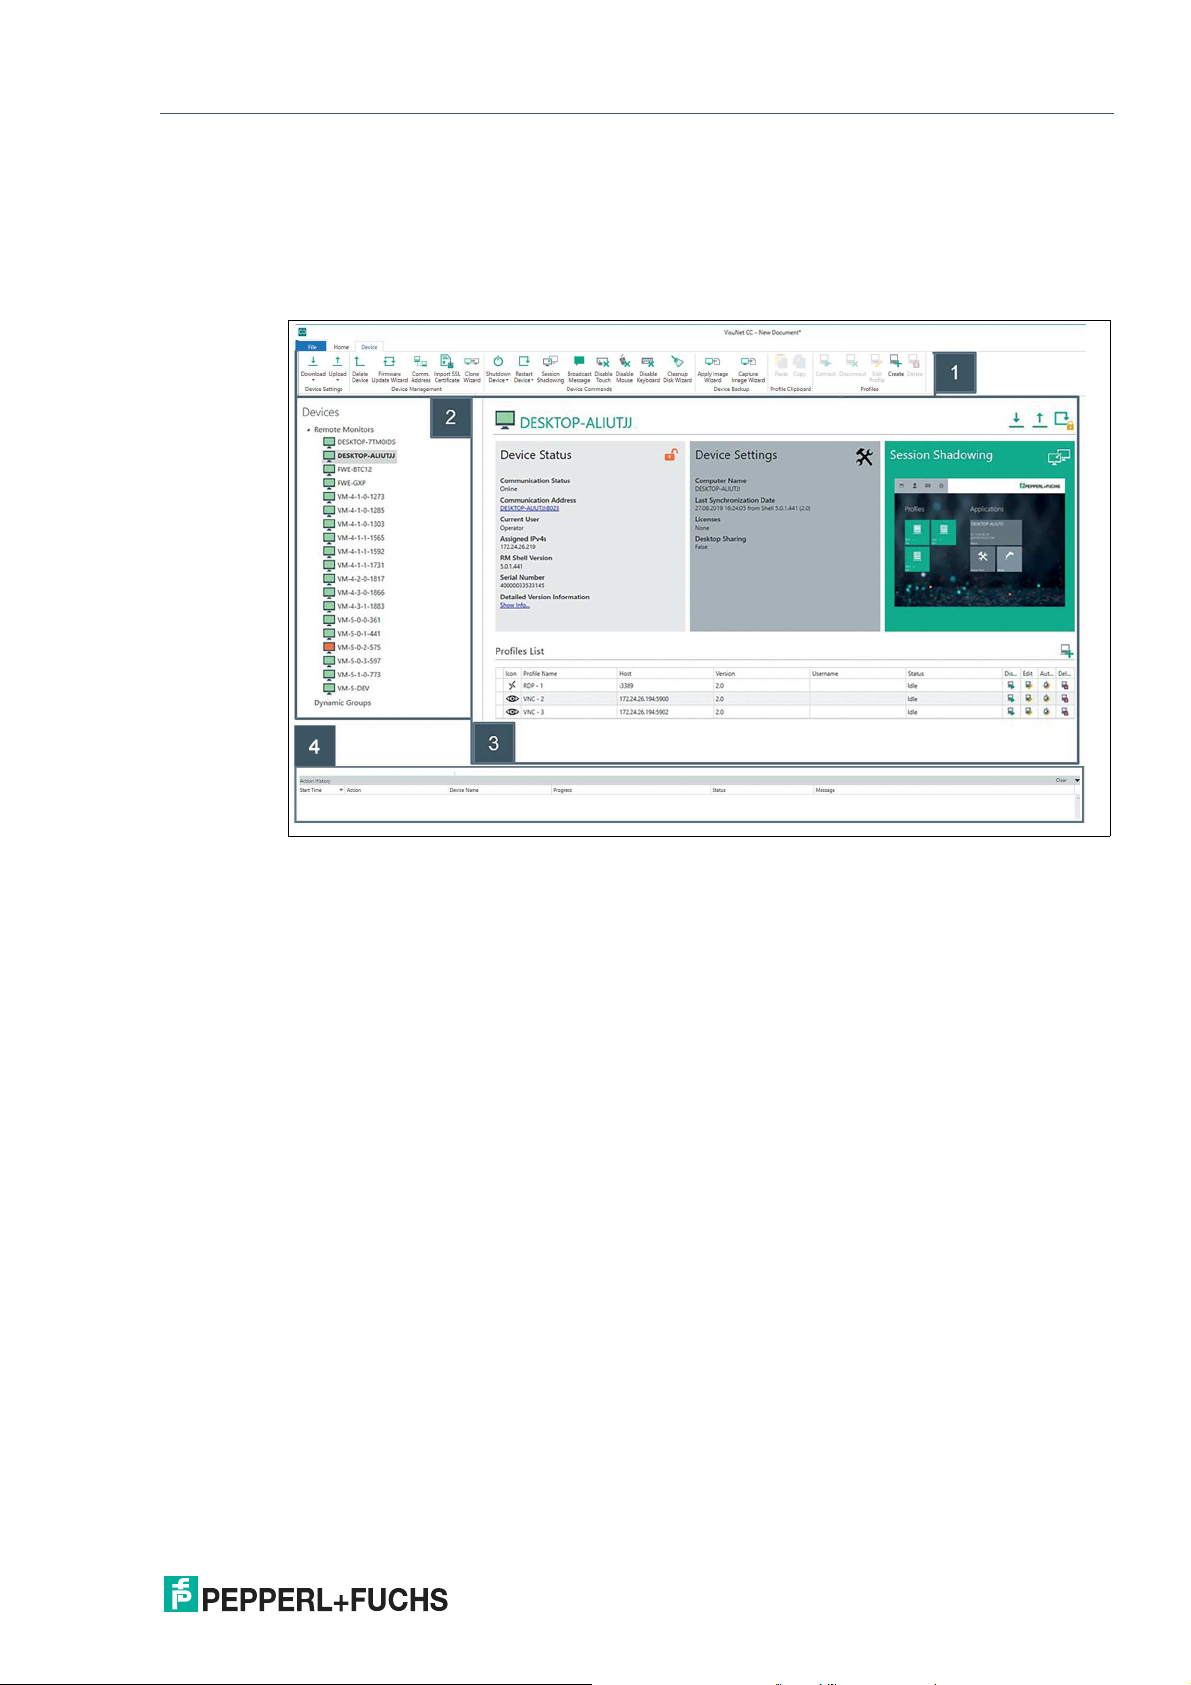
3.2 Device Structure
To get further information of the single devices, use the double-click either in the navigation
menu or at the list or tile view in the main screen.
This mode allows you to manage individual devices. The settings, information, and functions
available in this view are divided into 4 general sections.
Figure 3.10
1 Ribbon toolbar
For further information regarding the control and manage elements see chapter 5.
2 Navigation menu
3 Device function tiles including the list of profiles.
4 Action History list that contains all executed actions and all actions currently being
For further information regarding the control and manage elements refer to the
Device Function Tiles Chapter.
executed.
2020-12
15
Page 16
VisuNet Control Center Version 4
Manage (Home)
4 Manage (Home)
In this chapter group actions and features are explained. The following actions can be executed
when the remote monitor overview and the home tab are activated.
Figure 4.1
4.1 Group Management
Figure 4.2
The Group Management helps you to organize your remote monitors. The different groups are
the basis for the group actions.
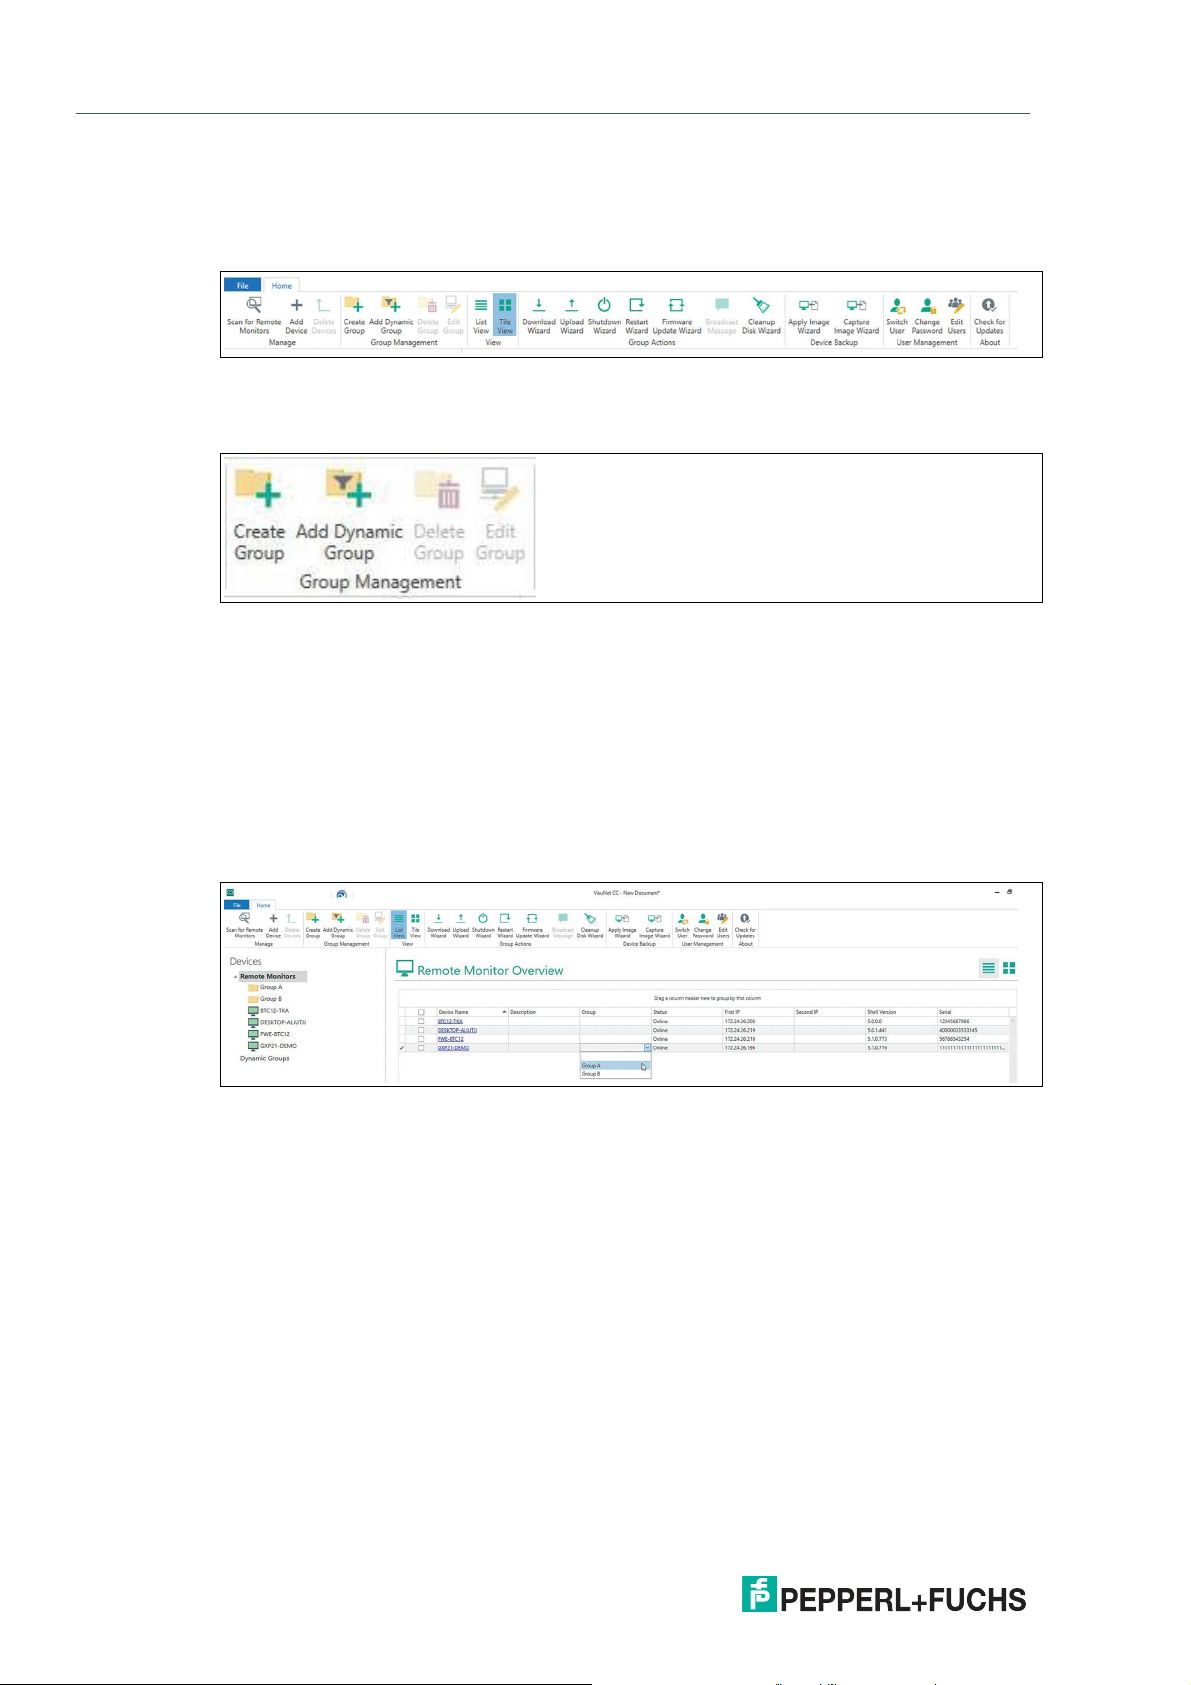
Static Groups
An RM / BTC may be assigned to either one or zero groups. These groups are represented by
a folder in the navigation menu. To assign a device to a group, click “Remote Monitors” in the
navigation menu from list view mode. Click the group cell for the RM / BTC that you would like
to assign, and assign it to the group you would like it to be in. Alternatively, click, hold, and drag
an RM / BTC into a group folder on the navigation menu. To keep the assignment of an RM /
BTC to a group, you must save the project.
Figure 4.3 Static groups
16
2020-12
Page 17
VisuNet Control Center Version 4
Manage (Home)
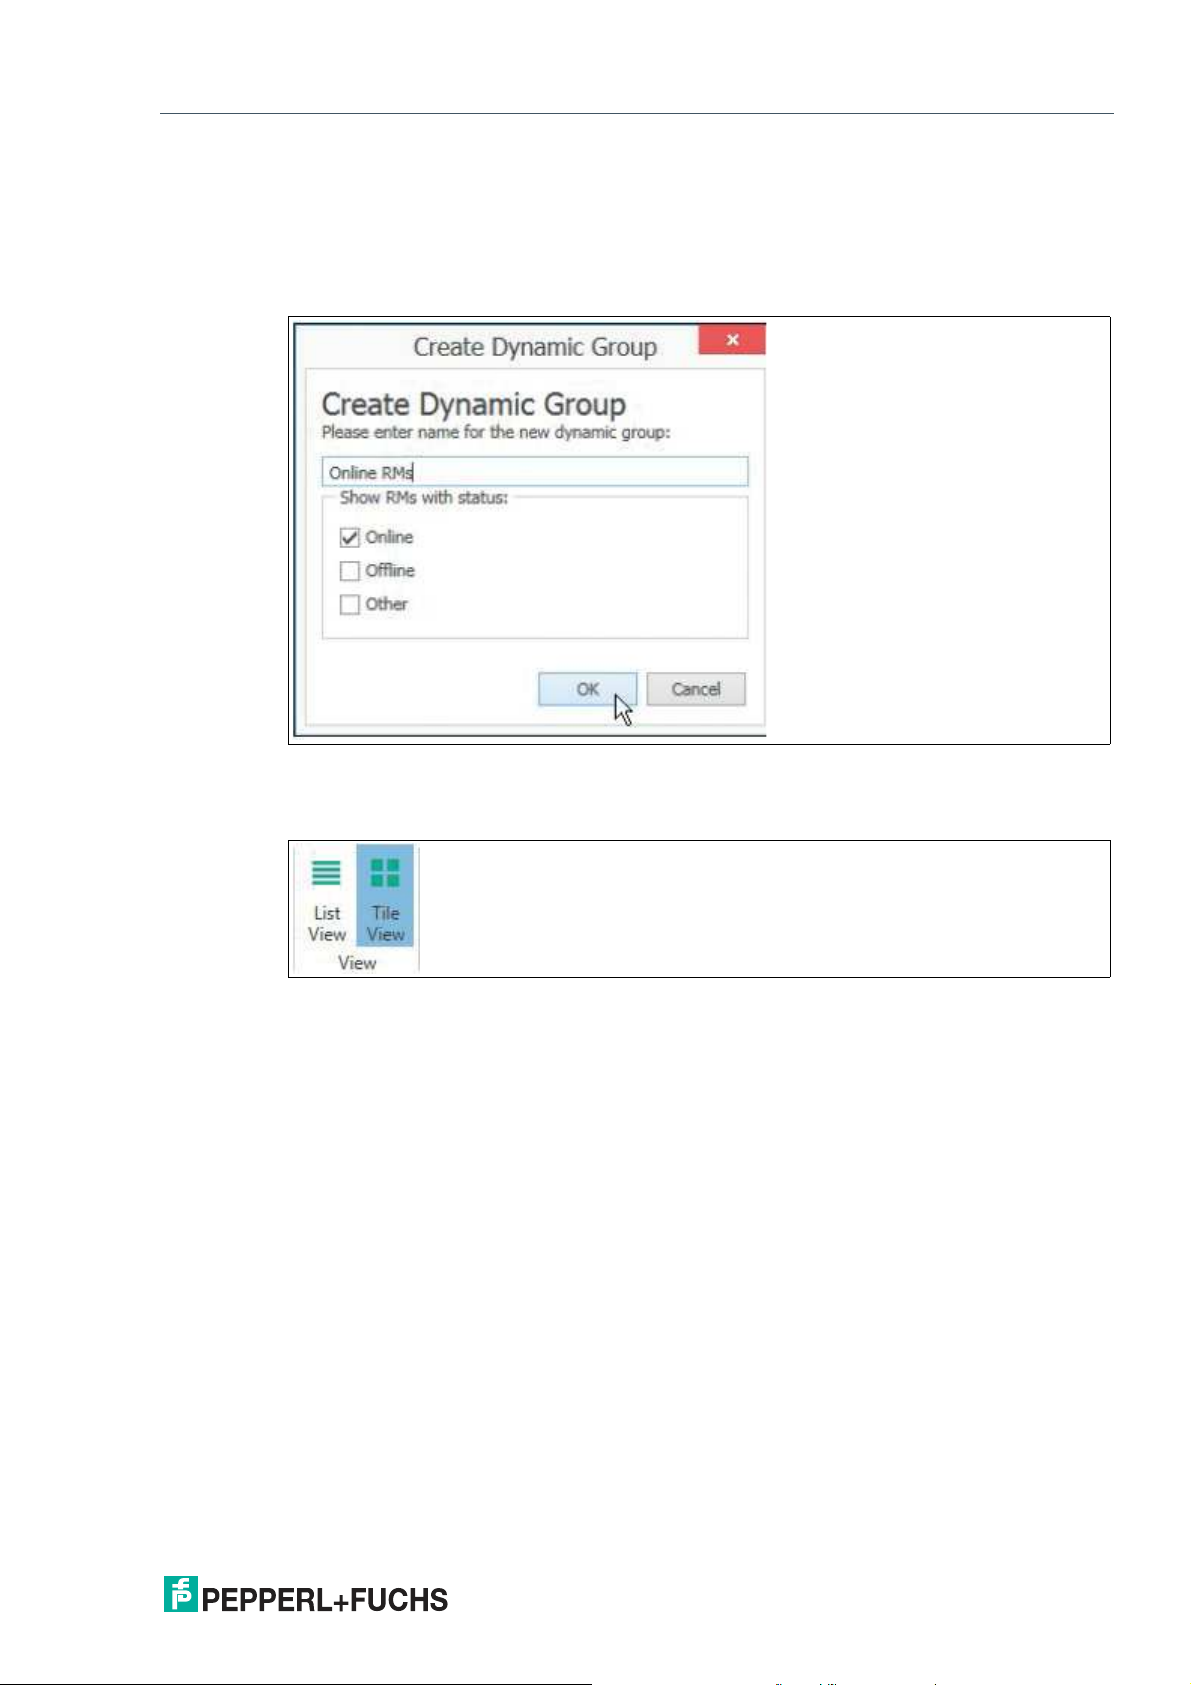
Dynamic Groups
Dynamic groups allow you to filter your list of RMs / BTCs based on their current online status.
To add a dynamic group, click “Add Dynamic Group” on the ribbon tool bar. You must assign it a
name, and you can select which online statuses you would like to see when viewing the
dynamic group. To keep a dynamic group, you must save the project.
Figure 4.4 Create dynamic group window
4.2 View
Figure 4.5
Depending on your required actions either chose List View or Tile view. In both views multiple
devices can be selected. Double click a device in either view or in the navigation menu to
switch from device group view to device detail view.
2020-12
17
Page 18
VisuNet Control Center Version 4
Manage (Home)
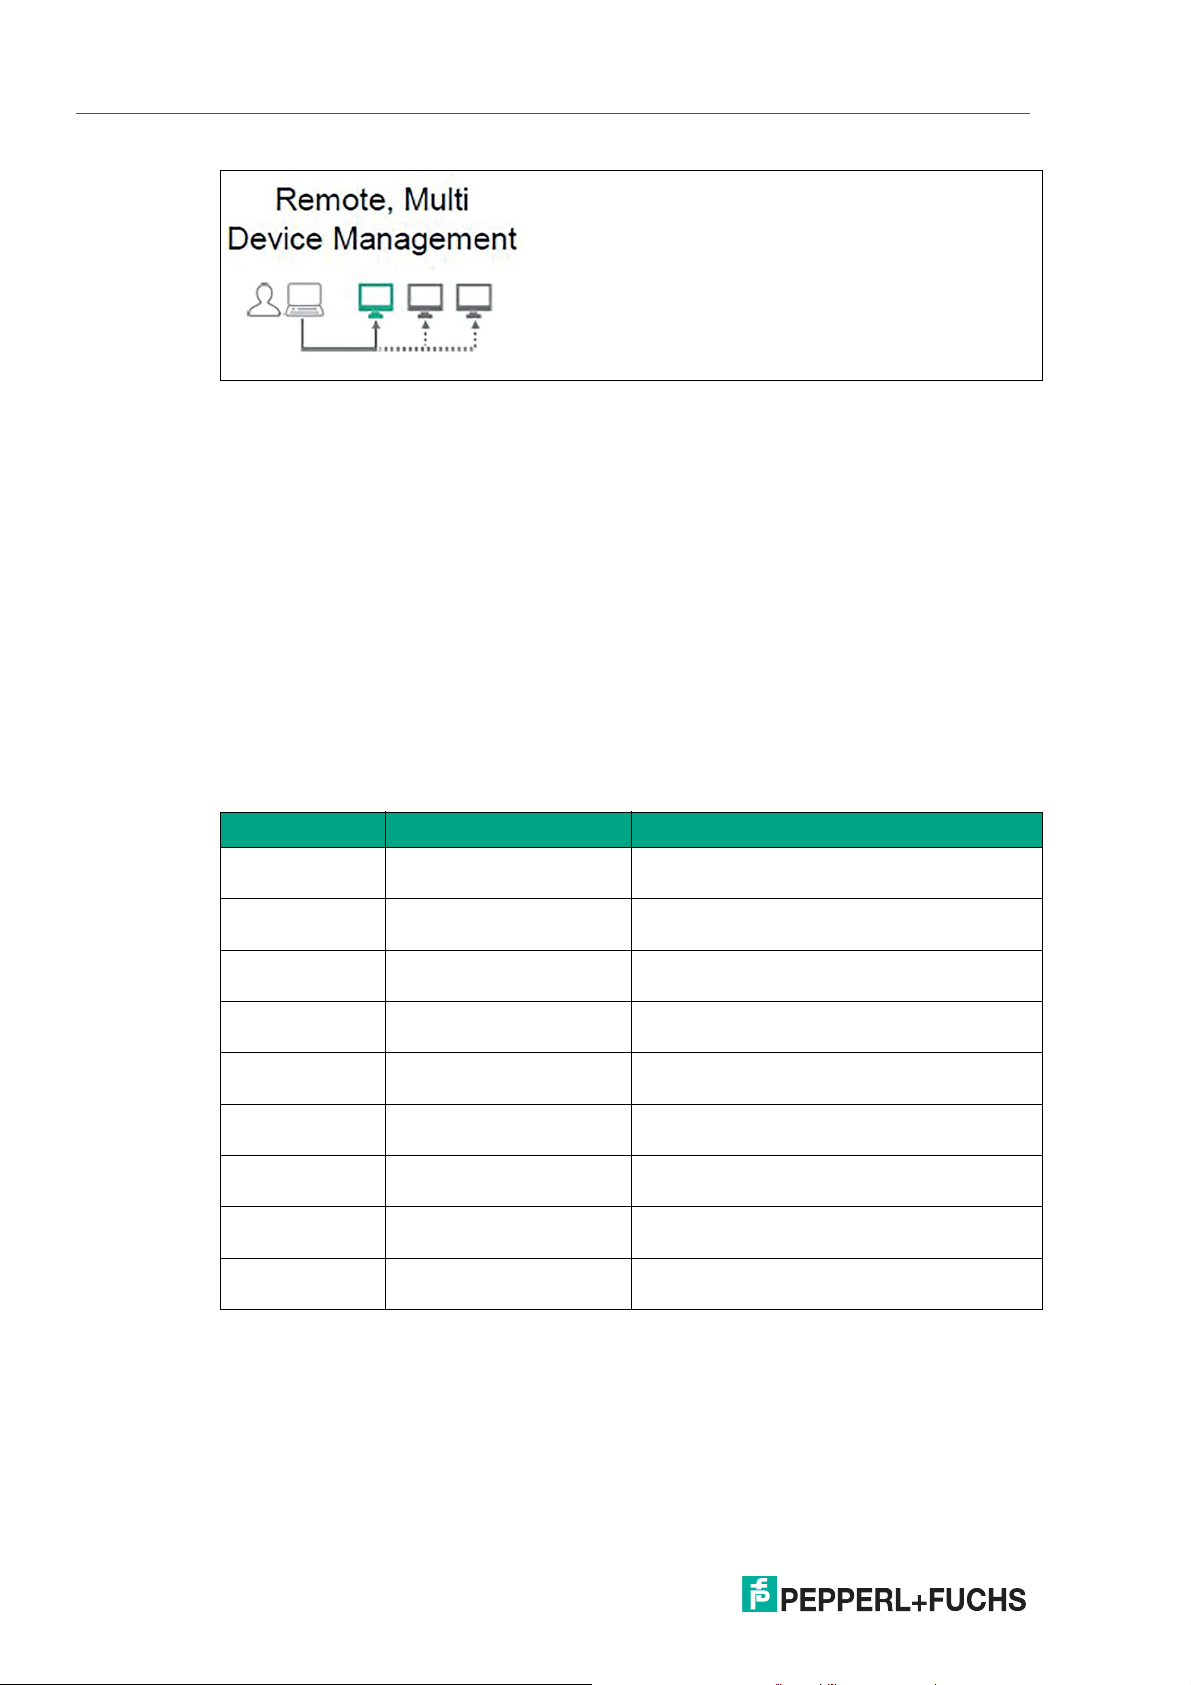
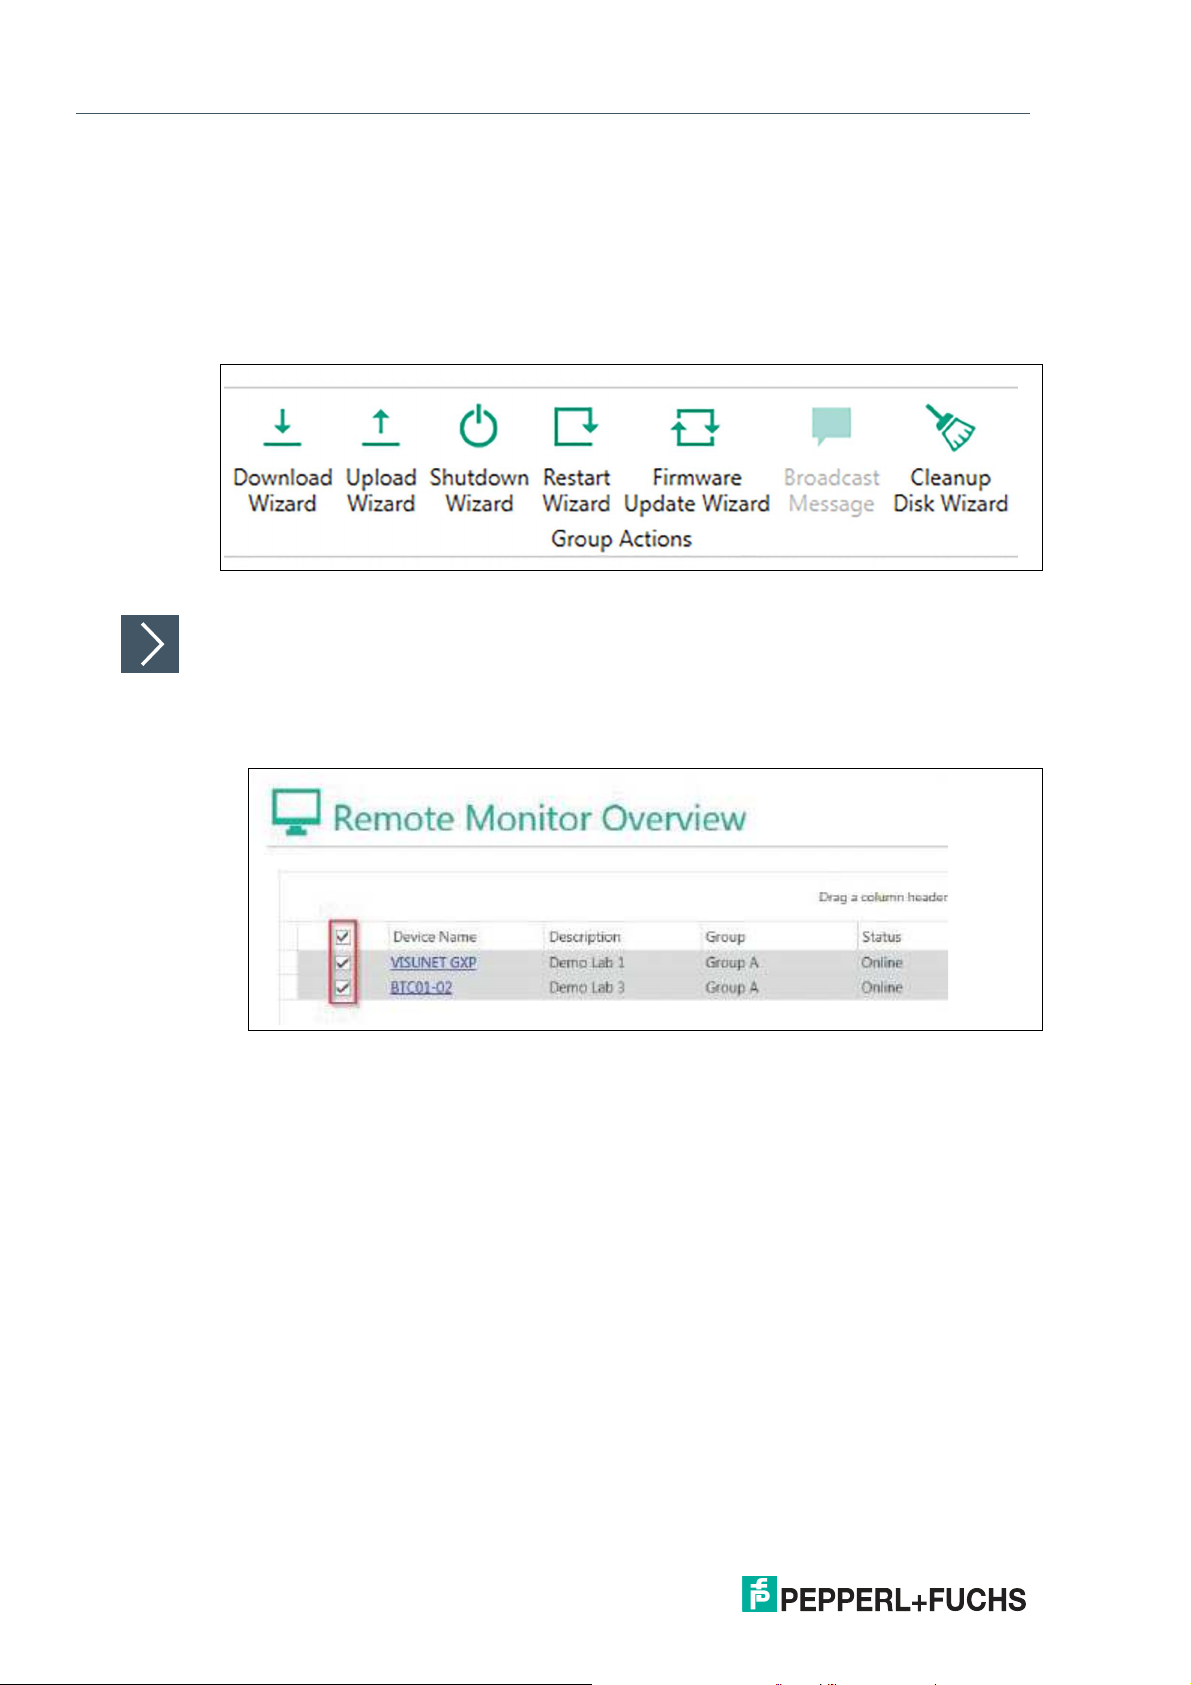
4.3 Group Actions
Group actions allow you to perform actions on multiple devices with only one time set-up. This
allows remote, multi device management which decreases set up times and therefore costs.
All group actions are performed via a Pepperl+Fuchs wizard, which guides you through the single steps of your action. The wizards support you when down- or uploading multiple device settings, shutting down or restarting multiple devices, update multiple devices with a newer
firmware or cleanup the disk of multiple devices.
Figure 4.6
Performing a Group Action via Wizard
Select your required devices by using one of the following methods:
1.
Switch to "List View" mode.
2.
Select one or more RMs / BTCs from your list of devices.
Figure 4.7 Selecting RMs for group actions
3.
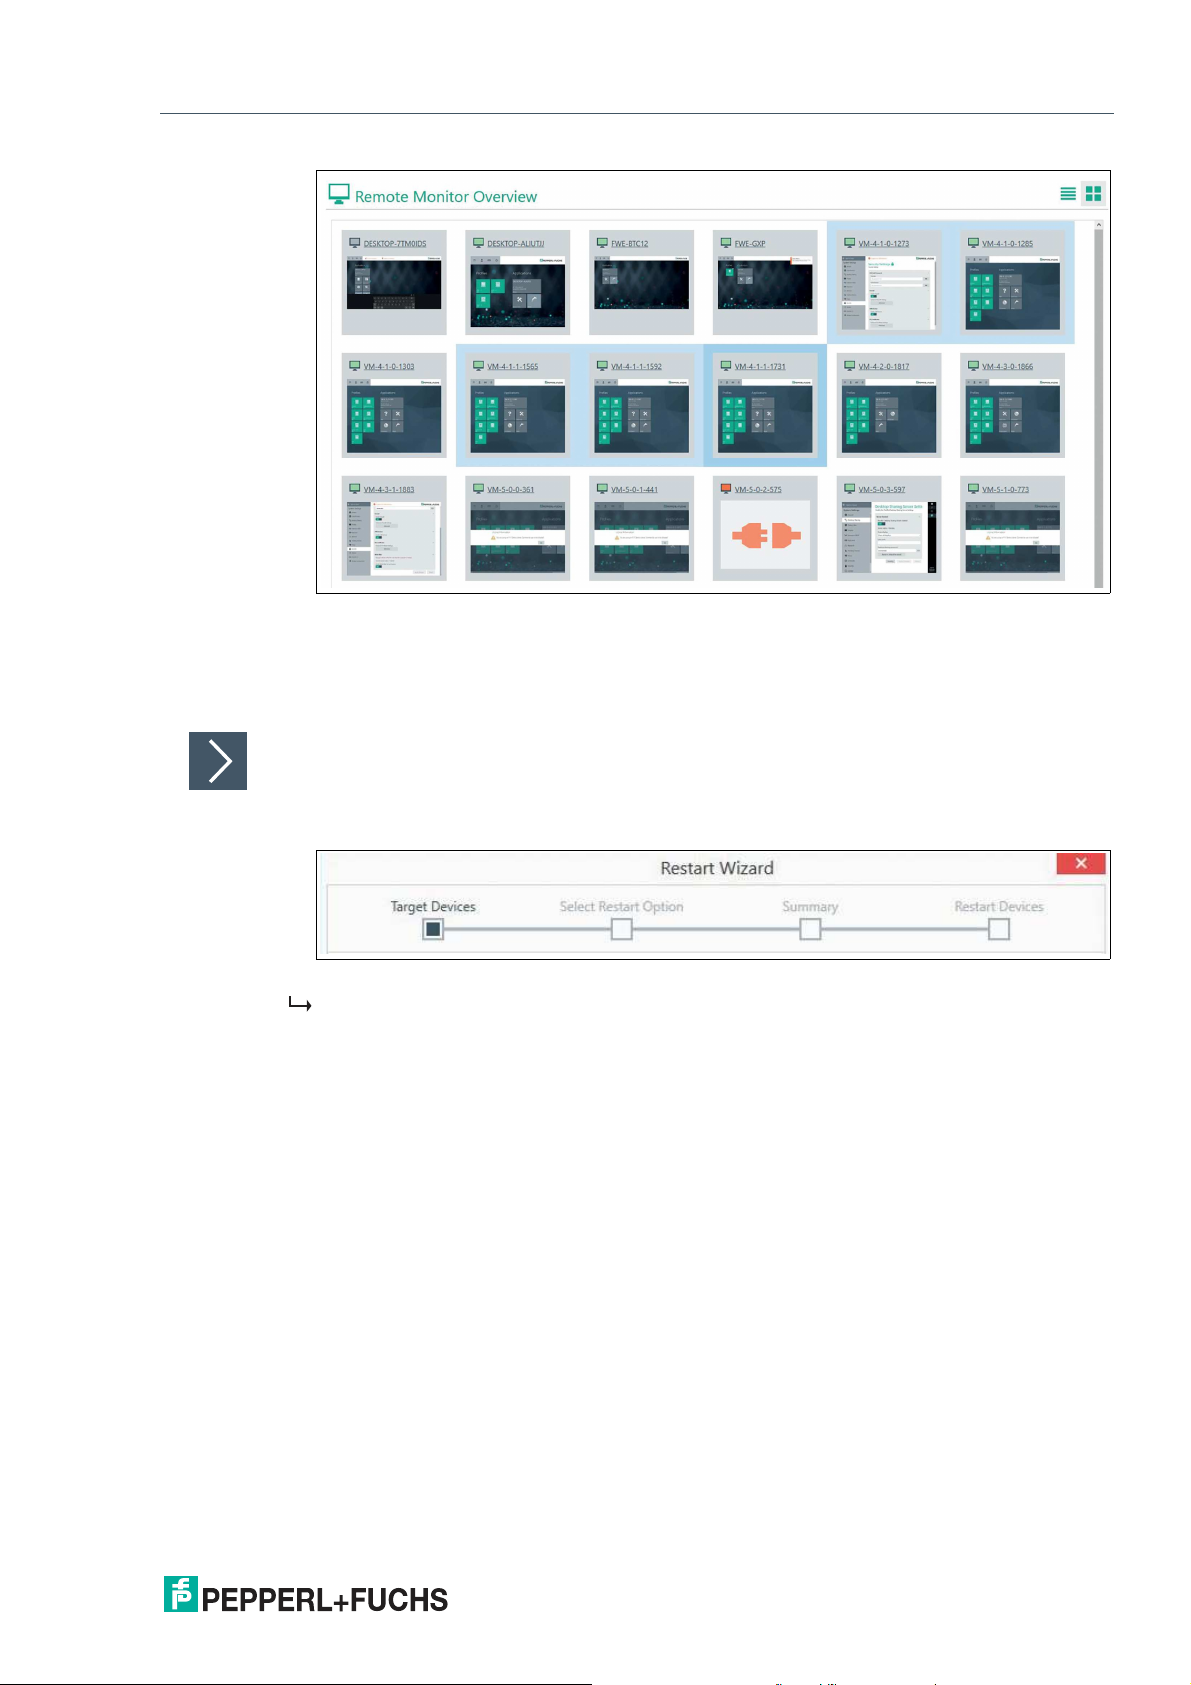
Switch to “Tile View” mode.
18
2020-12
Page 19
VisuNet Control Center Version 4
Manage (Home)
Figure 4.8
4.
Select one or more RMs / BTCs by holding down the Ctrl key and click any device you would
like to add.
5.
Perform the same selection procedure within the static or dynamic groups.
Performing Action
1.
Click the required action icon.
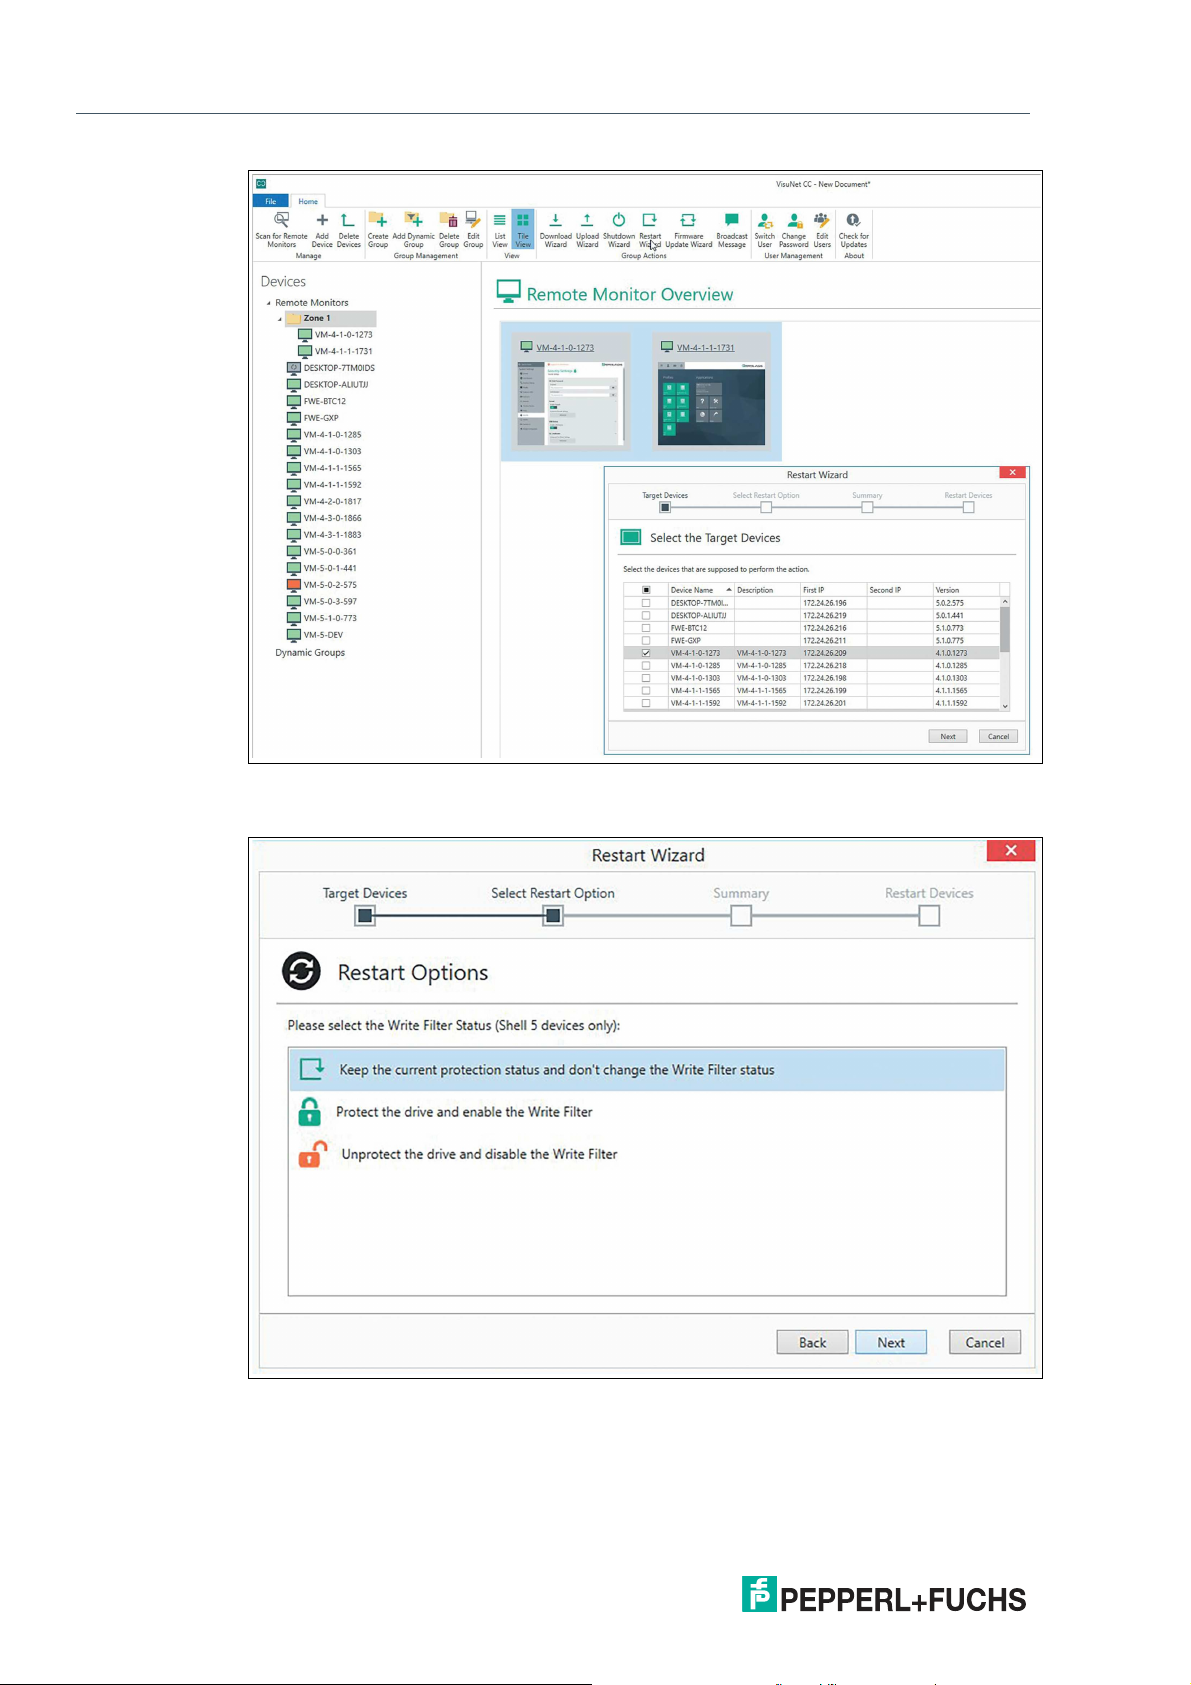
Figure 4.9 Restart Wizard: Target Devices
A window of the wizard appears that guides you through all the actions.
2.
Double check if the right devices are selected. Further devices can be added or removed from
the selection.
2020-12
19
Page 20
VisuNet Control Center Version 4
Manage (Home)
3.
Figure 4.10
Click "Next".
20
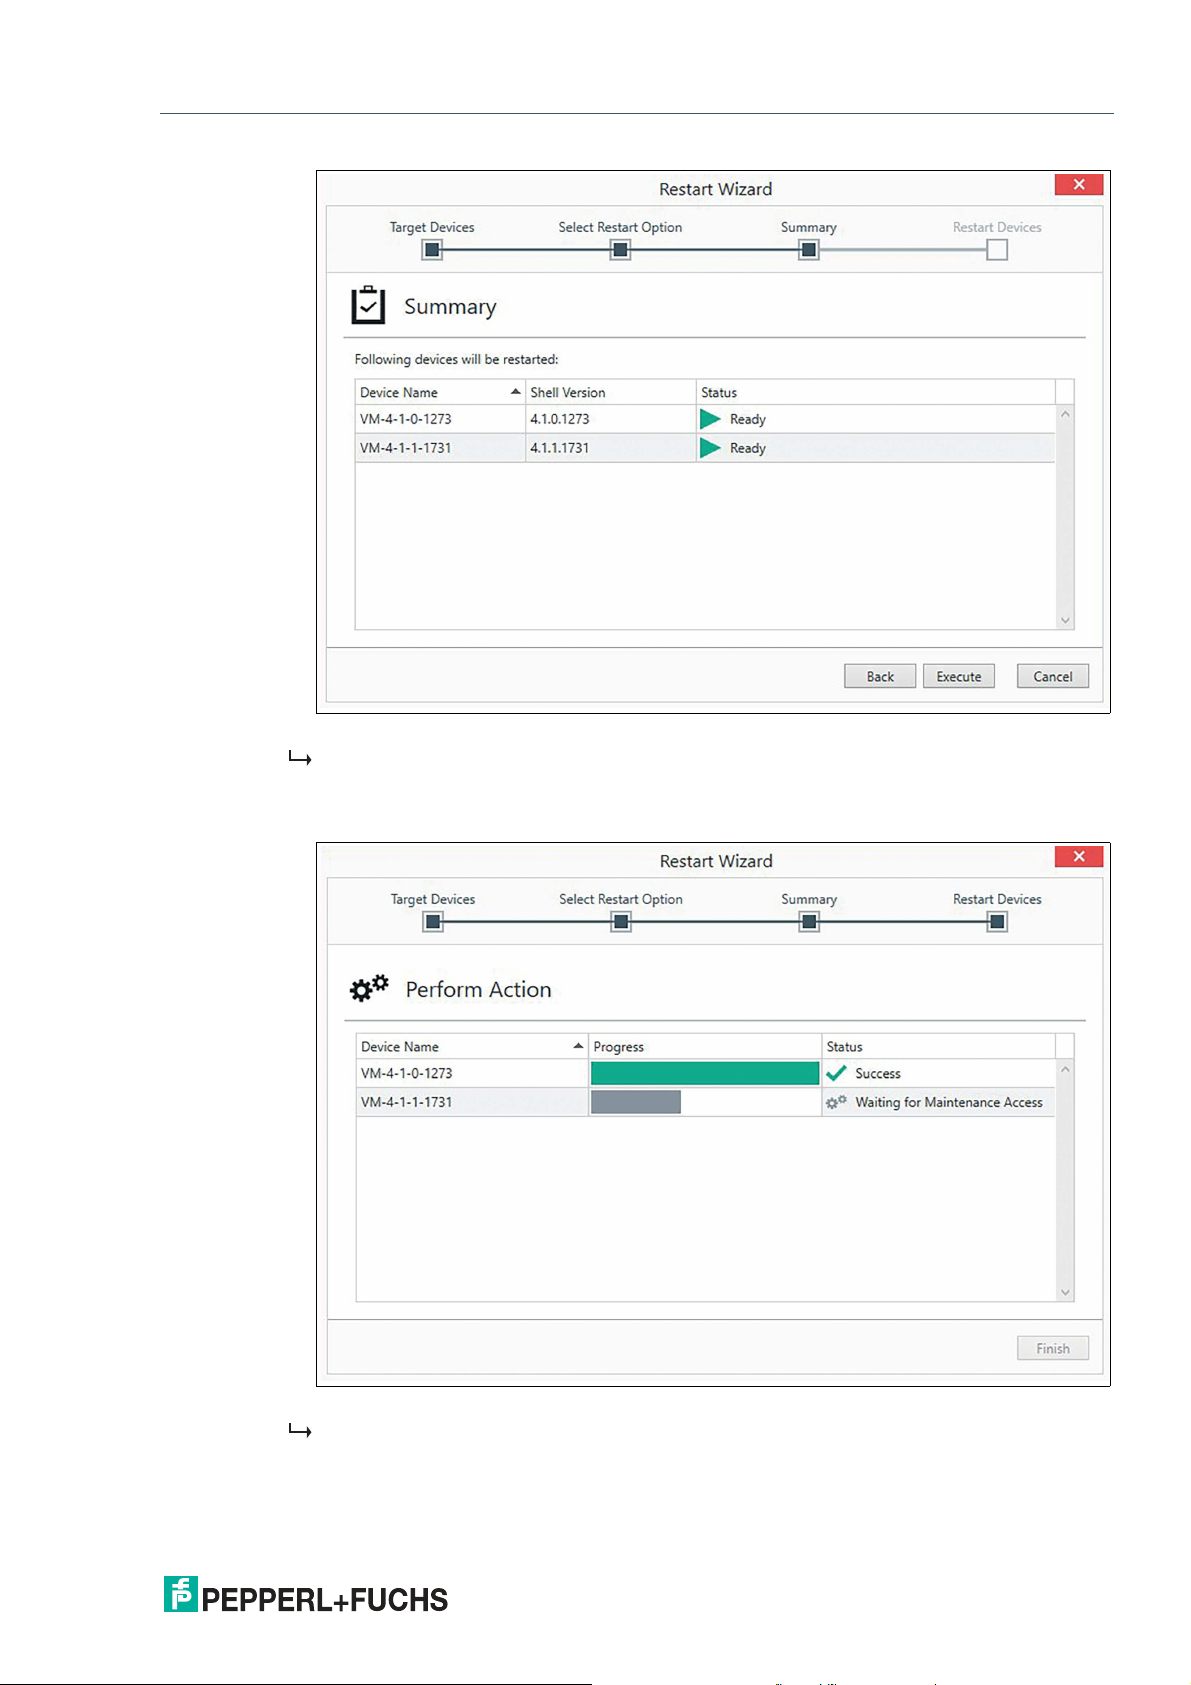
Figure 4.11 Restart Wizard: Select "Restart Options"
4.
Select one of the options and click "Next".
2020-12
Page 21
VisuNet Control Center Version 4
Manage (Home)
Figure 4.12 Restart Wizard: Summary
In the ongoing steps you always have the option to move backwards and adjust your selec-
tion.
5.
In the Summary recheck your selections and click "Execute" to proceed further.
Figure 4.13 Restart Wizard: Restart Devices
When every device status is set to "Success", the performed action is completed and the
wizard can be finished.
2020-12
21
Page 22
VisuNet Control Center Version 4
Manage (Home)
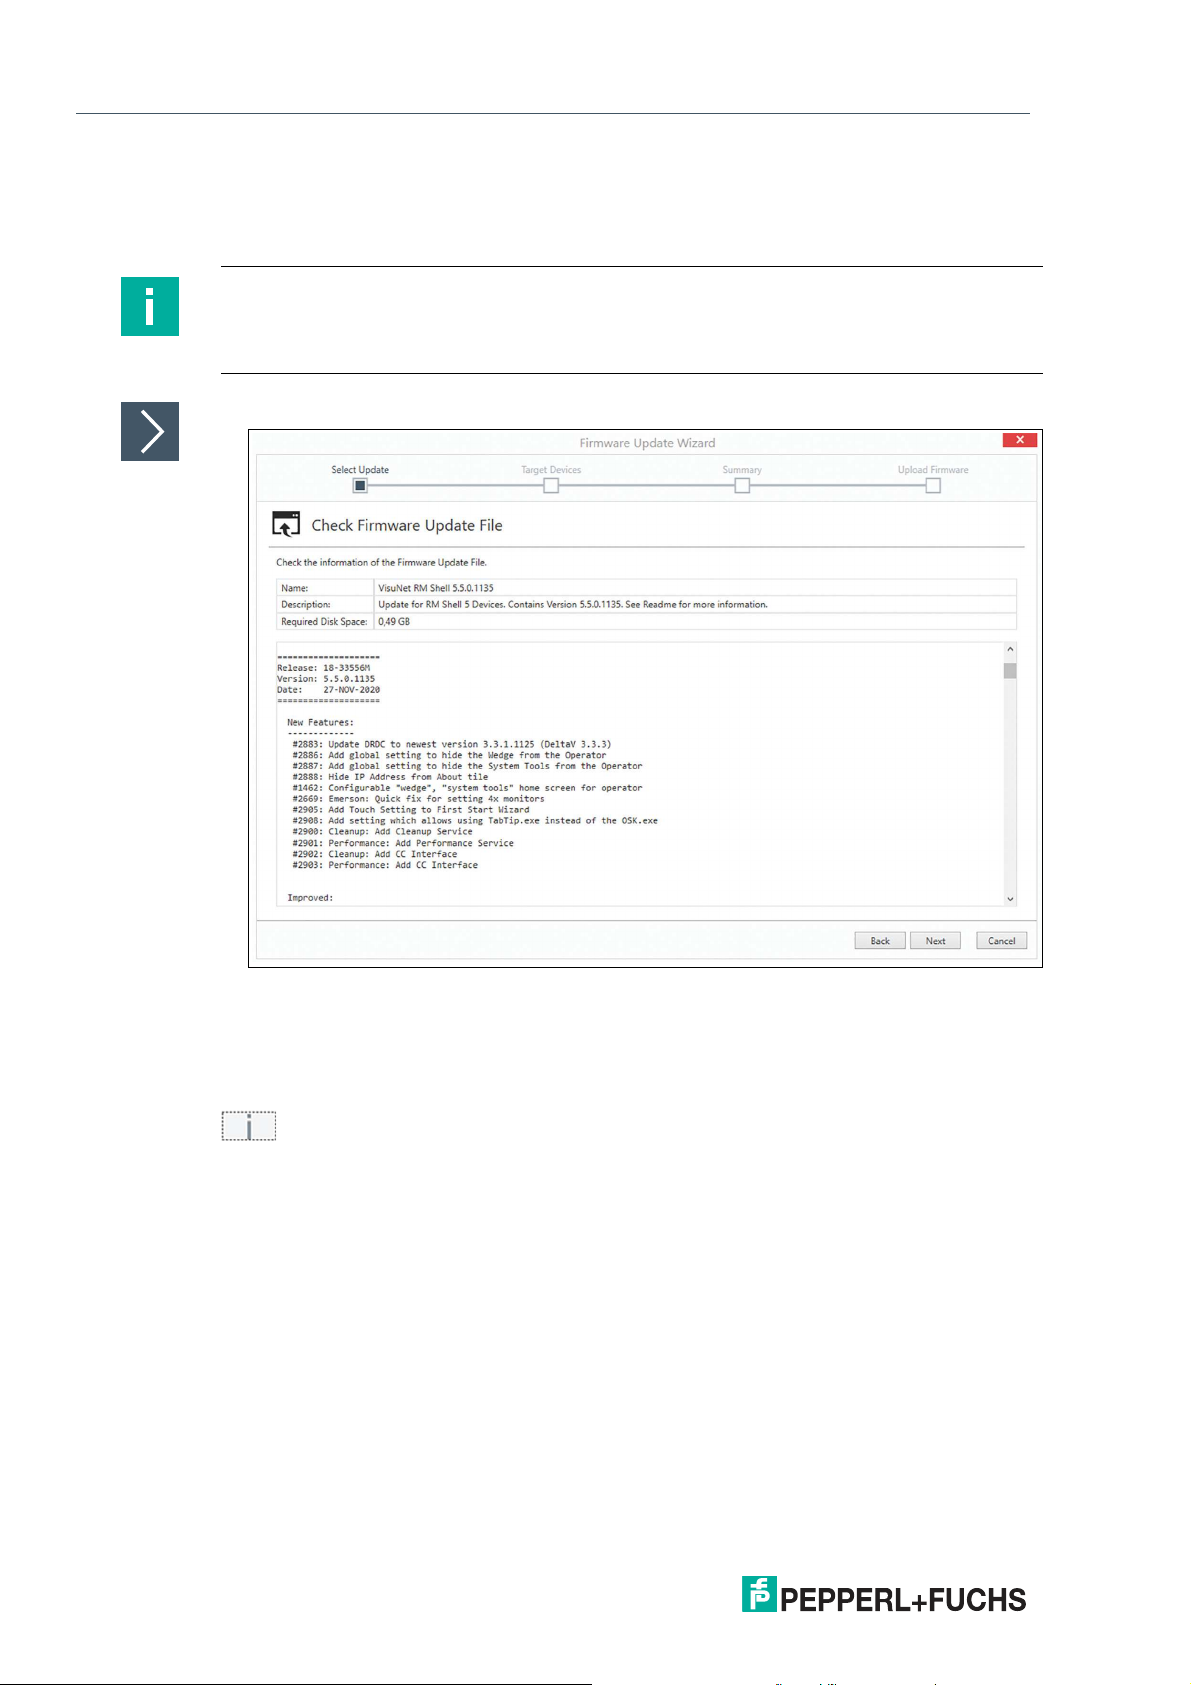
Firmware Update Wizard
The Firmware Update Wizard supports you in updating your latest version of the firmware e.g.
VisuNet RM Shell 5.0.2 to VisuNet RM Shell 5.0.3.
Note
The Firmware Update Wizard is not the right tool to upgrade VisuNet RM Shell 4 to VisuNet RM
Shell 5. Use the Quick Start Guide which is provided when purchasing the Upgrade Kit to get
further information.
Updating Firmware
Figure 4.14 Firmware Update Wizard: Select Update
1.
Select "Firmware Update File" and click "Open". You can find the latest available update on
www.pepperl-fuchs.com and download the Zip file.
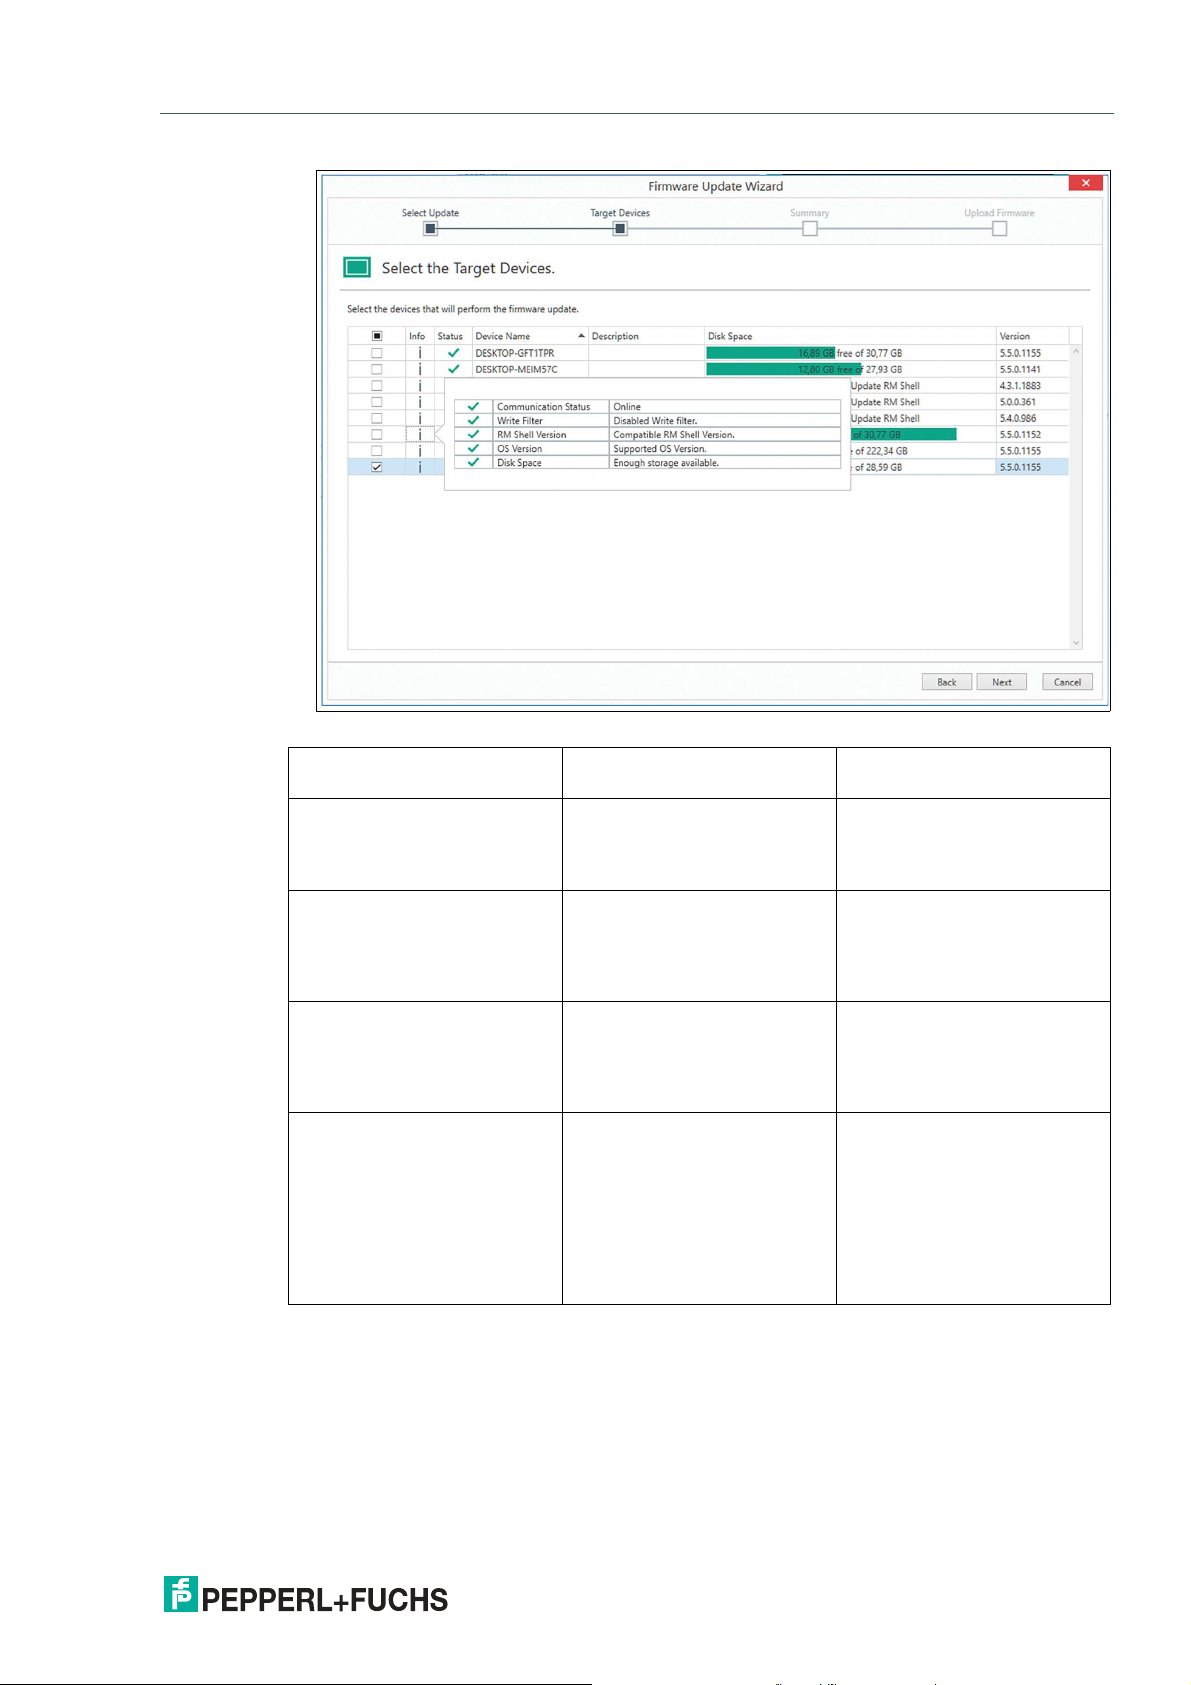
2.
In step "Target devices", select required devices as described above. Double check if the right
devices are selected. Further devices can be added or removed from the selection. By clicking
, get detailed information about the selected device regarding communication status,
enabled or disabled Write Filter or if your installed versions are compatible and supported. If
your status has a red exclamation mark, follow the information provided.
2020-12
22
Page 23
VisuNet Control Center Version 4
Manage (Home)
Figure 4.15 Select your target device
Communication Status Offline Make sure your device is
Write Filter Write Filter is enabled. Please
deactivate the write filter.
RM Shell Version Incompatible RM Shell Ver-
sion.
OS Version Unsupported OS Version.
Please download the relevant
update for your OS.
Disk Space Not sufficient storage avail-
able. Please use the Cleanup
Disk Wizard.
online.
Please refer to chapter
"Device Commands" to disable the Write Filter by restarting the device.
Refer to the RM Shell and
Image version in the Device
Status to check on your RM
Shell version. Use the correct
update, available online.
Refer to the Software information in the About tile in your
RM Shell to check on which
Operating System your device
is based on.
Please use the Cleanup Wizard. If the storage after cleaning up the disk is still not
sufficient we recommend to
update your device with the
latest factory reset version
>6.0. This will adapt your partition and increase the available storage.
3.
Click "Next".
4.
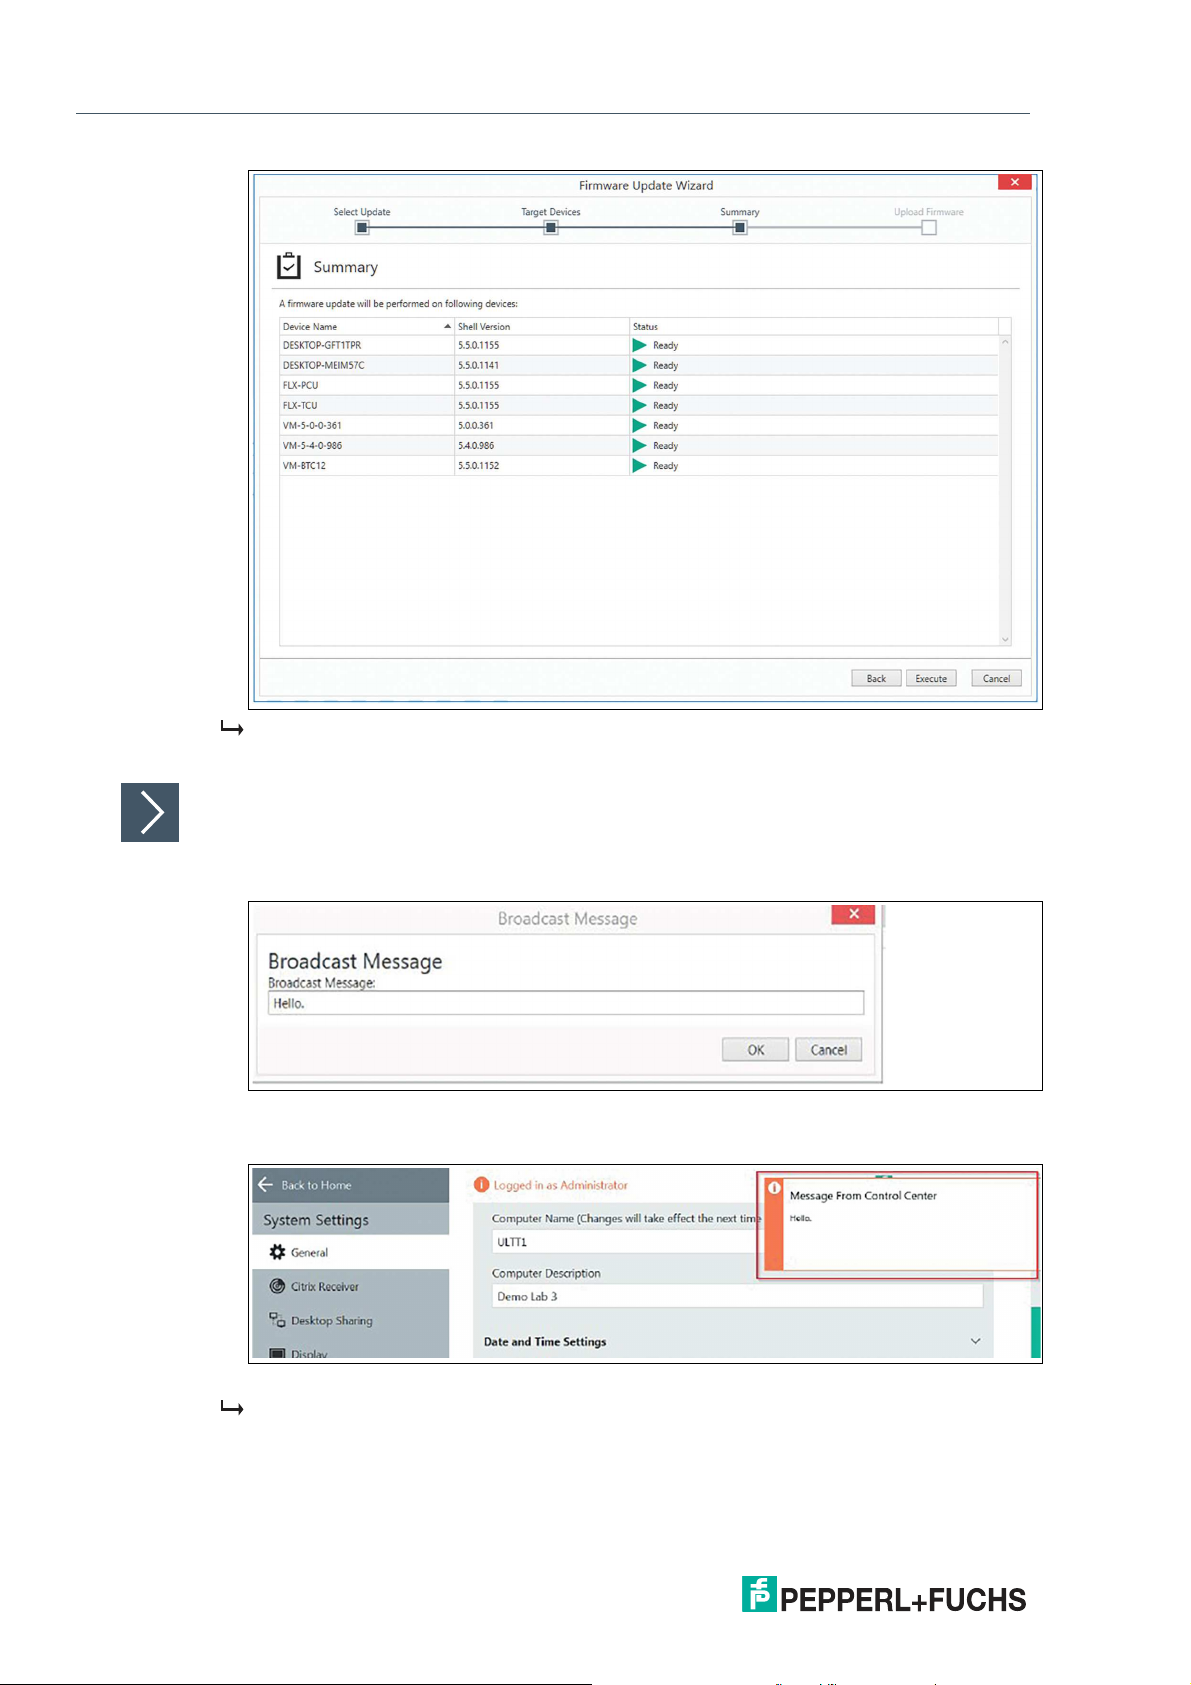
In the summary recheck your selections and click "Execute" to proceed further.
2020-12
23
Page 24
VisuNet Control Center Version 4
Manage (Home)
When every device Status is set to "Success", the performed action is completed and the
wizard can be finished
Broadcast Message
1.
With one or more RMs selected, click the "Broadcast Message" icon.
Figure 4.16 Broadcast Message Window
2.
Type a message into the space provided. Click "OK".
24
Figure 4.17 Fly-in message on RM Screen
The text that you entered appears in a fly-in message to the users of the selected RMs.
2020-12
Page 25

VisuNet Control Center Version 4
Manage (Home)
4.4 Device Backup
The Device Backup allows you to either capture or apply images to multiple devices. Wizards
guide you through these actions. Please refer to Chapter 5.5 to get further information.
4.5 User Management
Figure 4.18 User Management
VisuNet CC allows a project to be protected from access by unauthorized personnel via a user
management system. For each project, an individual user structure can be created that allows
you to assign permissions to individual user accounts. Further, a user group mechanism allows
user to be added to groups and to assign group-based permissions to the users.
Figure 4.19 Add User Window - Local User
2020-12
25
Page 26
VisuNet Control Center Version 4
Manage (Home)
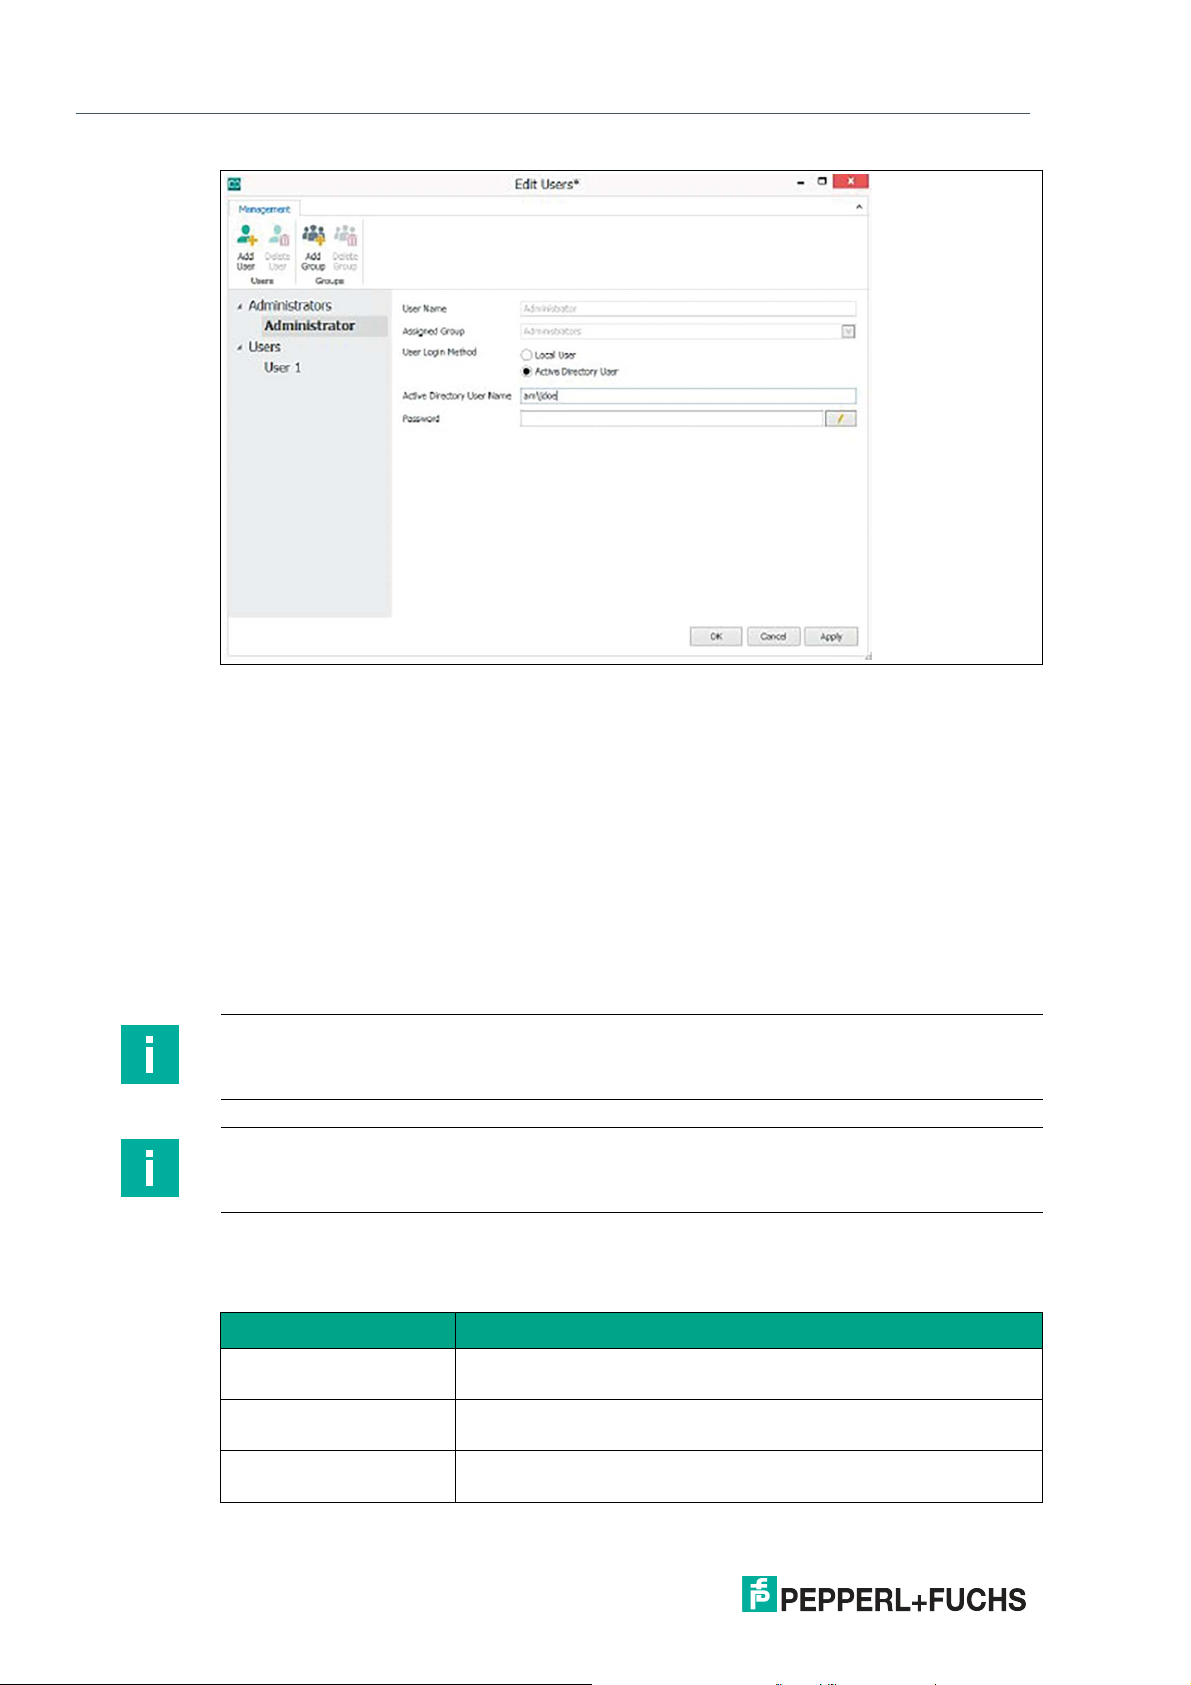
Figure 4.20 Add User Window - Active Directory User
User authentication can be configured by the "Administrator" account to be either a local user
or an active directory user.
• Local user: Local user accounts are only stored within a Control Center project file and
may have a password assigned to them, which they will need to enter to open the project.
• Active Directory user: Active directory users have an active directory user name associ-
ated with their account. When opening a project, if the logged-in Windows user's account
is associated with a Control Center project account, the user will be automatically logged
into the project under that name. The local user account may also have a password
assigned to it as an alternative means of accessing it.
Per default, every project has an "Administrator" user account, an "Administrator" user group
that has every privilege, and a "Users" user group that will act as the default group for newly
created users.
Note
If you create a new project, you will automatically be logged in as Adminsitrator.
Note
By default, the Administrator user has no password set. To protect the project from
unauthorized access, always set a strong password for the Administrator.
User accounts must be assigned to a single user group, which may have any number of VisuNet CC permissions assigned to it. The following permissions can be set for a user / user
group:
26
Function Description
Allow upload settings Allows a user to upload configuration to an RM, import an SSL cer-
Allow Session Shadowing
Remote Control
Allow Viewing of Session
Shadowing
tificate to an RM, and perform a firmware update on an RM.
Allows a user to take control of an RM while in session shadowing.
Allows a user to view an RM via session shadowing.
2020-12
Page 27
VisuNet Control Center Version 4
Manage (Home)
Function Description
Allow Editing Profiles Allows a user to create, delete, and edit connection profiles.
Allow Starting/Stopping
Profiles
Allow Editing User Privileges
Allow Local Commands Allows a user to enable or disable an RM’s keyboard, mouse, and
Allow Editing of Project
Structure
Allow Firmware Update Allows user to Update single or multiple Devices with the latest
Table 4.1
4.6 About
Allows a user to start and stop the connection of profiles.
Allows a user to access the “Edit Users” screen and add, delete,
and modify users and user groups.
touchscreen. In addition the user is allowed to reboot, and shut
down the devices as well as using the Apply/Capture Wizard.
Allows a user to scan for RMs, manually add an RM, remove an
RM, or assign an RM to a group.
Firmware.
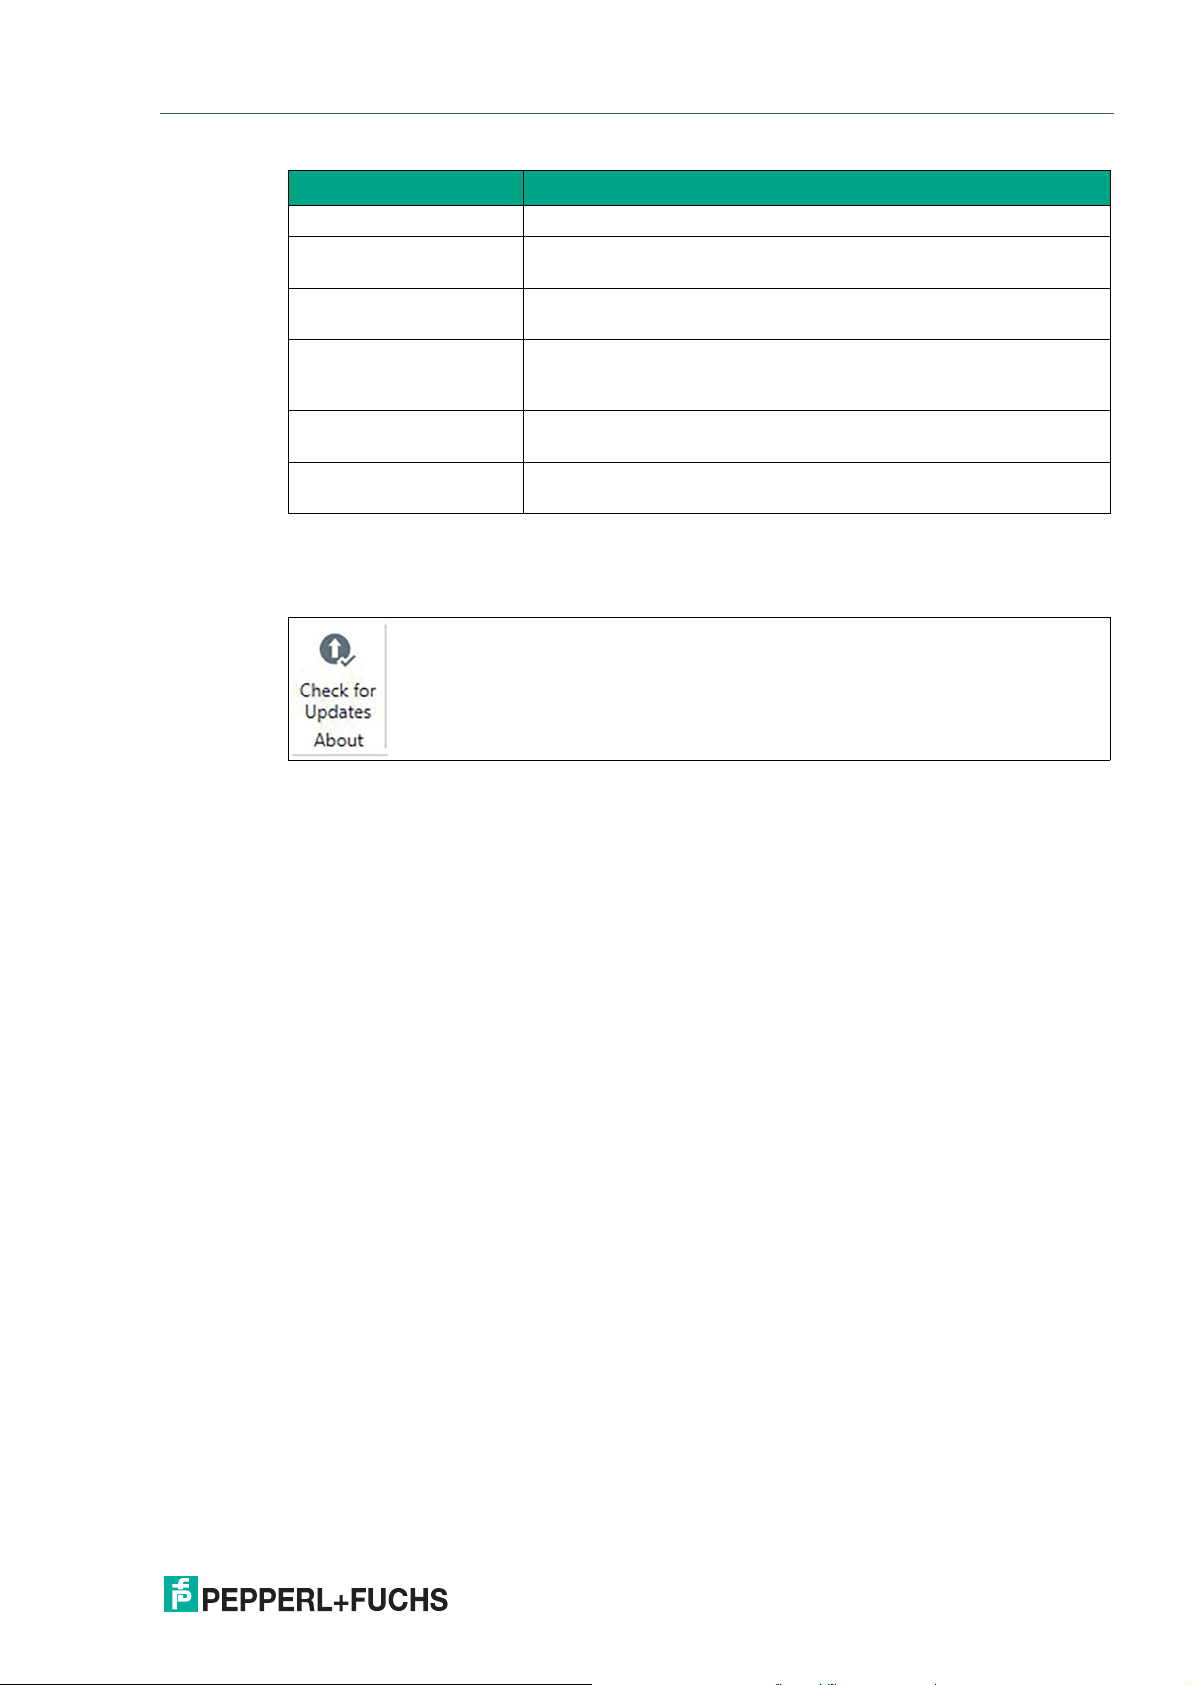
Figure 4.21
With this button you can check if any Updates for VisuNet Control Center are available. To use
this function the device needs to have Internet access. Updates can be directly installed to the
device.
2020-12
27
Page 28

VisuNet Control Center Version 4
Manage (Device)
5 Manage (Device)
To change to the device view, double Click the required device in the navigation menu or main
screen.
Overview of the Device Structure, see chapter 3.2.
Figure 5.1
5.1 Device Function Tiles
Figure 5.2 Device Function Tiles - Overview
The function tiles provide an overview of the core RM / BTC system information. Three tiles are
used to summarize the following information and functions:
• Device Status: Read-only information about the RM / BTC. If the connection to the RM /
BTC is active, the displayed data is live information that is periodically updated.
• Device Settings: The "Device Settings" tile groups all settings of an RM / BTC. Clicking
once on the tile opens a separate window that groups all available functions for changing
the RM / BTC settings.
• Session Shadowing: The "Session Shadowing" tile provides a live preview of the current
RM / BTC screen. Clicking once on the tile opens a separate session shadowing window.
Device Settings
Above the tiles, there are also two shortcuts to synchronize the data of the Control Center with
the RM / BTC:
• Upload/Download: The left arrow in the upper right corner is a shortcut that allows set-
tings and data from the RM / BTC to be downloaded to VisuNet CC when the connection
to the RM / BTC is active. The right arrow allows current configuration of VisuNet CC to be
uploaded to the RM / BTC when the connection to the RM / BTC is active.
28
2020-12
Page 29
VisuNet Control Center Version 4
Manage (Device)
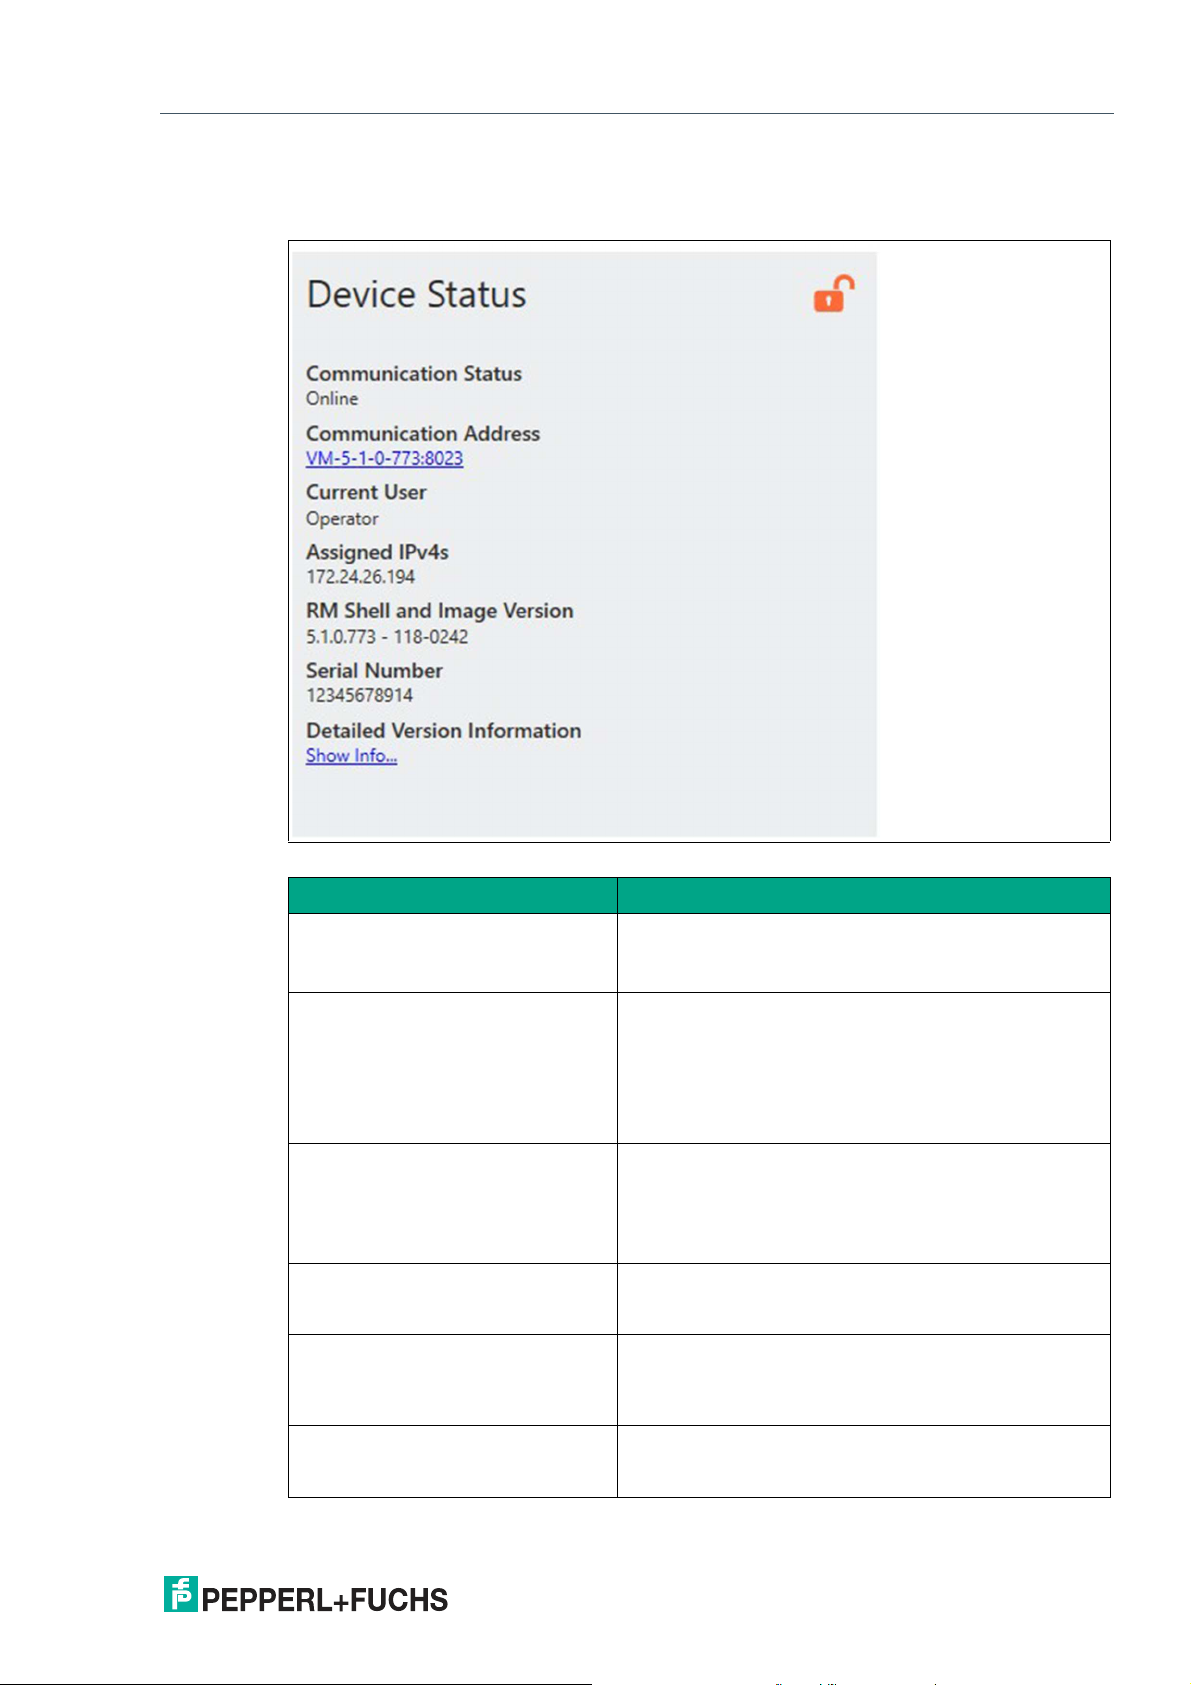
5.1.1 Device Status
The device status tile displays important device information.
Figure 5.3
Function Description
Communication Status • Shows the status of a connection to an RM / BTC.
• Shows correction steps, if the connection is dis-
rupted.
Communication Address The communication address establishes the communi-
Current User Shows the current user role that is logged in on the RM /
Assigned IPv4s List of the RM’s IPv4 address.
RM Shell and Image Version Shows the version number of the RM Shell and Image
Serial Number Shows the product serial number of the RM / BTC.
cation between VisuNet CC and the RM / BTC device
and can be the name of the device or the IP address.
The computer name is, when enabled, independent
from the communication address and will appear in the
main device screen as well as the navigation menu and
will only be stored in VisuNet CC.
BTC.
• Operator
• Engineer
• Administrator
If the RM has multiple network interface cards and IP
addresses, additional IPs will be listed here.
on the RM / BTC.
The image version is only listed in the latest RM Shell
5.1 version.
The serial number is also on the type plate of the RM /
BTC.
2020-12
29
Page 30
VisuNet Control Center Version 4
Manage (Device)
Function Description
Detailed Version Information Click "Show Info" to view a list with the update history of
/
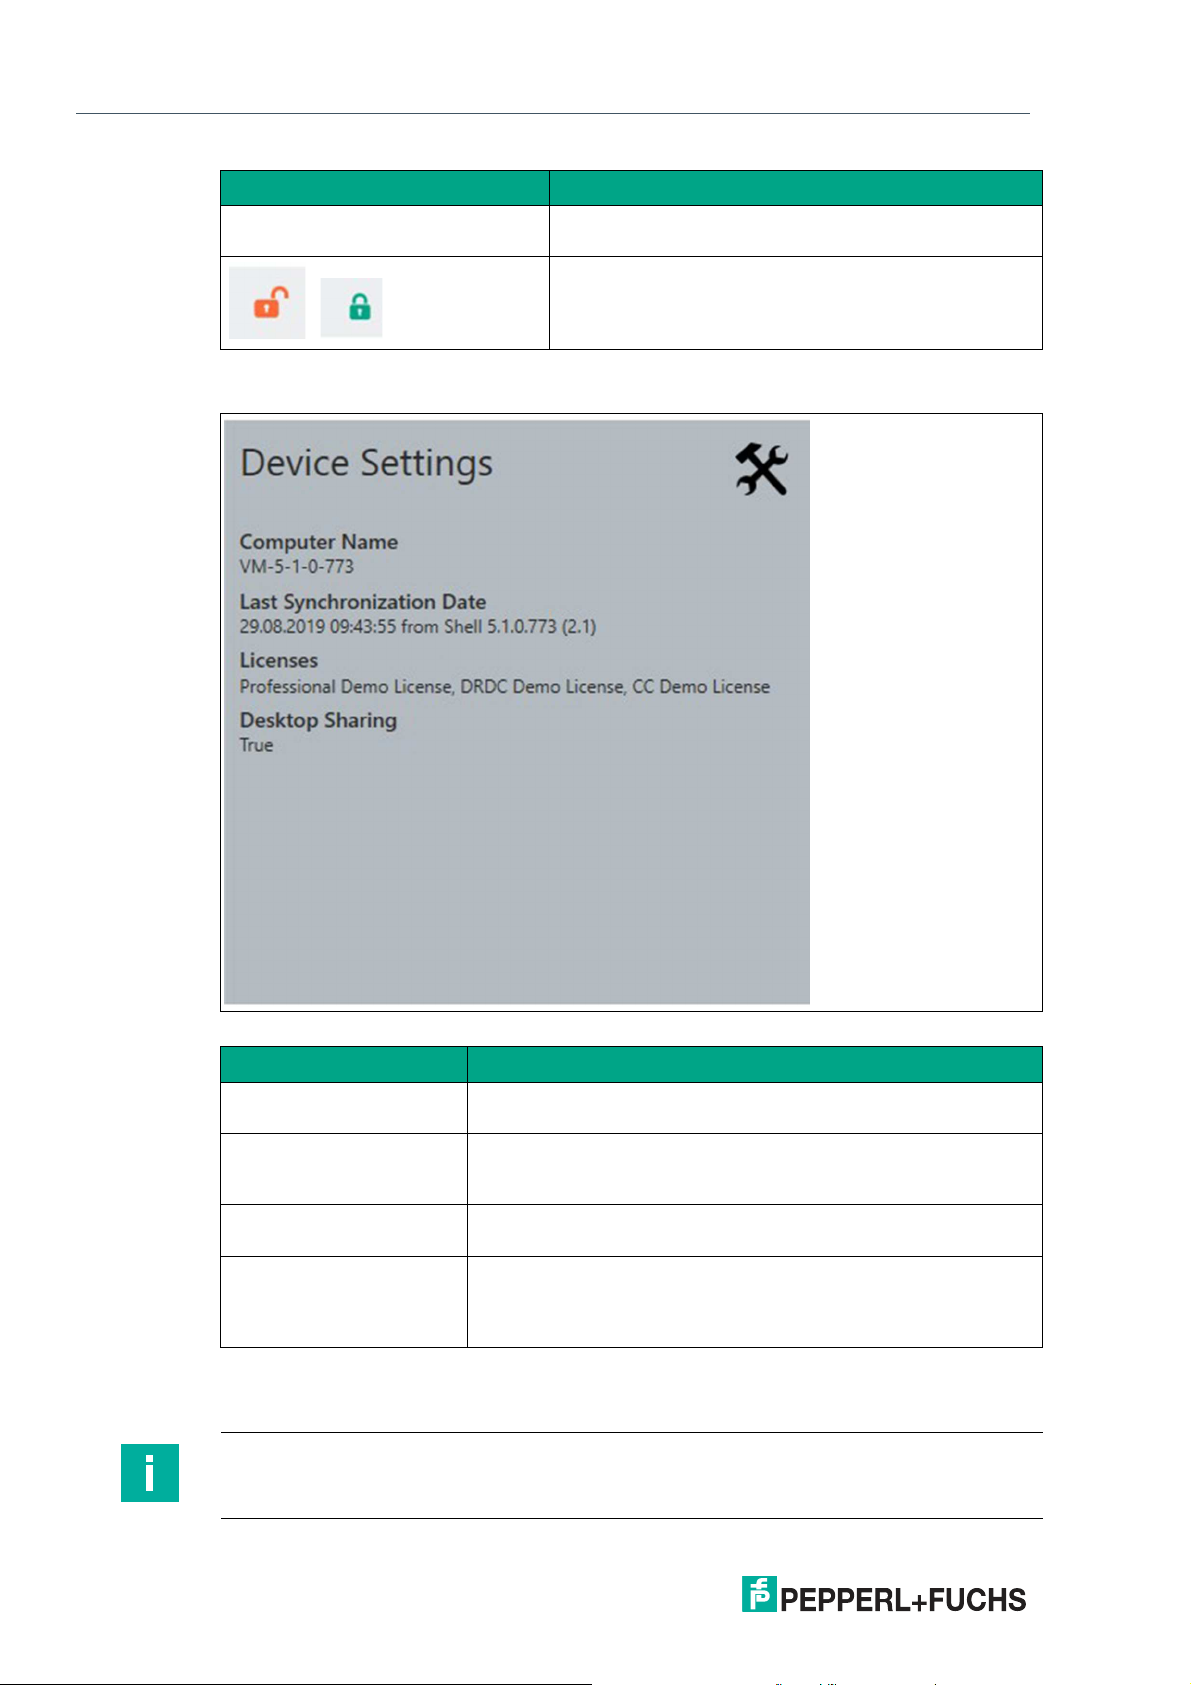
5.1.2 Device Settings (Tile)
the RM / BTC.
Left: Unified Write Filter disa-bled
Right: Unified Write Filter enabled
See Chapter “Devices Commands”
30
Figure 5.4
Function Description
Computer Name When changing the Computer NAme, the device needs to be
restarted to adapt the settings to the windows settings.
Last Synchronization Date Shows the date and time that the configurations between the Vis-
uNet CC project and the RM were last synchronized via an
upload or download.
Licenses Shows which licenses are currently entered in the RM Shell of the
RM.
Desktop Sharing Shows if the "Desktop Sharing" mode of the RM is enabled or
disabled.
"Desktop Sharing" must be enabled on an RM to use the session
shadowing function in VisuNet CC.
When you click on the tile, a window opens that groups the RM's / BTC settings. In this window,
all relevant settings that can be changed in the RM Shell can also be modified.
Note
The RM's / BTC settings must be uploaded onto the RM / BTC in order to be updated.
2020-12
Page 31
VisuNet Control Center Version 4
Manage (Device)
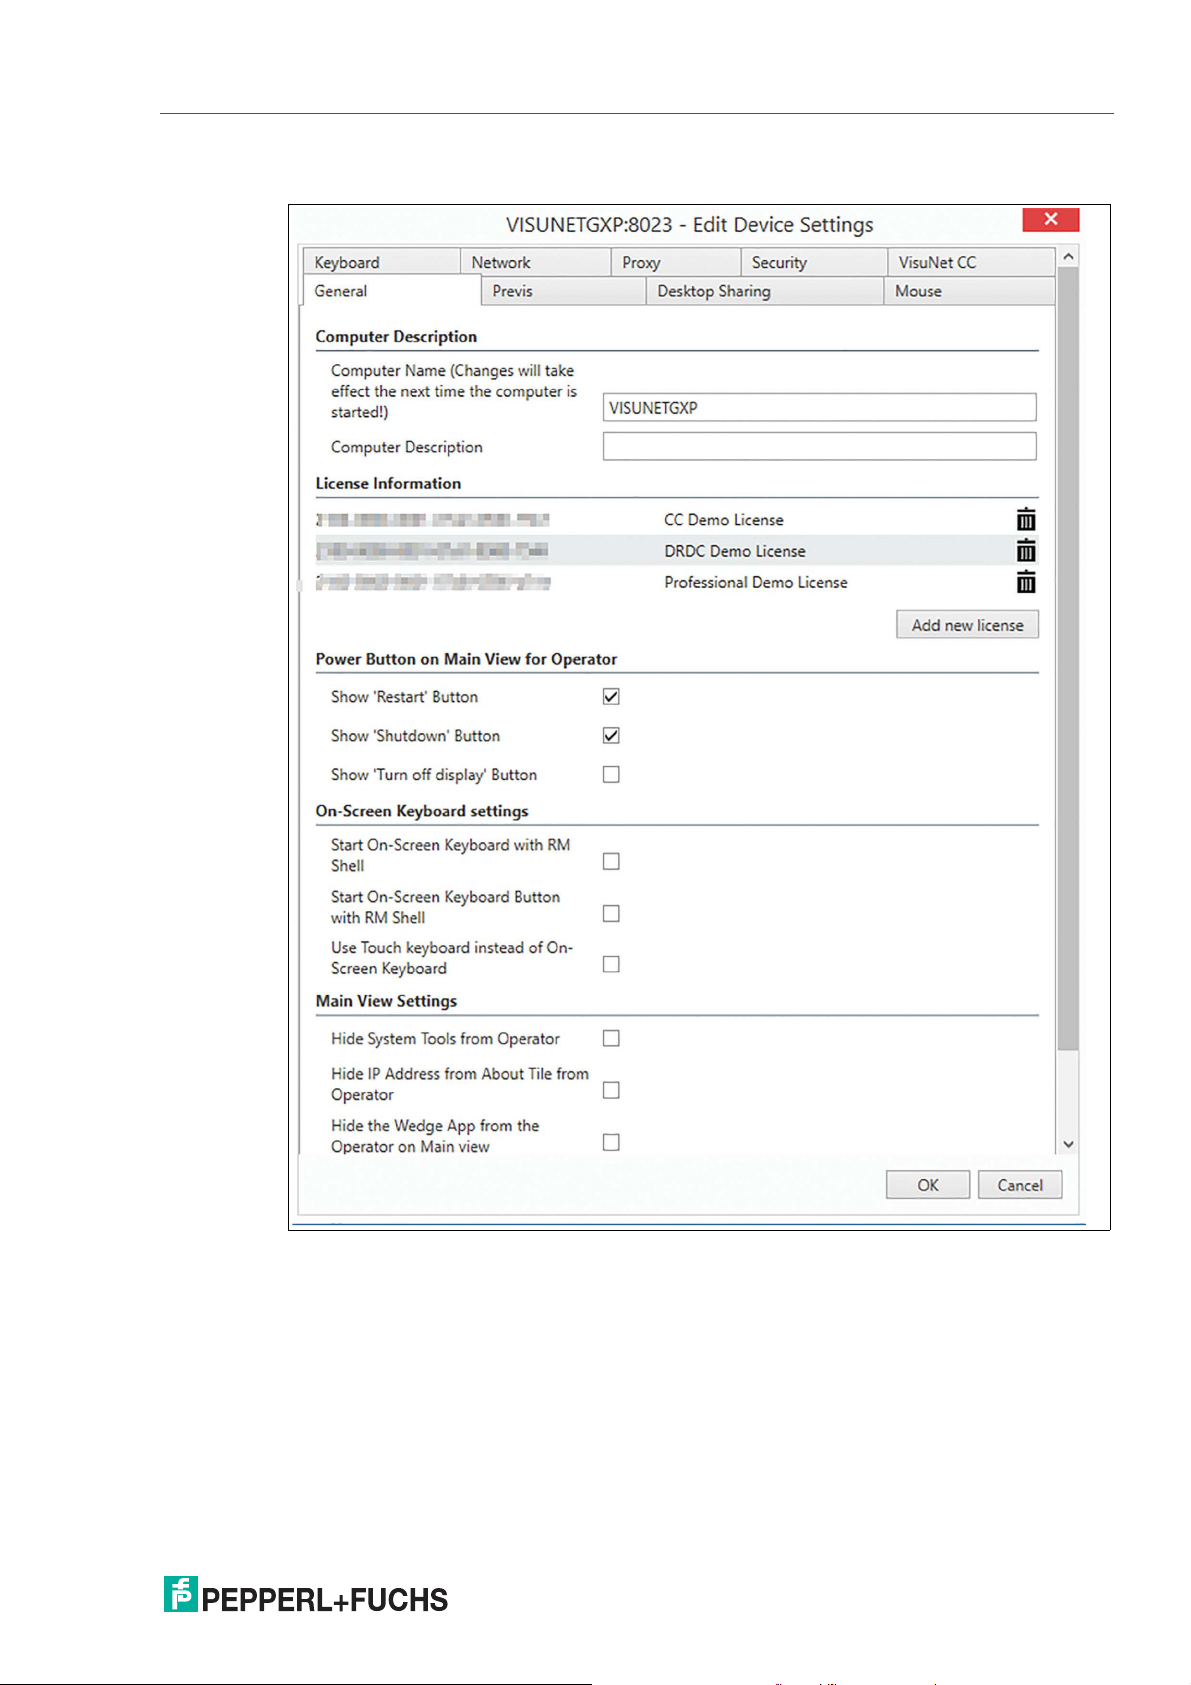
General
Figure 5.5 Edit Device Settings - General
• Computer Description: Here the name of the device can be changed. When the device
is restarted the new name is adapted.
Remember to upload the new device settings to your Shell device and restart it. If the
Communication Address or IP address of the RM / BTC Shell Device and the VisuNet
Control Center are not identical, the connection will fail.
• Touch: Depending on the installed Image you can choose the implemented touch screen.
2020-12
31
Page 32

VisuNet Control Center Version 4
Manage (Device)
Previs
32
Figure 5.6
Previs Screensaver: Previs is a screensaver which prevents permanent image retention or
image sticking on LC displays while presenting the process picture at the same time. Process
pictures stay visible, and you still have direct access to all important process information. The
Previs Screensaver is per default disabled. Set the idle time to activate Previs.
With the additional PRO license you are able to set a PIN so only authorized personal can
unlock the device.
2020-12
Page 33

VisuNet Control Center Version 4
Manage (Device)
Desktop Sharing
Figure 5.7
The VisuNet Desktop Sharing Server is per default disabled.
When enabling this function we highly recommend to enable the Secure Tunnel Service as well
to ensure high security connections. It is also recommended to use your own certificate. Be
aware that only private keys are allowed.
Further information on how to setup a connection with an own certificate, see in chapter 5.
Proxy
Proxy settings are identical with the proxy settings of Windows.
2020-12
33
Page 34

VisuNet Control Center Version 4
Manage (Device)
34
Figure 5.8
Open / Close, TCP Send / Receive, MEX Send / Receive Timeout
If the speed of your device or Network is low you might need to adjust the time out settings of
the VisuNet CC by extending them to prevent errors and timeouts.
2020-12
Page 35

VisuNet Control Center Version 4
Manage (Device)
5.2 Device Settings (Ribbon)
Figure 5.9
Figure 5.10
Either use direct function for one device or chose the Firmware Wizard to get guided through
the process and use the function for multiple devices with the dropdown menu. Depending on
which device either the RM / BTC or the VisuNet Control Center you edited your settings you
can either download or upload them to synchronize your local data. Please note that the downloaded or uploaded data always overwrites the existing data.
5.3 Device Management
Figure 5.11
Update Firmware
Use the Firmware Update Wizard to get guided through the update process and update an individual or multiple devices.
Please refer to Chapter 4.3 to get further information on the Wizard.
2020-12
35
Page 36

VisuNet Control Center Version 4
Manage (Device)
Communication Address
Decide if your Device Name should be the same as your communication address / IP address.
You can name your de-vice any name in VisuNet CC. The device name will not be uploaded to
the RM Shell but only be saved locally in your project.
Figure 5.12
The Device Name will appear in the navigation menu as well as in the device main screen.
36
Figure 5.13
2020-12
Page 37

VisuNet Control Center Version 4
Manage (Device)
Import SSL Certificate
Send an SSL Certificate (e.g. to access an encrypted website) to an RM. Create your own certificate with a private key and import it here. You can choose your Store as well as the location
the certificate is stored at.
• Current User: Cannot be seen or used by other users
• Local Machine: Any user can access and select it
Clone Wizard
Use the Clone Wizard to clone configurations from one device to multiple other devices. Please
note that the cloning and target devices need to be compatible in terms of the Firmware Version. To clone e.g. Profiles from a device with Shell 4 to a target device with Shell 5 an Upgrade
needs to be performed in advance.
1.
Make sure that all devices are updated to the latest Version and are online.
Figure 5.14 Clone Wizard - Welcome
2.
Click "Next".
2020-12
37
Page 38

VisuNet Control Center Version 4
Manage (Device)
Figure 5.15 Clone Wizard - Source Device - Copied Source Device Settings
3.
Click "Next".
4.
The Copied Source Device Settings are only an overview. The assignment cannot be adjusted.
38
Figure 5.16 Clone Wizard - Source Device - Select Source Information
5.
Choose the source of information you like to copy.
6.
Both options Device Settings and Profiles are selected by default. Remove the check mark if
the source is not to be selected.
2020-12
Page 39
VisuNet Control Center Version 4
Manage (Device)
Figure 5.17 Clone Wizard - Source Device - Select Source Profiles
7.
Choose the profiles that should be cloned to the target devices.
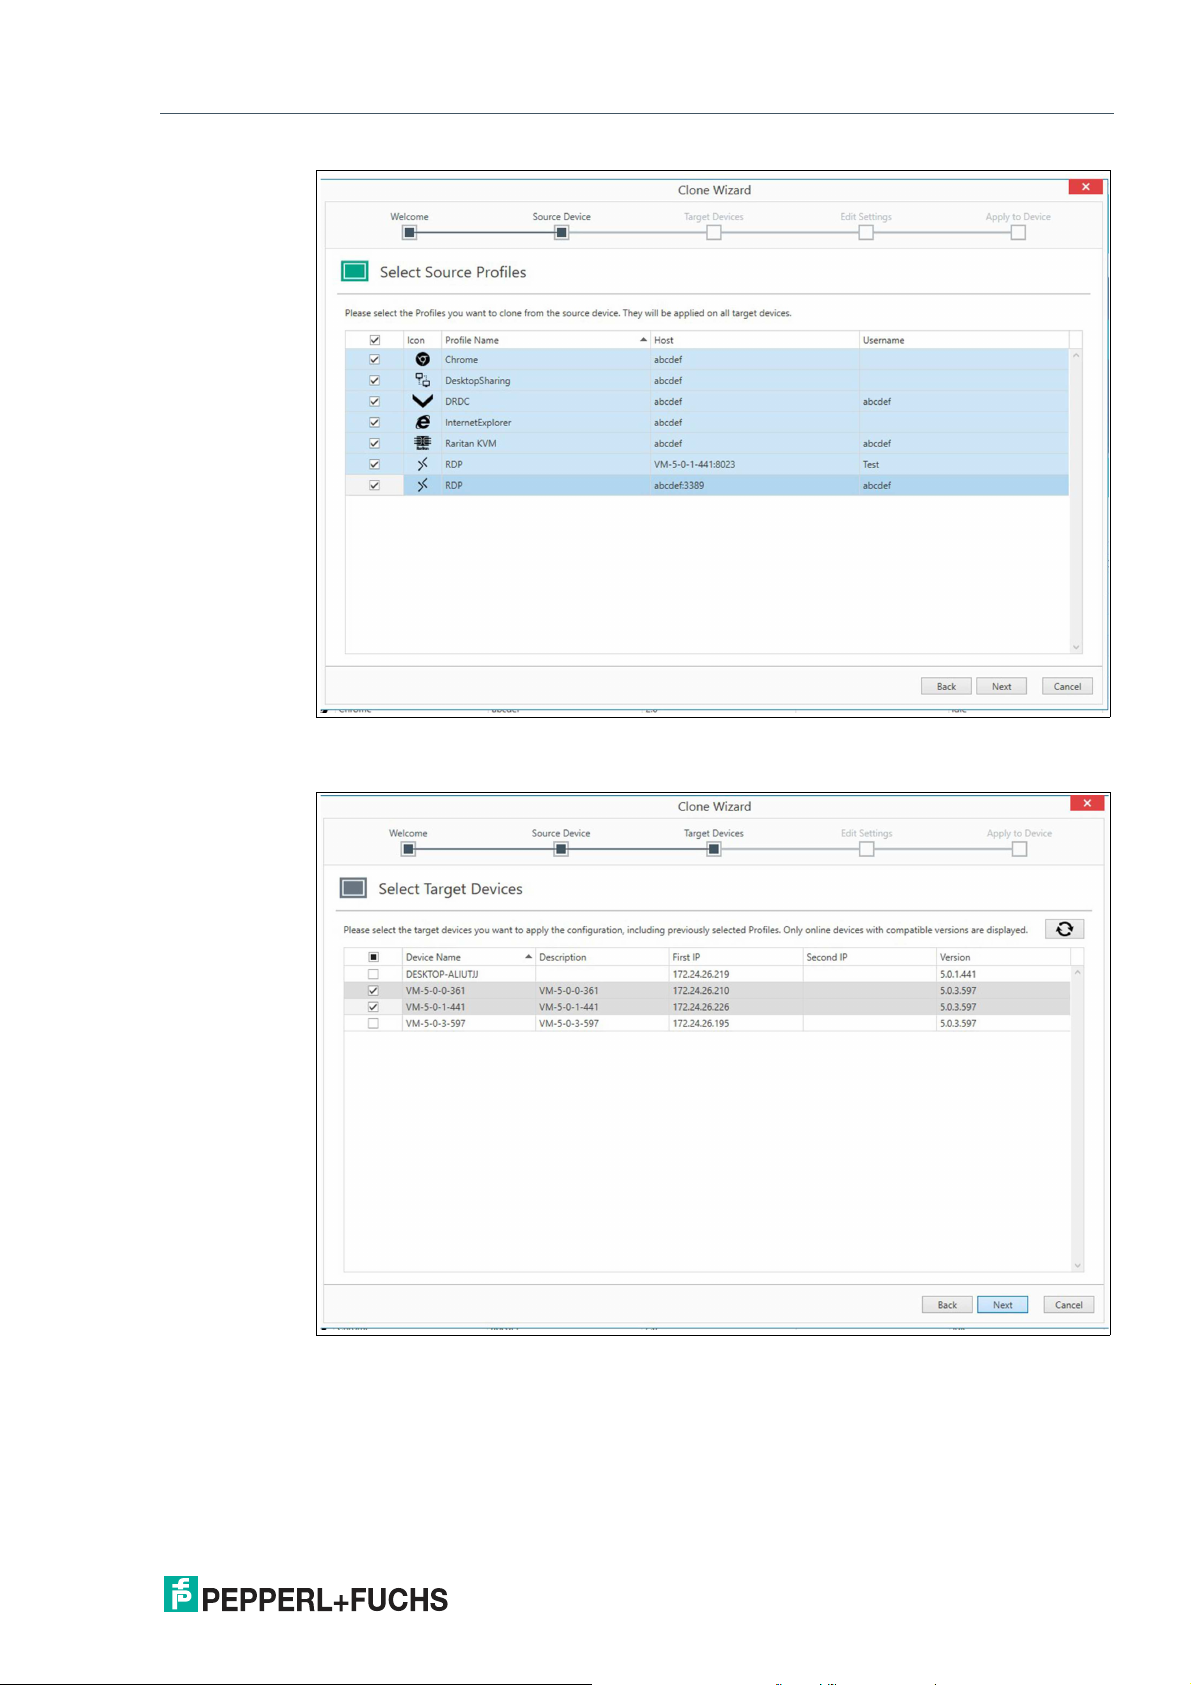
Figure 5.18 Clone Wizard - Target Devices
8.
Choose target devices you want to apply the configuration.
9.
For RM Shell DRDC and RM Shell PRO licenses are required. Make sure that you only copy
the profiles you also have additional licenses for the target devices as well.
2020-12
39
Page 40

VisuNet Control Center Version 4
Manage (Device)
Figure 5.19 Clone Wizard - Edit Settings - Enter License Key
If you add the profiles via VisuNet CC for the first time, you will be asked for the license keys
in “Edit Settings”.
If you already have licenses for the target devices the licenses Keys will be transferred and
filled in already.
If there is an error within in typed in license number the status will be marked with a red
cross. Use the mouse to hover over the Red Cross and get further information what error
occurred.
40
Figure 5.20 Clone Wizard - Edit Settings - Set Passwords
2020-12
Page 41

VisuNet Control Center Version 4
Manage (Device)
If the source device is provided with passwords for the Administrator, Operator, Desktop
Sharing and Factory Reset, the list would be prefilled. If you do not set new passwords the
same passwords will be transferred.
Figure 5.21
We recommend to reuse your former password of the target device and therefore adjust the
password settings.
10.
Change the profiles of each target device individually.
Figure 5.22 Clone Wizard - Edit Settings - Edit Profile - Chrome
2020-12
41
Page 42
VisuNet Control Center Version 4
Manage (Device)
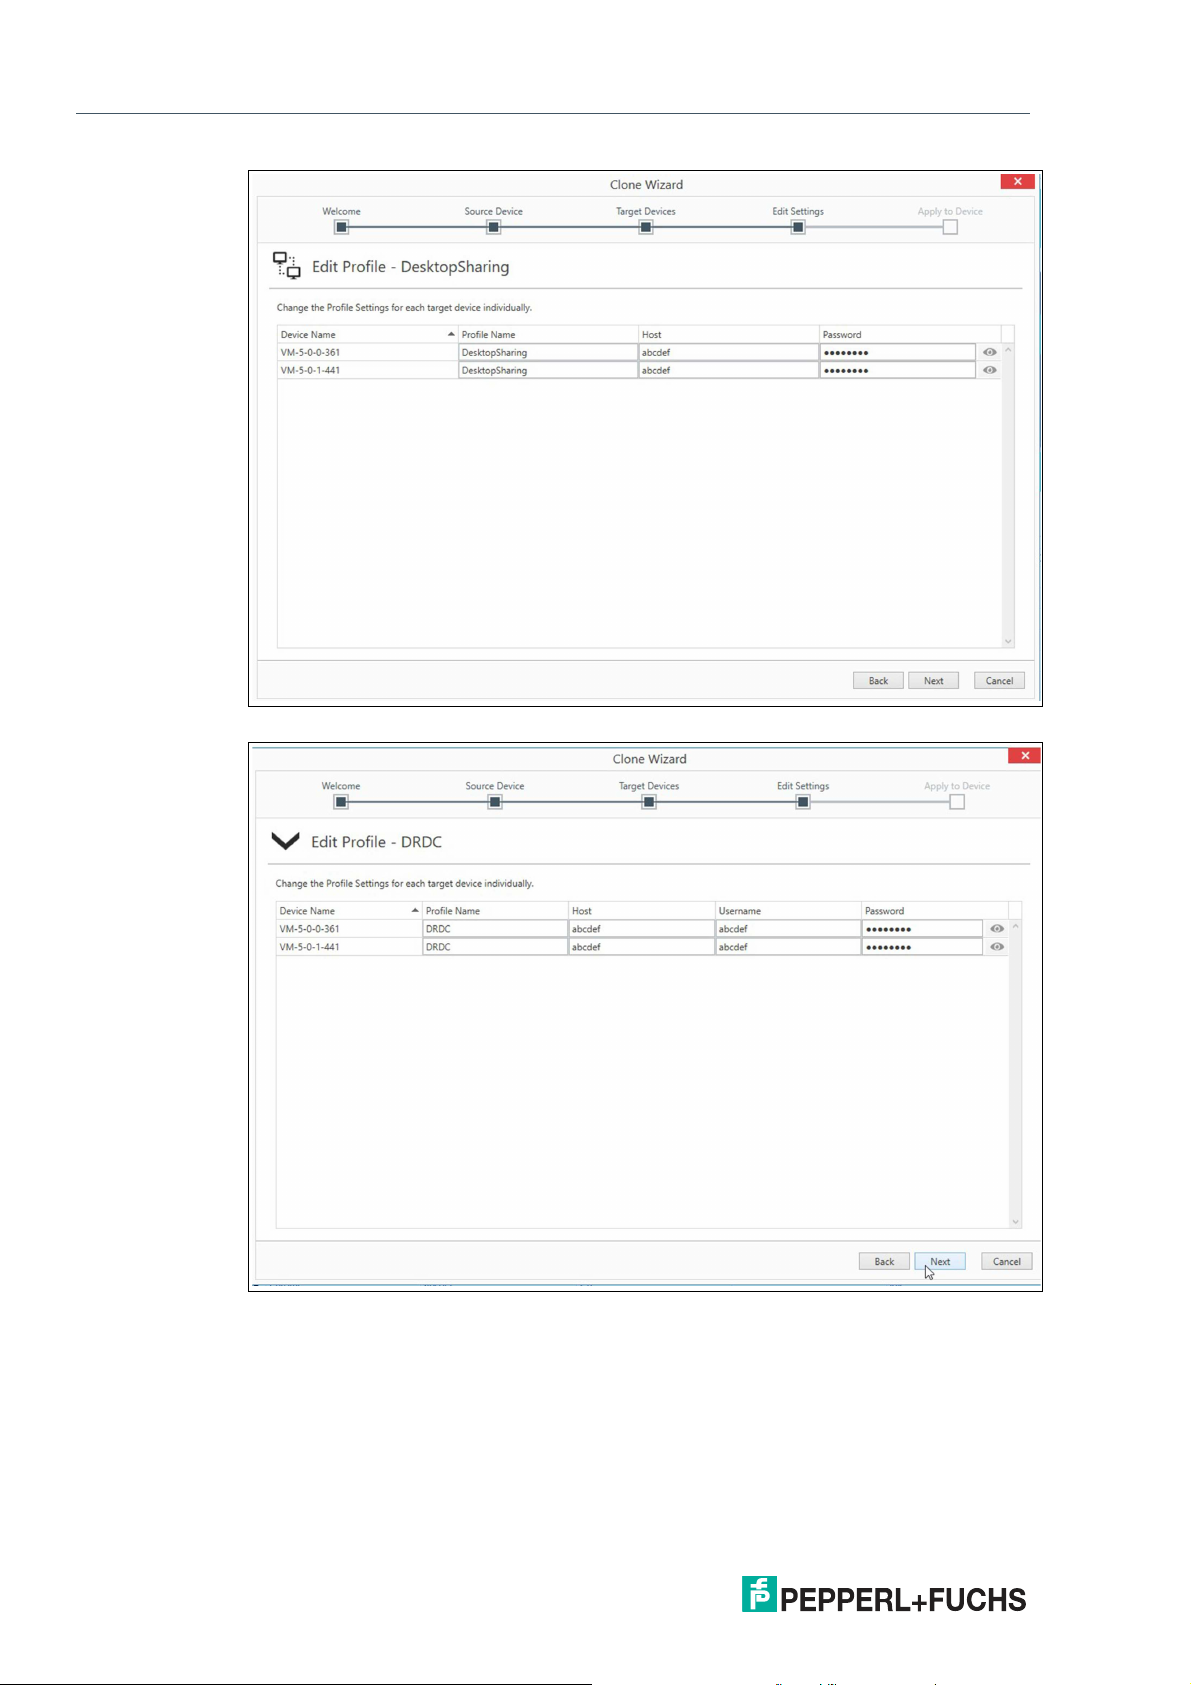
Figure 5.23 Clone Wizard - Edit Settings - Edit Profile - Desktop Sharing
42
Figure 5.24 Clone Wizard - Edit Settings - Edit Profile - DRDC
2020-12
Page 43
VisuNet Control Center Version 4
Manage (Device)
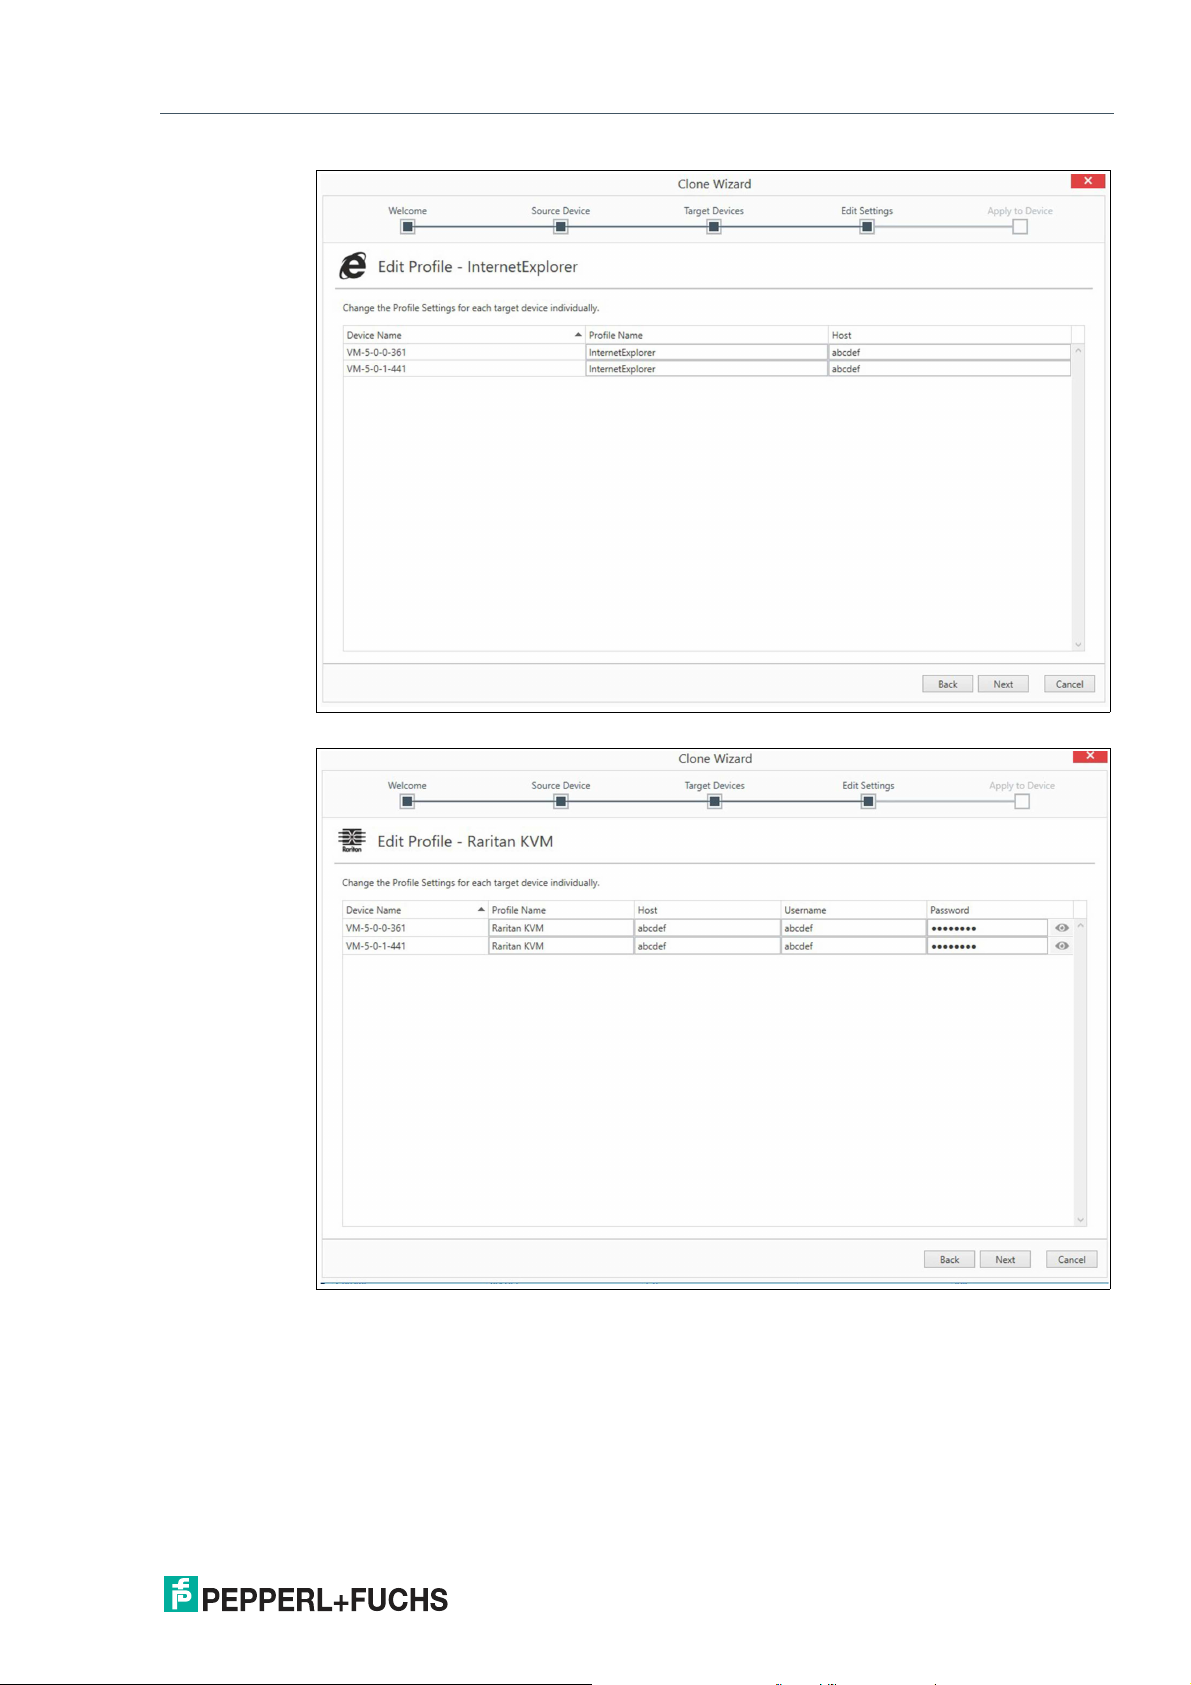
Figure 5.25 Clone Wizard - Edit Settings - Edit Profile - Internet Explorer
Figure 5.26 Clone Wizard - Edit Settings - Edit Profile - Raritan KVM
2020-12
43
Page 44

VisuNet Control Center Version 4
Manage (Device)
Figure 5.27 Clone Wizard - Edit Settings - Edit Profile - RDP
Figure 5.28 Clone Wizard - Apply to Device - Summary
The wizard guides you through all the different profiles of the cloning device.
44
2020-12
Page 45

VisuNet Control Center Version 4
Manage (Device)
Figure 5.29 Clone Wizard - Apply to Device - Perform Action
11.
When the Status changes to Succeed, click finish to complete the cloning process.
5.4 Device Commands
Figure 5.30
Shutdown and Restart Device
1.
Choose in the drop down menu to shutdown/restart one device directly or choose the Firmware
Wizard to get guided through the process and Shutdown/restart multiple devices.
Caution!
It is not possible to boot devices via VisuNet CC.
2.
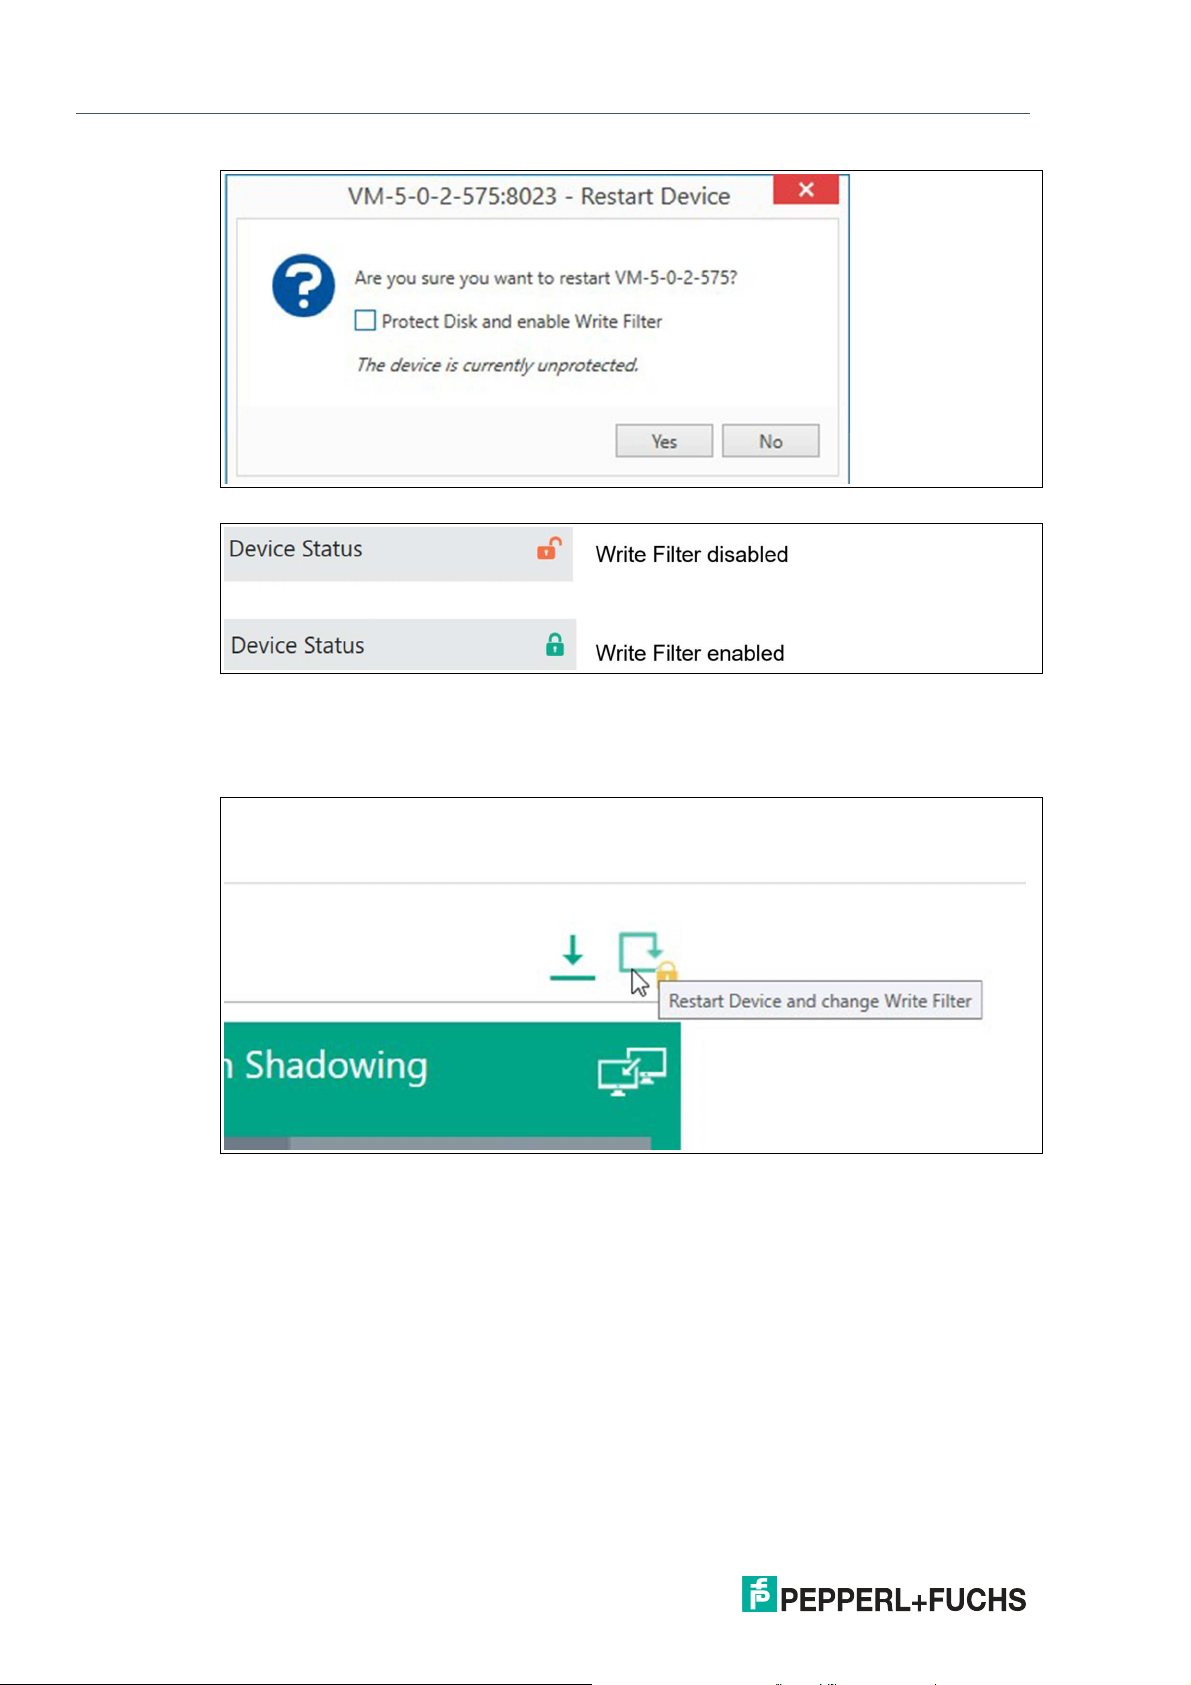
Shell 5 devices have two different restart modes. You can restart with write filter enabled and
restart with write filter disabled.
Note
Before the RM/BTC is shut down, the local operator is prompted and asked if the shutdown
process should be stopped. When restarting the device you can choose whether the Write
Filter should be protected or not.
2020-12
45
Page 46
VisuNet Control Center Version 4
Manage (Device)
Figure 5.31
Figure 5.32
In the Device Status you can check whether your device is protected or unprotected.
Besides the control elements of the ribbon bar you can also restart the device using the shortcut on the upper right corner of the main screen in the device structure.
Figure 5.33
46
2020-12
Page 47
VisuNet Control Center Version 4
Manage (Device)
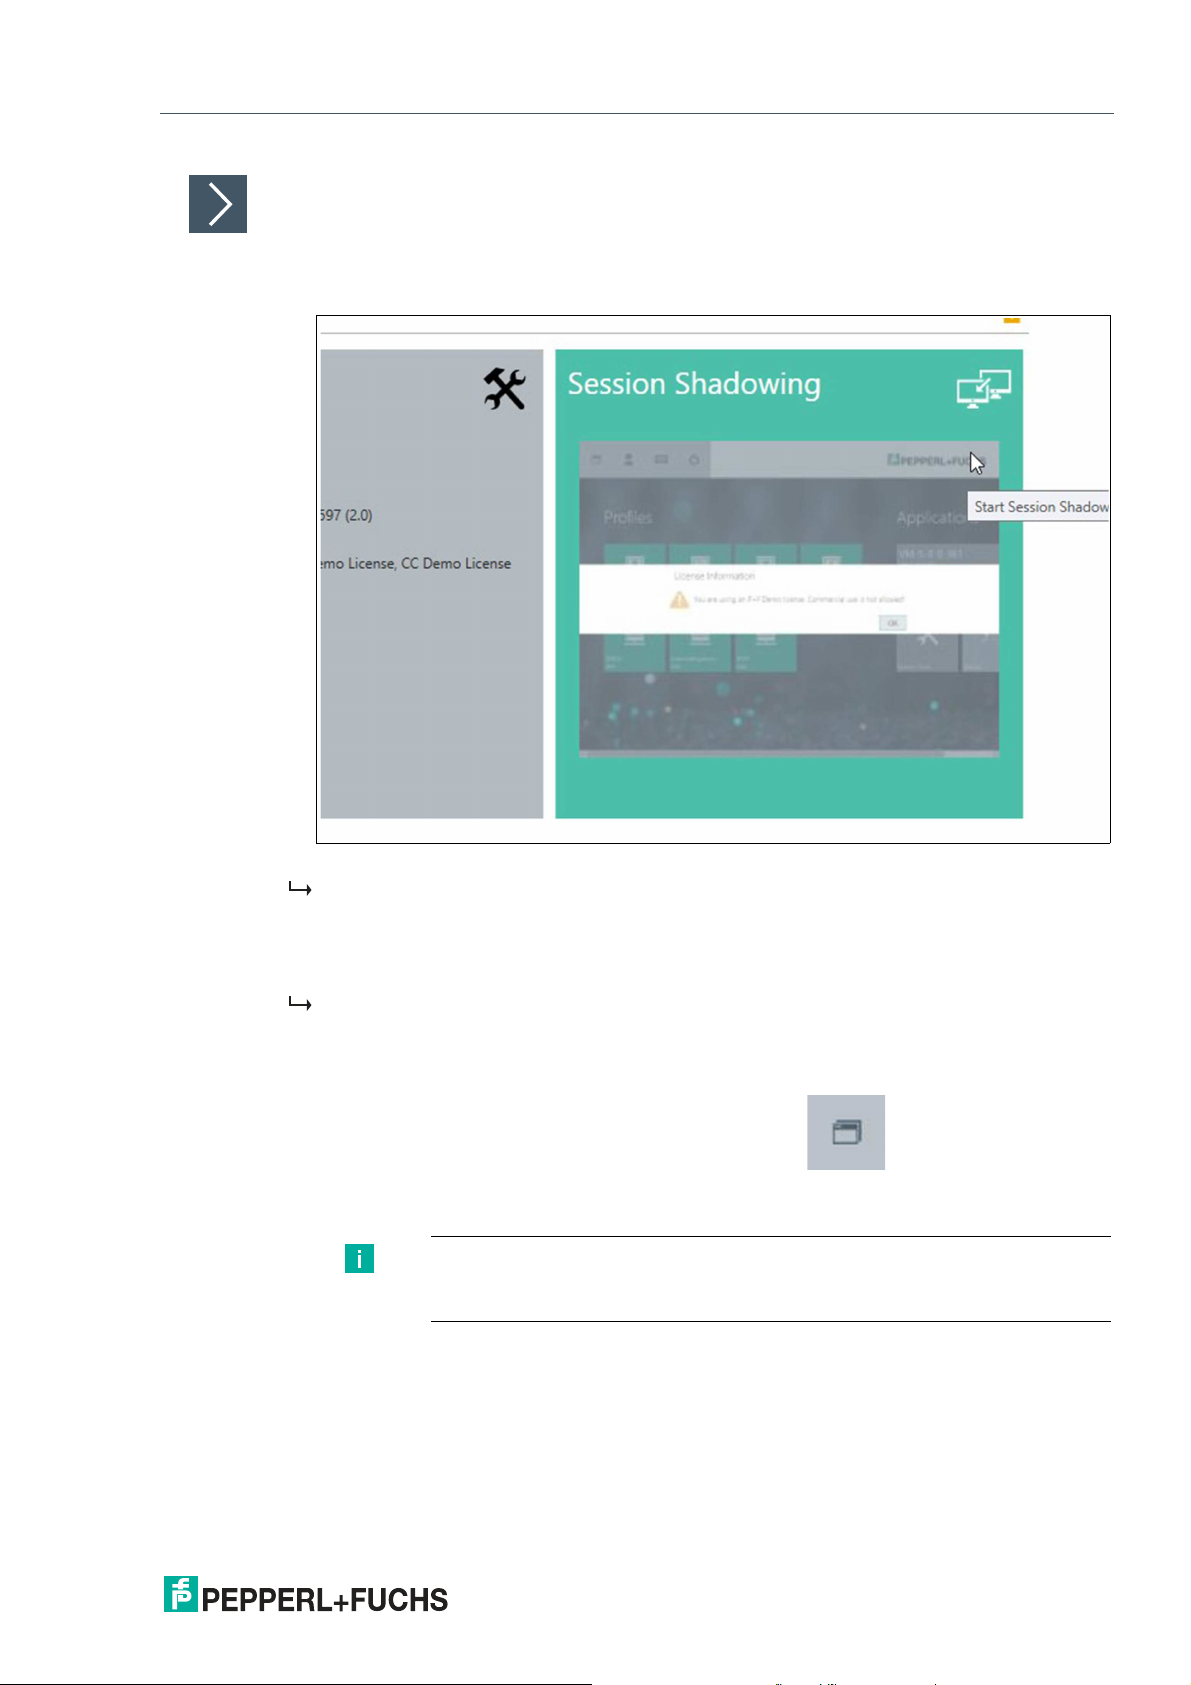
Session Shadowing
1.
Connect to an RM/BTC by clicking the icon or the minimized live view of the shown RM/BTC
screen and share its current screen. The function also allows remote control of an RM/BTC.
Figure 5.34 Shadowing the Session of an RM user
The session shadowing tile shows a minimized live view of the RMs/BTCs current screen.
This allows the VisuNet CC user to get an overview of the RMs/BTCs current status.
2.
For a detailed view of the RMs/BTCs screen, click on the tile. This will open a new window that
allows the user to shadow the RM/BTC or remotely control the system.
The RM/BTC screen is displayed in the session shadowing window. The screen of the
RM/BTC is scaled to the current size of the session shadowing window. Using the “Enable
Fullscreen” function, the window can be maximized to show the native resolution of the
RM/BTC screen in the VisuNet CC window.
3.
While shadowing a session, you can click the Task Switcher in the upper-left corner of
the screen to open the RM Shell task Switcher. This tool allows you to change open protocol
connections on the monitored device.
Note
The desktop sharing function must be enabled in the RM Shell to use this
feature.
2020-12
47
Page 48

VisuNet Control Center Version 4
Manage (Device)
Tip
If you need to take control of the mouse, click the “control” item in the Session Shadowing
Mode.
Figure 5.35
Disable Touch
Disable the touchscreen of an RM, e.g., during a washdown.
Note
This device command has an immediate effect on the RM.
Disable Mouse
Disable the mouse of an RM/BTC.
Note
This device command has an immediate effect on the RM/BTC.
If the mouse is disabled on an RM/BTC, the mouse also cannot be used via session
shadowing.
Disable Keyboard
Disable the keyboard of an RM.
Note
This device command has an immediate effect on the RM.
If the keyboard is disabled on an RM, the keyboard also cannot be used via session
shadowing.
48
Maintenance Mode
Whenever data is sent from VisuNet CC to an RM/BTC, the RM/BTC asks the local operator if
the RM/BTC is allowed to enter maintenance mode. Maintenance mode is a semaphore that
establishes an exclusive communication link between VisuNet CC and the RM/BTC. When
maintenance mode is active, no local changes can be performed on the RM/BTC – either by a
local operator or by another Control Center.
2020-12
Page 49

VisuNet Control Center Version 4
Manage (Device)
This mode is used to avoid accidental reconfiguration of an RM/BTC, for instance, when a local
operator performs a critical task such as entering a recipe. If an RM/BTC is triggered by VisuNet CC to enter maintenance mode, the local operator is prompted and asked for permission.
If the operator accepts, VisuNet CC gains exclusive access to the RM/BTC and can upload the
data. After the data is uploaded, VisuNet CC automatically leaves maintenance mode and
releases the lock.
Note
If no local operator is working on the RM a time-out will trigger the change into maintenance
mode automatically.
VisuNet CC allows the administrator to force entering maintenance mode, even when a local
operator declines the remote access.
Secure Tunnel Warnings and how to fix them
Warnings Fix
The certificate chain is broken. Import a
trusted root certificate.
The certificate contains another common
name as the server name. Check your server
settings.
The certificate is not available. Check your
server settings.
You are using the default certificate. Use your
own to increase the security.
Enable the Secure Tunnel on the device to
establish an encrypted connection.
Import the root certificate to complete the trust
chain. (Find further information in Chapter 5
“How-To”)
Check if the common name of the certificate
matches with the host name of the RM Shell
device.
Check in the device settings if the selected
certificate has been uploaded to the RM Shell
device.
Please refer to “Build up a connection with
your own certificate via Session Shadowing to
increase the security level” in the How-ToChapter.
The secure tunnel is available, but not activated. We recommend to activate the secure
tunnel for an encrypted connection.
Cleanup Disk Wizard
Use the Cleanup Disk Wizard to clean up the disk of one or multiple devices. Cleaning out your
device frees up your drive space and helps it run better by deleting temporary files and reduce
the size of the WinSxS folder.
Note
The Cleanup process might run for several hours. During this time the device can be operated
but might get slower. It is recommend to perform the Cleanup Disk Wizard only when the disk
space is running low.
It is recommended to increase the max. simultaneous actions so that the Cleanup process of
multiple devices can run simoultaneously. (For further information please refer to Chapter 3.1).
2020-12
49
Page 50

VisuNet Control Center Version 4
Manage (Device)
Figure 5.36
1.
Make sure that all devices are updated to the latest Version and are online. Choose the devices
whose disk should be cleaned up.
From RM Shell version 5.5.0 on the available disk space is visualized.
50
2.
Check again the selected devices then click "execute" to perform the Cleanup Process.
2020-12
Page 51

VisuNet Control Center Version 4
Manage (Device)
Figure 5.37
3.
The Cleanup process might take several hours. During that time the device can be operated but
might response slowly.
4.
Click "Finish". The Cleanup process will run in the background.You can follow the progress in
the Action History list. When every device Status is set to "Success", the performed action is
completed. The settings of the simultaneous actions can be reset again.
Note
If your storage after cleaning up the disk is still not sufficient for updates or
installing 3rd party software we recommend to update your device with the
latest factory reset version >6.0 available at www.pepperl-fuchs.com. Due to
the adapted partition design of the latest update the available storage has
increased considerably.
5.5 Device Backup
Figure 5.38
Apply Image Wizard
Use the Apply Image wizard to apply multiple images to multiple devices. Please note that this
wizard is only available for VisuNet CC 4.6 and newer.
Images that can be applied to the RM/BTC:
2020-12
51
Page 52

VisuNet Control Center Version 4
Manage (Device)
1) Pepperl+Fuchs
Factory Reset Image
2) Backup Image Own captured Backup Image, which can only
3) Clone Image Own captured Clone Image, which can be
Available for each specific device. The Pepperl+Fuchs default settings will be applied
back to your device. With Factory Reset 6.0
and newer the image won’t be stored on the
device any more.
Caution! After applying the Pepperl+Fuchs
image the setup of the device needs to be performed locally! The RM Shell first start wizard
will guide you through the most important initial configuration steps. Please refer to the
First Start Wizard Chapter in the RM Shell
Manual for further information.
be applied on the same device with the identical serial number. The backup image can be
used to restore a specific state of a device.
Note: VisuNet CC might not be able to find the
device when changes of the computer name
or the Network settings have been done after
capturing the image.
applied on devices with the same hardware/same device type e.g. BTC12. Within the
clone image all applications as well as 3rd
party applications and the whole operating
system is cloned. By applying the cloned
image a generic Windows image is created,
which resets the name and generates a
unique ID.
Caution! The devices on which a clone image
is applied to, need to be configured locally.
The set up processes can not be performed
via VisuNet CC.
Get in contact with
your local sales support
Has to be captured by
the customer in the
RM Shell Factory
Reset or via VisuNet
CC - Device Backup in
advance.
Has to be captured by
the customer via VisuNet CC - Device
Backup in advance.
Follow the steps of the wizard that guides you through the process:
52
2020-12
Page 53

VisuNet Control Center Version 4
Manage (Device)
Apply Image Wizard
Note
When applying a Pepperl+Fuchs image or a clone image you need to setup
your device locally!
If you want to track the status of the device, VisuNet CC must not be closed
during the Apply Image Wizard application.
When closing and restarting VisuNet CC the devices on which the Image is
applied to is "offline" and can no longer be detected.
1.
Click "Next".
Figure 5.39
2020-12
53
Page 54

VisuNet Control Center Version 4
Manage (Device)
2.
Click "Next".
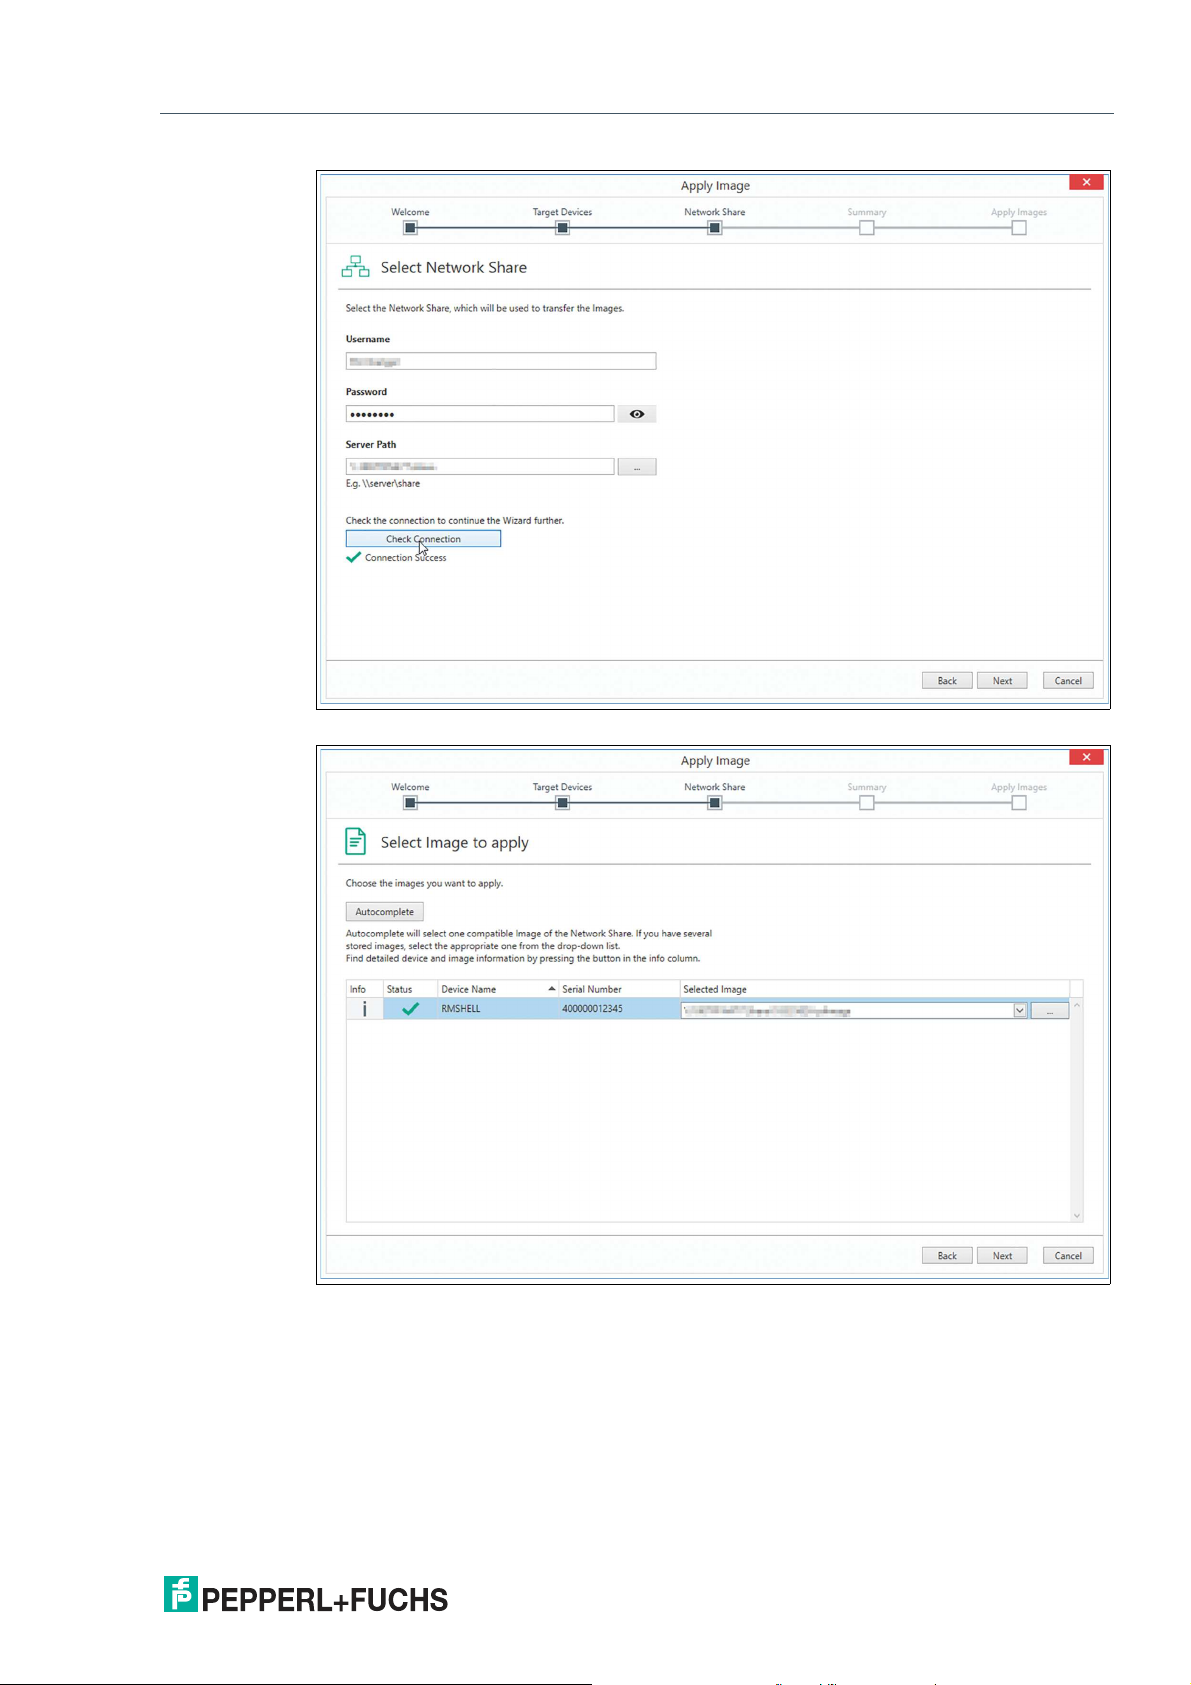
Figure 5.40
3.
Select the Network Share which will be used to transfer the image. The Network Share needs
to be available in the same network of your devices.
Note
Make sure to select an UNC -path, other paths are not recognized/accepted.
4.
Check the connection. If the connection failed, check the server path again. No further
procedure is possible. If the connection is successful you can continue the wizard further and
click "Next".
54
2020-12
Page 55
VisuNet Control Center Version 4
Manage (Device)
Figure 5.41
Figure 5.42
5.
Use the "Autocomplete" Button to look for all compatible Images within the selected network
Share. Use the combo box to select the requested Image if multiple images are stored.
2020-12
55
Page 56

VisuNet Control Center Version 4
Manage (Device)
Figure 5.43
6.
By clicking get detailed information about the selected Image and device.
7.
After selecting the required image click "Next".
8.
Check again the selected settings then click "execute" to perform the apply process.
Note
Applying this firmware will delete the complete Windows partition and you will
lose all settings. This cannot be undone.
56
Figure 5.44
9.
The apply process will take around 15 minutes. The system will reboot after the image(s) is/are
applied.
2020-12
Page 57

VisuNet Control Center Version 4
Manage (Device)
Figure 5.45
2020-12
57
Page 58
VisuNet Control Center Version 4
Manage (Device)
Depending on the applied image different further actions are required:
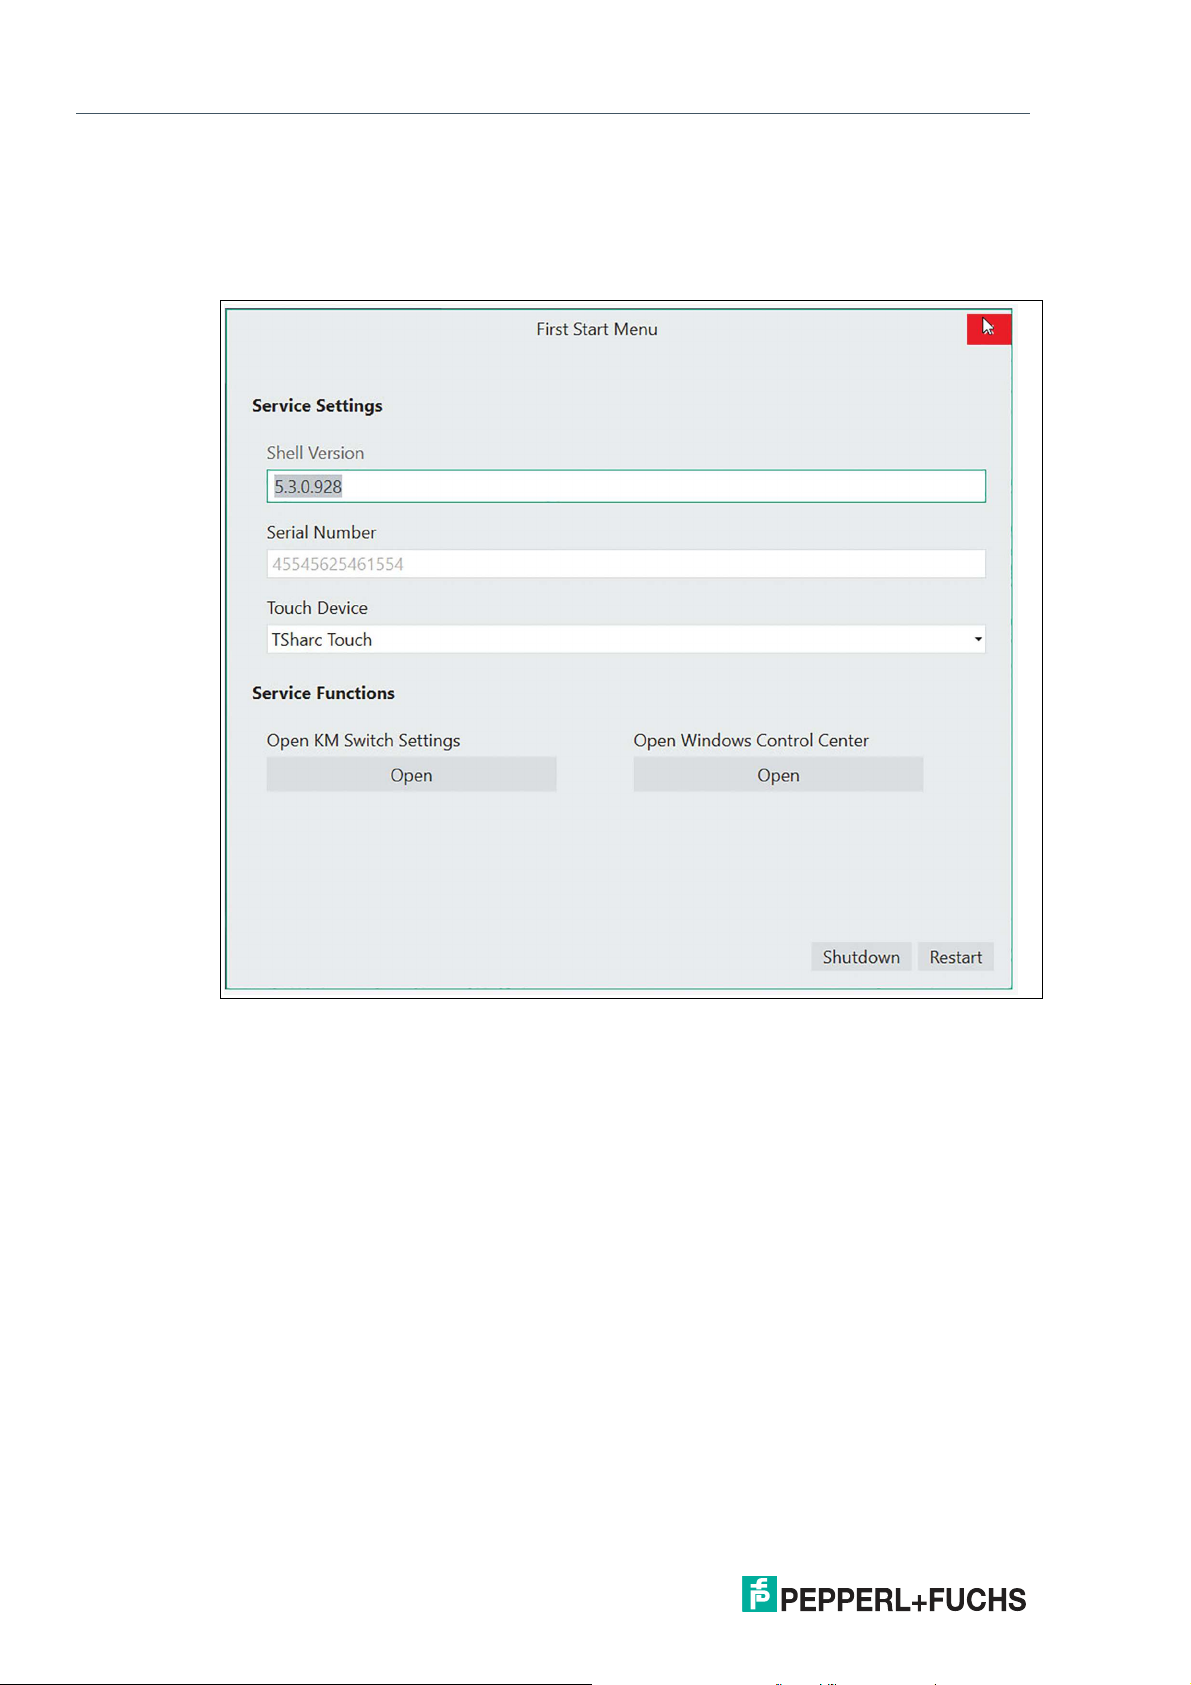
1. Pepperl+Fuchs Factory Reset Image
After the reboot of the device you need to change the following settings locally.
• Close the Window "First Start Menu"
58
Figure 5.46
• Either follow the RM Shell First Start Wizard steps locally on the device or remotely via
VisuNet CC. For further information on the First Start Wizard please refer to the RM Shell
manual.
• Enter the System Settings App of the RM Shell (Chapter 7 RM Shell Manual) and set the
computer name of your device.
• If your Network requires static IPs, also adjust the IP Settings. If the DHCP is enabled this
step is obsolete.
• Reboot your System so that the changes take effect.
2. Backup Image
After the automatic rebooting of the System the device will be found automatically in VisuNet
CC. All settings can be adjusted as usual if necessary.
Note! Make sure not to change the Computer Name and the IP address in between the capturing and applying process. VisuNet CC might to be able to find the device and a local setup
might be required.
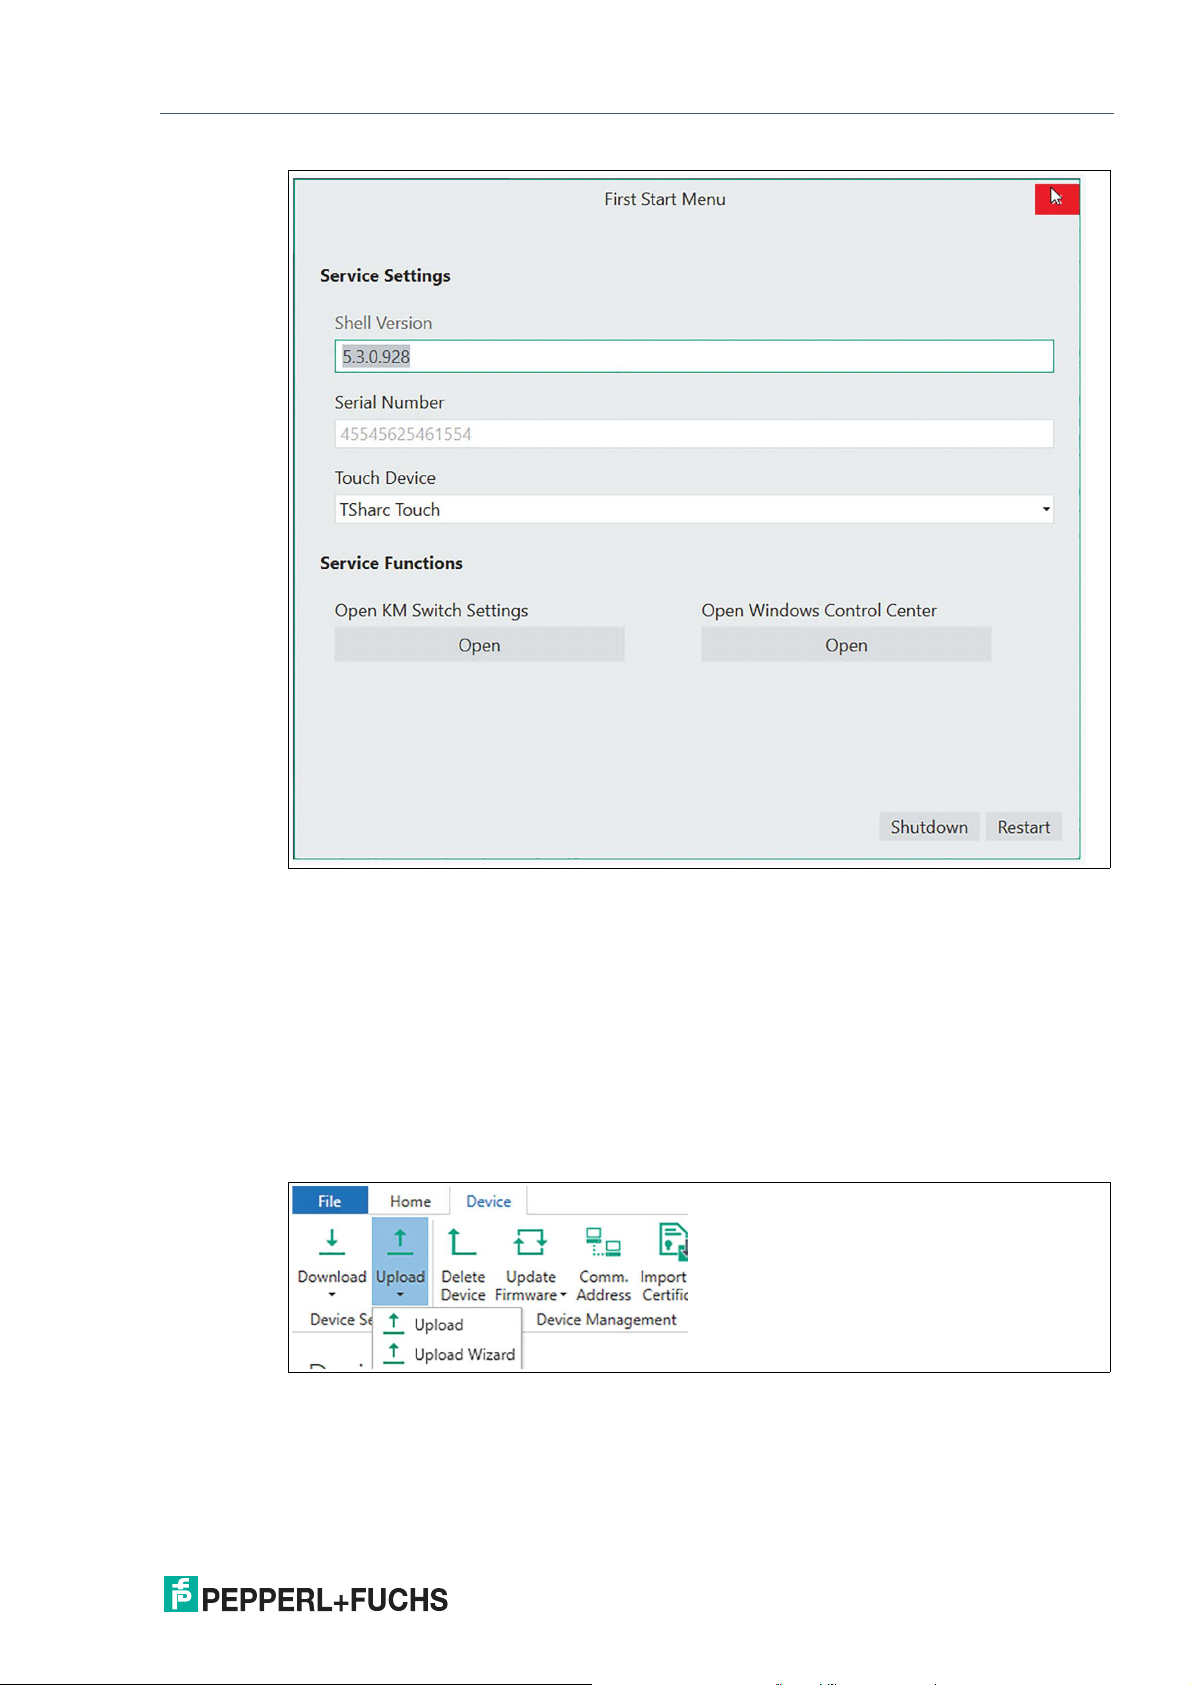
3. Clone Image
After the reboot of the device you need to change the following settings locally.
• Close the Window "First Start Menu"
2020-12
Page 59
VisuNet Control Center Version 4
Manage (Device)
Figure 5.47
• Enter the System Settings App of the RM Shell (Chapter 7 RM Shell Manual) and set the
computer name of your device.
• If your Network requires static IPs, also adjust the IP Settings. If the DHCP is enabled this
step is obsolete.
• Reboot your System so that the changes take effect.
• Continue the setup process via VisuNet CC. If you already configured your RM Shell
device settings in the past und would like to restore these settings follow a). If you would
like to configure multiple devices with the same configurations follow b)
a) Set your old computer name and upload the settings (we recommend this option, when your
devices haven’t been configured).
Figure 5.48
If you set your old Computer Name and the same Network settings as earlier you can upload
the device settings via VisuNet CC to the RM Shell and return to the previous setting status of
the RM Shell. The settings of Third party software remains identical to the cloned settings.
With the Upload wizard the upload can be performed for multiple devices simultaneously.
2020-12
b) Follow the clone wizard to configure multiple devices with your settings.
59
Page 60

VisuNet Control Center Version 4
Manage (Device)
Figure 5.49
Use one device, either set it up or use one device within your network, as a predefined standard
and clone the settings to multiple other devices. Please refer to chapter 5.3 Device Management for further information on the clone wizard.
Note
All devices need individual passwords which are required when executing the Clone Wizard.
The settings of Third party software remains identical to the cloned settings.
Capture Image Wizard
Use the Capture Image wizard to capture multiple images from multiple devices. The complete
Windows partition of the selected devices are captured as Image files. Please note that this
wizard is only available for VisuNet CC 4.6 and newer
For each Image about 7 GB storage are required in the Network share.
1.
Click "Next".
60
Figure 5.50
2020-12
Page 61

VisuNet Control Center Version 4
Manage (Device)
2.
Click "Next".
Figure 5.51
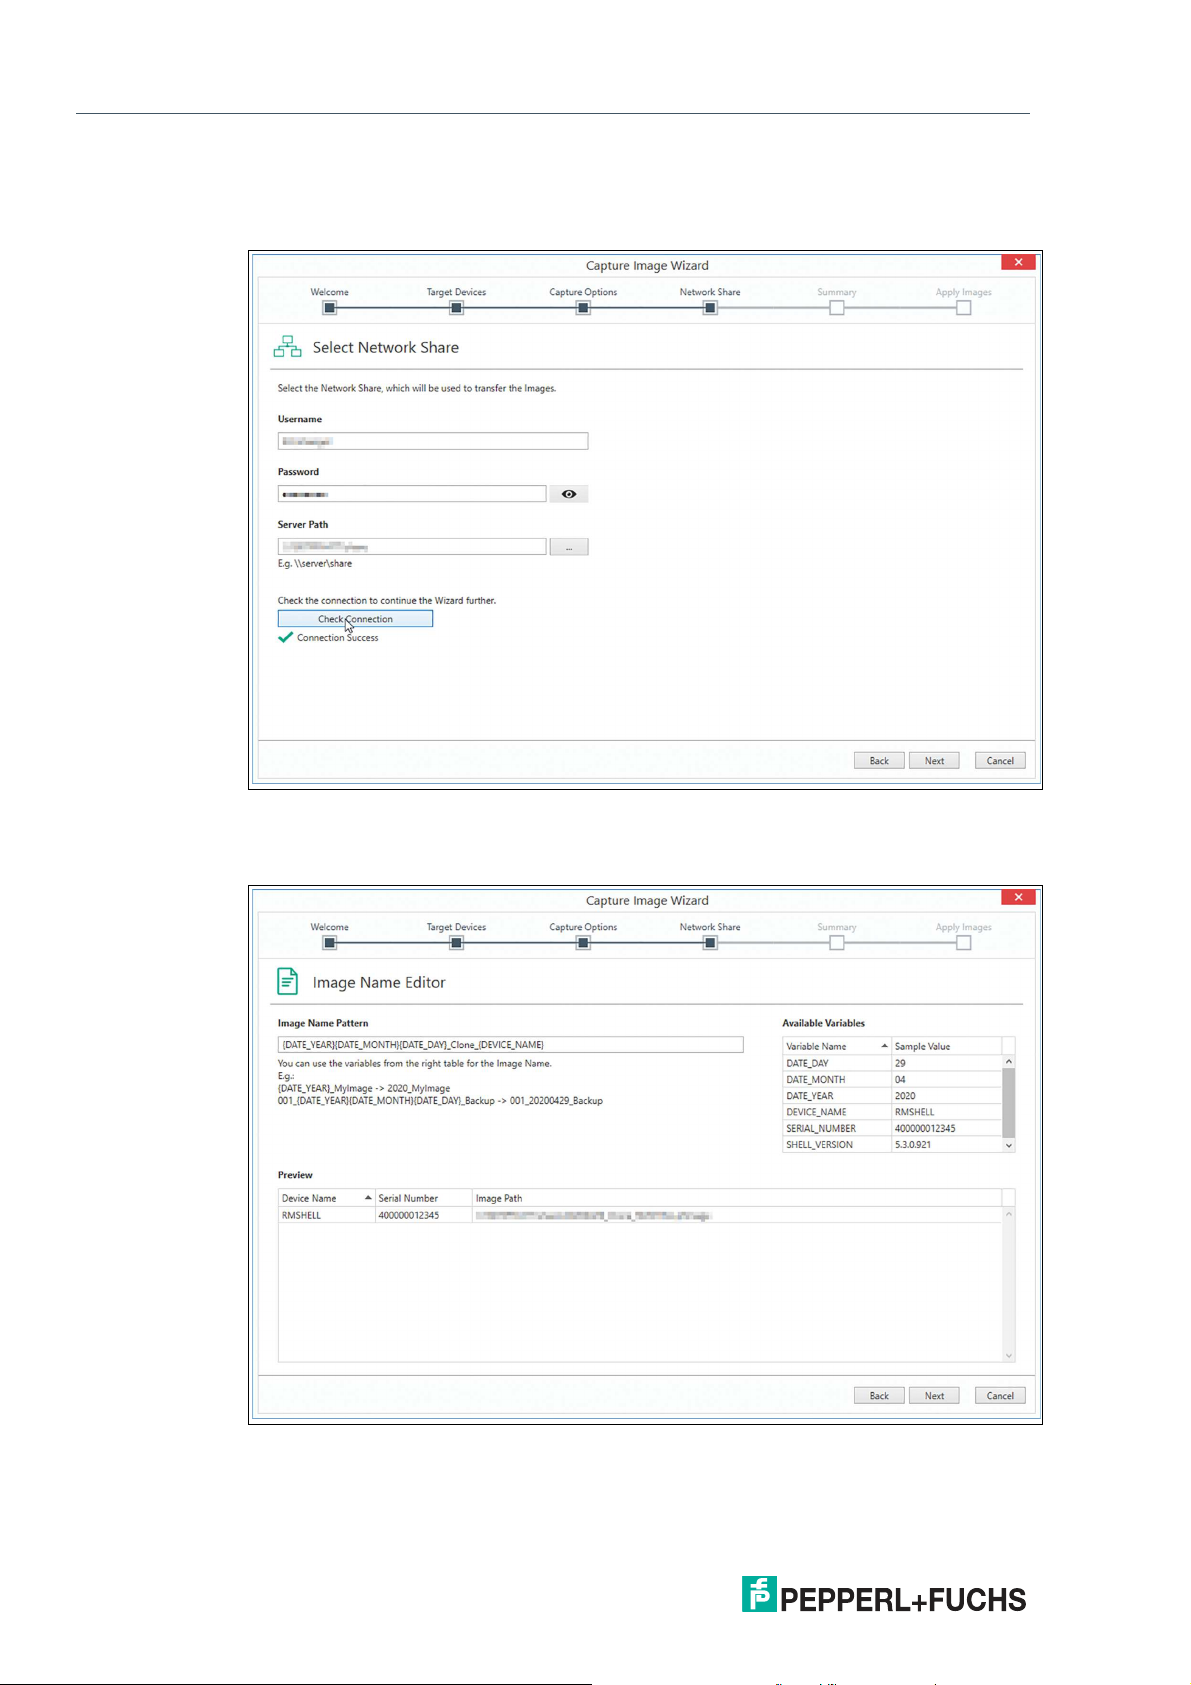
3.
Select if you would like to either capture a Backup Image or a Clone Image. For further
information on the different Images please refer to the table at the beginning of this chapter.
Figure 5.52
4.
Select the Network Share which will be used to store the image at.
2020-12
61
Page 62
VisuNet Control Center Version 4
Manage (Device)
5.
Check the connection. If the connection failed, check the server path again. No further
procedure is possible. If the connection is successful you can continue the wizard further and
click "Next".
Figure 5.53
6.
Choose a name for your Image. Modify the pattern for the name. You can use Variables to unify
each image name with properties of the device.
62
Figure 5.54
2020-12
Page 63
VisuNet Control Center Version 4
Manage (Device)
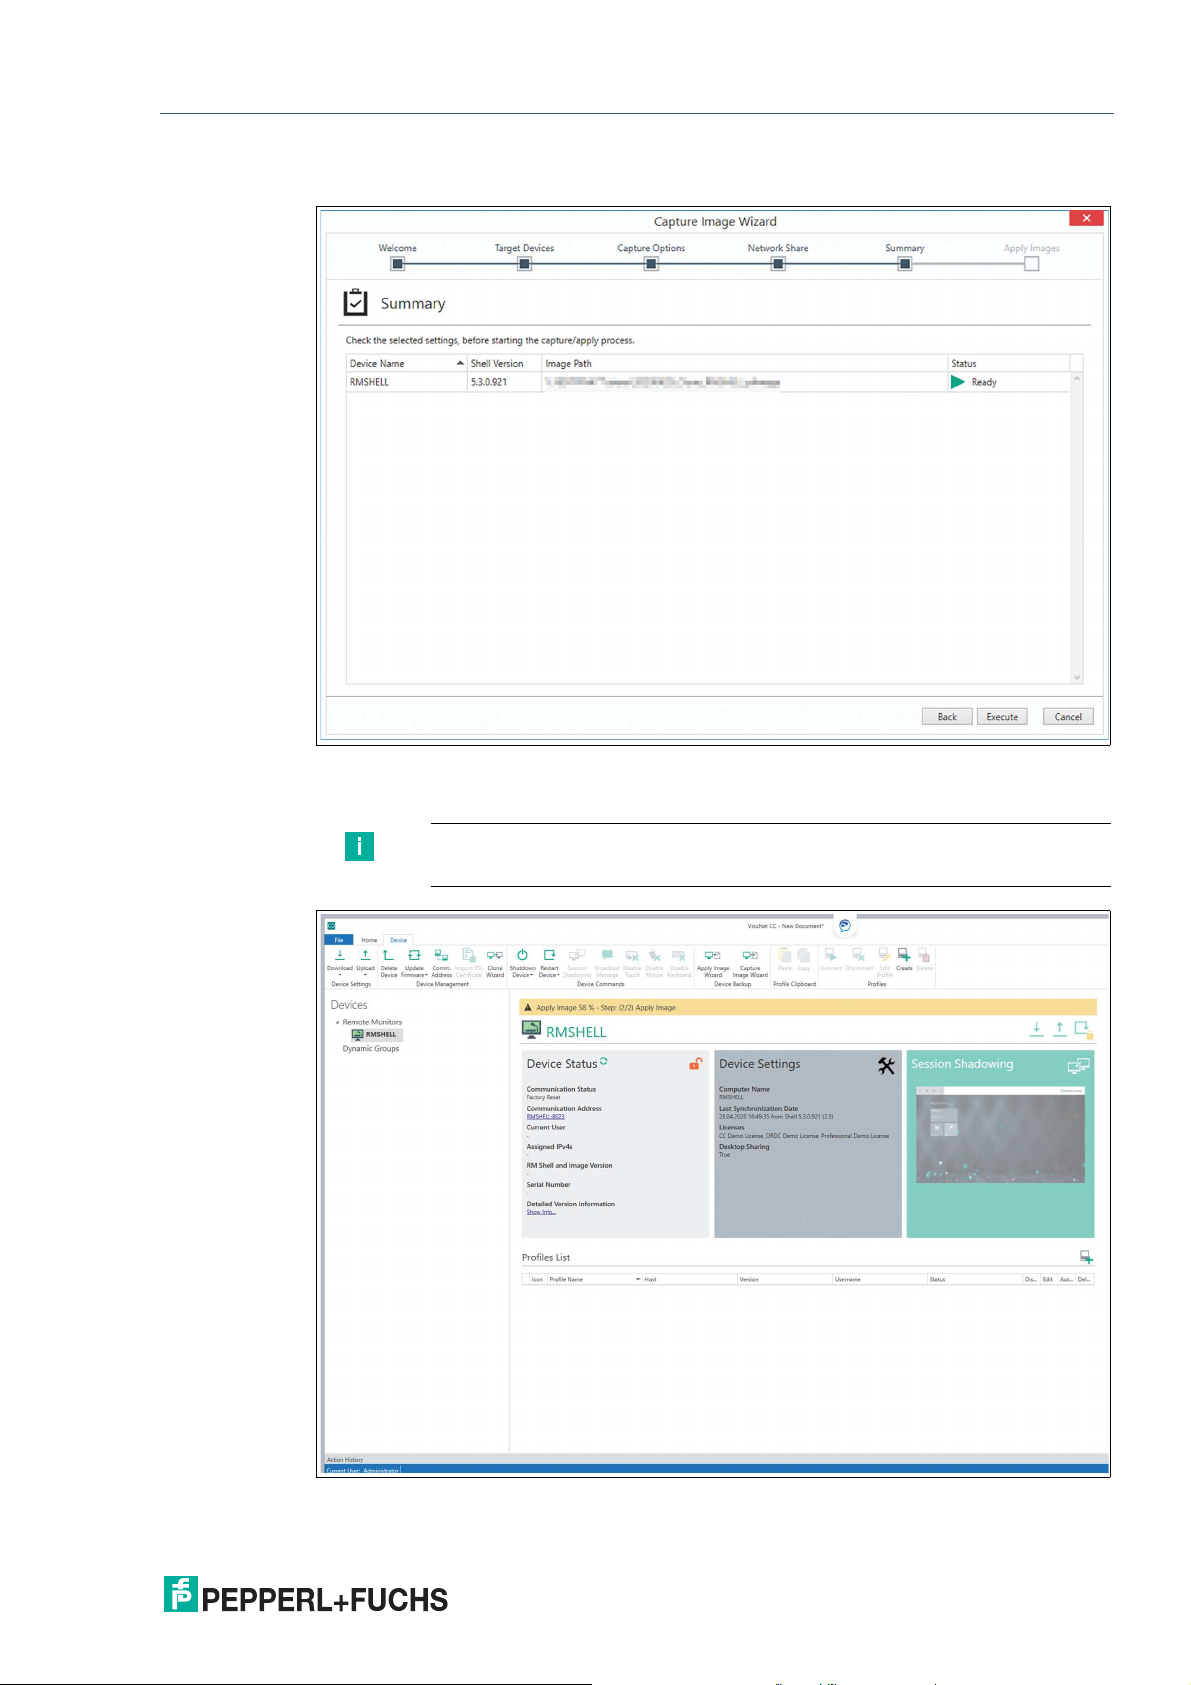
7.
Check again the selected settings then click "Execute" to perform the capture/apply process.
Figure 5.55
8.
Capturing a Backup Image will take about 30 Minutes.
Note
During that time the device can not be operated.
Figure 5.56
2020-12
63
Page 64

VisuNet Control Center Version 4
Manage (Device)
Figure 5.57
5.6 Profile Clipboard
Figure 5.58
One or multiple profiles can be copied between different devices. Select the profile in the profile list out of the device function tiles you would like to copy. Use either the icons or the right
click to copy and paste the profiles. Remember to use the “upload” function to synchronize your
new profile settings to your RM / BTC devices.
5.7 Profiles
The profiles group on the ribbon tool bar shows all relevant functions for setting up and using a
remote profile.
64
Figure 5.59
2020-12
Page 65

VisuNet Control Center Version 4
Manage (Device)
Function Description
Connect Start the profile selected from the VisuNet CC profile list stored on
Disconnect Close the selected active profile connection of an RM / BTC.
Edit Profile Allows editing core settings of local profiles that are stored in the
Create Allows creating a new profile in the Control Center with its core
Delete
1. VisuNet CC must be synchronized with the RM / BTC in order for the remote profiles shown on the profiles list to be
present on the RM / BTC.
2. To change the profile on an RM / BTC after editing, use the "upload" function.
3. To use the profile on an RM / BTC, use the "upload" function.
4. To delete the profile on an RM / BTC, use the "upload" function.
an RM / BTC.
VisuNet CC project.
values.
1
2
3
Allows a profile on an RM / BTC to be deleted.
4
2020-12
65
Page 66

VisuNet Control Center Version 4
"How Tos"
6 "How Tos"
6.1 Preparing an RM / BTC for Centralized Management
Goal
Prepare an RM / BTC for centralized management.
Pre-conditions
Ensure, that the following criteria are fulfilled by the RM / BTC:
• Local time zone, date and time of RM / BTC are correct.
• RM / BTC has firmware version RM Shell 4.1 or newer.
• RM / BTC is connected to the same network as the PC with VisuNet CC.
• RM / BTC IP address and VisuNet CC IP address are in the same IP address range.
DHCP is enabled as factory default setting in everey RM / BTC.
• VisuNet CC interface is enabled in the RM Shell (= default setting).
• VisuNet CC license key is entered in RM Shell. The license key can also be entered via
VisuNet CC.
When all pre-conditions are fulfilled, the RMs / BTCs can be managed over the network by VisuNet CC.
6.2 Connecting to an RM / BTC
Goal
Add an RM / BTC to a VisuNet CC project.
66
2020-12
Page 67

VisuNet Control Center Version 4
"How Tos"
Adding an RM / BTC
1.
Add RM / BTC to the list of available devices
2.
Open search window by clicking "Scan for Remote Monitors".
3.
Close window by clicking "OK". All RMs / BTCs that have been found will be added to the list of
devices.
Figure 6.1 Scanning for RMs / BTCs
4.
Click on the RM / BTC you want to connect to in device list.
5.
To initiate the connection to an RM / BTC, enter the administrator password stored on the RM /
BTC. The default administrator password is blank.
Caution!
Password security
Use strong passwords for the user roles "engineer" and "administrator" on the
RMs / BTCs to ensure a high level of security!
Note
To avoid recurring authentications, the connection password can be stored
encrypted in the Control Center project.
After the initial connection, the device settings are automatically downloaded to the VisuNet
CC.
2020-12
67
Page 68

VisuNet Control Center Version 4
"How Tos"
Figure 6.2
6.3 Uploading a Configuration to an RM / BTC
Goal
Updating device information with VisuNet CC
Note
All changes done in VisuNet CC are stored in the local project file. If you want to transfer the
changes onto an RM / BTC, you need to upload them to an RM / BTC. Proceed as follows:
Pre-Condition
Connect to an RM / BTC
Update device information
1.
When you have changed the device settings, upload them by clicking on the “Upload” button
on the ribbon tool bar.
2.
Choose in the drop down menu if you would like to upload the data directly from a single device
or get guided through the upload Wizard and upload the settings and profiles of multiple
devices.
68
Figure 6.3 Upload the data of a single device
The upload window showing the upload steps is opened.
Before the settings are uploaded to the device, the local operator of the RM / BTC is
prompted to give permission for the RM / BTC to enter maintenance mode.
3.
Wait until the operator accepts the request, or use the “Force Access” function in the window to
switch the RM / BTC into maintenance mode.
As soon as maintenance mode is entered, the data and settings are uploaded onto the
device.
2020-12
Page 69

VisuNet Control Center Version 4
"How Tos"
If the upload was successful, the RM / BTC will automatically leave maintenance mode, and
the operator will be able to use the RM / BTC again.
Figure 6.4
Upload data for multiple devices
The wizard showing the upload steps is opened and guides you through the process.
Figure 6.5 Uploading Device Data
2020-12
69
Page 70

VisuNet Control Center Version 4
"How Tos"
6.4 Shadowing a Session
Goal
Connect to an RM / BTC for remote support
Pre-Condition
Connect to an RM / BTC. Enable Session Shadowing via device Settings (see chapter 5.4).
Remote support
1.
Open the session shadowing window by clicking on the session shadowing tile or using the
function on the tool bar.
2.
In the session shadowing window, you are now able to shadow the session of the RM / BTC
that you are connected to.
3.
If you want to control the RM / BTC, click “Control” on the ribbon tool bar of the session
shadowing window.
Before VisuNet CC gains control of the RM / BTC, the local operator is prompted and asked
to grant permission. If the local operator does not deny access within the defined amount of
time, that can be specified in VisuNet CC under “Start”, VisuNet CC gains access to the RM
/ BTC.
Note
When controlling the RM / BTC, the local operator can still do local inputs on the Remote
Monitor.
Note
Use “force” mode to immediately take over control of the RM / BTC without asking the local RM
/ BTC operator for permission.
6.5 Creating a New Local User
Pre-Condition
Ensure that you are logged into a project as administrator or another account that allowse editing user privileges.
Creating new user
1.
Click the “Edit Users” icon on the ribbon tool bar.
70
Figure 6.6
2.
Click the “Add User” icon on the ribbon tool bar of the “Edit Users” window.
2020-12
Page 71

VisuNet Control Center Version 4
"How Tos"
3.
Use the displayed form to give the new user a name, assign them to a group, give them a
single-sign-on name, and set his password.
4.
Click “OK.”
Figure 6.7
5.
Save the project file to keep the changes.
6.6 Build up a connection with your own certificate via Session Shadowing to increase the security level
Pre-condition
An own root CA (public key certificate) as well as and end-user certificate with the import certification passwords need to be provided.
Note
The end-user certificate needs to be based on a private key! The common name of the enduser certificate has to have the same name as the host computer name of the target device.
Connection with increased security
1.
Click import SSL Certificate in the Device Tab to upload your end-user certificate
Figure 6.8
2020-12
71
Page 72

VisuNet Control Center Version 4
"How Tos"
2.
Use the browse function to open the path of our end-user-certificate with private key. Choose
the required store location and certification store from the list and enter the import certification
password.
Figure 6.9
3.
Click import and after the upload is completed click OK.
4.
Open the device Settings and navigate to the Desktop sharing tab.
5.
Check if the VisuNet Desktop Sharing Server is enabled. Enable Secure Tunnel Service and
uncheck “Use the default certificate”.
72
2020-12
Page 73

VisuNet Control Center Version 4
"How Tos"
Figure 6.10
6.
If you can´t find the certificate in the selection, click the update button. The Certificate will
appear in the selection. Select the required certificate and Click OK.
Figure 6.11
7.
Upload the new device settings to your target device.
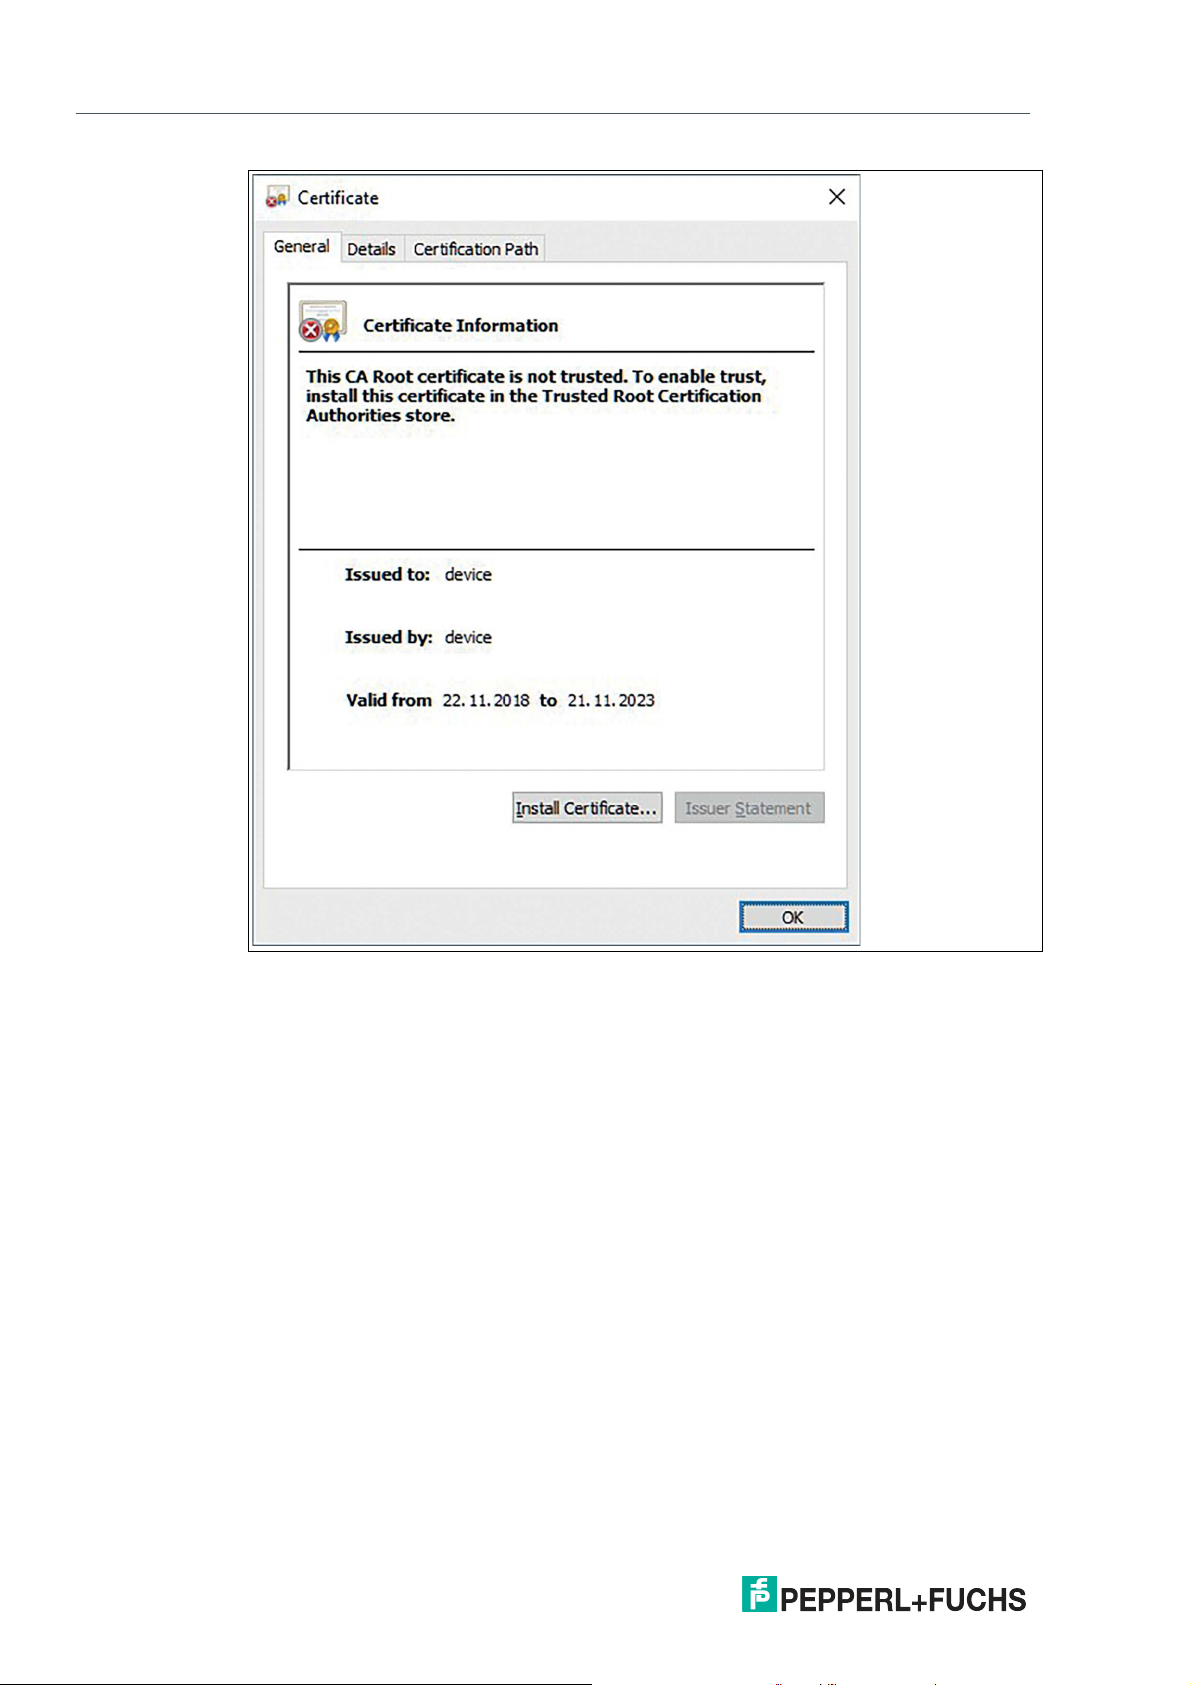
Install the public key certificate (root CA) on your local machine
1.
Open the certificate via right click and open the Certificate Import Wizard when clicking “Install
Certificate…”
2020-12
73
Page 74
VisuNet Control Center Version 4
"How Tos"
Figure 6.12
2020-12
74
Page 75
VisuNet Control Center Version 4
"How Tos"
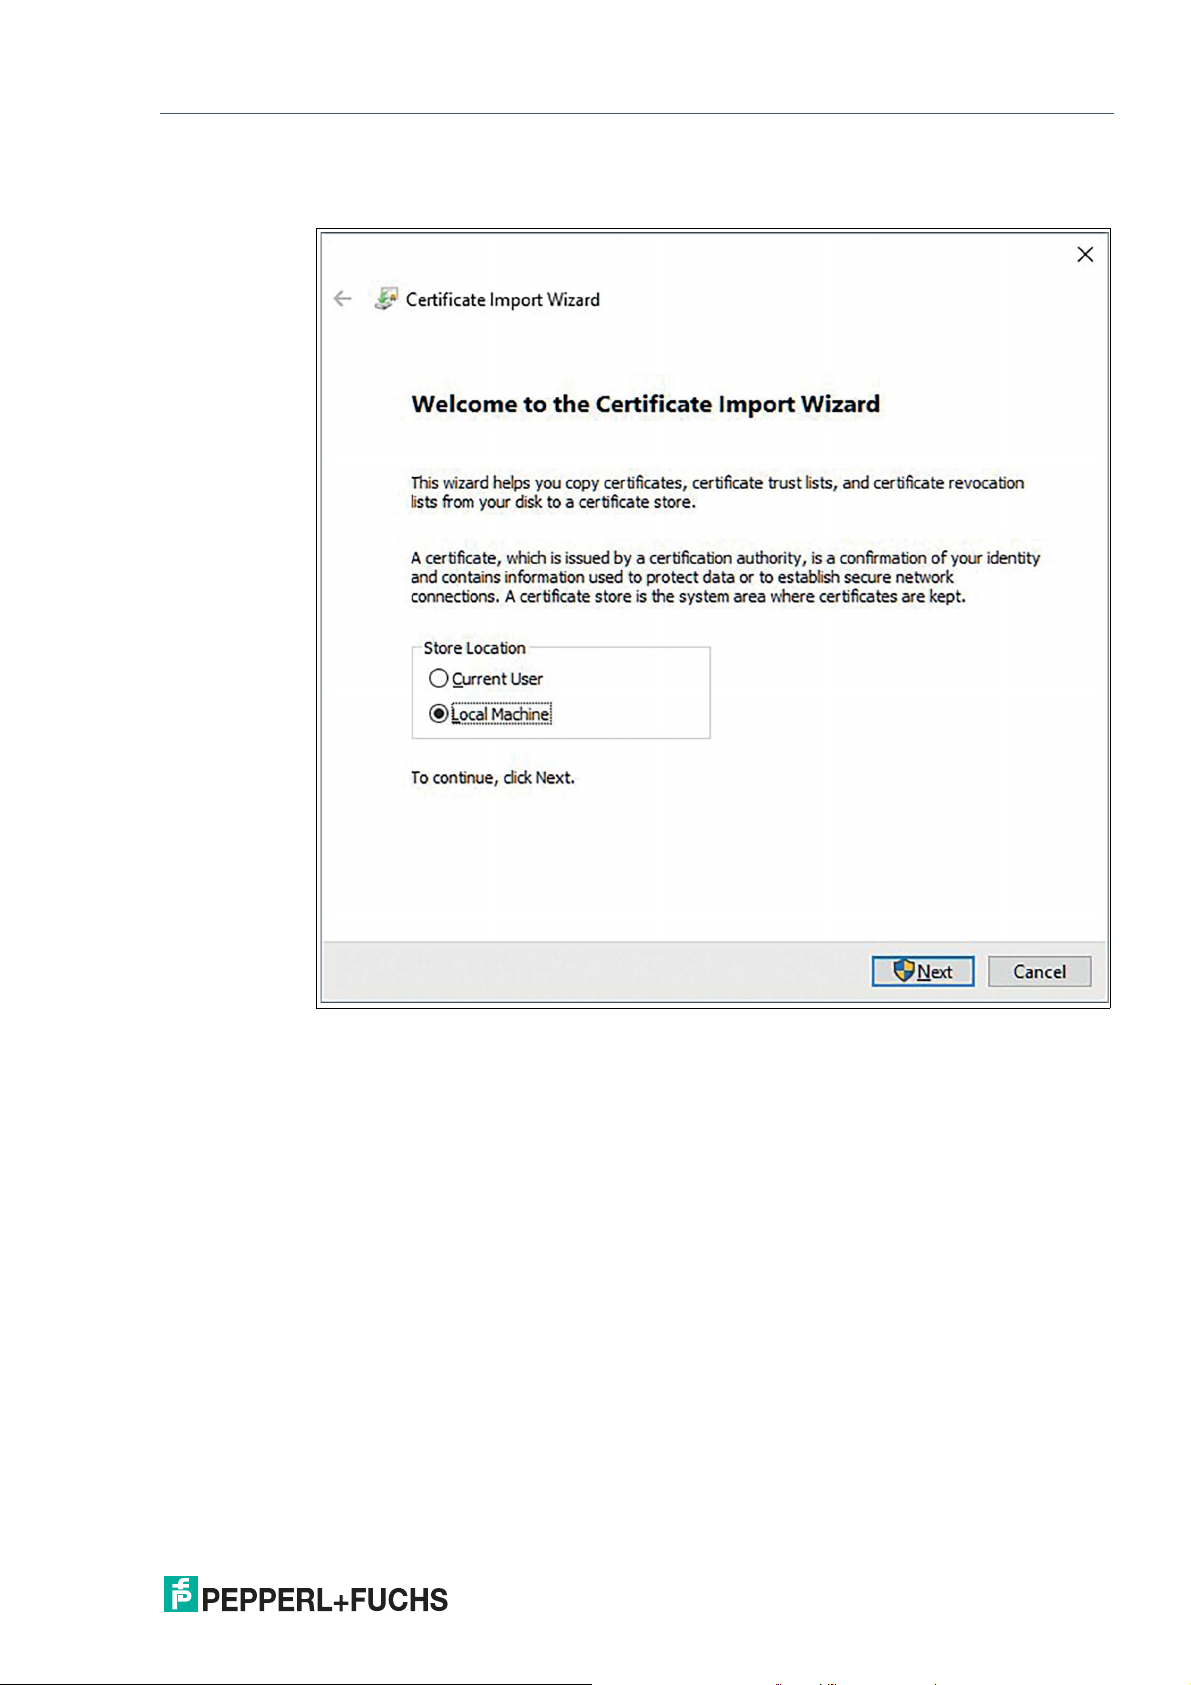
2.
Follow the guided steps of the import wizard. Choose your store location and certification store
and click "Next" to continue.
Figure 6.13
2020-12
75
Page 76

VisuNet Control Center Version 4
"How Tos"
3.
Before you complete the import of your certificate you can double-check the specifications of
your settings. Click Finish to complete your import.
76
Figure 6.14
If you completed all the implementations of the certificates successfully, no error message
will appear when your remote observation starts.
2020-12
Page 77

VisuNet Control Center Version 4
Troubleshooting
7 Troubleshooting
Problem Potential root cause Possible solution
RM / BTC cannot be found in
VisuNet CC, even though I
can ping the device.
RM / BTC has a status of
"Security Error."
The RM / BTC status is shown
as “Incorrect Password.”
I am prompted in VisuNet CC
to enter the VisuNet CC
license key on the RM / BTC,
even though I have already
entered it on the RM / BTC.
The communication protocol
is not properly routed through
the network. One root cause
can be that a second network
adapter (e.g., WiFi card) is
active that is connected to a
different network.
The communication protocol
uses a certificate-based
encryption that requires both
communication partners to
use the same system time.
One potential root cause for a
communication failure can be
that an invalid password has
been entered for the RM / BTC
(or is stored in the VisuNet CC
project file). If this error
occurred, it is also highlighted
in the device status tile under
“communication status.”
The VisuNet CC key might not
have been synchronized yet
with the Control Center and is
therefore unknown.
Try to turn off or disable all
other network adapters (e.g.,
WiFi card), that might be available in your system so that
only the adapter is active that
is connected to the RM / BTC
network. Use the IP address
as communication address.If
the RM / BTC is found, check
with your local administrator
for the network routing settings.
Check if the RM / BTC is set
up with the correct time zone,
date, and system time.
Try to re-enter the password
that is used for the administrator role on the RM / BTC you
want to connect to.
Download the RM / BTC settings via the download function to synchronize VisuNet
CC with the RM / BTC. This
will also download the VisuNet
CC key from an RM / BTC, and
remote access should be
granted.
1
1. Reboot the RM / BTC if you change the time zone, date, or system time.
2020-12
77
Page 78

Pepperl+Fuchs Qua lit y
Download our latest poli cy he re:
www.pepperl-fuchs.com/quali ty
© Pepperl+Fuchs · Subject to modifications
www.pepperl-fuchs.com
Printed in Germany / DOCT-B1B6G
 Loading...