

Page 1
RMS-D · RMS-D-RC · RMS-D-NA · RMS-D-RC-NA · RMS-D-Broad
!
1
1
2
3
4
!
click
!!!
!
Technische Daten
Funktionsprinzip
Detektionsgeschwindigkeit
Kennzeichnung
Einstellwinkel
Erfassungsbereich
Arbeitsfrequenz
Betriebsart
Funktionsanzeige
Bedienelemente
Betriebsspannung
Leerlaufstrom
Leistungsaufnahme
Schaltungsart
Signalausgang
Schaltspannung
Schaltstrom
Schaltleistung
Abfallzeit
Umgebungstemperatur
Relative Luftfeuchtigkeit
Montagehöhe
Schutzart
Anschluss
Material Gehäuse
Masse
Sendeleistung
Abmessungen ohne Befestigungsteile
Mikrowellenmodul
min. 0,1 m/s
CE
0 - 40° in 5° Schritten
bei 2200 mm Montagehöhe
und 30° Neigungswinkel
2000 x 4000 mm (TxB)
RMS-D-Broad: 3000 x 2500 mm (TxB)
24,15 GHz - 24,25 GHz K-Band
FCC (NA-Version): 24,075 GHz - 24,175 GHz
K-Band
Radar-Bewegungsmelder
LED rot/grün
DIP-Schalter für Betriebsartenwahl:
Richtungserkennung, Querverkehrsausblendung,
Turtle-Mode, Schaltungsart,
Empfindlichkeitseinsteller, Einsteller für Abfallzeit
12 - 36 V DC / 12 - 28 V AC
< 50 mA bei 24 V DC
< 1 W
aktiv/passiv
Relais, 1 Schließer
max. 48 V AC / 48 V DC
max. 0,5 A AC / 1 A DC
max. 24 W / 60 VA
0,2 s - 5 s einstellbar (Werkseinstellung 1 s)
-20° C bis 60° C / 253 - 333 K
max. 90 %, nicht kondensierend
max. 4000 mm
IP 54
Steckschraubklemmen 4-polig,
5 m Anschlusskabel im Lieferumfang enthalten
ABS, anthrazit
120 g
< 20 dBm
123 mm (B) x 65 mm (H) x 57 mm (T)
Störungen beheben
Störung Störung beheben
Tür wird detektiert. Empfindlichkeit vermindern.
Radar weiter nach vorne schwenken.
LED leuchtet nicht.
Sensor reagiert auf geringste Einflüsse
wie Regen, Vibrationen oder Reflexionen.
Tür öffnet ohne ersichtlichen Grund.
Potentiometer reagiert nicht Bedienung mit Fernbedienung ist eingeschaltet.
Fernbedienung reagiert nicht Bedienung mit DIP-Schalter und Potentiometer ist
DOCT-1544A
Pepperl+Fuchs GmbH ist gemäß ISO 9001 zertifiziert. Part No. 215075 09/2010
für RMS-D; RMS-D-RC; RMS-D-Broad
Keine Spannung, Gerät defekt.
Immunität erhöhen,
Feldgröße verringern.
DIP-Schalter 6 nach OBEN stellen.
eingeschaltet. DIP-Schalter 6 nach UNTEN stellen.
Gerät ist gesperrt. Betriebsspannung ausschalten
und wieder einschalten. Sensor ist 30 Minuten lang
ohne Code konfigurierbar.
Batterie der Fernbedienung prüfen.
Werkseinstellungen
Funktion
DIP-Schalter Schalter 1-5: oben
Feldgröße Potentiometer:
Einstellwinkel 15°
Richtungserkennung vorwärts
Abfallzeit 1 s
Relaiskontakt aktiv
Querverkehrs ausblendung
Immunität 4
Turtle Mode aus
Einstellung
Schalter 6: unten
Mittelstellung
Fernbedienung: 8
Potentiometer: aus
Fernbedienung: 1
Konformitäten
EG-Konformität: Die Produkte RMS-D,
RMS-D-RC und RMS-D-Broad sind konform mit
der Richtlinie 1999/5/EG, Geräteklasse 1 und
den harmonisierten Normen EN 62311,
EN 60950-1, EN 301 489-1, EN 301489-3,
EN 300 440-2
Die vollständige Konformitätserklärung kann
unter www.pepperl-fuchs.com
herunter geladen werden.
US-Konformität: Die Produkte RMS-D-NA,
RMS-D-RC-NA sind konform mit den FCCRegeln Teil 15.
ACHTUNG! Die EG-konformen Geräte dürfen
nicht in den USA und die US-konformen Geräte
dürfen nicht in Europa in Verkehr gebracht
werden!
Zubehör
RMS Remote control
RMS Weather cap
RMS Antenna broad
Pepperl+Fuchs GmbH . Mannheim . Germany
E-Mail: FA-info@de.pepperl-fuchs.com
Pepperl+Fuchs Inc . Twinsburg . USA
E-Mail: FA-info@us.pepperl-fuchs.com
Pepperl+Fuchs Pte Ltd . Singapore 139942
E-Mail: FA-info@sg.pepperl-fuchs.com
Fernbedienung
Montageset und
Wetterschutzhaube
Antenne für breites
Erfassungsfeld
World Headquarters
USA Headquarters
Asia Pacific Headquarters
www.pepperl-fuchs.com
Radar-Bewegungsmelder zur Detektion von Personen für automatische Türen deutsch
Sicherheitshinweise
Das Gerät darf nur mit Schutzkleinspannung betrieben werden, die mit den
Safety Extra Low Voltage (SELV)-Anforderungen in den auf IEC 60950 basierenden
Sicherheitsstandards übereinstimmt. Dieses Gerät darf nur von geschultem,
qualifizierten Personal installiert und gewartet werden.
Zur Erfüllung der UL508 sollte zwischen dem RMS und der Stromversorgung
eine träge 2,5A Sicherung verwendet werden.
Produktinformation
Lieferumfang
Menge Bezeichnung
1 Sensor RMS-D ...
1 Anschlusskabel
1 Bohrschablone als Abziehkleber
2 Schrauben für die Montage
1 Montageanleitung
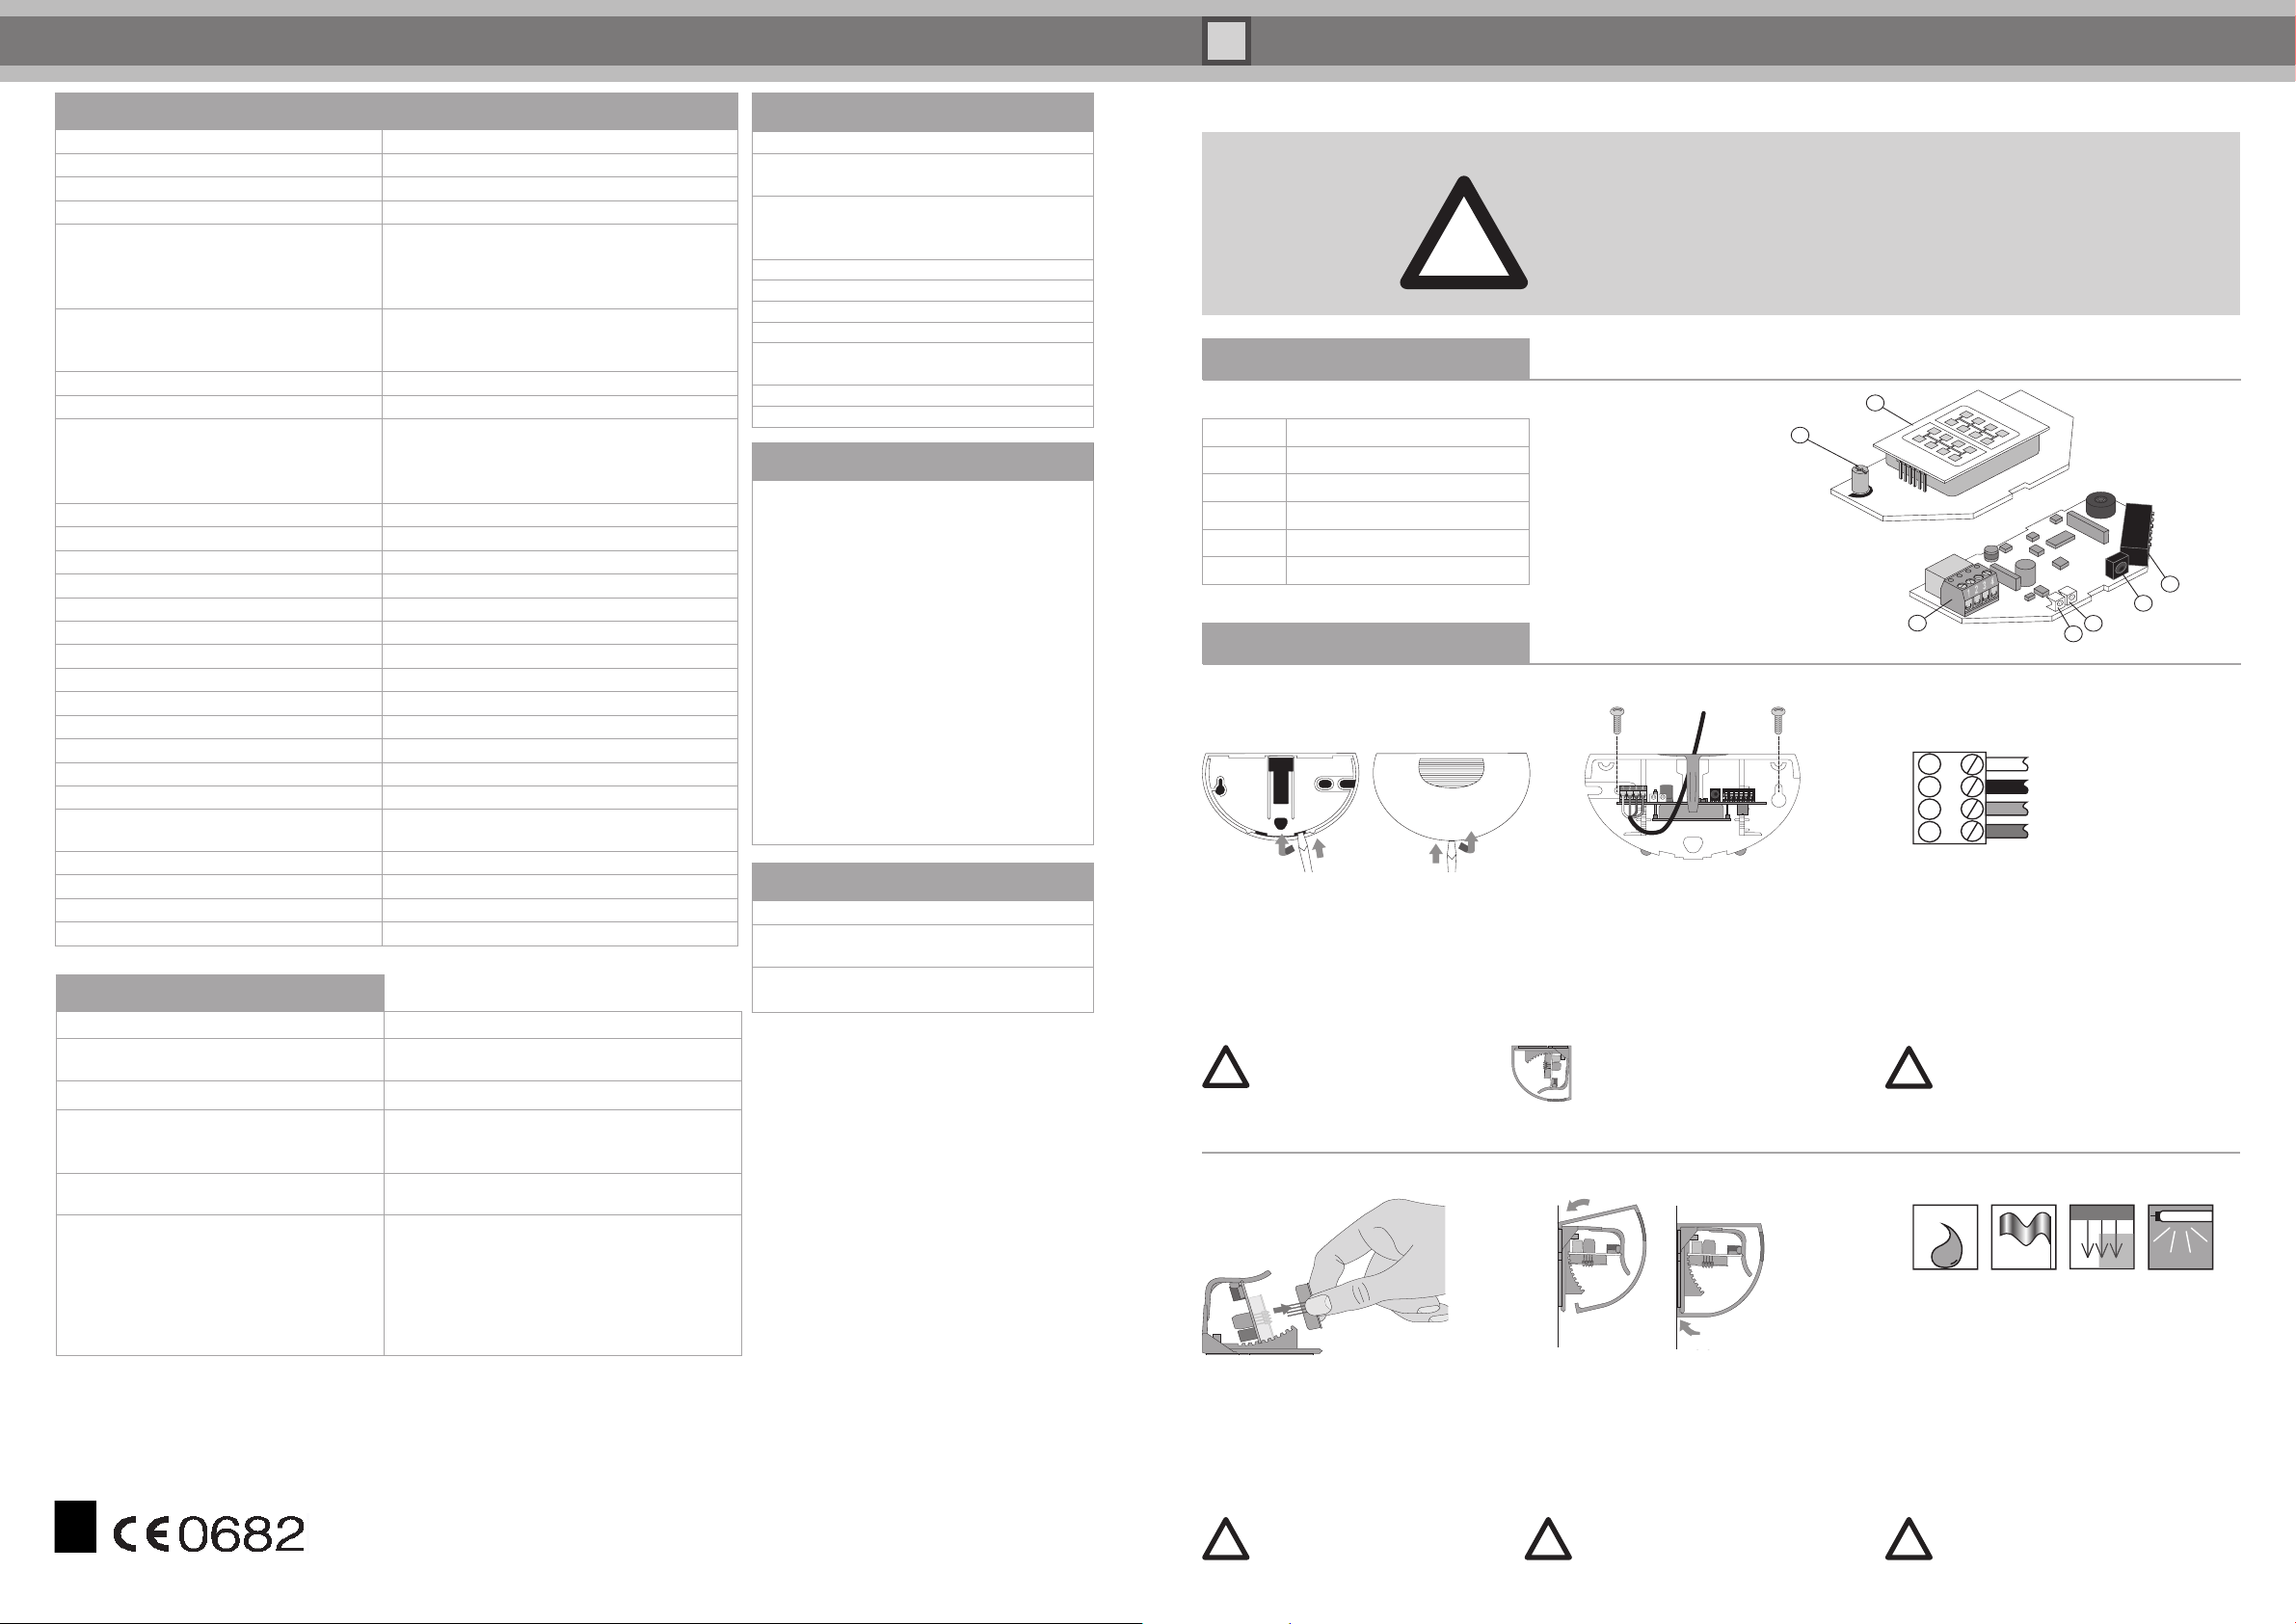
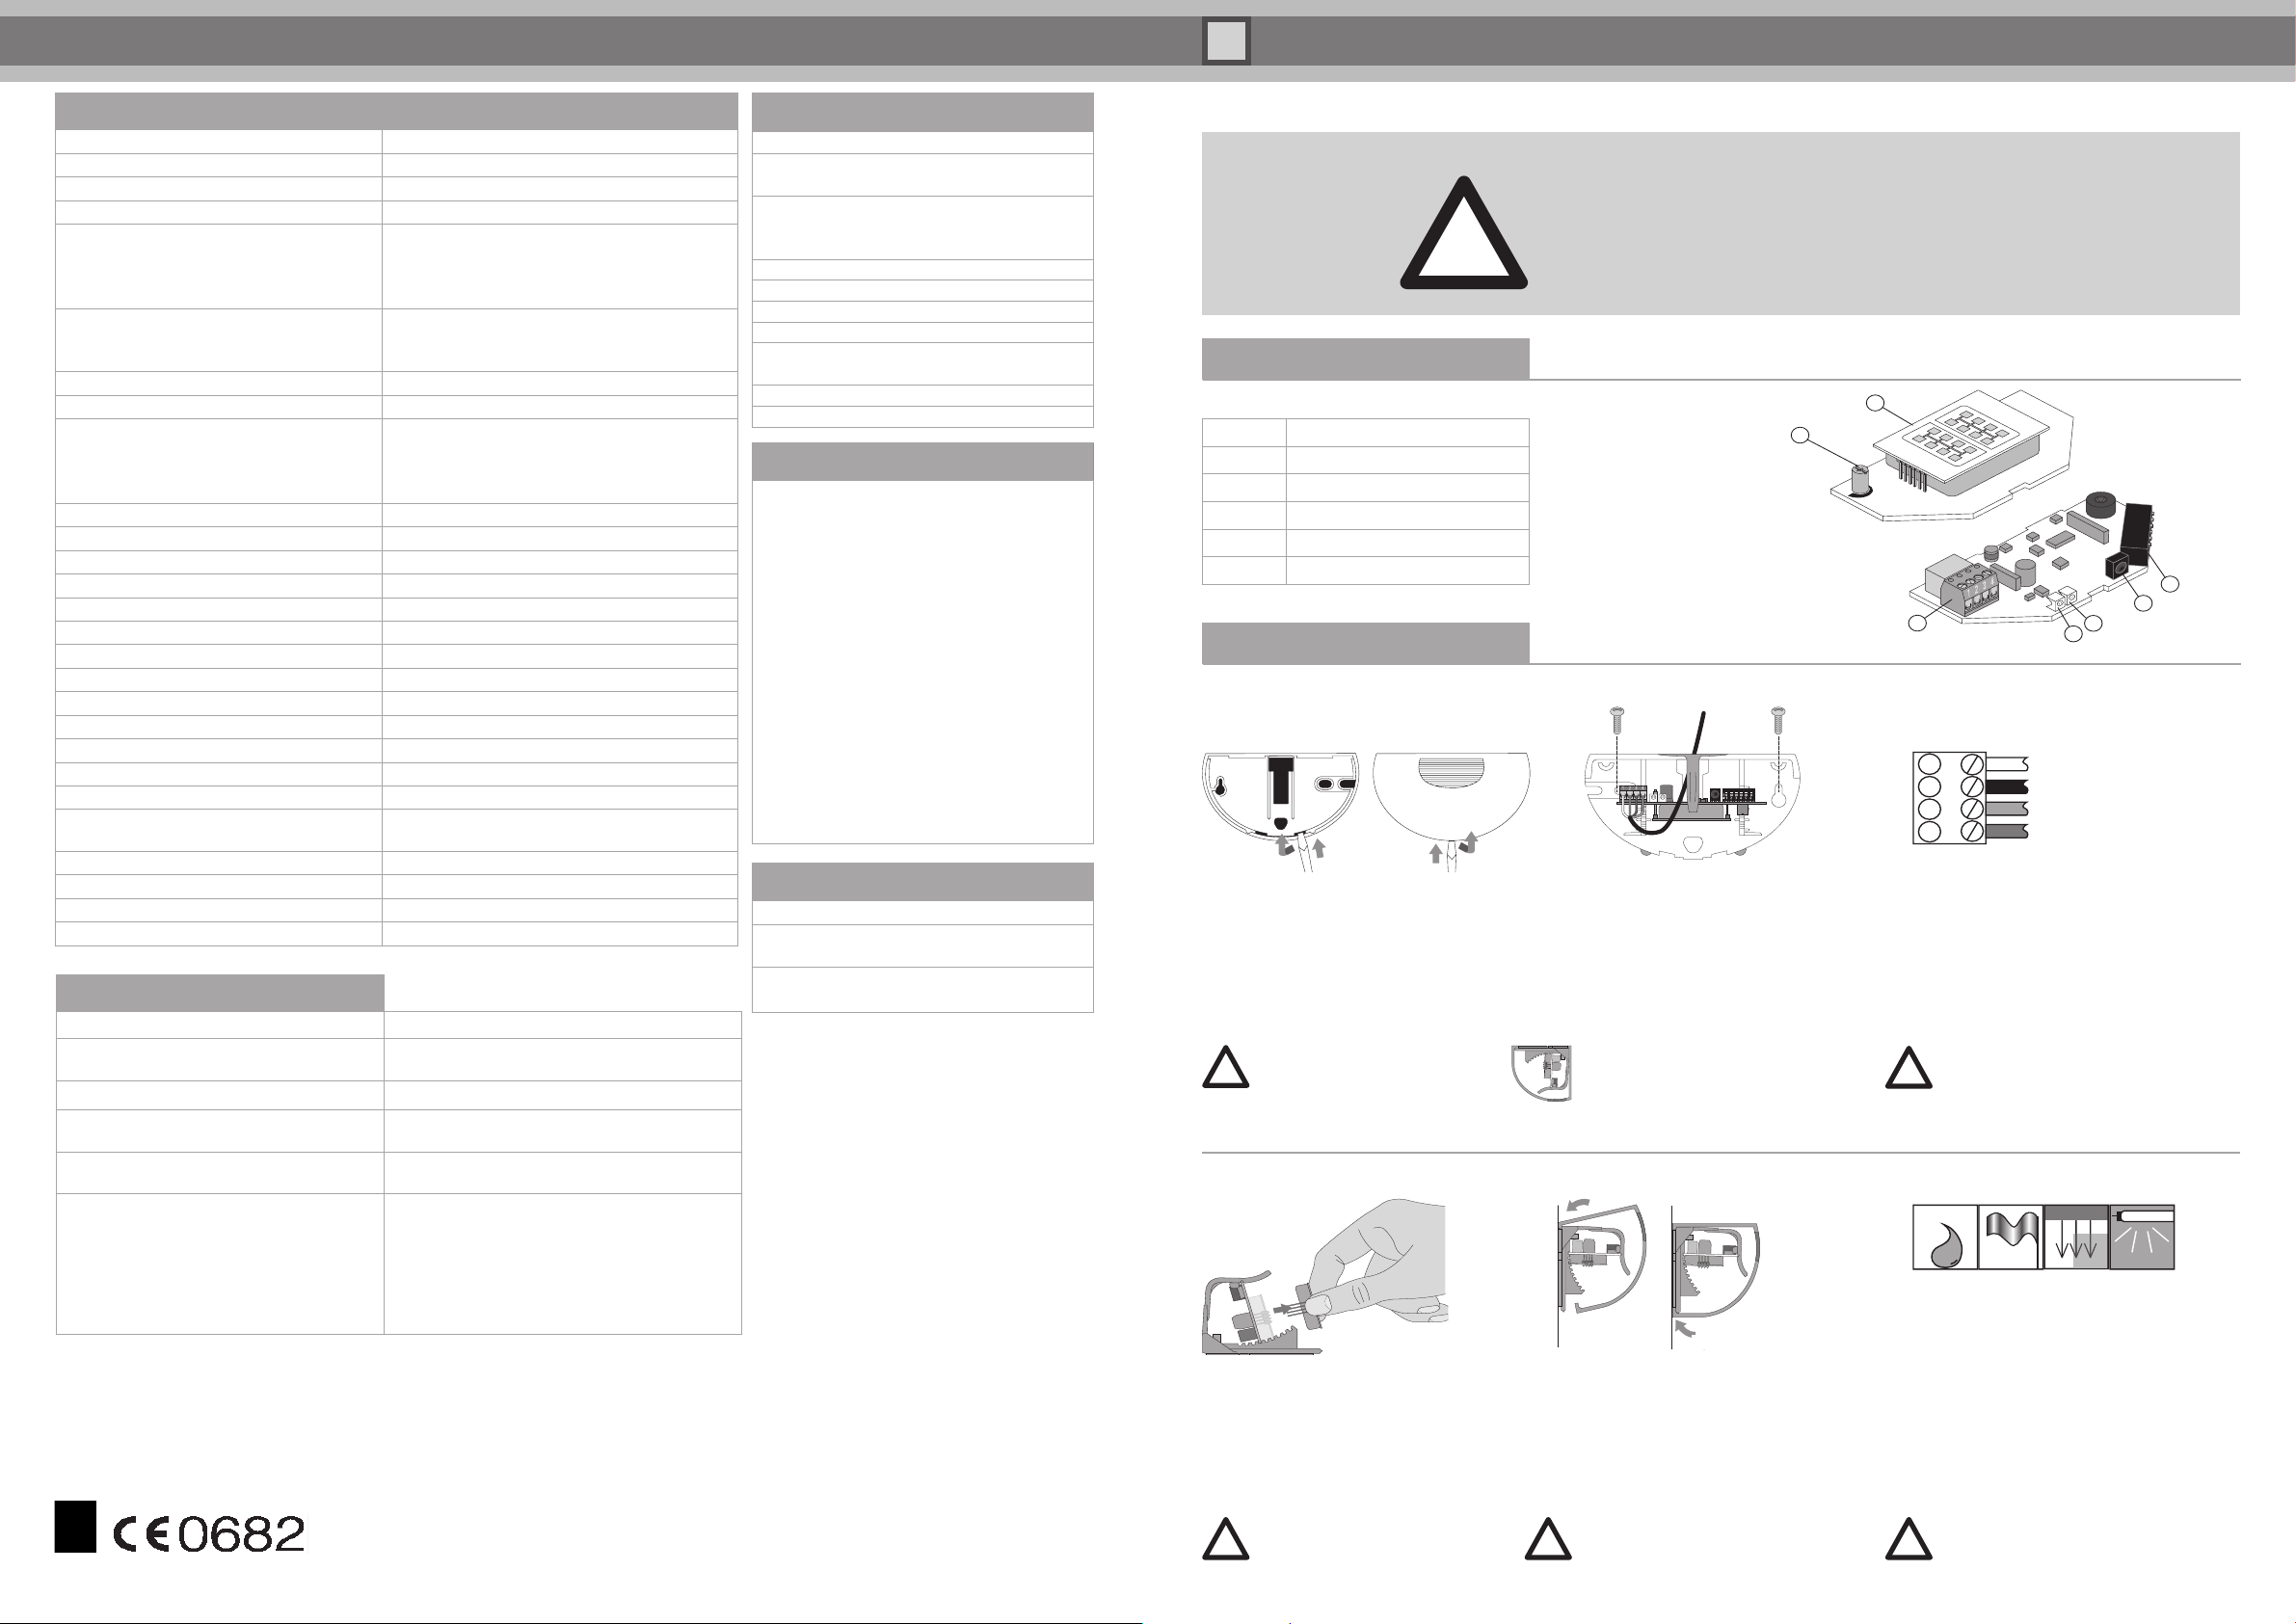
Montage
Gerät öffnen
Das Gehäuse von unten öffnen:
Vor dem Einbau von hinten,
nach dem Einbau von vorne.
Gehäuse nicht
von oben öffnen.
Antenne wechseln
Antenne für breites oder 1.
schmales Erfassungsfeld wählen.
Antenne vorsichtig mit zwei 2.
Fingern herausziehen.
Neue Antenne einsetzen.3.
Keine elektronischen Bauteile
berühren. Kein metallisches
Werkzeug verwenden.
Bedienelemente
Antenne
Potentiometer
Anschlussklemme
DIP-Schalter
LED (rot/grün)
IR-Empfänger
IR-Sender
Gerät befestigen
Bohrschablone aufkleben und gemäß 1.
Anweisungen bohren.
Kabel durch vorgesehene Öffnung ziehen.2.
Bodenplatte mit Schrauben befestigen 3.
(Schrauben sind im Gehäuse).
Deckenmontage ist mit
RMS Weather Cap möglich
(siehe Zubehör).
Gerät schließen
Haube von oben einfahren
und aufdrücken bis sie einrastet.
Entfernen Sie vor dem Einschalten
des Gerätes alle Gegenstände aus dem
Türbereich, die nicht in die übliche
Umgebung der Tür gehören.
Radar anschließen
Kabel wie folgt an Anschlussklemme anschließen:
Speisung AC/DC (weiss)
Speisung AC/DC (schwarz)
Relaiskontakt 1 (rot)
Relaiskontakt 2 (grün)
Für RMS-D-NA und RMS-D-RC-NA:
Zur Erfüllung der UL508 sollte zwischen
Gerät und Stromversorgung eine träge
2,5 A Sicherung verwendet werden
Einbauweise
Radar vor Regen schützen*.•
Bewegte Objekte im Detektionsfeld •
vermeiden (Ventilatoren, Pflanzen,
Bäume, Fahnen).
Radar nicht verdecken und nur hinter •
geeigneten Abdeckungen montieren.
Mechanisch bewegte Antriebsteile
können den Radar beeinflussen.
Neonlampen im Detektionsfeld vermeiden.•
* Der Einbau des RMS Weather Cap
wird empfohlen (siehe Zubehör).
Page 2
RMS-D · RMS-D-RC · RMS-D-NA · RMS-D-RC-NA · RMS-D-Broad
G
R
G
R
R/G
5
5
5
5
0,2 s
0,5 s
1,0 s
1,5 s
2,0 s
3,0 s
4,0 s
5,0 s
5
5
5
5
5
5
5
1 2 3 4 5 6
min. max.
!
!
!
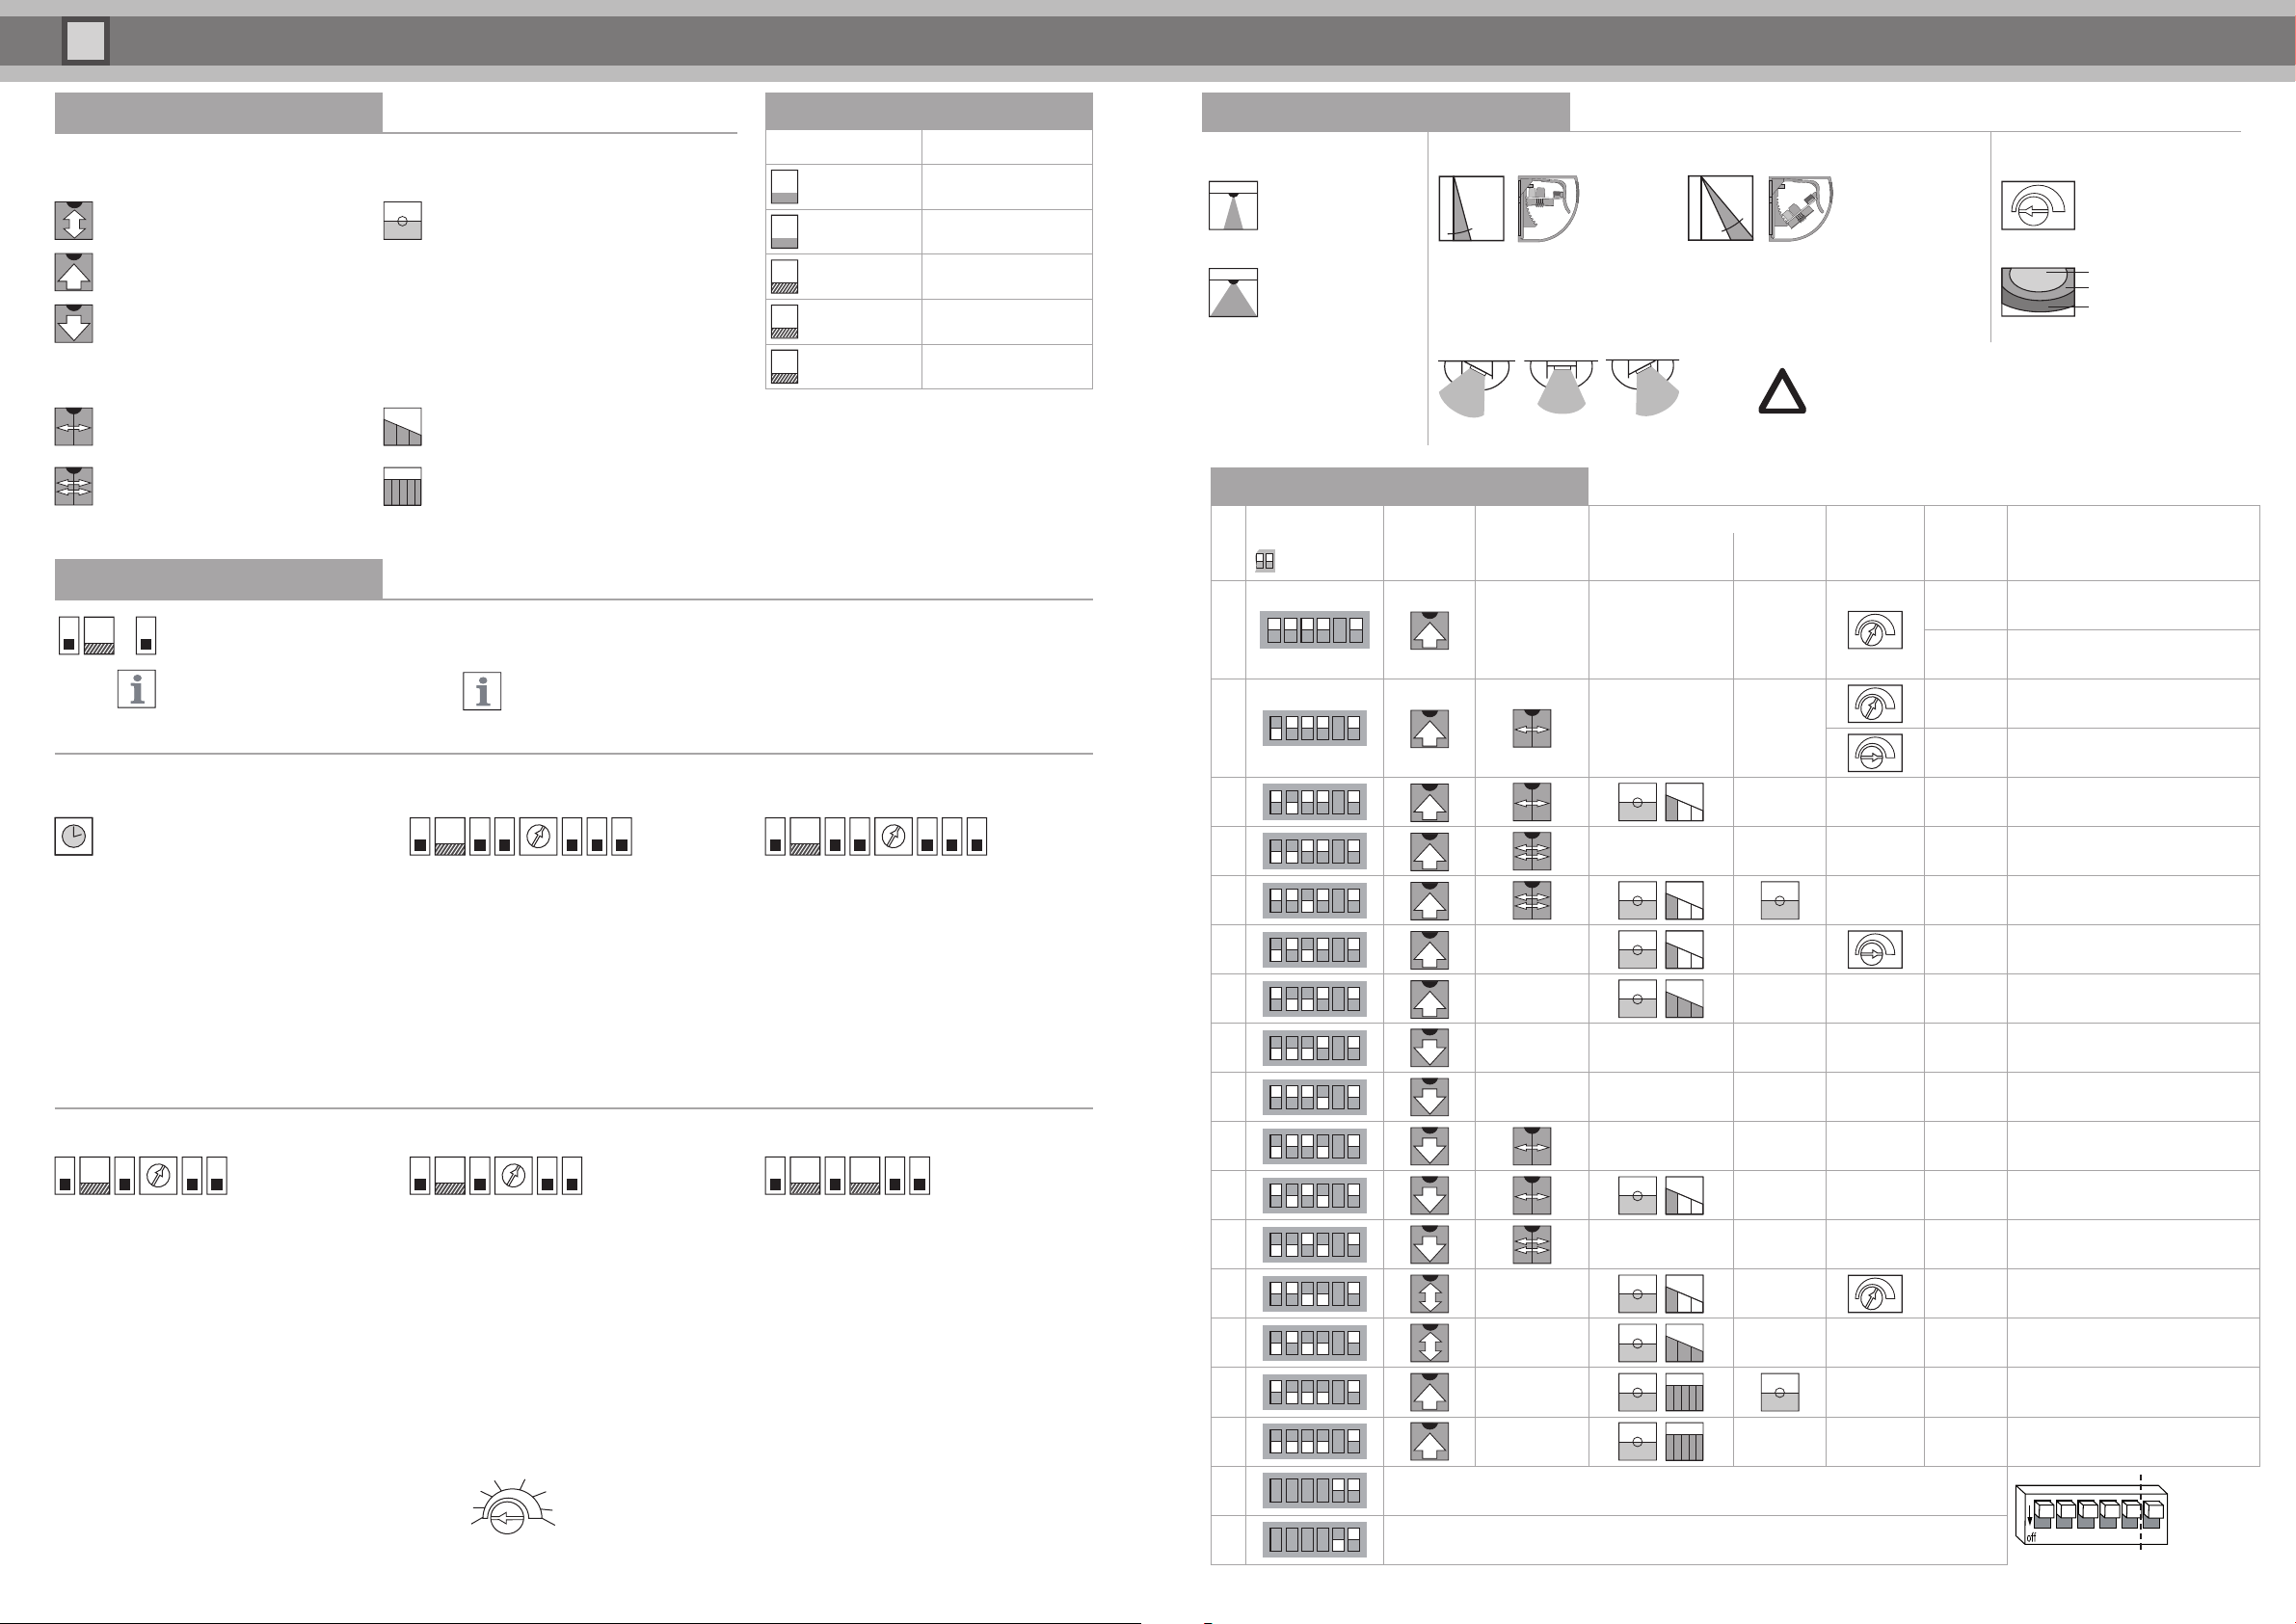
Detektionseigenschaften
Richtungserkennung Turtle mode
ohne Richtungserkennung
mit Richtungserkennung
vorwärts (auf den Radar zu)
mit Richtungserkennung
rückwärts (vom Radar weg)
Querverkehrs ausblendung
wenig Querverkehr,
Tür bleibt geschlossen
viel Querverkehr,
Tür bleibt geschlossen
Detektion auf kleinste Bewegungen
Tür geschlossen
Tür öffnet sich, wenn sich ein langsames
Objekt nähert, das mit der normalen
Detektion nicht erfasst wird
Tür offen
Tür schließt erst dann, wenn in der eingestellten Beobachtungszeit keine
Bewegung detektiert wird.
Beobachtungszeit / Empfindlichkeit
3 Sekunden / abnehmend
Beobachtungszeit / Empfindlichkeit
5 Sekunden / permanent größte Empfindlichkeit
Zusatzfunktionen
Während der Initialisierungzeit können Sie den Modus für Zusatzfunktionen einschalten.
5 G ...
Initialisierungszeit
Dazu Dip-Schalter 5 umstellen. Die LED blinkt grün. Zusatzfunktion einstellen und DIP-Schalter 5 zurückstellen.
DIP-Schalter 6 muss OBEN sein.
Feldgröße Turtle mode
Tür geschlossen
LED Statusanzeige
Farbanzeige Status
grün Gerät betriebsbereit
rot Detektion aktiv
grün blinkend Befehl empfangen
rot blinkend Fehler
rot/grün
blinkend
Immunität
Mit der Immunität können Störeinflüsse,
wie Regen, Vibrationen und Reflexionen
minimiert werden.
Merken Sie sich die Stellung des Potentiometers, damit Sie bei
Bedarf die ursprüngliche Einstellung zurücksetzen zu können.
Feldgröße Turtle mode
Tür offen
Initialisierung
nach dem Einschalten
Erfassungsfeld
Antennencharakteristik Einstellwinkel Feldgröße
schmal (Standard)
Breite: 2,50 m
Tiefe: 3,00 m
breit (optional)
Breite: 4,00 m
Tiefe: 2,00 m
Montagehöhe 2,20 m
Winkel Erfassungsfeld 30°
Empfindlichkeit max
Sie können die Lage in 5°-Schritten ändern. Leiterplatte dazu seitlich anfassen,
nach vorne ziehen und in die gewünschte Lage bringen. Werkseinstellung ist 15°.
Die Leiterplatte kann auch schräg eingesetzt werden, maximal 3 Zacken nach
rechts oder links versetzt. Zacken können auch herausgebrochen werden.
Einstellungen DIP-Schalter
Nr.
DIP
=Dipschalter
¨
1
2
3
Richtungs-
erkennung
0 Grad 40 Grad
Einbausituationen können die Einstellmöglichkeiten
und Funktionen des Sensors einschränken.
durch Abschreiten überprüfen
Quer-
verkehrsaus-
blendung
– – –
Turtle Mode
schließen
– –
Tür
Feldgröße
–
Abfall-
zeit Beispiel anwendungTür öffnen
1 s Standard
0,2 s Windfang
0,8 s Gehsteig
1 s Hohe Montage (optional breites Feld)
Mit dem Potentiomenter
die Größe des Erfassungsfeldes ändern.
min
50 %
max
Nach dem Anlegen der Betriebsspannung,
wird die Hardware und Software
initialisiert. Diese Initialisierungszeit dauert
10 Sekunden. Die LED blinkt rot/grün.
Radar einstellen. Einstellungen durch
Abschreiten überprüfen.
Nur während der Initialisierungszeit kann
man Zusatzfunktionen einstellen.
Immunität
G 2 2
DIP-Schalter 5 umstellen. 1.
LED blinkt grün.
DIP-Schalter 2 umstellen.2.
Mit dem Potentiometer die Empfind lichkeit 3.
der Immunität ändern.
Die LED zeigt die eingestellte Immunität an.
DIP-Schalter 2 zurückstellen. 4.
Die Einstellungen werden gespeichert.
DIP-Schalter 5 5. zurückstellen.
G 3 1 1 3
DIP-Schalter 5 umstellen. 1.
LED blinkt grün.
DIP-Schalter 3 umstellen. 2.
Dip-Schalter 1 umstellen.3.
Mit dem Potentiometer die 4.
Feldgröße ändern.
DIP-Schalter 1 zurückstellen.5.
DIP-Schalter 3 zurückstellen. 6.
Die Einstellungen werden gespeichert.
DIP-Schalter 5 zurückstellen.7.
Abfallzeit (Ausgang)
G 1 1
DIP-Schalter 5 umstellen. 1.
LED blinkt grün.
DIP-Schalter 1 umstellen.2.
Mit dem Potentiometer die Abfallzeit 3.
des Relais ändern. Das Relais wird dabei
mit der eingestellten Abfallzeit fortwährend
geöffnet und geschlossen. Die LED
wechselt analog dazu von grün nach rot.
DIP-Schalter 1 zurückstellen. 4.
Die Einstellungen werden gespeichert.
DIP-Schalter 5 5. zurückstellen.
G 3 2 2 3
DIP-Schalter 5 umstellen. 1.
LED blinkt grün.
DIP-Schalter 3 umstellen.2.
DIP-Schalter 2 umstellen.3.
Mit dem Potentiometer die 4.
Feldgröße ändern.
DIP-Schalter 2 zurückstellen.5.
DIP-Schalter 3 zurückstellen. 6.
Die Einstellungen werden gespeichert.
DIP-Schalter 5 zurückstellen.7.
Werkseinstellungen wiederherstellen
G 4 R 4
DIP-Schalter 5 umstellen. 1.
LED blinkt grün.
DIP-Schalter 4 umstellen. 2.
LED blinkt rot.
DIP-Schalter 4 zurückstellen. 3.
Der Radar wird auf Werkseinstellungen
zurückgesetzt und neu gestartet.
Nach Ablauf der Initialisierungszeit den 4.
DIP-Schalter 5 zurückstellen.
10
11
12
13
14
15
16
4
5
6
7
8
9
–
–
– – –
– – –
–
–
–
–
– –
– –
– –
–
–
–
–
–
–
1,5 s Supermarkt (optional breites Feld)
2 s Altenheim (optional breites Feld)
Relais-Kontakt bei Detektion aktiv (N.O.)
Relais-Kontakt bei Detektion passiv (N.C.)
DIP 6 nur bei RC-Versionen verfügbar
Page 3
RMS-D · RMS-D-RC · RMS-D-NA · RMS-D-RC-NA · RMS-D-Broad
!
1
1
2
3
4
!
click
!!!
!
Technical data
Operating principle
Detection speed
Approvals
Detection field angle
Sensing range
Operating frequency
Operating mode
Function display
Operating elements
Operating voltage
Current consumption
Power consumption
Switching type
Signal output
Switching voltage
Switching current
Switch power
Off-delay time
Ambient temperature
Relative humidity
Installation height
Degree of protection
Connection
Housing material
Weight
Transmitter radiated power
Dimensions without mounting brackets
Microwave module
Min. 0.1 m/s
CE
0 - 40° in 5° steps
at installation height of 2200 mm
and 30° angle,
2000 x 4000 mm (d x w)
RMS-D-Broad: 3000 x 2500 mm (d x w)
24.15 GHz - 24.25 GHz K band
FCC (NA version):
24.075 GHz – 24.175 GHz K band
Microwave motion sensor
Red/ green LED
DIP switch for operating mode selection:
direction detection, cross-traffic suppression,
turtle mode, output mode, sensitivity adjustments,
adjustments for off-delay time
12 - 36 V DC/ 12 - 28 V AC
< 50 mA at 24 V DC
< 1 W
Normally open/normally closed
Relay, 1 N.O. contact
Max. 48 V AC / 48 V DC
Max. 0.5 A AC/ 1 A DC
Max. 24 W/ 60 VA
0.2 s - 5 s, adjustable (factory setting 1 s)
-20° C to 60° C/ 253 - 333 K
Max. 90 %, not condensing
Max. 4000 mm
IP 54
4-pin plug-in screw terminals,
5 m connecting cable supplied
ABS, anthracite
120 g
< 20 dBm
123 mm (w) x 65 mm (h) x 57 mm (d)
Troubleshooting
Fault Corrective Action
Door is detected. Reduce the sensitivity.
Pivot the sensor further forward.
LED not lit up.
Sensor responds to very slight interference
such as rain,
Potentiometer does not respond Operation by remote control is activated.
Remote control does not respond Operation with DIP switch and potentiometer
DOCT-1544A
Pepperl+Fuchs GmbH is certified under ISO 9001. Part no. 215075 09/2010
for RMS-D, RMS-D-RC and RMS-D-Broad
No power supply, device not functioning.
Increase immunity,
decrease size of detection area.
Push DIP switch 6 UP.
is activated. Push DIP switch 6 DOWN.
Device is locked. Switch the operating voltage
off and on again. Sensor can be configured for
30 minutes without code.
Check the remote control battery.
Default settings
Function
DIP switches Switches 1-5: up
Detection area size Potentiometer:
Detection field angle 15°
Direction detection Forward
Off-delay time 1 s
Relay contact Active
Cross-traffic
suppression
Immunity 4
Turtle mode Off
Setting
Switch 6: down
remote control
medium setting: 8
Potentiometer: from
remote control: 1
Conformity
EC conformity: The products RMS-D, RMS-DRC and RMS-D-Broad are compliant with
Directive 1999/5/EC, device class 1 and the
following harmonized standards EN 62311,
EN 60950-1, EN 301 489-1, EN 301489-3,
EN 300 440-2
A complete version of the declaration of conformity is available for download at
www.pepperl-fuchs.com.
US conformity: The products RMS-D-NA and
RMS-D-RC-NA are compliant with
FCC regulations, part 15.
ATTENTION! EC-compliant devices must not be
sold in the US and US-compliant devices must
not be sold in Europe!
Accessories
RMS remote control
RMS Weather Cap
RMS antenna broad
Pepperl+Fuchs GmbH . Mannheim . Germany
E-mail: FA-info@de.pepperl-fuchs.com
Pepperl+Fuchs Inc . Twinsburg . USA
E-mail: FA-info@us.pepperl-fuchs.com
Pepperl+Fuchs Pte Ltd . Singapore 139942
E-mail: FA-info@sg.pepperl-fuchs.com
Remote control operation
Mounting set and
weather-proof cap
Antenna for a wide
detection area
World Headquarters
USA Headquarters
Asia Pacific Headquarters
www.pepperl-fuchs.com
Radar motion sensor for approach detection at industrial doors english
Safety information
The device must only be operated with Safety Extra Low Voltage (SELV) which complies with the
stipulations in the safety standards based on IEC 60950. This device must only be installed and
maintained by trained, qualified persons.
In order to meet UL508 requirements, a 2.5 A slow-blow fuse should be used between the RMS
and the power supply
Product information
Included with delivery
Quantity Description
1 Sensor RMS-D ...
1 Connecting cable
1 Self-adhesive mounting template
2 Screws for mounting
1 Mounting instructions
Installation
Opening the device
Open the housing from the bottom:
Prior to installation, open the back;
following installation open the front.
Do not open the housing
from the top.
Replacing the antenna
Select the antenna for a wide 1.
or narrow detection area.
Remove the antenna carefully 2.
using two fingers.
Insert the new antenna.3.
Do not touch any
electronic components.
Do not use metal tools.
Operating elements
Antenna
Potentiometer
Terminal
DIP switches
LED (red/ green)
IR receiver
IR transmitter
Mounting the device
Attach the self-adhesive template and drill 1.
according to the markings on the template
Pull the cable through the relevant opening.2.
Use screws to fasten the base plate 3.
(screws are in the housing).
Can be mounted on the ceiling
using RMS Weather Cap
(see accessories).
Replacing the cover
Insert the cover on the top
and press down until it engages.
Before switching on the device,
remove all objects from the
door area that do not normally
belong there.
Connecting the sensor
Connect the cable to
the terminal as follows:
AC/DC supply (white)
AC/DC supply (black)
Relay contact 1 (red)
Relay contact 2 (green)
For RMS-D-NA and RMS-D-RC-NA:
In order to meet UL508 requirements,
a 2.5 A slow-blow fuse should be used
between the device and the power supply
Installation information
Protect the sensor from the rain*.•
Avoid placing moving objects in the •
detection area (fans, plants, trees, etc.).
Mount the sensor only behind suitable •
covers. Mechanically moving drive
components could affect the sensor.
There should be no fluorescent lights •
within the detection area.
Installing the RMS Weather Cap is
recommended (see Accessories).
Page 4

RMS-D · RMS-D-RC · RMS-D-NA · RMS-D-RC-NA · RMS-D-Broad
G
R
G
R
R/G
5G225
5G115
0,2 s
0,5 s
1,0 s
1,5 s
2,0 s
3,0 s
4,0 s
5,0 s
5G4R4
5
5G31135
5G32235
5
G
5
1 2 3 4 5 6
min. max.
!
!
!
Detection capabilities
Direction detection Turtle mode
No direction detection
With forward direction
detection (towards the sensor)
With backward direction
detection (away from the sensor)
Detection of very slow-moving movements
Door closed
Door opens when a slow-moving object
approaches which would not be detected
with standard detection
Door open
The door closes if no movement is
detected within the set monitoring time.
Cross-traffic suppression
Little cross-traffic,
door remains closed
A lot of cross-traffic,
door remains closed
Monitoring time/ sensitivity
3 seconds/ decreasing
Monitoring time/ sensitivity
5 seconds/ constant maximum sensitivity
Additional functions
During the initialization period you can switch on the additional functions mode.
...
Initialization period
In order to do this, switch DIP switch 5. The green LED will flash. Set the additional function and reset DIP switch 5.
DIP switch 6 must be UP.
Turtle mode detection area
Door closed
LED status display
Color indicators Status
Green
Red Detection active
Green flashing Command received
Red flashing Fault
Red/green
flashing
Immunity
Immunity can be used to minimize interference
such as rain, vibrations and reflections.
Remember the position of the potentiometer so that
you can reset it to the original setting if required.
Turtle mode detection area
Door open
Device ready
for operation
Initialization after
switching on
Detection area
Antenna characteristics Detection field angle Detection area size
Narrow (standard)
Width: 2.50 m
Depth: 3.00 m
Wide (optional)
Width: 4.00 m
Depth: 2.00 m
Installation height 2.20 m
Detection area angle 30°
Sensitivity Max
DIP switch settings
DIP
No.
1
2
3
¨=Dip switch
0 degrees 40 degrees
You can change the position in steps of 5°. Holding the sensor’s base plate
by the side, move it forward and position it as required. Default setting is 15°.
The sensor’s base plate can also be inserted at an angle, i.e. up to 3 notches
to the right or left. Notches can also be removed.
Some installation situations may limit the setting options
and the functions of the sensor.
Check the settings by walking the sensing area
Turtle mode
Direction
detection
Cross-traffic
suppression
SEnD SEnD SEnD
SEnD SEnD
Close
door
SEnD
Detection
area size
Off-delay
time Application exampleOpen door
1 s Standard
0.2 s Porch
0.8 s Pavement
1 s High mounting (optional, wide area)
Change the size of the
detection area using
the potentiometer.
Min
50 %
Max
The hardware and software are initialized
when the operating voltage is connected.
This initialization period lasts 10 seconds.
The red/green LED will flash. Set the sensor.
Check the settings by walking the sensing area.
Additional functions can only be set during
the initialization period.
Immunity
Switch DIP switch 5. 1.
The green LED will flash.
Switch DIP switch 2.2.
Change the sensitivity of 3.
immunity using the potentiometer.
The LED displays the immunity set.
Reset DIP switch 2. 4.
The settings are saved.
Switch DIP switch 5. 1.
The green LED will flash.
Switch DIP switch 3. 2.
Switch DIP switch 1.3.
Change the detection area 4.
size using the potentiometer.
Reset DIP switch 1.5.
Reset DIP switch 3. 6.
The settings are saved.
Reset DIP switch 5.7.
Reset DIP switch 5.
Off-delay time (output)
Switch DIP switch 5. The green LED will flash.1.
Switch DIP switch 1.2.
Change the relay off-delay time using the 3.
potentiometer. The relay is then continually
opened and closed at the set off-delay time.
The LED changes from green to red accordingly.
Reset DIP switch 1. The settings are saved.4.
Reset DIP switch 5. 5.
Switch DIP switch 5. 1.
The green LED will flash.
Switch DIP switch 3.2.
Switch DIP switch 2.3.
Change the detection area 4.
size using the potentiometer.
Reset DIP switch 2.5.
Reset DIP switch 3. 6.
The settings are saved.
Reset DIP switch 5.7.
Restoring default settings
Switch DIP switch 5. 1.
The green LED will flash.
Switch DIP switch 4. 2.
The red LED will flash.
Reset DIP switch 4. 3.
The sensor is reset to the
factory settings and restarted.
Reset DIP switch 5 after the 4.
initialization period has expired.
10
11
12
13
14
15
16
4
5
6
7
8
9
Relay contact when detection is active (N.O.)
SEnD SEnD
SEnD SEnD
SEnD SEnD SEnD
SEnD SEnD SEnD
SEnD SEnD
SEnD SEnD
SEnD
SEnD SEnD
SEnD SEnD
1.5 s Supermarket (optional, wide area)
SEnD SEnD
SEnD
SEnD SEnD
2 s Retirement home (optional, wide area)
Relay contact when detection is passive (N.C.)
DIP 6 is only available in RC versions
Page 5

RMS-D · RMS-D-RC · RMS-D-NA · RMS-D-RC-NA · RMS-D-Broad
!
1
1
2
3
4
!
click
!!!
!
Datos técnicos
Principio de funcionamiento
Velocidad de detección
Certificación
Ángulo de ajuste
Rango de detección
Frecuencia de trabajo
Modo operativo
Indicación de la función
Elementos operativos
Tensión de trabajo
Consumo de corriente
Consumo de potencia
Tipo de conmutación
Salida de señal
Tensión de conmutación
Corriente de conmutación
Potencia de conmutación
Tiempo de retardo
Temperatura de ambiente
Humedad relativa del aire
Altura de montaje
Tipo de protección
Conexión
Material carcasa
Peso
Potencia de emisión
Dimensiones sin elementos de fijación
Módulo de microondas
Mín. 0,1 m/s
CE
0 - 40° en pasos de 5°
Con 2200 mm de altura de montaje
y 30° de ángulo de inclinación
2000 x 4000 mm (PxA)
RMS-D-Broad: 3000 x 2500 mm (PxA)
24,15 GHz - 24,25 GHz Banda K
FCC (versión NA):
24,075 GHz - 24,175 GHz banda K
Detector del movimiento por radar
LED rojo/verde
Interruptores DIP para la selección del modo operativo:
detección de dirección, supresión del movimiento
transversal, modo tortuga, tipo de conmutación,
ajuste de sensibilidad, ajuste de tiempo de retardo
12 - 36 V CC / 12 - 28 V CA
< 50 mA a 24 V CC
< 1 W
N.A./N.C.
Relé, 1 N.A.
Máx. 48 V CA / 48 V CC
Máx. 0,5 A CA / 1 A CC
Máx. 24 W / 60 VA
0,2 s - 5 s ajustable (ajuste de fábrica 1 s)
-20° C a 60° C / 253 - 333 K
Máx. 90 % sin condensación
Máx. 4000 mm
IP 54
Conectores de 4 polos,
5 m de cable incluidos en el suministro
Acrilnitrilo-butadieno-estireno (ABS), antracita
120 g
< 20 dBm
123 mm (An) x 65 mm (Al) x 57 mm (L)
Solución de problemas
Problema Solución
Se detecta la puerta. Reduzca la sensibilidad.
Oriente el radar más hacia delante.
El LED no se enciende.
El sensor reacciona a estímulos mínimos
como lluvia, vibraciones o reflexiones.
La puerta se abre sin causa aparente.
El potenciómetro no reacciona El manejo con el control remoto está activado.
El control remoto no reacciona
DOCT-1544A
Pepperl+Fuchs GmbH cuenta con la certificación ISO 9001. Part No. 215075 09/2010
Para RMS-D; RMS-D-RC; RMS-D-Broad
Falta de alimentación, dispositivo averiado.
Incremente la inmunidad,
reduzca el tamaño del campo de detección.
Ajuste el interruptor DIP 6 hacia ARRIBA.
Está activado el manejo con interruptores DIP y potenciómetro. Ajuste el interruptor DIP 6 hacia ABAJO.
Equipo bloqueado. Desconecte la tensión de
trabajo y vuelva a conectarla. El sensor es
configurable sin código durante 30 minutos.
Compruebe las baterías del control remoto.
Ajustes de fábrica
Función
Interruptores DIP Interruptores 1-5 arriba
Tamaño de campo Potenciómetro:
Ángulo de ajuste 15°
Detección de dirección Hacia delante
Tiempo de retardo 1 s
Contacto de relé Activo
Supresión del
movimiento transversal
Inmunidad 4
Modo tortuga Desconectado
Ajuste
Interruptor 6 abajo
Posición central del
control remoto: 8
Potenciómetro: desconectado Control remoto: 1
Conformidad
Conformidad con CE: los productos RMS-D;
RMS-D-RC; RMS-D-Broad son conformes a la
Directiva 1999/5/CE, Dispositivos de la clase 1 y
la normativa armonizada
EN 62311, EN 60950-1, EN 301 489-1,
EN 301489-3, EN 300 440-2
La declaración de conformidad en su totalidad
puede descargarse en www.pepperl-fuchs.com.
Conformidad con EE.UU: los productos RMSD-NA, RMS-D-RC-NA son conformes a las
reglas de la FCC parte 15.
ATENCIÓN! Los dispositivos conformes con la
CE no pueden ponerse en circulación en EE.UU
y los dispositivos conformes con EE.UU. no
pueden ponerse en circulación en Europa.
Accesorios
RMS Remote Control
RMS Weather cap
RMS Antenna broad
Pepperl+Fuchs GmbH . Mannheim . Alemania
e-mail: FA-info@de.pepperl-fuchs.com
Pepperl+Fuchs Inc . Twinsburg . EE.UU.
e-mail: FA-info@us.pepperl-fuchs.com
Pepperl+Fuchs Pte Ltd . Singapur 139942
e-mail: FA-info@sg.pepperl-fuchs.com
Control remoto
Juego de montaje
y cubierta protectora
contra las inclemencias
meteorológicas
Antena para campo
de detección ancho
World Headquarters
USA Headquarters
Asia Pacific Headquarters
www.pepperl-fuchs.com
Detector del movimiento por radar para la detección de personas en puertas automáticas Español
Indicaciones de seguridad
El dispositivo sólo debe utilizarse con tensión baja de protección que respete los requisitos
de Safety Extra Low Voltage (SELV) que aparecen en los estándares de seguridad basados
en la IEC 60950. La instalación y el mantenimiento de este dispositivo sólo deberán llevarse
a cabo por personal debidamente formado y cualificado.
Para cumplir con UL508 debe utilizarse entre el RMS y la alimentación un fusible de acción
lenta de 2,5A.
Información de producto
Alcance de suministro
Cantidad Denominación
1 Sensor RMS-D ...
1 Cable de conexión
1 Plantilla de montaje adhesiva
2 Tornillos para el montaje
1 Instrucciones de montaje
Montaje
Apertura del equipo
Abra la carcasa por la parte inferior: antes del
montaje abra por la parte posterior y para seguir
el montaje abra por la parte anterior.
No abra la carcasa
por la parte superior.
Cambio de antena
Seleccione la antena para un campo 1.
de detección ancho o estrecho.
Saque la antena cuidadosamente 2.
con dos dedos.
Coloque la nueva antena.3.
No toque los componentes
electrónicos. No utilice
herramientas metálicas.
Elementos operativos
Antena
Potenciómetro
Terminal de conexión
Interruptores DIP
LED (rojo/verde)
Receptor IR
Emisor IR
Fijación del equipo
Adhiera la plantilla de montaje y taladre 1.
de acuerdo a las indicaciones.
Pase el cable por la abertura prevista para ello.2.
Fije la placa base con los tornillos 3.
(los tornillos se encuentran en la carcasa).
Es posible montarlo en el techo
con la tapa RMS Weather Cap
(véase Accesorios).
Cambio de la cubierta
Introduzca la cubierta por la parte superior
y haga presión hacia abajo hasta que enclave.
Retire antes de conectar el
equipo todos los objetos que no
pertenezcan al entorno habitual
de la zona de la puerta.
Conexión del radar
Conecte el cable al terminal
de conexión del siguiente modo:
Alimentación CA/CC (blanco)
Alimentación CA/CC (negro)
Contacto de relé 1 (rojo)
Contacto de relé 2 (verde)
Para RMS-D-NA y RMS-D-RC-NA:
Para cumplir con UL508 debe utilizarse
entre el equipo y la alimentación un
fusible de acción lenta de 2,5A.
Consejos de montaje
Proteja el radar de la lluvia*.•
Evite la presencia de objetos que puedan •
moverse en el campo de detección
(ventiladores, plantas, árboles, banderas).
No tape el radar. Móntelo exclusivamente •
en las carcasas adecuadas. Las piezas
motrices activadas mecánicamente pueden
interferir en el radar.
Evite colocar tubos de neón en el campo •
de detección.
* Es recomendable montar la RMS
Weather Cap (véase Accesorios).
Page 6

RMS-D · RMS-D-RC · RMS-D-NA · RMS-D-RC-NA · RMS-D-Broad
G
R
G
R
R/G
5G225
5G115
0,2 s
0,5 s
1,0 s
1,5 s
2,0 s
3,0 s
4,0 s
5,0 s
5G4R4
5
5G31135
5G32235
5
G
5
1 2 3 4 5 6
min. max.
!
!
!
Características de detección
Detección de dirección Modo tortuga
sin detección de dirección
Con detección de dirección hacia
delante (acercándose al radar)
Con detección de dirección hacia
atrás (alejándose del radar)
Supresión del movimiento transversal
Poca supresión del movimiento transversal, la puerta se mantiene cerrada
Mucha supresión del movimiento transversal, la puerta se mantiene cerrada
Detección del más mínimo movimiento
Puerta cerrada
La puerta se abre al aproximarse
un objeto lento que la detección
normal no registra.
Puerta abierta
La puerta sólo se cierra si durante
el tiempo de observación establecido
no se detecta ningún movimiento.
Tiempo de observación / Sensibilidad
3 segundos / decreciente
Tiempo de observación / Sensibilidad
5 segundos / sensibilidad máxima
permanente
Funciones adicionales
Durante el tiempo de inicialización puede conectar el modo de funciones adicionales. Para ello, modifique la posición del interruptor
...
Tiempo de inicialización
DIP 5. El LED parpadeará en verde. Ajuste la función adicional y devuelva el interruptor DIP 5 a su posición original.
El interruptor DIP 6 debe estar hacia ARRIBA.
Tamaño de campo Modo tortuga
Puerta cerrada
LED de indicación de estado
Color Estado
Verde Dispositivo operativo
Rojo Detección activa
Verde
parpadeante
Rojo
parpadeante
Rojo/verde
parpadeante
Inmunidad
Con la inmunidad pueden minimizarse
inducciones parásitas como lluvia,
vibraciones y reflexiones.
Recuerde la posición del potenciómetro de modo que, en caso
necesario, pueda restaurar el ajuste original.
Tamaño de campo Modo tortuga
Puerta abierta
Orden recibida
Error
Inicialización
tras la conexión
Campo de detección
Características de la antena Ángulo de ajuste Tamaño de campo
Estrecho (estándar)
Ancho: 2,50 m
Profundidad: 3,00 m
Ancho (opcional)
Ancho: 4,00 m
Profundidad: 2,00 m
Altura de montaje 2,20 m
Ángulo del campo
de detección 30°
Sensibilidad máx.
Puede modificar la posición en pasos de 5º. Para ello sujete la placa de circuitos impresos
por los laterales, tire de ella hacia delante y colóquela en la posición deseada. El ajuste de fábrica es 15º. La placa de circuitos impresos también puede colocarse oblicua, como máximo
desplazada 3 dientes hacia la derecha o la izquierda. Los dientes también pueden eliminarse.
Ajustes de los interruptores DIP
Núm.
1
2
3
DIP
= Interruptor
¨
Detección
de
dirección
Supresión del
movimiento
transversal
verificar a pie por el área de detección
Modo tortuga
Cerrar
puerta
SEnD SEnD SEnD
SEnD SEnD
SEnD
Determinadas situaciones de montaje pueden limitar
las opciones de ajuste y las funciones del sensor.
Tamaño
de campo
Tiempo
de retardo Ejemplo de aplicaciónAbrir puerta
1 s Estándar
0,2 s Porche
0,8 s Acera
1 s Montaje alto (opcional campo ancho)
Modifique el tamaño
del campo de detección
con el potenciómetro.
mín.
50 %
máx.
Tras aplicar la tensión de servicio, se inicializan
el hardware y el software. El tiempo de
inicialización es de 10 segundos. El LED
parpadeará en rojo/verde. Ajuste el radar.
Verifique los ajustes a pie por el área de
detección.
Las funciones adicionales sólo pueden
conectarse durante el tiempo de inicialización.
Inmunidad
Modifique la posición del interruptor DIP 5. 1.
El LED parpadeará en verde.
Modifique la posición del interruptor DIP 2.2.
Modifique con el potenciómetro 3.
la sensibilidad de la inmunidad.
El LED indicará la inmunidad ajustada.
Devuelva el interruptor DIP 2 a su posición 4.
original. Los ajustes quedarán guardados.
Devuelva el interruptor DIP 5a su posición 5.
original.
Modifique la posición del interruptor DIP 5. 1.
El LED parpadeará en verde.
Modifique la posición del interruptor DIP 3. 2.
Modifique la posición del interruptor DIP 1.3.
Modifique el tamaño del campo de 4.
detección con el potenciómetro.
Devuelva el interruptor DIP 1 a su posición original.5.
Devuelva el interruptor DIP 3 a su posición 6.
original. Los ajustes quedarán guardados.
Devuelva el interruptor DIP 5 a su posición original.7.
Tiempo de retardo (salida)
Modifique la posición del interruptor DIP 5. 1.
El LED parpadeará en verde.
Modifique la posición del interruptor DIP 1.2.
Modifique el tiempo de retardo del relé con 3.
el potenciómetro. El relé se abrirá y cerrará
continuamente atendiendo al tiempo
de retardo ajustado. El LED alternará
análogamente entre verde y rojo.
Devuelva el interruptor DIP 1 a su posición 4.
original. Los ajustes quedarán guardados.
Devuelva el interruptor DIP 55. a su posición
original.
Modifique la posición del interruptor DIP 5. 1.
El LED parpadeará en verde.
Modifique la posición del interruptor DIP 3.2.
Modifique la posición del interruptor DIP 2.3.
Modifique el tamaño del campo de 4.
detección con el potenciómetro.
Devuelva el interruptor DIP 2 a su posición original.5.
Devuelva el interruptor DIP 3 a su posición 6.
original. Los ajustes quedarán guardados.
Devuelva el interruptor DIP 5 a su posición original.7.
Restablecimiento de los ajustes
de fábrica
Modifique la posición del interruptor DIP 5. 1.
El LED parpadeará en verde.
Modifique la posición del interruptor DIP 4. 2.
El LED parpadeará en rojo.
Devuelva el interruptor DIP 4 a su posición 3.
original. Se restablecerán los ajustes de
fábrica y el radar se reiniciará.
Una vez transcurrido el tiempo de 4.
inicialización, devuelva el interruptor DIP 5
a su posición original.
10
11
12
13
14
15
16
4
5
6
7
8
9
SEnD SEnD
SEnD SEnD
SEnD SEnD SEnD
SEnD SEnD SEnD
SEnD SEnD
SEnD SEnD
SEnD
SEnD SEnD
SEnD SEnD
1,5 s Supermercado (opcional campo ancho)
SEnD SEnD
SEnD
SEnD SEnD
2 s Geriátrico (opcional campo ancho)
Contacto de relé activo en caso de detección (N.A.)
Contacto de relé pasivo en caso de detección (N.C.)
DIP 6 sólo disponible en las versiones -RC
Page 7

RMS-D · RMS-D-RC · RMS-D-NA · RMS-D-RC-NA · RMS-D-Broad
!
1
1
2
3
4
!
click
!
!
!
!
Dati tecnici
Principio di funzionamento
Velocità di rilevamento
Etichetta
Angolo di registrazione
Campo di rilevamento
Frequenza operativa
Modalità di funzionamento
Indicatore di funzionamento
Elementi di comando
Tensione di alimentazione
Corrente a vuoto
Potenza assorbita
Modalità di commutazione
Uscita di segnale
Tensione di commutazione
Corrente di commutazione
Potenza di interruzione
Tempo di discesa
Temperatura ambiente
Umidità relativa
Altezza di montaggio
Grado di protezione
Connessione
Materiale custodia
Massa
Potenza di trasmissione
Dimensioni senza elementi di fissaggio
Modulo a microonde
min. 0,1 m/s
CE
0 - 40° a passi di 5°
Con altezza di montaggio di 2200 mm e angolo di
inclinazione di 30° 2000 x 4000 mm (prof. x largh.) RMSD-Broad: 3000 x 2500 mm (prof. x largh.)
24,15 GHz - 24,25 GHz banda K
FCC (Versione -NA): 24,075 GHz - 24,175 GHz banda K
Rilevatore radar di movimento
LED rosso/verde
Interruttori DIP per la selezione del modo di funzionamento:
riconoscimento di direzione, mascheramento del
movimento in senso trasversale, modo Tartaruga, modalità
di commutazione, regolatore di sensibilità, regolatore del
tempo di discesa.
12 - 36 V CC / 12 - 28 V CA
<50 mA con 24 V CC
< 1 W
Attivo/passivo
Relé, 1 contatto di chiusura
max. 48 V.CA / 48 V CC
Max 0,5 A CA / 1 A CC
max 24 W / 60 VA
regolabile tra 0,2 e 5 secondi (impostazione di fabbrica 1
secondo)
compresa tra -20° C e 60° C / 253 - 333 K
max 90 %, senza condensa
max 4000 mm
IP 54
morsetti a vite a 4 poli, cavo di connessione da 5 m in
dotazione
ABS, antracite
120 g
< 20 dBm
123 mm (largh.) x 65 mm (alt.) x 57 mm (prof.)
Eliminazione delle anomalie
Anomalia Eliminazione dell’anomalia
Viene rilevata la porta. Ridurre la sensibilità.
Orientare il radar un po' più in avanti.
Il LED non si accende.
Il sensore reagisce a influssi minimi come pioggia,Il
sensore reagisce a influssi minimi come pioggia,Il
sensore reagisce a influssi minimi come pioggia,
Il potenziometro non reagisce Il funzionamento con telecomando è acceso. Posizionare
Il telecomando non reagisce Il funzionamento con interruttori DIP e potenziometro è
DOCT-1544A
Pepperl+Fuchs GmbH è certificata secondo ISO 9001. N. parte 215075 09/2010
per RMS-D; RMS-D-RC; RMS-D-Broad
Assenza di tensione, dispositivo difettoso.
Aumentare l'immunità, diminuire l'ampiezza del campo.
l’interruttore DIP 6 verso l’ALTO.
acceso. Posizionare l’interruttore DIP 6 verso il BASSO.
L’apparecchio è bloccato. Spegnere e riaccendere la
tensione di alimentazione. Il sensore è configurabile per 30
minuti senza codice.
Controllare la batteria del telecomando.
Impostazioni di fabbrica
Funzione
Interruttori DIP Interruttori 1-5: alto
Ampiezza del campo Potenziometro:
Angolo di registrazione 15°
Riconoscimento
di direzione
Tempo di discesa 1 s
Contatto relé attivo
Mascheramento del
movimento in senso
trasversale
Immunità 4
Modo Tartaruga spento
Impostazione
Interruttore 6: basso
Posizione intermedia
del telecomando: 8
avanti
Potenziometro: spento
Telecomando: 1
Conformità
Conformità CE: i prodotti RMS-D;
RMS-D-RC; RMS-D-Broad sono conformi alla
direttiva 1999/5/CE, classe di apparecchiature 1 e alle norme armonizzate EN 62311, EN
60950-1, EN 301 489-1,EN 301489-3,
EN 300 440-2. La dichiarazione di conformità
completa può essere scaricata dal sito www.
pepperl-fuchs.com
Conformità US: i prodotti RMS-D-NA,
RMS-D-RC-NA sona conformi ai regolamenti
FCC parte 15.
ATTENZIONE! Le apparecchiature con conformità CE non possono essere commercializzate
negli USA e le apparecchiature con conformità
US non possono essere commercializzate in
Europa.
Accessori
Telecomando RMS
Weather cap RMS
Antenna broad RMS
Pepperl+Fuchs GmbH Mannheim Germania
Pepperl+Fuchs Pte Ltd. Singapore 139942
Telecomando
Set di montaggio e cappuccio
di protezione climatica
Antenna per campo
di rilevamento ampio
World Headquarters
e-mail: FA-info@de.pepperl-fuchs.com
USA Headquarters
Pepperl+Fuchs Inc. Twinsburg USA
e-mail: FA-info@us.pepperl-fuchs.com
Asia Pacific Headquarters
e-mail: FA-info@sg.pepperl-fuchs.com
www.pepperl-fuchs.com
Rilevatori di movimento radar per porte automatiche per il rilevamento di persone italiano
Avvertenze di sicurezza
Il dispositivo può essere utilizzato solo con bassa tensione di protezione conforme ai requisiti del Safety Extra Low
Voltage (SELV) nel rispetto degli standard di sicurezza basati su IEC 60950. L'installazione e la manutenzione di
questo dispositivo devono essere eseguite solo da personale qualificato e adeguatamente addestrato.
Per soddisfare la norma UL508, tra l’RMS e l’alimentazione elettrica dovrebbe essere utilizzato un fusibile ad
azione ritardata 2,5A.
Informazioni sul prodotto
Dotazione
Quantità Denominazione
1 Sensore RMS-D …
1 Cavo di collegamento
1 Maschera per foratura come
adesivo rimovibile
2 Viti di montaggio
1 Istruzioni di montaggio
Montaggio
Apertura dell’apparecchio
Aprire la custodia dal basso: prima del montaggio
da dietro, dopo il montaggio da davanti.
Non aprire la
custodia dall’alto.
Sostituzione dell'antenna
Scegliere l'antenna per il campo di rilevamento 1.
ampio o stretto.
Estrarre delicatamente l'antenna con due dita.2.
Montare una nuova antenna.3.
Non toccare i componenti elettronici. Non
utilizzare attrezzi metallici.
Elementi di comando
Antenna
Potenziometro
Morsetto di connessione
Interruttori DIP
LED (rosso/verde)
Ricevitore IR
Emettitore IR
Fissaggio dell’apparecchio
Incollare la maschera per foratura e perforare 1.
secondo le istruzioni.
Tirare il cavo attraverso l’apertura prevista.2.
Fissare la piastra di fondo per mezzo di viti 3.
(che si trovano nella custodia).
Il montaggio della copertura è possibile
con Weather Cap RMS (vedere Accessori).
Chiusura dell’apparecchio
Inserire il cappuccio dall’alto e premere fino al
suo scatto.
Prima dell’accensione dell’apparecchio,
allontanare dall’area della porta tutti gli oggetti
che solitamente non si trovano nelle vicinanze
della porta stessa.
Collegamento del radar
Collegare il cavo al morsetto di connessione come
di seguito descritto:
Alimentazione CA/CC (bianco)
Alimentazione CA/CC (nero)
Contatto relé 1 (rosso)
Contatto relé 2 (verde)
Per RMS-D-NA e RMS-D-RC-NA:
Per soddisfare la norma UL508, tra l’apparecchio
e l’alimentazione elettrica dovrebbe essere
utilizzato un fusibile ad azione ritardata 2,5 A.
Installazione
Proteggere il radar dalla pioggia*.•
Eliminare la presenza di oggetti mossi nel campo •
di rilevamento (ventilatori, piante, alberi, bandiere).
Non coprire il radar e montarlo solo dietro apposite •
coperture. Componenti di trasmissione ad
azionamento meccanico possono condizionare
il radar.
Eliminare la presenza di lampade al neon nel campo •
di rilevamento.
* Si raccomanda il montaggiodel Weather Cap
RMS (vedere accessori).
Page 8

RMS-D · RMS-D-RC · RMS-D-NA · RMS-D-RC-NA · RMS-D-Broad
G
R
G
R
R/G
5G225
5G115
0,2 s
0,5 s
1,0 s
1,5 s
2,0 s
3,0 s
4,0 s
5,0 s
5G4R4
5
5G31135
5G32235
5
G
5
1 2 3 4 5 6
min. max.
!
!
!
Caratteristiche del rilevamento
Riconoscimento di direzione Modo Tartaruga
Senza riconoscimento di direzione
Con il riconoscimento di direzione in avanti
(verso il radar)
Con il riconoscimento di direzione all'indietro
(a partire dal radar)
Mascheramento del movimento in senso
trasversale
Poco movimento in senso trasversale, la
porta rimane chiusa
Molto movimento in senso trasversale, la
porta rimane chiusa
Rilevamento di spostamenti minimi
Porta chiusa
La porta si apre quando si avvicina un oggetto
lento che non sarebbe registrato dal rilevamento
normale
Porta aperta
La porta si chiude solo se nel periodo di
osservazione impostato non vengono rilevati
spostamenti.
Periodo di osservazione / Sensibilità
3 secondi / decrescente
Periodo di osservazione / Sensibilità
5 secondi / sensibilità massima costante
Funzioni supplementari
Durante il periodo di inizializzazione è possibile attivare il modo per le funzioni supplementari. A tale scopo variare la posizione dell'interruttore DIP 5. Il LED
...
Periodo di inizializzazione
lampeggia in verde. Impostare le funzioni supplementari e riportare l'interruttore DIP 5 nella posizione originaria.
L'interruttore DIP 6 deve essere verso l’ALTO.
Ampiezza del campo modo Tartaruga
Porta chiusa
Indicazione di stato LED
Colore visualizzato Stato
Verde
Rosso Rilevamento attivo
Verde
lampeggiante
Rosso
lampeggiante
Rosso/verde
lampeggiante
Immunità
Con l'immunità è possibile minimizzare gli agenti di
disturbo come la pioggia, le vibrazioni e i riflessi.
Ricordarsi la posizione del potenziometro per poterla ripristinare in caso
di necessità.
Ampiezza del campo modo Tartaruga
Porta aperta
Dispositivo pronto
per entrare in esercizio
Comando ricevuto
Errore
Inizializzazione dopo
l'accensione
Campo di rilevamento
Caratteristiche dell'antenna
Stretta (standard)
Larghezza: 2,50 m
Profondità: 3,00 m
Larga (opzione)
Larghezza: 4,00 m
Profondità: 2,00 m
Altezza di montaggio 2,20 m
Angolo campo
di rilevamento 30°
Sensibilità max
Angolo di registrazione Ampiezza del campo
È possibile modificare la posizione a passi di 5°. A tal scopo afferrare lateralmente il circuito
stampato, tirarlo in avanti e portarlo nella posizione desiderata. L’impostazione di fabbrica è 15°.
È possibile modificare la posizione a passi di 5°. A tal scopo afferrare lateralmente il circuito
stampato, tirarlo in avanti e portarlo nella posizione desiderata. L’impostazione di fabbrica è 15°.
Impostazioni interruttori DIP
DIP
= Interruttori
N°
¨
1
2
3
Riconosci-
mento di
direzione
0 gradi 40 gradi
controllare misurando
Mascheramento
del movimento
in senso
trasversale
SEnD SEnD SEnD
Modo Tartaruga
SEnD SEnD
Chiusura
porta
SEnD
Con il potenziometro
modificare l'ampiezza del
campo di rilevamento.
min
50 %
max
A seconda delle condizioni di montaggio le possibilità di
regolazione e le funzioni del sensore possono risultare limitate.
Ampiezza del
campo
Tempo di
discesa Esempio di applicazioneApertura porta
1 s Standard
0,2 s Bussola
0,8 s Marciapiede
1 s
Montaggio elevato
(opzione campo ampio)
Dopo aver applicato la tensione d'esercizio, l'hardware
e il software vengono inizializzati. Tale periodo di
inizializzazione dura 10 secondi. Il LED lampeggia
in rosso/verde. Impostare il radar. Controllare
l’impostazione misurando.
Solo durante il periodo di inizializzazione è possibile
impostare le funzioni supplementari.
Immunità
Variare la posizione dell'interruttore DIP 5. Il LED 1.
lampeggia in verde.
Variare la posizione dell'interruttore DIP 2.2.
Con il potenziometro modificare la sensibilità 3.
dell’immunità. Sul LED è visualizzata l'immunità
impostata.
Riportare l'interruttore DIP 2 nella posizione 4.
originaria. Le regolazioni vengono salvate.
Riportare l’interruttore DIP 5 nella posizione 5.
originaria.
Variare la posizione dell'interruttore DIP 5. Il LED 1.
lampeggia in verde.
Variare la posizione dell'interruttore DIP 3. 2.
Variare la posizione dell'interruttore DIP 1.3.
Con il potenziometro modificare l'ampiezza 4.
del campo.
Riportare l'interruttore DIP 1 nella posizione originaria.5.
Riportare l'interruttore DIP 3 nella posizione 6.
originaria. Le regolazioni vengono salvate.
Riportare l'interruttore DIP 5 nella posizione originaria.7.
Tempo di discesa (uscita)
Variare la posizione dell'interruttore DIP 5. Il LED 1.
lampeggia in verde.
Variare la posizione dell'interruttore DIP 1.2.
Con il potenziometro modificare il tempo di discesa 3.
del relé. Il relé si aprirà e chiuderà di continuo con il
tempo di discesa impostato. Analogamente il LED
alternerà verde e rosso.
Riportare l'interruttore DIP 1 nella posizione 4.
originaria. Le regolazioni vengono salvate.
Riportare l'interruttore DIP 55. nella posizione originaria.
Variare la posizione dell'interruttore DIP 5. Il LED 1.
lampeggia in verde.
Variare la posizione dell'interruttore DIP 3.2.
Variare la posizione dell’interruttore DIP 2.3.
Con il potenziometro modificare la grandezza 4.
di campo.
Riportare l'interruttore DIP 2 nella posizione originaria.5.
Riportare l’interruttore DIP 3 nella posizione 6.
originaria. Le regolazioni vengono salvate.
Riportare l'interruttore DIP 5 nella posizione originaria.7.
Ripristino delle impostazioni di fabbrica
Variare la posizione dell'interruttore DIP 5. Il LED 1.
lampeggia in verde.
Variare la posizione dell'interruttore DIP 4. Il LED 2.
lampeggia in rosso.
Riportare l'interruttore DIP 4 nella posizione 3.
originaria. Il radar viene riportato alle impostazioni
di fabbrica e riavviato.
Al termine del periodo di inizializzazione riportare 4.
l'interruttore DIP 5 nella posizione originaria.
10
11
12
13
14
15
16
4
5
6
7
8
9
Contatto relé con rilevamento attivo (N.O.)
SEnD SEnD
SEnD SEnD
SEnD SEnD SEnD
SEnD SEnD SEnD
SEnD SEnD
SEnD SEnD
SEnD
SEnD SEnD
SEnD SEnD
SEnD SEnD
SEnD
SEnD SEnD
1,5 s
2 s
Supermercato
(opzione campo ampio)
Casa di riposo
(opzione campo ampio)
Contatto relé con rilevamento passivo (N.C.)
DIP 6 disponibile solo con le versioni RC
Page 9

О»³±¬» ½±²¬®±´ ОУНуЬуОЭ i ОУНуЬуОЭуТЯ »²¹´·-¸
О»³±¬» ½±²¬®±´ ОУНуЬуОЭ i ОУНуЬуОЭуТЯ ¼»«¬-½¸
ЬЧР -©·¬½¸ к ³«-¬ ¾» ¼±©² ±² ОУНуЬуОЭшуТЯч º±® ¿½½»-- ©·¬¸ ®»³±¬» ½±²¬®±´т
Ü×Ð -©·¬½¸»- ï ¬± ì ¿®» «-»¼ ¬± -»¬ ¬¸» -»²-±® ¿¼¼®»--»- ¿½½±®¼·²¹ ¬± ¬¸» ¬¿¾´» ¾»´±©ò ׺ ¬¸»®» ¿®» -»ª»®¿´ -»²-±®- ·² ¬¸» ®¿²¹» ±º ¬¸»
®»³±¬» ½±²¬®±´ô ¬¸»-» -»²-±®- ³«-¬ ¾» -»¬ ¬± ¼·ºº»®»²¬ ¿¼¼®»--»-ò ̸» °±¬»²¬·±³»¬»® ¿²¼ Ü×Ð -©·¬½¸ ë ¸¿ª» ²± º«²½¬·±² ©¸»² ©±®µ·²¹ ©·¬¸
®»³±¬» ½±²¬®±´ò
Ю±¹®¿³³·²¹
Þ»º±®» §±« -¬¿®¬ °®±¹®¿³³·²¹ô ®»¿¼ ¬¸» ÎÓÍ ®»³±¬» ½±²¬®±´ ±°»®¿¬·²¹ ·²-¬®«½¬·±²-ò
Þ»º±®» §±« -¬¿®¬ °®±¹®¿³³·²¹ô ®»¿¼ ¬¸» ÎÓÍ ®»³±¬» ½±²¬®±´ ±°»®¿¬·²¹ ·²-¬®«½¬·±²-ò
ݱ²²»½¬·±² ©·¬¸±«¬ ½±¼»
ݱ²²»½¬·±² ©·¬¸ ½±¼» ОУНуЬуОЭ Ú·²¼ ¿¼¼®»-- ±® ß¼¼®»-- ¨¨ Û²¬»® ½±¼» Í»¬ -»²-±®
Í»¬ -»²-±®
Í¿ª» ¿½½»--
ß½½»-- ©·¬¸±«¬ ½±¼» ݱ¼» ß½½»-- ©·¬¸±«¬ ½±¼»
Ü·-¿¾´» ¿½½»-- ݱ¼» Ü·-¿¾´» ¿½½»--
ß½½»-- ©·¬¸ ½±¼» ݱ¼» ß½½»-- ©·¬¸ ½±¼» Û²¬»® ìó¼·¹·¬ ½±¼» λ°»¿¬ ½±¼»
ОУНуЬуОЭ Ú·²¼ ¿¼¼®»--
Í»´»½¬ ¿ °¿®¿³»¬»® λ¿¼ ª¿´«» Ý«®®»²¬ ª¿´«» ·- ¼·-°´¿§»¼ Í»¬ ²»© ª¿´«»
±®
λ³±¬» ½±²¬®±´ -»¬¬·²¹- ݸ»½µ ¬¸» -»¬¬·²¹- ¾§ ©¿´µ·²¹ ¬¸» -»²-·²¹ ¿®»¿
Ó»²« Í»¬¬·²¹- Ü»-½®·°¬·±²
Í»²-·¬·ª·¬§
Ü»¬»½¬·±² ³±¼»
Ѻºó¼»´¿§ ¬·³»ô
±«¬°«¬
λ´¿§ ½±²¬¿½¬
-«°°®»--·±²
Ì«®¬´» ³±¼»
ܱ±® ±°»²
Ì«®¬´» ³±¼»
ܱ±® ½´±-»¼
Ì«®¬´» ³±¼» ¿®»¿
ܱ±® ±°»²
Ì«®¬´» ³±¼» ¿®»¿
ܱ±® ½´±-»¼
׳³«²·¬§
Ю»-»¬-
λ-»¬
ݱ¼»
Ü·-½±²²»½¬
ï ó ïê ïæ ͳ¿´´ ¼»¬»½¬·±² ¿®»¿
ïêæ Ô¿®¹» ¼»¬»½¬·±² ¿®»¿
Ѻº
˲·ó¼·®»½¬·±²¿´ º±®©¿®¼Ë²·ó¼·®»½¬·±²¿´ ¾¿½µ©¿®¼Þ·ó¼·®»½¬·±²¿´
Ѻº
ðòî -ô ðòë -ô ï -ô ïòë -ô
î -ô í -ô ì -ô ë -
ÒÑô ÒÝ Î»´¿§ ½±²¬¿½¬ ½´±-»- ±² ¼»¬»½¬·±² øÒò Ñò÷
Ѻº
ï ó ïð
Ѻº
ï - Ü»½®»¿-·²¹
í - Ü»½®»¿-·²¹
ë - ݱ²-¬¿²¬
Ѻº
Ѳ
ï ó ïð ïæ ͳ¿´´ ¼»¬»½¬·±² ¿®»¿
ï ó ïð ïæ ͳ¿´´ ¼»¬»½¬·±² ¿®»¿
ï ó é ïæ Ó·²·³«³ ·³³«²·¬§
ï ó ïê Ú±® -»¬¬·²¹- -»» •Ü×Ð -©·¬½¸ -»¬¬·²¹-Œ ¬¿¾´»
ß½½»-- ©·¬¸±«¬ ½±¼»
Ü·-¿¾´» ¿½½»-ß½½»-- ©·¬¸ ½±¼»
Ò± ¼»¬»½¬·±²
Ü»¬»½¬- ³±ª»³»²¬- ·² ¬¸» ¼·®»½¬·±² ±º ¬¸» -»²-±®
Ü»¬»½¬- ³±ª»³»²¬- ¿©¿§ º®±³ ¬¸» -»²-±®
Ü»¬»½¬- ¾±¬¸ º±®©¿®¼ ¿²¼ ¾¿½µ©¿®¼ ³±ª»³»²¬-
Ѻºæ λ´¿§ ·- ²±¬ -©·¬½¸·²¹
ðòî -æ ͸±®¬»-¬ ±ººó¼»´¿§ ¬·³»
ëòð -æ Ô±²¹»-¬ ±ººó¼»´¿§ ¬·³»
λ´¿§ ½±²¬¿½¬ ±°»²- ±² ¼»¬»½¬·±² øÒò Ýò÷
Ѻºæ Ì«®¬´» ³±¼» ¼»¿½¬·ª¿¬»¼
Ó±²·¬±®·²¹ ¬·³»ñ -»²-·¬·ª·¬§
Ì«®¬´» ³±¼» ¼»¿½¬·ª¿¬»¼
Ì«®¬´» ³±¼» ¿½¬·ª¿¬»¼
ïðæ Ô¿®¹» ¼»¬»½¬·±² ¿®»¿
ïðæ Ô¿®¹» ¼»¬»½¬·±² ¿®»¿
éæ Ó¿¨·³«³ ·³³«²·¬§
λ-»¬ ¬± ¼»º¿«´¬ -»¬¬·²¹-
ß½½»-- ©·¬¸ ®»³±¬» ½±²¬®±´ °±--·¾´» ¿¬ ¿´´ ¬·³»-ò
ß½½»-- ·- ¼·-¿¾´»¼ò Ò± ¿½½»-- ©·¬¸ ®»³±¬» ½±²¬®±´ °±--·¾´»ò
ß½½»-- ©·¬¸ ®»³±¬» ½±²¬®±´ ·- ±²´§ °±--·¾´» ¿º¬»® ¿ ½±¼» ·- »²¬»®»¼ò
Ï«·¬ °®±¹®¿³³·²¹ ³±¼»
ß¼¼®»-- ¨¨
Í»¬ -»²-±®
Í»¬ ¬¸» ¿¼¼®»--
Í»²-±®
¿¼¼®»--
Ü×Ð -©·¬½¸»-
ï
î
í
ì
ë
ê
é
è
ç
ïð
ïï
ïî
ïí
ïì
ïë
ïê
Ъ$® ¼»² Ж«¹®·ºº ³·¬ ¼»® Ъ»®²¾»¼·»²«²¹ ³«-- ¿³ ОУНуЬуОЭшуТЯч ¼»® ЬЧРуН½¸¿´¬»® к «²¬»² -»·²т
Ь·» ЬЧРуН½¸¿´¬»® п ¾·- м ¼·»²»² ¦«³ Ы·²-¬»´´»² ¼»® Н»²-±®¿¼®»--»² »²¬-°®»½¸»²¼ «²¬»²-¬»¸»²¼»® М¿¾»´´»т Й»²² -·½¸ ³»¸®»®» Н»²-±®»² ·²
ͽ¸¿´¬»® ë ¸¿¾»² ¾»·³ ß®¾»·¬»² ³·¬ ¼»® Ú»®²¾»¼·»²«²¹ µ»·²» Ú«²µ¬·±²ò
Ю±¹®¿³³·»®«²¹
ʱ® Ю±¹®¿³³·»®¾»¹·²² ¼·» ÎÓÍ Î»³±¬» ݱ²¬®±´ Þ»¼·»²«²¹-¿²´»·¬«²¹ ´»-»²ò
Ê»®¾·²¼«²¹ ³·¬ Í»²-±® ¸»®-¬»´´»²
Ê»®¾·²¼«²¹ ±¸²» ݱ¼»
Ê»®¾·²¼«²¹ ³·¬ ݱ¼» ОУНуЬуОЭ ß¼®»--» -«½¸»² ±¼»® ß¼®»--» ¨¨ ݱ¼» »·²¹»¾»² Í»²-±® »·²-¬»´´»²
Í»²-±® »·²-¬»´´»²
Æ«¹¿²¹ -·½¸»®²
Æ«¹¿²¹ ±¸²» ݱ¼» ݱ¼» Æ«¹¿²¹ ±¸²» ݱ¼»
Æ«¹¿²¹ -°»®®»² ݱ¼» Æ«¹¿²¹ -°»®®»²
Æ«¹¿²¹ ³·¬ ݱ¼» ݱ¼» Æ«¹¿²¹ ³·¬ ݱ¼» ìó-¬»´´·¹»² ݱ¼» »·²¹»¾»² ݱ¼» ©·»¼»®¸±´»²
ОУНуЬуОЭ ß¼®»--» -«½¸»²
п®¿³»¬»® ©<¸´»² É»®¬ ´»-»² ¿µ¬«»´´»® É»®¬ ©·®¼ ¿²¹»¦»·¹¬ ²»«»² É»®¬ »·²-¬»´´»²
±¼»®
Û·²-¬»´´«²¹»² Ú»®²¾»¼·»²«²¹ ¼«®½¸ ß¾-½¸®»·¬»² $¾»®°®$º»²
Ó»²$ Û·²-¬»´´«²¹»² Þ»-½¸®»·¾«²¹
ï ó ïê ðïæ µ´»·²»- Û®º¿--«²¹-º»´¼
ïêæ ¹®±--»- Û®º¿--«²¹-º»´¼
Ü»¬»µ¬·±²-³±¼«-
ß¾º¿´´¦»·¬ ß«-¹¿²¹
λ´¿·-µ±²¬¿µ¬
Ï«»®ª»®µ»¸®-ó
¿«-¾´»²¼«²¹
Ì«®¬´»óÓ±¼»
Ì$® ±ºº»²
Ì«®¬´»óÓ±¼»
Ì$® ¹»-½¸´±--»²
Ú»´¼ Ì«®¬´»óÓ±¼»
Ì$® ±ºº»²
Ú»´¼ Ì«®¬´»óÓ±¼»
Ì$® ¹»-½¸´±--»²
׳³«²·¬<¬
ʱ®»·²-¬»´´«²¹»²
λ-»¬
ݱ¼»
Ê»®¾·²¼«²¹ ¬®»²²»²
¿«-
-¬»®»± ª±®©<®¬-
-¬»®»± ®$½µ©<®¬³±²±
¿«-
ðòî -ô ðòë -ô ï - ô ïòë -ô
î -ô í - ô ì -ô ë -
ͽ¸´·»A»® ¿µ¬·ª
Jºº²»® °¿--·ª
¿«ï ó ïð
¿«ï - ¿¾²»¸³»²¼
í - ¿¾²»¸³»²¼
ë - µ±²-¬¿²¬
¿«»·²
ï ó ïð ðïæ µ´»·²»- Û®º¿--«²¹-º»´¼
ï ó ïð ðïæ µ´»·²»- Û®º¿--«²¹-º»´¼
ï ó é ðïæ ³·²·³¿´» ׳³«²·¬<¬
ï ó ïê Ы·²-¬»´´«²¹»² -·»¸» М¿¾»´´» œЫ·²-¬»´´«²¹»² ЬЧРуН½¸¿´¬»®•
Æ«¹¿²¹ ±¸²» ݱ¼»
Æ«¹¿²¹ -°»®®»²
Æ«¹¿²¹ ³·¬ ݱ¼»
µ»·²» Ü»¬»µ¬·±²
»®µ»²²¬ Þ»©»¹«²¹»² ¿«º ¼»² ο¼¿® ¦«
»®µ»²²¬ Þ»©»¹«²¹»² ª±³ ο¼¿® ©»¹
»®µ»²²¬ ʱ®©<®¬-ó «²¼ Î$½µ©<®¬-¾»©»¹«²¹»²
¿«-æ λ´¿·- -½¸¿´¬»¬ ²·½¸¬
ðôî -æ µ$®¦»-¬» Ø¿´¬»¦»·¬
ëôð -æ ´<²¹-¬» Ø¿´¬»¦»·¬
λ´¿·- Õ±²¬¿µ¬ -½¸´·»A¬ ¾»· Ü»¬»µ¬·±² øÒò Ñò÷
λ´¿·- Õ±²¬¿µ¬ *ºº²»¬ ¾»· Ü»¬»µ¬·±² øÒò Ýò÷
¿«-æ µ»·²» Ï«»®ª»®µ»¸®-¿«-¾´»²¼«²¹
ðïæ ¹»®·²¹» Ï«»®ª»®µ»¸®-¿«-¾´»²¼«²¹
ïðæ ¸±¸» Ï«»®ª»®µ»¸®-¿«-¾´»²¼«²¹
¿«-æ Ì«®¬´» Ó±¼«- ¼»¿µ¬·ª·»®¬
Ì«®¬´» Ó±¼«- ¼»¿µ¬·ª·»®¬
Ì«®¬´» Ó±¼«- ¿µ¬·ª·»®¬
ïðæ ¹®±--»- Û®º¿--«²¹-º»´¼
ïðæ ¹®±--»- Û®º¿--«²¹-º»´¼
ðéæ ³¿¨·³¿´» ׳³«²·¬<¬
Æ«®$½µ-»¬¦»² ¿«º É»®µ-»·²-¬»´´«²¹
Æ«¹®·ºº ³·¬ ¼»® Ú»®²¾»¼·»²«²¹ ·-¬ ¶»¼»®¦»·¬ ³*¹´·½¸ò
Æ«¹®·ºº ©·®¼ ¹»-°»®®¬ò Û- ·-¬ µ»·² Æ«¹®·ºº ³·¬ ¼»® Ú»®²¾»¼·»²«²¹ ³*¹´·½¸ò
Æ«¹®·ºº ³·¬ ¼»® Ú»®²¾»¼·»²«²¹ ·-¬ ²«® ²¿½¸ Û·²¹¿¾» »·²»- ݱ¼»- ³*¹´·½¸ò
Ю±¹®¿³³·»®³±¼«- ª»®´¿--»²
ß¼®»--» ¨¨
Í»²-±® »·²-¬»´´»²
ß¼®»--» »·²-¬»´´»²
Í»²-±®ó
ß¼®»--»
ïð
ïï
ïî
ïí
ïì
ïë
ïê
ЬЧРуН½¸¿´¬»®
ï
î
í
ì
ë
ê
é
è
ç
ЬСЭМуплммЯ
Р¿®¬ ²±т оплрйл рзсорпр ©©©ò°»°°»®´óº«½¸-ò½±³ Úß󷲺±à¼»ò°»°°»®´óº«½¸-ò½±³
ЬСЭМуплммЯ
Р¿®¬ Т±т оплрйл рзсорпр ©©ò°»°°»®´óº«½¸-ò½±³ Úß󷲺±à¼»ò°»°°»®´óº«½¸-ò½±³
Page 10

М»´»½±³¿²¼± ОУНуЬуОЭ i ОУНуЬуОЭуТЯ ·¬¿´·¿²±
О»³±¬» Э±²¬®±´ ОУНуЬуОЭ i ОУНуЬуОЭуТЯ Ы-°¿/±´
Р»® ´Ž¿½½»--± ½±² ·´ ¬»´»½±³¿²¼±ф ·² ОУНуЬуОЭшуТЯч ´Ž·²¬»®®«¬¬±®» ЬЧР к ¼»ª» »--»®» ª»®-± ·´ ¾¿--±т
Ù´· ·²¬»®®«¬¬±®· Ü×Ð ¼¿ ï ¿ ì -»®ª±²± ¿¼ ·³°±-¬¿®» ¹´· ·²¼·®·¦¦· ¼»· -»²-±®· -»½±²¼± ´¿ ¬¿¾»´´¿ -±¬¬± ®·°±®¬¿¬¿ò Ï«¿´±®¿ ²»´ ®¿¹¹·± ¼· °±®¬¿¬¿ ¼»´ ¬»´»½±³¿²¼± -·
¬®±ª·²± °·' -»²-±®·ô ¯«»-¬· ¼»ª±²± »--»®» ·³°±-¬¿¬· ½±² ·²¼·®·¦¦· ¼·ºº»®»²¬·ò ×´ °±¬»²¦·±³»¬®± » ´Ž·²¬»®®«¬¬±®» Ü×Ð ë ²±² ¸¿²²± ¿´½«²¿ º«²¦·±²» ²»´ ´¿ª±®± ½±² ·´
¬»´»½±³¿²¼±ò
Ю±¹®¿³³¿¦·±²»
Ю·³¿ ¼· ·²·¦·¿®» ´¿ °®±¹®¿³³¿¦·±²»ô ´»¹¹»®» ´» ·-¬®«¦·±²· °»® ´Ž«-± ¼»´ ¬»´»½±³¿²¼± ÎÓÍò
Ю·³¿ ¼· ·²·¦·¿®» ´¿ °®±¹®¿³³¿¦·±²»ô ´»¹¹»®» ´» ·-¬®«¦·±²· °»® ´Ž«-± ¼»´ ¬»´»½±³¿²¼± ÎÓÍò
ݱ²²»--·±²» -»²¦¿ ½±¼·½» ОУНуЬуОЭ Ý»®½¿®» ·²¼·®·¦¦±
ݱ²²»--·±²» ½±² ½±¼·½» ОУНуЬуОЭ Ý»®½¿®» ·²¼·®·¦¦±
׳°±-¬¿¦·±²» ¼»´ -»²-±®»
ß--·½«®¿®» ´Ž¿½½»--±
ß½½»--± -»²¦¿ ½±¼·½» ݱ¼·½» ß½½»--± -»²¦¿ ½±¼·½»
Þ´±½½¿®» ´Ž¿½½»--± ݱ¼·½» Þ´±½½¿®» ´Ž¿½½»--±
ß½½»--± ½±² ½±¼·½» ݱ¼·½» ß½½»--± ½±² ½±¼·½»
Í»´»¦·±²¿®» · °¿®¿³»¬®· Ô»¹¹»®» ·´ ª¿´±®»
±°°«®»
±°°«®»
ײ¼·®·¦¦± ¨¨ ׳°±-¬¿¦·±²» ¼»´ -»²-±®»
ײ¼·®·¦¦± ¨¨ ײ-»®·®» ·´ ½±¼·½» ׳°±-¬¿¦·±²» ¼»´ -»²-±®»
Ê·-«¿´·¦¦¿¦·±²» ¼»´ ª¿´±®» ¿¬¬«¿´» ׳°±-¬¿¦·±²» ¼· «² ²«±ª±
ײ-»®·®» ·´ ½±¼·½» ¼· ì ½¿®¿¬¬»®·
׳°±-¬¿¦·±²· ¼»´ ¬»´»½±³¿²¼± ½±²¬®±´´¿®» ³·-«®¿²¼±
Ó»²« ׳°±-¬¿¦·±²· Ü»-½®·¦·±²»
Í»²-·¾·´·¬@
Ó±¼¿´·¬@ ¼· ®·´»ª¿³»²¬±
Ì»³°± ¼· ¼·-½»-¿
«-½·¬¿
ݱ²¬¿¬¬± ®»´7
Ó¿-½¸»®¿³»²¬± ¼»´
³±ª·³»²¬± ·² -»²-±
¬®¿-ª»®-¿´»
Ó±¼± Ì¿®¬¿®«¹¿ ᮬ¿
¿°»®¬¿
Ó±¼± Ì¿®¬¿®«¹¿ ᮬ¿
½¸·«-¿
Ý¿³°± ³±¼±
Ì¿®¬¿®«¹¿ ᮬ¿ ¿°»®¬¿
Ý¿³°± ³±¼±
Ì¿®¬¿®«¹¿ ᮬ¿ ½¸·«-¿
׳³«²·¬@
λ-»¬
ݱ¼·½»
ͽ±´´»¹¿®» ´¿
½±²²»--·±²»
ï ó ïê ðïæ Ý¿³°± ¼· ®·´»ª¿³»²¬± °·½½±´±
ïêæ Ý¿³°± ¼· ®·´»ª¿³»²¬± ¹®¿²¼»
-°»²¬±
-¬»®»± ¿ª¿²¬·
-¬»®»± ·²¼·»¬®±
³±²±
-°»²¬±
ðòî -ô ðòë -ô ï - ô ïòë -ô
î -ô í - ô ì -ô ë -
ݱ²¬¿¬¬± Òß ¿¬¬·ª±
ݱ²¬¿¬¬± ÒÝ °¿--·ª±
-°»²¬±
ï ó ïð
-°»²¬±
ï - ¼»½®»-½»²¬» í -
¼»½®»-½»²¬»
ë - ½±-¬¿²¬»
-°»²¬± ¿½½»-± Ó±¼± ¬¿®¬¿®«¹¿ ¼·-¿¬¬·ª¿¬±
ï ó ïð ðïæ Ý¿³°± ¼· ®·´»ª¿³»²¬± °·½½±´±
ï ó ïð ðïæ Ý¿³°± ¼· ®·´»ª¿³»²¬± °·½½±´±
ï ó é ðïæ ׳³«²·¬@ ³·²·³¿
ï ó ïê л® ´» ·³°±-¬¿¦·±²· ª»¼»®» ´¿ ¬¿¾»´´¿ •×³°±-¬¿¦·±²· ·²¬»®®«¬¬±®· Ü×ÐŒ
ß½½»--± -»²¦¿ ½±¼·½»
Þ´±½½¿®» ´Ž¿½½»--±
ß½½»--± ½±² ½±¼·½»
Ò»--«² ®·´»ª¿³»²¬±
η½±²±-½» ·´ ³±ª·³»²¬± ª»®-± ·´ ®¿¼¿®
η½±²±-½» ·´ ³±ª·³»²¬± ¿ °¿®¬·®» ¼¿´ ®¿¼¿®
η½±²±-½» · ³±ª·³»²¬· ¿ª¿²¬· » ·²¼·»¬®±
-°»²¬±æ λ´7 ²±² ½±³³«¬¿
ðôî -æ Ì»³°± ¼· ¿®®»-¬± °·' ¾®»ª»
ëôð -æ Ì»³°± ¼· ¿®®»-¬± °·' ´«²¹±
ݱ²¬¿¬¬± ®»´7 -· ½¸·«¼» ½±² ·´ ®·´»ª¿³»²¬± øÒò Ñò÷
ݱ²¬¿¬¬± ®»´7 -· ¿°®» ½±² ·´ ®·´»ª¿³»²¬± øÒò Ýò÷
-°»²¬±æ Ò»--«² ³¿-½¸»®¿³»²¬± ¼»´ ³±ª·³»²¬± ·² -»²-± ¬®¿-ª»®-¿´»
ïæ η¼±¬¬± ³¿-½¸»®¿³»²¬± ¼»´ ³±ª·³»²¬± ·² -»²-± ¬®¿-ª»®-¿´»
ïðæ Û´»ª¿¬± ³¿-½¸»®¿³»²¬± ¼»´ ³±ª·³»²¬± ·² -»²-± ¬®¿-ª»®-¿´»
-°»²¬±æ ³±¼± ¬¿®¬¿®«¹¿ ¼·-¿¬¬·ª¿¬±
л®·±¼± ¼· ±--»®ª¿¦·±²» ñ Í»²-·¾·´·¬@
Ó±¼± ¬¿®¬¿®«¹¿ ¿¬¬·ª¿¬±
ïðæ Ý¿³°± ¼· ®·´»ª¿³»²¬± ¹®¿²¼»
ïðæ Ý¿³°± ¼· ®·´»ª¿³»²¬± ¹®¿²¼»
éæ ׳³«²·¬@ ³¿--·³¿
η°®·-¬·²± ¼»´´» ·³°±-¬¿¦·±²· ¼· º¿¾¾®·½¿
ÔŽ¿½½»--± ½±² ·´ ¬»´»½±³¿²¼± 8 °±--·¾·´» ·² ¯«¿´-·¿-· ³±³»²¬±ò
ÔŽ¿½½»--± ª·»²» ¾´±½½¿¬±ò ÔŽ¿½½»--± ½±² ·´ ¬»´»½±³¿²¼± ²±² 8 °±--·¾·´»ò
ÔŽ¿½½»--± ½±² ·´ ¬»´»½±³¿²¼± 8 °±--·¾·´» -±´¿³»²¬» ·²-»®»²¼± «² ½±¼·½»ò
Ë-½·®» ¼¿´´¿ ³±¼¿´·¬@ ¼· °®±¹®¿³³¿¦·±²»
η°»¬»®» ·´ ½±¼·½»
ª¿´±®»
׳°±-¬¿¦·±²»
¼»´´Ž·²¼·®·¦¦±
ײ¼·®·¦¦±
¼»´ -»²-±®»
ï
î
í
ì
ë
ê
é
è
ç
ïð
ïï
ïî
ïí
ïì
ïë
ïê
ײ¬»®®«¬¬±®· Ü×Ð
Р¿®¿ »´ ¿½½»-± ½±² »´ ½±²¬®±´ ®»³±¬±ф »² »´ ОУНуЬуОЭшуТЯч ¼»¾» »-¬¿® ¾¿¶¿¼± »´ ·²¬»®®«°¬±® ЬЧР кт
Ô±- ·²¬»®®«°¬±®»- Ü×Ð ï ¿ ì -·®ª»² °¿®¿ ¿¶«-¬¿® ´¿- ¼·®»½½·±²»- ¼» ´±- -»²-±®»- ¼» ¿½«»®¼± ¿ ´¿ ¬¿¾´¿ -·¹«·»²¬»ò Ý«¿²¼± ¸¿§ ª¿®·±- -»²-±®»¼»²¬®± ¼»´ ¿´½¿²½» ¼»´ ½±²¬®±´ ®»³±¬±ô ´±- -»²-±®»- ¼»¾»² ¿¶«-¬¿®-» ½±² ¼·-¬·²¬¿- ¼·®»½½·±²»-ò Û´ °±¬»²½·-³»¬®± § »´ ·²¬»®®«°¬±® Ü×Ð ë ²±
¬·»²»² ²·²¹«²¿ º«²½·-² ¿´ ¬®¿¾¿¶¿® ½±² »´ ½±²¬®±´ ®»³±¬±ò
Ю±¹®¿³¿½·-²
ß²¬»- ¼» ½±³»²¦¿® ½±² ´¿ °®±¹®¿³¿½·-² ´»¿ ´¿- ·²-¬®«½½·±²»- ¼» ³¿²»¶± ¼»´ ÎÓÍ Î»³±¬» ݱ²¬®±´ò
Û-¬¿¾´»½»® ´¿ ½±²»¨·-² ½±² »´ -»²-±®
ݱ²»¨·-² -·² ½-¼·¹±
ОУНуЬуОЭ Þ«-½¿® ¼·®»½½·-²
ݱ²»¨·-² ½±² ½-¼·¹± ОУНуЬуОЭ Þ«-½¿® ¼·®»½½·-² ± Ü·®»½½·-² ¨¨ ײ¬®±¼«½·® ½-¼·¹± ߶«-¬¿® »´ -»²-±®
߶«-¬¿® »´ -»²-±®
Í»´»½½·±²¿® °¿®?³»¬®±-
Ô»»® ª¿´±®»- Í» ª·-«¿´·¦¿ »´ ª¿´±® ¿½¬«¿´ ߶«-¬¿® »´ ²«»ª± ª¿´±®
ß-»¹«®¿® »´ ¿½½»-±
ß½½»-± -·² ½-¼·¹± Ý-¼·¹± ß½½»-± -·² ½-¼·¹±
Þ´±¯«»¿® »´ ¿½½»-± Ý-¼·¹± Þ´±¯«»¿® »´ ¿½½»-±
ß½½»-± ½±² ½-¼·¹± Ý-¼·¹± ß½½»-± ½±² ½-¼·¹± ײ¬®±¼«½·® ½-¼·¹± ¼» ì ¼3¹·¬±- λ°»¬·® ½-¼·¹±
߶«-¬»- ¼»´ ½±²¬®±´ ®»³±¬± ݱ³°®±¾¿® ¿ °·» °±® »´ ½¿³°± ¼» ¼»¬»½½·-²
Ó»²& ߶«-¬»- Ü»-½®·°½·-²
Í»²-·¾·´·¼¿¼
Ó±¼± ¼» ¼»¬»½½·-²
Í¿´·¼¿ô Ì·»³°± ¼»
®»¬¿®¼±
ݱ²¬¿½¬± ¼» ®»´7
Í«°®»-·-² ¼»´
³±ª·³·»²¬±
¬®¿²-ª»®-¿´
Ó±¼± ¬±®¬«¹¿
Ы»®¬¿ ¿¾·»®¬¿
Ó±¼± ¬±®¬«¹¿
Ы»®¬¿ ½»®®¿¼¿
Ý¿³°± Ó±¼±
¬±®¬«¹¿ Ы»®¬¿ ¿¾·»®¬¿
Ý¿³°± Ó±¼± ¬±®¬«¹¿
Ы»®¬¿ ½»®®¿¼¿
ײ³«²·¼¿¼
߶«-¬»- °®»ª·±-æ
λ-»¬
Ý-¼·¹±
ײ¬»®®«°½·-² ¼» ´¿
½±²»¨·-²
ï ó ïê ïæ ½¿³°± ¼» ¼»¬»½½·-² °»¯«»/±
ïêæ ½¿³°± ¼» ¼»¬»½½·-² ¹®¿²¼»
Ü»-½±²»½¬¿¼±
˲·¼·®»½½·±²¿´ ¸¿½·¿ ¼»´¿²¬»
˲·¼·®»½½·±²¿´ ¸¿½·¿ ¿¬®?Ó±²±
Ü»-½±²»½¬¿¼±
ðôî -ô ðôë -ô ï -ô ïôë -ô
î -ô í -ô ì -ô ë -
Òòßò ¿½¬·ª±
ÒòÝò °¿-·ª±
Ü»-½±²»½¬¿¼±
ï ó ïð
Í·² ¼»¬»½½·-²
Ü»¬»½¬¿ ³±ª·³·»²¬±- ½±² ¿½»®½¿³·»²¬± ¿´ -»²-±®
Ü»¬»½¬¿ ³±ª·³·»²¬±- ½±² ¿´»¶¿³·»²¬± ¼»´ -»²-±®
Ü»¬»½¬¿ ³±ª·³·»²¬±- ¸¿½·¿ ¼»´¿²¬» § ¸¿½·¿ ¿¬®?-
Ü»-½±²»½¬¿¼±æ »´ ®»´7 ²± ½±²³«¬¿
ðôî -æ Ì·»³°± ³?- ½±®¬± ¼» ®»¬¿®¼±
ëôð -æ Ì·»³°± ³?- ´¿®¹± ¼» ®»¬¿®¼±
Ы´ ½±²¬¿½¬± ¼» ®»´7 ½·»®®¿ »² ½¿-± ¼» ¼»¬»½½·-² шТтЯтч
Ы´ ½±²¬¿½¬± ¼» ®»´7 ¿¾®» »² ½¿-± ¼» ¼»¬»½½·-² шТтЭтч
Ü»-½±²»½¬¿¼±æ Í·² -«°®»-·-² ¼»´ ³±ª·³·»²¬± ¬®¿²-ª»®-¿´
ïæ Þ¿¶¿ -«°®»-·-² ¼»´ ³±ª·³·»²¬± ¬®¿²-ª»®-¿´
ïðæ ß´¬¿ -«°®»-·-² ¼»´ ³±ª·³·»²¬± ¬®¿²-ª»®-¿´
Ü»-½±²»½¬¿¼±
ï - ¼»½®»½·»²¬»
Ü»-½±²»½¬¿¼±æ Ó±¼± ¬±®¬«¹¿ ¼»-¿½¬·ª¿¼±
Ì·»³°± ¼» ±¾-»®ª¿½·-² ñ Í»²-·¾·´·¼¿¼
í - ¼»½®»½·»²¬»
ë - ½±²-¬¿²¬»
Ü»-½±²»½¬¿¼±
ݱ²»½¬¿¼±
Ó±¼± ¬±®¬«¹¿ ¼»-¿½¬·ª¿¼±
Ó±¼± ¬±®¬«¹¿ ¿½¬·ª¿¼±
ï ó ïð ïæ ½¿³°± ¼» ¼»¬»½½·-² °»¯«»/±
ïðæ ½¿³°± ¼» ¼»¬»½½·-² ¹®¿²¼»
ï ó ïð ïæ ½¿³°± ¼» ¼»¬»½½·-² °»¯«»/±
ïðæ ½¿³°± ¼» ¼»¬»½½·-² ¹®¿²¼»
ï ó é ïæ ײ³«²·¼¿¼ ³3²·³¿
éæ ײ³«²·¼¿¼ ³?¨·³¿
ï ó ïê ߶«-¬»-ô ª7¿-» ´¿ ¬¿¾´¿ þ߶«-¬»- ¼» ´±- ·²¬»®®«°¬±®»- Ü×Ðþ
λ-¬¿¾´»½·³·»²¬± ¼» ´±- ¿¶«-¬»- ¼» º?¾®·½¿
ß½½»-± -·² ½-¼·¹±
Þ´±¯«»¿® »´ ¿½½»-±
ß½½»-± ½±² ½-¼·¹±
Û- °±-·¾´» ¿½½»¼»® ½±² »´ ½±²¬®±´ ®»³±¬± »² ½«¿´¯«·»® ³±³»²¬±ò
Í» ¾´±¯«»¿ »´ ¿½½»-±ò Ò± »- °±-·¾´» ¿½½»¼»® ½±² »´ ½±²¬®±´ ®»³±¬±ò
Í-´± »- °±-·¾´» ¿½½»¼»® ½±² »´ ½±²¬®±´ ®»³±¬± ¬®¿- ·²¬®±¼«½·® «² ½-¼·¹±ò
Í¿´·¼¿ ¼»´ ³±¼± ¼» °®±¹®¿³¿½·-²
±
Ü·®»½½·-² ¨¨
߶«-¬¿® »´ -»²-±®
߶«-¬¿® ¼·®»½½·-²
Ü·®»½½·-²
¼» -»²-±®
ïð
ïï
ïî
ïí
ïì
ïë
ïê
ײ¬»®®«°¬±®»-
Ü×Ð
ï
î
í
ì
ë
ê
é
è
ç
ЬСЭМуплммЯ
Тт °¿®¬» оплрйл рзсорпр ©©©ò°»°°»®´óº«½¸-ò½±³ Úß󷲺±à¼»ò°»°°»®´óº«½¸-ò½±³
ЬСЭМуплммЯ
Р¿®¬ Т±т оплрйл рзсорпр ©©©ò°»°°»®´óº«½¸-ò½±³ Úß󷲺±à¼»ò°»°°»®´óº«½¸-ò½±³
 Loading...