

Pepperl+Fuchs Raritan Dominion KX II-101 Quick Installation Manual
Raritan® Dominion® KX II-101 KVM-over-IP
PROCESS AUTOMATION
QUICK INSTALLATION GUIDE
2
VisuNet Control Center Manual
VisuNet Control Center Manual
Introduction
The VisuNet RM Shell 4.1.1 (or newer) embeds a software client that allows connection to Raritan® KVM-over-IP
switches. The KVM-over-IP client allows a point-to-point connection between a VisuNet Remote Monitor and a
Host PC to be set up in the safe area. The local host PC can be shared and remotely operated by a second user
on the remote monitor in the hazardous location.
In this quick installation guide, the configuration of the RM Shell 4.1.1 (or newer) and the Raritan Dominion® KX
II-101 KVM-over-IP switch is described; it is available as an accessory (DKX2-101-V2, #547998).
Raritan® Dominion® KX II-101 KVM-over-IP Switch
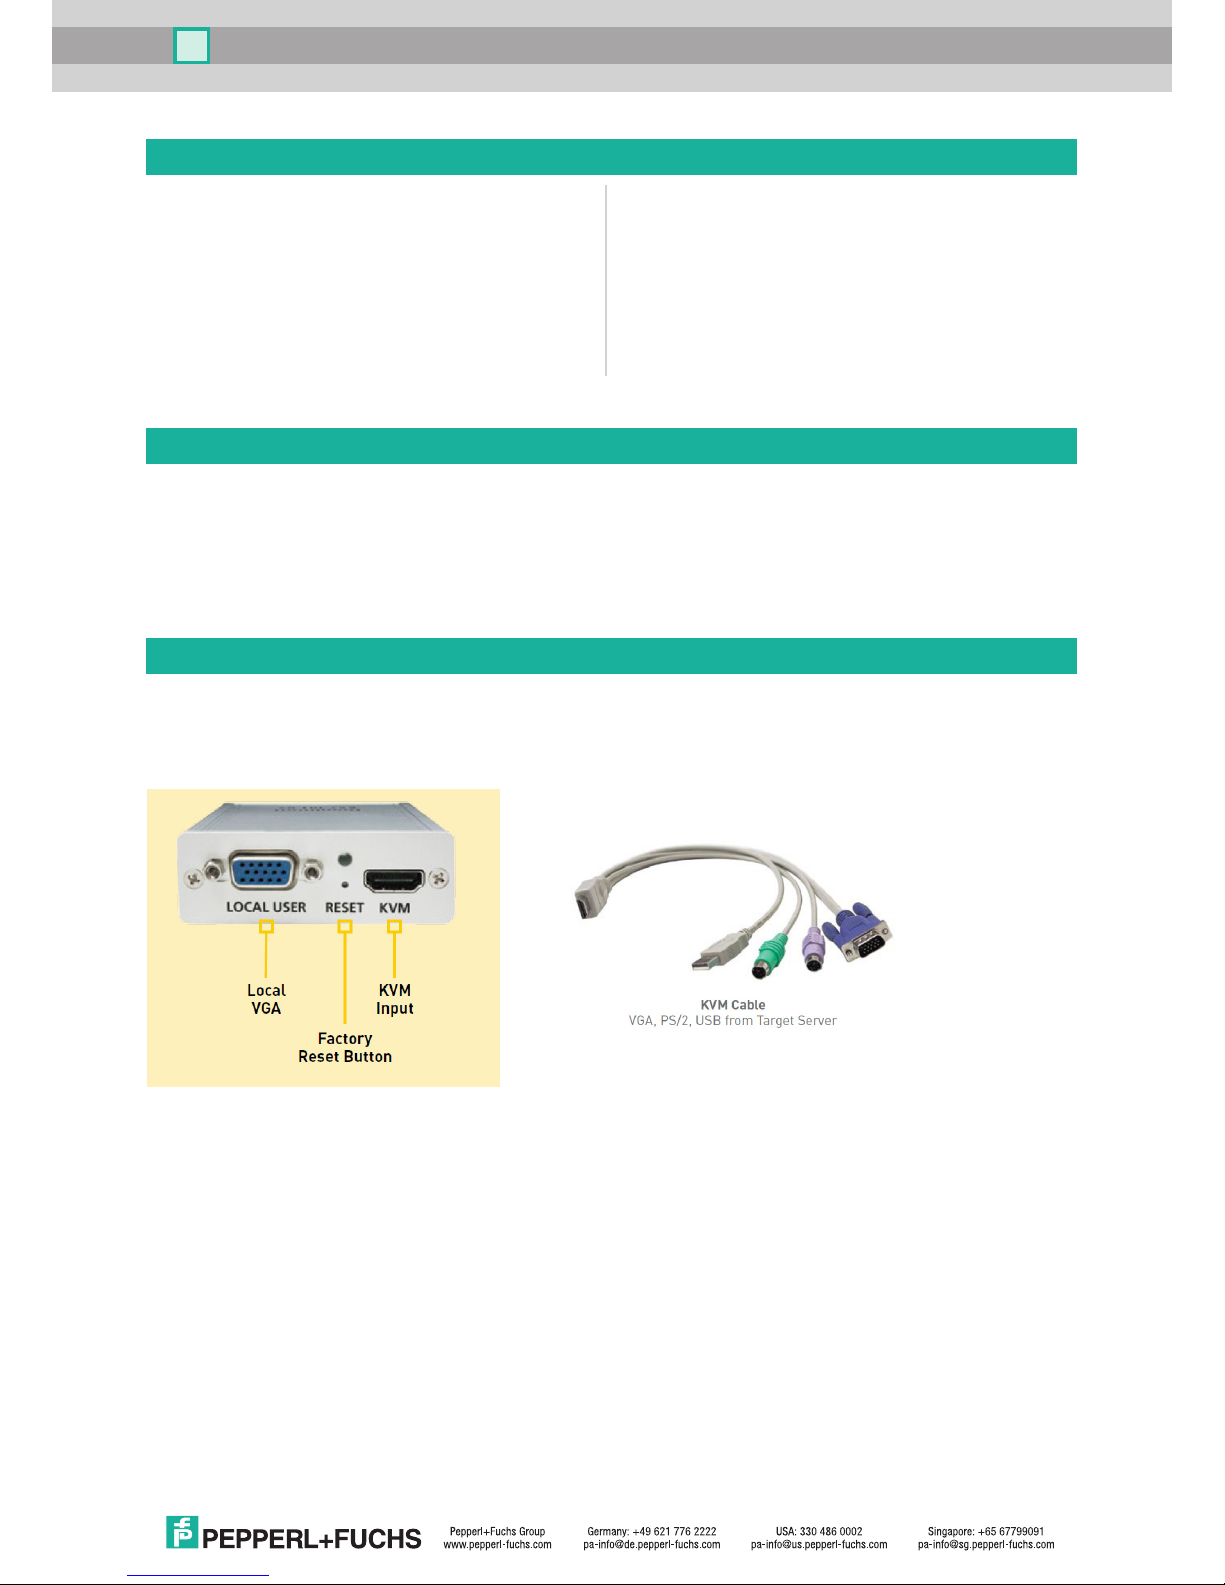
Device Interfaces
The Raritan Dominion KX II-101 KVM-over-IP switch (KVM switch) has multiple interfaces that are used to
connect a VisuNet Remote Monitor / Box Thin Client (RM) to a local Host PC:
Table of Contents
I. Introduction 2
II. Raritan Dominion KX II-101
KVM-over-IP Switch 2
Device Interfaces 2
Application Setup 4
III. Preparing VisuNet RMs 5
Set IP Address of RM 5
Add KVM Switch to Trusted Sites 5
Create KVM Profile and Connect to KVM Switch 7
IV. Congifuring the KVM Switch 8
Change Username/Password 8
Enable Direct Port Access 8
Set up Date and Time 9
Create a Self-Signed Certificate 10
Import a Self-Signed Certificate 11
Local VGA: This is a VGA port that can be used to connect an optional, local monitor to the KVM switch
and share the transmitted video signal from a host PC.
Factory Reset Button: This button allows the configuration of the KVM switch to be reset.
KVM Input: This is the interface for the KVM cable that provides all interfaces that must be connected to
the host PC.
VGA: Connect the VGA interface to the VGA port of the host PC to transmit the video signal to the KVM
switch. (If the Host PC only has digital interfaces like display port, HDMI, DVI, please use a digital-toanalog signal converter.)
USB: Connect the USB interface to a USB port of the host PC to forward the keyboard/mouse to the
host PC.
(PS/2: You can also use the PS/2 ports to forward the keyboard/mouse to the host PC.)

3
VisuNet Control Center Manual
(Local Admin: Serial port for local administration of a host PC
— this interface is not relevant for VisuNet Remote Monitors.)
To Power Adapter: This is the interface to power the KVM
switch.
LAN Port: This is the Ethernet port that must be connected with
the RM.
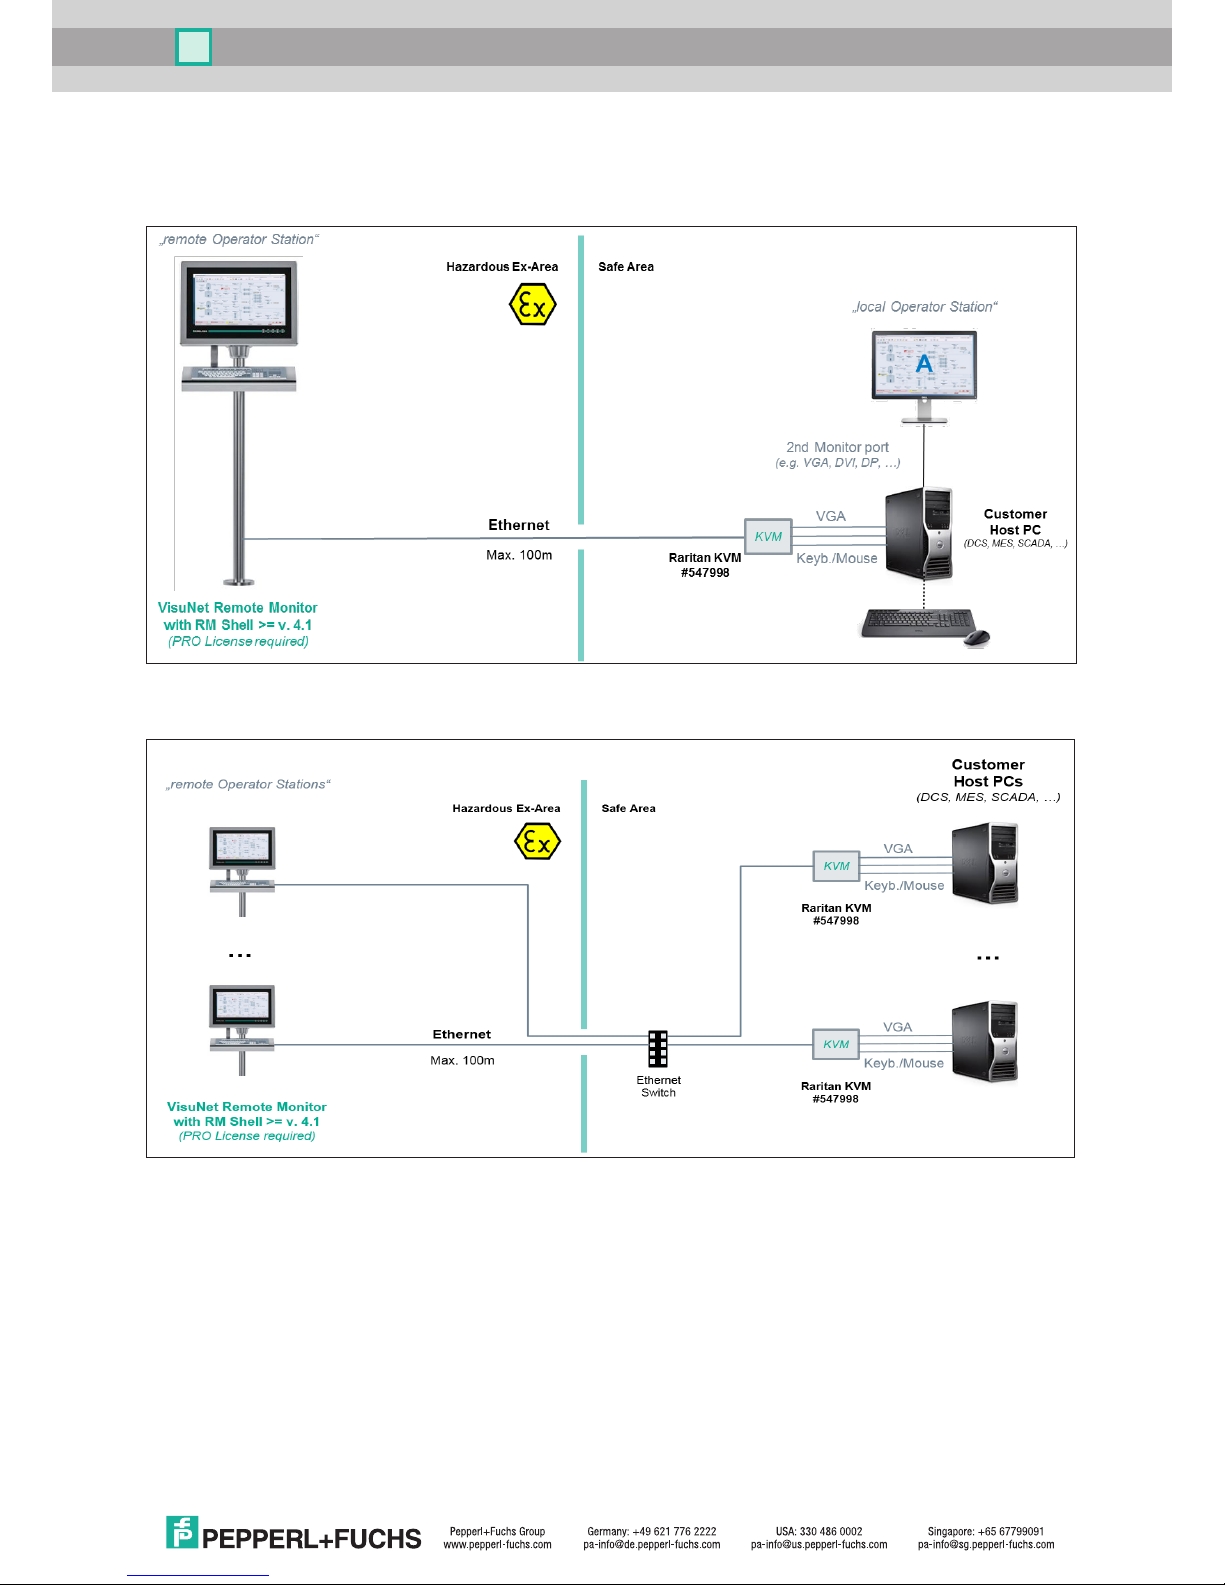
There are multiple setup options for the KVM switch:
Connection with Local
Monitor (connected to host
PC):
Use this setup if you want
to operate the host PC
locally and via an RM that is
connected via LAN.
(recommended setup)
Connection without Local
Monitor:
Use this setup if you do not
want to locally operate the
host PC but only want to
operate the host PC via an
RM that is connected via
LAN.
4
VisuNet Control Center Manual
Application Setup
In addition to the local setup of the KVM switch and the host PC, there are also multiple options for connecting
the KVM switch to an RM and integrating the KVM switch into a network:
Figure 1: RM and KVM switch (point-to-point)
Figure 2: RMs and KVM switches (Ethernet switched)
5
VisuNet Control Center Manual
Preparing VisuNet Remote Monitors / Box Thin Clients
In this section, the steps for a direct connection between an RM and a KVM switch are described. Before you
can connect with a VisuNet RM Shell KVM profile to a host PC, you need to configure the KVM switch.
Note: The following steps describe the configuration of the KVM switch from an RM. The setup can also be
performed from a standard PC.
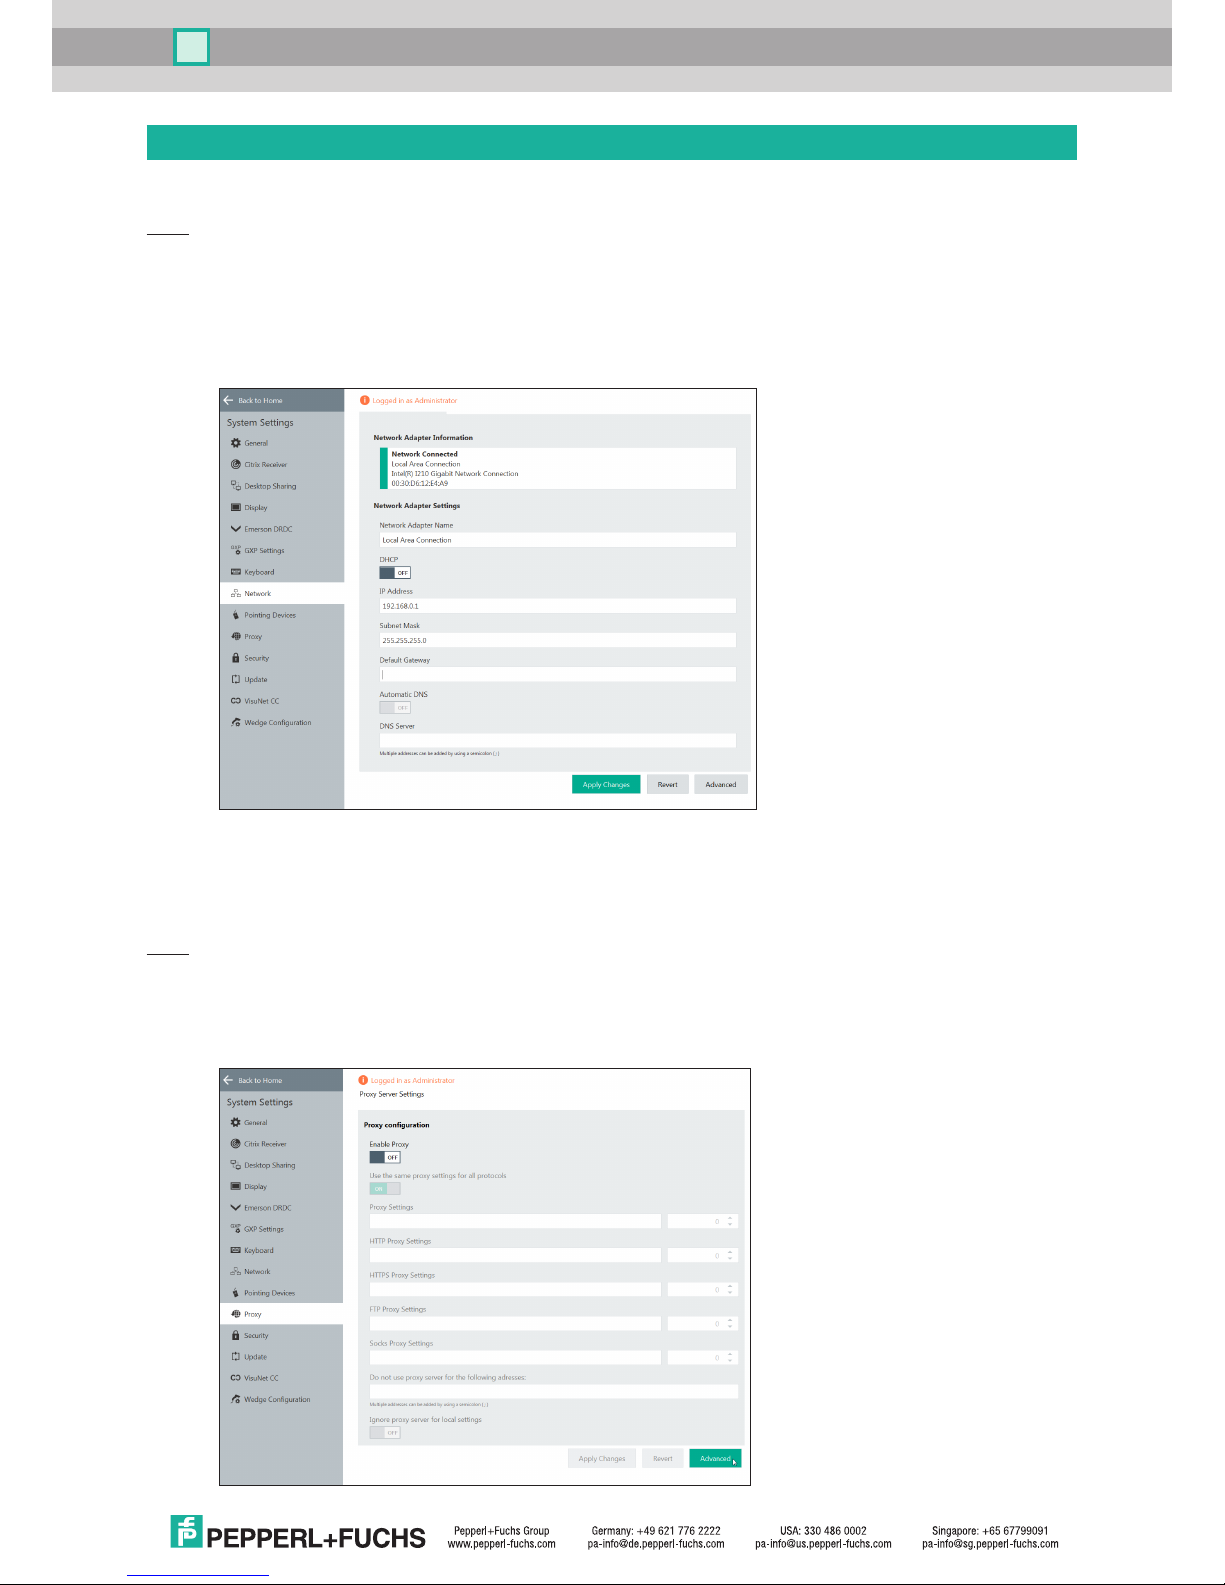
Set IP Address of RM
First, change the IP address of the RM to a static IP address that is within the IP address range of the KVM
switch (192.168.0.xxx).
("Sytem Settings" app Network IP Address)
Add KVM Switch to Trusted Sites
Especially when you use a point-to-point connection to the KVM switch, the certificate-based communication
can pose a problem since the certificate cannot be properly validated. To overcome this problem, we
recommend that the KVM switch be added to the trusted intranet zone and that the the security settings are
losened. This allows a direct connection to be established without warning pop-ups.
Note: If you are using a multiport KVM switch that is maintained by IT and has a valid certificate installed, you
can skip the following steps.
1. Open Internet Properties in RM Shell.
b. (Log in as Adminstrator)
c. Go to "System Settings" app Proxy Click on "Advanced"
 Loading...