

Page 1

MANUAL
2-D LiDAR Sensor
R2000 Measuring Sensors
FACTORY AUTOMATION
Page 2

2-D LiDAR Sensor
With regard to the supply of products, the current issue of the following document is applicable: The
General Terms of Delivery for Products and Services of the Electrical Industry, published by the
Central Association of the Electrical Industry (Zentralverband Elektrotechnik und Elektroindustrie
(ZVEI) e.V.) in its most recent version as well as the supplementary clause: "Expanded reservation
of proprietorship"
Page 3

2-D LiDAR Sensor
Contents
1 Introduction......................................................................... 5
1.1 Content of this Document .............................................................................5
1.2 Symbols Used...............................................................................................5
2 Safety................................................................................... 7
2.1 Safety Information.........................................................................................7
2.2 Laser Class 1................................................................................................8
3 Product Description ........................................................... 9
3.1 Validity ..........................................................................................................9
3.2 R2000 2-D LiDAR Sensor .............................................................................9
3.3 Functional Principle.....................................................................................10
3.4 Technical Data ............................................................................................11
3.5 Indicators and Operating Elements.............................................................11
3.6 Interfaces and Connections........................................................................12
3.7 Scope of Delivery........................................................................................13
3.8 Accessories ................................................................................................14
4 Installation ........................................................................ 15
4.1 Storage and Transport.................................................................................15
4.2 Unpacking...................................................................................................15
4.3 Mounting.....................................................................................................15
4.4 Device Connection......................................................................................17
5 Commissioning................................................................. 18
5.1 Ethernet Configuration................................................................................18
6 Operation........................................................................... 22
6.1 Menu Structure ...........................................................................................22
6.2 Operation....................................................................................................24
6.3 Description of Menu Items ..........................................................................27
6.3.1 "Ethernet Info" Menu Item.......................................................................27
6.3.2 "Ethernet Setup" Menu Item ...................................................................27
6.3.3 "Sensor Setup" Menu Item .....................................................................28
6.3.4 "Demos" Menu Item ...............................................................................29
6.3.5 "Tools" Menu Item ..................................................................................29
6.3.6 "End" Menu Item ....................................................................................29
7 Maintenance and Repair.................................................. 30
7.1 Maintenance...............................................................................................30
7.2 Repairs .......................................................................................................30
8 Troubleshooting................................................................ 31
2020-05
3
Page 4

2-D LiDAR Sensor
Contents
8.1 Potential Causes of Faults.......................................................................... 31
9 Appendix........................................................................... 32
9.1 Data Filter................................................................................................... 32
9.2 Amplitude Characteristics .......................................................................... 33
9.3 Pulse Ranging Technology (PRT) Glossary................................................ 34
9.4 Using Open Source Programs.................................................................... 36
2020-05
4
Page 5

2-D LiDAR Sensor
Introduction
1 Introduction
1.1 Content of this Document
This document contains information required to use the product in the relevant
phases of the product life cycle. This may include information on the following:
■ Product identification
■ Delivery, transport, and storage
■ Mounting and installation
■ Commissioning and operation
■ Maintenance and repair
■ Troubleshooting
■ Dismounting
■ Disposal
Note
For full information on the product, refer to the further documentation on the
Internet at www.pepperl-fuchs.com.
The documentation comprises the following parts:
■ This document
■ Datasheet
In addition, the documentation may comprise the following parts, if applicable:
■ EU-type examination certificate
■ EU declaration of conformity
■ Attestation of conformity
■ Certificates
■ Control drawings
■ Instruction manual
■ Other documents
1.2 Symbols Used
This document contains symbols for the identification of warning messages and of
informative messages.
Warning Messages
You will find warning messages, whenever dangers may arise from your actions. It
is mandatory that you observe these warning messages for your personal safety
and in order to avoid property damage.
Depending on the risk level, the warning messages are displayed in descending
order as follows:
2020-05
5
Page 6

2-D LiDAR Sensor
Introduction
Danger!
This symbol indicates an imminent danger.
Non-observance will result in personal injury or death.
Warning!
This symbol indicates a possible fault or danger.
Non-observance may cause personal injury or serious property damage.
Caution!
This symbol indicates a possible fault.
Non-observance could interrupt the device and any connected systems and
plants, or result in their complete failure.
Informative Symbols
Note
This symbol brings important information to your attention.
Action
This symbol indicates a paragraph with instructions. You are prompted to perform
an action or a sequence of actions.
2020-05
6
Page 7

2-D LiDAR Sensor
Safety
2 Safety
2.1 Safety Information
Read the following information carefully and follow this information when working
with the device. Failure to observe the safety notices and warning messages in
this documentation can lead to malfunctions and hazardous operating scenarios
during operation.
This can result in serious personal injury or death.
Target Group, Personnel
The personnel must be appropriately trained and qualified in order to carry out
mounting, installation, commissioning, operation, maintenance, and dismounting
of the device. The trained and qualified personnel must have read and
understood the instruction manual.
Prior to using the product make yourself familiar with it. Read the instruction
manual carefully.
Reference to Further Documentation
Observe laws, standards, and directives applicable to the intended use and the
operating location.
Intended Use
The R2000 2-D LiDAR sensor is a 360° measuring instrument with an all-round
display. It is used on automated transport systems or other movable machinery in
intralogistics. It is also used on stationary equipment in the area of factory and
building automation.
The device is only approved for appropriate and intended use. Ignoring these
instructions will void any warranty and absolve the manufacturer from any liability.
Operation, Maintenance, Repair
Do not remove the nameplate.
Do not remove the warning markings.
Do not repair, modify, or manipulate the device.
If there is a defect, always replace the device with an original device.
Only use accessories specified by the manufacturer.
When using the device with rack feeders and moving carriages, observe the
applicable safety guidelines for these applications.
Supply the device with a power supply that meets the requirements for safety
extra-low voltage (SELV) or protective extra-low voltage (PELV).
Do not point the device directly at the sun. Do not use the device to conduct
measurements into the sun.
2020-05
7
Page 8

2-D LiDAR Sensor
Safety
Delivery, Transport, Disposal
Keep the original packaging. Always store and transport the device in the original
packaging.
The device, built-in components, packaging, and any batteries contained within
must be disposed in compliance with the applicable laws and guidelines of the
respective country.
2.2 Laser Class 1
Class 1 Laser Product
This sensor is certified according to laser protection class 1.
Warning!
Class 1 laser light
The laser light can be an irritant, especially in a dark environment. Do not point
lasers at people!
Maintenance and repairs should only be carried out by authorized service
personnel!
Install the device so that the warning is clearly visible and readable.
Caution: Use of controls, adjustments, or performance of procedures other than
those specified herein may result in harmful laser beam exposure.
2020-05
8
Page 9

2-D LiDAR Sensor
Product Description
3 Product Description
3.1 Validity
This manual applies to all R2000-series measuring devices from firmware version
1.50 and hardware version 1.50 onward. The versions can be found in the device
menu; see chapter 6.3.3.
For devices using older versions, documentation is available on request.
3.2 R2000 2-D LiDAR Sensor
The 2-D LiDAR sensor is a compact 360° sensor with an integrated all-round
display.
The sensor offers a high measurement frequency, a small angular resolution, a
precise light spot, and, depending on the version, a visible measurement beam
(OMD10M-R2000-B23), all of which make it suitable for numerous factory
automation applications. In addition to completing familiar industrial tasks such as
logistics, transportation, and material handling, the sensor can be used for
innovative applications relating to building automation, automatic navigation of
autonomous vehicles, or monitoring rooms.
Design
The device comprises a static body on which a continuously turning
measurement module with an emitter laser and a receiver element is located. The
LiDAR sensor uses Pulse Ranging Technology (PRT). This functional principle
permits continuous scanning of the surrounding area through a full 360°.
User-Friendly All-Round Display
The LiDAR sensor has a row of LEDs on the back of the measurement module
that acts as an all-round display. When the sensor is rotated, this row of LEDs
produces a cylindrical projection surface for displaying text and images. This
enables commissioning and operation without a PC or laptop. Operating and
diagnosis information can therefore be directly displayed during operation.
Safety Certification to Laser Class 1
The R2000 2-D LiDAR sensor fulfills the safety requirements of laser class 1 in
measurement mode. The low amount of laser light emitted ensures that operating
personnel are not injured or harmed.
2020-05
9
Page 10

2-D LiDAR Sensor
Product Description
3.3 Functional Principle
The LiDAR sensor uses the principle of Pulse Ranging Technology (PRT). This
means the device measures the time between the emission of a light pulse and
the receipt of the pulse reflected by an object. Due to the constancy of the speed
of light, this time is a measurement of distance.
Compared with other distance measurement processes, runtime measurement is
affected very little by disturbances in the measuring environment. As a result, this
measurement process ensures a high level of accuracy even under tough
everyday industrial conditions. The light emitter and light receiver are located in
the rotating sensor head.
10
2020-05
Page 11

2-D LiDAR Sensor
2
6
1
4
3
5
7
9
8
Product Description
Note
Influence of ambient conditions
The speed of light depends on the air temperature and barometric pressure.
The influence of the air temperature is 1 ppm/K.
The influence of the barometric pressure is -0.3 ppm/hPa.
The user must take these faults into consideration when measuring long
distances.
In the operating range of -10 °C ... +50 °C, this fault amounts to 0.6 mm at a
distance of 10 m.
3.4 Technical Data
The technical data for this product can be found in the datasheet at www.pepperlfuchs.com.
3.5 Indicators and Operating Elements
Figure 3.1 Indicators and Controls
No. Description Color
1 Operating indicator Green
2 Fault indicator Red
3 "Next" menu button
4 "Return" menu button
5 "Q2" signal indicator Yellow
6 "Q1" signal indicator Yellow
7 Laser beam outlet
8 Ethernet link indicator Green
9 Ethernet activity indicator Yellow
Table 3.1 Indicators and operating elements
2020-05
11
Page 12

2-D LiDAR Sensor
1
3
4
2
1
4
6
7
8
53
2
Product Description
3.6 Interfaces and Connections
The following connections are found on all devices:
Power Supply
There is a 4-pin M12 plug on the rear of the housing for connecting the power
supply. The following diagram shows the pinout:
Figure 3.2 Power supply connection layout
1 24 V power supply
2 Q2
3 Ground (GND)
4 Q1
12
MultiPort
There is an 8-pin M12 plug on the rear of the housing for service purposes.
2020-05
Page 13

2-D LiDAR Sensor
1
3
4
2
Product Description
Interface:
There is a 4-pin M12 socket on the rear of the housing for connecting the Ethernet
interface. The following diagram shows the pinout:
Figure 3.3 Ethernet connection layout
1 TD+
2 RD+
3 TD-
4 RD-
The connector housing is located on the shield.
3.7 Scope of Delivery
The scope of delivery includes:
■ R2000
■ Quick start guide
■ Protective cover
■ 3 x socket cap screws, M5 x 10
■ 3 x washers, size 5
Note
Installation Instructions for North America
If a connection is made to the M12 multi-pin connector, the product shall be used
with a UL-listed cable/connector (CYJV) assembly rated minimum 30 VDC,
minimum 1.0 A, in the final installation for power supply.
2020-05
13
Page 14

2-D LiDAR Sensor
Product Description
3.8 Accessories
The following products are available as accessories.
Name Description
V1SD-G-2M-PURABG-V45-G
V1SD-G-5M-PURABG-V45-G
V1SD-G-ABG-PG9 Single-ended male cordset, M12 D-coded, 4-pin for bus cable
V1-G-2M-PUR Single-ended female cordset, straight, M12, 4-pin, PUR cable
V1-W-2M-PUR Single-ended female cordset, angled, M12, 4-pin, PUR cable
MH-R2000 Mounting bracket, quick-release and adjustment device
Note
Installation note for North America
If a connection is made with the M12 multi-pin connector, in the final installation of
the power supply the product must be used with a UL-listed cable/connector
assembly (CYJV) that is designed for at least 30 VDC and at least 1.0 A.
Name Description
V1-G-BK-2M-PUR-U Single-ended female cordset, straight,
V1-G-BK-5M-PUR-U Single-ended female cordset, straight,
V1-G-BK-10M-PUR-U Single-ended female cordset, straight,
Patch cable, M12 to RJ45, length 2 m
Patch cable, M12 to RJ45, length 5 m
M12, 4-pin, PUR cable, length 2 m, "UL
recognized"
M12, 4-pin, PUR cable, length 5 m, "UL
recognized"
M12, 4-pin, PUR cable, length 10 m, "UL
recognized"
14
To parameterize the R2000 conveniently via a software interface, you will need the
corresponding device type manager (DTM) in addition to the FDT framework
program (PACTware 4.x or above). PACTware and the DTM are available at
www.pepperl-fuchs.com.
2020-05
Page 15

2-D LiDAR Sensor
Installation
4 Installation
4.1 Storage and Transport
Package the device for storage and transport such that it is protected from impact
and moisture. The original packaging provides optimum protection. Also take note
of the permitted ambient conditions.
Note
If the temperature is subject to major fluctuations during transport, the device
must be allowed to acclimatize for around two hours prior to installation and use.
During this acclimatization period, avoid subjecting the device to condensation at
all costs, as this could have an effect on internal parts and cause damage.
4.2 Unpacking
Check the product for damage while unpacking. In the event of damage to the
product, inform the post office or parcel service and notify the supplier.
Retain the original packaging in case the device must be stored or shipped again
at a later date.
Should you have any questions, please contact Pepperl+Fuchs.
4.3 Mounting
Caution!
Aggressive environments may damage the sensor lens or cause it to malfunction
Using the device in aggressive environments may damage the sensor lens and
lead to impaired sensor function.
Never use the device in aggressive environments.
Caution!
Condensation may cause property damage and malfunction
Strong fluctuations in ambient temperature and humidity may damage the sensor
lens and lead to impaired sensor function.
Avoid excessive fluctuations in temperature and humidity to prevent
condensation.
Caution!
Excessive sunlight may result in property damage or malfunction
Continuous exposure to direct sunlight may damage the sensor lens and lead to
impaired sensor function. Taking measurements in direct sunlight may lead to
erroneous measurement results.
Protect the device from continuous exposure to direct sunlight.
Do not point the device's sensor at the sun.
2020-05
15
Page 16

2-D LiDAR Sensor
70
(40)20
60
20
53
106
117.5
4658
116.5
106
16
97.1
3 x M5
20
45
Emitting and receiving area
Complies with 21 CFR
1040.10 and 1040.11 except
for deviations pursuant to
Laser Notice No. 50,
dated June 24, 2007
CLASS 1
LASER PRODUCT
IEC 60825-1: 2007 certified.
Installation
Mounting the 2-D LiDAR Sensor
Only mount the sensor in locations that fulfill the following safety-relevant
requirements: no aggressive environments, no direct sunlight, no excessive
fluctuations in temperature and humidity.
1. In addition, note the following when selecting a mounting location:
■ The sensor must not be obstructed visually, e.g., behind a cover.
■ The sensor should be installed so it is protected from rain.
2. Mount the device on the underside using the supplied socket head screws
with washers.
Caution!
The wrong screw-in depth may result in property damage
If you screw the screws deeper than 8 mm into the base, the
device will be mechanically destroyed.
When mounting, make sure that the screw-in depth on the base is
≥ 5 mm ... ≤ 8 mm.
Figure 4.1 Dimensional drawing of R2000 2-D LiDAR sensor
3. Check that the sensor is securely seated.
Note
Keep the emitting/receiving area clear
When mounting, make sure the emitting area and the receiving area are kept
clear. Covering the emitting/receiving area reduces the performance of the 2-D
LiDAR sensor.
16
2020-05
Page 17

2-D LiDAR Sensor
PowerServiceLAN
4
1
2
3
TD+
TD-
RD-
Shield
4
1
2
3
24 V DC
0 V
RD+
Q2
Q1
1
3
4
2
1
3
4
2
Installation
4.4 Device Connection
Electrical connection in accordance with IP65
Put protective covers on unused M12 connectors.
The IP65 degree of protection is achieved. The protective covers can be
ordered as accessories; see chapter 3.8.
Danger!
Danger to life from electric shock
Absent or insufficient insulation can result in electric shock.
Only connect supplies that provide protection against electric shock (e. g. SELV
or PELV).
The device conforms to protection class III. This means the power supplied to the
device must be a safety extra-low protective voltage (PELV).
The power supply of the device uses a direct current of 10 VDC ... 30 VDC. Due to
the integrated motor, a higher startup current is required than with normal
operation. It is recommended that power supplies with 1 A (for 24 V) or with 2 A
(for 12 V) are used.
The maximum cable length is 30 m.
The pin assignment is as follows:
2020-05
Figure 4.2 R2000 pin assignment
17
Page 18

2-D LiDAR Sensor
Commissioning
5 Commissioning
The sensor has been tested and calibrated before delivery. It can be put into
operation immediately.
Commissioning the LiDAR sensor
Danger!
Danger to life from electric shock
Absent or insufficient insulation can result in electric shock.
Only connect supplies that provide protection against electric
shock (e. g. SELV or PELV).
1. Connect the device to the appropriate power supply.
The initialization phase lasts approx. 15 seconds. This phase is shown by
circles moving down the all-round display.
2. After the initialization phase, the Pepperl+Fuchs logo will appear on the allround display.
The device is now ready for operation.
Tip
Factoring in a warm-up phase
To achieve the best measurement accuracy, allow the device to warm up for at
least 30 minutes after switching on.
5.1 Ethernet Configuration
The sensor has 3 different addressing options that can be used as required. The
setting is configured using the menu interface on the sensor itself.
Note
Point-to-point connection
The sensor does not meet the requirement of the modern cybersecurity directives
and therefore is an unsafe component in the network structure.
We recommend establishing an isolated point-to-point connection between
sensor and the higher-level control.
Auto IP
In the Auto IP setting, the sensor independently assigns a "link-local" IP address
in the 169.254.0.0/16 range. During this process, the system ensures that the
selected address is not already being used by another device.
18
2020-05
Page 19
2-D LiDAR Sensor
Commissioning
Configuring a Connection via Auto IP
The sensor is set to Auto IP by default. The Auto IP setting is the best way to
connect directly to a PC.
1. If the network configuration of the sensor no longer matches the factory setting:
1. Under Ethernet Setup > Address Mode, set the sensor to "Auto IP."
2. Restart the sensor to apply the configuration.
3. To connect the sensor to the PC, set the PC to Dynamic Host Configuration
Protocol (DHCP).
4. Adjust the properties of the PC network card accordingly. To do this, select
the TCP/IP protocol in the network card properties.
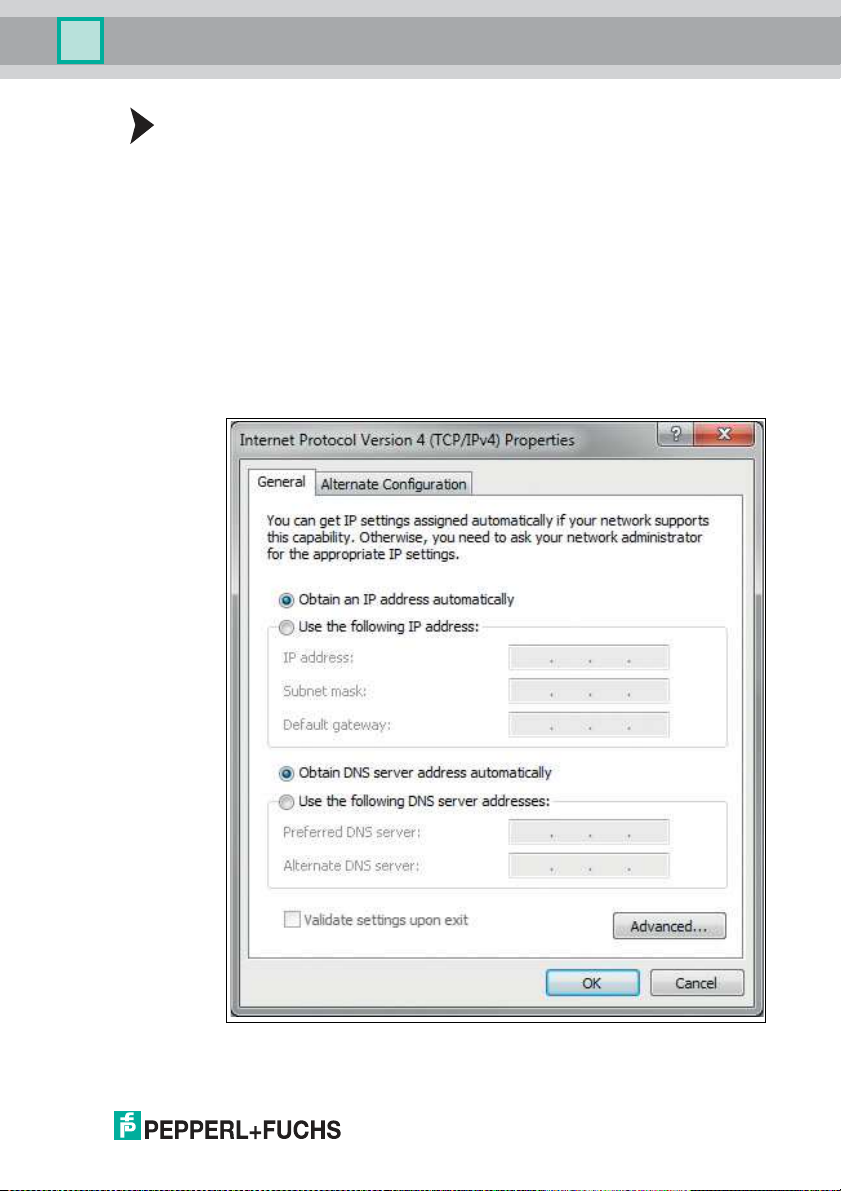
5. In the Internet protocol properties, select Obtain an IP address
automatically.
6. Click OK to confirm.
2020-05
19
Page 20

2-D LiDAR Sensor
Commissioning
After approx. 30 seconds, Microsoft® Windows® assigns an auto IP for
the PC.
DHCP
Connecting via DHCP requires the availability of a DHCP server, such as a router,
on the local network; see Auto IP, PC network card settings.
If this requirement is fulfilled, you can set the sensor to DHCP.
Configuring a Connection via DHCP
1. Under Ethernet Setup > Address Mode, set the sensor to "DHCP."
2. Restart the sensor to apply the configuration.
Manual IP
You can also address the sensor via an IP address set manually. You can set the
PC network card and the sensor to an IP address of your choice.
Note
The IP address of the sensor is set to 10.0.10.9 and the subnet mask to 255.0.0.0
by default.
Configuring a Connection via a Manual IP Address
1. Configure the sensor:
1. Under Ethernet Setup > Address Mode, set the sensor to "Manual."
2. Enter the required address under Ethernet Setup > IP Address.
3. Restart the sensor to apply the configuration.
4. To connect the sensor to the PC, enter the required IP address in the menu for
the PC network card. Select the TCP/IP protocol in the PC network card
properties.
5. Select "Use the following IP address" and enter the required IP address and
subnet mask.
20
2020-05
Page 21

2-D LiDAR Sensor
Commissioning
6. Click OK to confirm.
Note
Device restart
You must restart the sensor after changing the Ethernet configuration.
2020-05
21
Page 22

2-D LiDAR Sensor
Menu
Adress Mode
IP Address
Gateway
MAC Address
Back
Ethernet Info
Adress Mode
IP Address
Gateway
Reboot
Back
Ethernet Setup
Manuel
DHCP
Back
Auto IP
Subnet Mask
Subnet Mask
Operation
6 Operation
6.1 Menu Structure
22
2020-05
Page 23

2-D LiDAR Sensor
Operation
2020-05
23
Page 24

2-D LiDAR Sensor
Operation
6.2 Operation
The sensor is operated using the two buttons on the front.
These buttons can be used to navigate within the menu structure.
You can also use the two buttons to change parameters or enter values.
The content of the all-round display will vary according to the input data.
24
2020-05
Page 25

2-D LiDAR Sensor
Operation
Meaning of Buttons
Button Explanation
In each menu item, the set values are indicated by an underscore. These values
can be changed.
Note
Device settings may only be configured by trained and qualified personnel.
ARROW button.
Press this button
■ To navigate to the next menu item,
■ To change a value.
This button has a similar function to the ARROW button on
the computer keyboard.
ENTER button.
Press this button to select a menu item from the display.
This button has a similar function to the ENTER button on the
computer keyboard.
If no buttons are pressed in the menu levels for
≥ 60 seconds, the menu is exited
automatically.
Navigation in the Menu
Menu display
Top row The current menu level is shown in the top row.
Bottom row The currently selected element is shown in the bottom row.
Dash One dash means you are in the main menu.
Two dashes mean you are in the submenu.
Operation
Pressing the ENTER button takes you into the menu structure.
Takes you to the next menu element.
Keep the ARROW button or the ENTER button pressed for
> 1 second to go to the next menu element up.
Takes you to the selected menu element.
Keep the ARROW button or the ENTER button pressed for
> 1 second to go to the next menu element up.
Menu entry
End This menu entry exits the main menu.
Back This menu entry takes you to the next menu element up.
Changing Count Parameters
Menu display
Top row This shows the current parameter.
2020-05
25
Page 26

2-D LiDAR Sensor
Operation
Bottom row This shows the currently selected parameter value.
Underlined parameter
value
Operation
Changing Numerical Parameters
Menu display
Top row This shows the name of the displayed parameter.
Bottom row This shows the current value of the parameter.
Underlined parameter
value
Operation
Confirm menu
Top row This shows the changed number.
Bottom row This shows the executable actions (Save, Edit, Cancel).
"Save" action The changed value is applied and saved.
"Edit" action Takes you back to the edit display.
"Cancel" action Rejects the changes and takes you to the higher-level menu.
This is the currently activated value.
Takes you to the next available parameter value.
Keep the button pressed for > 1 second to go to the next
menu element up without changing the parameter.
Activates the parameter value currently displayed.
Keep the button pressed for > 1 second to activate the
displayed parameter and return to the higher-level menu
element.
This is the parameter value to be edited.
Increase the currently selected digit.
Keep the button pressed for > 1 second to increase the
selected digit at a quicker rate.
Takes you to the next editable digit.
Keep the button pressed for > 1 second to go to the Confirm
menu.
26
IP Configuration Display
Menu display
Top row Name of the displayed parameter.
Bottom row This shows the current value of the parameter.
Operation
Takes you to the next menu element.
Keep the ARROW button or the ENTER button pressed for
> 1 second to go to the next menu element up.
2020-05
Page 27

2-D LiDAR Sensor
Operation
No function.
Keep the ARROW button or the ENTER button pressed for
> 1 second to go to the next menu element up.
Back Menu Item
The "Back" menu item returns you to the higher-level menu.
6.3 Description of Menu Items
6.3.1 "Ethernet Info" Menu Item
This menu item provides quick access to the IP configuration currently in use. The
data can be read only in this menu item.
Address Mode
The address mode currently being used is displayed in this subitem.
IP Address
The IP address currently being used is displayed in this subitem.
Subnet Mask
The subnet mask currently being used is displayed in this subitem.
Gateway
The gateway currently being used is displayed in this subitem.
MAC ID
The MAC ID currently being used is displayed in this subitem.
Note
Changing the IP configuration
Changes to the IP configuration are only applied after a restart.
The IP configuration currently used by the device is displayed in the "Ethernet
Info" menu item. If these settings differ from the configuration specified under the
"Ethernet Setup" menu item, the device must be restarted.
6.3.2 "Ethernet Setup" Menu Item
This menu item is used to change the IP configuration data.
Address Mode
■ "Manual:" Enables you to manually assign the IP address, the subnet
mask, and the gateway to the device.
■ "DHCP:" Enables you to assign an IP address to the device from a DHCP
server (e.g., a Windows® PC).
■ "AutoIP:" Enables automatic detection of the device on the network.
IP Address
The IP address to be used in the "Manual" address mode can be set in this menu
item.
2020-05
27
Page 28

2-D LiDAR Sensor
Operation
Subnet Mask
The subnet mask to be used in the "Manual" address mode can be set in this
menu item.
Gateway
The gateway can be set in this subitem.
Restart
The device can be restarted in this menu item.
Note
Changing the IP configuration
Changes to the IP configuration are only applied after a restart.
The IP configuration currently used by the device is displayed in the "Ethernet
Info" menu item. If these settings differ from the configuration specified under the
"Ethernet Setup" menu item, the device must be restarted.
6.3.3 "Sensor Setup" Menu Item
Language
This menu item can be used to set the language to German or English.
Display Mode
The display mode defines the display in normal operation when the menu is not
active. Display mode is set on a permanent basis. The display is active following a
restart.
■ Display off: The display goes dark as soon as the menu is exited.
■ Static logo: The display shows the Pepperl+Fuchs logo. The logo can be
replaced with a custom bitmap file that will still be available after the device
is switched on/off. The information is saved in the EEPROM. See the
Ethernet protocol description for details about programming.
■ Static text: The "Pepperl+Fuchs R2000" logo is shown on the display. The
text can be replaced with custom text that will still be available after the
device is switched off/on. The information is saved in the EEPROM. See
the Ethernet protocol description for details about programming.
■ Distance bar graph: The display depicts distances in the form of a bar
chart that shows data in all directions. The bars become smaller as the
distance increases.
■ Reflector bar graph: A bar is shown on the display at the point at which a
reflector is detected.
■ Echo bar graph: The measured signal strength is shown on the display in
the form of a graph.
■ Application bitmap: A custom bitmap file (24 x 252 bit) is shown on the
display. The file is saved in the RAM, so is no longer available after the
device is switched off. See the Ethernet protocol description for details
about programming.
■ Application text: Custom text is shown on the display; the text is saved in
the RAM, so is no longer available after the device is switched off. See the
Ethernet protocol description for details about programming.
28
2020-05
Page 29

2-D LiDAR Sensor
Operation
Note
The Static logo and Static text display modes are suitable for infrequent
changes to the logo and text data.
The Application bitmap and Application text display modes are suitable for
frequent changes to the logo and text data.
Product Info
■ Product name: The display shows the current product name.
■ Item number: The display shows the individual item number.
■ Serial number: The display shows the individual serial number.
Version Info
■ Firmware: The display shows the current firmware version.
■ Hardware: The display shows the current hardware version.
■ PFSDP: The display shows the current version of the Pepperl+Fuchs Scan
Data Protocol.
Factory Settings
The factory settings for the sensor can be loaded in this menu item. To do this,
select "Load" in the submenu and press the ENTER key to confirm. Restart the
device to apply all the changes.
6.3.4 "Demos" Menu Item
A demo is only active temporarily. As soon as another option is selected in the
menu, the demo becomes inactive. A restart has the same effect.
Sensor Eyes
The display shows a pair of eyes that focuses on moving objects. If no activity is
detected within approx. five seconds, the "eyes" close. The "eyes" open again if
the sensor detects movement.
Measuring Tape
In this demo, the scanner measures the distance in a forward direction (X axis).
The value is shown on the display.
6.3.5 "Tools" Menu Item
Alignment Aid
A bar is shown on the display at the point at which a reflector is detected. An
angular scale is shown at the bottom of the display. The "Alignment aid" tool is
automatically exited after approximately ten minutes and the stored display mode
is enabled.
6.3.6 "End" Menu Item
End
Pressing the ENTER button to confirm exits the menu and displays the set display
mode.
2020-05
29
Page 30

2-D LiDAR Sensor
Maintenance and Repair
7 Maintenance and Repair
7.1 Maintenance
Caution!
Failure to clean and improper cleaning may cause property damage and
malfunction
Failure to follow these instructions for cleaning the device may result in lens
damage and impaired function.
Keep the glass on the device clean.
Never clean the glass on the device when the glass is dry. Always use a soft cloth
and water, with a little detergent if necessary.
Do not use aggressive solvent-based cleaning agents such as acetone.
Observe the applicable national regulations when maintaining the device.
The sensor is largely maintenance free.
Check the technical safety of the sensor system at regular intervals by looking for
damage to the housing. Check the sensor for dirt occasionally.
To clean the sensor, wipe it with a damp soft cloth at regular intervals. This will
ensure it continues to function properly. The housing is made of plastic. For this
reason, do not use acetone or detergents containing solvents.
7.2 Repairs
If it appears that safe operation of the system is no longer possible, the system
must be taken out of operation and steps taken to prevent it being used
inadvertently. If the device needs to be repaired, return it to Pepperl+Fuchs. If you
open or modify the device yourself, not only are you endangering yourself and
others but you will void any warranty and absolve the manufacturer from any
liability.
30
2020-05
Page 31

2-D LiDAR Sensor
Troubleshooting
8 Troubleshooting
8.1 Potential Causes of Faults
If the sensor reports no data or incorrect data, check the following:
■ Is the sensor securely mounted or is it vibrating?
=> Check installation.
■ Is the sensor partially covered?
=> Check installation point for visual obstacles.
■ Is the sensor exposed to rain or condensation?
=> Check installation point for moisture and environmental fluctuations.
■ Is the sensor exposed to sunlight or positioned so that it is measuring into
the sun?
=> Check installation point for sunlight.
If none of these suggestions rectifies the fault, contact Pepperl+Fuchs.
Do not repair, modify, or manipulate the device.
If there is a defect, always replace the device with an original device.
Note
Note on insulation measurement
When conducting an insulation measurement, be aware that suppressor diodes
have been installed for EMC resistance.
2020-05
31
Page 32

2-D LiDAR Sensor
Appendix
9 Appendix
9.1 Data Filter
The R2000 allows you to preprocess data. This can be useful for suppressing
measured value noise or reducing the volume of output data, for example. The
following measured data filters are available:
■ Average value filter: All distance data and amplitude data is determined
arithmetically using an appropriate filter width.
■ Median filter: A value (median) is determined using a selectable filter
width; half of the data is greater than or equal to this value.
■ Maximum filter: Using a selectable filter width, the arithmetic mean is
determined for a subset of the data. Starting with the highest measured
value from the measurements within the filter width, the data is used that is
shorter than the maximum value by a selectable range or which has the
same measured value as the maximum value. Data outside of this range is
discarded.
■ Reflectivity filter: Using a selectable filter width, the arithmetic mean is
determined for the data. The calculation only includes data with signal
amplitudes greater than or equal to an adjustable amplitude threshold.
Note: Details about the data filters can be found in the "Ethernet Communication
Protocol" manual at www.pepperl-fuchs.com.
32
2020-05
Page 33

2-D LiDAR Sensor
700
600
500
400
300
200
100
0
0.1 0.5 1.0 10 60
Echoamplitude [digit]
Distance X [m]
Echoamplitude characteristic
Echoamplitude on Diamond Grade 983-10
Object remission 0% ... 90 %
Appendix
9.2 Amplitude Characteristics
In addition to the measured value output for the distance, the R2000 generates an
echo amplitude for each measuring step. The measured value for the echo
amplitude is a value without a unit of measurement, ranging from 0 ... 4095 digits.
The echo amplitude is a measure of the energy received by the R2000. The
measured value is dependent on the surface properties of the measurement
object (reflectivity, structure), the distance from the measurement object, and the
angle of incidence of the measurement beam. The measurement of the echo
amplitude is not calibrated and is used for relative distinction between different
object reflectivities.
In particular, evaluation of the echo amplitudes can be used to distinguish
between natural surfaces and reflective film.
The picture below shows the curve of the echo amplitude on reflective film
(diamond grade 983-10). The curve shows the smallest expected measured value
in relation to the distance.
The second curve represents the largest value on a white (90 % reflectivity),
natural surface in relation to the distance.
2020-05
Figure 9.1 Amplitude characteristics for OMD10M-R2000-B23-V1V1D*
33
Page 34

2-D LiDAR Sensor
2500
2000
1500
1000
500
0
0.1 1 10 100
Echoamplitude [digit]
Echoamplitude characteristic
Echoamplitude on Diamond Grade 983-10
Object remission 0% ... 90 %
Distance X [m]
Appendix
Figure 9.2 Amplitude characteristics OMD30M-R2000-B23-V1V1D*; OMD30M-R2000-
B23-V1VD-HD-1L (ends at 30m); OMD12M-R2000-B23* (ends at 12 m)
The measurement on reflective film is based on a vertical angle of incidence on a
40 mm-wide reflective strip and an angular resolution of 0.071°.
The measurement on a white (90 % reflectivity), natural surface is based on a
vertical angle of incidence and an emitted beam that hits the entire surface of the
measurement object.
If the emitted beam is at an entrance angle of 60° ... 70° on the reflective film, the
measured value drops by approximately 50 % compared to the value for a vertical
entrance angle.
9.3 Pulse Ranging Technology (PRT) Glossary
34
Term Explanation
Accuracy The degree to which the measurement
Absolute accuracy The total of all systematic measurement
result corresponds to the true value of the
measurement. The accuracy is a relative
error based on a measurement standard.
For practical applications, a distinction is
made between different influencing
factors.
errors (e.g., linearity, device offset) over a
defined distance range, reflectivity range,
and temperature range that cannot be
eliminated by other actions such as
average determination.
2020-05
Page 35

2-D LiDAR Sensor
Appendix
Term Explanation
Repeat accuracy (repeatability) The measurement is repeated on the same
Measured value noise Randomly distributed deviation of a
Measuring range The range between the smallest and
target and under the same conditions. The
error is the repeatability value. The
measured value noise is not taken into
account.
measured value by an average value. The
distribution of the individual measurement
values typically follows a statistical normal
distribution.
largest object distance in which the
measuring instrument supplies readings
within the specification.
2020-05
35
Page 36

2-D LiDAR Sensor
Appendix
9.4 Using Open Source Programs
Pepperl+Fuchs uses a range of open source software in the R2000. These are the
programs listed individually below from 1 to 12. We have edited programs 1 to 4:
1. U-Boot
2. Blackfin uClinux
3. Xenomai
4. Mongoose web server
5. Libedit
6. Giflib
7. Libncurses
8. ST standard peripherals library
9. ARM CMSIS header
10.IAR LIBC
11.AVR LIBC
12.CRC library
You may use all programs in accordance with the respective license. The
licenses, their exact scope, and their exclusions of liability can be found in the
header of the files themselves.
In accordance with the provisions of the licenses for programs 5 and 11, the
respective copyright statements are reproduced here. The copyright statements
can also be found in the relevant files.
Program no. 5: Libedit: Copyright (c) The Regents of the University of California.
Program no. 11: AVR LIBC: Portions of avr-libc are Copyright 1999 – 2005 (c)
Keith Gudger, Bjoern Haase, Steinar Haugen, Peter Jansen, Reinhard Jessich,
Magnus Johansson, Artur Lipowski, Marek Michalkiewicz, Colin O’Flynn, Bob
Paddock, Reiner Patommel, Michael Rickman, Theodore A. Roth, Juergen
Schilling, Philip Soeberg, Anatoly Sokolov, Nils Kristian Strom, Michael Stumpf,
Stefan Swanepoel, Eric B. Weddington, Joerg Wunsch, Dmitry Xmelkov, The
Regents of the University of California. Portions of avr-libc documentation
Copyright (c) 1990, 1991, 1993, 1994 The Regents of the University of California.
We have reproduced the text of the license and exclusion of liability for programs
no. 5 and no. 11:
"Redistribution and use in source and binary forms, with or without
modification, are permitted provided that the following conditions are met:
* Redistributions of source code must retain the above copyright notice, this list of
conditions, and the following disclaimer.
* Redistributions in binary form must reproduce the above copyright notice, this
list of conditions, and the following disclaimer in the documentation and/or other
materials provided with the distribution.
* Neither the name of the copyright holders nor the names of contributors may be
used to endorse or promote products derived from this software without specific
prior written permission.
36
2020-05
Page 37

2-D LiDAR Sensor
Appendix
THIS SOFTWARE IS PROVIDED BY THE COPYRIGHT HOLDERS AND
CONTRIBUTORS "AS IS" AND ANY EXPRESS OR IMPLIED WARRANTIES,
INCLUDING, BUT NOT LIMITED TO, THE IMPLIED WARRANTIES OF
MERCHANTABILITY AND FITNESS FOR A PARTICULAR PURPOSE ARE
DISCLAIMED. IN NO EVENT SHALL THE COPYRIGHT OWNER OR
CONTRIBUTORS BE LIABLE FOR ANY DIRECT, INDIRECT, INCIDENTAL,
SPECIAL, EXEMPLARY, OR CONSEQUENTIAL DAMAGES (INCLUDING,
BUT NOT LIMITED TO, PROCUREMENT OF SUBSTITUTE GOODS OR
SERVICES; LOSS OF USE, DATA, OR PROFITS; OR BUSINESS
INTERRUPTION) HOWEVER CAUSED AND ON ANY THEORY OF LIABILITY,
WHETHER IN CONTRACT, STRICT LIABILITY, OR TORT (INCLUDING
NEGLIGENCE OR OTHERWISE) ARISING IN ANY WAY OUT OF THE USE
OF THIS SOFTWARE, EVEN IF ADVISED OF THE POSSIBILITY OF SUCH
DAMAGE."
Programs 1, 2, and 3 are licensed in accordance with the GNU General Public
License v2. Program 3 is additionally licensed for the user spacein accordance
with the Lesser General Public License. Pepperl+Fuchs grants you and any third
party a free license for further processing in accordance with the GNU General
Public License v2 and/or the Lesser General Public License.
Pepperl+Fuchs offers to provide you and any third party with the source code for
programs 1, 2, and 3 in the form in which we developed it for a period of three
years from distribution by Pepperl+Fuchs, free of charge on a read/write tag
commonly used for exchanging software.
Pepperl+Fuchs is not liable for any changes made to the open source software by
the user.
2020-05
37
Page 38

Sub ject to mo dific ation s
Cop yrigh t PEP PERL+ FUCHS • Printed in Ger many
www.pepperl-fuchs.com
FACTORY AUTOMATION –
SENSING YOUR NEEDS
Worldwide Headquarters
Pepperl+Fuchs Group
68307 Mannheim · Germany
Tel. +49 621 776-0
E-mail: info@de.pepperl-fuchs.com
USA Headquarters
Pepperl+Fuchs Inc.
Twinsburg, Ohio 44087 · USA
Tel. +1 330 4253555
E-mail: sales@us.pepperl-fuchs.com
Asia Pacific Headquarters
Pepperl+Fuchs Pte Ltd.
Company Registration No. 199003130E
Singapore 139942
Tel. +65 67799091
E-mail: sales@sg.pepperl-fuchs.com
DOCT-6019A
05/2020
 Loading...