

Page 1
KVM-over-IP Switch
Raritan Dominion KX IV-101
Brief Instructions
Page 2

With regard to the supply of products, the current issue of the following document is applicable: The
General Terms of Delivery for Products and Services of the Electrical Industry, published by the Central
Association of the Electrical Industry (Zentralverband Elektrotechnik und Elektroindustrie (ZVEI) e.V.)
in its most recent version as well as the supplementary clause: "Expanded reservation of proprietorship"
Worldwide
Pepperl+Fuchs Group
Lilienthalstr. 200
68307 Mannheim
Germany
Phone: +49 621 776 - 0
E-mail: info@de.pepperl-fuchs.com
North American Headquarters
Pepperl+Fuchs Inc.
1600 Enterprise Parkway
Twinsburg, Ohio 44087
USA
Phone: +1 330 425-3555
E-mail: sales@us.pepperl-fuchs.com
Asia Headquarters
Pepperl+Fuchs Pte. Ltd.
P+F Building
18 Ayer Rajah Crescent
Singapore 139942
Phone: +65 6779-9091
E-mail: sales@sg.pepperl-fuchs.com
https://www.pepperl-fuchs.com
Page 3

KVM-over-IP SwitchRaritan Dominion KX IV-101
Contents
1 Introduction................................................................................................................ 4
2 Raritan Dominion KX IV-101 ..................................................................................... 5
2.1 Device Interfaces ........................................................................................... 5
2.2 Application Setup .......................................................................................... 7
3 Preparing VisuNet RMs ............................................................................................. 8
3.1 VisuNet RM Shell Settings ............................................................................ 8
3.2 Disable permanently the warning for the certificate mismatch
((a) - recommended).................................................................................... 12
3.3 Create a self-signed certificate or use a custom certificate on the KVM
adapter (b).................................................................................................... 13
4 Configuring the KVM Switch................................................................................... 16
4.1 Adjust the login password .......................................................................... 16
4.2 Setup Time and Date ................................................................................... 17
4.3 Enable Direct Port Access (DPA) ............................................................... 17
5 Establish the Connection........................................................................................ 19
2021-01
3
Page 4

KVM-over-IP SwitchRaritan Dominion KX IV-101
Introduction
1 Introduction
In this quick installation guide, the configuration of the VisuNet RM Shell 5.2 (or newer) and the
Raritan Dominion® KX IV-101 KVM-over-IP switch is described.
The Raritan KX IV-101 #70118493 is available as an accessory and must be ordered separately.
With the VisuNet RM Shell 5.2 (or newer) the embedded software client that allows connection
to Raritan® KVM-over-IP switches got further improved and the setup process of the connection highly simplified.
The KVM-over-IP client allows a point-to-point connection between a VisuNet Remote Monitor
and a host PC to be set up in the safe area.
The local host PC can be shared and remotely operated by a second user on the remote monitor in the hazardous location.
2021-01
4
Page 5
KVM-over-IP SwitchRaritan Dominion KX IV-101
Raritan Dominion KX IV-101
2 Raritan Dominion KX IV-101
2.1 Device Interfaces
The Raritan Dominion KX IV-101 KVM-over-IP switch has multiple interfaces that are used to
connect a VisuNet Remote Monitor (RM) / Box Thin Client (BTC) to a local Host PC:
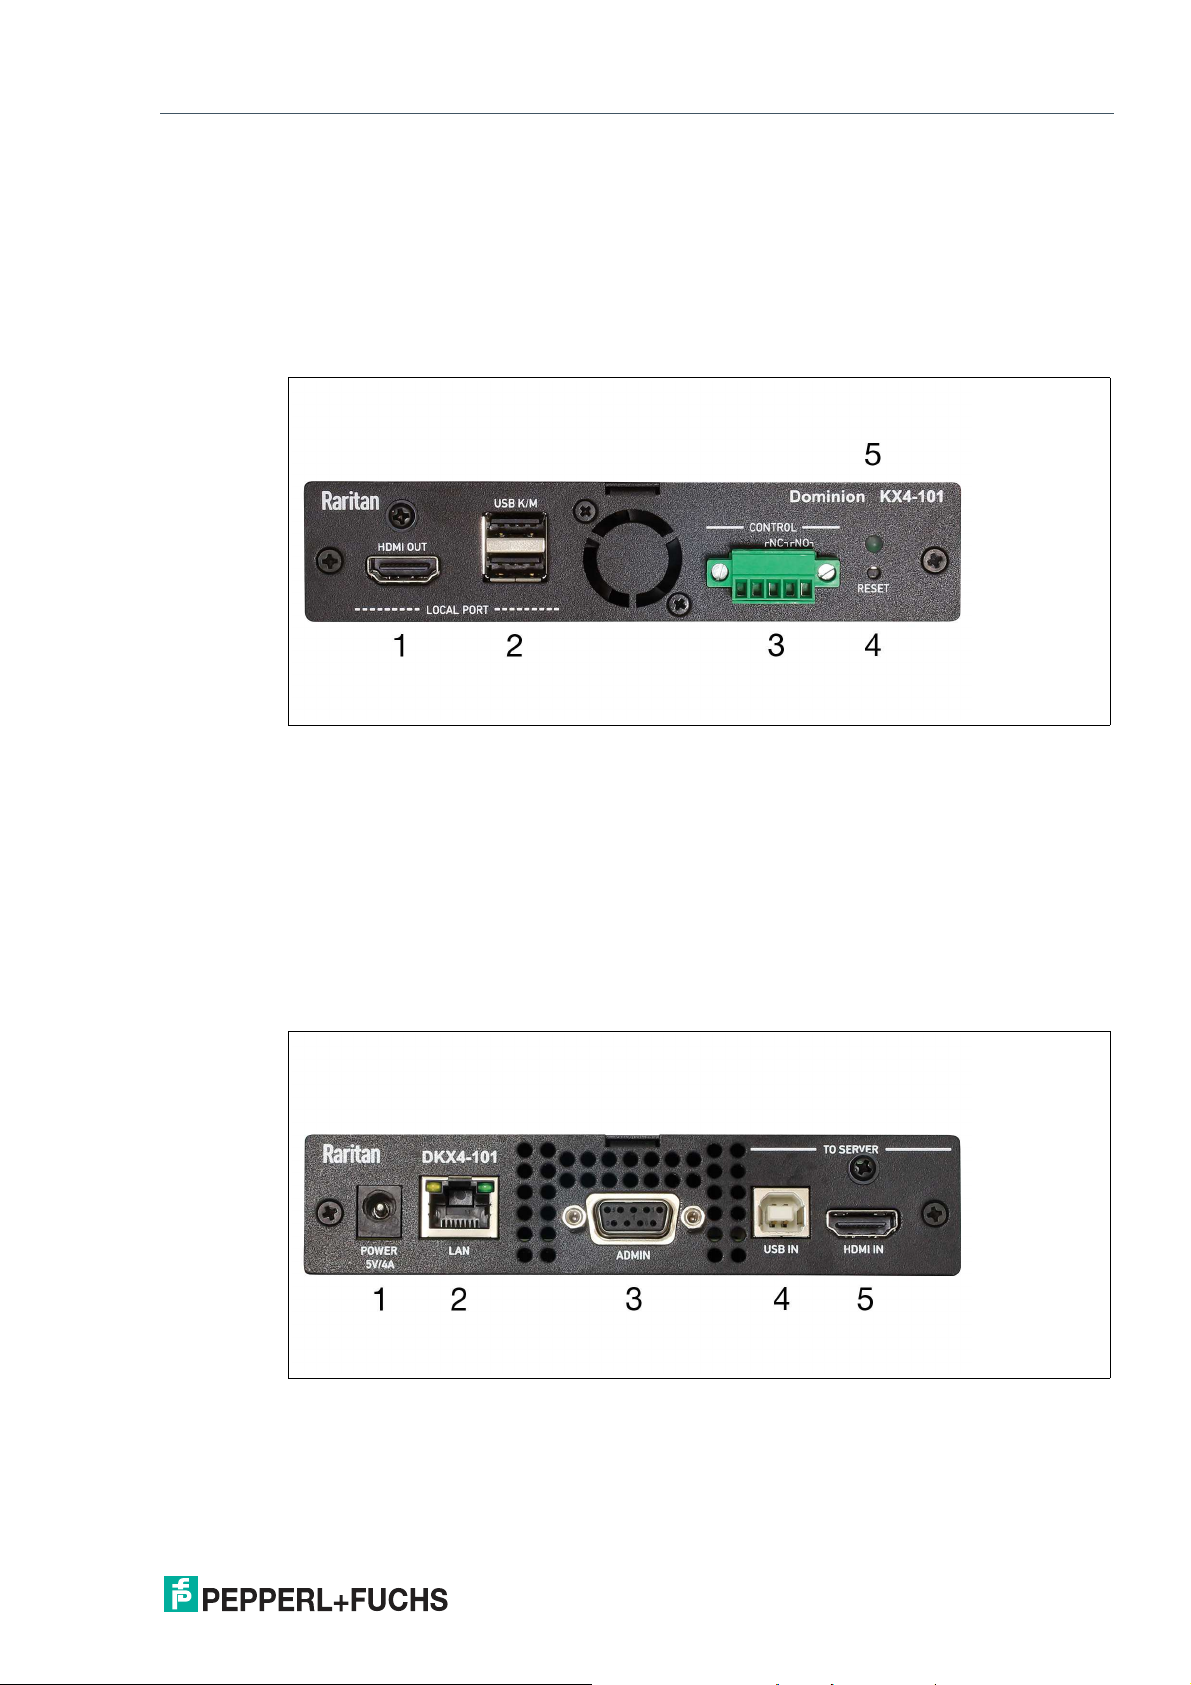
Front View
Figure 2.1
(1) Local Port HDMI Out to local monitor
(2) Local Port USB Keyboard/Mouse
(3) Input/Output Ports
(4) Reset
(5) Power Status LED:
• Green ON: Power on
• Green BLINKING: Remote target connection
Rear View
Figure 2.2
(1) Power 5V/4A from power adapter
(2) RJ-45 LAN Network Port with 2 LEDs for network speed and activity:
• Amber OFF/Green OFF: Link Inactive
2021-01
5
Page 6
KVM-over-IP SwitchRaritan Dominion KX IV-101
Raritan Dominion KX IV-101
• Amber ON/Green OFF: 1000 MBps Link/No Activity
• Amber BLINKING/Green OFF: 1000 MBps Link/Activity(RX, TX)
• Amber OFF/Green ON: 100 MBps Link/No Activity
• Amber OFF/Green BLINKING: 100 MBps Link/Activity (RX, TX)
• Amber ON/Green ON: 10 MBps Link/No Activity
• Amber BLINKING/Green BLINKING: 10 MBps Link/Activity (RX, TX)
(3) Serial Admin Port
(4) USB In from target server
(5) HDMI In from target server
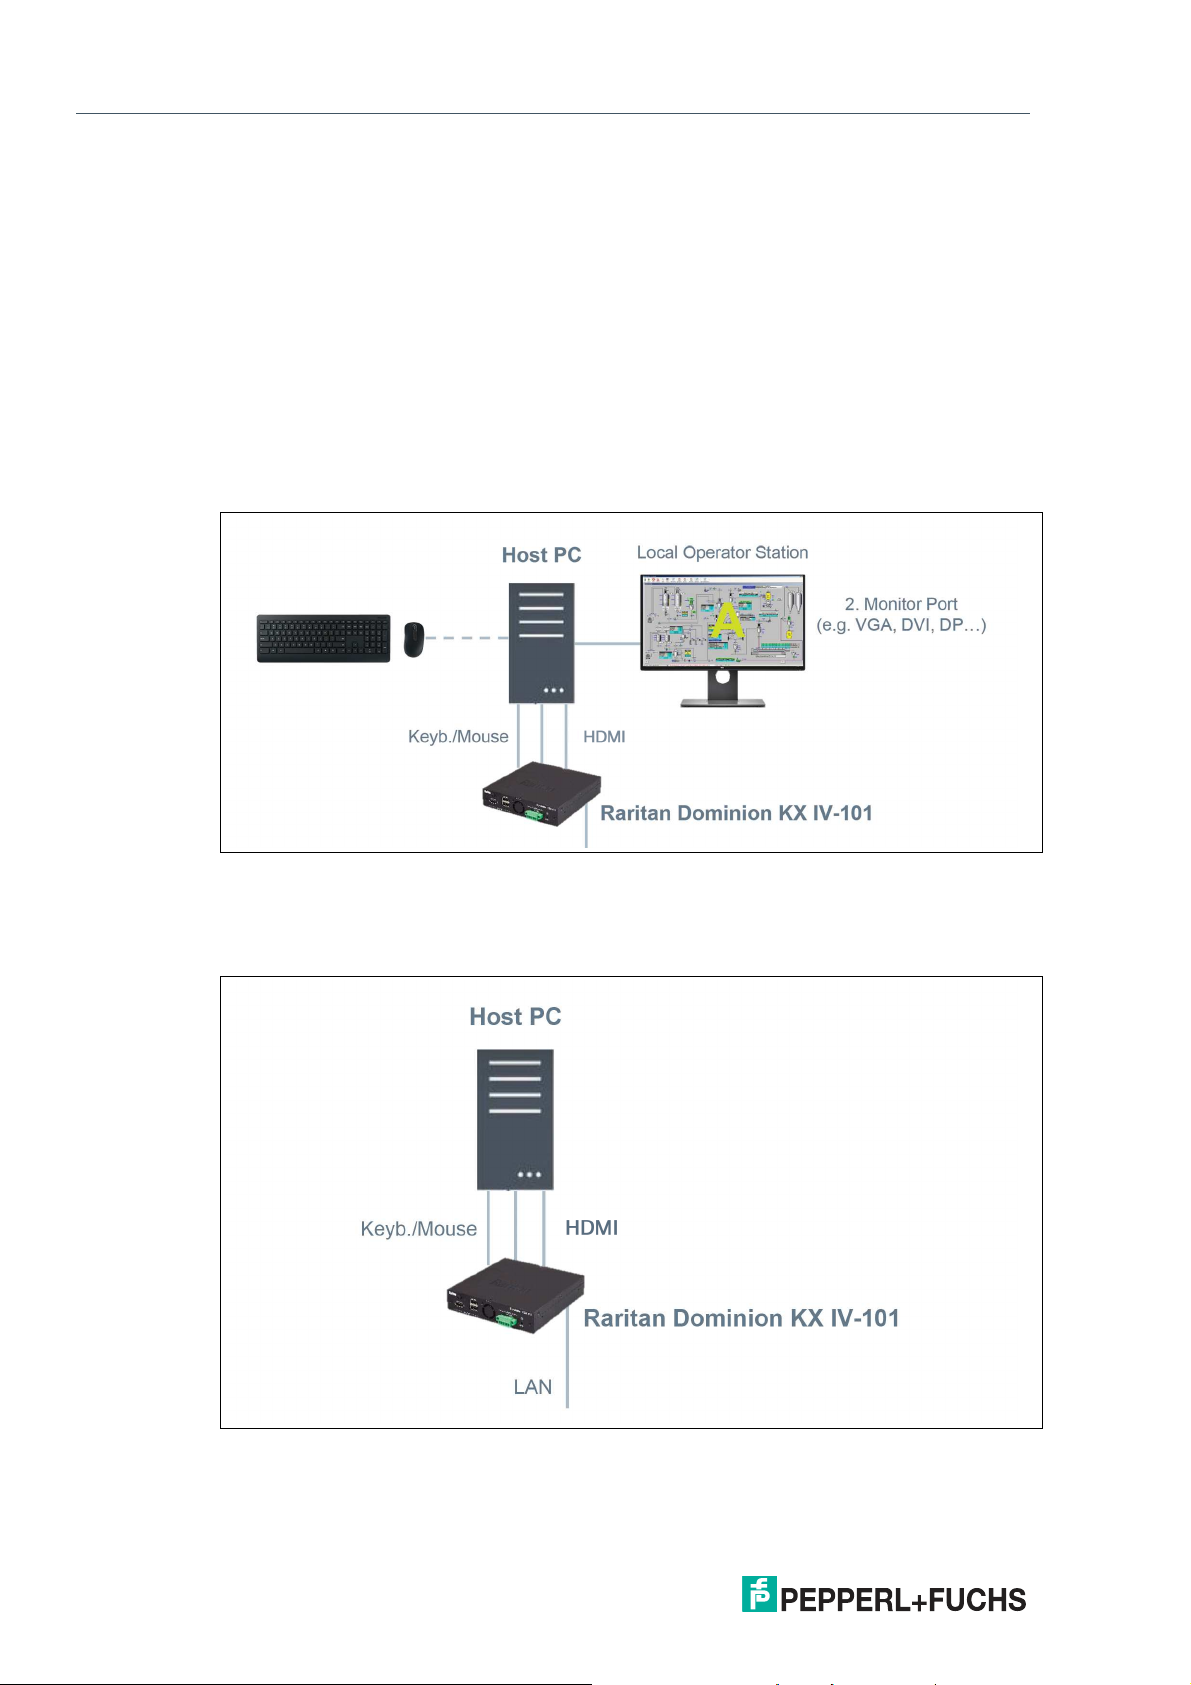
There are multiple setup options for the KVM switch:
Figure 2.3
Connection with Local Monitor (connected to host PC):
Use this setup if you want to operate the host PC locally and via an RM that is connected via
LAN. (recommended setup)
Figure 2.4
2021-01
6
Page 7
KVM-over-IP SwitchRaritan Dominion KX IV-101
Raritan Dominion KX IV-101
Connection without Local Monitor:
Use this setup if you do not want to locally operate the host PC but only want to operate the
host PC via an RM that is connected via LAN.
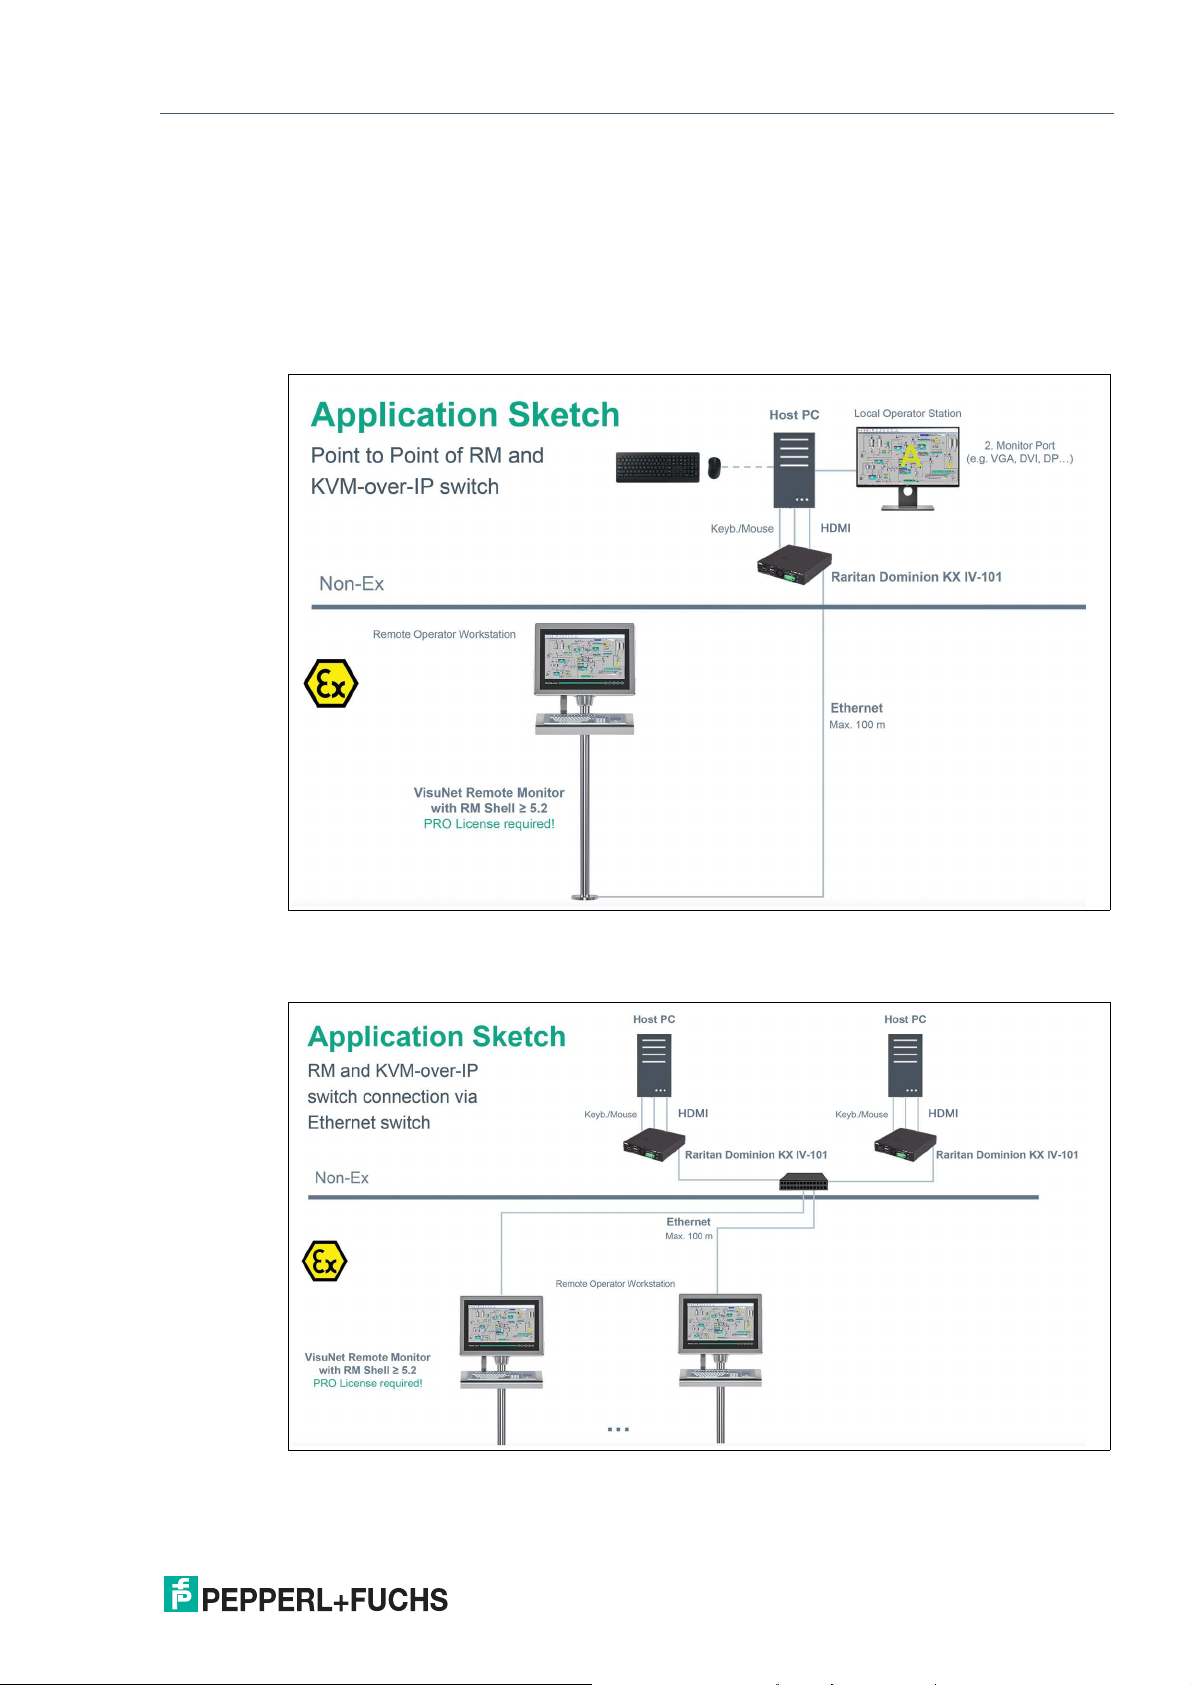
2.2 Application Setup
In addition to the local setup of the KVM switch and the host PC, there are also multiple options
for connecting the KVM switch to an RM and integrating the KVM switch into a network:
Figure 2.5 Point to Point connection of an RM and a KVM-over-IP switch
The explanation on how to setup the connection of the RM and the KVM-over IP switch is
described in this brief instruction.
Figure 2.6 RM and KVM-over-IP switch connection via Ethernet switch
If you require further information on how to setup the connection via Ethernet switch, refer to
2021-01
the Raritan and the VisuNet RM Shell manual.
7
Page 8

KVM-over-IP SwitchRaritan Dominion KX IV-101
Preparing VisuNet RMs
3 Preparing VisuNet RMs
In this section, the steps for a direct connection between an RM and a KVM switch are
described. Before you can connect a VisuNet RM Shell KVM profile to a host PC, you must
configure the KVM switch.
Note
Note: The following steps describe the configuration of the KVM switch from an RM. The setup
can also be performed from a standard PC.
Required Setup:
Connect the Raritan Dominion KX IV-101 KVM's USB and HDMI cables to a host PC.
Connect the LAN cable of the KVM directly to the Remote Monitor or the box thin client from
which you want to configure your Raritan Dominion KX IV-101 KVM switch.
3.1 VisuNet RM Shell Settings
Note
The KVM-over-IP client requires an VisuNet RM Shell PRO License to be unlocked. Refer to
the VisuNet RM Shell manual for further information.
Note
Disable Write Filter for persistent storage of configurations to persistently store configuration
changes, disable the Unified Write Filter (UWF). Once you have implemented the configuration
changes, enable the UWF again to persistently store the changes.
Enable DHCP
Switch the user role to Administrator. Enable the DHCP Settings in the System Settings of the
RM/BTC.
Figure 3.1
2021-01
8
Page 9

KVM-over-IP SwitchRaritan Dominion KX IV-101
Preparing VisuNet RMs
Whitelist the required processes for the dialog filter
Whitelist the processes for the dialog filter:
Open the System Settings and select "Dialog Filter". Add the processes "iexplore" and "dfsvc"
to the whitelist by typing in the process names.
Figure 3.2
Save the changes by clicking "Apply Changes" and close the window.
Create a new profile with the Profile Management App
Opening the Profiles Management App
To open the profiles management app, click the appropriate icon on the home screen:
Creating a New Connection Profile
1. To create a new connection profile, click
2. Select your required connection profile type and click "Ok."
2021-01
9
Page 10

KVM-over-IP SwitchRaritan Dominion KX IV-101
Preparing VisuNet RMs
The selected connection profile has been created. The new profile's main settings open.
If the processes Click Once App Deployment Fulfillment Service "dfsvc" and internet explorer
"iexplore" are not yet added to the dialog filter, the following warning appears:
The dialog filter closes all application windows that are not whitelisted and prevents users from
accessing the file system or unauthorized programs.
If this warning appears you must Whitelist the required processes for the dialog filter (refer to
Whitelist the required processes for the dialog filter).
Configure the new profile with the following parameters:
1. Profile Name: Use a meaningful name for the connection (e.g. Raritan KVM)
2. KVM Switch Network Name / IP address: kvm.local
Note
After configuring the KVM console the username and password need to be added in a final
step. Refer to Chapter 5 regarding username and password settings.
Save the changes by clicking
10
and Click
2021-01
Page 11

KVM-over-IP SwitchRaritan Dominion KX IV-101
Preparing VisuNet RMs
Figure 3.3
Certificate Mismatch
Before a connection to the KVM switch will be established, the following warning appears:
Figure 3.4
You can choose how to proceed:
a) Disable permanently the warning for the certificate mismatch and restart the system
b) Create a self-signed certificate or use a custom certificate on the KVM adapter
2021-01
11
Page 12

KVM-over-IP SwitchRaritan Dominion KX IV-101
Preparing VisuNet RMs
3.2 Disable permanently the warning for the certificate mismatch ((a) recommended)
Note
A web service's certificate provides identification of the server or KVM switch. If the certificate
names mismatch the address, it might indicate that your connection has been intercepted or
that the server is misrepresenting its identity. By default the Raritan KVM switch uses a
certificate with the common name "Raritan KVM" and therefore the name mismatch warning
occurs. For point-to-point connections or local intranets the risk is low.
Disabling the warning also affects the internet explorer settings.
For higher security needs create or import your own certificate where the common name
matches the KVM switch address. Refer to option (b) "Create a self-signed certificate or use a
custom certificate on the KVM adapter" (chapter 3.3).
Click yes in the occurred warning
The certificate name mismatch is disabled and the RM/BTC reboots. After rebooting the
RM/BTC switch again to the administrator user role, open the Raritan KVM Settings again.
Click:
To proceed further, accept the import of the "Raritan KVM" certificate into the "Trusted People"
certificate store.
Click yes
A notification pops up, that the certificate is successfully imported
Continue with the configuration in Chapter 4.
12
2021-01
Page 13

KVM-over-IP SwitchRaritan Dominion KX IV-101
Preparing VisuNet RMs
3.3 Create a self-signed certificate or use a custom certificate on the
KVM adapter (b)
Figure 3.5
Click No in the occurred warning
Figure 3.6
Another security alert pops up and asks you if you want to import the "Raritan KVM" certificate
to the "Trusted People" certificate store.
Click no and either create a self-signed certificate or import a certificate provided by your IT
department.
Log in to the Remote Console for the KVM as described in chapter 4
2021-01
13
Page 14

KVM-over-IP SwitchRaritan Dominion KX IV-101
Preparing VisuNet RMs
Create your own key and certificate
Note
This step is only required if you do not have a valid "company certificate" that can be used on
the KVM switch.
Navigate to Security
SSL Certificate
Caution!
The times on the RM/BTC and Raritan Dominion KX IV-101 KVM switch must match before
creating a self-signed certificate!
Refer to Set Time and Date
14
Figure 3.7
1. Fill in the required information of the red lined boxes and create a new certificate with your
organization information.
2. If all required information is available, you are able to click “Create New SSL Key”.
Caution!
Important!
The common name must be equivalent to the (future) Network name or IP address.
2021-01
Page 15

KVM-over-IP SwitchRaritan Dominion KX IV-101
Preparing VisuNet RMs
Figure 3.8
3. Click "Install Key and Certificate" to finalize the installation.
4. Ignore the popping up Windows® warning and continue with the configuring steps in chapter
4
Import a Certificate provided by your IT-department
Enable "Upload Key and Certificate" and follow the guided steps.
Figure 3.9
2021-01
15
Page 16

KVM-over-IP SwitchRaritan Dominion KX IV-101
Configuring the KVM Switch
4 Configuring the KVM Switch
Log in to Remote Console for the KVM
Figure 4.1
Use the following default Login:
Username: admin
Password: raritan
4.1 Adjust the login password
As Administrator you are immediately forced to change the default login password.
Figure 4.2
16
2021-01
Page 17

KVM-over-IP SwitchRaritan Dominion KX IV-101
Configuring the KVM Switch
4.2 Setup Time and Date
Check the KVM switch time.
Navigate to "Device Settings Date/Time" and update the date and time.
Figure 4.3
Caution!
The times on the RM/BTC and Raritan Dominion KX IV-101 KVM switch must match.
4.3 Enable Direct Port Access (DPA)
The VisuNet RM Shell requires DPA to be activated on the KVM switch.
Navigate to "Security -> KVM Security and enable "Enable Direct Port Access via URL."
Save the Settings
2021-01
17
Page 18

KVM-over-IP SwitchRaritan Dominion KX IV-101
Configuring the KVM Switch
Figure 4.4
Note
The DHCP is enabled per default. If a static IP address is required, refer to the Raritan's manual
as well as the VisuNet RM Shell manual to set the static IP address there as well.
Note
For further information regarding the configuration of the Dominion KX IV-101 and the entire
Raritan refer to the Raritan's website (www.raritan.com).
18
2021-01
Page 19

KVM-over-IP SwitchRaritan Dominion KX IV-101
Establish the Connection
5 Establish the Connection
Setting Username and Password in the VisuNet RM Shell Raritan KVM
Settings
Note
It is recommended to create a user within the Raritan Dominion KX IV-101 KVM console with
limited rights. Refer to the Raritan documentation.
Enter the Raritan KVM Settings again via profiles management. Add the Username (factory
default: admin) and Password (factory default: raritan) to the Raritan KVM Settings of the VisuNet RM Shell and click:
Figure 5.1
The KVM switch and KVM profile are now configured, and operators can start them by clicking
the profile on the home screen of the VisuNet RM Shell.
2021-01
19
Page 20

KVM-over-IP SwitchRaritan Dominion KX IV-101
Establish the Connection
Figure 5.2
20
2021-01
Page 21

Pepperl+Fuchs Qua lit y
Download our latest poli cy he re:
www.pepperl-fuchs.com/quali ty
© Pepperl+Fuchs · Subject to modifications
www.pepperl-fuchs.com
Printed in Germany / DOCT-6683
 Loading...