

Page 1

Technical Manual
Ex i Power supply ENT-DC-30
ENT-DC-30, TDOCT-4038_ENG, 2015-01 Pepperl+Fuchs GmbH Mannheim
Page 2

Table of Content
1 Important Information ....................................................................................................................................... 1
1.1 General instructions .................................................................................................................................. 1
1.2 Safety instructions ..................................................................................................................................... 2
1.3 Symbols used in this manual .................................................................................................................... 3
2 Initial Operation ................................................................................................................................................ 4
3 ENT-DC Power Supply ..................................................................................................................................... 5
3.1 Operation ................................................................................................................................................... 5
3.2 Specifications ............................................................................................................................................ 6
3.3 Pin Assignment ......................................................................................................................................... 8
3.4 Wiring ...................................................................................................................................................... 11
3.4.1 Block Diagram .................................................................................................................................. 11
3.4.2 Jumpers main circuit board .............................................................................................................. 12
3.4.3 Jumpers additional circuit board ...................................................................................................... 14
3.4.4 RS 485 bus termination ................................................................................................................... 15
3.4.5 Fuses ............................................................................................................................................... 16
3.4.6 S-ENT/PC-25 Connecting Cable ENT-DC-2.0 to PC (25 pin D-Sub) .............................................. 16
3.4.7 S-ENT/PC-9 Connecting Cable ENT-DC-30 to PC (9 pin D-Sub) ................................................... 17
3.4.8 S-ENT/MOUSE-9 Connecting Cable for Mouse ENT-DC-30 to PC (9 pin D-Sub) ......................... 17
3.4.9 DATL-A 4-10 Terminal Connection (1 feed circuit) .......................................................................... 18
3.4.10 DATL-A 7-10 Terminal Connection (2 feed circuits) ........................................................................ 18
3.4.11 DATL-A 8-10 Terminal Connection (3 feed circuits) ........................................................................ 19
3.4.12 DATL-A 4-3 Connecting cable ENT-DC to EXOM-DRAGON ......................................................... 19
3.4.13 Potential Equalization / Grounding .................................................................................................. 20
3.5 Housing ................................................................................................................................................... 21
3.6 Instructions for Installation ...................................................................................................................... 23
3.7 Rating plates ........................................................................................................................................... 24
4 Applied harmonized standards of the applicable directives ........................................................................... 24
5 Order designations ......................................................................................................................................... 25
5.1 Exi Power supply ENT-DC ...................................................................................................................... 25
5.2 Connectors .............................................................................................................................................. 26
6 Index ............................................................................................................................................................... 27
7 Appendix EEx Certification ............................................................................................................................. 28
Page 3

TDOCT-4038_ENG / 2015-01 1
1 Important Information
1.1 General instructions
Copyright 2014 by Pepperl+Fuchs GmbH
All rights reserved
The publisher reserves the right to alter the information and data contained in this manual without prior notice.
Unless otherwise indicated, the company names as well as other names and data used in the examples are
purely fictitious.
The publisher may have registered patents or pending patent applications for subject matter covered in the
manual. This manual does not give you license to these patents.
Limited warranty:
No warranty is provided for the accuracy of the information contained in this manual. As mistakes cannot be
entirely avoided despite taking the greatest of care, we would be grateful to receive information about any errors
you may discover. The publisher disclaims all legal responsibility or liability for errors as well as for subsequent
damages and claims.
Publisher:
Pepperl-Fuchs GmbH
Lilienthalstr. 200
68307 Mannheim Deutschland
www.pepperl-fuchs.com
Tel. 0621-776-0
Fax 0621-776-1000
E-Mail: info@de.pepperl-fuchs.com
Page 4

TDOCT-4038_ENG / 2015-01 2
1.2 Safety instructions
⇒ These devices are only allowed to be installed and operated by trained and qualified
personnel who have received suitable instruction in their use.
⇒ These devices represent state-of-art technology. They are only allowed to be connected to
systems that have been approved by Pepperl+Fuchs GmbH.
⇒ Never open the devices yourself. They are only allowed to be opened by authorized
Pepperl+Fuchs GmbH personnel.
Pepperl+Fuchs GmbH is not liable for any resulting damages.
⇒ The devices are not allowed to be modified or otherwise altered in any way.
Pepperl+Fuchs GmbH is not liable for any resulting damages.
⇒ Please study the “
Technical Manual” carefully prior to starting up the devices.
⇒ The most recent version of the “Technical Manual” is always valid. It is available on the
Support page of our web site (Internet address: http://www.pepperl-fuchs.com).
⇒ The operating voltage of the devices must not exceed the limits indicated in the
"Technical Manual" under Technical data.
In the event of failure to comply, Pepperl+Fuchs GmbH is not liable for any resulting
damages.
⇒ The relevant specifications for hazardous areas (e.g. EN 50178, EN 60079,
EN 50014 - 50039) and accident prevention regulations (e.g. UVV) must be observed.
⇒ Only connect circuits to the device when the voltage of these circuits does not exceed the
values of a safety extra-low voltage (SELV) or a protective extra-low voltage (PELV).
⇒ The device must be installed and operated only in surrounding enclosures that
• comply with the requirements for surrounding enclosures according to IEC/EN
60079-0,
• are rated with the degree of protection IP54 according to IEC/EN 60529
Alternatively, it is permitted to install and operate the device in a monitored environment
that ensures a pollution degree 2 according to IEC/EN 60664-1.
⇒ The installation instructions in accordance with IE
C/EN 60079-14 must be observed.
⇒ Close all unused connections with the corresponding covers to ensure the degree of
protection
⇒ The technical data specified for the hazardous area corresponds to the certified values for
the European EEx approval. The user is responsible for ensuring that the devices are
suitable for their intended application and for the prevailing ambient conditions. No
warranty can be given by Pepperl+Fuchs GmbH in this connection.
⇒ The external power supply used for ENT-DC-30 supply must meet the overvoltage
category II. (This is given for instance, if the external power supply complies with the
requirements of IEC 60950 series, IEC 61010-1 or a technically equivalent standard.)
Data subject to change without notice
Page 5
TDOCT-4038_ENG / 2015-01 3
1.3 Symbols used in this manual
Warning:
Caution:
Danger:
The indicated specifications may not be modified.
Non-compliance may result in dangerous situations
and damages.
Careful installation: do not replace electrical fuses
with fuses from different manufacturers. Noncompliance may result in dangerous situations and
damages.
The product may possibly be negatively impacted or
damaged by foreign influences.
Non-hazardous
area:
Assembly and installation only in non-hazardous
areas.
Power supply cables for the hazardous areas zone 1
and zone 2 only with cable type DATL-A.
Danger:
Hazardous area
( Zone 1+2 )
All safety regulations as well as compliance
certificates for hazardous areas must be observed.
In addition, all regulations (VDE) published by the
respective authorities for the application of the
devices in hazardous areas (zone 1 and 2) must be
complied with at all times.
Additional Info:
Information and notices that must be observed
additionally.
Pressure load:
Significant mechanical pressure or impact loads
may result in damages.
Page 6
TDOCT-4038_ENG / 2015-01 4
2 Initial Operation
This description for initial operation refers to those issues that must be considered with respect to the power
supply ENT-DC. Information with respect to operation of the peripherals connected to the ENT-DC power
supply can be found in the appropriate manual.
For operation proceed as follows:
Switch off system or machine.
Make sure that the assembly area is non-hazardous during the initial operation in case voltages are wired or
devices will be opened that are not intrinsically safe.
Connect Exi power supply ENT-DC. Refer to the chapter “Wiring” for the appropriate connections.
Connect protective ground wire to the power supply ENT-DC.
Warning
The protective ground wire runs along the housing. The
housing itself must be grounded. The wire for
connecting to ground must have a cross section of at
least 2.5 mm² and should be as short as possible.
Connect power supply.
Verify all functions.
Switch on system or machine.
Verify functions of the entire system or machine.
Warning
In case the ENT-DC has not been connected correctly
or its configuration is incorrect, malfunctioning of your
system/machine is possible.
Warning
The power supply ENT-DC is exclusively designed to
be integrated into a different machine. Operation may
not be initiated until conformity of the final product with
regulation 89/336/EC and 89/392/EC has been
established and the unit has been approved by a
specialist according to EN 60079 and EN 50014
respectively.
Page 7

TDOCT-4038_ENG / 2015-01 5
3 ENT-DC Power Supply
The Exi power supply ENT-DC can be used in safe areas as a power supply for components in zone 1 and
zone 2. The ENT-DC provides up to 3 feed circuits and one 20 mA CL-interface. The ENT-DC can used to feed
all hazardous components which meet the interface specifications of the ENT-DC.
The most important data in brief:
Approval [EEx ib] IIC
Classification in accordance II (2) G [EEx ib] IIC
with ATEX 95 RL94/9 EG: DMT 03 ATEX E 011 X
Housing Full, top hat rail, and 19" flush type housing
Material aluminum
Protection type IP 20
Number of feed circuits 1 - 3 feed circuits
Exi voltage Ua
max
7 V .. 9 V (according to configuration)
Exi current Ik
max
220 mA ..350 mA (according to configuration)
Exi power Pa
max
1.1 W .. 1.4 W (according to configuration)
Connections connectors / terminal screws
3.1 Operation
To warrant sufficient ventilation, the ENT-DC must be set up as described under “Assembly” in chapter 3.6. The
slots for ventilation on the unit may not be covered so that heat dissipation is warranted.
Page 8
TDOCT-4038_ENG / 2015-01 6
3.2 Specifications
Approval:
Protection type [EEx ib] IIC
Approval DMT 03 ATEX E 011 X
Protection category: IP 20
Housing:
Material Aluminum
Dimensions refer to chapter “Housing”
Weight app. 1.0 kg
Environmental conditions during operation:
Temperature range 0 °C - + 50 °C
Humidity max. 85 % non-condensating (48 h stress test)
Warning
The ENT-DC may only be set up and operated in a
non-hazardous area.
Environmental conditions storage:
Temperature range -20 °C - +70 °C
X1 data interface:
Data 20 mA CL active/passive, zero potential
RS232
Baudrate 19.200 Baud (38.000 Baud on request)
Connector 9-pin D-Sub integrated jack, pin contacts
Voltage U
n
≤ |±15| V DC
X2 interface power supply:
Voltage U
n
24 V DC ±10%
Drawing of current 1 feed circuit: app. 380 mA continuous current
2 feed circuits: appear. 550 mA continuous current
3 feed circuits: appear. 720 mA continuous current
Fuse SI 1 is safety relevant. Always use the correct fuse type.
2A slow blowing (type H 1500 A)
Connector 2 x 2-pin integrated jack / pin contacts, for CONNECTOR-K02-381-O
Page 9

TDOCT-4038_ENG / 2015-01 7
X3 Exi interface:
Data 20 mA CL active/active switched to plus
Voltage supply Version Ua [V] Ia [mA] Pa [W]
...-1..-... 8 280 1.2
...-2..-... 8.5 280 1.2
...-3..-... 9 280 1.2
...-4..-... 9 290 1.3
...-5..-... 9 300 1.4
...-6..-... 8,5 240 1,2
Connector 2 x 4-pin integrated jack / pin contacts, for CONNECTOR-K04-508-S
Note
Additional output according to the approval described in
the appendix can be provided upon request.
X4, X5 Exi interface (only for 19" versions -19K, -19E):
Signals according to X3 Exi-interface
Connector 96-pin spring contact strip DIN 41612 (not all springs equipped)
Page 10
TDOCT-4038_ENG / 2015-01 8
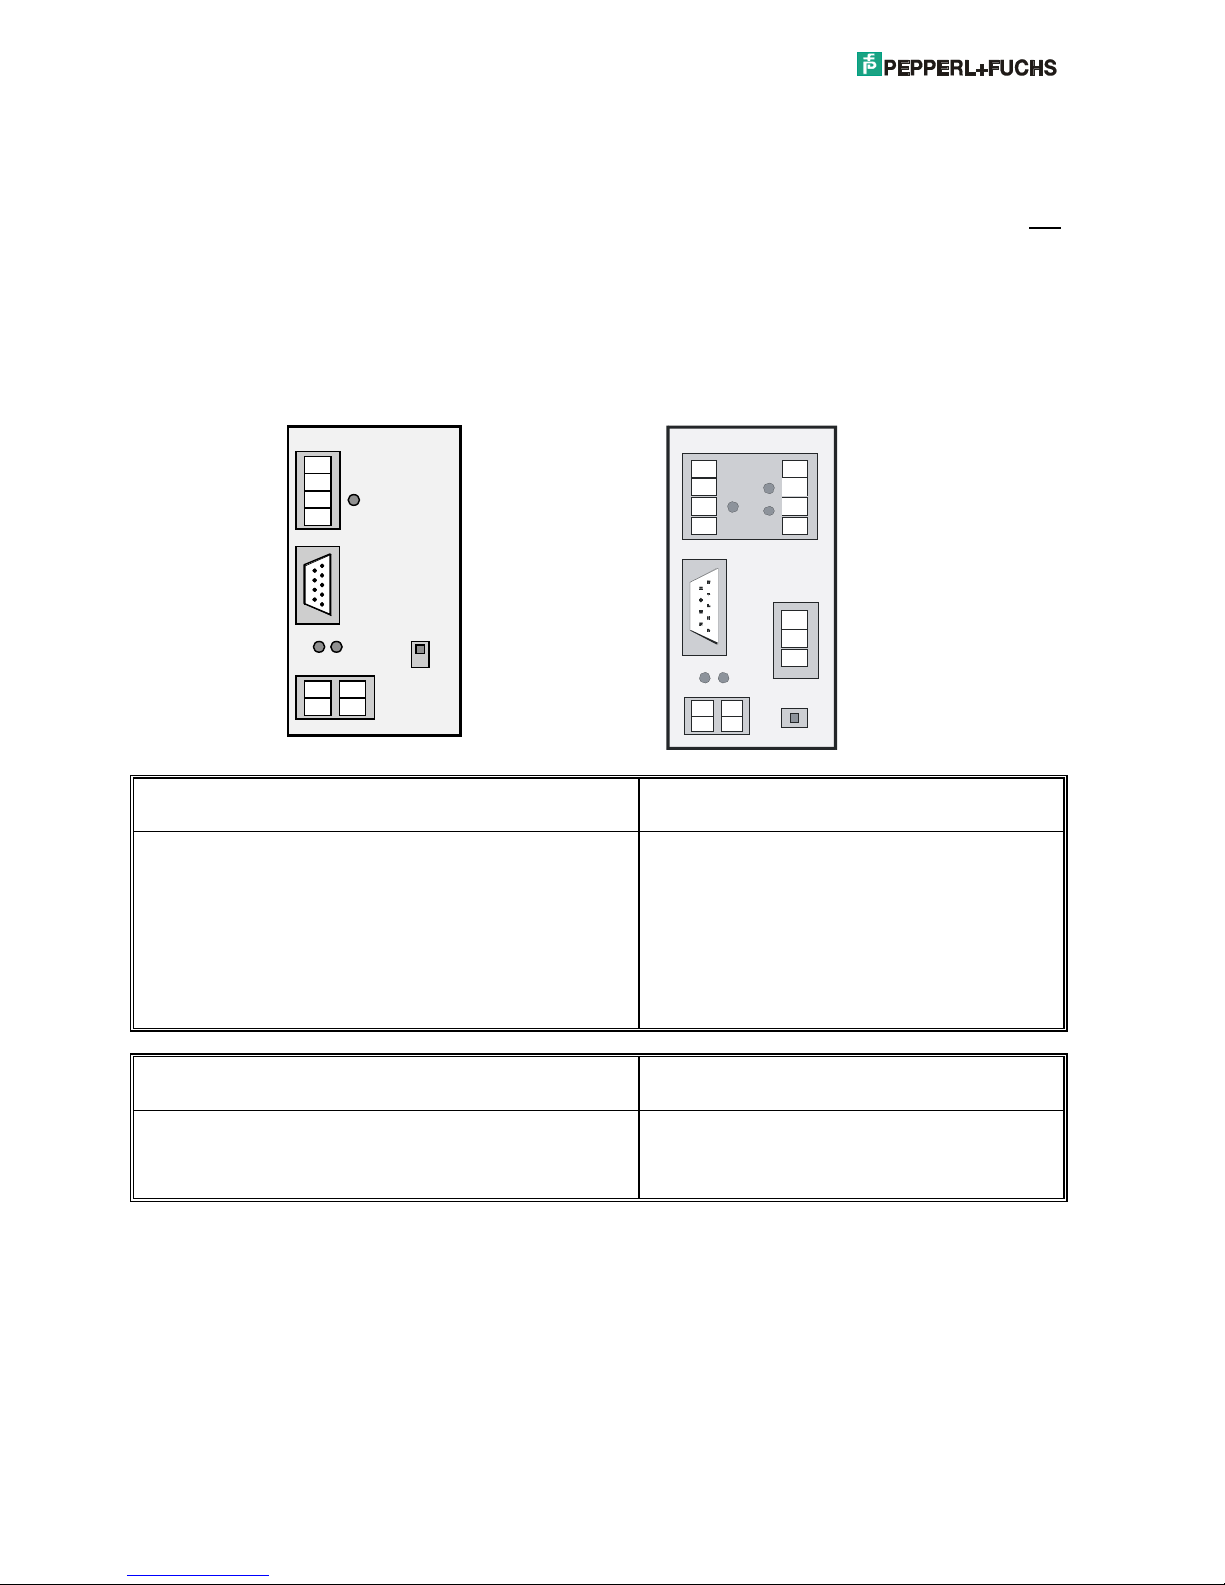
3.3 Pin Assignment
For the top hat rail and full housing version of the ENT-DC-2 all connections are made in the front. For the 19"version connections can be made in the front and in the rear. All connections can be reached from the front and
the back.
The connections X2, X3 and X4 are carried out as terminal screw-/plug-in terminals. The connection X1
constitutes a D-Sub jack. If the power supply operates with one feed circuit the connection X3 has four contacts.
If 2 or 3 feed circuits are in use the connection X3 has 8 contacts.
Front elevation:
1 feed circuit: 2 or 3 feed circuits:
X3
X1
LED Tx LED Rx
X2
.1
.2
.3
.4
.1.3.2
.4
LED Us1
TTY
RS232
J5
ENT-DC
X3
X1
.1
.2
.3
.4
.5
.
6
.7
.8
X2
.1.3.2
.4
LED Us1
LED Us2LED Us2
LED Us3
LED Tx LED Rx
J5
TT Y RS 23 2
ENT-DC
.1
.2
.3
X4
.6
.7
RS485
Interface X1
Data interface for safe area (PC)
9-pin D-Sub jack with pins
X1.1 Tx- (20 mA CL interface)
X1.2 Tx+ (20 mA CL interface)
X1.3 Rx+ (20 mA CL interface)
X1.4 Rx- (20 mA CL interface)
X1.5 +12V (max. 50 mA)
X1.6 TxD (RS232 interface)
X1.7 RxD (RS232 interface)
X1.8 nc
X1.9 GND (RS232 interface)
Interface X2
Supply interface (24 VDC)
4-pin terminal block 0.5 mm² - 2.5 mm²
X2.1 PA
X2.2 + 24V DC
X2.3 PA
X2.4 GND
Page 11
TDOCT-4038_ENG / 2015-01 9
Interface X3
Data- / supply interface hazardous area
2 x 4-pin terminal screw-/plug-in terminal
X3.1 Rx
X3.2 Tx
X3.3 Us1
X3.4 GND
X3.5 Us2 (only assigned if 2 feed circuits)
X3.6 GND (only assigned if 2 feed circuits)
X3.7 GND (only assigned if 2 feed circuits)
X3.8 Us3 (only assigned if 2 feed circuits)
Interface X4 on front
Optional data interface RS 485 to safe area
3-pin termianl screw-/plug-in terminal
X4.1 GND
X4.2 RS485 A
X4.3 RS485 B
Page 12

TDOCT-4038_ENG / 2015-01 10
Rear elevation:
19E with 1 feed circuit: 19K with 1 or 2 feed circuits: 19K with 3 feed circuits:
X4.d .b .z
.4
.2
.6
.30
.28
.32
X4.d .b .z
.4
.2
.6
.30
.28
.32
X4.d .b .z
.4
.2
.6
.30
.28
.32
X5.z .b .d
.30
.28
Interface X4 DIN jack
Combi-interface 1. and 2. feed circuit
F-strip (96 pin, not all contacts equipped)
X4.d.2 Us2 (Exi)
X4.d.6 Us1 (Exi)
X4.d.28 RxX4.d.30 Rx+
X4.d.32 Vdd
X4.b.4 GND (Exi)
X4.b.6 Tx20 (Exi)
X4.b.28 TxD
X4.b.30 Tx+
X4.b.32 +24 V
X4.z.2 GND (Exi)
X4.z.4 GND (Exi)
X4.z.6 Rx20 (Exi)
X4.z.28 RxD
X4.z.30 TxX4.z.32 GND
Interface X5
Combi interface 3. feed circuit
F-strip (96 pin, not all contacts equipped)
X5.z.30 GND (Exi)
X5.z.28 GND (Exi)
X5.b.30 GND (Exi)
X5.b.28 Us3 (Exi)
X5.d.30 GND (Exi)
X5.d.28 Us3 (Exi)
Note
For the 19" installation and 3 feed circuits a second
F-strip is located in the rear of the housing. The second
F-strip is turned for installation purposes.
Page 13

TDOCT-4038_ENG / 2015-01 11
3.4 Wiring
All connections for the ENT-DC are made in the front.
All clamps are also directed to the 19” header for the 19" flush type version. Hence connections can be made in
the rear or combined in front and rear.
Note
If connections are made in the front and rear the same
signals should not be assigned in the front and rear at
the same time. Proper operation of the ENT-DC may be
endangered in this case. (Issues with respect to safety
are not impacted).
3.4.1 Block Diagram
22R
J1
J2
HCPL 4100
HCPL 4200
S1* / J5
S1* / J6
SW1*
SI 1
J9*
J8*
1k
150R
1k
+ 5V
0V
J8
J7
J3 / J3'*
J4 / J4'*
+
GND
+
GND
GND
GND
+
+
20mA
20mA
RTS
=1
=1
=1
=1
Exi
Us_vr
Exi
Exi
XOR
XOR
XOR
XOR
1
1
X 1.4
X 1.3
X 1.1
X 1.2
X 1.7
X 1.6
X 4.3
X 4.2
X 1.5
X 1.9
X 2.2
X 2.4
X4.d.28
X4.d.30
X4.z.30
X4.b.30
X4.z.28
X4.b.28
X4.d.32
X4.b.32
X4.z.32
X 4.1
1
1
Rx +
Rx -
Tx -
Tx +
RxD RS232
TxD RS232
B RS485
A RS485
0V
+12V 50mA max.
0V
+24V DC
GND
Tx
X 3.2 X4.b.6
Rx
X 3.1 X4.z.6
Us 3
X 3.8 X 5.b.28
Us2
Us1
GND
GND
GND
X 3.5 X 4.d.2
X 3.3 X 4.d.6
X 3.7 X 4.z.2
X 3.6
X 4.z.4
X 3.4 X 4.b.4
The jumper settings shown in the diagram reflect delivery status!
Page 14

TDOCT-4038_ENG / 2015-01 12
3.4.2 Jumpers main circuit board
J3 J4
J5
J6
1111
J7
J8
J1 J2
1
1
Note
The jumpers J5 and J6 are designed as wiper switches
on the front panel for the ENT-DC-30 versions -19K, HS, and -AB.
On the -19E version the jumpers must be placed on the
circuit board.
Page 15

TDOCT-4038_ENG / 2015-01 13
J1
20 mA CL interface to PC / PLC
a
b
c
d
e
receiving
branch
passive
a
b
c
d
e
receiving
branch
active
1
)
J2
20 mA CL interface to PC / PLC
a
b
c
d
e
sending branch
passive
a
b
c
d
e
sending branch
active
1
)
For ENTDC-30-100-xx2**
1 feed circuit without RS 485
J3
logic level (X1) RS232
abc
normal
1
)
abc
negated
J4
logic level (X1) RS232 and 20 mA CL
abc
normal
1
)
abc
negated
J5 (switch front panel)
Rx (X1) RS232 or 20 mA CL
abc
RS232
1
)
abc
20 mA CL
J6 (switch front panel)
Tx (X1) RS232 or 20 mA CL
abc
RS232
1
)
abc
20 mA CL
J7
TxD RS232 via 19" header
a
b
sending branch
activated
1
)
a
b
sending branch
not activated
J8
RxD RS232 via 19" header
a
b
receiving
branch
activated
1
)
a
b
receiving
branch
not activated
1
) reflect factory status!
** with all other versions placed on the additional circuit board.
Page 16

TDOCT-4038_ENG / 2015-01 14
3.4.3 Jumpers additional circuit board
J3’ J4’
J9
J8
SW 1
1
1
1
ON
1 2 3 4
SW1 prolongation of sender activation
DIP 1 DIP 2 DIP 3 Prolognation time
ON ON ON
0,06 ms (153600 Baud)
OFF
ON ON
0,12 ms (76800 Baud)
ON
OFF
ON
0,25 ms (38400 Baud)
OFF OFF
ON
0,49 ms (19200 Baud)
ON ON
OFF 0,97 ms (9600 Baud) *)
OFF
ON
OFF 1,95 ms (4800 Baud)
ON
OFF OFF 3,90 ms (2400 Baud)
OFF OFF OFF 7,81 ms (1200 Baud)
*) factory status
J3’
logic level (X1) RS232
abc
normal
1
)
abc
negated
J4’
logic level (X1) RS232 and 20 mA CL
abc
normal
1
)
abc
negated
J8
Look at RS 485 bus termination
J9
Look at RS 485 bus termination
Page 17

TDOCT-4038_ENG / 2015-01 15
3.4.4 RS 485 bus termination
For the ENT-DC-30 is an active bus data fixing necessary. In every ENT-DC-30 there is the possibility for an
appropiate termination. For this the jumper J8 has to be put on position 2-3 and J9 put on position 1-2. The
ENT-DC-30 which are in the midth of the bus the termination has not to be done ( J8 in position 1-2 and J9 in
position 2-3 *)
* factory status
J3’ J4’
J9
J8
SW 1
1
1
1
ON
1 2 3 4
A B A B A B
SK-48
RS232 / 20mA CL
A B
A B
J4 J4
aba
b
5VGND
SK-485
RS232 / 20mA CL
J4 J4
aba
b
5VGND
S
K
- 485
RS232 / 20mA CL
J4 J4
aba
b
5VGND
SK-485
RS232 / 20mA CL
J4 J4
aba
b
5VGND
SK-485
RS232 / 20mA CL
J4 J4
aba
b
5VGND
bus termination
bus termination
open open open
:NORMAL
:Termination
1 2 3 1 2 3
1 2 3 1 2 3
J9
J9 J8
J8
Page 18

TDOCT-4038_ENG / 2015-01 16
3.4.5 Fuses
SI 1 2 A slow blowing (type H 1500 A )
Warning
The fuse SI 1 is safety relevant. Always use the correct
type fuse.
The fuse SI 1 is melted by an internal protection circuit of the ENT-DC if the supply voltage (24 VDC) increases
to values above 32 V. This feature is safety relevant to protect the internal circuit from overloads.
Warning
The fuses SI 2 through SI 4 (round fine-wire fuses) may
not be removed nor replaced.
A defect in these fuses is unlikely.
3.4.6 S-ENT/PC-25 Connecting Cable ENT-DC-2.0 to PC (25 pin D-Sub)
Cable for loading of projects from PC to a terminal (TERMEX) and for communication between TERMEX and
PC.
ENT-DCPC
TxD
6 TxD
RxD
7 RxD
GND
9 GND
2
3
7
DTR 20
DSR 6
RTS 4
CTS 5
1 Tx-
2 Tx+
25pin D-Sub male 9pin D-Sub female
housing
Page 19

TDOCT-4038_ENG / 2015-01 17
3.4.7 S-ENT/PC-9 Connecting Cable ENT-DC-30 to PC (9 pin D-Sub)
Cable for loading of projects from PC to a terminal (TERMEX) and for communication between TERMEX and
PC.
ENT-DCPC
RxD
6 TxD
TxD
7 RxD
RTS
9 GND
2
3
7
CTS 8
DSR 6
DTR 4
GND 5
1 Tx-
2 Tx+
9pin D-Sub female 9pin D-Sub female
housing
3.4.8 S-ENT/MOUSE-9 Connecting Cable for Mouse ENT-DC-30 to PC (9 pin D-Sub)
Cable required for mouse connection (EXTA-M.) to COM-port.
ENT-DCPC
6 TxD
TxD
7 RxD
RTS
9 GND
3
7
DSR 6
DTR 4
GND 5
1 Tx-
2 Tx+
9pin D-Sub female 9pin D-Sub female
housing
RxD 2
CTS 8
Page 20

TDOCT-4038_ENG / 2015-01 18
3.4.9 DATL-A 4-10 Terminal Connection (1 feed circuit)
ENT-DC-3.0
X3
.1 Rx
.2 Tx
.3 Us1
.4 GND
connector:
1x STECKER-K04-508-S
DATL-A 4-10
Terminal
TERMEX 2xx / 3xx
PA
X1 .1 .2 .3 .4 .5 .6 .7 .8
X3
.1
.2
.3
.4
1
2
3
4
1 2 3 4
X1
.1 Tx
.2 Rx
.3 Us1
.4 GND
.5 nu
.6 nu
.7 nu
.8 nu
One connector (STECKER-K04-508-S) is part of the power supply. For this reason a DATL-A 4-0 can be used
(without connector).
3.4.10 DATL-A 7-10 Terminal Connection (2 feed circuits)
ENT-DC-3.0
X3
.1 Rx
.2 Tx
.3 Us1
.4 GND
connector:
2x STECKER-K04-508-S
DATL-A 7-10
Terminal
TERMEX 2xx / 3xx
PA
X1 .1 .2 .3 .4 .5 .6 .7 .8
X3
.1
.2
.3
.4
1
2
3
4
1 2 3 4 5 6 7
X1
.1 Tx
.2 Rx
.3 Us1
.4 GND
.5 Us2
.6 GND
.7 GND
.8 nu
5
6
7
8
.5 Us2
.6 GND
.7 GND
.8 nu
.5
.6
.7
.8
Two connectors (STECKER-K04-508-S) are part of the power supply. For this reason a DATL-A 7-0 can be
used (without connector).
Page 21

TDOCT-4038_ENG / 2015-01 19
3.4.11 DATL-A 8-10 Terminal Connection (3 feed circuits)
ENT-DC-3.0
X3
.1 Rx
.2 Tx
.3 Us1
.4 GND
connector:
2x STECKER-K04-508-S
DATL-A 8-10
Terminal
TERMEX 2xx / 3xx
PA
X1 .1 .2 .3 .4 .5 .6 .7 .8
X3
.1
.2
.3
.4
1
2
3
4
1 2 3 4 5 6 7 8
X1
.1 Tx
.2 Rx
.3 Us1
.4 GND
.5 Us2
.6 GND
.7 GND
.8 Us3
5
6
7
8
.5 Us2
.6 GND
.7 GND
.8 Us3
.5
.6
.7
.8
Two connectors (STECKER-K04-508-S) are part of the power supply. For this reason a DATL-A 8-0 can be
used (without connector).
3.4.12 DATL-A 4-3 Connecting cable ENT-DC to EXOM-DRAGON
A
B
C
D
1
2
3
4
Rx
Tx
Us
GND
(Tx)
(Rx)
(Us)
(GND)
For fix mounting
Clamping assembly
Plug connector with socket hub
female
Page 22

TDOCT-4038_ENG / 2015-01 20
3.4.13 Potential Equalization / Grounding
The ENT-DC must be connected to a potential equalization at a PA-clamp (X2.1 X2.3). If 19" flush-type versions
are used potential equalization is accomplished through a screw connection with the 19" rack. The 19" rack
must be connected with PA.
The intrinsically safe interface X3 may not be connected to potential equalization in the safe area which means
that the shield of the line from the hazardous area may not be applied in the safe area. Refer to regulation VDE
0165.
The data line to interface X1 must be shielded due to interference reasons. The shield must be applied on the
ENT-DC side on PA. (PA via connector housing / jack).
It is not necessary to shield the supply line (24V) to interface X2. An optional shield can be placed onto PA via
X2.1.
X3
X1
X2
.1
.2
.3
.4
.1.3.2
.4
power
supply
24V DC
PC
Exi Terminal
Hazardous AreaSafe Area
Exi-line
ENT-DC
Warning
Compensating currents are generated by potential
shifting which may cause electrical sparks.
For this reason the shield of the hazardous line must be
put in place in the hazardous area and not in the safe
area.
power supply
24V DC
PC
ENT-DC
+24V
GND
RxD
GND
TxD
TxD
GND
RxD
+24V
GND
polarity
inversion !
RS232 connection
Warning
Polarity inversion of the supply
voltage!
Normally GND is connected to the PC
housing. If a power supply is
grounded and polarity has been
inverted a short circuit will occur on
the data interface of the ENT-DC
which can destroy PC and ENT-DC.
Page 23

TDOCT-4038_ENG / 2015-01 21
3.5 Housing
Top hat rail housing (1, 2, or 3 feed circuits)
108
68,2
X3
X1
X2
.1
.2
.3
.4
.5
.6
.7
.8
.1
.2
.3
.4
.5
.6
.7
.8
.1
.2
.3 .4
LED Us1
LED Us2
LED Tx LED Rx
J5
RS485 TTY RS232
ENT-DC
LED Us3
.1
.2
.3
X4
168
Mounting rail TS35
(hat profile)
all measurements in mm
Full housing (1, 2, or 3 feed circuits)
68,2
X3
52,2
132 148
ENT-DC
X3
X1
X2
.1
.2
.3
.4
.5
.6
.7
.8
.1
.2
.3
.4
.5
.6
.7
.8
.1
.2
.3
.4
LED Us1
LED Us2
LED Tx LED Rx
J5
RS485 TTY RS232
ENT-DC
LED Us3
.1
.2
.3
X4
108
190
168
3
all measurements in mm
Page 24

TDOCT-4038_ENG / 2015-01 22
19E Slide-in card (1 feed circuit)
3 HE
7 TE
X3
X1
X2
.1
.2
.3
.4
.1.3.2
.4
LED Tx LED Rx
LED Us1
19" row connect or
ENT-DC
19K Slide-in cassette (1, 2, or 3 feed circuits)
3 HE
14 TE
RS485 RS232 TTY
X3
X1
X2
.1
.2
.3
.4
.5
.6
.7
.8
.1
.2
.3
.4
LED Us1
LED Us2
LED Tx LED Rx
J5
ENT-DC
LED Us3
.1
.2
.3
RS485 TTY RS232
X4
19" row connector
Page 25

TDOCT-4038_ENG / 2015-01 23
3.6 Instructions for Installation
Attention
To avoid heat traps in the ENT-DC-30 a minimum
distance to other components is required.
The ENT-DC-30 must be installed so that the cooling
fins either point up or down.
Other components can be placed closely to the sides of the ENT-DC-30.
A minimum distance of 30 mm to other components must be maintained above and below the ENT-DC.
This minimum distance holds for all housing versions -19K, -19E, -HS, -AB
Minimum distance 30mm
Minimum distance 30mm
.1
.2
.3
.4
.5
.
6
.7
.8
.3.2.4
LED Us1
LED Us2LED Us2
LED Us3
Tx LED Rx
J5
TTY
RS232
ENT-DC
.1
.2
.3
X4
.6
.7
RS485
X3
X1
.1
.2
.3
.4
.5
.
6
.7
.8
X2
.1.3.2
.4
LED Us1
LED Us2LED Us2
LED Us3
LEDTx LEDRx
J5
TTY
RS232
ENT-DC-30
.1
.2
.3
X6
.6
.7
RS485
X3
X1
.1
.2
.3
.4
.5
.
6
.7
.8
X2
.1.3.2
.4
LED Us1
LED Us2LED Us2
LED Us3
LEDTx LEDRx
J5
TTY
RS232
ENT-DC-30
.1
.2
.3
X6
.6
.7
RS485
X3
X1
.1
.2
.3
.4
.5
.
6
.7
.8
X2
.1.3.2
.4
LED Us1
LED Us2LED Us2
LED Us3
LEDTx LEDRx
J5
TTY
RS232
ENT-DC-30
.1
.2
.3
X6
.6
.7
RS485
X3
X1
.1
.2
.3
.4
.5
.
6
.7
.8
X2
.1.3.2
.4
LED Us1
LED Us2LED Us2
LED Us3
LEDTx LEDRx
J5
TTY
RS232
ENT-DC-30
.1
.2
.3
X6
.6
.7
RS485
X3
X1
.1
.2
.3
.4
.5
.
6
.7
.8
X2
.1.3.2
.4
LED Us1
LED Us2LED Us2
LED Us3
LEDTx LEDRx
J5
TTY
RS232
ENT-DC
.1
.2
.3
X4
.6
.7
RS485
X3
X1
.1
.2
.3
.4
.5
.
6
.7
.8
X2
.1.3.2
.4
LED Us1
LED Us2LED Us2
LED Us3
LEDTx LEDRx
J5
TTY
RS232
ENT-DC
.1
.2
.3
.6
.7
RS485
X3
X1
.1
.2
.3
.4
.5
.
6
.7
.8
X2
.1.3.2
.4
LED Us1
LED Us2LED Us2
LED Us3
LEDTx LEDRx
J5
TTY
RS232
ENT-DC-30
.1
.2
.3
X6
.6
.7
RS485
X3
X1
.1
.2
.3
.4
.5
.
6
.7
.8
X2
.1.3.2
.4
LED Us1
LED Us2LED Us2
LED Us3
LEDTx LEDRx
J5
TTY
RS232
ENT-DC
.1
.2
.3
X4
.6
.7
RS485
X3
X1
X2
.1
LED
X3
X1
.1
.2
.3
.4
.5
.
6
.7
.8
X2
.1.3.2
.4
LED Us1
LED Us2LED Us2
LED Us3
LEDTx LEDRx
J5
TTY
RS232
ENT-DC
.1
.2
.3
X4
.6
.7
RS485
Attention
A minimum distance of 50 mm contour measure must
be maintained between terminals in the safe and
terminals in the hazardous area.
This restriction holds true for connections in front and
back.
Page 26

TDOCT-4038_ENG / 2015-01 24
3.7 Rating plates
Warning
The information contained on the nameplate constitutes
maximum values for hazardous areas. The electrical
maximum values must be maintained otherwise the
devices will not function properly. Refer to the chapter
“Specifications”.
Example rating plate (depending upon variant):
J2
a
b
c
d
e
a
b
c
d
e
J1
J6
cba
J5
cba
J4
cba
J3
cba
a
b
J7
a
b
J8
TP3
TP1
TP2
POW
EX
Ex-i Speisegerät / Supply ENT-DC-30-100-HS-2
II 2 G [EEx ib] IIC DMT 03 ATEX E 011 X 0°C t +50°C
u
Fertigungs-Nr. / Serial number.
Fertigungsja hr / Year of manufacture:
Part No.
0608170384-01
2006
193958-0003
22R
J1
J2
HCPL4100
HCPL 4200
S1*
/
J5
S1*
/
J6
SW1*
SI1
J9*
J8*
1k
150R
1k
+5V
0V
J8
J7
J3
/
J3'*
J4
/
J4'*
+
GND
+
GND
GND
GND
+
+
20m
A
20m
A
RTS
=1
=1
=1
=1
Exi
Us_vr
Exi
Exi
XOR
XOR
XOR
XOR
1
1
X1.4
X1.3
X1.1
X1.2
X1.7
X1.6
X4.3
X4.2
X1.5
X1.9
X2.2
X2.4
X4.1
1
1
Rx+
Rx-
Tx -
Tx +
RxDRS232
TxD RS232
BRS485
A
RS485
0V
+12V50m
A
max.
0V
+24VDC
GND
Tx
X3.2
Rx
X3.1
Us 3
X3.8
Us2
Us1
GND
GND
GND
X3.5
X3.3
X3.7
X3.6
X3.4
4 Applied harmonized standards of the applicable directives
This is an addition to Pepperl+Fuchs Declaration of Conformity in accordance with EN 45014:1998 in the
appendix.
Directives Applied harmonized standards
EC-directives 94/9EC (ATEX)
EN 50014:1997
EN 50020:1994
Page 27

TDOCT-4038_ENG / 2015-01 25
5 Order designations
5.1 Exi Power supply ENT-DC
Type
1.
Supply
circuit
2.
Supply
circuit
3.
Supply
circuit
Housing
ENT-DC
Interface
Type
ENT-DC-30
IS Power Supply & Data Interface
1. Supply circuit
1 Ua = 8 la = 280 Pa = 1,2
2 Ua = 8,5 la = 280 Pa = 1,2
3 Ua = 9 la = 280 Pa = 1,2
4 Ua = 9 la = 290 Pa = 1,3
5 Ua = 9 la = 300 Pa = 1,4
6 Ua= 8,5 la = 240 Pa = 1,2 Long Range
7 Ua= 8,5 la = 240 Pa = 1,2
2. Supply circuit
0 Not configured
1 Ua = 8 la = 280 Pa = 1,2
2 Ua = 8,5 la = 280 Pa = 1,2
3 Ua = 9 la = 280 Pa = 1,2
4 Ua = 9 la = 290 Pa = 1,3
5 Ua = 9 la = 300 Pa = 1,4
6 Ua= 8,5 la = 240 Pa = 1,2 Long Range
7 Ua= 8,5 la = 240 Pa = 1,2
3. Supply circuit
0 Not configured
1 Ua = 8 la = 280 Pa = 1,2
2 Ua = 8,5 la = 280 Pa = 1,2
3 Ua = 9 la = 280 Pa = 1,2
4 Ua = 9 la = 290 Pa = 1,3
5 Ua = 9 la = 300 Pa = 1,4
6 Ua= 8,5 la = 240 Pa = 1,2 Long Range
7 Ua= 8,5 la = 240 Pa = 1,2
Housing ENT-DC
HS
DIN rail mountable
AB
Separate housing
19K
19'' slide in unit, IP 20 casing
19E
19'' slide in unit, no casing
Interface
2
TTY, RS232
3
TTY, RS232, RS485
Page 28

TDOCT-4038_ENG / 2015-01 26
Table Ex-values of feed circuits (X = 0 : not used)
X
Ua [V] Ia [mA] Pa [W] Distance of the devices to ...
1 8 280 1,2 230 m
2 8,5 280 1,2 230 m
3 9 280 1,2 230 m
4 9 290 1,3 230 m
5 9 300 1,4 230 m
6 8,5 240 1,2 440 m
7 8,5 240 1,2 230 m
To the type code there may be attached further not safety-relevant markings.
5.2 Connectors
For interface X1: CONNECTOR-SUB-D-09W (2 ENT-DC required)
For interface X2: CONNECTOR-K02-381-O (2 ENT-DC required)
For interface X3 CONNECTOR-K03-508-S (2 ENT-DC required)
For interface X4 JACK-F96 (only versions -19K, -19E)
For interface X5 JACK-F96 (only version -19K with 3 feed circuits)
Page 29

TDOCT-4038_ENG / 2015-01 27
6 Index
Block Diagram 12
Data interface 9
Environmental conditions 7
Exi interface 8
Fuses 17
Grounding 21
Housing 6, 7, 22
Slide-in card 23
Slide-in cassette 23
Support 2
Warning 4, 5, 7, 17, 21, 25
Wiring 5, 12
Page 30

7 Appendix EEx Certification
Page 31

Page 32

Page 33

Page 34

Page 35

Ex
Equipment:
Manufacturer:
Address:
Formerly
Rated
voltage
Max. voltage
Description
The
power
supply unit can also
be operated with modified
Um values
for the
non-intrinsically
safe supply circuit
and the non-
intrinsically safe
signal circuits.
The basic safety and
health requirements of the
modihed version
are satisfied
through conformance
with
EN 50014:1997
+
Al
-
A2 General requirements
EN 50020:1994
Intrinsic safety'i'
The
power
supply unit was
manufactured in accordance with
EN 50014:1997
+
Al
-
A2 General
requirements,
among other
things,
so this
equipment continues to conform
to the basic
requirements
of Directive 94l9lEU.
The marking on
the
device
must contain the
following information:
Ex
II
(2)G
[EEx
ib] IIC
Parameters
Non-intrinsically
safe
supply circuit and non-intrinsically
safe signal
circuits
(connector
X4, terminals
28
-
32 as
well as connectors
X2 and
Xl)
CERTIFIED
TRANSLATION
DEKRA
Addendum
L
(Amendment
in accordance
with Directive
94l9lEU
Annex
III Clause 6)
to EC Type
Examination
Certificate
DMT 03 ATEX
E
011
X
Power Supply Unit
Type ENT-DC-30-***-*'.*
Pepperl+Fuchs GmbH
D
-
68307
Mannheim
EXTEC Oesterle GmbH
D
-
73730 Esslingen
24
2s3
V
V
DC
AC
Um
Page I of2 ofDMT
03 ATEX
E 01 I X / Nl
This certificate
may only be
passed
on to others
without change.
DEKRA
EXAM GmbH, Dinnendahlstrasse 9,D-44809
Bochum,
Phone
+49 (0)234/3696-105, Fax
+49 (0)23413696-110,
e-mail
zs-exam@dekra.corn
(Until
May 3
I, 2003: Deutsche Montan
Technologie GmbH,
Arn Technologiepark
l,
D-45307 Essen)
¡LLlSp
LEGAL CERTIFICATION
I hereby
certify that this
is a complete and correct translation
of the original
document
drawn up
in the German languale
Dâte:
ZS.aT.
Õ?
D
/4*-
David Allison
Officially
appointed and
sworn document translator for the
English
language at the
Regional
Court of Stuttgart in
Baden-Württemberg, Federal
Republic of Germany.
7-
LLI
(jl
;.:
'!'(;t...,¡.i
I
Y
a
Page 36

CERTIFIED
TRANSLATION
DEKRA
Special
conditions
for safe usaee /
instructions
for use
Unchanged
Test
Report
BVS PP 03.2006
EU, dated
February 21,2008
DEKRA
EXAM
GmbH
Bochum,
February
21, 2008
(Signature
illegible)
Certification
body
David
Allison
Officially appointed
and sworn
document tianslator
for the
English language
at the
Regional
Court of Stuttgart
in Baden-Württemberg,
Federal
Republic
of Germany.
(Signature illegible)
Department
Page2of2
of DMT03
ATEXE0II
X/Nl
This certificate
may only be
passed
on to
others without
change
DEKRA
EXAM GmbH,
Dinnendahlstrasse 9,
D-44809 Bochurn,
Phone
+49
(0)23413696-105, Fax
+49 (0)23413696-110,
e-mail
zs-exam@dekra.com
(Until
May 31,2003:
Deutsche Montan
Technologie
GmbH,
Am Technologiçark
1, D45307
Essen)
¡LL
I
S6
LEGAL CERTIFICATION
I hereby certify
that this
is
a
complete and correct
translation
of the original
document
drawn
up in the German
language
Date:
2
1. o3.
O
I
?/rL
a
LU
(9
è
a
ENI
lV
 Loading...