

Page 1
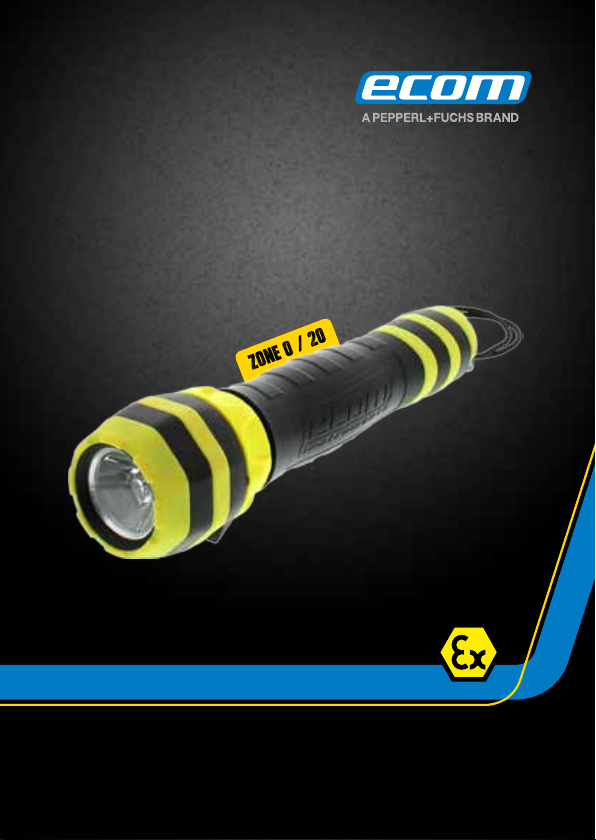
Zone 0 / 20
Lite-Ex® PL 30e
Operating Instructions | Bedienungsanleitung
Notice d‘utilisation | Istruzioni per l‘uso
Instrucciones de uso | Manual de instruçoes
1
Page 2

English Page 3
Deutsch Seite 13
Français Page 23
Italiano Page 33
Español Página 43
Portoguês Sida 53
2
Page 3

Content
1. Application ............................................................................................. 4
2. Safety instructions ................................................................................. 4
3. Faults and damage ................................................................................ 4
4. Safety regulations .................................................................................. 5
4.1. Special requirements for use in ex-hazardous area .......................... 5
5. Safety instructions ................................................................................. 5
6. Ex-data ................................................................................................... 6
6.1. ATEX ....................................................................................................6
6.2. IECEx ................................................................................................... 6
7. Technical data ........................................................................................ 6
8. Function descripation / operating information .....................................7
8.1. Lite-Ex PL 30e components ................................................................ 8
8.2. Getting started .................................................................................... 8
8.3. Battery replacement ........................................................................... 8
8.4. Cleaining the rotary switch ................................................................. 9
8.5. Lamp replacement .............................................................................. 9
8.6. Replacing the spare disc ..................................................................... 9
9. Repairs ................................................................................................... 10
10. Cleaning, maintenance and storage .................................................... 10
11. Disposal ................................................................................................ 11
12. Warranty and liability ........................................................................... 12
13. EU Declaration of Conformity .............................................................. 12
14. EU-type examination certicate .......................................................... 12
Note:
The current operating instructions, the EU Declaration of Conformity and
the EU-type examination certicate can be downloaded from the relevant
product page at www.ecom-ex.com, or alternatively they can be requested
directly from the manufacturer.
3
Page 4

1. Application
The Lite-Ex PL 30e is a LED- torch / ashlight (according directive 2014/34/
EU, ATEX) for industrial use in potentially explosive areas classied as zone
0 and 20 (in accordance with directive 1999/92/EC) and the IECEx System.
2. Safety instructions
These operating instructions contain information and safety regulations
which are to be observed without fail for safe operation in the described
conditions. Non-observance of this information and these instructions can
have serious consequences or it may violate regulations.
Please read these operating instructions carefully before starting to use
the unit! In case of any doubt (in the form of translation or printing errors)
the English language operating instructions shall apply.
3. Faults and damage
If there is any reason to suspect that the safety of the unit has been impaired,
it must be withdrawn from use and removed immediately from the Ex-area.
Measures must be taken to prevent it from being restarted accidentally.
We recommend that the unit is returned to the manufacturer for inspection.
The safety of the unit may be compromised, if, for example:
• there is visible damage to the housing.
• the unit has been subjected to excessive loads.
• the unit has been improperly stored.
• the unit has been damaged in transit.
• unit markings or inscriptions are illegible.
• malfunctions occur.
• permitted limit values have been exceeded.
4
Page 5

4. Safety regulations
Use of this unit assumes that the user observes the conventional safety
regulations and has to read the certicate in order to eliminate faulty
operation of the unit.
The following additional safety regulations must also be observed:
• The unit must not be opened within the Ex-area.
• The batteries must only be changed outside the Ex-area.
• Additional or spare batteries must not be carried in the Ex-area.
• Only type-approved batteries types may be used.
• Only spare sealing rings and discs of ecom instruments are allowed.
• Only accessories approved by ecom instruments GmbH may be used.
• Prevent the unit from coming into contact with aggressive acidic or
alkaline solutions.
• Do not open the inside torch head.
4.1. Special requirements for use in ex-hazardous area
• Storing of the torch is prohibited!
• After changing the batteries or the sealing rings always check to make
sure that the sealing rings and threads are clean and in good condition.
• Before using the lamp in the Ex-hazardous area and in order to ensure
the IP rating, please check that all parts of the unit are hand tightened up
to the stop – being careful not to over-tighten.
5. Safety instructions
Caution! Strong light may blind other people.
• Do not look directly into the light.
• Do not shine the light directly into the eyes of other people.
5
Page 6

6. Ex-data
6.1. ATEX
EU type examination certicate : EPS 16 ATEX 1 170 X
Ex-marking: † II 1 G Ex ia op is IIC T4 Ga IP65
† II 1 D Ex ia IIIC T130° Da IP65
Ambient temperature: -20°C ≤ Ta ≤ +50°C
Approved for Zone 2,1 and 0, device group II, explosion group IIC,
temperature class T4.
Approved for zone 22, 21 and 20, device group II, explosion group IIIC,
maximum Temperature 130°C.
6.2. IECEx
IECEx Certicate of Conformity no.: IECEx EPS 16.0074X
Ex-marking: Ex ia op is IIC T4 Ga IP65
Ex ia IIIC T130°C Da IP65
Ambient temperature: -20°C ≤ Ta ≤ +50°C
Approved for Zone 2, 1 and 0, device group II, explosion group IIC,
temperature class T4.
Approved for zone 22, 21 and 20, device group II, explosion group IIIC,
maximum Temperature 130°C.
7. Technical data
Ambient temperature: -20°C ≤ Ta ≤ +50°C
Storage temperature: -30°C … +60°C (without batteries)
Battery / power supply: 3 x LR14 (see table with approved batteries)
Lamp: 1 high-performance LED (3 watt)
Luminosity: 5000 lx (at a distance of 1 m)
Luminous ux: 204 lumens
Operating time: > 48 hours (continuous operation)
6
Page 7
Dimensions: approx. 220 x 40/45 mm
Weight: approx. 550 g (with batteries)
IP-rating: IP 65
ESD protection: Antistatic housing
CE-designation:
0102
Approved battery types:
Manufacturer Type (LR14)
Panasonic Pro Power
Panasonic Powerline
Eveready Energizer Energizer A93
Varta 4014
Energizer E93
Approved sealing rings and discs:
Manufacturer Type
ecom sealing rings type PL30 (complete set)
ecom spare disc type PL30
8. Function descripation / operating information
Please take the time to carefully read through these operating instructions
to ensure that you are familiar with all of the functions of your Lite-Ex
PL 30e and know how to use all of the functions. For your own safety and
information please read through the information on the following pages.
7
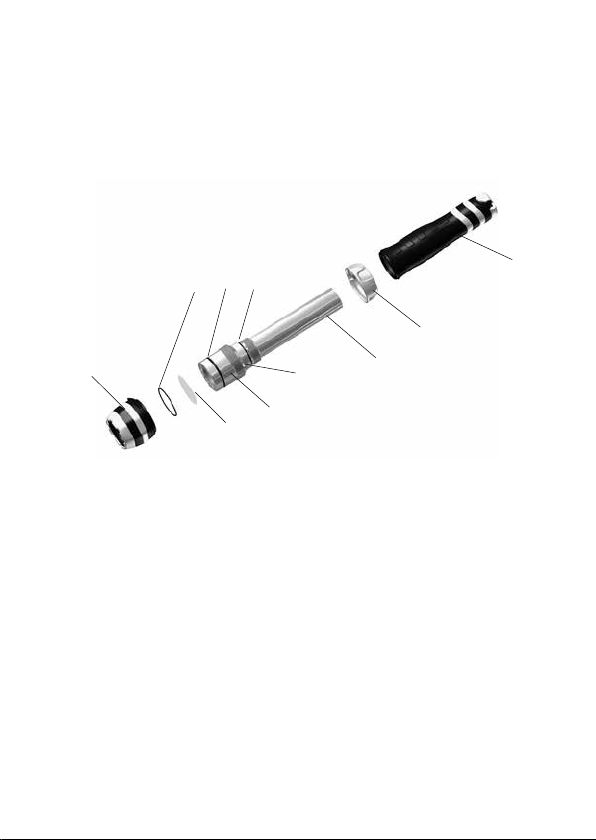
Page 8
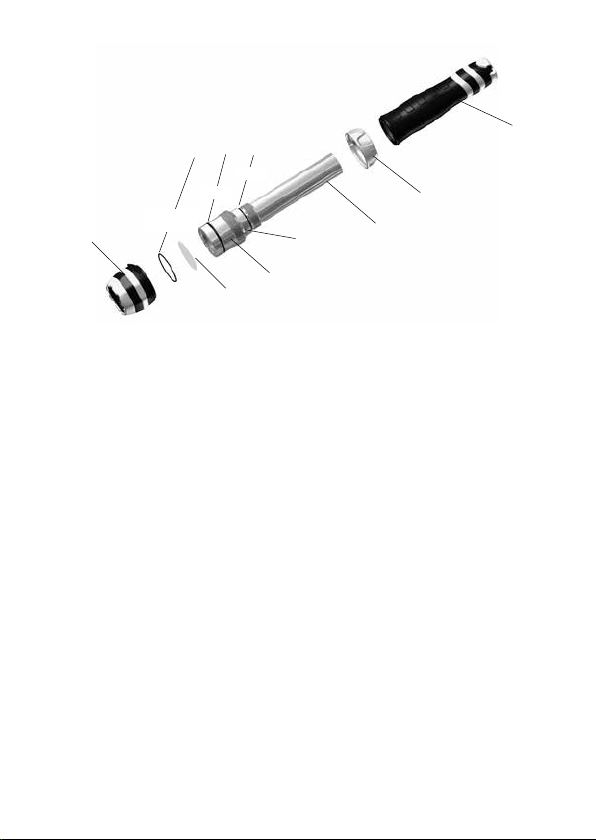
8.1. Lite-Ex PL 30e components
Body of torch
Twist ring
Housing head
Sealing rings
39x1,5
30x2
35x2
Battery compartment
Alignment screw
Torch head
Spare disc
Illustration 1
8.2. Getting started
In order to be able to use the torch in the Ex-area, you must rst check
that the outer housing head and body are screwed on completely. After this
has been done, you can switch on the torch by turning the yellow twist ring
slightly in a clockwise direction. The enclosed batteries have to be inserted
rst in the device (see section 8.3).
8.3. Battery replacement
When the brightness is no longer satisfactory, the batteries should be
replaced. It is strongly recommended that all three batteries are be replaced
together. When replacing the batteries, only use approved battery types
(see table of approved battery types in section 7: Technical data).
To replace the batteries, hold on to the housing head and the twist ring,
and turn the body of the torch anticlockwise until it comes off. Take the
used batteries out of the battery compartment, observing correct polarity
and replace them with new ones. After you have inserted the new batteries
screw the body of the torch back on. Make sure that torch components are
screwed together securely before switching the torch on.
8
Page 9

Battery replacement
• Only use approved battery types. See table in section 7: Technical data.
• Always replace all of the batteries together.
• Make sure that the polarity of the inserted batteries is correct.
• Please ensure that all used batteries are properly disposed of in an
environmentally friendly manner.
• After changing the batteries or the sealing rings always check to make
sure that the sealing rings and threads are clean and in a good condition.
8.4. Cleaining the rotary switch
A non-contacting rotary switch is used to switch on the Lite-Ex PL 30e (see
description above). Dirt or moisture does not effect the function. The rotary
switch is easy to clean if excessive amounts of dirt and grime have made it
difcult to turn. First take off the torch body and remove the batteries (see
section 8.3 Battery replacement). Remove the rotary switch by sliding it off
the back of the torch, and then clean the switch. When putting the rotary
switch back on, make sure that the arrow marks on the ring line up with the
alignment screw on the bottom part of the torch head (see picture 1). Then
re-insert the batteries, and screw the body of the torch back on.
8.5. Lamp replacement
The Lite-Ex PL 30e is equipped with an extremely long-lasting LED lamp.
Replacing the LED is normally not required. If, however, the torch is
defective or the brightness of the torch has diminished, it should be sent to
ecom instruments for inspection or repair. Under no circumstances should
you attempt to open the torch head. Manipulating the torch head or LED on
your own poses a risk to the safety of the torch and is not permitted.
8.6. Replacing the spare disc
The torch head is protected by the housing head that surrounds it as well
as an additional disc, which is positioned over the opening where the beam
is emitted. The disc is made of high-quality material. Should, however, the
disc break, it is possible to replace it. To replace the disc, hold on to the
body of the Lite-Ex PL 30e and the twist ring, and carefully unscrew the
housing head by turning it anticlockwise. Clean the housing head thoroughly
9
Page 10

to remove any remaining pieces, and check the sealing ring for damage.
After this has been done, you can install a new disc and, if necessary, new
sealing rings. Only spare sealing rings of ecom instruments are allowed.
The sealing ring is positioned between the housing head and the disc (see
picture 1). When putting the housing head back on, ensure that the seal is
positioned properly on the disc. After installation, you should not be able
to see any part of the sealing ring through the opening where the beam is
emitted. If the inside of the torch head or lens is also damaged, the torch
should be sent to the manufacturer for repair.
9. Repairs
Repairs are to be conducted by ecom instruments GmbH or service centres
authorised by ecom instruments GmbH, because the safety of the unit
needs to be tested after repairs are implemented.
The actual repair report sheet can be downloaded from the service area at
www.ecom-ex.com.
10. Cleaning, maintenance and storage
• Only use a suitable cloth or sponge to clean the unit.
• Do not use any solvents or abrasive cleaning agents when cleaning.
• We recommended having the operation and lumen output of the device
checked by the manufacturer every two years.
• The batteries should be taken out of the unit if it is to be stored for
extended periods.
• The storage temperature should be within the permitted range of -30 °C
to +60 °C.
• It should be observed that the electrical performance of specic types
of Zinc-Manganese Dioxide (Zn/MnO
temperatures below the product specied ambient temperature range.
) batteries are limited to ambient
2
The datasheets for the specic manufacturer and type of battery used
should be consulted to see what the recommended ambient temperature
range of use is to achieve maximum battery performance”
10
Page 11

11. Disposal
Old electrical devices by ecom instruments GmbH will be directed to
disposal at our expense and disposed of free of charge in accordance with
European Directive 2002/96/EC. Please follow local regulations for the
disposal of electronic products. The costs associated with returning devices
to ecom instruments GmbH are to be borne by the sender.
In accordance with Article 1, Section 18 and Article 2 of the Act revising the
law of Waste-Related Product Responsibility for Batteries and Accumulators
(Gesetz zur Neuregelung der abfallrechtlichen Produktverantwortung für
Batterien und Akkumulatoren)
dated 25 June 2009, we are obligated to
provide the following information.
Your device contains alkaline batteries.
Depleted batteries that can no longer be recharged should never be
disposed of along with normal or household waste. Old batteries can
contain harmful substances that are hazardous to health and damaging
to the environment. Please return the batteries. Return is free of charge
and required by law. Please only dispose of discharged batteries in the
designated containers and tape the terminals of lithium batteries.
Note:
The battery used in this unit poses a re hazard and can cause chemical
injuries if it is used improperly. Neither the batteries nor the battery
cells should be opened or disassembled and they should not be burned
or exposed to temperatures exceeding 60 °C. If the batteries need to be
disposed of, they can be removed as described under point (8.3). The
disposal regulations specied above are also applicable for old devices.
All batteries and rechargeable batteries can be recycled. Precious raw
materials such as iron, zinc and nickel can therefore be reused.
The symbol
has the following meaning:
Old electrical devices should not be disposed of along with normal or
household waste.
11
Page 12

12. Warranty and liability
Under the general terms and conditions of business, ecom instruments
GmbH offers a two-year warranty for function and materials on this product
when used under the specied operating and maintenance conditions.
Batteries, LED/Lamps and working parts are considered consumable parts
and are not covered under the warranty.
More detailed information regarding the General Conditions of Delivery and
Payment of ecom instruments GmbH are available at www.ecom-ex.com or
can alternatively be requested directly from the manufacturer.
13. EU Declaration of Conformity
The EU Declaration of Conformity is enclosed with the sales packaging
as a separate document. Please also observe the information provided
underneath the table of contents.
The current EU Declaration of Conformity can be downloaded from the
relevant product page at www.ecom-ex.com.
14. EU-type examination certicate
The certicate is enclosed with the sales packaging as a separate
document. The current EU-type examination certicate can be downloaded
from the relevant product page at www.ecom-ex.com.
12
Page 13

Inhalt
1. Anwendung ............................................................................................ 14
2. Sicherheitsinformationen ...................................................................... 14
3. Fehler und Beschädigungen ..................................................................14
4. Sicherheitsbestimmungen .................................................................... 15
4.1 Besondere Bedingungen für den Einsatz in explosionsgefährdeten
Bereichen ............................................................................................. 15
5. Sicherheitshinweis Blendgefahr! .......................................................... 15
6. Ex-Daten ................................................................................................ 16
6.1 ATEX .....................................................................................................16
6.2 IECEx .................................................................................................... 16
7. Technische Daten ................................................................................... 17
8. Funktionsbeschreibung / Bedienungshinweise .................................... 17
8.1 Aufbau der Lite-Ex PL 30e ................................................................... 18
8.2 Inbetriebnahme .................................................................................... 18
8.3 Batteriewechsel ................................................................................... 18
8.4 Reinigen des Drehrings .......................................................................19
8.5 Leuchtmittelwechsel ........................................................................... 19
8.6 Wechsel der Schutzscheibe ................................................................. 20
9. Reparatur ............................................................................................... 20
10. Reinigung, Wartung und Lagerung ......................................................20
11. Entsorgung ........................................................................................... 21
12. Garantie und Haftung ........................................................................... 22
13. EU-Konformitätserklärung ..................................................................22
14. EU-Baumusterprüfbescheinigung ...................................................... 22
Hinweis:
Die aktuellen Bedienungsanweisungen, die EU-Konformitätserklärung
und die EU-Baumusterprüfbescheinigung stehen auf der entsprechenden
Produktseite unter www.ecom-ex. com zum Download zur Verfügung oder
können direkt beim Hersteller angefordert werden.
13
Page 14

1. Anwendung
Die Lite-Ex PL 30e ist eine LED-Taschenlampe (nach Richtlinie 2014/34 /
EU, ATEX) für den industriellen Einsatz in explosionsgefährdeten Bereichen,
die als Zone 0 und 20 eingestuft sind (gemäß Richtlinie 1999/92 / EG) und
dem IECEx-System.
2. Sicherheitsinformationen
Diese Bedienungsanweisungen enthalten Informationen und
Sicherheitsbestim-mungen, die für den sicheren Betrieb unter
den beschriebenen Bedingungen unbe-dingt zu beachten sind.
Die Nichtbeachtung dieser Informationen und Anweisungen kann
schwerwiegende Folgen haben oder einen Verstoß gegen die geltenden Be-
stimmungen darstellen.
Bitte lesen Sie diese Bedienungsanweisungen sorgfältig durch, bevor Sie
das Gerät verwenden! Sollten Zweifel bestehen (unklare Übersetzung
oder Druckfehler), sind die Bedienungsanweisungen in englischer
Sprache heranzuziehen.
3. Fehler und Beschädigungen
Sollten Gründe vorliegen, die auf eine Beeinträchtigung der Sicherheit des
Geräts hindeuten, darf das Gerät nicht mehr verwendet werden und ist
unverzüglich aus dem Ex-Bereich zu entfernen.
Es sind Maßnahmen zu ergreifen, um eine versehentliche erneute
Verwendung des Geräts zu verhindern.
Es wird empfohlen, das Gerät zur Überprüfung an den Hersteller zu senden.
Die Sicherheit des Geräts kann unter folgenden Umständen beeinträchtigt sein:
• Das Gehäuse ist sichtbar beschädigt.
• Das Gerät wurde zu großen Belastungen ausgesetzt.
• Das Gerät wurde nicht ordnungsgemäß aufbewahrt.
• Das Gerät wurde beim Transport beschädigt.
• Die Gerätekennzeichnung oder Beschriftung ist nicht lesbar.
• Es treten Funktionsstörungen auf.
• Die zulässigen Grenzwerte wurden überschritten.
14
Page 15

4. Sicherheitsbestimmungen
Vor der Verwendung dieses Geräts muss der Bediener die Einhaltung der
Sicherheitsbestimmungen gewährleisten und das Prüfzertikat lesen, um
eine fehlerhafte Bedienung auszuschließen.
Darüber hinaus sind die folgenden Sicherheitsbestimmungen zu beachten:
• Das Gerät darf im Ex-Bereich nicht geöffnet werden.
• Die Batterien dürfen nur außerhalb des Ex-Bereichs gewechselt werden.
• Ersatzbatterien dürfen nicht mit in den Ex-Bereich genommen werden.
• Es dürfen nur typgeprüfte Batterien verwendet werden.
• Es dürfen nur Ersatzdichtungsringe und Scheiben von ecom instruments
verwendet werden.
• Es darf nur von der ecom instruments GmbH zugelassenes Zubehör
verwendet werden.
• Der Kontakt mit aggressiven Säuren oder Basen ist zu vermeiden.
• Der innere Lampenkopf darf nicht geöffnet werden.
4.1 Besondere Bedingungen für den Einsatz in explosionsgefährdeten
Bereichen
• Ein Lagern der Lampe ist untersagt!
• Nach jedem Batterie- oder Dichtungsringwechsel sind Dichtungsringe
und Gewinde auf Sauberkeit, korrekten Sitz und Beschädigungen zu
überprüfen.
• Die Gehäuseteile der Lampe müssen vor dem Einsatz im Ex-Bereich
handfest bzw. bis zum Anschlag verschraubt werden, um den IP-Schutz
zu gewährleisten.
5. Sicherheitshinweis Blendgefahr!
• Nicht direkt in den Lichtstrahl blicken
• Lichtkegel nicht direkt auf die Augen einer anderen Person richten
15
Page 16

6. Ex-Daten
6.1 ATEX
EU-Baumusterprüfbescheinigung: EPS 16 ATEX 1 170 X
Ex-Kennzeichnung: † II 1 G Ex ia op is IIC T4 Ga IP65
† II 1 D Ex ia IIIC T130° Da IP65
Umgebungstemperatur: -20°C ≤ Ta ≤ +50°C
Zugelassen für Zone 2, 1 und 0, Gerätegruppe II, Explosionsgruppe IIC,
Temperaturklasse T4.
Zugelassen für die Zonen 22, 21 und 20, Gerätegruppe II, Explosionsgruppe
IIIC, maximale Temperatur 130°C.
6.2 IECEx
IECEx-Konformitätszertikat Nr.: IECEx EPS 16.0074X
Ex-Kennzeichnung: Ex ia op is IIC T4 Ga IP65
Ex ia IIIC T130°C Da IP65
Umgebungstemperatur: -20°C ≤ Ta ≤ +50°C
Zugelassen für Zone 2, 1 und 0, Gerätegruppe II, Explosionsgruppe IIC,
Temperaturklasse T4.
Zugelassen für Zone 22, 21 und Zone 20, Gerätegruppe II, Explosionsgruppe
IIIC, maximale Temperatur 130°C
16
Page 17
7. Technische Daten
Umgebungstemperatur Ta: -20 °C ... +50 °C
Lagertemperatur: -30 °C ... +60 °C (ohne Batterien)
Batterien / Stromversorgung: 3 x LR14 (siehe Tabelle)
Leuchtmittel: 1 Hochleistungs-LED (3 Watt)
Leuchtkraft: 5000 lx (in 1 m Abstand)
Lichtstrom: 204 Lumen
Betriebsdauer: > 48 Stunden (Dauerbetrieb)
Abmessungen: ca. 220 mm x 40/45 mm
Gewicht: ca. 550 g (mit Batterien)
IP-Schutzart: IP 65
ESD-Schutz: antistatisches Gehäuse
CE-Kennzeichnung:
0102
Tabelle mit typgeprüften Batterien
Hersteller Typ (LR14)
Panasonic Pro Power
Panasonic Powerline
Eveready Energizer Energizer A93
Varta 4014
Energizer E93
Tabelle mit zugelassenen Dichtungen und Schutzscheiben
Hersteller Typ
ecom Dichtungsringe Typ PL 30 (komplett)
ecom Ersatzscheibe Typ PL 30
17
Page 18
8. Funktionsbeschreibung / Bedienungshinweise
Bitte lesen Sie diese Bedienungsanleitung sorgfältig durch, damit Sie alle
Funktionen Ihrer Lite-Ex PL 30e kennen und nutzen können. Lesen Sie zu
Ihrer Sicherheit und Information die Hinweise auf den folgenden Seiten!
8.1 Aufbau der Lite-Ex PL 30e
Dichtungsringe
Schaft
Drehring
Gehäusekopf
Führungsschraube
Batteriefach
Lampenkopf
Schutzscheibe
Bild 1
8.2 Inbetriebnahme
Um die Taschenlampe im Ex-Bereich verwenden zu können, müssen
Sie zuerst sicherstellen, dass der äußere Gehäusekopf und der Rumpf
vollständig miteinander verschraubt sind. Anschließend können Sie die
Taschenlampe einschalten, indem Sie den gelben Drehring leicht im
Uhrzeigersinn drehen. Die beiliegenden Batterien müssen zuvor in die
Taschenlampe eingesetzt werden (siehe Abschnitt 8.3).
8.3 Batteriewechsel
Sollte festgestellt werden, dass die Leuchtkraft nicht mehr
zufriedenstellend ist, sollten die Batterien gewechselt werden. Es empehlt
sich, alle 3 Batterien auf einmal zu wechseln. Es dürfen nur Batterien des
entsprechend zugelassenen Typs eingesetzt werden (siehe Tabelle mit
typgeprüften Batterien unter Punkt 7. Technische Daten).
18
Page 19

Zum Batteriewechsel den Gehäusekopf inkl. Drehring festhalten und den
Schaft entgegen dem Uhrzeigersinn drehen und von der Lampe entfernen.
Danach können die Batterien aus dem Batteriefach entnommen und
gewechselt werden. Nach dem Einsetzen der neuen Batterien (Polarität
beachten) kann der Schaft wieder aufgeschraubt werden. Bitte achten sie
darauf, dass die Lampe vor dem erneuten Einschalten wieder komplett
verschlossen ist.
Batteriewechsel
• Nur typgeprüfte Batterien verwenden. Siehe Tabelle, Punkt 7.
Technische Daten.
• Immer alle Batterien gleichzeitig auswechseln.
• Auf richtige Polarität achten.
• Verbrauchte Batterien sach- und umweltgerecht entsorgen!
• Beim Batteriewechsel sind die Gewinde und Dichtungen auf Sauberkeit
und Beschädigungen zu überprüfen.
8.4 Reinigen des Drehrings
Die Taschenlampe Lite-Ex PL 30e wird mit dem kontaktlosen Drehring
eingeschaltet (siehe Beschreibung oben). Die Funktionsfähigkeit wird
durch Schmutz und Feuchtigkeit nicht beeinträchtigt. Sollte das Drehen
des Drehrings durch zu viel Schmutz schwierig werden, können Sie diesen
einfach reinigen.
Nehmen Sie zuerst den Schaft der Taschenlampe ab und entnehmen Sie die
Batterien (siehe Abschnitt 8.3 Austausch der Batterien). Entfernen Sie den
Drehring, indem Sie ihn über das Ende des Schafts schieben. Reinigen Sie
den Drehring anschließend.
Stellen Sie beim Wiederanbringen des Drehrings sicher, dass die
Pfeilmarkierungen auf dem Ring mit der Einstellschraube am unteren Teil
des Taschenlampenkopfes ausgerichtet sind (siehe Abbildung 1). Setzen
Sie dann die Batterien ein und schrauben Sie den Schaft der Taschenlampe
wieder fest.
19
Page 20

8.5 Leuchtmittelwechsel
Die Lite-Ex PL 30e ist mit einem extrem langlebigen LED-Leuchtmittel
ausgestattet. Ein Wechsel der LED wird im Normalfall nicht notwendig
sein. Bei einem Defekt oder bei nachlassender Helligkeit ist die Lampe
zur Überprüfung oder Reparatur an ecom instruments zu senden. Der
innere Lampenkopf darf nicht geöffnet werden! Selbständige Eingriffe am
Lampenkopf oder Leuchtmittel gefährden die Sicherheit der Lampe und
sind nicht zulässig.
8.6 Wechsel der Schutzscheibe
Der Lampenkopf ist durch den ihn umgebenden Gehäusekopf und durch
eine zusätzliche Scheibe am Lichtaustritt geschützt. Sollte es trotz der
eingesetzten, hochwertigen Scheibe zu einem Bruch kommen, so kann
diese gewechselt werden. Dazu wird der Schaft der Lite-Ex PL 30e sowie
der Drehring festgehalten und der Gehäusekopf vorsichtig gegen den
Uhrzeigersinn abgeschraubt. Der Gehäusekopf ist anschließend gut zu
reinigen und der Dichtungsring auf Beschädigungen zu prüfen. Danach
kann die neue Scheibe und gegebenenfalls ein neuer Dichtungsring
eingesetzt werden. Der Dichtungsring liegt zwischen Gehäusekopf und
Scheibe (siehe Bild 1). Beim Aufsetzen des Gehäusekopfes ist darauf zu
achten, dass Dichtung und Scheibe sauber anliegen. Es dürfen nach der
Montage keine Dichtungsanteile im Lichtaustritt sichtbar sein. Sind der
innere Lampenkopf oder die Linse ebenfalls beschädigt worden, so ist die
Lampe zur Reparatur an den Hersteller zu senden.
9. Reparatur
Reparaturen dürfen nur von der ecom instruments GmbH oder
Servicecenter, die von der ecom instruments GmbH autorisiert wurden,
durchgefürt werden, da die Sicherheit des Gerätes nach der Reparatur
überprüft werden muss. Der Reparaturbegleitschein steht im Service-
Bereich unter www.ecom-ex.com zum Download bereit.
10. Reinigung, Wartung und Lagerung
• Gerät nur mit einem geeigneten Tuch oder Schwamm reinigen.
Verwenden Sie zur Reinigung keine Lösungs- oder Scheuermittel.
• Es wird empfohlen, Funktion und Lichtleistung des Geräts alle zwei Jahre
vom Hersteller überprüfen zu lassen.
20
Page 21

• Bei längerer Lagerung sind die Batterien aus dem Gerät zu entnehmen.
• Zulässige Lagertemperaturen –30 °C bis +60 °C nicht unter- bzw.
überschreiten!
• Beachten Sie, dass die Leistungsfähigkeit bestimmter Zink-Mangandioxid
(Zn/MnO2)-Batterien bei Umgebungstemperaturen bereits unterhalb der
für das Produkt angegebenen Umgebungstemperaturbereiche nachlässt.
Lesen Sie die Informationen des entsprechenden Batterieherstellers,
um den empfohlenen Umgebungstemperaturbereich der Batterie zum
Erzielen einer maximalen Batterieleistung zu ermitteln.
11. Entsorgung
Elektro- und Elektronik-Altgeräte von der Firma ecom instruments GmbH
werden zu unseren Lasten der Entsorgung zugeführt und nach der europäi-
schen Richtlinie 2002/96/EG kostenfrei entsorgt. Bitte befolgen sie die lokalen
Bestimmungen zur Entsorgung von Elektronik-Produkten.
Der Versand der Geräte zu ecom instruments GmbH geht auf Kosten des
Versenders.
Nach Artikel 1, §18 und Artikel 2 des Gesetzes zur Neuregelung der abfallrechtli-
chen Produktverantwortung für Batterien und Akkumulatoren vom 25. Juni 2009
sind wir zu folgenden Hinweisen verpichtet.
Ihr Gerät enthält alkalische Batterien.
Sind die Batterien „leer“ oder lassen sich die Akkus nicht mehr auaden, dürfen
Sie nicht in den normalen Müll oder Hausmüll. Altbatterien enthalten möglicher-
weise Schadstoffe, die Umwelt und Gesundheit schaden können. Bitte geben Sie
alte Geräte zurück. Die Rückgabe ist unentgeltlich und gesetzlich vorgeschrieben. Bitte werfen Sie nur entladene Batterien in die aufgestellten Behälter und
kleben Sie bei Lithium-Batterien die Pole ab.
Achtung: Die im Gerät eingesetzte Batterie birgt eine Feuergefahr und die Gefahr
von chemischen Verletzungen bei nicht ordnungsgemäßem Einsatz. Weder die
Batterie noch die Batteriezellen dürfen geöffnet oder demontiert, nicht über 60
°C erhitzt oder verbrannt werden. Im Entsorgungsfall kann die Batterie wie in
Punkt (7) beschrieben entnommen werden. Im Übrigen gelten die oben genannten Entsorgungsvorschriften für Altgeräte.
Alle Batterien und Akkus werden wieder verwertet. So lassen sich wertvolle Rohstoffe wie Eisen, Zink oder Nickel wieder gewinnen.
21
Page 22

Das Symbol hat folgende Bedeutung:
Elektro- und Elektronik-Altgeräte dürfen nicht in den normalen Müll oder
Hausmüll.
12. Garantie und Haftung
Für dieses Produkt gewährt die ecom instruments GmbH laut den
allgemeinen Geschäftsbedingungen eine Garantie von zwei Jahren auf
Funktion und Material unter den angegebenen und zulässigen Betriebs- und
Wartungsbedingungen. Ausgenommen hiervon sind alle Verschleißteile (z.B.
Batterien, Leuchtmittel, etc).
Weitere Informationen zu den Allgemeinen Liefer- und Zahlungsbedingungen
der ecom instruments GmbH nden Sie unter www.ecom-ex.com oder
können Sie direkt beim Hersteller anfordern.
13. EU-Konformitätserklärung
Die EU-Konformitätserklärung liegt der Verkaufsverpackung als separates
Dokument bei. Bitte beachten Sie auch die unter dem Inhaltsverzeichnis
angegebenen Informationen. Die aktuelle EU-Konformitätserklärung
steht auf der entsprechenden Produktseite unter www.ecom-ex. com zum
Download zur Verfügung.
14. EU-Baumusterprüfbescheinigung
Die EU-Baumusterprüfbescheinigung liegt der Verkaufsverpackung als
separates Dokument bei. Die aktuelle EU-Baumusterprüfbescheinigung
steht auf der entsprechenden Produktseite unter www. ecom-ex.com zum
Download zur Verfügung.
22
Page 23

Sommaire
1. Application ............................................................................................. 24
2. Informations de sécurité ....................................................................... 24
3. Pannes et dommages ............................................................................ 24
4. Réglementations liées à la sécurité ...................................................... 25
4.1 Conditions particulières pour l‘utilisation en zone dangereuse ......... 25
5. Consigne de sécurité ............................................................................. 25
6. Caractéristiques Ex ................................................................................ 26
6.1 ATEX .....................................................................................................26
6.2 IECEx .................................................................................................... 26
7. Caractéristiques techniques .................................................................. 27
8. Description des fonctions / consignes d‘utilisation .............................. 27
8.1 Composants Lite-Ex PL 30e ................................................................ 28
8.2 Mise en service .................................................................................... 28
8.3 Remplacement des piles .....................................................................28
8.4 Nettoyage de l’interrupteur rotatif ...................................................... 29
8.5 Remplacement de l‘éclairage .............................................................. 29
8.6 Remplacement de la vitre existante .................................................... 30
9. Réparations ............................................................................................ 30
10. Nettoyage, entretien et stockage ......................................................... 30
11. Élimination ........................................................................................... 31
12. Garantie et responsabilité ...................................................................32
13. Déclaration UE de conformité .............................................................32
14. Certicat d‘examen de type UE............................................................32
Remarque :
Les instructions d’utilisation actuelles, la déclaration UE de conformité et le
Certicat d‘examen de type UE peuvent être téléchargés à partir de la page
du produit correspondant sur le site www.ecom-ex.com ou peuvent être
demandés directement au fabricant.
23
Page 24

1. Application
Le Lite-Ex PL 30e est une torche à DEL / lampe torche (selon la directive
2014/34 / EU, ATEX) à usage industriel dans des zones potentiellement
explosives classées en zone 0 et 20 (conformément à la directive 1999/92 / CE)
et au système IECEx.
2. Informations de sécurité
Les présentes instructions d’utilisation contiennent des informations et des
rég-lementations de sécurité qui doivent être strictement observées an de
garantir une utilisation sans danger dans les conditions indiquées. Le non-
respect de ces informations et instructions peut avoir des conséquences
graves et violer les réglementations.
Prière de lire attentivement les présentes instructions d’utilisation avant
de com-mencer à utiliser l’unité !
En cas de doute (sous forme d’erreurs de traduction ou d’impression), les
instruc-tions d’utilisation en anglais font foi.
3. Pannes et dommages
S’il l’on suspecte une défaillance du dispositif de sécurité de l’unité, cette
dernière ne doit plus être utilisée et immédiatement être retirée de la zone
Ex. Prendre les mesures nécessaires pour prévenir toute remise en marche
accidentelle.
Nous recommandons de retourner l’unité au fabricant en vue de son
inspection.
La sécurité de l’appareil peut être compromise, par exemple si:
• des dommages externes sont visibles sur le boîtier,
• l’appareil a été soumis à des charges excessives,
• l’appareil a été stocké de manière inappropriée,
• l’appareil a été endommagé lors du transport,
• des marquages ou inscriptions sur l’unité sont illisibles,
• des dysfonctionnements surviennent,
• les valeurs limites autorisées ont été dépassées.
24
Page 25

4. Réglementations liées à la sécurité
L’utilisation de cette unité suppose que l’utilisateur respecte les
réglementations de sécurité conventionnelles et lise le certicat an
d’éviter une utilisation inappropriée de l’unité.
Les réglementations de sécurité supplémentaires suivantes doivent
également être respectées :
• Il est interdit d’ouvrir l’unité à l’intérieur de la zone explosive.
• Le remplacement des piles est uniquement autorisé à l’extérieur de la
zone explosive.
• Il est interdit d’introduire des piles supplémentaires ou de rechange dans
la zone explosive.
• Utiliser uniquement des piles homologuées.
• Seule l’utilisation de bagues et rondelles d’étanchéité de rechange de
l’entreprise ecom instruments est autorisée.
• Exclusivement employer les accessoires agréés par l’entreprise ecom
instruments GmbH.
• Éviter de mettre en contact l´appareil avec des acides on bases
agressifs.
• Il est interdit d’ouvrir l’intérieur de la tête de la lampe de poche.
4.1 Conditions particulières pour l‘utilisation en zone dangereuse
• Il est interdit de stocker la lampe!
• Après chaque remplacement de piles, de joint ou d’opération de
nettoyage, véer qu’aucun élément ne soit endommagé.
• La lampe doit être montée et toutes les pièces vissées à fond avant son
utilisation en zone Ex, an de garantir l‘indice de protection IP.
5. Consigne de sécurité
Risque d‘éblouissement!
• Ne pas regarder directement dans le faisceau lumineux.
• Ne pas diriger le cône lumineux directement dans les yeux d‘autres
personnes.
25
Page 26

6. Caractéristiques Ex
6.1 ATEX
Certicat d‘examen de type UE : EPS 16 ATEX 1 170 X
Marquage Ex : † II 1 G Ex ia op is IIC T4 Ga IP65
† II 1 D Ex ia IIIC T130° Da IP65
Température ambiante : -20 °C ≤ Ta ≤ +50 °C
Homologué pour les zones 2, 1 et 0, groupe d’appareils II, groupe
d’explosion IIC, classe de température T4.
Homologué pour les zones 22, 21 et 20, groupe d’appareils II, groupe
d’explosion IIIC, température maximale de 130 °C.
6.2 IECEx
Certicat de conformité IECEx n° : IECEx EPS 16.0074X
Marquage Ex : Ex ia op is IIC T4 Ga IP65
Ex ia IIIC T130°C Da IP65
Température ambiante : -20 °C ≤ Ta ≤ +50 °C
Homologué pour les zones 2, 1 et 0, groupe d’appareils II, groupe
d’explosion IIC, classe de température T4.
Homologué pour les zones 22, 21 et 20, groupe d’appareils II, groupe
d’explosion IIIC, température maximale de 130 °C.
26
Page 27

7. Caractéristiques techniques
Température ambiante Ta: -20 °C ... +50 °C
Température de stockage: -30 °C ... +60 °C (sans piles)
Piles / alimentation: 3 x LR14 (voir tableau)
Éclairage: 1 DEL haute performance (3 watts)
Luminosité : 5000 lux (à 1 m)
Courant d’éclairage: 204 lumen
Durée de fonctionnement: > 48 heures (fonctionnement permanent)
Dimensions: env. 220 mm x 40/45 mm
Poids: env. 550 g (avec les piles)
Indice de protection IP: IP 65
Indice ESC: boîtier antistatique
Marquage CE:
0102
Tableau des piles de type certié
Fabricant
Panasonic Pro Power
Panasonic Powerline
Eveready Energizer Energizer A93
Varta 4014
Energizer E93
Type (LR14)
Liste des joints et vitres de remplacement
Fabricant Type
ecom instruments Joint d’étanchéité type PL 30 (complet)
ecom instruments Vitre de remplacement PL 30
27
Page 28

8. Description des fonctions / consignes d‘utilisation
Veuillez lire attentivement ce mode d‘emploi an de connaître et de pouvoir
utiliser toutes les fonctions de votre Lite-Ex PL 30. Pour votre sécurité et
votre information, lire avec attention les consignes des pages suivantes.
8.1 Composants Lite-Ex PL 30e
Joints
Corps du boîtier
30x2
Bague rotative
Compartiment à piles
Tête du boîtier
35x2
39x1,5
Vis de guidage
Tête de la torche
Vitre
Figure 1
8.2 Mise en service
An de pouvoir utiliser la lampe de poche en zone explosive, il convient
de s’assurer que la tête et le corps du boîtier sont bien complètement
vissés. Après vous en être assuré, vous pouvez allumer la lampe de poche
en tournant légèrement l’anneau rotatif jaune en sens horaire. Les piles
fournies doivent d’abord être insérées dans l’appareil (voir section 8.3).
8.3 Remplacement des piles
Lorsque l‘on constate que l‘intensité lumineuse n‘est plus satisfaisante, les
piles doivent être remplacées. Il est recommandé de remplacer les 3 piles
en même temps. N‘utiliser que des piles du type autorisé (voir le tableau
des piles homologuées du paragraphe 7. Caractéristiques techniques).
Pour changer les piles, tenir la tête du boîtier et la bague rotative, tourner
le corps du boîtier dans le sens contraire des aiguilles d‘une montre et le
28
Page 29

retirer. Ensuite, retirer les piles du Compartiment à piles et les remplacer.
Après la mise en place des nouvelles piles (respecter la polarité), revisser
le corps du boîtier. Veiller à ce que la torche soit à nouveau complètement
fermée avant de la réactiver.
Remplacement des piles
• Utiliser uniquement des piles homologuées.
• Voir tableau, point 7. Caractéristiques techniques.
• Toujours remplacer toutes les piles à la fois.
• Respecter le sens d’insertion des piles.
• Éliminer les piles usagées dans le respect des lois et de
l‘environnement!
• Vérier la propreté et l‘absence de détérioration des letages et joints
lors du remplacement des piles.
8.4 Nettoyage de la bague rotative
Une bague rotative sans contact est employé pour allumer la lampe de
poche Lite-Ex PL 30e (voir description plus haut). La saleté et l’humidité
n’affectent pas le fonctionnement. En cas d’encrassement important
empêchant son fonctionnement correct, la bague rotative se nettoie
facilement. Retirez d’abord le corps de la lampe de poche puis retirez les
piles (voir section 8.3, Remplacement des piles).
Retirez la bague rotative en le faisant glisser de l’extrémité de la lampe
de poche puis nettoyez la bague. Lors du remontage de la bague rotative,
assurez-vous que les repères échés sur l’anneau soient alignés avec la
vis de réglage sur la partie inférieure de la tête de la lampe de poche (voir
gure 1). Réinsérez ensuite les piles et revissez le corps de la lampe de
poche.
8.5 Remplacement de l‘éclairage
La torche Lite-Ex PL 30e est équipée d‘une DEL à très longue durée de
vie. En principe, elle ne doit jamais être remplacée. En cas de vice ou de
luminosité faiblissante, la torche doit être renvoyée à ecom Instruments
à des ns de vérication de réparation. Il est interdit d‘ouvrir la tête de la
torche. Les interventions autonomes sur la tête de la torche et l‘éclairage
mettent en péril la sécurité de la lampe et sont interdites.
29
Page 30

8.6 Remplacement de la vitre existante
L‘intérieur de la tête de la torche est protégé par la tête de boîtier qui
l‘entoure et une vitre placée devant la sortie de la lumière. Si, malgré
l‘utilisation d‘un verre d‘excellente qualité, la vitre venait à se casser, celleci peut être remplacée. À cet effet, tenir le corps du boîtier de la torche
Lite-Ex PL 30e ainsi que la bague rotative et visser la tête du boîtier dans le
sens contraire des aiguilles d‘une montre. Éliminer ensuite tous les débris
de verre de la tête du boîtier et vérier l‘absence de détérioration sur le
joint. Ensuite, insérer une nouvelle vitre et un nouveau joint. Le joint se
place entre la tête du boîtier et la vitre (voir Figure 1). Lors de la mise en
place de la tête du boîtier, veiller à ce que le joint et la vitre reposent bien
l‘un contre l‘autre. Après le montage, aucune partie du joint ne doit être
visible au niveau de la sortie de lumière. Si l‘intérieur de la tête de torche et
la lentille sont également endommagées, envoyer immédiatement la torche
au fabricant pour réparation.
9. Réparations
Les réparations doivent être effectuées par ecom instruments GmbH ou
des centres de réparation autorisés par ecom instruments GmbH, car la
sécurité de l’appareil doit être testée une fois la réparation effectuée.
Vous pouvez télécharger la che de rapport de réparation actuelle à partir
de l’espace dédié au S.A.V. Sur www.ecom-ex.com.
10. Nettoyage, entretien et stockage
• Ne nettoyer l‘appareil qu‘avec un chiffon adéquat ou une éponge. Ne pas
utiliser de solvants ou de produits abrasifs pour le nettoyage.
• Il est recommandé de faire vérier par le fabricant le fonctionnement et
la puis sance d‘éclairage de l‘appareil tous les deux ans.
• En cas de stockage prolongé, retirer les piles de l‘appareil
• Ne pas dépasser les températures de stockage admissibles, comprises
entre -30 °C et +60 °C.
• Veuillez noter que les performances électriques des types de batteries
spéciales au zinc / dioxyde de manganèse (Zn/MnO2) se limitent aux
températures ambiantes inférieures à la plage de température ambiante
spécique au produit. Il est conseillé de consulter les ches de données
pour le fabricant spécique et le type de batterie employé an de
connaître la plage de température ambiante recommandée de manière à
garantir des performances maximales de la batterie. »
30
Page 31

11. Élimination
Les vieux appareils électriques de ecom instruments GmbH seront envoyés
pour élimination à nos frais et éliminés gratuitement en vertu de la directive
européenne 2002/96/EC. Veuillez observer les règlements locaux pour
l’élimination des produits électroniques. Les coûts liés au retour des
appareils à ecom instruments GmbH sont à la charge de l’expéditeur.
Conformément à l‘article 1, § 18 et à l‘article 2 de la loi du 25 juin 2009 sur
la nouvelle réglementation de la responsabilité pour les produits soumis au
droit des déchets pour les batteries et accumulateurs
(Gesetz zur
Neuregelung der abfallrechtlichen Produktverantwortung für Batterien und
Akkumulatoren),
nous sommes dans l‘obligation de fournir les informations
ci-après.
Votre appareil contient des piles alcalines.
Si les batteries sont « vides » ou si les accumulateurs ne peuvent plus être
rechargés, vous ne devez pas les jeter avec les déchets normaux ni avec les
déchets ménagers. Les batteries usagées peuvent contenir des polluants
susceptibles de nuire à l‘environnement et à la santé. Prière de nous
retourner l’appareil. Cette restitution est gratuite et inscrite dans la loi.
Veuillez ne déposer des batteries déchargées que dans les conteneurs
appropriés et masquer les pôles des batteries au lithium. Attention : la
batterie utilisée dans cet appareil peut provoquer des risques d’incendie ou
de blessures chimiques en cas d‘utilisation non conforme.
Ne tentez pas d’ouvrir ou de démonter la batterie ni ses éléments, de les
incinérer ni de les porter à des températures supérieures à 60 °C. Pour la
mise au rebut, la batterie peut être retirée comme indiqué au point (7). Les
directives de mise au rebut indiquées ci-dessus s‘appliquent en particulier
aux appareils usagés. Tous les accumulateurs et batteries sont revalorisés.
Il est notamment possible de réutiliser des matières premières de grande
valeur telles que le fer, le zinc ou le nickel.
symbole a la signication suivante :
Le
Les appareils électriques et électroniques ne doivent pas être jetés avec les
déchets normaux ni avec les déchets ménagers.
31
Page 32

12. Garantie et responsabilité
Conformément à ses conditions générales de vente, ecom instruments
GmbH accorde pour ce produit une garantie de deux ans pièces et maind‘œuvre, dans les conditions d‘utilisation et d‘entretien indiquées et
autorisées. En sont exclues toutes les pièces d‘usure (p. ex. piles, ampoules
d‘éclairage, etc.).
Pour de plus amples informations à propos des Conditions générales de
livraison et de paiement de l’entreprise ecom instruments GmbH, consultez
le site www.ecom-ex.com ou adressez-vous directement au fabricant.
13. Déclaration UE de conformité
La déclaration UE de conformité est fourni avec le produit sous forme d’un
document distinct. Veuillez également observer les informations fournies
au-dessous de la table des matières. La déclaration de conformité UE en
cours de validité peut être téléchargée sur la page du produit correspondant
sur www.ecom-ex.com.
14. Certicat d‘examen de type UE
Le certicat est fourni avec le produit sous forme d’un document distinct.
Le Certicat d‘examen de type UE en cours de validité peut être téléchargé
sur la page du produit correspondant sur www.ecom-ex.com.
32
Page 33

Indice
1. Uso ......................................................................................................... 34
2. Informazioni di sicurezza ....................................................................... 34
3. Difetti e danni ......................................................................................... 34
4. Prescrizioni di sicurezza ........................................................................ 35
4.1 Speciale utilizzo all’ interno della zona classicata Ex ....................... 35
5. Avvertenza di sicurezza ..........................................................................35
6. Dati sul rischio di esplosioni .................................................................. 36
6.1 ATEX .....................................................................................................36
6.2 IECEx .................................................................................................... 36
7. Dati tecnici ............................................................................................. 37
8. Descrizione del funzionamento/indicazioni per l’uso ...........................37
8.1 Componenti Lite-Ex PL 30e ................................................................. 38
8.2 Messa in esercizio ................................................................................ 38
8.2 Guida introduttiva ................................................................................. 38
8.3 Sostituzione delle batterie ................................................................... 38
8.4 Pulizia dell anello girevole ................................................................... 39
8.5 Sostituzione della lampadina............................................................... 39
8.6 Sostituzione del vetro frontale ............................................................. 40
9. Riparazione ............................................................................................ 40
10. Pulizia, manutenzione e stoccaggio .................................................... 40
11. Smaltimento ......................................................................................... 40
12. Garantie et responsabilité ...................................................................42
13. Dichiarazione di conformità UE ........................................................... 42
14. Certicato di esame UE del tipo .......................................................... 42
Nota:
Le istruzioni per l’uso, la Dichiarazione di conformità UE e il Certicato di
esame UE del tipo per esplosivi possono essere scaricati dalla pagina del
prodotto corrispondente del sito www.ecom-ex.com oppure possono essere
richiesti direttamente al produttore.
33
Page 34

1. Uso
Il Lite-Ex PL 30e è una torcia LED- / torcia elettrica (secondo la direttiva
2014/34 / UE, ATEX) per uso industriale in aree potenzialmente esplosive
classicate come Zona 0 e 20 (in conformità alla direttiva 1999/92 / CE) et
dal sistema IECEx.
2. Informazioni di sicurezza
Le presenti istruzioni per l’uso contengono informazioni e normative
sulla sicurezza che devono essere sempre rispettate per consentire il
funzionamento sicuro nelle condizioni descritte. La mancata osservanza di
tali informazioni e indicazioni può avere conseguenze pericolose o violare le
prescrizioni previste.
Prima di iniziare a utilizzare l’unità, leggere con attenzione le istruzioni
per l’uso. In caso di dubbi (causati da errori di traduzione o di stampa),
verranno ritenute valide le istruzioni per l’uso in lingua inglese.
3. Difetti e danni
Se per una qualche motivazione si ritiene che la sicurezza dell’unità sia
stata compromessa, è necessario smettere di utilizzarla e rimuoverla
immediatamente dall’area a rischio di esplosione.
È necessario adottare le dovute precauzioni per impedire la messa in
funzione involontaria.Si consiglia di restituire l’unità al produttore per
sottoporla ad attenta ispezione.
La sicurezza del dispositivo è compromessa, ad esempio, se:
• l’alloggiamento presenta danni evidenti;
• l’unità è stata sottoposta a carichi eccessivi;
• l’unità è stata riposta in modo inadeguato;
• l’unità è stata danneggiata durante il trasporto;
• le etichette o le iscrizioni dell’unità non sono leggibili;
• si verica un malfunzionamento;
• sono stati superati i limiti massimi consentiti.
34
Page 35

4. Prescrizioni di sicurezza
L’uso dell’unità presuppone che l’utente si attenga alle normative standard
sulla sicurezza e abbia letto il certicato per evitare un impiego errato del
dispositivo.
È inoltre necessario rispettare le normative sulla sicurezza riportate di
seguito:
• L’unità non deve essere aperta all’interno dell’area a rischio di esplosioni.
• Le batterie devono essere sostituite solo al di fuori dell’area a rischio di
esplosioni.
• Non portare batterie supplementari e di scorta all’interno dell’area a
rischio di esplosione.
• Impiegare esclusivamente batterie omologarte.
• È consentito impiegare solo guarnizioni ad anello e vetri di ricambio di
ecom instruments.
• Possono essere utilizzati solo gli accessori autorizzati da ecom
instruments GmbH.
• Evitare di far entrare in contatto il dispositivo con acidi o basi aggressive.
• La testa interna della lampada non deve essere aperta.
4.1 Speciale utilizzo all’ interno della zona classicata Ex
• e’ proibito stoccare le torche
• dopo aver cambiato le batterie e la guarnizone, assicurarsi che i letti e
la guarnizi one stessa siano puliti e in buone condizioni.
• Prima di utilizzare la torcia in zone pericolose e per garantire il livello
di protezione IP, è necessario vericare che tutte le parti siano avvitate e
serrate a mano (evitando di eccedere).
5. Avvertenza di sicurezza
Rischio di accecamento!
• Non guardare mai direttamente il raggio di luce
• non puntare mai la luce negli occhi di altre persone
35
Page 36

6. Dati sul rischio di esplosioni
6.1 ATEX
Certicato di esame UE del tipo: EPS 16 ATEX 1 170 X
Marcatura Ex: † II 1 G Ex ia op is IIC T4 Ga IP65
† II 1 D Ex ia IIIC T130° Da IP65
Temperatura ambiente: -20°C ≤ Ta ≤ +50°C
Approvato per la zona 2,1 e 0, il gruppo di dispositivi II, il gruppo di
esplosione IIC, la classe di temperatura T4.
Approvato per la zona 22, 21 e 20, il gruppo di dispositivi II, il gruppo di
esplosione IIIC, temperatura max. 130°C.
6.2 IECEx
Certicato di conformità IECEx n.: IECEx EPS 16.0074X
Marcatura Ex: Ex ia op is IIC T4 Ga IP65
Ex ia IIIC T130°C Da IP65
Temperatura ambiente: -20°C ≤ Ta ≤ +50°C
Approvato per la zona 2, 1 e 0, il gruppo di dispositivi II, il gruppo di
esplosione IIC, la classe di temperatura T4.
Approvato per la zona 22, 21 e 20, il gruppo di dispositivi II, il gruppo di
esplosione IIIC, temperatura max. 130°C.
36
Page 37

7. Dati tecnici
Temperatura ambiente Ta: -20 °C ... +50 °C
Temperatura di stoccaggio: -30 °C ... +60 °C (senza batterie)
Batterie/alimentazione elettrica: 3 x LR14 (vedere tabella)
Lampadina: 1 LED ad alte prestazioni (3 Watt)
Intensità luminosa: 5.000 lx (a 1 m di distanza)
Flusso luminoso: 204 Lumen
Durata in servizio: > 24 ore (funzionamento continuo)
Dimensioni: ca. 220 mm x 40/45 mm
Peso: ca. 550 g (comprese batterie)
Grado di protezione IP: IP 65
Protezione ESD: Alloggiamento antistatico
Marchio CE:
0102
Tabella con i tipi di batteria testati
Produttore Tipo (LR14)
Panasonic Pro Power
Panasonic Powerline
Eveready Energizer Energizer A93
Varta 4014
Energizer E93
Lista delle guarnizioni O.R. e dei dischi frontali approvati:
Produttore Tipo
ecom Set completo di guarnizioni o-ring tipo PL 30
ecom Vetro di ricambio tipo PL 30
37
Page 38

8. Descrizione del funzionamento/indicazioni per l’uso
Leggere attentamente queste istruzioni per l´uso per poter aver la
conoscenza ed utilizzare tutte le funzioni del prodotto Lite-Ex PL 30e in uso.
Per propria sicurezza e informazione, leggere le indicazioni riportate alle
pagine seguenti!
8.1 Componenti Lite-Ex PL 30e
manico
anello girevole
alloggiamento
guarn. ad anello
35x2
39x1,5
30x2
scomparto
vite guida
testa della torcia
vetro frontale
Fig 1
8.2 Messa in esercizio
Afnché la torcia tascabile possa essere utilizzata in un‘area a rischio di
esplosione, occorre garantire che l’alloggiamento esterno della testa della
torcia e lo stelo siano chiusi perfettamente. La lampada può quindi essere
accesa girando leggermente in senso orario l’anello girevole giallo. La torcia
viene fornita dal produttore con le batterie.
8.2 Guida introduttiva
Per poter utilizzare la torcia nelle aree a rischio esplosione, controllare
innanzitutto che l‘alloggiamento esterno della testa e dell’impugnatura
dell’apparecchio sia stato completamente avvitato. Successivamente
è possibile accendere la torcia ruotando leggermente l’anello giallo
in senso orario. Le batterie in dotazione devono essere inserite prima
nell’apparecchio (si veda il paragrafo 8.3).
38
Page 39

8.3 Sostituzione delle batterie
Se si nota che la potenza della torcia non è più soddisfacente, occorre
sostituire le batterie. Si raccomanda di sostituire sempre tutte le 3 batterie
insieme. Possono essere utilizzate solo batterie del tipo ammesso (vedere
la tabella con le batterie omologate al punto 7. Dati tecnici).
Per sostituire le batterie, tenere ferma la testa dell’alloggiamento e l’anello
girevole; girare in senso antiorario il manico e toglierlo dalla lampada.
Successivamente si possono estrarre le batterie dal tubo metallico e
sostituirle. Dopo aver inserito le batterie nuove (fare attenzione alla polarità)
si può riavvitare il manico. Prima di riaccendere la torcia, assicurarsi che sia
bene avvitata.
Sostituzione delle batterie
• usare solo batterie omologate. Vedi tabella, punto 7. dati tecnici.
• Sostituire sempre tutte le batterie insieme.
• Fare attenzione alla giusta polarità.
• Smaltire le batterie scariche in modo corretto e non dannoso per
l’ambiente!
• Quando si sostituiscono le batterie, controllare che l’anello di guarnizione
e la lettatura non siano sporchi o danneggiati.
8.4 Pulizia dell’anello girevole
Per accendere la torcia Lite-Ex PL 30e ruotare l’anello girevole senza
contatto (si veda la descrizione sopra). Lo sporco e l’umidità non
pregiudicano il funzionamento. L’anello girevole è facile da pulire nel caso
in cui un accumulo di sporcizia ne complichi l’utilizzo. Estrarre prima di
tutto l’impugnatura della torcia e rimuovere le batterie (si veda paragrafo
8.3 Sostituzione della batteria). Rimuovere l’anello girevole spostandolo
verso il retro della torcia e pulirlo accuratamente. Al momento di rimontare
l’interruttore assicurarsi che le freccette sull’anello siano allineate con la
vite di regolazione posta alla base della testa della torcia (cfr. Figura 1).
Dopodiché reinserire le batterie e avvitare l’impugnatura della torcia.
8.5 Sostituzione della lampadina
La Lite-Ex PL 30e è equipaggiata con una lampadina a LED di lunghissima
durata. Di norma, non è necessario provvedere alla sostituzione del LED.
In caso di guasti o qualora l’intensità luminosa dovesse decrescere, inviare
la torcia per un controllo ed eventuale riparazione a ecom instruments.
39
Page 40

La testa interna della lampada non deve essere aperta! Non è consentito
di provvedere personalmente ad effettuare interventi alla torcia che
potrebbero comprometterne la sicurezza.
8.6 Sostituzione del vetro frontale
La parte interna della testa è protetta da un alloggiamento e da una piccola
lastra in vetro da cui esce la luce. Se tuttavia il vetro dovesse rompersi, è
possibile sostituirlo. Tenere fermi il manico della Lite-Ex PL 30e
nonché l’anello girevole e svitare con cautela l’alloggiamento della testa
in senso antiorario. Pulire con cura l’alloggiamento dai resti di vetro rotto
e controllare la tenuta della guarnizione. Inserire quindi il vetro nuovo
e, all’occorrenza, sostituire la guarnizione ad anello, che si trova fra la
testa dell’alloggiamento e la lastra di vetro. Quando si rimette la testa
dell’alloggiamento, controllare che vetro e guarnizione siano appoggiati
bene. E’ consentito l’utilizzo solo di guarnizioni fornite da ecom instruments
GmbH. Dopo l’assemblaggio non devono vedersi parti di guarnizione nella
zona da cui fuoriesce il raggio luminoso. Se dovessero danneggiarsi la parte
interna della testa o la lente, è necessario inviare la torcia al produttore per
le dovute riparazioni.
9. Riparazione
Gli interventi di riparazione devono essere eseguiti da ecom instruments
GmbH o da centri assistenza autorizzati da ecom instruments GmbH poiché
dopo la riparazione è necessario un controllo tecnico di sicurezza.
Il modulo per la riparazione può essere scaricato nella sezione ‘Assistenza’,
alla voce ‘Riparazione dei prodotti’ cliccando qui: www.ecom-ex.com.
10. Pulizia, manutenzione e stoccaggio
• Pulire l’apparecchio esclusivamente con un panno o una spugna adatta.
Non utilizzare né solventi, né abrasivi.
• Si consiglia di far vericare dal produttore il funzionamento e la resa di
luce dell’apparecchio ogni due anni.
• In caso di stoccaggio prolungato, estrarre le batterie dall’apparecchio.
• Non superare né scendere sotto le temperature di stoccaggio consentite
comprese tra -30 °C e +60 °C!
• Veuillez noter que les performances électriques des types de batteries
spéciales au zinc / dioxyde de manganèse (Zn/MnO2) se limitent aux
températures ambiantes inférieures à la plage de température ambiante
spécique au produit. Il est conseillé de consulter les ches de données
pour le fabricant spécique et le type de batterie employé an de
40
Page 41

connaître la plage de température ambiante recommandée de manière à
garantir des performances maximales de la batterie. »
11. Smaltimento
Gli apparecchi elettronici dismessi di ecom instruments GmbH verranno
inviati a nostre spese per lo smaltimento e smaltiti gratuitamente secondo
la direttiva europea 2002/96/CE. Vi preghiamo di seguire le disposizioni
locali in materia di smaltimento di prodotti elettronici. I costi associati alla
restituzione dei dispositivi a ecom instruments GmbH sono invece a carico
del mittente.
Ai sensi degli art. 1, §18 e art. 2 della legge del 25 giugno 2009 che
disciplina le nuove regole sullo smaltimento di pile e accumulatori
in termini di responsabilità di prodotto
(Gesetz zur Neuregelung der
abfallrechtlichen Produktverantwortung für Batterien und Akkumulatoren)
siamo obbligati a fornire le seguenti informazioni. Il dispositivo è dotato di
batterie al litio o di batterie alcaline.
L‘apparecchio contiene batterie alcaline.
In presenza di batterie „scariche“ esausti non ulteriormente ricaricabili,
non è consentito procedere al loro smaltimento come riuti normali o riuti
domestici. Le batterie esauste contengono eventuali sostanze dannose per
la salute e l’ambiente. Restituire il dispositivo. Il conferimento è gratuito ed
è prescritto dalle normative vigenti. Si prega di consegnare negli appositi
contenitori di raccolta solo batterie esauste e di isolare
prima del riciclo i poli delle batterie al litio.
Attenzione:
Le batterie utilizzata nell’apparecchio può essere causa di incendio e
lesioni chimiche in caso di impiego non conforme. Non è consentito aprire
o smontare le batterie o le celle della batterie, né esporle a temperature
superiori a 60 °C o gettarle nel fuoco. In caso di smaltimento è possibile
rimuovere le batterie secondo quanto descritto al punto (8.2). Trovano per il
resto applicazione le norme sullo smaltimento di apparecchi esausti o usati.
Tutte le batterie possono essere riciclate. In questo modo è possibile
recuperare materie prime preziose come ferro, zinco e nichel.
,
Il simbolo
ha il seguente signicato:
I riuti di apparecchiature elettriche ed elettroniche esausti come riuti
normali o riuti domestici. Quando si spediscono le batterie, attenersi ai
41
Page 42

12. Garantie et responsabilité
Conformément à ses conditions générales de vente, ecom instruments
GmbH accorde pour ce produit une garantie de deux ans pièces et maind‘œuvre, dans les conditions d‘utilisation et d‘entretien indiquées et
autorisées. En sont exclues toutes les pièces d‘usure (p. ex. piles, ampoules
d‘éclairage, etc.).
Per maggiori informazioni sulle Condizioni generali di consegna e
pagamento di ecom instruments GmbH consultare la pagina www.ecom-ex.
com o in alternativa rivolgersi direttamente al produttore.
13. Dichiarazione di conformità UE
La Dichiarazione di conformità UE e il certicato sono acclusi alla
confezione come documenti separati. Si prega di osservare altresì
l’indicazione alla ne dell’indice. La Dichiarazione di conformità UE può
essere scaricata dalla pagina del prodotto corrispondente su www.ecom-ex.
com.
14. Certicato di esame UE del tipo
La Dichiarazione di conformità UE e il certicato sono acclusi alla
confezione come documenti separati. Il certicato di esame UE del tipo può
essere scaricato dalla pagina del prodotto corrispondente su www.ecom-ex.
com.
42
Page 43

Índice
1. Aplicación ............................................................................................... 44
2. Información de seguridad ...................................................................... 44
3. Averías y daños ...................................................................................... 44
4. Normas de seguridad ............................................................................ 45
4.1 Condiciones especiales para el uso en zonas
con riesgo de explosiones ........................................................................45
5. Instrucciones de seguridad ................................................................... 45
6. Datos Ex ................................................................................................. 46
6.1 ATEX .....................................................................................................46
6.2 IECEx .................................................................................................... 46
7. Datos técnicos ........................................................................................ 47
8. Descripción del funcionamiento / instrucciones de servicio ................ 48
8.1 Componentes Lite-Ex PL 30e .............................................................. 48
8.2 Puesta en marcha ................................................................................ 48
8.3 Cambio de pilas .................................................................................... 48
8.4 Limpieza del anillo giratorio ................................................................ 49
8.5 Cambio de lámpara .............................................................................. 49
8.6 Cambio del disco delantero ................................................................. 50
9. Reparación ............................................................................................. 50
10. Limpieza, mantenimiento y almacenamiento ..................................... 50
11. Eliminación........................................................................................... 51
12. Garantía y responsabilidad .................................................................. 52
13. Declaración de conformidad de la UE ................................................. 52
14. Certicado de examen UE de tipo ........................................................52
Nota:
Estas instrucciones de uso, la Declaración de conformidad de la UE y el
Certicado de examen UE de tipo están disponibles para su descarga a
través de la página correspondiente al producto en el sitio web www.ecom-
ex.com y pueden solicitarse directamente al fabricante
43
Page 44

1. Aplicación
La Lite-Ex PL 30e es una linterna LED (según directiva 2014/34 / UE, ATEX)
para uso industrial en zonas potencialmente explosivas clasicadas como
zonas 0 y 20 (según la Directiva 1999/92 / EC) y la norma IECEx.
2. Información de seguridad
Estas instrucciones de uso contienen información y normas de seguridad
que deben respetarse escrupulosamente a n de garantizar el uso seguro
en las condiciones descritas. Ignorar dicha información y las instrucciones
descritas a continuaci- ón podría derivar en consecuencias graves o la
infracción de determinadas normas.
Lea detenidamente estas instrucciones de uso antes de comenzar a
utilizar el dispositivo. En caso de duda (debido a un error de traducción o
impresión), prevalecerán las instrucciones de uso redactadas en inglés.
3. Averías y daños
Si existe alguna razón que conduzca a sospechar de la seguridad del
dispositivo, desista de su uso y aléjelo del área sometida a riesgo de
explosión inmediatamente.
Tome las medidas necesarias para evitar que el dispositivo pueda volver a
encenderse accidentalmente.
Se recomienda devolver el dispositivo al fabricante para que este proceda a
su inspección.
La seguridad del dispositivo podría ponerse en compromiso si, por ejemplo:
• La cubierta sufre daños visibles.
• El dispositivo ha sido sometido a una carga excesiva.
• El dispositivo ha permanecido almacenado en condiciones inadecuadas.
• El dispositivo ha resultado dañado durante su transporte.
• Las marcas o inscripciones que ostenta el dispositivo no son legibles.
• El dispositivo no funciona correctamente.
• Se exceden los límites permitidos.
44
Page 45

4. Normas de seguridad
El uso de este dispositivo implica que el usuario respete las normas
convencionales de seguridad y lea el certicado con objeto de evitar el uso
del dispositivo de un modo incorrecto.
También deberán respetarse las siguientes normas de seguridad
adicionales:
• La unidad no debe abrirse dentro de zonas potencialmente explosivas.
• Las pilas deben cambiarse únicamente fuera de la zona potencialmente
explosiva.
• No deben llevarse pilas adicionales o de reserva al área potencialmente
explosiva
• Solo se deben utilizar tipos de pilas aprobados;
• Solo están permitidos los discos y las juntas tóricas de repuesto de ecom
instruments.
• Únicamente se admite el uso de accesorios aprobados por ecom
instruments GmbH.
• Evite que el aparato entre en contacto con ácidos agresivos o lejias.
• No abra el interior del cabezal de la linterna.
4.1 Condiciones especiales para el uso en zonas con riesgo de explosiones
• Se prohíbe el depósito de la linterna en almacenes.
• Tras cada cambio de batería o anillo estanqueizante, se deben comprobar
la limpieza, la sujeción, y los posibles deterioros del anillo
estanqueizante y la rosca.
• Las partes de la carcasa de la lámpara deben ser atornilladas con
fuerza o hasta el tope antes de su empleo en la zona Ex para garantizar
la protección IP.
5. Instrucciones de seguridad
Peligro de deslumbramiento!
• No mire directamente al rayo de luz
No dirija directamente el cono de luz hacia los ojos de otra persona
45
Page 46

6. Datos Ex
6.1 ATEX
Certicado de examen UE de tipo: EPS 16 ATEX 1 170 X
Marcado Ex: † II 1 G Ex ia op is IIC T4 Ga IP65
† II 1 D Ex ia IIIC T130° Da IP65
Temperatura ambiente: -20°C ≤ Ta ≤ +50°C
Homologado para Zonas 2,1 y 0; grupo de dispositivos II; grupo de
elementos explosivos IIC, categoría de temperatura T4.
Homologado para las zonas 22, 21 y 20; grupo de dispositivos II; grupo de
elementos explosivos IIIC, temperatura máxima 130°C.
6.2 IECEx
N.º de Certicado de conformidad
según la norma IECEx: IECEx EPS 16.0074X
Marcado Ex: Ex ia op is IIC T4 Ga IP65
Ex ia IIIC T130°C Da IP65
Temperatura ambiente: -20°C ≤ Ta ≤ +50°C
Homologado para Zonas 2, 1 y 0; grupo de dispositivos II; grupo de
elementos explosivos IIC; categoría de temperatura T4.
Homologado para las Zonas 22, 21 y 20; grupo de dispositivos II; grupo de
elementos explosivos IIIC; temperatura máxima: 130°C.
46
Page 47

7. Datos técnicos
Temperatura ambiente Ta: -20 °C ... +50 °C
Temperatura de almacenamiento: -30 °C ... +60 °C (sin pilas)
Pilas / suministro eléctrico: 3 x LR14 (véase tabla)
Lámpara: 1 LED de alto rendimiento (3 vatios)
Luminosidad: 5000 lx (a 1 m de distancia)
Flujo luminoso: 204 Lumen
Duración de servicio: > 48 horas (funcionamiento continuo)
Dimensiones: aprox. 220 mm x 40/45 mm
Peso: aprox. 550 g (con pilas)
Tipo de protección IP: IP 65
Protección ESD: carcasa antiestática
Identicación CE:
0102
Tabla con pilas homologdas
Fabricante Tipo (LR14)
Panasonic Pro Power
Panasonic Powerline
Eveready Energizer Energizer A93
Varta 4014
Energizer E93
Tablas con juntas autorizadas y cristales
Fabricante Tipo
ecom Anillos estanqueizantes tipo PL 30 (completo)
ecom Disco de repuesto ,Tipo PL 30
47
Page 48

8. Descripción del funcionamiento / instrucciones de servicio
Lea atentamente estas instrucciones de servicio con cuidado, para
poder conocer y utilizar todas las funciones de Lite-Ex PL 30e. Lea las
instrucciones incluidas en las siguientes páginas para su seguridad e
información.
8.1 Componentes Lite-Ex PL 30e
Varilla
Cabezal arcasa
Anillos estanqueizantes
30x2
35x2
39x1,5
Anillo giratorio
Compartimento pilas
Tornillos de guía
Cabezal linterna
disco
Imagen 1
8.2 Puesta en marcha
Para poder usar la linterna en el área potencialmente explosiva, deberá
asegurarse de que el cabezal exterior de la carcasa y el cuerpo estén
completamente enroscados. Una vez hecho esto, puede encender la linterna
girando el anillo giratorio amarillo ligeramente en la dirección de las agujas
del reloj. Las pilas incluidas deben insertarse primero en el dispositivo
(consulte el apartado 8.3).
8.3 Cambio de pilas
Si se observa que la intensidad de iluminación no es satisfactoria, entonces
deberán cambiarse las pilas. Se recomienda que las 3 pilas se cambien
simultáneamente.
48
Page 49

Sólo pueden utilizarse pilas del correspondiente tipo autorizado (véase tabla
con pilas homologadas en el punto 7. Datos técnicos).
Sujete el cabezal de la carcasa incluido el anillo giratorio para llevar a
cabo el cambio de pila, gire la varilla en dirección de las agujas del reloj y
extraiga la lámpara. A conti-nuación, podrá sacar las pilas del tubo metálico
y cambiarlas. Después de la colocación de las nuevas pilas (preste atención
a la polaridad), abra de nuevo la varilla. Preste atención a que la linterna
está cerrada por completo antes de encenderla de nuevo.
Cambio de pilas
• Utilice únicamente las pilas homologadas. Véase la tabla, punto 7.
Datos Técnicos.
• Cambie siempre todas las pilas simultáneamente.
• Preste atención a la polaridad correcta.
• Elimine debidamente y de forma ecológica las pilas usadas
• Durante el cambio de pila, compruebe la limpieza de roscas y juntas
y posibles deterioros.
8.4 Limpieza del anillo giratorio
El Lite-Ex PL 30e se enciende sin contacto a través del anillo giratorio
descrito anteriormente. La suciedad y humedad no pueden mermar la
función de conmutación. Si el anillo giratorio se tiene que endurecer
mediante fuertes sedimentos, el anillo se podrá limpiar de forma fácil y
sin complicaciones. Retire la varilla y las pilas por el momento. (Véase el
punto 8.3 Cambio de pilas). El anillo giratorio se puede sacar ahora hacia
atrás y proceder a la limpieza. En la colocación del anillo giratorio, preste
atención a que, las echas y el tornillo de guía visibles del anillo giratorio
están colocados en la posición correcta en el cabezal inferior de la linterna.
A continuación, vuelva a colocar la pila y atornille la varilla.
8.5 Cambio de lámpara
El Lite-Ex PL 30e está provisto de una lámpara LED de gran durabilidad. En
condiciones normales no será necesario cambiar el LED. En caso de avería
o disminución de la luminosidad, compruebe la linterna o envíela a reparar
a ecom instruments. - No deje abierto el cabezal interno de la linterna. Las
49
Page 50

intervenciones por cuenta propia en el cabezal o lámpara de la linterna
ponen en peligro la seguridad de la linterna. Por consiguiente, dichas
intervenciones quedan prohibidas.
8.6 Cambio del disco delantero
El cabezal interno de la linterna está protegido mediante el cabezal de la
carcasa que lo rodea y mediante un cristal adicional en la parte de salida
de luz. Si se produce una rotura del cristal a pesar de la protección de gran
calidad del mismo, éste se deberá sustituir. Para ello, sujete la varilla del
Lite-Ex PL 30e y el anillo giratorio y desatornille con cuidado el cabezal de
la carcasa en sentido antihorario. Limpie de forma adecuada e inmediata
el cabezal de la carcasa de restos de cristales y compruebe que no esté
dañado el anillo estanqueizante. A continuación, se puede colocar un
nuevo cristal y, si fuera necesario, un nuevo anillo estanqueizante. El anillo
estanqueizante está situado entre el cabezal de la carcasa y el cristal (véase
Imagen 1). En la colocación del cabezal de la carcasa, preste atención a
que la junta y el cristal queden bien ajustados. Tras el montaje, no deben
estar visibles las partes de las juntas en la entrada de luz Si se han
producido daños en el cabezal de la linterna o en la lente, envíe la linterna
al fabricante para proceder a su reparación.
9. Reparación
Las reparaciones deberán ser realizadas por ecom instruments GmbH, o
bien por personal o centros de asistencia autorizados por ecom instruments
GmbH. Ello se debe a que es necesario vericar la seguridad del dispositivo
una vez llevadas a cabo las reparaciones. El formulario de solicitud de
reparación está disponible para su descarga en la sección de servicio del
sitio web www.ecom-ex.com.
10. Limpieza, mantenimiento y almacenamiento
• Limpie el aparato sólo con un paño apropiado o con una esponja.
• No utilice disolventes ni detergentes para la limpieza.
• Es recomendable que el fabricante compruebe el funcionamiento y
prestaciones de
luminosidad
del aparato cada dos años.
• Extraiga las pilas del aparato si va a ser almacenado durante algún tiempo.
• Respete la temperatura de almacenamiento permitida, de –30 °C a +60 °C.
• Es necesario asegurarse de que el rendimiento eléctrico de las baterías
de tipos especícos de zinc-dióxido de manganeso (Zn/MnO2) se
50
Page 51

limite a temperaturas ambiente inferiores al rango de temperaturas
ambiente especicadas para el producto. Consulte las chas técnicas
del fabricante especíco y del tipo de baterías utilizado para ver cuál es
el rango de uso de temperaturas ambiente recomendado para lograr el
rendimiento máximo de las baterías»
11. Eliminación
Los dispositivos eléctricos antiguos de ecom instruments GmbH pueden ser
depositados en nuestras instalaciones sin cargo alguno de acuerdo a la
Directiva Europea 2002/96/EC. Respete las normativas locales acerca de la
eliminación de productos electrónicos. Los costes derivados de la devolución
de dispositivos a ecom instruments GmbH correrán a cuenta del remitente.
De acuerdo con la sección 18 del artículo 1 y el artículo 2 de la nueva ley
acerca de la eliminación responsable de baterías y acumuladores
(Gesetz zur
Neuregelung der abfallrechtlichen Produktverantwortung für Batterien und
Akkumulatoren)
del 25 de junio de 2009, es nuestra obligación proporcionar
la siguiente información.
Su aparato contiene pilas alcalinas Si las baterías están „vacías“ o no dejan
recargarse, no está permitido desecharlas en la basura normal o casera. Las
baterías gastadas pueden contener sustancias peligrosas que pueden dañar
el medio ambiente y la salud. Por favor devuelva las baterías/acumuladores.
La devolución es gratuita y está jada por ley. Por favor deseche sólo baterías
descargadas en los recipientes para ello dispuestos y cubra con cinta
adhesiva los polos de las baterías de litio.
Atención:
En caso de un uso inadecuado, la batería empleada en este aparato
puede ocasionar incendios y provocar lesiones químicas. No está permitido
abrir o desmontar la batería ni sus células, ni tampoco calentarla a más de
60 °C o quemarla. En caso de ser desechada, se puede extraer la batería
como se describe en el punto (7). Adicionalmente rigen las normas para la
eliminación de aparatos antiguos, arriba señaladas. Todas las baterías y
acumuladores serán reutilizados. Esto permite recuperar valiosas materias
primas como hierro, zinc o níquel.
51
Page 52

El símbolo signica:
Los aparatos eléctricos y electrónicos antiguos no deben eliminarse en la
basura normal o casera.
12. Garantía y responsabilidad
Ecom instruments GmbH garantiza el funcionamiento y el material de
este producto por un periodo de dos años en las condiciones de servicio y
mantenimiento indicadas. Quedan excluidas las piezas de desgaste (pilas,
lámparas, etc.).
Dispone de más información respecto a las Condiciones generales de
entrega y pago de ecom instruments GmbH en www.ecom-ex.com, o
también puede solicitarla directamente al fabricante.
13. Declaración de conformidad de la UE
La Declaración de conformidad de la UE y el certicado forman parte del
paquete comercial del dispositivo, en el que se incluye como documento
independiente. Contemple también la información que gura bajo el índice.
La Declaración de conformidad de la UE vigente puede descargarse de la
página de producto correspondiente en www.ecom-ex.com.
14. Certicado de examen UE de tipo
La Certicado de examen CE de tipo forman parte del paquete comercial del
dispositivo, en el que se incluye como documento independiente. El certicado
de protección contra explosión vigente puede descargarse de la pági-na de
producto correspondiente en www.ecom-ex.com.
52
Page 53

Indice
1. Aplicação ................................................................................................ 54
2. Informações de segurança .................................................................... 54
3. Defeitos e danos ..................................................................................... 54
4. Regulamentações de segurança ...........................................................55
4.1. Condições especiais para a aplicação em áreas
potencialmente explosivas .................................................................55
5. Indicação de Segurança ......................................................................... 55
6. Dados Ex................................................................................................. 56
6.1 ATEX .....................................................................................................56
6.2 IECEx .................................................................................................... 56
7. Dados Técnicos ...................................................................................... 57
8. Descrição de funções / Indicações de utilização ................................... 58
8.1 Componentes Lite-Ex PL 30e .............................................................. 58
8.2 Colocaçao em funcionamento ............................................................. 58
8.3 Substituição das pilhas ........................................................................ 58
8.4 Limpeza do anel rotativo ......................................................................59
8.5 Substituição da lâmpada...................................................................... 59
8.6 Substituição do vidro dianteiro ............................................................60
9. Reparação .............................................................................................. 60
10. Limpeza, manutenção e armazenamento ........................................... 60
11. Descarte ............................................................................................... 61
12. Garantia e responsabilidade ................................................................ 62
13. Declaração de Conformidade da UE .................................................... 62
14. Certicado de exame UE de tipo ..........................................................62
Observação:
As instruções de operação, a Declaração de conformidade da UE e a
Certicado de exame UE de tipo atuais podem ser baixados na página
especíca do produto em www.ecom-ex. com ou, de maneira alternativa,
podem ser solicitados diretamente ao fabricante.
53
Page 54

1. Aplicação
A Lite-Ex PL 30e é uma lanterna LED (de acordo com a directiva 2014/34
/ UE, ATEX) para uso industrial em áreas potencialmente explosivas
classicadas nas zonas 0 e 20 (de acordo com a Directiva 1999/92 / CE) e o
sistema IECEx.
2. Informações de segurança
Essas instruções de operação contêm informações e regulamentos de
seguran-ça que devem ser rigorosamente observados para uma operação
segura nas con-dições descritas. A não observância dessas informações e
instruções pode gerar sérias consequências ou violar regulamentos.
Leia as instruções de operação cuidadosamente antes de começar a utilizar a
uni-dade! No caso de dúvidas (erros de impressão ou tradução), aplicam-se as
inst-ruções de operação em inglês.
3. Defeitos e danos
Se houver razões para suspeitar que a segurança da unidade foi prejudicada,
ela deve ser retirada de operação e removida imediatamente da área Ex.
Devem ser tomadas medidas para impedir que ela seja reiniciada
acidentalmente. Recomendamos que a unidade seja devolvida ao fabricante
para inspeção.
A segurança da unidade pode car comprometida se, por exemplo:
• Houver danos visíveis na carcaça.
• A unidade tiver sido submetida a cargas excessivas.
• A unidade tiver sido armazenada de maneira inadequada.
• A unidade tiver sido danicada em trânsito.
• As marcações ou inscrições na unidade estiverem ilegíveis.
• Ocorrerem falhas no funcionamento.
• Os limites de valores permitidos tiverem sido excedidos.
54
Page 55

4. Regulamentações de segurança
A utilização deste aparelho pressupõe que o utilizador cumpre as regras
convencionais de segurança e que deve ler o certicado de modo a excluir a
possibilidade de um funcionamento incorreto do aparelho.
Também devem ser respeitadas as seguintes regras de segurança:
• O aparelho não pode ser aberto dentro da área Ex.
• As pilhas só podem ser trocadas fora da área Ex.
• Não devem ser transportadas pilhas adicionais ou de reserva na área Ex.
• Somente baterias de tipo testado devem ser usadas.
• São apenas permitidos anéis de vedação e discos de instrumentos ecom.
• Apenas podem ser utilizados acessórios aprovados pela ecom
instruments GmbH.
• Deve evitar-se o contacto do aparelho com ácidos on bases agressivos.
• Não abrir a cabeça da lanterna interior.
4.1. Condições especiais para a aplicação em áreas
potencialmente explosivas
• É proibido pousar ou armazenar a lanterna!
• Depois de cada substituição das pilhas e do anel de vedação, os anéis de
vedação e a rosca devem ser vericados quanto a limpeza, assentamento
correcto e danos.
• As peças da caixa do candeeiro têm de ser rmemente aparafusadas
manualmente e até ao encosto antes da aplicação na área Ex, de modo a
garantir a protecção IP.“
5. Indicação de Segurança
Perigo de encandeamento!
• Não olhar directamente para o raio de luz
• Não direccionar a luz directamente para os olhos de uma pessoa
55
Page 56

6. Dados Ex
6.1 ATEX
Certicado de exame CE de tipo: EPS 16 ATEX 1 170 X
Marcação Ex: †
†
II 1 G Ex ia op is IIC T4 Ga IP65
II 1 D Ex ia IIIC T130° Da IP65
Temperatura ambiente: -20°C ≤ Ta ≤ +50°C
Aprovado para as zonas 2,1 e 0, grupo de dispositivos II, grupo de explosão
IIC, classe de temperatura T4.
Aprovado para as zonas 22, 21 e 20, grupo de dispositivos II, grupo de
explosão IIIC, temperatura máxima 130°C.
6.2 IECEx
Certicado de conformidade IECEx n.º: IECEx EPS 16.0074X
Marcação Ex: Ex ia op is IIC T4 Ga IP65
Ex ia IIIC T130°C Da IP65
Temperatura ambiente: -20°C ≤ Ta ≤ +50°C
Aprovado para as zonas 2, 1 e 0, grupo de dispositivos II, grupo de explosão
IIC, classe de temperatura T4.
Aprovado para as zonas 22, 21 e 20, grupo de dispositivos II, grupo de
explosão IIIC, temperatura máxima de 130°C.
56
Page 57

7. Dados Técnicos
Temperatura ambiente Ta: -20 °C ... +50 °C
Temperatura de armazenamento: -30 °C ... +60 °C (sem pilhas)
Pilhas / Fonte de alimentação: 3 x LR14 (ver tabela)
Lâmpadas: 1 LED de alta potência (3 Watt)
Luminosidade: 5000 lx (a uma distância de 1 m)
Fluxo luminoso: 204 lúmenes
Duração de funcionamento: > 48 horas
(funcionamento contínuo)
Dimensões: aprox. 220 mm x 40/45 mm
Peso: aprox. 550 g (com pilhas)
Tipo de protecção IP: IP 65
Protecção ESD: caixa anti-estática
Identicação CE:
0102
Tabela com baterias de tipo homologado
Fabricante Tipo (LR14)
Panasonic Pro Power
Panasonic Powerline
Eveready Energizer Energizer A93
Varta 4014
Energizer E93
Tabela com vedações e discos autorizados
Fabricante Tipo
ecom Anéis de vedação do tipo PL 30 (completo)
ecom Vidro sobressalente Tipo PL 30
57
Page 58

8. Descrição de funções / Indicações de utilização
Leia atentamente este manual de instruções para que possa conhecer
e utilizar todas as funções da sua Lite-Ex PL 30e. Para sua segurança e
informação, leia as indicações nas páginas que se seguem!
8.1 Componentes Lite-Ex PL 30e
Anéis de vedação
Pega
30x2
Extremidade
da caixa
35x2
39x1,5
Anel rotativo
Compartimento das pilhas
Parafuso de guia
Extremidade da lanterna
Vidro
Imagem 1
8.2 Colocaçao em funcionamento
De modo a poder utilizar a lanterna na área Ex, deve vericar, em primeiro
lugar, que o alojamento exterior da cabeça e o corpo estão completamente
enroscados. Em seguida, poderá ligar a lanterna rodando ligeiramente
o anel deslizante amarelo para a direita. As pilhas incluídas devem ser
introduzidas no dispositivo em primeiro lugar (consulte a secção 8.3).
8.3 Substituição das pilhas
Se vericar que a luminosidade deixa de ser satisfatória, as pilhas devem
ser substituídas. Recomenda-se que substitua as 3 pilhas de uma só vez.
Deve utilizar somente pilhas do respectivo modelo autorizado (ver tabela
com modelos de pilhas testados sob o ponto 7. Dados Técnicos).
Para substituir as pilhas, segurar a extremidade superior da caixa incl.
58
Page 59

anel rotativo e rodar a pega no sentido contrário aos ponteiros do relógio e
retirá-la da lanterna. De seguida, as pilhas podem ser removidas do tubo
em metal e substituídas. Depois de colocar as pilhas novas (preste atenção
à polaridade), a pega pode ser aparafusada novamente. Preste atenção para
que a lanterna esteja totalmente apertada, antes de a voltar a ligar.
Substituição das pilhas
• Somente modelos de pilhas testados. Ver tabela, ponto 7. Dados
Técnicos.
• Substituir sempre todas as pilhas ao mesmo tempo.
• Ter em atenção a polaridade correcta.
• Elimine as pilhas usadas devidamente e protegendo o meio ambiente!
• Ao substituir as pilhas, a rosca e as vedações deve ser vericadas quanto
a limpeza e danos.
8.4 Limpeza do anel rotativo
O Lite-Ex PL 30e é ligado sem contactos através do anel rotativo
descrito anteriormente. A sujidade e a humidade não podem prejudicar
o funcionamento do interruptor. Se o anel rotativo perder mobilidade
devido acumulações de sujidade, este pode simplesmente ser limpo sem
quaisquer problemas. Primeiro, retirar a pega e as pilhas. (Ver o ponto
8.3 Substituição das pilhas). O anel rotativo pode ser puxado para trás e
limpo. Ao colocar o anel rotativo, deve prestar-se atenção para que as setas
visíveis no anel rotativo e o parafuso de guia na extremidade inferior da
lanterna (ver imagem 1) estejam alinhados. De seguida, volte a colocar as
pilhas e aparafuse a pega.
8.5 Substituição da lâmpada
O Lite-Ex PL 30e está equipado com um LED com uma durabilidade
extremamente longa. Normalmente, não é necessário mudar o LED. Em
caso de avaria ou luminosidade deciente, a lanterna deve ser enviada à
ecom instruments para vericação ou reparação. A extremidade superior
interior da lanterna não deve ser aberta! Intervenções próprias na
extremidade da lanterna ou lâmpada prejudicam a segurança da mesma e
não são permitidas.
59
Page 60

8.6 Substituição do vidro dianteiro
A extremidade interior da lanterna é protegida através da extremidade da
caixa, que a envolve, e de um vidro adicional na saída da luz. Se, apesar
do vidro de boa qualidade aplicado, ocorrer uma quebra do mesmo, este
pode ser substituído. Para isso, segure a pega do Lite-Ex PL 30e e o anel
rotativo e desaparafuse cuidadosamente a extremidade da caixa rodando
no sentido contrário aos ponteiros do relógio. De seguida, a extremidade da
caixa deve ser bem limpa, removendo todos os resíduos de vidro e o anel de
vedação deve ser vericado quanto a danos. De seguida, pode ser aplicado
um novo vidro e, se necessário, um novo anel de vedação. O anel de vedação
encontra-se entre a extremidade da caixa e o vidro (ver imagem 1). Ao
colocar a extremidade da caixa, deve ter-se em atenção que não pode existir
sujidade entre a vedação e o vidro. Depois da montagem, não pode estar
visível qualquer parte da vedação na saída de luz. Se a extremidade interior
da lanterna ou a lente forem danicadas, a lanterna deve ser enviada ao
fabricante para reparação.
9. Reparação
Os consertos devem ser realizados pela ecom instruments GmbH ou por
pessoal autorizado ou assistência técnica autorizada pela ecom instruments
GmbH, pois a segurança do dispositivo deve ser testada depois que os
reparos forem implementados. A folha de relatório do conserto pode ser
baixada na seção de assistência técnica em www.ecom-ex.com.
10. Limpeza, manutenção e armazenamento
• Limpar o aparelho apenas com um pano ou esponja adequados.
• Não utilize dissolventes ou produtos abrasivos para limpeza.
• Recomenda-se que o funcionamento e potência da luz do aparelho sejam
testados pelo fabricante a cada dois anos.
• Em caso de armazenamento prolongado, as pilhas devem ser retiradas
do aparelho.
• Não ultrapassar os limites superiores nem inferiores da temperatura de
armazenamento permitida de -20 °C a +60 °C!
• Deve-se observar que o desempenho elétrico dos tipos especícos
de baterias de zinco/dióxido de manganês (Zn/MnO2) é limitado às
temperaturas ambiente inferiores ao intervalo de temperatura ambiente
especicado pelo produto. As folhas de especicações técnicas
do fabricante e os tipos de bateria especícos usados devem ser
60
Page 61

consultados para vericar qual é o intervalo de temperatura ambiente
recomendado para alcançar desempenho máximo da bateria“
11. Descarte
Os dispositivos elétricos antigos da ecom instruments GmbH serão
direcionados para descarte às nossas custas e serão descartados sem
nenhum custo, de acordo com a Diretiva Europeia 2002/96/CE. Siga os
regulamentos locais para o descarte de produtos eletrônicos. Os custos
associados à devolução dos dispositivos para a ecom instruments GmbH
devem ser arcados pelo remetente.
De acordo com o Artigo 1, Seção 18, e Artigo 2 da lei que altera a Lei de
Responsabilidade de Produtos Relacionada a Resíduos para Baterias
e Acumuladores
Produktverantwortung für Batterien und Akkumulatoren)
(Gesetz zur Neuregelung der abfallrechtlichen
de 25 de junho de
2009, somos obrigados a fornecer as seguintes informações:
Seu dispositivo contém baterias alcalinas.
Baterias descarregadas ou baterias recarregáveis que não podem mais ser
carregadas nunca devem ser descartadas junto com o lixo comum ou
doméstico. As baterias antigas podem conter substâncias nocivas que
trazem riscos à saúde e danos ao meio-ambiente. Devolva o dispositivo. A
devolução é gratuita e é exigida por lei.
Observação:
A bateria utilizada nesta unidade apresenta risco de incêndio e
pode causar ferimentos químicos caso seja usada de maneira inadequada.
Nem a bateria nem os elementos da bateria devem ser abertos ou
desmontados, e não devem ser queimados ou expostos a temperaturas
superiores a 60 °C. Caso a bateria precise ser descartada, pode ser
removida conforme descrito no ponto (7). As normas de descarte
especicadas acima também são válidas para dispositivos antigos. Todas
as baterias, recarregáveis ou não, podem ser recicladas. Assim, matériasprimas preciosas como ferro, zinco e níquel podem ser reutilizadas.
O símbolo
tem o seguinte signicado:
Dispositivos elétricos antigos não
devem ser descartados com o lixo comum ou doméstico.
61
Page 62

12. Garantia e responsabilidade
Para este produto a ecom instruments GmbH concede uma garantia de
funcionamento e material de dois anos, conforme as condições contratuais
gerais, sob as condições operacionais e de manutenção indicadas. Estão
excluídas todas as peças sujeitas a desgaste (p. ex. pilhas, lâmpadas, etc.).
Para mais informações relativas às Condições Gerais de Entrega e
Pagamento da ecom instruments GmbH, consulte www.ecom-ex.com ou
contacte diretamente o fabricante.
13. Declaração de Conformidade da UE
A declaração de Conformidade da UE e o certicado acompanham a
embalagem de venda como um documento separado.
Consulte também as informações fornecidas abaixo do índice.
A Declaração de Conformidade da UE atual pode ser baixada na página de
produto especíco em www.ecom-ex.com.
14. Certicado de exame UE de tipo
A declaração de Certicado de exame UE de tipo acompanham a
embalagem de venda como um documento separado.
O certicado Ex atual pode ser baixado na página de produto especíco em
www. ecom-ex.com.
62
Page 63

63
Page 64

©
Copyright
2017 ecom instruments GmbH.
Der Inhalt dieses Dokuments darf ohne vorherige schriftliche Genehmigung durch
die ecom instruments GmbH in keiner Form, weder ganz noch teilweise vervielfältigt,
weitergegeben, verbreitet oder gespeichert werden.
Der Inhalt dieses Dokuments wird so präsentiert, wie er aktuell vorliegt. Die ecom
instruments GmbH übernimmt weder ausdrücklich noch stillschweigend irgendeine
Gewährleistung für die Richtigkeit oder Vollständigkeit des Inhalts dieses Dokuments,
einschließlich, aber nicht beschränkt auf die stillschweigende Garantie der
Markttauglichkeit und der Eignung für einen bestimmten Zweck, es sei denn,
anwendbare Gesetze oder Rechtsprechungen schreiben zwingend eine Haftung vor.
Die ecom instruments GmbH behält sich das Recht vor, jederzeit ohne vorherige
Ankündigung Änderungen an diesem Dokument vorzunehmen oder das Dokument
zurückzuziehen.
©
Copyright
2017 ecom instruments GmbH.
The contents of this document, either in part or in their entirety, may not be reproduced,
forwarded, distributed or saved in any way without ecom instruments GmbH prior written
consent.
The contents of this document are presented as they currently exist. ecom instruments
GmbH does not provide any express or tacit guarantee for the correctness or
completeness of the contents of this document, including, but not restricted to,
the tacit guarantee of market suitability or fitness for a specific purpose unless
applicable laws or court decisions make liability mandatory. ecom instruments GmbH
reserves the right to make changes to this document or to withdraw it any time without
prior notice.
PA000700 / 07/2017
900017AL01A02
WEEE-Reg.-Nr. DE 934 99306
Änderungen vorbehalten! Subject to change without notice.
ecom instruments GmbH | Industriestraße 2 | 9 7959 Assamstadt | Germany
Phone +49 62 94 42 24 0 | Fax +49 62 94 42 24 100
sales@ecom-ex.com | www.ecom-ex.com
64
 Loading...